Transcripts
1. Introduction: Hello everybody.
How have you been? You are welcome to this class. Here you will know the step-by-step process of
drawing the manga are and the mystyle on the TV
format is a term used in the context of enemy or manga to describe a
correctors line of drawing. Read the restyled
enhance a little bigger than the
size of the bodies. And usually done to get a funny are more
emotional with it. This class we will make the characters drawing
name it didn't. We will start by the
dance of helpline, where we will define
and his position. And Rachel, after we work in
the line art of the drawing, we will make a line
art using 19 bounce. Finally, we will band
the drawing polarise. The end of this class, you will be able to make a style of drawing
in the TV format. You will know the step-by-step, the radio to accomplish
the drawing things. It's first race to the line art. This sense of coloring
in colored pencils, teak or February to drawing
material inlets drop. See you in our drawing.
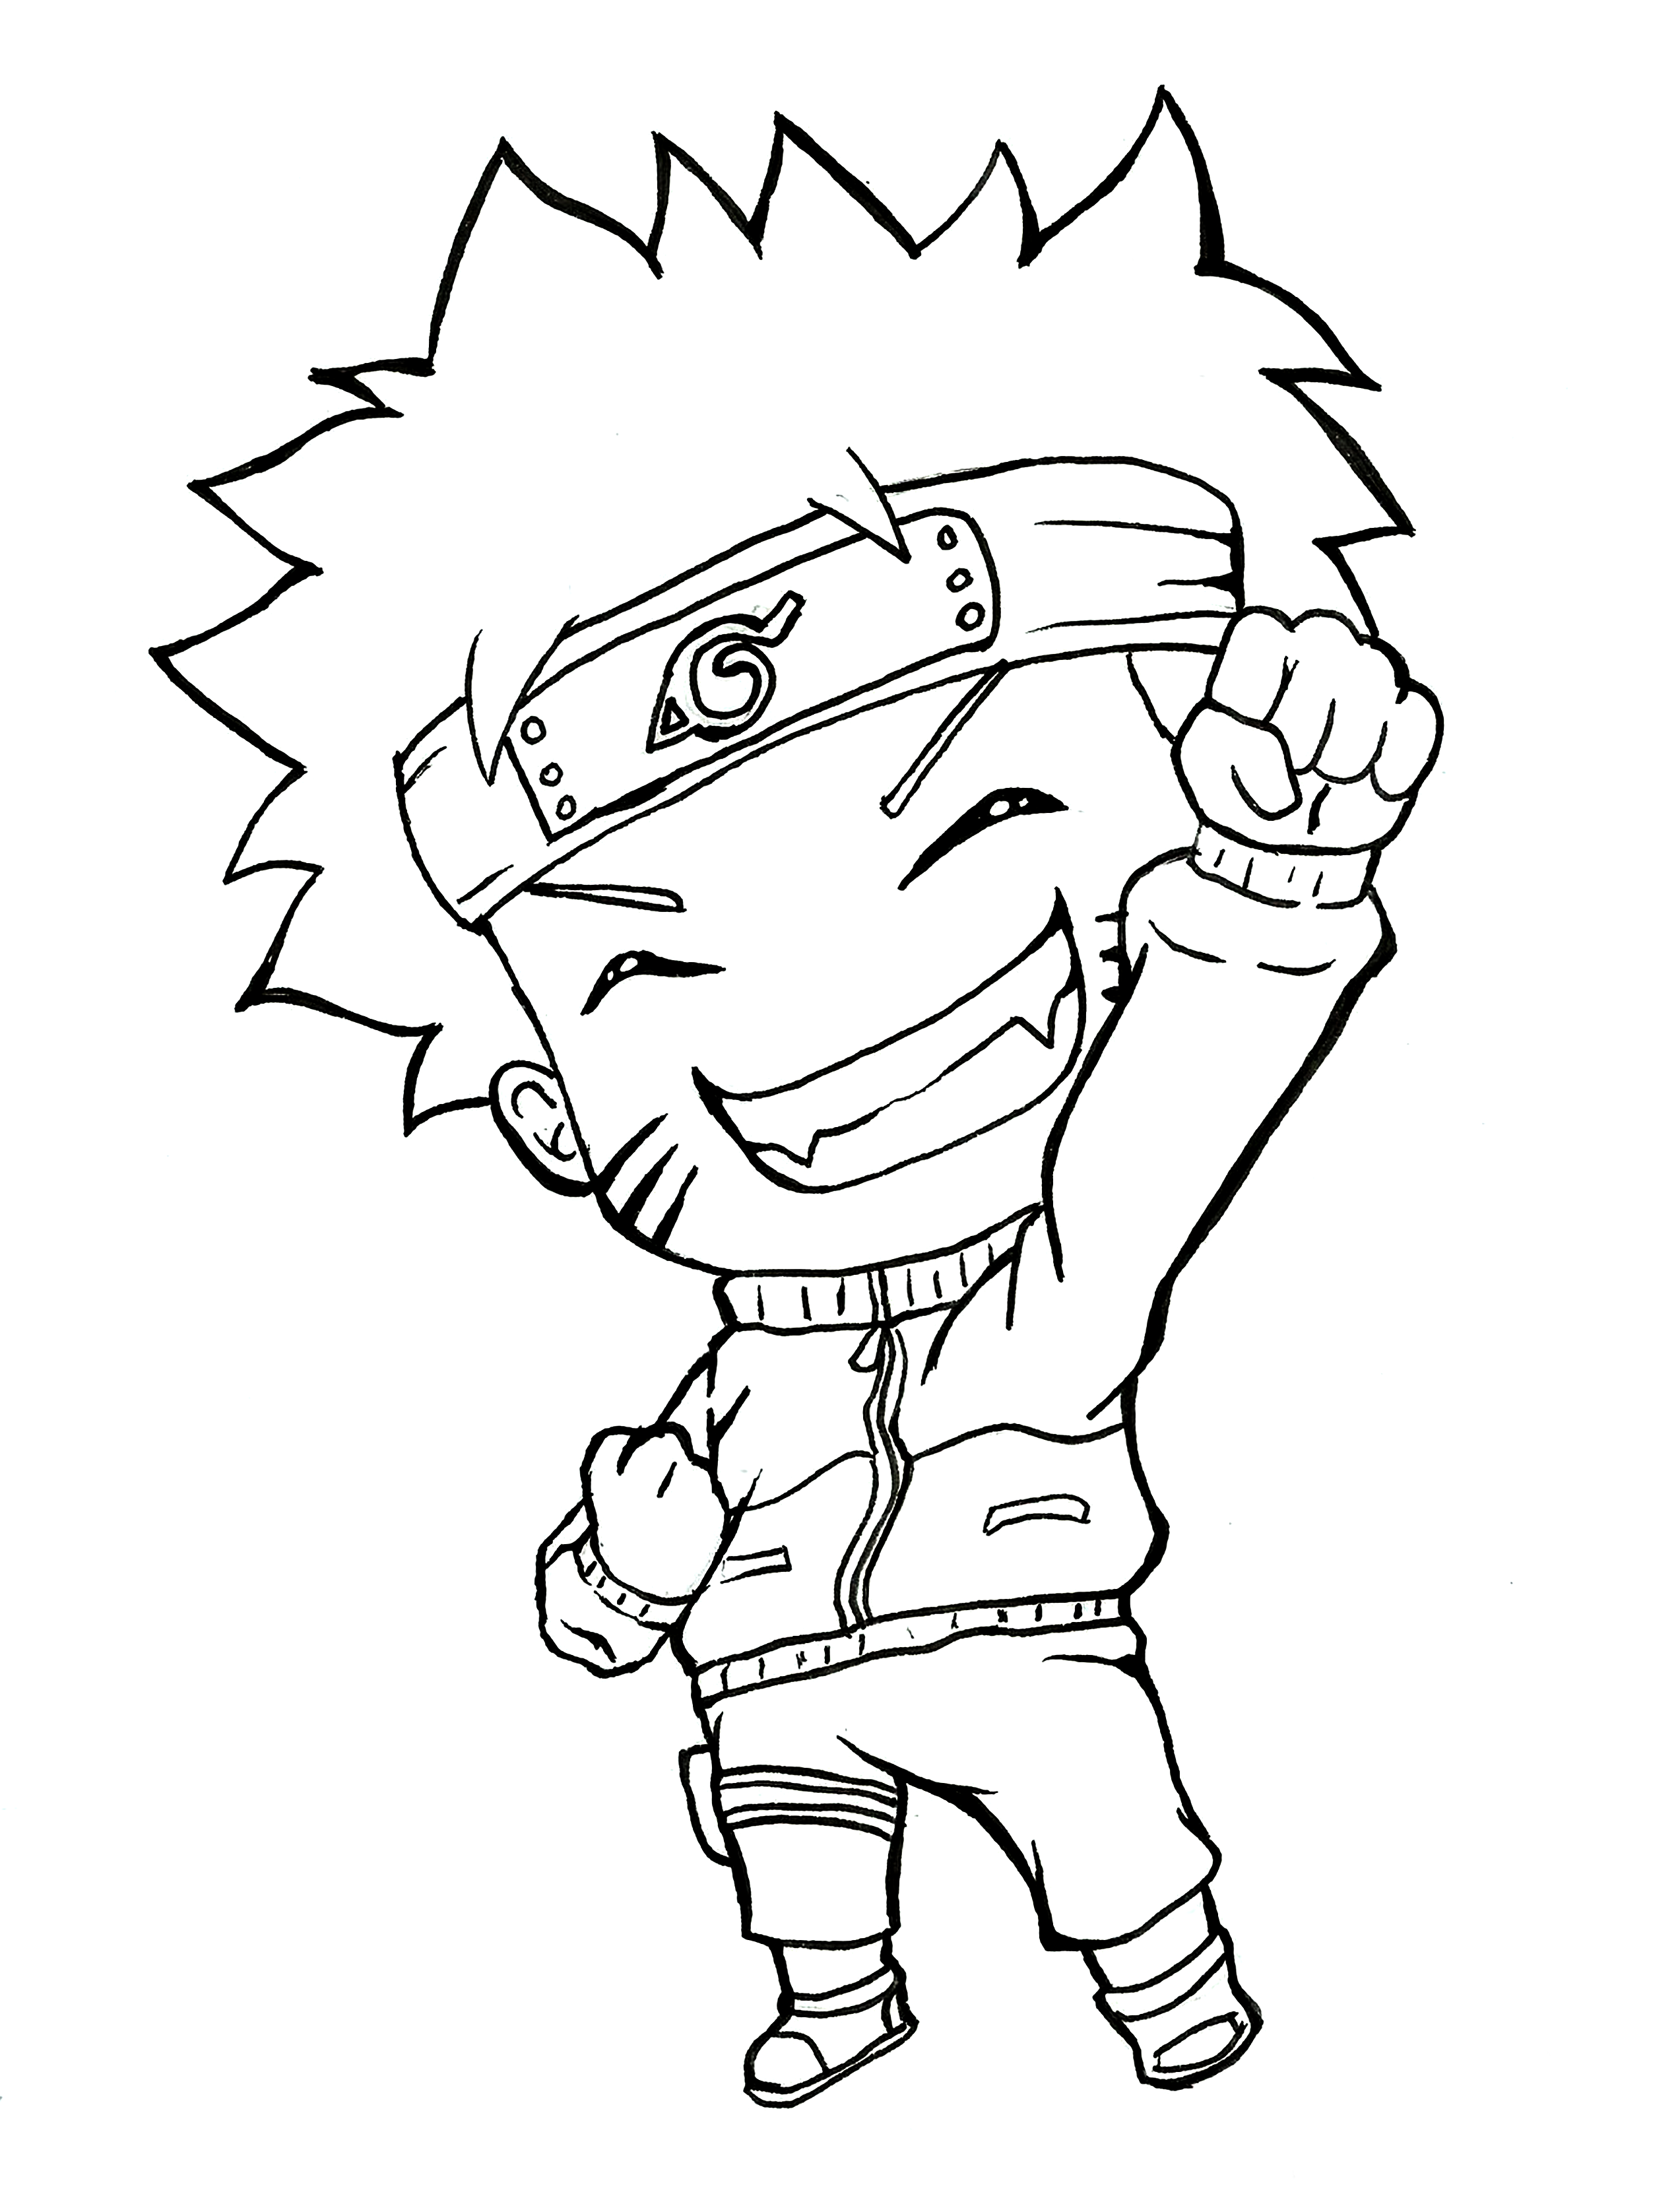
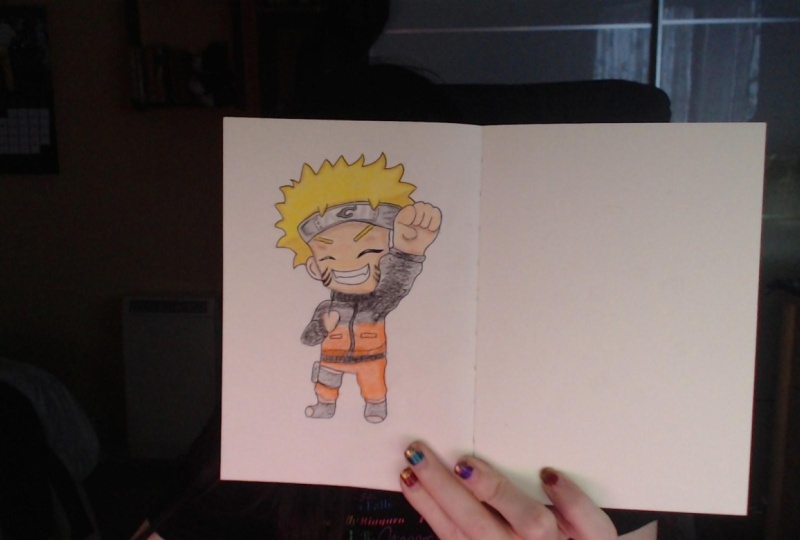
2. CHIBI or KAWAII: Hello guys, how's it going? My name is Israel. In this video, I'm
gonna show you guys some basic differences between a Chevy drawing and
a Hawaii drawing. I know that a lot
of people have some down some questions about the children in
the Hawaii Dragan and what it is achieved
drawing indeed, in what it is the
Hawaii drawing. But on this glass I'm
going to show you guys all about those two, these two charring types, okay? And we're gonna start
with a TV drama. But before that, I
would love if you guys, by the end of the class, just tell me down below about what it is your
favorite drawing is titled if it is a TB
or cutaway drawing. And also if you have
some character that you would like me to teach
you guys how to draw. That will be very happy. Very happy to do so because
I'm here to help you. Okay? So let's start with a TV
drama in this first example, as you can see, has a lot of details. We have details on the hair. We have shadows and light, and a really nice clothes and also are a
pretty upper issue. It is, it is a very
nice drawing to make the chip Drummond
and has a lot of details. But when we are talking
about a colorway trauma and we don't have
them many details. It is the same character, it is the same girl. And actually we are using basically the same
colors on both Germans. But we can see it is obvious. We do not have them in details. We don't have a lot of shadows, so we don't have a lot of lights that we have on
the cheap drawing, the hand, the cloth shoe. It is not very, very hard to make the
echo-y drawing because he doesn't have a
lot of details. Okay. And now I'm going
to show you guys the features of a
chubby trolling. The hair, the head. It is big. It is, it is actually big, but it is much more complex
than just a circle. It is not just a circle
because we have, it will have some details. For example, the
cheek, the cheeks. Okay. And the, the, the other the
other details of the head, of the face, the
shadows and light. It is very important. All these type of trauma
in the eye for example, you can see has a
really big light. And it is very important
to make that light. The hair also has
a lot of details. We have a lot of locks. The locks of hair are
very, very highlighted. The lines it is, it is very thin lines. The same rule applies
to the close. If it is thin lines, it is full of details, of full of texture, light and also shadows. You can see here on the
pants that we have. We have some shadows. The I, as I, as I said before, we have the light. Okay? So the CI be drawing, it is basically a
a regular drawing with a lot of details. Okay. But it is a mean trauma
and it is not big drawing. It is mainly drawing. And the D hand also the fingers. Usually we highlight
these details of the hand of the fingers. This is this Roman. We don't have a lot of
details on the handle cake, but usually we do. We add a lot of details to the fingers into the, the hint. And we also tried to make
a realistic drawing. We tried to make a relative
drawing with light, with shadow, with tails
are many drawing. Okay. But with all those, those features and this drawing that you can see on
the screen, we can see this. We can see all the textures
of the line to the shadows. Okay? But now we have another drawing. It is basically the same
drawing, the same character. But it is a college Roman. It is a colorways tail. And then we can see
a big difference. We don't have them in details. And although it is the same character
is the same drawing, we don't have them in details. The face, the head. It is just a circle. Okay. We don't have details of check. We don't have that many details. It is just a circle. The ice usually aren't
just black point, black dots, usually
just a black circle. We don't have a lot of
light on the Kawasaki. Kawasaki drawing hallways tail. But you can add, I like to add some light to
the eye of a college Robin. Okay, that's fine. But usually we don't do that. It is just a black circle, but it is not a rule. You know, you can feel free to do whatever you want
it as your own German. So you can do whatever you want. The hair, it is
very, very simple. It is very simple. We have just one color. We don't have shadows
and light in the hair. And the traces in
the lines thicker. You can see this, it is thicker. And this applies to the
entire image Robin. It is a really key drawing guys, it is a really cute drawing. Okay? And the cloth, if we don't
have a lot of texture, we don't have a lot of details. Okay? And it is just simple, simple lines and that's it. And the hands, it is
very simple hands, but give very, very simple
hands that we don't add details with all you
don't add the thumb. It is just actually we don't
add any fingers to the hand. Okay. Usually we don't use any any of those
details to the hand. Okay. The colors, it is, of course, beautiful colors. But it is not on the
rail is take your key. It is not a realistic callers. It is acute trauma and it is a drama without
light and shadows. It is just is just
what it is, okay? But it is a really nice style to a real-life
because y is tail. So guys, that's it. I hope you guys understood the
differences and that's it.
3. How to Draw Eyes Basic Eye Construction: Filler body. How's it going? Welcome. On this video lesson, I'm going to teach you
guys how to draw eyes. It is very important
to know how to draw eyes, because the eyes, we can see the
character, personality, we can understand the
persona of the character. Okay? So it is very important to understand how do you
RNAi and what is, what, what are the
basic structures. Okay. And I'm going to teach you guys, and we'll try to
teach you guys how to draw a beautiful i. Okay? So let's start by drawing
a horizontal line. Just like this. We can divined this
horizontal line in three parts and try to divide it with the
same size, okay? If you want to use
a roller, you can. But just trying to divide, divide the horizontal line in three parts with the same size. If you liked manga style, you might know that we have a higher part, this right here. And we have a lower
part on the tear duct. That's a very common way to draw a night with a higher
part and the lower part. Now Rural, for example, uses this kind of. So let's start by drawing
a curved line just here. Okay? Take care of it, a line
or this first part. And now we can draw
a straight line. That's it. And on this part right here, we can control a
curved line again. And of course, let's connect
both parts, both lanes. On the center. Let's draw the iris. It is a sermon circle, a real simple circle. Okay? Of course, let's draw the lashes and
the eyebrows down. We can add these details. And now we have a sketch. We have a sketch
of a simple eye. As you can see, if you make that horizontal
line and just divided in three parts in make much
easier to draw your eyes. And now you can just use a darker pencil and outline the parts that
you want to highlight. You can do this. Okay, That's highlight. Let's outline all of this
part right here of the eye. Okay. That's a male I okay. And of course we have
a lot of lashes on the female eye, but only male. We also have some details, we also have some lashes. And of course we
have to highlight this part to remember character. Character, you will
highlight the lashes, the upper eyelash, while the iris. They'll k. Now we
width with the sketch, do the online highlight the part that we
want to highlight. It is very, very, very easy. So do the sketch, okay, now let's run the propel. It doesn't matter the
color of the eye. Also the propel will
be black. Okay? Unless, of course your character
has a special feature. So in that case you will do
the poll build different. But usually we just use
a really dark blue pill. Of course, you
have to add light, shine to the I k, and you can add a bigger light. Of course, it depends
on the character, depends on the environment
that character is. The light. It is a very, it is a part
that depends a lot on. A lot of things can
indeed smaller than them. I'm going to add some color. My eye will be green. And I'm gonna just
painted on this part. I will make it darker, darker. Okay. You can do just like this
to make it darker up. And on the lower part, you can make it lighter. Just like this. Does be careful to not paint
the light and you shine. You don't want to do that. On both sides. We have two channels right here, so we have to be careful to
not paint either of them. Just add some more details
right here. And that's it. You guys here is our drawing. Okay? Very, very nice, very beautiful, very simple. And let's try with
another example. I'm going to use
the red pen tool to help you to visualize, to see what I'm actually doing. Let's make a rounder. I actually will use
the same principles. We'll use the same sketch. Let's make three
different divisions on the horizontal line with
the same size actually. Okay? Now, you can make a
curve or a line per year, k, just like this. And on the middle, SCC home doing lunges, highlighted this part here. Okay, so we have a
curved line right here. And on the other part, we can just make
your curve is a line to connect both parts. Very good guys. And of course, it is a different shape when
you see the first one. But now let's add the iris. It isn't really big. Iris pupil pill. And the shine, just
like the first one. So you will use the
same principles. Let's highlight the
lashes right here. Let's highlight it a lot. Okay. Very good. Just like these guys, that could be a female I with a really big lash with
written highlighted lashes. And look this details
that I'm doing right now. These eyelashes, some eyelashes
right here too. Okay. Okay. Now you can see the
lashes. The eyelashes. Of course. You have to be careful about
the size of the lashes. It is very important to make a thinner and thinner pointing. You know, the, the final
part must be thinner. We don't want to
make lashes to take. Okay, now the pill, and you can see that we
have the same shape. The pill in the eye, in the papilla has the same
shape, the oval shape. Now let's run the main chain. It is a real big
shine and the other down here, smaller. Okay. If you want to call her
insulin to paint your eye, you can do just
like the first one. Make it to darker up here. And our firm. Just make lighter. When you go down. It is a gradient guys. This gradient darken
on the upper part and lighter on the right
here on this other part. And that's it. Just, again, be careful
to not paint the shine. We don't want to
paint the Schein's. Okay, let's just do
it again right here. Paint a little more. Just on this upper part. Okay? In a can use
your creativity, okay? You can add the
details that you want. Mak a beautiful, I choose your favorite
characters and try to draw the eyes of your favorite characters because it will make much easier. Okay guys, that's it. That's some basic structures
of how to draw in. I, I really hope you guys
enjoy it and understood it. Okay. And that's it. See you on the
next video lesson.
4. How to Draw Eyes Side View: Hello everybody. How's it going? So on this video lesson, I'm going to teach you guys
how to draw eight Seinfeld I. And you will see
that we have some, some differences between a
Farmville I in a synovial I. Okay. So I'm going
to start drawing a, a front I gave from the light. So we're going to use
it as an example. Simple I. I'm gonna use a darker pencil to
outline this i. Then we're going to use
as an example, okay? And here is the
symbol I from Vil. So, well, we're seeing
a, a Farmville face. Well, we have
something like this. We have the eyes right here. We have nose, the mouth. I guess I'm going to, I'm going to add some
hair right here. This is a face in a front vowel. Okay? But when we're talking
about a Seinfeld, could just have one
part of the face. We see just 1.5 of the face. And that's applies also, of course, to the eye. And it means that we have
some different features, we have some
different structures when it comes to
drawing a side Ville. That's what we're
gonna do on this, on this video lesson. And of course, we're going
to see just 1.5 of the eye. Just as we solve, we have half of the faith. We're going to see
just 1.5 the eye. Okay? And we're going to have of
course different features, different structures,
and we're going to have a more triangular shape. As you can see. I'm doing right here. And I, of course you
have to understand, to realize to where you
want your eye looking at, to know if it is for the
parietal, for the laugh too. But anyway, we will have
a triangular shape. Really simple
triangle the shape. Okay? We have here the
propeller design, okay? And that's a sign Advil. I will have a triangular shape
as I told you guys before. And of course, you can have a bigger eye
or a smaller one. Either bands of the character and the drawing that
you want to make. It appends a lot of
very intentions. But in general, we will always
have a triangular shape. I'm going to do another
example right here. And basically that's it. Okay? I'm gonna make down here
a more realistic example. I'm going to, of course, he started making a sketch. I'm going to mark the defaced evasion
right here with a nose. The eye brown. Of course, the eyebrow will, will become a
little bit smaller. And we can make here
on this other part of the paper in another example with a different shape that we have the
outline of the nose and the forehead. Okay. So we have two different
examples of eyes. But we actually who's
basically the same principles. It is a triangular shape. Nike highlights with
a darker pencil. And when you have the shape, draw when they wouldn't
have the sketch, then you can use all
the other principles, all the other techniques
that you already know. Okay? You can add to propel, you can add the iris. You can highlight
with a darker pencil. Depot bill will be darker. And you can add to the light. You don't have to
add two shines. Well does exempt we can just add one to a bagel bigger one. Of course, it depends on the where the light
is coming from. Okay. That's it. I'm not going to focus on the, on the structure
of the face, okay? It is not the focus
of our class. But you can see that
I already added a shape to the nose and
now drawing a eyebrows, we can add the lashes. The eyelashes right here. Okay. That's it. It can just add in a play of the techniques that you already know that you already learned. Now let's do the same
thing with the other eye. On the left. Let's highlight this
branch right here. The iris. As you can see, the iris is kinda of smaller. You know, we made a beggar
iris on the first one. On the second one we are making, withdrawing a smaller iris. I'm going to add two
lights to shines. That's fine. It is my drawing. I can do whatever I
want in your drawing. You also can do
whatever you want. That's fine. Okay. It's very simple, guys. The side view I it is we
don't have a lot of secrets. You know, you don't have to
play a lot of techniques. That is simple. You just have to understand the basic
principles in there. You can look and do
an amazing drawing. And that seeds guys, that was our class. I really hope you guys
enjoyed and understood and rethink about how to draw
a side Ville I. Okay. And if you have any questions, you can you can ask me. Bye Bye, guys.
5. 3 X 4 Eye Drawing: Hello everybody. Let's continue our classes
about how to draw eyes. And on this last one
we're going to learn how to draw a three by four Ville. I I don't know how
you guys call it. Okay. But are you really call this
kind of a three by four? Okay. And I'm gonna teach
you guys about it on previous classes, we saw that when we
want to draw a front, I, Farmville, I will just
make a horizontal line in divided in three parts
with basically the same size. That's the technique that I
taught you guys how to do. But when it comes to the
three bike for Ville, I well, we don't do that. The first time that
you need to realize, decide that your eyes
are looking at, okay, if it is the left to the right. But anyway, let's just
make a sketch. Okay? And as you can see, I draw here two circles. Our eyes, but we
have one bigger than the all of them in. That's it. Okay. We need to make this when when it comes
to the three by form, I will have one bigger
than the other. We have one smaller
than the one bigger. Okay? I'm going to try to make here in example, a better example. So I hope it helped you
guys to understand, Let's make a horizontal line. Okay, Let's do our sketch. I'm going to make one
part smaller, okay, the middle part, I can divide
the distance that I want. Indeed, it is beggar because our eye is looking to the
left on this example. Okay? So I'm going to use a darker
pencil just to align, align the eye basically
guys is the same thing. Is that the same techniques that we saw in previous classes. We use a lot of the techniques that we use
it to their Farmville I. And you can use a line to
divide the middle of the eye. So you can have some kind of, some kind of outlook of
how the AI will become. Okay. Let's add
to the, the iris. I'm going to make the iris
right here in the pill. Black. Dislike the other examples. Okay. I'm gonna
make a female, I, and I'm going to add
a lot of eyelashes, big eyelashes right here too. Okay. So this I is basically denim. We already had
everything they needed. We needed to add the light, the pupil, the iris. So we can go to the other eye. You can see that we
have is smaller I it is kinda router. Okay? And it has this shape
now, it is rounder. We can outline and
highlight all this part. If you understand these
principles, you will, you will apply then to
every character that you, that you choose to
draw with a three by four Bill. Okay, style. Let's add the iris, the nose right here. We can add the tail, just like the other one. Let's highlight letter the iris, the shine of course. And you have to pay
attention to the shine. Because if they shine
is in one place, in one eye, you have to do the same thing with
the other eye. There. Look to the same size site. Now you can add the eyebrow. And it is important to the
eyebrow to follow the shape. Though the I dislike this. We have a baker
eyebrow on the beggar. I have is smaller. I'm wrong on the smaller I. Okay. And we have basically
the same the same size, the same size of the eye, it is the same size
of the eyebrow. Here we did this on both. Both ice. Of course. Of course that you can
add color to your eyes. And you need to
add a darker tone, darker hue on the upper part in down here can
make it lighter. If you want, you can
add more lights. We can add more
shine to move eyes. That's fine. I want focus a lot on the
painting because this class, we are, we are focusing on
the drawing and painting. Okay, but, but
we're going to talk about painting in the future. I'm just using one
color to paint the eye. You can, of course, choose the color that you
want to take your eye. And that set will have a
three by four Ville draw in. Okay? And these principles
applies to any kind of drawing that you want to
make with a three by four. Well, DM him gonna
do another example. I'm going to make a square
and divided in three parts. Inner make a smaller
part is more I, in a bigger eye. It will do it well-defined to where
your eyes are looking at. You may want a
smaller one beggar, and then you can choose
to wear your character. I'm looking at, for
example, this character, this character is looking
to the right part. Okay? And in That's it, You can make ofcourse
one bigger, one smaller. You can change the the
position, so that's fine. I'm doing this. I'm making a different shape of I in this example right here. Okay? It is important to be careful
when you are drawing. But if you make some
mistake, that's fine. You can just use
your eraser, okay? You can see that we
have kind of weird. And that's because,
that's because I use the eraser because of this. Because it's kinda weird. I'm going to try to
reposition the pill. So it is normal. It is normal. Sometimes you got to make some
mistakes and that's fine. Just use the eraser. We can just see what you
did wrong and change it. Now you can call or you
can paint your drawing. You want kind of darker on the upper part and
lighter on the lower part. Nose right here. And that's it. We have also the eyebrows
in this example. Those are the principles that, those are the techniques
that you need to understand that you need to know if you want to
draw with through, by fulfill a drawing. For example, look at this. If you want to
draw a face, okay, if you went to draw a head of
your character, of course. We also will adjust
the shape of the face, the shape of the head. That's fine. But we also will have a bigger eye
in his smaller I. That's the basic principle of a three by four Ville drawing. Because we have a part
that we can tomorrow. Half of the face. We can see more. Any part of that we don't we
don't can't see everything. We have a smaller t. And that's it. Of course, you have to pay
attention to the height, to the size, two, to the distance between one
eye in the other proportions. It is very important to pay
attention to the proportions. Okay. That's it, guys. That's it. If you have any questions, please feel free to ask me. I'm here to help you guys. Okay. That's it. Thank you very much. And I'll see you on
the next video lesson.
6. Mouth Design Basic Construction: Hello everybody and welcome. On this video lesson,
we're going to learn how to draw mouth. And it is very important to understand and to
learn how to draw mouth is because the mouth is a really big important
part when it comes to add facial expressions to a character, to your drawing. Okay, and before we start to
talk about how to publish, drove a car wise tile,
a mouth, Hawaii. I'm going to show you guys
how to make a basic sketch, a basic outline of a mouth. Okay, so I'm going to start with a horizontal line,
as you can see. And I'm going to divide it in three parts with the same size. And the middle
part, I'm going to divide it in the middle. So the upper lip, as you will see, we have kind of a shape.
You know what I mean? It is like in Nam. That's it. We have also to make
the metal line. The metal ion has
basically the same shape. The M shape and
the the lower lip. It is kind of a W
shape. That's it. That's a basic and simple
shape of our mouth. Of course, this is
a realistic mouth. And we can add a lot
of details to it. And that's it. So that's
the basic construction of a mouse realistic
mouth or pores. And this is our Farmville mouth. We don't have the inner
part of the mouth. We don't have here at the teeth in all the
other parts of the mouth. Inner part have just the
outside of the mouth. And that's kind of our
focus on this video lesson. She wanted to draw a
three by four mouth. You will make base because
it's the same thing. You will make a horizontal line divided in three parts and
they invited the middle part. However, we're going to
divide it again, right here. And again. It depends on where
your mouth is located, depends on how you want
how you want to make it. But we can make the
privilege just like this. It depends on the
angle of your faith. But we just make the upper lip just
like this within them, shape the middle line and
we do the same thing. Now, the lower part. As you can see, we have these smaller and
smaller site in a bigger size. That blue side is bigger
because the face, as you can see when it comes
to the three by four veil, we have this shape. We have one part of
the faith and half of the face that we have a bigger
eye and is more, I like. This same thing
applies to the mouth. Have one part that is
bigger than the other, because we have 1.5 of
the face that we can see more than the all the ages. The perspective, of course, it depends on the
angle of your face, the face of your character. Based close this. And there's middle line. It is very important
because you can make, you can draw the
chin and using this, this line and K. But let's, let's use it to draw a, another mouse with
this side Ville. Inside Ville mouth. Let's make sure all the
upper lip, the lower lip. And that's it. These
are the basic shapes, the basic parts of the mouth, how hot and dry
mouth. We have here. A Farmville example will
have a three by four volt. And then we have down here a side Ville drawing
the side of your mouth. These are the basic,
the basic structures. If you want to
make a open mouth, you can also draw it. And you will use basically
the same structures, the same sketch, the
same techniques. I'm going to try to draw
an example right here. So you can see, okay, it is important
to understand guys, those principles, those
techniques, okay. So keep the intention. That's gonna be a open mouth. I'm going to draw this
shape right here that I'm doing now. Okay? The open mouth, we have some
some inner parts, of course, the teeth and the teeth. The tongue, of course. So I'm going to add that first. The teeth, the upper part of
the lower part of the teeth. The term right here. And all the new
parts of the mouth. It is very important to
add those in importance. Okay, so I'm gonna use this blue pencil
just to highlight, to add some details so you can
better understand and see. I'm going to add those
details right here too. The TFs. We can
add these details. Of course there is
a lot of details. There's a lot of techniques
that you can apply. All the unimportance of
the teeth of the mouth, later parts of the mouth. But you can do just
like them doing. Of course, these are kind of
a more complex is Rawlins. It requires more techniques. The Hawaii drawing is very, very simple, simpler,
much simpler. We can just paint
that part right here. I'm using a blue pencil. That's fine. I'm just using a blueprints
and in reference to, to to make. So you can better see, you can better see
all the parts. But usually we just
use a black pencil. That's fine. The tongue. I'm going to paint
the term. Okay. Very good. Now let's add some details. Those little lines to add
some texture to the tongue. Now let's highlight
all this outline. We have more details
on the open mouth, then the close closes the mouth. But that's fine. And I made just female mouth is of course you can
make email mouth. And you can add less details. You don't have to
add them in details. But you can also add, use the same techniques. The horizontal line
dividing it in three parts. And in drawing the upper lip and the lower lip
doesn't like this. Okay guys, that was our lesson. There was a class, I really hope you guys
understood how to draw them. All of this. And the
next lesson we're going to learn how to
draw a wide mouth. Okay. Thank you
very much and bye.
7. Manga style Mouth Design: Hello guys, how's it going? Welcome. On this video lesson, we're going to learn how to
draw a Mondays tail mouse. Okay? We saw on our previous
lesson how to draw a irregular
really come on mouse. I'm going to draw
a Farmville mouse right here at a
really simple design, really common mouth, okay? And we have here the middle
part, the middle lane. And then we can
draw the upper lip. And as you might remember, we have a shape
on the upper lip. Now we can add, of
course, the lower lip. And that's it. Of course, we can add
some more lines here to add details to the mouth. But in general, it is a real
simple and come on mouse. However, we want
on this lesson to draw a manga mouth,
mangoes tail mouth. Okay? And it is very important to pay attention to
the middle line. So let's talk a
little bit about it. The metal line of the
mouth, it is really, really important because
they middle line will give us the expression of the
mouth of the character. So it is important
to pay attention to the middle line and the upper lip and the
metal in the middle. When it comes to
the mangas tell, well, it is not that important. The most fun part of
the manga is tau mouth. It is the middle line because it will give the expression of the character and the upper lip. The lower lip will be simpler. So how are we gonna do it? Let's draw here the
middle part of the mouth, the cages like this. And then we can make this line
right here and right here. And that's it. Very, very simple.
As you can see, the most important part
is the middle part. You can make it
simpler if you want. You can just make a
line just like this. Then doing down here. And then you can add a
shadow right here. Okay? That's it. Another, another very, very
common style is do like this. I'm going to use the
blue pencil to do it. You can just make a
curved line right here. You can see that we
have here two lines, but you do not connect thing. You'll add a space,
space between them. Just two lines. In that set. You can of course, add this detail down here, a kind of a shadow
and amaze in mind. Gas drawings usually use
those kind of Malthus, the middle parts of
the most foreign part in the upper left
and the lower lip. Well, it is important
but we just use, use simpler lines
in the middle line. It is indeed the most fun part. If you want to make eNobe mouse. Let's do an example right here. Okay, let's draw this
upper part right here. And then lower leg,
just like this. Okay. When you make an open mouth, you need to understand that
the lips will be thinner because you are
stretching the legs. So they will be thinner. There won't be that thick. Who have a same poll mouse to draw when we have the teeth
and who have the tongue? Okay. This line that
I'm drawing in blue, it is what would be the
middle, the middle lane. And that's the most important
part to this middle line, of course will, will give the expression to the character, even women when it
comes to an open mouth. So I'm going to try
to do an example right here so you can visualize. Okay, The term, we
also draw the teeth. And here we have a
manga style drawing. Basically it is the same
characters, the same techniques. Actually the same techniques
that we use it to draw a more realistic drama in. Let's take mouth. It is very, it is actually
almost the same techniques. If you want to make it
three by four Ville mouth, you can do just like this. We can add some
details in the n-side. Okay? We can divide right here. And then we can add to
the teeth, the tongue. I'm going to paint
a little bit here. Add some shadows. Highlight all the n. Here we have a three by four
veil mouse in a open miles. In open mouse. Well, what about the
this side Ville mouth? I'm going to make an
example right here. So you can visualize. I'm going to draw
the lips right here. And we have that part
right there that connect the both
lips, the two lips. Then you can add more
details to the length is going to paint a little bit. And that's it. That's it. Okay. But when it
comes to Manga, it is basically the same shape. Okay? The shape will
be basically the same. But we're going to do like this. I'm doing the chin right there. Okay. So that's it. We don't have to add a lot of details to the upper
lip and the lower layer. We just need to make those
simple lines and that's it. If you want to make
a mouse is myelin. I'm going to make an example
of those myelin mouth. You just have to use the middle line to give the
expression that you want. As I told you guys,
the middle lane, it is indeed the
most boring part of the mouth when it comes
to main guys tail. So I've just make its
myelin and that's it. Very simple lines,
very thin lines. And that's it. The next lesson we're going
to see more examples. And I'm sure that you
will understand it. We'll learn more and you will
become an amazing designer. Okay guys, Thank you.
8. Mouth Design for Chibi Characters: Hello guys, how's it going? Welcome soap. On this video lesson, we're going to focus on
how to draw HEB mouth. Achieve these tile mouth. And actually it is
kind of simple. We're going to use simple lines. And I'm going to start
with those two lines. That's a Smiley mouth. To make his Smiley mouth, you just have to make curved
lines pointing. Nope. Just like this. It is a Smiley mouth with
curved lines pointing up. But if you want to
make a sad character, we just have to make,
again covered lines. But Boynton down, dislike this. Said mouth here too. If you want to make it angry mouth of a
character that is angry, you also will make a
Kevin Lane pointing down. If you want to show a happiness, to show their
criteria is myelin. And to make like this
a very simple hump. And even when you want
to draw a open mouth, you also will do this. It will make Kevin
lines pointing up. Or if you want to make key
open mouth of a sad character, it will make the lines pointing down into consent that I'm doing this like this on these two examples that
I'm drawing right here. Of course, you can
add to the teeth and the tongue is important to it. And these details. If your character is angry
in a negative expression, you will make Kevin
lines pointing down. It went to draw a three
by four Ville mouth. It just need to divide
it in the middle. And mates cleat do
the same thing. Just draw the shape. Then you can divide
in the middle. You add to the teeth. And of course the tongue. Pay attention to the site that you want to
draw the tongue. Okay? The teeth, the
this part right here. And then you can just
color like this. And that's a three by four. We'll mouth with a GPS tile. K. Of course, you can use a lot
of different types of mouth. There's a lot of
different designs. You have a smaller mouth
is and bigger mouth. And that's fine. You can just choose whatever
style do you want to, whatever design
you want to try to character and use these
techniques to draw. But when it comes
to a cheeky smile, you need to understand that the curved lines need
to be up or down. If you want to make it smile as Smiley mouth or a sad character. Okay, why don't we draw a entire character interface
with a nine nose and mouth. You will see that it makes
a lot of difference. These details that I'm talking, I'm telling you guys, okay? I'm going to draw another
example right here. Beggar example. Okay? So as you can see
the mouse right here, it is really close to the chin. Actually the close, actually the mouth and the chin
touching each other. And that's it. You can see that the mouth
on this case is very big. And we don't we don't pay attention to the proportion
on this case right here. Because it is a cheap
is titled mouth, it is achieved be trawling and so we don't have
to care about it. Another example,
another big example. But this time I'm going to
make this design of mouth, as you can see, the mouse, a touch of the chin, and that's it. That's okay. Teeth. Okay. We can color this part. And let's say it
guys, That's it. Okay, Very, very simple
shapes are simple lines. Of course there's a lot of different shapes and
designs of mouth. If however, you can
choose the beta for, you can choose what you want
to use in your character in, and just use this technique that I'm telling you guys
in this role, okay? That's it. Of course you can
add more details. You can add. Any way. You can add more details to
your drawing every time. But the techniques is just this. And you can make your
drawings is length is okay. I really hope you guys
saw how you can do it. I really hope you
guys had these two. And let's see you on
the next video lesson.
9. How to Draw Chibi Nose: Hello guys, welcome. In this video lesson, I'm going to teach you
guys how to draw noses. And of course there's
a lot of types, a lot of designs of noses. Are we going to
focus on two types? We're going to focus on a
realistic knows in them we can learn about cheese
tile notes, okay? That's what we're going to do. The first thing that
you guys need to understand is that the nose, the nose is a part
of the face that kind kind of exceed face. You know what I mean? I'm going to try to to explain better what I mean with HCI, the face. Anyway, that lateral is fair
with the realistic drawing. A nose. We can make a simple sketch with
just a horizontal line. We can divide it in three parts. In the change row, three
simple circles just like this. Then we can add two
vertical lines, three simple circles
and two vertical lines. And although this is
just a simple sketch, you can already see
the nose shape. Okay, it is just a sketch. I repeat. But you can
already see the nose shape. Well, guys, we don't want, we don't add a lot of
details to the nose. Of course, we can add shadow, we can add some little
details, but we, we don't have a
lot of things that we must add to the nodes. However, the nostrils are part that we rarely
need to plantation. Nostrils are they most
form part of the nose? I'm doing this right here. Just curving lines. In one side. Obvious, on the other
side, two lines. Let's really high. Light. Didn't nose won't change
the face expression. The eye, the mouth. You will change the
face expression, but then those won't. Now I'm going to
show you right here. For example, I'm drawing
a character in the nose. I just made like this. However, if I make a sad
character dislike that. The nose it is the same, knows it's the same. I didn't change
anything about the nose because the nose won't
change the face expressions. And that's fine. I'm gonna
just add some details. I'm going to highlight
the sides of the nose. Then let's go up. You can, of course, use the eraser to erase the parts that you
don't want them to maintain on your own. Drawing. This is a realistic
drawing of a nose. Of course, that's not
a focus, of course, is not about realistic drawings, but a relief, a real fell today, it will be very important to you guys to learn to
understand how to draw realistic knows
because techniques and the principles that we
used to draw that knows, we're going to use to
draw a lot of them. Are that its title is or what? A tight other types of noses. Okay. I'm adding some
shadow right here. Some more details. This part right
here over the nose. And that's it. If you think that it is
simple to you to try, this kind of knows. I'm sure that you
will feel the same about drawing a manga. Knows that she knows. Okay. This part right here of the
nose is kind of a rounder. It is centered color. And the sides. And the nostrils that
are very highlighted. And that's what we want. So let's talk now about a manga. Main guy knows and achieving
nos, That's all focus. So let's do it in a
depends on the character. Of course it will
change the nose, you will change the shape. However, in general, we use just a simple nose
with just two lines. He has like a triangular shape. It is polite, K, L, you know. Anyways, we have that
triangular shape. Some designers will just
make small dot in it, Make a, of course,
a triangular shape. All their little jets make
a little dot and that's it. Others will make it like this. Okay, so we have this other example with a
curved line, with a circle. It is a rounder. And then the nostrils with
two simple and easy lines. Some characters likes
to add some shadows. You do like this. Just like days. Okay? It, all those examples, almost all of them has
a triangular shape. We just have one example that we don't have
a triangular shape. Twin sample is actually you have also that dot right there. But we have also this other example that
I did right there. Okay? So all of those noses, our noses, uh, FarmVille nodes, as we know, it is
very easy to draw, it is very easy to make. But let's now talk about
a side Ville nose. And we have that we will use the same
techniques of course, but we need to remember that we are seeing just
one part of the nose. It is just 1.5 of the nodes. So if this is a synovial knows, we have to remember about it to draw them as
best as we can. Okay? We have again
a triangular shape. We can draw the nostrils. Nostril is just right there. In that sense. It is assigned
Valle knows it has a triangular shape
and as you can see, the nose exceed the face. Just as I told you guys before. Once again, it knows exceeds the face. Okay. And that's it. It didn't knows. Well, we'll have we have a lot of different types and a lot of different
designs of noses. As you can see, we can make more
rounder nose as we can make a nose with a
triangular shape. If you, if you want to make it three by four, Valle knows. I'm going to show you
guys how to do so. I'm, I'm drawing
a simple sketch, this to show you
guys how to do it. I'm going to draw
the eyes right here. As you know, we
have a beggar I in a smaller ion in the nose. It will be just like
this triangular, okay? But it is not that straight. The previous examples were
more illustrator and use it. It's traded lines by the
three by four Ville. We don't have those
types of lines. I'm going to make another
example right here. Again, this character
is looking left. But this other example
is located right. And of course the
nose will change. The position of the
nodes will change. And always the nose will
exceed to the face. We are making the nose that way. Okay. So that's it,
guys. That's it. That's the noses that
I would like to teach you guys haven't drawn
into really hope you guys, you guys get how to get to understand how to
draw the nodes, okay? And if you have any questions, feel free to contact me. Okay. Thank you and bye.
10. Introduction to Hair Design: Hello guys, how's it going? So in this video lesson, we're going to have an
introduction about hedge Rowan. And I always like to make this introduction
because the hair, it is a really big
important part of any character. With the hair. We can understand the
personality of the character. We can understand the
persona of the character. So we need to understand
the basic principles in the basic structures
of any hair, of the hair of our character. Okay, so let's start our
introduction lesson. Let's start right here. Just, just throw in something
simple locks of hair. I'm going to draw a straight
hair in a wave here. As you can see, we have a really, really big important
principle when it comes to the lots of hair that
we have a faker part, the upper part is always thicker and we have
a phenyl part. Hello, We're part, it is much thinner and it will never cross the lots of
hair like this. We shouldn't do that. Never. When we want to cross
the locks of hair, we must do like this. We must make their
way just like this. Okay. We shouldn't never cross
the hair. Just like that. We need to do just like this. Hot I'm doing right here. As you can see, we
have a thicker part. We will have a thin part. That's kind of road. And we need to highlight
all the online or the logs. If it is a black hair, if it is a darker hair, you can just paint some shine to the lock of hair. Just like this. And when you add the light, shine to the hair, need to do just like this. Key. In do you have always
to follow the code, turn the outline
of the trauma and if it is a lighter
lighter lock of hair, you don't you don't have to
paint everything which has have to do some
details like this, some thin lines. Right here. I'm going to do the same. If it is a darker hair, you can just paint it all. But if it is a lighter hair, you can just add some details, some thin lines. Okay. That's it. That's it. If you have some lots
of hair pointing up, you can do basically
the same thing. You should want to
add some lights, some shine to the lock of hair. You can do just like this. And then you have some kind
of gradient, the drawing. Okay? We can do the same thing here. If you have a blunt the
hair, lighter hair, you just had some some lines, some details like this. Okay. Guys, it is just say, a introduction about
how to draw hair. And of course, there's a lot of different
types over here. And we're going to see in the next lessons about it. Okay? So see you in the next lesson. Thank you very much guys. It is very nice to teach
you guys about it. Okay. See you in the next lesson. Bye.
11. Male Hair Design: Hello guys, how's it going? Welcome. In this video lesson, I'm going to teach
you guys how to draw some types of male hair. And of course, it is not a rule. You can use a mail her
in a female character. That's fine. That's just okay. But I'm going to show
you guys some designs, some types over here that we usually use in male characters. The first thing that I'm
going to do right here, it is a simplest one, much of a face. And I advice you to do the same thing that
I'm doing right here. Do a sketch just like that. It'll help you. In now, we can add to the hair
in our character. Of course, that you need to know what type of
error you want to make. If it is full of lots, if it is, he has just fill logs. You need to know what
type of hair you will add your character. This character right here. I will make a hair or long hair. Not that long, but
i'm, I'm gonna, I'm gonna draw a
darker hair too. I'm going to just
use the arrays right here because I think that you guys are not
seeing the outline. So I'm going to use
the red thread pencils and I feel that you
guys will see better. Detroit. Okay, the first thing
you need to know, it is the line between
the forehead and scalp. This line right here. You need to define it. And from it you can draw all the logs that you want
to draw your character. This line between the
forehead and scalp. It is really, really important. I'm going to draw
some logs right here. Some big lots of hair in a
width triangular shapes. Okay. That's a darker hair. I went to black hair. And so I will I will just paint. I'm going to leave some shines. If you don't want to add some light to your
hair, that's fine. You can just paint everything. But I want to add some
light, some shine. And that's that's why I'm making I'm not painting
the entire lock. Right here. You can see that I didn't divide the hair of the
character in the middle. I divided right there. That's the point where I
will make all the other lux. Now we already have the
length of the hair. You already have the main lux. So I just, I just need
now to paint here. And of course I'm going to
add some shine right here. That's the most part in China. Here. We have a
division right there. And it is important to pay
attention to the division and see and how, how to make the lines, how to paint. Okay. Just like how I'm doing here. Just like this. Don't cane in, That's it. That's our first
example of here. A very nice, simple
and beautiful hair. Now I'm going to draw
another example. Let's start with
the simple sketch, just like the first one. I'm going to make this
arrow pointing up. I'm going just to outline the
year right here. In them. I divide the line
between the forehead. It is called okay. I did file it in the Hankin, add the logs pointing up. Just like this. Of course, we don't
have any role that you must follow to draw this
kind of hair right here. But you can make
just like I'm doing. If you make some
mistake, that's fine. Just use your eraser. I'm going to add some details in this line between the
forehead and scalp. I also want a darker hair. So I will just paint
in that some shine. And of course that you
can add the shining guys. But if you don't want
to add the text file, you can add to the
design just in the logs. You can add light just
in the middle part. Depends on the character. It depends also on
the environment. They are character
are, you know. Okay. So now we have
a second example. Also dark just like
the first one. And we have some lux pointing up here in
this second example. Now let's make a third example. The sketch, of course. Okay. As you can see, I add a neck detail in
the second example. It is a really thick neck. And it didn't neck. Actually the term body
of the character, the hair of the character. Everything is connected and everything must have
some kind of harmony. So the third example, I already did, the sketch. Now I can add the
details of the hair. The first step is
always to define the line between the
forehead and scalp. I don't want it to divide
his hair in the middle. I want to divide it right here with this vertical line
that I'm drawing right here. Let's start with
some locks down. I'm going to make some
logs bigger than others, some thicker than
others to. That's fine. We want to make a
really adverse hair with different locks. In here, where I
divide the hair. I can just choose the height
that I want my hair to be and then go and divide
with those two logs. Okay. I'll want my hair, the hair of my
character to go down. I'm gonna do this
just like this, connecting one
part to the other. And I do this in one tied
in on the other side too. Okay. I can you can add more
locks right here. Pointing down. Also pointing down. Just highlight some
more right here. On the other side, you can
do just like the same thing. We can make some some
logs that way it going down and down until you
connect one part to the other. Okay. That's it guys. Another example. That's it. Very nice styles,
very nice hairstyles. And I'm sure that
you guys enjoyed these three examples that I
show it to you guys. Okay? And that's it. We're going to see
some other examples in our next lesson. We're going to see how to draw female hair in the next class. And I'm sure guys, that you will like to oh, okay. Thank you very much. In bite.
12. Female Hair Design Part 1: What's up, guys, Welcome. In this video lesson, we're going to learn how
to draw a feed mill here. And of course, we don't have
any kind of role there. You can't use a female
hair in a male character. Feel free to do
whatever you want. But I'm going to show
you guys how to, how to draw some hair, some hairstyles that we usually
use in female characters. Let's start with
a simple sketch. Right here. Just assemble sketch, just like we did in
the previous lesson. I'm going to add the
eyes just right here. The mouth right here too. Is myelin mouth. The eyes. It is not the focus
of our lesson today to draw these
parts of the face, but, um, but I'm going to add just to make a drawing better. Okay. People pill the iris. I also added some light
right there in the eye. We have here our sketch or face. And we're going to use this
catch to add our hair, the hair over our character. The first thing that
I advise you to do is to divide the line between the forehead in the scalp and I did
it right there. Now we can add the
logs that we want. I'm going to draw a real
basic hair, this example. Okay? And we're going to
divide right here. Just like this. And you need to understand guys, that we cannot draw here. We need to to let some
kind of space between the discount pole in the logs. Indeed, you will see
how I'm gonna do this. What kind of hair you want to make you
only straight hair, you want to wavy hair. You want a longer
or shorter hair. You need to decide it. Of course, I'm going to
add a log right here. It's molar log just beside it. But here I'm going to
change the direction. I'm going to make it real
big luck going down the k. That's the female character. The neck right here. I'm going to add some
more detail just to make the drawing nicer. So the lucks, Let's
add some logs. Right here. Just like this. It is not a long hair. It is a really regular income. And then actually
simple to draw. This part right here. Now, as you can see, we use a lot of curves. It is curving lines,
also curving lines. In this example, of course. Now, what I told you
guys about the distance between the scalp
and the luck deluxe. It is this part here that
I'm doing right now. We need to let its space. Okay? I'm going to draw a log
of hair just right there. In, uh, we'll go down. We'll mark the line right
there and then can connect one part to the other. Okay? Now we can do the same
thing with the other side. It depends a lot on the style that you want to use
on the length of the hair. Okay? But this example, it is basically concluded. This basically finish it. I'll just highlight the
outline of this here. As you can see, the logs or not all of them
in the same direction. I change the directions
of the logs. That's very important. In deluxe, earn doesn't have
the same, the same size. We have some bigger
than, than others. And that's fine. That's why we weren't actually. We want to natural drama and
we want a beautiful drawing. So it is important to
pay attention to this. I'm just aligning
again right here. You can, you can paint if you
weren't, those parts here. And paste it. Click guys. This basically is this. You could add some shine
right here on the top. If you want. I, I really like to add
light in the drop-in. I think it becomes a
matter. And that's it. Our first example of hair
or female hair. Indeed. In today's lesson, we're
going to see more examples. Thank you guys.
13. Head Design and Chibi Body Proportion: Well guys, we already
talked about how to draw some parts of the face, like the mouth, the nose, and also the ice. But in this video, we're gonna talk about how to
draw the head in the body. We're going to talk
about proportions. Okay? So let's start by drawing
four simple circles. Just like this. We have a head and
a body in one side. And on the other side we have
one head in one body. Okay? And as you can see, the same size of one circle, we have the same size
in the other circle. But in the second
cart character, I draw some lines down there because I'm going
to add some legs. Okay. We have one circle to the head. And the same size of this circle we're going to add
to the circle of the body. It is the same size. Of course, if you want to
draw a taller character, we just have to add
a bigger circle. Okay? You won't be the same
character, okay, We're going to intro to
different characters. But I'm sure that
you guys will enjoy. You will understand
what I'm want to we'll teach you guys. Let's turn now to, let's keep now
drawing the sketch. So I'm going to
draw a square and divided in the middle,
just like this. And I'm going to now highlight this part right here of the outline of the
chin of the character. This takes are important
guys because we knew, we knew draw a sketch. Well, it is really
good to draw a sketch, becomes easier to
draw your character. So let's divide again
with a horizontal line. And then let's do it
again right here. Okay? Then we have our sketch. We can now add the parts
of the face like the ice. Let's add some ice. I want to add a big eye. Okay. You can choose what type of
IE1 to add to your character. O King. Very nice guys, Very nice.
14. Face Drawing Front View: So if you want to draw a
character is Molly character. Let's do this right here. I'm going to start
with the big square. I'm going to now
divide the middle, just like this, and then divide it again with
the horizontal line. Well, you don't have to
use this kind of square, this kinda sketch
every single time. I'm just using it to make it, make it easier for you guys. Okay? But you can just shoot the
square with a very cool line, with a horizontal line. And now you can divide
it again right here. To add the parts of the face. We're going to add
the eyes between those two horizontal lines. And you can add a big
AI is model work. You can choose about it. Okay? The hair will start right here. This horizontal line that
I'm adding now will be the D line between the
forehead and scalp. Now we can add all the
parts of the face. I'm going to start with a big, I want, I'm big on this example. So I'm gonna just
defined right here. He uses catch some
lines, guidelines, okay? And it is important to
choose the angle of the eye. So you can start by adding
the lashes right here. Just like this. Okay? And then can devise
in the middle. That's going to become
the angle of your eyes. Okay. Let's highlight this
part right here. You can add the shadow, the eyebrow, the eyebrows
from both sides. The second part, the
bottom part right here. In that the reverse
pill of course, people Bill, as you can see, it is just the dark circle. I added also some
light to the eye. I'm going to do the same
thing with this second eye. It is important to pay
attention to the height. We want both eyes
with the same size. The iris, the book bill, and then the light
in the eye with a big light in that set. Right here in the middle, I'm going to draw
with the mouse. You can add the mouse right
here if you want to keep, because we don't have a
nose in this example. So we can add to the
mouth right here. The ears In both sides. To simple years. It is important
to make the same, to use the same height to both, to both ears, the chin, and the cheeks or so. And that's it. We have our character, and we have all the
main parts of the face. We have the eyes, the mouth, the eyebrows. And that's the
structure of the face. I'm going to add
something detail breaking into foreheads. We can add the detail
that you want. Now the hair. So guys, that's it. That's the basic
structure of a character. It should be character, just like the first
one that we did. This third example. We use the same techniques, it is the same structures. Now we're gonna do another
example right here. Let's start with
a, a big square. As you can see, it is
a different one from the previous square
that we made, but we cannot divide.
It's in the middle. Just like all the
other examples, we got into a fight
with a horizontal line, just like all the others WE did in another horizontal
line, just here. Okay? And now we can add all
the details that we want. Let's do the same thing
here with the eyes. Let's add all the
parts of the eye. I don't want to add large eyes. Okay, so I'm gonna, I'm gonna do smaller ones. Tool I use a guideline
to help me with the height, width, the height. Then I can draw the
outline of the eye, the iris in both eyes. And then the propel. Delight. Well, right
here in the middle, I'm going to draw a nose. It simple nodes. Right here. The mouth is simple mouth to your eyebrows. The eyebrow. I advice you to use
this same size of the, the the, I can use those three points
that I'm doing right here. Then can just connect
those three points. And then you can
have a nicer Brown. And as you can see, we have basically the
same size of the eyes. That is the same size. Now we have the main
parts of the face. We're going to add
just some ears. You can draw a simpler year, or you can do a year with
alarm details, you can choose. I'm going to add some
detail here too. Okay. You can, you can see that we
are using a more realistic, we are using realistic lines. In this example. We are right now. The here. And that's it. We have this other
example right here. With all the main
parts of the face. We use the proportion, we use the sketch that we
are using in all examples. Okay? But it is, it, is it easy guys? You just have to
understand the techniques. We just have to
understand how to use the main parts of the
face, the sketch. That was our lesson. We saw how to draw
the body, the head. We saw how to draw
the proportions if we want to make a taller character or if you want to
make a smaller one, we can choose the size
of our character. And as you can see, we use in those 2
first examples, we use circles to draw the
head and also the body. And it helps us a lot to
draw with a nice proportion. Okay. I hope you guys understood. That's it. Thank you, guys. Thank you very much.
15. 3x4 View Face Design Part 1: Hello guys, how's it going? Welcome. In this video lesson, we're going to
learn how to draw a three by four Ville face. I'm going to show you guys the main techniques and how to do this in the
best way possible. Okay? You can see that we have
some differences when it comes to the
three by four face. Let's start with a sketch with a simple circle with all those guidelines
that we have here. To add. The eyes, the mouth, the outline of the face. And let's add all of these. That's a from Ville
Farmville face though we solved the
previous lessons. The nose, it is a
really simple face. Okay, That's a firm will face. I'm just drawing it. So you guys can remember. Of course you can add the hair. But it can be as simple hair. The neck, a very, very simple hair,
and a simple face. With cheap characters you
can add the UE knows, but if you don't want to
add the nose, that's fine. That's okay. That's a face, that's
a front we'll face. Okay? And we can also
draw right here. A side will face. Inside will face. It is kind of easy to, I'm going to enter our array
here so you guys can see, let's add the nose
that exceeds the face. As you can see. You can choose what kind
of knows you want to add. It depends on the character, character that you are drawing. The eyes with a
triangular shape. The years in the hair. Mouse. That's the side. That's the site will face. Of course, it depends. The details depends a lot on the character that
you want to draw. But in general, it
is just like this. Okay, in general, That's
decide to build character. The neck. And that's it. We have
two different angles. I'll face, we have a firm will face in a side Ville phase. But now we're going to talk
about a three by four phase. Let's start with
a simple circle. Okay? Now you have to find
it in the middle. You want to, the first thing
that you need to decide is to where you want your
character looking at. I want my character
to look left. So I'm going to add
the middle line, the vertical line,
just like this. Okay? This middle line
actually depends on the angle that you want your
character to be looking at. The cape. If your character
is looking left, you're going to add
the line right here. Okay? And you can,
you can make a very, very darn it face your middle
line, we'll define it. So it is very important. This middle line,
this vertical line. Let's, let's do know. A big circle. I added the middle line. I can add this line right
here with curved lines. That's our chin. Okay. And the cheeks. We also have
the checks right there. You can add the ears
just like this. Okay guys. You had the jaw line
to digital line. You can make it straight
illustrator line. Of course it depends
on the character. But I'm just giving you guys the main guidelines domain of the main principles
and techniques. So you can make it
a nice drawing. Now let's divide with
a horizontal line. We need to add the ice. So I'm going to do fine
with two horizontal lines. Now I have the places that
I'm going to add the eyes. Let's start with the lashes. I'm gonna give a Bigger space between
one eye in another. It is important to
have a bigger space. And I'm going to add a big eye. It's a simple eyes. You guys already know
how to do it. Okay. And that's it. As you can see, we have one
eye bigger than the older. The mouth and the nose. It is really important for
you guys to understand the main techniques and
the main principles, okay? Because we have infinity of characters in all
of those, those, those shapes will
change depending on the character
who have a lot of different types of eyes, a lot of different types
of mouths and noses. So it will depend
on the character. I'm going to outline all those main parts right
here with my blue pencil. Okay. I've already simple face, but with all the
parts that we need, you can add just now the hair. Going to add the hair
with a lot of locks. The year. As you can see, we have just
a small ear in that part. But sometimes they won't appear. Sometimes we will be
able to see this year. But the other world we can see, it depends on the
angle of her face, the eyebrows, the hair. And that's it guys. Now we have a basic example
of how to construct if phase, how to troll if faced with all the main parts long and
then draw another example. But this time I want my
character looking right. Okay? So I'm going to have
to pay attention to this vertical line is important to know what is the angle that I want my
character to be looking at. Now, this two horizontal
lines just like this. Then I can, I can draw
the outline of the face. The year right here. I'm going to draw the year with more details in this example. The jaw line and
chin and the cheeks. We have also the
cheeks, the eyes. I want to draw a big eyes
in this, in this case, two, don't forget to lead a good expired due space between one white and
one eye in the other. Okay. And now we can add the other details of
the eye, the iris. We have also the pupil
and I enter edit. It likes to in the eye. I don't want to add
nodes in this character, but I'm going to add a big
mouse with a big smile. Now let's align all the main
parts of the character. I'm using a mechanical
pencil right now. You also can do this. We can use a
mechanical pencil to highlight all these
parts of the character. Again, I'm using
different colors of blue or red just to
help you guys to see, to visualize the drawing. But of course you can do
your own territorial with just a mechanical pencil
with just one band so you don't have
to hint to use. Your brand colors? Well, we already have the
main parts of the face. I'm going to just add
some eyebrows right here. And then we can add to the here. And I'm gonna do it. That's going to be simple here. I don't want to use a
really complex hair. That's not the focus of our work over lesser
of today's lesson. This is simple here
with some logs. Trying with the
triangular shape. It is a very common hair
type in chubby characters. I'm going to just erase
this part right here. Because I want to make it some, some, some things different. I'm going to mark those
lines right here. Dislike this because that's
the size of the hair, the height of the hair. Now I'm gonna do
some logs like this. As you can see, I'm using different sizes into
the locks of hair. We have some some
larger locks of hair. We have some thin
layer locks of hair. But all of them has
a triangular shape. No king, the ear, or it was more a
year as you can see. In that set. That's it, guys. We have our exemple
completed, ten, That's it.
16. 3x4 View Face Design Part 2: I'm going to draw noun, another example, but this time is going
to be a female face. And you will see that
it doesn't matter if it is a male phase or female phase. We can use the same techniques. You can use the same principles. As you can see. I'm adding
all the guidelines of the, the lines of my sketch. I can add a real simple
nose and the mouth. Also the eyes. With big eyes. I want eight cubed drawing. So I'm going to try
to do just like this. I can add the year. This character will
have a lot of hair. The neck, I really thin neck in that say to
the same techniques. That is the same way of
existing construction. Okay? And and we have
here the jaw line, we have the checks. It is basically the same thing guys. I'm doing right here. A small example,
just so you guys can see that when
it comes to the three by four character, we have one part that is
bigger than the other, because 1.5 of the head, the head, we can see a better the details
we can see better. All the parts. It is the three by four. It is a feature of
through by four drawings. Okay? And now we can add
all the details that we want in our character. For example, I'm going
to start with the eye. Just here. It is a female. I am going to add
some eyelashes. The iris, they propel. If you want to add color to
draw and feel free to do so. Not the other. As you can see, we have a bigger pie right here. Because this eye
is other part of the face or the half of the
face that we can see better. All the parts. And that's also a feature
or three by four drawings. It is important to add
also light to the eye. In, we need to add the
light in the same side. Both eyes. The nose right here. As you can see, there's
a real simple knows. What else. Simple nose
and also the mouth. A one to a is myelin mouth. But I think I'm going to
change just a little bit. Okay. Very nice. Okay. Very, very good. We have a flatter, flatter face. In this example of
this female character. As I told you guys,
it is not a rural. You can have a flare phase. You can have a longer face. The space between the eye
and the nose and the mouth. It depends on the character
that you chose to troll. Okay? So for free, for free to do
that where you want to just need to take a reference
and try to do the same. You can see how, how the face works into
character that you want to draw. And just do the same if it
is a flatter character with a flatter and flatter face
with the loader phase. Now the hair, it is
important to add the hair. Best way you can guys. I already told you
guys about it. But the here it is one of the main parts of the character
because with the hair, we can understand the
personality of the character or the persona of the
character, okay? And if you use any reference, if you chose a specific
character to draw them, you need to be as faithful as
you can to your reference. Okay? Of course you can
adapt some parts, you can change some parts. If you're using a reference, you need to try to
be as faithful as you can do the reference. And as you can see, we have a different kind of lock of hair in
this character. Okay? But that's because this, this character has this kind of hair. And that's it. Now we can add the eyebrows. And of course we
can add some more luscious right here
to the character. Usually we add a lot of
lashes when it comes to a female character.
It is not a row. You can do whatever you want. You can do the way you want. But we usually add
a lot of lashes. We add a lot of
details in the eye, especially because it
is a female character. Okay. Now I can just paint
here a basic painting. I won't talk a lot
about painting because it is not the
focus of our lesson. I want to add a light
and shadows to the hair. But you could in That's it, guys. We have our drawings. Then. I really hope I helped you
guys to understand how to draw a three by four of veal
face of attribute worry. Okay. Thank you and see you.
17. Side View Face Drawing: Hello guys, how's gearing? Are welcome to
this video lesson. And today I'm going to show you guys how to draw
a side we'll face. And we already saw how to draw away through
both for phase, which we saw how to draw
away from will face. But let's talk, let's
talk a little bit about a firm will face in Ghana and draw a
simple face right here with a simple circle. And let's use those
lines to guide us. In the eyes and the
nose, the mouth. When we saw that we need to have a really nice distance between
one eye in and out them. And you can add the nose. But if you don't want to add No, that's fine. That's it. With the three by four Ville, we saw that this middle line, we can put it right
in the middle. Okay? It depends on the angle of the face
every character. Sodium can use the middle
line just like this. And then you can
enter the outline. You can draw the outline and
add the nose, the mouth. And of course the
ice is right here. And then we have one bigger
I in one part of the face. One smaller I on the
other part of the face. So we have here a frontal face in a three by four Ville face. However, this side Ville face. Well, we have a lot of
different features. Let's start, of
course, with a circle, just like we did in all those other
examples. Button here. We won't divide
it in the middle. We won't use a middle line, which is we'll, we'll add
this line right here. And then we can throw the
jaw line just like this. Okay, You can add a
year, right then. That's a simple face,
that simple sketch. And you can use to draw
realistically drawings and also to draw cheap beam
should be designed. You can use this kind of sketch. You can add the
neck right there. I'm going to now add the eyes. The eye, it actually
is just one. I will add two eyes, just one. I told you guys, then we can choose to add
the nodes or if we want to, we can just don't use the nose. The nose. However, I
will add to the nose because I think he's going
to become nice right here. In the cytosol vision. Does routinized to add the nose. We can add the mouth right here with just one simple line. And then the eye. The eye, as you can see, it is kind of different
from the others. We have a triangular
shape and that's fine. We weren't this
triangular shape. The hair. Just like this. I'm going to add a simple hair. A really common error. Really usual hair. Now we have our site
Advil face aside, Advil trauma and he
doesn't really simple one. I am showing you guys the basic principles,
the basic techniques. Of course, you can
add a lot of details. You can, you can do a lot of things different and I'm going to show you
guys how to do so. Let's start here, another
example down here. And I'm going to start
with a circle, okay? And to add the jaw line, to add the d, the cheeks. I'm going to undo
just like this. The eye right here. I browns. And then we just have
to do like this. If you want to know how to add the nose as I told you guys, the ear right here. Okay. Basically it's
the same thing. The mouth. As you can see
it is, it is simpler. This accent that I'm
enjoying now, it is simpler. No, you can add the
hair that you want, but simple hair. Okay. And then that's it. Of course depends on the
character that you want to draw. But basically in general, it is that way they
will go and do a side of her face in a tube
drawing a cheeky character. We have also the neck
right here. And that's it. It is, it is simpler, as you can see this
Israeli simpler. Now I'm gonna do
another example, but this time and then change
the angle of the face. It is basically the same thing. I start with a simple
circle in them. I want my character
look in right. We draw two samples. We're looking to the left. And now I'm going to draw
in my example looking to the right as her with a
simple circle in there, I can add the jaw line
and chin and the cheeks. And that's it. Just like this guys. I e, e triangular there. I i with a triangular shape. The mouth. I don't want to throw
aids, millimoles. I'm going to intro
the mouth like this. The lashes, the ear right there. And then we can add the hair. You can add, you can
draw a simple hair, or you can draw a
hair width letter detailed with light,
with shadows. You can choose. I'm going to draw some
loves of hair right here. The eyebrows, the division of the hair right there. That's a female character. And that's a long hair. And then I'm going to
do just like this. I'm going to just color the hair to give some
more how highlight. That's it. We have here. Another example of
how to draw a side, we'll say Advil, drawing
in Chiba character. Okay guys, if you
have any questions, if you didn't
understand something, please contact me and I will be very happy
to help you guys. Okay. Thank very much. And see you next.
18. Facial Expression Design: So guys, In this video lesson, I'm going to show you how to
draw some face expressions. I'm going to use
this pen right here. But of course you can use a
pencil to do your drawings. And actually I advise you to use the pain so because you
can just erase a few, you make any mistake. Okay? But I'm going to start withdrawing
this simple face right here with a simple, simple hair. And this character that
I'm dreaming right now, it is a character maybe dealing with some
kind of confusion. Maybe this character is
thinking about something. So that's the expression. Our first expression came. Or character is thinking
about something or dealing with some
kind of confusion, but he is not happy or
characters and unhappy at all. Okay. Anyway, Let's now draw
another expression with another character and you
see how I'm doing it. I draw a eyebrow. I draw a, I N a is myelin mouth. When you're drawing a
character is myelin. As you can see, we
change all the parts of the face because
the eyes change in, the current turns happier old. So other parts of the face
can change a little bit. I'm going to draw
some simple hints, as you can see, our
characteristics in the face with it, with the hand. The hair, a very simple
hair. Right here. I'll focus on this video lesson struck about the expression. So I won't, I won't
teach you guys a lot about hair in the parts
of the face, okay. I will just show you
guys those expressions. And here we have our
character is myelin a lot. Our character is happy. Our character is
feeling, feeling good. Okay. Let's add some heart right here. Because our character, maybe his love in it is very happy. You know, it's filling
it towards you. Now, another example, let's use the same character
with the same hair, with the same phase. It is very important guys to practice a lot how
to draw expressions, because we have thousands and
thousands of expressions. Okay, so it is important to
train a lot to practice. This character now
is kind of angry. It is very, very angry. Maybe fighting with
someone may be yelling. In finding with someone. In here we have a
angry character. You can add some details, those lines that I had to. Or this example here. Okay? Just like this character
is yelling, He's angry. That's our third expression. Let's go to another one. The same, the same character. It simple hair does like all the other examples,
are the same. The same shape of the face. It, I'm going to paint this
entire part right here. I'm going to paint all
this part just like this. Okay? My paint, all the sport where we would
draw the eyes. I paint this entire part. And I'm going to add
some details right here. Just to give more highlight to know to, to this expression. You can also add those details. Maybe this character is,
you know, embarrassing. Or k trees and birds
sit with something. Now we can move on and
go to another example. Let's draw a half character. Okay, Just like this. It is like the
pervious that we made. Okay. But we have a different mouth and we can see that it
is a simpler drawing. This character is happy to. This character is
feeling good too. Okay. Now let's go to another example
with the same character. Just like this. I'm gonna, I'm gonna draw
this character crying. And he's not happy, he's crying and we
have a lot of tears. So let's do like this. As you can see it is
it is a lot of tears. Of course you could
do different, she could do different TAs. I'm gonna do another
example right here. So you can see this, it is basically
the same drawing. But as you can see, we don't have wavy tiers. We have just straight
tiers as you can see. Okay, but what it is, it is basically the
same expression. We have the same effect. We have a crying character, we have a side character in both examples, just like this. Okay. Very good. And another example. But this time, let's see,
see how I'm gonna do. See the eyebrows. I made a current I1 bronze. It is a different
type of eyebrows. I can add here, right here. We can add some details
down the, the, the eyes. And now in nope mouth, I really open mouth. I added to the details of
the teeth. The tongue. Let's add to the hair. The hair just like this. Okay. And the face
with the chin. That's another expression. It is a very common expression. We can see a lot of Maine gets characters with
this kind of expression. We don't have tears
in this case, but this character crying. It is crying. Okay. We can see this
because of the mouth. Because the mouth help us to understand that this
character was crying. Now, another example
where I here it is, That's really common expression. To that I'm just drawing
a square with some teeth. Some teeth. When the character is
surprise it with something. Or if the character is not, It's not understanding what's
going on, what's happening. We use this kind of expression. This is a square represent the mouth incident that
this kind of mouth, it is really different from
all the others that we saw. It isn't real big mouth indeed. Okay, Now let's add the details of the
hair of the character. This character is
surprised it in this character is not
understand what's going on. Okay? So that's it. There was some expressions. Train a lot of practice a lot. And I'm sure you guys will learn how to do all these expressions. Thank you.
19. Basic Proportion: Well guys, I'm going
to show you how to draw chubby drawings and I'm going to use
a role to do so. To show you guys about the peripheral portion,
the basic proportions. I'm going to draw here a
line with four centimeters. Four centimeters in one
part of the sheet of paper, and four centimeters
right here too. Okay. Now I'm going to
connect those two dots. I'm going to control it in line. As you can see it as a
really straight line. Now I'm going to do, although
the parts that I want to do five centimeters now, in five centimeters in
this other side it to, okay, let's connect those
two parts just like this. I'm going to draw the head of
the character right there. Now five centimeters. Again. That's going to become chest part of the body
of the character. It is the same size. We have five centimeters
to draw the head, and you have five centimeters
to draw the body. I'm going to draw 8
third, third space. Okay? But also with five centimeters, five centimeters to draw the rest of the body
of the character. And now we have three parts with the same
size, five centimeters. Okay? And now we can use those three parts to
draw all the parts. We want to draw our character. And again, to add some circles, to draw the face and
also to draw the body. You can see here we must use, we must use the same size to
draw the body and the head. Okay, Well, I'm
going just to add some details in this phase, the year we already have. I want to add a lot of details. Okay. I don't think
it is necessary. I just want to show you
guys about the proportion. I just want to show
you guys there. We need to use the same same size to
the head into the body. Not the legs right here. Very good. It is the size of two heads. Well into that. That's the proportion, that's the base proportion
that we want. Of course, you
could add the eyes, nose if you want. Use all the lines to guide due to low the place that
you should draw, the details of the face. Right here I'm getting, I'm going to introduce
another example. But this time you will
see that I'm going to use a proportion kind of
different devices and tomato right here. Okay? Now we're going to
do five centimeters right here in five
centimeters right here. Okay. So I have five centimeters, five centimeters, and down, you have 2.5 centimeters. It is two hats, half heads and half. Okay. Now we can add the
details of the head. Let's draw the
guidelines that we need to draw in
any, any character. We can add the outline of
the face, just like this. The ear right here. Oh, yeah, the year. As you can see, we're using
the same height in both ears. The cheap B, draw a
tube drawings are, have more details than
the Kawhi crawling. We'll read talk
talked about that. Can add legs right
here in the shoulder. As you can see him
using some circles and some lines and simple
lines to draw all these, all these parts that we want. Now you can just add more details to the
legs into the body. Here in the chest. Those lines, those
little circles help us a lot to know what to draw other parts of the body
that we need to draw them. You can always use your eraser. That's fine. We can use the eraser
whenever we need to. Know. Okay. They can add to the fingers, you can add the hand. I want to add a lot of details. I won't talk about
all the details that you need to know to draw
a cheap withdrawal. But I just want you guys to
understand the proportion. In this case, I used a five centimeter is than
five centimeters again, and then 2.5 centimeters. We have to we have to
have the other half who? We can say that we have
to have noise here. We can add the I in
the mouse DTP drawing. We have a lot of details. The Kawhi, we don't, we don't have lots of details in white for when n. Now we have discourage
of two characters. We have the first one. It is a cheap drawing. This I can draw
with. It is a car. Why? 12? And now
we have those two. Okay, guys. And that's it. Practice a lot. And if you have any
questions, please contact me. Thank you. And see you.
20. Basic Body Design Proportion and Initial Sketch Part 1: Hello guys. In this video lesson, I'm going to show you
guys about how to draw a body in the cow is titled. That's gonna be a lesson
about cow wide bodies. Okay, let's start using
eight row right here. I'm going to use the proportions we saw on the last lesson. You can use five centimeters
or eight centimeters. You can choose the proportion
that you want to use. What we have here,
22 circles, okay? I'm gonna divide in the
middle, just like this. And also a horizontal
line right here. Okay? Now we can add another
horizontal line to add the details of the face. You, you already know about it, about those parts here. And now we can draw the face. Well, it is a simple shape. We can use this kind of shape to basically any
cutaway drawing. You just need to pay attention to this size of the things. We don't want to
make one part of the face bigger than the other. It is important to
pay attention to the size of both sides. We can draw the body, this first part of
the butt right here. And then we can add
the legs, simple lags. And that's it. Also pay attention to the
size of the legs. It is important to make one leg with the same
size than the other. We don't want a fake
leg in a faint lag. Okay. We want both legs
with the same size. Don't be afraid to use
your eraser. Erase it. Is your friend. Use whenever you want. Let's roll the eyes right here. Okay, we have basically
our character, character. We have this sketch
of our character. We can add to know the eyes. As you can see, the space between one
line and another. It is important that
we could add another. As you can see, that the space
between one away in another was to be like this. The eyebrows just here. Pay attention to the
size of one eye in another because we want both
eyes with the same size. Used a ray. I'm going to
use the erasing here again. That's fine. Let's use that. Let's try the
eyebrows right here. And all the mouth. Real
simple curved line. And that's it. Now the I am. We can divide the,
control the arms. I'm going to draw the arms. Very simple arms. As you can see. It is a cheap drawing, but even so, I'm gonna draw, both hands are really simple. Okay? Okay. Very good. We have the head, we have we have the body, the legs, the arms. You could add some
fingers if you want. But I'm going to
add a little light. The way it is. Now. The hair, that's a
female character. Okay, so I'm going to
add two 0s, a long hair. I'm going to add some
lots of hair here. On the forehead. The years. Well, let's keep
drawing the hair. And the top of the hair. I think I'm going to
draw just a short hair. I think, yeah, I think it's
better to this character. That's it. Our sketch basically complete. The next lesson. We're going to see more
about this character.
21. Basic Body Design Proportion and Initial Sketch Part 2: So guys, let's keep
drawing this character. We started to draw on this character in
the previous lesson, but now we're going
to finish it. Okay? I'm using a pencil,
a dark pencil, because I want you
guys to better visualize all the
character, all the lines. Okay? Of course you can use the
bands so that you want. But I'm sure that you
guys will see better. All the lines and all the draw with this pencil that I'm using. Now a to be sold in the eye. Let's highlight the contour. The lashes. The lashes are a really
important part of an eye. It doesn't matter if it is a female character
or ML character. It is really important
to draw the lashes. We have here, the
pill, the rivers. You can add some
light if you want. If you decide to paint your
eye, just remember to, to make a gradient to know, make darker on the upper part and lighter in the lower part. The mouth. Let's
highlight also the mouth, the jaw line, and the
outline of the face. Okay. Don't forget today the rays, these are friends, so use
whenever you will need. And I use the eraser to
face this part right here. It is important to make
one side of the face, like the other side
of the face from one to both sides of
the face the same. Now, the year's smaller years. And as I'm highlighting, highlighting the main parts, parse data one to, to, you know, be highlighted. I can be using the eraser
to erase all the traces that is no longer and
longer important. We just want to maintain
the lines and the traces, the parts that we'll, we'll add some value
to the character. I'm going to, I think
I'm going to drop some equal to the character. Okay. Like a swimsuit. Denied. Write them on just the mouth. One same lines in the
mouth and also through limbs and other parts of
the face of the drawing. I'm going to paint
to this friend Sue. And I'm going to use
the pencil to do so. I'm doing this, but you can choose what color
you want to add. You can choose what close as you want to
draw your character. In this character, I
chose to draw a swimsuit, and I chose to draw to
paint with my pencil. So the swimsuit is when the
real thing that when you, when you paint your character, the character and they get
the character is much sheep, it's better, batteries,
much better. You can see life in your
character and your paint it. Let's just add some more
light in the eyes right here. You can use your
eraser to do so. That's it. Very nice,
Very nice guys. Don't forget guys. They're both lights
both shines And the the I must have the same
size and must have, must be on the same site. This guy's we, in this case. In this case we have two
lights on the left side. Now let's highlight the
outline of the arm. This arm right here. Now, the belt line of
this on right here. I'm going to paint the hair. Also with my pencil. Just like this. When you painted the
character, well, really enjoyed painting
the character guys is really nice to do so. Here I'm using just my band,
so everything's great. But but you can use
whatever color you want. You can use yellow and black. Blue can use whatever
color you want. We're going to add some
details here in the hair. But the highlights,
this army here, again. That's a collide coin, that's a cheap drawing. Now the legs, it is very
simple guys, very simple. Look to the defeat. Very, very simple feet. I'm using the eraser to erase the traces that
I don't want anymore. Right here in the
Division of the legs. I'm going just to adjust. Okay? And that's it. And now we have our
character and really nice and cute
character in that set.
22. Drawing Body Positions Part 1: Hello guys has gotten. So in this video lesson, I'm going to show you
guys some positions, some body positions that we can use with white characters. So I'm gonna start
with a simple circle, just draw the head. We already know how to do so. You learned about it in
the previous lessons. I'm going to add a
face expression. I'm already going to get
some face expression. As you can see, our
character is angry. Maybe I'm preparing to
fight with someone. I don't know. But we can add the legs
right here, just like this. And of course the arms. It is a really simple
way to do this. This body position. It is very simple. We just use simple traces, we just use a simple
sketch to do so. Now we can highlight
the head, the eyes. Well, I want to add
any detail of close. If I want to add here the k. We got to do this
in other lessons. But today I wouldn't just do those details about the
body position. Okay guys. Let's just highlight
with this bam. He had of course, it depends a lot on the
proportions they want to use. I'm using here a
proportion of two heads. I'm using a really dark
pan to do my drawing. You can use your pen. So if you, if you don't have a band like this, that's fine. And edify you to use a black pen because I really think that the trolling gets
more highlighted. Let's go to the second example. I'm going to start. Just like the previous one. Let's draw the head to the body. I'm making a different,
different leg. As you can see. Just be careful about
the size of the things. We need to have a
good proportion. We need to be careful
about the proportions. So just, just pay
attention to this. I'm going to draw an
expression of a character and even angry, even more angry. Or Detroit has a open mouth, is Yellen is fighting me. He's arguing with
someone angry guys. Let's highlight the hat. Okay, Now the arm. We have one arm up
and now the legs. Maybe our character is running. You know, you can see that we have one smaller
arm and that's fine. That's the body position that
we want in this character. It was the sketch done. We can now use the pan to highlight all the
parts that we want. I'm going to outline
all the main parts. Of course, you can use
erasing after this to erase all the lines that
you don't want anymore. The term, I'm going to paint
this part of the mouth. Okay, Very nice guys, Very nice. Now let's go to the body again. Let's skip highlighting now
the outline of the body. It is very important to practice a lot those body positions, because we know the different
characters has a lot of different positions
and it is important to know how to draw all
those positions. So practice guys,
practice a lot. Let's go to the third example. Let's do a little bit different. This third example, let's
start with a sketch. The body we have here. Also they had, Let's
draw the legs like this. O came in. Now the arms look to the
position of this body. It is different from the previous two that
we did, that we made. But that's fine. Let's add some face expressions. You can add the ice. Again, this character is angry. All, all, all, all
characters are hungry today. That's fine. In open mouth, the tongue, the
teeth, write them. This hurts where he's
really, really angry. Baby arbitraries for
providing it to to fight to to punch someone. I don't know. What cell
line right here. Okay. I think I'm going to add
some details right here. Like this. In the eyes. It is like fire. Our categories. So, so angry that there's
far you fire in the eyes. Now right here. The arms. Okay. No. We don't need to add a lot
of details to the fingers. You know, I I think
I'm going just to adjust these arms. That's fine. We can just say, anytime the rewards that we
need, that's fine. And now we have our sketch. I can now use the pen, a black pen, to highlight
all the parts that I want. Fire in the eye is, as you can see, it is very nice. Now let's highlight the
outline of the head, the body, the arms right here, the mouth right here. If you wanted to, you can, you can add some closes your
character or edit closest, okay, but if you want, you can, that's fine. We're going to have
a lot of examples in the next lessons above
a closest. Okay? And now we have
our third example. We're going to do
more examples in the next lesson. See you.
23. Drawing Body Positions Part 2: Okay guys, let's start
another example. Just like we did in
the previous lesson. Let's start with the head, okay, a simple circle. Let's draw this catch. The best way that we can. You already know how to do this. So bless her with the sketch. And of course we're going to
talk in this lesson about board positions just like
the previous lesson. And always, always
do this sketch guys, it is very important
to do this sketch because if you do something
wrong, That's fine. Just use your eraser and fix, fix whatever you want to fix. The sketch. It is a really big
important part. As you can see. This head is different from the others examples that
we did in the last lesson. This character is also angry. And I'm gonna do, and I'm going to add this detail around the
character just like this. Look how nice this utility
visit tail is very nice. I really like to, to make
this kind of detail. We have a lot of enemies and in mangas with this
kind of details, now I can use my
pen, my black pen, and add all the
details that you want. You can highlight. You're, you're trawling. Just like this. If you want to can that hair, you can add closest, you can add whatever
detail you want. In this, particularly
a character, I won't add any of
those details, okay? But you could, if you want. That's highlight also this
detail around the character. Just like this. Just like these very nice
guys, very, very nice. And I would have our character. First character. Let's
go to the second one. You start with this circle. Let's do they had
defined in the middle. Now we can add the body and chose the size of our character. And this character is flying at, this cartoon is flying in. He has superpowers. Let's add now the legs. Okay. You can see that the legs
have different positions and that's that's why that's
because he's flying. I'm gonna I'm gonna just
change a little bit. This part right here. I think I think I can do better. Okay. Not the first leg now. The second one. Okay. Okay. Okay. Now it's fine. The other right there. Okay. As you can see the sketch, it is really being brown part because you can visualize
what it is nice, what is bad, what is wrong, and why you need to fix. And I always use my eraser to fix whatever I want.
And that's it. Guys. Don't be afraid to
use your eraser. You can adjust all the parts
that you need to adjust. That's, that's the function. That's why we do is sketch. Now the head. Very nice. You can now add some
face expressions. You can add the miles, the eyes. You can draw a happy
character or angry character. You can choose whatever
face expression you want. And we know we have
now our sketch. That's our sketch. And after I make, after I draw the sketch, I can use my black pen and highlight all the parts
that I want to highlight. If you want to improve
your character, you can add some clothes. You can add a mask, maybe. Anna, Cara, any
detail that you want. Those details are
very, very important. Okay, now we have our
characters fly-in. He's also fighting against
someone, is also in group. Now, let's do this
other example. Just like the others. Let's start with the head. The body, draw the body. Add some, some face expressions. We're going to add
the eyes right here. Okay, the mouth. In them. We can, just, for the
parts that we want, we can highlight are
the parts that we want. Erase in fakes, whatever
you want to erase and fix. This character is definitely
fighting against someone. So it is very important to pay attention to the
arms into the legs. The arms and legs was to be
in some kind of harmony. And I'm going to try to do this. Now we have here the
arms of the character. Just like this. Then
we have the legs. We have, well, 12 legs. Okay, true, right here. Because our character
is fighting, is fighting against
someone, is angry. And that's it. Now we have our sketch so we can use our Pam and highlight all the parts
that we want to highlight. And that's the
easiest part of all. We just need to use your pen and align everything. Very good. Just like this. We saw those
six examples in this lesson, in the previous lesson, three days and three
in the previous one. And now you can use your
eraser to erase all the parts, the traces that you'd
want to use anymore, that it is no longer necessary. So you can erase all those lines that we
use it in our sketches. That's it guys. Very simple examples, but very beautiful examples. I hope you guys
enjoyed this lesson. Thank you very much, NICU, in the next video lesson.
24. Little Kawaii Witch Pencil Drawing Part 1: Okay guys, Let's go. Let's start. I will draw in with a circle, with
simple circle. Do not be, be done to try
to make a perfect circle. Again, you don't have to
draw a perfect circle. Let's draw our lines that will help us to know where to
draw the eyes and all the, all the parts of the face. Just like this, it is
really important to pay attention to the
size of both eyes. Let's draw a mouth right here. Okay. This character is myelin. And we can add some
light in the eye. It is really important to it. The shine, the
light in the eyes. Okay. And as you can see, we
have lights the same side and the left side of
the eye. The hair. Let's draw right here, the hair. Now, right here,
these are the detail. We already have the main parts of the face of our character. I want to add a hat,
this character, okay? So I'm going to do just
like this to draw this hat. That's how we, you
know, that's a weak. So it is very important to it. The hat, just like they is. Very curvy lines,
very beautiful lines. In Now, let's do this part right here
with a triangular shape. Okay? And another detail
right here on the top. I think I'm going to just do
a little bit on the sides. Let me use my eraser
into helped me. Okay. Very nice. But we have
the face of our later, which that's where all the years one side and
on the other side. Just to adjust this
part of the face. Okay. Very nice. In the air. I'm going to draw
some hair right here. Okay? Now it isn't the time
to draw in the body, the body of our little wage. I started with this branch
right here, does like this. It is a little body
to this character. And I'm going to draw a body
position just like this. I want a, a brush. Once a bro, two hour later, which I just saw my razor. I are really two that
I could do better. So I just erasing this part, this down part in I'm going to do it again.
Well, that's fine. Okay. Also the hair I
think they went to just the hair in the
broom, the brown. It is very important to
draw the brown to this. Happy, which the arms located. It is just the sketch. We don't have to add a
lot of details because that's just the sketch. Okay? And that's why it
is so important to draw this sketch
because you know, where everything is
going to be, you know, uh, where you need to highlight all the parts are the important
parts of your character. You can see what you need to fix and just erase and just fix. I think I'm going to add
some cloth office to a, which is very important
to add these details. Okay. A really simple hand. We don't we don't have
to add all the fingers, you know, just a simple
hand. That's fine. Okay, very nice, very nice. Happy little wage is
getting is become a very, very beautiful, very pretty. I'm going just to change this, this arm right here. And I'm going to draw it
like the ok. Now the broom. You could add a tragic, could add this card. You could choose what
kind of clothes you, what kind, of course, if you want to add to your character, dislike this triangular,
triangular shapes. Now we can add some
details to the bloom. You don't have to add
a lot of details. That's a cutaway drawing, but I'm going to add a
little bit of details. Now we have our sketch of
the little h, of the boom. We have a nice hat. I'm going to highlight the lags. Very simple lags. The shoes also are
very, very simple. I'm going to draw
you a dark shoes. Oh, we can add some
more details here. Very nice, very, very nice. Now we have our sketch.
25. Little Kawaii Witch Pencil Drawing Part 2: Now we're going to use
a pen to highlight, oh, the main lanes, although in parts of this character, okay. Of course, you can use a black pen or whatever
pain you want. K. Let's start by highlighting
the outline of the face. Just be careful because you won't be able to use the pen or, sorry, sorry, you won't be
able to use the eraser. So it doesn't bring
to don't make any mistake on this stage, okay. Just remember that you can
use whatever you want, whatever color you want to. And that's the
easiest part of all. We just need to outline
the entire Roman course. Being careful in all of this. But it is a really important. Releases teach. Okay. Now the hair, I won't, I won't make any scotch to draw
this hair right here. Of course, you could
add the sketch, you could draw the sketch, but I'm going to
just use the pen. Okay? And that's it. That's it. We have
our character. Now, use your eraser to erase all the lines there you'd all
need anymore various catch. Okay. Now we have a clean drawing. Another thing that
I'm going to add, a detail right there
in the hat. I forget. I forgot to add this detail, but I think it is important
to add this detail, this especially detail to
the hat of this character. Arrows, our happy little witch. Now I'm going to
paint this character. I'm going to use orange
shade to the skin. Of course, you could
use any color you want. But there's little
h will be orange. All the parts have skin. I'm going to use
this orange pencil. This orange color pencil. Okay. Those those colored pencil that I have a really
cheap yellow you don't have, you don't need special
colored pencils. Inexpensive colored pencils. But I'm really liking those
color palettes that I have. Very cheapy ones. And as you can see, are really, really nice colors. I'm using purple to
paint this head. Okay. I bought 12 colored
pencils or for just $1, which is $1.12 colored pencils. Yeah. I know. Pretty pretty cheap. Okay. Just be careful when you are
coloring your drawing, okay. Just be careful about
the directions of the the lines. Anyway. Just be careful. Okay. I'm going to let some
light right there. Okay. I want to paint that part because it is a
light that I want. Now let's paint the, the cloth of this character. I'm going to use blue. Anyway, guys, use whatever
color pencil you have. Again, feel free to choose
the colors that you want. You can use whatever
color you want. O k. Now, I'm going to use green. This other part of the
cloth of this character. Very nice, very nice. Also right here, green. I'm going to let some
shines, some lights. Those white parts guys are
the lights and all the hair. I wanted to eat orange hair. Oh ki, be careful about the direction because we
have a lot of it is hair. So just be careful about
the direction. It is. A cow eye. I'm so you don't have
to pay attention, a lot of attention
to those details, but to draw away, to paint a nice drawing, it is important to do so. To do like this. Disliked him doing. Now the broom I'm going to use I'm going to use
this color pencil, this brown color pencil. Okay, in a queue to a really
cute to draw them in. Okay. All those white, white spots. These white parts are the light, the light that we want
to add to our character. Of course, you can just
paint everything, you know. But I will let, I will leave those wide
part because I went to, to add some light
in the character. Now this sucks right
here, purple too. And then yellow on
this detail, right? That term of course read. And that's it guys. That's our happy later, which are very cute. Drawing a very nice
trauma and knees, right? If you have any questions, contact me guys. See you.
26. Student Pencil Drawing: Okay guys, Now we're going to do another sample,
another drawing. And there's going to be a girl. I'm going to start with just two big circles
just like this. As you can see. This first one, it is the
face of the character. So I'm going to divide with all those lines that will help me to place all of the
parts of the face. As you can see, this first
line that I'm that I did, it is the line between
the forehead and scalp. Okay. I'm going to draw the
shape of the face. That's a female character. It is a really rounded face, a circle or phase. Now, the eyes just like this, add a lot of lashes because that's the female,
female character. And I think I'm going
to make a character, we think full width closet eyes. She's not with open
eyes, is with close it. I'm going to also add some
splashes on the other part. Of course, I can
use my eraser to fix whatever I
want and I did it. Okay. Let's just be careful about this size and about the position of the eyes because
we don't want to make one bigger than the other. We don't want to make one. I want to the left
or to the right. Both eyes need to
be in this same, must have the same size. And let's have with
basically the same position. As you can see, we
have big lashes. And that's what we want. I'm going to add some details. Right here. Down in the eye and the mouth. This character is smiling. Okay, so we're going to use a really curvy line,
just like this. Now we can go to the
body and when to divide. Right here in the middle. This upper part of
the body at first. And then we can add the
lower part of the body. And I'm going to draw a
skirt in this character. Okay, a great nice is Kurt. And we also, we also will add some details in this upper part and how the closest
that character right here, the hair. I'll just highlight
the outline again. And as you can see, I'm always using same lines, a really thin lines. We have here, all of the
fingers, 123455 fingers. I'm going to do the same thing. And the other side. As you can see, I'm really
I'm really consenting about the height
because both arms, both hands, I want with the same with the same
high to the same size. And I'm always using really
thin lines with light lines. That's my sketch. And that's how we do it. Okay. Guys, always always be care
be always have habitation. Always be concern about
the height of the things, about the size of the things. That is very important
to have some proportion between all those
parts of the face, all the parts of the
face, we must be, must to obtain the proportion
that we have here, this scourge skirt, a simple
been really nice skirt. Why? I'm using a kind
of a darker lines, dark lines I'm using
In this on the skirt. And now the legs. Pretty simple lags grid
is simple shoes too. But I wanted to add these shoes. Or we can do this same
on the other side. Just like this. Very nice guys, Very nice, very simple. Legs seem very simple shoes. But it is very important to
make the shoes to the same. You know, we don't want to
draw two different tools. It's important to
have are already in the drawing key. We don't have a lot
of details below. But that's fine. Now we have this catch,
almost 100% occluded. Need to add now the hair. And that's what we're
going to do now. I'm going to divide the her
into parts, the marrow, okay? And then I can add
the logs of hair. Like this. Very simple, very simple
shapes, very curvy lines. Okay, and now we
have our sketch. For the next lesson, we'll get to finish
the entire German. Okay. See you.
27. Student Line Art: Well guys, so now we already have these catch of a drawing. And I'm going to start to use a nib pen just to
highlight to the outline. Okay, That's a really
easy part of the Roman. Just have to highlight all the main parts of
the main lanes, okay? Using this pan, okay. It is a really nice pen
to use it as a black pen. And you can use more like this. Or you're combining another row with another color, that's fine. You can, you can use
the pen that you want. But this pen that
I'm using here, it is really nice. It is really, really
good to use. Okay. I'm going to keep our line highlighting all the
outline of the drawing. Here we have some lashes
and I want to make beautiful lashes and
very dark lashes. Okay, let's add some details
right here, down the eyes. And then we can keep highlighting all the
outline of the face, the chin, the cheeks. Right here we have the hair. And it is very important
to have careful on this stage because you can't, you can't make any mistake. But in general, it is very easy, easy process to
make cookie guys. Of course, that depends a lot on the character that
you are traveling. We have some characters
with a lot of details, with a lot of complex lines. But this example that
we are doing right now, it is a really simple one. Just have to highlight
the parts that we want. You can do it is low lean. You can do this. Anyway. You guys take the
time to do this, okay? You don't have to rush. It is not necessary. They fingers right here. Those tiny parts,
those tiny details. You will have to be careful so you don't make any mistake. We are almost
finishing this role and let's highlight the outline of the shoes, of the legs. Okay, that's it. Very nice. We highlighted everything
that we wanted. Okay. And now you can just
take your eraser and clean deems her drawing is very important to
have a clean eraser, you know, because it is burnt. Have a clean eraser. Erase all those lines
right here of the sketch. We don't need them anymore. Here it is. I'll draw in student,
our little girl. And you can adjust some parts. You can of course, add
some details that you want after you clean
with the eraser. And that's it.
28. Rocker Pencil Drawing: No Guys, let's do another
example right here. Okay, We're going to
intro where you brokered. And of course we're going
to start with these catch. You can see they're ready-made. Already. Drew two circles. I divide it in the middle
with a vertical line. There. We can now add all the details
are the parts of the face. We can place the eyes. I won't I won't use the
closest ice in this example. I want to open eyes. Now. I realize simple mouth. And let's add to the light. To the, today's AI. The hair. You can add all the
details that you know that we must add to the drawing. I'm adding now I'm
drawing now the hair. And you can see that I, that I'm controlling a really, really big locks
of hair because I want this to be very nice,
very, very beautiful. So what I'm doing just like this is really important to pay attention to the direction
of the locks of hair because we need to
harmony in the drop-in. Okay, so just pay
attention to this part. Let's just add now
the neck right here. Just like this. Okay? We have almost all the parts
that we need in the face. I'm going to erase some parts just to make the
chromium cleaner. We already have the eyes, the mouth, the hair. I also draw the ear
one-year. Write them. It is very important to the raising guys because
when you clean the drawing, it becomes easier for you to
know what you have to fix, what you have to adjust. So it is very important
to use the razor. And now I'm fixing some parts. I'm adding some more details and seeing what I want
to, what I want. I can use the eraser
again, that's fine. Of course, you can use the
erase it just at the end. That's fine. But you can also do this in
the middle of the process. Okay. I'm adding some,
some details here. That's going to be
a ROC curve, okay? So it is important to add these details right
here in the neck. It is kind of a necklace. Okay. Does detail also here in
the middle and that's it. I think I'm going to
just didn't Nicholas? I think I can do better. One tail. And the other detail. In then the last one. No king. Now let's draw the body. Okay, Just right here. I'm going to draw all of these
upper parts of the body. And they were going
to draw the chest. And all this part right here. We can add the part, the lower part of the body
with the legs, with the shoes. As you can see, I draw a drill, a real big, really big feet. The arms now. Berlin, thin arms. This part right here too. Okay. Now we can draw an, another detail right here. Sharing the arms, we can add more details with
it just like this. Okay guys. The other arm, you
can do it too. Once again, I say to you guys
that when you use a sketch, you can see what is nice, what isn't, what
you have to change, what you have to fix. Okay? So I really advise you
guys to use a sketch. You can see that I'm
paying attention to the proportions is very important to maintain
the proportions, the harmony in the trawling. And then we can
keep highlighting all the parts that we need. All the online outline
of the drawing. You can, you can
add some shadows, you can add some
light to the drawing. We can also paint. Just like this. Is very important guys to understand how to
make the drawing. What are the most
important structures? What are the most
important principles? So if you understand
the main parts, the main structures is
gonna become much easier to draw any kind of trauma. In practice a lot. It is very important
to practice a lot. And you can add the
details that you want. You can add in detail you want. Okay? And that's it. We already have the sketch,
the initial sketch. In the next lesson, we can do more in
details and we're going to finish
this Roman. Okay? We're going to use a
pan in the last lesson. So see you guys.
29. Rocker Line Art: Well guys, now
let's use the pan. I'm going to use a
black pen to draw the final art to do the final aren't of this trauma it okay. Thank can just outline
how the main parts. I'm going to start
with the face and then I'll go to the body. Of course, that's not a rule. You can start with the body. But I, I, I prefer to
start with the face. And you need to be very
careful because we can't make any mistake on this page
because we're using a PAM. You're not use any
pencil anymore. So it is very important
to pay attention. Okay? And then we can do all
the outline of the hair, of the main parts of the face. But actually guys, this part of the drawing
is kind of easier. You just have to online
the entire drawing. And if you practice a lot, well, it will become easier
for you. Okay? That's it, guys. We can do this and
things are drawing. We can align all the main parts. Glove course, just
pay attention to the lines because
as you can see, we have some lines
thinner than others. So that's important because, because we have different lines and we need to pay
attention to this, okay? So just be careful. We want to make the best, the best problem that we can. We want to make a
beautiful drawing. Those details, these details are very important
to pay attention. Okay? All the, online,
all the details. Now this coal, this
ArrayList simple school. Now the closest, we
can add the details, the details of the closest. Okay? We have a lot of stripes
here in this character. So I'm going to just add
some color to these stripes. Going to use the pen to do that. It will be black. I'm going to use black. As you can see, I first
made the outline in, then I use the pen to color it. Rather to do like this. Because I don't want
to make any mistake. I really want to make
the best rum that I can. So I do stage by stage. In here in the nightclubs. As you can see, I'm using
some lines to do the detail. Okay? Now these tribes, again, it's color, all these stripes. Very nice guys, Very nice. Okay, at this detail that
I added to the nightclubs, it is a really nice detail. You can also use it if you want. Just some simple lines. Now we can go to the
pants, to the legs. Just like the upper
part of the body, we just need to align all
the lines that we have here. We have a really big
fit in that set. Now we can color these boots. And of course you can
use any color you want. I'm going to use black. I want a black boots. Just like this. We can do this the entire bulb. Okay. Once again, I
start by outlining the boot and then I
painted with my pen. I'm going to add some more
details here, the pants, okay? And I'm going to paint
the entire paints with my black pencil, black pen. Just like this. And you can see that I made a little detail
between the paint, paint in the boots. And also we have some
pockets right there. And you need to be careful in this stage because we
want to make the bass, the message, the best
coloring that we came. So be careful. Okay. Very good guys, Very good. We are almost finishing it. Now here. That's it. That's it. We have our black pants and our character rocker who
is basically finished it. I'm going to use the eraser. I don't want those lines. Okay. There it is no longer necessary. So I'm gonna use the eraser and I'm going to do this
and they turned Robin, take a moment before e
star using the eraser. Okay? Now you don't want
to have to wait a lot, but just wait a second before
you start to use an eraser. Okay. Very good. And that's it. It is the ROC curve, the final art and
that's it guys. Any questions? Feel free to contact
me. See you.
30. Japanese Girl Initial Sketch: Okay guys, let's move on. Let's draw another
example right here. I'm going to start
with a simple sketch. And as you can see, I already drew a
circle, simple circle. And I'm going to
start to draw in the body this right here. I have a habit to always drew the body more to the right,
but that's not good. That's not good at all. So that's why it
is so important to draw a vertical line
dividing the middle. So you can do better than Roman. Okay? So I advise you guys to
always use a vertical line. And the horizontal lines to place all the parts of
the body in and love the face is very important
to June to draw a sketch. You also need to pay
attention to the proportions. And I'm doing this right here. The size of the head, it is the same size of the body. If you have a role, you can, you can do this. You can see this. I'm already placing the eyes. It is very important
to petition to the height of the eyes because we want both eyes with the same size and
with the same height. Real simple mouth,
which is right here. You can always use the eraser. I'm gonna, I'm gonna do this. I think I can do better. So I'm going to at first
draw a horizontal line that I can grow When I came
in with the same line, with the same line
that we drew here. I can draw this second one. When you draw a
sketch, becomes very, very easier to place all the parts of the
face and of the body. Some details right here. That's a cutaway drawing. Okay? So we need to apply
all the techniques that we've already learned
about controlling. I'm going to fix the mouth. Just a curve line. That's it. Very good. Now I can start to
draw in the hair. The hair. As you guys already know. We have a lot of
different types of hair. We have a lot of
different tiles. So we need to know what kind
of here we want to draw. And then you just choose
the best, the best hair. Start drawing it. That's a female character
demonstrating right here. That's a Japanese girl. And I'm going to
draw the hair just like this big locks of hair. As you can see. I'm really paying attention
to the directions of the locks of hair and the
size of the locks of hair. You want harmony on this room. Then a fix right here. Okay, I think that the height
of the hair, it is fine. And we'll just do
just right here. Okay. It asks, this is a sketch. You can feel free to make any mistake and you
can use your eraser. You can fix whatever
you want to fix. You can adjust whatever
you want to adjust. That's a natural
part of the process. That's really, really normal. Everybody that does a sketch will make mistakes
and we'll adjust. We'll fix the parts that
need need to be fixed it. Okay. And I'm adding
any detail right here. The hair of this character. That's really cute
character. Okay? And now we can go to the body. Let's draw the body. And we're going to start
with this part right here of the chest
of the character. That's a really small
part. Small part. Now, let's add all the details of the closest of
this character. Okay, I'm going to
add some tools here. And also there are
real nice close this. Let's go to this low
part of the body. Old cane training to
make the best clothes that I can. Okay. As you can see,
we have one part, two bigger than the other. And that's okay. That's part
of the detail of the cloth. Now let's add the legs. I wouldn't draw begged legs. Just more legs. It's fine. In some flip-flops. I guess. This greater. We don't have to add any
fingers and the toes. Actually, we don't have to
add in intos this character. Now let's go to the arms. This part of the cloth, it is a very big part. It is important to make one part just like the other part. Okay? Just like this. We need, we need harmony
in the drawing, okay guys? So the left sides must be
just like the right side. Of course we can
add more details to the clothes just like this. And you can choose what kind
of details you want to add. I'm drained. You control of
flowers, you control clouds. You can draw a heart. On the clothes. You can choose. Whatever detail you want to add. No king. Its think that's fine. Let's highlight also the feet, right here, the hair. And that's it guys. Of course, if you
have a reference, it will become
easier because you can just look to the reference and do just like in the sketch. Or drawing is
basically finish it. This basically completed. Okay, That's how little
girl or Japanese girl. In the next lesson, we're going to use a pen
to do the final art. Okay? See you.
31. Japanese Girl Line Art: Guys, now I'm going to
start to use in a black pen to do the final art of this later role of
this Japanese girl. That's a really easy
part of the drawing. Just have to highlight
the main part, just have to outline
the entire drawing. So I won't talk a
lot about it because you guys already know
how to do it. The game. You just have to see, well, what are the parts that
you need to highlight? What are the main parts? And then just outline
it just like this. Just be careful, guys, just be careful because this
part of the drawing we can, we can make any mistake because
we're using a black pen, we are using a pain. We can use the eraser
to fix anything. So be careful right here. Be careful with the lines. It is curving lines, but we also need to be careful. Okay, let's go
right here and now. With this pretty nice detail, all the hair of this character, we have some similar
lines than others. So you also need to
be careful about it. Those smaller parts, or you need to be very
careful about them. Just like this. Again, be careful about
these smaller details. Okay? Be very, very careful. You don't have to put a lot
of pressure on the pen. K. Be soft, gentle. Human being can do
the best. You can. Okay? Now we have our drawing. It is basically completed. We are aligned in trade,
throbbing, aching, wait, just 1 second and then I can use the eraser to clean
the entire drawing. And that's it guys. That's it. Drawing is completed. Okay, in the next lesson, we're going to add some light
and shadows on this rock.
32. Japanese Girl Simple Shading: Okay guys, so let's start
by adding some shadows. And of course light. This Robin, I'm going to
use in a to B pencil. I'm using it to be basil. And I'm putting a lot
of depression and the pencil because I
want a really dark here. Okay. I'm putting
a lot of brushes. Vibration. Of course, that if you
have a for big banks, so you can use it. Because as you guys might
know, eight for VPNs. So it's darker than
need to be passed on. But I'm using a to B pencil. I'm going to try to use this pestle in the
entire drawing. In this particular
part of the drawing. Pay attention to the
direction that I'm using. I'm just painting and all
those parts of the hair. Okay. Just like this. Of course, you could use a blue or green or
red colored pencil to paint these hair. You can use black. I also don't want to use
a green and gray pants, so we have some
white parts right here that's painted on it. Okay. We also have this other
part right here on the top. That's also part of the hair. So I'm going to keep him
going to move to aim. The same hue, the same color. Okay. Now, you could use another, another color pencil, colored pencil to paint
this part right here. I'm going to use
my to be paying, so I'm going just to use it. However, right here. I didn't put a lot of, a lot of pressure in the pencil. And then we have a
lighter hue of grade. No, I'm going to use
this two right here. That's a smudge pen, so I don't know if you guys
call it T is measured pencil, but we will just merge them all. Although those
parts of the hair, it is just like this. I really like to use this tool helps us to
spread the graffiti. Okay, we can use a darker tone and also in the lighter tone. And I'm not using, I'm not putting a
lot of pressure with these merge pencil. Okay. I know you guys could
use your finger, for example, to do this. But I advise you to use a tool just like
this one that I'm using. You can add some shadows. Also with this tool. Disliked this. Okay, Nice. And now you can use
again the page so you can color all those parts. Here. I want a lighter tone, a lighter hue of green. And I'm going to use a very
gentle lead, the pencil here. Okay. A very, very
light hue of green. Now I'm going to use again my tool to spread
all the graffiti. It looked at difference
when we start to use the, this much pencil. And that's it. Now we have our drawing. It is a very simple drawing. It is a really simple technique
that we needed to apply, but I advise you guys
to keep practicing. You will become an
amazing designer. Thank you guys. See you
in the next lesson. In any question,
please contact me. See you.
33. Peasant Girl Initial Sketch: Okay guys, In this video lesson, we're going to start
by using the rural, okay, we want a good
proportions in this drawing. So I'm going to start by marking the hearing
two centimeters in one side and two
centimeters on the other side. Okay. We have now two
points and we can connect those two points. And it is very important to
make very straight lines. Okay? Now let's do again
right here with aids and tend to meters and eight centimeters
on this other part, two, we can now connect both
points, both dots. Okay. In the head. Okay. I already drew a circle
because that's owe her head. No, let's draw again. Working in eight
centimeters. Okay. In them. More it more four centimeters. It is hi top two heads
and a 8.584 centimeters. Okay, we've gotten to
draw the body right here. And then we're going to draw
the legs on this other part that we have the height of two heads and a 8.5 centimeters, eight centimeters, and
then four centimeters. Okay. Now can you start by, we can start drawing
this sketch. Already. Edit to a vertical
line in the middle. That's a three by four
Ville controlling. We use a lot. These kind of of this three
by four will she be drawings? Okay. We control the
shape of the head. The years. We can mark right here, the height of the eyes, the nose. We can add the mouth. I'm going to add a a open mouth. Okay. And that's it. Now we have basically all
the main parts of the face. I can start by drawing some parts of the
hair just like this. And you guys know that in the
future we're going to just erase all those lines that
we will use in this catch. So don't, don't be
too little care a lot about all those
lines that we have. You can add more details and the eye adding the
pill at in the light. Now I'm going to, I'm going to draw more details right here. Okay. That's the hair
of this character. Okay? And then we can go to the body with a neck with the
upper part of the body. That's just his sketch guys. So it is important to, to draw the main parts. Let's draw the legs also. Very simple lags,
very simple eggs. That's just a sketch. Now the arms right here. Okay. With this sketch, guys, you can no. You can see where to place all the main parts
of the body and then over the face
of your character. So it is very important
to trolleys catch it. Now, let's draw the feet. As you can see, I'm
drawing the real big feet. And that's kind of, well, it is not a rule, but we can see a lot of attribute draw wins
with big feet. Okay? Now we have all the main parts
right here in the sketch. And now we can add the
most important details, like the closest in the
other parts. This drawing. We already know where to place
other parts of the body. Because we have a sketch, now we can just add the details right here too. Of course, those details
depend a lot on the cloth. If they're your character has, you need to know bucket of cloth you want to
add to a character. And you can keep adding all
the details that you want. We have the hand,
very simple hints. Okay, take your time. You don't even need to rush. We have a detail of
a heart in this, in this Greek term. And now we can go to the feet. And then some more details. Okay. That's a TV drawing. That's a little girl
that we are drawing. The proportions of these
roles are very nice. We use a three mirrors than a centimeter, than
four centimeters. And that's it, guys. It is very important to use
good proportion as it is really important to
pay attention to this. Let's, let's add some more
hair details right here. And that's it. Of course you can add
more details to the face, but it has less. So we get a, you
get to define art. Okay, That's it guys.
34. Peasant Girl Final Sketch: Well guys, now, we're going
to conclude the drawing. I'm going to use
this darker pencil because I want to
add to the final, the final art of this drawing. We already have a sketch so it is easier and that's
part of the drawing. Later I'm going to
do a digital art so you guys can see how to
do a digital art, okay. But I'm going to try to make, I'm going to try to outline all the lines that we have here. Of course, I can
adjust other parts that I feel that
it is necessary. That's just a sketch so
you can use your eraser. You can, you can add
more details just like this one of the ear
that I added right now. Now we have the
eyes, the eyelashes. Neat, needs, need to be
very, very thick, okay? So don't be afraid to draw
really thick eyelash, lashes. Okay. Fake eyelashes. We have here the eye brown. Right here. We have the, I let, the details of the pill of course
delight the Pope pill. As you can see, I, it is just a black circle. Okay, let's highlight
the eyelashes always. And it is important to, to troll both eyes
with the same height. Okay, that's a three
by four drawing. However, we need to
draw both sides with the same height and width. A three by four Ville trawling. We have one beggar
i then the DOM. We have this I on the right, that it is a big one because we can see better
this half of the hat. Okay. That's how we do. They eat
three by four inch woman. Now, we can already
see that I'll draw in is getting very nice. It's become a very
beautiful the mouth. We have some details
on the chick here. And I'm also using a to
B to be a pencil, okay? And usually to be pencil, to draw this entire design
business rage Roman. Of course, you could
start by using a to B pencil and then
use it for B pencil. I think it is actually better to do that way
using a B2B at first, then a four beam. But I'm just using
it to be true, to be pencil and
encouraged for arlen. Okay, very nice. We can add, we can highlight all these details right
here in the hat, the hair. It is important to put some pressure on the pencil
because we want dark lines. Okay? You really want
dark, darker line? Okay? Now we finish
it, the head. Now let's go to the body. The body, as you guys can see, we just have to outline, okay, the main lines, the
main details and parts. Just have to highlight
what we need to highlight. So let's do it. In. That's why it is so
important to draw a good sketch at first. The sketch help us. A lot. Came right here too. That's really nice and easy
part of the throwaway. We just have to align. Align all those parts again. You can use your
eraser if you want to. If you have to. Also. I'm going to add some
more details right here. This part. I'm going to add
some more shadows. Case some gray hungry
details like this. Some stripes. In case some stripes. It is a nice detail. The fingers and the head it is, it can be very simple. You can be very, very simple. Let's add these tribes
right here too. I think I need to fix, adjust these stripes right here. Okay? Okay, That's it. Very nice. You can also highlight
this part right here. Is a really easy part, guys, really easy stage
of the drawing. Just have to outline
those parts highlighted. And that's it, guys. We have this really nice drawing a girl who
peasant girl came. You can see that we have
really nice proportions. We have really nice details. Also, a lot of details on
the face from the body. Okay. And then we have a one
to 2.552 heads height. You know what I
mean? So that's it. I see you in the next lesson. See you.
35. Little Chibi Witch: Guys, that's going to be one of the most complex drawings that we're going to make
in this course. Okay, so he annotation,
take your time. Do not rush. And let's start with the face. We don't have anything
new right here. You already know how to do this. That's a simple shape of a head. You can see that I
divided it in the middle. I divide it again with
two horizontal lines. We have the place of the eyes, the height of the eyes, it is just the same. We have the mouth.
And that's it. It is a really,
really simple start. You already know how to do this. I'm going to also
draw right here. They lie in between the
forehead and the scope, and the hair squint
to be right there. But let's draw some
details like this. That's gonna be a little weak, actually located, that's
going to be a little wedge. And we want a hat. This wedge. Okay. I'm going to
use the eraser. Okay. I don't want to let that
many lines on the drawing. So I'm going to always be using the eraser because I
want a clean drawing. It is much easier to draw
with a clean drawing. We don't want a lot of lines. Let's add some details
right here. On the hat. I'm going to just
clean the drawing and now do the final
art, final line. Like this. Okay, as you can see, I'm now putting more
pressure than that. It depends. So, so these lines now are darker than before. And that's what we want. Let's do this detail right here. Then we can do this other
one. And that's it, guys. If you make any mistake, you can use your eraser. Actually, I advice
you to always use the razor because we don't
want a lot of lines, we don't want words. He claimed Robin in the hair right here. As you can see him,
I'm using really, really curved lines and
I want a long hair. So I'm doing the locks of hair and the best way that I came, I went to harmony and days here. Okay guys, so I'm using
more curved lines. I made the mistake rate that. So I'm going to fix
with my eraser, okay. Oh, no, it's better. But that's it. Sometimes we make some
mistake, that's fine. It is part of the process. Okay. So I advise you guys
that every time you see some mistake that you made, please just raise
just do it again. Okay. That's it. Now we already have the hat, we already have some
part of the hair also right here of this little wedge. Okay, let's add some
more details right here. And that's it. That's it. Let's add some more shadow
right here, down here. I won't say beautiful hair
to one's really nice hat. Now we can go back to the, to this other side here. We can go back to the face, to the outline of the face. Let's draw all these
lines right here. And in the inner part, I'm going to erase
everything in them again, i'm, I'm going to
control the eye. I want a flatter,
flatter, flatter ice. I don't want them too. Big eyes. Okay. The eyelashes right here. Rarely big eyelashes. Okay, it is very important
to draw thick eyelashes. Let us draw the eyes, the eye versus the bill. Do not forget to add some light. The eye is very important to have the light inside the eye. Let's draw the other one. Erase it again. Okay. Let's go. That's a three bar for drawing. Okay? So you know that this second
I is gonna be smaller. We have one bigger
I in one smaller I. But of course we have
to pay attention to the deposition of the light
and of the propel because we want the both eyes
look into the same side. Side. Let's draw the eye. Brahms wasn't sin I, Brahms. We can already see the
face of the character. It is a character
and its myelin. I want his eyes
mining character. O k. Very nice guys. I'm going to paint the hair. If you wanted to realistically
hair, you can pin two. You can add oh, the light and all the shadows. That is, it is important. And as you can see,
I'm being very soft, Tim being very gentle when
it comes to paint the hair. Because that's how
we do a token. You wanted to other
locks of hair. Very nice, very beautiful. So I'm really paying
attention to the directions of the lines that
I'm drawing here. Because I want a real hair, I want a beautiful hair. So it is important too. Do like this, okay? And as you can see, I'm not painting the hair. I'm literally adding the entire
head with a lot of lines, lines and lines and lines. And then we can have this
nice hair that you can see. Okay. Now let's go to the body. It is kind of a complex
body, as you will see. Well, let's start with this upper part of the
body from right here. We have the chest,
we have those parts. We have the upper
part of the body. Let's draw the arm. Just like this. We have now two hands, okay? And as you can see, I'm paying attention to the, to the height of the two
hands because I want both, both hint right there. And can get control. The legs right here. Again, we will draw it wrong. Okay, So we need
to pay attention to the height of the hints. Let's roll now the other arm. Very nice. I'm gonna just fix some parts because I think I
can do better guys. Let's do it again right here. This nice detail. Now you can see that I'm already adding the final details. I'm adding some
details to the arm. This character is
holding a broom. This, which has a nice room. So as I told you guys before, we need to pay attention
to the height, the hints. No, because the hands
are holding the Brahma. They'll k, we have the
term right here. Oh king. This example is,
it's kind of like we drew a little wage in the peripheral in
previous lessons, you know. But this one is, is very, very complex, a very complex problem. Let's do more details right
here and the shoulder. Okay? Let's do just like this. Very nice. Then we can add this other part. And then the arm. Okay, Very nice. Now we can go to the
lower part of the body. Okay. Let's do just like
days that's addressed. So k guys, so it
is important to, to to draw the dress. We have the wind. So the dress is just like this. And it is important to align
the dress with the lags. Try to use always,
always curving lines. We'd all have to
use straight lines, in this case here. Oh, okay. You want a
realistic controlling? We want to say natural trawling. There's a lot of movement
because of the way and our little which is flying
with the bromine on. So it is important
to draw all those, those details because
we have movement here. Let's draw the legs
with the feet. Okay. We have a little boot also. And let's just add
some more shadows. Okay. Let's go to the second leg. It is a different position. No. Okay. Very nice. Very nice guys. Spain's right here. In here again. We can add more
shadows if we want. Actually guys, the drawings
basically completed, we just have to add some
more details if you want to. But basically we have
all the details, we have all the main parts. Okay? It is also important
to add shadows and light to make the
drawing more realistic. But that's it. Use your creativity. Do whatever you want
with your drawing. You can add a lot of details. Feel free guys, feel
free to do to use your creativity the
best way you can. Okay, let's do this again. Let's highlight
this part better. And we have the
broom right here. And it is important to
make these details. Okay. Very nice, very nice. And that's it, guys. That's a drawing. It is a really complex Robin, as you can see, but I'm sure
that if you practice a lot, that if you try to draw
this kind of drawing, you will become an amazing
drawing in you will, you will, you can do this. Okay guys. Thank you
and see you next.
36. Chibi Student: Hello guys, how's
go and welcome. So in this video lesson, I'm going to teach you guys
how to draw a student. That's the character that will draw them in
this video lesson. Okay? That's gonna be a
kind of complex trauma. And you will see the, we're gonna use a lot of
techniques to do this problem. But I'm sure that you
guys will understand it. We will enjoy drawing
this character. Okay, Let's start with the face. You already know how to do this. It is a very, very
simple sketch. You don't have to put
a lot of pressure and with the pantsuit just, just draw a really soft light. Lines. Be careful about the light of the height of the
bowl, of the eyes. Okay. We're going to add some
eyebrows and the nose of k. We have here a three
by four Ville drawing. So we're going to have a
bigger and a smaller one. And always use your eraser
to clean the drawing. I want to clean my drawing
because it is very hard to work to draw with
a lot of lines guys. So feel free to use
your eraser. Okay. I already know where to place all the parts
of the face. Okay. So I can now, now I can put a lot
of pressure with the pencil and draw
some darker lines. Now I can do it
because I already know what to put where to place all the parts of the face. Now, already, I already
have a sketch. Okay. That's a female character. That's a is two girls student
is student who is a girl. And she has a lot of eyelashes, so it is important to
highlight today eyelashes. The propel, always add
some light to the eyes. Okay. Now I'm going to just
paint with a gray, the eye. Okay, you can add some
gradient to the eye. So the upper parts, you can make it darker and the lower part you can
make it a lighter. Let's do the same
thing with the second I do not forget about, please both lights in December. The same position,
the same direction. So if you have one
light in one eye, in the right side,
you need to do the same thing with
the other eye. Let's draw the nose in there. We can draw the mouth. It's going to be a
triangular mouth. Just like this. It is an open mouth,
is myelin mouth. Let's just, just this
part here. Okay. Now, we can start adding
some locks of hair, some beautiful and
loan locks of hair. We have here the body, we have the shoulders, the chest, and the abs. Do not rush. Take your time, guys. Just try to do the
best way you can. See how I'm doing and
try to do the same. Be careful about the heights
and the size of the things. If, if you redo one part of the body in one way
and the right side, we need to do the same
thing in the left side. We want harmony in the drawing, really one to harmony. Okay. Now right
here with the legs. Well, I won't use
very, very big legs. So cages, regular
ones, it is fine. We can draw the feet. In that set. Of course, you could draw a sketch
to draw the legs, but you can also do
just like it did. You're free to do the
best way you can. Do the way you want to do. We have here in the arms. We have the hands right here. Okay. So guys, about the hands, you just have to do well, finger then you
do the other end. That's it. It is not that hard. Let's add more locks
of hair or eye here on the forehead. Okay. Like this. We have a lot of hair
on the forehead. Now I'm going to draw the ear. It is kind of a big
year with some details. Now let's continue
and drawing the here. Okay, very nice, very nice. You could draw these
catch before you started drying the hair. Okay. But I'm not I'm not
trying to sketch, I'm just trying to hair. You're free to do this same guy. If you, if you want. Some more details right
here on the hair. Too free to add the
details they want. Now we can use the eraser. Okay. It feels like this. I want to clean my drawing. Now. I can make it dark and
light, dark lines. I can draw dark lines in that. Some more details to the
body of this character. Because I made a
scotch in this sketch, it helped me to know where to place other parts of the body. Okay, a very nice, very nice clothes that we're
adding to this character. Let's draw the
fingers of the hand. Just like this, the hair. We can also add
some darker lines. Like this. Very good guys, Very good. Let's go now to the lower
part of the body, the skirt. Let's add some
details like this. Okay guys. Okay. Let's add more details
on this other part here. We can also do this on the
other side and then the legs. Okay? Pay attention to the
size of the things, okay? A hint to the
proportion of things. These are very important to, to give harmony the drawing. Let's add some
details right here. In the fit, the shoes. Oh, okay. We have some socks. Right there. We have the nice, Very nice. I'm going to use the eraser
just to fix this part. Okay guys, some more details in the shoes. Let's highlight these
lines right here. We are almost finishing
this rolling. Almost finishing it. You can now just
highlight some lines. Add more shadows. We can paint. The heritage is like this. Okay, just to
highlight the hair. Of course, that if you use a colored pencil so you
don't have to do this. That's it, guys. Troy is completed.
37. Girl in Kawaii Panda Uniform: Okay guys, let's start
another example. I'm going to start with
the high-tech one to define the heights
and the proportions. Okay? I'm going to start
with the face. I know that it is
kind of obvious. We always start with the face
and then we go to the body. And we're gonna do this again. Okay? I'm really concerned
about the proportions. I want to maintain
good proportions. And that's it guys. Let's set here all the details
of the arm and the legs. I'm going to add the ice
right here, the mouth. And I'm going to define what kind of IL-12
add in this drawing. I think I'm going to use age. Just say circular I. Okay, This is simple I, that they called wide drawling. And we know that Kobe
problems are simpler. Let's do the same thing
here with the other eye. And actually actually I think that I'm going to add
some lops off here, okay. Right here. So we don't have to
add the second eye because we have
lots of hair on it. Let's use the eraser
to clean the drawing. Okay, are we good guys? Now can keep the
drain some here. Okay, right here. This character have
like a I who, you know. So I'm going to add, we're going to draw
this character. And as you can see, all the logs over here of this character in
disliked the others. We have one thing apart
to new unseen and part. We have here the two
lights of this eye. And that's it. We have the face now
let's add the mouth. The mouth. It is not a happy character. You know, the eye brown. Let's just paint right here. Okay. I know I'm going to use black. I'm going to use just my
pencil and paint in green. Okay. And now we have
the the arms right here. The hand. Okay. We have the hands and the arms. Let's do, do just like this. Because we have the fabric of the closest of
this character. And we need to add
these details. Let's continue right here. Now. Just like this. Very simple, but very
beautiful details. Very curvy lines,
two curved lines, some buttons, a pocket. Why not? Another pocket? And that's it. And let's do now the other arm. Very nice guys. I'm going to use my
eraser to clean the fallen and fix this part
right here of the arm. When you start by
making nice catch. Well, with these catchy, you know where to
place all the things over character or the details. Other parts. Always feel
free to use the eraser. Very nice. Now let's go to the legs. Very simple legs. I'm going just to erase
this part here and do it better. Well, lag. Another leg. Let's do a very simple
legs and very simple feat. Okay. You could add a boot, for example, to this character. You could add a nicer shoes. Nicer shoes. You know, feel free to choose what kind of closes
and what kind of see, what kind of shoes you want
to add to your character. Let's go back here to the hair. Let's draw it just like this. Okay. And now we have our who'd take your
time. Don't rush. Always use your
eraser whenever you feel that it is necessary, okay? And don't put a lot of
pressure and you're paying. So k Just just do
soft and light lines. Oh, That's it. It is very important
to use the eraser and fix all the
things that you want to fix him doing it again. Some details are right here
and also right here in the, in this character k. That's really nice. One to add like a panda, you know, it is like append. It is a hoot with a panda. Could use other
animals, you know. But I'm going to
use the pen down. It isn't really cute animal. So we're going to use the panda. Oh, no, let's just
this part here. And that's it. We need to adjust every single time they would feel
that it is necessary. Okay. And now we
have our pin down. Very acute pain down
in That's it guys. Already simple drawing and
see you in the next lesson.
38. Goku Chibi Part 1: Okay guys, So let's start
drawing with a simple circle. That's going to be, they had, Let's divided in the middle
with a horizontal line there, with a vertical line. Just like this. Now that we have the division, Let's draw the shape of the
face of this character. Just be careful about this
part right here of the chin. Because it is important to
pay attention to the height. Because we have the right
side and the left side, you in new ones parts left-hand side of the
drawing to be the same. That's a, that's a good cue. You know, that's our
character. That's good cue. I don't know if you guys
know this character. I believe you guys know this
character, you go cubed. Let's add two right here. The eyebrows we already
draw, drew the ears. Let's do here again,
the other eyebrow. Let's add this little
detail right here. That's a angry character. And all the I's, It's a very simple eyes, very simple eyes and the nose. A triangular shape to
the nose and the mouth. We don't want a Smiley mouth. This commentary is angry. These cartoons fighter
with thumb while. So we want this
expression to his face. Let's add some details
in the inner part of the year of both ears. Okay. Now we already have
the eyes, the mouth, nose, the eyebrows,
and the ears. Let's go now to the hair. Let's just divide and mark this middle line between
the forehead and scalp. And then we can
start to draw in, to draw the locks of hair. I start with this one. A very beautiful lock of hair. And on the other side
we can do the same. Let's start right here
in the middle. Okay? And then we can go
down and go up. Very nice, very curvy lines. Let's add some
details right there. Some shadows. Let's go to another part
of the, of the hair. The other side,
Let's do the same. We have a lot of triangular
shapes as you can see. And that's it. Let's say T. We have a triangular shape
in all the logs of hair. And it is a thicker
locks of hair. Now, let's go ray here. You can see that I'm using
a lot of curved lines. And we have a thicker
part in a piano part. And everyone of those, those locks of hair. I'm going to work just
right here because that's the height that
I want this hair. Okay? So device you
to do this tomorrow. At the height that
you want to do, that you want your hair. Now, I'm doing this
just like this. I'm going to add this
lock of hair right here. And I'm can do all the
others like these. Okay, Very nice guys, Very nice. Please practice a lot when you can just see how I'm
doing and train. Tried to do this same. Take your sheet of paper, take your mechanical
pencil or your pencil or in practice and
see how I'm doing. We have all the locks
of hair is kind of up. We usually draw hair down, but this time the
locks of hair up, because this character go Q, has some superpowers and he, and his hair also have some
kind of super borrowers. Then it is up. Okay. It is fine if you make
some mistakes because, you know, this kind of hair, it is not easy to, to draw. It is not it at all. So you got to make some
mistakes and that's fine. You can just use your eraser
and fix it and do it again. O key. And we can already see that this
hair is pretty, pretty nice. I'm going to use the
eraser right here. Because if Phil that I need
to make some, some changes. And I also wanted
to take my drawing. It is, it is easier to work
with a clean troll one. And now I can do this ray here. Okay? Again, in those
parts right here. Very nice. This hair is basically
completed, okay. Of course, acute, I
had a lot of shadows. You could a lot of lights. But, you know, if
we will do this, let's do only in the final art. Okay, now let's do the
body of this character. That's HEB character, let's
say cheeky character. So let's do the body. Let's start with the chest part. O came in all the
legs down here. Well, I don't want to
dwell way really complex rolling with a lot of details that I don't want to
do this right now. I just wanted to show you guys those techniques that
I've been showing. And I'm just wanted
you guys to know how to draw a character. It is go Q, I really
like this character. So this won't be a
really complex growing, but you guys will learn a
lot of techniques from it. No, we already have the
arms and the legs and the chest of this character. We have the shoulder right here. So let's define this part here. Closest. We have some
muscle on this part here. Okay. As you can see, we
didn't add and we didn't draw any any
neck, then that's fine. That's just okay. I've already simple body. It is a small body. Now we have just to add
the details of the body of the closest. And that's it. As I told you guys. We can see that the
sketch helped us a lot, helped us a lot guys. So it is very important
to start with the sketch. We can now add all
those details. We can draw darker lines and add all the details
that we want to add. We have here the hand
with the fingers. Okay? And I believe that
the head is one of the most difficult parts to draw because it is important to draw each
one of the fingers. We have a lot of details to the fingers
going to the hand. So it is not an easy
drawing to make. But if you practice a lot, I'm sure that you will, you will be able to do so. You can, of course, fakes and thing that you need to fix with your mechanical pencil. We have some muscles,
okay, right Then. Now the other hand,
let's draw the fingers. You know, when all the
details that we need to draw the hand, we have the fingers. Let's draw it. Came. Very nice, Very nice guys. Will have here
some more details. And that's it. That's it. Of course we have
some muscles right then. We also need to
define it to draw it. Okay? And that's it. We already have the
upper part completed. Let's go now to the
lower part of the body. We have a bout or something
like this right there. And now we can draw the pants. We have a sketch, okay? So we just have to add to the details that we need to add. Because the sketch help us to know where to place
all the things, all the parts, all
the details. Okay. We have here the shoes
of the character. The feet maybe. You can add, choose if you want, but if
you don't want to add any, any shoe, that's fine. Okay. I chose to add some boots
and this character. So I'm going to add to
the details of the boots. Okay. That's it guys. Stay. Drawing is completed. Okay. I really liked it to teach
you guys this throbbing. See you in the next lesson.
39. Goku Chibi Part 2: So I'm going to start by using the eraser to clean
this trawling. Okay. I already made these catch so I know where to place all of the parts
of these character, of the parts of the
body and of the face. But when I use the eraser, I can clean the drawing. And I think that
that's really good. Okay. Now I'm going to start
using my pen, my black pen, and I can do the final art, the final lines,
okay, with the band. I advice you to do the same. Let's start doing like this. Let's highlight all
the main parts. And the guys, when
you use the eraser, just to be careful
because you don't want to erase everything. We just want to
clean the drawing. You just want to erase some of the lines that you
don't need to anymore. Okay? So just be
careful about it. Let's keep highlighting
all the main parts and all the lines of this drawing. We are here in the ear. Or readily nice hair and kind
of complex, hard to draw. Let's do all those logs of hair right here we have the ear. In this part. We can add some
details just like this to the locks of hair. Pretty nice details. Okay. Just some thin lines. Okay, very soft lines. Just like this. Very nice guys, Very nice. Now let's draw this luck
over here, right here. We have some shadows down there. Let's do the same thing
with this other one here. Okay? Oh, of course you can add some details to the
ear if you want. We can go to the
eyebrows and the eyes. This is a really,
really easy part, really easy stage
of the drawing.
40. Line Art With Pens on Pencil Drawing: Hello guys. So we're going to undo the final art to this drawing
in this video lesson. I'm going to use this eraser
right here that I'm holding. As you can see, it is a
very flexible eraser that's a spatially rearrange them and it won't erase everything
of the drawing. I will just remove the
access of graffiti. That's that's really
a nice eraser. It will remove just the
excess of graffiti horns. You could use a regular eraser. Just be careful because you don't want to erase everything. We don't want to remove
everything of the drawing. We just want to remove
the access of graffiti. And now, of course, when you remove the
excess of graffiti, you can see all the main line. So their main parts
and the drawing becomes much cleaner and
we want a clean drawing. Once again, you can use a
regular eraser, but I use it. This one. I'm going to use these
pair right here. Okay. That's a unit can Pam, I don't know if you guys
know this brand of PM. It is a really nice one. And I'm going to use this
pen to outline the drawing. And I'm going to also use this all the pen right here, okay. It is a, a black panel, so I'm going to use it to
paint all those parts, those black parts, those bigger black parts,
just like this. And you can also buy one
of those those pants. And I'm sure that you will
like to use both of them. So let's go to the Align, Let's highlight of the outline. I'm going to use this
spanning the entire drawing. You can just use, you can just position
your hand just like this. And then you can use this pen. You can also use a sheet
of paper to practice. You can practice in draw
some lines like this. Okay? So you can just position your hand like this and move
your hand just like this. Okay. And it can practice
and practice. And then you will
become an expert. When it comes to, to draw lines. I like to draw lines from
the left to the right. Or you can of course, choose what is best for you. How old it is easier
for you also. Okay. So I move my hand
my hand like this, and I can outline
the entire wall and the eyebrow just like this. Okay. And we can keep elaine
the locks of hair. Again. That's it. That's a really
easy stage of the drawing. You just have to, I outline the lines in all the main parts. But it is very important to
be careful because you can't make any mistake in this
stage because as you know, we use any pain and we won't
be able to use the eraser. We can keep aligning the entire huge Wally
does like these guys. Okay, and that's it. You're already a line
into the IntelliJ fallen. We highlighted how the
rainfall fun part. Now we're going to use This
are the pen right here. And then we're going
to paint in black. All those parts that we
need to paint in black. Okay, That's a
panda who's a very cute and very nice
and due to bend. So let's paint. Oh, came to be careful here
in the eye because we want to maintain the light pockets. Right here. We are almost finishing. The drawings is very
nice, very beautiful. Let's now use the
eraser and erase all the lines that we
don't need anymore. Let's do it. Okay, Just like
this, the entire drawing. You can use a regular eraser. Okay. In those irregular one, I just advise you to use
a white eraser, you know, because if you use a
pink razor for example, well, it is not that good. You can highlight a little
bit those parts right here. And we're hitting the hair. Basically guys that
say it, say it. Of course you can add more
details if you want to, can paint more
parts if you want. But that's that UPS to you. You can choose what to do. Thank you guys. See you next.
41. Transparency Artwork (Light Table or Other Features): Okay guys, so let's do the
final art of these fallen. As you guys can see, it is kind of a complex trauma and we have
a lot of details on it. And I'm gonna do something
different this time. Okay? So I'm going to take
another sheet of paper. You can do this same thing. I went to maintain. I don't want to
change anything with the troll and paint shop. Okay, so I'm gonna take
this other sheet of paper. I'm going to take some tapes
in due just like this. You're going to understand
what I'm trying to do, guys, you will see just take
another sheet of paper and use some tapes in
due just like this. Okay? And we're going to
use this light table. This light table it is, it is not a really
expensive product, okay? But it is very, very nice
to have a light table. It is very, very useful. As you can see. We are able to visualize
the trowel in this sheet, this sheet of paper. So that's it guys. That's it. We can see the drawing in this in this sheet of
paper and we can now, Let's start doing the final art. We're going to use a pan. And of course you
have to take care. You have to be careful. You really have to be careful. But you will see there's
gonna be very nice. You can turn off the
lights in your room, okay? And then you will be
able to see better. I'm going to use this other
sheet of paper right here and I'm going to put
my hand on it, okay. Because, you know, it is it is kind of a
way of be careful. And let's start. Let's go. We can just to outline
all the main parts. We are able to see
all the details. We can see all the main
parts, all the details. So we just have to
highlight the outline. Okay. I just turn on the light
ray here in my room. But you can just
turn off the light of yours if your frame. And I know guys that not
everybody have a light table. And actually you can do
this without a light table. Okay? But it is very real divisor guys to have more light if it
is not that expensive. And it is a very, very nice tool to have. Look how nice and how easy
it is to use the pen on it. Okay? And, but if you don't
have a light table, you can use a very, you know, you can
go to more with, with a big window. And then you can, maybe you will be able
to see one trawl. And if you put a sheet
of paper now you will, you will be able to see. Anyway, there's a lot
of ways to do this, but the light table
is the best way. And as you can see, went
into internal the light, you can see that we
have the drawing. We have the drawing and it is the same drawing
that we have down. Very nice drawing. We can see all the details. We can keep doing it. We can kipp, kipp
highlighting and now lining. I don't have a lot to explain
this part right here. We just have to see
the details and just outline and that's it. Okay here, I don't
have a lot to explain. It is very, very
easy to do this. Okay? Then we can keep doing it. All the details or the parts. Light table helps a lot. The way I'm going to maintain
the drawing in pencil. And then I'm going to have
another trauma with the band. I'm going to have to draw lines. Okay. I think there is some, there is some maps. You can look in your
place horror on your I don't know what is the name of the Iphone
Store having a cell phone. Anyway, you could just look for some apps, light table apps. And maybe you will,
you will find, okay, maybe that's enough. You should have a tablet. You will be, be helpful too. Okay. Now we can go down here. Be very careful guys, because we won't be
able to use the eraser. This stage, it is
important to be careful. Don't rush, take your time. Okay, now the broom, we have some details
here in the boom. We are almost finished. This robin. We are almost, almost
finishing the final art. It is indeed the order
of the most easiest. It is one of the
most easiest part of the drawing because
we just have to outline everything
that we already did. Here is we have our little
weight with all the details, with all the main parts of very nice and
very nice drawling. That's indeed a
really easy stage, really is a part of
the drawing to make. Let's just add some details
right here to the broom. Okay. You can then add more
lines like this. Okay. That's it guys. I hope you guys
enjoyed this lesson. Thank you.
42. Digital Line Art: Okay guys, this is
the Paint Tool SAI. It is really nice software
and we can do a lot, a lot with it guys. I really love this software. And if you are beginning, you will need this app
because it is very nice. We can paint a lot of
problems with it in anyway. I love, love the Paint Tool SAI, we have the menu right here. We have a lot of options. I don't know guys, if you know how to use the Paint Tool, SAI. But I'm going to try
to help you guys to, to know how to do some, some to do whatever you
want with this software. Okay, we have a lot of tools, we have a lot of things that
we can use in our charm. Let's go right
here in file open. Now I'm going to choose, I'm going to choose the
drawing that I want to use. I'm going to choose
this one right here. It is the curl we threw
in a previous lesson. And I'm going to just open it. Click right here. Okay? So we want, we have to
fix the position OK, because it is in
the horizontal way. We want this troubling
to be in a vertical way. Let's call ray here and screen. And let's go and
click this last. This last or the, you know, you can click and
the last option, you can click and
the last option. And now we have our trauma
in a very cool way. Well, this drawing
have a good quality. Image is nice. But I'm going to pick
gray here again, I'm going to change lemons. See guys, I'm gonna, I'm gonna put it 300. This is going to improve
the quality of the image. Okay, let's click in right here. Let's wait a second
and that's it. That's it. Oh, let's create a layer. I can click right here. If you don't know how to
use the Paint Tool, SAI, I advise you to just play a
little bit with the tools. You just try to figure it out, how to do it. There's a lot of videos
on YouTube about it. But anyway, I edit
right here in a layer. And then we're going to work with this layer that
we created right here. I'm going to just adjust this right here for
the four percentage is fine. Okay? Okay. Okay. Now I'm going to use I'm
using guys digital table. I don't know if you guys know, but what they say
is a digital table. But of course you could use, just show your mouse, your computer, and then all
you could use your laptop. That's fine. But I'm using a digital table. It is a very nice tool. It is not It is
kind of expensive, but I have to tell you this, but it is very nice. And we have here the
the lines, okay. You can just click that
to raise it to you can, you know, it is very easy.
This part right here. And I'm going to outline, I'm going to start
with the hair. It is just like the just
like the the paper, if you will, you use
an a sheet of paper. Just have to outline. You can adjust like this
is all very nice tool. You can see that
I just said this, it is very easing. You'll have you can adjust
also how fast your, your line will be. Okay? And that's, that's very, very nice feature of this app. You can go faster, it can go to lower, and we can choose. Another benefit of using the paint tool sides that if you make any
mistake, that's fine. You can just raise, can just, you know, it is easy to do so. But if you use ingest repair, well, you won't be able
to use the eraser. Well guys, I don't have a
lot to explain in this part. You just have to
highlight and online. Oh, the main part to know, if you're using a digital table, that that's a really easy part for you using your computer. Well, I guess it is
not that hard tomb, but it just have to outline the drawling and see
how I'm doing it in. You can adjust the parts
that you need to adjust. If you make any
mistakes, that's fine. You can use the eraser
right there and fix it. It is very easy. You can edit anything
that you want to edit. And indeed, it is
easy to do this. However, you need to
pay attention, okay? You really need
to pay attention. If you use it in
a digital table. You also need to pay
attention in Tik. Be careful because of course you want to make the
best throw in that we can. It is very important
to practice a lot, because if you practice a lot, it will, it will become
easier for you to do this. Okay? Now we have the outline of
the face of these drawing. We have here a lot of, a lot of features dies at the Paint Tool SAI it is a
very nice soft software. You can add a lot of details. You can add a lot of, you know, a lot of
stuff to draw them. Let's kick the highlighting and now lining the entire drawing. Guys, I made a
mistake right there. Oh gosh, I made a mistake. But what about the bullets?
Fine. I'm going to fix it. It was a layer mistake,
but that's fine. That's why you always have to be careful when it
comes to the layers. Because you have to, to make the drawing
in the right layer. Burma, but that's fine. It can easily fix
this mistake, okay? No, that's it. Sometimes you will
make some mistakes, sometimes we will do something
wrong and that's fine. Of course you have
to be careful, of course you have
to pay attention. But sometimes you will make
mistakes and that's fine. As we used in the
Paint Tool SAI we use a digital table or maybe
you're using your computer. It is easier to just
adjust and fakes because it is a software, so it is easier to fix
into just the things. Okay? Now we have the drawing and I
would try and complete a M. Okay. That's it. I made a mistake but I
could fixate quick, clean. And we have our drawing. As you can see, we have a really nice drawing
with really big quality. We have all the main
parts of the details. As you can see, it is
not that hard to do. It. It is kind of easy the case. So I recommend you to
use I advise you to use the Pen Tool SAI software, and that's it, guys. I really hope you guys enjoyed this lesson that you guys understood
how to do it. If you have any questions, guys, any questions, please
just contact me. I'm here to help you. See you next time. Bye.
43. Drawing of Body Positions - Part 1: Hello guys. Welcome.
On this video lesson, I'm going to start
using a roller, okay? I'm going to divide here
with four centimeters, each one of those parts. So we have four
centimeters in one part, in four centimeters
on the other part. At first, I'm going
to draw a circle, a really simple charcoal. Doesn't like this. And right here, down here, I'm going to divide, divide it in the middle. Okay? That's our sketch. Okay guys, it is very important
to draw the sky. And I'm doing this. I'm going to draw the upper parts of the
body of the character. Just like this. I've already simple
body in very, very easy one to draw. Okay? We can add to control the arms. It is important to
choose the position that you want to draw your arms. And the same thing
applies to the legs. We have here, the hand. One hand, we're here in the
other hand, right there. Very simple hints. In the legs. The legs are character is
maybe running, you know. So you want to to draw
the legs just like this. We already have this catch, a very simple one. But we already have
this sketch with the, with the main parts. Now it is the time to add
the parts of the face and I'm going to use a pencil. Grip pain. So again, I'm going
to add these details. You can use whatever
paints you have, okay? You can see they use a railway
at first and they use it. I'm using actually
now a regular pencil, but you can use whatever
colors you have. We have also the mouth
in them we can outline, we can draw the
lines of the face. That's a three by four
phase as you can, as you guys can see. And we know that we have some rules to follow
when it comes to a three by four
Ville, a character. And that's it. Let's keep drawing all
the lines on the face. That's connect one
part to the other. It is not the focus of this lesson to talk about
the parts of the face. It is not the, the focus of this lesson to
talk about hair. We are going to talk
about body positions. And this character
is running a case. So this is the focus
of this lesson. Today. We have here the hints and
I'm drawing now the fingers. Look how I'm drawing
the fingers. Very simple fingers. But that's it. 12345 fingers, five fingers. That's it. Now on the other
side to the same thing. It is important to
pay attention to some muscle than maybe
your character have. You know, in some detail
that you need to add. You can always use your
eraser to fake fakes, anything they want to fix. Now let's go right here. To the chest, to the
upper part of the body. Very simple, very
simple character. Okay. Very nice. Now we can go to these
lower parts of the body. Let's go to the legs. As you can see, all the shapes are very rounded. And that's what we want. I'm using curved lines,
straight lines too. That's fine. But that's a cute
character. Okay? But anyway, the focus
of this lesson, it is the better position. That's what I want you
guys focusing located. And that's it. So we will, we are
almost finished with this body position. They're very simple.
One, very nice. Keep practicing, okay,
it is very important to be very important
to practice a lot. And that's it. See, you guys.
44. Drawing of Body Positions - Part 2: Hello guys, welcome. It is very good to
have you all here. On this video lesson, we're going to draw another
body position, okay? But I'm going to use
these same proportions. So I'm going to draw these
horizontal lines that you guys are seeing
right now on the screen. Okay? And now we can
start this sketch. I start with a simple circle
because that's the hat. Okay? I'm going to
change the color. I'm going, I'm gonna, I'm gonna use my
mechanical pencil. So you guys can better see all the lines in all
the details that I'm, that I'm adding to
the drawing. Again. We can draw the face. It is a very simple
one, common face. That's the hint that
I'm drawing right now. Okay. That's the hint. And
after I draw the hand, I can draw the arm. And let's also start
drawing the body. Okay? This character, it is not a hard one
to, to draw guys. You guys will see,
Let's draw the leg. One leg, right here. The second leg. Let's draw right
here, the second leg. Maybe our character is
fighting against some work. Okay? So that's the position, the body position that
this character has. This role, the feet right here in this second
fit right there. Very nice, very simple fits. The time to draw this arm. Okay? S, I already drew the hand. It is very easy to
draw the arm now. Okay. Now the eyes. You can draw also the mouth. I want to add a Smiley
mouth to this character, gay. And that's it. Let's now use this
other pencil to draw to highlight all
these lines right here. Okay? As you guys already know, it is not the focus of this
lesson to draw a close, if it is not the focus
of this lesson to draw the parts of the face. So I'm going just to
add a simple models, simple eyes of our focus,
the body position. Let's draw the hand right here. You want to add some
details to the hand. I'm going to do
this on the sketch. We just do a hand,
a simple hand. But when we are
making the final art, we can add more details. We can add more. You know, we can make a nicer
hand with more details. Right here. Very nice, very nice. Now we can do the same
thing with the other arm. When we draw a sketch. Well, it is very,
very nice to do. To make a sketch. It is easier to draw into
place all the other parts of the body of the character because these catch
help us with this. So a really, really advise
you guys to draw a sketch. Now, these are the lag. K as simple, a simple fruit. And that's it. We have the arm right here
in that say two guys, the drawing is completed. Okay. See you next.
45. Drawing of Body Positions 3: Well guys, now I'm going to use this same proportions to this other example that I'm
going to draw right here. Okay, let's start with the head, a circle O K as divided in the middle
with a vertical line. And then let's go to the body. We have the chest right here. Okay? Now we have the legs. And now we can choose what the position we want
to draw this character. I'm going to choose this
position right here. And then the other,
the other leg. Okay, Very, very nice. The legs. We don't use the same height and these legs are, that's fine. We can draw the hand right here. I really, really
believe that it is easier to draw EDF
first the hand. You can draw the arm. I really believe that it
is easier to do this way. But of course you can
do the way you feel more comfortable to draw, to do for design. Now we already have our sketch. Now we can add the details. We can highlight all the lines. We can add the eyes and
the parts of the face. But it is very, very important
to practice a lot guys, because we knew guys practice. You understand better
how to do things. You, you become an
expert in, in trawling. Any character. I'm going to use my eraser right here
just to clean the drawing. And as I made a sketch, I know where to place all
the parts of the character. Okay. I don't know if you guys can see all the lines because
of the video. But I didn't erase everything. I can already see. I can see all the lines
are the main parts. Okay? So just be careful
because you can use the eraser and just
erase everything. Now we just have to do the
same thing that we already did in previous examples
in previous lessons. You just have to
outline in highlight the main parts in all the
lines of this drawing. Now we have the
fingers right here. It is a very small, small hand. But we also can
add some details. Of course, when not. It is very nice to add
these details because the drawing becomes
more beautiful. O can go to the other leg. Okay, and also to the
foods right here. Okay. Very, very nice. Now we have just, we need just to do this other part of the
body of this character. We have the hand here too. We have the fingers. That's it, guys. This row, it is
basically a completed, a very nice body position
in a very nice character. And that's it guys. That's it. You can see that it is a very, very easy drawing to make. To draw. You can always use
your razor to change and fix anything that
you want and that's it. Okay. Keep practicing. And if you have any
questions, please contact me.
46. Drawing of Body Positions 4: Hello guys, welcome. This video lesson. I'm going to continue and
draw in somebody possessions. But this butter position will
be a little bit different. Okay? Of course I'm going to
use this same proportions. We have four centimeters
in one part, in four centimeters
on the other part. And you can see that I use it
to simple circles at first. A new guys. I'm sure that you
guys will love this. For example. Let's go now. With the eyes. Yeah, these are the eyes. We have the arms. This character is upside down. We have the hint right here. Okay, Now the other arm, I'm going to use the same shape. Now the body is basically
guys the same thing, okay? But this character
is upside down, so we have the legs right
here and in the arms, as you guys can see,
are down there. It is a very nice
Robin to practice. Okay guys. You guys can see we use
these same techniques. It is just the same thing, but the body position
is different. The character is upside down, as you guys can see. Now I'm going to use a regular
pencil, a gray pencil. I'm using red and
sometimes I use blue, but you guys can use your
regular pencil the entire time. You don't have to use a red
pencil or a blue pencil. You can use it to be
or maybe for B pencil. That's fine. You have the eyebrows right
here and then the mouth. Oh, okay. Now we
can draw the arms. Just like this. As you guys can see, the forehead is not that big. It is a real small forehead. And that's it. That's what we want. Because of the body position. We have a really small
forehead, the other arm. Let's draw this same hint
details with the fingers. Now we can go to the body. Okay, this character is kind
of a little bit fat, fatter. It is a fat character. But of course, acute trauma
does a theme character. You know, that's fine. And that's it. Now let's go to the other leg
with this food. A very simple drawing, of course, with a really
nice body position. I hope you guys enjoyed it. See you.
47. Drawing of Body Positions 5: Hello guys, how's it going? Let's do another example. Let's start with these
very simple circles, okay? But this time the
body position is going to be a little
bit different. This character will
be lying down. Let's do these catch. Okay, Let's draw the sketch. We have the head right here. It is a three by four character. We can do the AI that you want. I'm going to draw one I
opened in one eye, close it. You guys can choose any, any kind of AI or
any kind of mouth that you won't use
your creativity. We have a division
in the middle, and then we can draw the body. And basically it is
the same thing that we did with all the
other examples. We have here. The arm, Hold on, sorry guys, the leg. We have leg right here. And the other leg right there. This character is lying down, maybe on the sofa, may be on the beach, you know, he's just lay laying down. Lying down is resting
his very tired, so he's just take
a moment to rest. Let's draw now the hint. It is very important to
draw some, some fingers to. Basically we already
have our sketch. Of course, you can adjust
anything that you want. You can erase the parts that you want to
fix or to change. Now I'm going to use a darker
pencil to draw the details. Let's define the parts that
we need to define the lines, the main parts of the
body of the character. We know that we have a lot
of different positions. We know that we have a lot
of different characters. But these techniques that I'm, that I'm teaching you
guys who will help you to draw any kind of character. I change it. The eye, okay. I want to open eyes. Now the hand with
all the fingers. Some people have some
difficulty to draw the hand. Some people think that
it is very hard to draw the hand and the fingers. But I'm sure that if you
guys just practice a lot, you will be able to do eight
really nice handle with beautiful fingers. I'm sure. Now let's go to this other arm. Into the other hand. Is you guys, so I use it, my eraser just to
fix this, this part. That's fine. Let's go to the body. A very simple body. We don't have a lot of details. Came in. That's it. We can go now to the
legs and the food. The character is really, really become a
very nice in India. It is very easy. That's it guys, That's it. We already finished
this drawing. And I hope you guys enjoy it. If you have any questions,
please contact me. You guys know this
into your next.
48. Drawing of Body Positions 6: Well, greetings.
Welcome to this lesson. And I'm going to start
with the roller. Okay? I'm going to, to mark the
height of this character. That's going to be
a higher character. He has 12 centimeters. And I'm going to do, to start drawing this sketch. We have here now three
horizontal lines. And on the first parts I'm
going to draw a circle. And on the other parts are
going to also draw a circle. Now, I'm going to divide
it on the middle. And also on the body. I'm going to divide
in the middle. I'm going to change a
little bit to this greater. Okay? We are drawing, we are learning about
body positions. So we're going to do this
in this video lesson. Let's go right here. On the hand, on the head, divided also in the middle
with a horizontal line. We can place the eyes
who can draw the eyes? Very simple wise, it is not
the focus of this lesson. Awesome. The mouth or a very simple one. I'm going to change
a little bit. Okay. I'm going to draw
the eyes right here. I think it's better in
the mouth right there. Okay. That's what I want. That's a cheeky character. Now let's draw the hand. A very big hint. Right here. Very big hand. We have the arm just right here. Okay? Let's draw the fingers, other divisions of the fingers. In. Now, this sum right here. As you guys can already see, the sketch will help us a lot
to place all the details. We have here. The other hand, but this time
it's going to be a smaller, smaller hand versus motor hint. And that's okay, that's
a chubby character. We can do this in this kind of trauma and we have
a really big hand, but but another very
small in that's fine. Now the legs regular lags. Okay. We want at a lot of
details to the to the legs. Just regular legs. With regular feet.
That's it, guys. We already have the body
position of this character. So now it is the time to
use a darker pencil to add all the details and highlight all the lines that
we wanted to highlight. We have a really simple
face and that's fine. Let's go to the
online right here. Now, the hand, we have some details
because of the fingers. Disappointing to pay
attention to this part. We want and really nice hand. Okay, we have a lot of
details on the fingers. Kay? Congruent to add
more details, okay, because that's really big hand. So we can, we have the opportunity to
draw a lot of details. And I believe that when
you add these details, the drone becomes better,
becomes more beautiful. So feel free to use
your creativity. It just draw these details. Now the hand, Very nice. Then we can go to the body
into the other parts. This character. We have the body right here. Now the legs. I'm going to change
this a little bit. The legs, okay. You guys can now see the knee. The other lag. Very nice, very
simple legs indeed. But you guys can see that
it is a really nice legs. Our real nice legs. Bold k. Another detail right here. Or we can go to the last
arm, to the other arm. In highlight these lines
that we need to highlight. We also have fingers right here. We also have to
add some details. Let's highlight the
lines of the fingers. We don't have to add a
lot of details okay. On this hand, because
it is a smaller one. But we, we can add some details. And if you practice a lot, if you practice a lot, a lot, you will be able to do enemies strongly dislike
this, okay guys. You can use your
eraser and to change something or to fix something. Feel free to do so. But here these guys here it is. This character is finished. It, we have here all the characters with a lot of different
body positions. And if you have any questions, feel free to contact me. Thank you guys very
much and see you.
49. Transferring the Draft to Another Sheet: Hello guys, welcome. It is very good to have
you all here with me. On this video lesson. As you guys can see, we have all the characters that we
made on previous lessons. We have a lot of body positions. We're going to focus on
one of these characters. I think This last one is better. And we're going to focus on it. And we're gonna do some, we're going to play
with it to know. Of course you could do this
with any one of the others. You could do this with
any of these characters. But I'm going to choose
this last one here. Okay? I'm going to use another
sheet of paper because I want to transfer the drawing to, to another sheet of paper. And I'm going to do this. We have a lot of, a lot of lines that we don't need on this original drawing, as you guys can see. And that's why I want to transfer this row into
another sheet of paper. And I believe that if
I do this is going to be better and easier for you guys to
visualize the trauma. Okay. So let's do this. I believe that you guys
already know how to do this. It is a very simple process. I went to use my light table. This light table. It is not inexpensive
a tool to have. Social guys can please
buy one of those, one of these, because it is very nice to use this
kind of light table. I'm going to turn it on. Now we have the light here. I'm going to take this drawing. Then I'm going to
put this sheet of paper with this possession or
when to turn on the light. You can turn off the
lights of your moon. Okay, So you will see better. Of course, you don't have
to transfer your drawing. You don't have to
do this process that I'm doing right now. You can do it the way you
can, the way you want. But I'm going to
do this because I believe that is going
to be batteries. It's going to be you guys will better visualize
this wrong. Okay? If you don't have a
light table, you can do. You can just use another sheet of paper or
a sheet of paper with a, you know, I don't know, guys, you guys can choose the
best way to do this, again, a user creativity. But I believe you
guys are able to know and to realize
how to do this. But I'm going to use these tapes right here because I don't want to my sheet
of paper moving. And I don't want my
sheet of paper moving. So we're going to use these
tapes. And that's it. Now, I'm ready to start. My trails firm. And if you turn off the
light of your room, it will be very, very eastern
to do this transfer. Okay. I'm going to use my mechanical
pencil to do this process. It's going to be a really
easy and fast process. I think that I'm going to
just to change a little bit. This i o k. Of course you can do this. That's fine. The mouth right here. You can just turn off the
light table and you can see how your drawing is getting. How is your drone? Now I just have to
outline the drawing, just have to highlight
the parts that I want to. And that's it. That's an easy part
of the process. That's an easy stage
of the drawing. In hideous guys, hey, this. We already have our sketch. The transfer is completed. And now I can just
add more details. I can of course, do the rest of the drawing. We already have a
much cleaner and trauma and that's
what we want. The k. The next lesson we're
gonna see more about it.
50. Final Pencil Drawing Part 1: Okay guys, Welcome. Not. Let's continue
with this problem. I made the transfer to
this sheet of paper. I'm using the eraser
just to clean the drop-in more. But that's fine. That's k, That's
just the sketch. And now I'm going to
start by going to start outlining the drawing in highlighting the parts
that I want to highlight. I'm going to do a little bit
different this time, okay? All going to add the
eye without a doubt, those lines that we use this to draw the eye. Right here. We have the eyebrows also, of course, the lashes. I'm going to change
the shape of the eyes. Okay. Let's do the other. I don't want, I
don't want it to be big eyes and I want
to eat a flatter, flatter eyes. That's okay. Not the mouth. This characters may be angry because is phi two
nuggets someone? Now, it is the time to do
these details right here. I want a helmet. Okay. This hurt
to have a helmet. And I device you guys
to have a reference. It is very, very nice to have a reference because when
you have a reference, you can just look to, to it and do the same
thing with your drawing. You know. We're gonna have
a really nice helmet. This drawing really where
it'll boot food helmet. Okay. Then you can add whatever detail you want to add to
your helmet, okay? If you have a reference, you will be much easier for you to add the details
to the helmet. But that's it, guys. You can add to a
lot of details you draw will become more beautiful. It is very nice to
add a lot of details. And that's it. We can highlight
some of those lines. Now we can go to this
part right here. Oh Kay guys. Okay. Very nice helmet. So just be a rotation then. Be careful when
adding the details. I'm using my eraser because I want my drawing to be
as clean as possible. I also adjusted this part here. The face on the cheap. Now we're going to add
some details to the hair. Okay. It is very
important to vary the size of the
day. Lots of hair. You don't you don't have
to draw all the logs of hair with the same size
in the same direction. That, that's not necessary. So feel free to show the
lots of hair that we want with different sizes
in different directions. We also have some
details right here. That's a really nice
are more, you know, we have the helmet of course, but we have other
parts of the armor. We have this
detailed right here. On the shoulder. That's a
detailed on the shoulder. That's not a really, really easy drawing to, to make you know, it is kind of complex because
we have a lot of details, we have a lot of parts, a lot of different
parts to draw them. But you can be sure
that if you practice, you will be able to do it. And if you have a
reference to do this, it is better because
you will just see the reference into the same
thing with redrawing them. And if you use these techniques, these techniques that
I'm teaching you guys, she will be able to draw
any kind of rolling, will be able to draw
any kind of character. And this character, I have
a real nice body position. And I really full of
details are more. We even have a helmet. Now let's go to this
part of the arm. We have this detail here. Okay. Now we can go to the chest and add the details of the armor
of this part of the chest. I'm using a lot of curved lines with my
mechanical pencil. You don't have to draw guys
are really straight lines and the lines or on TV
characters is better. We have the hand with a
lot of details, this hand. But as we use it, a sketch, now, it's easier to add the
details that we need to add. We have the divisions
of the fingers we have. We can add to that
a lot of shadows. If you want to know. Oh, that's some details
of the arm or yellow. We have this parts of the armor. Right here. On the hand. I'm dividing those parts and trauma in some details
with curved lines, a lot of curved lines. You can draw straight
lines on this part. We are almost conclude
in this part of the hand in some more details on this. All right, down here. Very, very nice hand with a lot of details
and that's what we want. Now we can go to other
parts of the body. Okay? We have a really
nice belt right here. And you can see that this
problem is becoming very, very nice. Very cool. Now guys, we can go
to the to the arms. The legs. I'm sorry. Go to the legs. I can see that I made
a mistake right there, but i'm I'm going
to fix it later. Okay. Let's focus on this lower parts of the body
of this character at first. But then I'm going
to go back and fix this part that I'm
seeing right there. But later, but later. Let's
keep doing this right here. Down the belt. Okay, Very, very nice guys. We have a lot of
details right here too. You can see the, they are very small legs. But even so we
have some details. We need to edit it. The armor of this part. We have some more
details over here. In very nice guys.
51. Final Pencil Drawing Part 2: Well guys, let's continue
with this drawing. As you go to the second lag. As you guys can see, we have very small legs, have a lot of details
on both legs. But that's fine. We can add these details. It is basically the same
details of the other leg. So you just have to do the same. The only thing that is
different on this leg that we are trying right
now is the angle, you know, we have
a different angle. That's true. But it is the same details, cities, the same features. We have some details
on the shoulder. Okay, on this part right here. And we can go to the arm and draw the details
of this part. A lot of curved lines. I'm not using any
straight lines here. Now, that said, we are almost
concluding this drawing. This hand is done. We have all the details made. Now we can go to
this other part here because I can see that I made a mistake cookie on this part. So I'm going to erase it. I need to. I can do better, so I'm going to do better. That's fine. You will make mistakes. Okay, guys, I'm so sorry. I'm very sorry to
make this mistake, but that's fine. I raise it. Now. I'm going to fix it. Just like this. Okay, Very nice. Now, let's do just like this. O k. Better. Now down here. Well, we already
have this part here, but we could do it a
little bit smaller. If we want. We could
do it smaller. And I believe that
smaller is better. In this case. I'm going to maintain these
other parts here. Okay? I'm using a reference, okay guys, I'm
using a reference. And I'm trying to do
just like my reference. And it is very nice to
use a reference because you can see what you did good, you did wrong, and you
can fix or change. Maybe. You will make
a lot of mistakes. You will use your eraser a lot. As you guys can see,
I'm using money. You raise her a lot. But that's it. That's fine. It is normal here. That's really complex or more
with a lot of the details. And that's the reason why we emit a lot of mistakes
and using my eraser. That's fine. That's it. That's okay. That's okay. You can see the difference
between the upper part of the armor in the lower
part of the ARMA, you can see the difference. So I'm going to adjust, you know, I'm going to
adjust this part right here. And now we are almost
conclude in this drawing. As you guys saw, I made some mistakes,
but that's fine. And we have a lot of details. We have a lot of different
parts on this Roman. So that's it. And I really hope
you guys enjoy it. And I really hope you
guys keep practicing. Okay, I see you on
the next lesson. We're going to finish this
drawing on the next lesson.
52. Finishing the Drawing with Ink (Line Art with Pens): Hello guys, welcome. Let's start this lesson. I'm going to start
with my eraser. Okay? I'm going to use my eraser just to
clean this drawing and erase the lines that
I don't need anymore. I don't know if you guys can see the lines the same
way that I'm seeing, you know, video, but I'm
not erasing every thing. I'm being very careful. I'm being very gentle. Castle want to maintain all the main parts and
all the main lines. One to be able to
see everything. I'm going to use a pan. You know, that's a
Nanking linking pin, 0.8. It is a 0.8 and then kin. And also we'll use
a 0.40.4 though, these two pins, okay? I also have this other one. It is a 0.1, it is a micron, it
is another brand. I don't know if you
guys know these brands that I'm talking about. But it doesn't matter. You just have to use good-quality pins, pins
with good-quality. But anyway, let's start with the highlights in the
width, the online. I'm going to use this pen. I won't put a lot of pressure. Care will be careful
because if I make any mistakes on this stage, I will, I won't be able
to to raise because we can use the razor
anymore on this part. Anyway, you guys I don't have a lot to explain on this stage because I just have to outline the main lines
and the main part. Sometimes I'm gonna, I'm
gonna control a thinner line, but other towns
are going to draw a thicker line and that's
fine. That's nitrile. We have different lines
with different sizes. But anyway, just be careful, just pay attention to everything
that you aren't doing. And I'm sure that you guys
will draw a really nice, you really beautiful drawing. You can just see
the way I'm doing. And you can do the
same thing, okay? If you don't have a pan, dislike this that I'm using, we can use another pen, you know, any pen that you have. That that's fine. That's okay. You don't have you
don't need to have the same thing that I have
now. But I have here. Be very, very careful guys. I know that sometimes
we make mistakes. But this time on this stage
is very important to be very, you know, you can
make any mistakes. You can lose your
entire drawing. You know, if you
make any mistake. On this stage. You've heard careful on this part right
here of the armor. It is very important
to keep a steady hand. Really steady hand. Of course, you can just paint some parts of the
drawing in black. And as you can see, it is very nice to do
this because you know the draw and become
more beautiful. We have some details right here. Okay? And you can add these details. It is kind of like
a light shadows, you know, like shadows in this part right here. Let's paint in black, you know, and also their chairs like this. Those smaller parts. This kind of hotter, you know, to, to make. But if you use a 0.1 pan, it will be easier for you. But if you don't have a 0.1 pan, of course you can use
whatever pen you have. But these smaller details
with these smaller parts, we just need to be careful because it is kind of
harder to draw them. No K, the upper part of the drawing is
basically completed. Now we can go to the lower
part of this character. Oh, cane. Now some details, all the near two. I'm using a thinner
pen. You know. It's better to use thinner
pens to smaller details. It is finally just to vary
the thickness of the lines. Okay, let's add some shadows. On this part right here. The Irma. As you guys can see, I'm using a sheet of paper. You guys can see that
I'm using a sheet of paper under my hand. And the reason for this
is because, you know, I can swear to you can I don't want to obtain
the drawling. So I'm using a sheet of paper on the my hands and you
can do just like this. I'm drawing very,
very thin lines. So you guys can see I'm using a different brand of this pen
is from a different brand. But it doesn't really matter. You can use and the brand
of pen that you want. The important thing is to highlight the main
parts is to online drawing and do the best you can with the
tools that you have. And that's it, guys. We have character completed. We have all the details, we have all the
parts, the main part. And I really enjoyed
to teach you guys all these techniques are
really hope that it helped you guys to know
how to bet a drone. Cheap drawings. It is very nice for me to be with you guys and
teach you guys. I'm really here to help you with anything that you want
and see you next week. Bye guys.
53. Pencil Sketch: Hello guys has gotten. So let's start this
lesson with these catch. Okay? You can see that already made
two circles just like this. I'm gonna divide in the
middle with a vertical line. Then we can control the face, the shape of the face
of this character. Those two circles. I drew them with the same size. Okay guys. So this, you know, this we have a bandana and
they in this character. And that's why I
draw that detail. Write them. I can draw the eyes. Mouth suggests like these
are really big open mouth. I'm going to also add some
kind of teeth details. Also the Abrams, let's say
it's guy is very, very nice. Of course, that's just a sketch. I'm gonna, uh, we'll come
back to the face later. But for now, that's fine. Let's go now to the body. We have a arm up. Very nice, simple
and soft lines. We can do all the parts
right here of the body. Because it is important to make his sketch as you
guys already know. Because with the sketch
we know where to place all the parts
of the character. Know how to place
all the details, the main parts we have
now, the feet rather. Just remember that in
this kind of drawing. We don't have to, I love
details in the Fe2. You don't have to add a lot
of details on the hands. We don't have to add
them in details. That's acute drumming,
that's GB character. But that's it. Let's go to the hand. Like this. You can add some
details to the fingers. I'm going to add
some details again. You don't have to, but I will. As you can see, the
scratches helped me a lot to know where to place
every one of the fingers. Very simple fingers. I didn't add a lot of
details to these fingers. Now let's go to this other part of the face of the character. We haven't bandanna right here. As you guys know, told you about this. It is so really simple, but nice and bandana. Let's add eight year right here. Of course you can improve in
part two, can add others. Let's draw the hair with a
lot of triangular shapes. Very nice hair in anytime
that you filled in, needed to change something
or to fake something, feel free to do so. Again, let's add some more
details to the to the bandana. Fta, you redraw the sketch. Otherwise is just details. So don't be afraid
to use the eraser. I'm going to draw these detail
right here in the middle. Very nice. I'm going to just
fakes and adjust this. I think we can do better. Just this part right here. Okay. Now it's done. Very nice, Very nice. Let's go back to the
face with the eye. Brahms. As you can see, I'm using, I'm using
my eraser out a lot. That's fine. That's it. You can see that we
have a lot of lines. When they use the eraser, I can clean the drawing, helps me a lot. Very nice, very nice
arm and this arm is up. We have realized arm. Let's use the razor again. Clue they trolling. So more details here. Of course, you're going
to draw the closest. This character in February. February has a lot of details. We need to add these details. I'm always, always
using the eraser. That's fine. Let's go right here. In this arm. We have thumb details
and really closely with two who didn't mean visible
part of the character. That said, this is
stage of the jury. I don't have a lot to explain. You just have to
outline the main parts. Just have to see what are the main parts in
the highlighted. Just like this. That's it guys. Practice a lot, see
how I'm doing it, and try and do the same. That's it. Now we
can go to the bands. The lower part of the character. As you can see, this character
is almost finish it. We almost completed this Rowan. Let's just go to the
bench right here. Okay. Let's keep adding
some details to the pants, to the fabric of the fentanyl. We have the feet right here. You could add a boot
or another nice shoes. You can chose. Maybe you could add a flip-flop. Anyway, you can choose what to draw in this
part right here. But I'm going to choose to add. It is some kind
of like a reboot. But we can see the
toes and you will see, while I'm going to do these on the other side to know, you've got to do
basically the same thing. Just have to be careful about
the angle of this second. The second food right here. We can add all the
details that we need. Just like this. In the next lesson, we're going to do the final art and seen how to
finish 100% is from. So keep practicing and see you.
54. Line Art: Well guys, I'm going to
start using a eraser game. We're going to use a pan, a black pen to do the final art. You can use a white
eraser just to clean, to draw in and erase the traces and the lines
that we don't need anymore. I'm doing this right
now. Just like this. Of course be careful
because you don't want to erase everything
of your drawing. You want to maintain the main parts who wanted
to maintain domain lines. So just be careful. But you can erase. Oh, the most Hugo can raise you guys the lines that you
don't need anymore. No, I can't start using my pen. Like this. You just have to
outline the drawling. Of course, if you
want to fix anything, you want to add some detail. That's the moment, that's
the time to do so. For example, handily year, I edit some details
in the inner part. And that's it. You
can add some details, you can fix whatever you want. Just be careful
because you can't use the eraser anymore
in this stage. Because we're using a pan. We have the close it
ice, both of them. But we need to, of course, highlight these ice. And as you can see, I edit some, some light, some
light to the eye. It is a really small
light. In both eyes. It isn't really small light. But anyway, it is nice. There's no rule to where you can start with the hair or you can start
with the pain too, can choose where
you want to start. There's no rule about it. Now, the mouth right here, it is a big mouth
and an open mouth with a big smile and
does what we want. We have some more details
right here. The teeth. We can keep aligning
those parts here, the hand, the bandana. Just be careful about. Because as you can see,
we have some thin lines, we have some fake lens. Just be careful about it. At this stage, I don't
have much to explain. You just have to practice
a lot to this very, very important to
practice a lot. And you just have to see
the way I'm doing it. Try to do the same, guys, try to do the same. We have a lot of details here on the cloth face
and also all the face. Just see how to do it in try to do the same
in practice a lot. Have any questions, guys, please feel free to contact me. I'm here to help you. So if you have any questions, feel free to contact me. Let's continue the drawing them. Right here on the hair. I'm going to make more
thicker lines. You know. You could do this
too if you want. I don't want thin lines
right here on the hair. I'm gonna do those. These take care of
lines, as you can see. It is always triangular shapes. That's it. Each one of
those lots of hair. Triangular shapes and lines. Very nice, very nice guys. We wanted to highlight
these online. You know, wanted to
highlight these online. That's the reason why I
chose to do thicker lines. That's it. That's it. We have hair. It is a right, Nice hair. Very highlighted. We can do the same
thing right here. I want to highlight this
part more than lines. Now we are almost
finishing this trauma. You're just adding
some more details. We are just we can make the final adjustments right here and the fabric
of the bands. And the guys that say, you can now adjust the final parts and
then some more details. That's it. That's a drawing, a really nice, really
beautiful drawing. We have the final
art done. Okay? That's it guys. You can do just like this. So practice a lot. You can, of course, pain to draw and you can
use the colors you want. You're free to use
your creativity. Now I'm going to use the eraser just to make this rowing clean. You want a clean drawing. You can just use the
razor and then use the panel if you feel
you fulfill the need to the pan again just
to highlight some part. Okay. You can do this. That's it guys. Just to finish,
to use an eraser. Okay, very nice. Now, the next step is
using the colored pencils just to paint these trauma. Who wanted to paint a
really beautiful qualities? You want to paint with
really nice colors. And you can do this in an SLS. Suddenly we going to
talk about callers, we're going to talk
about all of this, okay? If you have some questions, feel free to contact me and I
see you in the next lesson. Thank you. And don't
forget to take all of all your colored pencils. Okay. See you.
55. Colors Hair: Hello guys, how's it going? Welcome. In this video lesson, I'm going to show you guys
how to paint this trauma. I'm gonna use a lot
of colored pencils. Okay. Actually, I'm not using a pretty expansive
colored pencils. Okay. Those are just regular
chloride pencils in UK. It take yours and just choose the colors
that you want to use. Paint, the hair,
parts of the face. The closest advice you guys, that you shouldn't put a lot of pressure on the colored pencils. Just begin TO be soft
team. And that's it. It doesn't matter the directions
that you that you paint. Okay. That's fine. You can just paint
the way you want. But just try to paint
all the spaces. Okay. We don't want any white part. As you can see I'm my
directions right now. It is in the ventricle. But you can paint it in
direction that you want. It is not important. The directions they, you follow. As you can see, I'm
not putting a lot of pressure, being very gentle. That's it. This character is blunt. I'm using the yellow pencil. We must paint all the space. We don't want to
let any whitespace. Okay. Let's keep doing it. It's narrow, tall,
blonde character. Be careful right here. To the edges. The eyebrow LMS, I'm gonna also paint with
the yellow plane. So now I'm going to use
this color in pencil. It is, it is kind of a orange. And I'm gonna, I'm gonna add
some details to the shadows. We have some shadows
on the hair. I'm going to use
this colored pencil. Just like this guys. You don't have to put a lot of pressure in this case, either. Just have to be very
soft, very gentle. You can at all the shadows that you need to
add to your Darwin. Also be careful guys about the places that you
will add the shadows. But feel free to do
the way you want. More here also, I
believe that you guys already can see the shadows
in the video, right? On the video, you guys
already can see, I guess. But this part of the drawing at the shadows, it
is very important. It is a very, very important
part of the process. Because the shadows, the drain becomes better in
more beautiful. It is very important
to add to the shadows. In this video lesson, we only world will
paint the hair. The last lesson we are going
to paint in the bandana. And then the next one
we're gonna painted the skin in all the other
parts of the character. But in this, especially if it, unless we only will
paint the hair, we are almost
finishing the hair. As you can see, I added
to a lot of shadows. At first use it a moral
lighter colored pencil, and then they use a darker
warm to add the shadows. I'm adding a lot of shadows. The shadows, as you can see, makes the Trofim
very, very nice. Normal gonna use
the white pencil. I'm going to do just
like these guys. I'm going to use the white page, so all the hair came in. We're going to use
the white pencil in the lighter part and
also on the darker part. We're going to use
in both parts. And as you can see, the
white paint so also makes the drawing better
and more beautiful. Let's keep doing it
with a white band. So it is very important to use the white pencil
guys. Believe me. Very nice. We can also do right here. Just like this. It doesn't matter the
direction that you use. Okay? It doesn't matter if it is vertical lines or horizontal,
horizontal lines. It doesn't matter.
You just have to paint all over the hair
with a white pencil. The final result is
getting very nice. It's become a very nice. That's it guys, That's it. That's a drug in
a very nice hair, very, very beautiful hair. And to you in the next lesson.
56. Colors Bandana: Okay guys. Now we're gonna start
painting the bandana. Okay. We already painted the hair. So now is the time
of the bandana. I'm going to use a
gray pants sold. Of course, you could
use any other color. Feel free to choose the
colors they want to use, but I'm going to use the
gray pants, so okay. Let's start just like this. Once again, it doesn't matter the directions that
you want to paint. Okay. Be careful because
that's how it was Mole part and we don't want to paint the
yellow part to know. So just be careful with it. That's it. We already have
the lighter part all painted. And I'm going to
use a darker pencil and add some some shadows. I'll put in a lot of
pressure in the pencil. Okay. I just have to add
these details right here. I'm using a black pencil now. I can use the white pencil
to make the drawing, to give harmony to the drawing. Just like in the other part
to this guy's very nice, endemic afraid to use
the white pencil, okay. It doesn't matter the direction that you use this pencil widow. I'm also will use
this blue pencil. But I'm going just
to use it very, very soft enough software. Just like this. It is a blue spend, so this colored pencil. And again, I'm going to
use the white pencil. It makes the drawing
a more beautiful. Now, right here
in the near part, I'm going just to add
some light, okay? I'm going to add some light in this part right
here of the middle. Then I'm going to
paint just like this. I can do all this also here. We're going to add
a lot of flight. Actually, we want
paint the light. The light will be just white. We don't have to
paint anything. Okay. A very light hue. And that's what I want. This what we want. Now in this symbol right here, I'm going to just add a
darker tone and a darker hue. Okay. To finish, let's use
the white pencil. I'm going to use the
white pencil guys, even in the part that
we did e to paint anything the white parts and also we'll use the white pencil. That's it. We're ready to
have bandana and paint it. See you.
57. Colors Skin: Guys know we're going to start to painting
the scan, okay? I'm going to use this
colored pencil right here. It is a orange colored pencil. I'm going to use it to paint all the skin of this character. We're going to do
just like you would with the bandana and just
like we did with the hair. And we won't put a lot of pression in this colored pencil. Gonna be very gentle. We're going to be very soft. We want a light view. So we're going to do this. Does it matter the
direction that you paint? Just have to be very gentle. And we want a light hue. Okay? Then we get, we can do this and the
interior face of this drawing. Of course, we're going
to use this same color. It depends on what the other
parts that we have scanned. We're going to use
this colored pencil. Just be careful because
we have here the eyes, we also have the mouth. So just be careful
because we don't want to paint the parts. We won't use this color. You can do right here also. Dump but a lot of pressure. Don't be rush. Just take your time and
paint the entire face, the entire skin
of our character. Now the hands, the same
hue, the same color. Okay? Now right here, again, of course we're
gonna add some shadows. We're going to add
some shadows later. But at this stage you just
have to paint all of the scan, the entire parts of the skin. And I'm going to use
this colored pencil, this brown colored pencil. And I'm going to add
finally the shadows. The technique, it
is just the same of the hair and of the bandana. You just have to choose the places that you need
to add shadows, okay? You choose the places that
you want to add shadows. And then you can
add it right here, some shadows with this
brown colored pencil. It is very simple to do this. Just have to outline the face. Basically. We did a tweet, the HER2 would basically
just align it. The contour noodle. You can keep doing
it right here. Two very simple, simple here. In the i2, on the I2. That's it. The Chan. You can of course, add more shadows if you want to. Cute. Add more shadows. But I think it is already fine. I'm going out to the hand. And as you can see,
I'm also adding some some shadows to the hands. Just like this and this part. The fingers two. Very nice, very nice guys. And also on the other
hand, the same thing. We can add more
shadows right here. Now I'm going to use
the white paint. So that's a really big four in part because
as you guys know, we use it to the white paints hone in all the other parts. In now, it won't be different. We're going to also
use the white pencil. This can own this skin. K right here again. All the parts of the
face, only entire face. Also own the eye. We want to give a hardware
live to this drawing in the white pencil
will help us with it. Very nice, Very nice guys. We can see this skin is
very nice, very beautiful. That's what we want. It is very, very important
to use the white pencil. The white pencil will give a lot of Harvard
into the drawing. And the drug will be
more beautiful with the white pencil right
here on the checks. I'm also given some highlights. Again. That's it.
58. Colors Uniform Part 1: Okay guys, so I'm going to start painting the uniform
of this character. We're going to paint all
the parts of the globe. Okay? I'm gonna start
with the gray pencil. Just paint this
part's right here. I'm going to add some
lights just over here. Near the neck. Of course I'm using
a gray pencil, but you could use
any other color. You could use the red or
maybe be green or yellow. You can use whatever
color you want. But I chose to use
the grid pencil. No. Okay. You could also use your pencil. Okay. Your regular pencil,
you could also use to paint the
cloth these close. Okay. As you can see, I left some some parts
white because I want to add some light to the cloth. This check it. No, I'm gonna keep
doing this ray here. Of course I could add more light secured, add some shadows. Okay? It may be able to do
this in the future. Right here in this detail. The jacket, and then we
can go to the banks. I'm going to use a black pen. So that's the moment that I'm going to start to
drop some shadows. We can add more
shadows right here. Near the edge. Of course, you can
choose all the places that you want to
add to the shadows. But as you can see, I'm adding my shadows, the shadows of this
drawing right here. I don't want to I don't want
to control too dark shadows. Okay. Of course I'm using
a black pencil, but I don't want to
make too dark prints, too dark shadows. Right here too. I'm going to add some
shadows right here on the arm down there too. At this stage, I don't have
much to explain, guys. We just habit to place the shadows where you
want to place them. Of course, you need to chose, choose the spaces that
you will add light. That's it. We have what we have here, shuttles, we have a light. Now I'm going to start
using the white pencil. As you guys were any known
the white depends WHO gives some harmony
to the drawing, okay, so it is very
important to use it. You can use the white pencil
on the entire trinomial. You can use the gray part
and also on the black part, and even only white
part of the drawing. You can use these
white paint soul. We already have all
the part of the, the great part of the closest. Okay. Now we can go to
other parts of the body. I forget to paint this part
right here of this skin. The lags, and also the feet. Okay, so we have to
paint right here too. If you paint with too much pressure in the color is into the
code that you want. You can just choose
the razor or came and they can make the color lighter. Also, I'm going to use the brown pencil to add to
the shadows of the trauma. And it is a really
big part in part. That's it. Now, this part of the
uniform is completed. Okay, we can go, we
can move on into, we can go to the second
part of the uniform. And we're going to do
this in the next lesson. So I see you guys.
59. Colors Uniform Part 2: Okay guys. Now we're going to
finish this trauma, we're going to finish the
painting of these traumas. And I'm going to use the
orange band show, okay. And I'm going to
paint this part that these remain part of the
ejecta in also depends. Of course, you could
use any other color. If you want to use another
color, that's fine. You can do it. Okay.
You guys already know. We can't put a lot of
pressure on the pencil. You don't have to put
a lot of pressure. Just be gentle, okay, we want a light hue right here. So do just like I'm
doing right now. That's it. We can go to the bank with the same
color with orange. Very light hue. Okay. It doesn't matter the direction that you are painting, okay. Don't don't care about it. We just have to paint
the entire part. Just like this. Now we can go to the
other parts of the paint. Do the same thing. We are almost finished in it. That said, I'm going
to adjust the hue. Of course. You can see that we
have some white part. So it is important to paint
again with the pencil, okay? And that's fine. That's natural. That's part of the process. It is the time to use another
pencil, a dark Hawaii. It is also a orange pencil, but as you can see,
these darker one. I'm going to add all the
shadows that I want to add to this rowan
with this already, this darker orange pencil. Let's do right here. We also want to add some
light to this Rowan, and then we're going to do
this maybe in the future, but not what I want you to
focus only on the shadows. And it is important to
add some shadows right here to the banks. Can always clean your roman. Right here. Two very nice frame ice guys. On this other part of the pens to you can see that we are, we're getting very nice shadows. Notice the time to
use the white paint. So that's the last part. I'm going to use
the white pencil. The entire drama in
all these parts. Here. As we already know, we can use the white pencil on the turn Sherwin on the orange
parts, on the gray part. Even on the white part. That's fine. You want to give a lot of
harmony to the drawing. Really new to drawing. So it is very
important to use the white, the white pencil. Okay, that's it guys. That's it. We finish the drawing. I really, really enjoyed
to draw this character. I believe that you guys also, also enjoyed this character. Okay. I'm going to sign right here. That's my signature. You can also do the same. You can sign your drawing
student, that's fine. But that's it, guys. Of course, that FTE
use on your drawing. You can, you can just
show drawing again. You can change something
or add more light, maybe more shadows, That's fine. Okay. For example, I
believe that I need to give this to make some shadows right
here on the teeth. I'm also going to use
the white pencil. That's it guys, That's it. I've already simple drawing
of our beautiful drawing. Who was an easy one I think, tuned to make
questions that you, that you have guys contact me. I'm always here to help you. I believe that all
these techniques that I told you guys that I teach, that I told you guys, it is very important
to techniques. Comment right here down
below and tell me what it was you thinking about
these characters? What what are your
favorite characters. Okay. Thank you very much and see you.
 Israel De Sousa