Transcripts
1. Welcome!: [MUSIC] Have you ever wondered where do I start in creating an
abstract painting? How do I do it? I'm not sure. Well, this class will
help you with all of those questions and
where to start and just guide you through step-by-step to create your
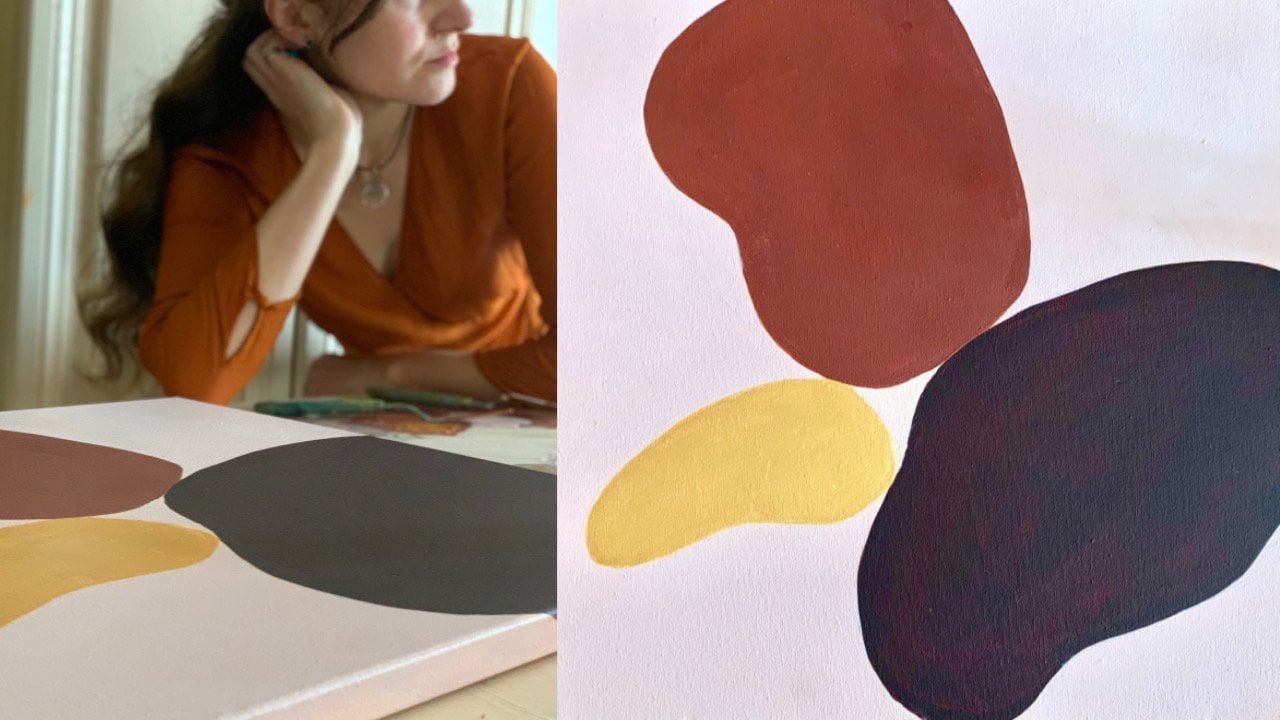
own abstract paintings. [MUSIC] My name is Yvette Swan, and I've been painting
for about 20 or so years. I've created mainly in the
area of abstract painting, in solo and group exhibitions for projects and commissions. For the last seven plus years, I've been teaching
abstract painting and just guiding students, helping them get some
knowledge around tools and techniques and know
where to start and how to create an
abstract painting, and how to add layers, come back to it, change it, and keep going and
never give up. With this class, because
you'll be guided through step-by-step
learning tools, techniques, all those
skills will come together. You'll be building
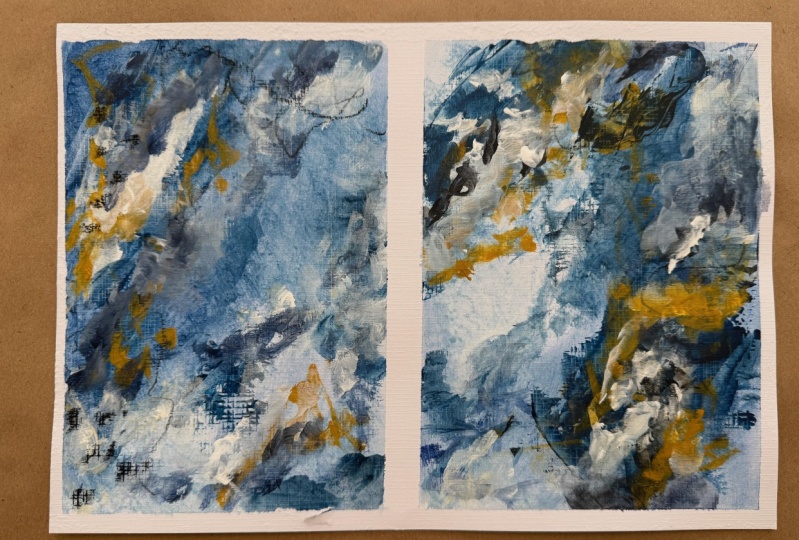
layers and you'll create your own final project. With that class project, you'll be creating your
own abstract painting, and then you can
go on and create your own paintings and your own style will
evolve from that. For this class you don't
need any knowledge, as I'll be teaching
you step-by-step, so you'll just learn
along the way. Then all the ideas
can come from there. You won't be wondering, how do I use these
tools? What can I do? You'll already have
that foundation in place and you can just launch into creating your own style and developing it in your projects. This is a great
foundation to then create in any kind
of area of art. Whether that's still
like decorative, landscape or abstraction, this is a great
foundation to build upon. Let's get started. [MUSIC]
2. Class Project: [MUSIC] With the class project that will be at the
end of the class, that you'll be working
towards in each lesson. Each lesson will give
you some skills, you'll learn about tools and what techniques you can
use with those tools. Just get comfortable with
those in each lesson, and let things build up. Let layers dry in between, go back to them,
use another tool, draw another lesson,
add another layer, more depth, and by the end, you'll have your own
abstract painting. The tools you'll need
for the class are, three small dishes to
mix some washes in. You'll need a set
of paint brushes, small, medium and large. For example, that can be large, and two smaller ones. Just so you have some variety. You'll also need a pallet knife. Now these come in different
shapes and sizes, so just choose one
that you love. You can instead, use better hard
plastic if you wish, or a better hard cardboard just to be able to scrape
some paint along. Now, you'll also need a
sponge or a sponge brush. These are the sponge
brushes in different sizes. Or you can cut up a car sponge, or a kitchen sponge
into small pieces, and just use that. You'll need two wet cloths just to mop up
during the lessons, and it's handy having
a dry cloth as well. You'll also need a
water spray bottle, and we'll experiment
with spraying the paint. You will need some paper
to paint on, either A3, or A4, whatever size you prefer, and paper that you can
paint acrylic paints on. You will need a set
of acrylic paints. Get your primary colors, yellow, blue, red, and then
white and black. You can make other colors
from this as well. Or you can also bring along
other colors that you love. You'll also need a
container of water to wash your brushes
during the lesson. Let's have fun creating, and I'll see you in
the first lesson. [MUSIC]
3. Create with Paint Washes: Welcome to create
with paint washes. In this lesson, you'll get to see how to use paint washes. How this fits into the bigger picture of the
art class is that you'll be working towards
a final project and you'll be developing
your own style. Each lesson will
give you a skill, it will teach you about a
certain tool and technique, and how you can utilize
that in your artworks. All those different tools
and techniques work together to create depths
for your final piece. In this lesson, you get to see how you can break paint down into a wash and then
how to apply that. The first part of
that is just layering some water down onto
your surface and then you can add the colored
wash to that water and it will glide and
bleed on the surface. A second way you can use wash
is to paint directly onto your artwork and it'll be a stronger color than just
painting to the clear water. Thirdly, we're going to use
the water bottle and spray some of that water onto the washes you've
already created, and you'll get to see the patterning that
happens from that, and the dribbles, and it's very beautiful. With your final project, you'll be just
building these layers up and changing the look, adding more layers for depth. These washes will be
undercoats as well as can be used as an
overcoat on a dry painting. To create a wash, just have some paint and add a little bit of water to
it and start mixing in. Don't use too much water at
first because it'll break the color [NOISE] down too
much and it will be very weak. But if you just
add a little bit, then you'll have a strong color as well as it being a wash. But also if you
would like to paint a light-colored wash over a finished artwork
or over some layers, add more water so then the color isn't too
strong and it will be just be a light touch of wash
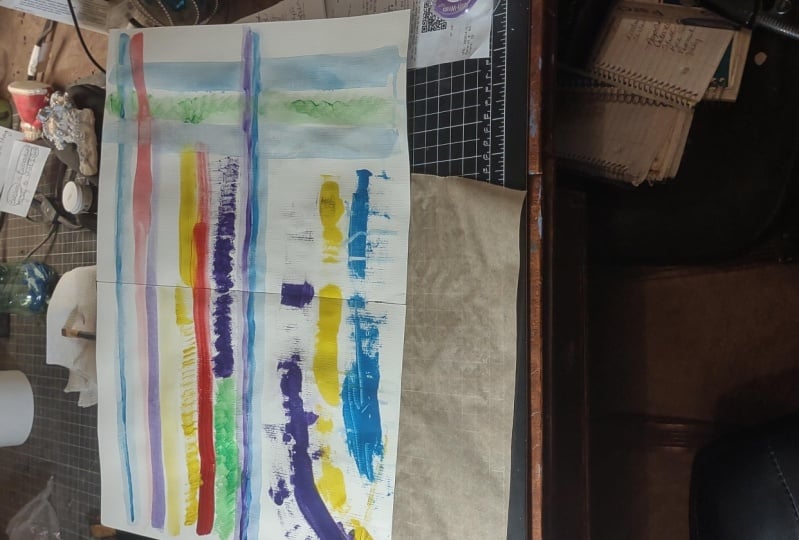
at the end of your artwork. The first way to use a wash is just to lay down some clean, clear water [NOISE] on
your surface first. You can paint whatever
shapes you want and then get your brush
and dip it in the wash, the color, and just layer over that clear water
that you painted on. It'll be colorful and
watery at the same time, and it has a beautiful fit, a bit like calligraphy or
old Japanese paintings. You can do lines and
squiggles and splatters. Remember to have a wet cloth
with you because it gets pretty messy at this stage
and you can wipe things up. Also just take the
surface you're working on and hold
it up and just jiggle some of those wet
colored washes around the page, and you'll get
beautiful dribbles. You can also paint the
page again and just add another color and just see the beauty of the unknown
coming onto the page, everything's bleeding and
expanding, and dribbling. Hold that page up and just push those dribbles all around
and help it move around. You can shake it, you can rock it side to side, the dribbles can
go down the page, and up, and across. Use that wet cloth to mop up. The second way you
can use a wash is directly from the wash.
Just paint that on and it'll be a lot stronger
in color and look [NOISE] instead of adding water first and then painting
onto the water. You can create all
different shapes, and this look will really contrast with the
previous of the water. It won't be as strong as solid paint but it'll
be a nice in-between. Once you've done that
water and then wash, just use another color and
different sized brushes, and paint directly from that
colored wash onto your work. Remember, if you use different opposing colors,
contrasting colors, warms and cools, just remember to let
things dry if they start getting [NOISE]
a bit dirty in color. Another way to create washes
is using a water bottle. With the work
you've done so far, just spray it and just allow patterning and
dribbles to occur. Hold the work up and then spray and just let those
dribbles naturally come. You can twist the
page around and have the dribbles going
[NOISE] all directions. Remember to have that
wet cloth to wipe up. You can spray certain
areas a bit more and have even more patterning at different sections
of your artwork, and just hold it up and let
gravity help pull it down. As you're experiencing
this lesson, just have in mind a sense of maybe your final project and how this lesson can add to that, just building up those layers, having differentiation [NOISE], having contrast, thinner
layers, thicker layers. With all these washes, they're really beautiful to
start building up layers. There's those initial layers and then you can
add solid paint on top or once some
artworks have dried, you can actually add [NOISE]
a wash on the top and finish it in that way
or alternate wash, solid, wash, solid. Start building up some
depth, some layers, changing the look and just having that beautiful
combination. I hope you've enjoyed
create with paint washes. The key points with this
is we know how to use just clear water and adding
the wash to that water. The second part is
using the washes directly onto your surface
and combining the two. Then thirdly, using the water bottle and
the different effects with that and the extra
patterning you can get from what you've
already laid down. Just have in mind for
your final project, how this lesson can add to
what you're going to create. How it can create
more layers and contrast in having a
wash to solid paint, and how that can come together
in your final project. After each lesson,
just upload photos of your work to the photo gallery as I'd love to see
your progress. Remember to do this
for each lesson throughout the whole art class. I hope you've enjoyed
create with paint washes. I'll see you in the
next lesson [MUSIC].
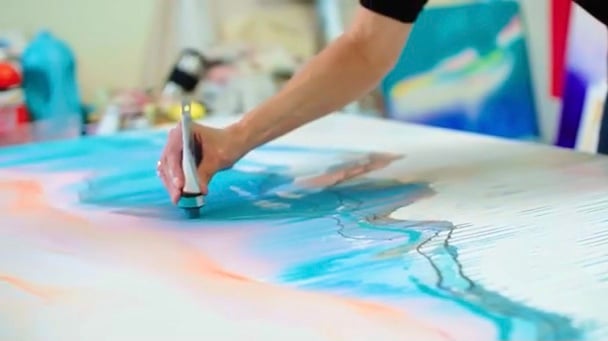
4. Painting Effects, Palette Knife: [MUSIC] Welcome to the lesson, painting effects with
a palette knife. In this lesson, you're
going to learn how to use the palette knife hard
to the surface and scrape and the effects
that gives you, and then also how to
build up texture. Then thirdly you'll also learn
how to use the tool to cut into paint and create
shapes and lines. I love the palette knife, I've been using it
for over 20 years. It's a great way to deliver
paint on the surface. There's different shapes and
different sizes depending on how large or small your work is and what
effects you want. This is a key lesson to work
towards your final project. With the palette knife, there's all shapes and sizes. Some taped ones,
some longer ones, small ones, and
more rounded ones. Firstly, we're going to take some paint on the knife
and just hold that paper tightly so it doesn't
move and just press hard to the paper and
drag that paint down. You get to see the texture
of the surface underneath or any washes or paint that you may have painted
underneath as well. You can paint some
lines over lines. Also have a wet cloth with you. You can wipe excess
paint onto the cloth and in-between different colors so the colors don't
mix and get dirty. Just pull that paint through, overlay some other colors, and wipe off that excess paint. Have fun exploring
the palette knife and pressing hard
to the surface. Another aspect of using a palette knife is
using the corner of it to scrape the line
work through your paint. You can drop the head
a bit lower and also have wider lines coming
through your paint. Just use a more rounded
wider palette knife and you get another shape. You can overlay some
paint on top of paint. Just remember to wipe off excess paint in
between each color. The second way to use a palette
knife is to add texture. Add paint onto that knife and then apply it
to your surface. You can slide it, you can tap it, you can load up. Just keep adding more texture
and playing around with it. You can also add a medium called impasto and that
thickens the paint. You mix it with the
paint and it becomes very thick if you
love textural work, and you can overlay
previous work. If you have an undercoat
of other colors, once it's dry you can come
back and add another layer. All these layers build up
for your final project. You can add some paint
over the washes you did in the previous lesson and start building
up these layers. They all work towards
a final project. Remember to let
things dry in between each layers so the paint
doesn't go too dirty. The key points from this lesson are seeing how you
can press hard to the surface and drag paint along and see
the effect of that. As well as using a
palette knife to build up texture and give your artwork
that textual thicker look. If you love texture, a palette knife is great to use. The other key point is
using part of the knife, the corner, just to cut into the paint and create
lines and shapes. Keep in mind your final project and how you may want to use a palette knife to just build up those layers and
play with the paint. See other layers underneath
by pressing hard or building up texture and
also just cutting in. A palette knife, it's
a beautiful tool to use in all stages
of your artwork. Remember to upload
your lessons to the photo gallery and I
can see your progress. I'll see you in the next lesson. [MUSIC]
5. Using Sponges: [MUSIC] Welcome to the
lesson using sponges. These come in either a sponge brush that you can
get from the art store, or you can cut up
a car sponge or a kitchen sponge
into smaller pieces. The key point with
this technique is that it gives a
softening effect. It's very beautiful, very
ethereal and social, and just a beautiful
quality to work with, as well as the other
tools and techniques. What you'll get from this
lesson is just awareness around another tool
and the look of it, the effect it gives, and how you can utilize
that in all of your art. For each lesson, you'll get a different look, and you can build
those layers up which will work towards
your final project. You can use some
[NOISE] sponge brushes from the art store, or cut up some kitchen or car
sponges into small pieces. Then [NOISE] you can dip it
into some water to start, squeeze that water off, and I just find it's
a lot more soft and fluid to start the art work. Then you can dip it into some paint and just move
that around the page. You can do swoops or
lines or pattern around, tap it around, creating some shapes and
just building that up. You can add more colors
and just start blending them and see how
they look together. Then you can use that kitchen or car sponge like
the sponge brush, dip it into some water
first, soften it up, and add some paint and just
pat that around as well. You can experiment
with a dry sponge or soften it a little bit with water and see
what you prefer. [NOISE] Just blending
all those colors together has a softening effect with this technique
of using sponges. Looks very beautiful, ethereal. You can dip your sponges in washes [NOISE] as
well as solid paint. You can paint a background
very smoothly with a sponge brush versus
using a bristle brush. It looks a lot
smoother and cleaner. [NOISE] Then you
can pat some more, wash different colors and some paint over
that original wash, and then you can use
your cut off sponges. It's got a slightly
different look, a little bit more textural. If you love texture, you can add a little
bit and just work it, get the look of the sponge
on the surface as well. Then add your layers to your final project
in your [NOISE] art. Use the other tools and
techniques and mix and match, let things dry and just
see where it takes you. Use your intuition. With your cut up sponge, you can use it like a stamping
tool to get the shape of the sponge and holes and start
layering some paint down. [NOISE] You can turn the sponge around and
add in another color and get two colors out of
that one cut up sponge, then you can wash
that out later. I'm just adding some
contrasting colors in creating your work. When you use this
on your projects, it gives a lovely
softening effect that dubbing and moving around. If you want that finer equality, this is a great tool to use. Use the sponge brush
or sponge and just add colors to your artwork, add some layers,
reinforce the colors. You can use your hand or a cloth just [NOISE]
to blend some of those colors. Very handy. Just work it, go
with your intuition. Abstract dot is
from the unknown, no rules, just have fun. [NOISE] Remember to
put all your tools and particularly the
sponges in a wet cloth. Otherwise, they'll dry out
and they'll ruin the sponge. You can just blend
things nicely, softens it up with
this technique. [NOISE] You can hold the
sponge from behind and just use your finger
to maneuver it and put some shapes down,
add some layers. With your previous artworks, you can add some more layers
with the sponge brush. Give it more definition, more depth, until
you're happy with it. I hope you've enjoyed this
lesson using sponges. The key points from this
is that you can either get a sponge brush or cut some
sponges car or kitchen, and the look of this technique
is a softening effect. You can build up lovely
softening areas in your work, you can use this to layer with other
tools and techniques. This will be beautiful tool to work towards in
your final project, so you might want
to have a think of how you can utilize that. I'll see you in the next lesson. [MUSIC]
6. Colours, Warms and Cools: [MUSIC] Welcome to
Colors: Warms and Cools. In this lesson, we'll learn
how working with cool colors work really well
together and working with warm colors work
really well together. But when the opposites
meet and they both wet, then dirty colors
can be created, either a bit brown
or a bit green. You also will discover a couple of ways to
get around that. One way is just
once you put, say, your cools down, just let them dry and then come back to
them and add some warms. Or if they're already
mixing in a bit dirty, you can either scrape that back with a palette knife
or you can grab a wet cloth and just mop up
some of that dirty color. Enjoy the lesson. We have a palette of color here. We have cool shades:
purples, blues, greens, and warm shades:
yellows, oranges, reds. We also have white and black, which give darker and
lighter tones of each color. First off, we're just
getting some primary blue, adding a tiny bit of black, not too much, and you
achieve a deeper blue. With that deeper blue, [NOISE] we can then
add some white for lighter tone of that
particular deep blue. Then you can add some
white to the primary blue and get more
of a powdered blue. Same with the warms. We have some red mixed
with a tiny bit of black, which gives a deep crimson, burgundy red, and you can add a bit of white to
that deeper shade, and then have a lighter shade
of that particular tone. Same with the
primary red and some white, mix them together, and have a lighter primary red. Cools work well with
cools when it's all wet: blues, greens, grays, purples, and same with the warms: [NOISE] reds,
oranges, yellows, brown. They work well together. They won't get dirty. But as soon as you
start adding warms and cools together and they all wet, things start getting
a little bit muddy, bit green, bit brown. Just allow things to dry
[NOISE] and come back to it. As you can see, it's going a bit
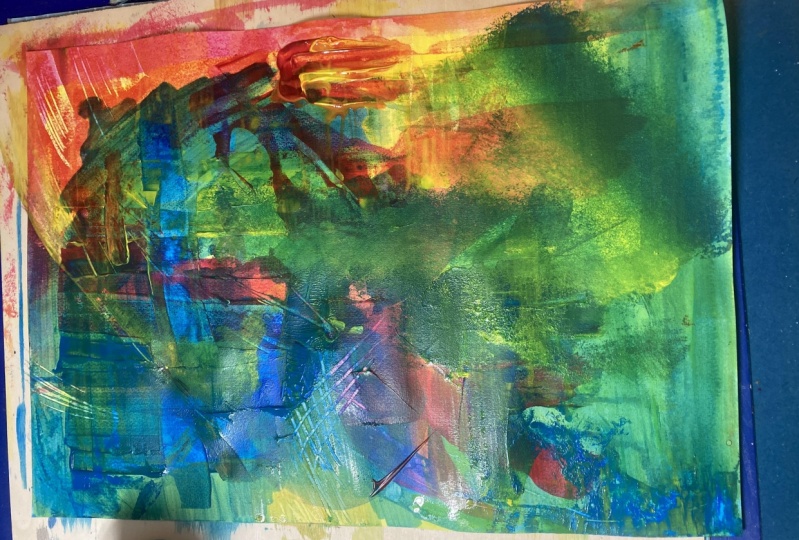
green dirty color. Here we've just got
lovely warms, rainbow, a swish, some orange, some red, some yellow. Looks so vibrant together. You can add some water
with a spray bottle and just let those dribbles
run in that patterning. It's very beautiful. I'm just adding some blues now, some cools against those warms. Everything is wet. The blue and the
yellow is going to create a bit of murky green now. [NOISE] I'm just cutting some of that dirty
paint back with a palette knife and wiping
that off on a wet rag, getting rid of that. I'm just using a wet
[NOISE] cloth now just to mop up any remaining
dirty parts. Another way to rectify
that is you can let it dry and then add some
white paint [NOISE] just to block it out
or some other color. Once that's dry, we
can redo that surface. You can always use
a wet cloth just to pull colors back
that you've put on. The great thing here is this is a dried work and I'm
adding another layer. Because it's dry, I won't have those colors [NOISE]
clashing and I can play around with it and rework the surface with the
brush or a wet cloth. Looks really lovely,
that contrast and color. [NOISE] I'm just adding
some water and spreading that color lightly around into that [NOISE] white
space and have some texture from the cloth, making some shaping there. Really lovely. Here I'm just adding a deep burgundy red against that
turquoise line work. It looks really powerful
having that contrast. But the turquoise now is wet against wet [NOISE] so it
will start going dirty. I can let that dry and
always come back to it. I'm putting some orange here, and I'm just finding
that [NOISE] it's not quite what I want. It's bit dowdy looking, so I'm just breaking it
down with some water and spreading that around with
a knife and the wet rag. It's more of a tint. Now this is strong orange, and that works a lot better. I hope you've
enjoyed this lesson, Colors: Warms and Cools. The key points that
you can take away from this lesson that
can work towards your final project is that
cools working with cools work, warms working with warms work, but when they come together
and they're both wet, they can start creating
dirty looking colors. It can go brown or green. You've also learned a couple
of ways to get around that, which is just let colors dry. Also if it's already
a bit dirty, you can use a wet
cloth and just mop up some of that dirty paint
and then let it dry. Just share some of your lessons
on the project gallery. I'd love to see what
they're looking like in each step and then how they all come together
in that final project. I'll see you in the next lesson. [MUSIC]
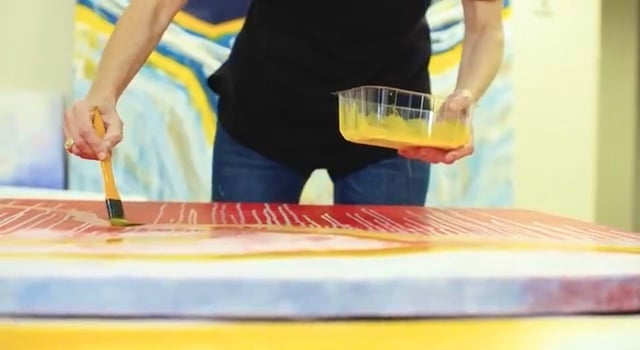
7. Feathering and Stamping Effects: [MUSIC] Welcome to the lesson, feathering and stamping
effects with brushes. In this lesson, you will learn how to feather with your brush. What that is, instead of using your brush in a
traditional way like this, you dip it in some paint and have it
parallel to the page, and it'll give it a
lovely feathering effect. The texture of the brush will come up in the paintwork
and look really beautiful. I tend to use this with semi-abstract landscape
and also landscape. Now, if you don't
have a pallet knife, this is a great way
to get around it. You can maneuver it quite well and get some
similar effects, but a little bit more texture
because of the bristles. The other part of the
lesson is stamping. With your different
shaped brushes, you're actually going to
stamp that in some paint and then precisely just
lay that paint down, so you get some
stamping effects. You'll just build that
up more and more, and when it comes
to its final look, it'll look very
full and amazing. Different shapes will give you different looks
on your page. Here we're starting
with feathering. As you can see, you hold the brush parallel
to the page and add some paint to that
face [NOISE] that touches the surface
of the brush. You just maneuver it
around and literally just feather it around. It creates a beautiful
blend when you add more colors and
work the area together. They can blend really well, or have it rough
however you wish. The lovely texture of the bristles can be
seen on the page, whether you leave this
quite thick or thin down. Here we're feathering some
warms together, oranges, reds, and some coals on the other
side, purples and greens, khaki green as well and just adding some white
here and blending that in, what such a lovely
time to put in. Also with your dried
[NOISE] artworks, if you want to add
another layer, you can feather
some paint over the top and just work the area. Because the paint's dry, you won't be smudging the colors and creating dirty paint. You can use paint, or you can feather
on a wash as well. Here we're now moving
towards stamping effects. Whatever shape brushes you have, you can use that shape
[NOISE] to create a stamp on the paper
or the Canvas. You can achieve the
shape of the brush on the surface and dip that paint on one side of the brush as well and
just stamp carefully. You probably get maybe 3, 4, 5 stamps before loading
up with some more paint. Here I'm just creating tears, working it with
one color and then [NOISE] another layer underneath and another layer underneath. Now I'm adding
another color on top, lighter blue, turquoise
on the darker blue. Here I'm using a rectangular
brush this time, whereas the other one was more pointed and just
layering some red down. Now I'm using some yellow
and because it's wet [NOISE] on wet every
few stamps of yellow, I then need to wipe the brush on the rag
and just clean it off. Here I'm working on another dried artwork and I've done some feathering
already, a layer of it. Now I'm [NOISE] adding a
second layer of white, so it really stands out now
and it pops that white. It all looks very organic
like a field of heather. Now I'm adding some yellow
and just highlighting and it's beautiful that
contrast of white and yellow, so use as many
colors as you want. [NOISE] I hope you've
enjoyed this lesson, feathering and stamping
effects with brushes, and some key points to take
away is the feathering. How you use your
brush parallel to the page instead of upright, and how you get texture from
those bristles in the paint. Also if you don't
have a pallet knife, this is a great way
to get around it. I do find it helps with semi-abstract landscapes
and landscapes, but you can use it
in all looks of art. The other aspect you've
learned is stamping. You can use different
shape brushes to create different looks in stamping and really
build up those stamps, so it looks really
full and amazing. Please upload your work
to the photo gallery, I'd love to see how this lesson was for you and the
look of your work. Also, have a think
about how this can be utilized in building up layers
for your final project. I'll see you in the next lesson. [MUSIC]
8. Building Layers: [MUSIC] Welcome to the
lesson Building Layers. The key points in
this lesson is to let yourself use all the tools
that you're discovering, create a layer, let it dry, and then come back to it and add another layer just so the colors don't get
dirty and mix together. Then building up those
layers creates more of a 3D full artwork. Instead of it looking like one or two layers
and flat and thin, it'll have more body
and more depth to it. This is a great way to work
towards your final project. That it has multiple layers, more depth, more body, and a richness to it. In this lesson, you can utilize all the different tools
you've been working with. The brushes, the palette knives, the sponges, and just
build up each layer. A tip is build up a layer, let it dry, and if you want
to keep painting, you've got the vibe
to paint that day, just have three or four
artworks on the go and just rotate so that the
layers can dry. Here we have a dried artwork and this is perfect to then
add more layers to. Just allow your artworks
to dry and rotate them. I'm just adding some
wash here using some of those tools and
techniques we've learned so far to add different looks. Then I can work that
over the paint. The wash is over the paint
and you can see both layers. Just building up [NOISE]
bit by bit and just using some water spray
and a damp cloth just to push around and soften
out some of that wash. Add as many or as few
layers as you wish and just experiment and see what
it looks like with lots of layers or few layers. Here I'm adding some yellow wash on top of yellow paint [NOISE]. That really makes the color pop, and with that contrast
of the white, it's just making the
color really emanate. I'm just feathering
it on with a brush. That technique we learned about feathering paint
onto the surface. Here I'm adding
some white paint, and you can start to notice how having that contrast
really makes the read and turquoise colors
pop and stand out more. What you'll notice by
building up layers is that your artwork will start developing a bit of
depth and a bit of body. Instead of it looking flat
and thin and two-dimensional, all these layers will
come together and it will look more full in 3D. Here I'm adding another layer
to another dried artwork. This is a city
abstract landscape. This is a red wash on
top of paint layers, and I'm just painting the
unknown, adding some water, letting some dripples occur, using a wet cloth, and just dabbing
some of that wash, I put down and feathering some more
paint on, some more wash. Here I'm highlighting
with a green color. Some of the linework underneath
[NOISE] and that makes that pop and come
forward, accentuate. It gets more depth
to it bit by bit. Just adding some more
beige on top of the page, and so you can let things
dry and come back to it and add the same
color over the color. That really accentuates
that and highlights. Bit by bit, it's coming through. Just let it dry and
add another layer. I hope you've enjoyed this
lesson Building Layers. This is a key to any artwork, whether it's abstract
or realistic, is just building up layers, so your work starts
developing depth and body. Whereas if you just
have one or two layers, that can work, but also it can look a bit flat and incomplete. This is really beautiful just
to give body to your work and some key points are to let your artworks dry each layer, just let it dry, put it aside. Maybe you want to
start another work and do that layer and then come back to the other artwork once that layer is dried
and just rotate them. It's really fun, keeps that
creative energy happening. What you've discovered is
in this Building Layers, you have been able to use all your tools in different
techniques and just building up the look
and the texture of an artwork and giving
it a body and depth. That works really well
for your final project. Definitely build up the layers. I'd love to see how your
work is progressing. Definitely upload
your artwork to the photo gallery and then you can work towards
that final project. I'll see you in the
next lesson [MUSIC].
9. Changing Direction of Your Painting: [MUSIC] Welcome to the lesson, Changing the Direction
of Your Painting. Some key points of this lesson. Never give up and never throw
an art work in the bin, you can always use it later. Instead of rejecting an artwork and wanting to throw it out, just put it aside, maybe it's for a day, a week, a couple
of months, a year, but you can come back to it and add more layers and change
the look completely. What you had there before
that can be a background, and you can just use all the tools and techniques
that you've discovered so far and build up more layers and change
the look completely. In this lesson, a
good challenge is maybe use some
artworks that you're not quite happy with and just add some more ways
and change the look. Maybe use sponges, the
brushes, the palette knife, the feathering, all those tools, all those techniques, and
just change it completely. What you can discover in
this lesson is what you started out with looks
completely different. You can get some of
your previous artworks, either ones you're
working on now or ones you're not happy with and just come back to them, and you can just change
the direction completely. You can just free flow some
abstract work or you might have something in mind,
some shape flowing, linear, geometric, and just use all the tools and
techniques you've learned so far and play around with it. Maybe with the palette
knife, the brushes, the sponges, feathering, colors, and the artwork underneath will come through
in certain parts, you can utilize
that layer beneath, have some of the color there, and also have those
new layers on top. Here I'm just adding
some color on top. This was a landscape artwork and now it's a portrait,
vertical shape. Just adding some red and
spray bottles, some dribbles, some sponge work, and just
playing around with it, then I can come back to this. You can use the different tools and techniques that you've learned so far to change
the look of the work, you can use different
paint colors, either cools or warms to completely change the look
of the artwork as well. This is artwork I have done about three
different layers on, so we're just going to
change the direction again. I'm going to just
turn it down with some more muted colors, and so I'm just feathering some paint on with
a wider brush, adding more muted colors, some beige, some khaki
green, some white. The artwork underneath
was very bright, I'm just playing around with it. I'll see how this goes, and I can also add
more layers later if I wanted to rework
what I'm reworking now. I'm just cutting
some shapes in with the palette knife for
something different. [NOISE] Just add what you want and keep reworking it, let things dry and come back
to it, add another layer. Now I'm coming back to this, what's looking like an
abstract landscape. It was originally just abstract, now it's abstract landscape. I'm just adding some
more white to that sky, a second layer of the white paint and
blocking it out more, highlighting more green, adding some yellow and
those colors just pop, so use the tools and techniques, but also the use of colors
to help your artwork. Now just adding
some bold sweeps on top of that stamping
with the sponge. This has about four or five
layers and just adding more, and then I can come
back to this as well. I'm just playing around with what direction it looks better, this actually looks
better from upside down. Cut some shapes in, use water bottles, mix it up, have some
fun, enjoy yourself. I hope you enjoyed this lesson, Changing the Direction
of Your Painting, and the key points from this
lesson are never give up, don't throw away your
artworks that you don't like, and just change the
direction so you can use all the tools and techniques you've
discovered so far. Palette knife, brushes, sponges, feathering, and work the artwork till you're happy with it. You can use a change of color, a change of shape, you can use linear shapes
or flowing shapes, and whatever you
end up with can be completely different from
what you started with. This will be towards
your final project, so I'd love to see your progress from the early lessons
through to this lesson, and then your final project. Upload all of it and what
you'd love to share. Now I'll see you in
the final thoughts. [MUSIC]
10. Final Thoughts: [MUSIC] Welcome to
final thoughts. I hope this art class has being really supportive for you. Just know that all these tools and techniques can help you with any kind of art you wish
to explore in the future. This is a great foundation. You've learned tools
and techniques, you've learned about layers, you've learnt about colors, you've learnt about not
giving up on your artworks, and changing the look
of it completely. It's a great foundation to now develop your own style,
your own projects. Whether you want
abstraction or realism, landscapes, still
life, figurative, it doesn't matter, this class is going to be of benefit to all of that because these skills and tools and techniques can be added
into any look of art. Now, you're going to work
on your final project. You can use some
of those tools and techniques or all of
them and start creating. Create from the unknown, from your intuition, just let things flow. Maybe you like linear
or geometric shapes, maybe you love flow and
curvilinear shapes, or a bit of both, lay some things down. You can use washes and
experiment with spray bottle, and all those things you've
learned along the way. Let the layers dry, come back to it. Maybe you want to use
a different technique and just explore with that, and then let that dry. Keep adding layers so
you can create depths. You can always change the
direction of your artwork, and have something completely
different from what you started with for
this final project, and have fun creating from the unknown with everything
you've learned so far. Stay in touch. You can follow me on Skillshare. You can follow me on Instagram or tag me
to some of your work. I'd love to see what
you're creating along the way as well as
your final project. Please upload that, and I'd love to
see it. Thank you. I hope you've enjoyed the class. I look forward to seeing some
of your projects uploaded. [MUSIC]
 Yvette Swan, Painting Classes