Transcripts
1. Intro Trailer: Welcome to illustrate your personal food
pyramid and procreate. My name is Ray and I am a
business owner and an artist. Making art as a way of getting better acquainted
with yourself. If you are what you eat, then when we draw those foods, they become a self portrait. I haven't sung my
merchandize directly to brick-and-mortar businesses
over the last five years. And one of the keys to my success has been continuing
to challenge myself, continuing to try
new things and learn new things online and
classes like Skillshare. Then incorporating
those new things I've learned into my designs. In this class, we're
going to illustrate our own personal food pyramids with the foods we actually love. This class is great
for familiarizing yourself with editorial
illustration. You're going to learn how to
source original inspiration. Understand when and how to incorporate hand lettering into your designed to strengthen your concepts and
make it your own. In the end, we're going
to have drawn all of these different food pyramids
that are as diverse as our appetites that reflect the different styles
that we bring to the table and are also reflective of our
individual tastes. This class is open to all levels and
everyone who wants to explore editorial
illustration and draw some of their
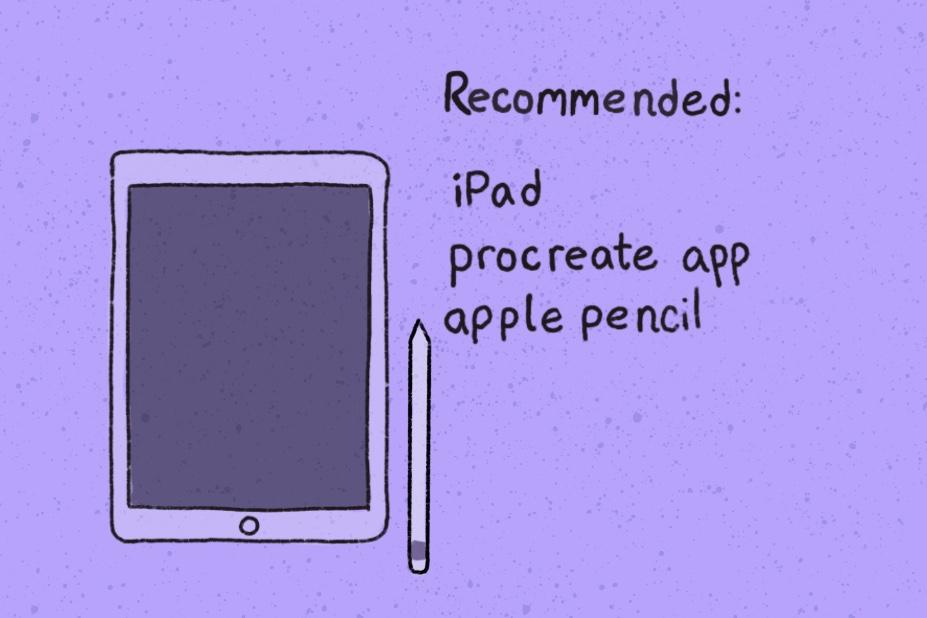
favorite foods. All you need is a pen
and paper at minimum. But you're welcome to work in
whatever medium suits you. I myself, I'm gonna be
working on my iPad and the program procreate
with my Apple Pencil. But that's not necessary to participate in
this class at all. Alright, so if you're
ready to get started, go over to the next module.
I'll see you there.
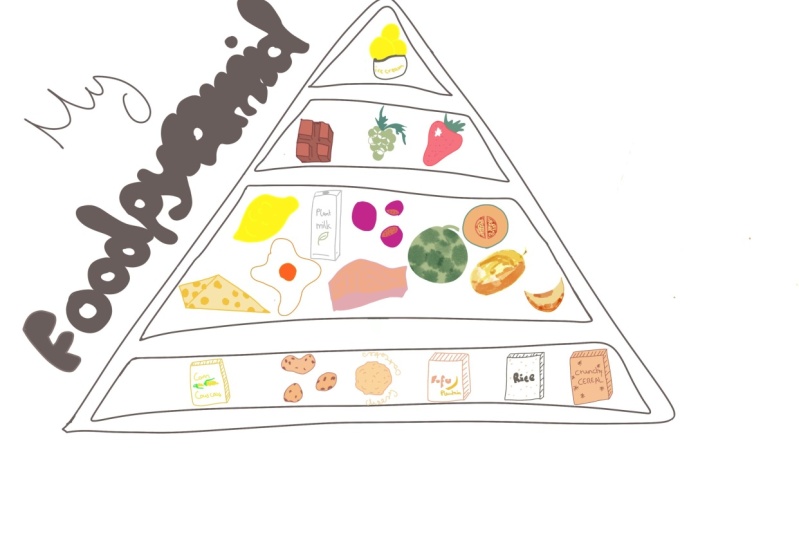
2. Project Overview: You might have
already guessed it, but today's class project is to illustrate your own
personal food pyramid. The food pyramid was
designed in the 1970s in Sweden by a woman named
Anna Brett and Seder, Home Economics Educator
and a cookbook author. It was then adopted by the US Department of Agriculture later on to represent
the ideal diet. However, what's an ideal
diet varies both culturally, individually and it
changes over time. The reason that I chose
this project is because the food pyramid lends itself
to editorial illustration. Because editorial
illustration is illustration that
helps convey concept, message or idea in a way that words that are
written cannot do alone. That's why you see
it in magazines, newspapers, and on book covers. And it usually accompanies texts or incorporates hand
lettering into design. Before we dive in, we're going to get loose by sketching our next grocery list. So this is a really
nice way of bringing art and artistic practice
into the mundane. At this point, I want
you to make sure that you can access
the downloads. So you're gonna go to
the browser version of Skillshare and
under resources, the downloads are
available there. I have both of the pyramid
template for you to use, as well as individual
stamp brushes that I made called food stamps. And those are for you to use in any capacity that you like. I made them specifically for
this class for you to enjoy. Alright, well, I'm feeling
ready to get inspired. So I'll see you in
the next module.
3. Sourcing Inspiration: In this module, we're
going to talk about two ways that you can
source inspiration. The first is on the web, on sites like Pinterest
and Instagram. I was able to build this
Pinterest board for class. And you can access the link in the resources tab if you
want to check it out. Pinterest is a great
way to see a variety of art and multiple styles and
get ideas for inspiration. It is inspiring and it's a
great reminder that there's a variety of ways to get
your ideas out there. A quick reminder, never copy and other artists work without express permission
and citing credit. The second way I recommend is to take yourself out a
gift you can give yourself as an artist and a person is to treat
life with curiosity. Imagine you're on a scavenger
hunt and you're going throughout the every day in your mission is to
experience life, take a walk, go somewhere. Even your next trip
to the grocery store can be a source of inspiration. What color combinations,
texts, lettering, layouts, and labels
stand out to you? What are you drawn to when you are drawn to
those things? Why is that? When I take photos, I take
a photo of something, even if I only plan on
using one aspect of it. That way, I'm able to have original source images
for my art work. Okay, so, so far we've talked about two ways of
sourcing inspiration. One being online through
social media on Pinterest and Instagram and other
things on the web. And then the other one's
living life, paying attention, looking around, taking
your own source images. I do want to talk about a third, and that is by
taking classes and continuing to challenge
yourself and following prompts. I love the challenges on
Instagram where it says 30 days of drawing or faces Friday
or whatever they are. And you engage in these
challenges and you're able to draw things you might not normally and just get
drawing in general. So in this next module, we're going to illustrate
our own grocery list. And that prompt is
hopefully going to get you drawing, incorporating
hand lettering. And also maybe just doing
something you haven't before. Alright, so in the next module we're going to dive
right into it. But I also want to
mention some of the things are gonna
be procreate specific. If you're working
in another medium, just go ahead, Carry
on illustrating. Alright, I'll see you there.
4. Grocery List Mini Project: Okay, so we're gonna start
with the plus button and go to paper size of 11 by 8.5 ". I think that's a
really good page to start on for reference
because a lot of us can visualize what an eight-and-a-half
by 11 inch paper, it looks like that's
about 300 DPI. So if I want to go
back and change it, go to crop and re-size, I click their settings and it's at the 11 inch
and eight-and-a-half, and I can change the DPI
right there as well. Alright, so for today we're gonna get started on
our shopping list. And I'm going to
go ahead and get started right here in
the brush library. I'm gonna go with calligraphy
and a monoline brush. I'm gonna go ahead and
use this pen and I get, get started on my shopping list. Alright, so now that we
have our shopping list, we're gonna go ahead
and we're going to illustrate these elements. I'm going to start by
illustrating the chicken. So I'm gonna go ahead and zoom. And this is how I zoom.
I take my two fingers, I squeeze in and out. Now helped me zoom in and out. Alright, so I'm
illustrating my chicken, doing a nice little
plastic bag around it. I'm going to do two
little chicken breasts, kinda like little
wobbly triangles. Maybe a few little marks there. So it looks like there's
some cellophane wrap or something on top of it. Alright, zooming back out. Alright, so I like
my little chicken. Alright, so I'm
gonna go ahead and illustrate maybe
some sitar ******. So when I want to
undo something, I can use two fingers to undo
and three fingers to redo. All right, so I'm back there, I'm drawing my lid,
my little container. It looks a little bit
like a pill bottle. Maybe I'll draw a little ******. Still kinda looks like pills. That's okay, I'm fine with that. Alright, so I'm gonna go ahead
and draw lemon over here. And lemons, they're
kinda like wobbly circle is also not really
sure how I like that, but it's more of an oval and then you can add two
little points onto it. There you go. Then I can use the happy
little eraser tool. And I can just erase
the edges there. So I have my oval and then those two little humps on both ends that kinda make it look a little more like a lemon. Then I can use the brush size editing bar over
here on the left. And that helps me
edit the brush sizes. We can do that for both eraser and brush size tools
to edit your shapes. Add some freckles.
My Greek yogurt. This is from a
Mediterranean dish that I'm having tonight. And I can edit that to
make a perfect ellipse. I can kinda move things
around if I want to. Alright, so I have it zoomed in here and
go work on this lid. And my apple nib kind of
came off my pen there. Sometimes that happens, I'll
notice I lose traction. Easy fix you just
tied on all tighter. Alright, so I'm speeding up
through this process here. Again, I'm using
the Edit Shape tool to make that perfect
ellipse for my little egg. And then I'm actually
going to introduce a new tool or the Lasso tool. Circle around there, three
fingers down, Drag, duplicate. Now I have two perfect eggs. Alright, so I can use
that Lasso tool again. Circle that leg three fingers
down and go to Duplicate. Alright, so I've done
that process again and said I'm having another
edit and my third egg. Alright, well, if I want to
keep duplicating, I can. However, I think
I want to zoom in and maybe just draw
my own imperfect egg. Not all eggs have to be perfect. I'm going go ahead and
draw the six of those. Then I got draw a row
behind them here in a moment there could be the
eggs and the egg carton. So just drawing this
little wavy line underneath here
for my egg carton. I want to erase over here. First I'm gonna go to Layers, make sure I'm on the same
layer, consolidate layers. Now I can go ahead
and make sure again, I'm on the same layer.
They're all consolidated. I'm gonna do a race
the bottom of the egg because I don't
think they really show through in the carton. Use that last layer
and I'm gonna move it down just a little bit. So that's sitting a little
lower and that carton. Alright, so I'm
speeding ahead here. You can see I'm drawing
on my egg carton. I like it moving onto Hamas. And here when I'm
drawing my, cuz, cuz I'm drawing just
like a little box, simple shape drawing window so that you can kinda look
out at the cuz, cuz, cuz, cuz can look at it, you
using the Lasso tool to kinda make it bigger. Alright? And then cucumber, Cucumber can be kinda
hard to tell what it is. So sometimes you do a
little cross-section there and maybe like
little cucumber rounds, they're like, I'm a cucumber. And one more obvious now, then for Adele, I can
put it in an ice pack. It's unfortunately
in plastic packaging as well, sorry, environment But that's just a lot of the
stuff we have in the store. I mean, it's great when you
can grow your own supplies. Alright, and I go draw Bananas. Bananas are a huge
staple for me, not for dinner, but I
just always have them. We're going to draw a
bunch of bananas and bagels is definitely like a guilty pleasure kind of thing. So I'm gonna go ahead
and draw my bagel. It looks like a flying
saucer and that's okay. Alright, so I have my
grocery list here, and now we're gonna go ahead
and make it a little nicer. All right, so I can click
on the layers panel. Currently I have two layers. There's this one which has food, and this one which
has the written text. Alright, so I can
go ahead and I can change the opacity on these, or it can even turn them off completely. They're still there. Alright, So right now and go
work on the written text. So I got the other one out of the way just so it's
not distracting me. And I'm gonna go ahead and make some guidelines for myself. I'm tapping and holding
down on the screen. Yep. So when I tapped down it makes a straight line
all the way across. Alright, so on this new
layer and just swipe left duplicate and clicking right
there on the duplicate. Now I have an exact
replica and drag it down. And then I'm going
to go ahead and do that quite a few more times. Another guideline.
So everything's on the same vertical and
horizontal plane. Alright, and then I can
go ahead and click there. And Alpha Lock, choose a color. And I'm gonna go ahead
and choose another color, just something that's not
the same color as black. So maybe blue, then I get
a lower opacity down. So you can kind of vaguely
see that guideline there and that's going to help
keep my writing straight. So clicking on layers. And I can use the layers panel
to switch between layers. I'm gonna circle this
with my Lasso Tool, three fingers down, and
click, Cut and Paste. That puts it on a new
layer here for me. So you can see that can
turn it on and off. On this layer, I have
all of my list of written things and I can use
the lasso tool if I want. So click on that Lassa tool. I circled lemon and I can move that word around however I like. Alright. And so I can change
the opacity down lower. That's to increase the
transparency here again. Alright? And I'm just gonna kinda play around
with this a little bit. I'm really liking
how that's looking. I'm going to go ahead and now
work on this grocery list. Alright, though, actual
word grocery list. So we're gonna go
into add texts. Alright? And I'm
just going to go ahead and type in the
word grocery list. I'm gonna go ahead
to the font library and dislikes just a random font. They go back up to layers. Good, click on opacity and
I'm going to lower that down. So I have that there. I'm gonna go ahead and I'm
going to click on my brush and maybe going into the
painting library, paint. Let's go painting. And she's the flat brush. I'm using this as a guideline. I'm zooming in nugget kinda speed through
this really quickly. I'm not, I'm not following
these letters shapes exactly. I'm just using them
as a guideline. I want you to compare what we have written
here from the text we added from the texts library to what we've created here. So I'm going to drag that down and you'll see it
looks quite different. I would say that we
use as a guideline, but not really the
inspiration for this piece. Alright, so now we have a
nice grocery list here. I'm going to clean up
my layers over here. And just layers, I'm not using maybe those guidelines, I
don't need them anymore. Alright, so I should have
these three layers here, my list, my title,
my illustrations. I'm going to go
ahead and turn down the opacity on my sketch
layer of food items. And I'm gonna go ahead and
take off and start sketching. I'm just tracing over
what I already have. I'm finishing it up, making it a little nicer,
a little smoother. I wanted to mention color. So I created a
whole another layer here with just a
little check boxes. And we're just going
to drag and drop color in right-hand corner. That's color. We
have a few options for looking at color here,
for selecting color. I really encourage you
guys to explore these. I'm going to go ahead
and zoom in and I'm going to make sure my
correct layer is selected. So clicking on and off, Yep, that's right layer dragging and dropping color into those boxes. Now, see what happens when
there's a little space there. Right from here, you can't tell, but we know there's
a spot missing. Alright, when I
drag that color and boom, it goes everywhere. Now undo. And we're gonna zoom back in and we're going to
undo that again. So now it's a nice closed box. And when I drag that in, it's going to fill
that box again. Alright. So here we
have our grocery list. We've used tips and tricks
that are used in Procreate. We've illustrated things in a way that might
be personal to us. I, for example, put
a little heart on kombucha because
I love kombucha. We've incorporated
hand lettering. And with all this, I feel ready to move on to our main project.
5. Illustrate Your Pyramid: I have my eight-and-a-half
inch by 11 inch canvas. Go to brush, that's
food pyramid. And I'm gonna go ahead and
pop that down right there. Alright, then I'm gonna
go ahead and I'm going to use the selection
tool right there. And I'm gonna go ahead
and we have Freeform, Uniform, Distort and warp. We're going to use free form. You can see how that
moves more freely. It's not fixed. I'm gonna go ahead
and undo that. Now. What uniform? I can move things
in a proportional manner. You can see that
middle line that's keeping it centered
there on the page. I added another layer. Now I'm gonna go ahead
and I get choose a brush. I'm going to use this pencil, but you can use whatever
you want you want. I'm holding down to draw
the lines straight across. And then in my own handwriting, I'm writing my food pyramid. Then with the selection tool, I'm going to go ahead
and I'm going to grab that and move that to
center. There we go. Now I'm adding another layer. And I'm gonna go ahead and start dropping down some
of my stamp brushes. You don't have to use
these, but I made them. I like them. I'm
going to use them. So you don't have to keep
them all on the same layer. You can put them on
different layers so you can kinda move and
edit them separately. The workaround would be
using the Lasso tool. That way you can keep them on the same layer. I'm
using the Lasso tool. You are able to select what
you want and move it around, scale it how you want,
rotate it, all that. So right here, I'm
using the pyramid kind of as a skeleton and
just fill it in with shapes, a lot of them and go
use for my food stamps. I'm also going to draw
some new icons and motifs. Drop them down in there
to fill in this space. Take some liberties to explore whatever style you want and
put whatever foods you want. This is your food pyramid,
make it your own. One cool tool here is you
can just flip horizontal, flip vertical if you want to. I'm just gonna
drag it down here, shrink at ease a little green
bar rotate to the right, and that helps me pivot things. I have to take a moment
to mention color. So I'm dragging and dropping
color somewhat haphazardly. A lot of artists
like to work from a predesignated color palette. I like to make my color
palettes on the go. And right now I'm just
dragging and dropping and seeing what I like and
what I don't like. And I am going to reuse colors. So you're gonna see the same
color as being repeated. I feel compelled to mention
one of my favorite tools. So if I open the Layers panel and I click on
what layer I want. And now another menu shows
up and it has Alpha Lock. I select Alpha Lock. Now you can see this whole thing behind here is not selected. It's only the items that
exist right now are selected. And if I draw, it's only
going to draw on that layer. So pretty neat and you can probably imagine some of
the benefits to this. I'm going to go
ahead and undo that because I don't
really want that. But imagine I want to do some shading so I can go
ahead and maybe choose, like the airbrushing
brush and size things up a little
bit and maybe choose a slightly darker color
than what already have. And I can create some shading. Another cool thing I can do with alpha lock is I go
back over here, fill layer, and it fills
it with the act of color. Now, I don't really like that, even though it
looks pretty cool, I'm gonna go ahead
and undo that. There are instances where I might not want
alpha lock active. For example, if I zoom in here, I don't have those
eggs filled in. So if I try to draw, it's not going to happen. If I select like
maybe like a nice, Let's see, I'm going to bring
it in to a nice soft pink. Nope, can't draw on there
because there's nothing there. It's a clear layer. I mean, it's the same
color as the background, so maybe you can't see that, but we're gonna go ahead and we're gonna go alpha lock off. And now I can drag
and drop color there. If when you drop color you notice it just happens
to go everywhere. Look at your color
threshold bar at the top, and you can slide it left to
right to fill less or more. If you're more
organized, the mean, you do want a color
palette go up here and you can click the little plus
sign. Create new palette. I already did that and I
titled it food pyramid, that has the colors
represented over here. Now if I want to add, I can use the little
color picker tool. Drag over a color and you're
going to see that there. It goes to the
right corner. And I drop it down into
that color palette. So I'm gonna do the same thing again with the darker blue. So grabbing that blue,
dropping it in there. Now I have those colors
saved for future use. If I forget, I can always just go to the color picker tool. I'm going to change my focus to my food pyramid, the text. So I'm going to layer is
adding another layer going, choosing a flat brush.
I'm zooming in. And now I'm going to just
use my existing texts that I wrote with my handwriting as a skeleton and I get
trace over that. But just going to make
the letter forms just a little, little nicer. And I'm going to just keep going and it doesn't
have to be perfect. And then changing the
opacity back lower. And then I'm going to trace
these letter forms once more. I just have another layer
that I can work off of. And that's the really cool
thing about Procreate. So now, based off
my own handwriting, I'm creating this text That is fairly unique and I think pretty fun
and playful as well. I'm just finishing
out my letters by smoothing them out
and filling them in, which gives them a
nice textured feel. I'm liking that title. I'm gonna go ahead and I'm
gonna go see what I got here. So I have three
layers right now. You can toggle on
and off alpha lock. And I'm going to go ahead and
choose a color, maybe pink. Me go back to the Alpha
Lock and go fill layer. So it fills that
color on the outline. Turning Alpha Lock off. Now I'm dragging, boom, that color drops in there. It's a little
distracting that bold. I'm gonna go back to layers. I go lower the opacity so it's
a little less distracting. So I changed my mind on
the color. No big deal. I'm just gonna go
ahead and I'm gonna go here and I'm Google
alpha lock fill layer and I'm going to
do purple instead. I'm feeling like a
purple girl today. So that's what I'm
doing. Up here. I did a drop shadow.
So I'm just good. It's just two layers
staggered but same thing. So alpha lock fill layer and
I'm filling out that purple. I like that a lot better. I'm feeling ready to add
some of my own handwriting. So I'm using the Narendra pencil and I'm gonna go ahead
and select that. Now, zoom in and I'm
going to start writing. Okay, I'm on that alpha locked
layer. Let me add a layer. Okay, So on a new layer, writing chips and salsa, occasional glass of
wine, heirloom tomatoes. I like how it looks. Next I'm gonna go up here
to adjustments, magic wand. And it is magic. So you have hue, saturation,
brightness, color, balanced curves and
gradient map all here. I'm gonna go ahead
and I'm actually just going to go down
to Gradient Map. That's what we're going
to use right now. So I'm going to click there. And now it gives me
the gradient library. And I'm going to move that. Alright, so you can
kinda see a bunch of different options
and it shows you immediate other color palettes. And then you can
change the strength of those color gradient maps at the very top of the page
and slide that over. And then kind of like a filter. You can choose how prevalent
it is in that map. Alright, I'm really liking
how that's coloring. It looks good. I'm going to add a little bit more
texts into things. So I'm gonna create a grid for myself, change the opacity. And I'm going to quote myself so that if we are what we eat and
when we draw those things, they become a self portrait.
I kind of self portrait. So I can quote myself
because we all can feel free to call
yourself anytime. I'm now cleaning
up layers a little bit and just a little editing. And I'm liking how
that's looking. Now that I'm happy with what I have going on for
my food pyramid. I think last step would be to go toolbar and share image as JPEG. And it's exporting. Now I get to choose
where I send it, but I'm just gonna go
ahead and go Save Image. And that is going to send
it to my photo gallery. If I exit out of the program, I can go ahead and
click on my gallery. It appears right there. And boom, there is my
JPEG, That's my image. Go ahead and upload your JPEG to the project gallery so
we can check them out. Alright, well in
the next module, we'll do a quick recap.
I'll see you there.
6. Conclusion: At this point, we have
a pretty good idea of what is editorial illustration. And now that you
know what it is, you're going to
see it everywhere. We also learned a
little bit about the food pyramid as we made our own and how it's a
representational model. And that's a lot of what
Editorial Illustration is. And I'm hoping that you are
able to incorporate some of your hand lettering
because that really does help elevate a piece. And it also helps make it feel more organic
and personal to you. So if you're feeling nervous about that,
throwing the guidelines, but you do not have to be a
professional hand letterer to start incorporating
lettering into your work. Leaving this class, my
hope for you is that you feel more capable of finding
inspiration in the everyday. So for example, your next
trip to the grocery store, your nice walk when you
write your grocery list, when you write list at all, what can you illustrate? How can you symbolize this? Leaving this cost,
you should have two unique pieces that you'll be able to add your portfolio. And with that, I just want
to ask one more time, please upload your project
to the project gallery. I really want to see them. And thank you so much for
taking this class of me. I know Your time is
valuable and I'm really honored that you
chose to share it with me. So thank you. Take care.
 Ray Becker, Teacher, artist, business owner, nomad.