Transcripts
1. Intro: Hello and welcome to
my Skillshare course. My name is Ashley and
I have a Bachelors of Science in soil science
and a minor in plant science. In this course,
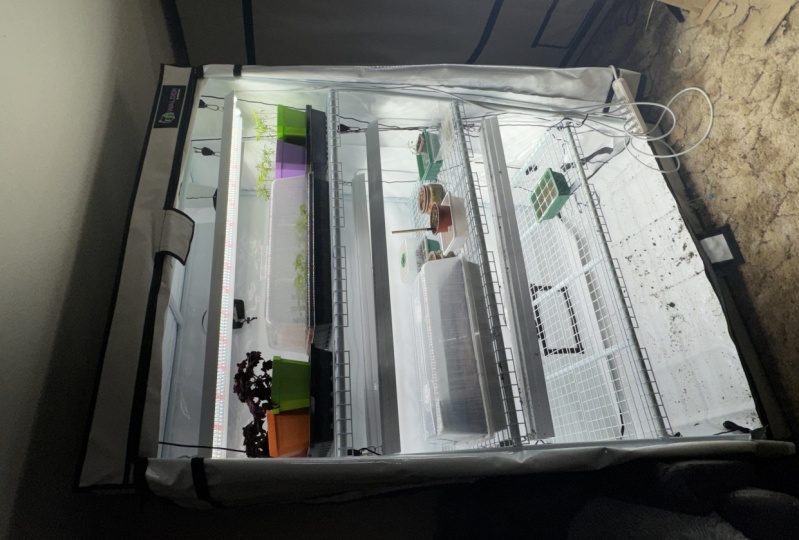
you're going to learn how to grow indoors. Your final project is
going to be showing off your indoor grow setup
and ultimately helping other people achieve the
same goal with giving them tips and tricks of how you
made it suit your environment. This specific course is only going to be about
growing in swell, whereas future courses
will also include hydro. So with that being said,
let's get started.
2. Choosing A Container : The first part of
growing indoors is determining what
container to use. In this case, we're using soil so we don't necessarily
need something that holds water and leak would benefit from something
that has drainage pores. So this means that we can
use a classic container, but any food safe plastic
will actually work. These are considered containers that will not lead
to harmful products into the potting soil
solution uptake in by plants. Some really great
examples of this are five-gallon pill buckets, which are labeled food safe. Even the Rubbermaid
roughneck neck containers are a member for of course, you can use anything that
you purchased food in. So these can be things
from the grocery store to go meals and stuff
of that nature. You can also use cardboard, cardboard boxes shockingly
do hold soil pretty well. One thing you want to
keep in mind though, when choosing a container is how you're going to
contain that water. So one example I have
is a self watering kit. It's called buckets up, but any of these DIY or
otherwise would work. It essentially involves having a bucket that does not
have holes in the bottom, and instead using a
bottom watering system and get pillory action
inside of our soil. This allows us to
water our plants when the trigger point
tells us to you without ending up with
water on the ground. If we choose to use a container that has
holes in the bottom, we want some sort of
catchment system. This can come in the form of an actual grow tent or simply just a bottom
saucer for that container. Keep in mind that grow
ten is not necessary. The only role for
grow tent is actually to reflect light and
intensify it onto your plan. If you use a crow ten, it's not uncommon
that you are going to actually need to decrease
your light intensity. This can be done
through a dimmer or through lowering or
lifting your life. This is because the
light intensity inside of growth is much higher. So step one is finding
that container. This example, I'm using a
five-gallon pill bucket that is considered food safe with the bucket up
self-monitoring system. This is because I don't want to have to have
a faster render it. I want to be able to not put as much attention
into watering and let the system be able
to self-sustain itself without
continuous monitoring.
3. Choosing A Potting Soil: We looked at containers,
now we need to determine what soil is going to go
into those containers. If we're using a self
watering system, we want to go with
a swell that has very large particulates
of pearlite. This means medium to large size and we want a
relatively large amount. When we're using a self watering system
we're working on to pillory action means that we
are working against gravity. When we're working
against gravity, we're working with small
pores that suck the water up. This means that we need to
be able to provide some air. Plant roots do need some air, oxygen and CO2, in particular, plant roots very
simply put, need air. In particular, they
need aerobic soil. When we end up with too
much CO2 or anaerobic soil, we end up with some
harmful bacteria that tends to colonize the area. This can result in things
like root rot or damping off. So we want to have more
pearlite rather than less. This allows for some air
to be in that system, despite the fact that it
is being bottled water, if we're watering simply top to bottom and we have holes in
the bottom of our container. We don't have to worry
about this as much. We can go with just a
regular potting soil. A great example of
something that could be in a self watering system
would be something like the Jocelyn
means soil booster, such as what I have here, it's very poorest and it ultimately has a lot
of chunks in it. Or sunshine Makes five. So I'm trying to mix
number five again, has very large
chunks of pearlite. Otherwise regular Pro Max and Miracle Grow would work
in a system where we have the holes in the bottom and we're flushing the water through and working with gravity
rather than against it. One thing you want to keep
in mind is fertilizer. So you want to use fresh
soil whenever possible. Fresh soil will mean less pests, such as fungus gnats, thrips, mealybugs, aphids because it's
been packaged properly. And in some cases
when we go with something that's been
dehydrated into a cube, this results for pest
management is even better. The other thing to
keep in mind is that fresh soil will have higher levels organic material that ultimately will
fertilize our plants. The nice thing about
growing in soil, as we don't have to
worry about fertilizer. So long as we're
using fresh soil, when we're using fresh soil, we won't have passed and we actually will not have
to fertilize throughout the entire growing season
if you're reusing soil, one thing to keep in mind
is that you may end up with some pests and you ultimately
will need to fertilize, will have a section
on pest control as well as fertilization. A little bit further
in this course.
4. Seed Selection: Next part of the course
is seed selection. Now this is important when we're looking at things that
fruit and flowers. Otherwise the rules
don't necessarily apply when we're
talking about roots, leafy greens, and herbs. When we're looking
for leafy greens, we want to look for something
that is non pelletized. Pelletized seed is not
chemically treated. It actually is just a clay
that's surrounding the seed. Vcs are almost partially Germany did inside of
that little pellet. And while these work
great for planting outdoors or metering outdoors, they do have an expiration date. If we're choosing
to grow indoors, we can't necessarily
so the entire pack, this means that after about
six months to a year, the germination rates
begin to decrease. If you choose to
use pelletized by the packages in fewer quantity, then you won't have to
worry about this issue. Now, when it comes to picking
herbs and the greens, you can go with anything,
literally anything. All of these will be reasonably
sized because you'll be continually harvesting
from that plant. And very rarely with these
get to full maturity and then endorsed system because you will be continually consuming them. The next popular
plant to grow and doors is peppers and peppers. You can again go
with any variety. This can be bell peppers, it can be spicy ones
such as these Filipinos. You name it having
arrows, et cetera. All of these stayed
relatively compact and small and are completely
manageable indoors. There's nothing special
to look for when choosing a pepper
seed to grow indoors. If you're choosing to
go for something like a cucumber or tomato, you want to go for something
that is considered dwarf. These plants usually
needs to be trust or staked in some way due to
the size that they can get. Because we're dealing
with indoor situations, we want to go for a determinant, dwarfed non trellis
or small version. This will be listed on the
actual packages themselves are really popular cucumber variety to go with is called
a patio snack, or this is a complex plant specifically meant for
growing in containers. The tomato equivalent to this is called a Red Robin tomato. The Red Robin tomatoes are determinants small compact
cherry tomato plants. This will allow you
to grow indoors without stressing the
area that you're growing in and having to buy
more grow lights as the plant spreads
out on your property. If you're choosing to grow
fruit vegetables indoors, such as Beats, turnips,
radishes, or carrots. The only thing we
actually had to take into consideration is not
the seed variety, but the container
itself being narrow or wide and a deaf that's
adequate for those to grow in. This is why things like five-gallon buckets
don't necessarily work for growing root vegetable
root vegetables indoors. But roughneck rubor means do work great for this
because they are of appropriate dimensions
to allow for ease of planting things
you can't grow on doors are mainly monocot plants. So this would be things
like corn, wheat, rye, and barley, anything
that looks like a grass. This is because they
need when to germinate. And there's a lot of
other crazy stuff that goes along
with these plants. So you want to avoid these
guys whenever possible. If you're choosing
to grow and doors, you will need to pollinate your plants if
they're flowering. This will include
things like how Pinto's, tomatoes and cucumbers. All of these plants
will need to be pollinated if you're
growing along with me, the next course that I outlined, which will involve
flowering plants and how to fertilize them
in an indoor setting, I will go through
the differences in the flowers and how to
obtain fruit from them. So keep that in mind when
you're choosing new grow indoors with soil or hydro, your seat selection
is important. If you don't want to have
to sit there with a Q-tip or vibrating toothbrush
to ensure Polynesian, you may just want to stick with a leafy greens and
herbs for this case. In the case of herbs,
we will be doing something called topping
and courses in the future. But for right now, let's
just not worry about it. It's not complicated.
And a beginner, even someone who doesn't
even know anything about plants will
know how to top. It's very simple to do.
5. Lighting: A question I often get is whether or not you
need grow lights. And the answer is yes. Unfortunately, if we grow in a window, no
matter how sunny, we will end up with legacy plans or just poor
performance in general. The light doesn't
have to be special and I don't want you
to overthink this. I want you to go for
something that's considered full spectrum and has an adjustable
height or a dimmer. The dimmer will
allow you to adjust the light intensity as needed. If your groin, leafy
greens and herbs, you're gonna find
that you don't need as much light as you're growing peppers, tomatoes,
and cucumbers. You're going to realize
you need more light. So these are all
things that you need to take into consideration. If you want a plant
that's going to be able to serve you for a while, go with something that has a dimmer and the
adjustable height. Otherwise you can go with
just adjustable height, which will allow you to adjust
your plants up and down. But again, don't overthink this. Just grab something cheap at Amazon or your local
hardware store. Anything will work.
6. Seed starting : Next thing we want to
look at is planting, if we're planting things like cucumbers, peppers, or tomatoes, one plant at a time as good
enough or however many plants using q need to be able to feed your family if you're
planting herbs, I strongly encourage you to
grow one plant at a time. And then in the middle of
that plants grow cycle around 30 to 60 days,
start another plant. This will ensure you
have continuous Harvest even after the first
planet has deceased. If we're doing things
like greens, lettuce, things of that nature, then you want to actually do something called wave planting. This involves planting
enough plants for a week, planting enough plants to feed your family for
approximately two weeks. And then every week
after that planting a subsequent amount of plants to feed your plant
family for two-week. This is what we
call wave planting. This will ensure that your
family will have food or leafy greens for a
prolonged period of time. For me and my case, I like to do three
lettuce plants a week. So this means I grow three lettuce plants
from week one to two. On week two, the
beginning of week two, I start a, another
three lettuce plants. Week three, I started another, another three week
for another three, et cetera and so forth. I will then review what
my stock looks like. And if I'm eating
through plants or lot, if I'm eating less than three, then I will backoff and the number of plants
I'm planting. But regardless, every week
I'm starting a new batch. I usually start these
seeds at the same time. I'm doing my rounds to ensure
what needs to be watered. Plants do have germination
rates and I will do a course separate on this for just seed
starting in general, when we get closer to
that time of year, one thing that you need
to consider is that the germination rate
is not 100% ever. If anything there
around 80% on average. This means for every
one plant you want, you would want to plant seeds. Now it seems like
access and wasteful. And in some cases all
three seeds may terminate, but it's more likely that
one or two will germinate. So keep this in mind if you're relying on this and not
just doing this as a hobby, you will want to
ensure you're planting enough seats every single week. In my case, I like to plant around eight feeds to supply
me with three plants. Give him I end up with
an overage Sometimes, but it helps me
ensured that I do have that leafy green organic food ready whenever I need it
because you're growing in soil, you actually can start the
seeds directly in the system. This is the nice
part about ROI and tall when we're
growing in hydro, the process of seed starting
does vary a little bit. So that is something
to keep in mind.
7. Pest Management: Let's quickly look
at pest management from the perspective of soil. Soil is notorious for having
things like fungus gnats, thrips, mealy bugs that are soil borne and things
of that nature. That's just something that comes along with growing in soil. We don't often see this in hydro so long as the environment is clean around the
actual plants themselves. So in order to counteract this and make this
as easy as possible, we want to use different
forms of prevention early on. And again, one of
the best ways to prevent against pest issues is to choose a soil that has been dehydrated into the blocks. The dehydrated blocks help ensure that larvae
and eggs do not survive the transport and ultimately make their
way into your home. If you're choosing to go for bag swell or you're
unable to find a dehydrated soil block that I encourage you to pick something that's been stored in doors, not something that's been stored outdoors or
inside of a greenhouse. There are typically
tiny holes on the bag because potting soil
has organic material, this organic material will
decompose, which releases CO2. If the manufacturer did
not put holes in the bag, the bags themselves
would begin to split due to gas buildup, but the little holes they
add to help prevent against the CO2 bloating ultimately results in things
like fungus gnats, thrips, and other pests
getting through the membrane. That means they're laying
eggs and larvae in that soil. Once we add water,
we end up with those paths inside of our home, which kind of defeats a lot of the fun about indoor growing. So what I encourage
you to do is get something like eight
beneficial nematodes. This is a great example of that. Now you don't have to go
with this product because there's many different products
out there on the market. This one may only be
available to Canadians and those who are watching from
other places in the world. You may not have
access to these. The key here is you're
looking for what this nematode is able to eat. These are microscopic so
you will not see them, but what they do eat
is fungus gnats, thrips, aphids, mealybugs
that are born in the soil, that is their meal source. This means if we place these in the swell prior
to them hatching, we are able to eliminate them before they can
even get started. Other preventions may
involve things like sticky traps or an
active infestations. I encourage you to do a
50% isopropyl alcohol with water spray. This works best when compared to insecticidal soaps or
things of that nature. You want to apply this
once a week until the active infestation
is eliminated. I hope this helps, but
like I said prior, we're going to do future
courses on pest management. So be sure to include
the pests that you're currently encountering
down in the discussion. This will help me make videos
curated towards you and your issues and
make sure that you get the most benefit
out of my courses.
8. Fertilizer: One thing to take into
consideration, it's fertilizer. Fertilizers used to
provide nutrients. And if we're growing and soil, we don't necessarily need to concern ourselves
with fertilizer as much in hydroponics systems and future courses that will do, we will discuss
fertilizer in more depth. But if you're using fresh soil, then this is not of concern as long as that soil is less
than nine months old, meaning has been grown in
for less than nine months. The nutrients provided
is more than enough. If you've decided to
reuse old soil for either environmental or just
budget saving purposes, you may want to
consider fertilization. The key here is to use
a liquid fertilizer. Here's an example of
what that looks like. This is an all-purpose. You can also get
a bloom formula. If you're growing
herbs or leafy greens, I would encourage you
to use all-purpose. All-purpose is higher
and nitrogen which will provide the plant with
more green, lush growth. If you're choosing to grow root vegetables
or something that fruits and flowers such as cucumbers, peppers, or tomatoes. You want to go with a
bloom formula that's going to be higher and
phosphorus and potassium. But like I said, future
courses are going to go over different nutrient
deficiencies you may encounter and how to solve
them in your indoor system. So long as you're
fertilizing every time we're watering in
an old soil system, he should be just fine. The use of liquid
over a slow-release, granular or just a compost. Brahmin caste or anything
of that nature is going to provide you
adequate nutrition quickly. If we are using
granular slow-release or a compost from a
cast or manure mix, we tend to see that the
rates in which fertilizer is released or nutrients is
released to the plant is lower. This is because if the
soil becomes too dry, then the microbial activity
begins to slow down. Microbes are responsible
for nutrient cycling, which makes those nutrients into bioavailable forms
for the plant. The opposite is true if
the soil becomes too moist over saturated soil results
in anaerobic condition. This again results in the die
off of beneficial bacteria that's needed to help cycle nutrients and
make it bio-available. Now the thing with liquid is
that it's able to deliver nutrients and a
bioavailable form immediately to the roots. This is why for beginners, experts and anyone looking
for great results, I encourage them
to go with liquid. Now of course, if you
don't want to ship water, you could always get a
dehydrated diversion of these or granular that's
dissolved in liquid. This is all the same,
so long as what's being provided to the plant is
solubilized in water, you will get the same result. So like I said, don't get too
excited about fertilizer. If you're growing in new soil,
you should be just fine.
9. Final Project: Now let's look at our
actual course assignment. This is going to
involve you guys showing me your indoor setup. I want to see what
container you used in y, what type of soil you
chose to go with, and specifically what
seeds you chose to grow, how many, how you're watering and how you're
fertilizing them. Be sure to include the type
of light you purchased or why you purchased that
lighter using that light. And of course, any issues
that you are encountering. The next course is going to be troubleshooting
nutrient deficiency, pest infestations, and other issues you may see when you're growing
indoors with swell, you're able to post
your photos down below. It will help me make content
curated specifically towards you guys and the
issues you're having. But I'm super excited
for you guys to start. I think you're really
going to enjoy indoor growing because it's
going to save you a ton of money and bring joy and happiness into your life.
Thanks for watching.
 Ashley Esakin, Gardening With Science