Transcripts
1. Course Introduction: My name is OP and welcome to this little short course on
how to air brush miniatures. I have been airbrushing
monitors for the last 15 years and
painting miniatures. In this course, you
will learn about how to prep your
models properly, how to undercoat them. The two types of
different stages of undercoat and priming. After undercutting, we
will be going through the basics of how
to do a base coat, how to spray this evenly, how to control the airbrush. Moving on to the next stage, which is the mid tones
and highlights and extreme highlights then will be vanishing the model plus
vanishing, bringing it back. And applying a wash
to wash will create all the details that
come out of the model. And at the end we will
bring up the detail more by using a technique
called dry brushing. This money costs will go through everything from start to finish, from how to prep your model, how to get it ready for priming, base coating, mid
tones, highlights. And then you will have a model
which is all prepped and ready and you can add more
details to how you wish later. You can pick up any
model you want, any, any you like and start
painting along with me. Same technique. These techniques can
be used on any model. The principles are all the same. What are you waiting for? Let's start painting.
2. Introduction To The Airbrush: Okay guys, this is a
quick introduction to the air brushes are used simply. I bought the best ones
out there because the brushes I think are really important if you're
really serious about it, is good to invest in the right tools because they will make your
life a lot easier. Now the first one we have
is the water Eclipse. This is an HP CS,
the Japanese one. This is a great brush. And both of these
are dual action. What I mean by dual
action is Number one, when you press the trigger
down, it comes out. Then when you push it
back, the paint comes out. With the pushing back. It gives you the ability to control the amount
of paint coming out. You can do a little
bit of bursts paint. And then that's what you're trying to do with airbrushing. You're trying to really control the trigger of the amount of
paint that comes in and out, press it down the a, then
push it back the paint. This is just a quick
introduction to the air brushes. This is the Japanese one. And this one here is
the German one to infinity C plus, plus
harder Einstein. But this is a great brushes
or this is Britain a brush. Again, the good
thing with this one is the same direction. You got to press it
down and push it back and then come on. I need to see at the
front head and needle. You will see the
needle goes back and comes up, goes back. When you press it
down, air comes out and then back
up and then back. Right? Now these haven't been
hooked up to the bar. I will do that later to show you in the airbrush exercises. The good thing about this brush
is when you push it back, you got little roller here. The roller here has numbers 123. The more I push it inwards, screw inwards, the less
this is restricted, you can't push it back. Now as I push it back, you can push it back. You see it controls the amount. You can push back. That's good for little bursts. So you go up that little
bursts of paint coming out. And I'll show you the example
of that gray air brush. I use this both the most, you can get a budget
one for example, there's this one here
is a budget one. But the thing is this is
single action, right? So single action is
when you press it, as you push it back, air comes out and
the paint comes out. That's the only thing. You don't have as much control. The lack of control, I think is not It's not ideal when you're
airbrushing with miniatures. I would highly recommend
if you can get a low budget dual action to
start off with dusk, good. I'll put links in the
description for that. But I would highly recommend
if you're serious about airbrushing hotter and Steinbach or the water or the go-to. You'll see that in a
lot of the forums. And love airbrush,
expert airbrush, they will mention
these two quite a bit. There are other
brands out there, but just like the
Japanese and German cars, you can't really go wrong. Can you reduce to our brilliant? So check them out and
see what you think. See which one feels better. Sometimes people go
with the ones that feel better in your hand. But I would definitely
recommend these two. And I will put a link in the description
for budgetary one, dual action budget training
or single-action one. I'll see you in the next video. And we'll talk about
airbrushing and different exercises on how to
actually use the air brush. I'll see you next video.
3. How To Use The Airbrush: In this video, we're just going to
have a brief video on how to use the airbrush. I'll hook that up
as you can hear, the compressor in the
background are hooked up here. That's the quick release. If
you press this releases out, you can get these adopters. Adopters, come on. You can just quickly
release the airbrush. This is when you
press it down on us. When you press it out, the paint coming up through
the press it down. I didn't back down and then
back down and then back. This is just a quick video to show you how the air brush works down and then back. Isn't
the paint comes up. In the next video, we'll
show you how to do the exercises with the
paint minute, okay.
4. Airbrush Miniature Paints: Okay guys, so this is
just a quick video on the different types
of paints you can get. These are the wall
paints, the army paint, or once they're all
acrylic paints, just different brands. Some brands are better than others in terms
of paint quality. But these are like the
standard really good ones. And then you have the Vallejo. These are brilliant
paints as well. Valais whoa paints,
a Spanish company. And then of course,
the Games Workshop sitted orange, which
are great too. So you get paints, washes, and you get inks as well. That in all of the ranges, we'll be using the Vallejo
ones for this tutorial. But anyone is fine
wherever your preferences. But these are generally the one of the best paints for
painting miniatures with. All right guys, so we move
on to the next video.
5. Airbrush Flow Improver: This is an important
fluid that we use. The airbrush flow improved. This basically. You put this in first
into the airbrush, report a couple of drops in, and then you put the painting and then you mix it because then it helps the paint flow
through the nozzle easily. So it's very important to
learn this later on when you just apply the paint
into their straightaway, thickens and clog the nozzle
and the paint spread size. Very common mistake that
happens when beginners, all the payments everywhere. But if you put the
airbrush flow Improving first a couple of drops
and a little bit of paint, then mix it, which
I'll show you, you, you start to see this
as we do the tutorial. The flow just comes out so much even for the paint and you
avoid all the spitting, which is very common that
happens with the paints. And it really makes
the model look a bit. Really ruins the model. Basically. You want
to make sure you Finn always filling but using
the air flow improved. See you next video.
6. Airbrush Varnishes - Gloss, Satin & Matt: All right Guys. Quick video on the different
types of vanishes. So pretty much self-explanatory, but you have the glass. He had shiny gloss, certain which is
in-between gloss and Matt. And any of them map, which
is a complete flat finish. Depending on what finish
you're going for. I guess three standard
final vanishes. Whatever suits your theme
for your model you can use. Either one will be
using the gloss for the glossing wash technique later on in the video
which I'll show you. But yeah, these
are the vanishes.
7. Airbrush Exercises: So we're gonna do an exercise
here where we're just gonna do circles and controlling
the trigger point, moving the brush
forward and back. Like we said before,
flow improved. We didn't put a few drops in 123456, however much you want. So long as you're filling
that bottom area. A little bit of a part of
their thoughts what you want. And we'll get a paint,
make sure we shake it. What we're doing, we're
just putting a little bit of not too much. We just put in little
to F3 drops. Yeah. Maybe another 14 drops
because it's quite thick. What we want to do
now, can old brush. I'm just going to mix it. What I've got here is an older brush. I'm
just going to mix. Put it in. I have glasses here with
just water in it. And you want to have that ready. You want to have all clean
free glosses of Ultron and just ready to wash your
brushes and what have you. I've put my compressor on
and this is ready to go. Now, if I press it down,
the a is coming out. As you can see, one
of the exercises I do under compression kicks on. One of the exercises, do I
slightly bring the trigger back and you'll start
to see color coming. Okay. Now what I'll do, I'll go
closer and I just do circles. Just to get a nice
warm up to my arm. You can go closer.
The closer you go, you'll notice the darker,
darker line here. And you can get really
close and it gets warm up. Keep your trigger finger-like. You can push it back
a bit more than more. You push it back. Push
it back a bit more. Now you see the darker
the color of getting. This is just an exercise. We just randomly just
working your arm, pushing the trigger
back a bit more, making it go faster. Really close as
you can see there. You'll get darker, pushing
the trigger back more. That's the one exercise. Next one is you're
getting air out. You're pushing your
trigger finger back. As you can see, the
more you push it back, the more darker it gets. And then the other thing
is when you push it back, if you push your arm backwards, the gradient gets a bit
more lighter as you go out. Another exercise, you can
do this little circles. Push it and push it back. You're keeping a trigger, medium backwards, halfway and then you're
pushing it back. So you're getting this
kind of nice gradient. Push the trigger back and then backwards,
move beyond backwards. Push the trigger back pain comes out and then you
can go backwards. Exclude getting those
nice gradients. Just the idea of this
exercise is you're practicing moving
this backwards. And then you also move
in your arm back. So you can get less. The more you move it back, the more it's going
to go spread out. You want to be careful about
when you want a miniature. The other thing you can do
is little bursts like this, which are really cool as well. Keep the, keep it pressed down and just slightly bring it back. The action yet slightly
bring it back. Which on managers you
will be doing more of. Because you want to get, you want to get little areas
on the miniatures. You're doing. Obviously a
big miniature, very big one. But a little burst slide back. Good exercises to, and also like we did before, comes out. Comes out. You're spraying, can
push into trigger back. Pain comes out. Then you'll hold
into trigger asset in place so you've got control. You can see here, you've got and then you
can spray around. Just have fun with it. You're doing. And then
you can mix that with the previous exercises
and go back little bit. Moving around. This is an exercise for steadying
your hands or you can just do what you did in first I started a
little bit, come out. Just do lines going down. Just do lines going down, just practice like all you're doing. You're just practicing
and getting familiar comfortable
with your brush. Then in the middle
you might want to practice your control. Comes out. And then
the air comes out. Then moving to trigger
back releases the paint. Good way to start
getting control. Instead of pushing
it straight away, you see how if you push it back straightaway,
just splits out. Just comes out and you get
orders bleeding on the side. You want to then there then you get excess paint
on the outside, and then that happens. Then you just then what you
do is you get a toothbrush, wet toothbrush, and then you can just clean it off like
this very lightly. Because you don't want to
damage the needle EVA. And then you'll notice you
just spray it to clean. And then you can start again. Sometimes when you paint
a miniature and stop, you might need to go to
decide and clean it a bit and then start adding. Because you might
paint a miniature and install some way
again and spit comes up. So it's good practice to just clear the nozzle
a bit like this. Then stop pain, which I'll show you when we start
doing the tutorial. But that's all an all day today are the exercises that you should
get familiar with. So just go over like this. Go close to the
Pays, go far away. The closer you are, the more sharp where it will be darker, the further away the lighter. Then you've got the
cross exercises under so-called ones coming up. So get familiar with those, really start to feel
comfortable with the air brush. Then we'll start moving on
to base coating mid coning, using the actual miniature
to apply these skills and these trigger controls and get that nice smooth effect. I'll
see you in the next video.
8. Cleaning Your Airbrush for Colour Changing: Alright guys, when it comes
to cleaning the air brush, I have this bucket with
this some paper in it. And also I have these
two bottles here. These bottles, I'll put a link. You can get these
on Amazon anywhere. And what I do is before
changing colors, I've got my airbrush here. I normally have this
all on the floor, so I do it on the
floor, but this is just for example, sake. I'll press the brush. So as you can see, there's
still paint india brush. Then what I'll do, I'll
put, as I'm pressing it, I'll put this water in
here just to clear it. And then I'll take it
out, keep doing it, tip it out until you can
see the water's gone there. And then I'll put my finger in the fund. Just press it out. So it was reversing back the is reversing back in.
This was coming up. And then I'll just
put water and again to double-check. That's it. That's how you
clear your elbows. Clean your brush, start simple. Nothing to it. Very simple. Now you're ready to put
the following claim prover in New. I'll do it now just to show you, as you can see, we use red. What we'll do now. We put flowing river in, in just to just to be
sure it's all clean. We'll use yellow because this was show us
yellows bright colors. Who was show us any other colors that may be in the steel. And then again,
we'll use our brush, we'll just use our brush to mix. Remember flowing
prover first year. And then we'll just check. And as you can see, there's no reading
day, it's not orange. That's when you know,
it's cleaned up properly. Sometimes when you do
change the colors, a bit of the old column
might come out first. So you just let
that spray out and then the new color
will start showing me. Okay. That's fine. That's
cleaned properly.
9. The Wet Palette For Painting: This is the wet palette. I'll leave a link below so
you can check this out. Wet palette is going to
be your best friends, so it's emptied the moment when this wet palette normally
what you get are these frisk sheets which
are coming in these packs. You can get them separately. I think you'll get
a couple of wisdom. What you get is you
get this hard kind of cartilage paper and it's a bit thicker than the paper
that's gonna go on top. You can kind of get away with
keeping us on for awhile. And it's the next layer which is a bit like
tracing paper. The phrase, you just
put that on top. Now what you wanna do is
once you've got that on top, first to what you want
to do is add water. I've got clean water here. And you just want to
add water in just enough that it's
soaking every way. There's a little layer
on top, as you can see, the SOC to all and
there's a little, but then you've got enough. So you've got a little bit lame. I want to put a
little bit more in. That's fine. We don't want too much, we
just wanted to soak their bid. Now what you wanna
do is you want to get your fiscal paper, your tracing paper,
or baking paper, whereas put it on top. And you want to just press the size that you notice
they start curling. So you just want to
press it down here, keep it pressed until
the water soaks. And then you'll notice is
eventually kills at the star. But then after you
just keep it pressed, it soaks and it stays like that. And then you just want to push all the water out
so it's more flat. That's how you prepare
a wet palette. Now you're wet palette has already to be used for painting. So now that you've got
everything set and it's already, the idea of a wet palette is
when you put paint on here, you can literally just close it. After a session. The paint will still be there. When you open it, it
will still be wet, so you're not wasting paint. That's the real good use
of having a wet palette. We start using this later on when we start painting
using the paintbrush. After we airbrushed our model. And we're going to
the techniques on how to wet blend using
the wet palette. All right, so I'll see
you in the next video.
10. Tools For Filing The Mold Lines: Guys, we want to do
with the miniatures is when you first get them out. You want to look at the manager. And you want to start cleaning up any mode lines
that are around. When you use
miniatures are costed. Sometimes there's these
lines that can happen. Just want to clear some of
these up around a joint. Let's have a look
around a miniature. See if there's any mode
lines that you can clear that you didn't must
show up when you undercoat. Miniature seems to
be alright, costed. Constant, real mode lines here and check out the components to make sure that there's no
lines might show up. Here. You see the thumb
where you could clean. But yeah, just want to
go over each component, have a look and just clear
any mode lines that might be the PCA mode lines. Then once we get the
modal loans out, we can give it the miniature nice barf in a little tuple web box with
very liquid and poof brush. We can brush it all
off, clean it properly. That will be the next stage. All the mode lines all
nice and clear and clean. And then we can move on
because only undercoat this and the lines are
there didn't show up. So we want to make
it all nice and clean pack of files
that you can get. If you look at your models, you may have some mode lines. All you're doing is filing
the mode lines off. Just to make it nice and smooth. You can use a knife
for that as well. Here's a file, but it just go around the whole model
we're looking at any. And also you can get
tools whereas rounded. You can go around like
the rounded areas. If there's any mode lines, if not, you're good to go. This is just a video just to show you the tools you can use for filing for different
types of files. I'll leave a link
in the description. And also you have your
cost knife here as well. Will your blades. You can also use this as well
as we did scraping away. You can file or scrape
away any mode lines. Guys are seen in next video.
11. Cleaning Your Miniature: Guys, so we want to
clean out miniature. So what we'll need is
a plastic topo whale, any kind of container.
More and more. And just to drop off
fairly liquid toothbrush. What we'll do is we'll just
open up our miniature here. You could use any miniature folders project doesn't matter. The techniques are the same.
You can just follow along. Okay, so here we
have a character. For this character right here. Now, a lot of these
miniatures will come with resin casting. Lines here, mode lines. So I tend to just tend
to dip it all in. These are the parts. You get multiple
parts WHO as well. This is obviously the
base. Can put that in. This is the head. Put that in, basically
report everything in sql. The other arm, The sword, then the hair part, right? This one, we can break this. So we've got this tool here, the clipper to use
to break this. Just throw that in. Once
it's in. What you wanna do. Get component, you're
just brushing it. This is to get rid
of any factory on a dust or powdery
kind of effect. You're just cleaning,
giving the miniature above. And really that's what
you're doing with this. Going around the whole model. You want to get each part
and just go through it. The arm area. Quite hard on that.
The other arm. Just be careful not to sort
this and just go lightly. I just want to go and
clean all departs. And once you've done
that, you want to put it, get it into a tissue and bring
it out and just leave it. What I'll do, I'll
take them all out, then I take it under the water, cleaner in the water, then put it on the
tissue like this, let it drain and I
want us to drink. Well, you got to tau, I could
get like the air brush. You can use a brush to brush off the motors or dry
it that way as well. You can do it however you want, however you like, or just
dry it with a tissue. You can start drying
that and then we can start priming and try to start Dr. fitting in
the next videos to come. I'll see you
in the next video.
12. Dry Fitting The Parts: Guys, now that you have got
your miniature already, what you wanna do is just try and drive it
to see how they fit. That fits. All right.
Like that seems fine. This makes sure the
parts fit properly. Near the front. Yeah.
Okay. That's fine. Not that obviously the
head will go like that. That's fine. There's
a little hold at the top which we
can glue that one. That's fine. We can do that. And obviously the base will do with pin this in.
I'll tell you how to do that. But all in all, all seems to be fine. That goes like that,
which is perfect. Add that in as well for dine after because you
can paint around it first or you can glue it, doesn't matter either
way. We'll stick it on. Alright, so all of
that works fine. And then now we'll move
into the next stage. We will start gluing
them together.
13. Different Types Of Glues: Hey, welcome back guys. So there are two types of
glues that we can use. We can use the superglue. We can use the plastic glue, which is the cement type glue. Both of them work fine
thing with the plastic. One is when you put it
on and you glue it, they actually melt, both
for the plastic together. So it's really solid joint now that's good if you don't want to make any alterations. But with superglue, you can
kind of break it up a bit. But if you really sure
you can use this one, it does melt them
together and leave it for a few few minutes and it
melts. Either one is fine. We'll go for the
superglue in this one. But either one is fine. There are two types of glues and we'll move on
to the next video. We will be assembling any gluing these
components together. Okay, I'll see you next video.
14. Assembling Your Miniature: All right guys, before
I start painting, I drilled a hole in both feet. Neighbor the ankle itself. I've got resin not
going through anywhere. Because I've given an example. Here's a character that was
working on the midtone, mid tones and highlights. And our pin it so I can hold it. That's all you're doing.
If we look at this, we're already got a Coke. I just said a tape them
together called paperclips, drilled a hole like this in
the Coke. The paperclip in. So I've got two
sticking out like this. All I'm doing, I'm literally
with those holiday, I'm just putting it in
like this. That's it. Now, of course, having to
work for a base I can spray. And what I'll do, I'll
just superglue that. So I'll just use the super
glue superglue name. That's just a little
technique that a lot of paint is used just
to keep their hands away from the model when
they're painting gouache brush and this one starts glued. Will do. I use the superglue? As you can see, it
comes out quite easily. I'm going to dab
it on. We're going to spread it everywhere as well. The other side. Then it's just a
matter of holding. Okay, so we're going to take you off the base
ten and put it in like this because that sort needs to disorder needs to
be on the floor here. So we need this space. So we'll just press
this in for now. Let this set. So as you can see here, we just include that in that went flying.
We'll get another one. What we're doing here,
we're just pinning, this is called pending. We'll just find a couple
of do it here again. Literally just drilling holes. You just put a bit of
superglue on top of the hole, grabs it on the way, going down. Same thing with the other side. Like so. And you can
just level it out. Now the tricky thing here is
we already drilled the hole. Might make more sense if we just because it's quite a thin. If we just try and
level this out, what we'll do, we'll just
super glue superglue directly. So we'll just add a bit
of superglue on hair. We'll just super great
directly. Let that dry. And then we'll move
on to using the pie. We will use this Vallejo
party in the next video and we fill in all the gaps so
it will look seamless, guy. So that's how you
assemble the model. What's in the next
video where we start to fill in and make
it all nice and neat. Ready for undercoat
England priming. And then we can
start the fun part, which is painting or
airbrushing to say, Okay, I'll see you next video.
15. Using Putty To Fill In Gaps: I'm gonna use this party
to fill in the gaps now, I'd just like to put a
little bit on a base. You can use anything you like. I use an old brush. What we're doing here, we're
just loading it onto brush. Just brushing it, pushing it into the gaps.
That's all we're doing. We're just trying to get this and then put it into the gaps. Just like so just pushing in. Then what you want to do
is we've got our water here and we've got
our tissue here, just watering down the party. Trying to push it into the gaps. We just wanted to create
a nice smooth blend. We don't want to leave
this partly how it is going to keep pushing
it in the gaps. Like so. Just pushing
it back inwards. Doing simple stuff
here, nothing too. And then slightly
row the tissue. Just go over the outside areas. Just pushing it
back into joints. Slight, lightly go over it. You can go written
notice that the gap the gap will stay even when you're putting the tissue
over the top of it. Bec so like that. Then you can just go
back again and look into the joints there and be like, All right, I want to
get some more in there. You can water the part of
your down as well as slightly there just to get it
into the sections. And then all you're doing is each time you're
filling with party, you're also watering down, pushing it back
into the gap again. You can also leave
it like this water down and then come
back and sand it, which is fine too.
Whatever suits you. I just like to dry some
of this excess off here. I don't mind leaving a
little bit like that. Can come back and find
it and then let it dry. And then if you feel like
you need to fill it more, come back after
about 1015 minutes, fill it again, keep building
it until it becomes similar. I'll go ahead and do the
same in the neck area. Anywhere else where I might think I think that's about it. Those two areas really. This area is okay. So yeah, that's just a simple
way of just filling it, just letting it dry, then
go back again, fill it. Then if it gets too much, you can just file it
down and just scrape it off and keep refilling
until you feel all full. Can use your fingers
sometimes here as well to smooth it out. Sometimes I use my finger like this because then it
goes over the area. I might just fill
it in a more there. Let it dry. So
yeah, just simple, simple way to feel party. Valais, whoa, plastic pipe
and you can't go wrong. Okay guys, I'll see
you in the next video.
16. Different Types Of Primer: When I talk about primers,
really quick video. So there's two types of primers is also wiped
that you can get by. I like to use black
and then gray. These primers are water-based. Very easy to use with the air brush and dry
really quickly as well. You just use a bill Airflow. Airflow improve a mixer. So it comes onto the model nicely as you'll see
in the next videos. Okay guys, I did the
primers, black and gray. You can use white if
you run by attend to use black and gray. So I'll see you in
the next video.
17. Two Step Priming Technique: Guys is a quick video on the
two-step priming technique. We will use black first. Then once we've covered the
whole model with black, will use gray and we
would spray it from the top down or wherever where you want
the light source to show. But we'll do it from
the top down so we know that the light is coming
from the top and then we'll leave a lot of the areas
underneath the armpits and what have you are
underneath the trousers have black to
create that shadow. So that will give the illusion
of depth in the model. That's just a quick video on the two-step under
coating techniques. So it's just black
first and then gray or a guys are
seen in next video.
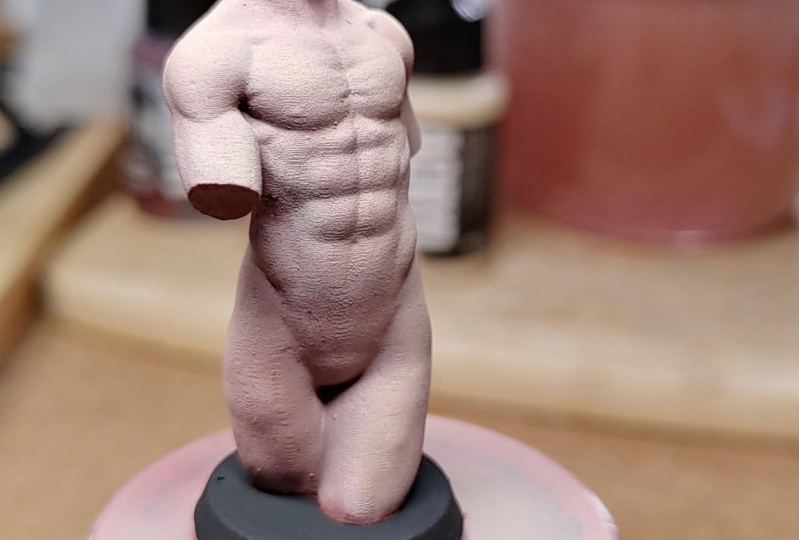
18. Priming Your Miniature For Painting: Okay guys, so we're
gonna be undercoat ink. We're gonna be using the
black undercoat first. Just gonna put in power drops. Make sure we shake
the undercoat. Let me show you did which is
pouring in younger career, not that much is fine. You don't need to
fill it up too much. And you just want to test now
to see if it's coming out. And there, you see
it's coming up. What we're doing now. But
just at a certain distance. Very rarely lightly. Covering over the
modal, not too heavy. Just going to go very lightly. Just thin layers, remember, thin under trigger
point on a brush, you don't want to push
it all the way back. Just doing it enough. It's coming out and
you've got control. Have a look at some
bits that you've missed. You want to add it. If you add it under the armpits and stuff, grass with
the shadow zone, make sure you've got
it all underneath there because there
was no other areas we're gonna leave doc going
to go and close as you can, but then don't use
a trigger as much. Because unless
print will come up. So you can use a little
bit of paint and go in closer to just fill
in those details. Which is fine. Customer trigger too much. They won't flood the modal
little bits coming up. So you can really go
into a little bit and try and get those covered. So take your time
with it. Be patient. There's no rush. Sometimes if you're a brush, Get it out, just block it. Coming out as much
because block it. And then start again. You can see some big job missed. No problem. Just let that dry for
about a minute or two. Then we'll use the gray primer. Then we'll go over
the highlights. We stopped putting the
gray pump primer on top to stop bringing out the
chest upper areas, the light areas, and
leave the dark pits, how they're okay, guys, we've got the black
undergo own and it's looking really good,
covered all areas. Gray is going to act. It's going to let us know
where to put the base color. So it's more like
letting us know where the light is going to be.
We'll just put it in. Sit back. We want to find out if we
spray a bit to just let the blackout previously
off the cleaning brush, you can see what we want. Do we want to keep the
control of the trigger? There's air coming out, push it back slightly. As you can see, it's
coming out there. You don't want to do
it too much backwards. We don't want paint to come out when we're really control this. What we'll do, we want the
light to come from the top, so we're gonna start
spray from the top. But we're going to
leave the shadows at the bottom and white
in the armpits. So we're going to hit
the high spots here. High spots on the chest, high split cylinder head,
high spots around feet, high spots here,
spot areas here, high spots in the bicep
rule hit in the high spots. Let's start slowly by the head. From the top, as you can see, there is created from the
top coming down, right? I'm going to really
put a little bit of paint on, not too much. So again, here the chest
area we're looking at, we're doing the
Chester from the top. Chest area here from the top. Take your time. Trapezius as all had,
the shoulder muscles. Just want to hit the top. Slowly pulling the trigger back because we want that's
where the light's going to hit and it's going to fade off. That's all we're doing
simply because this has given us an idea of
where the base will go. The base color that we want
to hit all the rays areas, the muscles you want
to hit the middle, the middle build them
off and going down. Using the trigger. Hope
it'll spit in there. You will get that. Capital spending. Five, what happens? Happens, that means your music, your opinions or
user Airbus cleaner. Slightly just dubbed a needle. To hog out the spinning top. And now we wanna do come
out and then slowly, slowly picking your
time to come out. Lonely quarter fringe
or by practice. As you can see, you're
starting to see the highlight, the gray slowly drifting into the adult bone marrow. We could do it lightly
and not through March. Now, we'll just carry
on around the model. The shoulders in
the middle there, going darker into
all we're doing. That's all we're doing. Even on this slider
to doubt array del, deltoid muscles of reconsider. Let the paint come out slowly. Building up the layers. Because all we're
doing during the live, every now and then
you might want to clearly a brush
loaded with us fine. Again, building up the
layers twice such costs go because the light's hitting the top and the bottom is doc. You're doing very simple
little technique. Again, the farm here
and what the bicep. Maybe at the top
here, the ********. What do we want? Follows coming out. Hopefully. I didn't leave the bone marrow. Rule top there. You can just generally then also record the chest
area already bought. The OB area will just
be there from the top-down, top-down. Renowned them. You can just pop color the folder likelihood as you consider the chest. Just a bit more light coming in there. In Syria. Patient with the way the pain comes
out, take your time. Do the same for the head. Slowly and the pain
starts coming out. You're doing is
controlling doctrine. And then we can do
on the fly structure just a little bit more. Highlight. Highlight here. Thanks, So that's
looking pretty good. Just everything are congruent. Congruent. Turn in the feet, get the free and
just lightly just put the gray over the
place enough so we can just simply
polio meconium on the underside dark
because some of the shadows the light
to hit inherit. Inherit. So the feet are fine. Yeah, That's the mid toned. So now they've got
those mid tones in. We can move on to basing upper
adding the base color will create whole new character. We know where the shadows are, we know what a high
spots are the shadows. And then the bottom
bits are the dark beer. It's even a hey, we can see the faces while we can replace the top
because of the light. From the top-down,
you can naturally see the light is hitting another
top and there's shadows. In the next video, we'll go
through the base color plot, applying the base
color, and then we do the hock mid tones
and highlights.
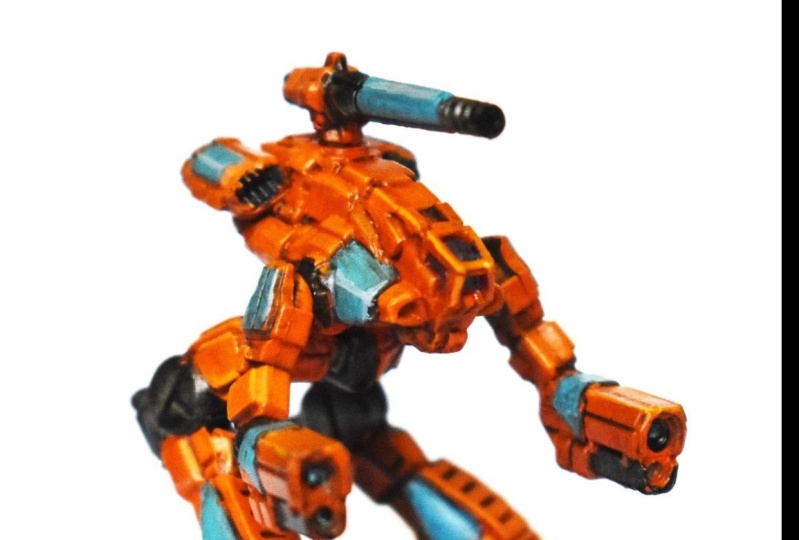
19. How To Airbrush The Basecoat: Okay, okay guys, So
the fun begins now. So these are the colors
we're going to use. We're going to use the gory red, bloody red, hot orange. We're going to use the orange
fire and extreme highlight. Very little we will
use cadmium skin. Now what we'll do is we're
gonna base coat In this video. We're just going to
use this one here. Just give it the
proper base coat. Then when we come
to the mid tones, will use bloody red. But what we'll do,
we'll mix a bit of gory read, read bloody red. Then we'll use bloody
red to highlight den for the next highlight will mix bloody red with orange. I'm going to get a little
bit lighter as we go. Then we'll use
orange to highlight. Then we'll use orange. We'll mix the orange fire
highlights slightly more. And then we'll use
orange to give it the final highlight
and mix orange with cadmium skin to give an extreme highlights.
So that's all we're doing. We're just mixing colors, mixing one cutoff,
the other guy. So we've got the airbrush ready. Standard procedure as usual, we're using the air
flow, improve a skill. We put this drops in.
We put a few drops in. So it's just about fuels at
the bottom there you can see, then make sure you shake your, It's really shake them because monomial in
the sitting around, it builds up at the bone. So you want to shake them
vigorously upside down? I'm only hold them
and I just shake. Sometimes it might get stuck. So to use this, okay, Then you just drop 1234. There's not been a
lot because these paints are quite thick. So what we'll do,
we'll just mix it in. It get a thin consistency. So let's check this out
again with test it. Yeah, we can add a little bit
and I would drop their mics that a bit. Brilliant. Okay. Alright, so
we always remember always testing to see how
the paint is coming up. Now what we're gonna do,
we're going to base paint the areas where we've
had the white areas. I'm going to leave the
black areas how they are. You can get a little
bit on the last point. The aim is to just
get it on the areas. You can see this coming on the head starting to come on and you're just working
through the light areas. Little pay our
time, not too much. Control your trigger.
Control the trigger. And then you can get it.
As you put it on there. We're not really going
to the light areas. As you can see, the dark
areas I left hug or how they are leaving the dark
areas, how they are. As you pointed in
the race areas. Because thought to
judge the distance. We can bring it because
you haven't got much pain coming out. You can go a bit closer to
the raised area because a Nobel paint coming out and you can control
that area a bit more. If you feel like there's
no paint coming up, just keep bringing it in. Bring the trigger
back if you feel that it's at the moment I've and then I just
push the trigger back. I'm starting off with air. Then I push the trigger back. And then you will notice the paint starts
coming. They're here. All you're doing once you've
covered the white area, leave the dark area how it is. All about gradient.
Just carefully. You can think finish
hidden layers. All you're doing
here, not the ball, maybe just covering up the
areas where the wife is. As you can see, I'm
leaving the dark areas, how they all orders
to it. I did. The main thing is to trigger
control, custom main thing. The more you blurt out, the more it's gonna come out, suddenly it's gonna
come out there. If you really want to be really want to be careful
with the trigger. Oil, you can put oil on
there to make it smoother. I'll do another video on that. Show you that when
you when you're maintaining the airbrush, again, you're just going
through top area, has asunder just the
highlighted area. The blacks takeover itself. Again, you can see here. If you don't if you
feel like there's not enough paint coming out, pulling the trigger back to
come to the AB area here. From the top-down. We can just work on
the top-down here. Even the intercostal,
her biceps here. We can see it's turning. You can see the color turning their order during a
given the illusion of depth by leaving
the dark areas, golf. Areas where light, where
you're applying the color. You can do out the bomb has
to lightly but not too much. Obviously the elbow. Then of course you have the feet Just roughly getting
the base color in thin layers, thick and thin. We can do you can work through
the top area again. Give me a second pause. Down here. Again, if you don't feel
the pain coming out, go back on the Kruger
bit more testing. All the time. There you have your base coat. You have a simple base coat
which is looking good. You got all the areas too. This is what this is why the gray helps a lot because it brings
out the base color. Then we just do some other topic and brings out the base color. Same kind of shadows as well. Which is key to making
your model look. Making it freely, which is
what you're looking for. We want it to give the
illusion that 3D effect. You've got this base
color and we're working with slowly within a
stop bringing the reds. And this is just the base, dark base color which we will resolve the absolute poverty AB. You don't want to do too much. We don't want to over saturate
beer in the middle there. Notice through the feet as well, get the slide. You're doing just
working for the model. All the areas are consistent. Which looks pretty consistent. To me. What we'll do is just add
a bit more around here. Looking good. Hey everyone, get as many layers as you're doing the other
five years still be read, but it won't be as many layers. Okay, so that's the
first base coat. Then we'll start doing
some highlights on the next. Add a bit more here. Pointing down, I'm just trying to be on the hammock
little bit around my hand. Wherever you want to a bit
bright pages add a bit more. A bit more of the color way you want it to be
a bit more darker, just add one layer
collected data. We've got the base code there. Now what we'll do, we'll start
adding the other colors. So we're leaving the docs, how they are leaving the light areas we're
lightyears are spraying. Guys. See in the next video.
20. How To Airbrush The Midtones: In the next video. So we're gonna be
doing the highlights solution to the whole orange. And then we're going
to use orange fire. And then we're going to
use the extreme highlight, really light one,
which Academy in skin? Let's start doing this. Start with the orange. We'll use the same
procedure if flow improved. Seven drops there,
shake your paint, mixed up paint, push
it back, blueback. Make sure everything's clear. That previous red paint out. Yeah, It's got out. Same thing again. We're
going into highlight just very lightly on
the raised areas. During top of their head. Cheek bones. Don't want
to go too extreme. Too much. Hopefully the ab just want to add layers slowly. Hi areas. Don't need to do
much at the bottom there. Lives coming up a
bit more on the top, so wonderful, a bit more. Fine. The fingertips step by step. A lot crisper little bit. Indicate some highlight. A little bit. We want a nice warm color there. Looks really good at
getting to how we want it. And now we start adding
extreme highlights are just add a bit more. We've got this, That
was her orange. And now we've got orange. This one is going to be
a bit more extreme now. But what we do, we're going to mix this with
existing same ones. So if we shake this up,
this similar mixed volume, if we mix this slightly
brighter as you can see, push it back or we
do normal standard. As you can see, it's slightly
brighter than the next one. Again, same thing we're
doing this summer. I'm doing in smaller areas. Going in the bicep. Nuchal area. Most specific. I'll just do it. You do it no matter
what the middle. We've got the chest In regard to all extreme highlights.
A bit lower here. You present some hopeful. Again, we don't want to
do too much. Just enough. From the top of the bicep. Not go there. Guys. I'll see you in the next video.
21. How To Airbrush The Highlights: The final highlights I
now we're gonna do or fresh air brush, dry this. We're going to add
the phloem approval. Then we're going to add the previous color that we're using. We put that in 123. We'll use the cadmium skin. Let's try that much. You mix this up. This is gonna be our
extreme highlighter. This is gonna be very, very up to be very
delicate with this one. Sorry, push this
back. Very light. Let's test this. As you can see, it's coming out like WHO
and be very delicate. Thing about this is you'll be able to see it straight away. You don't want to lose that. Always. Wondered why under high, high point, just want
to have the whiteboard. We don't want to
lose the orange. We don't want to
lose it to March. On the Harvard foreign area. For wears hard, wider. Nowhere. No more. Marks tricep
highlight their hustle. We want wider middle, so we've got the nice
contrast happening there. Looking good, how we
want it free as well. Just stop the top. You go. Little spray there. But also I was told that our desk looking how we want it, nice highlights, sharp
highlights there. You could go on a
shelf or because they're Walsh will bring your back elbow to
highlight on the elbow. Looking all right. All right. We're getting it will
determine how we want it. Just add a bit more
of the highlight in the middle of the
budget pop out. Now the last and final
highlight which will add that is just, just using their cuddling
skin or a guys for this last highlight
will just do the same. Same again, I'm going through
the same process as you can sue for this whole
series of videos, just adding this highlight
now, so as you can see, what I do is I
mixed two colors to the previous colors,
add the highlight. And then, then I
use the color on his own to add the
final highlight. Bright. Yeah. We have to be very, very delicate with if we just
wanted Bailey, It's just a slightly That's it.
That's all it is. Light and then dark going down. Because all you're doing bicep, middle ********,
middle, shoulder. The middle. All it
is very simple. Very simple. Knuckles.
Just the hirers of overhead and now
tires. Knuckles. Elbow. Your finger to the indicator, coming out from the elbow to
be on the cost structure. While on the bottom.
Stipulated sticking out. Yellow muscle is
true. Not too much. We don't want we
want these muscles. When they are adults. You could add a bit
there. Fine. Don't need them up to the top
of their spine. Red area. Both. Okay. So that is more or
less most of it done. That is how you base coat
midtone and highlight. How to highlight it might
look a bit extreme, but once we wash it, Gloucester model and wash it, would bring everything back
down and then we'll give you a dark wash. That's why it's
good to go a bit lighter, bit more extreme than you
would normally present. The muscles will pop a
little bit light there. Could have left that
but never mind. But yeah, thus. Thus fine. I want to keep playing around with too much cooler
than you lose it. But everything's looks
all right there. This area could have a
little bit more there. So now what we'll
do, we'll gloss, varnish it, then
we'll let that dry. And then we'll give it
then we'll give it a wash. And that's how you
would base coat. And then the finally will
show you everything, will just paint all
of this black again. And then we'll move on
in the next course. We'll do the painting with the
brush to get more details. But the basic basis of pink in a minute has done in
airbrush, the skin tones. Guys. I'll see you
in the next video.
22. Gloss & Wash Technique: Guys, now what we've done, we've given the
model or gloss code, as you can see, is
gloss varnish on it. Nice and shiny. The reason we're doing
this is we're gonna be using these washes, really thin down inks. And when we put them on to
the model, doesn't slide off. The higher is and go
into the recessive. The gloss acts like
a kind of glass, so it doesn't stay in
one place and podo, very important, this
technique works really well. The gloss are used as Vallejo
books are good at here. The Gloss, the gloss I've
used is the Vallejo gloss. And update the same as the
other colors I've used. Airflow improved, put that
in the airbrush first data, the gloss that are mixed it just to thin it because
it is quite thick. Then you get one of these,
I'll put the links below. You can get these equipment. This is really good for
mixing and what we're gonna do this washing, this phase is where you see the details coming out so
you'll get your brush. And all we're doing, we're
gonna use a bit of red tone. This is the Army
painter, or again, all these links for
these paints and washes will be all in
the course content. You can be sure to get
them if you need these, you can use other washes too, but these up the best in
the business at the moment, in my opinion, dark
tone and red tone. So these are just
dark inks that will really bring out the muscles. We'll do. We'll give it a shake and we'll just put an equal
amount right. Now. The reason why we spray
airbrushed lighter, because this ink will bring it bring everything
back together. It will tell you
everything down. We want it. Or as we've
got those two washes in, give you a bit of a mix. What we're doing,
we're just going over, we're going to start
from the top-down. So we're just applying the wash. be generous
beginners to that. You can put a whole load on. It will automatically go
into all the recesses. Just load it on and do the work because
your order details starting to come out now. If it's just going over too
much and just get your brush, you can just pull it back
with your brush longer. Again, it is putting
it all over. I just work in the home water. All you're doing is just
going over the muscles. Don't be afraid to
be too generous with it at the moment
when you look at it, it looks a bit messy, but when it dries and settles, you'll see areas that are meant to be dark in all the areas
that are meant to be. And you can just as
all you're doing is pushing the ink in
the reassesses. You need to add more. In some places, add them, you need to take some
away. Take them away. Had some in the armpits,
hair dark areas. You can add some
airflow improve if you want to thin down to wash. That can help to there as
you can see, can go over it. Actually the thinner
might be better because it did look a bit thick, but that actually looks a bit by just giving you a ten around. Again, if there's too
much, they just take it off too much around there. What we'll do, we'll
just leave that to dry. The little details over flooded. We don't want to
obscure the details EVA in at the same time. I'll just go over the model. Makes sense when looks
and feels right. And if it dries,
become a look at it, if we feel that didn't never pass of wash. We can
do another pass, but I think one should be. All right. You can
see how that's toned down a lot
of the brightness. Then in another course
I'll be painting over. This is just to
get the mid tones and washes in for the skin tone. Then on another
Skillshare course, I will be talking about
painting over the tone, bringing out more
of the muscles. But for now, we'll let this dry. And then we'll just touch
it up a little bit up to where the airbrush, some areas that might need a touching up. We'll check it out. Once it's dried.
23. Drybrush Technique: Guys, we're just going
to be dry brushing. We're gonna do, we're
gonna get paint to reuse this hot orange paint poured on the tissue like so I've
done an example here. We're just loading this
up with the paint. Loaded it up, Come again, another tissue and we're
just wipe the excess off, really wipe off all the paint. The idea here now with
Dr. Washington is just going over arrays there. As you can see, it'll pick up whatever the raised area is. Bring out some of that detail very lightly. You can see it. Good way of getting
all the detail out. And you want to work your
way through the whole model. You want to get malaria. Make sure you wipe most
of the payoff, all of it. Because if you leave
a little bit on any dry brush, it
would look like that. You'll see streaks of the paintbrush which
you don't want, just wanted to
take it off enough that you've got paint on it, but it's not going to give
a kind of powdery finish. So you want to work your way
through the whole body and just dry brushing and
building up the layer. If you run out of paint isn't applying on public
load the paint again, dry brush, wipe it off. Dry brush again. Again,
we're aiming for the high spots on
the abs as well. You feel like you're
running out of paint. This load the brush up again
and the same procedure, just wipe it off. Make sure you wipe
it off because you don't like I was saying before, it's going to give
a powdery look. You want to be really patient
with this and really go over the surface
again and again and again until you get
it how you want it. Keep going over. As you keep brushing over, you'll see the detail
starting to come up there. As long as it's done in a
very patient lightweight, you'll start to see the
effects of dry brushing. Instead of bloating or put in all the paint
on this slapping on, Just take your time. No rush. And you can
start working on the face very lightly. Very lightly. And keep a repetitive
build up the layers. Each truck is building
up the layers. Just have to be very
patient with this process. Then we'll come in and we'll
paint all these areas. This has given us a guide
to where to highlight. You can see when
we added the wash, how it's dark and
everything now. And that's what the wash
tells us why you want to air brush it a bit lighter
than what it is. So this is just a
one simple technique can use to bring
out the details. And then we build would
using a lighter orange. So we use this orange, then we start using
lighter orange hair. So if we put this on the tissue, load it up as usual, what excess, what
really wipe could. This is a light color and
it will show up more so we don't want any streaks,
nothing like that. So we really wipe everything off this and then we'll
start with the feet. Same procedure. As you can see. It's lighter. You can see this lighter. Just going to get the
areas of the cup. And that's why you didn't. You're going around
a whole modal. Same procedure. Take your time. Get older dry brushes
in minority areas. Back to the face. We can start applying the
lighter highlight to the face. Abdomen area to what you're doing is working through the whole motor patiently, making sure their
transitions are nice and even the airbrushed has
done most of the work. You'll just slightly adding
just a little bit at the top. Then you can see how as
you're building layers, you can see the
gradients falling back given the
illusion of depth. And thus, thus,
all you're doing, you just burn up less
Daniel, build a lighter one. You could use this one next to highlight your keep building up the layers and then we'll start painting with a slowly
building up the layers.
24. Conclusion: Alright guys, I hope you enjoyed
that little mini course. And this is a little
recap on what we've learned through
this course together. We learned about how
to prep the model, how to get it out of the box, how to prepare it, file down all the spews, older lines, mode lines that
come from the factories. Then we learned how to
clean the models as well. Then primate, primate
with a two-stage priming where we use a black primer
and then we use gray. Depending on where
the light hits. After that, we went
to the base coat, choosing the colors you want. And then we build that up from
the base to the mid tones, to the highlight, to
the extreme highlights. And we made it the highlights
even more extreme. That'll be varnish and wash and bring the
color back down. And then we finished up with dry brushing that
brought the detail out. All in all tasks, the
basic fundamentals of airbrushing and apply in your base coat, your
mid tones highlights. I hope you enjoyed
it and I wish you nothing but fun on
your painting journey.
 Opi Chaggar, Senior Animator + YouTuber