Transcripts
1. Introduction: Hi everyone and happy holidays. My name is Keri Sanders and
I'm an artist, a teacher, and a creative here at Klaus hotter studios in
St. George, Utah. I live just outside of
science National Park. And there are so many
beautiful inspirational things to paint from here. We held workshops and classes
indoors and outdoors. If you're ever here in town, I would love to
have you join us. This is finally holiday
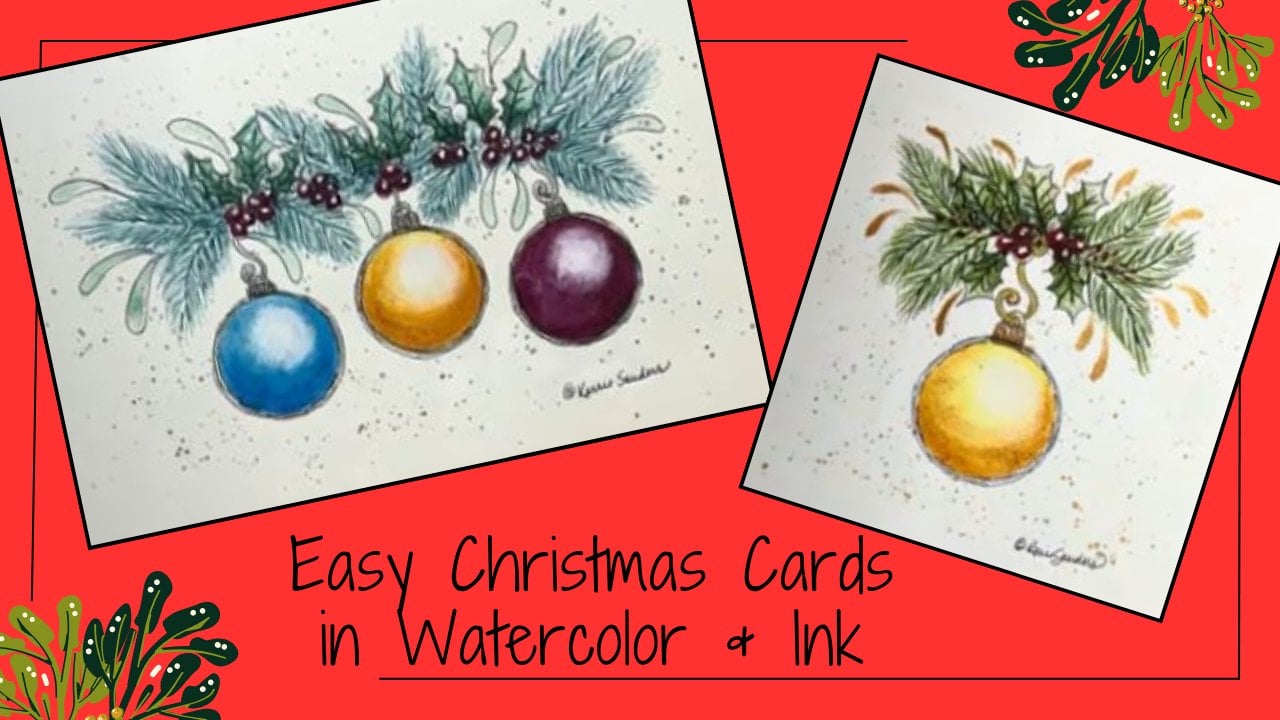
season full force, and that means it's time for us to send out Christmas cards. And I have a wonderful
tradition of hand painting Christmas cards for my
close friends and family, as I'm sure many
of you do as well. And it's become so fun
because they anticipate it. They start asking me, what are you going to
paint this year? Because they like to add it to their collection and save
them from year to year. This year, I thought it
would be nice to share my pattern with you
because it's one that you can easily
paint multiples of at the same time and get those done without taking
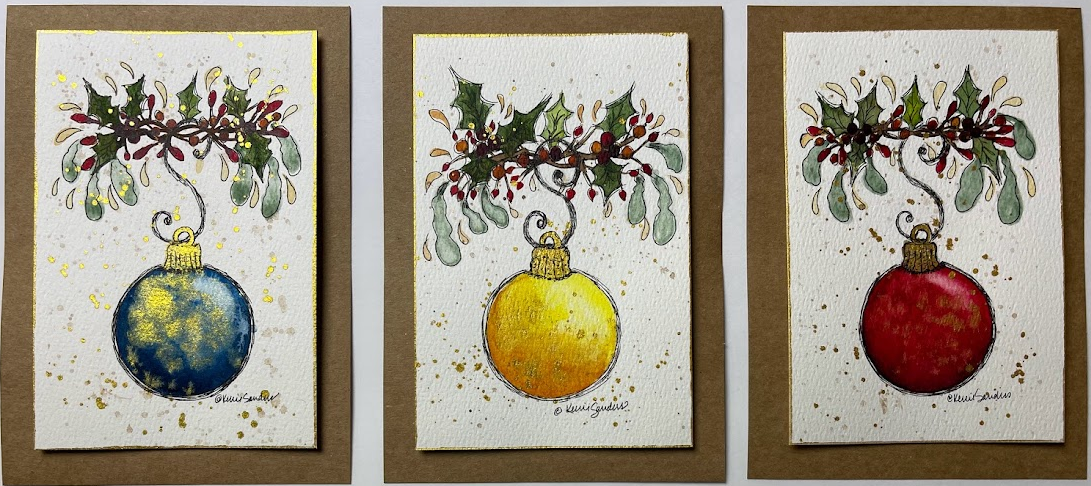
weeks of your life. This is the pattern here. There are multiple colors
that I'll give you the option to choose and do. And it's going to
be an ink class. We also paint. So first we'll paint
in using watercolor, and then after it's dry, we'll do our inking with this. And then we will
mountain on these cards, send out you'll be learning some things like
highlighting and shading, wet on wet technique, flattering, and some basic
watercolor techniques. This is a class that's probably
for someone that's had at least a little bit of
watercolor experience. If you've never painted before, please check out some of my other holiday
watercolor classes. There's something for you there. If this looks like
a fun class that you would like to do,
then what do you say? We go back to my studio
and let's get started.
2. Supplies Review: The supplies that we're going
to need for this project. And this will be the
colors included for all three of the ornaments and
some of them crossover. So you'll want to have these
handy is Prussian blue, indigo blue, Alizarin, crimson, violet, quinacridone,
gold, yellow, ocher, lemon yellow,
Naples, burnt umber. And then for our greens, you're going to want
terre verte or you can mix a blue and a green and mix that color Hooker's
green and under the sea green or
a darker green to go ahead and shade those. And then you'll need a gold
metallic of your choice. This is a cure, a talky gold, and they have a number of beautiful goals that
would work just great. And you'll need a
pencil for applying our stencil of a perfect circle. My preference here is the, it's a black wing. This is the palomino. It's absolutely my favorite. It's top-notch pencil. You can use, of course,
any pencil that you want, but I just share
that with you in case you ever want to
try something new. And my favorite pen
to ink with is a Muji and you JI and it's
a wonderful gel pen, has a nice fine tip. And any fine tip black pen that you have will be just
fine, of course. Then you're going to need
a variety of brushes. And I'm not gonna
go through all of these and I may not
even use all of these, but I just recommend
that you have a variety of small
to larger rounds, as well as a flat, a medium size, and a small size so that you have
those handy for you. Then your watercolor paper. I always recommend that you
use 140 pound or better. 100% cotton watercolor
paper will make all the difference in the
outcome of your project. And you're going to put so
much wonderful effort into it. You want it to be a beautiful
piece when you're done, I'm going to use a pre-cut
four by six card size, but you can also just use a
sheet of watercolor paper and tear that so you have a really cool torn edge
or you can cut it, whatever you want to do there. You're also going
to need something to make a perfect circle. And you can see my
stencil has been well loved over the years. That's what I'll be using, but you can definitely just use round plate or whatever you
have handy that's round. But the reason I
say that is because the ornament is the star
of the show on this piece. And since it's the feature, I don't take a chance
on free handing it. I want it to be a
perfectly round circle and so that's what
I would recommend. And before we move on
to the next video, I would go ahead and apply your round circle here
towards the bottom. You want to leave room for that beautiful hook
we're going to apply. And then just lightly draw a line here to indicate
where your mind is gonna go. It's about equal in
width to your ornament. And down just a little bit, make sure you leave
room for the greenery. We're going to put
up the top and the greenery we're
going to let hang down here and then have
some clean water. And always my favorite
handy-dandy tissue handy so that if you have anything
that you need to wipe up or for some of our
highlighting and whatnot, you're going to love having
a role in tissue handy. So, Alright, go ahead and get your supplies ready and
apply your pattern. And we will see you
in the next video and get this started.
3. Holly & Petals: Let's begin by using
our burnt umber. And I'm using a script liner to pick up some of
that burnt umber. Let's mix some water in
there and we're going to add the vine. And we're going to
follow our line, but we don't want
a straight line. There's no such thing really
as a straight line in vines. And then we're going to just add a few little flicks,
so to speak. Just kinda flick your
brush out a little bit. Just a few branches that
we can attach barriers to. Turn my board the
other direction. Okay. Let's let that dry for
just a moment and we'll work on the first
set of greenery. We're going to use
terre verte now. And if you don't have
this color, that's okay. You can actually mix it up. Let me show you what
it looks like here. It's a very blue-green
and so you could use like some civilian blue
mixed with some sap green. And just kinda mix
up your own version. And we're going to keep it
very light and see-through. So don't feel like you have
to run out and buy some. But this is called tariff or tea if you have it or if
you want to try it, then I just present that
to you as an option. I'm going to turn my board
upside down and we're going to do a standard pedal
stroke for this. It's always a good idea to have some spare watercolor
paper handy to try out different strokes and the amount of water you have on your brush or the amount of paint you
have on your brush. So for this particular pedal, we're going to touch him crest. And then as we pull
towards ourselves, we can wiggle it a little bit. We don't want it to be a
straight petal towards us. We want it to be
kind of dwindling, just kinda hanging
there, rickety. And that's just perfect. And this is a great
opaque ness that we want it to be quite see-through. So I'm happy with that sample. And we're gonna do about three
is all three on each side. And these are going to come down on either side
of the ornaments. So I'm going to start about
here, touch and press. And as I come up, I'm going
to wiggle that and go really light to a fine
tip just like that. And I'll add a couple more,
just different sizes. I'm going to let the water
flow down a little bit there. Can you see how that
water is flowing down to the bottom edge? Let's let that dry just a
little bit before we move on. Now we're going to add our IV. Again. I'm going to be using this round brushes six round. I'm going to have
some tissue handy in case I have to lift
off a little bit. I'll be using my hookers green and my under
the sea green, so a medium and a darker green. And let's start by
picking some up. I'm going to practice one. I think it's a good
idea for you guys to practice one because These have, this Holly has a distinct
shape and we want to make sure that we are
comfortable with that before we just start
right in on our projects. So that's the shape. And if you liked the shape, then you can fill that
in and we are going to do some wet on wet technique. So while it's still wet, we'll come back with on some of these will come back
with a darker color. On others will come
back with a yellow. And we'll just add
that darker in. And you can see how that
just does its thing, the magic of watercolor, it starts to bleed into
one another and let, let's do one more so that you
can see the lighter color. So when we have a lighter Holly, we're going to add some
of this lemon yellow. And same thing will touch it. And you can see the yellow
start to bleed down in, and it just gives it
more of a yellow green. There we go. So we'll have our
darker and are lighter. I will have some
in-between as well. So if you're comfortable
making that shape, then let's get started. Here we go. I'm gonna make a set
of three over here. I like to start with the one on top because it'll
be the tallest. I'm coming in kind of
light, almost tentative, so to speak, just so I get
a feel for things first. I'm happy with that shape. I like that and that placement. So I'll go ahead and
gently fill that in. I don't need to pick
up any more paint. I like that. And I'm just going to pick up
a little bit of the darker now and touch it. And you can see that starts
to bleed up like that. You can manipulate
it if you want. You can help it along. Having it run down. There we go. You can see how it's
darker here and up there. So I really liked that a lot. Okay, let's do another. My medium green. I'm going to have one that
goes off to the side here. Let's go pick up some of
that darker under the sea. I'm going to manipulate it a
little bit now because this is on top of the branches, I'm going to pull that
brown that's underneath it. Meaning I'm just
going to go over it. I'm going to work it with
the brush a little bit. And you can see how
the brown lifts off and kinda join some
blends in with the green. And then it makes
it so belief is not see-through the branch, through it. Which is great. And I'm going to pull
in some of the yellow. That's it for our holly leaves.
4. Berries, Petals & Splattering: Now we're going to add some of our quinacridone gold berries. They're not very many, just a few relay. You can see it's kind of
an orangey yellow color. You could probably substitute burnt sienna if you needed to. And we're going to put
these berries kind of close to the branches of the. Now we're picking up Alizarin
crimson and I'm going to switch out to a small round. This is a two round, has a very small tip. We're going to do the
small berries that are on the ends of the twigs. So these are not going to
be large berries like we will do on the holly. These are gonna be,
let me show you one. These are going to be shaped
almost like ovals like that. So if this is the twig,
it's gonna be like that. So we'll keep them
quite small and not as dark as the holly berries will be. All right. I think I'm done with that. Turn it around. Yes,
that looks great. Okay. Back to a larger round. We're going to pick up some more of that Alizarin crimson. And we're going to add
our holly berries. I'm going to do a set
of three over here. Now while those are still wet, we're going to come in using
the wet on wet technique. Some of our purple. You don't have any
violet or purple. You can use the Prussian blue
or even the indigo blue. We're just going to touch
the bottom of the berry. And you can see how
that adds a shadow. Violet obviously has
a lot of red in it. Perfect. And so the size, along with the shading
sets that apart from the little berries that are attached to the wooden twigs. Okay, Let's let that
dry really well so that we don't stick our
hands in it while it's wet. And then we'll do our
Naples yellow petals. We're moving now into
our Naples yellow. And again, we're going to be using the basic pedal stroke. We're just going
to add some petals here and there that are
actually not even attached, but they just add a
nice little filler. And I'm going to use this teeny tiny brush to brush because I just want
them to be quite small. Right now I'm demonstrating with a lot of paint on my brush, but when I get onto the piece, it's going to be quite light. But I wanted you to see, we're going to have them curve
all different directions. But it's that touch press lift. These days that we're
adding in these pillars. They don't need to be
attached to the wood. But if it bothers you, you can come back in
with some of the brown and add in a little
piece of twig, so to speak that attaches to it. So do whatever makes
you feel good. Okay. I think that's enough. Let's turn it over and see. Yes. Okay. Coming back now, I'm still using this to OT. I'm going to pick up some
of our darker green. For me, it's under
the sea green and just add a hint of the veins. And it might seem like
a lot right here. But once we add our inking in, it's going to go
to the background, but it will add
dimension that will be a nice touch to your piece. Alright, the last day is before
we start on our ornament is to splatter some brown. And I don't really want it
to get on the ornaments. So I'm just going to tear off a little piece of my
tissue and put it here. And if you haven't
splattered before, you're going to want some
burnt umber and lots of water and use a
smaller brush, brush. You're going to
roll this between your thumb and your middle
finger and turn it over. And you're going to
tap it will give you some good control. And if a few spots seem
a little bit large, you can gently lay
a tissue on crest. You can see how
that softens them. And then we are going
to come back and we're going to splatter
again with goals, but not until after we've
finished our ornaments. So the next phase is
to begin our ornament. I'm so excited. Let's go ahead and
get our colors out. I'm going to wash my palette out and we'll get
started with that. See you in the next video.
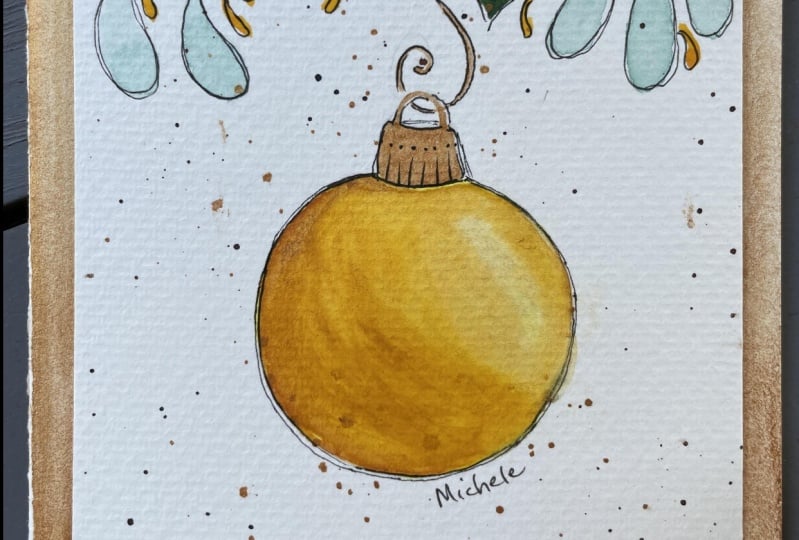
5. Ornament: We're ready to fill
in our ornament. We're going to start
with lemon yellow. Could also use cad yellow light. I like to just fill mine in
quickly with a round brush, but I do not go all
the way to the edge. Then I take a flat and
I come back and take that to the edge
because I can get a nice clean edge with a flat. Notice I'm pressing
down with my brush. This allows the brush to work the paint the
way it should. And you get a nice
clean edge if you're trying to work strictly
from the tip of the brush, you're not gonna have
as much control. Wonderful. Now while
that's still wet, we're going to pick
up our medium color, which in this case is
going to be yellow ocher. Just going to stick with my
flat brush for a minute. On this lower area, we're going to use
a curved stroke and just throw some
paint in there. Since it's wet on wet, it's going to do most
of the blending for us. Then lastly, pick up some
of this quinacridone gold. This is powerful compared
to the other two colors. So we're gonna go and carefully, starting on this lower edge, I'm just going to gently touch. I can kind of gauge
how much water and how much paint is on my brush. I really just want this
on the bottom portion. Now, while it's still wet, we're not going to worry
about working with it yet. I'm going to pick
up some of my gold and I'm just going to drop some in and let the water
work with that. We're going to actually pull
out a bit of a highlight. Now, see all the fun
things you're learning. You're shading, you're
highlighting. I'm so proud of you. Alright, so I'm still using
my flat and following the curve of the ball up here
on the highlighted area, I only have water on my brush, so I'm touching and you can see how it comes off
onto your tissue. I'm going to rinse.
I'm gonna do it again. Now the key here is do not
press hard on your paper, but rather let the water
from your brush do its job. And then you can take your
tissue and touch and press. And you can see how that
creates a highlight there. You do just a little bit more. Touch and press. Great. I think that's good. I think I'm going to leave it. While that's drying, we can go ahead and
take advantage of having this wet gold
and do some splatter. And it's gonna be
the same technique that we did with the brown. When you pick up some wet gold, work it into our brush. I'm using a little bit bigger
brush this time because I want bigger splatters
with the gold. And this time, I don't care if it goes all the
way to the top. I'll snap, beautiful. Love it. Great. Actually, while
we have wet gold, Let's go ahead and take a flat brush and just
quickly fill in. The little tougher
to this ornament. I'm going to add hello.
6. Blue and Red Ornaments: I want to show you
some variations of colors that you can do for your ornaments in case you're interested in doing something besides the gold is yellow. So first, I want to
show you the blue, and we're going to start by just filling in the basics
with our Prussian blue. Let me just work that in. Oh, I just love this color blue. It's just so beautiful. So we're going to
make sure that we have plenty of water
on our brush for this. And again, I like to just fill in the bulk of it with around. Okay. While that's still
wet, I'm going to pick up some of the indigo blue. You can see that's quite dark. It has some black in it. And we're going to just touch and let the
watercolor do its magic. While that's still wet. I'm going to add in some gold. Well that's pretty. You could also do silver. Silver and blue look
beautiful together. I'm just going to let
those blend a little bit. I'm going to tilt my paper just to encourage it. Great. I did pick up a little bit of paint there just to
give it a little push. And I'm just pushing that gold around so
I don't have spots. I want it to blend. Nice. Okay. And while that's drying, let's move up to our other ones. Show you the colors
there are going to fill in with our
Alizarin crimson. Okay, and now we're going to go ahead and add in
some of our violet. You actually could use some
of the Prussian blue or even the indigo blue instead of the file
if you wanted to. That's just a
personal preference. I like the redness
of the violet. I think it blends well
with the alizarin crimson. Add some gold for a minute. Alright, And after those
have set for a minute, we'll come back
with our gold and willing to splatter them. It's okay if it's
still wet because we want that to kind of
blend in some more. And I'm using a larger brush. So I can get larger splatter. Some. Love the way that
that goes right there. All right. So that gives you
your red ornament and your blue ornament. Or you could do
your yellow gold.
7. Edging in Gold: If you decide you want
to have a torn edge, which is a beautiful
look on the cards. You need a straight
edge that you hold down tight and then gently
pull up to rip. So you get this beautiful edge. And then something that you
can do that's kinda fun, is to pick up some more of this gold paint and
haven't quite loose, meaning a lot of water
and not much paint. And just gently brush
it across that edge. And it'll just give it a nice brushed gold
attach to that edge. And that would look really
beautiful on your cards. You can do it on a
straight edge as well. If you, if you're not
tearing your card, you have to be a little bit more careful when you're applying it. There. Isn't that beautiful,
the nice touch. The last thing I'm
going to do before I apply the inking
is that gold edge. I'm not going to
tear the edge on these cards because
they're pre-cut my life, the clean cuts are these Beautiful. Okay, I'm going to let that dry. And then we'll come back with our gel ink pen and we will finish off our
beautiful ornament card.
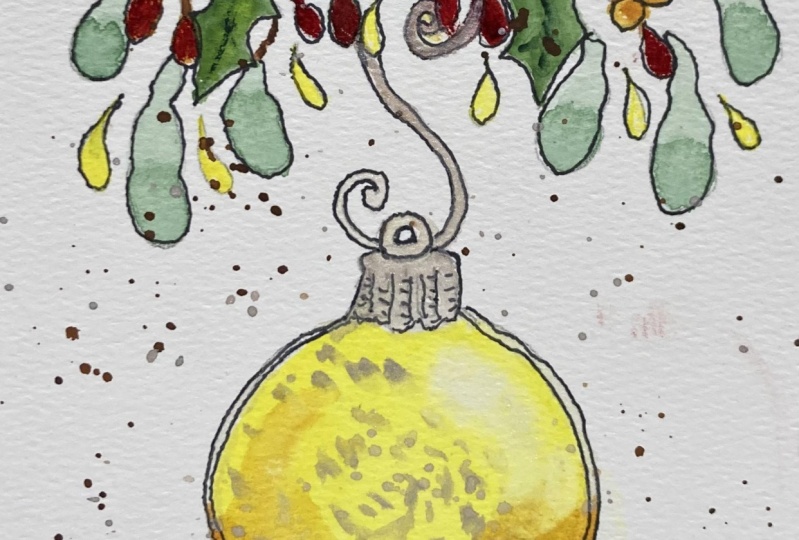
8. Inking With Pen: Hey, I'm going to use my
Muji black fine tip pen. And we use a really loose, loose stroke with this guys. Don't be tight and try to
do an exact leaf, e.g. you can see how I've gotten
outside of the lines. I might even do a double
line here and there. And that's okay. I want
it to look really loose. And basically we're gonna
go over almost everything. I like to start with the
biggest shapes first. This is where you have a chance
to make nice fine tips on these ivy leagues. Okay? You can see how that's
shaping up already. And then I go to my
next largest thing, which are the red berries. And I go around each of
them a couple of times. Loosely. You can see the space. Be careful not lose your green petals that
we're doing here. Okay, This is a good time
to step back and see if you have everything in the top portion that
you want to be there. If you're missing anything,
this is a good time to add. It ends before I start
inking my ornament, I just want to get
a loose idea of where my a hanger
is going to be. Well, I start with my circle. Come around, then it's
going to come up. And I like to have
a nice S-shape. So once you have that in, Let's get our pan
and get rolling. Alright, I'm gonna start with
my hook and add that dot. I'm going to add
the bottom one's kinda kinda gives me a guide. Now I'd like to just kinda put this middle curve in that
kinda helps me stay on track. Go on top of this back one, behind the front one. And then for our circle, we're gonna do several around. But again, it's not going
to be all one line. This is a good time
to stop and take a look at it and see
where we need more inky. Okay, I'm looking at my piece. I'm just going to tighten
up a little bit of shadow. I think we're good. So always remember
to sign your name. You can sign your name
next to your piece here or down in the corner here. Because after all, this is an original piece of artwork
and you want to take good care to put your name on
everything that you paint.
9. Card Assembly: I ordered some some cards and they came with
some envelopes. I thought that this
dark craft paper would look beautiful with
all of our gold trim. And I'm just taking some of this double-sided
thumb tape and cut it into a couple
of little pieces here and put it on
the back of the card. And we will just take
that onto one of these cards and Mt. All right, there. There is our beautiful
Christmas ornament. You can write a message on
the back if you would like. Or I could have
mounted at towards the top and stamped
Merry Christmas or written Merry Christmas or whatever message I wanted
on the bottom there. And it's ready to go in its
envelope and away it goes. Thank you so much for
joining me on this project. I hope you had a
good time with it. And I'm sure the people you
send these two will really appreciate your beautiful
original hand painted artwork.
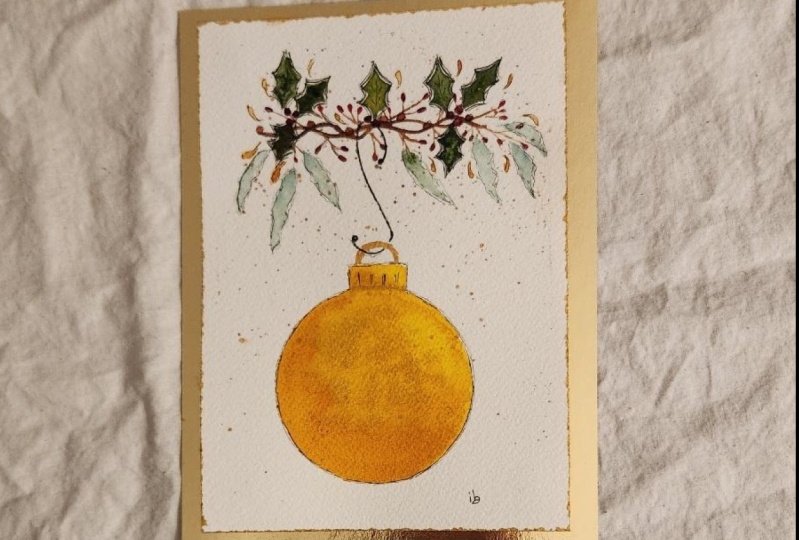
10. Class Project: Your class project is to complete one
Christmas ornaments. Following the
videos step-by-step in the guidelines that I
have provided for you. When you have finished, take a moment to snap
a picture of that and upload that into
our class gallery, which is on the
bottom of this page. By clicking on the green
Create Project button that I'm showing you here. It looks like this.
That will allow us to communicate together and
I can comment on your piece. But also more fun
is to allow all of the other students
in the class to see what each other
has accomplished. And this is such a
fun, easy project. It'll be great to see
each of your ornaments, so please take a
moment to do that. Also, if you
wouldn't mind taking just a moment to leave a review, I would really appreciate
that as a teacher, it helps me with Skillshare. Thank you again for
taking this class.
11. Congratulations & Bloopers: Well, you did it. Congratulations, you've
finished your project and your card is ready to send off to someone
special in your life. I'm so excited for you and I'm excited for them to
receive it from you. If you could take just
a moment and take a picture and upload that in
the gallery for us to share. I would be really excited
to see what you did and make a comment on it and
we can communicate there. Also, if you
wouldn't mind taking just a moment to leave
me a quick review. It would help me
improve as a teacher. It would also help improve
my ratings with Skillshare and their algorithm the way
things work on the backend. Thank you for doing that for me. And also, if you
enjoyed this class and think someone else
would enjoy it as well. If you click on the
button that I'm showing you here and it's on this page, than both you and your team friend would
benefit financially, you get a credit
from Skillshare, which would be kind of fun. Then lastly, I know I'm
hitting you with a lot, but if you are a person
that enjoys Instagram, I would love to be part of
your art journey on Instagram. I'm at Kerry Sanders art. And if you included me
than I would love to follow you and be able
to share that with you. Alright, I'm gonna let you go. I think I have tons of
blue versus time guys. So I'll post a few for you here so you
can make fun of me. It's okay. Happy Holidays. I'll see you with some fun new year's projects and take care. Bye, bye everyone. I live just outside
of Zion National Park and there's so much
beautiful things. I didn't say the scrapbook or wherever you would
like to put that in. Following the, let
me start over. One ornament on
watercolor paper. Following the
guidelines that I have given you, following that.
 Kerrie Sanders, Artist, Teacher, Creator.