Transcripts
1. Welcome: Hey, thanks for
popping in today. I have for you today another
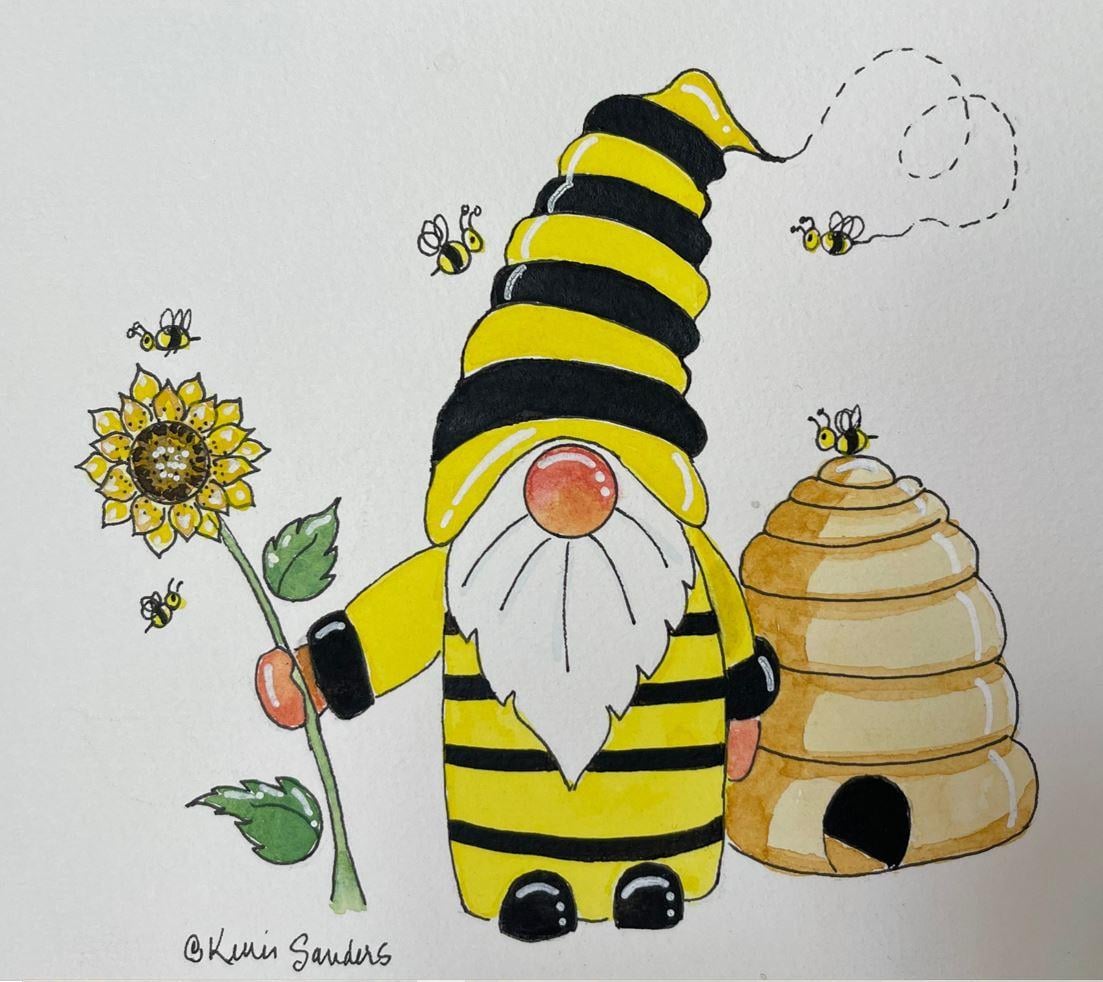
in my series of gnomes. This one is a cute
little beekeeper with a hive of bees
buzzing around. This is something for
people of all abilities. If you've never painted before, you're going to have a
great result with this. I designed this for beginners and for people that also love to paint that
have experienced. So you're going to
zip right through. But really I thought
this would be so fun for you to
grab a neighbor, a friend, a mother, a sister, and have a little paint party
and just do it together and have
some fun with it. Hi everybody. My name is carried banners
and I'm an artist, a teacher and a creative
here in St. George, Utah. And we love to do some
plein air painting. So urban sketching a little
bit of in studio painting, but it's just so beautiful
outside of Zion National Park. If you'd like to find out more, you can find me here at
Carey centers aren't dot com and see some
of my portfolio. I've also been fortunate to have my holiday patterns picked up and taken across the nation in both holiday book
and pattern packets. In other words, guys, I just love teaching. I love sharing the passionate
painting that I have. And I'm so happy to
be with you today. I hope that you will join me. Why don't you grab your
paints and let's go back to my studio and
let's get started.
2. Supplies: Let's do a quick review of
supplies and then we'll dive right into painting this
cute little beehive. First of all, you're going
to need some tracing paper. If you can just take the PDF that I've provided on the page, print that out and
then you can trace it onto some tracing paper. It will look
something like this. And then you can apply it
to your watercolor paper. I use graphite frequently, just lay that down, set your pattern on top, and then use something to trace that and the lines will
appear on your paper. Just a quick word on that. I prefer to trace with a stylus. It has a round ball
on the end and that way it doesn't
ruin your pattern. You have the, the lines that you can use
over and over again. But you can always use a
pencil, that's totally fine. You're just going to have
pencil marks on your pattern. No big deal. So use whatever you have and then your pattern
will be ready to go. I always recommend using
140 pound watercolor paper. And that is going to
interact well with your watercolors along with
the water, your paintbrush. It is made to give
you the best result. And when you're doing
something worth doing, you want to have a good result. So watercolor paper is the
one thing I don't skimp on. And I highly recommend that you do that if you're able to. Let's talk about brushes. I'm just going to use a couple of small rounds
and a small flat. Just use whatever you
have and it'll be fine. I always recommend my
handy-dandy tissue, my favorite tool. It's definitely something
that you're going to need. Some water, a towel,
a shop towel. Let's talk about our paint. I'm not going to specify specific paints I will share with you what
I'm going to use. This palette is a pastel
dreams palette by Premack. You just order it online and then I added a
bunch of paints to it. But mostly we're going to be
using lemon yellow, yellow, ocher, and black, and
not a whole lot more. This is a cute
little beekeeper in a sunflower and it's gonna
be yellow and black, so that's basically it. And then for inking, Let's talk about that for just a second because it's
so vital since we are inking first and paintings second paint
going on top of your ink, you need to make sure that you are utilizing waterproof ink. And so as we've talked about
the size of our Eclipse, Let's do a little test and I recommend that you
do a little test. So I prefer to have fine lines because there's so many lines I don't
want it to distract. So I'm going to be using
an oath three micron. It is waterproof and you can see that this is also one
of my favorite tools. It's a unit ball and
it's a fine tip. And this is also another
of my favorites. It's a Muji MUGA. Yes. You can use
a ballpoint pen. You absolutely can. And I want to show this to you, close up on the camera. All three of these that I
just showed you are fine tip. All three are different sizes. So you have to
determine what look you want for your piece and use the one that
floats your boat. Now, this is a fountain tip, a fountain pen with a fine tip. And I love to use this for
urban sketching and whatnot. And it is not waterproof. And I want to show
you what happens if you don't use waterproof
paint because we are inking first using
watercolor on top of it. I'm just using water on my
brush as if it were paid. And you can see it's
just fine on everything except that's what happens if you don't have
waterproof marker or ink. So please test whatever
tool you decide to use, test it out and some paper
first and mixture that it's waterproof and you'll be just fine when we go to
do our painting. So why don't you grab your
supplies, apply your patterns. And in the next video, we're gonna get
started painting.
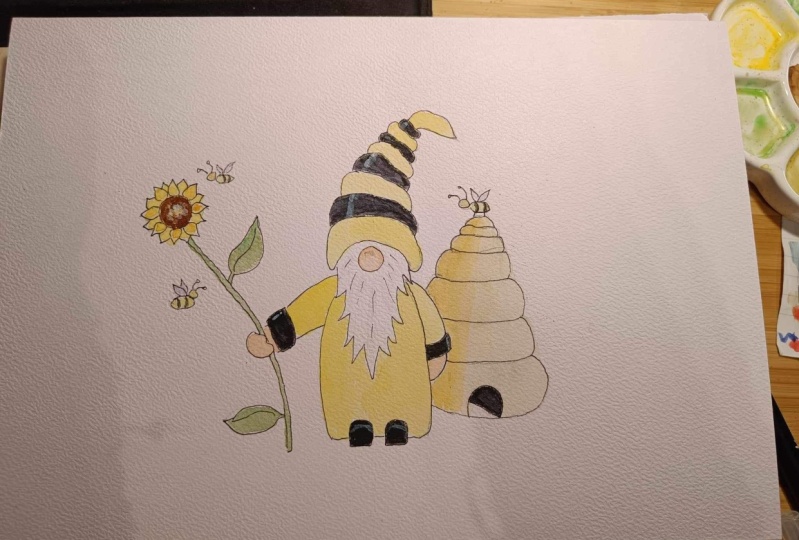
3. Coat, Hat , Petals: While that's drying,
we're going to pick up some of our lemon yellow. Could also use a
cad yellow light. We're going to base
it on his jacket. Okay, taking this
same lemon yellow, we're going to do the
stripes in his hat. I'm going to turn my piece. Great. Now while we
have this color, we're going to do
what's called a wash. So we're going to still use
this same lemon yellow, but we're going to
add a lot of water, about a 5050 ratio. Water to paint. Test it out on your paper. I want it to be quite sheer. And we're going to wash
over these petals. We'll come back in
an accent them. We want to start out with
something quite light. I remember going to
go light to dark. Alright, and also while we have this picking up more paint now, I'm just going to put it
on the tip of my brush. You can see I'm
rolling the brush with my finger and lifting
it to a point, I get a fine point. Just going to touch
the body of the b's. It's okay to go over where
the black stripe is. Alright, let's let
everything dry. I'll see you in the next video.
4. Black Stripes: Alright, let's pick
up some of our black. It's going to turn my
palette this direction. Black is going to take
a couple of coats, just know that upfront, so don't try to cover
it all in one coat. And try not to go
onto your yellow. It would be pretty
hard to lift off. So I'm gonna stay
away from the line. You can come back in on your second coat and
get closer to the line, or you can fill it in with a marker. While we're here. Let's go ahead and do RP. Okay, again, notice how I'm leaving all these whitespaces. I'll fill that in either with the second coat or with
the marker because they don't want to bleed into
what we've already painted. It's a little bit hard
to lift out black after it's gone where
you don't want it to go. Now I'm turning it again
so I can do the stripes. Alright, I know that
looks messy right now. Don't worry, we're
going to clean it up and make it look nice. But first we have to let
that dry completely. Okay, my black is
completely dry. I'm going to use this
number one scripter and come back in with black
and get close to that line. Now when I have control
with a nice fine, fine tip. So I'm going to
speed up the camera. You go ahead and clean
years up as well. And I wouldn't recommend
coming in with marker at this point if you plan to just fill
in with marker, hold on that until the very
end, I'll tell you when. But if you have as big
a gap since I left, then let's fill in
a little bit with some Scripture if you're
comfortable with that. Alright, I'll speed this up. Okay. I had to stop the time-lapse because
I can't speak well, it's in time-lapse mode, but I did have a
little accident. I wanted to share it with you
because accidents happen. I smeared this cuff. I went into the flesh
right here and so I had to take a brush and clean water and
just pick up just lifted off and you just touch it and then touch it
with your tissue. You can see where I
touched it there. It pulled off the flesh
as well, which is fine. Once it's dry, then I'll come back in with
some more flesh and I'll come back in
with some more black and it'll be great. So if you have a little
accident that's okay. Lifted off with clean water and you should be good
to go. All right. I'm going to finish out
the black in speed again, and I'll see you
when it's finished.
5. Hive, Flower, Skin: Don't do anything else unless
you're black is 100% dry. So make sure there's no shine to it and you are good to go. We would hate for
you to smear it like I did at this point. So we are going to take
some of our yellow ocher, which is just a little
bit more intense yellow. It's kind of a brownish yellow. This one right here. And a lot of water, we're
going to do a wash. So again, about 5050 ratio. Test it out on your paper. We're going to just add a
little shadow to our HIV. All right. Can you see how I'm making
that look round, round, round. Okay. Now I'm going to pick
up even more water. So it's even a lighter wash. And I'm going to pull
it across these lines. Okay, well, we have
our yellow ocher out. Let's go ahead and do some
more on our sunflower. Do a little bit here and
there on these inner leaves. I'm just going to.it a
little bit here and there. And now, while that's drying, let's do some
readiness on his nose. I'm going to pick up
some of this pink. You could also use
some cad red light. I'm going to mix it a little
bit with that flesh color we used and water down. And I'm going to add it
on the top of his nose. Now I'm not pressing
hard at all because I don't want to lift
off that flesh color. I'm just kind of lightly dabbing almost an up and down
motion on that Cute nose. And I'm only coming
down halfway. And I'm going to let that
dry and see how it does. Okay, while the nose
finishes drying, let's come back to our flower. If your yellow ocher is dry. And I'm going to
intensify with the lemon yellow because I want
to brighten it backup. I just wanted to
add some dimension. Let's let that dry. Alright, we're going to take just a touch of
this cerulean blue. Really watered down. This is probably 10%
paid, 90% water. So I'm sure you can
barely see this. We're going to just add
some strokes on the beard. And we will come in
with marker after. And we're going to
make these curved. Here we go, just a few. And let's see how
our nose is doing. If you have a harsh line
that you're not happy with, just touch it with some water. What's looking good guys? It's looking really good. Okay, Let's finish
up our sunflower. I'm just going to pick up a
little bit of burnt umber. And I'm just going to go around. You see how I'm just
making little lines. I didn't like my
dots in the center, so I just took some
water on my brush and touched them lightly and
I'm going to let that dry. I might have to come back in with some brown around the edge, but it was too strong for me. Alright, if everything
is dry over here, we'll let our flower dry. It's time to do the
strikes on the genome. So let's pick up, this
is a very small flat, so number two and some black. And I'm not going
to do the sleeves. I feel like it's too much. You can if you want. But I'm just going
to start up here where I have a small space. It's a great place
to get a feel for things and make my way down. You wanted to go crazy. You could go plaid. How brave Are you? Alright,
let's do a little gap area. You could do it
with your inking, but it would look a little bit different than if you
just did it with paint. So tends to have a sheen and
your paint is matte finish. Alright, and when we touch up, we're going to add
lines on the beard. So no problem there. I just wanted to come
back to my sunflower. I like those brown
tones in the center. That's cubed. Let's let that dry.
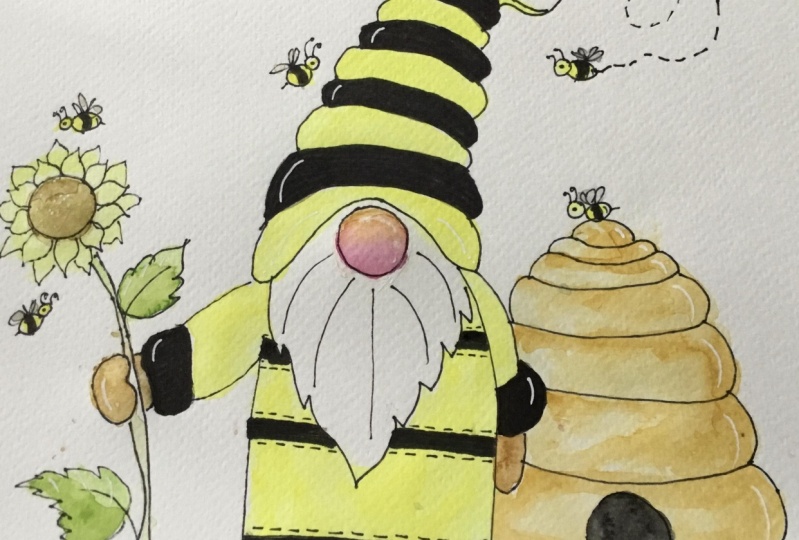
6. Black Stripes, Details, & White Highlights: Okay, If it's completely dry, then you can add a second
coat on your black stripes. And that's what I'm gonna do. I'll speed up the video and
see you when it's finished. We are ready to do
some fine details. First, we want to just
clean up any areas that still need a little
touch up with a marker. So e.g. when I did my
second coat of black, I didn't come all the
way to the beard. I'm going to just
touch that up with the marker and bring that in. If you have areas, this is gonna be an
individual thing. So if you have areas that
you need to touch up, go for it now, before we do our
final highlights. I'm going to speed up the camera so that you can see where
I'll be touching up. And you do the same on yours. And then we'll come back and do the beard and some highlights. Okay guys, everything
should be completely dry. And the last thing
we need to do with our marker is to put
the lines in his beard. And let's go ahead and
just add those in now. Just make them curved
down either side. And then when you
come to the middle, It's fairly straight and
then curve the other side. There we go. If you want to, and I'm going to just add a
little eyeball on my bees. I think just that little
touch adds a lot. So now for white highlights, I'm going to be using my
fine tipped postcard. You could also use a paintbrush and you can see how that goes on if you've never used one. And this is the fine tip. You could also use
a fine paintbrush with some white gouache
that would be great. Lynne on the sunflower, I'm going to add some
dots in the middle. Oh my gosh, that's cute. Oh, I think highlights. Just really perk it up. Bring this up so you can see it, the tips of the petals there. And I'm going to add a little
bit on the leaf as well. Okay, I don't wanna
get too carried away. But I would love to. Highlighting is just so fun. There's just so many
places you can do it. I am going to add
a little bit here. Alright, I think I
will stop. Alright. I always recommend that you
step back and kind of prop it up and look at it 3-6 ft away and see if
you missed anything, if there's anything
you want to add. And if not, then go ahead
and sign your name. I've already signed my piece. But guys, be really
proud of your work. Everything you do is unique and beautiful and special to
you and your talents. And always sign your work and claim it and be
really proud of it. I'm so proud of you for
doing this and I'm I'm so appreciative that you
would spend the time to take this class
and do this with me. So thank you so much. Sign your piece
and I will see you in the next video and we'll
start to wrap this up.
7. Class Project: Your class project is to complete one cute
little beekeeper. Know, you can do this by
following all the videos I provided for you that'll
take you through step-by-step beginning to end. You can stop and
start as needed. Once you've finished. If you would take
a pic and share that in our student
gallery below, by looking for the green
Create Project button. Then we can communicate
freely together. And it's always so fun to see what each
other has completed. Alright guys, I will see you in the final video where
we will wrap up.
8. Thanks and Congratulations: Great job everyone. You have finished your class, your project, and I
hope you had fun. I know I enjoyed
being with you today. Thank you so much. And if you know someone
that went enjoy this class, all you need to do is
find this Share button. Click on that and both you and your friend will benefit
financially from Skillshare, which is pretty cool. Also, if you'd like to
communicate more with me, we can find each other on Instagram at Kerry
standards aren't. Or you can reach me on my
website carry centers are.com, which is where you can
see more of my profile, sign up for my workshops and see what's happening in our world here at different
kind of business. We'd love to have you also, if you wouldn't mind
leaving a quick review, that would be so appreciated. And if you're interested in taking more watercolor
technique classes, I just released this one
is called watercolor techniques and can easily find me by following me
here on this page. And you'll get notifications
or just type in my name. Alright, thanks again, everyone. I sure enjoyed being with you today and until the
next year class. Take care.
 Kerrie Sanders, Artist, Teacher, Creator.