Transcripts
1. GameMaker 2D Platformer Workshop: Hello everyone and welcome to the gamemaker to D
platform a workshop. My excitement is off for charts. As I get to introduce you to
this incredible journey here you'll create your very own
retro game from scratch. For those passionate about
gaming and creativity, you've found the right place. My name is Dan the
creator of this course, and my background is in indie game development,
which is extensive. Fueled by my passion for
creating unique games, I've honed my skills in gamemaker and several
other engines. You may have come across my
creations on tie to come games more than just a
game developer encoder. I'm also an adapt pixel
artist, which by the way, we also have a course on called Pixel Art Boot Camp Complete Two D Retro
Game Master Class. Now I recommend you
checking out if you're more interested in
the artistic approach. Now I'm here to
transfer my knowledge of game design and
experience to you. So let's take a peek at what
this course has in store. We start our adventure with
an Introduction to Gamemaker. You'll become acquainted
with its interface and learn why it's an exceptional
tool for game development. Next we lay the foundation. We'll map out our game project. And delve into collisions, From basic box collisions to more intricate set ups
that mold to sprites. As we advance through the
lessons for fun really begins. You'll master setting
up object instances, crafting a tileble background
for our space themed game, and defining playable
level bounds. You'll dive into sprite editing and enrich your
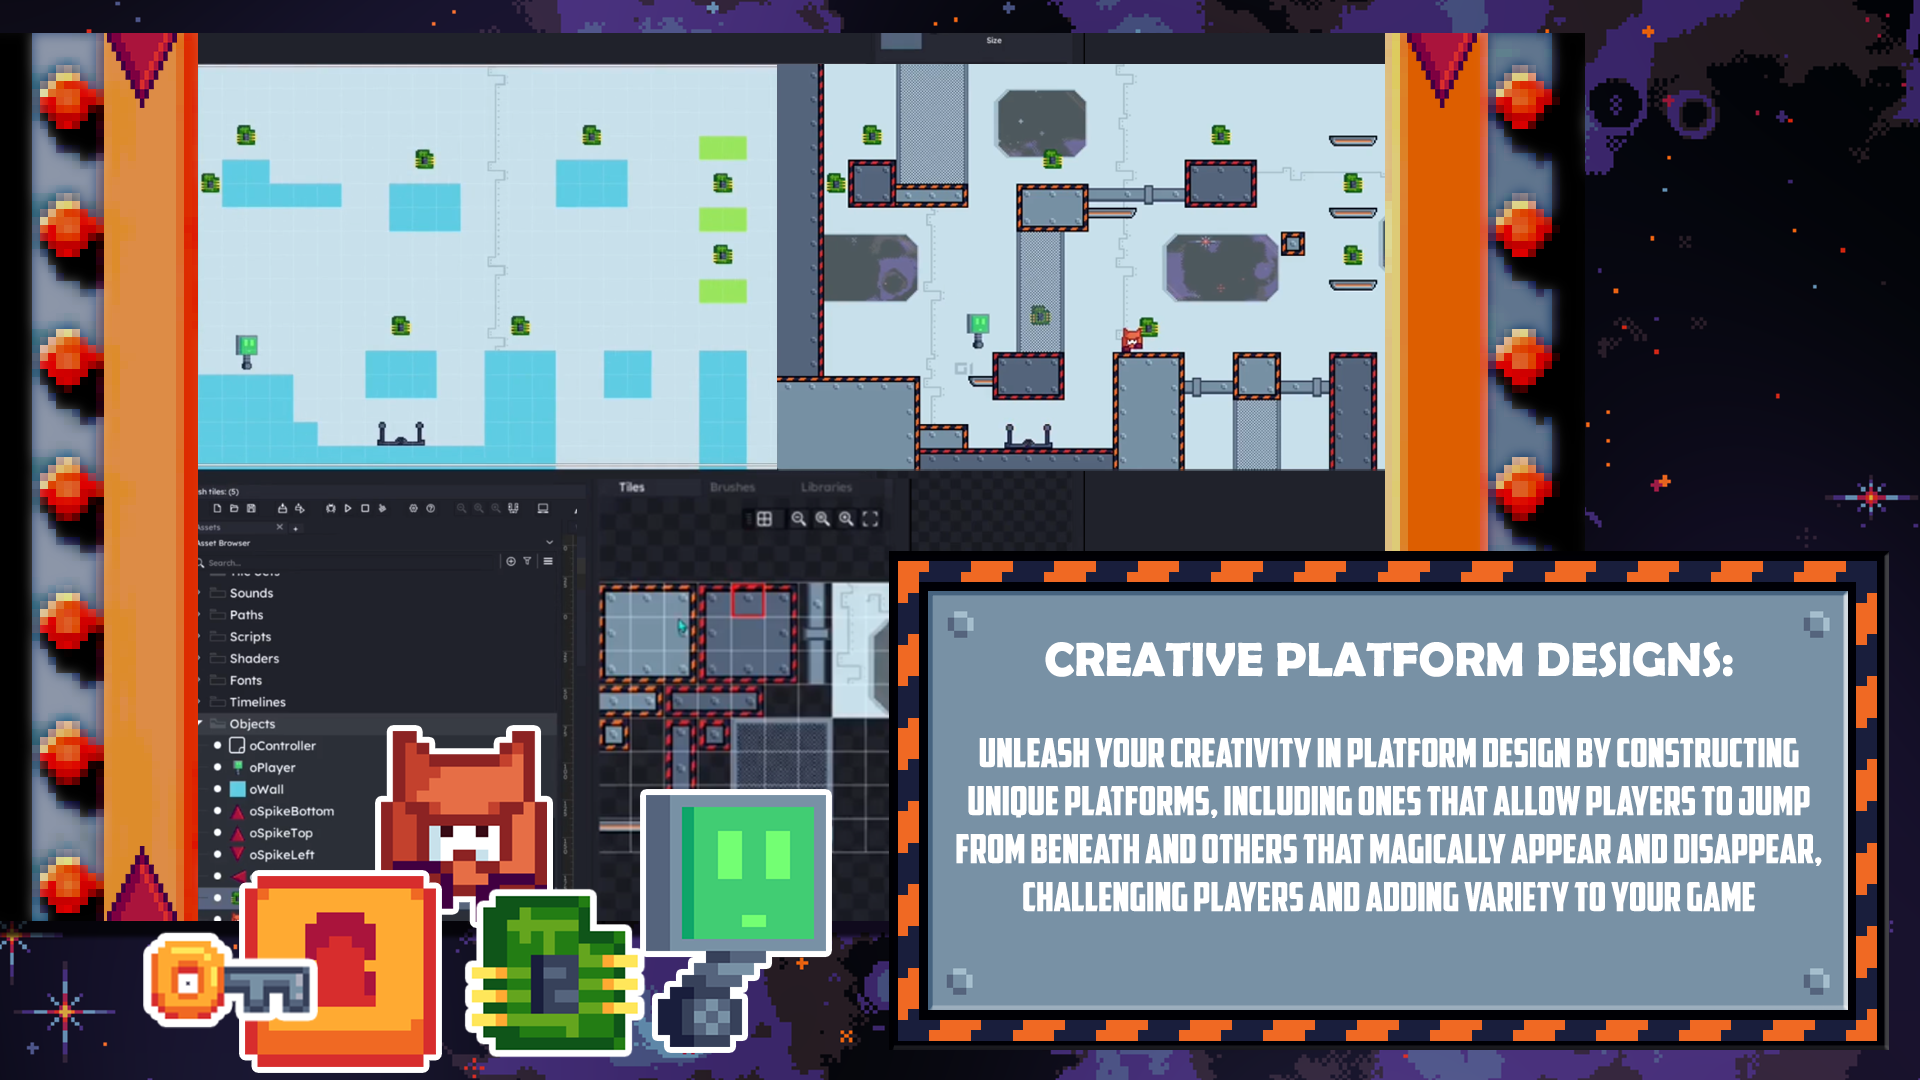
games visual appeal. Then it's time to jump
into coding platforms. These aren't just for standing. You'll code them to
allow your character to leap from beneath. And we'll also develop
collectible mechanics that guide players
towards their goal. You'll animate enemy
walk cycles and con cut game mechanics
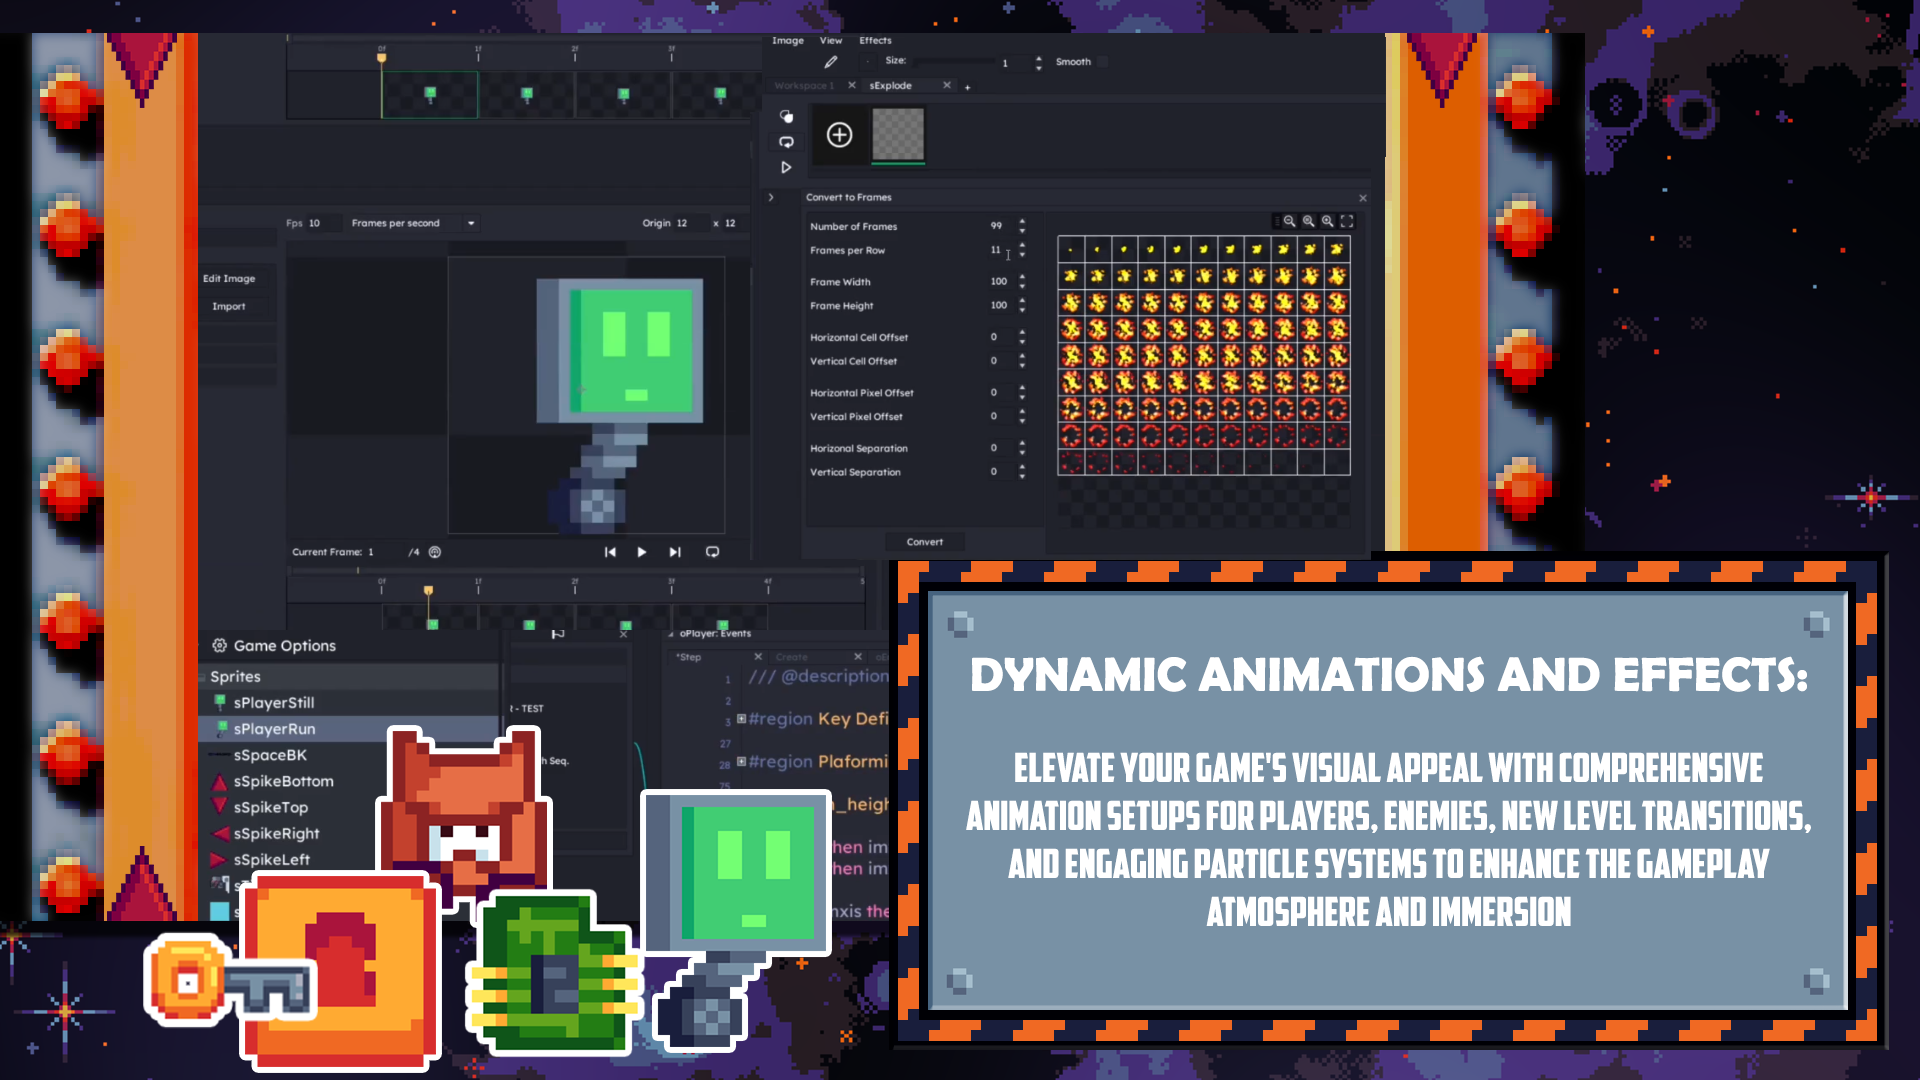
before defeating them. Next we'll focus on V
effects for pixel art. Imagine crafting every
death animation and adding camera shake effects for a more thrilling experience. We'll also start experimenting
with particle effects, creating a burst
of excitement when collisions and
collectibles are snagged. This course then ramps up with deployable spikes
and lurk animations. Those not only increase
level difficulty, but make transitions
more intuitive, both for spawning levels and crafting engaging
death sequences. We'll then make your games exit spectacularly
rewarding with glowing particle effects and
a tractor beam effect when your player exits a level. To heighten player
immersion and satisfaction, we'll dive into
character animation. You'll learn to create flip
animations based on walking direction and animate
idle and run states. This is where your game truly
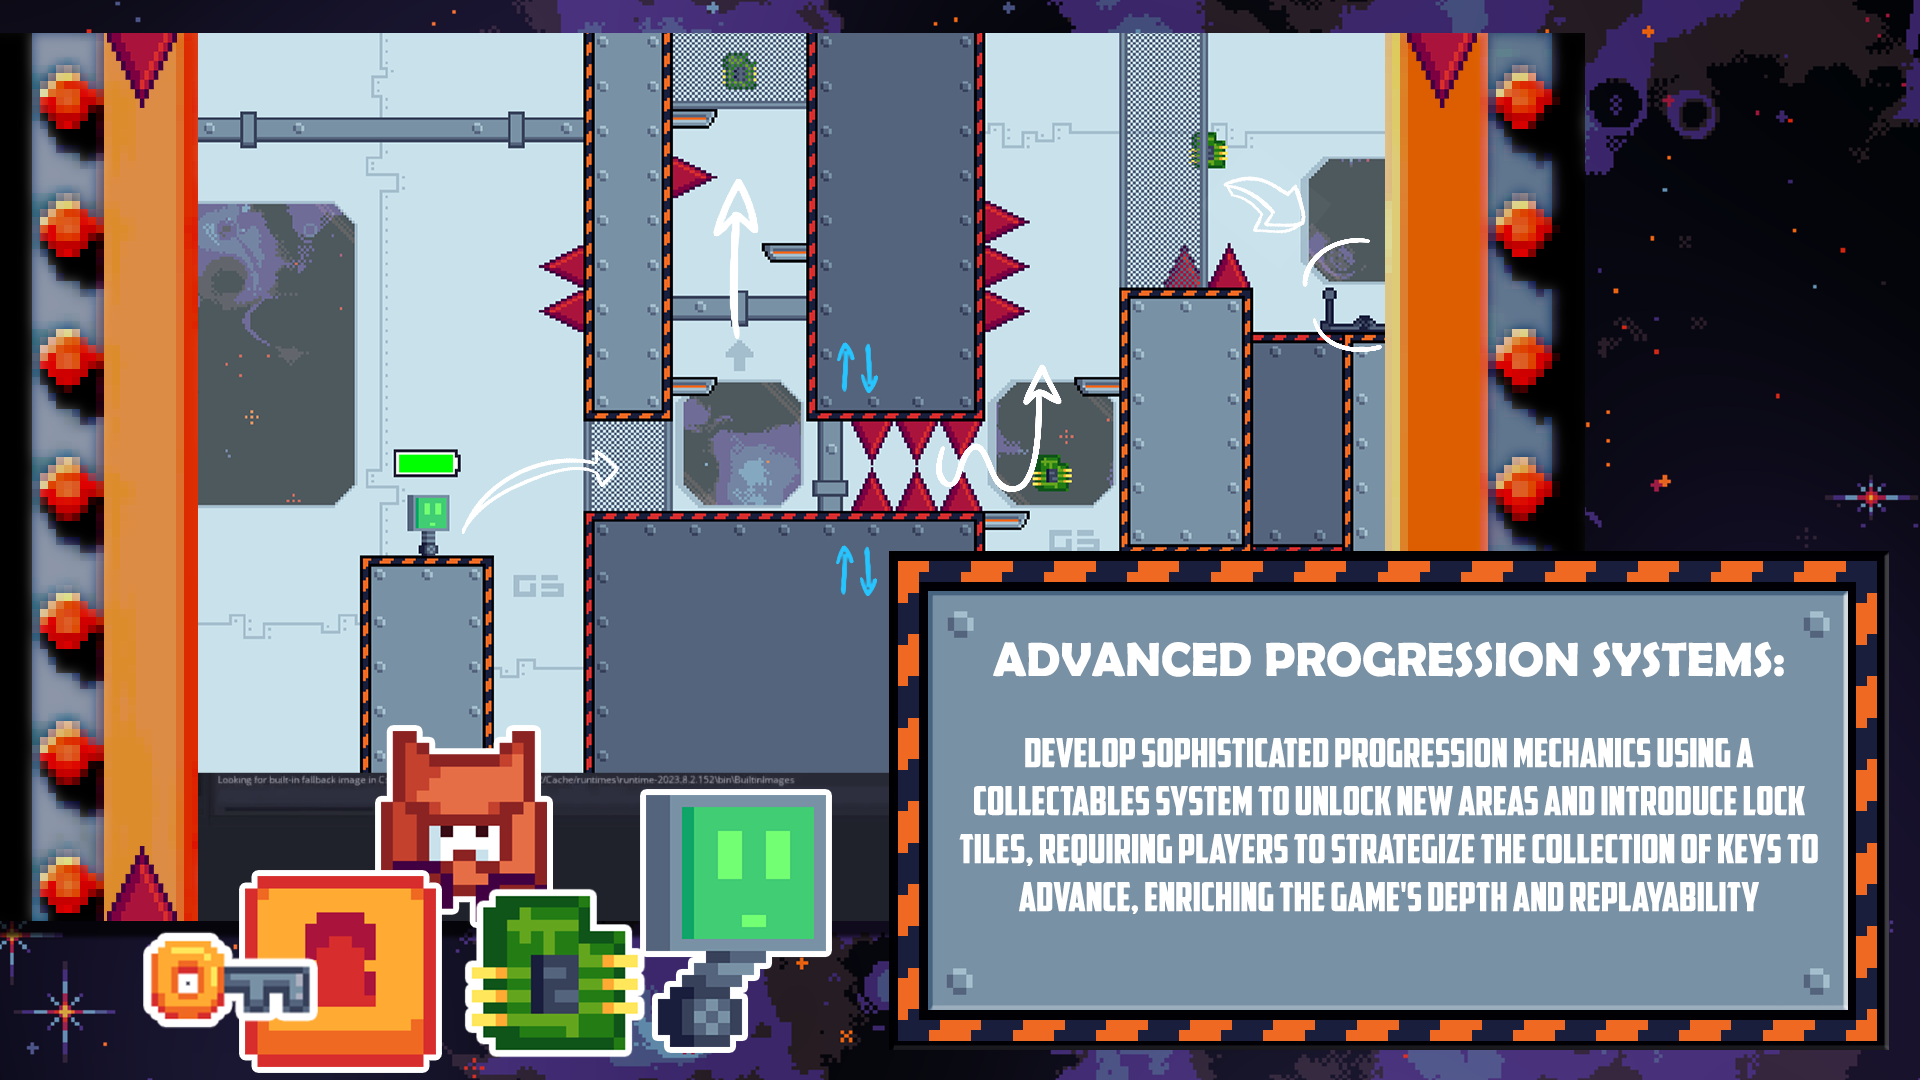
starts to come to life. In the following lessons, we'll tackle more complex elements. Crafting a battery
depletion system that restricts player movement. Introducing new adversaries
like a swinging spike ball, deploying a key and lock system, setting up retractable
spikes and vanishing blocks for
added challenges. Incorporating soundtracks
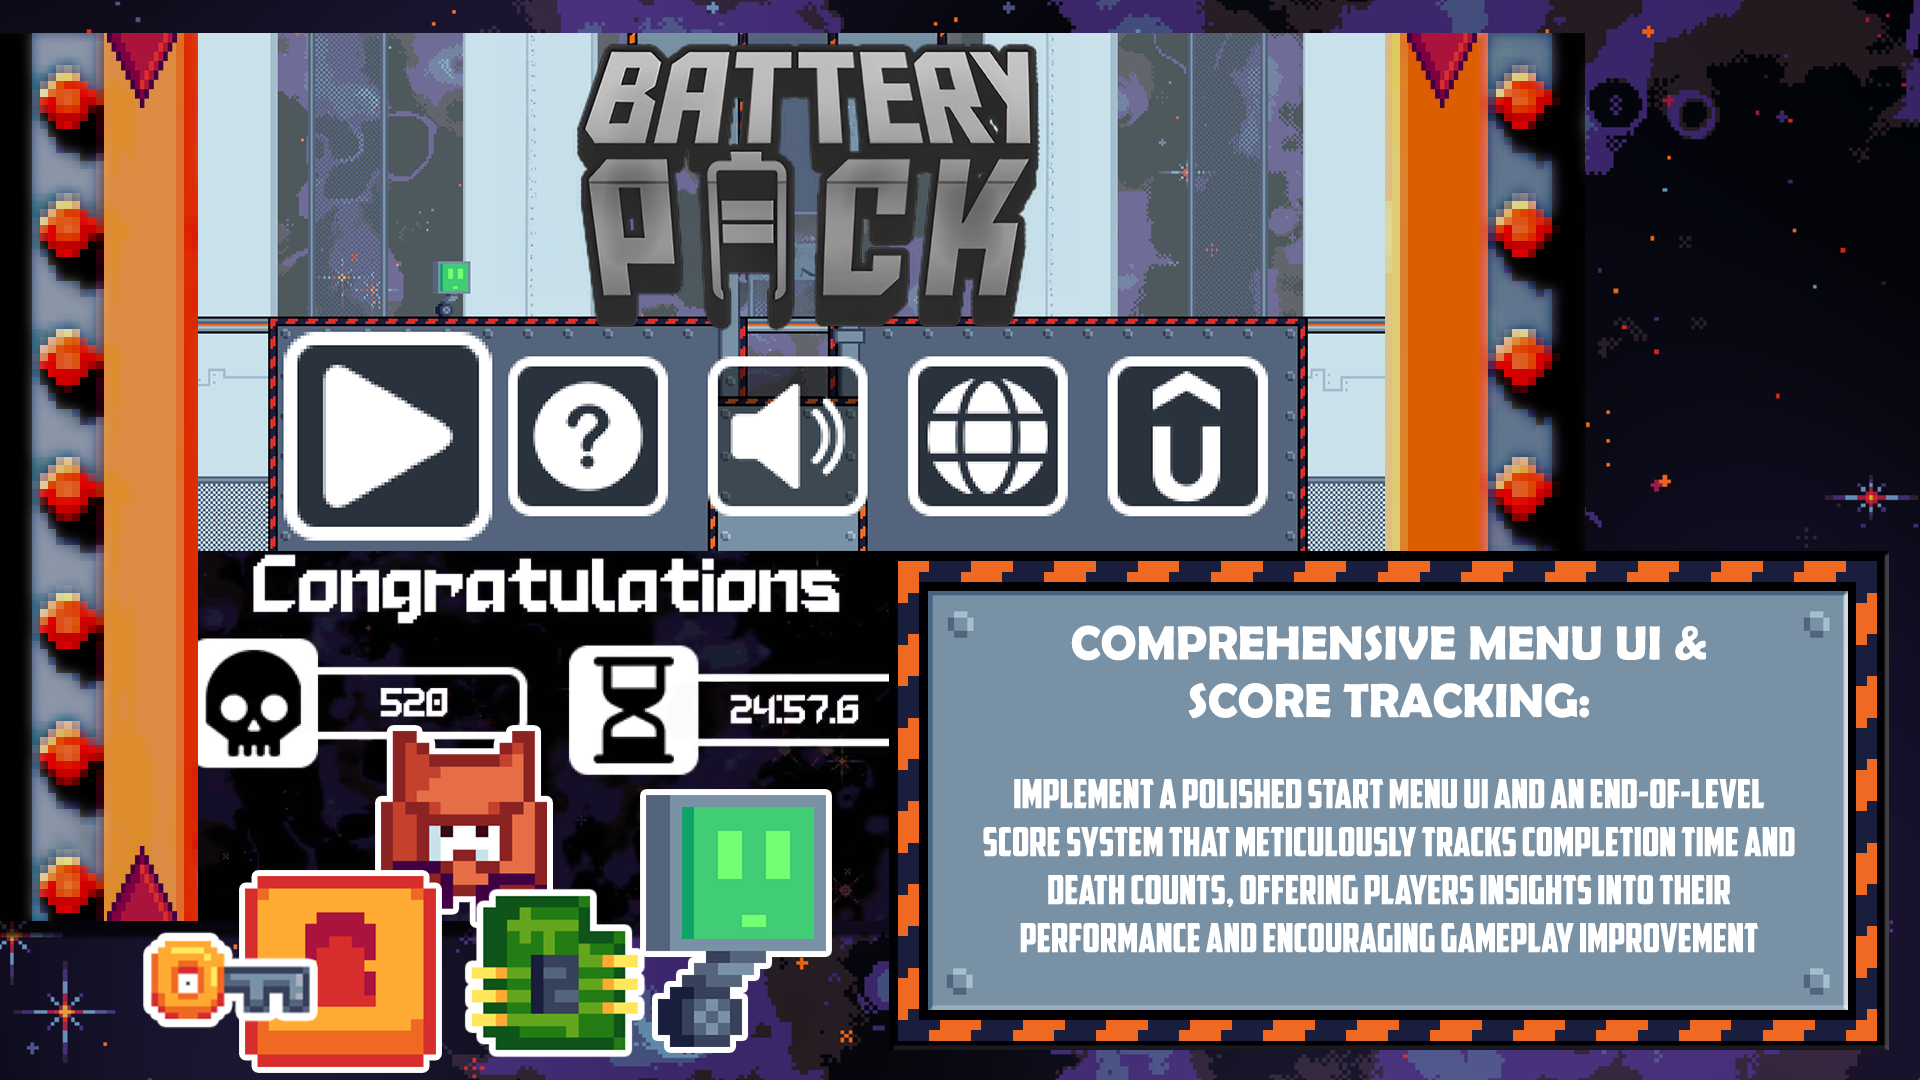
and sound effects with tools like chip tone, building a bespoke UI
for your game menu. Designing an impactful
game over screen and ultimately exploring intuitive level design and
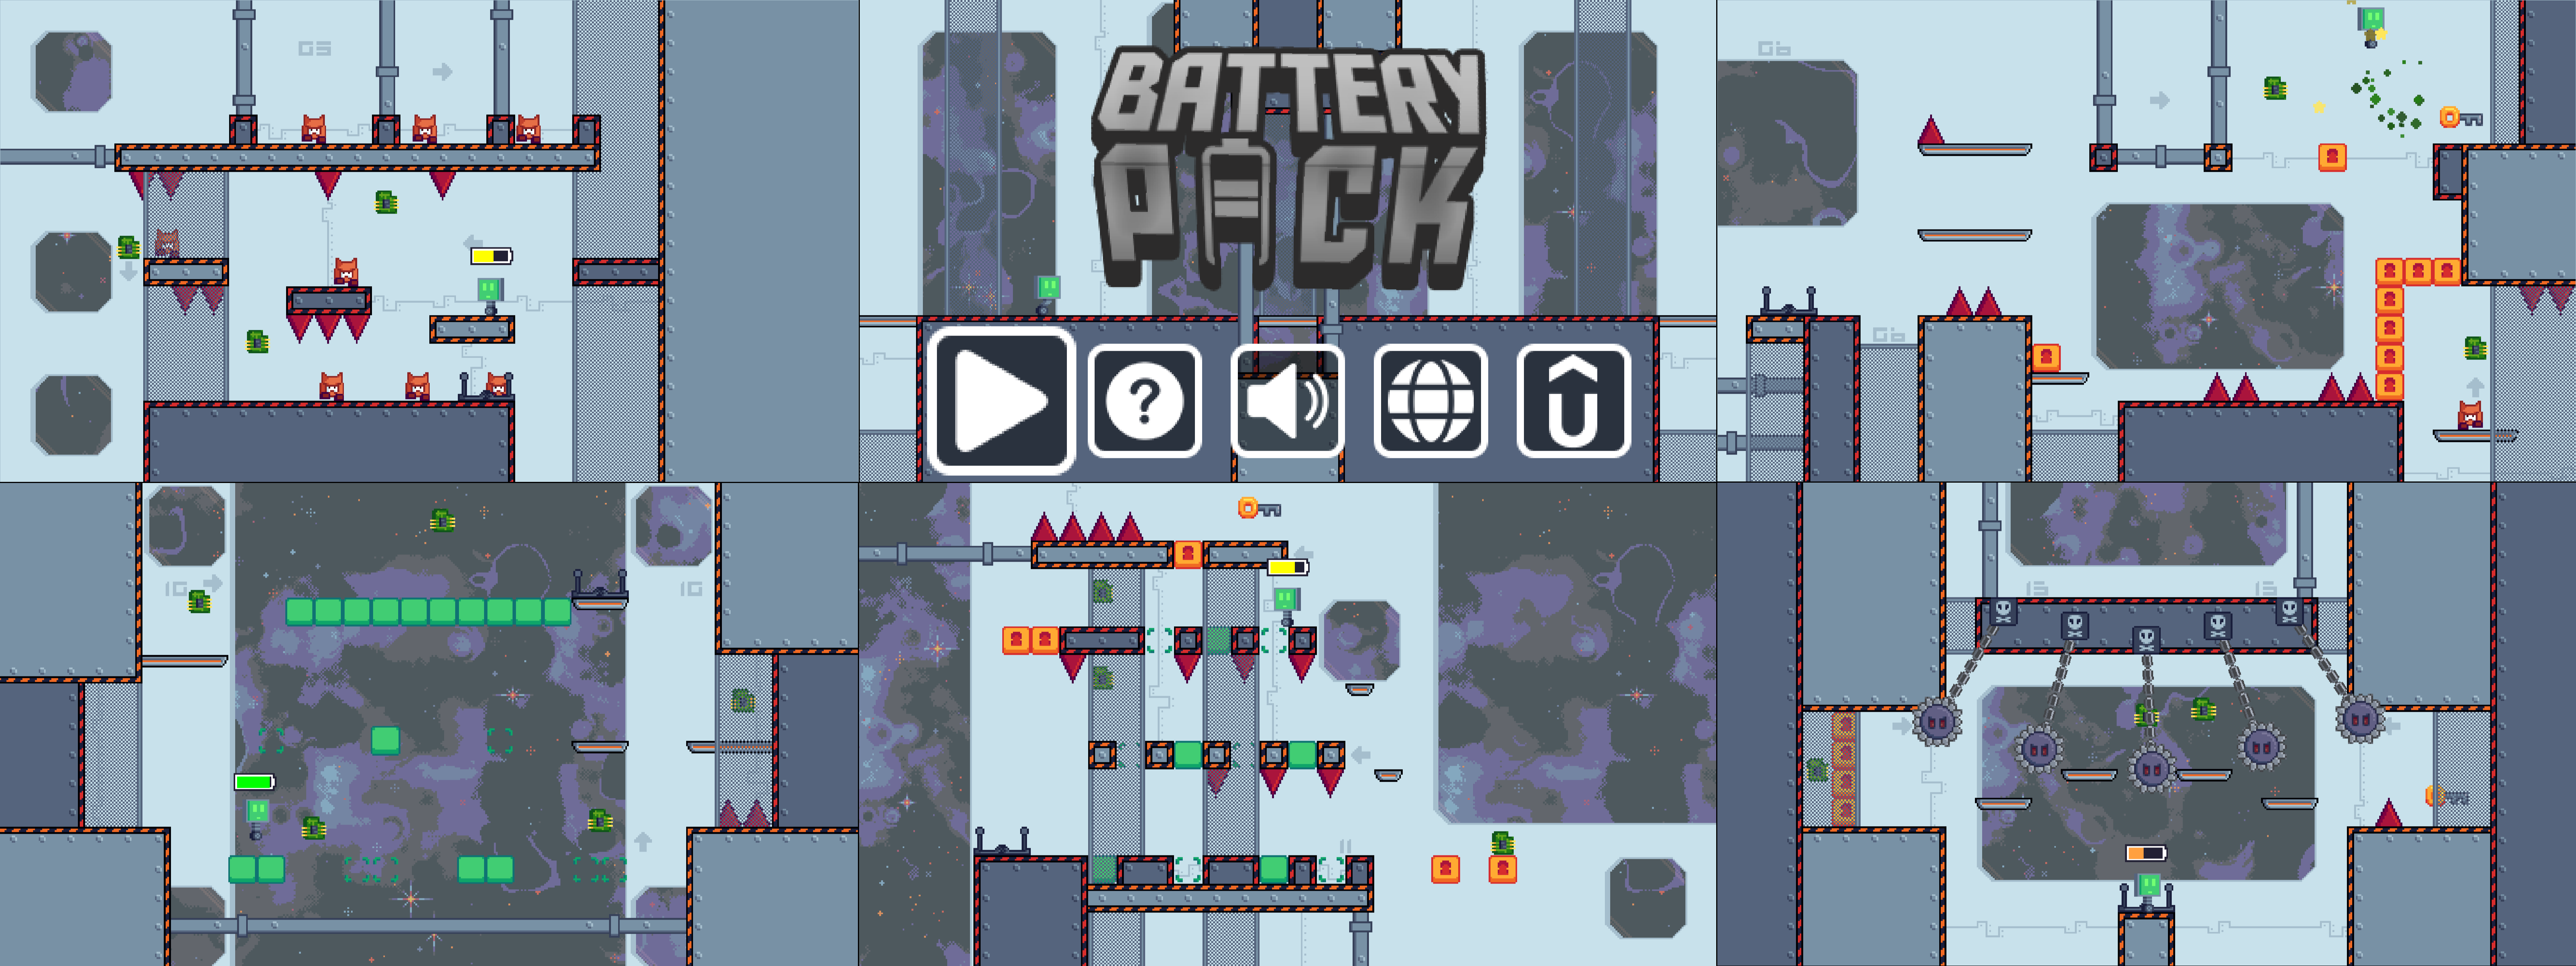
mechanics introduction. Your creation battery pack will be an action packed
two D platformer. It features a robot with
a dwindling battery. Enemies that can be vanquished
by jumping on them, and various spikes
and platforms. To add challenges you go, you'll animate
characters and enemies, devise captivating
level transitions, and beautify your game with particle effects and
animated sprites. By the end of this course, you won't have just built
an incredible game. You'd have gained an in depth understanding of game
development mechanics. And you'll be ready to
continue crafting and innovating in the exciting
world of game development. So are you geared up to embark
on this thrilling journey and create your very own
remarkable Two D platform. Let's dive in and get started.
2. Introduction to Game Maker Navigating the Interface: Welcome to Gamemaker Two
D, Platform Workshop. In lesson one, I'm going to
introduce you to Gamemaker, the tool we're going to be using to make your platform a game. So with that in mind, let's make a game. Now the first thing
I'm going to do before actually diving into
making a game is introduce you to the
tool we're going to be using, which is Gamemaker. Formerly known as
Gamemaker Studio. Gamemaker is primarily a two
D game creation software, though it has been used for three D titles in
the past as well. And there are countless
well known titles made with Gamemaker that I'm
going to introduce you to. And I have no doubt in my mind any avid gamer would have heard
of at least one of these. Starting of course with Forager. Forager is also available on the switch as well as
various other platforms. And you are in this
one in a two D, open world Exploring, collecting resources and
building that world. Of course, who hasn't
heard of Hot Line Miami? A top down shooter with edgy graphics and some ruthless
battling and fighting. That one is
absolutely brilliant. We also have Nuclear Throne, a top down shooter, also known for its
fantastic pixel art style. And we have Hyper
Light Drifter, again, wonderful Pixilart style, a wonderful storytelling game that you more than
likely heard of. We have Katana Zero, also available on Switch and PC. This is a neon futuristic
action platform. We have honey, I joined a cult, a building management sim. Building management Sims
are always popular options. Now you are building and running your own cult in this
humorous cute C way. And of course, probably one of the most famous gamemaker
games undertail a beautiful RPG with unique graphics styles and
systems that as I said, I'm sure everyone
would have heard of. So with that in mind, let's
actually show you gamemaker itself when you first open gamemaker and have
started your new project. This is the screen you're
going to be presented with. Now this may look slightly different to
when you first run it, because the original theming is more of a black
and green tone. But thankfully, you have
customization options. Everything you see here
is a dockable deck. You have your asset
browser here. You also have different layers, room properties, all of that. These are all doccable in
different styles and formats. Typically, the Act browser
is on the right hand side, I prefer it on the left, so I've moved it over here. What I've also done is made
the text a little bigger, just so it's easier to read. And I've changed the
font and colors, but essentially, when
you work with Gamemaker, it will be exactly the same. You can change the theme up, you can change the fonts,
you can change a lot of it. And it's really just about
how you make it comfortable. What I've actually
opened here is one of my existing projects, a game called Cookies
and Cataracts, which is a memory platform. And what you're presented with here is your initial space. Now with this space, you are first looking at what you've got on the left hand side here, some favorites. So if you have any
assets that you want to refer to
quite frequently, it's a good idea to set them
as a favorite. A room order. Now, I'm going to go over what
rooms are in this lesson. But the room order
explains what order of appearance they actually
appear in, as well as tags. I don't tend to use tags, but if you want to
tag things such as your assets for
certain resources, certain ways to organize
them, you can do. And then you have what is
effectively a file browser. Now these folders are default, they're given these
names so that you can easily put these into
different categories. However, you can
always edit tags. You can also add groups or folders as they are, as
I've just called them. And you can therefore mix it up in whichever way you're
most comfortable with. Now as I say, it's all about making it
most comfortable for you and your workspace and
how you'd like to do it. This is also tab
based, your workspace, so if you have different
things in different windows, you can always do
it that way too. Once you have a layout
you're happy with, you can save that
layout so you can refer to it in all
your future projects. But once you've got your
workspace comfortable, you're going to need to know
what you're working with. Gamemaker is an all
in one platform. That means everything
you do can be done within the
confines of Gamemaker. Now with that in mind, there
are different assets that formed together to put
your game into one piece. Now Gamemaker uses a
programming language called GM L. It holds very
similar semblances to other programming languages
you might have heard of, if you think we're
like of Python, those sorts of languages. They are what we call object orientated programming
languages. Object orientated means,
as you can see here, we've got objects, a category. I will cover all of your code bases itself around
a working object. But before we do that, I'm going to go through
some other pieces. What's a game, without
any form of imagery? That's, well, probably
a text based adventure, but almost all
games have images. These are known as sprites. Sprites can be anything from your character to the
background pieces to anything that forms a
visual element to your game. With that in mind, we're
going to expand this folder. Now as you can see, this game features a delightful
old lady here. I have named it SP. Grant. This is because it's
a right facing grandmother. And SP for sprite, it's good to get
naming conventions in because when you do
naming conventions, it makes it easier
to refer to in your programming and it just
keeps things a lot easier. Again though, this is
entirely up to you. It's about your
workspace and how you want to make it comfortable. Now this is an animated sprite. So you can see here
it's got two frames. It's running at 22
frames a second. Just to give it that
slow up and down, Bob. You can also then go into the sprite and you have
the ability to edit it. Gamemaker has some
wonderful editing tools. You are able to draw
your own sprites here. Personally, I draw the sprites in a program called a sprite. You may remember
I've done a pixel tutorial using a sprite. But it's okay because
you can always import your image
if you do choose to do so that way Now I will go into other
things in later lessons. But at the moment I'm
just introducing you to the core elements of
what makes up a game. Beyond all our sprites, we then have tile sets. Now a tile set, you may
be familiar with this. This an image that
is divided into a set of images
that can be used to effectively be a
background piece, decoration, platforms,
whatever they might be, this is taken as one image and divided into these squares. Now this tile set in particular comes from this
particular sprite. A sprite originally
is imported like this and then
assigned a tile set. Tile sets are not essential, you don't have to use them, you can just have them as
their own independent sprites. But these days,
especially if you're using an RPG platform
or whatever, you might be making
along those lines, a tile set is usually
quite important. Then of course, we have Sound. As you know, a sound is
incredibly important. Let's look at a fall Sound. That's what happens
when you fall off the stage and die also. Sound is much more important
in the way of music. I'm not going to
play all of that, but music you get the idea. Anything audio goes
in, the sounds half. They are sometimes used. We're not going to cover
them in this lesson, but we can explore
them at another time. Scripts, Now, scripts are where you will use your GML language. I've used a few here,
you can refer to them in various parts of
your programming. Here we see what the GML
language looks like. Now, when you are using
GML and Gamemaker, it will automatically color
code certain things in different ways so it
makes it easier to distinguish in, amongst
your programming. Now, you can also
hover over things to see what the functions
are and what they do. It's not essential that you know what this script does now, because this is a script I've
used in a different game, but by way of example, it's simply a block of code. And then what you can do is
refer to it by its name, in this case, reset array at a different point
in your programming. Now, we will revisit
scripts in later lessons, but for now that's where they are and that's
what they do. Fonts, very similar in the
way of a visual input, but in this case, as suggested, it's your text based fonts. So this is if you
import a font such as this pixel based font here
that I've used in this game. You will then be
able to refer to it as FN pixel small or
whatever it is you call it. And you can then use it to
draw text on your screen. Now in this case,
it's a small game. I didn't use a lot of fonts, but you use as many
as you want objects. Now this is the bread
and butter of gaming. This is the absolute most
important thing, all of these. There are controllers,
there are solid objects, there are character objects,
such as the player. These are what you
put into your rooms. I'll explain rooms in a moment, but say for example, the player. This is object
oriented programs, This is an object of a player. They are visible,
they are managed. They can be solid in some cases, but in this case they're not. I believe, for example,
a wall object. Oh no, I actually didn't
make this one solid. Perhaps I should have. Did
I make this one solid? No. Okay, bad example. You can make some solid. I think the platforming system I used in this game
didn't use solid objects. But it's good for physics
and that kind of thing. We also have here the events
that make up the objects. In this case, when this
player is created, certain code will take place. Likewise, a step event
every frame, for example. It will conduct various
checks to do various things. Again, it's not important you understand what this code does will cover making code and how you put it into your
objects in later lessons. But it's important
to know all of these events can take
place on any object, for anything, and they will form the foundation
of your game. Now Gamemaker is a multi
platform development tool, so you can do gestures
for Android games, as well as mouse and
keyboard inputs For the PC, you can also use
game controllers, but that tends to be a
bit more complicated. Typically, you don't
necessarily have to, but you can always explore this. And of course, we have
functional things like what happens at the game. Start the room, start.
Animation ends. It's all here, and we'll
go over it in more detail. And finally, we have rooms. For example, each
level is a room. A menu screen is a room. It's basically what will
display what you have done. For example, if I
look at level one, this is self is the room. Now you can see here
we have instances, another word for objects. And all of these are
placed in the room. They're highlighted
when I select them. And they do various things to effectively make
that come to life. Now the rooms itself are
the different levels. And it's also a focus screen, a menu screen and a
screen where my logo for Tidekin games
that will come up. And then that is a separate
room which Ben goes off onto its next step,
which is the menu. Now there are extensions. Gamemaker is very versatile. There are extensions
for various things. In this case, I've
used a couple here. Basically because I've
made this a web game. I changed the loading
bar as an extension to do that and focus the window. But there are hundreds
and hundreds of extensions you can explore
for various different things. We're not going
to be touching on these too much as
we're going to be using the pure assets that
Gamemaker has already for us. But these are things to bear in mind as
Gamemaker does have its own market place full of tutorials and various
accessibility features, and added features that you
can consider in the future. With that in mind, this is
what Gamemaker looks like. Now that you've had
an introduction, in the next lesson
I'm going to be showing you where to
start when it comes to creating your very
own game. So stay tuned.
3. Designing a 2D Platformer Collision and Basics: Welcome back to Gamemaker
two D Platform Workshop. In lesson two, I'm
going to be showing you how to set up your
very first project. So with that in mind, let's begin the lesson now. When you first open game
maker for the first time, you're going to be
greeted with this screen. What you've got
on screen here at the moment are
different projects. My recent projects, but we're going to be
starting a brand new one. And we're going to
go through this. In this first lesson, I'm going to explain
to you a little bit about what the game
I'm going to make is. First of all, do excuse the fact that I'm currently
offline, that will be sorted. You get a choice of
making a game or a live wallpaper,
interestingly enough. But we're obviously
going to make a game. The game I have in mind is a very simple platform in which you play as a robot in space. And what you have to do is collect all the
computer chips to get to the endpoint and
therefore win the level. With that in mind,
we're going to start our very first game. Now the way we do this is by
clicking here. Very simple. What we're going to do next
is create a blank game. Now if you haven't
started gamemaker before, you may be prompted to
ask if you're using GML Visual or GML coding. Now the visual is a drag
and drop style method, but we're not going to
be using because it's good practice to get a
hang of the code and understand the coding
method that we're going to be basically using for
the entirety of the game. Then of course, we get to pick what we're
going to call it. Now I have a little
name in mind. I'm going to call
it battery pack. That sounds quite silly, but what I'm going to do is
explain to you the idea of this game is to not run out of battery before you collect
all the computer chips. You are a little robot. You have battery. You don't
want to run out of it. Now, it's important when
you're making a platform game, just try and think of some
sort of little gimmick. A lot of platform games
have been made before. There's a lot that's done. We're going to be making
something that's got a little gimmick to it
to make it stand out. Basically, when you're first
making a very first game, you don't necessarily have
to worry about a gimmick. But it's important to
think, if you want to make a commercially viable game, something unique about it's
going to make it stand out. Let's just put it on
the desktop for now. And we're going to put
it on this folder here. We're going to select the
folder desktop. Let's go. When you're first greeted
with your blank work space, it could seem quite
intimidating, but it's not a problem. We're going to go
into layouts first. As I explained in
the introduction, I have a layout I prefer,
which is this one. I'm going to zoom in so you can see a little bit about
what's going on. And this is the
organization system. Now, I have already made
some assets for this game. Now what you want to do
to get some assets across is you simply select
them as I'm doing here. We just move them in to sprites. Sprites is just another
way of saying images. It's an image within a game, and sprites are universally used for everything
within a game. It's everything visual.
So as you can see, I've drawn a little exit here. So that's going to
light up whenever computer chips are collected. Now I have just
called the file exit, and when I've imported
it by dragging in, it's already named exit. We want to keep some
level of consistency. So I'm going to
rename this exit. The reason being
is is for sprite. Now you don't have
to abide by this. However, it is good practice to keep a name and convention
when you're making your games. It generally makes it easier
to refer to it in code. And you don't want to confuse
things like your sprites, your tile sets, your
sounds, your objects. Because if you name
them just as they are, like you know exit. And then you have an
object also called exit, it's going to create
a bit of a problem. Now when we have a sprite here, this contains all of the
properties of that sprite. What we're going to look at
here is the collision mask. The reason being is this is
what detects the collision. Not the actual sprite itself
but this bounding box here. We can also nine slice. That is where you can make something bigger or
smaller based on a set point and it'll stretch the image
accordingly or loop it. We're not going to need
that in this instance, but it is good to
know it's there. In this case, I'm going
to manually adjust this just down here when
we detect a collision. It's going to be just
with this bottom part. Now, the bounding box or the
collision mask as its here. Those are important to bear
in mind when making a game, especially with funny
shapes objects, particularly spikes, which
I'll show you momentarily because they can appear
quite difficult. If you have, for example, a big square box and
it's just a small spike, you might end up accidentally
triggering a collision. Which doesn't
necessarily feel fair to your player because they
haven't actually hit the spike. With that in mind, we're going to look at that
one in a moment. But First Computer
chip, now this is. A big old blank blue square. I'm going to call
that wall that. We'll show you why in a moment. Because this is our tile set. Now we're going to use tiles because it's easier than having these as
individual objects. And I will explain more in a future lesson when we're
doing the level design. Now this one I'm going
to call Spike right now, a collision mask here
as you saw before. I went into this and
changed it to manual. I'm going to keep it automatic but where it has rectangle here, I'm going to make it precise. Now, we don't want to make
too many things precise collision checking because that does slow down the
processing speed. But for the sake of a spikes, we're going to actually
change actually that should be spike left not right, because that will attach
to the left care. I should know my left and right and this one
is spike right. Collision mask again is
going to be precise. We do have other options but that one seems
to be a good one. This is going to be spike at top collision mask you see here, we've got diamond lips
rectangle with rotation. All of them can be useful
in their own merit, but in this case we
only need be precise, or a rectangle as
we've seen before. I'm going to change that
one again to precise. Now, this is a big
space background, lots of different effects here. It's very pretty. I am going to show you why we use that
later in another lesson. This is our character, We have movement
and staying still, our little robot guy. Now ideally we want him to stay idle when
he's not moving. Move like that when he is. What I'm going to
do. Very useful. Keyboard chalk cut control
D. Now that will duplicate, in this case, a sprite. When you're on a line of code
it will duplicate that too. It is a duplicate button, it's very useful.
Player run player. Still are going to be two very important
things that we need here. Also, you may find
after a while, you're overwhelmed with all
these different windows, you can't find where it is. You can zoom in and out using the scroll wheel or
Be's buttons here. But what I'm going
to do is right click and go close all but this, that keeps your work space tidy. And then we've got the
still and the run. For the run animation, I'm going to shift click
and delete the first floor, four frames, leaving just our
little run animation here. For the still one, I'm going to do
the same, but with the last four frames I'm
going to delete them. Then we zoom in a little,
our idle animation. Now I'm going to
prepare the objects. Now, there will be more sprites in future as we expand on this, but we've just got a
baseline actually, before I add the objects,
I'm going to add a tile set. If I create a tile set here, and I'm going to call
it TS tile sets, I only have the one tile set, so I'm just calling it tile set. Now you assign your
tile set a sprite, which is the S tile set. As you can see now it's
divided it into this s lovely 16, 16 chunks. You can of course,
change the offset, the height, the width, and
any other details you want. If you've got, say, any
separations in between the tile sets or if you're
working with larger images. But in this case we're
just working with 16 16. We're going for a retro vibe, so that's going
to suit this one. Now what we're going to do
next is prepare our objects. So when you first
create an object, it will create this box. Now, gamemaker uses
event based programming. Every event creating the
object, destroying it. Every frame on timers, alarms as they're
known, draw events. Mouse events, keyboard gestures for Android phones or IOS. For example, collision
with another object. All of these have their own code and we're going to be
bearing that in mind. The first thing we're going
to need is a controller. Now, a controller
is very important in a level, in a game. It goes in the background, it draws all the
different things, or in some cases it controls when a level starts
and finishes. But the control
is very important for all the background runnings that you don't want interrupted. If a different thing like
a player disappears. The next thing we're
going to set up is our player object. That is where the
platforming goes on. That's going to be
very important too. And we're going to
assign it to sprite. We do that, we see
it has no sprite. We click into it.
Sprite Player still. We're also going to
prepare the wall object. Now this is where
this comes into play. Now instead of going into here, we can also drag. And drop it here
to a sinus sprite and that's going to be wall. Now that is not
going to be visible, but for now, we will keep it visible because when I'm doing the platforming,
we want to see it. However, when we
use the tile sets, we don't want it in the way we are eventually going
to make it invisible. But I'll again explain
that in another lesson. Moving on from this,
we're also going to need our spike object O spike. You see I'm keeping
the consistency all objects begin with all sprites begin with that
is going to be spike bottom. Now actually I'll call
that spike bottom. What I'm going to do next is
make a new object spike top. Now what you've got here is this is going
to effectively act exactly the same as the other sprite and
the other object. The only difference is going
to be the actual sprite. Instead of programming for
each different object, we're going to
need to give it a. Giving it a parent means
whatever I give to this one as the parent will
also affect the child, in this case the spike top. I'm also going to do
the same for left and right by duplicating this
and giving it a new sprite. The left sprite, you can see here the parent
is the bottom. That means it will always act exactly the same
way as the bottom. We're going to do the same
or this one spike, right? And we're going to again
assign it to different sprite. It's again the parent
of the bottom sprite. Now if we go into this object
by double clicking it, we click parent, you can
see the children here, top, left, and right sprites. Anything I do to this will
also effect on this one, this one and this one. It's very, very
useful to make it as a bit of a shortcut
so you don't have to change code every single time for every
single sprite object. We also have here a room. Now this room is by
default called room one. Now I'm going to rename that
R level one. Very simple. Now the properties of this room, you can see here on
the right hand side, I'm going to change
this to 480 by 270. That is because we want, I've just got rid of
that. There we go. It's a small game, we
want a low resolution. Now we've prepared
a very simple, a simple set of
things to work with. A controller, a player, a wall, and spikes. We are going to add more things, and we are actually going to
add the platform in code, but for now we've got our
game set up and ready. When you're ready to save, you can of course
use the keyboard, shortcut control less or the floppy disgicon here
to save your project. Now you'll see if
I close this down. You sure I want to exit? Yes, I do. Next time
I load up Gamemaker, you will see our
project is there. It'll be in the recent projects and we'll be able to use it. Gamemaker is loading up, there it is, battery
pack. I click into that. Our project is here again and it will load up what
we were last working on because it saves the work
space, which is very useful. However, in this case, we're
going to close it down. Close all but this
and it as well. And then we're going to save so. But next time we open, we've
got a fresh start here, ready to work on the code. So stay tuned for that.
4. Mastering Player Controls in Game Maker: Welcome back to Gamemaker
two D Platform Workshop. In the first part
of lesson three, I'm going to be showing
you how to set up some platform code so you can start making
your character move. So with that in mind, let's
begin today's lesson. Now, in the last lesson, we did set up our first room. But nothing is in that
room at the moment. Because if we do put
our player in the room, absolutely nothing will happen because they're not
programmed to do anything. So with that in mind, let's begin programming
some platforming code. So as I said before, Gamemaker is an
event based program. And it's event based and
object oriented program. We're going to need some events. Now the first thing
we're going to do is our create event. Now this is the code
that's going to start when the object is very first
created at the start of a room, when a level takes place, or when it's created in a room. Now what we're going to do here is define a local variable. Now in Gamemaker, there are
three types of variables. There are local variables specifically for one
particular object, which is what we're
going to set up. There are global variables, which are variables that take place across the entire game. And there are event
specific variables which we won't use now but may
come across later novo. We're going to start
setting up our code. So the first thing we're
going to do is set up a region platforming Set up. Now regions are just ways
of tidying up the code. So we do a hashtag
region and end region. Then we can collapse it and everything we need
is inside here. We're going to start by
setting up some variables. First thing we're
going to set up is GRV, which is gravity. And we're going to set that at 0.15 that is how many
pixels it will fall by. Increasingly from that point, we can do comments. If we do two dashes like that, you'll see it changes color. This is commenting gravity. It's always good practice to comment on your code
just because it keeps you informed about
what certain segments do. It's very useful when you
have a larger basis of games to go back and understand why you've
done what you've done. Next one is HSP,
and that is zero. For now, that is the
horizontal speed. We're going to also do VSP, and this is vertical speed. Now we're going to do HSP walk equals one, that is walk speed. And we're going to do VSP jump. If I can type correctly,
do apologize. There we go. Minus four and
that is the jump speed. Now the reason it's
minus is because game makers coordinates
work from bottom left. So we need for jump speed to be a negative number so that it
goes up rather than down. That is our maximum speed. We're also going to have a
variable called power jump, that is how much to jump by now. Basically that is an amount
going up to minus four. The reason being, you don't want to lightly tap the jump key for a small jump and it do
the full complete jump. And then we're going to
do jump set as zero. That is basically if the
player can still jump, we'll understand why
that's come up later. Now in most platform games, you don't just have a situation where you can jump only
when you're on a platform. There is a concept
called Coyote Time. Famous from Looney
tunes, Wiley Coyote. Where he'll jump off the ledge and then he can still jump. Now this makes it fair on people playing the
game because they feel as though they
have that small segment of ability to jump, even if they feel like
they've fallen off the edge. A lot of times there's
a technical side of how a platform game should
run, or any game indeed. And a fairness to make it seem more playable
for the people playing. We don't want people to feel as though they were robbed of a jump time max is 14. That is Coyote Time max. Now we can adjust that, but 14 is just shy of a
quarter of a second. Because games in game make a by default run at 60
frames per second. And the actual counter itself, which is time,
that's Coyote Time. Then we're also going to
do can move equals true. Now this is a bullion, which means true or false. Now we also have
numerical variables. Here we can set different
types of variables, but typically true
or false variables and numerical variables
are what we need. This is our set up. Now we need an event
called the step event. Now a step event runs
every single frame. This will, without fail, run 60 frames every second. All of a code we're
about to do will happen 60 times a second. We're going to start
with another region. Now this is key defining. This is important
because we need our players to be able to customize the keys
at some point. We may need them to do
that in the menu options, or we may need to
do it ourselves if we just feel that the keys we choose don't quite feel correct. This is where we set up an
event specific variable by using R. We're going
to do a few of these. We're going to do K R. That
is going to begin by zero. And we're going to do if
keyboard check K, right? That means if you're
pressing the right key, also if keyboard check R, D and then a capital D, that's for controls as well. If that is the case,
then KR equals one. And we're going to do
this, we're going to copy and paste or our
other keys as well. We're going to set up
variables called for key k l for key left and
key K D for key down. And we're also going
to change it here, key left and key down. We're also going
to make sure that these are equivalent for up, for left and for down. And likewise here we're going to do BK and we're going to do Kt and K down as our key set up. We're also going to
do pressed as well. I have copied this already. I'm going to just copy this in. But this is just to define
if the key is pressed. Keyboard, check, we'll check
if the key is held down. Keyboard press, we'll
check if the key is just pressed once and
it will trigger it once. We need that as well
for our jumping. I have put space there actually rather than I'm going to change that RD actually and
keyboard check space, I'm going to undo that because we're going to keep them both. In fact, we'll do
it here as well. Keyboard, K space. There we have multiple
options for keys, and it allows players to play in whichever way they feel
more comfortable doing. So that therefore, is
our initial set up, but we're going to
pause right there. Join me again in part two. We've started setting
up the platform code, and in that part we're going
to put it all together.
5. Advanced Platforming Integrating Complex Controls: Welcome back to Gamemaker
two D Platform Workshop. In the first part
of this lesson, I showed you how to set
up some platform code. In this part, I'm going to be showing you how to
put it all together. Now what we need to do now is the actual platforming region. Platforming, we're going
to end that region here. Now in this region, we're
actually going to put the meat and bones of the
platforming itself in. This is going to be where
it gets quite in depth. We're going to start by making sure we can
move the player. We're going to work out
where to move horizontally. First things first, if
can move equals true, we're always going
to start with that. The first thing we're going
to do is have our HSP H speed equal the key right,
minus key left. That is either going to be up
or down, or left or right. It's either going to
deliver a 10 minus one, depending on what's pressed. Then we're going to multiply
that by our walk speed. We can just adjust
that at another point. Now after that,
you'll see here that is that entire capsule
there we're going to do. If can move equals false, we're going to immediately
stop the player. Therefore, we have got
horizontal movement. Now we're going to do
vertical movement. We're going to work out
where to move vertically. This is SP, vertical speed
equals vertical speed plus RV, or the gravity
value that we set. Now we're also going to ensure that the player doesn't
go through a wall. If we're an exclamation
mark is they're not at a place meetings
is X and Y plus one. The Wall object.
Then Coyote time is going to minus equal one Te
time equals Coyote ten max. Now that is going to
effectively make sure that we have that frame
where we can jump. The next bit is workout
if we should jump. Therefore, if the coyote
time is larger than zero, basically, whenever
you're on a platform, the coyote time is going
to set to the maximum, which we've set to 14. Then from a second, you
leave the platform. As in, you're not meeting a wall below you for y
coordinate plus one. If there's no wall
immediately below you, the coyote time will
start to tick down. Once it's at zero, you cannot move if quite time
is above zero. And when you do an condition, it's two ampersand symbols, key up is pressed. This is, we're holding the up and of course can move equals true to ensure that we
haven't stopped for movement, then we're going to
set jump set to one. This is going to
ensure that we don't overshoot our jump and
we're going to set time to zero just to ensure we don't hit multiple
jumps at the same time. So it doesn't just jump
continuously upwards. Now with that in mind, if we
are not pressing the key up, then jump set will
also go back to zero. Now if jump set is equal
to one, in other words, if we have allowed for
jump conditions to be met, then q time is going
to equal to zero. Vertical speed is going to be equal to the
variable power jump. Power jump is then
going to minus, by 0.85 minus equals means it will go
down by that amount. That is an arbitrary amount. Also, we're going to
put a noting for jump sound effects that will basically ensure that the
jump sound effect goes off. Next, we're going to close that bracket and we're going
to work on the next bit. If power jump is larger than the SP jump as in the maximum
speed we can jump, then we're going to
make sure again, jump st is equal to zero, power jump is equal
to zero as well. This will ensure
that we don't again go flying upwards again. If we're not pressing
the Up button, then jump set will
also equal zero. Again, power jump
will also equal zero. Now what you can do is
use the semicolon to have multiple instructions
inside an if statement. Finally, we're going to end with some horizontal collision. This is going to
ensure that we don't. Skewer against a
wall, as it were. It wants to align
perfectly to the wall. We're going to put
horizontal collisions. Now here we set our own event specific
variable called one pixel. We're going to use a
mathematic symbol called sine. It's going to be a sine of SP. I've just written a load
of gibberish there. One pixel, there we go, equals P. Now that is our vertical speed up equals minus one and
down equals one. That's what that is
going to return. Now actually that is incorrect. That is for our
vertical collision. We will return to that later. What we actually
need is sine HSP. Hsp. That's a horizontal speed that is actually going to
be for left and right, not up and down, but we will return to, we're going to just make
sure that says right equals one and
left equals minus one. This is actually quite
similar to a piece of code by Sean Spalding who does a lot of game
makutorials as well, but it's slightly modified
to allow the coyote time. Here we're going to
check if a place is meeting at the
horizontal variable. At the horizontal
speed with the wall, we're going to be checking if at the horizontal speed there
is a wall next to us. If there is, we're
going to ensure while we're not at the place
right next to it, as in the one pixel variable
that we've defined earlier, one pixel at the same
Y coordinate wall. Then we're going to increase our X by that one pixel amount. Basically, this is
a roundabout way. And then we're also going
to set our H speed to zero. Then X equals X plus
our horizontal speed. This effectively just
forces us against a wall so that we don't end up
loosely off of a wall. We're then going to
check our vertical speed of vertical, vertical speed. This is going to be done
in a very similar way. I have actually copied
this from earlier. Again you can see our variable, one pixel is set and it's going to be a sign
of our vertical speed. If the place meeting
is B wall, it's wall. If it's at a vertical
speed below us, then we move as close as we can by this one pixel variable, Then reset it to zero. That will end our platforming. With that in mind, we now have a very simple
platforming set up. I'm also going to, just
for the time being, set image speed to zero. This is the animation speed
of our idle character. The reason being, we'll look at the animation effects later. But for now, let's go
into our level now. This is our room editor. There may be a lot going
on here and don't worry, I will explain more of it
in detail at another point. But for now I'm setting up our instance layer because these objects are also
known as instances. And I'm going to just place some platforms around just so you can get an idea
of what this looks like. Now this is obviously not
going to be our final level, but it just gives us an idea
for now of what to expect. We can also do a lot of
editing with the objects, but again, all in
good time for now. I'm just going to show
you what it looks like working as you can see. We're going to start by testing this particular
platform example. In the next lesson, we're going to start doing
some more fancy tricks and different tips to
make it stand out and to give the room
editor a bit more life. So this actually
looks like a level rather than just a big pile of bright blue lines as it were
just before I show you, I do realize there is
an error in my code when trying to do something
like this worth pointing out. When we do try to run
something and it's malformed, it will tell us here where
to look what I've done. It's forgot to put the
y coordinate there. Now, that should
make more sense. Let's try and run it. We
also needed close bracket. But again, it will tell you if you've missed a bracket or if
you've missed an argument. It is quite common
practice there. We have a very small
platform with some jumping. Now this does look at the
moment very, very tiny. We're going to do something very slightly better than this. We're going to make
it a bit bigger. I'm just going to just going
to move my head out of the way because I need to show you very
briefly viewports, this is how it's actually
displayed on screen. We need to enable these. What we can do is
ensure this is visible. First of all, we know that
the room size is 480 by 270. The viewport, we're going
to capture 480 by 270. But then what we're going
to do, that's the camera. We're going to
multiply this 480. We'll make it three
times bigger, 1440, which is 1440. And the 270 times
three, that is 810. We're again going to
make this 810 here. That's going to be
slightly bigger the way it shows up on screen, it will just appear a little bit more visible to
what we've already got. Now when we run it, we should
see a much bigger one. There we go. Look at that. That is our game already. We've got the platform. I didn't break, jump big
enough to cover that. You can see I fall off. But that's okay, because
there's plenty more to do. But for the time being, we do have a very simple
platform engine. In the next lesson,
we're going to look at level design and
we're going to start making some modifications
just to really make the game pop by
adding some collectibles and making it closer to
what we have in mind when we started with this
idea to join me for that.
6. Room Editor Essentials Setup and Configuration: Welcome back to Gamemaker
two D platform a workshop. I'm going to be
introducing you to the room editor by setting
up your very first level. With that in mind, let's
begin the next lesson. Now in the last lesson, we started with some
platforming code. Now this time we're going to
show you the room editor. Now the room editor is
very interesting and it is where all the action
takes place in your game. Everything takes
place in a room. There is no game without a room. Now, before I get started, there's one thing I need
to do very quickly. Which is with this wall
I had the orientation, the origin as the middle center. Now at some point
in this lesson, I'm going to be
showing you tile sets, but the tile sets are
lined to the top left. We're going to be
doing the same with our wall object so
that it lines up. Now with that in mind, let's open the
level room editor. What you see here
is room editor. What I'm going to do is
just move my face over here because what we're
actually doing is we're going to be showing
you this part first. This is the room settings with a viewport on the camera
that we set up last time. Now at the moment
the viewport is set up so that it follows
the entire screen. However, if you've got
a much larger room, you can set it to follow
a specific object. You can also set this border
so that it will follow the object when it
gets to the edge of the screen and the speed
in which it catches up. However, as we're doing
a whole screen level, so that the whole level is
actually visible at one point, we're not going to
be needing that. Now when you create a new room, it will always by default give you an instance and
background layer. Now these layers are by default the ones
you start out with. However, you can add more background layers,
instance layers. Now the instance layers are
where you put your objects, Objects and instances are interchangeable
words and gamemaker. The tile set layer, the path layer, we won't
need to use this one. There will be an Act layer. However, the Act layer
in this instance, again, we don't necessarily need it and there is an effect layer. The Act layer is
basically for sprites. So if you have some sprites in your game that you
want to show off, but they don't need objects, they don't need code, you
would put it on this one. The effect layer will add an effect to everything
underneath it. However, what we're going to do first is create some
placeholder objects. We've already got our spikes. We're going to
create, first of all, a new object for
our computer chip. As before, we're sticking with the naming convention and
calling it computer chip. And we're assigning sprite, The next one is the enemy. Now the enemy sprite I did add just before the
lesson started. This little guy
here, he's going to work similarly to say
like a Cooper from Mario. And that's going to walk
along the platform. Again, we're not going to
set that up right now, but we are going to set
up a placeholder for it. And we're going to give it
sprite by dragging it in here. We are also going to
set up our exit exit, that is also going
to have sprite. Now again, the origin
here is in the middle. I'm going to set this
because it is 18 high. We're going to set
it to the top left, then down by two so that it
aligns to the 16 by 16 grid. Now here is where the
fun begins, when. As you can see from
the last lesson, I placed various objects
here. You can click them. You double click them to
go into their properties. And you have a variety
of properties here. Their position, their scale, the speed of the image, if it's an animation frame. You can also edit them if
they have any built in variables or if you want to change the code, you
can do that here. You've also got more options if you wanted to
flip or rotate them. You can also equally
drag them like this to change them and
to change varrotation, but we're not going
to be doing that. I'm going to click delete. To remove this, I can hold control and select
multiple ones. Or I can hold shift and select
as many as I'd like here. In this case, we're going
to start afresh and the first thing we're going
to do is set up a background. The backgrounds
come from sprites. Now you remember I did have
a space background here. What I'm going to
do, as you can see, there are different properties. I'm going to set the
speed of this to 0.2 Now you can see it
will actually animate. However, it's falling
off a screen. In order to prevent
that, we're going to ensure that we tile
it horizontally. Now. You'll see a tiles and it makes a lovely little
effect like this. Now the first thing
we're going to do is add our tile layer. Now it's important
to realize that the depth is sorted
basically chronologically, from top to bottom. There is actually a depth here. The background
depth would be 200, the instance would be
zero increments by 100. You can adjust this manually
and equally instances, you can give different
depths as well. We will cover that when we do the control object,
this controller here. But for now we're going
to worry about the tiles. I'm going to call this one here. I'm going to right click
it and I'm going to rename it, Tiles Below. Now the instance layer,
it's going to be where. That's going to be where
we put all our objects. And then we're going to
create a new tile layer here for tiles above. Now that's just going to
create some fun effects. Now when we do level design, there's various
approaches we can take. I like to think of
the Mario approach, where when something
is introduced, it's introduced first
in a safe environment, then it's introduced in a
environment that poses risk, and finally it's introduced
in a different way. Now what we can do with
that is we can use our tile set to begin
forming our level. If we were to, for example, begin by putting
in the tiles here, what we can actually do is
go into the room editor. You can see we have full
access to these tiles. In fact, what I'll do
first is I'll create a separate tile set
called Background. Now the reason being I've used
the same tile set and this one we're going to use just
as a background piece. I'm going to just
fill this in for now. We have various tools here
such as an entire rectangle. Now that's going to
look quite unappealing, but we'll change it. We can also, for example, have a line piece here. We want it to have a little bit of an interesting segment. We want it to intersect bar, but before that we're going
to start with the walls. We're going to do a
very simple level, because this is going to
be our very first one. What we'll do is we'll start
by putting our instances in, and then we'll start overlaying the background in order
to place an instance. We drag it across and
we start placing walls. That's going to take
a very long time. If I hold the Alt key, I can start placing
them in this way. Now what we're going to do
is we're going to make sure the player is feeling
closed in so they don't walk off the
boundary of the edge. Then we're going to
start making sure we have different areas
that they can jump. First of all, now I
may need to adjust the jump height on this because I realize the jump
height is very low. But we're going to begin by introducing a safe environment. We're going to do
that like this now. Again, we may need to
adjust the jump height, but we've got those
variables already set up, so it's not going to
be difficult to do. Our next one is we're
going to implement risk. In this instance, there's
a gap, you can fall off. Finally, we're going to
implement it in a different way. Now actually what
I'm going to do here is create a new object. Now this is going to
be pass through wall. Now the pass through wall won't function yet because we
do not have code for it. But I'm going to give it
a slightly different one. Again, control D to duplicate. We're going to give this
a different sprite sprite so that it's clear
when we're editing. We're not going to import, we're actually just going
to go and edit it. We double click it and we
have our inbuilt editor. Now I prefer to use
the external editor, a sprite, and
import them myself. However, in cases like this, it's very easy to just do
a very simple colorful. And that's going to be
our pass through wall. We're going to do this and
introduce a pass through wall, which they will be able to jump through and then it
becomes solid again. Now what we need to
do here is introduce again the next layer of risk, as it were, by making
them jump across. Finally, we're going to add
a small exit path here. Now in this level, we're going
to start our player here. What they'll need to do is go
across, across, across, up, up, up, left, left, left, and back down to the exit. We're going to place
our exit again. This is, like I say,
just a placeholder. Now, it will align to the
grid that we have set, but we can adjust that grid. So we're going to go eight by eight so that it
fits about halfway. Now we're going to put
that actually down here, and then we're going to start putting some computer chips in. Remember the idea of this one is that they need to collect all of the computer chips in order for the exit
to start working. Again, this is all
something we're going to program at another point
in another lesson. But for now we're
introducing the room editor, but I'm going to
pause right there. Join me again in part two
where I will show you how to use the tile editor to
make your game come alive.
7. Room Editor Techniques Effective Tile Placement: Welcome back to Gamemaker
Two D Platform Workshop. I'm going to be showing you
how to use the tile editor and place some assets in
your very first level. With this in mind, we have a very simple level set up here. We're going to start
putting our tiles in, the tile below. This is going to be our wall. Now as you can see, this actually come up below, we can't really see
what we're doing. I'm going to put that above
the instance layer for now. We can just drag and move them up and down and
we'll put it back after. Now, the part of
filling in the tiles, we're just going to make
sure that this is varied. This is just a case
of clicking as we go and it'll
automatically fill in. We're going to make this
slightly varied and we're going to have a bit of
variety in the level layout. So it looks a bit fun, a bit unique, and
a bit different. This is why we have
the tile set in place because as you see there, I've just put something
in the wrong place. I can right click and
it will erase that. We want to have this looking
quirky, quite different. Going to have
something like this. What we're going to do is
just fill this in as we go. We can auto tile. There is auto tile options,
However, in this case, because we want it to be unique and we want the tiles
to be different, we're not going to
be doing that today. But if you were to want
to do an auto tile, when you bring up
your tiles set, there are options for you to do. So you can go into auto tiling. This is better for
RPGs where you've got grass tiles and things like that and you want to
automatically tile them. But in this instance, as I say, we're not using it today. We're going to be
doing a little bit of preparation here to make this look like a quirky,
interesting mechanical area. We're going to do this by just placing the tiles manually. What we're doing now is just making sure the
walls are covered. Then what we're going to do is start working on the
background piece. Now the background pieces
are going to be the most entertaining because we do have some level of decoration here that's going
to be a fun part. We'll start by filling the, we have still got the
rectangle selected. We can go back to
brush if we want to. We do also have these walk through tiles already designed. I'm going to start putting
them in place here. Again, this is just the tile. It's not going to do
anything on its own. But it is important to
remember that we will program the actual tiles themselves at some
point in the future. Now this is just getting to
grips with the tile editor. Now we'll put this back and we'll start working
on the tiles above. Now these are going to
appear above the player. This is going to
just add a sense of depth to our
game that we want. This is going to make it look
a little bit more involved, a little bit more mechanical, and it's going to all look like it's fitting in a bit more. So we're going to put things
like this grating in here, we're going to put a pipe in so we have all of these
different things that's going to help us do that. Again, this is all just
part of the same tile set, but because we have it
on different layers, it's going to look like it's got a bit more depth
than it really has. And that's the trick we can use when we're making our games. So with that in mind, we're going to start
putting our tiles in here. Now this all, like I say, looks very mechanical, but
because of a tile background, we're going to put in a bit of, we're going to
start by just doing the lines and then we're
going to override that. Now that looks a little
out of place there because I've placed
that out of place. We're going to go into the
Sprite editor because that looks a bit silly with
those random two dots. That was meant to be a sort
like a mechanical bolt, steel bolt as it were. Again, using our tile editor, our sprite editor, we can
just make sure that's moved across so it doesn't stick
out and look out of place. Again, the sprite editor
that's built in with Game Maker is very good
for very simple edits. You can use it for
everything if you wish. Personally, I would
prefer to use it just for smaller things and use a sprite or some similar tool or actual
full on sprite editing. But I do have a course on sprite editing using a sprite
and making in game images. If you were so interested, feel free to check that out. We're going to just randomly dot these around just to
bring it a bit of life, just to make it look a
little bit more lively. Here's the fun part.
This bit is transparent, so we're going to have
a spacy window in here. And we're going to
start being able to see the elements of the
space background that we placed beneath it. This is where the
depth comes in. The depth sorting that
we've already had, this is where it
comes into play. We're going to put a
couple of windows in here, really make it look
a bit more spacey. Now when we actually
run the game, we're going to run
into a problem. But I'm going to
show you what it is and then we're
going to rectify it. As you can see, here
is our problem. Other than the fact that this, this is actually animating. And we don't want
that to animate. We want it to show up as and when it's originally meant
to remain dark for now. And then it'll light up when you collect all
the computer chips. But that's not the problem. The more obvious problem
here is that our walls are completely visible and that takes away from what
we've already made. We're going to untick
the visible box, and we're also going
to do that for the pass through wall
while we're here, if you remember
the last lesson we touched upon parent objects. We're going to ensure that the wall is apparent
of this pass through. That means everything
that happens for the wall will also happen
with the pass through. That means if you remember
the collision code, the collision code
involving the wall also now affects the pass through wall because it is a
child of the wall. But we're going to just check our room editor now that
we've made those invisible. And we should see that they
are now completely invisible and the tiles that
we've put beneath them will be the
prevailing feature, and they're going to
be the visible part. What we're going to
enjoy seeing and playing, There we go. Okay, let's move that
across so you can see. Look at that. That is our first level,
at least in theory. At the moment it's not
going to work very well. You see here slight snag because we haven't
programmed it in yet. As you see we did also fall off, but we're not going
to worry about that. We're just going to
set up and this is the part of level editing
where it's a trial and error again because we
are aligned to a 16 by 16 grid for the tiles we
need about to be 16 by 162. Incidentally, we can hold control when we're
moving an object, and that will unalign
it from the grid. But we are wanting this to be aligned because
it's quite robotic. We want it to feel robot spend. We're going to put in
a few more tiles here. We're going to put
one there again. We'll move this back to below, so we can see what
we have missed. We can see we have
missed the tiles. We're going to put
those in here. Actually, we use a
light to one for that one. Then we'll move that back. Now you can see
everything that we have a wall for is covered. This also makes it great
for invisible walls. If you want to make any, those games where you've
got the hidden tiles, I have just fallen up there. Actually, I realized you didn't see that, that
was on the other screen. My mistake. Okay, there we go. Let's move it across
now. You can see it. There we go. Start by introducing it in a
safe environment. I've collected a chip. In theory, I haven't yet,
I have fallen off here. I think the way that this looks, it's important to translate
correctly to your audience. What means, what? This
is probably too obvious. This tile background piece, I'm going to actually, you can use a short
cut by holding, you can find out what
layer this is on. Across is like the
eye drop tool. We're going to move that
down because our player doesn't necessarily know that that's not a walkable
surface yet. Sure they've walked
through a pipe before. But we want to translate
as much as possible how, what is and isn't usable. And how we can actually
get this to translate to the player's mind as
I can't walk over that. We want to make sure it's
very clear to the player to begin with. There we go. That also comes into
play when testing. It's important to get
people to test again. Now, once we've coded in
that walk through part, that's going to be a lot easier. But as you can see, that now
looks more like a level, and that's what we
want, the next level. In the next lesson, we're
going to start putting together what we've made here. We're going to start
using the code again to make some of the instances here actually
do what we want them to do, rather than just act
as placeholders. And we're going to go from
there to start making enemy movement and
some more levels and some transitions
between them. So stay tuned for that.
8. Programming Enemies, Platforms, and Collectables: Welcome back to Gamemaker
two D platform, a workshop. I'm going to be
showing you how to get the hang of coding by coding some enemies
platforms, and collectibles. In this lesson, we're going to cover some very simple tools we can use to make our game
come to life a little bit. What we're going to cover is the platforms that
you can jump up, so they become solid when
you're actually on top of them, but you can jump through them. We're going to cover
what happens when you collect a computer chip, which would typically
be seen as a coin, a bonus, a collectible,
that kind of thing. And we're going to cover
the enemy movement. Now at the moment, most of these things don't
actually do anything. If we go through the
pass through wall, I have made it visible. Just for the sake
of demonstration, what I'm going to do is just
for your reference as well, just so you know, I edited
the tile set slightly, just so we've got some
nice little decoration here so we know what
level we're on. I thought it would
be a nice touch. So as you can see
here, the ti set now has these lovely
little numbers. But that's beside the point. If we go, for example, putting a, let's
put some wall here. Let's see through jump
through platform here. Now I'm also going to
put the enemy in here. I'm going to put him
on this ledge here. As you can see, I've already got the computer chips
dotted around. I'm going to show you what
it looks like at the moment. At the moment, actually,
I did make them visible. But it's worth
pointing out as well, because the actual
blocks are invisible. We can't see the added
platform we've added here. It looks like we're floating.
We need to fix that. Remember, the tile below, we make our instances
invisible below piece, These are our actual blocks. Let's just edit this slightly. There we go. Now we also
have the platform here, which is the jump
through platform. I'm going to put that there. Now that signifies based on the, the width of the platform, just by the looks
of it in general, but it's something
you can pass through. A lot of things about level
design and sprite design is just what you're communicating with the player when
you communicate. A thin ledge, typically
you're coming. That is something I
can jump up through. With that in mind, let's make our layer visible
again so we can see. And let's start our actual test of what it looks
like without re, actual coding or programming. At the moment, this doesn't
behave as it should. Our enemy doesn't move
nor does it kill us. Of course, when you jump into a computer chip,
it does nothing. I'm going to
demonstrate that now. One moment. While I
actually hit play. There we go, Right? I'll demonstrate what I mean. You see this platform
doesn't do anything. You can't jump through it, you can't collect this,
our enemy does nothing. Thankfully, alosophies are very simple
things but we can do to make it look better and actually make it start
behaving as it should. Let's get rid of
this for a second. We'll start with the
pass through walls. The pass through
walls is very simple. Every step events
in every frame. We're going to do a very
simple piece of code here. What we're going to do is check if the
player's y position, which is o dot player player
y is less than the Y start position -12 Now the
Y start position is a value that is given by default along with x
start to every object. With that, it maintains the start position at the beginning of a room that
you've placed the object. If you do move it, this
value doesn't change. The reason we're going
to check that one is because and -12 is
because of the offset. If you remember, our player
sprite is orientated to the middle and that's
a 12 12 origin. So we're going to keep it
at -12 What we're checking here is this platform
is above or below, or it started above
or below the player. The reason being is
because if it is above, y will equal y start
Else we'll send it way offstage, 9999, for example. Now this is still visible. We can see it in
action. There we go. Now you can see it there. You can see it becomes invisible when
you're underneath it. And when you jump on top, it becomes a platform. Now of course, the platform
is still set to visible. We're going to adjust that
and make it invisible. But it will have the same effect by turning this to invisible, it will still have the same
effect that we have before, the same effect
what you're seeing. You can now jump
through the platform. That's great. That's
all we need it to do. The next thing we're going to
do is with a computer chip. Now this is a very easy one. We are going to make some
effects in a future lesson. But for now all we need to do is at a collision
event with the player. We're just going to do one
very simple line of code which is instance, nice and simple. Now when you collect
the computer chip, it will be destroyed. And then when we do the
exit at a later date, you will see it will check if there are any computer
chips and if there are not, then it will simply
make the exit work. We go, we can now collect
the computer chips again, we are going to add
effects at a later date. Oh, I can't make that jump. Something to bear in mind when we go into our room editor. Let's make that jump
possible while we're here. Let's actually do that with one of the jump through platforms. If we do this, this is in our tiles below. Then in our instances, going to make it a
pass through wall. Nice and simple. When we
collect all the computer chips, we'll be able to actually
light up the exit. That's an effect we're going
to do in a later level. Now finally in this level, we're going to do
the enemy movement. Now the enemy movement is quite fun because what we
want the enemy to do is very much like a
Cooper trooper for Mario. We want it to start
walking around. The first thing
we're going to do is create a local variable and call it DR. Now we're going
to give it one of two values, choose zero or one. Now that will randomly
choose one of these values. We can use random random. And there are
different ways we can actually select a
random variable. But if it's just two values, like this is a good way to
do it in the step event. Now this is where
the fund begins. We'll start programming some
movement in the step event. The first one we need to
check is collision point. If collision point, now
you can see here when we open this collision
point has variables x, y, object, what it's checking, the collision four
precise collision checking and if it
includes itself or not, because sprite is also on the middle origin
on an eight by eight, we also need to check
eight spaces ahead, x plus eight, y as is an wall. A precise true, not me, false. We're going to check
if there's a wall, just eight sections to the right or if there
is no floor beneath. And we're going to do that by using the exclamation point. That means if there
is no collision at eight ahead and
eight below wall, remember we go from top left
trying to wear at top left and then down and right cameras reversed trying to get
that the right way around. But yes, we start
top left at 00, so we need to check
eight to the right and eight below object wall. Again, true precise collision
and false for not itself. If that is the case,
will be set to one. Remember we do have this
handy tool control D. Duplicate the line.
In this case, we're going to change
that one to minus x minus eight and this one
to minus x minus eight. That will then
check to the left. And if there is nowhere to collide or it's
going to hit a wall, it will change it to zero. Now if equals one, then x or minus equal 0.5 that means it will relatively
change by half a pixel. Likewise if equals zero, then x plus equals 0.5 Now we'll see it will
have some level of movement. We'll see here now in our game, it's starting to move left
and right, isn't that? But if we collide, it still doesn't do anything. The last part of this lesson, we're going to make sure it
does some level of collision. Now that comes
from the player in the player event
collision with the enemy. This one here. We're going to put some code in the
variables we already have. But we've defined BSP
for vertical speed. Should be speed. If you noticed that and I
didn't, but I have no. Likewise skep,
that's also speed. Sorry about the typos
that must have been killing you if you notice
that in the last lesson. Thankfully, that's
just our comments. It's always worth paying
attention to any typos as they will always
come back to bite you if they're in
your main code. Luckily, that was
just the comments. If the VSP is larger than zero, which means we're
moving downwards. So two per sands together mean and for collision checking, sorry, not collision checking. Condition checking and other
Y -12 when we use other, what we're referring
to is the other act. We're not checking all
of the enemy objects, just the one that
we're in collision with if that is the case. In other words, if we've
jumped on top of it, then SP is going to
suddenly equal SP jump, which we've set to minus four. It'll give it a satisfying
bounce off of it. Also with the other object, we're going to destroy it. Then we use these
curly brackets to define everything that's
happening in the other bracket. In the other object.
We'll close this off. As you can see there that's
highlighted and else. Now if we have
nothing else to do, we're going to put our
death code in here. Now we're going to
edit our death code. At another point, we're going
to make some nice effects. We're going to make it
pretty, we're going to restart the rooms
and particles, that kind of thing, but we want to preserve
that for later. What we're going to do
is call event user zero. This is a custom event which we haven't used yet,
referring to nonexistent. I'm going to set it up now. Basically, this means anytime that there is a death sequence, it will trigger a
user event zero. Now for user event zero right now I'm just going
to do room restart. That will restart
the room that we're in and set everything
back to normal. Likewise, do some checking here. If y is larger than
room height plus 24, just give it a chance
to fall off event zero. Same again, this means we can always call event
event user zero. Whenever there's a chance that the player has died in future, we can go back and
edit it so that we can add some pretty
effects and things. But for now we're just
going to restart the room. If you see here
bounce off the enemy, I did jump down
the hole and die. Next one, I'll let the
enemy hit me and I've died. But now I've fallen
off the edge. In this situation,
we've got an enemy. It will kill us,
or we can kill it. What we can do as well is fall off the edge and it
will also destroy us. Now this description
part here is very useful for user events because we can write Earth death sequence that will
then show up here. We remember to refer back to it. Now, just before we
close off the lesson, we're going to do
something with this exit. Now we're going to set
a step event so that we can check if the computer
chips have been collected. If instance number that counts how many computer
chips there are equal zero, then image index, basically that refers to
which frame of the image, because we have two frames, will equal one else, image index equals zero. Now that's all well and good, but you remember it was
flashing because it's playing its animation speed
when it's created, we're going to stop
its animation speed by setting image speed to zero. Now we'll try a full
test of this level just to make sure that we can actually collect everything. And it works. You see, now that's not lit up,
nothing happening here. Now let's avoid this enemy. We'll go over here collecting the computer chips
with the platforms that we can pass through now. Then we'll jump onto this
over here. There we have it. The exit now at the moment, that is very functional, but we don't have much in
the way of effects or fancy, pretty things to make it. We're going to need to do
that at some point as well. In the next lesson, we're also going to look
at a few more things we can do to really make this
game start coming to life. Stay tuned for that.
9. Dynamic Effects Screen Shake Implementation: Welcome back to Gamemaker
Two D platform Workshop. I'm going to be introducing
you to scripts and showing you how to make a simple
screen shake effect. So welcome back. Now
where we left off, we have ourselves a
very simple game here. And what we have is a
very simple way we can interact with enemies,
walls and collectibles. That is all well
and good. But we need to add some effects here. Because at the moment it's
looking a little bit flat, a little bit like it lacks
some level of animation. Now, we're not going to
animate the character today. What we are going
to do is just add some little effects we can do to give the game
some more juice. First things first, let's
start with a very simple one. When we jump on the character, it doesn't actually do
anything except disappear. Sorry, not jump
on the character. Jump on the enemy.
So we're going to make a dead enemy object. Now this is going to adapt
the same sprite as our enemy. And what we're going to
do is make sure that we have the image speed
set to zero on this one. And which we're
going to do here, image speed equals zero. And we're also going to
set the image index 20. This makes a flat
plain, simple image. But what we're
going to do is set the image y scale to minus one. Now this vertically
flip the image. Now we also wanted
to go off screen, we're going to do that by
setting gravity at just 0.1 It slowly falls off and
the gravity direction to 270. Now the reason we're going
to do that is because it works on cardinal directions. In Gamemaker 270 is the
equivalent of down. Then in the step event, we're going to do this if the y value is larger
than room height plus 24. To give it a chance to
just go off screen, then we're going to destroy
it. Simple as that. Now what we're going
to do is going to our actual enemy and we're going to use the
destroyer event. So this happens when the
object is destroyed, which as you'll remember
from the last lesson, happens when we collide with it. So if we look into our player, collide with the enemy with
other instance destroy. That is when we're
jumping on top of it. When that happens, what we're going to do is in
the destroyer event, here we're going to
use instance create. Now we can create it
via depth or layer, but the easiest way in this instance is to
create it via depth. We're going to create it in
the exact same location. The x and y position
will remain the same. And the depth will simply be the same value depth as
the existing object. And we're going to create
object, dead enemy. Now what you'll notice here
is when we do play it, now we should have a
character or we should have an effect take place to
make it appear as though the enemy is falling off
the screen when we hit it. If I don't get hit by
it, let's have a look. There we go. A very
nice simple effect. Now that's all well and good, but we want to do
some more things. So we're going to
do a new object and this is going to be
a screen shake effect. Screen shakes are brilliant
to add a little juice to the game and we're just
going to call it shake. Now in the creative event, we're going to set up a few values. We're going to do shake x equals zero and shake y equals zero. Shake INT, that's the
intensity equals one. And shake len, the
length of it equals one. We're also going to
set some values x. That is going to be camera
get view x, camera zero. That's going to get the
exposition of the camera itself. We're going to duplicate this
line using control D and set it for camera get y as well. Now that is going to get our camera positions and set
them as local variables. Now in the step event, we're
going to change this up. And what we're going to do is if shake length equals zero, we're simply going
to set shake x to zero and shake y to zero, And then instidance destroy, because we don't want it hanging around when we don't need it. Next one comes from if the shake length is
larger than one, larger than zero, in this case, shake x is going to be, This is going to be a
little bit of maps here of the shake intensity divided by two plus a random amount
based on the shake intensity. Now we're going to do that also. We're going to set the
same one for shake, and that's going to be a
different random amount so it looks like it's
shaking the camera. Then we're going to take
the shake length down by one by using minus equals one. And then we're going
to close that off. Then we're going to set
the camera equivalent to a camera set view Po's going to again be
view camera zero. That's because we set
up camera zero to begin with view camera zero, the position is going to be x, which is the original position plus the shake value
we've just set. And same y, s plus the
shake y value we've set. Now that's all well and good, but how do we actually
get these values? This is where our very first
script comes into place. We're going to create this
script and we are going to call it C shake. The script is going
to work like this. The first thing we're
going to do is set, we're going to set in this description which
should look like this, time and intensity. Now you can adjust this however you'd like if you wanted
to add more variables. But this is going to be very simply the parameters
we're going to use, which you do by the
free dashes at param, and this is a real value of time and that's
how long to shake. And intensity, which
is how much to shake. The script itself is
going to look like this. So we're going to set
originally two local values which are going to be, as we've already said,
time and intensity. Now these local values
are going to come into use when we
actually set it all up. Actually, just for the
sake of simplicity, because INT can be
misinterpreted, we're going to do
underscore intensity. Now what we're going to do
here is set instance number, and this is going to
be the shape object we've just made, which is shake. If that number is equal to zero, if it does not exist,
we're going to create it again
instance create depth. Now it doesn't matter
what depth we use simply because it's just not going to take any effect
for anything visual. It's just going to shape
the screen with the object. With all object shapes
as one we should have created the shake Glen is going to equal the time value
we've just set and the shake intensity is going to equal the intensity
value we've just set. Now that should therefore
set it off so that the time and intensity
values will be transferred to the shake
that we've already created. Now if this works, which
it certainly should, then we're going to
see as screen shake. I'm going to test
this because if I do, say for example, let's
do keyboard press, let's do for test. It's always good to
test these things with this consistency like this. And we're going
to call SC shake. And you'll see there now it suggests we fill it in
with time and intensity. So time is in frames, remember 60 frames per second. And let's do 20 intensity, 20 pixels of intensity. Now you should find when
we press the keyboard key, we'll have a screen shaped
effect ICB problem. This is a controller object, We don't have a controller
object in the room. If you remember our level
editor, our room editor. In the instances, we're going to put the
controller in here. See it's here. There we go. Now that does appear as
though it's a blank one. That is because it
doesn't have a sprite. It doesn't need one
because it's just there to be a control. Would you look at
that, the screen now? Obviously, it shakes quite a
lot because we've set it to quite a high intensity
and we're not going to be doing that intensely. But we can see now when
this is destroyed, we can add SC shake. If we just set it to 10.10, ten frames and about ten
pixels. We should notice. Now when we jump on our player, we're going to have
a little screen shake just to give
it a bit of juice. That's all you need just to make it feel a little bit more alive. Now finally, we're going to add some new sprites in here,
and I'll show you why. Because we're going to be
doing a particle effect. Now, particle effects
equally are very, very useful because
they bring a bit of life to the game itself. But we're going to
pause right there. Join me again in part two, or I will show you how
to use particle effects.
10. Enhancing Gameplay with Particle Effects: Welcome back to Gamemaker
two D platform, a workshop I'm going
to be showing you with the scripts we've
introduced you to in part one, how to create a simple
particle effect. Particle effects
equally are very, very useful because
they bring a bit of life to the game itself. I have got two particle sprites here and we will import those. We're going to call that
particles and particles Star. Now what we're going to
do with the particles is we're going to
create an effect. And then again, just
as we did before, we're going to use a script to set those values in advance. First of all, we're
going to create this as a particles object. And we're not going to assign it to sprite because
that's going to be assigned when we actually set
it all up through a script. A script is going to assign the values to the object
as it creates it. So we're just going to first
of all, do image index. Image index is the amount
of animation frames. This is image index 012345. There's different shades because it will make it
look a little bit more in depth than just
the one same here. 123 gives it a bit more
depth effect direction. Here is going to be random, so they come out at all angles. The alarm now an alarm
is a timer in game, which sets off after a
set number of frames. That's going to be
30 plus random 30. It'll on the screen no more
than 1 second friction. Now this is a built in
value to slow it down and that's going to be
0.1 And image alpha, this is a transparency that's
going to be 0.8 plus random 0.2 It's going to be mostly visible and
fade will be false. Now an alarm zero. When the timer is up, we're going to set fade true. What we'll do with this
value is then make a check in the step event to see if that is the case.
If fade equals true. If fade equals true, then image alpha is going
to slowly disappear. So it fades away. Nothing
should ever just vanish. Things need to fade in and out, or go in and out of the screen, because it looks a bit
more like it's alive. If something just
pops in and out, it can be disorientating
to the player. Then if the image alpha
is at zero or above, or less than zero,
it'll just destroy. Now we need the script in
place to use our particles. The way we're going
to do that is again creating a new script. The new script of
this time we're, we're just going to
call it particles. That's because then
whenever we want particles, we would just set particles. Now I have copy and pasted this. I would recommend pausing the video to check what
parameters we're using. We're using the x, y a sprite, so we can call star or do the amount of particles
produce the speed, the color, and how
much they scatter by. And with particles,
we're going to also set some predetermined
values based on these. Now again, I would recommend if you can just to
pause the video, to copy of this over, and to
look up the values we set. It's x, y, sprite, amount, speed,
color, and scatter. Now these are built in
variables that we're going to do specifically
for this script. First things we need to do
is repeat by the amount. This means that whatever
chunk of code I put inside these brackets will
repeat a set number of times. This is now going to be where we create the particles
incident creates depth. Now with means that
it will assign these values to the
instance it creates. The first thing we're
going to do is set by the x position minus scatter over two and then plus
random scatter times two. Now the reason is that will then set X as the focal point and then it'll add total
scatter around. It is our position. Then we're also going to do
the same for our y position. That is Y, Y. And it's going to be
also scatter amount. Now the depth is going
to be depth minus one, just so it stands up on top. And that is going to
be depth minus one. The object we're going
to create is the one we've just done here,
object particles. With this, we're going to
actually make sure that the amount of
particles created will all be significantly wild. It looks like some fire effect.
We want that to happen. Like I said, it's the position minus scatter over two plus
random scatter times two. Same with the y value, y minus scatter over two, plus random scatter times two. Depth minus one and the
object is particles. With that in mind, with this
particular instance Create, we're going to apply for every
single one, the following. That is going to be
the sprite index equals underscore sprite, which we've already
set the image blend. Now this is going to
change the color. So it's going to blend it
with the color we choose. That's going to be
underscore color. The speed equals the speed
we've already determined. Minus, not 0.5 and
plus random one just to just to give it a bit of difference
per time it's created. Those particular
commands are going to apply every single
time it creates this. And it's going to do it this specific set amount of times. That's one thing I
did notice as well. While evaluating the code. I've put two brackets
on the end there. That was my mistake.
It should be one. Now we can see S light up to show that it's in
relation to Se variables. It's always worth making sure. Whenever you open a
bracket, you close it. Same with the curved
brackets here. We need to make sure that
when we do open them, we are closing them
appropriately. And we're not leaving any opened ones that
should be closed. We'll know because
when we highlight it, you'll see which one
it's in relation to. Therefore, anything
in this function from this to here take place. Likewise, anything
inside these brackets will be repeated
this amount of time. Anything in this bracket
which opens on this here will be done to
this particular command. It's always important
to check and make sure any bracket you open, you close, and you don't leave any open that
haven't been closed. Because in doing so, that's going to create a
bit of a problem. But with that in mind,
let's test this out. Now what we also need
to bear in mind, if I go into the sprite here, we can check the hex
value of this color. Because gamemaker uses different
ways to identify color, you can saturation in value. Red, green, blue
values of color. You can use some built
in color values. Or you can use a X value. And I'm going to show you
just how they take place. I've taken that x value. What I'm going to do now is
going to the computer chip. On the destruction of
this computer chip, which as we know happens
when it collides with the player collision with
player instance destroy. We're going to call our
particle script now particles. We're going to create it
at the x and y position. The sprite we're going
to use is particle dot. We're going to create,
let's say ten of vs give them a speed of
one and the color. Now if we were to do underscore, you can see there's some
built in values for colors. But if you want to
go more than that, you can also use
the commands make color HSV and make color RGB, hue saturation value,
and red, green, blue. Or you can do this if
you get the hex value, put in the hashtag symbol
and paste in that, then what we can do
is scatter it by two. Then what we'll also do,
well we've got this, let's get the value for
the yellow one as well. We'll make a nice star as well. Let's use the eye drop
tool and get this color. The hex value is here. Again, we're going to
do what we did before, where we go onto
the particles here, we can just control D
particle dot, right? I think what we actually
need to do is change this from real because what we
actually need is an asset. The best thing we can
change this to is index. Index is a value such as a sprite or an
object that makes it a bit easier to
interpret because what we're effectively doing is
defining this for ourselves. Because we're saying I'm going to put in a
real value here, I'm going to put
in a sprite here. Or you can use
string for example, if you're going to put in text. It just makes it easier. When Gamemaker is trying to help you, you have
to understand, Gamemaker does try to
help as much as it can. It will say, hang on a minute. You were looking
for a sprite here. You were looking for
something else. Why? Why are you doing
this? Why are you giving me a different value? You don't have to necessarily put what type
you're doing there, But it does help because what you can actually
do is then say, oh, this is meant to, it won't necessarily
come up with an error, but it will underline
it or say, oh, I was expecting you to
put this and not that in, and it makes it a
little bit easier for gamemaker to just
try and help you. It's very handy to bear in mind, but we've changed that to
index and now you can see, it's not saying, hang on, aren't you meant to put
something else here? Now, with that in
mind, we should see a nice particle effect. Now that is a nice
little particle effect based on what we've just done. Now, these particles are
quite small, but that's okay. We can always make
them a bit bigger, we can always make them
a bit more vibrant. But we're just making a
nice little particle effect that's quite pretty, I think. Let's amp this up a little bit. Let's put some more
particles in there. Let's do 20. Let's make
them a bit faster. Let's do as well, make that one also the
stars, equally faster. Again, it's about playing
around, seeing what fits. We should see some
better effects. Now when we collect
a computer chip, look at that nice healthy
explosion of particles. When we collect
the computer chip, that is going to make it
feel much more alive. When we're playing the game, we've got some particles, we've got some screen shake. And we can apply these at any time because we've
made them as scripts. Anytime we want to actually use particle effects
or screen shake, all we need to do is
write particles or SC shake equivalent to
the script we've created. And they will just
come into play at any time that we need
to use them in future. Which definitely will be quite often when we
want to make the E, make the game feel more alive. Actually, before
I end the lesson upon reviewing the footage, error is a slight
issue with particles. This takes place after the create event here where we are setting
the random image index. It's actually setting this, but it's not setting the sprite, is setting the sprite, but
it's not changing it over. We need to put that here. The sprite index changes to the particle sprite
that we've assigned. Then we change the image index. And now you'll notice
when we go back in, it's going to actually have
different sized particles as per the image index or random sprite images
that we've got. There we go. That
makes more sense. Just a little amendment to
the lesson to bear in mind. So it does really matter
what script is executed in, it does really matter what
way the code is organized. So just bear that in mind. If something doesn't work, it might be that you've put
it the wrong way around. So with that in mind, we've
covered quite a bit today. We've gone over
quite a few things. We're going to look at
some different elements of using gamemaker such as
some animation effects. Next, so our character
isn't just a static image. And we're going to
start putting together a few more things to make the game really come alive,
including some spikes. Because we have actually
got some spikes here. We haven't done
anything with them yet. We're going to make some effects for what happens when we die. And we're also going to make
some transition screens, all to look forward to
in the future lessons. In the meantime though, our game is starting to come to life. And I hope you're enjoying
what you're viewing so far. If you are, stay tuned
for the next lesson.
11. Implementing Spikes and Level Transitions: Welcome back to Gamemaker
two D platform, a workshop. I'm going to be showing
you how to create some spikes and some
transitions between rooms. Welcome back. Now in
this lesson I told you, I'd show you what would
happen if you hit a spike. So it's very simple. As you can see here we've got
our spike objects and what we need to do is simply add a collision event to the spikes. However, because the parent
object is spike bottom, all we need to do is
add a collision for this one event user zero. What would happen
is that would then take place for every time you collide with not
just this spike but all of its children for
top left and right. With that in mind, we have
our little spike here. Let's put the other ones into just so we can be sure it works, let's put one here to the left. Let's put one here to the right. Let's put one to
the bottom as well, just so we can be sure that anything is going to
cause that deaf effect. So let's take a look. Here we have our
deadly, deadly spikes. And when you look
at that, you die immediately upon
collision as planned. Now you can do various
different things. You can make sure that
you can play around with the code and
ensure that perhaps it will only work in
certain conditions. Maybe the spikes will go
up and down on timers. Those are quite fun as well. We can certainly have
some experimentation with other enemies and
other different things too. But this is to get a very
simple running game from there. We can always expand
upon it in the future. And that's where it
will come down to you based on what you've learned and expanding
your knowledge. However, first of all, you
might notice when you die, it's a very simple affair. It just resets the room. We don't want that to happen. We want some effects. And that's what the main
part of this lesson is about. Let's do some of that. The first thing I'm going
to do is show you what I call a opening
opening and closing, or a room transition sequence. But in order to show you that,
I need to show you this. Now this is what's
called Lup Lp movement. Can be used to create
smooth and spring movement. I think it's very useful to do something like this
because it adds a bit more of a lively
effect to the way something moves rather than
it just being a static speed. We're going to use
this in making a closing and opening
frame for our levels. With that in mind, let's
do something like that. We're going to first of all
need ourselves a new object. We're going to create first
opening level, open level. Now what we're
going to do is set our two variables that we
need for this to happen. That is going to
be Y and Y target. The current Y to show the
Y level and the Y target. Then what we need to do is
go into our step event and adjust it so that y is equals p, then y is again y tar, and 0.1 This will
therefore create that smooth movement effect that we want when we're
opening the level. Let's start by introducing
you to our drawer event. With this event, we're going to first of all,
set the color to black. Set color, in this case
we just need black. And we're going to
draw a rectangle. This rectangle is going
to be begin at 00, it's going to go
to the room width. And what we're going to do here is so that it will
actually come down. It's going to start,
actually we're going to start by putting this at the room height variable. We're going to do
room height again, or actually what we'll do
is we'll do zero plus y is, then that'll therefore
make it come down. Now we'll set an alarm. If we go into our create
event and set an alarm, or let's say just a
very small amount, ten frames, one sixth of
a second in this alarm. We will then set the Y
target to room height. In doing so, that
will therefore make the value of that variable
increase to that target. The Y is value which
we're drawing here. We will see a smooth
opening sequence. Then what we will do is set
another alarm, alarm one. Let's set that to a second
and a half just to be sure. And in doing so, we
will then destroy the instance we must
remember to save memory. Whenever we're done doing
something, we destroy it. Or we put it out of use because
we don't want it to hang around where it's not
going to be useful now. And you're going to see, I have intentionally
done this wrong. I will explain why. First of all, let's
put open level into our room and you'll
see where the issue is. Actually, that's not the issue
I was meant to show you. I did forget an argument here. There is also outline, we want that to be false, we want it to be solid. But now I'll show
you what I mean. As you can see, there are some things still
above this rectangle. We don't want that.
We're going to fix this. This is where our
controller object comes in. Let's delete that and
go to our controller. When our controller, the first
thing we're going to do, create event, is for
instance, create depth. We're going to create this at 00 because it doesn't really
matter where we create it, but the depth is the
most important thing. That's going to be -500 It's minus because
it's a layer system, so we're putting it right
on top of everything. 500 is just arbitrary depending on how you sort your depths,
you can up or down that, but it's important that
it's above everything else, then open level. Now you'll notice because it's creating this on
top of everything else, everything else will be covered. If we go into it now you'll see it's on
top of everything. That's all well and good.
That's the first half of our death transaction. Now we want the second half. You'll notice in
the O player event, the death sequence at the
moment is simply room restart. Now we don't want that, so what we're going to do is we're going to create a similar
object to open level. We're going to call that
closed level level. Now what we're going
to do is similar. We're not going to actually
set this as a parent, but we're going to set
this very similarly. We're going to set the
alarm to one this time because we want it to
happen instantaneously. Again, we copy the step code because that is very
useful, the alert code. In this case, what
we're going to do is make it go the
other way around. In this case, it's going to draw the rectangle from the top. It's going to be room
height minus yes, and that's going to
therefore make it sweep up. Instead, when we die, it will start at 00 and it will then take the room height minus and it will come down
and then it will go back. It'll have a nice
smooth transition. The reason it's
important to have a smooth transition like this, and I say this a lot
about a lot of games, and it's a fatal flaw
that games can make. Nothing should simply
pop into existence. Everything should come in
and out of the screen. Or come in and out
of a transition. Otherwise, it's
going to look very unnatural when
something just pops up. Take a look at the new
Amario games, for example. When the coins appear, the extra coins you can collect, they come into the screen
and then you collect them. There are other examples, but just by way of example, nothing should just appear. With that in mind,
we're going to do something different with
a closed level and we're going to set a variable
called room targ, room tag. We're just going
to set it to zero. What we're going
to do this time, we'll set the alarm
as we did before. What we can do is we
can actually copy an event and paste it here
that does the same thing. Alarm one will
therefore in this time change not to destroy
itself but to go to. And that's going to
be our room target. Now we are going
to use this value. But what you will notice here, I've already set this to zero. I'm going to comment this out because that can override
the way we want to do this. I'll show you what
we need to do here. Actually, I have made
a slight error here. We don't need room
height minus y is, we just need y is. And that will create
it to go down. As I was saying here, this is the code we're going to need. I'll explain that for you. Our death sequence currently
is just room restart. Now, that's not very exciting. What we're actually
going to do is that room instance
by first of all doing instance create death as we did before, it
doesn't matter where. But a very high up value for the depth or very
low down I suppose. Close level. Now what we're going to do is
case this with a value. Is going to create this instance and the code as following. Our target is that value. Now we're setting it for the first time and
we're going to do at get index room name, room. Very simple. It's
getting the name of room and converting
it into be act. It will just take you back
to your current room. That is room restart. But what we'll do instead is to some particles as you
remember from the last one. We're going to do
that where it is. We're going to do the sprite for the particles as particle. Let's do 37, has a
speed of say, three. We're going to do just a
very simple green color for now. We can
always adjust that. Let's add a bit of
scatter effect. We're then going to
also add a shake shake. We're going to shake it for a third of a second,
quite intense. Then we're going to,
once we've done this, destroy the instance, which
we do here with instance. Now what we should see is
a proper death sequence. Let's see how that looks. This
should be our first error. Let's see why that's okay. Now it's important
to do error checking because when you error check, you actually start to realize
there are things that were relying on that
object being around. In this case, it was
the pass through wall. When we destroyed it, code ceased to work because
it was looking for the player object
that did not exist. We'll simply change this to if instance number player
is not equal to zero, then we encase this code. Now we're learning
as we go along here, as it's important
with gamemaker, you'll find your
encounter errors when you see things
that depend on others. Now hopefully this
will work correctly. There we have it, a simple death sequence that looks
a lot more exciting and a lot more lively than just a very
simple restart room. This time it has
some effect to it and you can quickly restart
and go back into the level. We have ourselves a
nice effect there. We can also speed this
effect up if we want to. We can change the
alert values to 0.2 instead of 0.1 That makes the whole thing act
a little faster. And then when we
set these alarms, we could change it to 1 second and that will therefore reduce the intermittent time
between when it's reloading the level or at
least appears to be reloading. And that will make it
look a bit more speedy, a bit more whizzyough, simple death sequence
that would be best for a game where you
die quite frequently. Basically how many times
you're expected to die should match how quick of a
restart sequence is. There's nothing quite
as bad as a game that takes a very long time
to restart after death, and death is expected
quite often. In today's lesson, we've
covered how to look out for errors inadvertently,
but we have learned, we've also covered how to program a very simple
death sequence, and we've also made some very
nice effects to go with it. In the next lesson, we're going to start doing a
few more things. Like what happens
when you actually collect all of the
computer chips? How to transition
to the next level. It will involve
what we've already learned with level object. We're going to be tying
that together with some more level designs and
different things we can add. Then we're going to
start putting it all together before eventually adding the effects such
as sound and a menus, title screen, the things that make it feel like a
fully packaged game. But we are getting
there, so I hope you enjoy today's lesson and I'll
see you in the next one.
12. Level Completion Mechanics Setup and Effects: Welcome back to Gamemaker
two D platform, a Workshop. In this lesson, what
we're going to do is make sure we can
actually end the level. This happens when you collect
all the computer chips. Now in later lessons we're going to cover the
gimmick of this, which is where you
have to collect them before you run out of battery. And we're going to do
some more effects, but for now we want the
actual pure and simple. Make it to the end of the level just to work so we can test. Before I do, I will just remove that because you
can't get past that spike. Don't worry about that for now. Let's start creating. We go first into our ex it, now our exit is the same as it, in that this is the sprite
and this is the object. They're both linked. We want to create some particle effects. When we look at the sprite,
or rather this one here, we can see we want the
particles to emanate from this point and this point
to give it a little bit of excitement that's available that it's free to go into that. You've collected all
the computer chips, we're going to do
instance number, I've just copied that twice. If instance number of
computer chip equals to zero, this is where we're going
to do our particles. We're going to first. Now the origin point
here is at this point, we're going to check here. And it is going to be 3.4 that is going to
be plus three and it starts at two plus two. X plus three and y plus two. The sprite we're going to use is particles, particles,
particles, do. The amount is just one because it's going to do at every step, the speed is going to be two. The color we're just
going to do yellow. We can always change it
later and the scatter, we're going to put it at two. We're also going to use control
D to duplicate this line. What we're going to find here is just how far along this goes, which is 28 as well. We're also going to
do x plus 28 now, actually create a nice little
inciting particle effect when we're ready to
go into the exit. Let's see how that looks. We're going to try it out here. We're not going to die because that's not a very
good thing to do. There we go, Op take that. Now we'll collect all
the computer chips. What we'll find is that
it'll start to light up and we'll be able to
actually enter the exit, or rather it'll
look like we can. Okay, we may have
saw it briefly, but we need to move
that spike out the way. We can't move out of the
way. Testing is important. If you hold down, it will
be a multi layer select. Even though we're not
on the correct layer, now we're on the tiles there. If we select Hold down and
select that by clicking it, it will default to the instances and we're going to press Delete. In fact, while we're here,
we're just going to delete a few of these because we can
always put them back later. But for now we want to check,
it works straightaway. So we're going to
make it easier to test that by just
having two to collect. It only checks a, a non, so it doesn't matter
how many are in a level you can see now
that's lighting up. That's very exciting now that
if anything is too much, we're going to reduce those. The way we're going
to do that is by doing equals choose
one or two here. If P equals one, then this if P equals two, then that way I'll alternate and we can
also reduce the speed. The speed I think would
be better at maybe 0.5 It's just a case of trial and error and
we'll see what one fits and what doesn't
as we go along, we should see this is going
to start to look a little bit less crazy for
the particles. We'll try again. There we go. That looks like it lights
up. That's quite snazzy. That's like a little glowing
effect. We quite like that. That looks very interesting.
We'll keep it like that. But of course we
can bear in mind we can always adjust
it at another point. With that in mind, let's
actually make it work. What we're going to
do next is check for collision with it in here. We're going to do
a collision check, which we can do this, we can check for a
collision with the player, but we can also put
it in the step. The reason I want to put it in the step is because I want to check if it's in the
center collision. We can actually use either
a circle, an ellipse, a line, a point, or in this case we're going to use a rectangle. Now the way we're
going to do this is by checking if we
have the sprite open, we can use the boundary box, but we also
predominantly need this. It's actually going to check
at about 14 pixels down. We want to 12. If we're going to say 12, about 19 pixels. 12, 19. And how many did I say? 14. Let's do 14. 14 down and 12. 1914, 19. We're just making some
notes as we go along. That's going to be X plus 12, and then we're going
to do y plus 14. Then we're going to do x
plus 19 and y plus 16. Therefore, it's only going to
check in that central part. The object it's going
to look for is player. It's going to check if it's
precise in that collision and not me will be set to true because it's not
checking for itself. But before we do that, again we're going to encase this in instance player checker
because as we did before, we don't want this
error to occur where it's checking for a collision with an object that
doesn't exist. We've encased it. And now
let's start some coding. In this plate we are going to do now you remember where we
actually did a death sequence. What we did here was tag the room target to
equal the same room. We're just going
to set it to zero. The reason for that is
because we're going to add some conditions to
the room closer. Now this is where the actual action takes place
in the first alarm event. We can change this
description to change room so that we can see it
here for future reference. But if we do, Tar is not equal to zero then
it will go to the room. But we choose, if t
is equal to zero, then we're just going
to go to the next room. Room. Actually, that's not correct. Bear with
me one moment. What we actually need here is not room exists because that will check
for a specific one. If room next the next room from this one is not
equal to minus one. Minus one is the value returned when there is an
issue with this. As in other words,
this is saying if there is the next next room exists, then room next. Just for now, we'll also
do game end. Very simple. Now that would therefore
make when we set it to zero, an automatic check to go to the next room that
we're doing here. With instance, create
depth closed level. If a room target is zero, it will check of the next room and if it
exists it will go to it. If it doesn't, it'll
simply end the game. Let's see that in action
elect these, we go into it. It just ends the game. Now we can add some
fancy game over screens, but we're not going
to do that yet, because now what we're
going to do is just make it a little bit
more interesting. First of all, we want the
player to stop moving. The way we can do that,
rather than initiate it here is by moving the
player and destroying it. At this point we're
again going to use with but this time with player we're going to destroy. Now it's going to look
bizarre on its own because the player is just
going to pop out of existence. We're going to do a new
object which is dummy player. What we're going to
do with this one is give it player sprite. We're going to set
its image speed and image index to zero. We're going to set its depth to -100 That will basically make sure it's a bit higher up in the order
so we can see it. Then what we're going to
do is just, first of all, it's image alpha equal one and
set a fade value to false. We'll set an alarm or a second. Then after a second, actually
we're going for 2 seconds. We'll elongate the process a
little bit after the alarm, we'll set fade true. Once we've done that, we can
then work on our step event. In a step event, it's
going to rise slowly. Y value is going to increase
by 0.5 pixel every step. If f equals true one or true if they both do the same thing
in this context, then image alpha
which basically means the transparency is
going to go down. Then it will check if
the image alpha equals zero, then instance destroy. What we can do here
is rather than immediately create
this closing part rather than immediately, not the death sequence
one, but this one. Rather than immediately do this, we can actually do this at the destruction of the player
object, the dummy player. Actually we'll call it
the wind player because that sounds more
fun. Wind player. What we'll do is in the destroy, we will then create the
room ending sequence here. I should close that because it's going to make a mistake
if I keep that open. We're just going to do
instance depth now. It doesn't matter what depth because we've already set it. Player x is value O, player X, players y value, which
is player Y the depth. Like I said, it doesn't matter. And we're going to use
wind player it's going to create this and then
destroy the player. Now that should create
a nice little effect. Let's see how that looks. Now we can see it's
open and we rise. And that's quite pretty, but we're going to
pause right there. Join me again in part two, where I will show you how to add the effects when
ending your level.
13. Finalizing Level Completion Mechanics in GameMaker: Welcome back to Gamemaker
two D platform, a workshop. I'm going to be
showing you how to add some pretty effects to make the end of your
level look great. Of course it is a
little slow themed, so let's speed it
up a little bit. And we can do this by
going to Owen Player. First of all, let's reduce
this to one, a 2 seconds. Let's make this rise a little faster and fade
a little quicker again. It's just about playing
around with the values, seeing what fits best. Let's have a look at that now. We'll jump and we'll collect
the computer chips. Perfect. Now, well, I say perfect. Let's add one more little
touch to this by adding a closing bar that's just going to look a little bit
more like a fun effect. Now in this case,
we are also going to use the Lp value
which we had before. You'll remember the lerp value, it's going to be
far p equals zero, bar tag equals zero. And we're going to take
the same code we at before this one and just
replace the values that's going to be bar appear
facing this one. It's already going
to point out but vuse variables aren't
defined in this object, but that's fine. We're
going to replace it. We're going to make
this slightly smaller, so it's a slower transition. Now with that in
mind, we're going to start creating our draw event. We're going to draw, set the color to white. We want it to be
semi transparent. Draw sent alpha to 0.5 and we're going
to draw a rectangle. Now the rectangle is going
to be from the x position. It's created in minus bar peer over two because we want
it to be center aligned. The y value is going to
be y, the x value here. The second part will be x
plus bar here, over two. And you'll see it will
start to autofill. It'll suggest your local
variables which is brilliant. The y value is going to be zero, so it's going to appear
as though it's coming from the top of a level. And the outline, we're
going to set that to Fox. We want it to be solid,
not just an outline. When we're done with this, as we should with every drawer event, we need to reset
the alpha to one. The reason is, if you're
using other areas, with other drawer
events, other objects, it will take on this
last piece of code. So if you don't immediately
set it back to one, it can make some weird
effects and make things a bit more transparent
and we don't want that. Whenever you're done, draw
set alpha, we'll go to one. And we can also,
for good practice, set draw, cut, set
color to white. We've only ever used white here. But if we were using
a different color, that's for example, let's pick a light yellow,
for example. Let's go to our sprite editor, Find a nice light yellow so
we can prove this point that we need to set it back just
going to any old sprite. It doesn't matter, we're not
actually editing the sprite. What we're doing here
is editing the color. We'll go for a really nice
light yellow like that. Take that x value and you
remember how we apply X values. We will go to here it
is, the draw set color. We use the hashtag symbol and then the hex value
that I'll make. If you hover over it, you
can actually see that color. It's very intuitive
in that respect. Now that will appear. Let's set a small alarm. Just say alarm zero to ten. Then after that, the tag value, now we want our player
is 16 pixels wide. We want it to
encompass the player and leave a little extra room. Let's set it to 24. Let's see how that looks. That should leave
a six pixel wide either side here when we have the collision with the exit or rather
with this exit. That's the sprite. What we'll do again, we'll create this. Now we have already set
of the wind player to -100 Let's set the depth
of closing bar to 101. It appears as
though you're being taken up into this tract to
be, that'll be quite pretty. With that in mind, let's go to the collision part with the player colliding
with the exit. So the other way around the exit colliding
with the player, we will, we're going to
create it at its x value. So it'll be created
in the middle. Actually, let's do player X. Let's put it there. We'll
create it at its own Y value. Now remember, its own Y value is here based on
the origin point. We want it to appear as though it's coming from the bottom. That we will need it to be 15. 15 minus two is 13, unlucky sum, but
we will use that. I've just opened
up for one here, it will be y plus 13 and we're going to do
the object closed bar. Now with this, we can
therefore see hopefully, very pretty bar effect appear as the player gets tractor
beamed into the exit. Let's see that in practice, look at that, that's
a very nice effect. It did open a little slowly, but this is again where different elements of play
testing goes into it. Let's put that to 0.2 as well, so it appears a bit more then. What we can also do
just for a bit more of a un effect here is if
we go to close level, what we can do is as
soon as this is created, if instance number C bar is not equal to zero
with the closed bar, then we will set the bar t zero just so it looks
like it closes off again. So that means as soon as
it starts to transition and the bar comes down,
that will close again. That'll give us a nice effect as though your robot is being taken away by a tractor beam. That'll be quite fun,
and it will then easily transition smoothly
into the next level. We can see the dirt.
It's as simple as that. We've created a transition
to the end of the level. Now, in the next lesson, we're going to start doing
some different things. We're going to make
a few more effects. We're going to make a few
more nice parts to the level. And we are now getting very close to having
a complete game. We do need to animate
our character. We'll touch on that as well. And we'll do some
different things to just tie it all nicely together. So with that in mind, I hope
you enjoyed this lesson. And I'll see you
in the next one.
14. Player Animation Bringing Characters to Life: Welcome back to Gamemaker
two D platform, a workshop. In this lesson, we're
going to look at animating our character
where we left off last. Our character felt
a little stale, there wasn't a lot of movement. Yeah, the character moved, but if we look at the animation, I forgot we did the
death sequence. Okay, let's try that
again, shall we? Okay, as we can see, our character moves around, but not a lot happens
and we want to fix that. We're going to do that today. First thing we're going to do is give it a flipping effect. Now the way we want
to do this is by making sure we have
two variables set up, image x target or IMXt. And IM x is, it doesn't really matter
what we call these, but we're just going
to call them that. Now the reason we have these two particular
variables is because we don't want the flip
to happen instantly. We want to have a flip
effect like that, rather than it just
happens straight away. If IMXT is larger than IMxIS, then IM IS will
add 0.1 Actually, we'll go 0.25 we'll make
it a little bit quicker. Likewise, if I XIS is larger and we're
going to reduce it. Now what we're going to do is then make sure that
in our platforming, we will check if the HSP, the H speed, is
larger than zero. If it is, then IMT, the target, will equal one. If it's less than zero, then it will equal minus one. The reason we do this
is because what we're going to do now is
introduce the drawer event. The drawer event will basically make anything that's
already displayed. In this case, our
player disappear and override with whatever
we choose to draw. Now in some cases, you
can just do draw self. Now if we do draw self, you'll see that will
actually not make very much difference
because it is just drawing the character as is. So when we look at
our game so far, it appears nothing has
changed. And that's fine. But we want it to do something
rather than draw self. We're going to draw the sprite. Now the sprite is going to be the sprite index
and image index. But what we're
going to do here is change list of draw sprite xt extended and as you'll see at the bottom we have a
few more variables. The x value will be x, Y, valuable would be Y. But here is where we
make the difference. The X scale, that
is going to be I, M, S. What is the Y scale? Is still going to be
one. Actually, we'll do image Y scale just in
case we want to change it. The rotation will
be image angle, in other words, zero. The color will be
white services. If it blends into a color, it's not going to serve.
There's no need to. The alpha actually, we'll
set it to image alpha, that is the transparency. Alpha is just another
word for transparency. Now when we run the game, we should notice some
significant difference in the way the player acts. We'll see here it flips back
and forth, which looks nice. We're just going to
close that down. Actually, I should
probably change that so that when we
have the death sequence, we don't immediately
end the game. But yeah, we're not going to
worry about that right now. Actually, we'll worry
about that another time. Because what we're
doing here is we're just changing it
to the same room. Then the room target
will effectively change. But I'm getting sidetracked. We'll worry about that later. Now we'll add a
small restart key, which is just for testing. Key press letter R. We'll just put this as test
so we know and it's gaming. We start, that's just so we
can restart at another point. We have made a fatal error
here by starting it at zero. What we actually want to
do is start it at one. Now you see when we
move our character, there is a bit of a
flipping effect here. That's beautiful,
that's what we want. What we've also set here
is image speed to zero. Now we want to change that. We also have some
different states here. If SP is not equal to zero, then image speed equals 010. Sprite index equals
player still, it's standing stock still.
When it's in the air. We want the image
index to equal zero. Now if HSP, this
is our idle state. Actually, we want the jumping
state to override this. That will come second.
Remember, these codes are a piece of code are done sequentially If HSP equals zero, as in the player is not moving, sprite index is not
already player still, then sprite index will become
player still image speed. Will equal one. We don't
need the end actually, we need the comma semicolon, even image speed will equal one. This will get it
Sidell animation. The next one we want is if HSP as M speed is not equal to zero as in the player is moving, then we do the same again, but we set it to run. Therefore, we should have different states to annotate
different animations. And this should start to make our player feel much more alive. However, what we've done
here is we've come across a small error in 86.
This is line 86. This is because
we've used a comer instead of a semi colon. It's always important to
check your code, right? We should see now
an improvement. Let's have a look and
see how that turns out. See, actually I've got to
stop running into that spike, made the game
difficult. Here we go. Now we have a bit of animation. It appears when it's running, do a run animation. It does a little jump animation. What we actually can see here is that even though we're getting the animation for
running when it's idle, it's not doing the
idle animation. I think this is because we have here the sprite index equal. If VSB equals zero, that is automatically changing it to one per player still. However, if HSP equals zero, we need to get rid
of that because that's stopping the
animation from running. Now we should see
idle animation. There we go again. It's important to test, It's important to
test your code. What we do, notice here though, you will notice there
are certain things that happen over time
when we do these lessons. I've got to stop doing that. A lot of this lesson is just me running into that
very same spike. Okay, what we notice now is that we're getting
caught in this wall. Now, why is that happening? The sprite boundary
box is changing. When the sprite changes back, it's detecting we're
stuck into a wall. Now this is important when you look at the collision mask. To this one and this one,
they are very different. The best thing we can
do here is change this manually so it matches
what we already have. This way it won't
detect a collision because the collision
is detected with the collision mask, the boundary box, and not
the player sprite itself. Now we should find
we're not getting stuck in walls. There we go. Now we're having
an idle animation. Jump animation.
When we're moving, it's changing to a
movement animation. You see that looks a lot more
alive than it did before. Okay, we've just before we
go on to the next part, you've noticed what
the problem is. If you'll remember, I noticed a slight issue earlier
when testing the game. This is where testing
as you go comes in. Where when you run
in it goes to zero. What you saw in the top right, there was me trying to
ascertain the issue by figuring out what the
room target value was. I did that by setting it
to a bright blue and just drawing the R target
value as I go along. It turns out as
Gamemaker numerically makes the room assets
0123 and so on. What we're doing
is we're checking if when we change room
it is equal to zero, it's reading level one as zero, therefore it's doing a
reset or going to the end. We don't want that to
happen. We're going to change this to minus one. If you'll remember
when we have the win, we're setting this
also to minus one. This way it will reset the
game automatically because it, even though it
detects it is zero, it will say that's
a death sequence. Now it's operating as
it should. That's fine. Just a little bit of problem solving there as we go along. Then you'll remember
from our last lesson, we had a lovely can't
complete this level. Who knew this one spike and
one enemy would stop me. There we go. Now it'll go to the next level, or in this case, close again. This brings us
onto our next part because what you remember
there is we actually had our P Now our lop came
in from the closed bar. I believe it was
called the closed bar. Yes, we're going to do this, We're going to take these values and we're
going to use them for our next bit of animation just to add some more effects. If we take our
computer chip here, what we want to do
is add a show value and show the target going
to set these both to zero. What we're going to do, taking what we learned with our P from the last lesson, which is here. We're going to replace
these values y show and y show, y show here. And we're going to
basically set it like this. If we set the alarm to let's
say 30 plus random, 30, actually it'll be random for an integer because random
includes rounded numbers, non rounded numbers and does
include just a solid number. Then we'll also
do the same here. But what we'll do is we'll
make show either ten. Well, actually no
tennis too much. Either three or minus three, and this should create
a bouncy effect. We'll actually do it
slightly more often, we'll do it by 20. What we'll do now,
if you remember we took the drawer event here. We'll draw sprite. This will be as before, we'll go sprite the x, t in Vax. We have more variables here. This will be the sprite index, image index x and y. But in the Y we're also going to plus the variable we've
just set up here, which is y, show. That's going to give it
a fun bouncy effect. The scale is going to be
the same image, x scale, y scale, and the rotation
and same with it. And image alpha of
the transparency. Now what we should see is a slightly fun bouncy effect
With our computer chips, We can see they're doing a little bouncy effect
which makes them all the more fun and
interesting to collect. We can also make
them sequential, rather than just randomly
going up or down. We take the computer chip here, we're going to do it slightly
differently in the alarm. If y show t equals three, then show t equals minus three. L y show t equals three. That way, if it's three, set it to minus three. If not, set it to three. Now we'll see they'll
alternate up and down. And that'll make them look all the more fun and all the more enticing to collect as fun
little bouncy objects. We could also change
this to make it look a little bit more
like it's bouncing up and down more frequently. Again, it's just fine tuning it to suit the
theme of your game. We'll see now that looks a lot more enticing and a
lot more fun to collect. Let's do that.
Let's collect them. Let's stump on this enemy. And you see now we've
got some movement. There we go. In this lesson, we've added some animations. We've done some quick
problem solving with one of our bugs in the game. And we've also made
a bouncy effect. So we've had some fun.
And we've also learned some important lessons
about checking your code and checking
how it translates. Again, a lot of this is as you go and making sure it works
frequent play testing, and just bringing it
to life a bit more. In the next lesson, we're going to be adding some gimmicks. We're going to be
bringing more life into other parts of the game. And we're going to be
putting it all together more and more until we have
ourselves a full game. So stay tuned for that.
15. Introducing Game Gimmicks Engaging Mechanics: Welcome back to Gamemaker
Two D Platform Workshop. Now in one of the beginning
lessons I mentioned, we're going to add a
Gimmick to this platform. The gimmick is when you have
a battery and it runs out, you will explode and die. So you have a set
amount of time to complete the level effectively
based on your movement. So you have to pick the most effective movement
route around the level. It's important to
have a gimmick in not just platforms,
but games in general. Something to make it stand out. But if you're just starting out, sometimes it's best to get the
core mechanics down first. But let's look at this gimmick
and see what we can do. So we'll need two values. We're going to do battery max, and we're going to
set that to 100. Now we're going to set it
higher than that in future, but for now we're just
going to set it to 100 just so we can
check it works. And then we're going to do
battery cur or current. And we're going to set
that to match battery max. Now we're going to go and
take in the movement. So you see this is where
we move horizontally. What we're going to do is if HSP horizontal speed
is not equal to zero, the battery Barty battery
minus equals one. In our draw event, we can
check what that value is by drawing the text
at the x coordinate, y -40 So it's above us, the value battery
ur, we should see. Now when we do actually
move horizontally, the battery value will go down. You see here it's 100 and it's going to
drain very quickly. We are going to need to set
it much higher than that, but that's just by
way of example, let's take our step value. What we can do is
at the end here, if the battery value, battery c equals zero, then we're just going
to do the death sequence event user zero. Simple as that. Now
that's going to be a very simple way of
making sure the battery, when it drains, it
checks if it's zero. And if it does, then you'll
die plain and simple. There we have it. Now of course, what we also want to do is
actually the battery itself, because having a
number on screen just doesn't seem appealing. We're going to use
this icon here. What we can do with
this is we can take our player and draw
this icon above. So we're going to take this, we're going to remove
the draw text. And we're instead
going to draw sprite. Now this sprite is going
to be battery icon, and we're going to draw it with a sub image of zero
at the x coordinate. And we're going to
check, let's see what y -35 looks like. Now it's important
before we do this, we draw set the alpha
to one and we draw set the color two white. Therefore, what we're
doing with this is making sure that it's
resetting to Vs values. If we use draw text color
at any other point, then it's not going to
interfere with this. That is, drawing above,
it's a little high, so we're going to maybe change that to 20. That
should look nice. That should stand just
above the player, because remember the
player's origin point is right in the
middle of a sprite. So we want to ensure that it stands out just a
little bit higher. And there we go, we have
ourselves a battery. Now what we're going to
do once we've drawn this, is set the color to, let's say, a nice line. Like a nice bright green. Of course, we can change
this as we go along, but this is where
the fun comes in. We're going to draw a rectangle. Now this rectangle
is going to start. We want it to start here. We want it to start at 22 in comparison to the
middle center, which is 1210. That is eight, and
that is also going to be ten to the left
and eight higher. That's going to be the
start coordinates. Now x, we need to see how much room we're
working with here. If we again take
this to the right, we see we've got 21.2
so that gives us 19. We're going to put this
back to the middle center. We're going to take the
fraction of battery, battery, battery
over battery max. That's going to
give us a fraction. And then we're going
to times it by 19. Now that is going to be added onto our
original start point, which is X minus ten. We're going to put that in, we see that will go down
as the battery goes down. We also have a certain amount
of Y space to deal with. We have anywhere 2-8
That is eight minus 26. I hope you could
figure that one out. We've started at Y minus eight. We're going to also Y minus two and we don't want
it to be an outline. This should therefore see a battery representation
of this battery appear. I have realized as well, we started at -20 We're
going to make sure that's 28.22 What we should see is the battery itself will start to drain
as we go along. Here we go. That
is a little high. Actually, I think
that is slightly off, but you can see the battery
drain starting at 52. Okay, That's three above 23.17 This is where we
need to remember that the middle origin point is extremely important
because we need to understand where that's going to be drawing
that battery icon. I think what we
need to do is 16, because it will draw
that one pixel down. And likewise, I
think this is 18. Again, trial and
error, you need to be in a position where
you can check and it draws precisely where
actually not even 16. It should be 18.
It should be one further up, not
one further down. This should therefore draw
a nice representation of how much battery we
have. There we go. That looks nice, and as you
can see, the battery drains. There we go. Now let's do
that slightly differently. We've set this only to
our line at the moment. Let's change this up slightly. Let's take a new variable, local to draw event called VAR
BP for battery percentage. Let's put this at 100. Now let's take battery
c over battery max. This fraction, let's say this times 100 is what
BP is going to equal. That's going to give
us a percentage. Now we're going to start
by setting it to line. Then if BP is less than say, 50, going to change that to draw set color circle precision. It will auto fill sometimes, and you need to be
careful with that. Let's change it to orange. And then using control D
to duplicate that line. Well, let's make it four colors. If it's at 7,050.20
and we'll do, say, yellow, orange, then red battery is
really about to run out. And that should give us then,
a slight increased sense of urgency when the battery
is about to run out. There we go, look.
Now the battery is almost out and we're dead. That's therefore showing
battery draining slightly. Let's add in a little
explosion effect as well. Now the reason we want a
little explosion effect is because rather than just
immediately creating this, we're going to do
ourselves a little bit more of an effect for
when we run out of battery. Now I have a sprite
sheet for this. I'm going to show you how to do a sprite sheet for
those who don't know, a sprite sheet looks like this. It's a set of images. It will, therefore, each of
these represent one frame. But we can't import
this image just as is, because that's just
one gigantic image. What we actually
need to do here is we need to import
it as a sprite. Now the way we do this,
we create a blank sprite. Let's call this S explode. When we open S explode, what we need to do by
double clicking this, we're going into
the image editor. Now with the image editor, we have an option up
here for image and we're going to import
a strip image. Now if we go into our
explosion set here, you'll see we've
got some options. Each frame is 100 by 100. There are 36911
across 11 per row, and there are 99 frames. We now convert this, it will say you're
converting into an image. You'll see it's taken each
of those spaces we've given, and turned it into a frame. This gives us a very
nice exploding effect, so we can hit play.
Look at that. Let's change this up
to 60 because that is almost 100 frames there. It's 99 frames. We want it to last a second
and a half. There we go. Now we'll create a new object, and this will just be for
the explosion effect. Explode, explode,
explode. There we go. And we're going to
assign it this sprite. Now what we can do is, rather than immediately
create this closed level, which is what we are going
to do at some point, we're going to check
instance number O. Explode is not equal to zero, then we're going to do this
else we're going to actually, we'll just leave it
as is because we're going to have the explosion
a different system. We're going to do animation end. With animation end, we can
then repeat this process. We can just create
the close effect. We're going to set the image
speed here to one now. What would happen is where
we have the step event here, rather than event uses zero on its own when we
run out of battery. We're going to also create at X and Y coordinates at
the same depth minus I, say minus one, so it
stands out the explode. Now when we actually
run out of battery, we'll have an explosion effect. And then we'll actually be able to end the level based
on running out of life. Now as you can see, that
explosion effect did start, but this should actually
be equals zero. If it doesn't equal zero, it's important to remember the difference between
if and if not. Now we should see the explosion. Then what you might
have seen is that that also started the animation again because there
was that brief pause. We can remedy this by at the animation end
saying image speed equals zero, visible
equals false. But of course, at the start
we want visible to equal true, anything that we change. We must also set in a
creative event just to be sure in case anything
affects it later on. Now we can see the explosion stops and
then the level explodes. Level ends. However,
if we just hit a spike straight away, we die. Therefore, this gives us a bit more of an
incentive to not run out a battery because it gives
us a dramatic explosion. We'll be able to see then that the actual battery is important
to the levels operation. We can also show this
through level design. It's important to show that through level design we
want to go through showing, rather than telling as much as possible when we create a game, We don't want to bombard the
player with a wall of text, because in doing so, they're
not going to want to play. They're just not want to, they just want to
dive straight in. Unless it's a very heavy
story driven game, something like this, it's not going to be as important
to bombard them with words. Generally speaking, when
it comes to level design, you're going to
want to demonstrate how that battery works, perhaps through an
introduction level. And the same for things
like spikes, enemies. And that's where we're going to look into different ways we
can introduce these tricks. Now though, that is how we
add the gimmick to our game. So it's starting to
look like more of an interesting
puzzlykd platform. We're going to expand on
this in a different lesson. We're going to add
some, not gimmicks, but different elements just to bring the game to life
a little bit more. So more enemies, more collectibles
like a key and a lock. Those are usually tropes
of a platform game. And we're also going to then do a bit more level designed to
show how we introduce that. Once those are introduced, we'll start tying it all
together with a menu screen, and before we know it, we'll have ourselves again. So join me in the
next lesson for that.
16. Designing a New Enemy Strategy and Implementation: Welcome back to Gamemaker
Two D Platform Workshop. In the last lesson, we made
the gimmick for our game, the battery running out to zero, and when it does,
you end up dying. We've got a few challenges. We've got our things to
collect our computer chips, and of course we've
got the enemies. However, so far we do only have spikes and the walking guy, not a lot of variety. In this lesson, we're
going to make a new enemy. What we're going to make is a swinging spike ball
that's attached to a chain, that's attached to a box. And it's going to either
swing left to right, or it's going to do a 360 loop. In doing so, I'm going
to teach you a bit of programming and I'm
also going to show you a new way to define
variables. Let's get started. Our first object is going
to be the spike box, that's what we're
going to call it. And we've got a
sprite ready for now. What we need to do here is
do variable definitions. Now these variables are going to be set as the object is created. And it's an excellent way adjust the variables every time
we create the instance. Which really is helpful for things like this and
other things that require a little bit of variance depending on how we
create them and what we do. Let's start by creating these
variables by clicking A. Now the first variable
we're going to do is going to be called length. Now that's going to be
the length of the chain. We can set the default
to let's say 48. Now we also have types, real, integust, string, Boolean,
et cetera, et cetera. We're going to do real, these are going to be real numbers. The next variable we're
going to add is max speed, so that is going to be
the speed at its maximum. We'll set that by default four. And then we're
going to set, we're going to go with delay. Now the delay we want because what we want
to happen here is for perhaps a string of them going at slightly
different speed. We'll want them to start
at different times. We're also going to do mode. Now mode we're going
to set as zero. Now that's going
to mean swinging and one is going to mean 360, like a 360 angle. I'm going to show you
all of that as we code. We're also going to do Durgo go by default is going
to be one for right, zero, left, right one. What we're going to do, as well as in the creative event here, we're going to add
some commented code. Now this is just for
our own reference, so we can refer back
to it when we need to. Again, you see here go equals one for right
and zero for left, one for 3600 for swing. We're then going to set up the actual coding
for this alarm. Zero is going to
equal one plus delay. That's because we want it to be somewhat of a delay and
the alarm won't set off. If it's set to zero,
we're also going to set the direction at 358. Now remember we are using
cardinal directions. Get the camera right. We're
around the right hand side. I can't face, there we go. That direction is
going to be zero. Hang on that direction,
that direction is zero. That is 270 and left is 180. I realize my camera is flipped, so it's hard to make that point. But cardinal directions mean
that downward facing is 270. Now that we've set up the alarm, the alarm is going to also
then make delay equal zero. That will basically
set the value back to zero once the alarm
has taken place. Now all the action is going to take place in our step event. So this is going to happen
every step or every frame. First of all, if mode equals
zero, mode equaling zero, as we can see for
reference here is going to be if it's
swinging left to right. The way we're going
to do this is if direction is larger than 182, then go zither Direction it's
going to, is equal to one. Now that's going to set
it back to moving right. Likewise, if direction
is less than 358, more than 358, or less than 182, then Durgo equals zero. That's going to
set it to go left. We'll put in a little
that reference here. Zero equals left,
one equals right, just so we have
that for reference. Now what we're also going to do is actually do the swinging. If delay equals zero, then we don't always
need the ven. We can just open brackets if
we're doing some code here. But sometimes it's helpful for one line of code to add a n just so it looks a bit more coherent and you can follow
it better with your eyes. It's really down to your
own star if ago equals one. And we're going to add to
the direction plus equals, this is where a bit of
complication comes in. One minus the absolute value. As in the positive value of 270, the downwards direction
minus direction. Over 90 times by max speed. Now seems a little
bit complicated, but don't worry, we do have
max speed defined, don't we? Yes, we do. That might seem
a little bit complicated, but this is going to
ensure that we have a slow and gradual
left and right, rather than just an immediate. We want it to appear
like it comes to a stop. We're also going to duplicate
this line again with our favorite control
D. If go equals zero, then we're going to do
the same but minus. And then we're going to
close off these brackets. Now that's all well and
good for the swinging, but if mode equals one, it's going to be a lot simpler. If delay equals zero, then all we need to
do is if go equals zero and direction
plus equals max speed, then with our trusty control D, if go equals one, then di minus equals max speed, That keeps a consistent
temperature, temperature direction,
and consistent speed. Now what we need to do, we're going to actually use
these directions and speed values and move the spike
ball at an x and y basis. The x equals the starting place where we actually put the box, plus length, no length x. What this actually does is put the length in an
x and y coordinate, equivalent to an angle
and a direction. That's going to be the length. We've defined length
over direction. It did define length as well. You can see that one here. Then we're going
to duplicate this. We're going to do control
D and we're going to do y equals to y start
plus length y. Again, length and direction. This will therefore
ensure that it moves at y and x coordinates equivalent to the
direction it is facing at the length that
we have already set. Now once we have that in mind, the next thing is to
actually draw it. We're going to go into
a drawer event here. Now we want to draw the
box at the start place. We want to draw the chains. And then we want to also
draw the spike ball itself. First of all, we're going
to draw set alpha to one and draw set color to white. This is always good practice at the start of any
drawer event in case any previous drawer
event didn't set this or changes the alpha
value or the color value, we don't want it to mess up. First things first, we're
going to draw a chain. We're going to need a four loop. Now four, we're going to
set the variable to 164. Loop continues doing an action multiple times until
a condition is met. The condition in this case is larger than 480 because that's going to be
the maximum length. Realistically we're
going to use, we don't want to
repeat too many times after each action. This
is what it's going to do. It's going to
increment it by 16 now 16 because we're
on a 16 16 grid. You see here, this
is a 16 16 sprite, as is our chain. We're going to do
this for the length. And what we're going to do is if length is a larger
manner equal to I, then we're going
to draw a sprite. Now in this case,
we're going to draw sprite extended because we
want it to be at an angle. What did I call it? Spike chain. That's what I called
it, spike chain, the actual sub image is zero. Now the x is going to
be x start plus length. It's going to be x and
the length and direction, but y is going to be
similar, Y start. And then we're going
to add length y. Again, that is going
to be and direction. Then once we take the
scale into account, that's going to be
1.1 The actual angle is going to be
direction plus 90. Because this is downward facing, we want to rotate it, so it's
direction plus 90 color. We're just going to
do white because we don't want any
color blending on it. The length alpha here is
just going to be one. We don't need to
extend it beyond that. That therefore is a four loop to contain our chain itself. Now once we've done that, we've got our four
loop in place. The next thing we need to do
is draw spike ball sprite x. And this is going
to be spike ball. Now this is going to be one
of a sub image or zero. It doesn't matter, x and y because that's the actual
x and y coordinates. Image x scale and image y scale, 1.1 doesn't really matter. Varitation on this one
is going to be zero, going to be white. Again, no color blending. And the image alpha is
going to be one, of course. Finally, we're also going
to draw the actual box. We're going to take
the name for the box. We're going to use
the same values, but it's going to be
x start and y start. Now this means that it's going to draw at the start position. Now when we go into our room, what we can do here is we can make sure this is in
the instance layer. Let's delete this guy, because we're going to replace
him with a harder enemy. Let's put this here. What we can do as well is make
sure that the tiles above, if I get rid of the instances, these ones, we make
this invisible. We can see these
are actually below. The spike ball
will appear above. Now what we can do on our
instance layer is double click this and you'll see
we have the variables. This is where we can start editing using the
pencil like on here. We can change this,
for example, to 32. Likewise, we can change
the speed to six. It does a lot of
things by default, but you can automatically
adjust them. That would therefore make it more varying as you go along. So you can have a
row of them with different lengths,
different speeds, different delays that it's one thing to bear
in mind as well. Actually, a slight
error in the code. We shouldn't do plus plus 16. We do plus equals when
we're adding something, relatively speaking,
it's plus equals. If we want to add
one to a variable, plus equals one, I realize
a typo I put plus. We learn while we're here. I did change x position to x. I did not change the y
position to start again. It's just about making sure you're checking over your
code before you run things, just to make sure everything
is going to work as we expect, as we can see. Now, this is going to look
a bit peculiar because this is over this layer here, actually, this should be on top of the spike ball or
other view of the ward. The spike ball should
be on top of this pipe. We can fix this by
simply going in and checking what depth
the tile layer is. Now the way we check this is
if I just move my face up the way that depth is
equal to zero face back. What we're going to do
here is we're going into the creative event
of our Spike books. And we're going to set the
depth just to minus one. Now we don't want
to make sure that other things are
top or below it, so we need to make
sure that the open level and closed level
is still on top. When you're changing
depths manually, it can affect things if you've got things like
a control instance, the control object which has all the other aspects to
it that can affect it. Because that will then be on top if we have
it set too high. For example, if I set
the depth of this to say -1,000 we should therefore start to see it'll actually appear on top of the opening
level transition. As you can see at -1,000
it's on top of that layer. We need to set it to one.
We need to be cautious, how we're adjusting depths
manually. Now here we have it. We have a spike
player. Spike ball. A nasty little creature, but thankfully
he's very high up, but he's not going to hit us. However, this is where
the variables come in. Let's set the max
speed to three, let's set the length to 128, let's set it much longer. And this is where we have
the variance going on. Now we're going to
see a much slower, but much bigger spike ball. Look at that. Much
more menacing. In fact, probably to menacing, Let's set it to 90. It's all about trial and error, as I always say, when it
comes to things like this. Just try different things
and see what fits here. We see very menacing
looking spike ball. Now we don't want
to run into that, or rather it doesn't matter because we haven't
programmed a death sequence. But this is very easy
because we already have an event for the
death, the death sequence. If we go into our player,
you can see here, we'll act the same way as if it's in collision
with a spike. All we need to do here
is duplicate this event and change
it to collision. Now it will be collision
with the spike box because you remember what we're actually drawing
is the spike ball. The box is just an x and y representation of
where it starts. Now when we collide, we, we do there, we have an interesting new enemy that we can use in our game. We're going to do a few more
enemies, not just enemies. But we're going to do a
few more little tips and tricks like keys and locks and platforms that change just to bring our game a
little bit more to life. Once we've done
that, we'll start closing off of some sounds and music and a menu screen and
we'll have a full game. So stay tuned for that.
17. Integrating Keys and Locks in Level Design: Welcome back to Gamemaker
to D Platform A Workshop. Welcome back. Now in
their last lesson, we made a new enemy. A little spiky ball. Which is all well and fun. But we also need some more
obstacles in our game. Obstacles are inherently
important to just make the game feel a bit more alive and a bit
more interesting. And what better obstacle than
the classic key and lock. So of course, with a key unlock, there are different
things we can do. But it works the same way. You gather the keys and
then the locks unlock. Now of course, you can vary this with different
colors, different types, but we're just going
to go for a very simple key and lock system here. So first things first,
we're going to go with key, which is the key object, we're going to assign
that the sprite key. Now what we do with this one is very similar to what we did here where we want a nice
hover up and down effect. And we're going to
achieve this simply by copying and pasting. We're also going to make sure
that we have a lop effect. We're also going to
do here actually, rather than copy and
paste, we can also just copy and paste
the entire event. As you can see, we write,
click it and paste it. And then here we draw
the same as before. We copy and we paste. And that will give it a nice
hovering or bobbing effect. Likewise, when the
key is destroyed, we will copy that,
paste it here, and we'll create
now the particles. In this case, I think we
will just do the dots. And the reason being, I've
got an idea to show you, which I think is going to make
it stand out a little bit. The key, let's get this color. We double click to go
into our image editor. Grab this color here. Actually let's go for
the Goldie color. I think that's probably better. That is the hex value we need. So we're going to copy that. And that is going to make
particle effects that we want. We're going to paste that here, and we're going to have,
as you can hop over it, you can see a nice goldy color. Likewise, when you
collide with the player, it will destroy nice and simple. We've got ourselves a
little key collectible. Now let's set up the lock. We'll create a new
object called lock. Now the lock is going
to act like a wall or assign it lock sprite. And it'll act in the
same way as our wall. So you can see here
when we go into our wall it's got a pass through wall as a child but we also need this lock as
a child as well. We drag it in here or we
could assign it here. But either way, if
we do, we'll see now it's parent is
the wall object. That means when you
collide with it, it will act the same way as
when you collide with a wall. However, what's going to be
different is our step event. Now our step event, we're
going to do a simple check. And that check is going to be if instance number key equals zero, then instance, nice and simple. And of course, just like we
did before with this one, or indeed with this one up here. We'll take this one,
for example, destroy. We can copy this event,
and we can paste it here. And that will create
a little explosion, a little particle
effect as it were. Let's take the darker
color for this one. Let's take the really dark
color, this one here, and the slightly red color, and we'll take the hex value. We'll copy and paste. We'll miss the OK button, and
then we'll try again. There we go, in our particles,
we will paste it here. Now you'll see it's
the red color. Let's create slightly
less, let's create ten. Now the reason I want to do that is because I have
a script to show you, which I think is going
to be a lot of fun. Now this script is going to
involve a separate object, which we're going to name
for now, split effect. Split effect, what
we want from is lock is for it to just break
apart into separate pieces. And that's going to
be a lot of fun and a different effect because really effects are very
important in games. We want them to feel a bit more static and
a bit more alive. So we're going to set
some values first. We're going to do
fade and offset. I'll explain what
offset does later, but fade is going to
dictate whether or not the object has been assigned
to a value true or false. And if it's true, it will fade. We're setting the
speed value to zero, also setting the image alpha
to be slightly random. The alarm first alarm
will eight plus, let's say random ten. Actually, let's make it
a bit longer because this alarm going to be alarm zero event will
dictate that fatal become true. Actually, let's make it eight. Let's see how it looks and
we can adjust it after alarm one was set to one. The reason we need to do that
is because in alarm one, we're going to start setting
up some different effects. But we need the objects
to all exist first. And I'll explain
what that means. We have a slight delay
of just a single frame. Now, let's first of all work with that
alarm event so I can explain what I mean in alarm
one, what we're going to do. Is set, we have a
variable called split. What you'll notice is
I haven't set it here because I'm going to arrange a script that will set it up. If split equals zero
direction equals, we're going to
randomize it a bit. Random, 120 plus 30. Let's do that. We use
control D. Duplicate the line 12.3 and we'll want them going in
different directions. This is going to create
four separate objects that go in a random direction. We're also going to use the offset value that
we set earlier. Offset equals and that is
going to be sprite get width. That will be sprite
split over two. Now the sprite split that again is a value we're
going to set in advance. That's something we're going
to use our script for. We can use a script to define these variables as it's the first thing
that is called. If we create an object in a script and assign
it variables, it will assign them
and then in the alarm, it will then adjust them depending on what
sprite we choose. Because we want to save this
effect for multiple reasons, we want it to split apart, this is how we're
going to achieve that. Then also, if split equals zero, then x minus equals offset, Y minus equals offset. This is basically because
we're using the middle origin. So we need to get the
sprite width and we need to adjust it accordingly so that they're not all
in the same place. Because we wanted to look
authentic when it splits apart, but we're all just
crunched together, if that makes sense here, we're going to just do X
minus offset if split is one, if split two, if split is one, Y minus offset, and if split is two X or
minus the offset, basically this will
just adjust it so that it's all in place and then
it will crumble apart. That is our alarm event set up. Just to add a little flavor, let's do image angle. Let's say minus ten
plus random 20. We'll also need
to set the speed. Speed equals two plus, let's say two plus random. We don't want it to
look two different, let's say plus 0.2 Now we'll
go into our drawer event, and this is where all
the magic takes place. We want to draw
part of a sprite. We've been setting
up the variables. We need some local tavisvent
variables x and y L, and I'll show you what they are. Now, if split equals zero, then x L and Y L will
equal zero as well, because that's going to
be the top left corner. Then what we'll do is duplicate it's 12.3 so that will be the top
right hand side. So this will set it to offset, which if you remember, is
half of the sprite width. If it's two, then
it's the left corner. We want the y value
to equal offset. If it's three, it's going to
be the bottom right corner. They're both going
to equal the offset. Again, like I say, this is
half the width of the sprite. Now we draw it, sprite. What we need to do is general. We're going to do sprite split. Now this is a variable,
again that will be defined in the script which
will show you shortly. Actually, we can do image index, it
doesn't really matter. Now, the X and Y position, that is not what's come up here. If you look here, it's
actually left and top. That is part of the
sprite we're drawing, we're drawing it from
that offset value. Then the amount the
width will be, again, half sprite width,
which you've defined as of offset and offset.
Level width and height. X and Y will be x and y. Image scale and
image y scale will be the same as well
as image angle. Because we do adjust
that slightly, we can also x, y. We, we can also the same
script, a variable color. A bit of color from each corner. That's what, 12 and 3.44 if you want to say a bit of a
gradient going through, it can look quite interesting. But we're not going
to need it because we're just going to do
the split of each one. Now, this all might seem quite confusing,
but that's okay. It's all going to
fall into place when we call upon the scripts. We're going to create
a new script split. Actually, let's call it
split effect because that's going to make more sense. Let's go with split effect. Let's make some scripts. Now you'll notice a function automatically renames itself. That is quite handy.
It's a good thing to do. We're going to change this split effect
sprite, the x and the y. What we're also going to do here is predefine these variables. We do this by putting it
in the function name, underscore x, underscore y, we're doing underscore so we don't collide with
any other values, variables that might be
predefined and underscore sprite. Now we're going to
use a four loop. You remember in the
last lesson we used one of these four variable y, I actually not one. I equals 02 is less than four. In other words, if
I is 012 or three, then we're going to increment
by one and repeat the loop. That's how a fall works. It's what we're setting. What will be condition
is to end the loop and what we do when
we repeat the loop. Now this is where we do with
instance, create depth. These are the variables
we've underscored earlier. Might say depth minus
two, so it stands out. And we're going to
do split effect. This is the object
we're creating here. When we case a instance, create a width statement, what we're doing is we're
creating this instance. And everything inside
this width statement will carry forward onto the
newly created instance. And this is where
we actually want to put the variables that we've already used but haven't
defined. Sprite split. That is going to be underscore sprite which we're
going to define when we call the script split is
going to equal I value, but we're incrementing
here 123,012.3 because we start
counting from zero. Now when we call upon this,
it's going to underline. Why is that underlined it? Yeah, it's just trying
to look out for us. Gammek has a useful
feature called feather where it tries to predict
what you're doing. And if it detects you've named variables in
a different way, it's going to say, hey,
you mean to do that? We are meant to do
that, it's fine. Now this is where we actually
call upon this script. So all we need to do now is
do sprite split underscore. I didn't underscore
it, actually. I didn't call it sprite split, I called it split effect. You'll see there, it'll start to auto fill what it suspects. You're going to put,
we're going to put x, y and the sprite lock and
that's going to create that. We also want to then
destroy the actual lock. Are not image destroy,
instance destroy. It will try to autofill which in most cases
is quite useful. But now we can put
in this level levels already looking pretty full that we'll do some different
levels as time goes by. This is just our test, as it were, we can start putting
in these locks and keys. So let's start by
putting in the locks. The keys, again, to be
quite big and obvious. We want that, we want it to be very clearly big old coins. Actually, before we test it, just so we've got a bit
of maneuverability, let's set the battery pate a bit higher because I set it
quite low to test it. Now let's put in the lock. So first of all,
we'll want them here just to make sure we
can move on them. And then we'll also put them here just to make sure we
can't get past this barrier. What we should find now is
the keys they will act as. You do have a slight error here on the split effect script. This is interesting, it
is an unexpected symbol. And see if you can
spot it before I can. It's on line seven.
Ah, there we go. That's not a comma,
that is a semicolon, We learn right now. We have some locks
and some keys. We've got that
one. Got that one. Would you look at that now? They're not fading away. I
don't believe in the lock, actually, in the split effect, there's what I was missing. What we need here is for
it to fade away properly. That's simple. We go to our step event within
the split effect object. If f equals true, the image alpha minus
equals 0.1 It reduces the transparency
if the image alpha is less than zero
and destroy it. Simple as that. It's
all well and good, triggering the
transparency to fade. But if we don't actually
have a command to do so, then it wait. Now, here we go. Elect the keys till
Spiky Boy gets away. But you look at that,
a split effect, to go with our locks
being destroyed. I think that looks very pretty. We've learned a new effect which we can use
in future lessons. We've also managed to make a nice lock and key system which we can use in
future levels as well. It's all starting
to come together. We've got different
things we can add in different lessons. So for example, we can
consider a retracting spikes. Retracting blocks, there are different things we can do
to bring our game to life, and we're going to explore them in the next lesson. So
stay tuned for that.
18. Crafting Retractable Spikes A Design Guide: Welcome back to Gamemaker
two D platform, a Workshop. In this lesson, I'm
going to show you how to do some
retracting spikes. They can add a different
level of challenge to the game by making the
spikes appear and disappear. And that's going to be
something we want to do. So let's start by making
our retract spike. Now what we're going
to do here is use the same one we have
here, the top spike. I name these differently, I actually have that's
top and that's bottom. That should be the
other way around. Okay, let's keep consistency
with the object naming. Let's give this
the bottom spike. Slight naming convention
situation there, but we're not going to
worry about that because it still works in
the create event. We're going to define
some variables. Now these variables
we're going to define are going to be retract. That's going to equal
zero and retract. Now you may remember, of course, that we're using t because
we're going to use the Lop, the Lop event while the step event is where
the Lop takes place. And this is going to
be retract equals p, then retract Targ, then 0.2 just to give it
a nice steady effect. We're also going to do
in the step event is set an alarm zero to one. Now the reason being is
because we're going to do what we did before and set
up some variables here. Now this is going to be mode. That's going to be
mode as to whether the spikes are already
up, already down. We're going to add delay. That is going to then go
to how much it will start, how much delay I'll have to start with, and then interval. And that's going to define how quickly they go up and down. Now, of course we want
to define these here, but when we create them, we can always give them
slightly different ones. We'll set some default, zero will be down,
let's say delay. Let's start it at ten
and an interval of 60. Therefore, if we
don't do anything, these will be the
default values. Now with alarm zero
set to one frame in, at one frame in if
mode equals zero, then we're going to set
retract and to zero as well. Actually we'll set it to 16. Retract tug will also equal 16, but they'll only be
called once just to make sure that we set them in the right position to begin with. Therefore, zero means up, zero means up, and
one means down. Now what we'll also
do here is alarm one will equal one plus delay. That will be the
initial delay there. Then in alarm one, we will
set if mode equals one, then mode equals zero, else mode equals one. This will just alternate
it back and forth. From there, we'll set alarm
one to the interval that will then make sure that it
will reset the alarm so that every time it will go up and down
with consistency. Now what we'll need to do
here is make sure that we set the target if as we said here in the alarm mode equals one, we'll take this. What we'll do instead is we
won't set retract value, just the target value. We want it to be zero being
up and one being down. We'll make a comment
of that so we can keep track one equals the spikes
are up, all they're down. That would therefore mean that when the target is set to 16, it's actually know
I'll be the other way round one equals P
and zero equals down. The reason being, we'll take the drawer event,
we'll draw the spikes. What we'll do as well,
because the spikes are going to be on the
instance layer. What we want them
to do is make sure that if we remove the
instance layer here, these tiles below, we want
them to fit behind the tiles. The depth would actually be 200. We want to be, let's set the depth to, let's make sure it's below
that depth equals layer get depth and it will be tiles
below then plus one, so it will be slightly
below that layer. Now here's where the
fun part comes in. If the sprite index
equals spike bottom, we're going to draw the sprite, sprite index, image index. And the exposition here. Exposition is going
to stay the same. The y position is
going to be y plus the retract value if
the one will be up. And then what we want
to do is make sure that when they retract
it will go down. It'll add that amount. Now the reason we've done if sprite index is because
we're going to copy this and do it a few more times for the
other sprite indexes. The reason being we're going
to do some parent objects, you may remember them
from previous lesson. In this case it's going to
retract up into the wall. If it's like this, if it's
to the right hand side, then when the retract
value is plus 16, we want it to go forward. We don't want anything to
add to the y value here. We'll do minus retract, and we'll do that as well here. Therefore, it will be adding or subtracting that value
to its y position. Now what we can do is create a new object with this object. We will call it
retract, spike bottom. We'll give it the other value. Really should have aligned
these names, but that's okay. What we'll do here is a sign it, this is the parent object and therefore everything
will be copied across. Likewise, we're
going to do the same control D, or duplicates, and we're going to make
sure that they all have different spikes
but the same actions. This one will be our left spike, then this one here will
be our right spike. Now we're going to do
some testing just to make sure in case we've got any
values the wrong way round. But this should therefore make a nice retracting
spike in this case. Let's put our instance back on. Let's get rid of this
from our last one. Let's try some retracting
spikes and see how that looks. I'm going to try a
few different ones. I'm going to see how that looks. Now as we've already defined these variables in
the variable object, we can go in here
and adjust them. Let's adjust this mode one. Let's add the delay
at 30 on this one, then 140 on this, 1.1 50 on this one. We should see a bit of a
variety coming out from that. What we'll do as well
is we will also add one of each so that we can be sure that they're all
working the way they should. Let's try these ones, and let's try some
top ones here now. Should therefore give us
a better understanding as to if these spikes
are going to work. At the moment they won't
actually do us any damage. But at least we've got
a slight error there in the event we attract spike
event. What have we done here? Let's see if we can find
out very common mistake. We haven't actually
closed off the brackets, but this is a good
thing about gamemaker. It will tell you if
you've made some errors. I hope you've been
able to follow along, because now we're
going to see if this is going to look good. There we have it. So we can see the spikes
appear and disappear. Of course, at the moment
they don't do anything, but that's a good start. Okay, now what we need to do
is make sure that when you collide with this spike
and its children, you will same as any
other spike, die. However, the difference
here is we're going to put this collision event
in the spike itself. The reason being is we're going
to use the retract value. What we're going to do is
if retract is larger than, let's say less than two, that gives you an opportunity when the spike is still emerging to escape from it rising
up before it kills you. Just a little leeway to
make the game feel a bit better then with other. The other in this
case is the O player. We're going to do
event user zero, which you'll remember is
the death sequence event. Now what you'll find is when
we actually run the game, you should have some level
of leeway where you can actually get in front of a
spike when it's retracted. Then when it comes out
enough it will kill you. It'll come up, you get out
of its way and you're fine. However, if you stay too
long, you get spiked. Very simple sequence there. And that will add a lot more
variety to our gameplay. Next, we'll do some disappearing
reappearing blocks. And that will be, again, a different element
of challenge that should bring us to a decent
amount of challenge. But we can start designing
some levels around it, so stay tuned for that. And then we'll start
to add some music, some sound effects,
and a menu screen. And we'll have ourselves
a complete game. So stay tuned for that lesson.
19. Creating Vanishing Blocks for Dynamic Gameplay: Welcome back to Gamemaker
Two D Platform Workshop. In the last lesson, we
looked at retracting spikes. In this lesson, we're
going to look at boxes that appear and disappear. This will have a very
similar platforming element. We're going to call
it an appear box. We've already got some
spikes ready for it. And this is just
going to add again, a different level of nuanced challenge to the platforming. Similarly, we're going to have some variables defined here. We're going to start with mode. I'll be defining whether it's
arriving or disappearing. Or arrived and disappeared. Then we'll have the value delay which will set as a default ten. Again, this can add a bit of delay to it, so it
can go in a row. If you add a different or if you want them coming and
going at different times. Again, interval, let's set
that to 120, actually 180. Let's give them a bit more time. Now what we're going to do
here is set the first alarm, alarm zero to delay. Then we're also going to set, once the alarm has been set, the alarm again, alarm zero. This time that'll go and
redo the alarm two interval. Now, in this case, we
have the mode values. If mode equals one, then mode equals zero, L mode equals one. This was 1-0 Now if we have zero being up
and one being not, If mode equals zero, actually let's put this in the step events because then
we are always updating it. This will save us
doing it twice. If mode equals zero, what we'll do, we'll
set the x, the 9999. Then if mode equals one, then then x equals x start. What we want to do here
is make sure we are drawing always at
the X start and y start position y position here. The appear box out, We're always drawing that first. Now the reason being is that
will be that is sprite here, this one we want that
to always be showing. Then on top of it, we will draw actually if we borrow
from before our effect, we can have a nice
little effect. Let's borrow the, put them here, let's rename them to
pop and pop target. The pop and pop, just to
make it a bit easier. You'll see why we're
doing this in a bit, but what we want to do is if we say that we change to pop, what we now need to do is
draw the sprite itself. It will go for the draw sprite, but this time Xt extended
for more options. This will be S a per box in. Now, this will be
also the submdero, this will be the position, the current position,
and y start. Now here is where the
interesting part will be, because it will be one
plus pop in the same here, what we need to do is set a
color to rotation to zero. See white of a color because
we're not blending it. And one is the alpha,
full transparency. Now when we actually
change the alarm, rather than just zero to one, if it's at zero, it's not going to be
on screen one, it is. When we change it to one, we will also do is set pop to 0.2 Now we'll see
how that looks, but what we can see here is
that when it's set to one, it will be back at
its start position. It'll have a pop
when it appears. Now that will give it
a nice popping effect, and it'll look quite interesting as a bit of an extra challenge. Let's see how that looks now. Should have a nice
little pop effect, but when it appears and then
it will disappear again. Let's see, you see it goes, and then the pops into effect. Now that'll add some
challenge there, because then what will happen is it'll have a moment where
the blocks will appear, you'll have to race across
them, and then it'll run out. Now of course, we can
adjust this as well, so we can make it as though it appears to be
flashing before it goes, but for now, that'll be okay. We can change things
up as we go along, but for now we've got a lovely little pop effect
when it appears. And that looks quite
fun at the moment, though, it doesn't do anything. What we need to do is, if you remember our
pass through walls, we're actually going to. Use this as the parent, then it will be a parent
of a different parent. So the child here will
be the appeal box. Now where we've
already added events here in the step event
you look at the parent, it is still the
pass through wall. However, we also want
event inherited. What we also want
to do is change, it is a Y start
because the Y value, if you remember changes for
the pass through block, we want to keep it,
we don't want to fall into a spikes on screen. Okay, now we can
pass through it. When it's here it will
act like a solid wall. There we go, It's a solid walls, but this will prevent us getting caught until
we're on top of it. We've just won the
level, nice and easy. Actually, we noticed
a slight issue. There should only happen if
there is no computer chips. We noticed a slight issue. We shouldn't have been
able to complete the level there where we actually
initiate the ending sequence. Here we only check if there's
more than one player. We don't actually
check if there's no computer chips available. We've learned a
slight little bug. We've fixed a little bug, and we've made these blocks
appear and disappear. There we go. Now we don't just randomly complete the level. Also an effective thing
to notice what that does there is create a block appear
and disappear at random. Well, not at random, it'll
be at intervals you set. But you will learn that
I can pass through. Now that's all part
of the challenge. We want to be able to go
through it a set times there. We have it as simple as that. Therefore, that acts
like a solid platform, right up until the point when it disappears and it's
suddenly maneuverable. That adds a little extra
platforming challenge. It's important to add
different elements of the platform challenge because that's only
going to make it more interesting when
we design more levels. At the moment, the level we
have here is a bit of a mess. But that's not a problem for the long term because this
is just our playground. This is how we're going
to test things out. What we'll actually do next is start designing some levels. I'm going to go over some tips and tricks about level design that you need to
be aware of when you're putting your
levels together. Then, as mentioned
in the last lessons, it's just a case of
putting sounds Music and a menu screen together and we
have ourselves a full game. So stay tuned for that and I'll see you in
the next lesson.
20. Sound Design in Game Maker Adding Depth: Welcome back to Gamemaker
two D platform, a workshop. In this lesson, we're
going to be looking at importing sounds
into our game. Sounds are, of course,
very important, makes our game come alive. The game without sound really
just isn't the same thing. So we're going to start
by importing sounds. Now, importing a sound
is very, very easy. I have here some sounds I already wish to
use in this game, and I have preemptively
named them. As you can see, I've
called the music files followed by main for
the level and menu for the music and for so. Again, it's important to
stick to naming conventions because that's
going to make it a lot easier in the long run. We want to refer to the
asset names in our code. First things first, we're going to take the sounds as you see, I've selected them there and
we're just going to them in. Now we're going to drop them
into the Sounds folder, handily provided for us. However, it doesn't really
matter where we import them, as long as they're in the game. And you'll see here we have some sounds and what we can do is we can hit play. Quite funky. We've got a good
selection going on here. There's a few good sounds here. Now if you're looking for sounds, especially
sound effects, it's important to understand when you want to create sounds, you want to create them
for a certain effect, certain style of game
you're going for. I've gone for very retro
sounds because we're making an eight bit
retro style game. However, it's
important just like your sprites and imagery, but it all fits a
consistent theme. Now there are
different varieties. You can actually
record something. You can record it yourself. You can also use, I use use something here
called Chip Tone by SFB Games. Now this is a handy
free to use device. Well, it's an online tool, but you can also download it and it creates a variety
of sound effects. You have a lot of
different styles and ways you can modify them. And then you can save them as WAV format and drag
them into your games. That is very handy to use
when it comes to music. If you're not so musically
talented, like I'm not, then you can look at someone who is and ask them to help
you as I've done in the past. Or you can use a
variety of royalty free, copyright free sounds. It is very important however, but you realize what you're
using is copyright free. The author, if it is free, music, is allowing
you to use it. Now if you're looking
for music in a game, it's recommended to
find music but loops. So what I mean by this
is music that's going to reach the end and
then continue to play. So if I preview this looped, an option a gamemaker has, we should notice no difference between when this ends
and starts again. It should be
seamless, like that. If Music has an obvious
start and end point, it's going to sound very different when you're
actually playing the game. And you will notice when you
listen to it over and over, of course there are
different options you can do to have a looping section
and a start and end. That requires a little
bit more complexity that we're not going to
go to in these lessons. But ideally, we want to just find something that
loops and as I say, make sure it's copyright free
and royalty free to use. And make sure if the
original for wants credit that we do so
appropriately in our games. Because again, it can be very
disrespectful if we don't. With that in mind,
we're going to go to our controller and we're
going to set up a variable. Now this is going to be
global Sound And it's going to be set to 11 for
true, zero for false. We can also use the word
true in this context, it doesn't make a
lot of difference. Now, the reason we set up a
global variable is because we want it to affect
throughout the entire game. Global variables are consistent
throughout your game. Now at the moment we're going to put it in
the controller. However, we're going
to add to move it to menu when menu
controller is ready. The reason we do that, and that is going to be for
another lesson, setting up the main menu screen. We don't want to reset
this to true every time, because we want to give players the option to turn
the sound on or off. Some players when
playing like to have it on mute for
their own reasons. And that's fine, so we're going to do it for
me. Option two. However, because we don't have a menu controller just yet, we're going to set to one in
the main controller object, which if you'll remember
in our level is here. This is the default placeholder for when something
doesn't have a sprite. You'll see it is the
controller object. And we're just
going to make sure that we have one in every room. But we're not going to
worry about that for now, because for now we're going
to be setting up a script. Now this is a script I like to use whenever I'm
actually making sound. And the reason is I
actually created a sound, let's not worry about that. Let's create a script
as we actually planned. Now I'm going to call
this audio underscore P. Now the reason
I'm going to call this audio SP is because it's a script that will do
some shifting in pitch. We have the sound file, the initial pitch and
the pitch variance. The parameters, so initial pitch and pitch variance are here. Now what we're
going to do is set up these variables
inside the function. We do that by putting it
in the brackets here, and we're going to
underscore underscore it and then underscore pitch. Now these variables are going to be taken in whenever
we call the script. A script is going to ask
for three arguments, sound pitch and initial pitch. We're going to do
audio sound pitch. The index of this is going
to be the sound we select. Then what we're going
to do here is take the initial pitch and then we're going to take
away pitch over two, half of the pitch
that in brackets. And then add random itch
that is going to add, say for example the pitch
variance is 0.2 It'll take away 0.1 and add 0.2 at random and set it
around that initial pitch. The reason being that
this way we have when we collect an item
and it makes a sound, a slightly differing noise each time it adds
a bit of variety. And it makes it sound a
little bit more interesting. Rather than just the
same consistent di, di, di, di, di, di, it'll add a bit of variety, and variety makes it
sound more alive. Now this is where the
global variable comes in. If global sound equals one, we're going to then do
the playing of the sound, which is audio play
sound underscore Sound. Now we have here some priority. The priority is going to be one. In reality, it doesn't matter what you set
the priority to. There are very few instances
where this comes in useful looping as zero or false. Again, it doesn't make any
difference which one we do, but this is because we
don't want it to loop. We wanted to just play it once. Now we can also
set up our music. And we're going to do
this in the controller, in the step event, every frame. We're going to first of all, do audio stop Sound menu. Now we're only
going to need to do this if a menu Music is playing. If audio is playing MU menu, then audio stop Sound
The next thing, and we put the
exclamation point here. If audio is not playing U main, then we're going to
audio play Sound. And this is going to
be main priority zero. And this time we
want it to loop. This means when we come from the menu that we
create in future, it's going to stop
playing the menu. Music And start
playing the main game. Music However, all
of this will be, or at least when we
actually instruct it, if global, so actually
we'll do it here, we'll do it inside this
global sound equals one. That way it's also
going to check if the music is not playing
and the sound is on, we're going to play
the main music. Now with the script
we've just done, we've got a few sound effects
that we want to implement. These are all sounds that
I've implemented here. I've imported them here
in our deaf sequence. We're going to do audio SP. The script we've created
and this is going to be dead initial pitch one. Let's add some 0.2 variants. Let's also do the same when
we have a computer chip. Here we have S N computer chip. Let's add a little bit
more variance to this. Let's back to 0.3 just so we
had a bit more sound to it. Then we can also do some
different sound effects. Let's say for example, the battery dying, we have
a sound effect for that. What I would recommend is if you do think about the sounds, it's good to get a checklist going on the types
of sound you want. Then of course, we can always change that as time goes on. Here we look for now we commented out earlier
as where we would put for the jumping. Let's put that in a jump. Again, we're going to add a little variance. It's
different each time. Like I said, if you
have a checklist going, you can check it off
as you go along. We fall off the stage.
That one is down here. Actually, if the
battery is zero, what we'll do here actually
with the death sequence, that will automatically
destroy us anyway. Audio SP battery did. We're not going to add
much variance to that. It doesn't happen too often. Let's also look at,
say for example, if we fall off screen, we're going to add
that one in here. I call that N41 0.2 and I'll add a semi colon to indicate this is the next thing
we want it to do. We'll also do the
same for if we get, for example, the key item. This one again will be audio SP. Now we need to be careful when we're putting these in that we're not continuously playing
the sound over and over, especially when we're
putting it in step events. We need to make
sure that they're meeting conditions in which they don't repeat and
play multiple times. What we also need to do
is when the lock here, if instance number,
object key equals zero incidence destroy, we can. Now, this is going
to be interesting because if we play the
sound multiple times, then that's going to set off magnitudes of
the same sound. Rather than do that, we want
it to only appear once. The best way I can think to do that is if we go
into the controller. What we can do here is
set up a local variable, unlock Sound equals false. Now if instance number we're going to do lock. If we say that is equal
to zero at the start, then we'll set that true. Now in the step event
that equals false, instance number k equals zero, then we're going
to set it to true and play the sound
effect this way. What we're doing is we're
setting this sound effect to only happen once at
the same magnitude, because otherwise if we
have ten keys to unlock, or rather ten lock boxes, they will play it ten times
as loud as if we just had one case where we're actually wrapping it up
inside the control event. This is only being
triggered once, no matter how many times
that object gets destroyed. Then of course, when
we reset the ring, the same thing
will happen again, the variable will reset. Now if we look at our exit exit, this is also checking here to
actually make it available. Again, we're going to do
sound play equals false. Then in the step event here, we're checking to
create the particles. If sound play does equal false, then this is where we talk about making sure in the step event
we're not repeating it. We'll set sound play to true, and then we will play the sound, or when the exit is open. Now when we go to check, because we've already
set that to true, it won't play at
every single frame, which will get
extremely annoying. Likewise here in this
collision event, we will create the
wind bar here. What we will do
actually if instance number actually this actually only the once I believe,
but just to be safe. Now what we can see here is
if instance number equals, then it destroys the, or not equal to zero
destroys the player. Anything inside this will
only play once again. It's ensuring in a
step event that we're only making sure we're
playing this sound once. Now if we play this, we should notice our game will
have some sounds. Now what we do,
notice there actually is the jump noise is
playing multiple times. Let's find out why that is. What we can do
here. We can check if audio is playing and jump,
or rather if it is not. We do that by putting an
exclamation point here. Then we program
the spit in again, this is where it's been
playing multiple times. It's doing a relay effect.
And we don't want that. We want it to play just
the once, there we go. We have sound. You see how
much more alive that feels. Now we've got sound. We have now got music. We have now got a
variety of enemies. No levels yet, but we can always do level
design at some point. All that's left now is a
menu screen and of course, a game over screen for
when you reach the end. I think that will wrap it out
for today, but stay tuned. The next lesson where we will cover doing the menu screen. Just as a side note, I had noticed during
recording that the sound effects did
not record correctly. So I will just put some
footage in here to show you what the game sounds like with the sounds as intended.
21. Building a Menu Screen Foundation and Layout: Welcome back to Gamemaker
two D Platform, a Workshop. In the last lesson, we added sound and music vital
parts to our game. However, what's
arguably more important to our game is a title screen. We can't just jump straight
into the game play. So what we're going to do here
is I'm going to introduce you to some new assets that
I've added into this game. And I'm going to show you
how we're going to turn them into a lively
welcome screen. First of all, we have our logo, of course, we've called
the game battery pack. On top of that, we
have a help screen. This is going to
pop up just with some information about
how to play the game, some basics about
what we need to do to start playing again. This will pop up only when we
hover over the Help option. Here are our options. Now you'll notice they're all on one sprite because our menu, our title screen,
is all going to operate from a single object. Now we have these
different assets here. And each of these is going
to represent a button. Or in the case of these two, they're going to represent
the mute and unmute options. What we have here is a new room. A room I created
called our menu. Now this is very similar to the room we've created
for the levels. However, there are no instances
or objects, if you will. That's because we're
going to create some. You'll notice our menu is here, but this little home icon
is still over level one. This is because that is
still the first room. However, if we click here, you'll have the room
manager and you will have the option to re,
order the rooms. We're going to put our
menu as the first room. Now if we run this simply as is, you'll find we don't really have a lot going on at
the moment because we haven't actually put
the actual menu item in. We have new object in, we just have a nice
opening screen. Now this looks quite pretty, but we want something to happen. We're going to start
with a new object, we're going to
create this object, and it is going to be
called Menu Control. If we do menu control now the menu control is going to do a lot of different things. It's going to show the logo. It's going to, most
importantly, set up a sound. Because if you
remember previously, we already set up a sound
in our creative event, but we want global sound
to equal one for true. Now let's go into our
controller object and just remove where we've
set that up here because we don't want
this to override. Move to menu control
when that's ready. That is going to
be ready. We don't want that value to override, especially if in the menu our player decides to
play the game on mute. We're going to set
up some variables. Can sell as can you select
what you want to do. M Sell. Now that's
the menu select. And we're going to
start at Zero logo and we're going to set
that to -300 each. Now you're a member of the S, and typically we use them
for Show and Target, which means we're going
to use our favorite Lup. We're going to do menu options. Now this is how many
menu options there are. We're going to set this
to five because we have five Play Help Sound Website, because you always want
to link your website in the game if you can, and exit. Now we're going to
do an array now M show and we're going
to do array create. Now the reason we want to create an array, it's like a database. It's like having multiple values stored under the
same variable name. This is going to be
where the menu shows. It's going to be the amount of menu options is how many
we're going to create. I'm going to start with -200
as the value for all of them were show and M show. Now we're also going to do
M in an inflate effect. Again, this is going to be array create with the amount
of menu options. And we're going to
set this one to zero, not mine zero, there we go. And our favorite control
D to duplicate the line. And we're going
to do for Target, we're also going to do the
next one which is Appear. And that's going to
equal minus one. Now that's going to show which menu option is going to appear. Because an important
part of game design, in my opinion, at least
nothing should just be there. Something should just appear. Things need to make
their way onto screen. That's free fade effects
or in this case fue, bouncing in off of the
edge of the screen. Going to set two
alarms, The first one is going to set
for half a second, and that's for the
logo appearing. The next one, we're going to set one alarm 160 and will
be options loading. The first one that is
going to be alarm zero. Now what we're going
to do with this one is we're going to set this for
the logo appearing this, you remember we set logo
that is going to equal zero. Likewise, then we're going
to do our menu options. Now menu options is going to
work slightly differently. What this moment is
going to do is make M appear plus equal one. That's going to set menu
appear option up one. And then the M show
the target for that, for the current MPA value
is going to equal zero. That will gradually set
each 11 by one to zero. Now if MP does not equal the amount of
menu options minus one, that'll basically reset
the alarm and up it again. So I'll set that to
say 20 else if it does then we're going to set can
sell to true, say right. All the options have appeared. Now we can start selecting them. Here is where it all comes into play because this
is our step event. In our step event, we're going
to put in the following. First of all, we're going
to do our Lop Effects logo equals P logo and logo. We're going to do that at 0.1 so that means our menu
is going to appear. Now here we're going to
do some overflow states. This is basically
to make sure we don't select something we can't. If M cell equals menu options as in it's
gone over how many we have, then it's going
to start at zero. The reason it is at
menu options is because variables always start and
count from zero the next one, If M cell equals minus one, as in we've gone too far
left on the menu options, then M cell equals menu options minus
one to reset it back. Now the main menu
inflate effects. The inflation effect is going to work through a four loop. We're going to start with
a variable equaling zero. Then if I is larger than
menu options value, then what we're going
to do is stop the loop. We're going to increment by one per iteration of this loop. And this is where
the inflation is. M show is in the ones for
at the moment will be lop, that is going to
be M show I again, and M show the
target effect again, we're going to set that to 0.1 What we're also going to do is the same
for our inflation effects. This will basically
ensure that each of these is looped
through multiple times. And we're going to do
that to make sure that the Lop effect is going to
show up for all of them. It's also going to inflate and deflate when the
menu is selected. Next thing we need to do is
our main menu selection. Now this is where all happens. This is where
everything takes place. So cancel equals true. And this is where we're going to start checking for keyboards. For keyboard input we need
if keyboard check pressed. And this is going to
be the first one, ORD Ord, capital letter A. That is going to then
make sure that if we select the capital letter A, now I don't know why, but it does have
to be a capital. However, if you do
press A on its own, it's still going to work. We're also going to
count left, basically. If we press left or
we press the option, then what's that going to do? That M cell, the option
we have selected, it's going to be minus one. Now again, control D to duplicate this line and
we're going to do the same but with the
letter D or K. Right? Now what we're going to do
here changes to VK, right? We're going to have
M cell go up by one. Now if we close that there, you'll see we have ourselves a fully
functioning selection. Actually, we've
already closed off. When you hover over
the closed brackets, you'll see that it shows you which ones that
is encompassing. No, that is all inside the all inside the
condition of the cell. If can sell equals true. Also while we're here,
we're going to do audio SP. What we have is S, N menu
select or menu navigation even. We're going to do
the pitch as one and the variation at 0.2 Again, we want to make
sure we're playing some sound that's going to be important for the right option. For the left, we'll
make it a slightly lower tone just to add
some effect to that. Then what we're doing is we're making sure that those options, if they're selected, then it will basically go left
or right accordingly. Now we actually
have the main menu. Again, we're going to use
if cancel equals true. For this one, what
we're going to do is start putting in
our main options. We're going to order it
like zero equals play. One equals the Help option, two equals Sound three
equals the website address, and four will equal it. This is basically
going to now check if keyboard check press. There's a few different things we want to incorporate
as many options. People will either
press space or the press, for example, Enter. We don't want to
make people feel like they're pressing
the wrong thing. We're giving people
the option here. So if either of
those are pressed, we're going to begin our
main selection process. So we've encompassed this
in a gigantic if statement. And now we can start
doing the following, but we're going to
pause right there. Join me again in part two, where now that the
menu is set up, we're going to put
it all together.
22. Completing the Menu Visual and Functional Elements: Welcome back to Gamemaker
two D platform, a Workshop. In the second part, we're going to continue
what we started in the first part and put our new title and
menu screen together. First, if M sell equals zero, as in the play option, then we're going to
do sell equals false. Now the reason we want
that to happen is because we don't want someone
to select multiple things. We're going to do
menu select at one. The next thing we're going to do is now you
remember we did have the effect to go to the next
level. The way we did this. If you remember from
our player object interacting with, was
it the player object? I believe it was actually
at the wind player. Now what we actually did
here is we set this up so that the t here is going to be our first level
that we're going to set to L autofill level one. Now let's maximize this, so we can see a bit
more what we're doing. Now what you'll see here is that this is still
all encompassed. However we need to
close this off. So that's the first
menu option done. Next one if M cell equals one. Now actually we
won't do if M L cell equals one because that's going to be in our drawer event. We'll go to the next 12. And this is going to be Sound. This is nice and
easy. Basically, if global dot Sound equals true, then global Sound equals false. Nice and easy. Then we're going to incorporate
an F L statement, global sound equals true. And we'll play a little
sound just to confirm, Basically the sound is back on. Nice and simple. Now what we've done
here is we've got this one actually let's make
sure that's encompassed. That is M cell two. Next one, if M
cell equals three. Now we're going to do
this as the website one. Now what we can do
here as well as our audio sound to say we've actually selected
this as well as this, we're going to open up a URL. Now to open up a URL, we do URL extended. Let's say my website. Why not? You can have my website on there
too if you'd like. But we'll also add this
underscore blank on the end. That's just for additional
options that will open it automatically on a new
tab in the browser. Finally, if Ml equals four, and this will be for the exam, is going to be simply game, and closed brackets should
be our menu option. Nay, we have to make sure everything is closed off here. Let's see
where this goes. That encompasses
our keyboard check. This one encompasses
if l equals true, and this one, this is a spare. We'll get rid of
that. There we go. Now that is our main menu. Now what we need to
do is start doing some logo things to make sure the logo appears
and help things, this is if M cell
equals one, then logo, the target for the
logo will equal -300 to make sure
it goes off screen. And that will be important
in our drawing later. Else logo T equals zero and that is going
to be show help. Now with that in mind, our next step actually before
we go to our next step, I should have noticed this needs to have
an opening bracket. Otherwise it's going to
throw some errors at us. Right, Our next step is going to be resetting
The inflation basically mean that it will only show the inflation
of the object, the menu option
that is selected. Again, we're going
to use a four loop and we're going to
do the menu options. So it goes through and cycles through all
the menu options. The good trick to this
then is that we can also add more menu
options as we go along. In this case, we're going to set the menu inflation
target of everything. Basically, set it
all back to zero. Then if M cell is
less than minus one, less than minus one,
as in it's larger than zero and M cell is not
larger than menu options. Basically to make sure
we're in the parameters, then the menu inflation target
of just the one that is selected will equal 0.3 That means a 30% boost on the
one that is selected. Now we have that in mind, we have our draw. The drawer event is where it's all going to come together. We've actually set
up everything. The next step now is to
draw it First things first, we're going to start
by drawing our logo. Sprite Xt. Actually make sure T that
is going to be logo, that we'll put it in the
middle by using room with D two room with will take that value of
how wide the room is. Put it right in the middle. Let's put that at say 96. I think that should do it. Now what we need to
do apart from that is Do 96 and then plus logo, that's going to be
plus zero or plus -300 in some case when the
Help option is selected, just to make sure it
doesn't override, set the rest of them just to
the standard default values. Now if can sell equals true, we're also going to start
drawing the help screen. Now this is going to work
very much the same way, but what we're going to do
here is draw sprite again. This is going to be help screen.
We had that one earlier. It's going to be, I should have added in
there the zero as well. That's the image
index because these are non animated sprites. Again, we're going to
put room width over two. We're going to put this one. Let's, let's put it a
little further down. Let's say it's at 128, Now this is going to be -300 and then plus logo
x, make it show up. And then 110 white, and one again see it
as the default values. You'll see here rotation alpha, that thing that's going
to make our logo up here. Now let's actually draw
the menu set alpha to one, should always be
setting that anyway. In fact, let's move that up. It's good practice to always
have the alpha set to one unless you do anything. Otherwise, we'll always set
it to one before we start. Just in case we have draw set
alpha overriding elsewhere. It will override unless you specify otherwise at
the start of an event. And now it's just a case of
drawing our sound options, not sound options, menu options. Again, draw sprite XT. Actually, let's
maximize this so we can see more of what
we're doing as well. Draw sprite to
first I call menu, it's called button it because I imported sprite menu button. They're all called menu
button. Menu button. Now the sub image here, the first one is
going to be zero. Let's do this at 800224. Now this is going to be
224 minus M. Show zero. It's going to be set to 200. That's going to go off and
it's going to appear on screen here we have one plus, and this is the M inflation.
The menu inflation. So remember we said
it to 0.3 when that is selected.
That's for the scale. Again, we're going
to do it for the X scale and the Y scale, we're going to set that to zero because the arrays
all start at zero. Rotation is going
to be zero color, white and alpha one. Because we're not
adjusting that. That's our play option. Again, we press control
D to duplicate. This is the Help option. Let's move this 80 pixels
along because it's 64 by 64. But we do want to give
them a bit of gap. What we do here is
simply changes to one and this one to one,
and that one to one. Now the next one is going
to be our sound option. Now what we're going
to do here is do two plus global sound, where sound is off,
it's set to zero. And where sound is
on, it's set to one. That'll have a bit
of variation there, so we can adjust
that accordingly. Again to change service is going to be for a
second inflation option, remember there's
five but a raise as with all other
variables. Start at zero. It's going to be 0,123.4 The next option is going to
be the fourth sprite index. That's going to be at 320, so we're facing them out by 80. That's at the third
inflation option. And finally, the fourth one. Again we control D, That's going to be the
fifth image index. Let's do that at 400. There we go. That will
be very nicely there. What we can also do
as well is we can set a fade option
to draw over it. Let's say fade equals one. Let's say alarm two equals, let's say five.
And that's fading. What we can do here is fade to 0.95 And we can do a
little bit of trig here where if fade is
not equal to one, then fade is larger than zero, then we can reduce fade. This will basically make
sure we have a little fade, a value that will start
at one and go to zero. Now here's where we
can add some Trig can do set alpha to fade, set color to black. We can do a draw rectangle. We can do this at 00, room width and room height. We don't want it
to be an outline. And then we set the color
and everything back after white and draw,
set out to one. This is basically going to
encompass the whole thing inside, inside a rectangle. Therefore, we should have
ourselves a nice menu. Let's also take a
keyboard pressed, let's do the letter R just
to do a restart again, this is only for testing, but just to make sure it works, we can restart it afterwards. Now if we hit plate, we should see a menu
option start to appear. Or we've got a slight error
there in our drawer event. Let's have a look at
that, is in draw line 80, we got an error. This is always an
interesting part. Did I forget to close this off? I did, indeed. There we go. That's why it's highlighted, because we forgot to
close off a statement, but we learn now. This has been quite
a lot to take in, but actually we
even play the game. What we actually need
to do now that we have the menu control option,
is we need to place it. If we take our instance
layer and you remember we select the object and we just place it
anywhere in the room, because it's not
dependent on where it is, we can just place it anywhere. Then what we should see is we see many options
start to appear. Actually, slight error here. It's 128 minus and
then whatever's in this worth checking out your maps before you
start doing this. But what we should see to make sure it's working
again, a slight error. When we press on the
right hand side, it should increment by one very important to
make sure we have that. Yes, that was a
slight error there. That should be 300 plus
logo S because logo then becomes 300 when
we have it selected. Actually, I think 128
might be a little high. Let's put that to 96
so we can match with the text with the
vital screen there. We should see a fully working
there we go, look at that. We have ourselves a lovely menu Now we can always dress this up with particle effects
and different things, but this is a very
nice, very simple, easy to use, perfect look at
that and what you will find. We go in and play a serviceable menu screen. Now this has been a slightly longer than lesson than usual. Obviously, there's
been a lot to take in getting a fully
working menu screen, but we're now that much closer
to getting this game done. And we have almost a
fully working game. We are going to need to look at some level design tricks
and tips along the way. And we're going to have a
nice little game over screen. Once you've done all the levels, we'll have a little bit
more tying up to do, and then some tips
and tricks for you to consider for
your own lessons. But now we have a fully
working title screen. So with that in mind, we're
very close to the end. Now we'll have a few
more lessons to cover and I'll see you for
the next lesson.
23. Setting Up an Engaging Game Over Screen: Welcome back to Gamemaker
two D platform, a workshop. So now that we have a full game, at least in theory, I'm going to run through a game over screen. Because a game over screen is really something that just ties the whole package together. Now we're going to be
making a very simple one. What I have here are two. A Game over Death Box
and a game over Tim Box. These are going to
show the time and amount of deaths we had
while playing the game. Now I have actually designed, as you can see here, 15
levels for this game. And I want to talk to you a
bit about level design to make sure that when you are
making levels for your game, they're doing it in a way that introduces and
eases the character into a new concept and so that the player
doesn't feel cheated. But I'm going to tie the game together with a game
over screen first. And once we've done that,
we'll show you the levels. So first things first, in order to track
how many times we've died and how much time it's
taken us to do the level, we're going to set
up some variables. Now we're going to set these
up in the menu controller, because this only occurs at
the very start of the game. If we put it in the
main controller, we're going to be
resetting these back to zero every time we
want it to keep track. To do this, we're going to
be using a global variable. We're going to be using
time M for minutes, time for seconds, and time MS for not milliseconds
but tenths of seconds. We're also going to be using global death, which
sounds pleasant. Now what we can do is if we remember our main player
here as an event, specifically for
the death sequence, we're going to in here just add onto global death
plus equals one. That will increment it by one every single time
the player dies. Now if we go into the
controller object, now this is something that
occurs every single level. But we don't have a lot
here at the moment. We're going to start by
setting an alarm to six. Now the reason we're going
to set an alarm to six is because our game runs
at 60 frames per second. And we want this to tick
every tenth of a second. Now we need to check
if there is a player. If there is, then we go
on to the next step. If that is not equal to zero with what we're going to
do is set a variable. The variable is going to be can tick and we're going
to set that to false. What we're going
to do now is with player if can move equals true. So basically the player
is not going through a death sequence because it seems unfair to
count the time up. During that, then can
tick will equal true. Now once we've
closed all that off, we're going to do
if can tick equals true and we're going to
start counting a part timer. You remember trick tick. There we go. Now remember, the first thing we need to do
is increment global times. We're going to plus equals one. Now if global time
MS equals one tenth, then we're going to do
global times back to zero. We're going to implement
the seconds by one. The same is going to
occur for the minutes. If global time equals
60/62 in a minute, then global time for
minutes or plus equal one. And we're also going to reset
the seconds back to zero, Global dot equals zero. Now you remember we're
going to put a semi colon in between these two commands
to differentiate the two, and we're going to put
them in closed brackets. Now that's going to occur
every one tenth of a second, and then we're going to
reset the alarm back to six. It occurs every one
tenth of a second. That will mean, therefore,
that when we actually run the timer at the
end of the game, we're going to have ourselves
an actual game over screen that displays how long it took us to navigate the levels. In order to do that,
we're going to create a new object, Game Over Control. This is a control object
that specifically applies only into
the Game over room. Which we don't have yet. But we will use our D
control D for our duplicate. That will make our
game over room. Now this is just a blank
template of a level. We're going to disregard
all of this at the moment because we want
the room to be blank. So we're going to get rid
of this and our background. I suppose we can actually have it slightly
spacierow the way we do a slightly spacy but semi transparent is I'll just move
my head out the way here, you can see we have the
color set up for black. Well, for gray, if we
set this up to be black, we can also set a
transparency layer of about 100 and we can see or 150. It still stays here, but it is dark. This
is the background. And if we remove this way too bright for some text
that we want to focus on, what we're going to do as well, just to add some
different effect, we're going to make it
slightly faster and speed in the opposite direction,
it should look like that. That will be quite nice.
I'll put my face back here. Now, as we were going onto
the game over controller, you'll see in the instances we have the level
controller here, we're going to delete that and put the game over
control in instead. Now in the game over controller, we're going to actually set up some variables to
make the text appear. Now this might sound
a bit unusual text, we haven't used text yet, so I'm going to show
you how to do that. But first, as we always do, let's set up some variables
GO appear the game over. That's going to count up, so things are going to
appear one by one. Now what we'll do is show. And we're going to
create an array. We're going to create the array, we want four things, and we're going to set
that to -500 So this is going to be in addition to
the current y position. We're going to show it as 500
pixels off of the screen. Actually, we'll do plus
500, so it appears below. And then we'll zoom back up. Now we're also going
to do an alarm, which we're going to set at 120. If you'll remember in
our controller object, we had the level opener bar. We want that to still appear because we want it to not
simply snap into frame. We want it to show
the bar opening first and then disappearing.
We're going to do that. And then in the alarm event, we are going to start with shop, the target show of appear
because it's go here. If you remember, an array holds the amount
of values in here. It's having a set
amount of values, like a database, all applying
to the same variable name, but with different values. The value that applies to go
up here is going to equal zero and that's going
to be increment by one. Go Appear will then plus equal one and Go Appear does not equal four
increment four times. Then we'll reset it again. Alarm zero equals, let's
say a second and a half. That will give enough
time. Now what we're going to do from here
is go into our step event. Now you'll remember we
did have a four loop. Similarly for the way our
menu options appeared, and we're going to implement
that here as well. Four equals zero semicolon
larger than it was four. And that will mean
it'll count 0123, which is the amount
of database values. We'll have increments by one. We open the brackets,
so this is going to run through Show, that's going to
do the lap effect that we've learned
so much about, Show I and then show
the target Show, and then in brackets I again, and we're going to do it by 0.1 That is something
that's going to make basically
menu items appear, Not the menu items,
the game over items. What we're going to draw on
screen appear one by one. And that's what we want. We want this effect to take place. We're going to put
this code in here. Now we dot to actually draw
what we want to appear. This is the fun part.
As you can remember, we have started setting
with timer increment. At the end of the levels, we
want that timer to appear. Now we can organize
the room order. If you click here, you'll
see the room order. I believe I mentioned
this previously, but this is the way the
rooms are ordered in game. After level 15 comes
the game over level, or game over screen,
or game over room. Technically, room would
be the correct term. As mentioned in Gamemaker, everything takes
place in a room. So it's going to take place, it's going to take
us to the game over room and that's going to
show us the final stats. What we also want to do here is check to go back to the menu. If keyboard check press is VK, start VK, start VK. Let's do VK, any key, any key will take them back. What we need to do is make
sure that the go up here, the option that's been making it increment by one
every 1.5 seconds. If that equals three, because we don't want them to skip
the game over screen. Then we're going to
go back to the menu. Now you remember we did
this previously when we had the deaf sequence. The death sequence here created the room Clovel object and it set the T to
the current room. We're going to do
something very similar by copying that and
putting it here. But we're going to set
R targ rather than to the current room
simply to our menu. And that's going to
therefore create a nice effect with this. However, we do need
to make sure if instance number close
level is equal to zero. We don't want them
to be able to do this multiple times
over that way, it will simply take them
back to the menu screen. Now the game over
screen is going to also show us how many
times we've died. And it's going to show
us the time we've taken. That is going to therefore
make a very nice effect. But as I said, we need
to draw this text. This is where a little bit of trial and error will
come into place. Now what we need to do is first create a font. We'll
in fact need two. We'll need one for displaying the big congratulations text, and then we'll need one
displaying a smaller information. We're going to create
a font here by right clicking and
creating a font. We're going to call
this one big text. Now I'm going to
use a font that I'm quite fond of called
for more future. Now what you can see here is that it does have a
nice pixel effect. We want the anti aliasing off because we're going for
a pixel art effect, but if we turn it on, we can
see where it blurs slightly. You see there will be some
blurring around the edges. Now we don't want
that because we want a nice pixel perfect effect. If we keep increasing the size, you can see where that lines up and doesn't
create that effect. Multiples of 12 seem
to do the trick. What I'm doing, by the way,
zooming in and out is by holding the control key and
moving the mouse wheel. You can also do that with the zoom in and out options here. It's very useful to zoom
in on something if you want to see what you're
doing in a bit more detail. That's going to be our big text. And then we can also
duplicate an N small text. Now there are more
things you can do with text and with fonts, but we don't need to
worry about that for now. For example, we can limit
how many characters will actually display when
you have a large game. You may want to limit
how many characters there are because that will actually save some space when
you're exporting your game. However, this is
only a small game, so we don't need to
worry about that. But we're going to
pause right there. Join me again in part two. We've started making
this game overscreen, and in that part we'll
put it all together.
24. Finalizing the Game Over Experience: Welcome back to Gamemaker
two D Platform Workshop. In the second part, I'm going to be showing you
how to put together the game overscreen that we started creating
in the first part. Now what we can do is use
some test variables here. Our test variables,
time MS equals zero, time m equals zero, and time equals zero, and death equals zero. Now those are going
to be just examples, but what we're going to do is load them up with
the correct values. Afterwards, if we go
into our drawer event, now we can start drawing
first things first, we need to set the
font to N big text. And we need to set the
alignment for H. Line two center controls the
commands for text alignment. We then need to draw, now by default it is top left, we're going to keep
it at the top, but we want to center it. We're going to actually, we'll set the color
as well to see white. It's also good practice. Why did various, I just press
F 11 by accident but that minimizes these panels at
the side happy accident. But it's a good tip to Earth. You want to focus on
what you're doing and you want panels disappeared. It's 12 11, but we're
getting sidetracked here. But that's not what
I'm here to show you. We're going to set alpha to one. Now that's the transparency. Let we draw the text. The first thing
we're going to draw is set up room width over two. Let's try 100 again. It's going to be some trial
and error to get it right. And we're going to draw
the text on gratulations. Now what we can do, we can set the game over
screen to be first. Just so we can check
that that looks right. Now what we'll find is
that we'll draw the text. Congratulations in the top
corner, in the middle. Like so, however, we
haven't set the font. What we have here
you go to our fonts. It's N big text. We did draw set font. Let's try that again.
Okay, there we go. That has got it. Sometimes
when you're adding new text and also when
you're adding new elements, new assets, that kind of thing, you may need to
restart Game Maker if it doesn't correctly save. Usually it does,
but occasionally that will fix the solution. There we have the
word congratulations. Now that's slap
bang in the middle. We wanted to go a little
bit higher than that, so let's put it at 60 and we're going to start
putting things in. So if we put drape, let's use the sprites we've imported earlier, the death box. Now these boxes, let's
check how wide they are. 180. Okay. We want them to, we want them to be evenly
spaced in the middle. Let's draw a first sprite
game over Deaf box. Let's do that room
with over two. Let's say if we do that by
minus 180 or -200 even. Let's put that, let's
put that in the middle. Again, it's about shuffling things around and
seeing how they look. We're also going to do
the time box as well. With that one, we're going
to take the name of that, it here, plus 200. That might be too much of a gap. Fairly certain it will,
but it's trial and error. Yeah, absolutely. Very far apart. Also, I set the y
coordinate to zero. What I'm going to do is
set that room height over two and room height over
two for this one as well. Room height over two, let's say they're 100 apart. That should give
us a bit more of an inkling for what
we're working with. There we go. That looks
a bit better to me. Now let's move, congratulations
text up a little bit set. We're going to set
this before we draw the sprites to set, we're going to set
that to N small text. Then we're going to draw
some text in here as well. We're going to text, now let's actually set this, we have room width over two -100 Now with
this one in particular, we want to shuffle along
slightly where it's 180. But we also have to
remember the boxes in the way drawing it in the dead center is not
going to work. Let's try 30 across again. It's trial and error,
finding out what works and room height. Let's say this is going
to be the death text. Let's just say 520. Awfully optimistic. Let's also do this,
one plus 130. That's going to be our time. Let's say 24 minutes. It's 57.6 seconds. Again, we're just
testing at the moment. It's a lot of trial
and error just to find out what fits
and how it fits. What we'll also want
to do is move the text up because the dead center, when it's top aligned, doesn't look
necessarily as good. We're going to try, let's
say 20 pixels high. And let's see how that looks. Okay, that's way too high. I'd say the x
coordinate looks right. But let's adjust
that down to say 15. Again, when you're doing
things like drawing, setting up, you want to draw the full picture first
just to see how it looks. I'd say actually,
probably ten is closer. Once you've got this set up, of course you can set up a screen and mock it up
yourself in advance. I prefer to just dive
in, in the deep end, but of course, almost there. Say 12. Let's see how out looks
-12 As you go along, you're going to do a
few more trial and errors and you're
going to see it live. If you actually make it in the game rather than
an mock screen. There we go. I'd say
out looks about right. And then let's do our last bit, which is also going to
be with a small text. And that is going to be
press any key to return. Nice and simple. And we're going to put that at, let's say room height over two. Now these were, I
think, 80 large. Let's plus there in the
middle orientation. Let's say 60. Maybe 55. Again, all trial and error, that looks about right. Maybe just a little higher, maybe. Let's try 50. This should therefore make a very nice looking
game over screen. There we go. Now all we need to do is
populate these values. What we'll do here is we'll
put those variables in. The first thing we
need the show value. We're going to add
this on each of these. So the first one, the
y coordinate here, is going to be y plus show zero. Then this one is going
to be one, show two. Same with these ones. Show one. Actually, that's in
the wrong position. We need to be here
plus show one, y, and show two. Then finally, this one
will be plus show three. Now we should see these
items slowly appear, quickly appear, but one by one. Off screen. There we go. Now if we press any key, we should be able to return
to the exit, the menu. Even although that would
be, if go up here, let's say if that
would equal four, because that would end on four. Now we'll see it. Pre.
Congratulations, we're back to the menu now. That's as simple
as that. We have created a game over screen. In the next and final lesson, what I'm going to
do is show you how to populate that
with real values. And talk to you about
some level design. Because level design is a
important aspect of this game, and indeed any game that
you create in the future. So again, this has been
a slightly longer than usual lesson just to prepare
our game over screen. But it will be all the sweeter when we have a wonderful
finish to our game. So stay tuned for
the next level, next level, next lesson. But we'll tie it all
together and we'll have a complete finished game.
25. Advanced Level Design Strategy and Techniques: Welcome back to Gamemaker
Two D Platform, a workshop to the last lesson. So far in the lesson previously we've created a
game over screen. Now this game over
screen very quickly shows us how many
deaths, how much time. And it allows us to return
back to the main menu screen. Congratulations time, and
press Any Key to Return. Perfect. However, what we have not done here is actually
populate these values. Now we need to do that. We've set up some
global variables. If you'll remember in
our menu controller, we have set these up, we're displaying it like this. What we actually want
to do is let's move these to the drawer event and use them as local variables. The first thing we're
going to do is make sure we remind ourselves
of these variables. I'm just going to copy and
paste them into the drawer and put some comments around them just so we
know what they are. Far, D equals global a
bar is going to equal. Now we're actually going
to put string around this because we want it to
be displayed as a string. Now the reason is because as a storing it as a
numerical value, it can be different, it cannot necessarily alter. In the same way, when
we're combining strings, we're going to concantonate. What that means
is we're going to put different strings together. There is a way you can just concantonateusing
string content. That is one way to do it.
However, what we need to do is slightly adjust the
values as we go along. What we're going to do
instead is plus equals plus equals string global time. That's all well and good, that's how many
minutes you take. Now if global time
is larger than ten, actually larger than nine, then t time value we're using Or plus equal string
global times. However, if it is less than ten, then t plus equals zero. Then in between this
t plus equals colon, then we're going to put t us equals a dot for the
temps of a seconds. And we're going to
do the last one, which is t plus
equals string global dot S. It will show us to
the teenth of a second. What that is, the
reason we're not concantinating is because
we have this here, which will add a zero
before the seconds, if the seconds are
less than ten. Now what we display here, rather than these random digits, we're going to show
the variable D, the depths, and the
variable t, the time. Now if we start this now, it will throw up an error. That is because we don't
have those set in advance. However, what we are going
to do is use this as an opportunity to talk to
you about level design. In doing so, we'll see our
game over screen in practice, because that will come
at the end of Level 15. Let's actually start this and show you exactly what I mean. Here we have our game. This is everything
we've worked towards. This is everything
we've been working on for the last several lessons. This is what we've actually
created As a result, we have, of course,
remember our menu screen. I've turned the sound off
so you can hear me talking. Instead, I have implemented
a test function to that was the test
shape, the screen shake. No, it was R. To move on to the next level, our first level. Now you see we've
dressed it up here. This introduces
the core concept. Core concept is collect
the computer chips. We have some arrows in the background just
to gently nudge us. We want the player to be intuitive on their own and
find out what's going on, but not in such a way that it basically takes away
everything from them. We want them to understand
what's going on. Actually, let me just
check something first. There was a slight error
in the control object, what we needed to realize. This part was set before
this variable was set. After we checked if the
player doesn't exist. When the player doesn't
exist and the alot, it said the variables
don't exist, caused a little game freeze. We fix that. Now let's show you some more
about level design. What's most important, as
I've said, is discussing. Introducing the concept. We are introducing
the very concept of the control mechanism. The player will understand
what they're doing. There will be some very
delicate hints with the arrows showing where
they were meant to go. As they move, they collect
the computer chips. And I'll look, that opens up
and we can go in, perfect. Now, when we introduce
a new concept, I like to consider three
different approaches. Three different steps to
introducing a new concept. First, we introduce the
concept in a safe environment. Secondly, now in this
game is a lot of death. Safe environment
can't always happen, but in an environment where it's going to be
difficult to mess it up. Secondly, we introduce it in
a challenging environment. And thirdly, we introduce
it in a new way. Now we've coded various
different things in this game. If we introduce spikes
in the last time, we're now introducing them in a slightly more
challenging way here. And we're also introducing the concepts of up
and down spikes. Up and down spikes
are retreating, spikes are introduced in
a safe environment here. And then we're going
to be introduced in a slightly more
challenging way in the next level, you see here, they're introduced in a way that poses more of a challenge because you have to
figure out the time in advance so that you
don't get spiked. As you can see here, you have
to consider the movement. And then it will
be introduced in a different way as things
progress through the game. For example, take these walking
enemies, walking enemies. Here we're introducing this
in a safe environment. We see them, we can
easily avoid them, we can jump on them and look, we've learned to jump slightly
higher off of their backs. We're introducing women in a challenging way here where there's slightly more of them. Then in the next level, we'll introduce
them. A new concept. In a new concept,
it's going to be, there's a lot of them, whereas you've learned to jump
onto them in this case. In this case, we want
to perhaps learn that it's not a good idea to
always jump on them. We're introducing
a new challenge with an existing concept. Everything you're
making, every part of your platform game should introduce different
concepts in different ways. Look at this one here,
we're introducing keys. We're introducing them first. Now in a very safe concept, the concept here is you gather the key and it will
unlock the gate. That's very easy,
we can do that. We'll gather the key,
we'll unlock the gate. Now if we look at the next one, we're introducing it in a
slightly more challenging way. The key is harder
to get and get back from because there's a lot
more enemies and obstacles, and there's two keys you have
to collect along the way. When you collect the key, you can then get the
prize behind it, which is that fair enough. Now in the next level, we're introducing a new
concept with the keys, where the actual key
padlocks act as a wall, which when moved,
suddenly pose a threat. You're introducing the same
thing in a different way. Now let's take, for example, these blocks that
appear in and out. We're introducing them
in a safe environment. You can stand on them
if you fall off them. Only a minor setback,
you're back on them again. The next level we're introducing them in a slightly
more challenging way. They're coming and
going a bit faster, but a bit more frequent. Now we're introducing a new way around using them
because of course, your movement is limited. If you get trapped here and you try to move out of the way, you're either going to die or you're going to run
out of battery. When the game is
called battery pack, we don't want to
run out of battery. We're also reminding our
players of a previous say, trick, or a little bit
of a deception we'd use. Where the key barriers or the padlocks that
are created from the blocks which are existing because we haven't collected
keys, also benefit us. So we're reminding the players of the things we've
already taught. Now take a look at
these spike balls. We're introducing them here in a relatively safe environment.
I can get around them. This one's not
going to attack me. We see the different forms
of movement they make. And then we're
introducing them in a slightly more challenging way here. They're slower moving. You have to plan your
movements ahead and you have to think fast
to not get spiked. And we have to do a
lot of back and forth, and we're likely
going to get hit. And now we're
introducing them in a different way where they pose a much more
challenging threat to us. This is all about introducing
things in a different way. Now this is level 14. I've also put those
numerical indicators there. On our final level, we tie in everything
we've already used, everything that's already
built up to this point. In level 15, there's much more variety about
which ways you'd go, which concepts you take, which approaches you
might take to not run out of battery
before you hit the exit, which is currently
behind my head. Now that is how we
conceptualize level design. I did also notice I've made a slight typo here,
again over screen. We must make sure our
variables are named correctly because that
will cause some issues. It's all about trial and
error, living and learning. With that in mind though, let's make sure our game
over screen works. I remember putting in R. Let's make sure we have
a couple of deaths. Just opsidasy. Opsidasey. Just so we make sure we're
counting it correctly. I didn't die, I was
planning on dying again, it's about teaching the player without actually showing them. We want them to figure
it out for themselves, but we want to
introduce new ways of existing concepts being used. So terribly clumsy might
just accidentally fall off. Oh, no, we did. We've
died a few times. We've spent not very much time
going through the levels. This time we have a game over
screen which now shows us an accurate representation of the times we can actually complete that
game in 33 seconds. I would be very impressed
because it would likely take just a little
bit longer than that. In fact, let's add
a small safeguard. Safeguarding is very
important when you have text boxes with very
restricted amounts of time, global at global time is
larger or equal to larger van, 100 larger than 99 then
is just going to equal, we're going to override it
entirely and just put that in. If you spend more
than 99 minutes, then perhaps you need to how to play the game a bit better. But that's going to
safeguard us from someone leaving the game
overnight, then completing it. And it's just showing
a huge amount of text which overspills
out of the box. Safeguarding is an important
part of design tricks. Now, I have only made 15 levels because I've had introductions to different concepts
I've created with you. I've introduced
them through first, showing you how they work. Secondly, throwing them
into a bit of challenge. And thirdly, adding
a different way of seeing the same object. That is, how you should
introduce a new concept. However, I haven't put a lot of conceptual levels together that don't involve this puzzle. Different things you can add when you're
making your games, why not think about things that you also see
in platform games? If we take a look at
springs, for example. If you remember the
code we used when you jump on top of a enemy. So for example, the
enemy script here, if you remember
the player script when we collide with an enemy. If you look at that where we
checked if we were higher than the y value of the other
player, we made a jump. Why not do springs
are just the same, but they don't
actually kill you. Well, let's look at switches. For example, let's
say you had a switch, you hit it and a box changed
from transparent to solid, if you remember mode equaling 1.0 And then how we
conceptualize that with the start value changing for the x values and
the start variable, so it goes to X start
or way off screen. And therefore acts as a solid or not solid depending on
where it's located. Why don't we do that to a switch if we do a collision
event with a switch, or why not look at more enemies? Consider different movement
styles, different patterns. What about ones that move
along a conveyor belt, for example, Or perhaps
more collectible items? What about gems if you had them in order to unlock a door? Look at the way we
did keys for example. Or why not Two
different colored keys, silver keys and gold
keys by way of example, or as we're making a game about batteries and
running out of batteries, why not have a collectible
where you collect a battery to get
more battery power? If you look at your
battery variable, you can consider
changing that back by incrementing it and making sure it doesn't go
over the max value. What I'm getting at here
is we have created a lot of concepts to create a
very simple game here. But there are so many more
things you can add and should add when you're making a fully fledged platform game. Every level has so many
different concepts and you get so much more content out of gradually introducing these concepts and then combining them together
into a big puzzle. So think about this when
you're making your game. Think about what concepts are
in other platform games and how you can interpret that
in your own game in future. As we wrap up the Gamemaker two D platform the workshop course, I want to extend my
heartfelt thanks for joining me on this
creative journey. I hope you found the course
engaging and informative. If you've enjoyed
your experience, please consider
leaving the rating and sharing your feedback
through a review. Your input is
invaluable as it helps us refine and improve
our future courses. By now, I'm confident you have gained the
skills and knowledge necessary to craft a fun
and exciting platform game. Together, we've covered all the essential steps
required to create a captivating sci fi adventure with our little robot character. Your new abilities will serve
as a solid foundation for any game development project you choose to undertake next. If you're eager to
continue learning and expand your game
development repertoire, I highly recommend exploring
our other courses. In particular, our
course on creating pixel art for games is a
fantastic next step if you're interested in
customizing the aesthetics of your platform or any
other game project, this course will equip you
with the techniques to bring your unique artistic
vision to life. Thank you again for
choosing to learn with us. I look forward to seeing the incredible games you'll create. And hopefully having you as a student in another
course soon. Keep creating, keep
experimenting, and most importantly, keep having fun with
game development.
 3D Tudor, Bestselling Blender Author & 3D Educator