Transcripts
1. Introduction: What I love most
about interior design is the transformation from an empty space to a well-designed space that we would all love
to live with them. I believe that we all deserve
a well-designed home. That's a no waste is away
from the rest of the world. I'm Dimitri is, I'm
an interior designer and I'm also a content creator. You may have seen
me on Instagram where I share all of the tips, tricks and resources
for others to start living a more
elevated home lifestyle. Today you'll be learning
all about my approach to interior design and how our
create a functional space. From start to finish, you'll be learning how to audit your space, choose
your furniture, create a mood board,
style your furniture, and will also be
breaking down how to choose the perfect
accessories for your space. They're truly speaks to your personality so that you can best translate your vision to your guests when
they're visiting. After taking this class, I hope that you walk away with all of the confidence that you need to begin designing a space that's truly
unique to you. Design doesn't have to be hard. It doesn't have to be confusing. It's all about having
fun with this. So take your time,
enjoy the process, and be sure to add photos
to the project gallery below because I cannot wait
to see what you come up with. Alright, so let's get started.
2. Audit Your Space: Thanks for joining
me in today's class. The first step of the process is actually going to be
auditing your space. You want to assess
the things you currently have
within your space, the things you wanted
to add to your space. And most importantly,
we want to determine the function and
flow of our space. And so let's head to my living room and I'll
walk you through auditing MySpace so that you can see what it takes for you
to audit your space. Now that we're in this space, we want to figure out
how we want this base to function and how we
want the space to flow. In regards to function. This is the living area
of my open concept. And so this will function as a conversational area
that would actually be really cozy and inviting
and inspire all of my guests to actually sit here and converse
with one another. And because it's
an open concept, we want each separate space to flow and harmonize
zone one another. But my instance, I want a really good flow
from the dining area to this living area and
write-off to the patio as well. Now, let's audit MySpace. Myspace or have this sofa. Also have the coffee table. And those are the
only two things that I have in this
space right now. So of course, we're going to build out this space together. Well above the sofa, we have a rate blink wall and that's a huge opportunity for art work. Here we have a really
huge patio door and so of course we want to ask some
beautiful window treatment. The window treatment is not only going to soften this space, but it's also going to
visually take your eyes up to the ceiling and make the
space feel much grander, much taller and much wider, just in front of the patio door. I plan to do some
really awesome chairs here that would allow
my guests to be cozy, but also converse
with the guests that will be sitting
right here on the sofa. Here we have another blank wall, which would be another
opportunity for artwork, but on a much smaller
scale because we will have a window treatment
flanking the doors. So we want to make
sure that we're not overcrowd in that wall, but still bringing in elements that fit the scale of this wall. This is where I ran into
an issue within Myspace because I have this door
that leads to my garage. We pretty much had to push the
room over about 36 inches. And so we did lose a bit of space in the actual living area. But don't worry because I came up with a
solution that works. What I did was placed this TV centered on
the shortest wall in this center point of the TV dictated the center point
of the entire space. And just under the TV, I brought in two
floating shelves. And that allows us to have a really good surface to
style elements in the space. I actually did a frame
TV because I didn't have a lot of wall space to bring
in a ton of pieces of art. And so the TV acts
as the large CL, piece of art in this
space that will actually set the tone for the
entire aesthetic. And now that I've assessed
my space, it's your turn. So I want you to walk through
your space and decide how you want your space
to function and flow. And also take note of all the things that
you intend to keep in your space and all the things that you intend to get rid of. And also make notes
of all the things that you wish to have
within this space. Lastly, be sure to
measure your space. If you're a pro, take those measurements and
build a floor plan. Next up, I'm going
to walk you through ordering all of your
furniture and accessories. And I'm also going
to share all of my tips and tricks
so that you're set up for success when it comes down to ordering your
furniture and accessories.
3. Choose Your Furniture: Before you begin
selecting any furniture, I need you to set a
realistic budget for this entire project because
things can get expensive relatively quickly and we
need a better understanding about where replacing our money when you're selecting furniture, always choose those
investment pieces first and work your way down to the
more affordable accessories. And that's going to ensure that you're allocating your budget to all the right things that
work for your lifestyle. When selecting a sofa, I highly encourage you to source and investment
quality sofa that will stand the test of time because we don't want
to be buying a new sofa in the next couple of years when you're selecting the
fabric for your sofa, always assess your
current home lifestyle, determine if regular
quality furniture works for you or if you need to upgrade to performance fabric that's
more suitable for families, a more active lifestyle. And folks would pits also when you're
shopping for a sofa, be open to making
modifications on your own. As for me, I really loved
the sofa that I purchased, but I did not love the height, so I did go ahead and order that sofa and I upgraded
and bought some new legs. When it comes to
sourcing your area rug, I always recommend an
eight by ten area rug or even going up to a nine by
12 if your space allow it. Those two rogue
sizes are perfect because we always want
the front ends of all of our furniture to rest
directly on top of the rug and not seemingly
float beside the rug. So of course, I always
go for a bigger rogue. And when source in an area rug, don't just stop there. Be sure to add a high-quality
road path because this is going to ensure that your
rug isn't slipping around. And it's also going to give
you that extra thickness and extra percussionists
that's going to make it seem much more high-quality. The rug that I chose
for my space was an eight by ten rug
that is neutral, but it also has a
very subtle pattern and it also enhances the
overall aesthetic for my space. Next up, let's get
into the coffee table. The coffee table that I
selected for my space is around coffee table with a really
solid enrich marble top. The base is dark and
texture and it also plays well and create some contrast when it's sitting
on top of the road, when social on a coffee table, the shape of it is a
personal preference. But I always suggest that
you source a coffee table that sits at the same height
as the seat of your sofa. And this ensures that the coffee table is
easily accessible. Next up, let's
choose a side table. You always want to ensure
that the surface of your table is that the exact same height
as the arm of yourself? This way, when you place an
object on the side table, you reach directly over as opposed to reaching up or down. As I was sourcing my side table, that table that I absolutely
fell in love with was not high enough for my sofa. So what I did was
took inspiration from that exact table and built
the DIY version that met my specific
requirements taken on DIY projects are
really great way to cut costs with your projects, especially if you have
the skills to do so. Now let's get into
lighting for your space. When you begin to think
about light into your space, don't just stop at a chandelier. You always want to
layer your lighting to include floor
lamps, table lamps, and Wallace glances because
that's what's truly going to create that ambient and
cozy vibe and your space. For my space, I chose
a chandelier that was very modern and edgy. And I also wanted something
that wasn't too busy. I wanted something that
was very streamlined and would also bring
in much more lighting. And you'll notice that I
chose a chandelier that actually has six bulbs
as opposed to one, because that chandelier was six bulbs is going to make
your space much brighter. And if it is too bright, you can always put your light
switch on a dimmer and you can lower that lighting
to suit your best needs. I also selected a floor lamp that paired well
with my chandelier. I didn't want them to match. I just wanted a nice
amount of cohesion. So I chose a floor lamp that I can lower and raise
to any height. And I can also put it in any
orientation that I like. Now we can get into one of my favorite elements of
design, which is artwork. When you're choosing our
work for your space, always remember that
our work is subjective. What I love may not
be what you love. So don't feel as though
you have to stick within any parameters
when selected artwork. My only rule of thumb
is ensuring that you absolutely loved the art work
and that it speaks to you. And whenever it's within budget, I love to get our work
professionally frame. It's simply elevates the entire
look and feel of a piece. And if you're struggling
with the scale of artwork for your space, I recommend that you grabbed some painters tape
and simply take those dimensions
out on the wall and see if it feels
good in the space. Because we always love to
measure twice and buy once. That's for our work in MySpace. I chose to hang these
two pieces that I painted myself above the sofa. And not only did I
paint them myself, I've built a Florida
frames for them as well. And in my living area between the window treatment
and the garage door, there was a nice amount of wall space that was
screaming for our work. And so I pulled two pieces from our collection that had a ton of color and a great
amount of black and white to truly tie
the space together. Those two pieces specifically
spark a ton of joy for me. So I'm going to
be really excited to see those hung there. Now, let's get into
window treatments. When it comes to
window treatments, I love doing Florida
ceiling window treatments. And I also love to mount the curtains from
a ceiling mounted track to really add drama
and height to a space. But if you're not
a fan of drapery, there are many other
routes that you can go. You could do roller shades, blinds and even Roman shades. The options are limitless. My only advice is to do what works for you and your space. If you choose to do blinds, there are many options
to choose from. You can do the
standard vinyl blinds or you can even upgrade
to the wooden blinds. The choice is ultimately yours. But I would say that the wooden blinds definitely elevator space and make the space feel
much more luxurious. S for window treatments
and MySpace, I chose to flank
each patio door with custom window treatments
and S for Windows. I opted for the vinyl
blinds just for privacy. Now that I've talked
to your ear off about choosing the perfect
furniture for your space. Let's go ahead and get
into mood boarding.
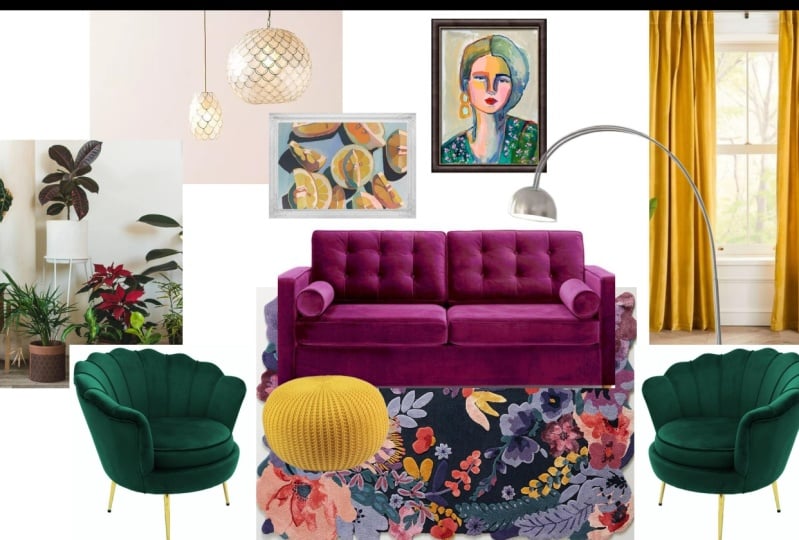
4. Create Your Moodboard: Now that I've selected
all of my furniture, we're gonna get into creating
a realistic mood board. I say a realistic
mood board because I want you to be very
intentional about only adding the pieces
that you intend to add into your space that
are within your budget. Because we can sometimes create mood boards based upon
fantasy and realized that the pieces we've
added are actually quite unattainable for us when it comes to developing
a mood board. I love to use Canva and that's just my
personal preference. Don't feel as though
you have to use that, but it's the easiest
platform for me to use for this specific task. In order for you to set your
mood board up for success, I will want you to gather
all of the images. The images that you
select should be images with minimal background. But don't worry if there are a few unsightly
things within the image, we can definitely delete the background and
the Canvas app. But the first thing
that I love to do when I'm building a
mood board is dropped. My main pieces of furniture. And so the mood
board, of course, I'll start with the
sofa accent chairs and area rug and build
the space from there. You'll just simply
start by selecting each item that you want
to drop into Canva. And once the element is there, go ahead and hit edit image and actually hit
background remover. Now we have a background that is transparent on our
specific image. And so we can create a whole
collage that is sort of 3D, but built here in the app. As you add the rest of the
elements to the space, be sure to remove the
background as well, because we want to remove as much background as possible
so that we can actually put items on top of items
and give you a much clear visual of what to
expect from these items. Another thing that I
love is the ability to flip the orientation
of an image. And in my case, I have one image
of the side chair. And so what I'm gonna do
is flip the orientation of the side chair so that the
psi chairs face one another. But initially, I had a full scale for all
of the area rug. And so what I did was cut the
area rug image in half and simply place the
image underneath the sofa and the side chairs. And so right now
my area rug is on top of the sofa and the chairs. So we're going to actually
send that image to the back so that the sofa and the chairs are resting on top
of the area rug. And that would actually
give you that clear visual of what to expect
when it's in your space. Let's go ahead and add our
coffee table and our art work. So now we're going to add in our lighting to this mood board. And what I love to
do is sometimes place it in the exact spot
it will live in the room. But in this instance, I won't place it centered
here because It's black, just as well as the artwork
and you lose the sight of it. And so I'll place it
off to either side, reduce the scale because again, we're just getting a sense of
how everything feels here. Now that our work is
placed on the mood board, Let's go ahead and add side tables and
pillows on the sofa. Right? And so let's see, we have all of our furniture
and everything here. And so I will also add our a couple of pieces
of artwork here as well. As you can see now, the artwork is
starting to feel good. It doesn't necessarily
match with everything that's
going on in the space. But again, artwork has to
speak directly to you. Doesn't really have to match. As you can see here, I'm going to further reduce the size of my artwork because I would love to squeeze the image of my window treatment
here as well. Mine more custom, so I
don't necessarily have an image of it
already ready to go. So I do have an image of the drapery that inspire
the overall look. And as you see here, we don't have much
room for that image. And so what we're
gonna do is delete this image and make
room on our mood board. We're going to pretty much
resize all of the objects. Instead of re-sizing each
element individually, we're gonna go ahead
and group all of the objects in order to get all of these
elements in a group, we're going to simply
click and hold on this and select multiple and
pretty much select every element that you would love
to be locked in here together so that everything
isn't shifting around once you bring in your
artwork as it is now. Now you can simply reduce that entire group of
images at one time. But I did miss one. And so we're going to simply
go ahead and adjust that. Moving on over, no
worries at all. And so now let's go ahead
and drop our image of that window treatment and just
place it off to the side. And that is essentially
how you build a mood board and the way
that I love to make them. But feel free to go as in-depth
as you wish with this, add multiple pages
at your accessories, at your plant and all of the other things that is
going to help you envision what your space is
going to look like before you even
start to buy things. Because again, interior design is definitely a process
that takes time. And so we wanna make
sure that we're saving ourselves time and not having to reorder elements by adding everything
into this mood board. Now that your mood board
is successfully completed and you've downloaded the
PDF from the Canvas app. Feel free to drop that PDF in the project
gallery because I would love to see how
you've implemented all of my mood board,
tips and tricks. It's time to go ahead and
order all of your furniture. I've already done so I
have everything already. So let's go ahead and get all of our furniture and
accessories and its rightful place so
that you can see how I've brought my
mood board to life. Let's head back to
my living room.
5. Place Furniture: I always like to build my space, starting with the
messiest things first. So let's go ahead and get
the chandelier installed. Before I began to
install the chandelier, I shut off the
power and are also removed the ceiling plate
that was already there. Now I'm gonna go ahead and
connect the white wire with the white wire and the black
wire with the black wire. And I'm also going to attach the ceiling brace that ensures
that your chandelier would not come tumbling down if your wire's got disconnected somehow. Before I secure the
chandelier to the ceiling, I'm gonna go ahead and turn on the power and give it a test. We want to make sure
that your chandelier is properly installed
before you secure it, because you don't want to do
this backwards and end up having to remove the
chandelier and re-install it. So simply turn on the power and installed one
light bulb, give it a test. If your light bulb comes on, you're good to go ahead and continue installing
your fixture. And if you're wondering why
I'm wearing rubber gloves, it's because I don't want
fingerprints on my fixture, nor do I want fingerprints
on the light bulbs. The next thing that I'm going to install on my window treatments, I'm simply going to attach my window treatments
to the ceiling mounted track using the returns and the clips that are
attached to the curtains, I went with a ceiling
mounted track instead of a
traditional carbon rod because this look
is much cleaner and gives you a much
more tailored look. I chose to flank
both patio doors with customers linen
panels that are 106 inches tall and
70 inches wide. They also have a pinch
pleaded header that makes the space feel much more
tailored and refined. This is a task that
could be done alone. But of course, if you have extra hands to people is
great for this installation. To get this exact look
and measure your space from Florida ceiling and
subtract two inches. The two interests is actually the depth of the curtain track. Once you subtract
the two inches, the number you're left with
is the height of your panels. To decide on the
width of your panels, always go two to 2.5
times the opening of your windows and doors or wherever space you'll
be planning to cover. This not only ensures that
the curtains are able to cover the entire
window or space, but it makes for a much
fuller window treatment when the panels are open. Now that the window
treatments are installed, let's go ahead and bring in
our area rug and our rug pad. When deciding on the
size of your row of PAD, always go a few inches
smaller than your area rug. I chose this specific area
rug from our space because I wanted to bring in a bit more
pattern and a subtle way, and I also wanted to bring
in more rich textures. And so this area rug was
the perfect way to do so. When placing your sofa into your living room never
rested up against the wall. By moving your cell phone just a few inches away from the wall, you'll be created in a much more intimate and inviting
environment. Also, always make sure
at least the front legs of your sofa are on
top of the area rug. It's time to bring
in a side table. And this table is a
DIY that I took on recently and I couldn't
be more happy with it. Now, let's adjust our coffee
table to make sure that it's 18 to 24 inches
away from the sulfur. 18 to 24 inches specifically, because you always want your coffee table place close enough to the sulfur
to ensure that you won't have to get
off the sofa to grab a glass of water
or grab your remote. Now, hockey table is in place. Let's go ahead and bring
in the accident chairs. I placed the accent chairs on an angle so that when
my guests are over, we can all converse
in this space. I wanted to bring in color. And so these Accenture's was
a really great way to do so without overwhelming the
space with too much color. Now that all of the furniture
is in its rightful place, let's go ahead and bring
in the next layer, which will be our accessories.
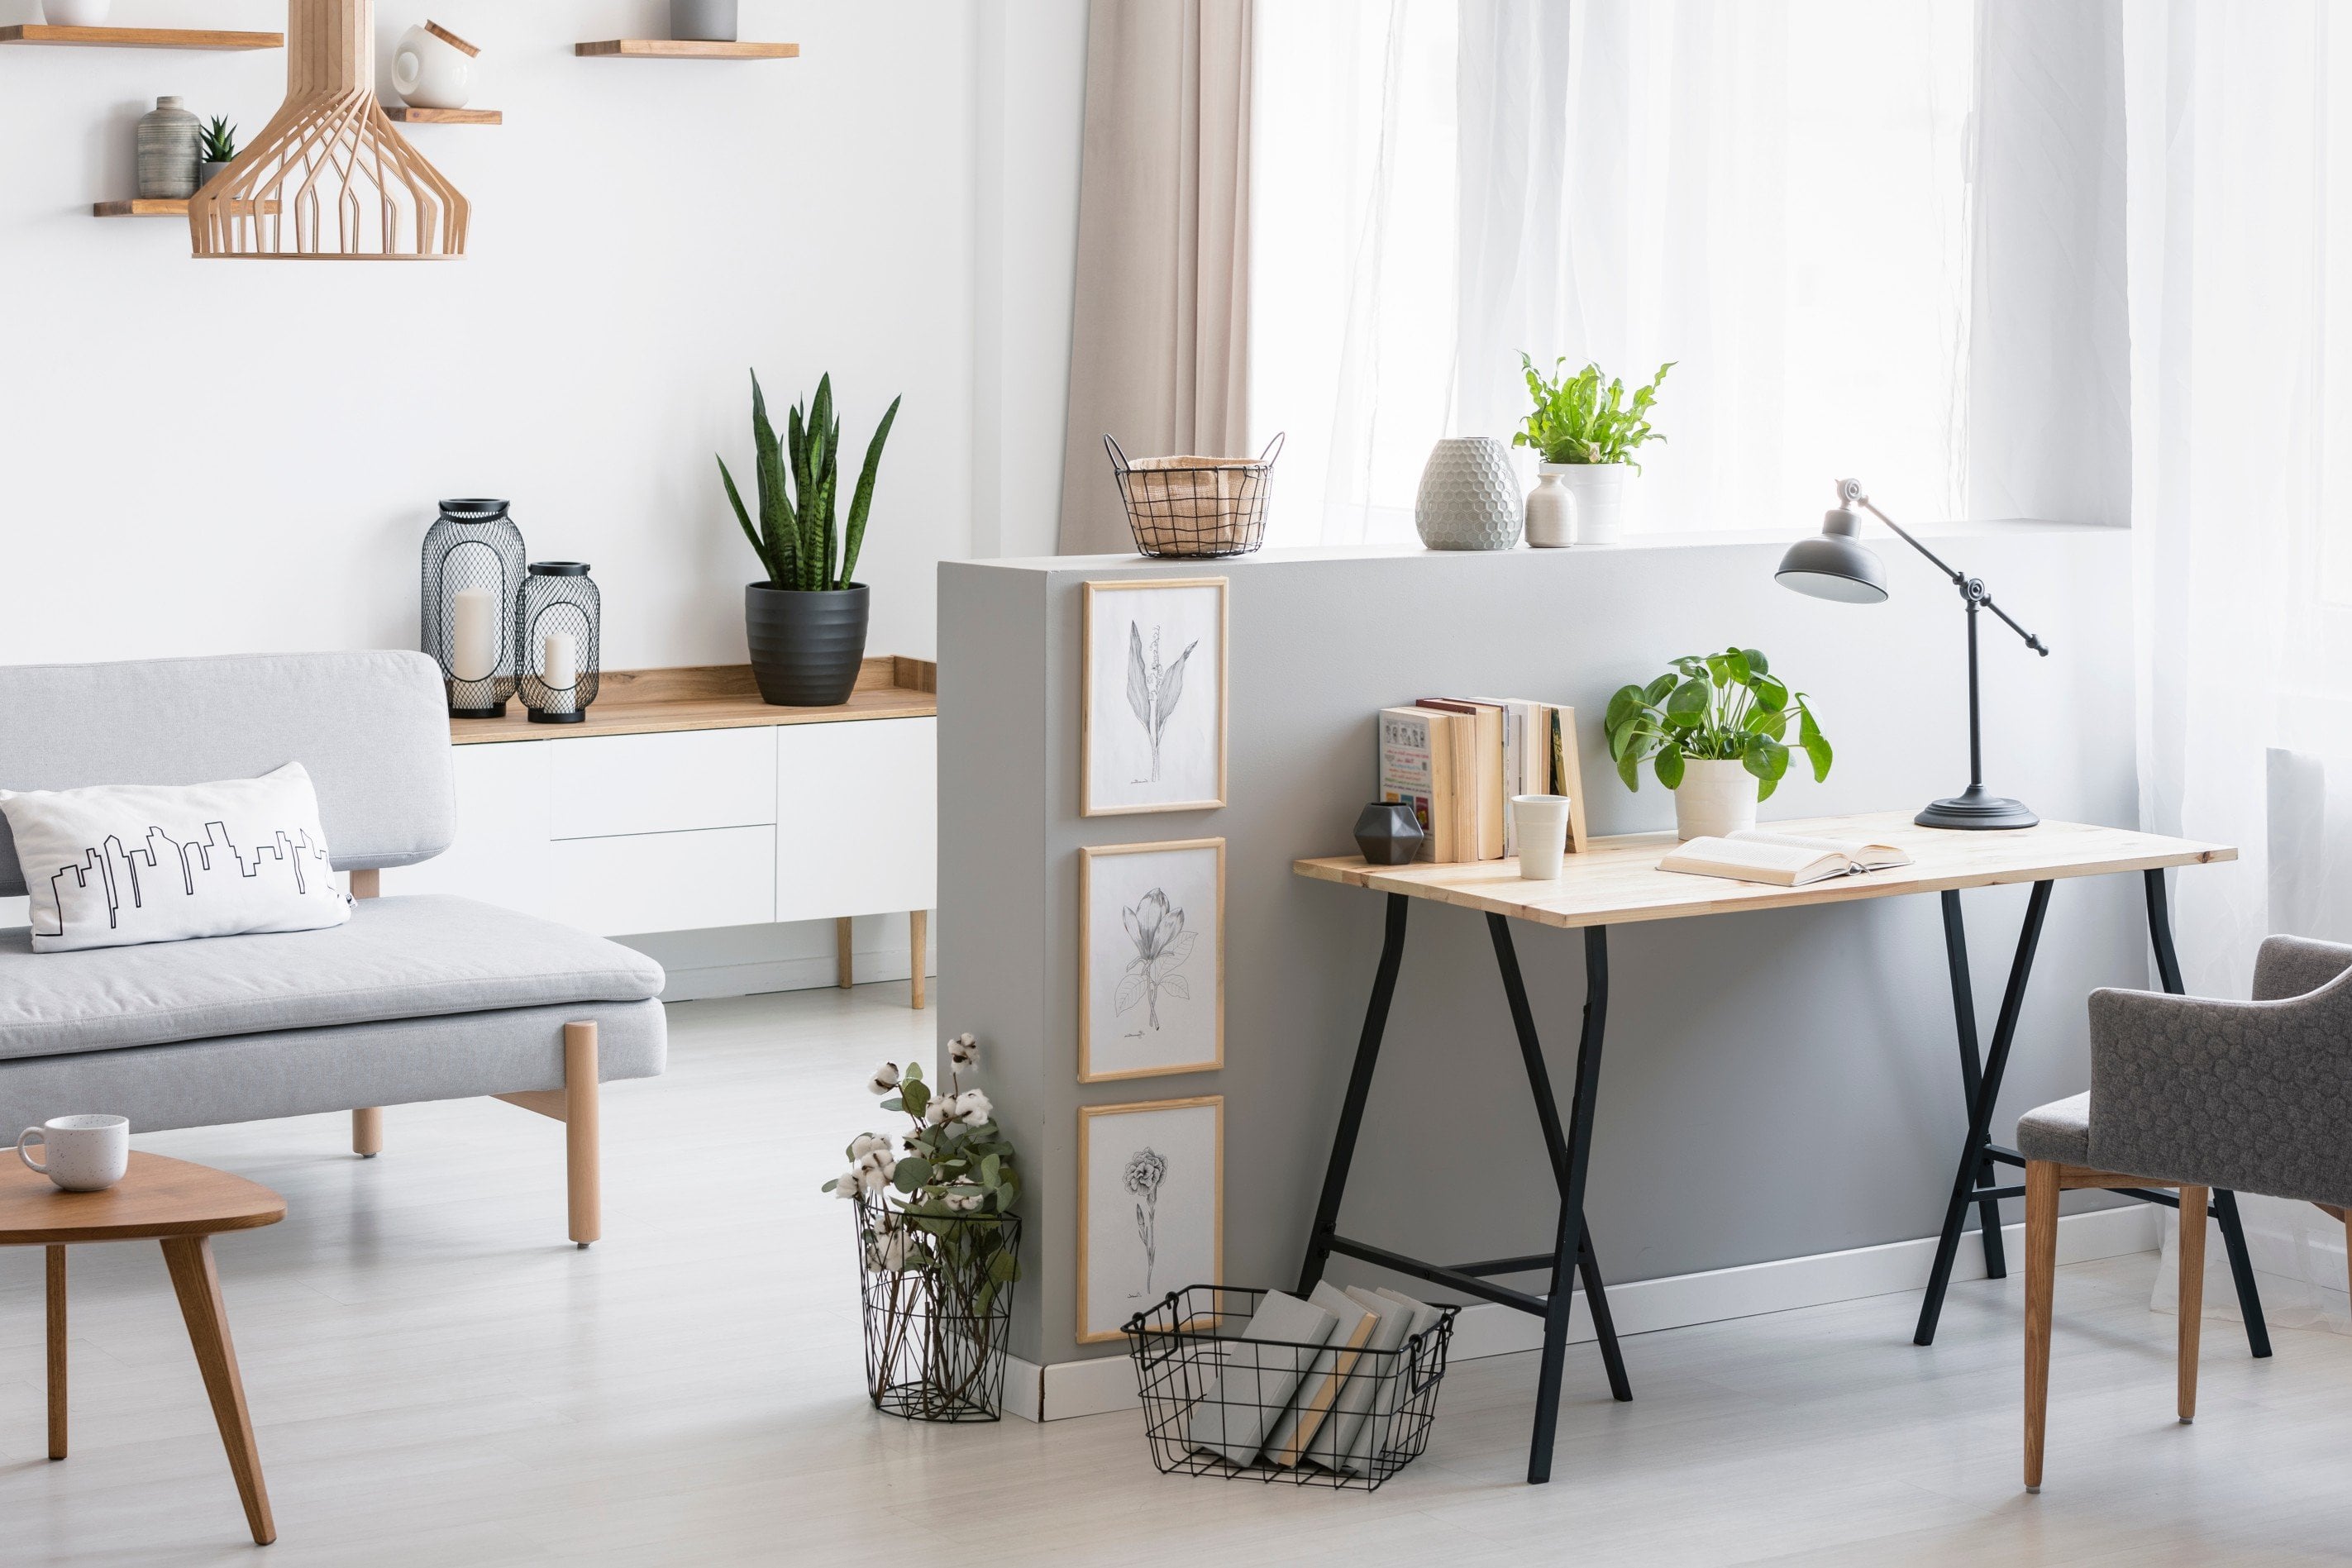
6. Place Accessories : We've already placed our
furniture and now it's time to bring in the next layer,
which is accessories. And then the accessories
phase is where your vision begins
to truly come alive. And so let's head
back downstairs. And the first thing we'll
get into as placing artwork. When you're bringing
in your accessories, always remember to do the
messiest things first. So let's start
with the art work. When you're installing
your artwork, always ensure that you
drilling directly into a stirred or that you're using or drywall
screw for support. We always want to ensure
that when installing things safely and
properly the first time. And if you notice
the sofa seem to sit relatively low
within the space. Bringing it needs to
large-scale pieces of art were the perfect way
to close the gap from above the
sofa to the top of the ceiling when you're
installing artwork in your space, always remember to hang
your artwork at eye level. Here on this wall,
I'm installing two of my favorite pieces of
art and my collection. Not only does these
two pieces of art introduced more color
within my space, they actually take up a
nice amount of wall space here and adds to that visual
interests to my space. But feel free to bring in
pieces that truly speak to you. And keep in mind, artwork
doesn't have to match your space as long as it feels
good to you, It's great. When styling around coffee
table such as this one. I like to break it
into sections using my coffee table books and layer in other interesting objects at varying heights for
maximum visual interests. And when you're
shopping for coffee table books and accessories, only by the items that
speak to your personality, your hobbies, and your
overall interests. And most importantly, go ahead and edit some
of your styling, play around, move
some things around, take some things away
because I want you to get an understanding of what an object does for
that placement. Here on the floating shelves. I'm going to style
my coffee table book collection because this is where my guests are going to get
a better understanding of who I am without me
having to speak. So you'll see me
use design books, fashion books, art books, and also books that
include a lot of history. Although my style and
it's pretty minimal, feel free to go as
bold as you like. This is where your
personality is gonna speak. So of your book collector. Bring in books if you
love plants and candles, bring in plants and candles so that when you're
enjoying your space, all of these items will
speak to you and spark joy. Let's move on to
bring it into plants. The first plan on
placing here in this corner is actually
my largest planet. I have about 36 inches in this corner simply because
on the opposite wall, that's where the door
to the garage is. After placing the largest
planet in this corner, I realized that we still had a nice amount of
space to play with. And so my snake plant was the perfect short plant to
introduce right here in this specific space
to really create a really cozy vignette here on the opposite
side of the sofa. You'll notice that we did not
place a side table there. We needed to find a way
to break up the space. And so I introduced
another tall plant. After placing that plant, you'll see that the living area is now separate from
the dining area. Always be sure to assess the level of light
that your space gets. And also be sure to educate yourself on a
specific plant needs, such as watering light levels, because we want our plants to live within our space
for years to come. While I personally
prefer live plants, if you don't feel too confident
about keeping them alive, you can find some really
awesome full plants, or you could even
use flowers to bring that same vibe that the
plants we're bringing. Alright, so the room
was perfectly styled, everything is in its
place and we're done.
7. Demetrius's Reveal: Now that the space is
all styled and we've applied all of the design
principles from this course. Look at the space. It looks so different. Everything is layered
to perfection. Starting with the artwork, this artwork was a
really nice play. Black and white to really
carry that theme throughout the entire space and also add that visual
height in this space. The other element I'm really
loving is the chandelier. Look how dramatic and made
the space and it adds so much drama and visual interest to
this wide floor plan. Now, other dramatic element in the space or the
window treatments. These specific window treatments
where customer they are actually a 106 inches
tall and 70 inches wide. I chose 70 inch wide curtains because I wanted them
to be able to flank pass the inset of
this window while also having enough space
to close completely. While I chose these specific window treatments for MySpace, I highly encourage you to find window treatments that
are gonna be perfect for your space because window
treatments are not one size fit all and they do make
the difference in the space on this
side of the room. I actually chose to hang two of my favorite art pieces
that have been in my collection for
quite some time. I've mounted these two pieces
of art here in this corner. Because if you remember
on the other side of the room we have all
of the tall plants. And so I want to decide to feel symmetrical and actually
feel well balanced in here. Remember, at first there was no art work and of course
the shelves were empty. And now you can see
that I've styled my shelves in a way that really speaks to me because I really loved to
collect design books, fashion books, and just
overall lifestyle books that encourage folks to just pick this up
and get inspired. And then I also carried the black and white thing that had been flowing
throughout the space. I chose this really nice
black and white piece of art, but it's majority black, which adds a great deal of
dominance on this wall and also contrast that really
plays off these white walls. I encourage you to
dive a little bit deeper and figure out
what you really love. Introduce your hobbies
into your space, and find those
little ways to truly express yourself through
the items around your home. My other favorite element in this space is
certainly the sofa. The depth is perfect and it
has just the right amount of cushion to where I can
sit here and be upright, converse with my guest, or choose to watch TV
without feeling like I'm sinking into the sofa and
of course the pillows. When it comes to pillows, I'm obsessed with a
downfield insert. So if you want this
chopping look, always go for a
downfield answer. That is my space and I cannot
wait to see how you've implemented all of these tips
and tricks into your space. So take photos and be sure to drop them in
the project gallery. And I cannot wait to see you.
8. Final Thoughts: Congratulations, you've
made it to the end of the class and I'm
super excited to see all of the work that
you guys are doing and are going to continue to
be doing in your space. So feel free to drop those photos and the
project gallery. And if you need to contact
me with any questions about any design dilemmas
or anything design-related. Feel free to drop those
comments and questions below, and I'll be sure to
get back with you. We've learned so
much in this class from auditing your space, creating mood boards, installing your furniture all the way
to place an accessories. And I cannot wait to
see what you create. I hope you have so much
fun with the rest of the design process, and
I'll see you later.
 Demetrius Robinson, Interior Designer & Content Creator