Transcripts
1. Introduction: Do you have a space in your
home that's been neglected, is cluttered, boring,
or ready for a refresh. I know I have lots
of those spaces in my home and I've been slowly tackling them
when space at a time. My name is Tessie and I've
dedicated the last 20 years to figuring out how to create a joyful home for
my family of six. I've lived all over the world
in 11 different houses. And I'm excited to
share with you what I've learned in this class. We're talking all about
home design down. We're not talking
about redesigning the entire house or shrinking it down, simplifying
the process. I'm focusing on creating
one small pocket of joy. So what's a pocket of joy? If any space in your
home that you love. It's not an entire room. It's a corner and bookshelf, a wall, a knock. Really any portion of a room that fills you with joy
when you look at it, creating a pocket
of joy is quick. It's easy to do on a budget, and it will instantly
change the way you feel each time you
walk into the room. Investing time and energy into your home is a
form of self-care. It enables you to feel grounded, relaxed, and ready to show
up better in the world. So what are you waiting for? Come and join me and creating a pocket of joy
inside your home.
2. Class Materials: The only thing you'll
need for this class is the printable
workbook that can be found in the download section. The workbook goes hand in hand
with our upcoming lessons, and it'll walk you through
the entire process of creating your pocket of joy. As far as other materials go, That's completely up to you. You may want to shop
your own home and create an entire pocket of joy
with items you already own. Or you may want to
go shopping and buy a few extra things for
your newly designed space. As we go throughout the process, you get to decide. So go ahead and head over to the download section and print out the pocket of joy workbook.
3. Class Project: Your class project is to post a before and after picture
of your pocket of joy. I'll be walking you through the entire process of choosing a space and
how to fix it up. Just to remember to
take that before picture because we
all want to see the progress you're making and compare it to the finished, beautiful space
that you'll create. I've already posted the
before and after pictures of a space that I've recently
completed in the project area. So go ahead and check
that out for inspiration.
4. Lesson 1 Choosing Your Space: Your first step in
creating a pocket of joy is to choose the space you'll be focusing on during our class. Think about a space that means a little love and a little TLC. It could be a place that seems empty or spot that
feels cluttered. It could be a space
that annoys you, an area you've been neglecting, or just a space that
needs a little refresh. Here are a few
possible examples. It could be a bookshelf, a corner of a room, a dresser, a closet, a cabinet that needs organizing, a blank wall in need of artwork, a bedside table area, a piece of furniture that is currently being used
as a dumping ground. I'm sure you know what I mean? Really anything goes here, but I think it's
helpful to choose a spot that's been
weighing you down. Something that's
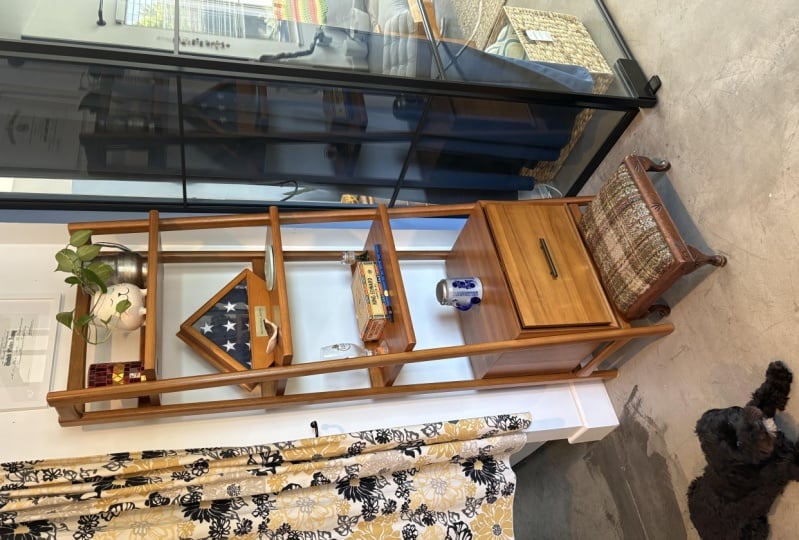
been annoying you, or a spot that would make a big impact if you fixed it up. So here's an example of an
area that I chose to refresh. It was a corner of my bedroom
That was pretty neglected. Things got thrown onto this storage cabinet when we
first moved into our home. Then it sat there and sat
there for way too long. It was an area that
I just tried to ignore since it was
kind of an eyesore. But once I finally fixed it up using the pocket
of joy method, it made a huge impact on the
overall feeling of the room. And it became a place to honor
the story of my marriage. And now I absolutely love it. In thinking about your home, you probably already know the
spots that needs some love. So follow your gut
and let's figure out which space you are going to
focus on during our class. Go to your class
workbook and fill out the first two pages
entitled less than one. These pages will walk
you through the process of choosing an area after you filled out the worksheet and decided on the area
you're going to focus on. Remember to snap a before photo and post it inside
the project area.
5. Lesson 2 Make a Plan: Now that you've chosen
an area to focus on, it's time to start
brainstorming a plan. We'll start by looking at your current space and
assessing the situation. Think about what's currently working and what's not working. Pay close attention to what
you love about the space and what parts of it are
currently weighing you down. You'll also begin to think about what things you want
to add to the space, remove from this space, and change about this space. So don't worry too much about how and what this face
will look like in the end. Simply listen to your gut and think through
where the space is currently at and what changes would make it more
functional and beautiful. Go ahead and pull out your workbook and fill
out the worksheets and titled lesson to the walk you through the
brainstorming process. And once you're finished, I'll meet you in
the next lesson.
6. Lesson 3 Tell a Story + Sentimental Objects: We're getting to one of my
favorite parts of the process. It's time to figure out what story you want to
tell inside your space. It doesn't have to
be a big story. It can be something small
or something subtle, but I do want you to intentionally choose
a story to tell. I know sometimes people
think that this part of the process is silly
or not important. I promise you that being intentional about
the story you tell, add meaning to your
space and affects the feeling and the mood of
your home in a positive way. Some stories that I've
told them the past or that I love color and I'm
not afraid to be bold. Sometimes I tell the story
that everyone's welcome here or that my family
is central to my life. You could tell a story
of a place you've traveled or meaningful
memory from your past. As you're thinking about
the story you want to tell, take note of any
sentimental objects, cherished memories, or life-giving collections that you'd like to include
in your space. Adding an object
from your life or your family's history is a great way to add
meaning and interest. In the example space
for my bedroom. I decided to tell the love
story of my sweetheart CJ, and our marriage of 23 years. I kept it simple by displaying a couple of photographs
with the two of us. And they even went
through our years of love notes and popped
one into a frame. Now, every time I
walk up the stairs, I get this grounded
and happy feeling, remembering our love story. So start to think about what
store you'd like to tell and what sentimental objects
you'd like to display.
7. Lesson 4 The Shining Star: In this lesson, we'll
be talking about my favorite decorating shortcut. It's my secret weapon
for making sure a space feels cohesive
and pulled together. I call it the shining star. Shining star is an
object that will be a jumping off point
for your pocket of joy. It doesn't have to be big, but I like to think of it
as the star of the show because it can help inform the design choices for
the rest of your space. A shining star can be
almost done anything. It can be a piece of artwork, furniture, fabric,
rug, wallpaper. It can be a sentimental
object, a collection, or really any item that brings you joy
when you look at it. Choosing a shining star
can help to influence the color palette and also
the mood of your space. So here are some examples of shining stars that
I've used in the past. This velvet patterns stool
is from anthropology, and I used it as the shining
star for my bedroom. The minute I saw my heart did a little dance
and I knew it'd be the perfect compliment to my mom's antique vanity
that was passed on to me. This stool gave me a great jumping off point
for the rest of the space. It tied together the hot pink
chair that I already had. And it inspired me to take the colors from the stool
and add them throughout the room with Navy curtains
and yellow accents on my bed. You can see how the overall
feeling of the room is very cohesive because I took
inspiration from this one object. In my office. I use this abstract
art print from Purina studio as my shining
star, Senate and gorgeous. I loved it because it created a sense of energy and movement. Provided lots of different
colors for me to pull from. After choosing the print, I decided to paint the
wet bar cabinets peak. And I've purchased a
dark green velvet sofa. In the example of
by bedroom noch, I used a photograph of me and my husband for
my shining star. I mimicked the color
palette by adding lots of black and white accents
and use the photo to inspire the rest of the
feeling for the space. So start thinking about what you'd like to use for
your shining star. And I'll meet you
in the next lesson.
8. Lesson 5 Choosing a Color Palette: If you want your pocket of
joy to look intentional and cohesive than we need to think about the colors that you'll
be using in your space. If we look at the before
picture of my bedroom noch, you can see that one of
the major issues was there was no sense of a
cohesive color palette. I had all sorts of different
sizes and colors of boxes. And it made the space
seem messy and cluttered. After I was a bit more intentional about
choosing a color palette. In this case, mostly
blacks and whites. The entire space felt pulled
together and restful. When choosing a color palette, each of us will be drawn to different colors depending
on our personality and depending on the feeling and mood that we want to
create inside our homes, generally, I like to choose just one or two
colors to focus on. And mixing a whole lot of neutrals with pops of
color here and there. But I'm also a color loving gal and sometimes I wanted to
include all the colors. So if that's the case and you're dealing with a lot
of different colors, then it's good to mix in lots
of white to balance it out, or to organize things in rainbow order for a more
pleasing color scheme. It's also okay if you don't
want to add too much color at all and feel more comfortable
sticking with neutrals. Just trust your gut on this one and don't worry
too much about it. Just keep in mind that
you should be intentional about the colors that are
going into your space. My best advice for picking
out a color palette is to start with one object and
then build from there. Remember from our last
lesson that we call this object the shining star. It's one item that has meaning
and that you love them. We build our color
palette around that.
9. Lesson 6 Refine Your Vision: Now that we've done some
planning and you've learned about color palettes
and the shining star, it's time to refine your vision so we can
start to get to work. So go ahead and pull out
your workbook and fill out the page for lesson six and
titled, refine your vision. In this worksheet,
you'll write down the purpose of the space, the shining star,
the color palette. You've chosen three words
to describe how you want the space to feel and how you'll tell your
story throughout the space. So go ahead and take a few minutes to fill
that worksheet out now.
10. Lesson 7 Decluttering + Start with a Clean Slate: Now that you've
finalized your plan, it's time to roll up your
sleeves and get into work. It's time to start decluttering and getting
that space organized. So why decluttering? Well, we declutter a space. It creates a sense of order
and does several things. First, it allows
our minds to rest. When we have like things
grouped together. It's visually pleasing
to our eyes and it helps us to have
a sense of calm. Second, when our
spaces are organized, it makes it easier
to keep them clean. If everything has
a designated spot than putting things
away is a brace. And last, when we create
order in space by taking out all the things that
we no longer need or want. It leaves us with only
the things that are meaningful,
beautiful, or useful. Creating an organized space
doesn't have to be perfect. It's definitely an
ongoing process. But I always like
to start with it because it truly
is the foundation for a joyful space and makes a huge difference in the
feeling of any area. So let's go ahead and get
started decluttering. First. You'll want to remove everything from
its current location. Absolutely. Everything comes
out whether you're going to keep it
or get rid of it. Next, you're going to wipe
down that empty space. We wanted to get
all the dust and grime out so that when
we put things back, it's going to feel
fresh and clean. Now you'll go through
each item one by one and decide if
you're going to keep it, donate it, or if it belongs
in a different space. So get your Marie Kondo on and start paying
attention to what is sparking joy and
be ruthless about getting rid of the items that
are no longer serving you. Once you've gone through every
item and you're left with the things that you
intentionally chose to keep, then it's time to
group like things together and decide on
a way to contain them. You may want to purchase
some boxes, bins or baskets, or find objects around
your house to do the job, just be sure that your different containers
are aesthetically pleasing and work with
your chosen color palette. So go ahead and start
cleaning out those spaces. Once you're all finished, meet me back here and we'll
talk about how to make things pretty once
you're all organized.
11. Lesson 8 Artwork: After you've made a
plan, Andy cluttered, it's time to figure
out how to make your space visually appealing. Essentially, how do
we make it pretty? My two favorite ways of
making spaces beautiful is adding artwork and learning
how to style a space. So we'll cover artwork
in this lesson and in our next lesson we'll
dive more into styling. First step is art work or really anything you'll
be adding to your walls. It could be art, photographs, a tapestry, or any
other wall decor. Choosing what to hang
on your walls should be fun and it should be
a time to explore. It says a lot about who
you are, what you value. And it's an opportunity
to showcase your personality and tell
your personal story. It's okay and expected for the things on your walls
to change over time. So don't take it too
seriously and just have fun. When it comes time to start
hanging things on your walls. Keep the following
rules in mind. First, artwork should
be hung at eye level. A good rule of thumb is that the center of your
art work should be about 57 " from the floor. Now, this 57 inch
rule only applies if you're hanging something on a wall with nothing
underneath it. But if you're hanging out above
a piece of furniture like over a sofa or above a
dresser or a nightstand, than the bottom of
the artwork should be about six to 8 " from the
top of your furniture. This will ensure that
the piece of art relates to the furniture
it's hanging above. When you're thinking about how wide a piece of art should be. It should also relate to the piece of furniture
it's hanging above. The width of your art should
be at least one half to two-thirds the width of the
sofa, dresser, or console. So I always like to
encourage people to go baker with what they
hang on their walls. Because in most cases, bigger is almost always better, especially if you have
a large area to fill. If you're hanging lots of different pieces altogether
to create a gallery wall, you can treat that
gallery wall as one large piece of artwork
and the same rules apply. Just be sure to keep
your rivers are the spaces between each
piece as uniform as you can. Go ahead and have fun exploring with what you
have on your walls. And I'll meet you
in the next lesson, where we'll learn
more about styling.
12. Lesson 9 Styling: This lesson is all
about styling. A lot of us tend to get stuck when it comes
to knowing what to put on those flat
surfaces like dressers, night stands,
bookshelves, mantles, and really any other surface? Well, this is where
styling comes in. What is styling? Styling is a process of adding all those little extras to a space to make it
uniquely yours. You can see in these two images. On the left, we have a space
that has a blank bookcase. And the image on the right
shows the bookcases styled. It has the added books, vases and objects
that really add personality and make
the room look finished. Any surface can be styled. You can style a nightstand at
coffee table, a bookshelf, a sofa, or any flat surface, that means a little
something extra. When it comes to styling, you also get to decide how much or how little
you want to do. Styling can be as simple as
adding pillows, twist sofa, or it can be more ornate as you fill a room with items you love, It's completely up to you just to remember
to keep it fun. Styling is a time to experiment
and play in your space, so don't get stressed out
about making it perfect. If you love it, then that is all that matters. Let's talk about some
tips for styling. First, make it personal. App, things that are
meaningful to you. Add family photos,
travel mementos, collections, anything
that you love. People who come
to your home love the quirky things that are unique to you and they're often a great conversation starter. Second, bring the outside in. I believe that every
space needs to have an organic element to it. Plants, branches,
coral, driftwood, crystals, flowers, anything
from the great outdoors. Bringing the outside
in immediately adds breadth of
life to any space. Third is to think about
the number three. So grouping three things together is not only
pleasing to the eye, but adds great visual
interests, twist space. So here's a simple
formula for grouping three items together
to create a vignette. First, start with
something flat, like a tray or a book. Second, add something tall
like a vase or a lamp. And third, add something
sculptural like a plant, coral, or a decorative object. Here's some more
examples of using three objects to create
an eye pleasing vignette. Let's start with this image. On the left. You can see the flat is the tray and the books. The tall and the sculptural
is the vase of flowers. Then they added another
third object by including a candle to
tie the group together. In the center image, you can see the
flat as the book. The tall vase with the flower
is the sculptural element. And the third item is the alarm clock that ties
it all together again, in our third image on the right, we have the flat with the books, the tall with those
bird paintings to add to the vertical space. And then we have the flowers
for the sculptural element. As you're thinking about
your pocket of joy, here are the steps
to begin styling it. First, gathered
together all the items that you think may
work for your space. I usually go throughout my
entire house and gather up everything I can that matches
my chosen color palette. And you can even go to a
store and purchase items. Just be sure to keep
your receipt so you can return anything
that doesn't work. Once everything is gathered, it's time to play. So think about adding something flat, tall and sculptural, and keep experimenting with
different groupings until you find something that's
pleasing to your eye. Once the space is starting
to come together, you can take a photo to better examine your work
of lot of times, looking at a space through a two-dimensional
photograph will help you be able to pinpoint anything that feels off or spots where you may need
to add a little something extra inside your
workbook or three styling principles to provide a few more tips for styling, a bookshelf, styling and
mantle and most anything else. Just remember to keep it fun and don't worry about
making it perfect. Remember that rules are meant to be broken and if you love it, That's all that matters.
13. Lesson 10 Shopping Tips: If you're thinking
about purchasing something for your news space, I want to share a few of my favorite shopping
tips to make your shopping experience as streamlined and
productive as possible. Before I go into a store
or shopping online, I always like to start
with shopping my own home. You can go through
different areas, rearranging things, and giving them a fresh life
in a new space. Make sure you look at
those storage areas. Basements are either rooms
of your home to see if there's anything you'd like to include in your pocket of joy. Once you've scoured
your house and you've exhausted the
possibilities there, then you may want to
do a little shopping. Before you start shopping, remember to measure everything, measure every inch of
your space and make special note of how
deep shelves are, how large the furniture is, how big openings are, and the measurement
of any empty space that needs to be filled. Whether you're shopping in
a store or shopping online, having all of your measurements
in one handy place. Since a lot of time and energy. Also, I like to
keep a tape measure inside of my purse just in case I'm out and about and need to check
the size of something. Nets. Take photos of your space
before you begin shopping, including overall
photos of the room, and also take some
close-up shots and photos from
different angles. You'll find that referencing these photos while
you're shopping is super helpful for visualizing if an item is going to work
in your space or not. My third tip is remembering to stick to your color palette. You can and definitely
should mix lots of different styles and items
from different places. Sticking to a chosen
color palette, we'll keep this space
looking cohesive. Inside your workbook,
you'll find a spot to jot down your specific
measurements and area to create a
shopping list and a summary of my
favorite shopping tips. I know you're
probably getting in the messy middle right now in creating
your pocket of joy. But I promise it's
going to all come together and it's going to feel so good once your
space is complete. So keep going. We're almost there. I promise it'll be worth it.
14. Lesson 11 Finishing Touches: We're almost to the end
of our class and I can't wait to see your pockets of
joy as you finish it up. If you're still inside
that messy middle, don't worry about it. Just keep going and
remember how good it's going to feel once
your space is complete. As our final lesson, I wanted to share my
favorite tips for creating a cozy and
inviting space. If your space is feeling a
little flat or need something, extra, fees are some fun
ideas that can help. I don't expect you
to do all of them. You can just pick one or
two that feel right to you. Number one, add something
shiny tier space. I'd love to add a little bit of sparkle to each area
that I'm working on. Now I'm not talking
about glitter here, but more of a glossy or
wet looking surface. Some great ideas for adding
something shiny are a mirror, something glass,
something metallic, or anything that has
a reflective surface. Second, bring the outside in. We've already talked about this, but having something from
the outdoor world inside your space will definitely
add a breath of fresh air. Third, opposites attract and almost always look
good together. If your space has a lot of wood, then you may want to add
something upholstered. If your space is
really feminine, you may want to add some
masculine elements. If your space is
all light and airy, then you can mix in
some dark here and there to add depth
and visual interest. If you have too much of
one thing in your space, think about how you
can add the opposite. Fourth is to go big with
your artwork and rugs. So don't be afraid to fill up that space with a
big old statement. Piece. Fifth is adding curtains. Now, I know not
everyone's face will have an opportunity
to add curtains, but I'm always amazed at how Heyne curtains can
immediately make a room feel pulled together and add lots of personality
and warmth. Sixth is to never underestimate
the power of paint. Paint is the quickest
and cheapest way to make a big impact in this space without spending a lot of money. Seventh, is to add
layers of lighting. So add lamps concepts, or candles in addition to
your overhead lighting, helps set the mood and gives you options for how
to use the space. Number eight is to add books. I feel like when you're
styling a space, you can never have
too many books. You can stack books both
vertically and horizontally, and use them as a base
under decorative objects. I always like to take the book jackets off
for prettier look. And there's something
about adding books twist space that just makes
it feel more lived in. Number nine is something
we've already talked about. And that's making it personal at things that
are meaningful to you. This could be family photos, travel momentum is collection, sentimental objects or
anything that you love. These personal touches don't only say a lot
about who you are, but they are a great
conversation starter as well. Number ten is when
you're feeling stuck, phone a friend and
bring in backup. So it's okay to ask for
help if something is falling off in a room and you
can't quite figure it out. The less Someone help you. I'm always available to
answer questions or ask a trusted friend for their
ideas or suggestions.
15. Final Thoughts: Congratulations on finishing
up this class and I can't wait to see your
before and after pictures in the project area, make sure you post them. I also have a really
amazing resource that I wanted to tell you about. I know how hard it can be finding just the right
items for your home. I've wasted countless hours
scouring stores locally, and it's often hard
to know where to look online and which
companies are reputable. So I created the ultimate
home decor shopping guide. It's my personal list of over 40 of my favorite places
to shop online. These are tried and
true stories that I've purchased from
in the past and that I love and stand
behind inside the guide. I've listed everything
by category, including what I like about
each store and a price guide. So that you'll know
if it will fit inside your budget to get
your free copy. Head over to test cpa.com
forward slash shopping guide. This was so much fun. I hope we can continue
to stay connected as we work together on
creating a more joyful home. Bye for now.
 Tessie Fay Snow, @tessiefaydesign