Transcripts
1. Welcome: Hi and welcome to my
Skillshare class. My name is Avraham and I'm
a professional illustrator. In this class, I'm going to
show you how you can create your very own Scallop Brushes for use in the Procreate app. Knowing how to create
your own Brushes is a very powerful tool because you can
customize and create exactly the type of brushes
you're looking for. And so I'm gonna guide
you step-by-step how to create four different
scallop brushes. The first is going to be
a generic Scallop Brush. Then a Scallop Brush
with an Outline inside. The third will be a scallop
brush with a Drop Shadow. And the last little combine
everything together. Scallop Brush the drop
shadow and light inside. Each one gets a little
more complicated. But if you follow along
instructions step-by-step, you have no problem
framing them yourself. In addition, I'm including in the Projects and
Resources section, all four of these
brushes already, so you can just grab
and start using them. However, I really do recommend
wearing the techniques to create your own brushes
because of all the doors open, can open to you in the future. For this class, you
will need an iPad, the Procreate app, and I highly recommend
the Apple pencil. For a to begin. I'll see
you in the first lesson.
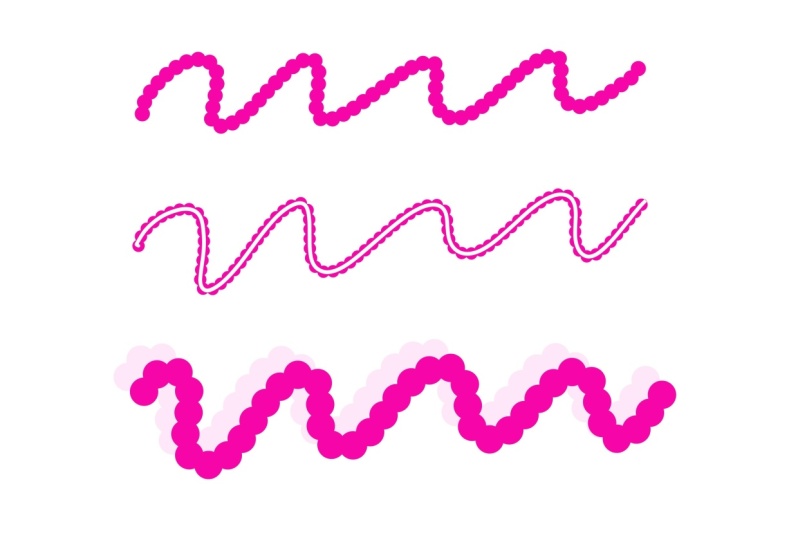
2. Basic Scallop Brush: We're going to create a few
scallop brushes going from the easier ones to
the more complicated. For all of them
though, you can create a brush with you have a canvas. So we're create a new canvas
by clicking the plus icon. And we're going to choose
the square canvas, 2048. By 2048, we can create our
first Scallop Brush simply by going to the brushes library and down to the query Brush Set. And duplicate or
mono line brush. Take the brush and
swipe to the left. We have the option
to duplicate it. Now. See it says my
line with a one, and on the far right that has the little Procreate symbol, which means it is not a
native Procreate brush. We're going to take
this to keep things organized and put it
into our own brush set. So scrolling to the
top of the page here. And the personal I break you
see little blue plus symbol. We'll click that and we'll
create a Brush Library. We'll call it scallop. Okay, let's go back down to Clear fee and we're going to drag it into the
Scallop Brush Set. There it is. Before
going any further, we're gonna need this default
monoline brush again. So we'll just make a
duplicate on this new one. Click on it to edit. And what we're going
to do is first, we're going to go to
the properties and change its minimum size
to something much bigger. And now go to the
stroke path and change its spacing
from the default of 17, something around 48. And click Done. Now,
when you draw this, you have a Scallop Brush. However, notice the
very first node of our Scallop Brush is
a little bit smaller. So how are we going to fix that? Let's go back to edit this. My line Brush. Go
to Apple pencil, go to sorry, taper and change the size 12-0 or none.
And now click Done. And now you'll see that we
actually have perfect size. There we are, Scallop Brush and we're going to edit
and give it that name. So we'll go to About this
brush and recall it. Scallop. Nicely done. What's next? We're gonna make a Scallop
Brush with an outline
3. Scallop Outline Brush: How are we going to make a
scatter brush with an outline? Let us make a duplicate of this scallop brush and
duplicate them outline. Move them together. And then select the scalpers is your main brush and then the smile line as
your second brush by, by slipping, slipping
slightly to the right. Not too much like if
you smoke too much, it gives you the option
to duplicate it, but we're not trying
to duplicate. We just went to us to
just select them both. And now it gives the option
to combine, click that, and it makes the private, the first one that you selected, the primary and the
second one secondary. And if you click on to Edit, you'll see on the
left, we now have two brushes that are combined. The top one is our
primary scallop brush and underneath of the secondary
one is the mono line. What we wanna do is
edit the blend modes. So to do that, click on the act of brush, which is the scallop one. It'll bring up a
combined options and it combines are basically the
same as a blending modes. Read another blending mode or
combined method is normal. We're going to click
on that, the word normal and change it to difference. And say Done. Let's test this out. Pretty good. However,
I want to make the outline a little bit bigger. So to do that, I'm going
to go back to the edit. Click on our new brush. Make sure I select the mono line brush was the second one. And then go here to
Properties and change its maximum size to
something bigger. And as you do this, you
can see on the right and estimation what's
going to happen here. So 137, that seems good to me. We'll test it out now. Clear this, right? And if I make it
bigger, bigger one. So I see here on this pair over there that's maybe a bit too
close to the edge. So let's go fix that by
going to scallop brush. You can click the
model and again, we're still on the
properties and we'll change the maximum size
down a little bit. 111. Do that, okay, Clear and test this out. And if we try to
make a rectangle, It's the weapons
with that rectangle. Okay, so now we
have under our belt scale-up with a regular
scale up with an outline. Let's go update this
brush and caught scale up with the line. Great. The next level is to
add in drop shadows
4. Scallop Drop Shadow Brush: All right everyone, let's create our Drop Shadows for
the scallop brushes. To do that, we have to use our canvas so it's
clear off this canvas. And we'll go into a black color by double-clicking to get them to the edge of our color wheel. And then we're going to go
back to a mono line brush. We can use this one
and make a circle. Hold down your finger to
make it a perfect circle. Or another way you could do
this is if you just make an ellipse and then
you have an option to change your lips into a
circle. Either way works. Then you want to drop your
color drop into fill it in. This, we will shrink a little
bit and move to the top, top-right, duplicate
it the bottom layer, and move it to the bottom left, overlapping a little bit and changing the color to
a fairly pale gray. And dragging that in there
as the bottom layer. Now I select both and
center to center, I've to turn snapping on. We are. And I was at
the center or a page. Copy everything by doing
three fingers down, swipe, select Copy All. Now we've copied this
canvas into our memory. We wanted to go now and
duplicate our mono line brush. This one we're going to edit. And for shape the shape
and say Import and paste. So this is good,
except that we want to wipe is the air that draws. And black is air
it doesn't draw. And great is like a
translucent color. Are Shadow in this case. So we went do is tap with two fingers and that will
change, invert all the colors. So now we have the white area
and the gray for our Brush. Click Done. And let's go back to the
properties and make this larger. One thing I'm also
seeing here is that in the shadow, the area. Well, so I'll show you
here. If I click Done, We'll see what's going on here. It's a bit of an
issue. Let's group these in and hide it
and it can do layer. And we will draw here. So testing to test it
out trump new layer. So you see here every time
that the set of overlaps, It's creating an
extra shadow effect. So it's fixed that. But going here and untrue
cruiser size also. And we fixed that is going
to rendering and change from intense planning
to light glaze. Now, let me draw much better, right? That's what
we're looking for. So we can now have Drop Shadow, but we're scallop, go, Hold on. Let's go fix that. Go back to here, brush stroke
and change our spacing. Here we go. Now, 34 looks
pretty good to me. That done. And let's try this again. Excellent, except
the very first beat of our scallop is,
needs to be fixed. So we're going to go
to taper and change the tip size back
to 0.1 more time. Here we are. Now we'd have three
brushes done. Let's move this and rename it. Recall it. Scallop with Shadow. And the last thing
to do now is we make a scallop Outline Brush
that has a Shadow
5. Scallop Outline Drop Shadow Brush: So now we want to create a scope with an outline
that has a Drop Shadow. How do we do that? First, we're going to create a duplicate of this couple of Shadow Brush. And a duplicate of them Outline Brush with
them closer together. Make sure we select the scallop with Shadow
as our primary. And then a small swipe to the
right to also select them, Outline Brush and click Combine. So now we have to use
two brushes together. You can edit it. And we want
to change the blending, the combination mode, clicking
on the primary Brush, I'll bring up the
combined mode options and branching is the
mode to difference. Looks amazing, right? However, I already know
because I try this out, it does not gonna work. If I say done, look
at the preview, it's giving me the line
is way off centered. I'll even show you if
you start to draw here. It's nowhere where
we want to be. Right? So why is that? To make it apparent, perhaps
why is if we go back to here and change the properties to say you use the
stamp preview. And then back to done. You'll see that the
little black dot, which is our Outline, is not in the center of the white
area of the scallop. And that's because
when we created Brush, the mono line brush has a
dot right in the middle and we want the dot of our
Outline to be off centered. So how do we fix that? If we turn off our Shadow and then swipe down with
three fingers, copy all. We're now going grab
the dot off centered. And let's put that in into our mono line brush
for the shape. And we can edit this and
then import and paste. And you'll see we've now moved
off to the side in birth, hit with two fingers
to invert the brush. So now the black is white. So we'll be painting with the
white area and click Done. And now, if I go to
Properties and maximum size, It's looking a lot better. However, it's
exactly overlapping everything so we need
to do is move it a little bit more to the side so that it gets a little more
than centered, right? Because it's exactly
the same shape, so it actually erases the
brush. Let's go fix that. Done. Go back to the black dot. Let's go make a
duplicate of as well as the original. For here. We're going to go
and move it a little bit like this perhaps, and see how that helps us. Swept down three fingers, swipe down and copy all. Go back to our Scallop Brush
with the Shadow and Outline. Might align, Shape, Edit, Import and paste, and
move it, just touch. And let's see how
that helps now. So if I changed
for the properties and change Maximum Size, Yeah, That's looking much
better. Now I can hit Done. And if I create a new
layer in such a dry, so to draw on a new layer, we are almost, almost right. That's it we can do
here. I have a feeling. The issue is that it's too big. So go back to the maximum
size and make it smaller, but not this one was to
make sure we continue the size of the monoline brush. Just make it smaller like this, but we have to move it more. So let's go back to this dot and we're
going to move it up a little bit more and say Copy, you can edit it. Might align, Shape, Edit, Import, Paste. Now let's see. That's looking, but I
think that's looking good. Here. We're clear this
and paint on this layer. I think it's just
because at the edge here, Let's see if we can. To fix that, I'm going to have to make this brush smaller. So let's go and make this a
little bit smaller like that. So this other page, copy all align, shape, paste. This property is make the
size a little smokey, really in the center here. Clear. And look at that. I think we did it.
I think we did it. First of all, we have
a great line with a Drop Shadow and Outline. And if you want to
make a rectangle, you can do that as well. There we are looking really
amazing. This is rename that. Let me change this back to
showing the stamp preview. We can see what that looks like.
6. Thank you and Class Project: Congratulations. You just successfully
made for scallop brushes. And that last one is
pretty complicated. If you did run it
into a difficulty, you can reach out
with your questions in the discussion section. I'll be more than
happy to assist. The class project is to create one or more of the
scallop brushes, following the steps
shown in the lessons and create a piece of artwork
using the brushes. I'd love to see what you made. So be sure to upload it in the Projects and
Resources section. That way we can all enjoy seeing each other's work
and get inspired. I'd also love to know
what you thought this class by leaving a class review, I am constantly trying to provide better content
for my students. And feedback is very
important to me to know what I should do more of where
I still need to improve. Lastly, please follow me
here on Skillshare to be notified of future
class releases and other exciting
announcements. Thank you so much for watching. I look forward to seeing
you in the next class.
 Avraham Nacher, Artist & Photographer