Transcripts
1. Welcome!: Hi, my name is Avraham and welcome to
the Skillshare class. Have you ever looked at piece of Art and wish you
prepare yourself. I know I've had that may times ligands and like Instagram feed. So in this Skillshare class, I wanted to show you my
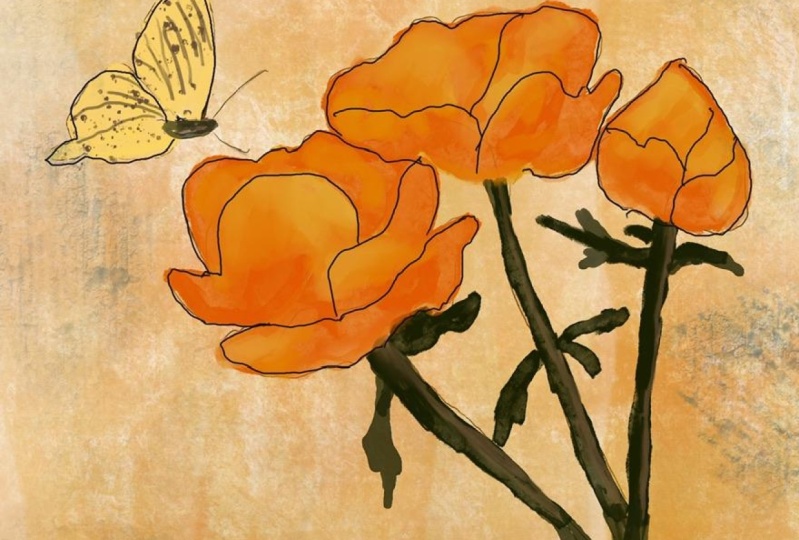
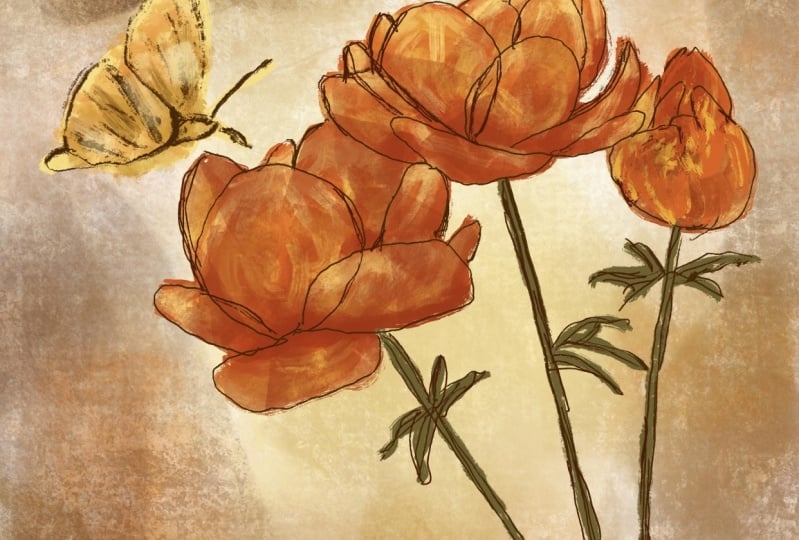
complete process for making this beautiful impressionistic Butterfly and Flowers Scene. We'll go step-by-step, starting from how to find inspiration
for your artwork. All the way to adding finishing
touches to your piece. Along the way, you'll learn how to set up
a custom canvas, use masks and then
blend modes till lives. Because we are
going for realism, you can find experimenting with techniques and simply enjoy
the creation process. Asked you that, I guarantee you will know only
have FUN in this class. Also come up with a wonderful
painting at the end. In this class, we'll be using the Procreate App with
the Apple pencil. You can totally
follow along using other digital software
as well if you prefer. Whether you're a beginner
or more events artist, I invite you to join me in
this class. Are you ready? Let's begin.
2. Starting with the Line Work: So we'll start by
creating a new canvas. To do that, we click
on the plus icon and then click on one of the
defaults like this square. However, I want to update
this to different dimensions. To do that, we click on the
wrench icon and then Canvas, crop and resize and settings. And we could change it to a
3,000 pixels by 4,000 pixels, which is going to be
portrait orientation. And DPI 300. Changing the DPI to 300 means that it prints
a much higher resolution. When you're ready, click done. And now we have our
portrait oriented canvas. Now for as far as what
we're going to draw, I'd like to use a
reference photo. And many times I'll find one on a site called
Pixabay to go there. We're going to go to
any brush you like. And this is the
Pixabay website and has images that amazing images
that you can use for free. You can search for them, like LinkedIn search
bar and typing things. You can also just click on
some of the main items here. So there's one called
flower looks good. So scroll down here and you can see many
beautiful pictures. I think I liked
this one over here, one of the butterfly
and flowers. So what I'm gonna do though, is since I want to make
something that was on portrait orientation,
that landscape. So I'm going to take this and
modify it a little bit so it's more of the portrait
orientation. We can do. We can copy it onto our
page as a reference. If you want to do that, you would long press on the
thumbnail and say Copy Image. Then go back to procreate and
under the wrench and add, there's an option called paste. It might ask you tip
from his permission. So I would say Allow. And here is our fixture. If you wanted to be very
precise in what you're drawing, you can click Fit to Canvas. Make it came a size,
of course mine. Here's portrait and landscape. But you get the idea. And then I would reduce the
opacity, something very low. And on a new layer with
a brush like six B, we could start to
sketch in our picture. And they had a very
accurate representation. You can add as much
details as you like. And when you're done
with your outlining, you can turn off glare. You could also make
it full opacity and then use it
to sample colors. Like if I press here, I'll get a little eyedropper, I'll get a color and
I can start coloring in using the color here. I won't be doing
exactly like that, but there's definitely an
option I will be doing. Let's just clear this layer here and hide this one
as a reference. So I'm going to put the two
and I have them side-by-side. And one way of doing
that is by swiping up, taking your app that you're
using the Google side. And you can see now we
have both side-by-side. It's a little bit smaller. A little bit smaller, so I
can see what's going on. And on this layer, I'm going to do a rough layout of what this
painting is gonna look like. Let me come much darker brush. For the brush, I'm going to
use a new drawing section, Blackburn, which isn't
amazingly versatile brush. Let's first make the size really small for this brush stroke. And we're going to
start sketching out. So actually, even if before that I'm going to make it really rough layout. So we have one flower here, another flower
here, here, right? Like this. And then birthplace, you're maybe a
little bit too big. So let's, let's move this
down just a bit like that. Shrinkage here and
have butterfly there. Okay, So that's
like a good layout. Shrink that really
small and null there. Okay, so over here,
this is our basic idea. Now we can draw our petals. I'm a very rough sketch. She's type of style here. There's one leaf first. And the third one. Those are flowers. And now for the butterfly,
something like this. Nice, Okay, I don't need this underlying layer
anymore. I'll delete that. And this can be art
or sketch here. So now let us add in some colors
3. The Flowers: Todd, colors, we're going
to make a new layer. I'm bringing it underneath. And now let's click. Go Back, reveal this
layer again if you want, we can pick a color like
this, pink with it. I'm going to still
use the Blackburn because I want to lay down
like an area of color. So moving like this. I don't need this anymore. Do we zoom in? We have everything
we need over here. I'm doing right now, is
laying in a basic color. And then afterwards we add in lots of little
variations all over. Because I don't want a
very flat piece of work. I went when it shows
lots of little rooms. I want love the colors here. Subtle, subtle hues. Okay, so to do that, we're going to first lock
this layer and Alpha Lock. And you can do that by swiping
right with two fingers. And then it changes it to this. You see the checkerboard
pattern in the back. Another of doing that
way of doing this is by clicking on the layer and
then selecting alpha luck. They'll turn it off and back on. And now if we were to draw, you'd see it only shows up where we have something already
existing on that layer. You can see in the thumbnail
as well. And do that. And we're going to add
in some more colors now that we're gonna go to our
artistic bursa and old Beach, which is a very
versatile brush painting here, a little smaller. To find some really dark areas. When to find her
dark areas first. Though, if you want, you could start with
the lighter ones. Wouldn't come back
to this as well. I'm just laying out some
colors and pressing. Not terribly hard. And that way it let some
of the color come through underneath and you have
this nice variations. Let's add in some
light color now. The personal bigger. Just a fun laying
down some color. And the wonderful thing about this is if
you don't like it, you can always undo or you can continue adding to see if you've got something
else that you'd like more. Still more. There's still
more I want to do here. This is just the laying down
some initial layers and that's more techniques
and some more brushed to the brushstrokes and colors
and some cool things here. So I'm switching to
a very light color. Then under and then go under
painting to turpentine, which is has the ability
to pull the ink as well. It pulls colors. So
you can see here it's got a brushstroke, lines and the brush stroke
and also pulls colors. So okay, So I'm going to add another layer and make
it into a Clipping Mask. And click mask
works very similar to alpha lock exceptions
on a new layer. Now, if I were to
paint with something that's take this
color, for example. Turn it off for a second and you'll see that I
can paint everywhere. But I'm going to turn
the clipping mask on. It's only going to appear
similar to the Alpha Lock, only where there's something
that's exists already. So I feel like I
went to cooking. So here you see this,
it's only showing up where something
exists beneath it. So if I were to move
this around and maybe we'll see
better like you see, it's it's hiding
everything that's not something that's already exists on the layer beneath it. We're going to delete this
though and make a new layer, makes it clear that but I
think it's clipping mask. And I'm going because
I didn't hear it. Yes, I'm going to add in under texture as this
rectangle texture. Go for something very red. Large truck this in, blur out a little bit here. Okay. I'm liking that a lot.
4. The Butterfly: Let's go on to our
butterfly now. Merge these together and unlock the sprint does unlock this layer because we
have paint on it again. Let's go with Art butterfly, which looks like it's
a very limited color. And lay it down with Blackburn. Lead time with the Blackboard. Turn on Alpha Lock. Start. We'll put
down some colors. First thing with
earlier, a little more, orangey and paste and stamp this down. Darker. Go to turpentine again. Later strokes and
pleasant, big, smaller. Okay, let me get the strokes
for the butterfly's wings. A few more of those
with the Blackburn. So let's go back to here, make sure it's small again. And we'll go back to
the sketch layer. Now this in, just a few of these dark in here. And we're going to and
in some late color, so no trouble that evolve. Then turpentine again. I think we could do also
added some speckles. So we're going to go to the
spray paints and splitter, the dark color on a new layer. Let's clean mask. We can split or
some things here. Yeah, let's Beautiful.
Look at that. Let's go for red color also, just afraid, but at some Anyway. Sorry, painting with
the could do it, right? Right. Okay. So I have that
and make a few more flicks. Another layer blend. And then this layer also
do a little blending. So much planting,
a little blending. Okay? And then we can
put all that together
5. The Stems: Next I think we could do Art, the Stems, sorry, over here, and a very deep,
deep color for that. I think that's about what it is over there because he's double-check the
color I'm choosing. And it looks like it's not
so of the layer though. And go back to drawing
and Blackburn, a little bit bigger and
start to fill in our Stems. Not really being so precise because
that's the nature of this type of piece here. One there. Then over here, this one. I don't see too much on
that side. All right. So we have like this will say over here, we'll have recently been less. Okay. Like that. Now that I would
in the Background actually wait before
we did Background, I want to, I'm adding some
color variation on the Stems. So we're going to swipe and
then go to a lighter color. This we can do black
Bernoulli edges. You can see the texture.
It's very rough. Put holy through here. And this one, which means
it close just a little bit. This one as well. For this Friesen, be nice. Darker under their leaves because they have
a little darker. And to turpentine, a
little bit of texture here
6. The Background and Finishing: Alright, so now it is too high. Listens how that's looking, and we now know what
you were Background. Let's go and try that
to the lowest layer. And for the Background, I'm going to go with Nico role. Paint large here. And I think we better with
a lighter color. So as we'll see what happened, we'll start with
this lighter color. Then at that, Let's go with some color, a little darker. For that. We'll try to earlier. Now I can blend
out a little bit. Stepping away. Let me see areas that it looks
like there to, to find. Also want to go and add in that turpentine small
size or add a bit of textures instead with a different color later. Okay, So this actually has a white brush and raised
very gentle pressure. Let a little bit of some
lines, brushstrokes. So looking at this,
I'm looking a lot. I think the Butterfly somehow
I forgot someone Butterfly. Let's go get them back in
here. Let's move him up. So let's move our
eraser risk preference, their bikes at the
top here. Look at it. Let's move it up. So what we'll be doing
this Butterfly to make it look more action-packed. Okay, so let's first
will go make a new layer above a Butterfly.
Something darker. Let's simple dark
color from him. It's pretty dark and too cold. Right over here on the edges. I don't think she's too
much the beach today. Maybe a little flower, but looking back to that one. Okay, so let's go and do
look more the leaves here. Little fill layer
for leaves here. And we're but it
clipping mask earlier. Later. Okay. That's it.
7. Thank you!: Thanks again for joining me
in this Skillshare class. How he picked up a
few new techniques for using that you
can use in your Art, as well as some tips and tricks for using
the Procreate app. They'll help you when you
create your future work. I look to see what you made. So be sure to upload it to the Projects and
Resources section. That way we can all enjoy seeing each other's creationist. And if you upload your
work to social media such as Instagram,
you can tag me. I'll be sure to give you a lake. Also let me know he
thought this class, but living in class review, I'm constantly trying to provide better context
for my students. And feedback is very
important to me to know what I should do more of
an where you do improve. Thank you so much for watching. I look forward to seeing
you in the next class.
 Avraham Nacher, Artist & Photographer