Transcripts
1. Welcome!: Hi, and welcome to
the skillshare class. We're together working to
create this oil painting of an apple using the default brushes that
come with procrate. My name is Avra and I'm
a digital illustrator. If you're anything
like me, you drool when you see the amazing
work by other artists. And you wish you
had the tools and the brushes that they have to create the work that they do. But I'm here to tell you
a secret, you already do. The procreate app is an amazingly versatile
and easy used program, and it comes with a huge
number of default brushes that let you create any type
of art that you can imagine. In this class, I'm going
to take you step by step and show you how
with a few simple, readily available
brushes in procreate, you can create your
own oil painting art. And once you understand
the techniques and how you use these brushes, you can then apply it to create other subjects and
other artwork as well. All you need is an ipad, the procreate app, and I highly recommend
the apple pencil. So if you read to begin,
let's get started.
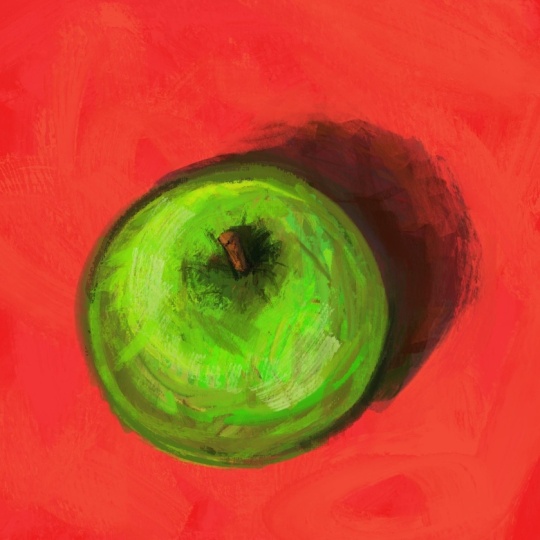
2. Setting up and drawing the background: We're going to start off
by creating a background. So I'm going to go
and pick a color that is in this reddish
area and color drop it in. And then I want to add
in some more texture. So to do that, I'm
going to first make a slight variation in
the brush, more red. And let's go into our
painting section and choose oil paint brush bigger, just a gentle back and forth here to be one pass, a little bit darker,
and then can do even a touch darker here. Everything to be very subtle. I don't want taking
away from our subject, but I want to makes the
background something interesting. Good. And now we're
going to go something a little bit of lighter side. I'm changing angle of my
brush, brush strokes. I'm using things at angles and not vertical or P or horizontal, because that gives a little
more action and energy. Okay, so now we have
this and we're going to start roughing out the
shape of our apple.
3. Drawing the apple and shadows: Let's create a new layer.
And we're going to start with roughing out
the shape of our apple. So for that I'm taking
a darker brush. I can keep on oil
paint, I suppose, make it smaller and do an
apple, something like this. And then we're
going to also rough out where our shadow
is going to be. Okay. So here we are. We'll begin by
making a new layer, and we'll start with making some shadows with
the same oil brush, and the color, the
brown that we've been using make the brush
a little bit bigger. Um, I see the oil brushes. I'm not entirely happy
with what the look is. It's more brush pulling the
paint than adding color. So I think let's go switch to the flat brush and see
what that looks like. Yeah, this is a lot better. It's laying down a lot
more of the paint, and I kind of like the look too. Let's pull out the color wheel, and that way we
have an easy axis, and we can just keep swapping colors just by pressing
on new colors each time. It adds a lot to the
painting by using a few different colors
because in reality, it's not going a uniform color. And so I'm adding in
some a little more of the red and oranges
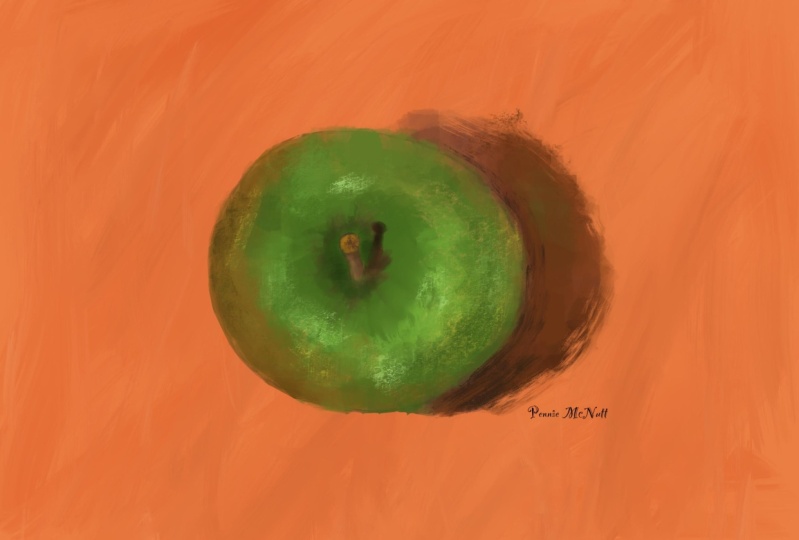
into the background. Now it's time for our Apple.
Make that another layer. Okay, let's start with
major colors, green. We're doing very,
uh, broad strokes. We're not looking for
accuracy at this point. We're just looking to lay
down some basic colors. I want to in this area over
here, we have our stem. So I think we should try to, um, mark that out. Go back to our other layer. I will draw on our stem. Paint. Small. Let me just move that
just a little bit. Ember here. Okay, back to our
drawing and our flat Bush. On the crock layer, of course. It's very big. Try to follow the contour
of our Apple? Okay. I'm applying a darker color
green right here because there's less light
hitting the apple on the top, so it'll be darker. Just keep doing some
various sittle variations on the color of our apple. I think what we
want to do also is we're gonna go we can use
that as our smudging brush, and that will help smooth
things out a little bit. Back to here and get darker. You're here. I decide darkest green 'cause
this is where the least light is showing up. And just a little bit again. I'm trying to make the
transitions less blocky, but if the style you're
looking for is different, you can use less transitions
or even no transitions. I think we've almost painted enough to get rid
of our sketching layer, but I still first
want to go in and refine our stem a little bit. So that's gonna be
a little more in the ground and smaller. A slightly lighter brown as we come around to the side
that's facing the light. Little highlights
here and there. And then we need a
shadow for our stem. So let's just grab
this dark color, and even a little darker even. Stem. Okay, let's continue playing with some
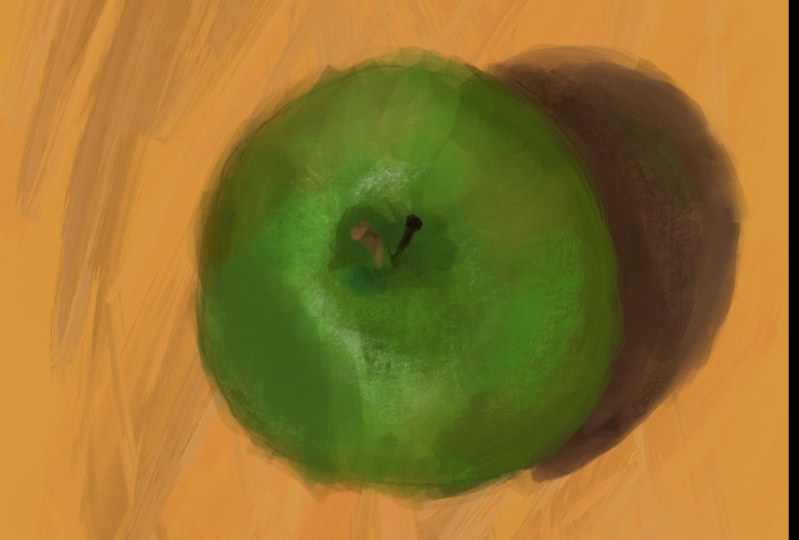
things around here. Adding a little
darker green where the Apple starts to turn
in towards the stem. Mm. More perspective, just adding more colour
variations to make the Apple more rounded.
What's the name. I want to add into
the shadow area a little bit more of the
oranges that I'm seeing here. I think we get rid of
the reference layer now. Okay. So we go stucco and we're going to add in a little bit
of, like, a texture. See how that is.
Yeah, I look at that. It's a little more
than I want, but it's definitely the idea
I'm going for. Sample color here, change it a little bit and add in here. Beautiful. This gives a little bit more of
a painterly feel. Changing to a smaller brush as I start to apply highlights. Don't need to go for pure white. I don't normally see things
that are 100% white anyway. It's gorgeous. We loving this texture that's
adding in here. I'm approaching this right
now is different planes. And different planes of light, how it's hitting the Apple. Think that I want to do
with our flat brush. The Apple looking very good. Very nice. Just want to smooth things out
over here a little bit. Go back to our stucco.
A little bigger here. Okay, let's look at
the shadows a bit. Going back to flat brush, getting some color here and
warming it up a little bit. This is the darkest area right here, so I'll make sure it's dark and adding in a few
different color variations. As. Big. Let's try pre but also stucco this also and just a little bit. It's like that. I see I meant to do it
on the other layer. So now we're going back
to the lower layer, I'll define be easier to cover up the gaps with
the Apple and the shadow. Take this color and
darken it ands. So I just want to smooth out our shadow that
we have over here. That's how it could be
a little smoothers's I got a light texture here? Or something again cover up. Uh, here. Going
back to flat Brush. Same thing with Bob. But here, I think I'm going to just
smooth out make this. I just a little
darker in our Apple. Here again, and I think
that we can benefit from going really
dark in the middle. Go back to our stucco again
and add it a little bit more. We got very cool textures. Okay. And now I
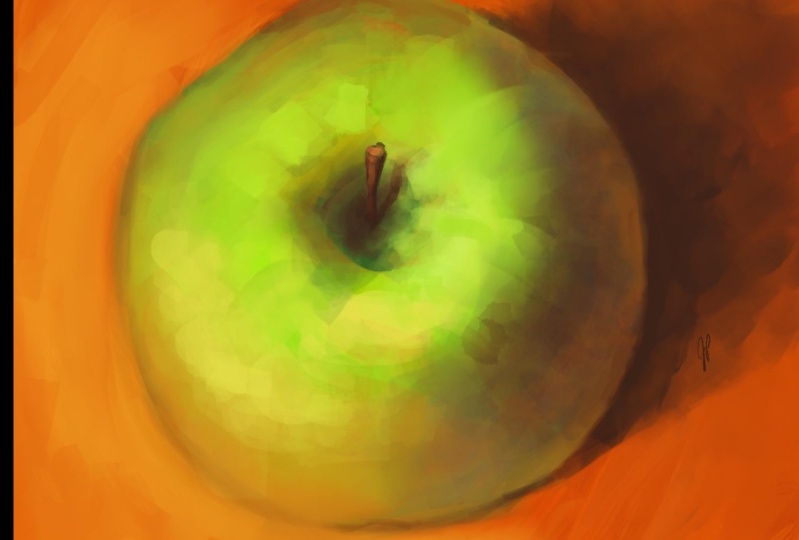
think we're good. So this is how
we're going to make our painterly style Apple using default standard
brushes a procret. And
4. Thank you!: Congratulations on making your
first digital oil painting of an apple using the default brushes that
come with procreate. I'd be so excited to
see what you made. So please be sure to upload it to the projects
and resources section so that way I and the other students can
see and be inspired. Additionally, I would love to hear your feedback
on this class. I'm constantly
trying to improve. And I would love to hear
your feedback on why I did write and why I
could have improved it. Lastly, please remember, follow me here on
Skillshare to be notified about future classes
and other exciting updates. Thank you again so much
for taking this class. I look forward to seeing
you in the next one.
 Avraham Nacher, Artist & Photographer