Transcripts
1. Course Trailer: This course will teach
you how to create realistic looking forests,
lakes, mountains, lender. A lot of people,
when they tried to create realistic
looking environments, they end up with a results
looking like this. I don't want you to
get such results and my mission is to
help you with that. Throughout this course, you
will learn how you can create a super realistic looking
environment using the ANT landscape add-ons
that comes with Blender. At first, we will start by studying some real
life references because it will be our guide to achieving a
photo-realistic result. Then you will learn
how to generate an infinite number of formations like
mountains and lakes. Using the ANT landscape add-on, we will dive deeply into how
it works and we will explain it in depth so that you can
use it in the future easily. After that, we will move
to shade our scene. And here you will learn all
about nodes, where they are, how they work and
talk to each other, and how to use PBR materials to have a photorealistic
environment. And after these videos, you will never have
to struggle with working with nodes
again in the future. Then you will learn
how to scatter different nature assets that comes with these scores to fill out our environment even more. And we will be doing this
using geometry nodes. Even if you're thinking that geometry nodes are complicated, this course will give you
a solid introduction to the core concepts of
it and how you can actually implement
it in your own work. I promise you that this
course will make you fall in love with the
geometrically nodes. The last part of this
course will be all about how to
finalize your scene, how to lie at it at a sky. Add background details without increasing your render time. Add some atmospheric depth, best render settings. Positing handle more. Not only when you
finish this course, you will end up with a solid
understanding of how to make your environments
looks so epic in gorgeous. But you will learn along the way some really valuable tricks and workflows that you won't
find anywhere else. And that will take your 3D
skills to the next level. So even though this
course might sound like it is just about
3D environments, it is just a topic
that will help you understand a lot of
techniques and workflows. The course is built
from the ground up to suit whatever your
level in Blender, we will explain
everything in detail so that you understand
exactly what we're doing. And most importantly,
why in the first place, this course is not just about showing you the buttons to hit, but most importantly,
why am doing whatever I'm doing and what is my
thought process behind it, which I think is the most valuable skill
that you can develop. So basically the scores, is it really tasty, pastor for all the
beginners out there with some spicy sauce on top for the ones looking for more
advanced techniques. And who wants to take their
3D renders to the next level? There is a value in this course, no matter your level, and simply, it will
blow your mind. Now, if all of that sounded
exciting for you, believe me, the scores will be a
huge investment in your 3D skills that
you will not regret. And I can't wait
to see you inside the course enough for
me for this video. And it is time to
start our journey, my friends and go. Now.
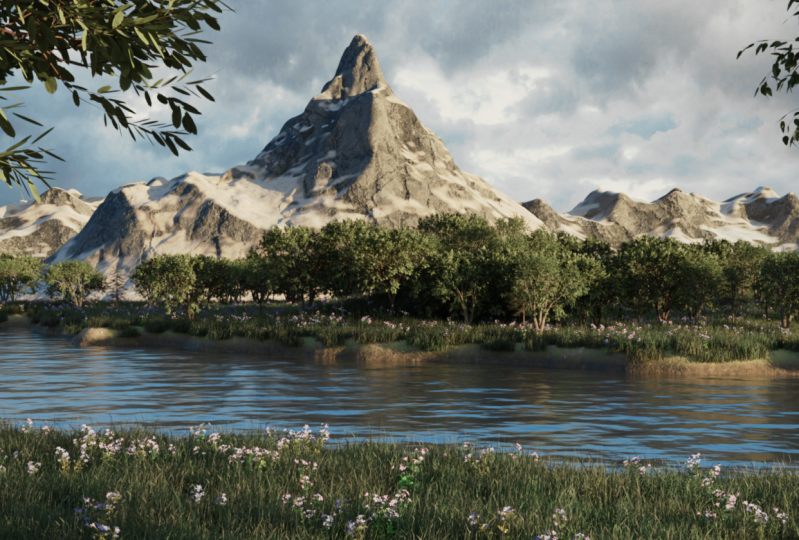
2. Studying Refrences: Our imagination is
really bad when it comes to drawing
things from memory. So that's why you always need references for this project. I assembled a couple
of references, which will be my guide to creating the render
I have in mind. So first things first here, how I'm imagining the
scene to be basically, I will have definitely the, some sort of this image. We will have a long line of trees somewhere in
the background. And also a lake probably
will be in the foreground. But I'm going to add some trees also maybe in the foreground
to frame the entire shot. And the biggest
difference will be there. And i'm, I'm actually
planning to add some mountains in
the background, just like in this picture. And also these are some
other references I might use in case I want to cover
these mountains with trees. But yeah, for my
main inspiration, I'm going to look at this, this, and this, and
for the texture of the water or how the water
is supposed to look like. I'm going to heavily rely on this image because it
doesn't have a clear, let's say texture for how
real water is looking like. And you will be
surprised actually, how easy to achieve a similar
looking water without doing any sort of like
crazy simulation or crazy shading or any of that. It is actually pretty simple and we will be doing
that in this course. And yeah, these are basically my main inspiration of how I'm imagining
this render to be. So buckle up and let's
start our journey. My friends.
3. Scene Preparation: Hello and welcome
inside of Blender. And in this video,
we will prepare the software for all the
work that we will be doing. One important thing I want
to mention is that I will be using the three-point
to Alpha version, which is by the time of
recording this video, it is the most recent version. It is not a stable one
because based on what I know, the latest stable
version is the 3.1. But you will be also able to follow even using
the 3 or even a 3.1. So don't worry about the
version because I'm trying to make the scores as
future as possible. And that means at least always using the latest
version possible. So yeah, as long as you
are from 3 and above, you would be ready to go. So let's just select General. And the first thing I'm gonna
do is basically to delete this light and
cubed x and delete. And after doing
this, let's change a couple of render
settings right here. And actually before I do that, one of the comments
that I received is that because my
screen is so huge, all of these icons
are pretty small. So that's why I'm going
to Edit Preferences. Now, don't follow
me in this and I'm going to change the scale
to something like 1.1. And I think by doing this, the icons and all the words
will be more readable. Let's help doing this in
the rendering engine. I'm going to choose cycles
in the feature set. I will leave it as supported. Or actually let's change it
to experimental because we might need some adaptive
sampling for the CPU. I'm going to change
it to a GPU compute. Of course, if you
have a graphic card, make sure to change to
GPU compute so that you have fast renderers
for the viewport. I'm going to change
it to something like 30 to uncheck noise threshold. I don't need it. And for the render, I'm going to leave
it for now as 4096, we will be changing at
later for the light paths, as you probably know, 12, I always say that is a
little bit overkill. So our drop it down by third, which means it will go to eight. Other than that, that's it for the rendering settings
in the format. I'm going to choose 2560, which is the cinema
scope aspect ratio that I used along this course. Make sure to check
render region and crop to render region so that the only part that will
be rendered is what inside the frame
for the frame rate, leave it at 24, even though I don't think that we will
be creating an animation, but just in case for the
end, Let's choose 240. And for the output settings, I'm not going to
change anything in here because we will
be doing all of that later when we use the composite or for that
in the render passes, I'm only going to check
the denoising data. And maybe later on, I will also choose
the mess because we might need to add
a little bit of fog, but for now, we'll be good
just by using denoising data. Let's check the properties
of our camera perspective. 50 millimeter. 50 millimeter is a good number. But I think because we're doing some sort of a
landscape photography, we will need a little
bit of a wider lens. So that's why I'm
going to choose the 35 millimeter
lens for the end. Let's bring it up to something
like 10 thousand meter because there are certain
extent we'll all be working in a real life scale. So it will be good if
we bring this number for the background images. Nothing here, let's
say viewport display. Make sure to bring this
passport to something like one. So basically if I hit
0 in the 3D view port, this number will
basically control how dark these areas are. And to be honest,
it is a little bit too distracting
what it is at 0.5. So I always like to
bring it up to one. So I only can see what's
inside this frame, which basically means
what the camera will see. It will make your life
easier when trying to set up the shot and all of that just rotate to exit the camera view. And what I'm gonna
do right now is to jump to the world properties. And from here on the surface,
as you probably know, blender right now is using this color as an
HDRI for this scene. If I jump to the rendered view, it is basically this
gray color that is acting like an HDRI,
the environment color. So make sure to go to color and choose environment texture, everything will turn purple because basically we don't
have an image plugged in. And basically all we have
to do is to go to open. And right here in the
Materials folder, you will find this
fruits and rise. So make sure to
double-click on it. And yeah, this is
our HDRI right now. Some people might find it distracting to always
see it and surprise. And one of these people, so I'm going to the render
tab and under a film, make sure to check
this transparent so we only see the
effect of the HDRI without basically
bothering ourselves to see the actual
background of the HDRI. Alright, so after doing this, I'm going to change
a little bit the UI of lenders so it suits my needs. The first thing, I don't
like this bar right here, so I'm going to
right mouse button and show tool settings. I'm going to hide it because
they don't need it and it is just taking some useful
space that I will need. I'm going to jump back
to this solid view. And also I'm going
to change this from the timeline to
the shader editor. And I'm going to
take it a little bit down because they
don't need it now. That probably will need a
pretty quick later on, so yeah, it will be already
ready right here for me waiting to be used. And the last thing that
I want to mention, even though I remember
mentioning in the first videos
of their scores, which are the, as I mentioned, we will be using the a and T landscape
along this chapter. So make sure to Edit
Preferences and from here, make sure to Jim to Add-ons. And from here make sure
to look for a point, end point T landscape, make sure to activate
this add-on add mesh. Ant landscape also enable another add-on which was
called sapling add-on, which is this one right here, AD curve sampling tree Jan, which is an add-on
that we will use later to create our trees. So yeah, make sure to save
your preferences from here. For me it is autosave, so make sure to save them, and I will close this, make sure to save your file. And right now we're ready to start working on
this environment. So I will see you
in the next video where we will create
the mountain. See you there.
4. Using A.N.T Landscape to Create The Mountain: Hello and welcome.
In this video, where we will basically start
by creating the mountain. So first things first, let's just go Shift
a and Andromache. You will find landscape. Of course you will not
have that option if you didn't activate
the ANT landscapes. So please make sure
to activate it. And here's what you will notice. You will have this formation
that looks like a mountain. Right here on the bottom, you will find this panel, which if you click
on it to expand it, you will be shocked with all of these different
settings right here. A lot of people will find the a and T landscape
pretty scary. But actually instead of looking at all of these
different settings, wondering what are
they supposed to do. It is a pretty good
if we understand the basics of how
this add-on works. And simply, this
add-on will generate a noise which will look
something like this. And then we'll automatically
use it to displace a plane. And that's why if
you look right here, you will find a tab
called noise settings, which is responsible for controlling the
look of that noise. And then another tab
called Display Settings, which is responsible for how the final result will look
like for displacing the plane. That noise texture
generated right here. And all of these different
settings are either related to changing
the look of the noise, which are all of these
settings right here, which we'll go over
them pretty quickly. And the other settings are
related to the displacement, which basically means
the way this add-on will use the noise texture
to displace our plane. You see pretty simple after all, Let's just jump to the top. And right here you will find plenty of different presets from some abstract shapes
like these ones do like some really
useful style. For example, like the dunes, which I think would be a
good idea if you apply this shader we created in the first chapter on these ones, just an idea out there. And of course you
will find plenty of different things like
lakes, mountains, mountains, planets,
all of those stuff the ANT landscape will
be able to create. In our case, we need
to create a mountain. So that's why I'm going to
choose either mountain one which will look something
like this or mountain to, but based on my experience, I think that mountains do is we'll give you
a smoother result. And what I want in
our shot is basically to have really rigid
look to our mountain. So that's why I'm going to stick mountain one which will
look something like this. After all of that you will have right here
something called name. So I'm going to change
it for example, two main mountain,
this is unnecessary, but I like to keep
things organized, subdivision x and subdivision y, which basically means
how much they add on. We'll subdivide that
Blaine by default, it will always use 128, but I think it is a pretty
low Ras to be honest. And that's why I'm going to crank this number to
something like 256, which will give you way better result and more rigid
look to our mountain. One small thing I
want to mention, the more you add subdivisions, the slower the adult will become and the slower
your scene will become an actually the ANT
landscape tend to slow down your view port and the
entire scene drastically, which actually might
crash the software. And in that case, you can cry hopelessly
in the corner. After that you will have
the mesh size x and y. We will leave them at two, but they are kind of
explanatory the size of this whole thing in the
x-axis and the y-axis. And right here you will, we will go to the most important
settings, in my opinion, which are the nose settings, which will allow you to shave this mountain the way you want. And right here you
will have plenty of different types of noises. For example, the
reg multi fractal, which is the one we're
using right now. We'll give you this kind. They're really edgy, more defined edges like
you're seeing right now. But if you go, for example, to something like
hetero terrain, it will give you these
kind of formation that is really suited for
things like hills. But for our case, we will be using the
reg multi fractal because it is exactly the
result we're looking for. But please feel free
to experiment with all of these different
things right here. And to be honest, an entire course can be made
around the anti landscape. But I think the best way
for you to learn about all of these is basically to
just experiment with them. But yes, make sure
to set it up to reg multi fractal
for the noise basis, you will also have plenty
of different presets. For example, right now
it is using a blender. For example, if we choose Voronoi F4 to look
something like this, which I don't know
what can be used for. The point is the ANT
landscape does have the millennia of presets
that you can choose from. And it is really powerful add-on that you will
enjoy playing with. It's so much for the
offset x and offset y, it will basically control the position of the
underlying texture. So look at this. Basically it will control the position of
the noise texture. In our case, I will
leave it at 0, size x, and size-wise, which will basically control the underlying texture or the
underlying noise texture. Which means that if we
scale it a little bit. This mountain will start to become a little bit more flat. So just as an example, if we bring these two numbers
to something like two, notice that the mountain
became way more flat. But in our case, I will
leave them at one because that's exactly what I
want for the noise size. Also, it is going to
self-explanatory the overall size of the noise texture for the environment that
we will be creating. I'm going to drop it down
to something like 0.8, which will give
you a result that looks somehow like this. This depth setting
will control basically the number of the frequencies
of the noise texture, which to be honest, I try
playing with this number. And what I noticed is that
any number above eight, we will not do almost anything. For example, right now,
it is set to eight. If I bring it to 12, which was the default number, almost nothing will happen. So I will basically just
to save some memory, I'm going to drop it to eight
and I know nothing changed. And that's the point. After that you will have
dimension which basically will control the fractal dimension
of the roughest areas. We're talking about
these areas right here. So in my case, I'm going actually to drag this number a little bit
up to something like 1.2. And this will just make them a little bit more edgy, let say, for the lack of
clarity which will control the gap between the
successive frequencies. It is basically the
setting that is responsible for
making this mountain look the way we want. This may not be the
most precise answer, but simply if you drag this
number to something like 2.4, it will just make
all of these edges like more picky and more
angular or let's say, which is if you think about it, that's a common look for all the different
mountains are there. You will always find this
really edgy peak on the top. Other than that for all the different settings
like the offsetting gain, it will simply
basically just control some different levels of black and white in the
underlying texture. For example, if you drag
this to southern like 0.7, what you will notice
is that it will bring the whole thing down. All of these pores
that we used to have some details
on kind of Lad, my case, I will leave it at the default value,
which is 0.88. And lastly, but not least, there is the gain which
will basically control the scale factor of
this noise texture, which the best way I
actually can show you what exactly will do is by changing this number
to something like two. And as you can see, it basically control the mid levels
of this mountain. And as you can see,
it became more flat. But in my case, I'm going
to leave it at 4.2. Lastly, but not least, you will have here some
different effect types. Let's say, for example, let's choose dots which will give you a result
looking like this. But yeah, just play with them. In my case. Now I'm going to use
any kind of effect, but feel free to play with them. And maybe you'll find something cool for the display settings, which are basically
controlling the way of how this noise vector is
displaying our plane. As I mentioned before, all of these settings are
kind of self-explanatory. The height will control how high the noise Intensity Scale, which means that if we bring this number to
something like one, the whole mountain will go up. And that's not actually the
result we're looking for. So I'm going to leave it at 0.5, or actually let's choose 0.6. Offset is the same one as we explained before,
maximum and minimum, which will control the
maximum point this mountain and the minimum
point of it, the falloff. And that's actually
pretty useful setting. And simply, some
people might ask, for example, this is
just one mountain. What if I want this
mountain to be really long? In that case, some people
might suggest like hey, just bring the
size, for example, on the y-axis or
something like five. But this will give
you this like kind of weird stretching effect, which is not exactly
what we're looking for. In that case, you need
to create some sort of a seamless texture
along the y-axis. And that's why, if you chose
in the fall, for example, x, you will notice that
basically this edge, I will give you this kind of effect that looks
like a formation. And by doing this, you will
be able to scale this up in the y-axis and you will be able to create a
very long formation. So in my case, I'm
going to live it back and the default value,
which is x and y. Lastly, but not least, you will have this thing
called what replaying, which basically will create
a just a simple plane that will be responsible to
becoming a water plane, which actually we will
dive a little bit deeper. Relate to Ron on what does this exactly do when we
will create our lake? I'm going to disable it by
clicking on water plane. And yeah, by doing
this where basically prepare the main peak of
the mountain for this shot. And all you have to do is
basically to click out. Now some people might
wonder, alrighty, seen, but what if I
click out by mistake? Do I lose all these settings
that I spent ages preparing? And the answer is now, as long as you didn't
close Blender. So for example, if I delete this mountain that
I just created, EX, Delete, and I go shift
a mesh and landscape. The add-on will basically remember my latest
settings by default, and it will give me the
exact same mountain. So this setting is
pretty useful if you asked me the other thing
that you will notice, if I select this
mountain and I hit N to open the side menu, you will have this Create tab, which is basically responsible
on this ENT landscape. And it will allow
you to change plenty of different
settings right here. But just for you
to know this work, as long as you didn't
start changing the mesh, once you start changing
it, it is over. But yeah, it is good to have all of these option
right here in case you want to do anything related to changing the
look of this mountain. But to be honest,
what I would highly recommend is that you anneal the settings you
want basically by experimenting in
the operator panel, which will show up when
you're changing the settings. Because till this
point I find all of these settings
right here a little bit confusing to work with, but yeah, just for you to know. Yes, you can change them
even after we close, they entail landscape
operator panel. If you close Blender
and reopen it, everything will be
back to default and all the settings we
did will be gone. Another setting that
you might want to play with is the
landscape rotor, which I'm not going
to dive in deep on it in this video because this
video is already long. So we're going to discover
a little bit more about how to create some erosions
for this mountain. And the next video, See
you in the next one. Everyone.
5. Creating Erosions: Hello and welcome. In this
new video where we will basically create some
erosions for our mountain. Alright, if you remember
in the previous video, I basically mentioned that under the Create and in
the landscape tools, you will find plenty of different kinds of
useful options. One of them is actually
the landscape or rotor. So basically, as
the name states, it will basically create
some erosions for us. So all you have to do
is basically to select your mesh and go to
landscape rotor. Wait for it for a second. And there isn't this
menu that will pop up. Now, just to mention one thing, some people might stumble upon a problem where you
will have some sort of a Python problem and basically red box that
will appear right here. In that case, make sure to visit the last chapter
of this course. What I will show you how
you can fix that issue. So if you're stumbling upon
that problem, just go fix it. It is pretty simple and easy. And if it is just
working fine for you as it is working
fine for me, then we can keep on going. Basically, erosions will add more details to our landscape. The only problem that I always stumble upon with
this erosion tool using the ANT landscape is that it is actually pretty
slow to compute. And when factoring the
time that I spent waiting endlessly for the results to compute and the result
that I was getting, it is not that
good to be honest, because the more we
crank this number up, the slower the whole process will be and the
more time you will spend waiting ages for blender to compute
the final result. So in our case, I will just
stick to a low number, something like for which
to a certain extent, we'll create a couple of
erosions here and there. They're not looking that good. It is not that bad. But actually the main
reason I'm using this erosion tool is
for another thing, which is if you jump right
here in the vertex groups, you will find that the erosion
tool will create plenty of different maps or
groups for us that we can use later for
distributing elements, for creating textures
and all of that. And to understand
exactly what I mean, let me jump from the object mode to the weight paint mode. And as you can see, basically, each map will give you
some details about different properties
that you can use later. For example, if you
select this flow rate, it will give you something
looking like this. If you select
water, for example, it will give you what
are the areas where probably you will have some water If a trained
or any of that. This is the rain map
which can be useful for you when you want to put
trees and all of that. So we can use all of these maps later on and
they are pretty useful. And I think that the real value of this erosion tool is not actually in the erosions as much as it gives you
all of these really, really handy vertex groups. Let me right now jump
back to the object mode. The other thing that you will find that in one of these tools, which is called
weight from slow. And if I click on it
and just hit Okay, Basically it will generate
this kind of map, which is called the slope
map or a high slope map. And it is used in most of the
terrain creation softwares. So what is pretty good to
have this option in case you want to export this map
to another software. Yes, it is such a cool
thing basically to have all of these
packaged in when add-on. But to be honest, I wouldn't rely, as I said, on the erosion tool to create a lot of erosions
for my mountain. So yeah, this was a quick
setup on how you can create some erosions
using the ANT landscape. And I will see you
in the next video. See you there.
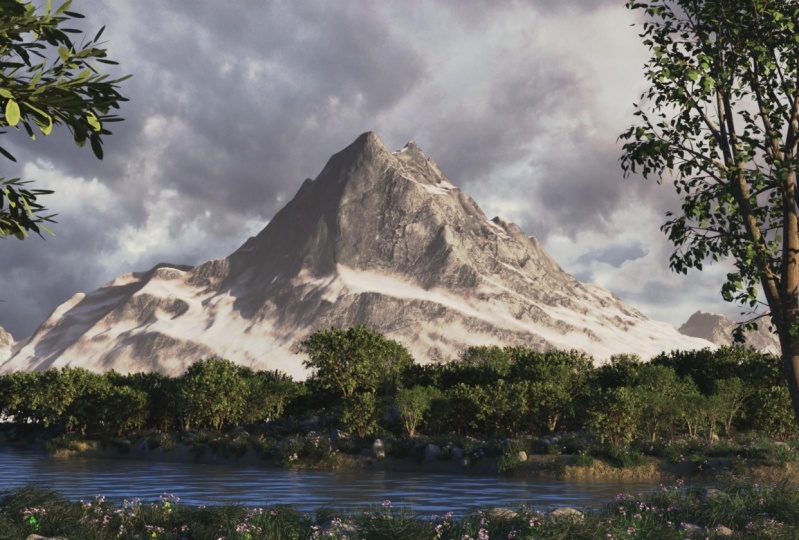
6. Displacement Modifier: Hello and welcome. In this new video, where we will add an extra level of detail to our mountain. So this is our mountain and this is where we
stopped last time. And basically we will use
a technique that lies at the heart of every
during creation process, which is using maps in combination with the
displacement modifier, as you probably
already guessed it. The first step will be to
add a displacement modifier. So let's jump right
here and let's look for displacement modifier. For whatever reason.
I've never been able to find it
at the first try. Yeah, there it is. Displays.
Once you click on it, you will have this blob
of mesh that will appear. But don't worry, we will
fix that in a second. So basically the
displacement modifier as the name state will displace our geometry
using a texture. So the first thing
we need to input some sort of a texture to it. And all you have to do is
basically on New and let's maybe call this texture
mountain displacement. And from here you will
have this small button, just click on it and you will jump to the Texture
tab from here we need to input some sort of a texture to displace
this mountain. I will be using
this rock 34 that you can download from NBN CG, and the two K version will
be more than enough for us. Or you can just open it from the Resources tab that
comes with this course. So here's what we will do. I will go to open in
the Material tab, you will find this rock 34. The only map we need
is the displacement. So double-click on
the displacement and you will have it right here. Let's check couple of
options right here. And the most important one, it is actually the color space. Make sure to change it
from us RGB to linear. And maybe let's jump also to the mapping and make this
map repeat something, let's say like eight times
or let's say four times. Alright, don't worry about
what's happening right here. We will fix it in a second. Let's jump back to the modifier. And from here, the main reason
we're seeing our mountain like this is that our
coordinates is set to local. And basically you need to
change it from local to UV. But this mountain, We
still didn't UV unwrap it. So that's what we
should do right now. The process is pretty simple. All we have to do for now
is to just disable this displays a modifier hit Tab
to jump to the edit mode, hit a to select
all of your mesh. And the first thing that
you will notice is that basically our mesh is
right now triangulated. It's not made of quads, but made of triangles. So basically you can
hit Alt G and this will basically turn all of these
triangles back to squares, which is a better topology
for UV unwrapping. I will go you and you will
have an option called unwrap. So just click on it. Wait for Blender for a second
to compute the result. Yeah, Perfect. We UV unwrapped our model and let's jump
back to the object mode. And if you just jumped to
the object data properties you will find under UV that
we created a new UV map. Let's jump to our modifier
and let's enable it again. And it will still
with this blob. And here's what we will do. It will change from local to UV. And for the UV map,
Let's plug this one. And most importantly,
let's change or less drag down the string to a pretty low number,
something like 0.01. Of course, depending on
the size of your mountain, you might have different values. And talking about the
scale of our mountain, I'm going to go to item. And from here as you can see, the dimensions of my
mountains pretty small. I really want to make
it way, way bigger. So that's why I'm going to drag this scale suddenly like 300, which will give you
the result like this. Right now, my mountain
is 600 meter by 600 meters and the
height of 172 meters. I might even also just
scale it a little bit on the z-axis by hitting S, Z. And let's say it
gets slightly up to something like 210 meters. And this is our
mountain right now, what you gotta do is hit
Control a and apply the scale. And by default, this
will kind of change the power or the intensity of the display of that modifier. So you will have to drag
this number a little bit up, Let's say something like five. And also you can change the mid-level somehow
a high number, which will give you
more edgy edges. Let's say basically the
mid-level will control from which point the
displacement is computed. If you put it at 0, it
will be computed from the lowest point at
0.5 from the middle, from one is from the top. In my case, I'm going to
choose something like 0.7. I think it is pretty suitable. And let's just play a
little bit more with this displacement and
let's put it at six. After doing this, you
will end up with a result looking like you're
seeing right now. The only thing is
probably I need to add a little bit
more details to it, which I will do
basically by using or by adding a
subdivision surface. So just click on
subdivision surface. Bam, this is what you
will get right now if you drag this number
to something like two, notice that we're basically introducing a huge
amount of detail. So our mountain right now, and that's exactly what we want. But let's just not
do that and only leave the level viewport
at one so that we save a little bit of memory
and don't go crazy with it because we're adding a lot
of geometry at this point. All right, the last
thing I'm just going to fix is that if you notice, if I scroll a little bit down, my mountain will
basically disappear. And this is an issue
related to clipping, which is that if
you jump to view, you will notice that
there is this end clip, which is basically means that
a blender will not be able to see anything that is basically further than
1 thousand meters. So let's turn this number to something like 100
thousand meters. And for the clip start, let's put it at 0.1 meter
and you will be ready to go. And this is our mountain. I'm just going to put it to
a new collection by hitting M New Collection and let's call it main mountain and hit Okay, so yeah, that's basically
it for how you can add an extra level of
details to your mountain. And in the next video, we will add our lake. See you there.
7. Creating The Lake: Hello and welcome.
In this video, we will create our lake using
the ANT landscape, alright, without going into details
again about how to use the AND landscape led
to this pretty fast. And one thing I'm going to do is basically to just disable my main mountain because by default my lake
would be right here. So I'm going to zoom in a
little bit and go Shift a and let's look
for mesh landscape. The Operator Presets,
if you remember, you will have this
preset called Lakes one. So let's choose this one. And basically it will
give you your late. And the nice thing
is that it will also create a water plane for you. Let's just change
the subdivisions from 128 to something like 256, so that we will basically have a more detailed mesh
for the mesh size. I'm going to leave it the
way it is and I'm not going to play a lot with all of
these different settings. And if you want to change
the look of this lake, you can play with
the seed number, which will basically give you different variations
that you can use. But for me, I'm
actually going to stick with the default
number, which is nine. I think that this
will be suitable, especially that probably
put our camera right here. So this will give
us a huge lake in front of it and we can put
some trees right here. So yeah, this is pretty suitable for what
we're looking for. Other than that, all of
these different settings, we already went over them in the mountain chapter when we
were creating the mountain. One thing is that you
will notice right now is that we are using
actually the water plane, which says that basically the entire landscape
would create landscape, which is the terrain of the
lake or the ground part, and also will create
a plane which will act like the water of
this later and later on. We will texture each
one of them on its own. Other than that, I'm
going to leave all of these different
settings the way they are and just click out. I'm going to put both of
these in a new collection by hitting M and new Collection
and let's call it Lake. Okay, and let's rename
this to ground. And maybe let's
rename this to water. I'm going to select
both of them. Let's hit seven to jump to the top view, zoom
out a little bit, and let's enable
our main mountain, which by default it will be above the lake so we
won't be able to see it. But don't worry, I'm going
to select both of them, g, y, to move them right here. And let's basically scale
them by a factor of, let's say something like 400, which will give you a
result looking like this. It is clipping right now
in the mountains, so J, y, and let's move it
slightly right here until you get to a result
looking like this. And what I'm going
to do is basically to start framing my scene. To do this, it is pretty
hard to basically stuck on this view and decide how everything
will look like. So that's why I'm going
to add another view. Hit N to hide the sidebar and
hit D to hide this toolbar, hit one from the
number pad to jump to the front view and
hit Control Alt 0 from the number pad to move
the camera up to the View we were seeing this
3D view port from. And after doing this, we
need to position our camera, hit N and from view, make sure to check
camera to view, which will basically log
the camera to the viewport. So whenever you move
your 3D view port, you will also basically
be moving the camera. Let's just try to choose a
nice framing for our shot, which I think will be
something looking like this. Alright, perfect. So I think that this will be good for now. And just in case I'm
going to disable this option so that I don't
move my camera by mistake, uncheck it, and let's get back
to where we used to work. Also, I'm going to
hide the sidebar from here and just put
a drop like this. And the first thing that
I will notice is that my mountain is slightly
smaller than the lake, and I need to make
it a little bit bigger and maybe
rotated slightly. So here's what I'm going to do. I'm going to move it
on the y axis, j y. Let's put it
somewhere right here. And I'm going to scale it a lot, like a lot until it
fills this scene, something like this, maybe. Perfect. And I'm going to hit our z2 old rotated
in the z-axis. And let's just rotate
it slightly like this, which I think will be more suitable for the look
we're looking for. And make sure to go Control
a and apply the scale. Also maybe let's make the
lake slightly bigger. Something just like this, I think would be good. Don't worry about this
dead space right here because we will hide
it later by the trees. This is basically our shot and our basic framing and how
our chart will look like. And I will see you
in the next video where we will start
texturing the scene. So yeah, See you there.
8. Texturing the lake: Hello and welcome. In this new video where we will basically start
texturing our lake. Alright, there are two
different approaches when it comes to texturing. Some people might choose to basically just use some
procedural workflow, which mean creating all
the textures blender, but it is really
time-consuming and it can get pretty
complicated, pretty fast. Instead of that,
we will be using what we call PBR textures, which mean they are textures
that you can download from the Internet and use
them in your project. In the resources
folder of this course, you will find a folder
called materials, and you will find a plenty
of different stuff in it. And one of them is actually the ground 37 and the wet sand. If you open one of them, for example, let's
open the color. You will notice that
it is basically just a picture and it
is basically seamless. So if we put this picture
on the surface of the lake, will basically give
the illusion like, Hey, this is how our
life is looking like. And as you can see,
there's a lot of dead leaves and grass and
all of that right here. So it should look good. Not only that, but actually
these kinds of maps, which we call PVR maps, comes with different maps like the roughness to plug
into the roughness, the normal displacement
and color. It is pretty easy to use
and that is a quick way to achieve a really realistic
result pretty fast. And that's exactly
the workflow that we will be using in these videos. Alright, let's get
back to Blender. And the first thing
that we need to do is basically to just bring
this a little bit up. Maybe zooming in here a little bit and maybe
make it bigger. And one thing that I always do, which is basically
to hide all of these overlays because
they are kinda annoying basically by unchecking this and unchecking this and we need
to see the final result. So let's click on the viewport shading to move to
the rendered view. After doing this, I'm going to disable the collection
of the mountain because I don't want to
see it so that we can have faster previews and that's
how we will be working. Let's get back to our ground. And from here, I'm going
to create a new material. Let's call it, for
example, a ground. Alright, so let's
start texturing the easiest way to import all
of these maps to Blender. It's basically by
using a really, really useful shortcut that the Node Wrangler
add-on will enable, which is Control Shift T.
And here's how it works. First thing, make sure to select your principal P SDF
by clicking on it, hit Control Shift D. And this will basically give
you this menu where you need basically to move to
where your materials are. And at first I'm going to
start with the ground 37. Double-click on it. And right here, all you have
to do is basically to select all of these different
materials are actually images, are maps, and click on
principle texture setup. And basically the
Node Wrangler add-on will do its magic to
connect them together. One problem that you
will notice that why aren't we seeing texture
the way we want? And the main reason
is that if you remember the texture
coordinates right here, we're using the UV data. And if I jump right here to
see whether this object, the ground, does have
actually a UV map or naught. If I jump right here, you will notice
that I don't have actually any sort of UV map. So I need to unwrap my model and it is actually
as easy as just hitting tab in this viewport and hit you and select and RAB. Wait for the results to
compute for a second. And bam, right now we UV unwrapped our model and we
do have right now a UV map. And as you can see also, we're starting to see our texture actually laid on
the surface of the lake. I'm going to jump back right
here to the object mode. The one thing that
you will notice is that it looks pretty huge. And the main reason
for that is that basically the
terrain of this lake is so huge and we need basically to make
this image smaller. So first things first, because we scaled our lake, we need to go Control
a and apply the scale. And the other thing, let's jump right here and you will have an option
for the scale if you select all of these and let's bring it to
something like 20. Basically, we made
that texture way, way smaller and this
will basically give us a more realistic look like actually this texture is laid kinda perfectly on the
surface of the ground. This method does have
when major flaw, which is that if I jump to the top view by hitting
the number of beds seven, you will notice that
basically it is starting to give us
this repeating pattern. If you focus, this texture
is repeated many, many, many times because at
the end of the day, it is is just small
patch of grass. Yes. It is seamless
that when you repeat it multiple times, it will start to see
a repeating pattern. Now, an entire course
can be made on how you can map your textures
and avoid this problem. But in our case, if you hit 0 to jump
back to the camera view, you will notice that
there is no way or almost impossible to see this
styling effect taking place. And that's why we don't need to worry about that in our case. Because we're pretty
close to the ground and it is almost
impossible to notice that. But if you were, for example, to create a drone
shot or something, you need to address that issue because the tiling
will be visible. Alright, let me get back
to my camera view and get back control spacebar to
minimize this editor. And the last thing I'm
going to do is basically to just clean a little bit this semester
happening right here. Now, by default, the Node Wrangler add-on when it
imports all of these maps, it will connect them for you and do all the necessary
work for you. The only thing that I don't like about this approach is that it creates this rerouting node, which I find it kind
of annoying for me. I wouldn't like actually create a label for each group
of nodes like this. So that's why I'm going
to select this label, hit X, select this label hit x. And instead of using
this rerouting note, I'm going to select it
and just hit Control X. And this will basically just
delete this routing node and everything will be connected directly to the mapping know, I feel like by doing this, it is easier to understand. So let's just put it right here. And the other thing
I'm going to do is basically to select
all of these nodes, hit Control G, hit F2 to
rename the whole thing, all to rename the label. And let's call it,
for example, ground. Now, here's the thing. If you focus in real life, it is almost impossible to basically make a
texture or to have a texture or to have the graph's going like the way
we're seeing right now. It doesn't look realistic
because in normal world we will probably have
some grass right here or this texture
or this material. And right here we will
have a different material, like some sort of a
wet said if you want. So we need to mix this material
with a wet sand material. And if you remember,
we actually do have a wet sand material in the Materials folder that looks basically
something like this. So we will mix this material, the ground material with that. And the easiest way to do this. First of all, let's
select this principle be SDF Shift D to duplicate it. And let's put it right here. It will be inside this label, so hit Alt P to remove
it from that label, make sure you're selecting
your principle be SDF, control shift D will
open this menu, and this time we're going to
use the wet sand material, select all of the
different maps and click on principle
texture setup. And let's just move the whole
thing a little bit down. I'm going to delete
all of these labels. And let's select
this rerouting node, this point and hit Control X. So everything will be cleaner
and easier to understand. Now to see how this
texture will look like, Control Shift and click
on your principle be SDF. And it is looking like this. And as you can see, it is pretty huge and we
need to make it smaller. Well, all you have to do is basically to just bring
this scale to 20. And bam, you will have something
looking just like this. So let's select
this entire setup. Hit Control G, hit F2 to
rename the whole thing, and let's call it wet sand. Alright, so right now we do have two different materials setup. One of them is for the
ground and the other one is for the wet sand and
we need to mix them. And because I use the word mix, that means that I need to
mix this shader responsible for the ground with this shader responsible
for the wet sand. So let me look to shift a and
let's look for mix shader. I'm going to put it right here. And basically all you
have to do is to take the first ground material and plug it to the first socket. And let's take this
one and put it into the second socket and take this and plug it to the surface. So what's happening right now
is that a blender is using 50 per cent of the ground and 50 per cent of the wet sand. But that's not exactly
what we want because we want the final result
to be like following. We want the upper parts to
use the ground texture and these kind of perpendicular or these sort of formation
looks like a cliff, will have the wet sand material. So we need to create a mask that will tell
blender that, hey, use ground here and
use wet sand here, which we can do by
inputting some sort of a map to the factor socket
of this mix shader. So that basically we
will have some sort of a gradient that will
go from here to here, where we will have the wet sand on the
bottom parts right here. And the gross material
basically will go right here. And that's exactly
what we will be doing. So we need some sort of
a gradient that will take place right
here that will tell blender to transition at this points from the wet
sand ground material, we need the gradient, which means that we will add a gradient map or a
gradient texture. So go Shift a and let's
look for gradient texture. Let's just put it right here. We need to add the
mapping setup to it. So just hit Control T and
make sure to choose UV. And from here I'm just going to bring this a little bit up and Control Shift and click on this gradient texture to
see how it will look like. And our gradient right now is going from the
left to the right. We need to make it go
from the bottom up. So all you have to
do is to just rotate it on the y-axis, 90 degrees. So if I go like
this and type 90, basically the gradient is
going from the bottom up. Just to make the
whole thing easier, I'm just going to hide this water plane and
we need to basically move this gradient transition
somewhere right here. So where does the node
that will allow us to control the contrast of
this gradient texture? Well, it is the color ramp node. So let's go Shift a and
let's look for color ramp. And let's just put
it right here. And now, all you have to do basically is to
just make it way, way more contrasty until it starts to look like
the result we want. One thing I'm going to do
right now is to just enable this water plane so that I know exactly what I want
my gradient to be. Let's zoom in slightly and let's just keep on dragging
this bad boy a little bit up until we get to
resolve looking like this. And maybe if you want
to make the whole thing even looks smoother in
terms of this transition, you can change it
from linear to ease, which will make the whole
transition way, way smoother. And maybe also you can take
this a little bit like this and maybe bring
this a little bit down, just like you're
seeing right now. So basically right now with
a black areas will have the wet sand material and the white areas will have
the ground material. So let's plug all of this data to the mix shader,
the factor socket. And if you control shift
and click on this shader, you will have something
looking like this. And what you will notice
is that it is not working the way you're
expecting it to work. And the main problem happening right now is that we need to flip both of these because
it is kinda flipped. So if I go like this, notice that basically the
wet sand right now is right here and the grass is
taking place right here. And that's exactly
the result we want. So it is just a matter of
flipping both of these. And as you can see right now, we added more variation, especially to the way
of how this grass, or the way of how this
land will look like. And that's exactly
the result we want. And it will just make
the whole thing looks slightly better and
more realistic. And right now the final
thing that we need to address is the displacement. Because if you notice
basically right now we're only using the displacement out
of the ground texture, this one, even though our wet sand also come
with a displacement map. And the easiest way to do
this is like following. I'm just going to hit
Control Space bar to maximize my shader editor. And from here, I need to mix it, this displacement,
this displacement. And that's why I'm going to just delete this one and
X delete this one. And let's mix this and this. So let's go Shift a and
let's look for a mix RGB. Let's take the color
of the first one to the first socket
and the color of the second one,
the second socket. And also we need to tell blender where to use each displacement. So also we need to take the
scholar that is coming out of this and let's plug it to the factor and you will have
something looking like this. But if you remember, we flip it both of
these right here. So probably I will also
have to flip them right here so that my displacement
work the right way. And after doing this, I'm
going to plug this to a displacement node
by going shift a. And let's look for displacement. Let's put it right here. And I'm going to take
the color and plug it to the height and take
the displacement and plug it to displacement
control spacebar to minimize this editor
and probably will say, Hey, you're seeing nothing is
happening, what's going on? And the main reason
nothing is happening because as you
probably remember, when it comes to using
real displacement, you need to activate
their option because it is not
activated by default. So all you have to do is to
jump to the material tab. And from here you will find
an option called settings. And under settings you
will have displacement. Make sure to change it from bump only to displacement and bump, you might notice that
nothing much is happening. And the main reason because you will have this
number called scale. And right now it is one, that one is not enough because of the size of
our lake is so huge. So you might need to
bring this number slightly, something like five. And as you can see, we introduce some small bumps right
here on the grass. And it might not be
that visible yet, but let's try for example ten. And as you can see, we're adding small
bumps here and there. But one of the things that you probably should be
familiar with from previous chapters is that whenever you are using
micro displacement, you should also add with
it a subdivision surface. So let's go add modifier and let's add a subdivision surface. And from here, make sure to
check adaptive subdivision. And as you can see right now, we're adding a lot
of details and small bumps and I think it
is really, really strong. So let's drag this number
to something like two. And yeah, I think that this
is looking way, way better. And if I click on 0,
this is the result we're having right now where we
made this ground really, really rich in terms of details and this will be our
ground for the lake. And the last thing I'm
going to do is basically to also create a label for this
by selecting all of this. And let's hit Control G, hit F2 to rename it. And let's call it, for
example, the mask. Let's put it right here. And this will basically be our basic material for
the ground of this lake. Alright, that was how you
can texture your lake. And in the next video, I will show you how to create a really simple water material. So yeah, See you there.
9. Texturing The Water: Hello and welcome. In this video, we will add
the material for our water. Alright, so this is where we
stopped last time basically by creating the material of
the ground of our light. And right now we will move
on to texturing this water. Now of course,
there are multiple approaches are doing this. You can go fancy and use some complicated
procedural workflow. But in our case, the water is not the main
elements of the shot. So that's why I want to show you a really quick way of how
you can basically create really realistic and
nice-looking water without spending ages basically
just fiddling with notes. Yeah, Let's just do that. So first things first I'm
going to select my water. And the first thing
I'm going to do is to go to the object properties. And you will notice that
basically there is no UV map, so I need to UV unwrap my model, which is pretty simple. Hit tab and hit you, hit unwrap and hit Tab again. That's all right. Now
we do have our UV map. After doing this, we need to create a new material
for the water. So just click on New and let's call it, for example, water. After doing this, basically we will not use the
principle, the SDF. So I'm going to delete
it by clicking on it x. And from here, I'm
actually going to use a different shader, which is called
the glossy shader. So go a and let's look
for glossy, be SDF. Let's connect it to
the surface and right away you will not notice
anything happening. But if you start dragging this roughness a
little bit down, notice that basically
it's starting to look like it is
basically water. Let's say something like 0.15. And yeah, this is
definitely looks like it is surface of the water. The only downside for this is that basically when
we think of water, there are small ripples
or waves on top of it. So that's why we need to add an extra level of detail
to sell that illusion. And the nice thing
if you notice, is that the glossy be SDF actually does have
a normal socket, which as you probably
already know, it is basically meant for
you to fake the illusion of bumps and small
details on your geometry. So it is like a quick way
to achieve such look. And that's exactly the technique
that we will be doing. We need to add some
sort of data for this. And we need to think where is the texture might
look actually like the way the water or the
ripples of the water look like some people might
go with the noise texture. But actually in my case, I'm not going to use
it and I'm going to use the mass grief texture. So go Shift a and let's
look for Musgrave texture. Let's put it right here and I need to plug the
height to the normal. But as you probably know, this is a gray socket and
this is a purple socket. So I need to turn this data
to a vector data from here. And the easiest way to do this, what is the node that converted the black and white a vector? Well, it is the bump node. So go Shift a and
let's look for Bump. Let's put it right here. And all you have to do basically right now is to
take the height and plug it to the height and take the normal and plug
it to the normal. Nothing much is happening. But don't worry because
we need to play a little bit with all of
the different settings. So let's start
bringing the scale a little bit up to
something like 40. And bear, as you
can see, basically, we're now creating the effect of like ripples of
water everywhere. Maybe also we can bring the details to
something like five. And they think that
this is looking better. Let's try lowering the dimension
to something like 1.5. And let's just keep the leg
inherited the way it is. And if I hit 0, this is the
result that you will get. I'm going to hit Control Space
bar to maximize my editor. And yeah, I think that actually look like it is
basically a surface of water with some
couples imperfections and small waves here and there. The only thing that I suggest
you to do is basically maybe to bring this scale a little bit up to
something like 50. Just basically to make these waves a little
bit more dense. But again, it is just a
matter of self preference. Just make the result that
you are satisfied with. And yeah, this is basically a quick way on how
you can create a really nice looking
water material without bothering playing with a lot
of nodes and all of that. And right now, I'm
just going to enable my main Mountain Dew see how
the whole thing is looking. And yeah, we're starting
to get there slowly. And in the next video, I will show you how to
texture this mountain. So yeah, See you there.
10. Texturing The Mountain (Adding Rocks): Hello and welcome. In this video where we
will basically texture our MT or actually start
texturing our mountain. So the first thing
I'm going to do is basically to just disable this lake collection
to save a little bit of memory and make
my preview faster. And let's focus on our mountain. And also, I noticed that my drawings are still
visible right here, so I need to remove them. Perfect, This is way better. Alright, here's how we
will texture our mountain. First of all, the mountain
is made of rocks or right? So we need to add rock
material to our mountain and then we will add on
top of that some snow. So basically, this
setup meant for the mountain is composed of
two different materials, the rock and some snow above it. So let's start with
the base layer, which is basically the rocks. I'm going to select my
mountain and let's create a new material and
let's call it mountain. And just for the sake of making everything
slightly faster, I'm going to disable the
subdivision surface modifier, so I have faster previews. Now for this mountain, we need to add a rock material. We already did a lot of that in the texturing the lake chapter. So basically I'm not
going in details about how to do this because we already did this multiple times. So here's what we will be doing. First of all, let's select
this principle be SDF, hit Control Shift D. And
in the Materials folder, you will find this rock 28, this one Iraq 28. Double-click on the
folder to enter inside it and you will find
four different maps. And all you have to do is
basically to just select them and click on
principle texture setup. And right away you will
see the following result. Basically our mountain to a certain extent
right now textured. The only downside
of this is that basically the texture is so huge as you probably
already remember, and I said that 1 million times. So we need to bring
the scale from here, slightly up, let's say, to something like ten. And this will give you
the following result. The only problem with this, as you probably can remember it, that it will give you
the styling effect. And you can see there is a
repeating pattern happening, so we need to
address that issue. One of the most
famous methods to fix this problem is basically by combining different textures. And in our case, we will mix these rocks
with another rock texture. After that, we will
cover it in snow. So in a way, it will be kinda
impossible for you to see the tiling because we will break it using
different materials, like the second rock and the snow that will
cover the whole thing. So don't worry about
that. We're good to go. The only problem that I'm
seeing with this texture is that basically it does have
actually some green in it, which is, may not be exactly
the look I'm looking for. So that's why I'm going to
desaturate this map slightly, which is actually pretty simple. It is basically by going to
the color, that base color. And after it, we
will go Shift a. And let's look for
hue and saturation. Let's put it right here. And all you have to
do is basically to drag the saturation
a little bit down. That said something like 0.5. And I think that this will
look better if I click on the hue and saturation
and hit m2 mu the node, this is the before and
this is the after, this is before, and
this is the after. And I think that
this is actually more realistic because we're not expecting to have a lot of
greenery in our mountain. The last thing I'm
going to do is basically to just scroll down a little bit and I'm going to
delete this label as usual. Also delete this one. I'm going to select
this rerouting node and hit Control X to delete it. And by doing this, I
will have a cleaner view and I'm going to go
above all of these. I'm going to hit Control G, hit F2 to rename
the whole thing. And let's call it,
for example, rock 01. So this is our
first row Material. Right now we're going to
combine this rock material with another one that
we will be able to break somehow the
styling effect. So first things first, let's just select this
principle be SDF, hit Shift D to duplicate it, hit Alt B to remove
it from this label of the rock one control
shift D. And let's write now move Devi Iraq 11 and select all of the different maps and click on principle
texture setup. And you will have
something looking like this to see how this whole
thing will look alike. Let's zoom in on the
principle be SDF Control, Shift and click on it. And this is how our second
material is looking like. And as usual, we need
to bring the scale a little bit down basically
by changing this, Let's say this time to
a number like five, which I think will be more suitable for the look
we're looking for. And right now, I'm
just going to clean the whole thing by removing all of these unnecessary
labels for now, this select this
rerouting node Control X, and let's create a label
for this whole nodes, for all of these
nodes control G, F2, let's call it rock
02 and hit Enter. And also, I think I'm going to desaturate this one a
little bit. So go shift. Let's look for a
hue and saturation. Let's put it right here and drag the saturation down to
something like 0.7. And this is looking way better. So right now we do have
two different textures. One of them is the first rock and the other one
at the second rock, and we need to mix
them together. How can we do this by
using the node mix shader, go Shift a, and let's
look for a mix shader. I'm going to put it
directly on this link, so it will be
automatically connected. And I'm going to take the first-principle be SDF and plug it to the first socket, which will move this first
socket to the second socket. So right now we're
using 50 per cent of the first rock and 50 per
cent of the second rock. But do we need to tell blender
where to use each texture, which we can basically
do by plugging some sort of a map into
the factor socket. But what is actually the
best way to combine them? Surprisingly, I want to
show you another method, which is that if you remember in the early days of this
chapter of the mountain, when we use the erosion
tool it created for us all of these different vertex
groups or weight maps. And just to preview them again, I'm going to select one of them and jump to the weight paint. And basically maybe
we somehow can use one of these to mix our
different textures. For example, if I
select this water, if there was a way
of how I can turn these data to a
black and white data and plug it right here. I will basically tell
blender to, in this case, the blue areas will
have the rocks and the green areas will
have the second rock. But is there a way to turn this weight map to a
black and white map? Well, actually there is, and it is actually
pretty simple. All you have to do
is that makes sure you're selecting
the group you want. And in my case, I'm
going to choose water and change from white
paint to vertex paint. Nothing much will happen and probably will have
the same view. And all we have to do is
basically to go to paint. And from here you will find
vertex color from white, click on it and bam, it will turn the
weight map that we use to see to a
black and white map. And that's exactly what
the result we want. And if you scroll down a
little bit under vertex color, this is our data. This is the black and white data that is visible right
now, right here, which is called in
this case Cole, I'm not going to change it, but you can rename it. And right here in
the shader editor, if you go to add
input vertex color, you will find
actually call which is the exact same
group right here. So go add input
vertex color coal, and let's put it right here. And if you control
shift and click on it, this is basically our map. And just to not do any mistake, I'm going to jump back
to the object mode. So we can use this to control or to drive
our factors socket. The only problem with this
texture is that I will probably need to make it a
little bit more contrasty, which basically begs to
use the color ramp node. So I'm just going to take
it right here and let's add a color ramp, color ramp. Let's put it right here, and let's just start basically making the
whole thing way, way more contrasty, just like so something like
this will be good. And let's take the color and plug it to the factors socket. Right now, if you preview your mix shader Control
Shift and click on it, you will get something
looking like this. And as you can see, more or
less with starting to break, especially in these areas, the pattern of the rocks
that we use to see. And that's exactly what we want. If I get back to 0, yes, they're stole some tiling
effect visible right here, but we're going to address
that in the next video. And also the other thing
I'm thinking of doing is basically for the first
rock, if you remember, we plugged right here
in the scale ten, I'm thinking of dropping
it down to something like seven because I feel it is
like more suitable like this. But last thing right now
that we need to address is basically the displacement
maps that we're using. If you focus closer, basically right now
we're only using the displacement of the
first rock texture, even though we need to
tell blender to use Bot, the displacement of the first
rock and the second rock. So just like we did before
when we were trying to combine the displacement of
two different texture in the lake chapter right here, we need to combine this
displacement map with this one. So let's just do
that pretty quick. I'm going to delete both
of these placement nodes, and I'm going to look for
mixed RGB, makes RGB. I'm going to take the first displacement texture from the first rock and
plug it to color one. And also take the
displacement of the second rock texture
and plug it to color too. So right now we're mixing them. And also we need to plug the
mask that we created also to this mix because we
need to tell blender where to use each
displacement map. So let's take the scholar and here's a really
handy shortcut. Shift click on the first socket and let's move on to the node, which is this mixed
node shift and neglect on where you
want to connect it. So basically right now, both of these are
selected and just hit F and they will
basically get connected. This a really, really
handy shortcut, especially when you
want to connect to very distant nodes. Nice. So all you have to do right
now is basically to just drive this data coming out of this mixed node through
a displacement. So go Shift a and let's
look for displacement. Let's put it right here, take the color and plug
it to the high end. And we need to plug
this whole thing to the displacement socket
of our material output. Nothing much is happening
because by default, displacement will
not be visible. So we need to activate it, which means that
we need to go to the materials properties and change the
displacement from bump only the displacement and bump. You can of course play with
the scale a little bit. For example, let's
just try five. Alright, this is, I
think is better looking, let's say, and let's just get back to our
subdivision surface. It just enable it
for a second and let's see how the whole
thing would look like. And yeah, I think that this is actually looking pretty good. And this is basically
how you can create your rock material
for our mountain. And in the next video, I will show you how to cover this whole thing with
some snow here and there. Yeah. See you there.
11. Texturing The Mountain (Adding Snow): Hello and welcome.
In this video, as I mentioned before, we will add some snow
to our mountain. The first thing to add
this now is basically to import the maps responsible
for the snow material. So to do this, I'm going
to select this principle be SDF Shift D to duplicate it. Let's put it right here
and make sure to hit Alt B to remove it
from that label, then hit Control Shift D. And in the Materials folder you
all find this snow 00 sex. So double-click on it. And for this material, I'm actually going
to only import the color and the normal
and the roughness. I'm not going to use
the displacement. Then click on principle
texture setup and bam Blender will do
its magic to connect them. And let's just
delete this label x, this label X, select this
rerouting node Control X. This is more readable. I'm going to select
this whole thing, it Control G to put it
inside a label, it F2, and let's rename it to snow
to see the whole thing, how it will look
like Control Shift and click on this
principle be SDF. This is our snow material. It is somehow pretty huge. So let's bring this scale
to something like seven. And this is, I think, more suitable for the
look we're looking for. And the other thing I'm going to do in the principle be SDF, is basically to bring
this subsurface number to somehow low number,
something like 0.001. And also, I'm going to change the type from random walk to Christmas in burly or I don't know how it is
supposed to be pronounced. And let's just make sure that this color is actually white. And yet this will
just basically make some light go through the
surface of this snow, which will just somehow make the whole thing
look better, Nice. So all we have to do
right now is basically to combine this nanomaterial
with the rock material. If we focus slightly, this mix shader node
is basically the node responsible for
combining the result of the two different tracks. So the result that it will give us such as going through here, it is basically the rocks. So we need to mix it, this
whole thing with the snow. So let's add another mix shader and let's put it right here. And then we'll take the snow and plug it to the first socket, which is right here. And here's another
handy shortcut. Click on Alt with the
right mouse button. Drag over the nodes that
you want to connect. You will have this red line
and when you release it, it will basically connect
them automatically. So this is also a really
handy shortcut when you want to connect two
very distinct nodes. And right now we need
to plug some sort of a data to the factor
socket to tell blender where to use the rocks material and where to
use the snow material. In our case, we will
not be using actually, this is vertex groups that we will use a
different technique, basically just by using the
normals of this geometry. Here's what we will be doing to just explain the whole thing. So in a logical way, basically the snow
should somehow be these areas right here, right here, and right here, basically on the flat areas, if there is a way to
extract all of these data, which means they're
flat areas of our mesh and we tell blender to
put the snow on them. So the first step that
we need to do is to extract a map of the flat
areas of our mountain. For example, these areas right
here are basically flat, so the snow should
be right here. And these areas are not flat. They are perpendicular and
going straight upward. So it is pretty hard for the
snow to basically be there. The really nice thing there is something called the normal. The normal is basically
in mathematics, here is the vector that is perpendicular to
a certain plane. For example, I'm just going to hit three to jump
to the side view. And as you probably remember, these parts of the
mountain or flat, That's why the normal vector of them is actually
pointing like this. It is perpendicular
on the plane. Meanwhile, these
bars right here, the normal vector will
be pointing like this. So we need to tell
blender that, hey, the areas that does
have a normal vector pointing up are the areas
where you should put the snow. And the nice thing is that it is actually pretty
simple to do this. We need normal. So let's just go
Shift a and look for normal and make sure
to select normal map. And if you control
shift and click on it, basically this map right now contains our normal data that it is showing us the x data and the y data and the z data. We only need the z data because it is the
vector that we needed. The stuff that are pointing up, up means the z-axis. So we need to separate
these by going shift a, and let's look for
separate x, y, and z. By default, it will be on the X, but just Control Shift, click another time to move to the Y Control Shift and click
again to move to the Z. And it will give you
something looking like this. The real magic will
be when we add actually a color ramp
after this whole thing. So I'm just going to
take it slightly right here and let's add a color ramp. Let's put it right here. And if I start dragging
this slider like this, notice that basically
the areas that are perpendicular
will turn to black, which means that these
areas shouldn't have snow. So that's why there
are black and just keep on dragging the slider until you start getting a result that you're
satisfied with. What you will look
something just like this. The only thing I
might want to do is basically also to
drag the white flag. So the whole thing will be
slightly more contrasty. Something just like this, I think will be good. And as you probably
already guessed it, I need to plug the scholar to the factor of
this mix shader. So let's just do that. Take the color and plug it to the factor Control Shift and click on the
second mix shader. And yeah, as you can see, the snow is right now
on all of these areas. If you hit 0 to see
the final result, this is our mountain
with the snow. And of course, you can play as much as you want with all of these sliders until you start getting the
result, you won't. So yeah, I think that this
is looking pretty good. And the last thing
I'm going to do is basically to select these nodes, control G to group them. And let's rename this
whole thing by hitting F2. Let's call this labor, for example, snow mask. Nice. So this is basically our entire node tree responsible for
texturing this mountain. And as you can see,
it is actually not that complicated once you understand the concept of mixing different maps
and all of that. And if I enable my
lake right now, this is the result
we're getting, which I think it is
looking pretty good, especially after we start adding more and more details
like the grass, the trees, the flowers
and the rocks. And that's exactly
what we will be doing in the next
couple of videos, where I will show you how you
can use some geometry knows to basically
distribute some grass and different stuff
on this lake. So yeah, See you there.
12. Adding Grass: One of the many things
that can actually, with these scores is
actually this forest assets, which basically contain trees
with some grass, flowers, and some rocks, which we
will basically use to fill out our scene and all of
these different assets. I will show you how to create
them in a future chapter dedicated on how you can
create your own nature assets. But for the sake
of this chapter, we will use all of these
assets and we will start by adding some
grass to our scene. So yeah, let's just do that. Alright, so when it
comes to adding grass, there are multiple approaches
on how you can do this. Some of you actually
my suggested just use Blender built-in
particle system. But instead of that,
I will show you an easier method in my
opinion and throw it actually will learn
something new and you will start basically using
geometry nodes. So instead of using the particle system to
distribute our grass, actually we will use
the geometric nodes. Don't worry, it's gonna
be pretty simple. Alright, so first things first, I'm just going to disable my main mountain so that I
keep everything clean and I'm going to select my lake
and I'm going to hit the dart from the number pad to basically zoom
in on this object, which is the ground where I basically want the grass
to be distributed. And after doing this, I'm just going to drag this
slightly and dynein to add a geometry node modifier
to this as a starting point, let's just jump from the shader editor to the
geometry node editor. And also I'm going right
here to the Modifiers tab, and I'm going to
click on New and make sure you're
selecting your ground. Click on New, and let's call
it, for example, vegetation. And the first thing
that you will notice is that basically blender added the
geometry node modifier. So at the end of the
day, geometric nodes, it is just another form
of modifiers that you can add to a certain scene
or to a certain object. And basically geometry nodes are just a sequence of
operation in form of nodes. If I just zoom in
slightly right here, you will notice
that you will have your usual group input and
your usual group output. And you can do a bunch of
operations right here. Just as an example, if I go Shift a and
look for set position, you will notice
that I'm basically able to move this landscape or this lake element the way we want in every
different axes, which is exactly like changing the location of this
object from here. So that's why, as I mentioned, basically the geometry nodes. It is just another way to do different operations
on a certain object. Alright, so I'm going to delete this set object Control X, and we need to distribute
our grass on our geometry. So here's how we will do this. First of all, we
will use a node that is called Distribute
points on faces. So go a and let's look for
distribute points on faces. And if I put it between
these two links, two will get connected. And as you can see, it
actually turned our mesh into points just for the sake of
making everything more clear, I'm going to hide
my water plane. It turned our mesh
into these really, really, really small
dots or points, which as the name state, it will distribute some
points on the faces of our mesh and you can change
the density and all of that. And basically all what we will do is basically to tell blender, put the grass in the
places of these dots. But before we do this, I'm actually going to
change a couple of settings because this is where
you way too dense. And if I input any sort of geometry that contains
dozens of faces, it will basically just
crashed the software. So that's why we need to reduce at least the density of
all of these points first, which luckily we do have actually a slide
are called density, which is used to control the density of all
of these points. The only thing I'm gonna
do is basically to change the distribution method from
random to Poisson disk, which is more
accurate distribution when it comes to nature. And all you have to do
is basically to drag this density maximum
to a lower number. So for example, let's try one. And yeah, you will basically
have fewer points right now. They may not be that visible yet because they are
really, really small. But I think a density maximum of one will be good for now. We might change it later, especially after
we add our grass. So how can we tell blender to replace all of these
points with grass? Well, there is
actually another node called instances on points, not two points,
instances on-point. So just click on it and
let's put it right here. Nothing will happen and even
your points will disappear. Because we will need
to input some sort of geometry to tell blender
what to put on the points. So right now we need to
import our grass element. It is as easy as
go to File append, and from here jumped your materials folder and you will find this forest assets, double-click on it and
move to collection. And right here you will find the different assets that
comes with this blend file. And for the sake of
making everything easier, I'm going to select all
of them, click Append. They will basically
be right here. And I'm going to disable
all of them for now. So I save a little bit of memory and whenever
I need one of them, I will basically just use them. So right now we need to
distribute the grass on our mesh. So let's just take
the grass and drag it right over right here
to the geometry node. And you will have this new
node called collection info, which does contain
the grass elements. And all you have to
do is basically to hook the geometry
to the instance. But before doing this and
this is a general advice. I will highly recommend
that before you connect any operations in
the geometric node, that will introduce a lot of
computing to the computer, makes sure to at least
do that gradually. Which means, for example, if I hook this geometry
right now two instances, I will introduce a lot of computation to Blender
because he will need to calculate everywhere
where the grass should be, which does have the potential
to crush the software if you don't have a really high-end gear
on your computer. So that's why what I would
recommend, for example, is to drop this density
maximum to something like 0. Even when I will connect
this geometry right here, it will not do anything
and I will start increasing this density
maximum gradually. So let's just connect geometry
and plug it to instances. As I mentioned,
nothing will happen. And after doing this, Let's start dragging this
density maximum slightly up. So let's try 0.1. And just by doing this, basically we introduce
a huge amount of grass. So basically, if we left
it actually at one, we might even crashed
the software. You will have something
looking just like this in my viewport
is actually really, really slow and we
will deal with that. The first thing I'm going
to do is basically to check separate children
and also check reset children and also make
sure to check instance. And right now as you
can probably see, we cannot see the actual mesh. And the main reason for
that is that we need to tell blender also to use it, which we can do actually by adding a joint geometry notes. So go Shift a and let's
look for a joint geometry. Let's put it right here. And I will take my
original geometry, which is the ground of the lake and just plug it
to the geometry. And as you can see right now, you will have something
looking just like this. And one thing I need to
address right now is actually the scale of my
grass because it is way, way small to bring the scale. Some of you actually might just suggest to change
the scale from here, which actually will
do the same thing. If I bring the
scale, for example, to something like five, it will just make all the
grass way, way bigger. And that's of course definitely an approach that you can take. But instead of that, I want to be able to control the scale and
at the same time, I want to add some
scale variations, so some graphs will be
bigger than others. So to do this, we need to plug another node called
random value. If I go Shift a and let's
look for random value, you will have this
node and I will plug it from value to scale. And right now you will have to actually two different sliders. One of them is 0 and
the other one is one. This is our minimum, and this is our maximum. So let's, for example, change
our minimum to something like seven and our maximum
does something like ten. And this will give you a
result looking like this. And the first thing I noticed
is that basically I think I will probably also need to bring the scale
of slightly more. So let's try ten to 15. I think that this
will actually be more suitable for the
locker trying to get. And I'm going actually
to just lower down this density factor
so that basically I will be able to move
easier and my 3D view port and later on I will
and get it back to one. So let's just take
this density factor and plug-in low number,
something like 0.1. And by doing this,
I will be able to move easier in my 3D view port. Alright, so let's just
make this whole thing bigger and let's just jump
to the rendered view. You will have something
looking like this, which I think it is
looking pretty good. And especially if I activate
my water plane right now, this is the result
we're getting, but it is actually still
really far from perfect. And here's what I exactly mean. First of all, let me hide
again my water plane. And as you can see
actually that the grass is also distributed under
the surface of the water, which is not ideal. It is not a big deal because
it will not be visible. Anyway. This actually does have the potential to slow
down our computer drastically because
blender is still computing all over
this graph right here. So we need to
figure out a way of how to tell blender that hey, only distribute the grass on the top areas and not these parts that will be
covered with the water. That's number one. And the other thing, yes, we introduce the random
value to the scale. But what about also we introduce a random value also
do the rotation, which will also make this whole grass looks
slightly better and not basically all
of it will just look uniform in
terms of rotation. And that's exactly
what we will be doing in the next
video. See you there.
13. Finalizing The Look of The Grass: Alright, in this video we'll finalize the look of our grass. So let's just do that
first things first to make everything more readable
and easier to understand, I'm going to organize
my notes too, just something like this. And right now we need to
introduce some random rotation. So I said random, which means I will use
definitely the random value. So let's just hit Shift
D to duplicate it, and let's take the value and
plug it to the rotation. The only problem that
you will notice is that basically they are rotated
weirdly. And here's why. Basically when we plug
the random value, as you can see to the rotation, blender will apply
this operation to all the different axes. For example, let's say
this time blender is picking the number ten as
a random rotation angle. Basically Blender will rotate this ten degrees on the
x and the y and the z, even though we only want blender to rotate the grass
on the z-axis. So we need to tell
blender that hey, only rotate the
grass on the z-axis. Where does the node that will
allow us to do such thing? It is a node called
the Rotate older. So if you go Shift
a and let's look for rotate ruler, this node. So just click on it and
let's put it right here. And basically the Rotate older
will work like following. You need to pick the axis angle and we
need to cut this link by hitting Control
right mouse button and dragging over the link. And right here you need to
choose which axis you want. In our case, x is 0. We don t want to rotate
on the x. Y is 0, we don t want to
rotate on the Y, but the Z number is one. So that basically when we
will multiply this value by all of this will be
0 on the x, 0 on the y. And Blender will pick
the random value that we choose only for the z because z does have
actually the number one. So all you have to do is
basically to just take the value and plug
it to the angle. And right now
blender is choosing a random value from ten to 15. And I'm going to change
it to something like from 0 to ten or let's say 50. So basically right
now blender is rotating the grass
on the z-axis, a random value from 0 to 50. And this group right now
is actually my grass. So I'm going to select all
of the nodes, hit Control G, it F2 to rename the whole label, and let's call it grass. And the last thing
that we need to address is basically how can we tell blender to only distribute the grass
on top of the surface? And that's actually also
pretty simple because if you noticed on the
distribute points on faces, we do actually have
a density factor. And what you need to do
is basically to input some sort of a map right here that will tell
blender that hey, distribute the grass
only on the top areas. To do this, we need to
get a little bit smart. And here's what I mean. Let's suppose that the
height of our lake, let's say it will be, for example, ten meter. This is just hypothetical. So probably it's not
the right height, but it's not a big deal just
for the sake of explanation. And let's suppose
that the threshold where basically the
water will be visible, let's say it is on the
point of two meters. So what we need to tell blender in the geometry know that Hey, everything that is higher than two meter will have grass and everything that is below it will not have any sort of grass. So we need to tell that to
Blender using geometric nodes. And it is not actually
that complicated. Alright, here's what we will do. We need to plug a
map, as I mentioned, to this density factor
because we need to control the position of where Blender will basically
add the grass, we need to position nodes. So that's why I'm going
to add a position node. And let's put it right here. But we only need
the z data because the z is what control
what is up and down. So let's separate this two x, y and z by going shift a. And let's look for
separate x, y, and z. And let's take the position
and plug it to the vector. And right now we only
need the z data. But how can we tell
blender What is the point of where to start
computing the result? For this, you will
need a subtract node. So let's look for math. Let's put it right here, and let's change this
operation to subtract. Let's take the z and plug
it to the first value. And right now, if
you take this value and plug it to the
density factor, you will see that the
grass is actually right now visible
on the top areas. And the main reason
for this is that we will probably need
to change this value slightly to change the
threshold of where Blender will basically start
putting the grass bed. Before I do this, I'm going to address
a slight issue, which is if you notice, my grass is so, so dense right now. And probably if we crank
this number to a high value, it might crash the software. So we need another note to control the density
of this grass. Of course, you can change it
from this density maximum, but I wouldn't play
a lot with this, and I would rather basically just changed the
factor from here. So that's why I'm going
to add another math node. And before I connect it, I'm going to change
the operation to multiply and plug it right now. And let's drag this number
to something like 0.1. I noticed that basically
by lowering this number, we will change the
density of the grass. Let's try 0.001 and you will
have less grass right now. That's Troy zero-point. One, this is more 0.1. You will have something
just looking like this. And right now, if we start playing with the subtract value, basically you will
be able to add more and more grass and
just lower it until you start getting the
results we want until it looks something like this. Maybe even lower it down to
something like minus three. And because right now we are
on the spectrum actually we can change it to add
and track list of three. So it will make more sense. 3.1 basically just start making this number bigger until
you have a decent density. The grass, let's say
something like five. And maybe also I'm
going to lower this number to
something like 0.05, which I think will be good. And if I jump right now
to the rendered view and hit Control Space bar to
maximize the whole thing. This is what we're getting
and I kinda like it. I think it is
looking pretty good. And let's adjust enable my water plane so I can be
able to see everything better. This is our scene right now and I think it is
looking pretty good. The only thing I might do
actually is basically to bring the scale of
this grass even up, let's say something
like 20 to 25. And also maybe changed right now the density maximum to
something like 0.01. This is not so much, so maybe let's drag this to 0.2. Yeah, I think that this
is looking good and maybe bring this slightly
app or something like zero-zero point fifteen. Basically, I always try to play with the density maximum
and this multiply node because both of them can
have a different effect when it comes to change
the density of the grass. So let's maybe even drag
this number slightly up. And let's try 0.02. And this is looking
right now pretty good. The only thing I'm
going to do is basically to just select
all of these nodes. It Control G to put
them inside the label, it F2 to rename the label. And let's call it, for
example, height mask. And basically this
group of nodes will always be responsible
and telling them blender to only put the grams on the top
areas and maybe to make your life easier in
case in the future you want to get back to this
and understand it better. Make sure to select
this Add Node and open the sidebar by hitting
N. And all you have to do, for example, is to change
the label, for example, to something like
height threshold. So in the future it will
be called high threshold, which will give you a
better understanding of what does this exact note do. And maybe also can
change the color. Maybe let's change it to some sort of a shade
of the same color, maybe something like this. So it will be easier to know
what does this exact node do in this node is actually
controlling the density. So let's call it density factor, and let's also change its color to maybe the same exact color. Alright, so basically
in the future, you will know that both
of these two nodes, you can play with the values of them until you get
the result you want. And this is basically
our final setup. It is responsible and
distributing the grass, first of all, on the
surface of our lake. And this group right here, it is responsible for limiting that distribution
only on the top. Areas are only on the top faces. That's basically how you can
distribute different assets. And in the next video,
I will show you how you can distribute some
other elements like the flowers and
the trees and all of that just by using
the geometry nodes, which actually will be super
simple just by duplicating this group of bunch and changing couple of different
setting here and there. Yeah, See you there.
14. Adding Flowers and Rocks: Hello and welcome. In this new video where I will
show you how to distribute the flowers and the rocks on the lake or actually
underground part of our lake. With that basically doing, again the whole setup, it is actually right
now pretty simple to also distribute
any element we want, only have to do is basically to select all of these nodes, hit Control Shift D to duplicate
them and keep the links. So it will basically
the links from the group input that
is going to distribute points on faces and also
our height mask so that everything that will
distribute it will always only be visible
on the top areas. And after doing this, all you have to do, for example, let's suppose right now we want to distribute the flowers. So just select from grass and
let's select again flowers. Nothing will be visible yet
because we need to take this instance and plug it to
the joint geometry and bam, just by doing a
couple of clicks, we distributed right
now the grass, the only thing that I
need to address is, as I mentioned, the density. So that's why I'm going to drag this number is slightly
down to something like 0.01 or let's try 0.005. I don't want the
flowers to be really, really dense like right now. And maybe you can change the seed to get a
different variation. And yeah, this is,
I think looking pretty good if I hit
Control Space bar, this is the result we're getting and I think it is looking good. After doing this, let's
distribute right now some rocks, which is the exact same
technique basically by selecting all of these nodes Control
Shift D to duplicate it. And let's, instead
of using flowers, Let's use the rocks. They will not be visible
because we need to take the instances and also plug
it to the joint geometry. Still not that visible because we might need to
change, first of all, the scale and the other
thing we might also need to change slightly the
density maximum from here. So let's try, for example, 0.01 and something is wrong. Well, I'm actually changing the flowers element because it is actually
right here flowers. So let's bring this number
to where it used to be 0.05. And let's move to
the rock elements. So let's just select this
label and rename it to rocks. Bring this density maximum
to something like 0.1, which will give you a
result looking like this. And the first thing I noticed
is that I do have a lot of rocks and that's
not looking good. So I need to play slightly with all of these
different values. And the first thing,
let's bring this scale to actually the density maximum
to something like 0.005, which is the exact same value that I used for the flowers. And maybe bring this
scale slightly up, like for example, from 30.
15. Adding Trees: Alright, so this is where
we stopped last time. And to distribute the trees, we will use the exact same
technique that we used before, which is basically
by duplicating one of these node groups. And we will only change the collection right here
from rocks to trees. So let's just do that
first things first, let me copy all of these nodes, or let's say duplicate them
by hitting Control Shift D, which will basically duplicate
while keeping the links. And after doing
this, Let's rename this label from rocks
to trees by hitting F2, let's call it trees. And let's also change the
collection from rocks to trees. And right now, we will not see anything because as
you probably remember, we need to connect
this instance on points node to the
joint geometry. And right now they're
not connected, so we're not seeing anything. But actually, if you remember, one thing that I always mentioned is that
before you connect any kind of elements or any
kind of particle system, I would highly recommend
that you bring first of all, this density maximum
two lower number. So you avoid introducing a lot
of calculation to Blender, which my car, the
software to crash. So what I'm going to
do first of all is to bring this number down
to something like 0. And now I will be able
basically to connect this on points to the
joint geometry node, which is right here. So let's just connect it. Nothing is visible. So let's start bringing
the number up from here and the density maximum and make sure also you are
in the tree label. And let's bring this
number to something like 0.001 and hit Enter and just wait for the
result to compute. Right now we're introducing a lot of calculation to Blender, and this is the result
that you will get. The first thing I
notice is that the size of all of these
trees is so huge. So we need to
address that issue, which is actually as easy
as just going through this random value which is
connected to the scale. And let's bring the scale down to something
like for the minimum, let's say something
like seven and for the maximum to
something like eight. And I think that this is more suitable for the look
we're looking for. And actually one thing
that you will notice is that basically blender
for whatever reason, is muting the branches of the trees on their own and
the leaves on their own, even though they're supposed
to be connected to see this better if we
zoom right here, or let's say right here, the branches of the tree are
not linked to the leaves. The reason for this problem
is actually pretty simple. If I enable the tree
collection from here just so we understand
what's happening. And I'm going to open
the trees right here. You will have all of
your different trees. And one thing that
you will notice that inside every object
which is the tree, there is another object
called the leaves. And basically what
we did is that these leaves are parented, are connected or they are children of this big
object which is a tree. So the leaves are
children of the trees. And if I jump to my ground
element right here, one thing that you will notice, actually in the collection info that we're using to
reference the trees, there is an option called
separate children, which means that a blender will separate the children
from their parents. Alright, sounds really weird. But what I mean
is that basically Blender will clear
all the relations between the different
objects so it will separate the
leaves from the trees. So to tell blender that hey, consider the hierarchy
or let's say keep the relations between
the different objects. We need to uncheck this option. So blender will keep the relations between
the different elements. And by doing this, when Blender will
distribute the trees, it will distribute the trees
with all the elements that are inside them or the elements that are
parented to them. And right now, our trees
are looking the right way. So right now I need to address a small creative decision that I decided to take this shot, which is that I don't
want any elements or any sort of trees that
are in front of the camera, which mean that I don't want to have any sort of
tree is right here. And I only want to have trees somewhere right here
on the background. So somehow if I
hit seven to nine, jump to the top view. This means that
all of these trees that are right here
will be hidden. And I only want to
have trees right here. And it is pretty similar to the technique that
we used before, which means that
we need to figure out a way to tell
blender that, hey, put some tree is right here and don't put any trees right here. And this actually begs to
use some weight painting. I really want to show you
this technique because it is a slightly different workflow
than the workflow that we use to do to basically limit the distribution of the elements
only on the top surface, which has we called height mask. So here's what we will do. We need to create
a weight paint map that will tell
blender where to put each element are actually how
to distribute these trees. So let's just make this
whole thing slightly bigger. And just for the sake of making everything a little bit
easier to work with, I'm going to jump back
to the viewport shading. And let's jump right here from object mode to the
weight paint mode. And to make everything easier, let's just disable
the geometry node and a subdivision surface. And let's jump to the
vertex group right here. And let's create another group. And let's call it,
for example, trees. Density. Alright, perfect. So right now as you
probably remember, the blue and the weight paint
mean that a density of 0. And what we need to do
is basically to just paint over the areas where
we want the trees to be. So let's just hit seven. And in your tool settings, make sure that you're drawing
with a weight of one. And when you will
start painting, it would basically be
painting with red, which means a density of one. And all we have to do
is basically to just paint over the areas that
are in the background. So let's just do
that pretty quick. Alright, so this is the
result I'm having right now. And actually to see
everything better, you can enable the viewport
overlay from here, which will show you exactly
where the elements will be. As you can see, I'm pretty satisfied with
this weight paint. So let's just jump back from the weight paint to
the object mode. And let's enable all the
different modifiers, the subdivision and the
geometric note modifier. And the most important thing
right now is that we need to use this weight paint
or this vertex group to influence how
blender is distributing the trees in this distributed
points on faces node. So here's what we will
be doing from here, which is basically trees label. I'm going to bring this
density down to 0, so I will be able to
work faster in Blender. I'm going to cut this link, which is the density factor. And I'm going to take it and actually plug it to the output, which is this node right
here called the group input. So let's just put it
right here and you will have something called
density factor. So let's rename that by hitting N. And if you jump to group, Let's change its name
from, for example, from density factor
to something like three density and hit N
again to close the sidebar. And if you jump right now
to the Modifiers tab, and in your geometry
node modifier, you will have here this
slider called tree density, which is right now it is the exact slider as the one
right here in the tree label. This exact slider is
right now, right here, right now, it is
easier to control it, but that's not
actually what we want. We need to input some sort
of a weight map to this. The really nice thing
is that you will have this small icon which
looked like a spreadsheet. And if you click on it, you will be able to
select from here different attributes
related to this object. In our case, if you remember, we created a vertex group
called tree density, which does have the
weight map that we draw. So we can reference
this right here. And if I choose, for example,
tree density blender, right now we'll use this map to influence
our density factor. And if you remember, wait, map right here is red
and right here is blue, which means that a blender will only distribute the trees on the areas that used
to be painted in red. Nothing is visible yet because I drop the density
maximum down to 0. And before I do that, I really want to be able to control the intensity
of the weight map. What I mean if I just jump back quickly to
the weight paint, you will notice that I do
have right here a red color, which means a density
factor of one. But I actually want to
be able to control that, for example, I don't
want it to be, for example, one, I wanted,
for example to be 0.1. So to do such thing, we can add the math node before
the density factor. So let's just do that
by going shift a, and let's look for
math right here. Change the operation
from add to multiply. Let's bring the
second value to 0, and let's connect it before the density factor right here. Let me just move these slightly so it will be easier
to understand. And let's also jump back
to the object mode. After doing this, I'm going
to change the density maximum to the default value we used
to have, which is 0.001. Nothing is visible
yet because right now the moment I will start
changing this value, I will start the basically
adding more and more trees. And just as a general
recommendation right now, makes sure to save your file just in case blender crashes. And let's start
with a low number. Let's say something like 0.01. We'll have a couple
of trees right here. Let's crank this number
to something like 0.1 and you will have
something looking like this. And just to see
everything easier, Let's jump to the rendered view. I think we still can add
a little bit more trees. So let's try 0.2. I think we still
can add more trees. Let's try 0.3. And yeah, I think that basically this
is looking pretty good. I think right now
you're seeing why I'm basically getting
everything zeros so I don't see anything. And I start bringing the numbers gradually because
it is pretty easy like to input a
huge number right here and it will crush
the software immediately. So that's why I
always recommend, especially when you're
dealing with heavy nodes, to always start experimenting
with low values and then start basically
increasing them slowly. So you don't introduce a lot of heavy computing
to your computer. And speaking of that,
there is really nice and handy option they added
in the geometry node, which is that if you go
right here on the overlays, you will have this
option called timing. And if you click on it, Blender will basically
tell you how much time a node is
needed to compute. For example, in our case, if I jump to the joint geometry, you will notice that these joint geometry two
millisecond to compute. And our final result is taking 0.142 seconds or
142 millisecond. They might not be the most
accurate values to be honest, because definitely
this scene is taking over a couple of
seconds to compute bad. They will give you at
least an idea of what are the nodes that are causing some slowed down
on your computer. So that's a really
nice option in case you're wondering
what nodes are, what nodes groups are actually slowing down your
geometry node tree. By doing this, we distributed all the different elements
for our landscape. And we distributed all of them just by using the
geometric nodes. I think it was not
that complicated. And believe me, if you start
basically experimenting on all of these
geometric node workflow, you will find that it
is actually way much easier than just using the
particle system in blender. That's it for me with
this video and I will see you at the next one
where we will add the final touches to our
composition basically by adding some trees on the
foreground and adding a sky. So yeah, See you there.
16. Sky and foreground trees: Hello and welcome.
In this video, we will add the
final elements to our scene and basically
started finalizing it. So yeah, let's just do that. Alright, so this is where
we stopped last time. And one thing I'm going
to do actually is to, to just disable
the geometry nodes modifier so that
I will basically have a faster
workflow right now. The first thing
I'm going to do is basically to add a
skyline to our scene. And it is actually as easy as just importing
an image of a sky. So let's just go Shift
a and let's look for image import images,
Images as Planes. And in the resources
folder you will have this sky texture. So I'll just double-click on it. Probably it will be really, really small because of the
size of our scene is so huge. So make sure you're
selecting your sky texture, then jump to the
object properties. And let's bring this scale
to something like 500. It is still pretty small. Let's try 750, or let's just
try straight 1 thousand. Let's hit seven to
jump to the top view, hit G to move it, hit Y to only move
it on the y-axis. Let's put it
somewhere right here, four and the background, it is still pretty
small right now. So let's bring the scale to
something like 3 thousand. I know it feels right
now like somehow we're working with astronomical units. That is not a big deal. Let's hit G, Z to
only move it on the z-axis and bring
it a little bit up. And actually surprisingly
it is still pretty small. So let's crank this scale to
something like 4 thousand. And yeah, you will have
something looking like this. Try to basically hood
it's something like this. And just to see
everything better or less jumped to the shader
editor from here. And basically blunder
will automatically create this material for
you called Sky texture. I don't need the Alpha, so I'm going to get
disconnected and I'm actually going to take the color and plug it to the emission. This is a trick I
learned which will make the sky looks slightly neater. Let's bring the roughness
up and the specular down. Let's hit our acts and just
rotate it slightly like this. So basically right now the
upper areas will be closer to us and that's more of
the behavior of the sky. You will notice that
there is some clipping right now happening right here, but it is pretty easy to fix. Just hit G, Y and
just move it slightly forward until you have a
result looking like this. Another thing I like to do in the object properties
under visibility, re visibility, make
sure to uncheck shadow volumes, scatter
transmission glossy. And the other thing I might
want to do actually is to introduce a little bit
of blue color sky. So to do this, let me just bring this
guy texture right here, and I need to add
a curves before, after this guy texture. So to do this, let me bring this slightly app to have
more space right here. And let's go Shift a and
let's look for curves. The almighty RGB curves before I connect it hit control
on the sockets so that I will move this
right here and then take the color and plug
it to color and to introduce a
little bit of blue, there are two options. Either you can move to the blue and bring it
a little bit up, or another technique
which is basically by lowering the reds
slightly like this. Let's say something like this and also reducing the green. I mean, it is always good
to think differently. And yeah, I think that this
is actually looking better. And if I hit M to
mute this RGB curves, this is before,
this is the after, this is before, and
this is the after. And I think it is
looking slightly better. The other thing that I also, I will notice right now
is that I will probably need some background
mountains right here. So to do this, Let's hit
seven and hit the Shift and the right mouse
button and click to basically move the
3D cursor right here. We will basically add some
background with mountains. And to do this, it is
as easy as just using, again the ANT landscape. So go shift a look
for mesh landscape. Nothing is visible
the head because it is probably so small. This is our element right now, let's change the operator
preset to mountain one. You will have something
looking just like this. For the noise size, I'm
going to input 0.8, depth of eight, a dimension of 1 to an electronegativity
of 2.4. And this will give you a
result looking like this. The only thing I'm going
to do is basically to actually sub-divide
it a little bit more. Let's say 256, which will give you something
looking like this. And I want to basically
make this whole formation slightly longer so it basically can fill
this horizon line. So from the down menu
right here on the falloff, make sure to change
it from x and y. Just change it to y. And this will basically make this mountain
formation continuous. And right now, it is actually
as easy as just bringing this mesh size on the x-axis
slightly to something, let's say like ten. You will have something
looking like this. And maybe you can also bring the mesh size on the y
to something like seven. And this will give you a
result looking like this. I think it is a
little bit too much, so let's try three. And yeah, this is the result
we're getting right now and I kinda like
it to be honest. Another thing also that you can probably do right
here is that you can change the size
to something like 1.3 because there will be a little bit of stretching
happening because we are scaling the whole
thing on the x-axis. So by introducing some
slightly bigger size on the y-axis will at least
give us a better result. Will somehow reduce a
little bit this stretching. And after doing this, we
need to UV unwrap our model. So just hit tab and just hit
you and select and wrap, wait for the model
to unwrap and bam, it is done right now. So hit tab again to
exit the edit mode, and it is time to scale this whole thing up until
it filled the horizon. So I can scale it from here, but I'm actually going to scale it from the
object properties. And let's try something like 50. Well, it's not visible yet. I think our scene is so huge. So let's try 500,
let's try 7750. Alright, this is looking pretty
good and I think I might want actually to scale it a
little bit up on the z-axis. So let's hit S, Z and scale it a little bit
on the z-axis and maybe bring this whole scale a little bit down until you get
a result looking. And just like it is right now, all we have to do is basically to add a material for this. I'm not going to
bother basically by creating a different material
for it and all of that. So I'm just going to use
the same exact material that I used for this mountain. So let's select in
the shader editor, make sure also you're selecting
your background mountain. Let's select the material
called Mountain. And the first thing
that you will notice is that everything will go crazy because we're using some sort of a displacement of this material. So let's address
that pretty quickly. And the easiest way
basically to fix this issue is basically by
lowering the displacement. But by doing that, we will also change this result for
the main mountain. So to fix this issue, it, it will be easier basically to create a different material. Simply all you have to do is to click on this new material icon, which will create an exact
copy of this material. So let's rename it
to something like a mountain underscore
back ground. Now let's lower down
the subdivision two, pretty low number, let's
say like one for now, it's still pretty intense. So let's try 0.01. And I think that this actually
will suit better. A look we're looking for. And actually speaking of that, if you remember to
this main mountain, we added actually ie, a
displacement modifier. So let's add the same exact
modifier also to this one. And it is actually
as easy as just selecting this background
mountain shift, select the main
mountain, hit Control L, and you will have an option
called copy modifiers. So just click on it. It will turn
everything to a blob because of the
displacement modifier. So let's address this issue. And actually before I do
anything that if you remember, I actually forgot
to apply the scale. So hit Control a and
apply the scale. We will have a result
looking like this. And I think by doing that, our result will
look somehow fine, I think, and is looking
pretty good in my opinion. The only thing actually I
might do is to try and scale this whole thing for the
displacement. Let's try 0.1. And yeah, I think that it
is looking pretty good. I might actually also hit S, Z and scale up a little
bit on the z-axis, little bit more scalable thing, and hit Control a
and apply the scale whenever you change the
scale of your mountain. And all we have to
do is basically to rename this whole thing to background mountain
and hit Enter. Alright, perfect. So
right now we filled our background with some
mountains and the sky. So the last thing we're going to address is basically the
foreground elements. And for this, I
will enable again my geometry node modifier
on the ground object. Let's just enable it. This will give you a
result looking like this. And basically what I want is to add some trees right
here in the foreground. This will be super easy. Basically, lemon just bring
this slightly down to have more space in my outliner. And I'm going to create
a new collection and let's call it F G trees. And I'm going to take two trees from this collection
called trees. Let's see the first tree by selecting it and
hitting the dot. This is our first tree, and this is our second tree. Let's select this one and this one hit control C and move to every trees
and hit Control V. Perfect. And we basically copied both of these trees
to a new collection. Let me disable again this trees. And for these two trees, I'm actually going to move
them through the foreground. So let's just select them. Had seven to jump
to the top view. And where is my scene? It is right here, my camera. So let's just move this
whole thing right here. Zoom in a little bit and just
scale the whole thing way, way bigger and maybe hit our Z to rotate it until they
look something like this. Let's scale them up. We will have two
trees right here. And the whole thing,
it is actually as easy as just trying to frame this whole scene using this trees to create
some sort of frame. So let's select the first tree. This one hit G to
move it slightly on the x axis until it looks
something like this. Maybe you can rotate it a
little bit on the z-axis. Maybe you'll get a
different result. Alright, I think that
this is looking pretty good and maybe also
like this one, g x right here. Also, if you want it to look
like it is somehow falling, maybe you can scale it and
let it sit down and hit R and rotated a little
bit on the y-axis, something just like this. Alright, perfect. So this is, our tree is right now that
will be on the foreground. And I'm digging
this, the result, actually I think it is
looking pretty good. I might say, Hey, that the
tree is looks so huge, but it is not a big deal. And actually just for the sake of making
everything easier, I'm going to select
this camera up. And if you scroll down in
the camera properties, you will have right here
in the Viewport display. Let's bring the scale to
something like ten meter. So basically I will be able
to see my camera easily. Let's even try it 50 meter. So this is our camera right now. And yeah, this is the
result we're getting and we're almost there. The only thing that we
might want actually to add is basically some fog planes to kind of add more
depth to our scene and will be done after that. So yeah, see you in the
next video where we will create some fog planes.
17. Adding fog planes: Hello and welcome.
In this new video, where we will basically add
some fog planes to our scene. So to add some fog planes, which basically will
add some more depth. As I mentioned,
it is actually as easy as first of all,
creating a plane. So let's go shift a mesh plane to be really small because
I was seen as so huge. So let's bring the scale
to something 1 thousand. So it is pretty huge right now. Hit our x two, only rotate it on the
x-axis, and let's hit 90. Basically what you want is for this plane to cover
the entire frame. So let's even scale
the whole thing a little bit more until it cover, let's say something like this. Hit Control a and apply the scale hit F2 to
rename this object. And let's call it, for
example, fog underscore plane. And we need to add
a material to this. So here's what we will do. I'm going to hit the Tilde
key to only focus on object. And I'm going to also pause my render right here and
enable the render right here. Or actually I will need to
enable it in both views. So let's just jump to the
solid view right here. Perfect. And I need to create
a material for this. So make sure you are
in the shader editor. Click on New. Let's
bring this slightly up. And right here,
actually there are just two options that
we need to worry about, which is the base
color and the Alpha. So basically a fog Blaine will look something white right here, which will gradually fades out, or let's say gradient from
white to transparent. So I mentioned the
word gradient, which means that I will
need a gradient texture. Let's look for gradient texture and we need to add a
mapping setup to it. So make sure you are selecting your gradient
texture and just hit Control T or Control
Shift and click on your gradient texture to
see how it will look like. And it will look
something like this, which is not exactly
what we want. We want the black to be on top and the y to
be on the bottom. So all you have to do is to
rotate it on the z-axis, let's say 90 degree to
look something like this. But if you bring the location
to one on the x-axis, you will have something
looking like this, which you will have basically a gradient going
from white to black. White will be visible, black will be not visible. And if you take the color and
plug it also to the alpha, notice what will happen. Alright? Nothing will happen
for whatever reason. Alright, because I'm not
seeing the principal P, S, D, F. So Control Shift and click
on the principle be SDF. And as you can see, the upper
part is right now kind of transparent and you kinda see the checker
texture behind it. But we need to tell
blender that, Hey, we want the transition to
happen somewhere right here. And to do this,
it is actually as easy as just adding a math node and setting up the operation
from add to power. And if I Control
Shift and click on the Power node and a sub bringing this
number, what is that? I'm basically able to move the location of this
gradient the way I want. So maybe let's put it
somewhere in the middle, 5.5 and Control Shift and click on your
principle-based df. This is the result we're
getting and I kinda like it. And for the base color, make sure it is actually white. And if you're doing this, we're ready right now to put a couple of these fog
planes on our scene. So let's hit the tilde
key again to jump back to the view of our scene. And let's also maybe jump
back to the solid view. And let's jump right here
to the rendered view. Right now, our plant is probably covering a
large part of the scene. So let's hit G, z
and move it slightly down until you get something
maybe looking like this. And maybe let's also
duplicate it right here between the main mountain and
the background mountains. And just for the sake of
making everything easier in the object properties and or visibility in the
viewport display, make sure to change
from textured to wire, which will basically just
give you this kind of frame, which will basically will make
everything easier to work with so that we can see
through this blame. It's seven to jump
to the top view. And let's hit Shift
D to duplicate it and put it right here
on the background. And one thing that
you will notice, it is actually smaller
than the frame, so hit S and scale
it a little bit up and maybe also hit G, z and move it a little bit on the z-axis until you get a
result looking like this. And as you can see, it just adds a little bit
more depth to the scene by adding woods like
there is some sort of haze in the scene or
something like that, which I think looks pretty good. And yet by doing this, our scene is finished. And in the next couple
of videos, well, basically finalize it and just make it ready
for rendering. So yeah, see you
in the next video. Bye everyone.
18. Rendering layers: Hello and welcome. In this video, we will organize our scene
and break it down to different rendering
layers so that everything will be easier
for computer to render. Alright, so to do this, I'm going to bring this slightly down so I will have more
space in my outliner. And basically, I want to move all of these different assets, like the flowers,
the grass, rocks, and trees do their
own collection which will be called assets. So let's create a
new collection and let's call it assets. And I'm going to
select all of these and just move them to assets. I'm going to disable it and enable all the
ones inside it. So whenever I need
it, I will be able to enable all of these
different elements just by clicking on this
one instead of like basically enabling
each one on its own. So let's just minimize it. And there is a
really nice option, which is that you can hit the right mouse
button and change its color to
something like green. So I will know that, hey, this is actually assets
and actually maybe we can change the color of all
of these also to green. So I know that this will
be our assets collection, which actually surprisingly,
we will not render it. After that. I'm going
to work a little bit on my foreground elements. So to do this, I'm actually going to
create a new collection and let's call it for ground. And what are the
things that I will need on this foreground? First of all, I'm going to move the lake to the foreground because it will render
with the foreground also the trees, which are these ones right here. And here's one thing that you always need to know
is that you will always need to select
all the things that are inside an object that
you move all of them. So let's just select them
and move them to foreground. Let's select both
of them and hit M to move them to a new
collection, new collection, let's call it a veggie
trees and just hit, Okay, Let's also move
the leaves inside the collection so that
they're not left behind. Perfect, and make sure it is
actually inside for ground. This extra trees which we created before we
need to rename it to, let's say, fog planes. And let's get back
this to every trees. Alright, so for the fog planes, I'm going to leave them on their own collection main mountain. Let's leave it on
its own for the sky, I'm actually going to move it to a new collection by hitting
M and New Collection and let's call it the sky and
hit Okay, let's minimize it. Alright, so for the
background mountain, I'm going to rename
this collection to back ground mountain. And I'm actually going
to move the camera to the scene collection so it doesn't belong to
any collection. And let's just minimize this. And by doing this, we will have a collection for each
different elements. And right now it is about time to basically start breaking down the scene two different layers before our break it down
to different layers. Here's what we will do. The first layer, which
is we're in right now, I'm going to call it master, which will basically contain the whole scene together
in case I need to work on it a little bit more
than I'm going to click on this and just
hit Copy Settings. And I'm going to call
this for this guy, as you probably
already guessed it. I'm only going to enable
the sky collection. And if I just jumped
to the rendered view, this will be the sky later. Let's create another
one, copy settings. And right now, let's rename
this to background mountains. And I only want to see the background
mountains right here. So let's just enable the
background mountains. And actually one thing
I just remember is that the fog planes also
need to be visible. And actually I only
need the fog plane 001. So that's why I'm
actually going to move this to
background mountain. I'm going to disable
this collection and you will have something
looking like this. So this will basically be
my background mountains. Right now we will move
to the main mountain. So click on this
Copy Settings and let's call this main mountain. And from here, as
you guessed it, that's enabled main,
main mountain. And also I need to
enable this fog plane, which actually I will
move to the main mountain and just hit Delete for this frog plane because
we don't need it. So our focal plane, one of them would be in the
main mountain and one of them is in the background
mountain because one of them is in front of
the background mountains and the other one is in
front of the main mountain. So it will make more
sense if we render each plane with the
mountains behind it. So this will be
our main mountain and it is looking pretty good. Let's create another
layer Copy Settings. And this one will be
for the four ground. And right here, I will enable
my foreground collection, which will have all of
these elements right here. And after doing this,
we need to jump to our composite or to set it up. So let's move to compositor
check Use nodes, and we will use a bunch of file woods to render the scene. Let's just jumped to
the viewport shading and I'm going to hit
Control Space bar to maximize the compositor
because we don't need actually right now to see the whole thing in the viewport. And the first thing I'm
going to do is basically to actually cut this link
and dilute this composite. And all you have to do is
basically to select the layer that you want to render from here and where you
want to save it. So here's what we will do. First of all, we need
to denoise our render, because as you probably
remember in the first video, probably right here
in the render passes, we actually enabled
de-noise data. So we need to use this using
data to improve our renders. So to do this, we need
a denoising node. So go Shift a and let's
look for de-noise. And it is as easy as
plugging the image, image normal to the normal
and albedo, albedo. And let's add a file output. Let's plug it right here. Just make it slightly bigger. Click on this and basically just select where you
want to save your render. In my case, I'm going to save it right here
and I'm going to create a new folder and
let's call it render. Just hit Accept. And if you want actually
to rename your render, you will have to hit Enter
to open the sidebar. And under node properties, you will be able to change right here the name of the file, the first layer that
we will be rendering. It is actually the sky. So from here, let's call it sky. And for the file format that
we will save our project on, I'm not going to use PNG, but actually I'm
going to use Open XR. Yes, it will give us
a huge file sizes, but it is not a big
deal because we will only work with images. We're not basically creating an animation where we will
have a lot of images and we might worry about storage because we're only
working basically just using a couple of images that we will
blend together. We need as much as
possible data as possible. So that's why I'm going
to use Open XR and just leave all the different
settings the way they are. And after doing
this, it is as easy as just selecting
all of these nodes, hit Shift D to duplicate
the whole thing. Let's change from sky to
background mountains. And also for this node
makes sure to change it to back ground and
rescore the mountains. Now, select all of
these, hit Shift D. Let's rename from
background mountains two main mountain renamed the result of this
file output to, let's say main
mountain hit Shift D. And let's finally
choose foreground. And let's rename this
to four ground perfect. So this is basically our rendering no tree
for the compositor. And in the next video, we'll basically just change a couple of Render
Settings here and there. And after that, we will be
ready to render the scene. Yeah. See you in the next video. Bye everyone.
19. Rendering settings: Hello and welcome. In
this video, we'll, we'll change a couple of render settings to optimize our
scene for rendering. So, yeah, let's just do that. So this is where we
stopped last time, basically by building
the compositor no tree that we will
use for rendering. And let's just get back to our normal view by hitting Control Spacebar to
minimize our editor. And let's change a couple
of render settings. First of all, the render
settings right here, and make sure you're on
cycle experimental GPU compute for the Render Settings. I'm going actually to
render the scene a 256. Some people might seem
a little bit too much. It is not a big deal, as I said, because we're only
rendering one image. So yes, it might take a little bit of time
to render that is just one image so you can wait for it until render and
then you will be done. I'm going to disable this
denoising option because I'm already using a
denoising node right here. And other than that, let me jump back to cost X. I don't need neither
reflective, neither refractive. And yeah, this is
looking pretty good. I'm not going to
change anything else. After finishing with
the Render Settings, I'm going to jump to the
view layer properties. And from here, I'm going
to change a couple of settings may only
if you scroll down, you will have here an
option called override. And basically override will
basically allow you to choose different rendering
sample to each layer. For example, if I
jumped to the sky, my render sample right
here is actually 256, which is actually true
for rendering is, it is a little bit overkill. So that's why when
you jump right here, you will be able to select a different rendering
samples, each layer. For example, this guy,
I think it will be good even with 32 for the
background mountains, I'm going to leave it at 256. Same thing for the
main mountain. Let's leave it at 256. And for the foreground, I actually might even bring
this slightly up to something like 512 because they need more details
on the foreground. The other thing also that
I, as I promised you, which is basically we
will use missed past to kinda create some
fog in our scene. So to do this, let's
just jump to our master. And from here, I'm
actually going to enable the messed
pairs for this one. And I'm going to
also scroll down and let's choose a low sample. Let's say something like 32. We don't need a lot
of sense for this because we will only need
it for the midst pass. And if you jumped to
your camera properties, you will have here an option and are viewport display for missed. If you click on it,
you will have a line that will show right
here in your camera. And if I just change its location to understand
better what it will do, let me jump to the world
settings or properties. And right here you will have
an option called Miss fast. So basically the mess There's, will generate a picture that like the one you're
seeing right now, which it will help
me later to blend it with the render to
kind of add more fog. So basically the start in
depth, like the following. The start will basically
tell blender at which distance blender should start calculating
the midst pairs. And the depth is basically
the final point where it will be basically fully
white or fully opaque. We can see anything.
So to do this, let's change the star
to a high number. Let's say something like, let's say that the fog will
start basically around here. So let's just move
it in the star to somewhere right here, 350 meter. And the whole scene will be
fully opaque in a depth of, let's say 3 thousand meter. Let's try actually
5 thousand meter. Yeah, I think that this
will be good to start off 350 meter and a depth of 5 thousand meters
or five kilometers. And we also need to save this. So it is actually super easy. And all you have to
do is basically to just select one of
these node groups. It Shift D to duplicate it, and let's change it to master. We don't need this de-noise, so hit Control X and
all you have to do is basically to take the midst
and plug it to the sky. And in this file output, make sure to rename
it to missed an. After doing this, I think we're ready to go and all you have to do is basically to go file
and save just in case. And just right now
basically go to Render and render image. We have to do basically is
wait for blender to render. And I will see you in
the next video where we will finish this whole image. See you there.
20. Compositing Part I: Hello and welcome. And in this final video will
basically compose our shots. So let's just do that. One of the things that I always like to do is basically to start a fresh blenders scene
so that basically I don't work on an
already have a file. So by creating a
fresh blender file, I will basically have
a quicker workflow, Let's say at the end of the day it doesn't matter
because right now we're starting to deal
with images and we don't need all the
chaos of the 3D models. So just start fresh blender file and directly I'm
going to click here and just jumped to
compositing because that's what we will be
doing after doing this, basically make sure to check, Use nodes and delete both of these two nodes because we don't need them x and to delete them. And maybe let me just minimize this and hit End to
hide this sidebar. After doing this, we need right
now to import our images. And to do this, there are
two different approaches. The easiest one will be
basically to just drag and drop them from your explorer
or just go Shift a. And if you look for image, you will be able to have this
node and you click on Open. And right here just for example, let's start with this guy. I'm going to open the sky now, maybe hit Shift D
to duplicate this, click on open the background
mountains Shift D to duplicate it again, open main mountain
Shift D again, open ls choose for ground
shift D again open, Let's open the message
pass that took some time. Now here's the important
thing you always should think of the hierarchy of
all the different elements. Because the way of how
noodle compositing work is basically by putting
the farthest element, basically in the
bag and work your way basically to the
foreground elements, just like you're
seeing right now. So we need to put these background
mountains over the sky. So to put one element
over another, we will need a node called
Alpha over as the name states. So go a and let's
look for alpha. And I wrote sulfur Alpha over, which is this node right here. And basically what
this node will do, it will overlay the second
image over the first image. So I'm going to
connect this guy to the first image and connect
this to the second socket. And if I Control Shift
and click on this, you will have something
looking like this. And one annoying thing that
always bugs me is that you can basically zoom in on this picture by scrolling
the mouse wheel. So you need to hit V if
you want to zoom out. And let's maybe just put it right here so we
always can see it. And yeah, basically this is the result of
that you will get and also make sure to check
convert pre-multiplied. If you don't check it, some weird stuff will
start to happen. And now after doing this, we will put the main
mountains over that. So Shift D, Let's put it here. I'm going to take
the main mountain. Let's put it here,
shift D again, and let's put the foreground
elements right here. And this is our render. For now I'm going
to leave the midst pairs because I might use it, I might not, but
let's just leave it there for now in
case we need it. And in the next video
where we'll add the final effects
to this composite. So yeah, see you
in the next video.
21. Compositing Part II: So this is where we
stopped last time. And let's just do our
final adjustments to this. I'm going to try and make this composite as easy as possible. I'm not going to go super technical right now
because at the end of the day there are
limited stuff that you can do inside a
blender compositor. And to be honest, I just want to show
you how you can use some features that the blender
composite or can offer. One thing that I always
like to do because the setup of this composite or in Blender
is a little bit so weird. I'm going to select
all of these nodes. And if you hit age, you will basically
minimize them. And I don't need to see basically everything
because I already see the name of the files are actually the
name of the nodes. So it will be
easier like this to see how the whole
tree is connected. Let's say. Another option you
might find it useful. Basically, if you check
this magnet right here, all of these nodes will
stick to this grid. And I always like to make
them super organized. So what I like to do
is basically to apply some general adjustments
to the whole image. And if I notice some problems related to a certain element, I will address that
element on its own. But right now, let's just
adjust the settings, all the different elements, which means that we will add some nodes right here at
the end of the node tree. The first thing that I always
like to do is basically to go Shift a and add a curves, RGB Curves Adjustment
Layer or actually note, sorry, and it is
under this mismatch. So I'm just going to put
this bad boy right here. And what I'm going
to do is basically to crank a little
bit the contrast of this file to something just like you're
seeing right now. I think that this
is looking good. And one thing I will
notice is that there is some like really yellowish tint which actually you can
address in multiple ways. Maybe some people might
suggest to reduce, for example, the red, which will solve that
problem quite there yet. So what I'm going
to do is basically to just minimize also this node. And I'm going to add
another node after that, which is called hue, correct? And if I take this and
put it right here, I will be able to change the
saturation of each color, which means that, for example, we feel like this
picture is to yellowish, yellowy and to
orangey, let's say. So we might just drag all of these colors that are
right here slightly down. And as you can see, I
will be able to change only the saturation
of these elements. So what I'm going to do
is basically to just drop the saturation a notch until
it looks slightly better. In general, I do really
love the desaturated look, but at the end of the day, it is up to you and your style and the
things that you prefer. And basically by doing this, we fixed the issue related to that orange button that
were in the picture before. That's also minimize
this and maybe even let's put it
underneath this. And right now let's
add another RGB curve, which I'm going to use
to grade this image. So I'm just going to put
this bad boy right here, and let's just start
adjusting some colors. And actually, I'm
going to put it slightly here so I
can see my image. I'm going to boost a little
bit of blues to the sky. So you can boost the blue's
either by adding blues or you can reduce both the red and green thing
differently as they say, I'm going to reduce
a little bit of red from the highlights and a little bit of olive green from the highlights,
something like this. And maybe let's boost some
blues in the highlights. Or actually maybe let's
create a point in the middle and move
this just like so. Let's get back to the reds. Maybe let's just
lower them slightly. Alright. I feel like I'm not
getting exactly what I'm looking for just by
using this RGB curves. I'm just going to minimize
it and put it right here. And let's just change some
settings only for the sky. So to do this, where
is our sky node, which is this bad boy right
here. So let's go here. Let's add a curve and let's
maybe boost a little bit of contrast to the sky
to make it more moody, more scary, something like so. And let's reduce the reds, which will give you
something looking like this. Alright, That's not bad, I guess, kind of work. I might also actually drop the saturation a
little bit down. So go Shift a and let's
look for saturation. You use iteration value, Let's put it right here, and let's drop the
saturation to something like 0.9 or 0.7. Yeah, that's better. Minimize it and let's
put it right here. And I might actually
also add a hue and saturation value also at
the end of my notary. So let's a and let's look
for hue saturation value. Let's put it here and I'm going to drop the saturation
to something like 0.9. And if you play actually a
little bit with the hue, you might get some
cool stuff happening. In my case, I feel like if I reduce this to
something like 0.48, there is this light orangey, pinky color cast that
will start happening. I kinda like it. So I'm just going
to leave it there. Again. This is just self preference and actually a more into showing you what you can do and then
compositor more than actually getting a
really good result. Because compositing
can be time-consuming, especially when you're trying
to dial different settings. Nodes. If you hit M for this node, this is the before and
this is the after, this is the before and
this is the after. And I kind of prefer the result with this hue and
saturation node. I might even actually drop the saturation
something like 0.8. And this is the
result we're getting. I know it is a little
bit too desaturated, but that's what I'm going for. Another thing that you
might also want to address is that if you
notice right here, if you hit Alt V, you will be able to zoom in on this picture. Where is my viewer? Select your viewer. I'm just going to move
this slightly right here. Basically there is some
space right here happening. And probably that's because we didn't notice it when
we were working in 3D. But this is the issue that you can fix easily when
doing compositing because it is as
easy actually as just scaling the foreground
elements a little bit up. And we will basically have that artifact
happening right there. Where is my foreground? It is right here for ground. And all you have to do is edit
transform, node transform. Let's put it here. Let's change the scale
to something like 1.15 O we've seen how
did you figure out that? Well, because I did that before and let's just bring
it a little bit up on the y-axis just
slightly until we hide artifact happening right
here, something like so. And this is looking pretty good. Let's just minimize this and put it beneath the foreground. Alright, then the last thing
that I'm going to do is basically to add some
camera imperfections, which is basically as the
name states some artifacts or some imperfection that does happen because of how we
use cameras in real life, like lens distortion
and all of those steps. First things first,
I'm going to add a blur node like Bueller. And you might wonder
why am I adding this? Because generally the
renders that comes out of 3D softwares are really sharp and they doesn't
look that good. So I always like to add
like for example, one, the blur node to just
make it slightly, a little bit more blurry, it will help us along the way. Let's minimize this node. This is the first imperfection. And after that, I'm going
to also add a vignette. The vignette is basically the darker edges that will happen on the edge
of the screen. And to do this,
just go Shift a and let's look for ellipse mask, which is this bad
boy right here. And if you hit Control
Shift and click on it, this is the mask we're having. I'm going to bring
the width up to something like this and the height to
something like this. This is our mask, and right now it is super
sharp so we need to blur it. So go Shift a and
let's add a blur node. Let's put it here and let's blur it to something like 500. Perfect. And maybe
let's just try 400 to just make it a
little bit more darker, I will stick to this result. And right now we need to
figure out a way of how to apply these black and
white mask to our image. And this is actually
pretty simple because there is actually
a way to do this, which is by multiplying
this image with our original image that is
coming out of this blur note. And in case you're confused, I'm going to put
this right here. Let's go Shift a and
let's add a mix and just plug this to
the first socket. And let's plug this to
this first socket and Control Shift and click on
this and nothing is happening. And that's actually
a weird problem that a lot of people who face, which is that this ellipse mask, the dimensions we're inputting
right here are related to the project settings or to the
resolution of the project, which means these
width and height actually work in correlation. What a word with
this aspect ratio or actually with this
resolution 1920 by 1080. But if you remember
actually we set up our project settings two to 560, which is slightly more going
toward the cinema scope. So if we want everything
to work correctly, make sure you change
the project settings of this fresh blender
file to the same. They mentioned that we used
for our scene or to render our scene width
and a right now if you hit Control Shift
and click on this, this is the result
we're getting. And as you can see,
there is some sort of clipping happening
on the top. So let's just drop
down the height, just like so let's
see the result after the blur node Control
Shift and click on this. This is the result we're getting and Control Shift and
click on this and nothing much is happening
because we need to change this to multiply. And as you can see, we basically darken the edges of our image. That's pretty cool, right? And in case you want to change the intensity of
this black parts, well basically you
will need to add a color ramp node after this. So let's go Color Ramp. Let's just put it right here, and let's just choose the black color and
raise it a little bit. This will generally
make the black less black if that
even makes sense. Yeah, This is looking pretty good and let's just put all of these nodes beneath each
other so they look neat. And lastly, of course,
but not least, is to add the lens distortion, which is the distortion
that happens because of lenses in real life. So to do this dedicated
node for that, which is called lens distortion. And generally you
should use like really small values to
distort your image. In my case, I'm going
to put 0.01 minus, minus 0.01, which will give
you a slightly distortion. And maybe also a 0.001
for the dispersion, which will create the
chromatic aberration that might happen on the
edges of the screen. That's the minimize this and let's just put it right here. And yet, I would consider
this a finished render. As I mentioned before, you probably can spend a little bit more time
doing some compositing, maybe even jump in Photoshop, maybe even make it better. But for the sake of keeping
everything in Blender, I'm going to stick to this. And also as I mentioned
for this video, I'm not trying to basically show you exact values as
much as I'm trying to show you the potential
and the things that you can do inside of
Blender compositor. This is our final node tree and we didn't use
our mask paths, but it's not a big deal. You probably just
can do it basically by doing Shift D. And let's just plug this right here
and choose this screen. And right now we're
applying our misspells. It is looking a
little bit funky. That's why I'm just going
to hit M to mute this node. So basically I'm having
everything that is coming out of the
lens distortion only, and I'm not going to
use it this miss fast. Thank you very much
for tuning into how we can create the scene
inside of Blender. And yeah, have a great day. See you.
22. Fix A.N.T Landscape Eroder Problem: Hello and welcome.
In this video, we will fix a common issue
that might happen to some people when using the a and T landscape
or erosion tool. Alright, so basically, I'm going to recreate this problem. So imagine you just opened Blender and let me just
delete all of these because you have two and
let's go Shift a and let's add a landscape element. And when you hit End to open the sidebar and recreate
landscape tool. So you will have
landscape rotor, and if you click on
this, you will have this really annoying problem. And basically it is some
problem related to the script. It's not a problem
relates to your computer. It is a bug and the add-on. I did some research and it is a common issue that
did happen to a lot of people and even under-priced and Blender guru is
facing this problem. So we have believed
me you're not alone. I did some research and I found the solution
for this problem. And it is actually
pretty simple. Here's what you will
be doing inside the project files
of this project. You will have this AT&T
Lenski problem fixed. So let's just open it
and you will have this AND functions by some file. So just copy this file. And right now we're
going to navigate to where we installed blender. This can be if you installed a portable version
which is the zip file, or you basically use the
usual installer for, for Blender and the
beth will be the same. So in my case, I'm
going to jump to see, then go to Program Files, Blender Foundation, choose
your version of Blender. In my case, I'm
going to choose 3.1, go to 3.1 scripts, add-ons and look for ANT
landscape. It is right here. And you will have
this AND functions, which is the exact same files. Please forget about
this because this is my previous attempt to
fixing this problem. So here's what you will do. Basically just
change the name of the AND functions
file that you have. So something like
let's say a backup just in case you need it
sometime in the future. And let's just hit
continue and just go based and continue. And we basically replace that
AND function file before, which has corrupted
with this new file. Right now, if you close Blender, let me just close it. Don't save and let me
just open it again. And right now, if I
add my landscape, Let's add landscape and let's
jump to the erosion tool. Create landscape. Landscape tools,
landscape erosion. It will work the way it
is supposed to work. So yeah, this is how
you fix that problem. Hope it helped you right now. You need to get back to
the course, alright.
 Yassine Larayedh, VFX Artist