Transcripts
1. Introduction: Hello guys, welcome to the
course. This is Ahmed. I'm chauffeur, engineer
and tradi artist. At the time this
course was published, I've been practicing tradi
art for more than four years. I'm sharing my experiences with my followers for two years on
my Turkish Youtube channel. I also organized face
to face workshops in various education centers
in Istanbul, Turkey. Hundreds of my students took their first step
into blender with my online or face to face lessons and created
awesome projects. I recorded this course for
anyone who is new to blender but feels incomplete because I have not done enough projects. I used Blender 4.0
throughout the project, which is the most current
version right now. But since Blender does not make huge changes
between versions, I'm sure that you'll
be able to easily apply what I've done in
the next versions too. I believe this project will look great in your portfolio
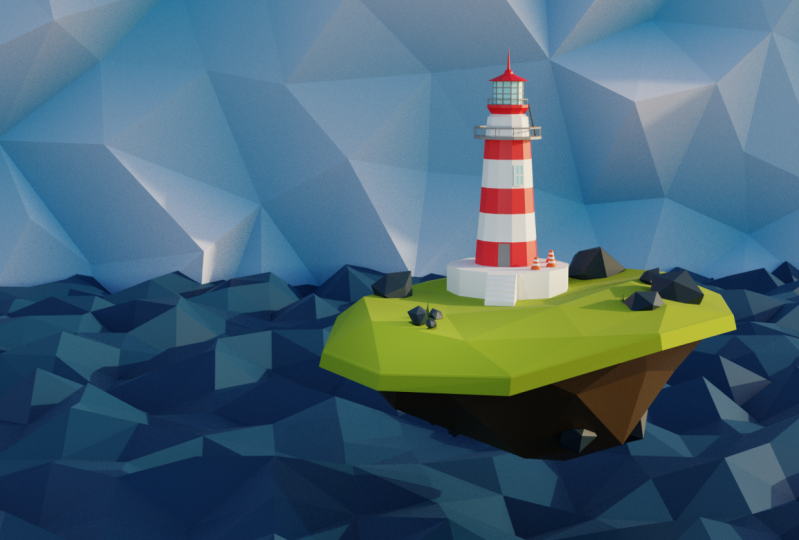
and teach you a lot. During the course, I explained the modeling, optimization, shading, lightening, the sea, and rendering processes
respectively, can wait to see
your final project. Do not forget to
share them with me. See you in the final part.
2. Modelling the Lighthouse Base: Before we start modeling, this icon showed by a free add on called screen cast case. And you're going to be able to follow any key that I pressed. For example, if I press N, this will show me
navigation menu. Also, if I press left
or right mouse button, you can always follow
up from this side. Okay, let's start modeling. First of all, we need to add our reference image
into our workspace. How can we do that? I'm going to take my mouse cursor over here. When I see this
double sided arrow, I'm going to right click
and vertical split, left click, summer over here. That will divide our
work space into two. Let's convert this
area to image Tor. Now we can add our
reference image into here. Now let's say we cannot
see the other parts. You can always use your
middle mouse, but like this. And I'm not going
to add new image. I'm just going to open
my reference image. Let's select this icon
to see them better, and that will be my
reference image. These are also divided parts. Maybe you might want
to use one of them. I'm going to select
this one open image that will bring my
reference image into our C. I can always check out what
to model and how to do this from our reference image with
my mouse cursor over here, I can press control and
space to see this image better control space will
maximize our Voc space. And I can always back
to previous with the same key. Let's
just look at it. This includes two parts, but of course we'll be using different meshes
for that kind of objects and the racks and
the objects like grass also. We're going to be
using different objects or the ladder also, but we can use one piece
object, that lighthouse. Okay? Now first of all, I want to delete this cue, pressing X and delete, let me add a new
object Shift and A will open this menu mesh, and let me add a cylinder. I want to change the number of vertices to something like 12. Right now we can
see our object by the y axis and I can start modeling by
switching edit mode. You can always use tab key to switch between object
mode and edit mode. And let me use one key to switch into vertex
selection mode. Press one and you can
also change it by here. Okay, let's turn X ray mode on. Before we start modeling, I'm going to turn it on
by selecting this icon. Right now we can see our
object in X ray mode and that will help us to select the back side of the vertices. Let's switch to our view, again, back or
front portographic. It doesn't matter
actually pressing. And this will lock my
object into z axis, left click and scale
it down a little bit. Maybe we can increase
the scale of the bottom. Something like this
will be enough. Let me see my object
in solid mode. Okay, I think that
will be enough. Maybe we can change something here and that will automatically
switch me to x ray mode. You don't have to
memorize any shortcuts, just I'm using them to model
easier, something like this. Okay, I'm going to
select this face over here and extrude it in the axis. If your extrusion is not
locked in the Z axis, you can press Z and Z again, double lock it in the Z axis. Automatically, left click. Maybe live in something
like this and Z, we can always change
the location of extrusion and to scale
it a little bit, extrude it and Z, maybe we can change
the location. And to scale it a little bit, maybe we can keep
it closer to here. But I think something
like that will be enough. Okay? Now we can extrude
it and keep it like that. I'm going to check this out. I think this is not too bad. Maybe we can change
that side a little bit. This is so high, okay? Right now I want to
model that part. Let's keep doing it.
I'm selecting this face over here using
key to insert it. And left click, something like that is going to be enough. Using e to x root, left click over somewhere here. Maybe we can keep it
a little bit shorter, we can directly
add these details. But first of all, I want to do the top part. Let me extrude this again, scale outwards and let me
check it out from this side, actually, that's not going
to be greater than this one. Extrude it again, I'm going
to keep it like this. Let me switch to vertex mode. I can directly merge
these vertices by pressing, choosing a center. Okay, with my vortex selected, pressing and Z a little bit, I aim to get similar
results to this. Always you can update
if you didn't like any part and Z, maybe
keep it like this. Okay, I didn't like this part because it's thinner than
our reference image. First of all, I'm
going to press Shift. And now I can direct my mouse and increase the scale of
the object a little bit. That key will help me to scale this object
without Z axis. Right now this looks better. Pressing Y again, x ray mode, and maybe we can increase this one a little bit,
something like that. Now we can directly
create the windows. Here we are going to
use three look cuts. Let me increase it a
little bit in edit mode. Control R will help me
to create loop cut. And press three, left click and right click
to leave it as it is. Okay, We're going to do
the other parts later. I'm going to add new
object in this part. Shift a mesh and icospherelet me use and
Z to bring it like this, scale it down, that's
the top of the object. Maybe we can look
from this side. Something like
that will be fine. Okay, maybe we don't have to use another object for this part. I'm going to use this one
and hide this object. Select this again, edit mode. Let's use control shift
and B to bevel this part. And click something like this
directly we can use to x root zero again
to scale it down, maybe we can make it wider. Use S to skate it a little
bit, that will be fine. Now we can show our
icosphere again. This is how our
objects look like.
3. Modelling Balcony and Ladder: Now we can add some
details into these parts. I'm going to use control
to add a look left click and drag it a little bit
over something like here. You can always
change the location of loop cut by pressing. And again, by this key we'll
be using our slide option. You can always select
this icon over here and use this gizmo that will
do the same operation. Let me increase it a little bit. Maybe you can change
it as you request. Okay, that will be fine for me. Let me get closer. And
using control B to bevel, that will divide
our loop into two. In this part, don't increase
the number of segments, just we'll use bevel
for getting this part, maybe a little bit thinner. Left click and leaving
the object like this. Three, we'll switch to
face selection mode. I'm going to use exude
along, normal guys, I'm going to press over here
and drag it Exude along. Normals will be here, selecting this and using it. Just pressing this chismo, moving it upwards like this. That will be too much. Maybe you can make it. As you want to select this loop, I'm going to use old key
and left click that will select all the loop
looking up by axis in x. And to bring this
a little bit down, let's do the same
for this foldleft click from axis in Xd. Something like
that will be fine. Okay, right now we can use a different approach
to model this part. Let me check this out. That will be a low poly project, so it's not going
to be a problem to model it with different objects. I can select this loop again by pressing Alt and left key shift, and D will duplicate this loop that will
lock this in axis. That will be fine.
Extrude this in Z axis and leave it like that. We can now use a
solidify modifier to increase its solidity. First of all, we need to separate this part
from the object. Let me switch to
face selection mode. Take my Maskers over here, pressing L to link select. Now we can press P to separate
the object by selection. Now we have a different object. Using control will help me to apply its rotation and scale. That will let us create
better solidity. Select this one,
actually, right now, we guarantee our job to see a better result
and use modifier, modifier, generate and solidify. Now you can see that the object exuded a little bit inwards. Let's change this value. I'm going to be changing
thickness a little bit. That will also, but maybe we can make it
similar like that. This will be nice. Okay, let's do the same
procedure for the parts. I'm going to be
selecting this object, tap to edit mode in
it selection mode, Alt and left key. Right now we can duplicate
it by shift D and Z. Let's extrude this a little bit. Use to extrude and
lock in z axis. I'm going to leave it
something like that guy. First of all, I
want to switch into phase selection mode L to select this part and to
separate our selection. Now we have another object
we can press key in Numpat or Total Local View. The shortcut for this
is nump'mel, this one. If it's not working,
use it again. Okay, right now
we're in local leap to see our object better. Switching edit mode
by pressing tab, press A to select all the faces, use X and we'll
delete only faces. Right now our faces are gone, but we didn't delete our edges. Okay, Right now we
can select one of these edges over here in edge selection mode and
select similar length. Okay, That will
select all the edges which have the same length, with this edge pressing X and edges When my object
selected in object mode, right click set origin
origin to geometry. The view point for this object will be in the center we can use and Z scale it in z axis. Something like that
will be enough. We can exit local
view by pressing Ump and edit it as we want, maybe a little bit downwards. And to scale it a
little bit inwards, I want this to be directly in this point inside
the edge over here. Something like
that will be fine. I'm going to leave it like this. I'm going to select this one. Right click Com to curve. We will use properties
coming over here. Let's see this fund better. And under the Bel section
we'll increase death. You can always use left shift to smoothly increase its value. Let me check this one.
Actually, this looks fine. But if you didn't like it,
you can change the value or maybe number of segments
using resolution type, something like that
will be okay for me. We will copy these parts here. Look in the object from y axis, shift D and Z. Let me bring the origin
of this object to, again, its center right click. Set origin, origin to
geometry and selecting both. Right now we can
directly scale it. I'm going to leave
it in somewhere like this to bring it in z axis. Okay, that will be fine. Actually, this looks nice. Right now we can add our
leader somewhere over here. I'm going to shift
and right click to bring my treedcursor over here. Shift a mesh and I will be using plane now actually we can
model it in local view, again, non pat total local view. In edit mode I can use
scale and maybe scale x. Now using to extrude that will
be one part of our leader, R x and 90 that will rotate our object 90
degrees by x axis. We'll be using modifier
to get our leader. But before we do this,
let me check the leader. Maybe from this image
about a steps over here, we can add something like this. Okay, using modifiers,
modifier generate an array. I will change x to zero and
y two, something like two. Now we can increase the count
to something like eight. Maybe eight is not too much, but our object is
a little bit wide. I will use and z to scale it in z axis a little bit,
something like that. Now I can change the
actual value of y. Maybe z, again, something
like that will be fine. In edit mode, you
can always change the base object and the
others will also be affected. Use and Y to grab
something like that. Again, we can use shift D and right click
from this object. I will remove modifier
using R Y 90. Using Enter to apply it, we can decrease its
scale in y axis y. Like that Y. We'll move it a little
bit middle of this part. Now to increase scaling axis Z, I'm going to locate it
somewhere over here. Maybe we can scale it
in x axis a little bit, shift D to duplicate it. We can use mirror modifier, but we do not have to
actually to mirror this. Maybe we can select them again. And y a little bit thinner, that will be fine
for that object. Okay, right now I
can select this one and apply the modifier
and select them. All right, click, I'll
join the objects. Also, you can use
control J as a shortcut. That will be one
object right now, unless we wish to global view and scale it down a little bit. I will locate it like this, scale it down,
change its position. Something like
that will be fine. Do not forget to
save your project because it's important.
That will be fine.
4. Adding Door and Windows: And we have one last part. If we don't include the Windows, this part will be easy. Actually, let's do this. I'll select the object,
switch to edit mode. I'm going to press
shift out and left key. I will select these two
face loops over here. I can also select these
parts and I will use key. And again that will switch to individual
mode, Left click. If I turn this off, that would look
before pressing key. Again, selecting individual and our faces will
inset individually. Maybe you can change the
thickness by again selecting shift key to make smooth
changes like this. Okay, We'll just
change the color. Maybe you can use
something like x route along normals in here,
but I'm not going to use. Okay, now we are about
to finish the base part. Let's add a door
over somewhere here. I think we can just control
R and left click and I will drag it a little bit
downwards, something like this. That's not going to be so bad. We can always change it by
using G and G key Again, you can drag it in any way. I will leave it as
it is G and G again, maybe a little bit upwards. And switching to face
selection mode for this part. We can select this
face over here and X and delete it because we
are not going to need it. I'll select this face inset and left click
and extrude it. This is going to be our door. And using IP again, maybe we can use a different
color in this part. That will be fine for our object to see
our object better. I will change some
properties over here. I will open the
shadow and cavity. Maybe we can also turn the
Y frame mode for a while. And turn the XA model
off. See how it looks. Okay. Now we can
create our windows and shift a mesh and add a plane, turn the snapping off. Maybe we can scale it
in y axis a little bit and x axis something
like that will be okay. I'm going to switch to
Edit mode to Inset. If this inset does
not work properly, as you see, these parts
are not perfectly equal. We can just use and x to scale
it in x axis a little bit. That will be one
of the solutions. Actually, it's not
the best solution. But this will be better
for now because we're going to use snapping
in edit mode. Again, use control R
to create one loop. Cut over here. Right
click to cancel control, left click and right click
to leave it in center, select the faces over here. Use key to inset them. If you press again, I will turn the
individual mode on. Now I can snap this window
over the lighthouse. And I will turn snapping on, change the settings the
pace and align rotation to target will be active. Also, we can snap it closest and use to snap the
window summer over here. Let me rotate it actually. And again, that will snap
our window one more time. We can try the best rotation
to see how it looks. Scale it a little
bit. Rotate, that will repeat the snapping. Let me see how it looks. In my frame mode, I want this to be directly at the
center of this face. Let me try this. Always pressing shift key to make side changes. Left click control S to say
project, that will be okay. And now we can actually select
all the faces by pressing a and to extrude in this
side, that will be perfect. If you want to move
it a little bit, maybe you might want to do this. You can directly switch
to normal mode in transform orientations and
turn the move option on. By doing this, you can change
the normal coordinates. That will be fine for me. I will select the faces and
extrude them a little bit. Something like that
will be perfect guys. Now I can duplicate
the window over here, but I'm not going
to be using shift D to duplicate. What will I use? I will use A and D that will
link Dublicate our object. The object data will be exactly, this means actually
the window objects are exactly the same. We do not have to use
Shift Dublicate because that will cause us to take
up more space in memory. Also, this have one more
advantage By doing this, we tell blender that
all the data in the objects will be the same
if we change the color. For example, I'm going to use
blue color and white color. When I do one change
in this window, that will be exactly the
same for the others. We will see the result
when we use materials. Okay, now let me snap
in somewhere like this. Alt again, to bring
it like that, I'm in Y frame mode
to see them better. And one more Alt D to snap it somewhere like this,
that will be perfect. Let's rotate them separately. Rotate to snap again. Rotate, and to snap again. Guys, that's not going to be the best way we create windows, but it's a nice way because
if you try other methods, we will need more time. I would prefer to use snap them separately because we just
have four or five windows. Maybe we snap them perfectly. This is not going to
be a huge problem. If I come over here, rotate and G, maybe we
can see a better result. Rotate, G, something like this. This one is okay,
this one is okay. But some of the
windows turned inside. We can directly change it by using normal transform
orientations. Select this and just
use move option to move it a little bit
outside. Like this. Actually it doesn't
have to snap perfectly. Bring something like
this because we will remove the faces over here. Control to save project,
that will be nice. Let's do the same for that
one and move it outside. Now our lighthouse
model is done. Maybe we can change
some of the objects. Like we can scale the ladder a little bit
to see how it looks. Again, I'm in normal mode. I can change the location. It's not going to be
really that important. Let me see how it looks. Maybe you can scale x axis. Again, that will be nice. Now we finished our object. In the next part, we can model these parts and start
modeling the base.
5. Creating Lighthouse Environment: Okay, let's keep modeling. And I'm going to
add a cylinder to the base of the
object, shift a mesh. And I will add a cylinder. Maybe we can keep it
something like 12. The number of segments
is going to be 12. And move it to the
bottom of the object. Scale in the Z axis. And scale it all the axis. I will create
something like this, we can check out from the
top we maybe scale x, but we can maybe
take a little bit to this way because our door
is going to be here, that part can be
wider than the back. Let's add our stairs over here because I'm going to use
one of the faces over here, Shift D and right
click using route, something like
that will be okay. If your x rod goes another way, you can use the normal
mode to fix it. Let me take this a little bit. Something like
that will be okay. And select this pace a
little bit downwards, it's going to be
something like a E. Now I can switch
to a selection mode, select this edge over here, and use control B
to create a bubble, but you'll realize that the
Bbl is not working properly. Again, I'm going to apply
the scale of this object. First of all, I have to separate this one L to select
all the faces or edges, it doesn't really matter, P
and separate the selection. Now this is another object. And secondly, control
A and apply the scale. Now in edit mode I can
select this H control B. Now you can see that our
Bevel is perfect left click. And I will open this Bevel menu. I'm going to use maybe
eight segments and enter. But I don't want this shape. I want to step shape over here. Let me change the
profile type to custom and change
the preset to steps. Now that will create our stairs, maybe we can change
the number of segments and apply preset again. You can always change the
number of steps by doing this. Let me make the width
of the stairs smaller. Okay, if we check out
the door over here, and if you imagine
that a human being is going to enter into the door, we can make the stairs smaller, maybe let me first like both and bring it a little
bit downwards. We can keep it in somewhere like this because our
tredcursor is in here. Let's change this
mode to treedcursor. We can change the transform
just by treedcursor. It's not going to be
affected to backside. This will be a nice
property to use. Scaling a thredcursor
mode and and Z two maybe increase the
height of the stairs. Actually we can
leave this like this and bring it somewhere
here to use the steps. Okay, Now we can select this face and grab it
a little bit upwards. This can also be fine. Actually, that's going
to be nice for me. As I said, you can
increase the number of the stairs and I can maybe scale this one a little bit by using the normal orientation. Maybe we can also increase
the face over here, and now this face a
little bit upwards. Okay, that's going to be fine. Now there's some
parts over here. Let me maximize this window. Actually, we can easily
model these cones over here. Let's first do
this. I'm going to take my predcursor to
somewhere like this. Shift and right click.
We'll do this operation. Remember shift a mesh
and create a con, let's decrease the vortices
something like 12. Or maybe if you want you can use eight or
something like this. It doesn't really matter because
it's a low poly project. I'm going to increase
the radius two by pressing Shift and
left click and dragon. That object will be nice and maybe decrease the
radius one a little bit. Now that's going to
be perfect and scale, we can actually directly
snap this one in the z axis. I will turn snapping on
with these settings I will use and Z to just
snap in the Zaxis. Left click. Devil be nice. Let's scale it a little bit. And Z, that's going
to be perfect. We can use Alt to duplicate Linkedl again and keep snapping. Actually, we can take
somewhere like this. And this one over here, I say the project, okay,
just one last time. Maybe we can scale them
in individual orden mode. I selected three of the
cons and scale them. Individual origins,
model and Z again. And maybe we can
add one more con using something like this. Just because we duplicated
these objects with Al, any changes in one of the
objects will affect the other. We can model this one. Maybe we can add
some loop over here. Left click and turn
the snapping off. And use G and G again to
turn slides on left click. I will leave it in
somewhere like this. Select this loop by
shift alt and left key. And maybe we can use trade along norms using this yellow gizmo. I'm going to exude this
a little bit outwards. We can leave it like
this as you see all the changings in the base
object affected the others. Now we can start modeling
the base object. See you in the next part.
6. Modelling the Island: Okay, we can now
model the base part. I'm going to use
Icosphere to model it. Pressing shift a
mesh and I will add an Icosphere, scale
it a little bit. Maybe scale in the Z axis
and grab it over here. Something like that's
going to be okay, and X like this. Now I want to change the
upside. How can we do this? First of all, let me
check out the reference. Actually, we can do
something like this. I'm looking the object from this side or this site,
it doesn't really matter. I'm going to turn X
ray mode on and select these pass over here, z zero. Now if I press Enter, we'll get a flat face like this. Now we can extrude
it and I'm going to turn the snapping
off. Seems okay. And also I can select
this loop over here and extrude along enormous, something like that's
going to be fine, but maybe I can scale it
in the Zaxis like that. Now let's scale it
a little bit more. Maybe it's too much.
Just like this guys. Now we can change the
shape of the object. In edit mode, I will switch to vortex selection mode
and select any face. And I'm going to do
some changing using proportional lit next
to the snapping icon. We have proportional lifting
option. I will turn this on. If you press and
move it slightly, you'll see a circle
at the center. If you scroll your middle
mouse button like this, you can see the effect
of vertex changing. If I increase this too much, it's going to affect
all the object. And if I decrease it, it's not going to
be that effective. I can keep it something like this and move the
vortex slightly. I will do this to get the
different part of the object. Maybe we can use this one
a little bit downwards. I'm doing the same
here and here. Maybe we can get
a better result. In this side, I'm changing
the size as I want. Actually, that's
going to be fine. Maybe we can select
all the vortexes over here at the bottom. And using scale and
Z a little bit, maybe we can get some
different shape. As I said, it's not going
to be exactly the same. You can do it as you want. Let me get a better shape here. We can do the same for the edge selection
mode, like this. Okay, that's going
to be fine actually. Now maybe we can change
the other parts. I can do the same by selecting any H,
something like this, Maybe to vertexs, I can do something like that because I will
move the object, we're getting closer
to our result. Let me see it. Also, we need to change the
vortexes over here. Maybe downwards a little
bit, something like this. As you see, I'm trying
to get different shapes, but if you accidentally
select another vertex, you need to change it back because this is
a low poly object, any mistake you did can cause different results and maybe
you will like it more. Selecting these vertices over here, This one is over here. Also, I'm going to try
to get a nice result. Something like this
is going to be nice. Maybe we can scale
the bottom part a little bit and seem like this. Okay, that looks fine. Actually, I liked it. If you didn't like your result, you can also change the
location of some vertexes. The result is really similar
to our reference image. Actually, as I said, we do not have to do
exactly the same, but you can get your own
result better in x mode. Maybe we can choose
this vertex like this. I want some changing here. Okay, maybe I
shouldn't change it. This is how proportional
liting works, actually. Now we can add our
rock and grass. Let me use shift A,
create an icosphere, decrease the subdivision to one. That will give us
a nice rock shape. Again, we can use
proportional thing to change it a little bit. I want to change something
like this will be fine. Now I can get this over here. If you use view section over
here and use frame selected, that will zoom directly
to your selected object. Choosing this, now
I can edit better. That's going to be nice.
Maybe rotate a little bit. You can rotate this better
by pressing R and R again. Now you can freely rotate it, something like that's
going to be fine. And shift D and scale
it a little bit, Maybe you can rotate it
again, pressing R twice. I'm using shift because they're not the exactly
the same objects. Something like that's
going to be fine. Maybe I can scale
it a little bit and select two of them
and use shift D, bring it somewhere like this. Scale them in individual mode. That's going to be
a nice huge rack. Maybe we can take
it to this pace. Actually, scale, rotate, do
the changing as you want. Let me one more time, bring this rack over here. This looks good. I want some more
rocks to this side. I will duplicate
this one shift x, and scale it a little bit. That's going to be nice. Maybe
we can scale it in axis. I will use global
orientation over here, x. We'll scale it in the x axis and rotate it like that.
That's going to be nice. Maybe some more details
over here here. Now, we can also do the same for the top of the island
using shift and D. Also, I can duplicate all
of them, shift and Z. Now we can do our changing. I can control space to maximize this window to see better. I think we finished our model. Let me check out the
reference image. We just need to add our grasses. And I will do the same
procedure with the racks. I'm going to take my
treedcursor here, shift A, and we can
add a cone actually. But I will decrease
the number of vertices to something
like three. Maybe we can
decrease the radius. Perfect. And that's
going to be our grass, now we can dublicate it. I will directly
select the island and the grass to see them in
local view by pressing Nampa so we can see how it
looks from the top view. I can duplicate it shift
shift and select them. Cancel this one shift. Maybe we can change the
skate of the objects. You can use geometry
nodes to do this. I consider in this project
that you're a beginner, that's going to be
a better practice. Let me do this in edit mode, change the side of the, maybe we can duplicate two more again in proportionally think I can change
the top vortex. Now we can duplicate
these different places, changing them and creating some deformation and
getting different results. Maybe we can exit the clio because I want to
see how it looks. Maybe we can scale them down. Rotate them may be like this. That's going to be
nice. One more time, we can add some extra
grasses next to the racks and scale them in the bounding box
center mode, not individual. I can scale them all and rotate. Maybe I can do the same for
some little rags over here. Actually, because we
got this local view, we can see how it looks. Now let's add our materials
and render the project.
7. Adding Materials: Okay guys, now we
created our model. Normally I suggest you to
remove unnecessary parts in the object like the bottom of this cylinder because we
are not going to see this. If you just move it a
little bit and X and face, we can just get rid of this face because user
is not going to see. I consider that you model this
project for a game engine, Unity or Unreal Engine. Maybe if you're creating this
model for a Game engine, I suggest you to do this. Okay, now we can add
materials to our object. I'm going to use these colors, but you can use
different colors. Guys, let me start
adding material. But before I do that,
I'm going to switch to Material Preview mode by
selecting this one over here. Now we can start adding
color to our base object. First of all, I will open material properties by selecting this and add a new material. I will call it base base one, maybe, because we will have
two materials in base. One of them is brown and one of them is going
to be lighter. Let me select here, base color. I'm going to use
this eye dropper to choose exactly
the same color, like this, something like that. We can get a little
bit darker like here or maybe like
this. It's up to you. If you like it, you
can leave it as it is. But I'm going to change
it a little bit. Maybe we can do it a little
bit red, something like this. I'm going to leave
it in here now. We can select the
material for here, but how can we do this? I will select one of
the faces over here. If I press control nap, that will select the other
faces outside. Keep doing it. One more time, I will
select these faces and I can select the
others with left shift and selecting this one also. Now this part is
going to be brown. Let's add a new
material, base two. We can also choose the
brown color for this. Something like this one
is going to be fine. Then me change it
using eye dropper. And this one I'll
assign it to project. Okay, that's going to be nice. If you didn't like it,
you can always change. Then maybe a little bit
lighter for the rock objects, we're going to use exactly the same procedure,
selecting this one. For example, adding new
and I will call it rock. Let's select the color dropper
and that kind of tone. We have a lot of rock. Skies. How can we apply the same color or
the other rocks? If I select every
object and select this, will actually take
a lot of time. You might prefer to do this, but actually I will select
all the rocks in the sea. Try not to choose the
grass excellently. Selecting all the
rocks as this one, this one and that one. Now we can select this
one for the last time, and that will be
our development. What development means
is if we now use control L to link the
data of the object, the material of this object
will switch to others. Select this. Now all
our acts are gray. Let me change the
color a little bit. Actually, it doesn't look bad, but we can change the tone like maybe a little bit lighter. That's going to be
nice. Keep doing the same for the grass objects. You can select this object
and open our filter. Turn on the selectable guys, because if we do this,
now I select this object. Let me open this collection. This is our base
object. You can see. I will turn it selectable off. Now we are not able to
select our base object that will help me to select
the grasses easily. You can also turn off the rocks, but I'm not going
to do that now. We can move them
to a collection, maybe new collection,
grass select. Okay. Now we can select all the grasses because they're
in the same collection. If I select grass collection, right click and select objects that will select
all our grass objects. Now let's add its
color for this one. And I will add a new material. Let's change the color
to something like this. Now select all the objects. Right click, Select Objects. And finally, this one. If that's not the development, it's not going to be applied. Control L and link materials. Perfect. Now let's keep
adding the others. I'm going to use
white for the stairs. Actually we can call it just
like white for this one. Also control L link materials, that's also going to be white. Let's add color to our objects. For example, I want to
add color for this one, but this cone includes
some details. I will add five loop
cuts control R and five. Maybe four can be also
enough control R. Four, left click and right click. I will leave it as it is. Okay. First of all,
we need to add a white material to this object. Now I can add the orange color
for the loops over here. Actually we can see how
it looks in this side. Now add a new material. Orange, that's
going to be orange. Sign, something like
this can be fine. Maybe we can make it darker or something like close to red. Okay, that's going to be fine. Also, you can do the same
for this face over here. Select the orange sine. You can use both of them. It's up to your
preference actually. Okay, let's do the same
for the window objects. I will select one of them. Add the white material
for the base. I will add a blue color
for the faces over here. Selecting these faces, add a new material and
that will be window, maybe something like
blue, it doesn't matter. And change the
color to this one. Actually, these are same. So we can use this color I selected sign that's going to be applied for
all the windows. Maybe we can make it darker
or lighter. It's up to you. Maybe something like
this can also look fine. Okay, that's also
finished right now. Let's select the loops
over here for this object. First of all, we need to add the white material
as a base material. This one, I will
add a red material, but it's not going to be
same with the con here. I will cancel these guys by pressing control and I'm
going to dielect these. Let me check out the door again
from the reference image. Actually, it looks like this. Maybe we can use the
same color for here, but the inside will be white. I can also keep selecting with shift hot and left click now, I will also select
the other parts, but let me add this
first new one, red. I will change its
color to red and sine. That's going to look fine. If you want exactly
the same tone, you can use drop maybe a little bit lighter.
That's going to be nice. Okay, now I want to
keep adding the colors, but I want to add one more look at over here,
something like this. And I will change the color of the object for these faces. I'll add a red color as sign. This can look fine actually, but if you don't like it, we can carry the loop cut over here a little bit downwards. I'll turn snapping on
and use face again. We will do the same to bring
it a little bit center. This is going to be nice. Okay, now we can keep adding the materials over this side. For example, I will select
the loops over here, that's going to be red, that's
a gray color over here. I will select this part, add the new material, maybe gray, that's
going to be fine. Select the other parts like these loops and this
loop over here. We can also do the
same for the loop at the bottom and assign the gray. For this, I'll add a new
material slot and select the gray and assign it
the same for this one. Okay, we can do the
same for this part over here, for this one. Let's add the material for the leader over
here. Add new one. Change it to leather. I will use this image
and use eye dropper. This seems too dark. We can change it
to a lighter one. That's going to be nice. You can always add extra
details if you want, but that's going
to be nice for me. Maybe if you change
the light from the settings over here and
the rotation of the light, you can look how it seems. Selecting this loop over
here and control Ump, select the down and the up
loops with the current one. Select red and sine, also a signd color
for this object. That's also for this one. We will select the
faces over here. I don't know how can we do this. Maybe we can just look from the y axis and use x ray mode. Select the faces over here, make sure that you selected all assign a gray
color for this one. We need to assign blue color
for the faces over here. I'm going to select one of them and select how can we do this? Let's come over here, select similar and select similar area. What this will do is, is going to choose
all the faces, which their area is exactly the same with
the selected one. We can now assign our blue
color window, maybe sign. We accidentally
selected this one too. Let's cancel this.
Actually, that one was red, but this looks better. Maybe red one. Check out which one
looks better for you. I will keep using the same. Actually, if you do not want these windows to be
in the same color, you can always change it. I can duplicate this material
with this icon over here, and change it to a window. And change its color to
something like this. Maybe it's going to be separated from
the window material, but I will use exactly
the same material. I won't change it, actually. We can use exactly
the same color guys, but we did it, so let me do
it again and make it lighter. Actually looks fine for me. Don't forget to
change the colors for the accidentally
selected faces like this. I will convert it to red
and change this color to gray. That's
going to be nice. You can use any color. Okay. Now it's time to
render the project. We can add some light and extra details and render
the project properly. See you in the next video.
8. Preparing for Render: Guys now we can add the
C background over here. It's going to be so simple. Shift a, add the mesh and plane and I will
scale it, turn it, snapping off from the top view, we can take it to the center. Something like that's
going to be fine. I will change its color to Let me change it
with diydropper. That's going to be nice. We can maybe scaled
a little bit more. I will add a
subdivision modifier and modifier, generate
subdivision surface. I will convert this to simple
and increase the level of earport to about six if I
uncheck this option over here. Now in Y frame mode, you can see how many
phases this includes. Actually that's going to be too, maybe increased to five. I will apply this, this error
over here and apply guys. Before I do change anything, I want to select all
the faces and control. We now triangulated our faces. By doing this, we will get this triangulated
surface actually. Now I will switch to
or text selection mode and use smooth randomized
tool over here, you can find it under
the smooth tab. Let's use our gizmo with left shift because if
you don't use shift, the scale is going
to be too much. I'm going to change it
something like this. Maybe this one is
going to be okay. Now we can check out in
the material preview mode. Perfect. Now we have the
result that we want. Also, if you didn't
like any part of this, for example selective
or text over here, use proportional
think and change it. Okay. Before I
render the project, I want to change the
materials a little bit. Maybe this one darker, we can change the
material properties like selecting this object. If you decrease the
roughness over here, you can see how it looks. I don't really like this one. We can leave it
something like 0.4 Okay, for this object, we can change
the white and the red one. You can see how it looks
bright in the reference image. If you want the same result, you need to decrease
the roughness of red and white materials. I'm going to select red one,
decrease the roughness. Let me see how it looks. You can see how it changes. But if you decrease
it to something like 0.3 that's going to be fine. Also, I will do the
same for the white one. Roughness 2.3 looks nice. Also, since that's
going to be a glass, we can do the same
for the window. Change it 20.3 and it's
going to be brighter. This gives project a
little bit nice look okay, for one last time, I want to change the color of this letter. Something like this
can be better. Now let's render our
project from this side. For example, we have to add
a camera into our scene. Shift A, add a camera. But I want this camera to
be directly where I look. If you cannot see the camera, you can scale it and you'll
now see where is it. Historically on the precursor, I want this camera
to directly look at this object. But
how can we do this? If you try to move it
and scale it or rotate, maybe you need a lot of time and it doesn't
really work to do this. But if you press and open
this menu over here, we can choose view
and camera to view. If you check this box over here, now we can switch to camera view by selecting this icon and move the camera as we want. Maybe select the object and
we'll use frame selected. Now that our camera
is moving with us, something like this
is going to be fine. Also, you can uncheck and get
closer and check it again. Now you can see better. Actually, we can use this
icon to get a little bit far away from the object
control, say my project.
9. Lightning and Rendering: Okay, now it's time to add a lightning into the
sea and render it. How can we do this?
Before doing it, let's wish to render
preview mode over here. And you're going to realize that there are no lights
into the sea. We need to add a
lightning actually, you can add a point light
maybe, or area light. Using shift a light
and point or area, maybe you can change
the settings over here, but I do not want this approach. I will add a sky
texture into the sea. In the first section
over here we can add a sky texture by selecting
this yellow icon. And under the texture
tap sky texture. I want to change some
settings over here. First we want to change this
sun intensity to something like maybe we can divide
by five directly. And that will set
our value to 0.2 and the strength to something
like 0.3 that will be better. You can also change these
settings over here. Actually, it's up to you that how you want this scene to look. You can change the
N values and see the results in the
render prev mode. But right now we are
in Render Engine, I'm going to switch to cycles. Before doing this, let me
change some of the settings. Because we are currently
in EV render engine, we cannot realize how the sun intensity
changes the scene. I will switch to Cycles engine. By selecting the render
engine to cycles, that will be how
our scene looks. Now you're going to see this noisy look in
the three port, but we can maybe decrease the max samples value under the port tab to
something like 32. Render it faster. We're going
to see the samples here. This is for report that one
is for the actual render, so we can maybe keep
it something like 128 if you want to
render the scene faster. And if you have a powerful GPU, you can switch to that one. But for using GPO, you need to change
the settings over here under the
system tab and Cuda, you need to activate your GPO. If I turn this off, that is how it looks under the settings, even if I render, it's
not going to use GPO. Turn this setting on and
close the window guys. Now, before we render the C, we've got some little changes that you might want to follow. Firstly, if I select any
material over here and see the properties for this
material using this icon. If you increase the
roughness values for all the materials, you are going to see
a better result. But as you remember,
I want these parts to be a little bit shiny
so you can keep the materials over
here like in a value something like 0.3
As an example, for the cones over here, maybe it's going to be
a little detail, but I set these
values to 0.9 You can also do the same 0.9 but
if I change this one, I think these are
the same materials. I'm not going to change
it, but actually it's more important for the
other materials, especially in the base. You can also do the same for the roughness values in these materials and for
the grass materials, you can set them to 0.9
for the rocks also, I think that will give
us a better result. I've got one more
thing to do in here. I will select this
object using Shifty. I will duplicate
it somewhere here. Firstly, I'm going to
press R and R again. Now we can independently
rotate the object. I will keep it
something like this. Let me see how it looks
in the camera view. Pressing zero, we can use
R and R again rotate it, maybe you can use the x
axis, something like that. I'm going to change
the camera view as we can see duplicated
object at the background. Let me turn this and
a little bit down, this can look better,
maybe for the render. Also, you can render
in any angle you want, but I want to show you
a method over here. We will use this one as
something like a sky. Let me actually firstly
zoom one of the objects. Now I can easily
move my viewport. If you also cannot
move the viewport, easily select one of the object. Come to view section over
here, frame selected. Now that you can easily
move in the viewport, that will look nice. Actually, let me get this one, a little back side,
that's going to be okay. Now we can change this one. Actually, it doesn't have
to be exactly the same. What I mean in here is
that I want this kite to look a little bit different from DC.
How can we do this? Firstly, select the object at
the background and come to modifier section at the modifier
and subdivision surface. That will increase
the subdivide level of our object,
this how it looks. Now you can also do this too and come over
here and apply. But before doing this,
maybe one can be also okay. And now I want to apply this. After doing it, I'm going
to add another modifier. Now under the generate
decimate modifier, what this will do is
actually it's going to decrease the polygons but not something like
un, subdividing. If I select this one
I can do the same. For example, if you switch this number to
something like two, that's going to use a
different algorithm. But this is not what
I'm at, actually. I'm going to switch to collapse again and decrease the ratio. You can see how it
changes as we decrease. Something like that can be nice. You can leave it in
any value you want. But I will have a
look at how it looks. I will leave in a value like 0.2 That will be
nice for me guys. Okay, now for the last time I want to change the camera view. I will end up the final angle. Maybe get a little bit
closer by directly using it. Again, I'm not able to
move my middle map. I will select this one
and view frame selected. Now I can move it easily. That angle will be
perfect for me. Maybe you can also
use different angles, but I'm going to keep it
in something like that. Now we can render the object against wishing to
render mode here, turning the sun a little bit, maybe from divorce settings, I'm going to change
the sun elevation, maybe sun rotation to
some value as I want. You can use any angle. Actually this will affect
how our object looks. The sun factor over here. Let me increase it a little bit. Maybe change some
settings over here. Bring your mask cursor to related value, for
example this one. And press backspace to reset the value. Maybe
double help you. And changing the
sun rotation again, maybe a minus volue can be
okay. Something like this. That will also look fine. Maybe decrease the strength
to something like 2,050.2 25. As I said, you can change any value and get the
result you want guys, changing the air will
affect the color a little bit and adding a dust maybe, and increasing the dust. Now actually we are
ready to render, but before I do
this, I want to add a little detail to this
object at the background, selecting it actually, accidentally if you
move this camera, dielect the camera to view
option and keep it like that. Now select the
object and come to the shading tab guys and
turn this box to object. Now we need to separate
the materials because the C and the Sky object have
the same materials on them. I will select this
object and come to C and I will duplicate it
using this icon over here. Now this is our new material exactly has the same properties, but I'm going to
change it to Sky. Now we are in sky material
using shift A and search, add a gradio texture. Now I'm going to
add one more node over here using shift A. Again, search and color m. I want a little
bit color difference in the object over here.
Let me show it to you. I want a gradient
effect on the sky. I will connect the
nose like this, that's how it will look. Actually, maybe we can rotate it and using bring it a little bit and change the black
color to exactly the same with using
eye dropper for this. Selecting this, that
will be the same, but because of the lightning, it's not exactly the same tone. We can maybe change
it by our request. Of course, I want
this to be a little bit lighter because
it's going to be a sky. Maybe we can scale it down. And this camera, okay. You can always keep using the decimate modifier and maybe decrease the
value over here. If you decrease it too much, this is how it looks.
Maybe you can like it. And using this value, I'm going to increase it
a little bit actually. That's going to be fine. Ice. I like how it looks and
scale it a little bit more. We just got a little
switch between the colors. Maybe change the
tone a little bit. That's going to be nice.
Something like this. There's just one more
thing I want to change. First of all, let
me turn this camera to and change these
settings from here. Actually, I will
select Render Output, or here under the
render settings, I'm going to scroll down
under the color management. If you change this look to something like
maybe high contrast, actually the colors will
look better, I think. Let me switch to render
mode again and turn the noise on to see
how it looks better. And scroll down again. Switch to look to something
like high contrast. You can see how color
contrast change it. I think this is better, but
it's a little bit higher. Changes high contrast
to something like maybe medium high contrast, that will also look fine, maybe decrease the
economy a little bit. That's going to be fine for me. Now we can render our project, select this and render image. This is our final result. You can save the output
by using image and save.
10. Final Thoughts: Okay guys, thank you
for watching my course. I'm really curious about what kind of projects
you come up with. Do not forget to share them with other students for inspiration. If you have any questions, feel free to ask
them down below. See you in the next projects.
 Ahmet Burul, Software Engineer & 3D Artist