Transcripts
1. Class Trailer/Introduction: Have you ever tried to
paint a pine tree and it's simply didn't turn out
how you had envisioned. Or have you seen a
beautiful pine forest scene and didn't even know
where to start painting. Then this class is for you. I'm Julia lists, and I've taught thousands of eager
students how to paint beautiful
watercolor paintings with easy step-by-step
instructions. Even professional looking
pine forest paintings can be replicated with
the right techniques. This class is a fun, practical exploration of
pine tree painting methods. You'll learn how to apply
the right brush strokes, the right places to achieve
a variety of evergreens. I'll show you how to
make your trees pop with simple strategies using different parts
of your paintbrush. I'll share what you need to
take into consideration when choosing the right type of pine tree for your
chosen background. Finally, you'll apply your newly learned
techniques to appropriate landscapes to achieve a
stunning forest painting. There is something so
satisfying about painting and intricate painting
using simple steps. So I hope you'll join me on this exciting journey of watercolor pine
tree exploration.
2. Supplies Needed: Let's first go over our
materials for this project. Of course, we will
need watercolor paper. Any watercolor paper will do, but I'm specifically using
100% cotton paper by arches. You'll also need a
variety of paint brushes. You do not need all of
these paint brushes. But I'm specifically
going to be using a size quadruple
zero, a double zero, and a size one by
Winsor and Newton, as well as a size 8.14
round brush by Grumbacher. I'm also going to be using a variety of green
watercolor half pans. If you only have one green, that is completely
okay because you can use black to
manipulate the color. And of course we'll be using black watercolor and possibly
a little bit of brown. In other materials,
you'll need a paper towel as well as a cup filled
with some water.
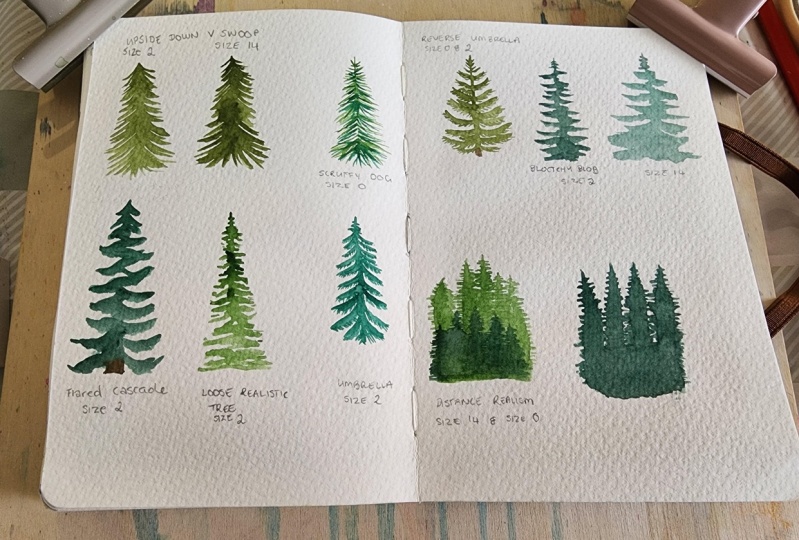
3. Tree #1: Cascading Tree: The first tree is called
the cascading tree or would I like to call the
upside down swooping V tree? I have taken my size one Winsor and Newton
round brush here. But I'm going to show
you how to do this with both a very thin brush as
well as a larger round brush. I'm just picking
up my watercolor and you can choose whatever
green that you want. It doesn't matter since we're just going for the technique. And we're first going
to begin by creating a swooping small upside
down V like that. And then we're just
going to start from that center point and continue
the sloping downwards. As you move down the tree, you're swoops become even wider. And you don't
necessarily have to follow this exact
V-shape like this, but you can save a
little bit of time and go bit faster and swoop the same side over and over a few times in a row before matching it on the other side, try to always start your swoops towards the center of your
tree moving outwards. Because if you start on
the edge going inwards, your ends are much less
likely to be pointed and less natural looking as you get to the
bottom of your tree, makes sure to fill
in that gap by cascading the bottom
of the tree outwards. You can alternatively
add a stump, but I think it looks more natural if the tree
ends cascading. Let's try this same technique
using a bigger brush. So I've picked up my size four
round brush by Grumbacher. And we're going to
do the same thing. We're going to start paint
that upside down V at the top. And then we're going to start
cascading out our tree. Now, it's definitely a
little bit more challenging if you have a thicker
brush because you don't get all those
individual strokes or upside down v's because
your brushes much thicker. However, it does fill
in the tree a lot more, which presumably gives it a little bit more
of a natural look. If you feel that your tree is looking a little bit
too much like a blob. It might be one of two problems. One is you've picked up too much water along
with your ink. And the second issue
might just be that your brush isn't pointed at all. If you have one of those more inexpensive dollar
store brushes, they may not be giving you the control that you need
to complete this look. And there we have it. Two trees using the exact
same technique when using a larger brush and the other one using
a thinner brush.
4. Tree #2: Flared Cascading Staircase: This next technique,
I like to call it the flared cascading staircase. And I have taken two
of my greens and just mix them together to
create another pigment. And again, I'm using my size one by Winsor and Newton brush. The color doesn't matter and the brush doesn't necessarily
have to be a thin brush, but it definitely helps. So similar to the
first technique, we're going to first create a little bit of a
upside-down V-shape. And then starting
right from the center, we're going to start
cascading this out. So this is basically what it looks like, an
escalator staircase. I just painted it out
there for you so that it's easier to see
exactly what we're doing. But in addition to this
cascading staircase, as you paint each layer
of the staircase, you want to apply pressure on your paintbrush vertically as you're moving it horizontally. And this will create
these little flares. So I'm just adding those
flares manually right now. Just because I wanted to show
you the staircase effect. But now I'll paint what I mean. So I'm positioning
my paintbrush flat. Instead of holding it like this. I'm holding it more
flat like this. And just going like this. Back. You're welcome to go back and make any adjustments that you wish by adding some extra
points on the ends. Of course, don't forget
to add little stump.
5. Tree #3: Scruffy Dog: This third technique, I like to call the scruffy dog technique. And I have pulled out my quadruple zero Winsor
and Newton brush. And I'm going to take
another green, of course. The difference between this
one and the previous two is that we're not going to be cascading our slopes downwards. Instead, they're going
to be flicking upwards and then slowly move into
the downwards position. You can begin by painting a
stroke upwards like this, and then two strokes
going up like that. We're going to
gradually flare out our branches as we move
down the center line. So keep painting your
center line downwards as you flare out your
little branches. And at one point they become
in the neutral position. Before they start to
cascade downwards. Here I've just switched to my size one by
Winsor and Newton. And when you are about
two-thirds down your tree, you no longer want to flare
out from the center point. You want to create a rainbow of flares that originate from
various parts of your tree. As you start to move
towards the bottom, you can start making your
flares a little bit more horizontal and less vertical. You can go back and thinking
some of your sections. If you feel that they're
a little bit too thin, you can choose to leave
it without a stamp or at a stamp with
brown watercolor.
6. Tree #4: Loose Realistic Tree: I call this the loose
realistic tree. Again, I have my size one, Winsor and Newton brush. I'm using any
generic green color. And we're going to start
off with painting a line. At the very top. Off of this line, we're going to tilt our
paintbrush horizontally. So it's not held vertically, but rather a little
bit more horizontal. And we're going
to start painting these loose additions to our, the main stem that we
painted at the top. And as we move progressively
down the tree, we can continue our stem and keep adding to it
in sporadic areas. So you don't want to make
this tree symmetrical. So you can add a
few short strokes on one side and then a few
longer strokes on the other. You can leave gaps
between the strokes. You want to make this look
like a realistic tree. Make sure to of course, flare out your lines wider
and wider despite the, the how why do you want them
as you move down the tree? As you move towards the base of the tree, base of the tree, you can begin to hug your lines a little
bit narrower too, round the tree off. In about the same width as somewhere in the
middle of your tree.
7. Tree #5: Umbrella Technique: This next tree I like to
call the umbrella technique, and it starts out very similarly to one of the other trees
that we've painted. So of course we want
to start with the top. And again, I'm using my size
one by Winsor and Newton. So we're going to start off
by painting just a line for the top and just a few
details at the top. Just some horizontal lines. And similar to one of
the previous techniques, we're going to start moving our paint brush from
the center to either side. Making sure that as we
move down our tree, our wisps become
wider and wider. Now, the difference
between this one and the other technique is, and why I call it the
umbrella technique, is because you're going to add little details coming from
each individual branch. Now I'm using my
size quadruple zero to really paint in
those tiny details. But as you saw earlier, the size one worked
just fine as well. To finish off, you can paint some more vertical
lines rather than horizontal that just taper off. You're a tree. That's our umbrella technique.
8. Tree #6: Reverse Umbrella: This next technique I like to
call the reverse umbrella. So similar to the
previous technique, we are going to be using
a similar technique, but it's going to be done facing upwards rather than downwards. So as always, we want to start off with the top
point of our tree. And instead of painting or details horizontally
or even downwards, we're going to paint those tiny little initial pints facing upwards towards the sky. And we're going to continue that upwards motion as
we move down our tree. I have switched to my size
one by Winsor Newton. I use the quadruple zero
initially just to get those few details down
at the top of my tree. Just like the first tree, I'm switching back to
my quadruple zero. And we're going to paint
those little details facing horizontally and moving upwards instead of facing downwards, like we did with the
other technique. I do like to paint
the tree in stages. So I'll paint a few branches and then I'll add the
details and then I'll continue on with the tree. The reason that I do it this
way is because I don't want the branches to dry before I have time to add the
tiny little details. If you find that
you have any gaps, larger gaps in-between your branches that
you want to fill, just feel free to add one more smaller branch
in-between the two larger ones. Again, don't forget
to make your branches wider and wider as you
move down your tree. Otherwise you'll have a
very stick looking tree. The last few branches, as you want to finish
off your tree, you have two options. You can make them a little
bit more horizontal like so. Or you can paint a stump
to finish off your tree. And that is our
reverse umbrella.
9. Tree #7: Blotchy Blob: This next technique I like to call the blotchy
blobby technique. And it's quite descriptive of the brushstrokes
that we'll be making. So I'm starting out
with my size one by Windsor noon as usual, just to paint the
top of my tree. And we're going to start it
off similarly to the others, where I just kinda
paint some blotches that run horizontally to
the center of the tree. Now, as we move down the tree, you're welcome to
paint just a guide, the stump. As your guide. Move your piece of paper
diagonally and hold your brush slightly vertically
rather than horizontally. And try to keep it
flat to the paper as flat as you can rather
than pointed upwards. Because we are going
to be utilizing sides of the brush and creating these blotches on the sides of our on either side of our pine tree as we
move down the stop. So as you press downwards, you want to do so more so in the center and then
lift your brush up so only the tip is
touching the paper as you move outwards
towards the sides. This will create this what
I call Blache technique. You don't have to be
completely symmetrical. You do want quite
a bit of pigment on your paint brush
for this technique. Don't forget to make your blotches wider as
you move down your tree. And then when you're
happy with your tree, you can just taper it off. And that is our
blotchy Blache tree. I'm going to utilize
this technique one more time with
a larger brush. This time I'm using my
size 14 by Grumbacher. The only thing that
I'm going to do similarly is use my thin brush, my size one, just
to paint the top. So again, we have the
pointed tip and then we have some horizontal
lines at the top. Now look how different
this technique is going to look when I
use a thicker brush. Notice how the ends are
a lot more rounded. This technique, using
the larger brush. It's also a lot faster. Now this technique is great
for covering large areas where the details
don't matter as much as they would
for other trees.
10. Tree #8: Distanced Realism : This next technique I like
to call distance realism. I'm starting out using
my size 14 Grumbacher, but any thicker or
round brush will do. And we're going to first cover
a large portion in color. So this usually works when you want to fill in a large area, but you don't want to spend too much time on all
the detail work. So I'm just creating
a large Blache here. And then I'm going
to begin by flicking my paintbrush upwards to
create these pointed tips. You do want to
work quickly here. Because you want to paint the details on before
these tips dry completely. Now you're going to
take a smaller brush. I'm going to use my size one. And I'm going to
extend those tips. So they have a very
long, thin tip. Now I'm going to begin painting these horizontal zigzaggy lines all the way down the
length of the tips. I'm going to try and
do this quickly. Before it dries. We've covered a
very large portion of space in very little time, and we have beautiful
detailed pine tree tips. To add even more realism. You're welcome to go over it
again with a darker pigment. So this time I'm using black and I'm making
sure not to make my tips go past the first layer, although you're welcome
to do that too. And there we have it.
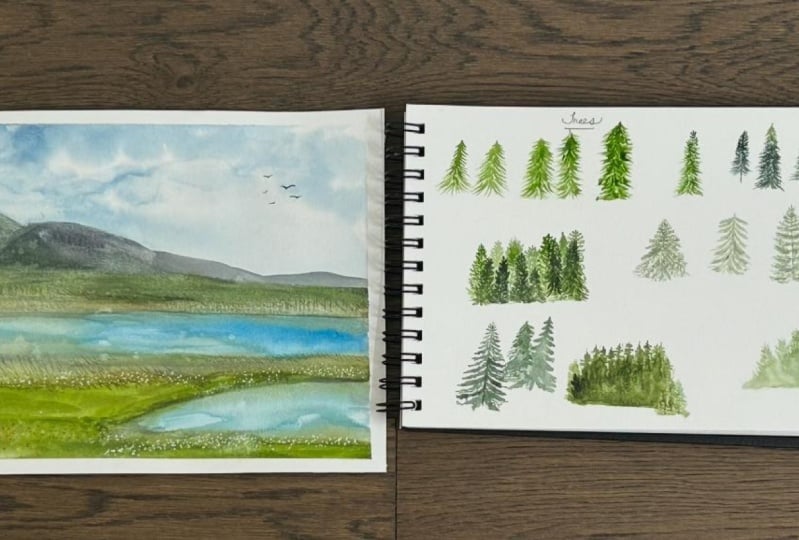
11. Applying a Technique to a Landscape: Now let's apply these
techniques to a painting. I'm just applying a wash
to the back of my piece of paper first before I
apply it to the front. This prevents the buckling
of the piece of paper. When we are painting landscapes that are so saturated
with water. And of course, we want our piece of paper to
be as flat as possible. In these particular paintings. Make sure that you have
a nice even spread of water before continuing
with your painting. I'm just preparing
the background of my piece of paper by painting random pigmented lines in random locations and then fading the moat
using a mop brush. Now, we are primarily
going to be using the last technique here. So I'm painting a long
line and then I'm swooping out my lines like so. And I'm doing this very loosely because this is our first layer. Now, I'm not going to
go into the details on how to blend out these
pine trees too much. Since we are focusing on
painting the pine tree itself. I'm clearly using
the sweeping down, upside-down V-shape
technique here to create these pine trees. But you can definitely
choose one of the other seven techniques
to create a similar effect. E.g. one of the last few
techniques that I used, the distance realism technique would also apply really well in this landscape simply
because we blur out the pine trees after every
time that we paint them. Apart from the last few layers when we really want the
trees to stand out. But as you can see here, every time I paint the pine
tree using the technique, I don't wait for it
to completely dry. Instead, I switched to
a bigger round brush, specifically my size
14 by Grumbacher. And I apply just a hint of water to it to keep the
general structure of the tree, but to blend it out
into the background. And I do this layer
after layer after layer, tree after tree after tree in different
areas of my landscape. To give the effect that this is sort of a mountainous
forest landscape. You can vary up the
size of your trees. You can even use
multiple techniques in the single painting. But I find that that upside-down V-shape
technique works the best for this painting because it doesn't
require that much effort. It doesn't have to be hyper
detailed because we are blurring out or details with
that larger round brush. Because I keep repeating the exact same painting
technique entry over and over. I have sped this up just
so you can see where I'm placing my trees and how
I'm blurring them out. If you do want to replicate
this painting yourself. Remember, the most
important thing to keep in mind is to keep your
brushstrokes loose. Create those upside down v's, and then gently blend them out before they have a chance
to completely dry. You can definitely
experiment with a multitude of techniques until you find your favorite
or the one that's most suitable for the landscape
that you're working with. As you can see, as I apply
more and more layers, I begin to make the trees
a little bit darker. And I do this in two ways. One, I add black to my
green watercolor and the other method is
applying less water and more pigment so that your
trees appear harsher or darker and more
prominent than the trees that you painted
in the previous few layers. This is how we create
depth and how we make it look like there are multiple
layers to our painting. You can also choose to blur out your trees a
little bit less pain. But there we have it. You can see based on four of the techniques
that I'm showing here that the best one I would say for this painting because we're blurring them out, is that upside-down V-shape one.
12. Summing Up!: And there we have it. Eight pine tree
painting techniques. Whether you want to use the
umbrella technique to paint a soft background or the blotchy technique to
create a similar end. Whether you want to
cover a large area with little effort
or focus on detail, or you desire a delicate
tree for your foreground. This class should equip you with the basic techniques to apply
to a variety of landscapes, to create beautiful paintings, greeting cards, or
whatever art you desire. Keep this class handy in
case you want to revisit any of the techniques and
check out my YouTube channel. Julia lists art for dozens of videos where
I apply a variety of these techniques to
landscapes for which you will now have the
skills to paint yourself. I would love to see
your application of these techniques
and any background. So please upload your creations to this class's project gallery. Good luck and keep painting.
 Julia Lis Art, Watercolor inspired by nature