Transcripts
1. Welcome !: Have you ever wanted
to create the soft, misty landscapes in watercolor, but don't know where to start? Or maybe you have tried
painting those foggy trees and dreamy skies but did not turn out the
way that you wanted. If that sounds like
you, you're not alone. Misty landscapes
may look simple, but they require a careful
balance of water control, layering, and just the
right amount of softness. And that's exactly what we are going to explore
together in this class. Welcome to seven days of
misty watercolor landscapes where we'll paint one
landscape each day for a week. Each day is a step forward, building on the skills that you have learned the day before. We'll start with
gentle skies and simple pine trees
and slowly move toward richer compositions
with more depth and detail. By the end of this class, you will have learned
how to create soft and foggy layers without
overworking your paper, and you will also
learn how to use muted and moody palettes to evoke that atmospheric emotion. And most importantly,
we will build a consistent painting habit that feels peaceful
and inspiring. We will begin the
class by discussing about all the art supplies
that we are going to need. After discussing all
the art supplies, we will move on to painting the class projects for
the next seven days. Hi, I'm Sacruta, watercolor
artist and teacher. I've been painting since 2017 and I've been teaching on
Skillshare since 2019. Misty and moody landscapes are my absolute favorite theme to
paint, and over the years, I have taught thousands of
students how to slow down, find their flow, and create atmospheric landscapes
with simple techniques. This class is not at all
about the perfection. It's about the process. It's about learning
how to paint in a way that feels peaceful. This class is perfect
for those who are familiar with wet on wet
and wet on dry techniques. And if you're absolute
beginner, it's okay. You can join, as well. We're gonna learn so
much in this class. Let's dive into this seven
day mystery Forest adventure. And I bet you'll be amazed to see what you can
create. Let's begin.
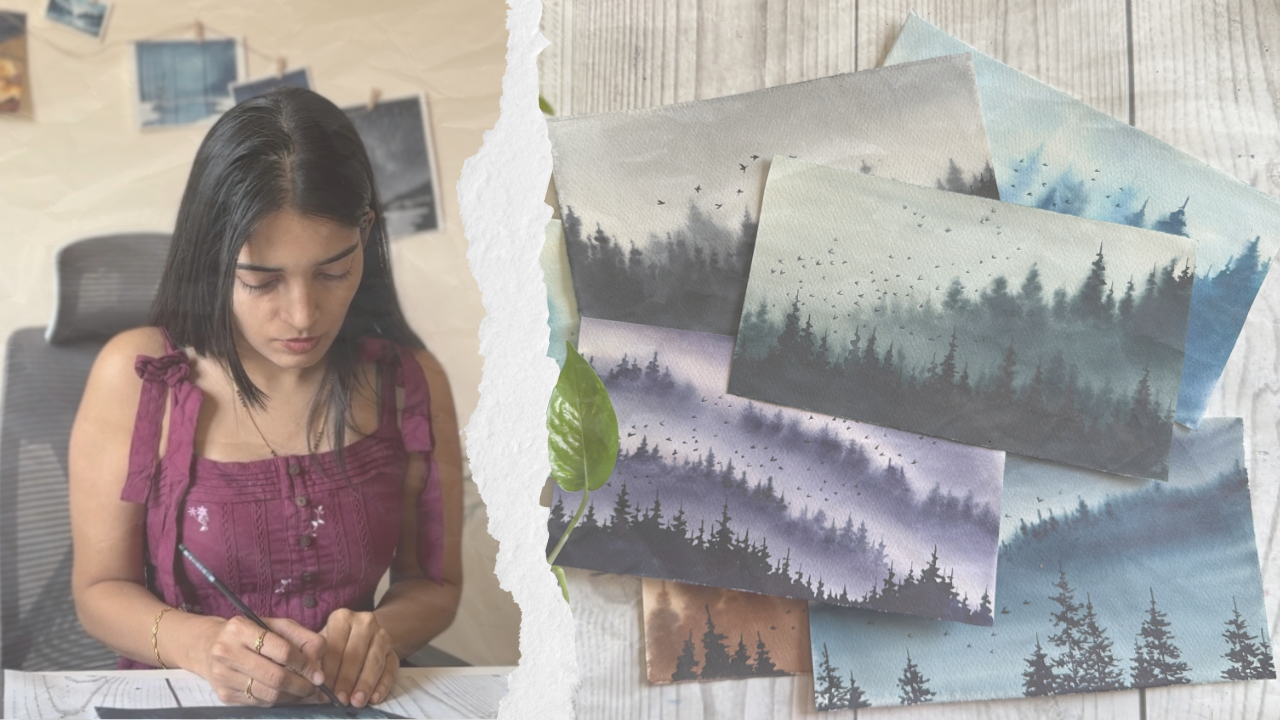
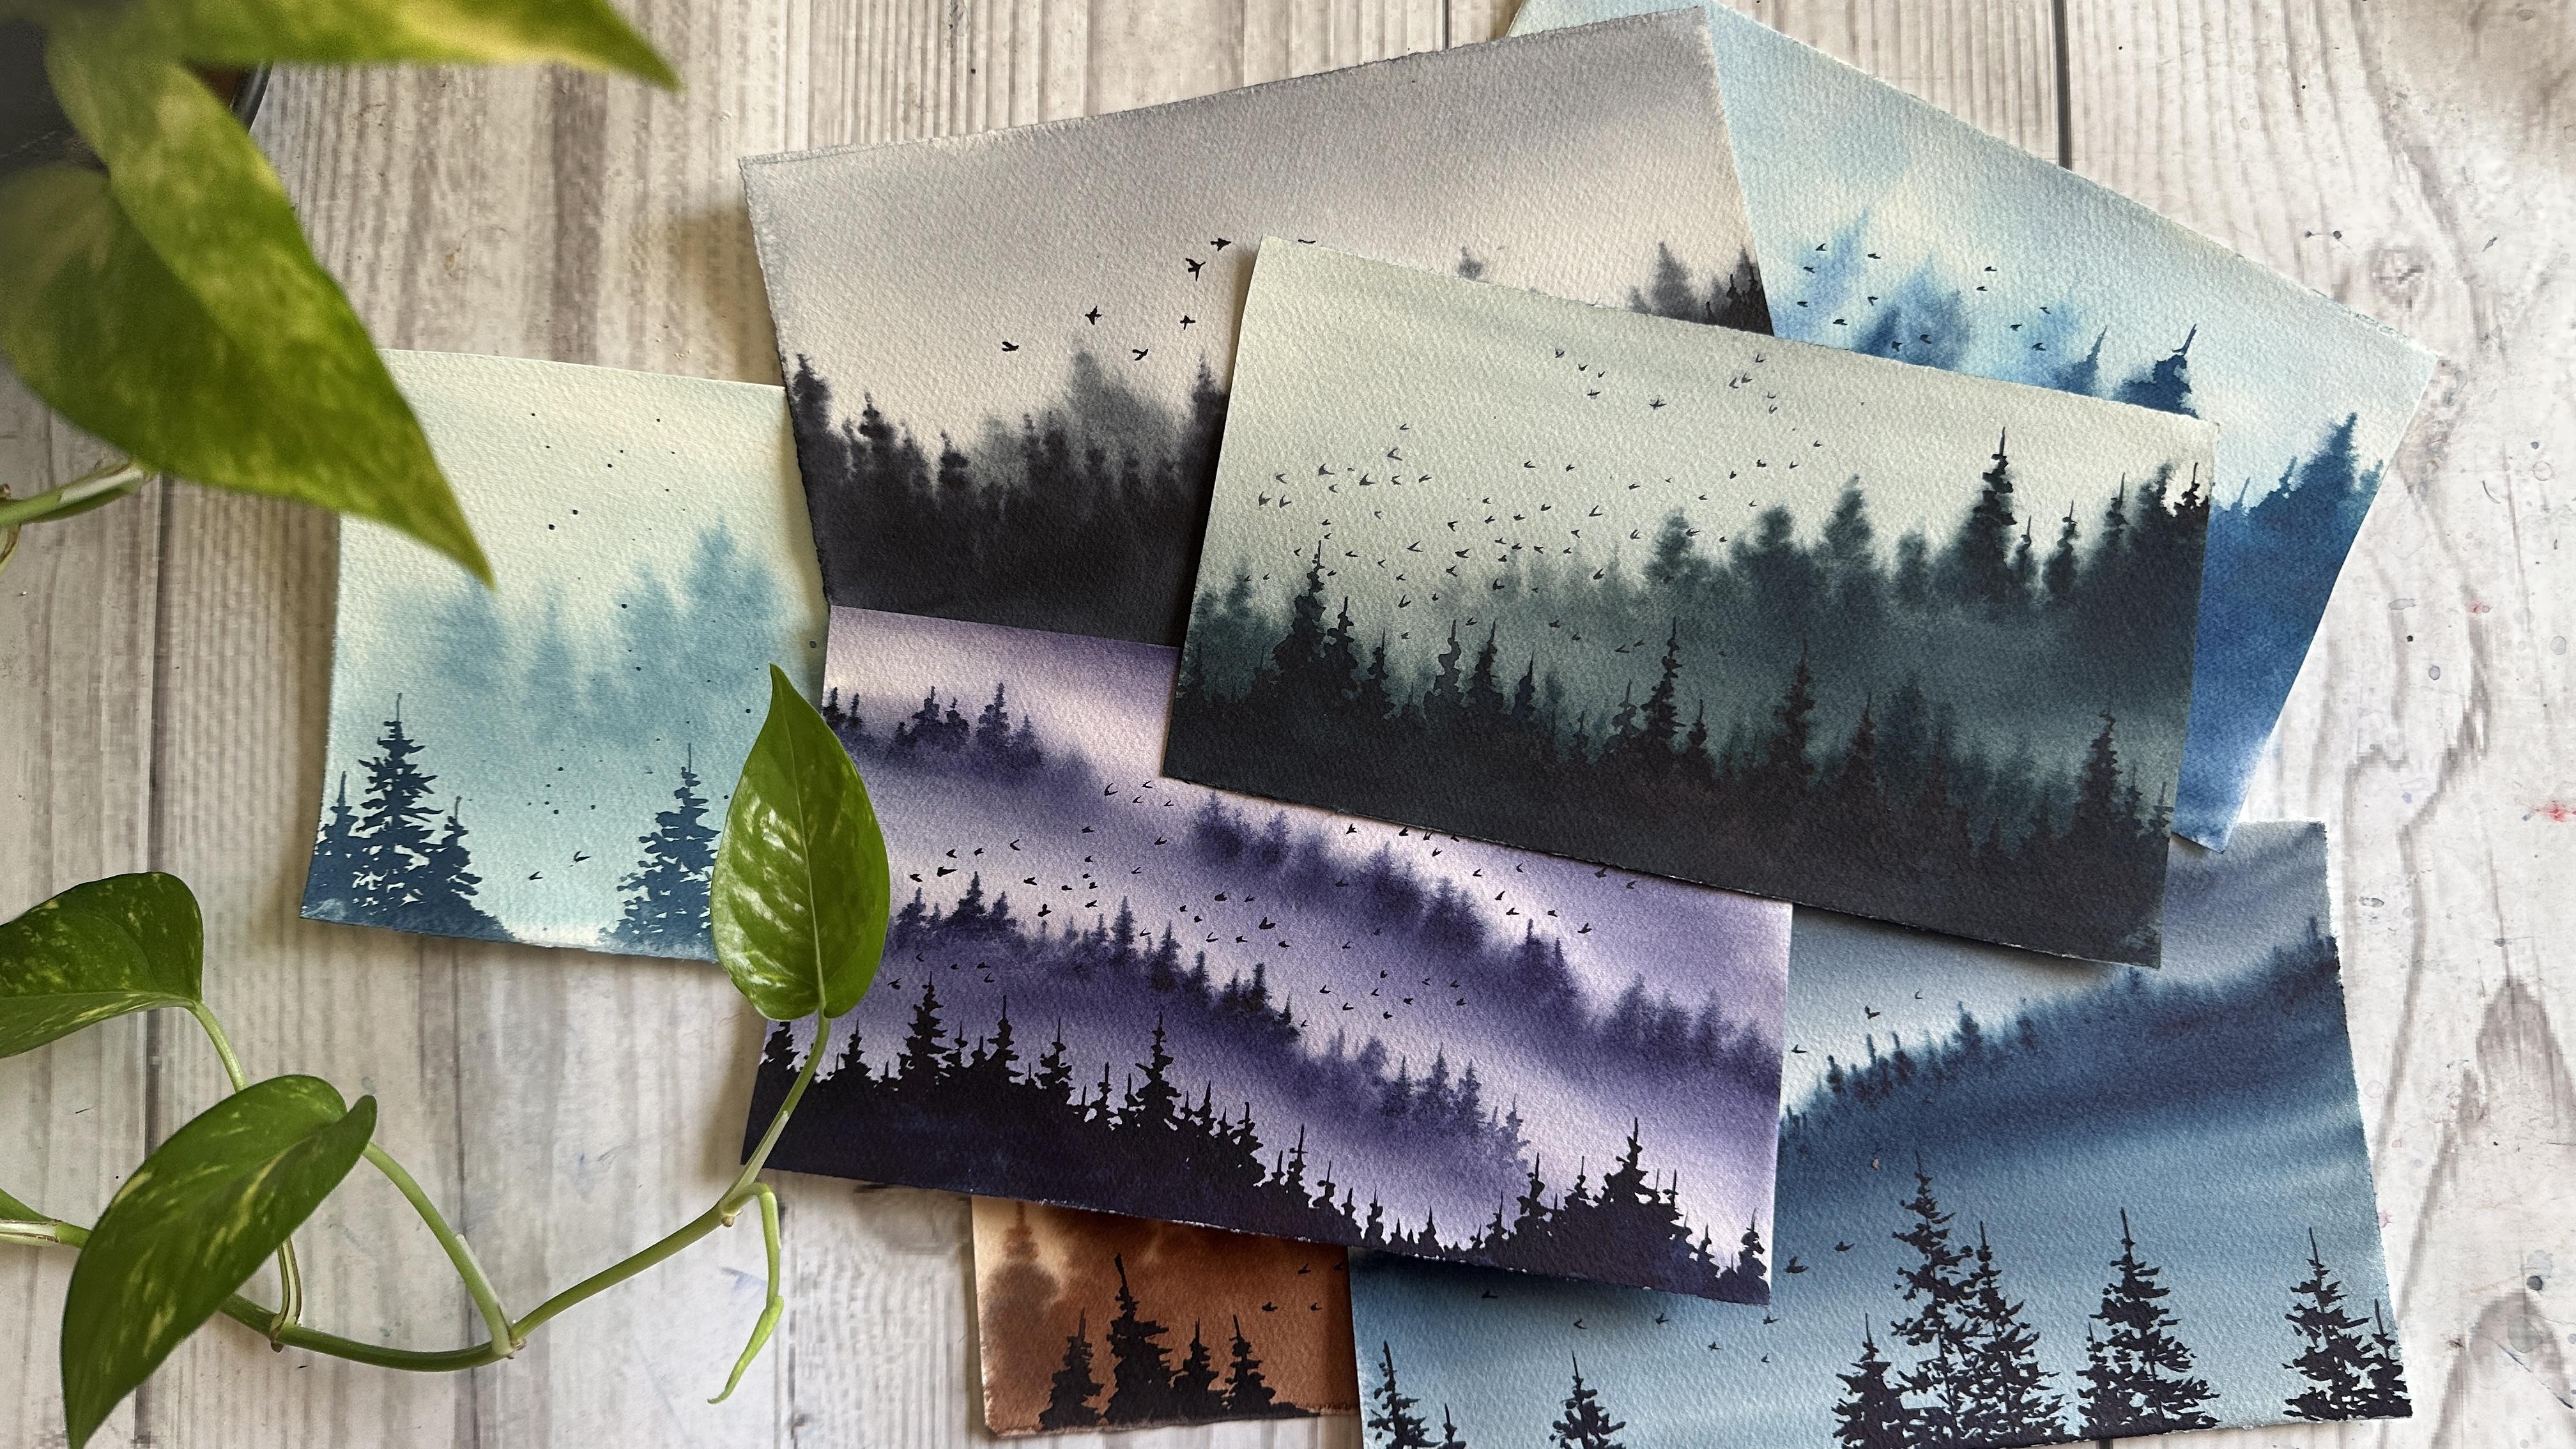
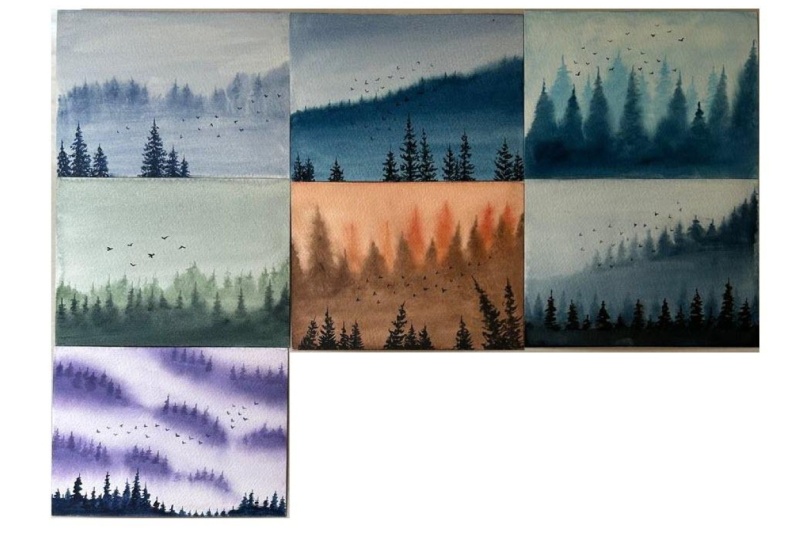
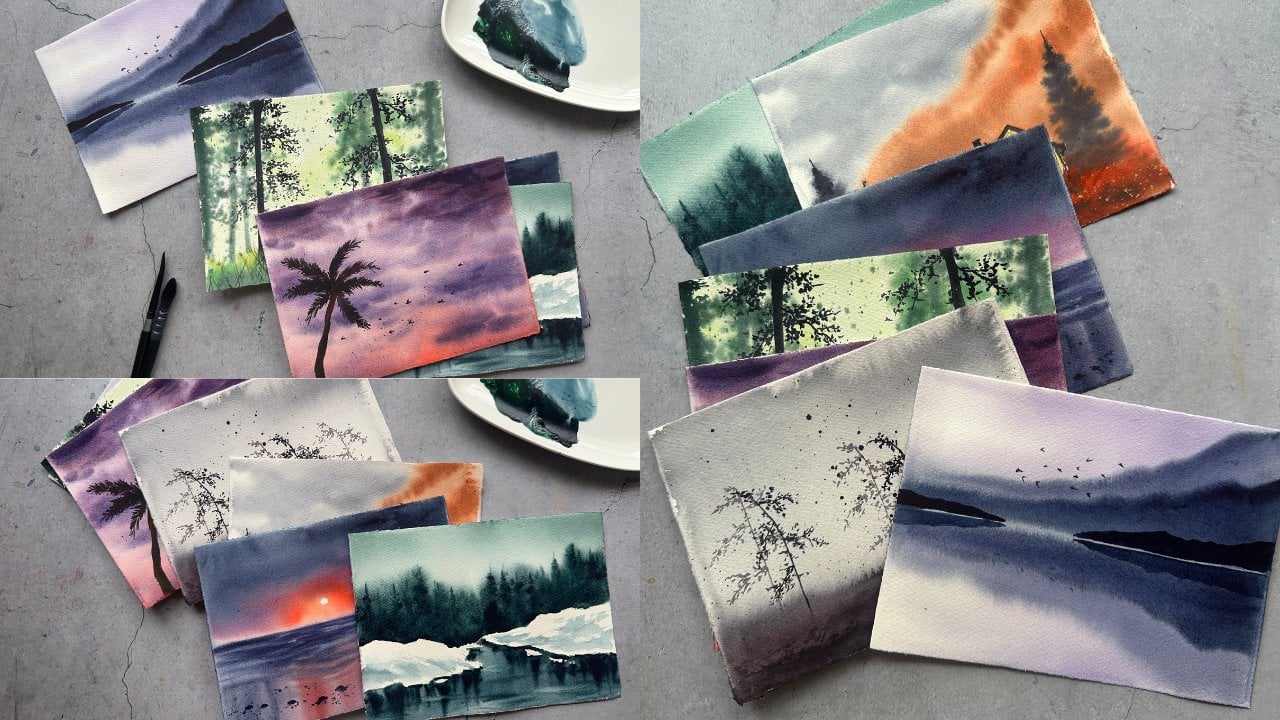
2. Class Overview : In this charming
and creative class, we will paint seven
beautiful misty landscapes, one for each day. Each project is
designed to gently build your skills
and confidence from soft skies and distant pines to layered pine forest
and dramatic mist. We will begin with
simple compositions and gradually move toward more detailed and
expressive scenes. In this class, you
will learn how to use water control to create
soft dreamy effects, build depth and atmosphere
through layering, work with a limited and
moody color palette, and finally, paint mist
and fog with ease. Starting from today, the class goes on for the next seven days. Each day we will
paint one landscape. This is the first landscape. Like I said, we will
start from simple and gradually move towards
more advanced landscapes. This class is perfect for watercolor artists who want to explore peaceful forest scenes, improve their
landscape techniques, and develop a soothing
daily painting habit. Whether you're painting
with your morning coffee or winding down in the evening, each lesson offers a slow
and satisfying escape into the world of misty forest. To be specific, I am painting
with my evening coffee. There is no rush
and no pressure in the seven days of misty
watercolor landscape challenge. All you have to
do is show up and paint one landscape a day. Sounds simple, right. Exactly. That's what
I was aiming for. So in the next video, we will discuss about
the art supplies that we're going to
need for the class. So without further delay,
let's get into it. See you in the next video. Oh
3. Art Supplies : Hey, guys, before we
jump into painting, let's quickly go over
the art supplies I'll be using in this class. For paper, I'm using fabriano, 100% cotton, cold pruss, 300 GSM, watercolor paper. It handles water really well and works beautifully for
these misty landscapes. I have taped it down to a clear acrylic board that
I got off from Amazon, super simple and I allow how sturdy and easy
it is to work on. I used regular masking tape
to hold the paper in place. And I'll show you how it is
done in Class Project one. Now let's talk
about the brushes. I used aquatone flat brush for those loose initial washes. For most of the painting, I switched between my
siloeblack velvet size 14 and Rafael size zero. This combo is great for painting bigger
and looser shapes. And for those tiny
little finishing touches and detailed pine trees, I also use the
silver black velvet, number six, which is perfect for delicate detailing because of its smaller size. For mixing colors, I
used a ceramic palette. Ceramic palette is
great for keeping your colors clean and also have enough space
to blend your colors. I will always go for ceramic
palette when painting. And, of course, a water
jar and a masking tape. Now for the paints, I have used a mix of
three brands aquaton, senneliar and white knights. Each landscape will have
its own color scheme. So we'll talk through
the specific colors before we start
painting each day. And that's it super simple
and not too many supplies. Feel free to use what you
have on hand and just try to stick to the basics,
and you're good to go. I will begin painting the class project one
in the next video. I hope you guys are ready to. So let's get going.
And, of course, I forgot to mention
the tissue papers, the paper towels are
very important as well. So see you in the next video.
4. Class Project 1 - Whispers Of Fog: Hey, guys. Welcome to
Class Project one. Today's class project
is going to be very easy and simple. So let's begin. Instead of sticking
the masking tape around the edges of the paper, I'm sticking it this way
to the acrylic board. So I have taken
the masking tape, the pieces of it, and
sticking it to four sides. And then the paper will be
stuck to the Aclic board. This is because it's
very hot in India and my paper will
dry up very quickly. In this way, the paper
stays wet for a long time. Now let's see what are the colors that
we're going to need. So I have leftover indigo from white knight on my palette, and I'm going to take
white watercolor. Do not use squash. Use white watercolor. This is Chinese watercolor
from the brand camel. So I'm going to mix these
two colors together, and I'm looking for
dark sky blue color. So let's see if I get that color using
these two color mixes. This is perfect, and I don't
want to mess this shade up. So if you have any color
that is similar to this one, you can use that one
directly instead of mixing. And I'm going to be also
using a darker shade to this. That is the indigo, as well. So there'll be two colors. One is this and the
other is indigo. How beautiful is
this color right? Let's begin the
class project now. So keep the masking tape nearby. We need to keep it
under the board so that the paint will
gradually come down. So that is one of the
techniques to make the mist very soft.
You will see. I've started wetting the paper with water and my
aquaton flat brush. So I'm going to keep the masking
tape under my board now, and I will continue
to wet the paper. Now I'm going to take
my silver black velvet, number 14, the
larger round brush. And with that sky blue shade, I'm going to start
painting the sky. Simple technique to make your
landscape look very soft is you paint when the paper is wet, like I'm doing right now. If you paint while
the paper is dry, it's going to get really
flat and dry. It looks dry. So yeah, that's one
of the important tips to paint the mist. I had a plan to leave
these white spaces, but I have decided not to, so I'm going to just blend
these colors into the paper. There are some white
caps in the paper, and that's very intentional. And yeah, now I'm going
to take the same color, but I'm going to add a bit of indigo to it to make
it a bit darker, one or two shades darker. Just to remind you, the
paper is very wet right now. So these shapes
will not hold up, but I am trying. So this is the color. This is a bit darker than the color that we have
painted the sky with. I'm just painting
this misty mountain with the pine trees on the top. So this is wet on wet. We are just showing the shapes and not
painting the details. So I'm removing a bit of color that has
spread over there. It happens while you
paint wet on wet, and it's perfectly okay. We have painted the sky and
this sorry, background. So the paper has
dried a little bit, not too much, but just a little, and that's exactly what we want. So I'm taking my silver
black velvet number six, the smaller brush,
and I'm going to start painting the pine trees. Again, this is still wet on wet, but the paper is
not soaking wet. So I'm trying to draw a few
shapes of the pine trees. So pines will hold up the shape, and some pines will not, and that is okay as well, because we are trying to portray the mist and not anything
that is detailed. Adjusting the shape of this
pine tree in the middle. And then I'm going to keep
the paper for drying. And once the paper dries, we can paint the
foreground pines. So I'm going to see
you guys in a bit. My paper has dried
up completely. Now I'm going to
remove the masking tape that is under the boat. We don't need it anymore because now we're going to be
painting only wet on dry. So I'm going to take
the darker sheade. I have told you before, I'm
going to take indigo color. So that's what I'm
going to take now. And I have taken this silver
black velvet, number six, the smaller round brush, and I have started
painting the pine trees. A complete beginner or you're painting the pine
tree for the first time. Do not worry about the shape. Just go on and paint
this landscape, go for wet on wet and
go for wet on dry. Just do not fear about
painting watercolor because the water is
very unpredictable, and I get that I
have been there, so you get better only
with the practice. That's why I always say for
every one of my classes that this class is also for the beginners so that you can
try and you can practice, and you'll get better
at the landscape. At first, I wanted to fill up the entire foreground
with these pine trees, but I have decided not to and paint only a
few here and there, because this is a
first class project, and I want this to be
very simple so that you guys get eased into the process of painting
the misty landscape. And I'm gonna paint a few
pine trees over here as well. Oh And that is all for the pine trees
in the foreground. Now with the same brush
and with the same color, we're going to paint
lots and lots of birds. Birds are the main hero
for the misty landscapes. For the entire seven days, we're going to be
painting sorry, birds for all the landscapes. Is it just me or
you also feel that adding birds to the painting
somehow completes it? Let me know your thoughts about adding birds to the landscapes
in the discussion section. And also, if you have any questions related
to this class project, you can start your question in the discussion section below, and I'll get back to you ASAP. And I'm going to also
splatter some paint, but be careful with this
because I have ruined a lot of paintings by
splattering at the end. So if you are not confident with this
technique, do not go for it. Birds are perfectly enough. And this is our
final class project. So I'm going to let
this dry and later, I'm going to remove
it from the board. So yeah, that's it. I can't believe we are
already done with Day one. Tomorrow, I'm going to be coming up with
Class Project two. I can't wait to see what you
create in this challenge. I'm going to see you
guys tomorrow with Class Project two,
and I can't wait. And thank you so much for
joining me today. Take care.
5. Class Project 2 - Silent Hills: Hi, welcome to
Class Project two. As usual, I will begin the class by sticking my paper
to the acrylic board. I'm going to use my
masking tape for this. I have already seen
so many students joining me for this class. Recently, I checked it's
more than 20 students in less than 24 hours,
and that's huge. Thank you so much. And I hope you guys enjoyed painting
Class Project one yesterday. It was a simple class, and today's class
project is going to be a bit complicated
than yesterday's. But this is also
beginner friendly. If you are a beginner, you
can easily try this one. My paper is ready. Now, we will discuss the colors. So the first color is
indigo from white knight. So there'll be only
two colors for this. The second color
is turquoise blue, again, from the
brand white knight. If we mix these two colors, we get a dreamy shade of blue, and that's my favorite. And that is the shade that we're going to use for
today's class project. This is the darker shade that
I am applying to the paper. But if you add more water to it, you get a lighter shade. So there will be two color variations with the same color. It's called shades. So
in this class project, we are going to be using the shade that is the mix
of indigon Tarquoise blue, and we're going to use
it the lighter shade, as well as the darker shade. I will explain as
we move further. Now let's begin
the class project. I'm going to keep the
masking tape under my board like I have
done yesterday. It really helps in getting that soft effect
for your landscapes, and we will begin by wetting
the paper with clean water. And for the wetting,
I'm going to be using aquatonFlat Brush. I Let's take that color, which is the mix of
digon turquoise blue, and let's paint the sky. Without adding any more paint, I'm going to just
drag the paint that is already on the top to
the edge of the paper. This way, we get a beautiful
gradient of the color. You get gradients like
this, you need two things. One is 100% cotton paper, and the second is a very
soft brush. That's it. And with the same color, I'm gonna paint the background. I'm thinking to paint
the pine trees, pine forest in the
shape of a mountain. Again, I'm using my silver
black vet number 14, the larger round brush for this. As you can see, I'm adding these vertical lines
to that mountain. It indicates that there are pine trees over there and
not just the mountain. Again, I'm not adding any color. I'll just drag the
paint down like we have done while
painting the sky. I'm painting another
gradient, that is. So it shows that
there is a mist here. Now, I'm going to be taking
my silver black velvet, number six, the smaller
brush, and the same color. I'm going to just paint
a few pine trees, the shape of the pine trees. This is still wet on wet, so you don't get the detailed
shape of the pine tree. It's okay if you just show the shape, even
though it's blurry. I want to overdo
these pine trees. I want them to be subtle. So I'm going to
leave it at this, and I'm going to keep
my paper for drying. And I'm going to see you guys in a couple of minutes once my
paper is completely dried up. My paper is dried up, so let's begin painting
the foreground. Like yesterday's class project, I'm going to keep the foreground
simple for this as well. So I'm going to paint only a
few pine trees wet on dry, and later, I'm going to
be adding a few birds. I can fill up the entire
foreground with the pine trees. That actually looks great. And in the coming
class projects, that's what we're going
to be doing as well. But since these are, like I said, these are
BrignerFriendly class project, the first two, so I
thought I'm going to keep them simple and easy for
you guys to practice. A I will add a tiny pine tree over here. And a relatively large pine
tree over here as well. Y. And a baby pine tree here. And a fairly large
one over here. Tiny pine tree here. I just love how cute
they look, right? And another tiny one
over here as well. I'm going to add a few
more tiny pine trees on my left as well because I thought to
leave it out at first, but it's going to look
rather dull and plain. So I'm going to add a few
very little pine trees. All right, done.
This class project looks exactly how I imagined. I'm not referencing any picture. It's just there is a
picture in my mind, and I'm just trying to portray, and it looks exactly like
what it is there in my mind. And it will so happy
when that happens. So yeah, I'm going
to paint birds now. Lots and lots of birds. Y To be honest, out of all seven class projects, this one is my favorite. Let me know if you
like this one as well. So yeah, that is it. Now I'm going to remove the paper because my paper
is already dried up. And yeah, thank you so
much for joining me today. I hope you guys enjoyed
painting Class Project two. Tomorrow, we will paint
Class Project three. I'm so excited. See you. H.
6. Class Project 3 - Twilight Pines: Hey, guys. Welcome to
Class Project three. I will first stick my
paper to my board. And while I do
that, I will talk a little bit about
today's class project. So in the previous
two class projects, the first step that we
have done is wet on wet, and later, we have done wet on dry to paint the
pines on the foreground. But there is a small change
in today's class project. So first, we're going to
paint wet on wet as usual. But for the second layer, instead of wet on dry, we're going to paint
wet on wet as well. So there is hardly any wet on dry technique
except for the birds and a few shapes
of the pine trees, you know, to sharpen the
tips of the pine trees. Only for that, I'm going
to be using wet on dry. I'll talk more about why I choose only wet on wet for this. For now, we're going to
talk about the colors. So I have chosen white
knight, turquoise blue. And the second shade is
aquaton ultramarine blue. I have shown this very
vaguely this shed because you can use any blue shade that
you have for this. It can be thalo
blue, Prussian blue, Cerlean blue, cobalt blue, any kind of blue. Just don't make it indigo or, you know, these turquoise
sheds. It should be blue. And the last shade is
white knights indigo. So now I'm going to be mixing turquoise blue and ultramarine
blue for one shade. And for the second, I'm going to be adding
indigo to that, so to darken it a little bit. This is the shade
one that we got from mixing turquoise blue
and ultramarine blue. I'm going to be using this to paint the sky and
the background. The second shade is a
little bit darker to this. I don't know how to say it
because this is my own mix. So for the shade one, I'm going to be adding indigo
to make it a bit darker, and that is our shade too. I'm going to use this to paint the foreground and the birds. That is all for
the color palette. Now let's begin
the class project. I'm going to wet the
paper with clean water, and for this, I'm going
to be using a flat brush. You don't have to clean
the edges of your paper. I'm doing this because
I'm shooting a video and I want to make my
painting look aesthetic. So I'm keeping my masking
tape under the board. Let's begin. You know
the first shade, right? The mix of turquois
blue with ultramarine. The color should be very light, and with that, we're
gonna paint the sky. As you can see, the
sky is not uniform, and I am painting these cloud shapes in the middle that is leaving
out the paper white. It gives that misty effect
that the mist is in the air. So I'm going to be
late I'm going to be, you know, correcting
this later on, but try to leave a few
white gaps in the middle. What I meant by correcting
later is exactly this. When you paint wet on wet, the color tends to flow
in all directions, and you have to use your damp
brush to give it a shape. Even though it's blurry, you have to show the
right shape of it. That's what I'm doing now. I am giving shape to
the clouds or the mist. Because the white gap in the paper could mean clouds
also missed as well. So I'm using both names. It could be missed or the cloud. Whatever, but we need that
white space in the middle. Now, using the same shade, but a different brush. That is, silver black
velvet, number six, the smaller round brush, I'm going to paint a few
pine trees wet on wet. There are no detailed
structures in wet on wet. In wet and dry, on
the other hand, you will have clear,
sharp details. Most of the class
projects in this class, that is six out of seven are having clear cut shape of the subjects in
the foreground. That is, there are
clear painting of the pine tree
in the foreground. So for this one,
I wanted to give that blurry misty effect
even in the foreground. That's why I chose wet on wet for both background
and the foreground. To be honest, in watercolor, the explanation is more complicated than the
actual painting. The actual painting should
be all about the process. Just close your mind, close your worries,
shut them up, and then just paint. You will see what
you can create. And then you can
correct from there. Again, the correction
in watercolor can be very broad in nature
because if I see something, the other person
sees it differently. So I can't say that the
other person is wrong. So in watercolor
or in any medium, all you have to do is just paint and do not worry
about the results. Here, I'm not painting the
bottom of the paper because it's going to be covered with a darker shaded
foreground anyway. So I'm just going to correct a few shapes of the pine trees. Remember, my paper is still wet, so I'm just going to try to
give them sharper edges, sorry, sharper tips
of the pine tree. Well, that is it. I tried my best to portray
these shapes as pine trees. I hope they look
like pine trees. So I'm gonna keep
the paper for drying and I'll come back once
the paper is dried up. Paper has dried, so I'm going to re wet the
paper once again. So this is quite new technique, especially if you're a beginner. It's called re
wetting. That means watercolor is painted in layers. So we have painted
the first layer, and now to paint
the second layer, you need the paper to be wet. So we are rewetting the paper. So if you want to successfully
revet your paper, you need one thing, that is, make sure the first layer
is completely dried up. If it is still wet, there is a chance
that the fz layer will come off once
you re wet the paper. So the paper is wet again. Let's begin painting the
foreground using wet on wet technique and
this darker shed, which is a mix of
shade one plus indigo. I'm going to add
the blurry shape of the pine trees at the bottom. This is a mix of pine
tree and the mist, so you don't have to
worry about the shape. Just add the color at
the bottom of the paper. I have taken my
silver black valet, number six, the smaller brush, and with this
brush, I'm going to begin painting the pine trees. Again, this is wet on wet so you don't have to worry
about the shapes now. Again, this is wet on wet. So you may have
to paint a little faster because if the
paper starts to dry up, we can't do anything about it. I'm gonna adjust the mist that is at the bottom
with a damp brush. Just a few corrections. It looks very dull on my right, so I'm going to darken
that area a little bit. Until I feel it's good enough, I'm gonna be adding
these pine trees or I'm correcting the shape of the pine trees that
are already existing. Keep adding the pine
trees wherever you see necessary and also keep adjusting the shape
of the pine tree, especially at the top. The top should be very sharp. I have one issue while
painting with watercolor. That is, I don't
know when to stop. Especially now. I think the
painting looks perfect, but I'm unable to stop. H All right. I'm going to keep
this for drying. Once the painting is dried up, I'm going to be
adding the birds. All right. The paper has dried up and with
the same shade, that is the first
shade mixed with indigo and a smaller silver black
velvet number six brush, I have started
painting the birds. I think those are
enough birds for today. The paper has dried up, and I'm removing
it from the board. So yeah, that is it for
today's class project. Tomorrow, I'm coming up with
a moody misty landscapes. Landscape. I'm so excited. You know how much I love
moody landscapes, right. See you tomorrow. Thank you so much for joining me today. O.
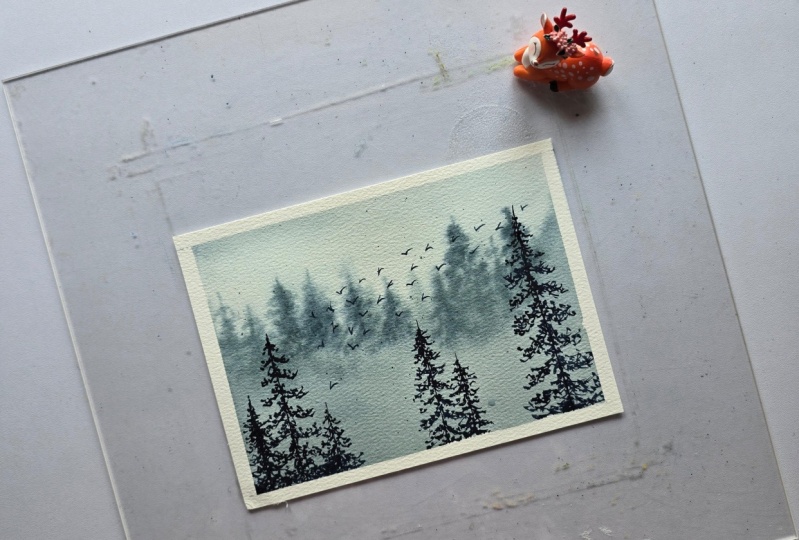
7. Class Project 4 - The Vanishing Path: Hey, guys. Welcome to
Class Project four. Wow. It's already day four, and I hope you guys are
enjoying this class so far. I have received a couple
of messages saying that they are feeling very calm while painting
these class projects, and it is such a
beautiful experience to paint the mist as always. And, yeah, I felt so happy
reading those messages today. And one of them even
said that they're painting painting the same
landscape in so many colors. That was me a few years ago. Yeah, it was, it was a happy moment for me
today this morning. So, yeah, I have started by sticking my paper to the
board using my masking tip. This is an unique method actually for sticking the paper. Here in India, it's
summer and it's very hot. I have told this before, but
I'm telling you guys again, I'm keeping my paper like
this because this way, the paper stays wet
for a long time, and that really is helping
me now in summers. Now let us see what
are the colors that we're going to need to
paint today's landscape. I had a bit of confusion
on which green to use. There are two here,
the bright green, hookers green and shadow
green from aquaton. At the end, though, I have
decided to remove the hookers green and keep shadow green
from the brand aquatone. It's quite darker than
the hooker's green, and that's exactly what
we are going for today. We are painting a very
moody misty landscape. So darker colors are preferable. So shadow green from aquaton and pines gray
from the brand aquaton. If you don't have shadow green, you can use hookers green
with a bit of indigo in it. Or you can also add a bit of pines gray to the hookers
green or sap green. You will get the shade
that is similar to this. We are mixing very little of pines gray to the shadow green. And this is what we get. This is the shade one, and shade two will be a bit darker. That is we're going to be using lots of pines gray
to make it darker. So this is shade one, and as you can see, I'm using Pines gray. So
this is shade two. So only two colors for
today's class project. Now, let us begin painting
the class project. So I'm going to start by wetting the paper
with clean water. I'm using my flat brush. We will now take the shade one, and let's begin
painting the sky first. So I forgot to keep the
masking tape under my board. I have remembered it later. So I'm just going to go ahead
and keep the masking tape. It's very important
to have that gravity. So yeah, this is the sky. It should be very
light in shade. After painting the sky, we will paint the
foreground pines. They should be very blurry and
they should be wet on wet. If you remember, in
yesterday's painting, we have gone with only wet on wet right to
paint the foreground, as well as the
background, right? So that's what we are
going for today as well. So first, with the shade one, that is the lighter shade, I'm going to start painting
the background pines. I'm repeating this
point in every one of the class projects because
it's very important. So I'm going to
repeat it again now. This is wet on wet
technique, right? So the shapes doesn't
have to be very detailed. You can just go ahead and
paint a few blurry shapes, and that'll be enough. It's quite easy, actually,
wet on wet technique. With a bigger brush, I'm going to just paint
the rest of the paper. You know this step right. We have been repeating this in previous class
projects as well. So we're going to just adjust the shapes of the pine trees
using a smaller brush. Again, this is wet on wet. You don't have to
go in detail about. I think I'm going to have
to paint anymore over here. We're going to be painting
the foreground later. So I'm going to keep
this for drying. And once the paper is
completely dried up, we will start painting
the foreground. So I'm going to see
you guys in a bit. If the paper is dried up, only then we will begin to
paint the second layer. That is, we will
rewet the paper. Like I said yesterday, you have to revet the paper only when it is completely dry. Only then you have
to add the water. Even though I have taken
so many precautions, there is a bit of paint
that is lost there. But it's okay. We will be painting the foreground
there anyway. So take the darker shade that we have watched
a little while ago, pines gray and let's begin
painting the foreground. Again, just drop the shapes. We can later correct the
shapes of the pine trees. A few years ago, mostly
around five or six years ago. While I was perfecting
wet on wet, I had to face a lot of challenges and lots of
paper got wasted, as well. So at one point,
out of frustration, I would I thought I would just stop this painting and go
back to my nine to five. But I'm glad I stuck around. Mastering wet on wet
needs a lot of patience. And I have observed in some
people that if they fail, they will not touch
the technique again, and I believe that
is a wrong approach. You will get better at wet
on wet only if you practice. So do not lose hope. And yeah, it took me
around two to three years, I think, to get the hang
of wet on wet wet on wet. So I thought I'd
share that because we are painting a lot of
wet on wet techniques. And I know that a lot of beginners are watching this
class, and this is for you. For beginners, especially. So if you I mean, if you want to get better
at wet on wet technique or any other painting technique,
you have to practice. So that is the only way, and there is no
other way around. Yeah. That is all
I wanted to say. Now, this is a second
layer of the pine trees. That is we are painting
the foreground, and we are correcting the
shapes of the pine trees. That means you need to have
that sharp edge on the top, and then those branches. That is all. We are not painting any detailed structures
here, as you can see. And this is mostly it. I'm going to cover
this entire foreground with pines gray. I'm going to let
the paper dry now so that I can paint
the birds later. Um, hold on. I see a few
corrections over here. The tip is not sharp enough, so I'm just going to correct it. And then I'm going to keep
the paper for drying. Once it's dried, we're
going to paint the birds. And my paper has dried up. I'm going to take Pines gray
and my silver black velvet, number six, the
smaller round brush. And let's begin
painting the birds. In this class project, I'm thinking to paint a few birds than yesterday
or day before class project, and I'm going to make them
a little larger in size. I think I'm going to start painting the birds
now. These are enough. So yeah, once the paper
is completely dried up, you can remove it from
the board. So that is it. That is today's class project. I hope you guys enjoyed
painting this one. I'm going to see
you guys tomorrow with a brand new class project. Tomorrow is going to
be a bit complicated than the last class projects. So I hope you guys
are ready for that. Thank you so much for
joining me today.
8. Class Project 5 -Echos Of The Forest: Guys, welcome to
Class Project five. I'm sticking the paper
to my board as usual. We will see what colors we can be using in
today's class project. And if you guys already had
seen the class project, you know that colors are
a bit unconventional. So I have taken
muted bright colors. In total, there'll
be three colors. The first one is Pines gray. The one that I'm putting on my palette is permanent orange. And the third color
is burnt sienna. All these three colors are
from a brand called aquaton. So the first color that
I'm going to be making is a mix of burnt sienna
and permanent orange. With this color, we get a
muter version of orange, which is what we are going for. You can say this is a
brick red color, right? It's sort of like a bright
brownish color. I don't know. I think it's called brick red. So this is the first shade
that we're going to be using. Eight. Second shade is a mix of all these three colors, the orange, Bnciana
and pins gray. You get this sort of
dull moody brown color, dark brown color, and that's the color that
we are going for. Now that we have
watched our colors, let's begin by wetting the
paper with clean water. As usual, I'm using my
flat brush for this. With the first shade, that is the muted orange color,
we're gonna paint the sky. Make sure the sky is
very light in shade. That means you have to add lots of water and very less paint. Oh, you can take that muted orange color. That is the mix of
burned Siena and orange, and we get this sort of
brick red shade, right. So with that, we will begin
painting the background. So this is wet on wet. You just have to show the shapes of the pine trees and not a detailed
pine trees, right? We have talked about this
in previous class projects. I'm not going to be dragging that orange color till
the bottom of the paper. You can see I have stopped it in the middle because we're
going to be painting the foreground anyway and the background won't be visible. So only the top of the pine trees will be
visible in the background. So I'm correcting the shapes of the pine trees while
the paper is still wet. And for that I'm using
my silver black velvet. Number six, the
smaller round brush. So just correct the shape. That means give it a sharper tip and then define a few branches. Oh, I'm going to keep
this for drying. Once the paper dried up, we can paint the foreground. So I'm going to see
you guys in a bit. Check if your paper has
dried up completely, only then rewet the paper. For rewetting, I'm using my
flat brush and clean water. Now we will take that
dark brown color that is the mix of all
these three colors. So with that, I'm going
to paint the foreground. Again, the foreground is the same process
as the background. It is paint the shape of the pine trees and
do not go into details. Again, this is wet on wet right. We have just rewet the paper. So the process is same
as the background. This process is same
as the background. So you have to correct the
shape of the pine trees, sharpen the tips, and define the tree a little bit
with branches and leaves. That's it. It's not a
complicated work, right? Only complicated thing
in this misty landscape, whole of mystery landscape is mastering the wet
on wet technique. So I believe it'll be a bit
difficult for a beginner. But if you practice,
like I said before, if you practice, it's the
only way that you can learn. Master wet on work. And then, uh, you'll be unstoppable
in painting wet on wet. Trust me on this. As you can see, I'm doing a few corrections
to the foreground. I'm covering it with
the darker shade. And I'm going to keep
this for drying now. Once the paper dried up, we can paint the
sorry, pine trees. Sorry, the foreground
pines and then birds. So I'm going to see
you guys in a bit. So the paper is dried up. Now I'm going to take
gray only Pines gray. And with the smaller brush, I'm going to start painting
the foreground pines. So I'm going to go with only a few pine trees
here around six, five or six pine
trees. So let's begin. If you guys observe this
landscape in this class project, the pine trees on the foreground
are a bit in the angle. It's very intentional,
so I don't want to make all the pine
trees in a straight line. I want to use different
different techniques here. So painting pine trees
in different shapes or different angles gives
that realistic look. That is, if you
see in the forest, not all trees will be
aligning straight, right? Some will be crossed, some will be like falling
falling to the ground. So that's the that's the
image that I was going for. This pine tree is a bit
leaning towards my right, and I was very doubtful
at the beginning, but once the painting
has finished, it looked superb, really. It's good to take
chances sometimes. So out of all seven
class projects, this class project
is a bit difficult. And also very different. The last two we're going to go through
with the same process, but we'll be painting
them in many layers. The last two, like I've said, the last two will be considered as advanced landscapes, right. But this one is neither
advanced nor beginner friendly. It's somewhere in the middle,
intermediate, you can say. So this is different also because we're going
to be we are painting with different
color palettes and also the pine trees are looking a bit
different than the rest. So yeah, I would say this is both different and difficult. I think I'm going to start
painting the pine trees now and move on to
paint the birds. I'm thinking to paint
lots and lots of birds in this class
project. So let's go. Right. We are done with
class project five. So simple. I wish
it's simple, right? So yeah, tomorrow, we're going to be painting
class project six. So I'm gonna see
you guys tomorrow. Thank you so much for
joining me today.
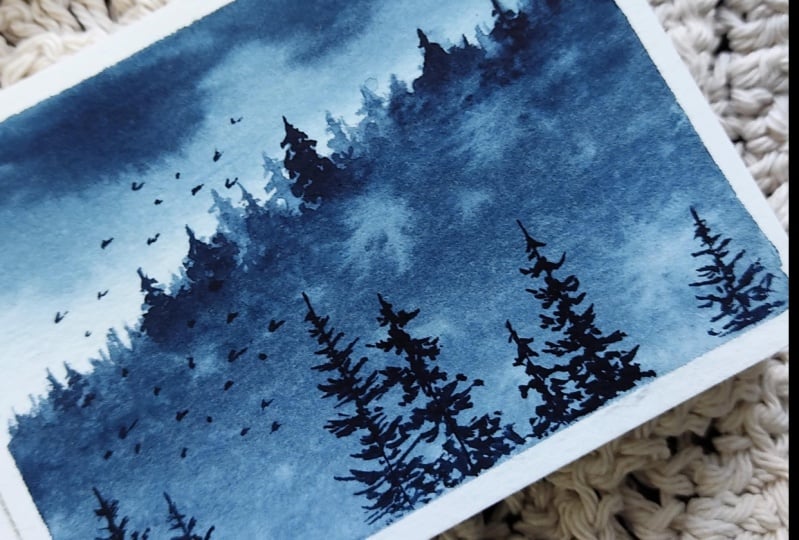
9. Class Project 6 - Stillness: No. Hey, guys. Welcome to Class Project six. Wow, it's already day six, and I'm so excited that we
are painting this landscape today because this one and the one that will follow
after that is tomorrow, these two class projects
are my favorite out of all these seven class
projects because the techniques that we use
here are a bit complicated. So that's why even in the
beginning that I've told you, these two class projects
class six and seven are considered as
advanced level. So painting advanced level
landscapes or painting something out of your
comfort zone really helps in practicing your
watercolor techniques. Painting something
that you don't know actually gives you an idea
that way you need to improve. So I always go for
complicated landscapes while practicing my
watercolor a few years ago. That really helped me a lot. So I'm excited for
these two landscapes. Let's begin. If you know me, you know that I always go
for moody color palette, and that's what we are
choosing today as well. This is hookers green from
the brand seneliar and the second color is indigo
from the brand, white knight. And the third color is Pines
gray from the brand aquaton. So these three colors are
our color palette for today. We get two shades from
these three colors. The first shade is a mix
of green and indigo. We get this light shaded color. I said light because the color that follows is very
dark compared to this. So yeah, the second color is green with a
mix of pines gray. So when you see
these two colors, the first one is the lighter and the second one
is the darker. So we are going with this
color palette for today. Let's begin painting
the class project. So I'm going to start by wetting the paper
with clean water, and I'm using my
flat brush for this. And I'm going to keep my masking tape under
the board as well. And we will begin with the
first shade of the color. That is the mix of
green and indigo. I want the sky to be lighter, and as we come down, I want the color to be darker. See, this is what
I am doing here. It's a very simple trick. So I'm starting from
the top as usual, and I'm using darker shade here. And it looks a bit lighter, so I'm going to go again
for one more layer. So yeah, let's put
darker shade on the top. And as we come down,
we will lighten. Like I've said before, I want the sky to be lighter
and see what I'll do. This is such a neat technique. So once I'm satisfied
with the colors, I'm just going to flip
my board, and the sky, the lighter shade for
the sky is on top, and the darker shade
is at the bottom. So I have removed the
masking tape as well. Now let's begin painting
the background pine trees. I'm using green and indigo mix, and let's start painting
some blurry pines. You don't have to paint very
detailed pine trees here. You can just put
down the shapes, and that's more than enough
since this is wet on wet. Mm. I'm now going to take my slo black velvet number
14 around a bigger brush. With this, I'm going to blend the colors into the background. But there is an issue here that is my paper
is drying up now. So I can't blend the
colors properly. So I'm just going
to stop it right here and I'm going to wait
until the paper dries up. I'm going to rewet,
and then I'm going to continue painting the
background and the foreground. So yeah, this is what you
have to do when your paper dries up and you are
stuck with wet on wet. So I'm going to see
you guys in a bit. Paper is dried up now, and we are re wetting
the paper again. So, uh, the previous layer
has dried up while painting, and we are continuing
by revetting. So this is considered as
the advanced technique, one of the advanced
techniques, right? So in a simple landscapes, you will not find
these type of tricks. So this will be a bit complicated if you
are a complete beginner. And if you're not a
beginner and know some of the techniques like wet on wet and wet on dry,
this should be easy. Oh, the paper is wet, so I'm going to just go ahead and blend it with
the background. I'm going to adjust
the shapes of the pine trees. Only
the tips right. We have painted this in previous landscape,
so this should be easy. And Now, the paper is still wet, so I'm going to go ahead
with the second layer. That is second background layer. This is not foreground yet, so you can say it's
a middle layer. So I'm going to go ahead and
paint the pine trees again. These will be blurry because
the paper is still wet. I'm excited to see all your class projects
in the project section. So I've been watching them. I had a bit of an
issue yesterday. I will discuss about it
later with you guys. But I'm so happy that
you guys are joining me. M Now, we will keep this for drying. Once the paper is dried, we will paint the foreground. You know that foreground is painted with a
dark shade, right? So yeah, I'm going to wait a couple of minutes and
later we're going to go. Okay, the paper
has dried enough, and I'm taking the darker shade. And I have chosen
this rigor brush, but I don't think so I'm going
to be continuing with this because rigor brushes are very hard and they slow me down. And this is silver black
velvet number six. I've quickly changed
it, changed the brush, and let's begin painting
the foreground pine trees. I'm going to paint
only a few of them. I actually wanted to paint only two layers of the pine
trees for this class project. But in the last minute that I have decided the
last two landscape should be advanced level. So that's why I have added
one more layer to this one. So in the class project
that comes out tomorrow, there'll be four
layers, I think, so that's going to be even bit more
complicated than this. You just have to perfect
your wet on wet game. Else if you practice this, your wet on wet will get
perfect. Trust me on this. I've seen so many artists not attempting any new techniques
in watercolor because they're afraid that
they'll just waste the time or they'll
just waste the paper because those new
techniques will not yield the results that
are in the artist's mind. So that's completely
wrong, in my opinion, because if your goal is to
get better at watercolor, if your goal is to become
an artist in watercolor, so you have to attempt
new techniques, right? So it's okay that if you waste a couple of papers
or a couple of hours, just go with it, paint and paint advanced
and new techniques. At least paint with
me in today's in the 70s misty landscapes challenge
because this really, really helps, trust me. Oh Again, one of the things that I
wanted to tell you guys is that I used to do an exercise a few years ago
while I was learning watercolor painting that
I would write down, what are my weaknesses
that for example, if I couldn't paint a pine
tree, I would write it down. And in my spare time, I used to practice on how
to paint a pine tree. So that is one of my
personal techniques that really helped me get
better at things separately, so I can paint them
in a landscape. Well, I'm just going to
stop painting pine trees, and I'll just blend the color with the rest
of the foreground. I'm just using the
darker shade for this. We are almost done painting
this class project. Only birds are remaining, so I'm just going to go
and paint a lot of birds. There are so many
birds here, right? At least there are
hundreds of them. I don't know. I
was just couldn't I just couldn't stop myself
while painting the birds. You can just stop here if you think these
birds are too many. Done. Thank you so much for joining me today in
today's class project. I'm gonna see you guys
tomorrow with a brand new and the last class project in misty landscape series.
So see you soon.
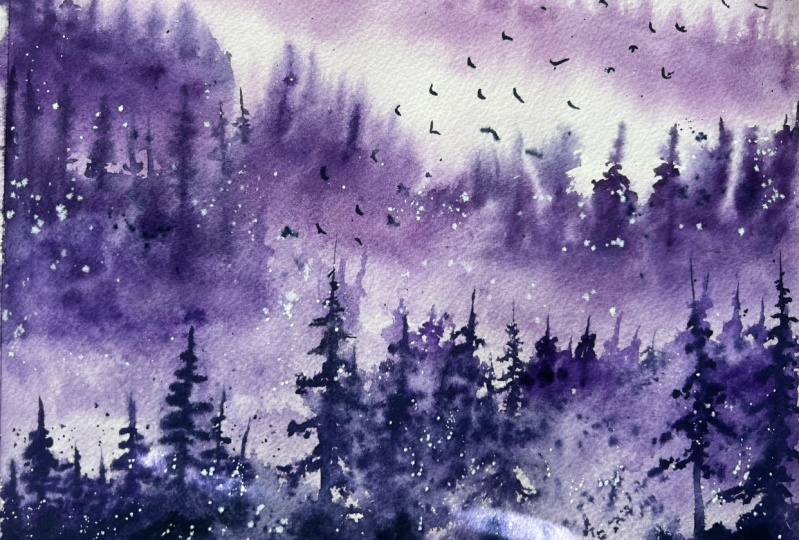
10. Class Project 7 - Where The Light Fades: Hi, guys. Welcome to
Class Project seven. I know this class
project is a bit complicated and
advanced compared to previous class projects. But so far we have practiced
six misty landscapes, so I'm sure you can paint this one very easily
if you are a beginner. As usual, I'm starting by
sticking my paper to my board. So stick the masking tape to four sides of your paper and then stick it to the aclt board. So this is a few of my students
asked me why this method. I have told this
in class O video, I think, but I'm going
to say it again. This way, the paper stays
wet for a long time, which is very important for me because the Indian summers
has already started. And I hardly have like five or 10 minutes for
each layer to get dry. So this is one of the ways
that helps me to paint longer. The class project may
look a monochrome, but it's not, so
I'm going to tell you what colors
to be used today. So the first color is unactonose from the
brand white knight, and the second color is dagenPurple from
the brand neliar. The last moment, I
have decided to add one more colour and it is parole red from
the brand aquaton. So if you don't have
these particular shades, you can always go
for any rose color, any purple and any red color. But indigo is a must. If you don't have indigo, you can switch it
with pines gray. And we are mixing all these
four colors together, and you can see that
unique color unique shade. So that's what we are going for. So that is the first shade. Let's see what
color we get first. This shade looks quite dark, but it's not, trust me, I'm going to add
lots of water to it. That makes it a bit lighter
so you can see the shade. This is it. This is
the first shade. And the second is
just plain indigo. So we have two colors to paint
our class project seven. Let's begin. So first, I'm going to keep the
masking tape under my board. Later, I'm gonna wet the
paper with clean water. You can see my water is not
clean, and that's okay. So I'm using my flat
brush for this. H. Since the paper is wet, it's time to add the shade one. So for this, I'm using my
Rafael number zero brush. Like I said, we are using
the first shade, right? It's a mix of all four shades. So with this, I'm
just going to draw that misty effect
on the wet paper. We are not painting
the pine trees now, that shape of the
misty mountains. So these are just the
shapes of the mountains. So, bear with me. This is a bit
complicated process. Like I said, it's an
advanced landscape. So we are using very
different techniques to paint the misty mountains. So yeah, I think this is good. I'm just going to adjust
the shape a little bit. And with my silver black
velvet, number six, the smaller round brush, and with the same shade, I'm going to start
adding the pine trees. Again, my paper is still wet, so this is still wet
on wet technique. The shapes will not
be that detailed, and that's exactly
what we are going for. You can see I have also removed my masking tape under the board. We don't need it now. So let's begin adding these pine trees. You have to keep on adding these pine trees for all these three layers
of the mountains. So yeah, this is
a bit complicated and also a long process. So there'll be mostly me painting and less talking so that it won't annoy
you guys that much. I'll repeat the same process for the second layer as well. But make sure you're
painting a bit faster because we need to paint before the paper
dries up. So yeah. That is absurd. I'm leaving gaps between the trees, right? So that is important. We don't want that overly stuffed pine trees
on the mountains. We just want a simple landscape. So make sure you
leave the gaps too. It looks quite good at the
end. Trust me on that. Third layer now. Now, I'm going to keep the
paper for drying. We are done with a
third layer as well. So once the paper dries up, we will continue painting
the misty landscape. See you guys in a bit. Paper
has dried up now completely. Now I'm going to take the masking tape and
keep it under my board, and we will ret the paper. I'm using my flat
brrush for this. We will add mountains again. That is, we have to match the color of the mountain
and the pine tree. So I am taking the mix of
all those four colors, the first shade and
my Rafael brush, and I will start adding
the mountains again. Add and adjust until
you feel satisfied. So I'm going to take a
bit longer time for this because this is the main
attraction in your landscape. So I have to get this right. So yeah, you have to bear with me again because
this is going to take a while. Also darkening a few
pine trees as well. At this point, I'm
just trying to get the shade right for the pine
trees and for the mountains. O. So I'm going to keep this for drying. I'm not satisfied with it yet. So once the paper dries up, we will paint the
mountains once again. So I'm going to see
you guys in a bit. So the paper has dried up and you know the
process now, right? So keep the masking
tape under the board, rewet the paper, and then
paint the mountains. It's time. I have to
get it right because I can't keep rewet the paper and paint again and again because already this is an advanced landscape
and already, it's a bit longer project
compared to previous ones, so I can't risk wasting time. It looks perfect to me now, so I'm going to keep
this for drying. And once the paper dries up, we can paint the foreground. Paper has dried up. Now I'm
going to take the shade two, that is only indigo, and I'm going to
paint the foreground. Foreground is all about
painting the pine trees. So at first, I thought to
paint only a few pine trees, but later I have decided to almost cover the foreground
area with the pine trees. You guys must be tired painting
this last class project. But please, please, please continue because the end
result is just perfect. And also, if you want
to take a break, you can take now because
this is wet or dry, you can paint anytime. You don't have to, you know, sit at the paper because the
paper is wet or anything. So yeah, if you need a
break now is the time, but I don't believe we have to paint longer now because only the foreground
and the birds are remaining. I tried to stop a
little bit before, but I figured out this area
is looking quite plain. So I thought I would add a few pine trees
over here as well. Done. Now, we will
paint the birds. So for the birds,
I'm going to use the second shade
that is only indigo, and I'm using a
smaller round brush. So I'm thinking to
paint lots and lots of birds because birds
are my favorite, especially for the
misty landscape. Oh, that is it for
today's class project. And also, that is it for our seven days of misty
landscapes challenge class. I am getting a lot of messages from you guys that you
are enjoying the class and that you are
progressing from Project one to Project
two and three, and so on. So that made me really,
really, really happy. So yeah, thank you. Thank you so much
for all the low. H. In my personal opinion, if you had perfected class project six and
today's class project seven, you are perfect in painting
mystery landscapes. You are done. You are an expert
now because these two are advanced and also lots and lots of complicated
landscapes, right. So if you want to paint a couple of times
to get the landscape right, and that is perfectly
okay because Lord knows how many times I have practiced
before teaching you guys. I practiced a few years
ago to master mist. And I'm also looking forward
to welcome you guys in a brand new challenge
class in a few days time. So yeah, more details, I'll be sharing with you later. And for today, we are done with seven days of
misty Landscapes class. I hope you guys enjoyed
painting with me. I'm gonna see you very soon
with a new class. Thank you.
 Sukrutha Jagirdhar, Watercolor Artist I Creative Entrepreneur