Transcripts
1. Hi There!: No. Hi there. My name is Marci, and I teach garment
construction. Today's video is about
how to put a sleeve in. When I studied fashion
design years ago, we learned so many couture
techniques and this technique of inserting a sleeve into a garment will never be
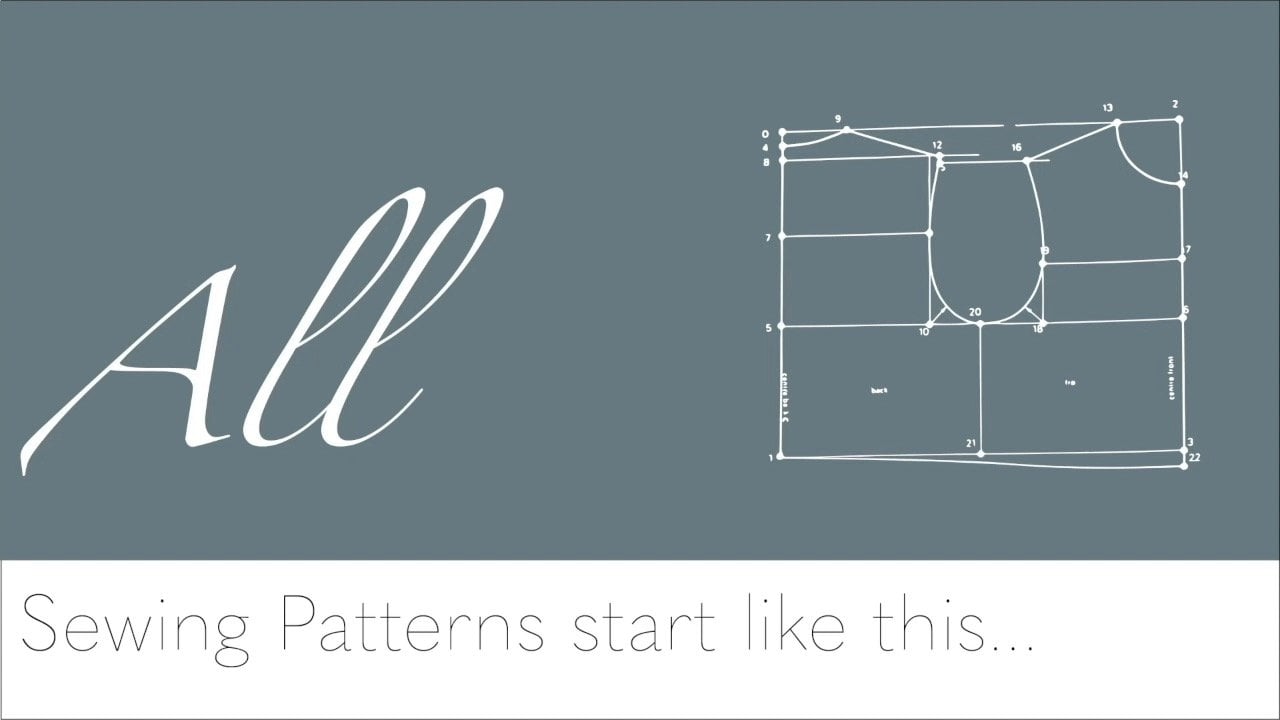
found in a purchase pattern. Earlier, I did a video called all sewing
pattern Start by This, which shows the pattern
development process, and it explains the
sleeve insertion. But I'm going to teach it
to you again in this video, let's get started. The
2. Background and Anatomy: In a previous video called All sewing Patterns
Start Like This, I went over the
way pattern pieces are developed by showing
the first stage, which is always the
creation of a bodice block. The bodice block is the portion of the
body from the neck to the waist and is like a second skin with a
bit of ease added in. Using a standard set of
measurements or your own. You follow a step by step
process and end up with the bodice front and back being joined
at the side scenes. As you see in the image here, the horseshoe shape in the middle is the space
where the sleeve will sit. That is called the arms. Basically, it's the arm hole. After each piece is separated, they look like the
pieces on the right. In this slide, using
measurements from the arm side, I show that the
sleeve is created. On the left, you can
see the dotted lines, which can be a little confusing. So I clarified some details
in the image on the right. The next slide shows on the left the bodice
block arm hole close up, and on the right, you can
see how the sleeve is built using measurements
from that arm hole. The next slide shows the sleeve with some
of the lines erased and the important points
like the notches in red. The center line becomes
the grain line, which is what you match to the lengthwise fibers
in the fabric. If it doesn't match
the grain line, the sleeve will be all wonky. In this slide, I show the
arm hole on the left, and the sleeve built from the
measurements on the right. And in the middle, I show you
how to measure an arm hole. Placing the measuring tape on its edge and carefully going from the shoulder point of the back to the shoulder
point of the front. And finally, I'm talking about
the anatomy of the sleeve. I point out in yellow, that's the head of the sleeve, the body up the sleeve. What I want to point out
is that the measurement of the arm hole and the head of the sleeve
are exactly the same. In fact, for years, I didn't know why it
was so challenging, but I realized while teaching that because
the pattern instructions tell you to gather the head of the sleeve between the notches, it can give the impression that there is extra
fabric to gather, but that's not true. If you measure all around both, you'll find they are
exactly the same. The only reason you have to
gather is because you're working on a semicircle and
putting it into a curve. I'm going to show you
something in the next video. As I said before, in my video called All sewing
patterns Start Like this, the slash and spread
method is used when changing original pieces
to create designs. In the middle image, you can see that the spread is
done at the top of the sleeves to create a
gathered or puffed sleeves. This can only be sung by
using the gathering stick, but the next far right image shows the opposite
where the spread is at the hem and in the body
to create a bell sleeve. But the top of the
sleeve hasn't changed, so you can use the bias method that I'm about to show you. I drew an image of the jacket I saw recently in
blue jeans fabric with a belt sleeve to portray the sleeve head
without any gathers. Beat me in the next
video where I'd go over samples of
gathering sleeves.
3. Gathering Method: So here we have two
pieces of fabric. And if it's the side seams of
a pair of pants or a dress, you're just going to
sew them together. And it's easy, right?
There's no problem. You don't even have to
think about it because they're both the
same same length, but they're also a straight.
It's a straight seam. I remember when I
was learning sewing in grade school that
the first thing that we learned was that two lines of basting stitches
parallel to each other, allowed you to
gather the fabric. And usually we were
making an apron. So it's easy to think that every time you use
a gathering stitch, you are gathering a
large amount of fabric. But I finally realized when I measured the curved edge
on the sleeve head and the arm hole that sometimes a gathering stitch is not gathering a
whole lot of fabric. It's just being used to put a curved edge or curved
seam into a straight seam, which is why the method
that I teach you using bias tape in the rest of the
video works just as well. Actually, it works
better, as you will see. At the moment, I am just gathering using my
gathering stitches. And you can see that I have gathered the thread
using the bobbin thread, which is the looser
thread, usually, so it's on the bottom, and you leave a long thread before you cut it off
from the machine. Then you pin it to the
straight piece of fabric, moving it along and kind
of making it straight, even though it's curved, you're making it
straight as you go. And then you'll sew it right on the five eighth of an
inch seam allowance, removing the pins as you go, and you can use a larger
pin to push the fabric along as you continue to even out the gathers
before you sew them down. And you can see that
without pressing it, it still looks pretty good. It doesn't look like there's any major tucks or pleats
that I've created with it. And actually pressing
it is the final step, which you will see in the video where I actually am
putting in a sleeve. But for now, you can see that this is what the
gathering technique is. I did it again with
another piece of fabric, and you can see that
it isn't as good that there are a lot
of pleats in it. You would probably have to
pick out the bits of it where you've pressed the fabric down and actually made a tuck
or a pleat out of it. So it's kind of why I don't really like the
gathering technique, but it's also why
the bias method, which I'm about to show
you is so awesome.
4. Bias Tape Prep: In order to prepare to
do this as a sample, I made a PDF of a bodice front and back and a flee
that I provided. I made sure that they
fit on an 8.5 by 11 piece of paper so that it's easy for
you to print them out. Welcome to my bias tape
insertion instruction. Before I get to that,
I just would like to clarify that there are two different ways to put
a sleeve in a garment. The set in sleeve, where the shoulder seam and the side seam of the
garment are sewn together, as well as the underarm seam of the sleeve is sewn together. And then connect them by
matching the notches and the shoulder point with the head of the sleeve
and the underarm seams. It's not as easy to
sew it in this way. I much prefer the flat
sleeve insertion method, which is much more open. You can see that you only sew the shoulder seams together. And you put the head of the
sleeve in the arm hole, and then you sew all
of the sam together. So you sew the sleeve
under arm together, and then you go sort of
around the corner and you just sew up the side seam
of the garment, as well. It's so much easier
to use that method. It may be that
your pattern tells you to always use
the set in sleeve, but I believe you always
have that option. Earlier in my video sewing
Without Reading a pattern, I introduced the task to place
a piece of masking tape on the wrong side of each
pattern piece as soon as you cut them out and write the
initials of the piece on it. For example, BF for bootie
front or B B for bootie back. If you are using a fabric
that is difficult to tell the right and wrong side of the fabric, this
will help a lot. It'll also let you
get into the habit of keeping track of the
right and the wrong side, the pattern pieces while
you're working with them because you're most often
working on the inside, the wrong side of
the garment pieces. So you want to get used to
seeing that masking tape. Inside Isco now you can ready your iron
on a steam setting. The first thing we're going
to do is cut a piece of contrasting bias tape and
press it with the iron. Try to avoid stretching it too much while
you're pressing it. Pressing means lifting up the
iron and putting it down, lifting it up and
putting it down. We want to keep the
stretch that's in the bias tape for when we're
applying it to the sleeve. Make sure that your
shoulder seams are sewn together and
that the edges are clean finished with your choice of either a zig zag
or a serge stitch. No. Put your stitch lengths
to a basting stitch or a long stitch and anchor the bias tape at the
first notch with a pin, and then sew a few
stitches and begin to stretch the bias along the
seam line as you sew it on. When you reach the other notch, leave a long thread and cut it. Yes me. Stay. Be free from she. Pin the sleeve into the
armhole by pinning it at the beginning edge at the notches on the
front and the back, the shoulder seam point, and putting a couple more
pins between those spots. So. Maybe in the next video
where we'll sew it into the sleeves. A
5. Sewing Sleeve into Armhole: Return your machine
to a regular stitch. Whatever your preference is
2.5 or even three is good. Back stitch at the beginning and remove the pins as you go. Ease the fabric under the
foot using a long pin for assistance by pushing the
fabric towards the foot. You may have to
stop and start in order to ensure
you aren't sewing any folds of fabric or you're not getting
fabric from underneath cut. Patience is definitely
important for me, this is where the zen
of sewing comes in. When you get into it, you're not thinking about anything
else in the world. You're in the zone. And I encourage you
to not fret too much because it might appear that you're sewing over
too many folds, but I found it surprising
every time that this method works really well and it's not what it seems
to be as I'm sewing. Just wait till you
get to the end before judging that
it's a good job or not. Sometimes the folds can even be straightened out with
your finger and actually nothing is really
determined till you press the seam because most of it
can be fixed with steam. I have had to go back, take out a small section, and re sew it, but then
that is sufficient. Don't worry too much
until you get to the end. I I co nose This house yells me. Stay home. B free from she Y No now let's see how it turned out. Look on the outside here to see if there's any
tucks or folds. Looks like there's
only one tiny spot, and I think I'll be able to move the fabric and straighten it
out underneath the stitch. Pressing will help. Now,
let's remove the bias tape. What? You have to
remove the bias tape. That's what I asked my teacher. I was so surprised. But I think it's because it prevents a lot of extra
bulk in the seam and it won't lie flat
because the bias tape actually goes on both
sides of the seam. If you were going
to try to press it, then it wouldn't be
rolling over really well. So let's just watch how
easily it comes out, cut really close to one side, and then pull the tape
away from the other side. Sometimes you have to go
in and cut it again on the side that still has some
because it might get stuck. But because it's on the bias, it's really easy to remove it. After you finish, you can remove the basting stitch
if it shows on the outside. It's easy to see here
which stitch it is. It's actually a really
good idea to use a contrasting color
for the basting stitch because it makes it really
easy to differentiate between the regular stitch and the basting stitch.
I didn't do that. Just most patterns will
tell you to finish the seam by sewing
parallel to the first seam about a quarter of an inch away then by trimming the seam
close to the stitching. It's rare that you will be asked to serge or
clean finish the edge. Meet me in the next
part where I show you using a garment
I made for myself, how to use a ham
to press and we'll see the result of a
beautiful couture sleeze.
6. "Hams" are for sleeves: This is your ham. It's
got wool on one side. It's got cotton on the other. It's got a slim end, and it's got a wider end. I've placed my ham at the edge of the small side of
your ironing board, and I've put my
sleeve over there. You can see how
beautiful see that there's no gathers in there with this bias
tape technique. I'm just going to
make sure that I turn the seam allowance. You can see if I press that
it's with my finger here that seam allowance is pushed to the inside. Is
that not beautiful? Look at that. It's
absolutely perfect. As we observe the
beauty of this sleeve, I just would like to
tell you a little bit about ironing and pressing. So ironing is a term
that a housewife used to use to explain that she might be ironing
her husband's shirts. This was what I
remembered when I was a little girl that
I helped my mother. She taught me how to iron. But when I studied
fashion design, they taught us that pressing is what you use
when you're doing couture, which is creating
your own garments that you've made using
the finest technique. So when you choose an iron, when you're going to
be doing home sewing, you really want to
find an iron that allows you to have the
most amount of steam. I found one called Renta. I think it cost cost
me a lot of money, like maybe $150 or something. But it has a beautiful dial
in here for the amount of steam and a dial along the top that tells
me how much steam. And because I'm going to be
using just the steam to press this sleeve at the head that I've turned up the dials to
the highest amount of steam. Going to give it a
little bit of a shot, see if I can't get it to give me a poth of steam.
So I know it's ready. Now that my steam is ready, I'm going to try and show you
with fairly good lighting, how to steam this sleeve. So you're basically
just going to place the iron here and
let the steam work. Gently put it on the top, give it some steam,
you press it. You lift it up, you put it down. You let the steam do the work. You don't really
rub it anywhere. You just put it up
and put it down. Just let the steam do the work. Never rub it back and forth. If you rub it back and forth, what happens is that you can create a sheen on fabric
that you won't get out. Alright, so that's
the difference between ironing and pressing, and this is the beauty of the bias method couture
technique, sleeve insertion. Try it and let me know
how much I love it. O.
 Marcy Newman, SewwwMuchMore!