Transcripts
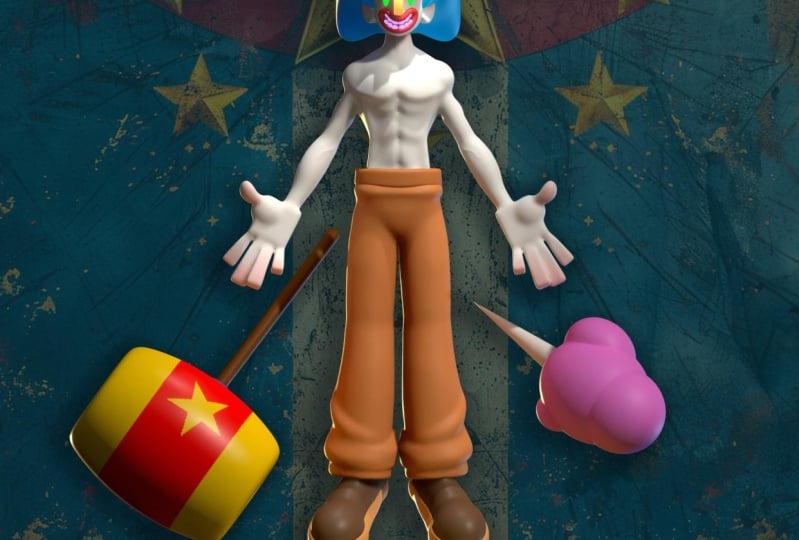
1. 3D Stylized Anatomy 101 with Drugfreedave: I'm going to show
you some simple, extremely basic tricks
to block out a humanoid, human like humanesque
human ish body in three D. Welcome to three D stylized Anatomy 101
with me, Drug Free Dave. And in this beginner
course, I'm going to walk you through how
to make a framework for any type of human humanoid character
that you want to make. Now, mine turned into
a weird killer clown, but it's the skeleton underneath that we're going
to be working on. And you can turn
yours into anything. Now, anatomy is difficult. That is one big pit. And there's nothing that's
going to make up for years and years of study
drawing the human body. But I know nobody
got time for that. You'll be able to save this blocked out figure and use it as a skeleton for characters,
any shape or size. Thinking about the body as
simple shapes will make it much less complex and
much less stressful. Again, this is a
beginner course. So as long as you have a
basic understanding of nomad, you'll be just fine. The next video, we'll
talk about the type of projects you can make once
you complete this course. Then we'll jump right into it. Once again, I'm drug free Dave. Keep drawing, keep sculpting, and I'll see you
all on skill share.
2. Class Project: All right. Welcome to,
you know, I want to spin. All right, welcome to
the class project. So you've seen my killer clown. That was just my
personal project. You don't have to make
any sort of clown, anything like, literally,
it's just the framework. It's just the skeleton.
And this will be posable. I'm not going to pose
the whole thing. I'm just going to show you
how to do a hierarchy. So hierarchy is basically like if we make a
pivot point here, the whole arm moves, we make
a pivot pivot pivot boot. We don't want to make
any pivot boots. We make a pivot
point at the elbow, and then everything
from down there, a pivot point here, and
then all this moves, and then pivot points in the fingers and all
the fingers move. So essentially, it's like that old wooden
that wooden thing that artists used
to use where they could pose it and
things like that. We're going to make that put in three D. So once
you make that, then you can use it
you can make pants, you can make whatever. Anything that you're
using this shape for, we'll just make it easier
to build out from there. So it just gives you a base. So this class isn't
necessarily going to be making a
specific character. It's just going to be
making this framework. You really can do
whatever you want. And that's my vibe. You can also use references if you want
to use a reference and then pose your
character in that way. You can just do that
for the class project. But if you want, you
can try to add pants, you can, you know, make
different body parts. You can make a more
feminine character. I'm going to show you
everything that I know. This is what I do if
I'm making a character. I did teenage age turtles, and I pretty much
did it this way, even though I didn't necessarily know I was
doing it this way. But this is the easiest
way because you have to start simple
and then build up. And you don't want to chisel
things out of a sphere. When I first started three
D, I thought I had to, like, chisel things
out of, like, a shape. No, you want to
use simple shapes, and that's what we're
going to do in this class. And then after this,
just remember that you can save this
posable figure, and then you can use it for the foreseeable future for any character that
you need to make. All right. So with
that being said, let's jump right into it. Let's move to the next video,
and we'll get started.
3. Blocking (Getting Started): So white is a little bit
difficult to scope with. So let's change it up here. We'll tap here,
and we're going to change from lit PBR to MTCP. That just ignores the lighting, and makes it easier to see. I'm using PXG clay. If it's something
else, just tap this and just find PXG clay, and then you can
just tap out of it. Let's bring in our
reference image. We'll tap here. We'll go
down to reference image. And then we'll just tap on the image if there's
an image there, import photos, and then
just find your photo, add. I'm going to tap on this
negative space here. You can see my photo is here, but you might want
to reposition it. If so, just go
back to this area, transform, and then you can move it around
anywhere you want. I think we put it
right about here. And then you just tap again and you'll be back
in sculpting mode. Let's make a platform, so we have a sense of
where the ground is, and we're going to use
this red line going straight across for
that. This is the grid. If you don't see it, the little grid
shortcut is down there. Also, if you don't see it,
you might have to hit front, and you can see the green
line and the red line. Let's add a cylinder. So we'll tap here
on the scene menu. We'll add a cylinder. Now we can pretty much
edit this cylinder. Let's go over here to the Gizmo, our controller, and there's an orange ring
around the outside. It's a little hard to see, but let's use the orange
ring and make it bigger. Then let's use the green
little sphere to shrink it. And then we'll use the green
arrow to move it down. The top line is right below right at that
red line going across. And this is a little bit extra. I like my cylinder to
look a little rounded. So I just open up
these options here, press these three little dots. I just want to change the
topology before we validate. So before it's an official
mesh in the project. Okay. So let's move the
post subdivision up to two, and you can see it's
pretty rounded, and I think that's good. I'll go ahead and validate. Now we just have
our rounded mesh, which is officially
part of the project. Now that we have the cylinder representing the floor surface, we don't need the grid anymore. The sphere is going to
be part of the head. Let's move it up. This will roughly
gauge the height of our character. We
can also shrink it. Maybe something like that. Okay. Okay, so for the head, we're going to have
I think a cylinder, maybe a sphere for the bottom, and maybe a sphere for
the back of the skull. So let's go to the scene. Let's add a cylinder. And let's add a sphere. Okay. So both of these
shapes are validated. Basically, this means
these two shapes. They just give us other
options that we can do before their official meshes. That's all that is.
That's why they're yellow here. Let's take the cylinder. Let's tap these three
little dots and let's name it head A. Now we'll use our GzmoGzm doesn't pop up when
you press it here, there's a little hidden
gzmo right here. Just press that and then
you can move it up. This is going to be in
the middle of the head, whereas the sphere is
like the lower jaw. Let's shrink it maybe something like that.
We'll move it down. And, I think that
looks pretty good. Now let's name this sphere. Let's go back and bring
this sphere up. Shrink it. We'll make this one
a little bit bigger. This is going to be like
the back of the head. I just turn it to my left
and then just move it so it's back of the head. Maybe you can stretch
it a little bit. Like so. Something like that,
I think is pretty good. And there's one little
detail I want to add. So for this cylinder, you'll notice in my
drawing the head gets wider as it goes back to
the back of the skull. There's an easy way
to do that with our cylinder because we
haven't validated yet. All you have to do is press
on the little cylinder here. And you can press on the radius, the radius will
change between one, control the middle node. Then if you press radius
again and you see all three, then you can adjust this one. I'll just make this a little
bit wider at the top. Then I'll make that sphere
a little bit wider as well behind it,
something like that. I'm going to validate.
Then I'm going to go back to the scene and
go to the head, validate. Now we have these
other two spheres here. Let's just name those. Let's name this one head C, and this one can be head B. If you want, you can put them in order if you're
slightly OCD like I am. Let's save. Humanoid. I might change the name of this later. That's a good start and we
can use that for our head. I'm going to tap on C that
way when I add a new shape, it's going to add it below that. Let's add another cylinder and
this will be for the neck, so we can go ahead
and name it now. We'll use our Gizmo. We
can move it up. Shrink it. And we're going to use
this to stretch it out. Or if you want to go back here, you can obviously do
it this way as well. I'm just used to
using the Gizmo. The neck is like that. Now we want to do the body. Let's add a box, and we'll use our gizmo,
we'll bring the box up. We can shrink it to about the width of the widest
part of the back, I would say.
Something like this. That's pretty good. I'm
actually going to make it a a bit of a taller torso. Maybe something like that. Okay. Now you can see that our body has gotten much bigger
than the floor. I'm just going to go ahead
and bring the grid back, and I'll just resize the floor. I'll just make this bigger
and then move it down. But you can also take all of these pieces
and I'll move them up. Maybe something like
this, since he's tall. I like this view. So
while we're here, let's go ahead and
save this view so we can come back to it. Let's hit the camera, add view, and we'll name this one. Okay. And if you want to if you want
to do other views as well, sometimes I like to
turn things like this, add two, and then maybe just do one
that's perfectly to the side. This way, you might
see me go back to these just switching
back and forth. Let's add a sphere for the
pelvis area and waste. We'll go here, add sphere, and we can use our chismo
and we'll move it up. And shrink it. And you
can turn to the side. Oh, I can use my little thing. You can turn to the
side and in flatten it. To something like this. You can actually flatten the body
a little bit as well.
4. Symmetry Blocking: Okay. So most of the other parts are
going to be symmetrical. So let's start with the ears, and then we're going to mimic
that for the shoulders, the arms for the other parts. Let's go ahead and add a cylinder and we'll use our
gizmo and we'll bring it up. I'm going to leave it
here just so you can see clearly what I'm doing. So the ears, you
can see, obviously, we need to change the cylinder so that the flat
part is facing out. Go over here and
hit snap and 90. If it's not on 90, just tap
on it and change that to 90. Now what you can do
is use the blue ring and it will just
snap to 90 degrees. We can go ahead
and make it small and we can smush
it with the red. Now we have like an ear, so we'll move it up and then we'll use the red and move it over to an ear type position. Okay. I'm actually going
to save this view as well. Now we can just make it
a little bit smaller. We can turn it a little
bit with the green ring, but you have to turn snap off so that it
just turns freely. I'm just going to
line that up at the bottom of the jaw and I'm just going to turn
it a little bit more. Maybe something like that. However you like your ears. I'm going to make it a. Now we want to mirror
it to the other side. We hit mirror and now we
have both of our ears. We're going to do the same
process for other spots. But since we have
a lot of meshes, it's always good to name things. Make sure you're keeping
things organized. First, I'm going to save, and
then I'm going to go onto my scene menu. This is ears. We're just going to
tap on the mirror, tap here and just name it ears. I'm actually going to change
this to just in case. Now I'm going to go through all of these and figure
out what they are. The cylinder is the floor. I'll just put F R. The sphere is the pelvis. We'll just put waste.
Everything else looks like it is labeled, so we'll go ahead
and do another save. Let's go ahead and add
some more spheres. We'll use our Gizmo. We'll bring them all the way up. Actually, I just thought
of something that will make our sculpting a little bit easier. Let's hide the floor. Then let's take everything else. Everything except the floor
and we'll just move it down. So that'll be easier, so
then when we add something, we don't have to constantly
zoom in and out. So where is the Oh, I didn't name the box or
at the chest. Body A. Okay, so this fear is
going to be the shoulder. We'll go ahead and hit mirror, and we'll shrink it
to a more shape. Let's go ahead and name it. So now let's add another
cylinder for the bicep. Just be careful because it will go into the shoulder section. For now to keep things simple, we're just going to move
this out of the shoulder. We can do add and
we can do mirror. Well, actually, we don't
have to do mirror, because I forgot that we
didn't validate it yet, so we can just do
mirror from here, and then it adds its own mirror. Let's go ah and name this
so we don't get confused. Let's just put arm B. And then we go to
the cylinder and we can use our Gizmo and we can
just move it in position. Make the shoulders a
little bit smaller. Sometimes I shouldn't say sometimes I usually have to adjust these shapes
as I'm working. Don't hesitate to adjust
things, make things look right. Now I'm going to
turn a little bit to the side and bring
this up a little bit. Now we have arm B. Let's
take both of these. We just want to take this
whole mirror and clone it, we can change the name
of this one to arm C. Now we can take the cylinder, if you notice that my gzmo
doesn't really change, and that's because of a line. If you find that your gizmo
isn't aligned with the shape, then that might be it. I'm going to turn that
off so I can just move RMC out like this. I'll make it a little bit wider. I'll slide it down a bit. It's something like this. Now let's add a box. We'll use our gizmo, and
now we just want to move the box to where
the hand would be. We'll move it down. Remember
the box is the palm. I'll turn it a little bit so
we can properly shrink it. Move it up. Essentially, this
will guide our hands, however we want our hands. If you look at this line,
it's going straight, so we want to rotate
this to match that. Okay. All right. Great job so
far. Make sure to save. So let's go ahead and
add these legs now. So we'll add cylinder. And like I was saying before, I do want to separate these. So let's just bring them out of this other mirror and give
them their own mirrors. It says, ds. And this new cylinder, we can mirror it now, and this is going to be thigh. Okay, we'll use our Gizmo down. Shrink. I'll give them a little bit longer legs. I don't know why it has taken
me so long to work out. So you can see that the legs are they're open a little bit, so you can go and open them up a bit and adjust them as such. So now we'll add a little
sphere for the knees. I'm going to rename it. Let's use our Gizmo
and just move it down. I'm actually going
to stretch it. Something like this. And we can turn to the
side and I'd just like to move this up so we
can see it a bit better. And then we can use the thighs. Let's take both of the thighs or just the thigh in the mirror. We can clone that and let's
rename this leg lower. Now we'll take this
and just move it down. What I usually do is move
this part back a little bit. I also put a little band
in it with the move tool, which we can do a
little bit later. But for now, I
think that's good. Let's see. For the ankles, let's use a cylinder. Add cylinder. We use our mo, move it down. Shrink it. We have something like
this and then again, we can tap this little
cylinder options and we can make this side smaller and this
side a bit wider. We can also make it
a little longer too. Maybe something like this, we'll switch back to the Gizmo. I think that's a
decent positioning. And you can center it by
moving it to the side. I'm going to use the
node just to squash it because ankles are
usually fairly narrow. One other little
detail I'm going to do is I'm also going to
stretch it this way, and then I'm going to turn
it with the green ring, so it's pointed a
little bit out. See how the feet are
a little bit out, and they're not going to be
exactly like the drawing, but that we can match. Next, let's add a sphere and
this will be the shape of the foot. We have this cylinder. Let's make sure that
we're naming these as well. This can be ankle. And we can go ahead
and add the mirror. I think the knees I didn't
add the mirror either. I just want to make
sure that we add those. I'll do a quick
save. Okay. Okay. Now let's add a sphere. I'm going to go
ahead and bring it out of the ankle mirror. Gizmo, move it down and over. Can you go and mirror it. Now I'm just going
to stretch it out. Maybe adjust the
size a little bit. Then I'm going to or I'm
going to rotate it downwards. Okay. And now I'm
going to hit a line. And then I'm going to
rotate it just a little bit so the feet are
facing outwards as well. So we have something like this. And I want these to match, so I'll just rotate that as
well, so they're matching. All right. Let's do a save. Okay
5. Feet, Hands, & Fingers: Okay. So I like when characters have those sort of bigger feet, kind of like Mickey
and characters have those shoes with the front part is bigger, so let's
make some of those. I'm going to go into
the scene where I have the spheres for the feet. Make sure I label
them. I'm going to label this A as well, and that's just
because we're going to add a few more spheres. Let's clone this and this
is going to be front. Now we have two of
the same shapes. So we're going to take feet
front and move it up a bit. We're going to use the blue to make it a little bit more round. So it's kind of like this. I can make it a
little bit bigger. And then I'm going
to use the rotate. I'm going to rotate
it like this. I'm going to move
it up a little bit. It might seem a
little bit strange, but it's mostly because we're eventually going
to trim the feet, so we're going to trim
about half of it. We also want to add a heel. So we can probably
take this shape, so we can take feet front, we'll clone that, and
then we'll name it heel we'll just move it
back to the heel area. I'll give you a good
view of my shapes. And if you get a little bit confused because they're
two close together, you can just take
the heel and bring it out of the mirror. And then you can work on one. For example, this heel, go ahead and rotate
it. Like this. So probably something like that. Looks like it's lined up. Now, the only thing
is it's very wide, so I'm going to go in, make
it so it's not so wide. Okay. Now we can bring this
back into that mirror, and then we'll
have both of them. For the hands, the
first thing I do is add that round piece, which is this area here. We'll go here. Let's see if let's click
on this way or tap on it. That way we can add it here. Let's add a sphere, and I'm going to I'm going
to bring it out of the palm, and we'll use our Gizmo, and we're just
going to place this right about here.
And I'm going to just kind of line it up with or just flatten
it up with the hand. So we have something like this. So this is a really good
way to kind of guide us. Here's a little trick
I do for the thumb. We're going to take
the sphere that we use for the base of the
thumb and clone it. Now we'll take that c, and we'll just go ahead and use our gizmo and slide it over.
To right about here. Now we're going to validate it, and we'll just click our little
tools here and use move. I'm keeping my move
tool pretty small, maybe around 60 or so. Then I'm just going to
drag this to the thumb. I'm move it out a bit
more. Something like that. I'll just move and we're just dragging that to
this thumb area. Then I'm going to
make move a bit I'm just going to
push on this side. Now I'm just going to
drag it a little bit closer so we have that
nice curved thumb. I'm going to turn it to its
side because I want to make sure that this part of the
thumb is fairly broad. I'm just going to just
widen it a little bit like this. Okay. I think that looks pretty good. You can put as much of a
bend in it as you want. You can also take the gizmo and you can adjust it to
where you want it as well. Our thumb doesn't
really sit as much on the side of our hand
as it does in the front. I'm just going to move it
up and then rotate it. But you see that it's going
to be difficult for me to rotate the way that I need
to so we can use pivot. Sometimes it's good to start
with pivot, center pivot. If that doesn't help, go back to pivot and you can adjust it. Okay. So now that I've adjusted it, I can tap pivot again and we're
back to normal sculpting, and now I can just rotate it.
It's a very useful trick. I use that a lot.
Just rotate it. There we go. So it's a
little bit off center. It's not directly to
the side of the hand. Another little handy
trick that you can do. I shouldn't be doing this now since we're blocking,
but I can't help it. We're going to take flatten. Sometimes I like to just
flatten the underside. I just give some nice lines. So now we'll do a save. Let's add the rest
of the fingers. So let's make let's
go to the thumb so we can stay in that
general area in our scene, and let's make sure that
we name this as well. Thumb. Thumb base. Why not? Let's use the tube tool to
make the rest of the fingers. We use the tube tool and we
use path. We don't need snap. So first, we'll just
drag on the screen. Okay. Then we can
tap in the middle. And that's going to
be the basic bones. We'll tap the little green dot, and now we have our finger. If you want, you
can move it closer. Tape I you need to
go back and forth, you can tap tube to bring
back the tube options. Before we validate, let's make it into more of
a finger type shape. We'll tap these three dots, and we're going to uncheck this and we're going to
put both of these to four. And then we're going
to bring in the post subdivision up to two. Now we'll hit radius twice. So we have three nodes, so we should have
three orange dots. Then we can adjust the size. And I'm going to make the
end bigger than the bottom. I'm actually going to
move up a little bit. I also like to put a
bend in the finger, so I'll turn it to the side. Just put a nice bend
in it like this. You can also experiment with these settings because they
will change things slightly. They might actually
look better. Okay. So I'll just use my gizmo,
pivot center pivot. Just make it a little bigger. Now for the next fingers, we can take this
tube. You can hit. I'm going to stretch
this a bit, move it up. I'm going to tilt it a bit
and then move it over. Then I'm going to hit clone here and do the same thing with this. We'll slide it over. I'm going to tilt it a bit, so the bases are
a little closer. You can adjust these if you
want to adjust the sizes. Maybe this one is a, I think. Okay. And then we'll clone
this one for the pinky. I clone bring this
over and we'll rotate it make it shorter, maybe just overall
smaller. Like so. What's important about
the hand is straight. Things are a little bit spread
out. That's really easy. So take the Gizmo and give the fingers
a little bit of room. The only other
thing that I would do for the outer fingers
like for the pinky, let's go back to tube, and I would just
give it a little bit of a bend like this, maybe this one, a little
bit of a bend out, like so. But I think that
looks pretty good. It's also possible to rotate these fingers
or pose these fingers. Just remember, as long
as it's not validated, then you can go here and you can make any changes
that you might need. Maybe I'll tap that,
so it's a hard angle. This is how you would adjust
your fingers as needed. Let's mirror all of
these to the other hand. So we'll just go to our
scene. We have thumb base. We can just hit mirror. We have our thumb.
We can add a mirror. I'd be good to rename these. And we'll do the same for
the rest of them. Mirror. So now we have each
of our fingers separate that we can then adjust if we need,
but they're mirrored. So anything that happens in one will happen to
the other ones. I apologize for doing that,
that looks really weird. If you want to make the fingers do something different
or not be symmetrical, Then that's when you
would take the mirror, validate, but instead of join
children, go to uninstance. This will separate them both. If you do uninstance
and hit yes, then you get both of
your fingers here, but they're separate, then they're not going
to be symmetrical.
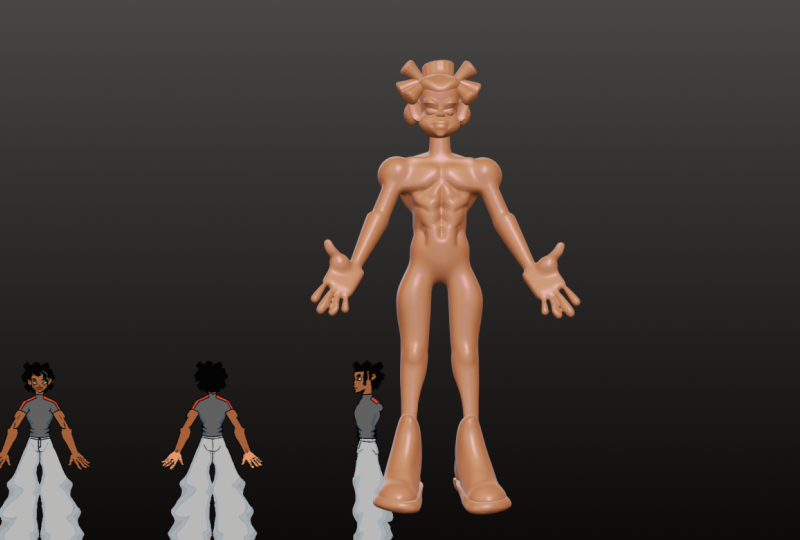
6. Body Framing: Okay. So let's shape the
torso using the mask tool. So first, we go to the torso
and we'll just validate it. Let's hit front so we know we're looking at
the exact front. Let's use select
mask and rectangle. First, we want to try to
get that nice V shape. So we'll just make a box below. So we have something like this. It's just covering
the bottom bit. Then I'm going to make
another box up here, maybe right below the shoulders. Now we can use our gizmo and we can just adjust
this middle section. First, I'm going to take
the orange ring and shrink it around what I think the mid part of
the waist should be. Then I'm going to
use this orange node to just bring those together. We have something like that. Now, this is a
little drastic here. We'll go back to
select mask clear. Then we can just draw
another mask up to that line and then use our gizmo and we can adjust
the bottom part. We turn it to the side,
and we'll just squeeze this together. Like so. And then we can bring up the select tool options
again and hit invert. Now the bottom part
is masked off. When we think about
the back, we want to try to get that S
curve a little bit. It just looks a little
bit more natural. We'll just use our
gizmo and we're just going to rotate
with the red like this. That will push the chest up. Then I'm going to move
it back till it's about lined up with
the neck area. This is a comical
to a little wide, so I'm just going to bring it in a little bit and
then just line it back up. Of course, you can
adjust as you need. I think that looks pretty good. Then you can go ahead and clear your mask and you have
a nice size torso. Let's go ahead and save.
Let's add a sphere that will work as h. It's
going to tap on the head. Add sphere. Okay. Now we can move this up. Let's just use our Gizmo. We'll move it up. We'll do something like that. Let's go ahead and validate. Then we can use move or a drag. Let's try drag. Make it
fairly big, maybe around 80. Then we're just going to
drag off into this area. Let's turn symmetry off. And let's make it a bit. There we go. We'll do
something like that. Now I'm going to add another
sphere. We bring it up. Shrink it. Now, this
one is going to be we have to make the
left on the right side, so I'm going to flatten it. I'm actually going
to go ahead and it. Now we have two different ones. One will be for the left side. You can adjust the size, and
this will basically just be the shape that will be the hair that's going
behind the ear. Then we can take the other one and that will be
on the other side. Maybe a little bit more
round. Push it back. We can actually
make it more around and push it inside
the head a bit. You always want to
make sure that you build out the back
part of the skull. Let's make this a
little bit bigger. So we can see the
forehead and the front. And we can use the move tool and we can just
move the back of the head. We can use the hair as a guide. Okay. Something like that. I don't know why I
say that so much. I'm always saying
something like that. I don't know why. Now that's the basic head shape, and I would say this is a
basic way that you would make hair just to think about
it in really simple shapes. Otherwise, hair can get really
complicated really fast. Of course, you can just use your move tool and
adjust this at all. Peak, lower or
higher as you need. Let's flush out the back
a little bit more and give him a little more
shape using the move tool. On the back, we just want
to pull up like this, and that will give the bridge, I think they're called
trapozoid I feel like. Also bring this
forward. I'm going to make the move
tool a little bit bigger and you
just want to bring this forward to the neck. You can see those muscles there. I'll bring it a little
bit more forward. Then I'm going to take smooth. Then I'm just going
to smooth all of this out and you'll
see that it'll soften it and make it
a lot more organic. Once I soften it, I see you
have that dip in the back. I can use move again, maybe a little bit smaller and just pull up from
the middle there. And that will fill out the
back a little bit more. Then you can raise it or
lower it as you need. And what's great is you can also adjust the wings on
the side of the back. Let's say you want
to pull this in, but bring this out
a little bit wider. If we look in the
front, you can see that little the side of the back. If you're careful, you can
pull that out from the front. For the neck, we
want to make sure we have both radiuses and we can make the bottom
a little bit wider. So you can also adjust
if you want to make obviously the neck
taller or shorter, you can just raise
the head up and down. Ears are looking crazy. I need to move
them back a little bit. That's a bit better. When I do characters chests, again, I just use a shape. For a man, I usually use let's tap on the back or the body. For a man, I usually
use a cylinder, but sometimes I use
a sphere as well. If we add a cylinder, and we use our gizmo, can move it up. Shrink it. Then I like to make sure
that I have snap on. Actually, we don't really
need snap for this. Let's just use this red
ring and turn it this way. Flatten it up. I use mirror. We can shrink. Maybe stretch
it out a little bit. Now once you have your
shapes like this, then you can just plug them in. Notice that I do it on an angle. Once I have a shape that I like, which that looks pretty good, I'll go ahead and validate
and then use move, and then I'll just
adjust them as I need. If you get stuck trying to move and they won't
go into each other. See, when we're in a mirror, everything that we do on one side will happen
on the other, so we don't really need
this other symmetry. Sometimes just unchecking
the symmetry will help because then it's not going to be
fighting each other. So if I was making a chest, I would want them a little
bit more flat to each other. Like so. And then I would bring this and kind of tuck this
underneath that sphere. Pull up on the middle to kind of get them to be a little
bit more rounded. Then I would just tuck that
right underneath that sphere. I'll go ahead and move
them back a little bit because they came
up a little bit. Something like this.
But what's important is use the move tool. What's important
is that this tucks in underneath the shoulder. Because these muscles
are connected here. The Again, the anatomy
isn't perfect. Obviously, the chest would go underneath and the
armpit would be here. There's lots of variables. Ultimately, just
has to look good, but it's not bad for just like simple
shapes being put together. You can do the rest of the
parts of the chest and stomach pretty easily
just by duplicating this. It will take this cylinder. You can clone it, you
can move it down. Shrink it, and then move
it closer to each other. Let's move it up a bit. So then you have the
area underneath. Push it back. Let's try
to use this for abs. You could also just use
spheres or something else, but it would essentially be the same way to make
different muscles. But let's try this
since we have it. I'd probably make them a
little bit more narrow. I wouldn't want them jutting out like this, so I'll
push them down. Maybe make them a little longer. You can also take
drag if you want to just adjust the
shape of them. Drag with a really small. Something like that, you can
adjust the size of them. But you get the idea
of just using shapes. Now, even though these
look a bit crazy. The great thing about blocking
is you will eventually be maybe we'll do something
a little fancier, rotate it. The great thing about
blocking is even though these are we looking shapes now, they're all smoothable
you can take smooth. Then you can smooth these out. Normally, what I do is once I have the body a little
more fleshed out, then I would just merge
everything and then smooth. When you merge everything
and then smooth, then it'll all look very cohesive and it'll
look more realistic. But if you just want
to do something like this, you can smooth it. But once it's all
meshed together, then it will smooth nicely. Now it just looks like
a weird chest plate. But that's okay. That's part of the process.
7. Refining the Blocks: Okay. So let's go ahead and trim these feet. They've
been bugging me. Let's select the
parts of the feet. So we go here and we have
these three parts of the feet, the front, the
middle and the heel. Let's just join those. So now we have that part of the foot. It's still within the mirror. What we'll do is just trim
we'll trim this foot. Right now we're looking
at the right sides take our line and we just
want to trim like this. With our line, we just
want the white part to be what we're actually going to trim. Maybe something like that. That's not too bad. You might have to experiment, you might want to go a
little lower with it. I think that looks a bit better. Then obviously, with the ankle, you can validate the ankle
and just trim that as well. That looks a lot better. Make the ankles a little thinner and rotate
them a little bit. Another rule of thumb is, I like to make the inside
of this arm straight, so I'm going to take this
cylinder and so we validate it? I'm going to go and move this closer together
where the wrist is. And then this part,
I'm actually going to, I guess I can't move it up. I'm going to go a
and use the gizmo. I was going to validate it, but I'll just use the Gizmo for now and just move it so that
that line is straight. Now, when you also do that, you want the right
side of the hand. If you look at our hands, this is straight and the
elbow part comes out, but this part is
pretty straight. So we want to match that in
here, so we have the palm. Thumb base, the thumb. I think these are all
fingers, which I should have. I should have labeled them.
I'll have to do that. But now we just
want to move this. Obviously, again,
you can either move it. That didn't look good. You saw that this hand
got a bit messed up. I'm going to take
care of the hands. I don't really want to
bend them too much. I think they're actually okay. But there is one way to preserve the way
that we move them. We have all these fingers,
we have the thumb. I'm going to go ahead
and take these, I'm going to put them
all in the same mirror. So I'm just moving them all to the thumb mirror. Thumb base. We can move everything
into the same mirror. I'm going to get rid of
these other mirrors. I can go a little crazy here. Now everything is
in the same mirror, see if that still happens. Okay. I was just
curious if let's see if we select all of
these now within the thumb. Yeah, there we go. That's much better. All we did was move everything
into the same mirror, and then we still
have the fingers are all still editable. That's such a hard word to say. I always have to brace
myself before I say it. Let's see if we can do
pivot center pivot. We can't, but that's okay. We'll just select all of these. Then we'll tap pivot and
then we can just adjust the pivot to make it a
little easier for us. I'm going to put it right
here in the middle. Hit pivot again, and
then we can just slide. Slide this like that. A
lot of people want to make and more posable characters and you can't really
do it in no mad, but you can using a hierarchy. For example, we'll use
the shoulder and we'll make a hierarchy so that if
we move the shoulder around, anything that's connected
to it will also move. The way to do it because we don't have all these
shapes validated. Just in case we might want
to we can validate these. We don't really need to worry too much about it.
We have the shoulder This is going to
be the shoulder. This is going to be the
mirror for everything. Let's take this shoulder
and rename it arm. Now this shoulder is going to be the first piece
in our hierarchy. Rm, we have the bicep. This is the bicep, the cylinder. Let's drag it up and nestle
it under the shoulder. We'll take arm V
and just delete it. Now I'm going to
rename this bicep. RMC. I'm going to
rename this forearm. We'll take the form,
we'll move it up and we want to nestle
it under bicep. We can also validate it, and we'll just delete
that random mirror. Then we have all of
the fingers and such. This is the palm. Can
validate these. The palm. I'll go ahead and nestle
under the forearm. The thumb base can validate I'll nestle
that under the palm. If it lets me.
There we go. Thumb. Yeah, we can nestle
it under that. But the rest of the fingers
can be nestled under palm. They don't have to
be under the thumb. So for example, I'm just
going to label these I don't need to label them all. So I'm going to bring
them, bring them up, and I'm going to
nestle them under palm and get rid of thumb. Now we have our arm here, and this is our hierarchy. All we did was just
nestle each of these underneath whatever
we want to move. We want the shoulder, we
want everything below the shoulder to move.
That's the hierarchy. We have the shoulder and
then we have the bicep. We want everything under
the bicep to move. We want the form,
everything connected. Everything is connected
one step below. The palm, we have the thumb
and we have the fingers. That's that's why we didn't connect the fingers to the thumb because that
wouldn't make sense. When you move the thumb, you don't move the other fingers. The other important part of
this is the pivot point. The pivot point is the
center of the gizmo. If we go to shoulder,
If we go to shoulder, you can see where
the pivot point is. So just hit pivot and we're
going to do this a lot. We'll tap on the shoulder and then we'll just
move the pivot to the very middle of the shoulder. Then we'll hit the
pivot button again. For the bicep, pivot. Then we'll slide this up to
the base of the shoulder. Maybe somewhere like that,
and we'll hit pivot. And we're going to
do this to all of these at the joints where
we want them to bend. Pivot. We'll move this
up to about here. We're also going
to move it back a bit because I think our
arm bends from our elbow. We'll do that. I don't to be that far back. Then it pivot. The palm is going to be at the wrist in the middle. Pivot. I can actually adjust
this a little bit. We'll do it later.
Actually, we'll adjust the palm
back a little bit. I don't think we need to change, I guess we'll continue
to work on these pivots, but I think that's pretty good. The thumb, you just want to
put it on the base pivot. Maybe down here is where
the thumb might originate. Then the fingers,
you want to put them obviously down towards the palm. Oh, I forget to pivot. So once you've changed
all your pivots, then you can go to your
different shapes do each one, everything below it
is connected to it. Even the fingers, you can move. Of course, you can go much
more detailed with it, but I just wanted to
show you how that works because it's very useful, especially when you have
a lot of things like this because you may
want to save this so you can just use
this shape and use this body in the future
for other characters. I think that's a very
smart thing to do. Let's go ahead and save. Okay. Also, his posture like his arms are a
little too straight. So I'd like to
give them a little more of a realistic bend. So I'm on the bicep, and I'm just going
to push the arm back and then tap on the forearm and then use the red ring to
bring this forward. So it's a little more
of a natural pose.
8. Sculpting & Adjustments: So of course, if you want to adjust the legs
and stuff like that, you can just go here
and you can make the ankles a little bit
smaller. If you want. You can adjust all of those
things on the legs, the arms. But also remember that
you can validate, and then you can also use
move and you can use smooth. For example, if I wanted
to adjust the leg, so it's more smooth and eventually I would
just validate it. Take smooth, smooth out
the top a little bit here, and then maybe take move, then I would just kind
of move it in like so. It looks great. Obviously, for a butt for tus. You can take the sphere and
just give him some cakes. I think that's the term
the kids use nowadays. Oh, I must have it in a
mirror. Well, that's fine. I'll keep it in a leg thigh, and I'll go ahead and
validate that sphere. We'll name this bum
Maybe we'll open this up a little bit. Okay. And we'll move it in,
so it's not so drastic. There you go. I
think something like that looks good.
It's not too crazy. If I want to do muscles
and things like that, for example, on this calf, I would just validate
and then you can take clay and you can
always add muscles in. For a calf muscle, I'd probably add
muscles like this. I do something like
that for calf muscles. And you can build out your
thighs too, you can build out. This is when it's good
if you want to look at anatomy books and
things like that. Usually there's a
big muscle here, and there's one here,
things like that. That's easy way to build
up your character. For the arms, the bicep
obviously here, s. You can add some
clay here or you can add another sphere
to go on top of it. But I just want to
give you a brief, let's see, what else would I do? I can add some to the forearm. But that's how you make your
characters nice and muscly. Actually, that
looks pretty good. Smooth is always your friend. Even move, you can give them a little bit of
something like that. Let's take a smooth and
smooth is a great way to narrow out some
of your pieces. Another little trick that
I do is for the legs. I take move, and I give
them a nice bend backwards. Move them up a little
bit. And we'll take clay and we'll add a little
bit to his calf muscles. I don't have very
big calf muscles. So we'll do something like that. We'll just delicately smooth. I like to drag or use move for the calves for the
bottom parts of the legs, I'm just going to pull that up, tuck it in. Okay. Knees can get tucked in as well. I want to be able to see them. But that's pretty much
how I build in my muscle. We want to make
sure that we cover the back part of the head. I'm going to take this sphere for the head and just clone it, and this will be a back. I just do that so that we can just color
everything together. This will also help
shape the head. Okay. Make it a
little bit wider. Now we have the back part
of the head as well. We also might want to take
move and shape the lower jaw. We'll take this
lower sphere and we can shape it as you want. Although I think that
looks pretty good. We'll try to make it
a little more sharp. In the back, we
can bring the jaw out a bit towards the ears. I think that's good. Okay. This is always a good
shape to have it going straight and
then like that. Let's smooth out this part of the head because that
will push it back. We can use move a little bit and just even it up with
the top of the head. Also, as we were talking about the curve of the
neck and the head. We want to move the head forward and the neck forward
actually too. But for now, let's
just take the think these spheres are this is ha Make sure we
label everything. Hair side A. I think
this is hair side B. Okay. Do a quick save. Okay. Let's name
this head lower jaw. Neck. Okay. Looks like everything is looking good. We can validate these. Let's take all of these
except for the neck and move the head,
I forgot the ears. Let's move the ears up. We can take all of
that and the ears. See, I knew because the
Gizmo was in a weird spot, so let's get rid of all that. Thank you very much. I still. Do I have something
else? Let's see if we can do pivot pivot. We can't ears. I'm going to go ahead
and validate the ears. That's a little
bit better. Now we can move the head forward. Okay. That already looks a lot more
natural maybe around here. That's actually a good
spot for the neck. The head is forward, so that's
a good spot for the neck. Let's deal with these shoes. Obviously, you can change the shapes and make the
shape how you want, but I still like these big
clown shoes for some reason. We go down and we have the
ankle and the feet here. I'm going to take the feet and just bring it
into the ankle. These can all be together now. I'll take feet and
just delete that. Now we have both of these meshes together that
we can make work together. We'll take both of
these, the feet and the ankle and we'll voxll
remesh them together. I'm going to do a quick save. Let's voxle remesh
them together. 1805 or so. We'll rem now they're together. We can take smooth and we
can smooth them as one. One funny looking pair of
shoes. I'm going to take move. And the inside has an arch. I'm just going to add that
arch in there a little bit. I really did make these
make his shoes big. So I'll smooth them
a little bit more. Okay. Like so. Now we have I'm just
going to name the shoes. Now that shoes and we
can clone this mess. Let's we the shoes. Now we just have two, and
we're going to take trim. Then we're going to trim off the top part of the second one. We're going to use line and
we're just going to trim it, and this is going
to be the sole. We just want a straight line. And now we have a
mesh and a mesh. We'll take the lower one. I just want to move
it straight down. So I'm going to try pivot and just rotating
this pivot like this, pivot and then I can
move it straight down. Let's make it a
little bit bigger. This might take a
little adjusting. I'll make it a little
wider, adjust it. Move it up. So now I might go
and take move and just sort of annually. S. There we go. Then just sort of manually
adjust as needed. I'm sure there's better
ways to do shoes, but I like to do mine this way. I'm never on the
right correct mesh. I just like to have a nice
thing going around them. But I think that
looks pretty good. A lot going on there at that
heel, bring that in a bit. And then you have shoes. You get the idea. You can make lots of different
shoes like that, and that's how I make the
soles. I'll take pinch. Pinch is great for just getting
back some of these edges. Just to make it look a bit ne.
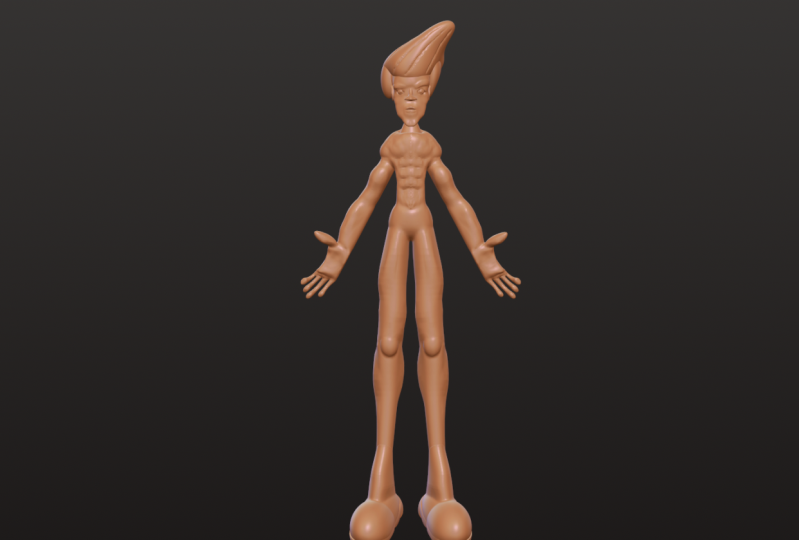
9. Face Tips: I don't want to go to
too much into the face because that will take forever. But once you have your
shapes, how you like them, head A, and there's
another head somewhere. Here we go head, lower jaw. I'm just going to
join those together. Let's just join. Now
we have the three of these together. I'll
just rename it. Head. Sometimes for noses, I can sometimes I
like to use a cone. We use our gizmo,
we'll bring it up. Forward. Shrink it. Make it a little more narrow. This is a good centerpiece to find where you want the
rest of your head to be. Make it a little smaller, a little more narrow.
Very easy nose. Okay. So I'm going to tap on
the head and use move. One thing about the
nose is you want to leave some space
for a nose bridge. So whatever piece is behind it, you want to push that
back a little bit. You want to allow
for a nose bridge. So you want a nice curve there. Okay. Let's go crazy and take head and let
me do a quick save. Let's a vox will
remish it together. Why not? Let's do
it at type 200. Now it's one piece and you
can go ahead and smooth it. Looks good. I probably should have added
the ears to that. Of course, again, just
adjust as you like, but I'm going to push this
in a little bit and then maybe adjust the nose
a little bit more. Go ahead and validate it. You can also do various
noses just with drag. You can do lots of shaped noses, you can make them a
little wider if you want lots of options. But let's go ahead and
smooth out this cone a bit, so it's not so sharp. You can adjust the
nose as you wish. Maybe it'll make the nose
a little bit flatter. I'll make the nose a flat. Maybe even a little
flatter here. Okay. We have the nose. Let's use clay on the face. Make sure it's not on sub. Make sure that symmetry is on. Then you can just slowly
build out your character. Let's say we have that as an
upper lip. Smooth it a bit. Can use clay again
for the bottom lip. Smooth it out. Then we can use crease we'll
start from the middle. It's got lips like mine. Let's see flatten
and let's try to flatten flatten the lips out. I really only wanted to
flatten the top part. Let's take a select
mask if this happens to you and you can really just
mask off the bottom lip. And we'll flatten the top. And then we can get
rid of the mask. Another cool trick. Actually, let's flatten
the bottom part two. So we'll flatten
that bottom part, we'll smooth it a little bit. And then we can use pinch to get some of those lines back. We lost our crease
in the middle. Okay. It takes some finessing, but I just think these doing it this way just makes it look a
little bit more realistic. Now we'll just use clay. I'll make it a
little bit bigger. You see the eyebrow situation. I'm going to use that going straight to the top of the nose, but I want to turn off symmetry. We'll do one here. We'll make that bridge, and then we'll do one
here, slightly different. It's making the expression
from the reference. Then we'll take clay and sub. We don't want symmetry
because these aren't symmetrical anymore. Now we can just dig out
an area for the eyes. I'll do something like that. Actually, you know
what? We can probably do it with symmetry on. Okay. I'll do something
like that. We'll smooth it. This is probably the
back part of the hair. You can just take move and
just push that out of the way. Now we'll go back
to the face and I like to manipulate
it with drag. I'll turn symmetry off
if I wanted to drag this eyebrow area up
and everything else, you can just move out
of the way as you need. We'll take the
back and just kind of move it behind the ear, take this and move it so it's kind of behind
the ear as well. Same thing on this side. Now we can see the
face a little bit better so you can take drag, and then you can manipulate the eye sockets,
however you want. For the eye areas, I would definitely use
a sphere for the eyes. We'll move it up. S Mirror. Move it back. You want to make
sure that they're fairly close to the nose. You don't want them
to be too far apart. I put them a little
bit. I'll validate. You might have to use drag
and you might have to drag the middle together. I'm going to turn symmetry on. You might have to
drag the middle a little bit more together. Okay. Another cool thing
you can do is use clay and do I want symmetry? I'm going to keep symmetry off because the eyes are
a little bit different. But it's always
good once you have your spheres there to add the upper lids of the eye to give him a little
bit more of that attitude. So we're going to use clay
on the face and really, really small mine at 1:40 or so, we're just going
to add some clay here and see how that makes it look like
it's the upper eye lid, add them over here as well. Okay. Looks good. Then again, I'll take drag and we
can just really drag this so it's in the right
spot in the right shape. L so, I think that looks great, another little trick
that I love to do. These are the eyes. Let's
go ahead and label them. Those are the eyes to take
this sphere, clone it. One can be whites for
the whites of the eyes, and the other can be
pupil is turning into a face thing. I really
didn't want to. The pupil will use the Gizmo, bring it out, shrink
it, looking crazy. I think he needs a
slim slimmer face, I believe, and he
might need a chin. But these are all like little extra things that you can sort of play with with
your character, figure out what your
character needs. Oh have symmetry on. Definitely want to
have symmetry on. And drag might be
easier if we don't want the lips to move.
You can try drag. The hair we can box
will remesh together. To do these little details,
just use a crease. You can use a
crease on the hair. You can use drag to make little sections
where it looks like the hair is coming
towards the head. And you can use crease mixed
with drag in certain areas. So the only other thing that I really want to show
you, obviously, we kind of went over faces
and things like that, but I really want to show you how cool it is when you vox
remesh things together. So I'm going to save and that'll be the
last thing because there's so many places
you can go with this. Let's just go ahead and take Let's see the
neck, the body. Oh, this is all chest stuff. So I I validate all of these, I take the body, not the shoes, the waist, All these arms
and fingers, thighs, legs? So if I take all of
these and Vox will remesh them together,
maybe around 250? Oh? Who. That's so weird. What was that? That was the weirdest thing
I've ever seen. Maybe I have to validate.
That was so strange. Why would it make a little
baby arm like that? What's up with that?
Okay, knees validate. I'm just going to join
all this stuff together because it's taken way too long. So we have legs. Chest plate. Now we'll try and vox
remesh this again. Hopefully it doesn't
give me the baby arms. Okay, now everything's together. Be careful when things are close because they will connect. But now you can smooth
and you have one smooth And just be careful where you
don't want to lose too much detail? Okay. But you don't really want to be too defined because then it just doesn't
look real at all. Just keep that in mind. I probably could have
done a better job with making the shoulders
a little bit bigger. I'll smooth this even a little
bit more in the middle. Then I might use crease to
bring back some of the detail. If I want. So I can sort of
bring back some of the detail and just
make it really subtle. Obviously, the hands, I probably could have
rounded the hands out a bit more beforehand. But Smooth seems like it's
doing a really good job. Okay. So again, just be
careful of this situation. But all in all, I would say it's a pretty cool breakdown of
the human body. So if you were to
usually I probably wouldn't I guess if I was doing a superhero, I would
do it like this, but I definitely want to do it a little bit nicer that's
something that I want you to do. I want you to play
around with it. I want you to get it exactly how you want it, add close to it, color it because that's
when you really learn. I can show you and
tell you what I know. But you really just
have to practice and keep with it and
find what works for you, find different methods
that work for you. Because all I can do is
show you what works for me, and I just have a blast doing
it. Hopefully this was fun. Hopefully you learned a lot and hopefully you'll be able
to use this when you're making characters and hopefully you picked up a few
things that will just make your anatomy look
that much cooler. May not look super realistic. Because it's stylized, it's
cartoony, that's my style. But that's the stuff
that I'm drawn to. So yeah, I'm going to work
on this a little bit, and I can't wait to see what you guys create for
your class projects.
10. Thank You!: All right, welcome back. I hope you guys enjoyed the class. So as far as the Killer clown, I didn't include
it in this because it's like a little over an hour, the video where I transform
this into a Killer clown. That is available on my YouTube. So please go and
subscribe to me there. Check out my other videos there. I do a ton of three D videos, and I also have a ton of old
procreate videos as well. But I do a ton of threeD and I'm always
posting things there, tutorials and things like that. It's an extension of this class. So you guys are going to be
in the end when you watch it, you're going to be like, Yeah, I made I already made that. I have this figure. A lot of people have
questions about doing like clothes and pans
and things like that. When you think about
pants and clothes, think about it the same
way you think about the arms and the legs.
You know what I mean? If you make a leg
in two sections, you can vox remesh
that together. And make it bigger, and
then you have pants. Or you can use the cylinder
and just make it straight. You know, use the or if you have your leg
posed or something, just make the cylinder
or use a tube. All it is is it's all the same thing.
You know what I mean? Like, there's no
way to really make things like hanging
off, like, naturally. You know what I mean? It's
not that type of program. Everything you're
going to be sculpting. So like, if it's hair,
You know what I mean? You just want to think
of a hair shape. If it's a shirt, think
of a shirt shape, the same way you
would the chest, the same way you would the arms. Don't overthink it. It's very
easy to overthink things. Just say, Okay, like, let
me look at the shirt. Let me break it down
into a simple shape. Kind of like if you
look at my hand, it's like, Oh, okay,
this is a square. But we already did all that. And you were already done. I'm just, uh I need to cut. Okay, so please
remember to rate and review post your class projects, Rating and reviewing is really important. It
will help me out. It's a great way to support what I'm doing, and
it's a great way. If you want more classes
here on Skillshare, definitely give me some
feedback and rate and support. Follow me on social media. If you post your projects
on social media, so if you want me
to see something, tag me Drug Free
Dave, Instagram, Drug Free Dave TikTok Drug Free Dave YouTube,
Drug Free Dave. I'm on Facebook, too, but I'm
not as active on Facebook. I do post in the Nomad
scope Facebook group. So if you're Not in that, then just go to Facebook
and join the group. I'm always looking there.
I'm always commenting there. And that's a great way to learn
a lot about Nomad sculpt. I learned a ton of
things from that group. It's great. And one more thing, a lot of people ask
me about the STLs. So I have a patrin if
you want to support, Patron is a great way to do it. I'm just going to upload
everything that I make as an STL on Patron. I already have about five
or six of them there, and I'm just going to
keep adding there, and I think that's
probably the only place that I'm going to offer them either for sale there
or for paid patron members. But, yeah, thank you all for
your time. I appreciate it. I love teaching, and I love that you guys are
spending your time with me, and I love that we're
all learning to just get better at our craft. Keep drawing, keep sculpting. I'll see you all in the next video. Okay.
 Dave Reed, 2D & 3D Illustrator - Brooklyn, NY