Transcripts
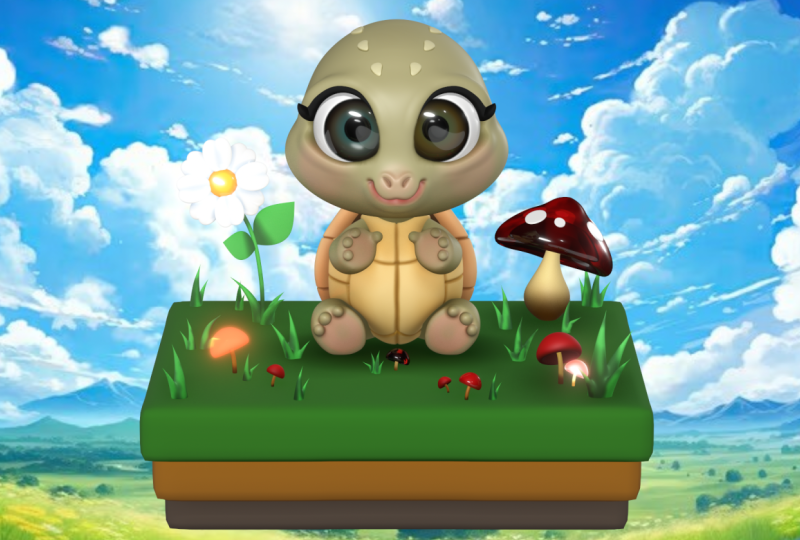
1. 3D Turtle Tutorial | Nomad Sculpt: Hey, what's up, guys,
Welcome, drug-free Dave here. Coming to you from
Brooklyn, New York. Thanks for joining me for another Skillshare
exclusive class. So I wanted to make a
really cute little turtle. I sketched him first and then I brought him
over to Nomad scoped. And we're going to
start from the very, very first sphere, all the way to a finished, polished, adorable
little turtle. So I would say this is
an intermediate class. It's a little more involved than some of my
beginner classes. So it's great for people
that had been working in nomads golf for
a little while now. But it's also really
good for beginners. Beginners that really want a new challenge and are ready
to take that next step. I'll be going through everything
from start to finish. I'll try to explain every
single thing that I'm doing so that you can
follow along easily. Sort of looks easier than it is once you get a good formula, are working formula,
it gets a lot easier. 3d does take some patients. It's worth it to
put in the time, because getting to the
end is pretty phenomenal, especially for what you
can do on a tablet. If you're new to Nomad scoped, than I would advise
you to go back and take one of my beginner courses. Actually have to begin with.
There's enormous scope. Once you start playing
around with it, either of those classes,
you'll learn a lot. I'm going to try
to show you all of the little tips and tricks
that I do to make sure that my models look the best that
they can look. Alright? Keep drawing, keep sculpting. I'll see you in the next video. And for those of you who
are joining me for class, Let's move on to the next
video, class project.
2. Class Project: Hey guys, welcome to
the class project. So of course we're going to
make a cute little turtle. So if you have any questions as you move through the classes, then just be sure to post
them in the discussion. I'm happy to answer
any questions and then we can figure out whatever issue that you
might have with the classes. Also be sure to download
all of the class downloads. Those are in the projects and resources tab or
the environment. The sample sketch, the
turtle sketch that I made. I'll probably also have
just a sample image of my 3D turtle. And I also might throw in some little 3D files that
you can plug in just, just to, just for fun, I tend to save certain objects, things that I made because
the things that are small, I like to save them to my iPad that way later on I can bring them into the project and
just plug them in places. I think that's really fun and I encourage you to do that as you continue to make 3D objects
and make 3D scopes, make little flowers, little accessories, things like that. But yeah, Be sure to
download those in the projects and resources tab. But I think that's pretty
much it for the projects. For the class project. Just remember that
this turtle is yours. You can change the colors, you can change
anything you want. You can do the project and then afterwards just play
around with it. Usually what I like to do
is save the project as one file and then
I'll hit Save As, and I'll rename it
that way I have the original one that I like
and then I'm finished with. And then I'll have
an extra one that I can just play around
with an experiment. And just in case the program crashes or
something like that, I always have the
original one as a backup. I definitely encourage
you to do that. Also be sure to save
after every lesson. I'm bad at saving. I turned off autosave. But just be sure to save your
project after every lesson. Just in case something happens. We don't want you to
lose all of your work. All right, so I will
see you guys in the next video and we'll start sculpting in getting started. That was gonna kinda confusing. I'll see you guys in the
next video Getting Started.
3. Getting Started: So here's our little turtle. So we're going to bring
him into nomad sculpt, which isn't very difficult. So let's just go
to Nomad sculpt. So right now we're starting with this sphere and we want
to bring our image. And so we're just gonna go to this little icon here,
reference image. And you can see I had
previously brought him in, but I had to start the
project over because I forgot to hit manual focus. So you can tap on
the image here, tap Import Photos, and then
just find your turtle photos. Tap it and then hit Add. And now I have two. Good thing, they're
in the same spot. So what I do now is I tap on
this and I go to Transform. And Transform is where
you can move it around. You can move your
reference round. Let's just put it down here. Once you have it
where you like it, you just tap on the screen once, and then it goes back
to sculpting mode. Another little trick. Sometimes the sphere
that you start out with a nomad
Skulpt is quite big, sometimes bigger than 6,146. So if it is, if it's larger than that and
you can just delete it. You can delete it and then you
can just add a new sphere. Let's just tap front
as cube is very useful for knowing
where you are in space. So let's tap front. And also, I do use
Lock quite a bit. If you don't see the
lock icon down here, then just go up here
to the options. They go to these three lines. And then just you can just
toggle the lock on and off. One more thing. When I, before I
start sculpting, I always make sure that
I tap this and that it's an orthographic not prospective. That'll just make it
easier to sculpt with. If you're wondering why my clay, I like to call it clay. My clay is red. It's because I'm
using a Mac cap, which is sort of a baked
in light lighting scheme. It just makes it easier to
see Egypt is scope with. So you can find it here
in the lighting menu and under shading. So this is the normal. But my cap is, I like to use this one.
There's plenty of them. I just use this
regular default one. Alright, so let's go involve
validate our sphere. We can start to model
his little head. So essentially I'm just gonna block blackout the heads
that the shape of the head. It's quite round but
you can see there's a smaller dome here. So there shouldn't
be too difficult. Then we'll just
turn it to the side and we'll sort of try and get this matched up nicely. So the most of his
head is quite round. So I think this
looks pretty good. It's just when you
turn it to the side. It's a little bit
longer in the back. A little bit longer here. So I'm just going to stretch
this out a little bit. So we stretch that
out a little bit. And I think I want to
use the Move tool. Maybe around like 300. I'm just going to
pull the back out. I have symmetry on. I'm gonna make it a
little bit bigger and just pull it back
out a little bit. So something like that,
just trying to match the roundness for his head. Let's take a look in the front and see what
it looks like. It looks pretty good. The only problem is He's a little bit He's
got a little bit of a dome in the front. So a couple of ways
we can do that. An easy way. Let's turn it to his side again. Let's
turn it to the right. So the easy way to do
that is let's just use our gizmo. And let's clone it. So we can just clone it and then bring it
up a little bit. Let's take a look
from the front. Now let's just use this orange
ring and make it smaller. I'll just bring it up so you
can see the orange ring. And we can just
sort of use this to make a little dome on top. I think that looks pretty good. It's not bad from the side. We'll take, we'll take
the Move tool and just drag this out, drag it back a little bit, just to sort of lines up
with the back of his head. Okay, let's tap the lower sphere and let's just bring
this back a little bit. So let's bring this
back a little bit. And the reason I'm doing
this because it looks like this comes all the way down and then he has his little
mouth here around this area. So I think that's
pretty good for now. The only thing else I might
want to do is just take this and we can use the gizmo and
just make it a little bit. We'll just squish
it in a little bit. With this green sphere. The spheres are for
Smashing and stretching. I think those are not
the technical terms. We'll just move it
up a little bit. Okay. I think that looks pretty
good. It's pretty good. Start. So now we'll just make another
sphere for this little, little part of his mouth here. So we'll go back here. Add sphere. Let's move this one over. And we use the orange
ring to shrink it. We can go ahead and validate
it, shrink it down. We want to try to put
it in a matching spot. So it looks like it's
probably around here. Maybe a little bit smaller, maybe stripped down
as a small bit and push closer to
it's not really sticking out from
his head too much. Okay. So I'm going to just
stretch it out. Hold. Not that I'm going to stretch
this out a little bit. I think that looks
pretty good. All right. So the only thing is on the drawing and he's
a little bit more, um, this part and his bottom lip sort of
goes right into this. So I'm not sure
exactly how to do it. There's a few ways. Let's see if we can take the Move tool. Drag. Make sure we want symmetry on. See if we can just drag
this down a little bit. Maybe not even that much. Maybe something like
that is even good. I think something
like that works. So his head sort of comes down. It's actually he actually has a decent amount of
forehead on them. So I'm going to bring
this down a little bit more even tilted forward. You have something like that. It will be have all this
forehead here, which looks good. It's nice and round bank here. But also importantly, this, this smoothly goes into
the bottom of the head. So I think that's a great start. And it's pretty wide. It's nice and wide here we
can make two big eyes here. Let's make this a
little bit smaller. Only because his
eyes, we're going to make his eyes pretty big. So I think that's
pretty good for now. So now let's go ahead
and voxel merge the head together at 01:50. I think 50 is good because the clay will
be a little bit softer. It'll make it easier to smooth. So we'll go here. And we want to make
sure that we select all of our pieces. Do we wanna do voxel
one and voxel merge? Now we can take smooth. Smooth settings
are around 190 and the intensities at about
75 or so symmetries on. And now we're just going
to just smooth ER, smooth as little head. I don't mean just
move that much over the nose part of the Snoop part. I don't want to lose
any of its size, any of its shape at all. But make sure you
just go over it. Okay, that looks pretty good. Okay. Then we have is proper
little nugget head.
4. Big Eye Sockets: So when really fun
way I like to, to help me with the eyes is to actually use
the crease tool. As you all know, I'm an
artist at a 2D artist. I've been doing that
for a long time. So drawing is just way
more comfortable for me. So things like eyes. I do this little trick. I just use the crease tool
and make it fairly small. The radius about 25. And I'll just draw
the shape of the eye. So this is the little, this line here is this nose. The eye. We're going to come up straight and I'm just
going to come over. Just keep it nice and round. So we'll start here. We'll just go up, bring it over. Come down on an angle like that. And you see there's
an angled line here. So this just comes
across like this. So something like that. And looking at it now
I probably could have made the nose a
little bit smaller. So there is that I tend to always make the nose a little
bit big for some reason. I'm not sure why that is, but I always tend to do it. But it all depends
on how big you want the eyes to be and how big
you want the nose to be. And there's no pressure. So like if you decide
that you want to like if I decide I want
the nose to be smaller. Just undo, make it a
little bit smaller. And then just do the same thing
and then just continue to do what we did before was this voxel merge all of
this stuff together. And we'll just smooth
everything again. It's important to,
it's important to make the changes as,
as you notice them. Because you really
have to like you, you really have to hold
yourself accountable and make things in a way
that you want to make them. And you can't really rush and you can't really cut corners. I mean, you can, but in the end it doesn't
pay off because you're going to
spend so much time sculpt or on anything east, but you don't want to
spend a lot of time. And then say, Oh, I
wish I would've went back and redone this, just redo it as soon
as you as soon as you understand that you
want to change something. Okay, so now we're back, the nose is a bit smaller. So let's take our
crease tool again. Let's just try it again. So I starts here, comes up, might be a
little too aggressive. Comes up, something like that. And it comes down. So something like that. I
think that's pretty good. And the reason why I do
this with decrease because then I can go ahead
and use my clay tool. I use clay will start with
a radius of around 85, intensities, about
60 symmetries on. And let's do sub, Let's see how big this is. Comprised, make it a
little bit smaller, but this hasn't really, I mean, essentially
we're just kinda digging out the,
the eye sockets. So it's not really
an exact science. But you use your crease is a guide as a guide for
how you want your, you know, your eye shape to be. I'm going to make it smaller. It just meant you
didn't you just make it smaller or bigger? Bigger for the for the larger
areas and then smaller if you really want to
try to get in there and make the shape
very specific. Sure it's nice and deep. Didn't have to be too deep, but, you know, I think that
looks pretty good. I'll go a little bit deeper because when we smooth it out, some will come back. So you just want to
be cognizant of that. I think that's pretty good. That's a pretty good spot. A little rounder,
where's cheeks are? I think that's pretty good. Then you just submit them out. You not to press too hard. You don't have to
be too aggressive. You just smooth it out
and make it look nice, make it everything looks soft. Because remember, all
of this can be sort of changed and fixed. If you need to, if you feel like it's not
sufficiently round, then you can always use the
move tool. Quite small. Maybe rhino, around 100. And you can lift, oops, let's make it bigger. You can lift things and sort
of rounded out a little bit. If you need to. Maybe one a little bit more, round out here,
things like that. But I think this is looking
pretty good so far. I'm happy with it
AlphaGo about here. So yeah, I think we're
doing pretty good so far. So let's put his
eyes into place. We're gonna go into more detail. Maybe we'll do it in this video. We'll see, but we'll
just add another sphere. So now that we have two spheres, so we have this, the head sphere and the
one we just made. Let's name the one we just made. And the other one can
be head, rename head. Okay, so we have head I. So we'll use the orange
ranges, shrink it, bring it forward over around
where we want it to be. Maybe something like this. Okay, so we're not going
to validate the eye yet. We're just kinda
sorta leave it there. But I do want to build out
the eye socket a little bit. So let's tap on the head
and we'll use move. And I just want to
make this a little bit more round. Back here. Maybe I'll make it a little bit smaller and just stretch it out. Something like that. So essentially I want this
straight and then I wanted to almost like a teardrop shape. So that's all that's
all I've done there. We'll leave the
eye alone for now. Because I think we're
making good progress. And we have our eye
and we ever had. So let's add another
sphere and we can start to block out his body. So we'll go here, we
add another sphere. Let's turn it to
the right and let's just figure out our proportions. Slide it to roughly where
it's supposed to go. Maybe something like this. So obviously we
have the back part of the shell and the
front part of the shell. Okay, so I think
that's a good size. Another thing that I want to do. And we also have to
make sure that his head is in the right. I guess his head is
in the right spot. So one thing that we
need to do is make sure that he has a base
because he's sitting. So when, when a character
is sitting or standing, it's good to have a base. That way the things
that are flat can be flat and you
can see what they look like when they when they're in contact with the
floor or the ground. So for that we'll just
do a box. A box is good. So add box, flatten it up a little bit back. So he's sort of sitting. I think something like
that will be good. Now of course,
we're also going to have to do the front part. But we might be able to get away with cutting this in half. So let's go to the sphere that we made for the
back of the show, and let's validate it. Flattened it out. We'll use this blue
sphere and it's just sort of make it a
little bit more flat. Something like that. Let's make sure that we name
the sphere that will be his, the back part of the shell. So it makes sure that
you name it back shell. We don't want to
name it back shell, but just make sure you name it. Okay, so I always like to think of little fun
ways to make the shell, make things easier and
simple and efficient. So you can see the shell has
this little outer part here. And I think I've done shows before where
I've used a tube. But tubes can be a little, a little tricky and
take more time. I think since this is
such a simple character, we'll just use a tourist.
5. Torus: I don't know why I
said it like that. So we'll go to Add and then
we'll go to tourists. Right? So you can go ahead and I'll just pull it out so I can show you what it looks like. So there's our tours. I'm gonna go ahead and make
it turn it 90 degrees. And I'm going to, I'm going
to wrap it around the shell. So it can be a
little bit smaller. Something like this, I
think is pretty good. Maybe a tad bit smaller. I don't want it to get lost
too much in the shell, but I think that's pretty good. So once you have your
tourists and place, Let's move it up a little bit. Even stretch it a little bit. We can go ahead and validate it. And then we can take our
trusty Move tool again. This, it goes up
behind his head. So I want to make sure
that I have symmetry on and just move our, make it a little bit bigger and just move it out this way. So I think what my
problem was is I didn't have the Move Tool big enough. So now that the move
tool is around 370, It's moving a lot smoother. And this is another
opportunity to use the lock. So I'm going to lock it because
we can't see the bottom, but we want to bring
the bottom-up. Maybe something like this. It's kinda stuff I
usually edit out, but I think it's good to show. Like sometimes I, I, I
make those mistakes. And by now I sort of wrote can recognize like when a tool isn't working the way that it's
supposed to be working. I can recognize it, but that also just takes time. Okay. I'm pretty
happy with that. I think it looks cute. So now let's see if I
can take the gizmo and flatten it like I
tried to before. Yeah, there we go. Maybe I'll even move
it down a little bit because right now
it's a little bit bigger here than here. So if I move it down, should alleviate
some of that arm. Move it forward a
little bit too. Okay. I think I like that. Okay. So we're going to block in the arms and the little legs. But there's a few things that
I see right off the bat. I feel like his head is
tilted down too far. So I'd like to actually
tilt his head up. So to do that, I'm going
to grab the eye and the head and makes sure I don't have anything else selected. Then I'll just use my gizmo
and just slide the head up. This is also a good time if you feel like you want
to reposition things. I want to reposition his head
a little bit further back. You look at the positioning here than I might have
to bring the tube out or bring the tourists out
a little bit because his head is decently far back. The weight isn't the weight
should be in the center. So I do have to make sure that
I move his head back some. So now that I've done that, I just need to move the tube. Let's take it off lock. I just need to
move the tourists. I'm probably going to
keep calling it a tube. I just need to move this
out a little bit like that. Baby steps. One more
thing that I wanted to do is now that we have the
tourists separating the shell. And this clearly looks like
the back part of the show. I'm not sure if I want to use the front part is the front, but that might be
the easier option. So let's take the split tool because the split will
split this shape, but it will create the back
part and the front part. So let's make sure we
tap on the sphere, the back shell split. We use lasso. We just want to trace.
Here's a little tip. Let's start down here. Bring it all the way up, and
then we just want to trace, try to get it in the
middle of the tourists. Just like that. Now you'll notice that
we have the back shell, back and then the front. So let's rename
this front shell. So now we have the back and
the front parts of the shell.
6. Boolean Operations: Okay, so we're gonna do
some Boolean operation. Boolean operations in this one. So basically we're going to use the front part of the shell and we want to cut out
some sections for him. So it'll be nice to cut
out a section here. That is Nick would be
going into the shell. So that's sort of like
cutting out a section there. We also want to cut a section here so his arms can come out. And then a section here. So his legs can come out. So the easiest way to do that, I think, is just to use spheres. And we'll use a bunch of
different spheres to cut out. And I think it's easier
to do one at a time. So let's go ahead
and add a sphere. We can mirror it,
will bring it down, we'll shrink it, and then
we'll move it over a minute. Why don't I see the mirror? So I was there it
is. That was weird. So I had to tap mirror on top and then tap it
again and it popped up. Alright, well, let me do that again because I don't want
anything to be confusing. And that was really
confusing even for me, but I think it was a glitch. So we're just going to
add another sphere. So there's our sphere. Will bring it down, shrink it, tap mirror, and then
separate. Okay, good. So when you look here, we do have the mirror,
we do have the sphere. But this is just going to,
we're going to use this to carve out of the front
part of the shell. So I'm going to
stretch these out. And I want to place them because where you placed
them is very important. Because that's what's the shape of the front part of the
shell is going to look like. So right now, I'm imagining
that this is just carved. Even though it's a sphere, it's going to be carved. So I think that looks
pretty good for the bottom. Can probably make them
a little smaller. Maybe something like that. Let's move it back a little bit. Because we also want, we also want this part is going to come into
the shell like this. So we want it like this. I know it's weird right now, but let's see how this looks. So let's tag the front shell. And let's take the mirror
first and let's validate it. Will validate that mirror. I'm going to drag it up
underneath the front shell. Must select them both. So now we have the front
shell and the mirror. And I'm going to
turn the mirror off. If you have an issue doing that, then go to your advanced setting and turn off sync visibility. Pretty sure that's the option. So if you have that checked, turn it off and you
should be able to easily deal with these. Okay, so we want
front shell mirror and turn the mirror off. Voxel ramesh 200 emerge. Now we have those cutouts here. That's good. That goes right into the back part of the shell. So we want something
similar to that. I probably should have cloned
these before I cut them. Actually, I can, I'm just gonna go, I'm just
going to undo. I'm going to go to my settings and I'm going to take the mirror and I'm just going to clone it. Now I'm going to go back to
front shell, my other mirror. I'll uncheck the
one we just cloned. Now I can go ahead and just
voxel re-image them again. So now I have the same thing, but I can bring back those. And I can sort of figure
out how I want to make the arms, whoops. I don't know why the pivots
all the way up there. I'm going to tap
pivot, reset, pivot. Now it's where it should be. So now we just have to
figure out where we want the arms to go. Let's make them a
little bit smaller. One thing that I That I forgot, even
though I duplicated that, it's not going to work
because it's not a mirror. So actually have to delete that. And I have to add another
sphere. And I have to mirror. Because it won't,
it won't react in the same way as just
a regular layer. And actually did that when I, when I practice this, I did the same exact thing. So let's skinny these up and actually want to
maybe turn them even. I think, I think this would
be a nice spot to carve. But I'm going to shrink them
even a little bit more. I think that would be
a nice spot to carve. Something like this,
I think might work. So again, we'll just take the mirror and
we'll validate it. So now we have the mirror. And I think the front
shell got renamed. But I know that this
is the front shell. So now I'm going to
take this mirror, I'm going to hide it. Voxel. We measured 200 and let's
see what it looks like. Okay. It's not bad, so we have a nice cut,
their clean cuts. The only thing now is this
front part of this show. So we want to, we want to have
we want to make it so that his his neck can come
out from somewhere. So we do have to make
that separation. So let's add another sphere. I don't think we have
to clone this one. I think we can just maybe
skinny it up a little bit. Just kinda figure
out tilt it forward. I think this is a good a
good place to have it. I'm going to pull it out so
you can see this, whoops. So you can see the
shape of the cylinder. So I have it like this. And all doing is really, I just want to cut off
a section like this. Because I want the, I want
this part of the shell to look pretty much like this. Now I'm going to have to go in and carve some of this out. But that's okay. So you just wanted to
let your sphere a little bit and just try to get the
front to look like this. I'm going to validate
this sphere. Now we have this fear here
and I think mirror ones, the front part of the show. So I'm going to highlight both. I'm going to hide my sphere. Same thing. We'll voxel remission
200 carboxylate. Alright, so now we have the
front part of the show. I think it looks pretty good. So let's go ahead and
take our trim tool. And I just wanted to carve
out the space a little bit. So we'll just use lasso. And we'll just make sure that
you read the front part. Make sure I didn't accidentally
cut anything. Locks. I don't do that again. So now I'm going to use my lasso and I'm
just going to carve out along the edge a little bit. Just like that. Perfect. Let's rename this
to France shell. And let's go ahead and
refresh it at 200. Now let's smooth it out. Get everything nice and smooth. Okay, I think we're doing well.
7. Arms, Legs, & Other Adjustments: Alright, so there's
some other little details that might be nice, like trimming a little bit more in here. This
little section. We don't really need it. So he can take your trim tool and I'm using the lasso
and I'm just going to trim another little
section out like that. Maybe I want him even make
this perfect up here. Whoops. Use have to be careful of that. You just have to be
careful of accidentally cutting pieces you
don't want to cut. So if that does happen, you can always use
the mask tool like I'll use Select Mask and lasso. You can just mask this off. So once you have
that masked off, you can go back to trim. I'll tap left so I'm looking at the exact lift and then you can just
make it really clean. Then you go back to select Mask, tap and then clear it. So nice and clean. And then just, you know, anytime you do anything,
just make sure to smooth it. Make sure to go back
and some of it out. One other thing I wanted to
do is drag this up a little bit to be bottom of his chin. So let's just drag this up. Alright, so let's use tubes
for the arms and legs. So we use path pair, snap. There we go. And then one extra. So let's drag these to the right position,
something like this. So we'll drag these nodes until they're roughly
where the arms should be. So something like this, something along these lines. Alright, so let's tap radius. And basically radius just
means that you can, now, you can take the orange node
and you can make the front. You can fake either
side bigger or smaller. So we're going to make both
sides a little bit bigger. Maybe something like that. Then you can just sort of just
sort of maneuver the arms. I think in the picture they
might be a little bit lower. So I'm going to lower
them just a little bit. And even though they're
going into this shell, I can always change. I can always drag the
shell down a little bit. But I just want them to be
in, right ish position. This out a little bit. So essentially you just want
them something like this. This is a little shoulder, so I'll just move it
out a little bit. In the front part, you can see the front part of
his hands is flat, so this tool will actually
work quite well for that. I'll make this a
little bit bigger. Here we go. So now we can mirror.
And now we have both of the arms on either side. I'm going to go ahead
and hit spline. I'm just going to stretch
this down a little bit more. Spline just makes
them nice and curvy. Okay, I think that
it looks good. I'm going to bring
them both together. Now. I do like to move
before I validate. I want to keep these nodes. So I don't want to validate it because then this will go away. The editor ability goes
away. Is that actual word. So the thing is with the gizmo, you can see that the gizmo was not not being too helpful
here in this instance. So that's when pivot
comes into play. So imagine, we don't
really have to imagine, let's say we wanted to
move this arm straight down or straight in
towards each other. That's when the pivot
will come into play. So I'm going to tap pivot. Now I want to rotate this. So it looks the way
that I want it to look. So I'm gonna make the red point towards the sky straight up. You might have to sort
of move it around a little bit until you get
it exactly how you want it. I'll take a look
at the top view. Top do you actually
isn't too bad. These have to be careful
not to touch the, the nodes or else it will reset. Now the red is
pointing straight up. So now I can move it up
and down if I wanted to. So we're still in
pivot edit mode. So we're just editing the pivot, so we're just editing the Gizmo. If we wanted them to move
straight towards each other, Right now, the green and
blue are not helping. So I'm going to use the
red ring to twist it. So now we have the blue. The green is pointing
forward and the blue is pointing where I needed to go. So now that we have that set, we can tap pivot again. So now my gizmo is set. So now I can easily just take this blue and move them
in towards each other. Very helpful when, you
know that kind of thing happens and you need
to adjust the pivot. So to make it easier, we want to use two tubes that are exactly like
this for the legs. So we'll just have cloned. So we tapped clone and then we take the red arrow
and move them down. But obviously, the
shape is all off. So we do have to adjust the shape so we can bring the
middle one up a little bit. And you notice that gizmo
is sort of in the way now. So I'm just going to
tap tube up here. So that way the gizmo goes away and you can actually
see what you're doing. Alright, So maybe I'll make
this a little bit bigger. I'll bring this down. So now it's just a
matter of preference. How you want as
little legs to be. But I think this is pretty good. And again, if I want
to move them inwards, I have to edit the gizmo again. So I'm going to tap pivot, point this straight up top
and appoint this straight. So it's like a 90 degree angle. Tap pivot again. So now at least I can sort of
have a little more freedom. So maybe something
like this will work a little bit
closer to each other. So let's take a look. I think that looks pretty good. Alright, so let's, let's sort
of so we want to make this, we want to edit the
shell a little bit. So let's take, we can
take drag or move. I think I'm going
to try and move. I'm going to I'm going to tap the front shell
and I'm just going to lock it so I don't
accidentally hit the arms. And I'm just going to
bring this down a little bit. In this part. I might even bring up we definitely want to raise the bottom part just so it's not so
much on his legs. So maybe something like that. I think that's
pretty good. I might actually bring his
legs back some. So I'm going to unlock. I'm gonna go to his legs. Let's just see how his legs
look if I bring them back. Yeah. Kinda like them back
a little bit further. So it kinda gives him a little but because he doesn't
really have a button. So let's give him
a little a little, but let's try the arms. Maybe I'll bring the
arms back a little bit to you. I'm happy with that. So let's give them a little neck just with a cylinder.
Pretty easy. So we'll go here and
we'll just add cylinder. And let's take it
out of this mirror. This just rename it neck. And while we're here, let's rename the mirror limbs. And let's rename this arms. And this one is legs. Okay. So let's go to our neck and we can go ahead
and validate it. And we'll just shrink it.
And we'll just drop it down. So this will sort
of be like a bridge between the body and the head. But I also have
decided that I think I want to put the head
a little bit lower, even lower than it already is. So I'm going to grab
the head and the eyes, move them forward a slight
bit and move them down. Okay. And I'm also going to just adjust the other parts
like the tourists. I'm going to adjust
that as well. And maybe even the front two.
Let's see how this looks. If I adjust the front
part of the shell. Just move that
down a little bit. Okay. I think that's pretty good.
8. Arms, Legs, Voxel Merge: So let's validate his
arms and legs that we can sort of pull them a
little more into. So we don't have this gap here. So validate both of these. And I'm going to take the legs. I'm just going to sort of move it just a little
bit further back. And n. Okay. I just want to fill
those little gaps. So I think that's pretty good. I'm going to go back to
the middle shell and just drag it up a little
bit from the bottom. Just to give it a
little little curve. Bring it in some
something like that. Just so it looks a little
bit more like he's sitting. Or I should say, this isn't really going
straight into the ground. I think that's pretty good. So I'm actually going to
box will re mesh the arms and the legs just so they're
a little bit softer. So voxel and our 3D
mesh the arms at 200. And I'll reverse
the legs at 200. And let me just see
how this looks. Might be able to even
go a little bit less. Let's rematch at 1170. I think when? Seventies. Okay. For now. So I don't really want
the neck too wide. It's basically just
to fill some space. So it's not, so it's
not so loose in there. We want them to be
snug and it'll show. And his arms are pretty much touching the back part of the arms where
the shoulders are. So I think I just want to
voxel rematch the neck, the arms, and the
legs altogether. That way we can
smooth everything out and see where we are. So let's take the neck, the arms, and the legs. And we'll just voxel
boxer merge them. A 200. Now we can just smooth
everything out. The arms connect nicely and can smooth out these poems
and this little legs. Okay? You can, you can also do
a little adjustments. If you wanted to like
say you wanted as little legs to be bent
a little bit more. You can do that. You
just might have to do selective mask like
we did before. And you might just
want to mask off any areas you don't
want to move. So now I'll go to
either move or drag. You can edit. You can sort of pull and
stretch as you as you desire. I think I just
wanted to pull his his legs out a little bit. So when we put some toes on, there'll be right around,
right around here. And then always go back
to selective mask. Tap the circle and tap clear. Okay. I think I think
it's looking good.
9. Fingers & Toes: So let's add some little
fingers and toes. He's not going to be anatomical. So I think I might just give
them two or three fingers. Three or three or four
fingers, something like that. So we're just gonna do
those with spheres. So it will go here, add sphere. And it's still under limbs. So I didn't think, I didn't think I just
want to take the sphere out of the limbs. We have legs, see the limbs
and is now everything. So we have our sphere. We can go ahead and hit mirror. These are just gonna be little small, little nugget fingers. They'll just going to sit kinda
acutely off of his hands. And the keys here is you just wanted to kinda help
them on the edge. So something like this, maybe flatten them a little bit. So we can validate and then
we'll just clone, clone. And then we take the
arrow and move it up over something like that. And maybe we'll give
them another one. We'll give them another
little fat finger loops. Again, I'm not too worried
about being anatomical. I mean, this is just like fun. It's just fun. But if
you wanted to do that, then of course, feel free. It's the best part about art is you can do whatever you want. Especially in my classes. I wholly condone doing
whatever you want. Now, I made his fingers
a little bit bigger. I think they made
them all a little bit bigger than the drawings, so I'm just going to shrink
them up a little bit. I noticed I tend to
do that at times. I'll make things.
Sometimes things will just wind up being
bigger than they should be. So I'm doing a lot
of I'm doing a lot of moving and adjusting. And essentially all I'm doing is I'm just trying to make
them so that they're circular, but they're a little
bit squished. And they're sort of going
along the same angle as this is the side of
his his his palm. So that's essentially
what I'm doing. I'm trying to make
them sort of squished. And then I'm trying to make
them go in a little arch. And this will take some time, but the more you get
used to the gizmo, the easier it will be. But it is, it is a
bit tricky at first. So, um, you know, give yourself, give yourself a break
and just give yourself time to sort of get
better with the gizmo. So now we'll just do one
more for the little thumb. And it's pretty good. I want it to be that big. So
I'll clone the middle one. I'll go back to my
gizmo because that's the only time clone
pops up. Clone. And then we'll move
this to some area. Turn it out a little bit in something
somewhere like that. So it looks like a little thumb. So now we can do the same thing. We might actually
be able to use the, the three fingers for
the toes. So let's see. So this one is the thumb. So it's good to name everything. So this one is the thumb. Let's put that on the bottom. So let's take this mirror
and clone the whole thing. So we'll just clone
the whole mirror. Will get rid of the thumb. And I'm going to
name the mirror toes so I don't get confused. And unnamed the
other ones fingers. So now that we have toes. So now we have just these
three spheres selected. I'm going to tap the gizmo and I'm going to bring it down. So I might be able to get
away with using these toes. Feet are using these
fingers for his feet. So we're sort of running into the same issue with the gizmo. So I'm going to tap front pivot. And you just adjust the pivot
so you have better control. Bring his little feet
as little toes in. And you can adjust
individually as well. If you see one that needs a
toe that needs reworking, you know, you can do that too. So big. I guess maybe it's his big toe. Kinda make sense. So now he has his little
fingers and as little toes. Okay, Let's voxel merge all of these parts together because they don't need to
be separate anymore, like the toes and
the hands and stuff. So let's Let's go ahead. And sometimes I completely forget where everything
is in the, in the app. It takes me a minute. So let's take all of these
fingers, toes, and lakes. You know, I think the legs
is the arms and the toes. So I've taken all of that. The arms, the legs, all that. And then when a voxel ramesh
200 actually let's do 250. Let's do 250. And let's
say before we do it, Save, we can go back
to voxel 3D mesh. The 250. Here we go. So now everything is together. Now we'll take our
Smooth tool very gently. Want to keep that detail. Now he has fingers and toes, and I feel happy about it.
10. Eyes: Okay, so now let's do
his eye slash eyes. So let's take this sphere. Let's bring it out
so we can see it. And let's make it bigger.
Something like that. Here we go. Because we want
them to have big eyes. So we need to make them
a little bit bigger. Alright, so I'm going
to validate this high. And I'm going to, I'm
going to go here. Oops, I go to this little icon. And instead of Metcalf,
I'm gonna go to lit PBR. I'm going to hide
everything else. So this one, I'm going to clone. So we have i, I'm going
to rename the first one. I white i1. I'm going to clone, and
I'm going to rename it corn for cornea. I'm
going to hide it. So now we have another eye, which I'm going to rename pupil. I'm going to hide that too. So high white. I'm going to clone
lots of cloning. I know. And I'm going
to rename this. I erase. So now we should be on I erase. And let's pull it out. Okay, so now this is how we're going to
construct the eye. We're going to do another
Boolean operation. Let's make this smaller
and let's shrink it. And then sort of figure out
how we want this to go. So he is really big eyes. I think something like this is good because we don't
want it that deep. Let me flatten it
a little bit more. We don't want his
iris to be that deep. So maybe something
like this will work. Okay, so let's go back here to our options to IY and
IRAs. And let's tap. I wait, and I erase.
We're going to hide. Now we'll voxel, will rock
swimmers them at 200. Okay. So I'm going to bring back corn. I'm going to tap on corn. Then I'm going to tap
here for the material. And I'm going to tap refraction. Refraction makes it clear, but you can see that it's not looking good right
now, but that's okay. First Paint Glossy,
then absorption. Then we take the absorption
color and change it to white. So now we take the index of
refraction and bring it, bring it down to 1.3. So there are a little
issues with the eyes. But one way to fix it for now is we'll take the
corn, we're ready. We're already on corn
and we're just going to make it the
slightest bit bigger. Just like that. Now let's take the pupil will go to our
little color circle here. We'll go to black, and then we'll take away
all the roughness. And then we'll do paint Hall, shrink it down all the way out. So you can see what
we're doing here. Maybe flatten it up and
we push it back in. Just like that. Let's actually color it before we
place it in the eye. So in order to do that, we want to hide the cornea. We don't have to worry
about the pupil. But we just want to be on Iwate. And let's hit front. Alright, so let's take our
Paint Tool. I'll tap on it. And we'll hit Clone. So then you're gonna get a new
Paint Tool and the bottom. So let's go to
these options here. So we'll press the
little pencil button. You have your falloff. Let's set that to
the straight line. And then we'll go down
and grab dynamic radius. Okay, So with your paint circle, I rename mine paint circle. It Just wanted you
just want to make a nice circle from the middle. It might take a few tries to
get it where the middle is. Unless you, unless
you're sphere, is perfectly symmetrical. And see mine is off. So sometimes I just
have to do it a few times until I get
it, how I want it. That's pretty good. Now I'm going to take the smooth brush, but I'm going to lower the
intensity all the way. So what I do is I tap
it and then I clone it. So I have one on the bottom. And this one stays
with zero intensity. It's very small. But zero intensity. That way we can
smooth the paint, but it doesn't mess up the it doesn't mess up the
shape of the eye. And also here, I'm going to go here to
the little layers thing. You can add a layer. And I probably should have
added a layer for the black. But here is where if you
want to add some color, you can go to your paint circle and just change the falloff. Change the falloff to where
it was, something like this. Now you can go in and you
can change the color to, let's say a say brown like that. Now you can change
the color of the eye. Make it a little bit
lighter towards the middle. You can do something like that. Alright, so let's turn
the corn back on. Looks good. Okay, so the cornea is back on. So now I'll select all of these and I'll push it back into the head and just
see what we have. Okay. Not too bad. Bringing
out a little bit. So we don't want
the eye to be too far popping out of his head. But I think this is pretty good. And judging by this, so we want the eyeball
to be sort of on the closer to the bottom, will shrink it a little
bit, bring it out. So something like this, I think looks pretty good. This is a decent spot for now. So I'll just tap view so we
can sort of see what we have. And I think it's a
decent spot for now. So one thing I'm noticing is
I want to stretch his head. So let's go to the head. Move my trusty Move tool. And I just want to
spread the head out to sort of match the
drawing a little bit more. Top can even come
down a little bit. I think that's good. So now for the eyes, this actually looks pretty good. So you want to have that
straight line on the bottom. That's very, very important. If you don't have it, you can either push the eye back and you can
do a little bit of pull as well with your
move tool. If you need to. Now I'm just going
to adjust this just to make my life a
little bit easier. Okay. One thing you'll notice is that the head actually goes into the
eyeball like this. So we're going to use the corn. We're going to use
that to carve out, to carve out of this the head. But before we do that, let's take the eye white. So all of these three,
and let's mirror them. So we'll do add. And then we'll do mirror. And now he has his
other eye there. You can check it out,
see how it's looking.
11. Eye Adjustments: And you can check it out,
see how it's looking. Now and now everything
is mirrored. So if I select all of these, I have all the functions,
or at least I should. Yeah, so I have all the
functions of regular eyes. So you can change anything if there's
something that you want to change that you don't
quite like position wise. But I'm pretty happy with that. Part of me wants to
flatten out the eyes. So let's try it. Flatten them out and bring
them a little more forward, and also tilt them
up a little bit. So before we move on, I think the only other
important thing to do is just continue to work
on the shape of your head. If something looks
off, then just adjust. Which you know, I'm I'm good at. I'm always adjusting something. I think I always want to. Now the top of the eye
is a little funny, so I'm just going to stretch
this up a little bit more. I think I'm gonna use in Fleet and just inflate
this a little bit. And then I'll just use
smooth. Smooth it out. I don't want this to, I don't want this to get
too close together, so just make sure that you
keep it like sort of separate. Okay. So once you have that, once you have a
position that you like, use the cornea to do
a Boolean operation. So you can carve out
the shape in the head. So we'll take the corn and we'll duplicate
it, will clone it. Just so we don't get confused. Corn erase, erase out of the mirror
and then mirror it itself. So I'll validate it. We have the head,
we have the mirror, and we'll hide the mirror. Voxel ramesh 200. There we go. So now that cut out that carve what we needed. So again, just in case
that was confusing, basically what happened
was it wasn't when I erased since the original
one was inside this mirror. It wasn't actually
two separate pieces. It's just one piece but
it's within a mirror. So I just had to bring
out bring it out of the mirror and make
it its own beer. Two pieces. And then
validate that mirror. So once you validate it
becomes two separate meshes. So that is what allowed it
to get carved out finally. Okay, so now that we have
our eye is carved out. So I think I want to take the flattened tool and just
sort of flatten this out. Either flatten or pinch. Let's see what looks better. So I'm gonna go ahead and
box will remiss this again. We measured at 200 and then
just trying to smooth it out. Okay. And just want to drag
this up a little bit. Because I want the bottom
to be nice and flat. And I might just go
back-and-forth between pinch, smooth and flat. And just to sort of build out this this area because I really
want it to be clean. So I'm just flattening and flattening the
areas that were sort of affected by the by the merge. So I'll just do a combination of flattened pinch gives you
a nice crease as well. But that's basically
how I flatten that out. It just, it really
just takes patient, patients. But I think
that looks good. One thing I'm noticing
and this has completely, I just want to want
to try this out. His eyes aren't
really elongated. Let's take all of these, the three I's and let's just see what
happens if we stretch. It. Should see how it looks. Right? I mean, it isn't that bad. I don't think it looks too bad. You can always you can
always check it out. You can always go
to the eye white and see what it looks
like without the brown. Right? Yeah. Here we go. Because the brown does give
it a different sort of look. So we'll leave I'll
leave it, I'll leave the brown on for now. But I think this
looks pretty good. Okay, So next we
have the details in the head and the details on the shell and in
the back of the show. So that'll be the next
thing that we work on.
12. Lashes & Shell Details: So one thing I'm noticing
with my character, It's very important that the shape of the eyes
is very important. The fact that his
eyes are like this, it makes him look a little mean. So I'm going to use the
drag tool on the head. I'm just going to lift up here. And then that will
give your characters instantly make them look
sweeter than they did. Okay, that looks
much better now. Alright, so the next thing
I want to do is let's add a quick eyelash area
like this little, this little bit tube tool path. And keeps snap-on thing. I'm always going to keep
snap-on from now until forever. So let's, let's go
back to firstly, let's go back to my cap. So now we're on tube path. We're going to start
around here. Here we go. One die, let go two dots, three dots. Tooele about here. And you want to do one coming
off and tap on that one. So it's like a hard turn. Will tap the little green thing. And now we just
have to adjust this because this needs to
stick off of his head, not be in his head. So something like this. You can actually
bring this down a little further if you want. You can always add nodes
by just tapping on the on the tube. Once it's, once it's
basically there, I'm going to hit spline,
so it's nice and curved. And then we can do the
same thing we did before with radius will tap radius and make this
one this side bigger. And decides smaller. Hide this one. This one will go
right into the skin, which will give it a
nice sharp ending point. I might need to bring
this down a little bit. Maybe something like that can make this a
little bit bigger. Then we just want to mirror
and see how we like it. Maybe a little smaller. So there we go, something like that. Then he has nice little
eyelashes. He or she. We can go ahead and validate. I'd like to take the smooth tool and just smooth out the end. Then I'll take flattened. And this is how I
sort of shape it. Flattened the bottom until it's pretty much the shape
that I want it to be. So something like this can
even use the drag tool. You can just drag it a
little bit, smooth it out. Something like this. Now I know why my
character's head is a little bit smaller. When I turn it in the top is kinda like an alien
head thing going. So I'm actually going
to use the tube tool and just kind of round out
the back of his head too. Okay, here we go. Let's good. Alright, so let's
add some details to the front of the shelf. First. Leaves are creased tool. And we want the radius
to be quite small. So let's start at ten. And I also don't want symmetry. Okay, so firstly, we just need to make a line from
the top to the bottom. So let's tap Lock so we don't accidentally
do anything else. You want to try to get it as close to the middle as you can. That's pretty good. Let's
also do some here as well. You can actually put on symmetry because this is gonna be equal, the rest is going to be equal or symmetrical, I should say. So you just want to
put a line like that. So the next line,
we'll just make one line coming down
in the middle here. So now let's start
from about here, and we'll do two lines
coming up slightly. Then we'll start
here and we'll have two lines sort of going
down a little bit. Perfect. Let's turn our little guy around and check out the
back of the shell. Let's turn Lock off. So now we're on the
back of the shell. We might need to subdivide
this, but let's see. So basically the shell is, it's only 8,572, so it's, it's not dense enough to
put a lot of detail in. You can try dynamic topology. So if we go here, we
tried dynamic topology, turn that on symmetry. You could try this. Then actually it
looks pretty good. So it's either to do
dynamic topology or you sub-divide the whole the
back part of the shell. So let's do a little test
and just see how it looks. I'm gonna do one line here. They meet in the middle, on to another line here. Would they be in the middle? And then I do a slightly
angled line down. I can probably do it
better than that. Connect those and do
another one like that. Then to do a line going up, do a line from here, there. And then there. It
looks pretty good. So now that we've
done that, let's take a look at the difference. So that looks pretty good. But let's take a look
at the difference. If I take the back of the shell, multi-tier is
subdivided, Let's see, I subdivided twice and
then delete lower. So now we have crease. And why I'm not using
dynamic topology anymore. Let's see how it looks. It looks pretty much the same. Just make sure it's
nice and smooth. It looks pretty much the same. Here, it looks pretty
much the same. So that means that I
think in this instance, I'd rather, I'd rather
use the dynamic topology. So I'll just do this once again. I'll do the same,
the same lines. This notice that I'm
angling up as well. These lines. Alright, so now we do one down and try to make this
as clean as possible. And then I'll just
connect these two. Same thing. So I'll
do one slightly down. Connect these two, this one up, this one is slightly up. This one's slightly down. That looks pretty good. So we'll probably have to go
over these lines again. Once we color, once we
color the, the shell.
13. Shell Edge Detail: Alright, let's add some
detail to the tourists. So I'm actually going to do the same thing
with the tourists. I'm going to actually
use more tourism, going to sub-divide
it just once. So I'm gonna take the flattened
tool and I just want to flatten out this plane
right about here. So I'll start at the bottom. I just want to try to
make that nice and flat. I think that looks good. You can even do a little bit on
this side if you want. A little bit on the bottom. I think that looks pretty good. Now what my crease tool, I really want to
try to add some, some divisions and
the shell here. So e.g. see how that looks. Now if I want a
cleaner than that, then I have to use
dynamic typology again. So I'll turn that on. And I'll start from the bottom. And I'll make this one
a little bit bigger. And I want to make
sure that I bring these all the way around. So they can be a bit tricky. Because what happens
is, you see, I was actually on a
different layer somehow. I don't know how that happened. So I'm going to lock it so I don't accidentally
do that anymore. Another thing I can do, I can hide the head. I can hide all this stuff to make it a little
easier for me. Here we go. So now I can crease in peace. And essentially we just want
to make sure that we have the divisions in the middle so they don't meet up
with these lines. Let's hide the floor to you can just do
one in the middle. Okay. So let's bring everything back and see what we're looking like. Okay? Or show is
looking pretty good. I think it looks great. The only other thing
that I might want to add is this little. So the little detail resubstitute the
crease for the face. I kinda want to
stretch everything. So let's just see how that
would look really quick. Otherwise, it's just
going to bug me. Go to the shading window, and let's go to LEP PBR. Now let's grab
everything on the head. So this ys, because we want
everything to be as it is. All of this stuff. I just want to see
what it would look like if I were to
stretch it out. I think the wider
one looks better. Let's go back to make cap is add these two little
pops right here. I would paint them in, but I'm probably we're
probably going to make him a or by going to make his skin subsurface and
paint doesn't really show that well on subsurface. Subsurface. So I'd like to add cylinder and touch snap and make sure that it's at 90. And then drag it
just tilted forward. And now you can shrink it
and just hit Snap again so you can freely move
around the gizmo. Would that it's snapping. Right? So this looks pretty good. All we have to do is
we want two of them. Number one, so let's just
go ahead and mirror it. Can make it even a
little bit smaller. And just look at the shapes. So it's just like
a teardrop shape. That's all we need is
a nice teardrop shape. Let's validate it. Let's try with the move tool. One thing I want to
use is the symmetry. But I don't want this symmetry. I want symmetry going
down in the middle. So I want the
symmetry button here. And this is the symmetry
that I want the green. I'm going to tap on the
red to turn that off. So basically what that's gonna do is now when I move this down, it's going to move the
back along with it. So something like this. I'm gonna make the move
tool really big and just sort of push on the other
side, on the underside. So we have a nice bend. I also want to push
this way a little bit just so we can sort of get it a little
bit tilted outwards. So now let's bring them both together and put them in the position where
they should be. And this is where you
can actually see. Here's a lot more
forehead in the drawing. Unfortunately, I think I I probably could have made
his head a little bit bigger. Let's shrink these
up. Quite small. Okay, so it's gonna be
something like this. Try to smooth this out. So they're not so harsh. And there's absolutely no
reason why I smooth on one go and smooth on the other because they're
both the same. Let's go ahead and try to
add a crease to his face. And I'm actually going to
do that on a new layer. So let's just tap layer and
let's just call it crease. That way if we want to
get rid of it later, it's just that much easier. So we don't have to
do the upper line, we just have to do the mouth. So we're going to start halfway
down like in the middle. Want a nice smooth stroke. You want to make sure
the end is deep. So something like this. Actually it looks pretty good. The best part is you
can add a new one. You can try. If you want
to just try it again. Now, we can go back if we like
that one, we can keep it. We can try a new one. So I do want to try another one that's a
little bit smaller. I think that might
be the winner. That one looks yeah, this one looks a
little bit better. So I'll delete the other one
and we'll keep this one. So if I were going
to do a nostril, I start with decrease. Let's make this on
a new layer two. So I'd start with decrease
and then inserted just make little markings where I
think I want the nostrils. Then I'll use clay. And you might even want to
turn on dynamic topology. Really small. Then when you smooth it out, make sure to turn
dynamic typology off. Here's a little nose too. If you fancy a little nose.
14. Little Tail & Lighting: What's up, guys, Welcome back. It's a new day for me,
a new listen for you. So I've been experimenting and there's
something else that I wanted to really quickly and it has to do with tobacco
physical shell here. So we're going to take
this part. Oh, no. What's up with this? So I figured it out when
I was stretching the head and I made it a little
bit smaller and I guess I made the shell smaller as well. So I want to add a little
tiny little baby turtle tail back here. So it's kinda tricky. I'm going to use
mood and just sort of pull this up a little bit. Not too much. Maybe something like this. You can see how that
looks a little strange. Just pull this up a little bit. Okay, something like
that might work, that might be enough.
That might be enough. So now we'll just add a sphere. So we'll bring the
sphere down and over will shrink it
really, really small. Go ahead and validate it. And now I'm just
going to take the, I'll take the move tool again. Turn symmetry on, which
is sort of pull it out. And then sort of just make
it a little bit sharper. Something like
this. Think works. I'm going to flatten
out the top of it. So something like this. It looks like a
decent little tail. Now let's slide it in hoops to get used to
the moving things around and just kind of kind of awkward in this new build. Maybe even a little smaller. Flatten it out a little
bit. Just like that. Touch. Just a cute little tail. So I don't know if
I'm going to keep it, but I thought about it
and I kinda liked it. Maybe if I make
it a little wider because he would
have a little tail. So maybe something like
that. It's kinda nice. Alright. I like it. Alright, so let's
make him PBR now. So we'll go to this window. Lit PBR. We have a better assessment
of our little turtle here. I think he looks
really, really cute. I feel like I want to put
something on his head. I don't know what but I don't want to put
something on his head. So let's start lighting him. So firstly, we'll go to the same window that
we did for loop PBR, though our Lighting window, and we'll turn the
environment off. So then he should
be fully black. And we can actually go
to the next window. We can go to the background and turn off the
reference image. I'm gonna go ahead and save. So now we can start
by lighting him. We'll just add our world light. So I'm going to rename this w1. I'm going to try to
just do the lighting very linear in the sense
that I'm not going to, I'm going to try not to
move them around too much because sometimes I can just
spend forever on lights. I love it. So I'll just move this over. So this is just the word light. Anywhere you put
this, obviously, it's going to have Major
shadows on our character. So I'm just going to
leave it where it is. I think it looks good. So we have the
one-world light and I always have it pointing sort
of coming down like this, sort of in the front, coming down like that. So
we have shadow. So we have shadows over here. And while we're
here, let's go ahead and add a camera view. So just go to this
camera and add view. Okay, so that looks pretty good. So let's rename it front, just so we don't get confused. This is our front camera view. So now we can add another light, but we needed light
up this side of him. So we'll go to another
light and we'll add. We can use another world light. So let's see if we
move this one over here and name it W2. We can name this
world light tube, but it's even
though we moved it, it's still pointing in
the same directions. That's how it is
with world bytes. So let's actually move it the arrows so it's pointing on the
other, the other side. So maybe something like this. You can go up or
down depending on what you what you fancy. Think something like
this works well. So, and also you
notice he's very plasticky and I
actually hate that. So I'm going to select all of
the parts that are his skin and everything in the shell and everything and just make
it like a matte white. I just think it
looks a lot nicer. So let's go here
to our Scene menu. And we're going
to take the head. We don't need to have
any lights highlighted. So we'll take the head. This tube is the eyelashes. So let's go ahead and
validate this, this mirror. I'm going to rename it lashes. Okay. So we have the head
of the lashes. I'm going to just kind of
put them all up by the head. Actually, you can connect them
to the head, that's fine. So we have the head, the lashes, and then these are the eyes. I'm going to name
this mirror eyes just so we know what it is. So we have eyes. I'm
going to move that up to. And this is just a
little organization. You don't have to move these up, but it's just a little
bit easier for me. This was my backup I that I
never did in this tutorial, so just pretend it's not there. Then we have back
shell tourists. The tourists is the shell edge. So I'm just going to rename it. Shall edge. This sphere is the, I think that's the tail. Maybe. What is this fear? The tail. So this is the reason
why I name it, because sometimes you can't see all of the shapes,
all of the meshes. So this is all the shelf stuff. In fact, Shell,
shell, edge, tail, we can connect to
that front shell. We can connect to that as well. Then we have this mirror, which is the, let's see, let's just name it brow dots. And these we can actually
validate as well, brown dots. So we're bringing this up
in sort of connected with the head because it's
sort of in the same vein. And these are the limbs,
so let's just name them. So we have the limbs. Then we have the all
the other parts. Okay, so now everything
is pretty much, is pretty much together. So we want to take the head, all of these things, the limbs, the shell, not the eyes
obviously, but maybe the box too. We can throw the box in there. And let's just make it a matte white just to make it
easier on the eyes. Maybe around like 0.500 or so. I think I like 0.500. Maybe even a little more math than that. I'm noticing. I feel like the head wasn't getting oh, see what happened. It's also a good lesson. So I was on this
random layer here, so I'm gonna go to the base and then I'm going to paint all. And now the now it's colored because wondering why the face wasn't getting the color and
it's because of the layers. So I think this looks fantastic. I think it looks much better. Like this.
15. Spotlight Turtle: One more quick thing
that I'm noticing. If I zoom in, you see how
this is sort of not clear, like it looks like
these little squares. So that shouldn't be
like that any eye. And it's just a matter of the I probably can just
be smoothed out. Just make sure you don't
do it on the cornea. If you tap here, it's
gonna go on the cornea, which is the outer shiny layer. So instead, you have to go into the eyes and
just tap my white. You noticed when I tap them, then all of these got selected. We don't want those,
we want just the eye white and we want smooth. So let's see. I'll go to the base on
the eye white layer. Now I'm just taking
my smooth brush and I'm just going to
smooth, smooth that out. You see how it just gets
a lot more. A lot nicer. A little bit over there too.
So now it's a lot nicer. We don't have those
artifacts there. So continuing with the lights, continuing with the lights,
we want to make one coming from the top-down
is one that I like to do. So let's add another light and we'll make this
one a spotlight. And I want to
rename it top-down. And here's our spotlight. We need to use the gizmo, whoops, and tap on it. We need the gizmo
will bring it up. And I just want to put
it directly on his head. And of course you can adjust the all the intensity
and things like that. I might make the
angle a little bit bigger and I might
bring it forward. I'm not sure if I want
a forward or back, but I think that's
pretty good for now. We do have another light,
which we could always add. If we add a light source, it might be nice to hit
them with a light source. But for now I just want
to give him an edge. So maybe we'll give him an edge, either the left or the right. And we'll do that using The,
using another spotlight. So we have top-down, we have the world lights. So let's add another one. And let's change this one
to a spotlight as well. Let's also rename it to edge. We'll just call it edge. I think that I think
that works for the edge. We want to bring behind him. Then we want a pointed at him. And we can raise the intensity. We can make the
intensity fairly bright. Hopes will move it
back a little bit. Now, as long as I have
the edge light selected, you can see it back there. I'm gonna move it off to
one side or the other. Doesn't really matter what size. But you can see already, you can see the effect. And this is why sometimes
it's kind of annoying. But when I'm, when
I'm posing him, when I'm posing my characters. Sometimes you have
to relate them for each pose if you want
them to look the best. Okay, so now I'm just going to straighten out my
light a little bit and sort of pointed
more towards him. A little bit smaller. So
now if you bring it in, It's going to be a
little bit brighter. If you angle it towards him is gonna be a little bit brighter. Maybe something like this. You can, you can bring the intensity up
to get a stronger edge. Things like that. So there's a lot of
different things you can do to give it that nice edge. Put it down a little bit. Okay, I think
that's pretty good. So another thing if you want
to test out the other side, you can just drag it over
and then angle it over here. And you can see which
one you like better. Like. So let's ask what trim his feet and
the shell. Whoops. We do have a little
bit of trimming to do because we want to
make sure that he's flat. So if he was sitting, he'd be able to actually
be able to sit. Alright, so we
have the box here. Let's see what it looks
like without the box. So it looks like it's there are some pieces that go
below where the boxes. Looks like it might
be this piece. So let's bring the box back. So when we trim, we
want to make sure that we have symmetry off. We don't want symmetry. And we also want to, we're going to use
the rectangle. And we don't want to trim it
too close to the top edge. Because when we smooth it out, it's going to move
up a little bit. Because if we trim right underneath his leg and
then we go to smooth it, then the clay will sort of move up a little
bit and you'll see all the jaggedness and
we don't want to see that. So put this back, so it's perfectly left. Trim tool symmetry,
half rectangle. Let's start with the legs. And actually we can make
this longer because the leg goes back under here as well. So I'm gonna do a
little bit underneath. So probably something like this. It's good. Now we'll go on to
the other shapes. So this part trim there. This part. But the same distance. This part might need a
little trimming to this one. I can go a little
bit higher because you shouldn't see this
part of the shell anyway. And then we have the tail. So we'll do a little bit
lower for the tail as well. So let's hide this
and see what we have. So we hide the box. Now we see that it's
trimmed on the bottom. I'll turn the environment
on so we can see. Now the bottom is all trimmed, so it's nice and flat. And I can take smooth and just smooth
this out a little bit. And I don't have to
be worried about actually before you
smooth it. Taps symmetry. So you don't have
to smooth it twice. Okay? And here's another thing. There's always a lot of issues. So if you notice
I'm using symmetry, but the symmetry isn't quite perfect for the
feet, for the legs. This one's a little bit higher. Symmetry is very complicated. I don't want to get
into it too much, but just know that
if this happens, It's because of the
local symmetry. So it's because of the symmetry
of the legs, the arms. And I think even what's
all connected to this, I think the legs,
arms, and the neck. So since we have
all those together, it changes the symmetry. So it's not everything
is going to be perfect. But since we didn't
move the turtle off of the central line
of the project. You can go to symmetry. You can tap world and see
this is the world center. So this is the very
center of the project. So that's the World Center. So using world center, we can tap on the leg. The symmetry is perfect because it's not going
off of the legs, It's going off of
the whole project. So now we should just
be able to smooth it. Just a little soft,
smooth, nothing too crazy. Again, this is like if I
get if I get this printed, it's going to sit
like on something. So, you know, just just kinda want it
to be a little smoother. But you see the mesh sort
of moves a little bit. That's the reason
why I don't do it. Right up to the edge. Because if you lose that, then it'll show when you sit it down like when
I bring the box back. Now it still looks
like he's sitting, so I'm happy with that. Let's turn the
environment backoff. And we actually have
our lighting so we can, we can adjust the
environment light. So let's turn it back
on for an hour to 2.89. This environment is
one that's included. If you're wondering,
this is an image that I made in Procreate. If you want to import it, just tap here. Import photos. You tap the photo,
and then you tap Add. And it will show up down here. So this is the one that I'm
using that I normally use. C has this nice, this nice pops of light That's because of
the environment. And again, there's obviously other environments that
you can use as well. You can play around with.
So 2.89 is way high. So let's turn that down. Maybe one is good or
maybe a little bit more, maybe 1.25 or so. It's probably decent. I think
that looks pretty good. I do like how it looks without the environment
and I think it's very, it looks, it looks very cool. The thing is, is you can add a little bit more shading when it comes to post-production. So that's why I make it
a little lighter now. So when it comes time for
post-production, I can, it'll be a little bit more dramatic. But I think
that's good for now.
16. Paint Job: So let's go ahead and
color this little guy. This is the fun stuff for me. So we'll tap on his head. And he has a base. He has like all
these other things. But I think I just want to
color the base because I can always come back
later and adjust it. So we'll color the
base for the head. I think that's the only
thing that has layers. Yeah, that's it. So
we'll go to our colors. And I think we wanted to. It's kind of nice. I think that that's nice.
A little bit lighter. So something like that. I like the roughness.
Let's do pain all. So this is this
color is 81818181. If you want to do the
same exact color that I'm doing, be 8181. Now that I've colored,
I noticed that this is a little crazy. These are a little crazy here. They don't they're
not really going smoothly into the into the face. So I'll just take my move and just see if I can adjust
them a little bit. Let's turn symmetry off. As we're quite hard. As you can see, it doesn't
look really smooth at all. I didn't see it before. Lock. Okay. So not perfect, but I'll take it for now. I might do them again, but I think there are, I
think it's fine for now. So let's take these
and color them black and turn roughness
all the way up. We don't want any shadows
or anything on the eyes. Okay. So now we have
the rest of his body. So I'm going to go to the paint, go to this little eyedrop here. Boom. Now I'm going to touch this
once that grabs the color. And now we want to
just cover this. So a tap on the arms
and legs, tap this. Paint all go. Now we have the front half. I think we want sort
of a yellowish color. Let's save. So think we
want a yellowish color. Maybe something like that. F phi d894. Pretty good for now. Alighted. Now for the back of the
shoulder we want brown or do we want greenish? Think we want like a
light sort of soft brown. So maybe something like that. This color is b f986c. I think that's
pretty good for now and I might change these colors, but I just want you to, if anyone wants to
match the colors, That's why I'm
doing it like that. So this part should be, I feel like a little lighter. Maybe something like this. Or maybe it should just
be the same color. Let's see what it
looks like. I think I like it the same color. I think I like it
the same color. Rooms forgot his little tail. In order not to do that again. I'm going to join the
tail and the limbs. So I'm going to
take the tail and limbs and I'm going to tag them both and then
I'm just going to join. I don't know what
happened to the color, but I'll paint it all loops. Color. I drop tail. Here we go. Very nice. I love them. I love it. So this, let's see what color we want this I think maybe
a little lighter. Nothing too crazy. Okay. So I'm very
happy with it so far. I think it looks great. And I always add
my little shadow. Let's go back to my whites. So we have Iwate, unselect the corn and pupil, just Iwate. Let's go to the layers. So we have a couple
of layers here. I want to add a layer
and name it shadow. I always do this. I always
add my little shadow. Now let's do a paintbrush. Black. And I just like to do, I'd just like to paint
the shadow on the eye. And then I'll take that
layer and bring it down to maybe
something like that. 0.600 or so. I always do that. Okay,
So I was looking great. The only other thing that
I want to do is maybe give him some facial details. So his eyes a little,
a little iffy. Get rid of this mouth. What does this? Let's get rid of this two. We don't need those
extra layers. So I'm just in the head. I'm in nostril. That's crease here. So I want to smooth this out because you can see
when you get close, this is because of the because we use the
dynamic typology. But should be good
once we smooth it out, should look a lot better. So let's take this color. Let's take our crease and we'll tap this little circle
that's the line through it. Eyedropper. And then
we'll tap the screen. So now we have the green.
Let's go darker with it. So we'll go darker
and more rough. And remember we're
using the crease tool, but now that we've
tapped the color, it's going to do the crease, but it's going to add the color. So now we'll start
right in the middle. And we'll just go
along or crease line like that and it will make it nice
and dark in there. And we can take the
smooth without intensity, and we can just smooth out
the color a little bit. I think that looks good. I'm going to tap on
the base and just smooth out a little bit
of this. His mouth. And a lot of these, a lot of these weird markings are
also from the shadows too. So you have to be careful
because the shadows will sometimes make it
look like there's a pattern on the skin
and it's just a shadow. So let's do the same
thing with the nose. Crease. Just add a little bit
of creasing here. We'll take just a
regular smooth, Let's just see how it looks. Just kinda blend the
edges a little bit. Here. I think it looks good.
17. Color Details: So there are some other little
options that we can do, a little tiny things
that can help. So e.g. on the, on the hands
and the hands and feet, we can add a lighter
color to the, to the palm sort of areas. So among the limbs, I just added a new layer. And we can just name a lighter because this will be lighter
than the skin color. And again, you just tap
the little eyedropper, get the color and then just
bring it up a little bit. I'm going to make sure
that I'm on world this way when I color the limbs and I know that there'll
be symmetrical. So that's another little fun
detail that you can add. Cold hands and feet. And other fun detail is to
give him a little bit of blush for his nose and
cheeks and things like that. So for the head, we'll just add a new layer and we can
call it a reddish. So then we'll just go to read. Maybe around here. You can bring the intensity
down to about 35, make the brush around 50 or so. Maybe a little bit bigger. You can just lightly
go over the nose. Make it even bigger. Lightly go over a little cheeks. We can take our smooth
with no intensity. And we can just blend
this in a little bit. At least try to when that as much as we can
and then take the smudge. Smartest is pretty decent. Smooth won't work. Okay, So I'm just
trying to smudge it around a little bit. And maybe since smudges and since a blend or smooth
isn't working so much, I'm going to turn
the intensity down and turn the brush
up a little bit. And I just still
want to lightly go over these parts of his
face a little bit more. Even though it's really light
and you can hardly see it. It does make a difference. So now that we have that, we'll go to the layer and
lower the opacity of it. So you can just see it. So maybe something like that. That's another little trick. You can do the same
with the hands. Let's do reddish. Just add a little
bit of redness to the fingers and the toes. Just the slightest bit. We want it to be like
barely noticeable. Okay. I think that's good. I want to bring these down into the skin a little bit more. I'm going to change the pivot so I can go straight
down with them, which is straight
down like that. Okay. Let's go ahead and
make this like a warm gray color.
Can validate it. If you want to do
a little extra, you can always do
the same thing we did for the mouth
and the nostrils. To the shell. So essentially, we take the color of the
shell, make it darker. Then you have to just
trace your lines again. So let's use crease. And I don't want symmetry
for the firstline. Pretty good. Can
turn symmetry on. And you can just trace
your lines like normal. And same thing with the
back part of the shell. Grab this color and
make it darker. And we'll just trace our lines. Thing I can do that a
little bit straighter. Really gives them the depth. Really gives it that little
bit more depth to just make it look a little
more realistic. I'll do the same with this. Just solo this. I want to make sure
that I don't move too far back as well. Because the furthest side, the farther I moved back, the thicker the crease will be. Can you guarantee to these? Let's take a look
at the color here. I might have to just I mean, I think that's
pretty much it. I think I'm happy with them. Let's turn on some post-process.
18. Post Process: Let's turn on some post-process. Really see what he looks like. He looks great. So
in post-process, this will all be
specific to your, you know, your, your iPad. Because some things will
be a little bit different, but we'll just run through this. I'd like to turn my render
resolution all the way up. I always keep this
on reflection, global illumination,
and keep on. I didn't want to test out
having the body B subsurface, so we'll test that out as well. But for now we'll just keep
going down the line and global illumination,
ambient occlusion. See this, this keeps
it nice and dark. I don't even need it that dark. I think that's good. Depth of field is fine for now. Can take a little bit of,
a little bit of blur off, so it's not so blurry. I think this looks good. And here's another, another tip. If you're finding that you
kinda want the background to be blurry but
not the character. It's because of the box. So just add a plane. Let me turn, turn turn up
post-process off for now. So we'll go here and
just add a plane. So you want it just
below the gradient, right at the level
where the boxes. Okay? So now I'm just going to spread, whoops, turn it off. Now, it's going to
spread this out. It's printed this out. So now he's on the plane. We can get rid of the box or we can just hide
the box for now. So we'll color the ground
terminal. Open this up. Now let's turn off perspective. So we turned off perspective
and I don't like it 19, I'm gonna put it down
to maybe 12.5 or so. 12.5. Stretch this out
a little bit more. So now it's more
like he's sitting on the ground, will
do post-process. Now you have a
little more leeway with the depth of field. So far blur, I'll
turn all the way up and even change the color. This here. Alright, I think he
looks pretty good. I think I'm going to
call this guy done. But really fun to make. I'm always worried
in the beginning. I'm afraid that is not going to look good enough for me to like, I've never gotten over that. I think that's just
how I am as an artist. But if you just keep with it, if you just work in those small baby steps
and make a formula, then he won't let yourself down. You know, even if you
have to make a ton of changes, just do it. Because it's really,
really rewarding when you get something
that you really like. I'm going to save this view too. You can see I just made the background a
little bit lighter. And I, I, the light w1, I just made probably
roughly like 200%. So that was the only difference, difference that I just made. I did forget we wanted
to see what it looked like if he was subsurface. So we'll do the head limbs, see if we can make him more
a little bit more depth. Shadows are a little he's
just a little softer. Subsurface, which I
think looks great. Let's change everything
that's subsurface. Why not? Just keeps everything such
a nice, realistic look. It's truly, truly special. Get rid of those like
really dark shadows when you don't want them. Southern knew a few
extras. On little turtle. I actually made the eyes. I sort of just squish them. So I think I can probably
just show you here. But I selected the eye, the cornea and the pupil, and I just squish
them back down, made the eye a little
bit bigger and then I made the pupil bigger. You can see the difference. So this is how it
was made them see, I squashed them a little bit and it made them
a little bit bigger. And then it made
the pupil bigger. And you can see there's a
big difference in Q-factor. There's just so much to do. So I'm going to continue
to work on this. But I think I'm going to
call the project done. But I will be doing more. I'll work on him some
more, probably on YouTube. So I'll see you in the next video and we'll
chat a little bit more.
19. Thank You!: Alright, thank you guys
so much for joining me and just hanging out with
me and sculpting with me. I hope you had a good time. I hope you learned a lot. This has been a new
passion of mine teaching. So of course, if you have
any suggestions of things, That's just you bet I should do better, please let me know. Also the class project. Be sure to rate and review
my class and also upload your designs to the project and resources tab. Create project. I would love to see
your turtles and I'm sure everyone else would
love to see your turtles. And I want to see what
you do if you change it. If you, if you experiment,
I want to see that as well. Feel free to upload whatever
you want to upload. I'm happy to see. I'm happy to give you feedback
if you want it to. Of course, you can check me
out on Instagram drug-free, Dave, TikTok or YouTube, all drug-free, Dave, I actually, I actually continued to work on this turtle and actually
made another turtle. But I continue to work on classes afterwards and I just
post them to my YouTube. Even make the thumbnails
for this class and lots of different things that I just continue to do
and I always do that. I finished his sculpt and then
I just keep working on it. So make sure to check that out. But yeah, I don't want to
take anymore of your time. I really appreciate you guys. As always, keep drawing, keep sculpting, and I'll see
you all in the next video.
 Dave Reed, 2D & 3D Illustrator - Brooklyn, NY