Transcripts
1. Teaser Trailer: Hi. In this class,
we'll be building a spaceship inside of
Substance modeler, a new three D modeling
software that streamlines hard surface
modeling with a clay life workflow and
streamlined interface. It's a simple, but
powerful program that beginners can
start with quickly. Follow me as I build out a
spaceship from scratch and learn about the possibilities of what you can do
with this program. I'll be demonstrating
various techniques to achieve interesting sci
fi shapes in real time. Let's start with
the first lesson.
2. Main Block Out: Side of substance
three D modeler. It's a fairly new program that's only been around
for a year or so, and I like it a lot because of the simplicity
of the interface, and it allows you to do
some very cool things without the technical baggage of traditional
political modeling. So let's start with a quick
rundown of the tools here. They're pretty self explanatory. Here's the slick tool to top. Clay tool is how we do the
majority of our modeling, you choose one of
these primitive shapes that most closely resembles
the shape that you need. And it's a matter of adding a shape and then subtracting
with the ras tool. And with this combination of adding basically a chunk of clay and then taking
a chunk of that out. Is how you create very
interesting shapes quickly. And then below that are a bunch of very familiar sculpting tools that will also be self
explanatory if you've ever used any three D software
with sculpting features. So let's choose a
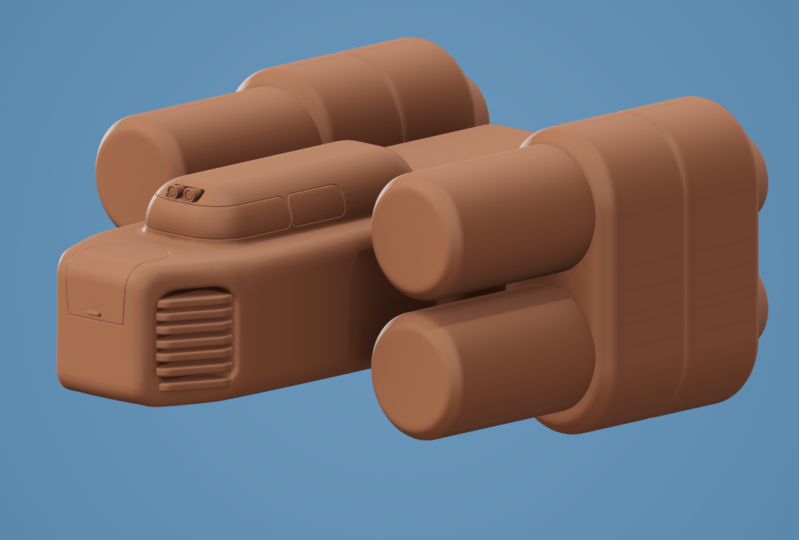
subject to model. And I think I can't go
wrong with a spaceship. Let's do a blockout of the
main hall of the spaceship. I'm hitting space to
apply that shape, and then maybe we can
switch to a cylinder. Rotate it 90 degrees
and switch on symmetry by pressing right click and toggling this
symmetry button. In that way, I can move
this clay shape around and the other side will mimic
what you're doing over here. I'm going to play
with the sliders here to smooth out the edges, and then these little
white dots you can use to manipulate the size and
scale of the clay tool. So I'm looking for a good spot
to put a pair of engines. Maybe the engines are
pretty oversized. And actually, before I do that, I want to add this in a new
clay layer so that it's not lumped into this
main hale and we can manipulate it separately
down the line. Same with the upper engine. Keep that on a separate layer. So by keeping those separate, if I want to move this around, it doesn't drag
everything along with it. And I want to add some clay
shapes to this main shape. So I'll select it first and then play with the sliders
to smooth out the edges. And then hit space to apply. And then you'll see that it
combines the two shapes, and there's a smooth transition. Moving on. When you press and hold control, and then drag the
white dot here. It will only move that surface. Without the contro button down, it's going to just
scale it evenly. So if you like this
bottom face is, but you just want
to change this, then you hold the
control button. So again, soften the edges. That's what That's one of
my favorite features of this program is the sliders to just quickly
smooth out edges. If we were in Blender, say, you'd have to either apply
a couple of modifiers, you'd apply a Bevel
modifier or add some edge loops and apply
the subdivision modifier. So it's not difficult, but it takes a couple of steps. Uh, whereas here it's just just flick this
slider up and it's, you know, instant smooth edges. So, I just want to had some a blocky chunk for the back of the ship and we'll keep that
on a separate layer. Notice how sometimes
I combine shape, sometimes I keep them separate. It's just to allow for
flexibility down the road, let's say I want to push this further forward or further back. I have that option later on if I don't combine everything
from the beginning. Something else you can do is we're not limited by the
shape of the primitives. If you say want to create a shape that's basically that has a cylinder in it, but you want to elongate it. Not like this, but
maintain this semicircle, but just just extend it. You could Hold the space bar
as you drag this shape down, and then you have this shape. I'll copy that and put
another one in the back.
3. Engine Detail Back: I'll grab the cylinder
primitive again, rotate it ops, rotate it 90 degrees
if it if it'll let me. And I want something
a little conical. So that's where the
taper slider comes in. You slide this up to have it just like
the name implies taper. And then we can have
a shape like this. Now, the other thing I want is an opening here for the jet, and you can do that by pumping
up the thickness slider. In combination with
the taper slider, you can get an interesting
shape like this. On top of that, if you want
to sand down the sharp edges, like we've done with
all the other shapes, bump up the full value. And now we can have
our jet exhaust shape. I don't know if that's
the technical term. I'm not a rocket scientist. But let's just go with it and hit space to apply on a separate layer
space to apply again. Having these separate
allows me to line them up separately like so.
4. Cockpit Detail Pt. 1: Go back to this cockpit shape. I want to lop off
the corners here, make it a little
more aerodynamic. So I'm going to
grab the clay tool again and line them up at
the angle that I want. This is a shape. This is a shape I'll be
using to subtract. I'm going to switch over to
the ras tool and it gives you a nice preview of where
you're going to subtract. G So go ahead and hit space or let me just push it out just
the angle and hit space. So we got corners cut off. But now we have
these sharp edges. So to deal with that,
you can switch to the smooth tool
by holding down D and just gently left clicking
your mouse over the edges. And the program is
making this neat sort of sound effect as
you use that tool. So you could either hold down the D key or just simply
click on the smooth tool. Sorry, correction. The D key switches you over to
the flattened tool. And to quickly switch
to the smooth tool, it's actually holding
down to the shift key while you have a
clay tool selected. So you can't it won't let you switch to the smooth
tool while you're in slick, but while in clay, holding down shift will give you
the ability to smooth. Okay. In fact, let's do this. Oh, and now that we have our clay tool kind of
in this weird angle, the way to reset it is this button here reset gizmo in the bottom center of the screen. I have an idea to do something interesting with these corners. I think I'll carve out
a little pocket where some like exhaust intake or a sort of like a
carburetor grill could sit. If I do something like this. Switch to a race tool, take a chunk out, and
notice these jagged edges. We can alleviate that by
increasing the resolution, and notice how it's
much smoother. On a separate layer, I
want to add row of fins. Move these into place, change the angle. Make him thinner. And then just hit a ply, drag down, hit a ply, drag down, repeat it multiple times until we've covered
the entire opening. Now we have that on
the other side, too. And so add a little visual
interest to the ship.
5. Cockpit Detail Pt. 2: Another cool thing
you can do with the ra tool is if
at the top here, if you switch from
ras tool mode to split tool mode, that will do. Let's say, I want to create a seam line like
the hood of a car. All right. See, I don't
want to take a chunk out, but I just want to
create a seam line. That's about that shape. And hold on. Just the taper slider to make this line
parallel to our corner. Like so. I hit space, and it's going
to cut this chunk out, but not delete the shape that was inside
the erase volume. As you can see there. But if
you just leave it in place, you could pull it out
and do other stuff. But this essentially
creates a seam line. And we can reset this shape. There's several
ways to reset it. He hit the reset button here. There's the reset button here, or you can double click the
the actual primitive icon, and that will also reset it. Adding something that is almost like a handle. L, let's say this is the hood of the spaceship where
you pop it open, the engine is underneath. You would want maybe some
kind of handle to hold onto. This could use some windows. So maybe this is
another situation where our the split
tool can come in handy. So we could split that. Put this back, split it again, push it back once more. Maybe we don't have
windows here because it engines right outside. These little cutouts
can be our window. Could cut out a shape the
top of the roof here. And I'm thinking we could
have we could put some, like, lights sitting
on top of this cutout. Like a lot of trucks do. Or like, really any
heavy duty vehicle, a lot of them come
with light attachments on the roof of the vehicle. So let's switch over to the race tool and make sure we switch back to a race mode, so that chunk will be
gone when we hit apply. So I need to press down shift in order to
rotate and increments, but that's also conflicting with the hot key for switching
to the smooth tool. But I finally got
to do what I want. This will be lights. It's going to be two of
them sitting right there. I'm making sure that I have
everything de selected so that this shape comes
in its own layer. I hit space to apply. And using that same shape, I want to cut out the
the actual light, and then maybe put it back.
6. Cargo Bay Detail: We can move on to
this back piece here. I think we could cut out a
big chunk from the back. Switch to. Something like that, maybe. So the idea was
that these would be more exhaust or jet
exhaust events. But then I just
realized we need a way for people to get in
and out of the ship. So maybe a better idea would
be to switch off symmetry, reset the position, so
it's in the center and actually create
auto for bay door. So Okay. So I'm going
to use the split tool. I also want to cut
out a chump here. Go back to the clay tool
and add something here to imply ad like a hinge to show how this door
opens and closes. I have it sitting
somewhere in there. Make sure it's own
separate layer. We don't want it to be merged
with this larger shape. And we can use the split tool to create some seams oops. Make sure you have this hinge selected so that that's the
only thing that's split. Because when I have nothing selected and you use this tool, it's just going to apply
the split on everything. Actually, I'm just going
to undo that last split.
7. Cockpit / Cargo Bay Connection: Want to cut out a chunk of this ship where
it meets the cockpit. And that'll create a more
believable transition, I think. Okay. Thanks. Huh. Something was off
about the a tool. So I had to do a little reset. But no biggie, just
reposition and try again. Trying to match the
roundness to the cockpit. Okay. Now, let's apply. A, we don't have
anything selected. We got to reposition
it third time. Sometimes model has issues with remembering where you
positioned your clay tool. It likes to reset the
position if you click out of something or deselect or Yeah, deselect a shape and you return to the clay tool,
it's in a different spot. So try that. Okay. That's all I
was trying to do. Cut out this little
shape so that this fits into this back shape neatly. Now, I'm going to
use Control H to hide these massive engines. So I can kind of see better
what's going on here. Oh. So let me see how this cockpit
shape kind of stops here. So I want to add
something to extend it. In fact, let's hide this. Position this Like, so and unhide everything,
hide these again. And let's just go ahead and add this shape with
small adjustments. Hey, go ahead and apply. And then we have this, which isn't perfect,
but I can't see it. So that's going to sit
better onto this piece. Just to make sure that
we technically have a connection between
these two pieces where the pilots would have a way from going to the cockpit to the
back door here. Let's add this piece. I sure it's all of this. Okay.
8. Engine Detail Front: We haven't paid any attention to these engines in a while, so we'll get to
that in a second. One more thing I want to do before we move on
to the engines. Maybe lop off the corners
of this back piece. With the symmetry on, let's see what that does for us. I just want the front of the
engine to be unobscured. Okay. So that gives us that. Yeah, let's do something about
the front of the engines. We need something I just realized the engine
shape that we created by holding
the space button and dragging our clay tool. We can actually achieve
the same thing with the tool by pushing the round
slider all the to 100%. And this is great because
then I can create a whoops. Yeah, it's the
shift key fighting between two different shortcuts. This is great because I can
taper the shape like this. Then here, I also want
some kind of opening. Like so. Press. Actually, before I
do that, turn on symmetry. But actually, let me hit a
ply and then after the fact, you can turn on this repetition, and then it's going to
create an instance on the other side and that's
different from symmetry. There's actually two pieces
of geometry on both sides. This one, if you turn this
off, the mirror is gone. So it's an instance,
and that's indicated by these striped lines. So now that I have that, you need something in here. Maybe we'll cut out We'll cut out or carve out
shape into the engine. We don't need this thickness. We want this to be smaller. We don't need to taper. Re size to match the shape of
the inner opening here. Again, I want to extend it
to the back and cut out an opening. Like so.
9. Engine Detail Overall: What are we going
to put in there? We could either
add fins like this or we could add cylinders. We at the top, at the bottom. Thing about the symmetry
is it's not per object. I think it's just when
it's on, it's on. So even when you
create a new object, it's automatically turned on. So this could could get you when you didn't
want the symmetry, but you still have it on.
You just didn't remember. And s So I'm trying to say if I like this or you know what? I think what I'll
do instead is just add a long piece, not even a fin,
but just something that fills in that hole. Vertically. Maybe it has a taper. Okay, like that. Okay,
Apply. Yeah, I like that. So we have the mass out of the ship more or less
in place from here on, it's really just adding
a bunch of details. You can do that pretty
quickly with the split tool. You can also just add shapes. I want the back fin here, this fin on the top to
be more aerodynamic. I'm going to the
front corner there. Like, so. And then Let's bump up the resolution and
gently smooth things out. By holding down the shift key. Okay? And then we'll do
something for the back here. I could use the cylinder shape, and I want to create
some cone shapes that are going to sit right in the center of the jet exhaust. I'd apply, and it'd apply.
10. Landing Gear: We've hardly paid any attention to the bottom of the ship. So let's imagine how it would land upon
entering a new planet. Go ahead and save, be a good time to save since we made a lot of good progress. We can simply cut out a
shape in the front here. Make sure you got the
split tool mode on. And then we could
use this piece, drag it out, and use it as part of the
landing mechanism. And we can do something similar. Here. Let's say actually on this piece. It oops. I accidentally added the shapes. This is what I wanted to do instead these are this will be the part of
the landing gear. I just want to make
sure it's lined up with this front piece it is. And we simply need to add the mechanical parts that connect the landing pad
to the body of the ship. Let's turn symmetry off. L et's reset our tool,
so it's centered. Go easy on the edge smoothing. So I'm going to add that. Maybe this shape a couple of
times on separate layers. Now, I'm creating the
connecting pieces. Also on the separate layers. I'm going to cut
out a ring shape to really help sell the idea that these
are mechanical hinges. Probably combined these by right clicking and merging them. Emerge you again. And let's group this mechanical. I think you can do
it by go right, hit this group button. Yeah. And then when
you click this, it'll just select everything. Instead of you having to go through and select
them individually, control D to duplicate and just copy it for the
back landing pads. And then right click
it repetition. Copy that instance this
on the other side. Maybe this one's backwards
like that. Yeah.
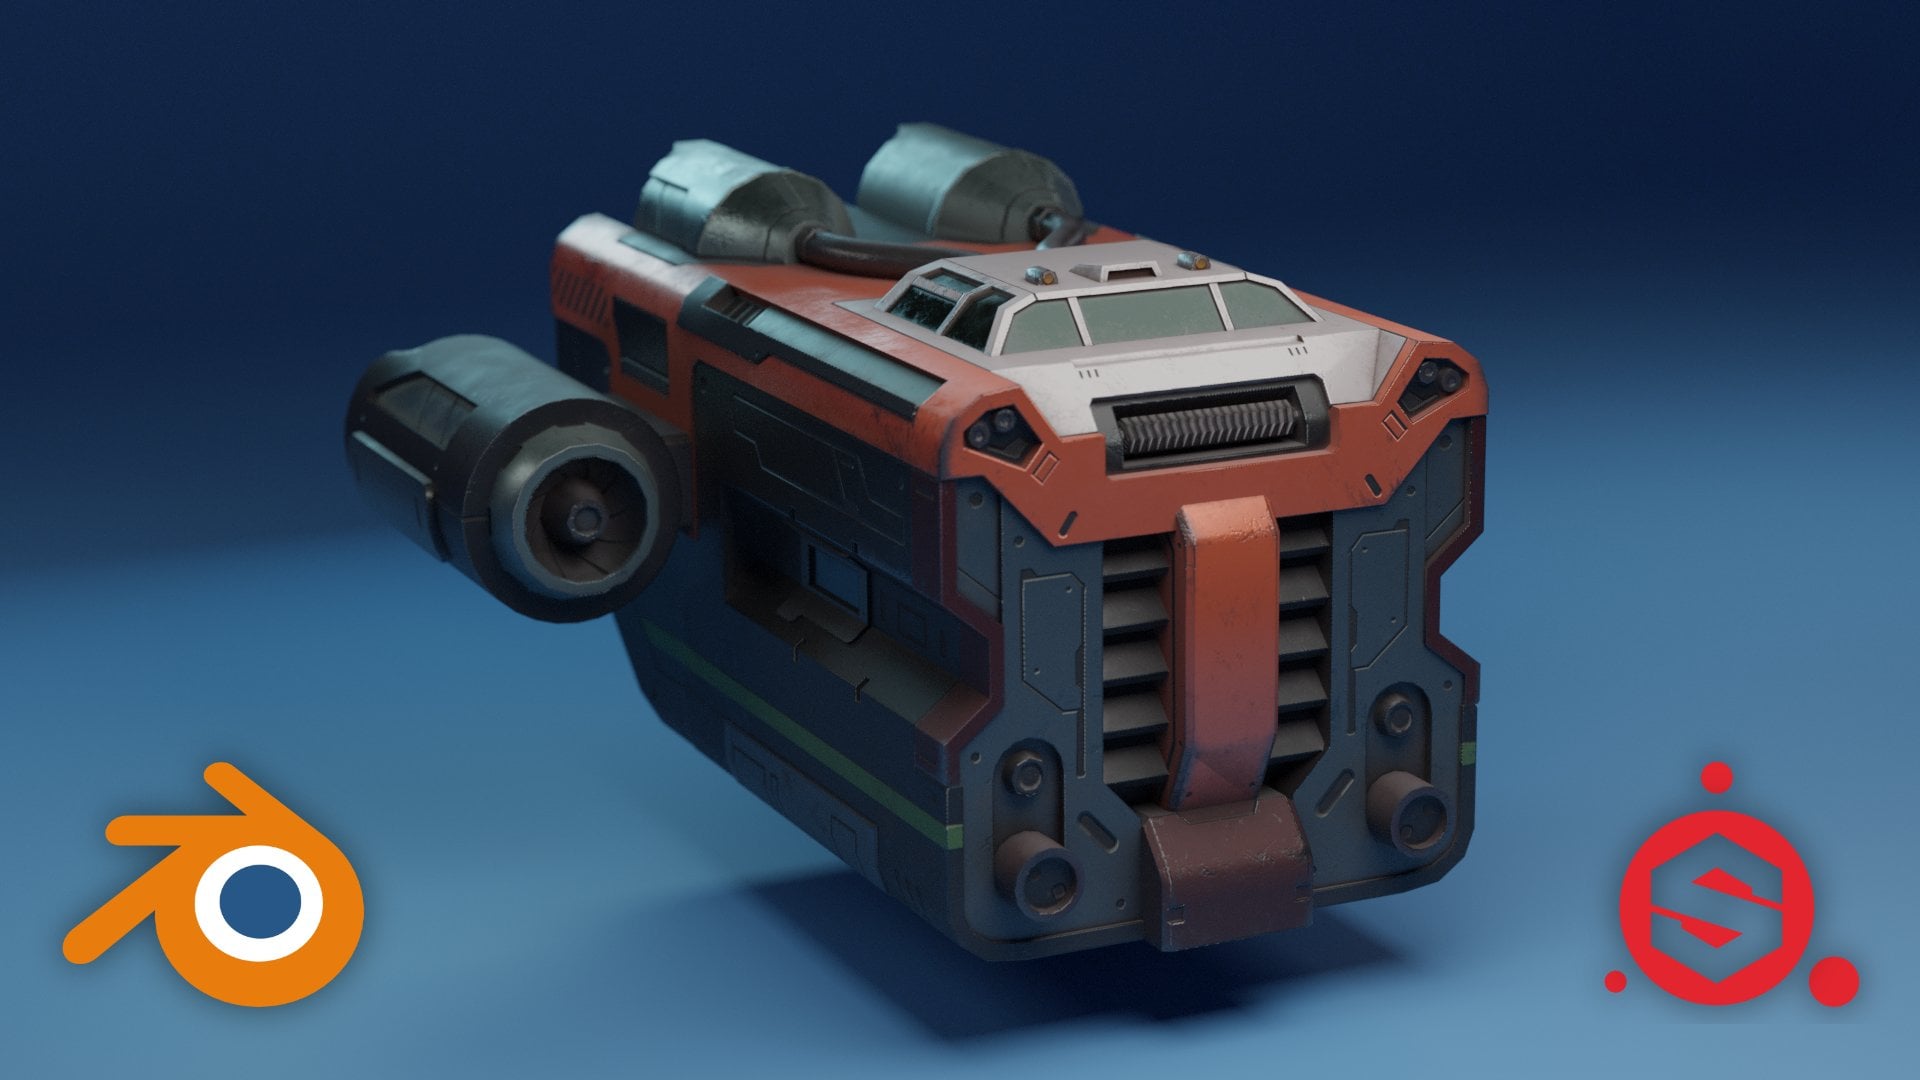
11. Conclusion: We got our landing pads. We got some details
on the surface, and you could actually spend a lot of time adding
way more detail, but I think this
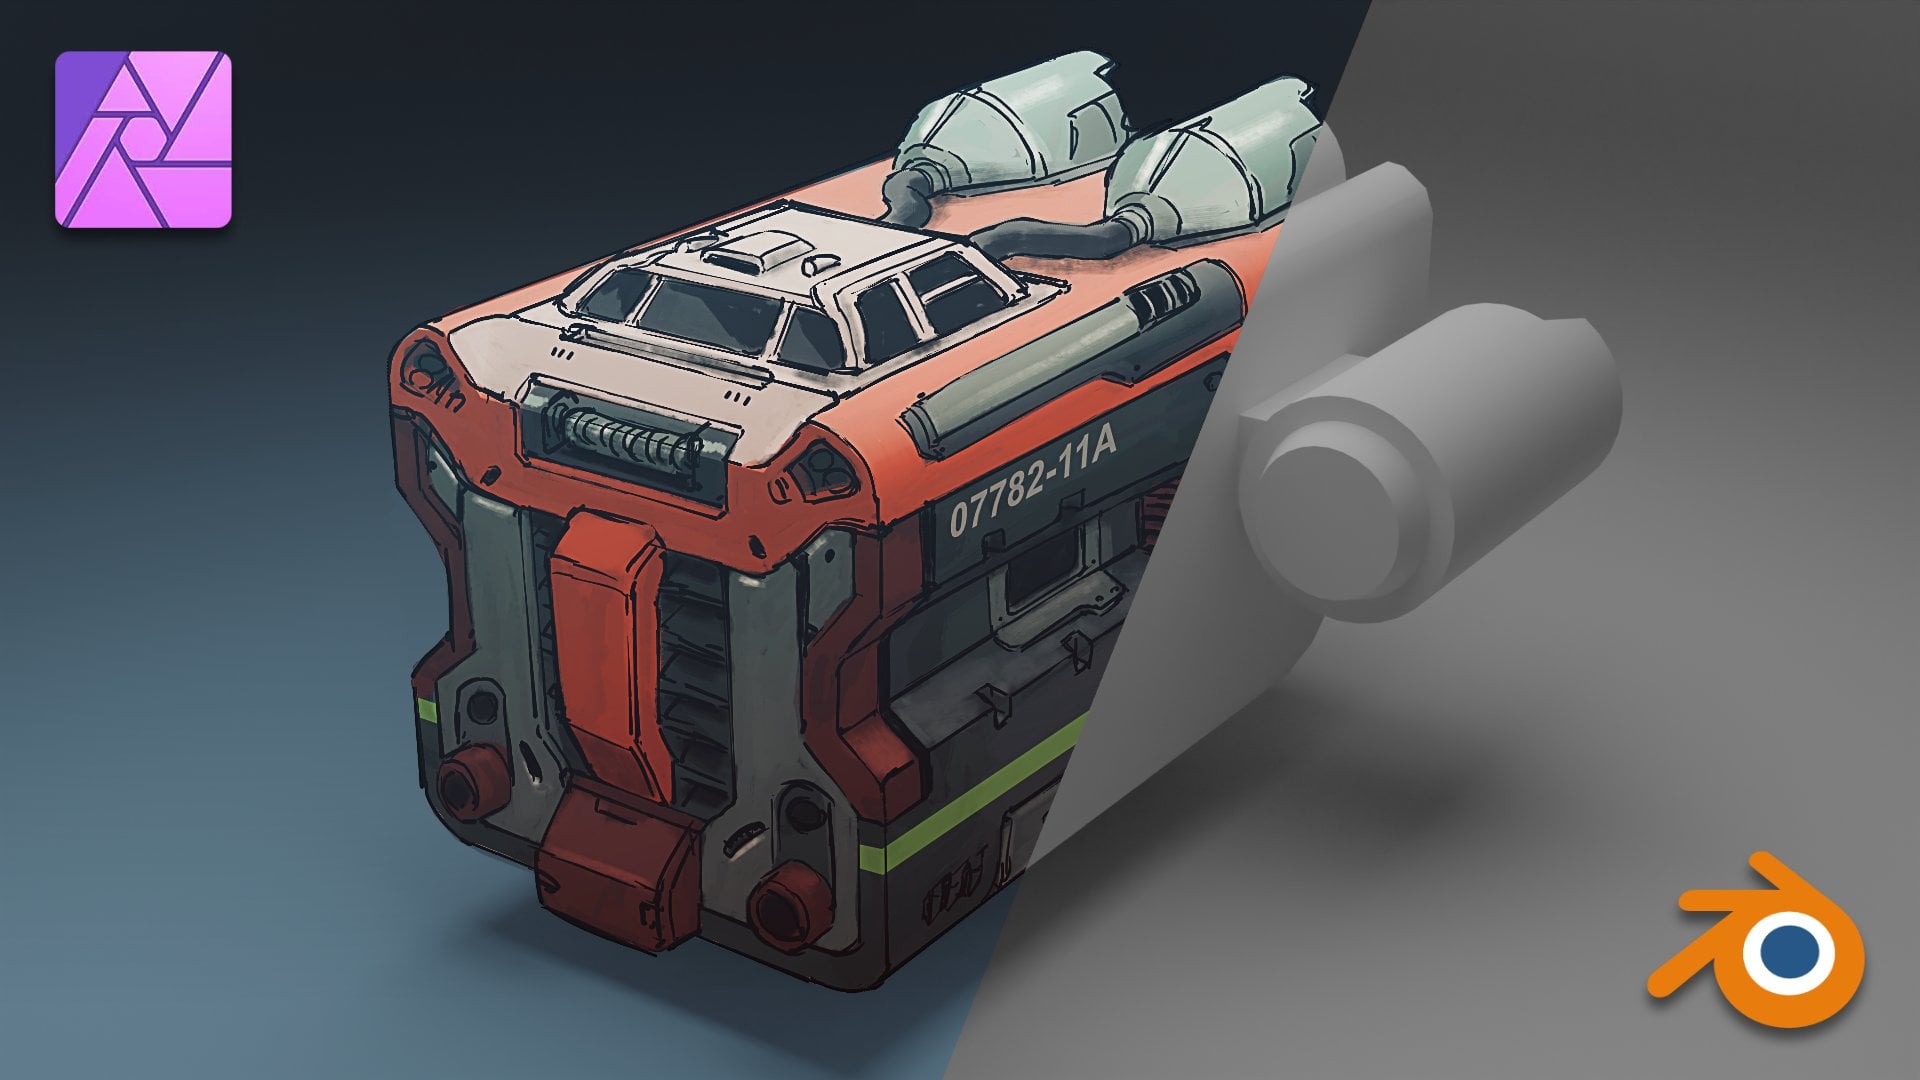
is good enough to add some color throw it
into blender for a render. The top right button here, there's a color picker material. This is an easy way
to apply color. If you want to? And
the color picker. The color picker will
just add a flat color, but if you go to
the material tab, add scene materials
edit properties, you can change the roughness, metallic and really
play around with the materiality of your colors. So this is be one step above simply choosing a
colors if you add a whole bunch of materials
and then simply select a object and apply to selection You can go through the whole
ship that way also. But I'll leave that to you. This is how you create a
spaceship in substance modeler.
 Design Boy, 3D Designer