Transcripts
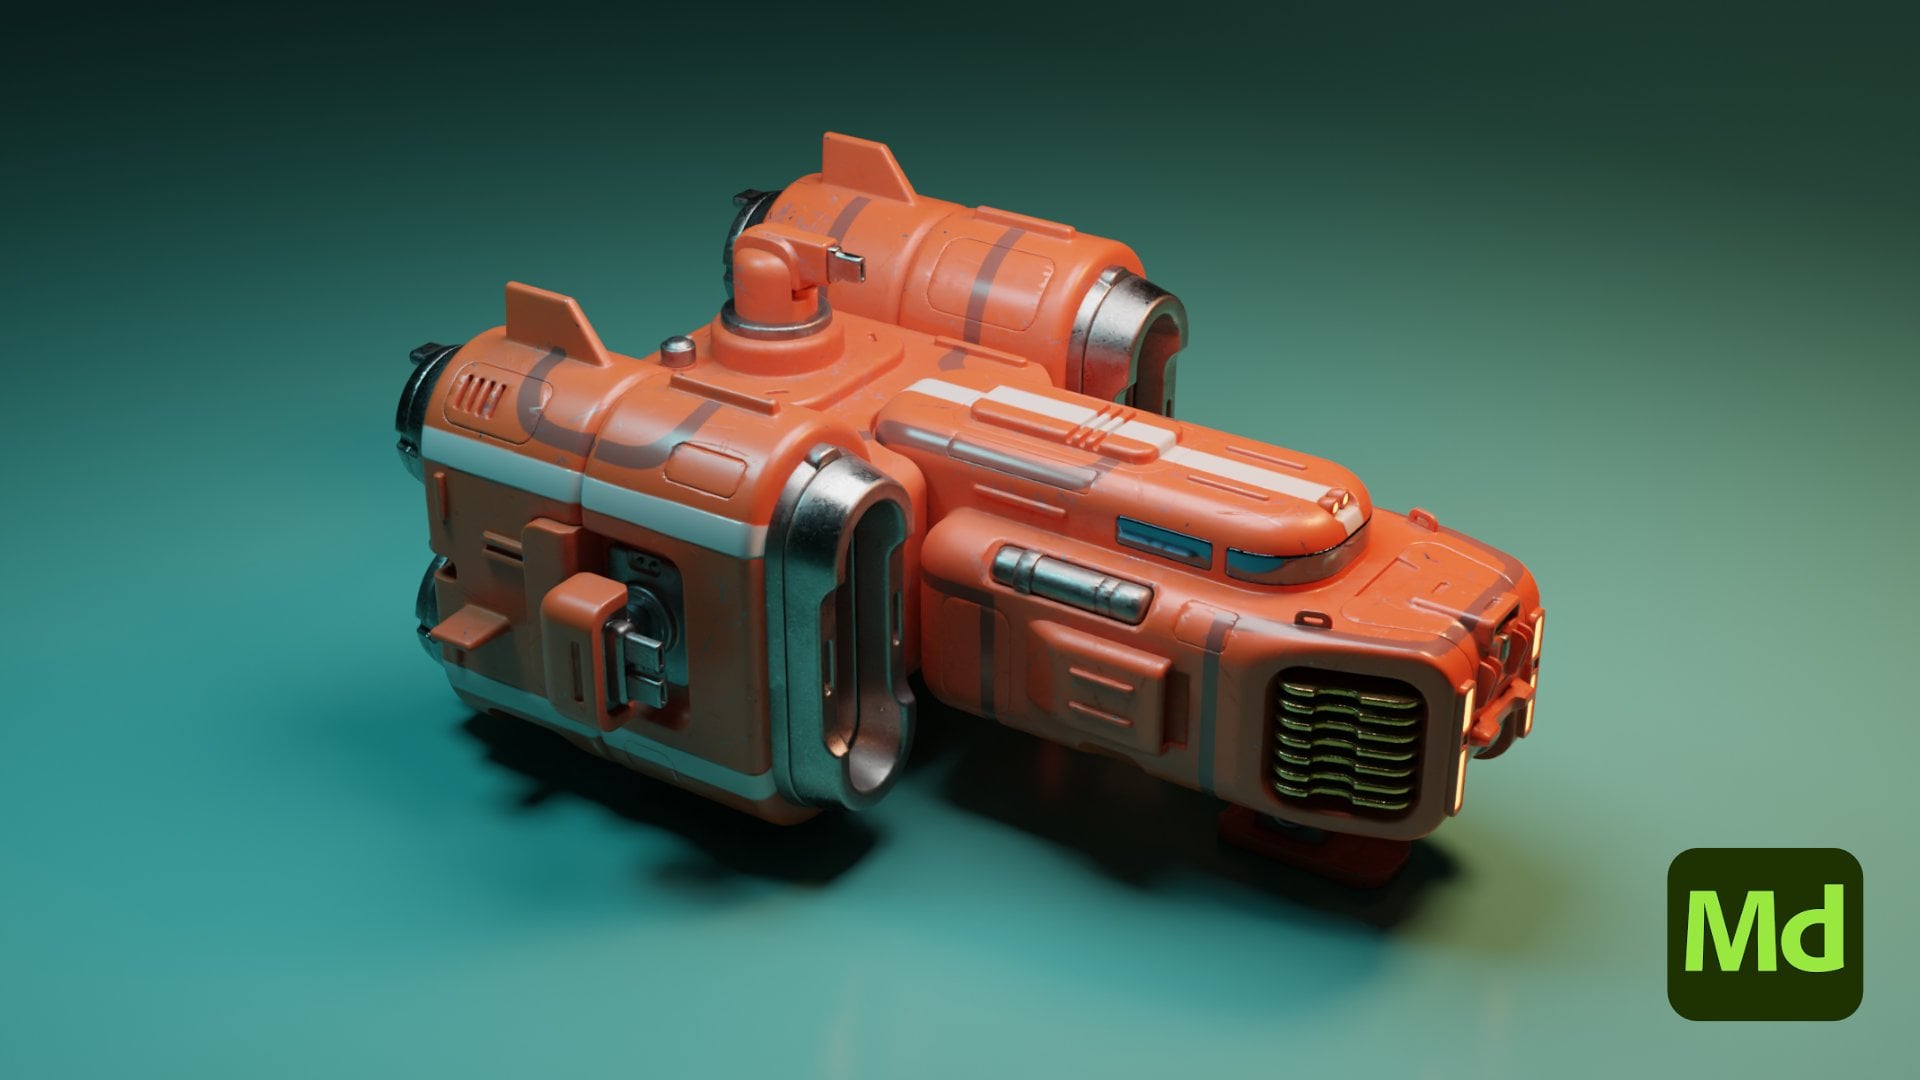
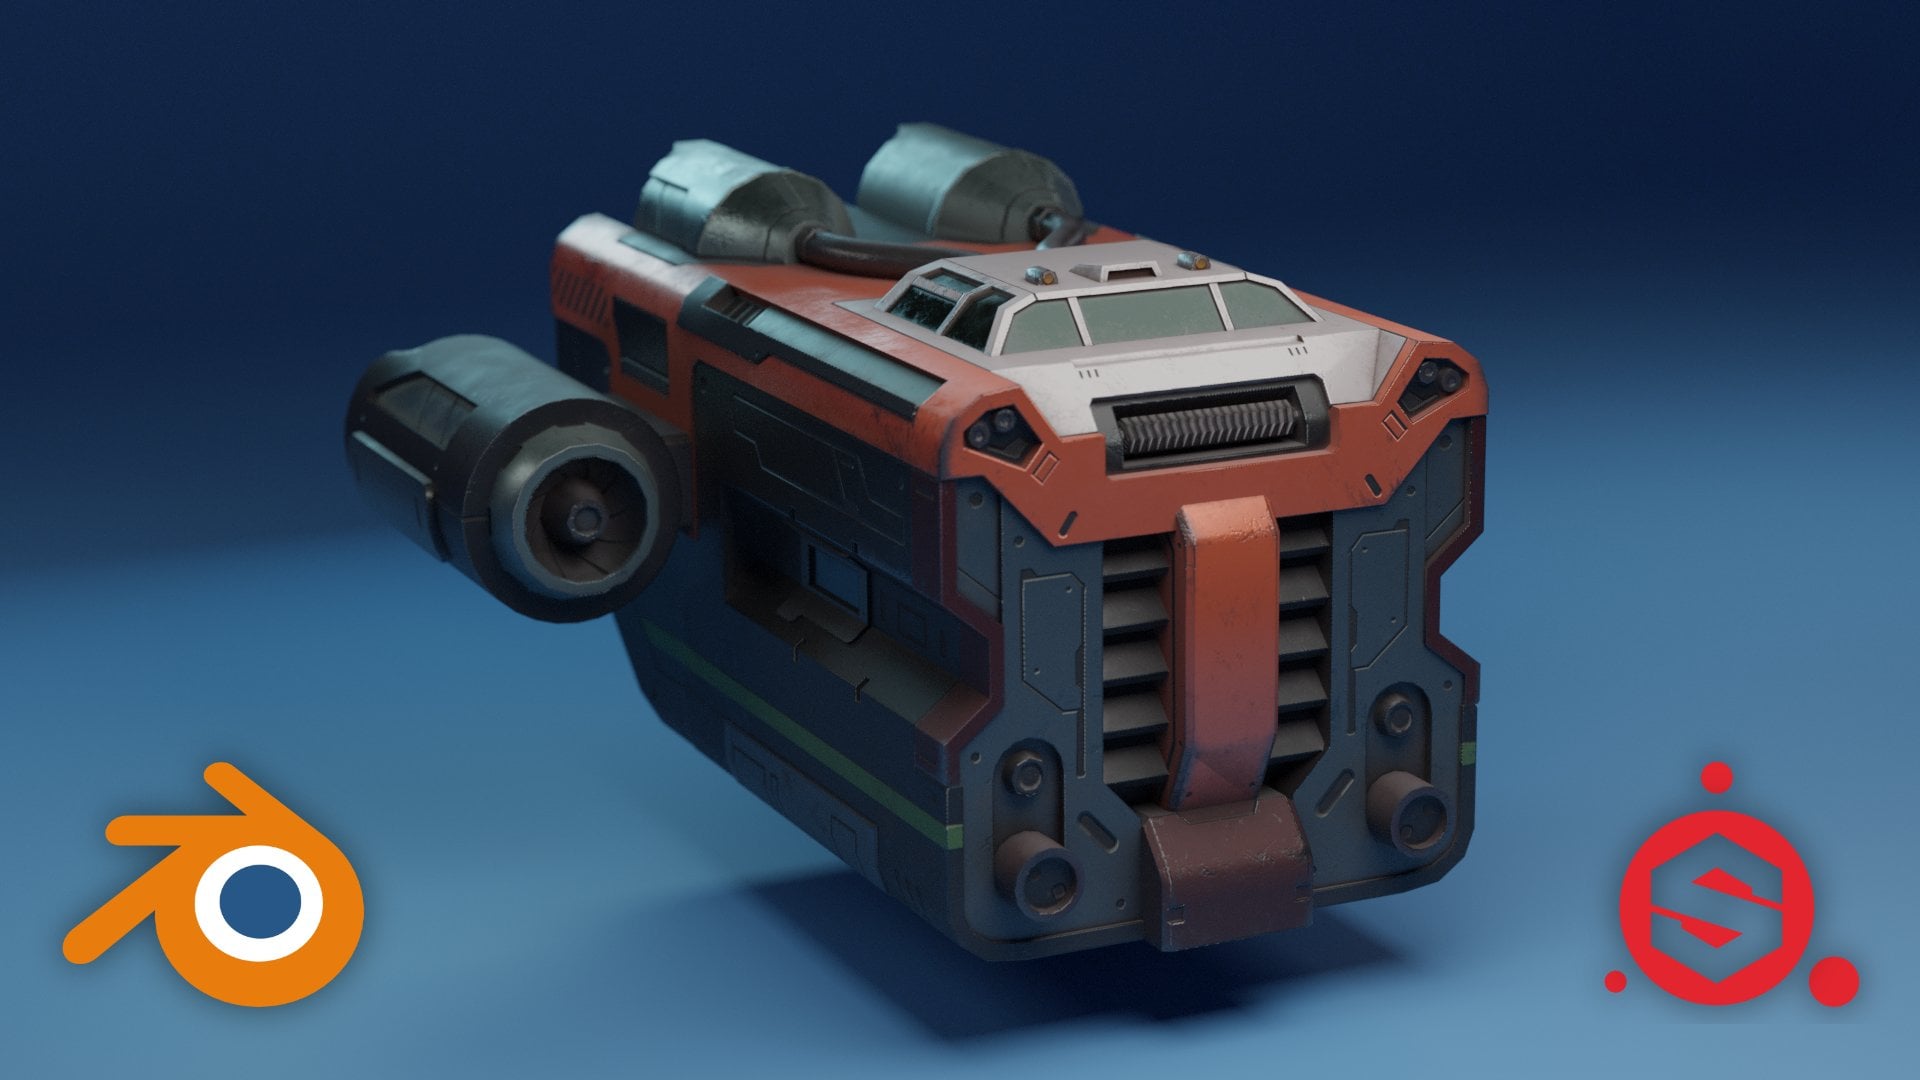
1. Class Introduction: Hi, I'm Daniel Kim and I'll be showing you how to create a concept art of a spaceship by combining 2D and 3D techniques. Concept art is an important tool in entertainment projects like movies and games. It is a tool for visualizing characters, props, vehicles, and backgrounds for fantastical worlds will begin by creating a design brief for our spaceship to get an idea of where to go with its design that guide our creative decisions. Then create some rough thumbnail sketches and choose one sketch designed to block out in 3D, once the basic forms are blocked down in 3D, will render out a handful of views, including front and back. And we'll bring those three rendered images back into our 2D image editing app and trace over and draw on top of it. We'll add some color shading and decals. Now with a finished piece of concept art, you or a 3D artist on your team can begin creating the 3D art asset or a film or game projects.
2. Lesson 1 Design Brief: Hi, I'm Daniel Kim. This is a concept art course. We're going to go through the art process of coming up with a spaceship design. And we are inside of Affinity photo. You can actually still follow along, even if you prefer to use something like Photoshop or maybe even GIMP. All of those image editing tools. And this one basically share 95 percent of functionality. So while I will use Affinity Photo specific buttons and techniques, That's really secondary to the concept art process that I'm going to show you. So let's open up a new document. And I'm just gonna pick out any one of these templates. I think the three k by three k, one will do. And I want to cover up this background with a white or light gray. We'll add a new layer on top and that's going to be the layer that we draw on. So I just switched to the Paintbrush tool. You can use a hotkey be or just press the icon here on the left. And that's going to let me draw or paint strokes. And inside the document. And I do have a pen tablet, which I highly recommend. It's going to allow you to create very natural strokes. And can this be very hard to do with a mouse? So I'm going to go up here to the upper right corner of the interface and click on the brushes tab. And here we have a wealth of options for what kind of brush we want. And let's take a look at the ink category and try a few of the options there. Okay, this first one, I'm kind of liking actually. This one's cool too. Yeah, let's stick with this one. So let's start out with some information about this spaceship. That's gonna go a long way in informing how we design the spaceship. We can think of some simple things like who would fly it? What's its functionality, and what is the capacity, how many passengers? Kerry will kinda cargo does a carry. And what's the level of technology that this spaceship is based on? So I'm thinking just to keep things simple, we'll keep it a design for a single passenger. Excuse my handwriting, single passenger. And it's going to have enough room for other passengers on occasion. So this tells us, right off the bat is going to be a fairly small spacecraft with minimal storage and cargo space. And as far as its purpose goes, I'm thinking thinking maybe it's like a space version of a tugboat where it's very utilitarian and very beat up and worn down. So I can write down space tug boat and that they're already she give you a lot of clues and ideas about what kind of visual details you want to throw in there to suggest this, this function, this purpose. And I guess the other part would be, you know, how, how advanced is the technology available to the spaceship? You know, are we talking 50 years in the future? Or maybe like more of us of fantasy sci-fi setting where you have everything from warp speed travel and interstellar travel and you know, people colonizing other planets. And maybe there's even alien species out there. I think. We're probably leaning closer to that sort of technology. So can put down fantasy sci-fi tech. Okay. So and we can kinda stop there. You can have a lot of fun trying to come up with more details, more background, more information about this spaceship. But these three points will be plenty to go on to start hashing out some spaceship designs. So let's hide that. Just kind of keep those three points in mind.
3. Lesson 2 Thumbnail Sketches: Let's do some outline designs. So like I'll just do a quick one up here. This is a top-down view of a potential design, right? And I've spent maybe a few seconds on that. I'll move on to another design next to it. Right? And we're gonna do a bunch of these in succession. Not really pausing too much to think about it. Just generating some ideas. Okay, maybe we'll do just a few more. And I'm a 11 more for luck. Okay. So we've got a few options here. I just want to rearrange these guys, fit them up, fit them all up top. Okay. Just use a combination of the Marquee Tool and the move tool. Get these, all these guys up top. And we can kinda look through the options and pick one to explore further.
4. Lesson 3 Exploration Sketches: Okay, So this is, this very first one I think is a pretty boring shapes. I'm not going to go with that. This one could be interesting. The third one. This could be interesting. Not this one, not this one, not this one. This one. That could be interesting. So let's explore these three designs further. Just beneath it. Let me zoom in to Canvas here using the zoom tool or Z. So while I'm drawing, I am using the pen tablet to free-form draw as I would on a piece of paper. But when I know I need straight lines, I can hold down Shift. And then I can draw these straight lines. Like so, much more, more easily. If I try to do it by hand, I can keep it straight for a little bit, but at a certain point it starts to, you know, it's a little hard to do by hand. So happy to let Affinity Photo or whatever your image editing program of choice. Happy to let it helped me keep my lines straight, right? So I, I kinda like the box easiness of this. In fact, most of the designs that I've chosen exhibit very hard angles. And I think that is more reflective of the tugboat utilitarian usage of this spaceship. So I'm taking this very vague little thumbnail sketch and kind of putting in more detail. Still pretty loose. I'm adding in just a few random details to fill in some of the empty spaces. But not too much. Okay, so we'll leave that there. Let's move on to the second design. So kind of a trapezoid shape. You can hold, Shift and draw four straight, vertical and horizontal lines. But if you want to create straight lines at an angle, just tap at the tap at 1, hold Shift and press your tablet again, where you want that line to end and it'll create this straight line for you. Now, this ink brush that we chose has this tapering thing going on so we can just go back and forth a couple times to thicken the line. Right now we've got our straight line. Same thing over here. I just tapped the tablet once at the start of where I want the line. Tap again at the end. I just do it again. There we go. Okay. If this is your first time using a tablet and drawing digitally, this may take a little getting used to should get a good handle on it fairly quick. Again, I'm just looking at this going through making a slightly more detailed version of it to see how might look. And just as a reminder, this is a, these are all top-down views. So we're looking at these ships like from a bird's perspective, looking down. Okay, that'll do it for that option. Let's do one more for this guy. Holding Shift again for my straight horizontal and vertical lines. Happy to get the help when I need it. And you can still maintain, you can still control the pressure as you draw those straight lines. So right, even though I held Shift to keep my lines straight, still looks pretty natural. So as I'm adding these details, I'm not entirely sure. What's y like? Maybe this is event. This might be the cockpit or front of the cockpit window section. I'm kind of going by a trying to fill in empty spaces with some interesting details. So that's half of it. The other half is trying to think of where things that functionally speaking like, I know somewhere in the front is a cockpit and that cockpit needs windows. I know that there might be some sort of event sticking out on top or on the sides. I know that they shouldn't need some form of propulsion near the back. All right, so we've got these rocket boosters, just general things like that. As I'm filling in little random details. Some of them are random and I don't really know what they are. But saw them, I'm, I'm kind of thinking like, okay, this is this and some of the details do mean something. It's a mixture of both. Okay. So that'll probably do it for the third option here is just nudge this guy this way.
5. Lesson 4 Choosing a Design: Now we need to pick one of these three. And it's a little harder to eliminate. Because on this first row here is pretty obvious which, which designs didn't really have much potential. But I'm, I'm kinda liking all three of these. As far as which one you choose. I don't think you can go wrong with any of these. But think maybe this middle gone kinda torn between the first second. So maybe we can review what we wrote at the beginning. Right, to kind of inform our design decisions. We know it's going to be small, single passenger, small cargo capacity ship. We know that its purpose is to act as a tugboat but in space. So maybe in this sci-fi fantasy world that this spaceship lives in, There's a bunch of stranded ships out in the middle of the space. Maybe ran out of fuel during travel. For whatever reason. It needs a little help getting to the nearest space station or a nearest habitable planet. And earlier I mentioned that space type O is going to be very utilitarian. You know, it's not going to be pretty, it's going to it's going to look rough and worn down. And it's going to be very, very functional, right? Like a truck. It's not a it's not a sports vehicle. It's not stylish, is just a small spaceship designed to get the job done. So after having reviewed what the design intent was behind this Spaceship project, I think I'll go with this first option because this spaceship in the middle, it looks really cool, but it's, it's too stylish. It's almost like a, like a space version of a Mustang, right? These angles make it appear more attractive and stylish, whereas this more boxy shape of the first one indicates that this spaceship is not designed for looks, it's designed for getting the job done. What we're gonna do now is take this design into a 3D package, like Blender or any other 3D package of your choice. And we're going to block out a very rough 3D model and use that to draw on top of, okay. And having a 3D reference to draw over is gonna take care of the problem of drawing, correct? Perspective. Perspective drawing, unless you're very practiced, is hard to pull off, especially for beginners and even for professionals. The sort of modern concept art world makes more and more use of 3D and the creation of concept art because it just gives you a more accurate image. We're going to actually use this image as reference inside of blenders. So let's go ahead and save it out. We can hide this stuff on top. I'm gonna make a copy of this ship design and bloat up to fill up the whole frame. Like so. And then we'll save it out. As a PNG spaceship reference.
6. Lesson 5 Setting Up Reference: Okay, We're inside of Blender now. First thing, let's set up that reference image that we saved out of Affinity Photo. I just wish to orthographic view looking down and the z-axis. And I'm going to add a reference wherever you saved that spatial reference from earlier. Find it in here and load reference image. And just so that it's the correct scale, I like to have the armature add-on activated so I can bring in a humanoid skeleton. And when I've modeled something in 3D, all kinda use this as a scale reference. It's not available by default, but if you simply go to Edit Preferences, you can find the rigid phi add on here towards the bottom. Just switch that on. And then when you look for it in the Add tab, it'll be available here. So I'll set this guy side. And I'm thinking this spaceship would be around this size. Vout about there.
7. Lesson 6 Initial Block In: Okay, and let's throw in some primitives and work along with the sketch. So the middle part can be represented by a huge box. And then those jets on the side can be made up of a cylinder. Oops. Copy that to the other side. So that's basically it. From here. We're going to try and interpret the sketch as the best we can. And we're not trying to create the final model that will be used for production. So quick and dirty is the name of the game. So I'm just changing my magnetic settings to vertex snap with center. Switch that on. And then I'm going to actually also wanted to toggle this auto merge vertices so that when I snap vertices like that, it's going to weld it together. All right, Let's toggle that off. We can copy and paste that to the back. You can get rid of this. Let's shade smooth so we get rid of that. Faceting. Can go ahead and combine these. And in the Object Data Properties tab the lower right. Here, we want to expand. Normals. Check this box are as smooth. And you'll notice it's going to automatically smooth out our mesh with a cutoff angle being 30 degrees. So everything under 30 degrees is going to be smoothed out. I think we could use another tube primitive to connect the jet with the rest of the ship. Sort of like that. Let's join those under the Object tab. Go to apply all transforms. And that's going to bring the orientation pivot to the center. And that'll out. That's great for when we add the mirror modifier. It's going to mirror it perfectly across this point. So that takes care of the jets.
8. Lesson 7 Continuing Block In: I'm modeling this little detail there. Switching in and out of x-ray mode. Grab that face. All right, let's look at it from the top. Something, something kinda like that. Thinking maybe these edges have a bevel. Maybe like so. All these edges as well. And let's just copy these. And then wherever this is, those are look like they're made of cylinders too. So I'm just going to recycle this model we already made. Save some time. I'll just get rid of this. So that the fact that we copied and pasted this engine isn't as obvious. Maybe I just thought maybe there's something going on here where it makes sense for these engine sitting on the top to be kind of halfway in the vessel. And let's give those skew these edges of bevel, like so. And we have this guy standing at the rear here. I'm imagining there's some kind of a bay door for loading and unloading cargo and there's not going to be enough room for that with these engine sitting on top. Something the bottom of the ship should extend lower. Hi, there. In fact, let's just bring everything up right above the grid plane. So yeah, this would make a lot more sense from a practical standpoint. And maybe we could even lower this a bit around there. Also, let's close this opening up with the fill function here, which will yield, you know, not, not the cleanest geometry, but you don't really care about that. Because again, this is not a production ready model. It's just for our purposes. In terms of fleshing out the design of this spaceship. I just realized got this box that we don't need.
9. Lesson 8 Finishing Block In: Let's bring our attention to the front here. There's some details here we can flesh out and got rid of that front face so we can work more easily. I'm not sure what I'm seeing there, but I think it's something like this. Let's close it up with the fill action. And maybe a pair of cylinders is what these are. Let's use the knife tool to cut across the back here. I'm going to scale it in the z-axis to make it straight. And then I mentioned that this is probably a cargo bay door area. And on airplanes, those tend to kinda go up on a slant like this. K. So it's applying smooth here. I can try and add a bevel. And here I need to select these edges and sharp. Want to get rid of this hard edge. So let's bump up the auto smooth. Okay. Let me just apply a shade smooth on that and I'll bump the auto smooth for that as well. So without spending too much time, We very roughly kinda did a quick 3D interpretation of what this top-down and chip design might look like. So from here, we don't want to get carried away and start, you know, spend a ton of time continuing to, to model this spaceship. What we have here is, is just enough information to bring back into Affinity Photo and sketch over on top of it to really work out even more of the details.
10. Lesson 9 Background and Lighting: I'm going to try and set up a quick lighting setup so that when we render it out, it'll have some basic shading in it already. Just making a simple studio background, which I'm going to apply Shade Smooth and add a subdivision surface modifier. Let's add a camera into the scene. And this little arrow here, it's easy to miss. Let's pull that out. Click on the View tab. And the first we can toggle to the camera view with this button. And you'll notice that when you try and manipulate it, like you have before, the frame kind of doesn't move along with your view of the camera just kinda stays where it is. So we want to check this box camera to view. That way, you can rotate and look around in the viewport just like before in the camera's going to follow. So we just want to find a few good angles and actually backgrounds kind of getting in the way. So let's make that bigger. Find a few good angles. Can collapse that to render out. And as you can see, this is the render preview mode and everything's dark because we haven't added a light into the scene. Let's do that quickly now. You can go with an area light, make it way bigger. Bump up the power value to something way higher. And now when we look back at the render view-port, we have a lit scene.
11. Lesson 10 Rendering Views: All right, let's switch back to the camera view and do a quick test render with cycles. And depending on what graphics card you have, you'll have more options available next to device, which I will take advantage of now. And if not, you can still do your renders the same. It's just I have a graphics card that blender takes advantage of. So rendering in Blender for me is sped up when I select these options. So here's a good angle from the back. Or let's maybe get more of that of the top view there. So I'm going to save this. Let's choose another angle like that one. Save it. This one here would be good. And I I left some room between the bottom of the ship and the floor. Four, maybe like some kinda landing gear, which we can just draw in Affinity Photo. So let's render this out. And maybe a side view actually be very handy. Let's render this out. Those are probably all the angles that we need. We can always come back to do another render if we need one. So let's end it here and go back to Affinity Photo, where we'll load up these renders and sketch over on top of it.
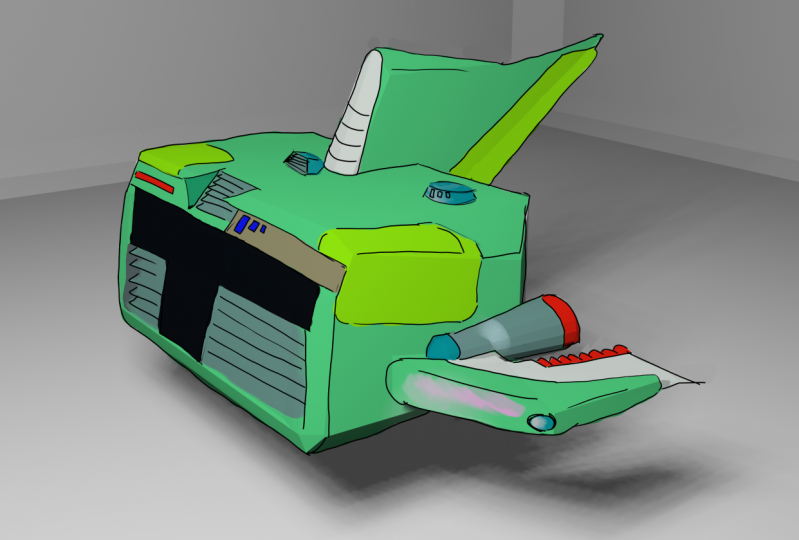
12. Lesson 11 Front View Line Drawing Pt: Brought all the renders from Blender into Affinity Photo. Was the back view, front view, side view, back view, looking down. Let's go ahead and save these. We'll call it a spaceship bottom paint over. We can call this one spaceship front paint over. Okay, Let's begin with the front view. Very important. Note here, add a new layer on top. Last thing you wanna do is draw on the same layer as the render. Let's not do that. On a separate layer. We can do are sort of ink line-drawing like before. And we don't have to worry about perspective and the shapes being the right size. Because having the 3D render done in Blender took care of all that for us. So now with this sort of base to draw on top of, we can just focus on the design and not worry about the technicalities of drawing a perspectively accurate spaceship. So I'm going to use the same brush year that I found in the ink category. And you feel free to try any of the other brushes and use the one you like. Really doesn't matter all too much. So I'm pretty sure this shape here is where the cockpit will be. Okay, so I'm just going to use the underlying 3D render as a base and start drawing in some details. And I'm not going to be married to the sort of gray mesh render. I'm going to keep or leave as much of it as I want. Just we're going to be flexible and go for whatever is going to be better for the final design. Again, the shift key, it's very handy for anytime I need a straight line. And that has to be one of the biggest advantages of drawing digitally is you can get Computer Aided precision, right when you need it. And then for the rest, you draw as you normally would on a piece of paper. Right? And every time I make a stroke, sometimes it doesn't come out the way I want. And it's as simple as hitting the control Z key. Just to undo those strokes in, I can try over and over again as much as I need to until it comes out the way I want it. So I just finish basically tracing the overall shape that the render gave us. But there's all this empty space that need to be filled out with some sort of detail and parts and machinery. So I'm going to go ahead and do that. Kind of just improvising. And being able to draw on this surface and have correct perspective and every, everything that, that does require some practice and an eye for perspective. But even if your perspective drawing skills are. Not as strong as you'd like it to be. Just by the fact that we have this, this render to draw on top of makes it a whole lot easier. In other words, instead of requiring you to be this master of perspective drawing, you only need to be halfway decent. Since much of that perspective drawing has already been done with Blender. And actually even if you are a master of perspective drawing, this will still yield the more accurate design, especially as we go through the different perspectives. We don't have to worry about one perspective not lining up with another. Because all of these came from the same basic 3D model. So I would say that we're still very much in the exploration phase. We're still trying to figure out the rest of the ship design. So don't want to labor over one particular part of this drawing. For too long.
13. Lesson 12 Front View Line Drawing Pt: Quick note about line drawing. You want to be aware of line weights, which just means the thickness of your lines. The thickest line should be reserved for things that denote larger shapes and sort of the overall outline of the ships. So might have noticed just now I thickened or darken the lines around this cockpit roof to kind of separate it from the parts of the spaceship behind it. Then I'll do the same for the overall shape of spaceship. And then the thinnest lines can be reserved for surface details. Okay? And so that'll make it more clear to people looking at this drawing with shapes are just part of a service detail and which lines are parts of objects that should be separated from the background like a foreground object, separated from a background object. And I'm not going to stay married to any particular brush stroke or stroke at this point yet. I just felt that this front profile is a little too boring. So I wanted to kinda break it up here in the middle and see what that gives us. Let's go ahead and start paying attention to the back of the ship. Nothing has to be perfect. Just do your best. And it's okay if your lines are a little sketchy. Colleague as opposed to a perfect stroke, we're not really worried about that at this stage. Nice and loose. And I seem to recall. And the original thumbnail sketch, we have these pipes going across the top of the ship. Like so. Thinking maybe this could be a good spot for some headlights. Think maybe here. To kinda bring it back to that original design idea of this being like a space version of a tugboat. Maybe this would be a good spot for a winch. So even this, even though this is a futuristic space vehicle, we can still take visual cues from modern-day sort of earthbound vehicles, right? And having some familiar elements will give the person looking at this, you know, some clues as to what this ship might be used for.
14. Lesson 13 Front View Line Drawing Pt: Maybe here we can break up this flat front shape again. Just adding some random small details. Hello. All right. And I know I said, I know I said earlier that we're not trying to make this drawing perfect, but it doesn't hurt to clean it up a little bit as you go. Okay, so we take this simple render and do all this additional line art on top. And you can see how much headache we saved ourselves from trying to come up with this shape, right? We did this very quickly in 3D. And a lot of the, most of the effort in coming up with this line drawing was just, you know, trying to make this interesting looking. And there's some parts here that no longer match with the line art because there's a couple of places where we deviated from the overall shape. So for that, let's create a new layer separate from the one we were on. Let's take a moment here to name this layer line art so we don't get them confused. And this would be, let's just call it fixed paints. Because we're going to fix the render. And we're basically going to use the eyedropper tool to pick this. Actually pick this color. And pain away is extraneous bit. Okay. Let's use the eyedropper tool again. But this time we'll select this light gray. Got to click right here to confirm or a set our brush to that color that we just picked with the eye dropper. And paint in this little piece sticking out. And we gonna do stain right here, where we'll color pick this gray in the front of the ship, set our brush to the same color, and then paint that in for this little protrusion. Okay, and then let's do one here. Since we deviated from the model. Oops. Gotta set the brush color. And let's just flatten this out. So it reflects the line drawing better. Okay? And then now you can see the before and after.
15. Lesson 14 Back View Line Drawing Pt: And to repeat this process now for the other perspectives. And just to be sure that we're consistent across the different perspectives, I'm going to go ahead and make a copy of all the layers together. The hotkey for that is Control Alt Shift E. Or you come up here under the layer tab and Merge Visible. We'll do the same thing. Okay? And then we'll simply copy and paste it into the next perspective. Shrink it down, and shove it into a corner. Right? As small as you can get it. Okay, Just like that. Let's add a new layer for our line art and will simply repeat the process. And now the whole point of concept art is to figure out an art assets design ahead of time before committing to doing the final model. And might feel tedious to have to repeat. Try and copy all these random details that can no longer be random in a different perspective. But this is important because we need to figure out what the back looks like. We need to try and cover as many of the angles as we can. So that when this lands on the 3D artists desk, he or she will know exactly to make and not trying to guess what the back or sides look like. But they still will have some guesswork to do. For instance, we don't have any renders from the very bottom of the ship. But those sort of details of this is handed over to a talented 3D artist. They'll have no problem kind of gathering the overall design language of the rest of the ship and applying it to the bottom of the ship in a way that makes sense and is cohesive. But the more, more design where we have figured out with these drawings and paint overs, the easier their lives will be. So I'm first going over the 3D model. And then, right, That's, that's the first step. And then after that, we need to recreate all the details from the first perspective that we painted over. Bring it over to this perspective. After that, we're going to explore the details that cannot be seen from this front perspective and fleshed out the design for the back of the spaceship.
16. Lesson 15 Back View Line Drawing Pt: Remember, there's a line coming across here. There's a window, windows on the side of this cockpit and some framing, that one like this. There was a vent sticking out in the front and some parking lights. And we also had tubes coming from these jets into the back of the cockpit. So erase these lines that go through the pipes. There's so here's the part that we can't see from that angle. There's probably something here to receive those pipes. Okay. Something like that. We had these sort of things sticking out on the top of these pieces. A little detail like that. I think maybe this part goes a little differently. Like so. Let's finish off the engines along the side. And I see something like this. And another another thing that goes like this. I'm looking at, I remember this little shape we cut out here. Let's see. I think that just about covers what we had so far here. And now we can look towards the back here and do some new design work. See, I remember we talked about having a cargo bay door. So let's add some line art here to reflect that. And just like in the front, maybe you like this is a good spot for some tail lights. Okay.
17. Lesson 16 Back View Line Drawing Pt: We're going to do a little bit to fix the the render to conform with the line drawing. So hitting the hockey for the eyedropper tool with I setting my brush to that color and pick the wrong color. Paint this away. Let's do I guess actually I guess the thing that's 08 writer color pick this light gray. Set the color. Paint, this extrusion. Oh yeah. And right here. This one's a little tricky because there's quite a bit of shading this little area. So a lot to pick multiple colors and try and fix this. Sorry like that. Oh, and I forgot. This layer should be below the line art. And then let's fix this part. Right here. Should be one flat shade. Just like that. And that Let's go back to the line art. Switch it to black and draw in the rest of this jet. Just want to make this jet opening much deeper than the 3D render. Alright, and something like that. And I fill in this area a bit, was feeling a bit too empty. Also feel like there should be more detail around here. Let's see. Oh, and let's go back to the fixed paint layer and focus on some of the areas on the top here. All right. Just a little something to indicate the pipes and the front part of these engines. Okay. So that'll do it for the front part, I think. Just wanna take a moment to fix some of the line weight. This line here is too thin. Or they can it, right? Because this is the outline of the overall ship. And here we want to think in this line to separate it from this crown element. Like so. And that creates a visual separation. And it makes it easier to understand what you're looking at. Right Same here. Just slightly thicker lines to separate the cockpit from the rest of the ship. Induce the same with these pipes, same with the top of these engines. And even for edges where it's still part of the same surface, basically, we still want a to indicate that this part is sticking above this surface. Okay? So now we have both a speaking of line art, line weights. For this, some parts I overlooked could use some thicker line weights. So so now we got the front view and the back view. Be sure to save both of them.
18. Lesson 17 Refine Line Drawing Pt: We're going to refine the line art for this front view. Do a color pass, maybe slap on some decals. And then we'll combine the different views into a single art board so that you can see the design in one view. So let's make sure I'm on the correct layer. And I'm going to go in, do a little clean up. So this is the part where I make the, the drawing little less sketchy and more detailed. And instead of erasing everything or starting over completely on just salvaging as much of the initial drawing as I can. And making selective edits and fixes. I want to tighten up the pipe drawings. It's funny how when zoomed out, it looks like it's fairly detailed. When in actuality, you get in this close, you realize is how rough and sketchy lines are. Now, how, how much time you spend doing all this clean up work is going to be a function of how much time you have to spend on this. If you have maybe a dozen other designs that you need to flesh out, then you may only want to do a little bit of clean up In prioritize quantity over quality of one drawing. And as you clean up your line art, you're going to just buy as a by-product you're going to tighten up in. I clean up your design and clarify what, what some of these lines what kind of detail there really indicating. Because when it's really loosened, sketchy. I'm like these for example, that could be anything, it could be bolts. These could be little air vents. It's kinda vague. So by doing another pass, you can clarify the design specific design details. And that will in turn make the 3D artist who's going to be assigned to build this spaceship or whatever your concept art is. It's going to make their lives easier. Thought to spend less time trying to fill in the gaps.
19. Lesson 18 Refine Line Drawing Pt: Thing right here, I just found a opportunity to add another window, maybe a view from lower cargo area. I imagine there's some kind of ladder or maybe steep staircase that goes up to the cockpit. Once you enter through the cargo bay. Again, making use of line weight too. Make this part kinda pop above the surface. As I mentioned before, these are little vague as to what they supposed to be. And decided to make them smaller events. Still a little hard to tell, but at least it's not as vague as it was a moment ago. Let's spend some time on the jet. Here. Is definitely some clean up we can do around here. A little tricky to get these curvy shapes. But after a little trial and error, you can eventually get there. Okay. Oops. Okay. So I think you get the idea.
20. Lesson 19 Mask Painting: You might end off concept art, black and white like this. But again, the more of the design you take care of the concept art stage, the less work, the less figuring out that the 3D artists will need to do. So let's create a new layer, call it color pass. And we can set the layer mode to color. And that's going to leave all the shading alone and allow us to simply color in the spaceship. So let's say for example, we picked some sort of bright yellow. And then you can see that it's only affecting the color and not the shading. Now, one quick thing I'd like to do before we start coloring all the different it's in pieces, is to paint in the mask of the entire ship. So you can choose a different brush for this, but I don't see anything wrong with the one I'm already using. I'll just size it up like that. And we're just painting in the inside of the ship. And you'll see later that it's going to make it easier for us to focus on choosing the right colors. They'll let us focus on coloring and not coloring wall stare, staying in the lines. If we do this ahead of time. And for this, I'll choose a nice bright contrasting color that's different from all this gray. So you know exactly where your opinion. And also you'll know right away if say, you painted in part of the mask on that and then there's some spots that you miss. Those are really easy to spot. Just going around and around and around. Coloring within the lines. All right. I got all the edges and can blow my brush and start filling it in. Right? And if we get rid of the or hide the line art layer for a moment, we can really see all the spots we missed. So I think I just plugged up all the holes there were. And now we have the spaceship colored in. So from here we can select, I can select, well we just painted through this leg tap selection from layer or the hockey you control Shift L. And let's create a new layer and click on Mask layer. So we don't, we don't need this anymore. Call this color layer. And now, when we paint, we can do so without being mindful of the edges and always stay inside.
21. Lesson 20 Choosing Colors Pt: Let's do a bit of exploration as to what colors might work well. With this spaceship design. Can start with the overall color. And I actually set this layer to Color Mode. Thing about the setting your layer to color mode. When you try and add in something dark, it's not going to pick up the color that you chose. So it's really only good for like actual colors. If you wanted to register darker colors, we can try and see if there's other blending modes that will allow that. So it looks like overlay. I do the trick. And actually I do want to switch brushes to something more painterly. And this will allow me to do some blending, trying to see how this reddish brown looks. Now I am noticing some issues around the edges where maybe I didn't color right up to the line. So we can select the Mask icon there again in, Let's see if we can't. Quickly fix that. Just want to make sure we got white selected. White is opaque, black is transparent. You can make out the tiny little spaceship sort of shape inside this icon. Yeah, it was hard to see these little slivers of the edge that we missed earlier because we were painting the mask with the gray color. Looks like we've got it under control now. So I'm going to select the actual layer again and switch my brush to something like this. And if you hold Alt and drag your pen across or tablet a bit, you can quickly color, pick whatever is on your screen, whatever is inside this, in that pinpoint of this magnifying glass. So I do like this hue, but overall it's too dark. Tiding all the details on the concept. So just for the sake of clearly communicating those details that we drew and we need a, a lighter shade of that brown. And for inspiration, I did take a look at some pictures of real life tugboats to get some ideas on what kind of color schemes we could use for this ship. And it turns out those boats come in a lot of different colors. But they do seem to have some commonalities in that. I think the the sort of structure that holds up the the cabin think that's what it's called, is sort of a brighter color. And then the bulk of the ship, the part that's in contact with the water that tends to be a dark, darker color, a black or a dark gray. And then between, you know, where were the drivers are the captain of the tugboats are between the cabin and the part of the boat that meets the water. Say like the, the deck of that boat. It comes in all kinds of colors, yellow, green, blue, red. So we'll, we'll choose one of those and see if it works for our spaceship as well. Yeah, I like this acrylic brush because it lets me, depending on the pen pressure, let me apply different opacity of this color. Okay, so that's for the cockpit.
22. Lesson 21 Choosing Colors Pt: I think a metallic dark grey could work for the jets. Let's make it darker. And just to test my idea, I'm just going to roughly fill in those jets with this color, see see if I like it or not. There is how depending on where I'm coloring, I'm increasing and decreasing the size of my brush by using the sort of a wheel button on my tablet. Depending on what tablet you're going to, depending on which pen tablet you're using, you may have a slightly different interface on the tablet itself. But I think that the wheel is a pretty common, pretty common among all different pen tablets. I'm pretty sure these pipes are going to be a dark gray of some kind. Doesn't get darker than that. Let me switch brushes here. So as I mentioned before, the typo references that I saw, the bottom tended to be this dark gray black color. So let's try that for this spaceship. I'm not too concerned about coloring in the lines. Perfectly. I'm still trying to get a sense of what the color scheme will be. Okay. I think this might be working. Now. I don't, I don't think I'm gonna keep this brown. Let's see what else might work better. If it was some sort of red. Yeah, maybe something like that. And I wonder can introduce another color or not. That's a bit too colorful. But this orangey, reddish secondary color to the body is kinda interesting. There's too much dark gray covering a lot of surface. I think we could do a different a lighter hue of that gray for the front part here. And introduce some of that color in this top engine. So it's not this boring. Light gray color all around the engine. Throw it on the side engines to and maybe a couple of other places. Same with this. Red. Yeah. I wanted these parts to be some sort of different color, but not as bright as this red. So it doesn't take over with something like this can work. I think I can commit to this color scheme.
23. Lesson 22 Cleaning Up Colors Pt: Right now, it's very messy around these edges. Let's do a clean up pass. So it looks more presentable. All UN zoom in a bit to make that easier. Yeah, This part is pretty fun. When you're using a pen tablet. And especially when you have a fairly realistic brush settings to imitate, you know, whatever this is, acrylics, imitate real life mediums, right? I feel like the hard part of making design decisions and picking out the right colors that work well together. I feel like the hard part is over and cleaning up the coloring around the edges here. This is sort of the, the relaxing part. Hey, that does it for the the red, orange, red highlight, accent color. As I'm sure you already noticed, the benefits of starting out with a 3 render and painting on top of it. Here's another benefit of that is we're only filling in color and we're not going up here. Messing with the brightness slider to try and shade the spaceship. It's already shaded, so we're just going through and filling out different parts with different colors. So not only are we spared from having to worry about correct perspective drawing, we're also spared from doing our own shading. Huge time-saver. To use 3D renders for your concept art. Let's take one of these windows. Some instances, even with the overlay, blend mode, can't quite get the either the right color or the right darkness in my color to show up. So after we finish with the color pass here, we can go through and on another layer, you know, go through and this side window, for example, I want it to be darker shape than this, but the overlay mode won't, won't make it won't let me make it any darker, even though I've set the brush color to be almost black. So for, for instances like that, we can address it later with a new layer.
24. Lesson 23 Cleaning Up Colors Pt: Also when you use the color picker on a layer that's set to a different blend mode. It's not going to give you the exact color as you see it on the screen. It's going to choose the, the actual color that's in the layer. And then give that to you as, as the color that's been picked, which will give you a color that's slightly in a slightly different tone and then what you see on the screen. So I have to adjust the sliders a little bit to make sure it's the color that I want. The other reason why we need to go back on a new layer is not just to get the correct colors and the correct level of darkness, dark colors, but we also need to paint in some additional shading where C, like this front part of the side jet. This wasn't actually modeled in the geometry, so the render doesn't give us any shading information here. So it's just flat. The details that we added. Inside of an Affinity Photo, we need to provide the shading for those additional details. Let's do some cleanup up top here on the engine. Okay, Let's clean up the dark reddish brown. Hey, it looks like this. Might be the last thing. And the last color, that means clean up.
25. Lesson 24 Additional Painting: Okay, now, let's create a new layer. Let's select, do the same selection of our spaceship again and add that as a mask for this new layer. We'll call this color to. It doesn't really matter. And yeah, we use that without changing the blending mode, we'll use that to fix the coloring. These windows can be a lot darker. The pipes only need to be darker, but they need some shading as well. Shading down here. And this is where I want the softer brush. That'll let me blend the shading. Let's fill in this window. To add some shadows underneath these fins, the front grill. And let's also take a moment to add some highlights to suggest that the metal parts are metal. Just a little little Shiloh. Some highlights is some highlights here and there. Oh, and let's get really dark in these little cracks. And I'm going to switch to a different brush for that. Again, a softer brush so I can control the opacity and introduce some shading. This is another area that could use some additional shading. This surface here should be lighter since it's facing up. So it's going to catch more of that light that's being cast downs. You can tell from the shadow. Same appear brighter for this surface that's angled upwards. Darwin, the surface that's facing down and brighten, the surface is facing up. Okay, and we might call it a day for coloring. Let's check out what we just did. So you can see from the line art to coloring in with that layer set to overlay. And then this by itself is going to look too flat. So with an additional layer on top, right, we brought back some of the darks, added additional shading, add some highlights, making it pop.
26. Lesson 25 Adding Decals: On to add a little bit of De Kao work just to finish it off. Let's call this later. We'll just call it decals. And we're going to look for opportunities to add some labels and numbers and lettering and things that you expect on a utility vehicle or like a tugboat or as a space tugboat. Says far as lettering, that's an easy one. You just type some random numbers and letters. Choose an appropriate font. And then let's manipulate this to it. To the side somewhere. Maybe better route. Right about there. Bumped down the opacity. And I could sit and I can see it right there. When you use the text tool automatically creates a new layer for that text. So that's fine. Something I want to add. You can never go wrong with can never go wrong with these cautions. Stripes? I don't know if that's what they're called, but definitely see these a lot around construction sites or really any, any sort of industrial work environment. So let's merge or first, yeah, let's select all of these stripes and The group them together. You can mask them. Make a copy and bring this maybe up here, this corner. So then notice about tugboats is they have, they tend to have these sort of highlight colored stripes around the rim of the boats edge. So let's see about incorporating something like that. And I think I can just use the lasso lasso tool for that holding Shift to keep it straight. And then maybe we could go for a lime green. See how that looks. Bumped down the opacity. And yeah, that works. Let me do the same thing to this side. So I just started here is to see that it lines up. I want to subtract from my selection, like so. And I want to erase this little bit sticking out there. So let's group all the different layers that we made for the cows. Call that group. And you can see without spending too much time just adding a handful of De Kao items here. And they're really adds a lot, goes a long way.
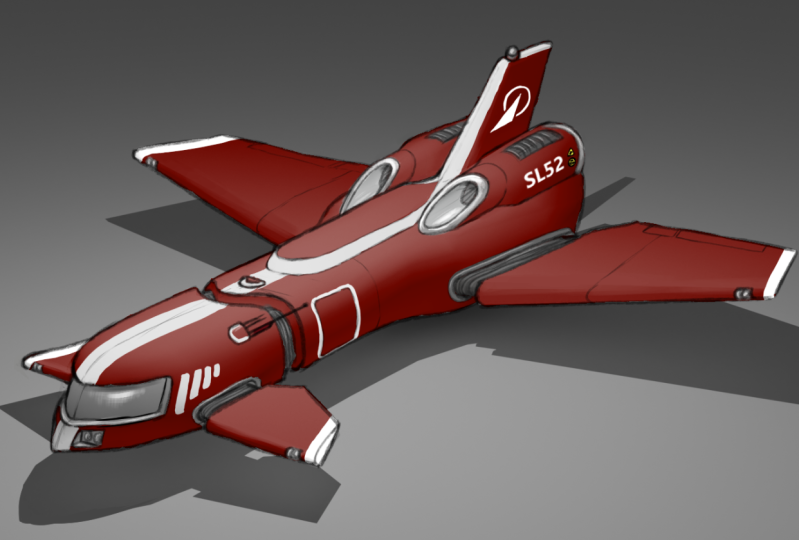
27. Lesson 26 Combining Views: Instead of single view of the spaceship, we throw in an extra view like the one that we drew for the back. We could kinda maybe move this guy over to the side and squeeze out in this corner. On that way, you can kinda soak up the, the design of the Spaceship in one view and one artboard. Now be a very typical setup for concept art. That might be put up on a board, up on a wall inside a game studio. So let's, let's combine all these layers into a single layer using the Control Shift Alt E shortcut. So let's copy and paste that into here. Also, I want to use the lasso tool in conjunction with my pen tablet. And just kinda roughly make a selection, trying to include the fine art. So we maintain a clear outline. Lost that first part of this lecture and for some reason, but it's not a big deal. I'll just select it again. Make sure all the line art is inside the selection. And let's mask that. And then we can resize it off in the corner. Now, if it's like that small, it's kinda hard to make out. I wanted to be around this size and it'll fit if I move this guy over to the side. So in order to do that. I'll copy a copy of this background layer, which is the 3D render That's beneath everything. Let me select that background and everything we painted up on top. Group it into a folder. We'll call it came over group, and then move it to the side. And because we have a copy of that background still, it covers up the gap, the left by moving this group over. But there's this scene here. Easy way to fix that is to first unlock the layer and then simply invert. Just flip it horizontally. And now we have this seamless extension of the background to the left so that we can comfortably fit our back view line-drawing. If you were to go ahead and give the different views the same treatment with either just a line drawing or a full color pass like this. And you know, there's more space here too. Add those different views. Maybe even a cutout view where you can see a bit of the interior of the spaceship. But that's going to conclude the course. I hope you have a better understanding now of a 3D based concept art process. Now that you get the gist of how things work, you can spend all the time you want to refine the line art. Really zoom in and make sure your line drawing is detailed and tight. And you can do a full color pass and all the different views and have them all lined up here in one big art board. But really just with what we have here, this is plenty to go on for a 3D artists to look at and start producing assets. Alright, so I hope you had fun following along. Good luck with your own spaceship designs or any other kind of futuristic vehicle designs in the future.
 Design Boy, 3D Designer