Transcripts
1. Introduction: This class will walk
you through every step of taking a simple
block mesh model to final geometry and generating textures for a
vehicle game asset, and a real studio environment. Block mesh models
may be provided by a concept artist who used it to generate concept
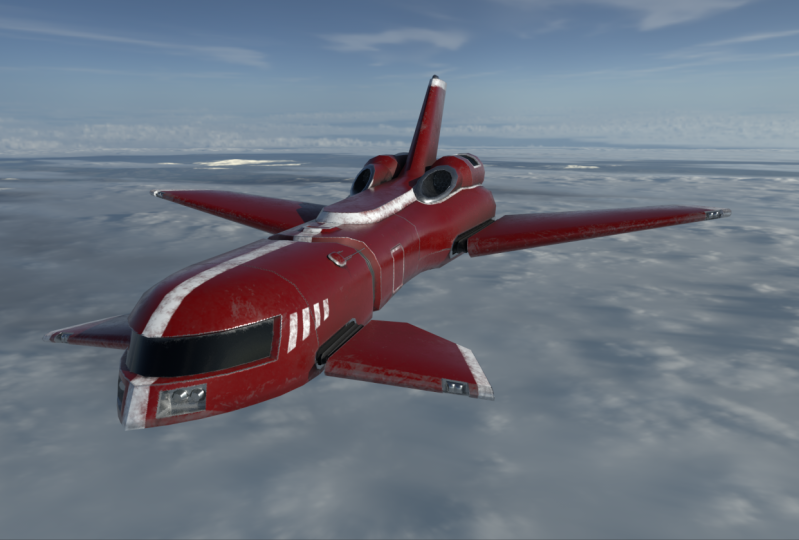
drawings and renderings. Concept art of the
spaceship will be provided to use as
reference while modeling. Creating an immersive
project environment that emulates a real-world
3D artists work task. The end of the
class, you'll have a stronger understanding of how the sausage gets
made, the game industry. The tools we'll be using
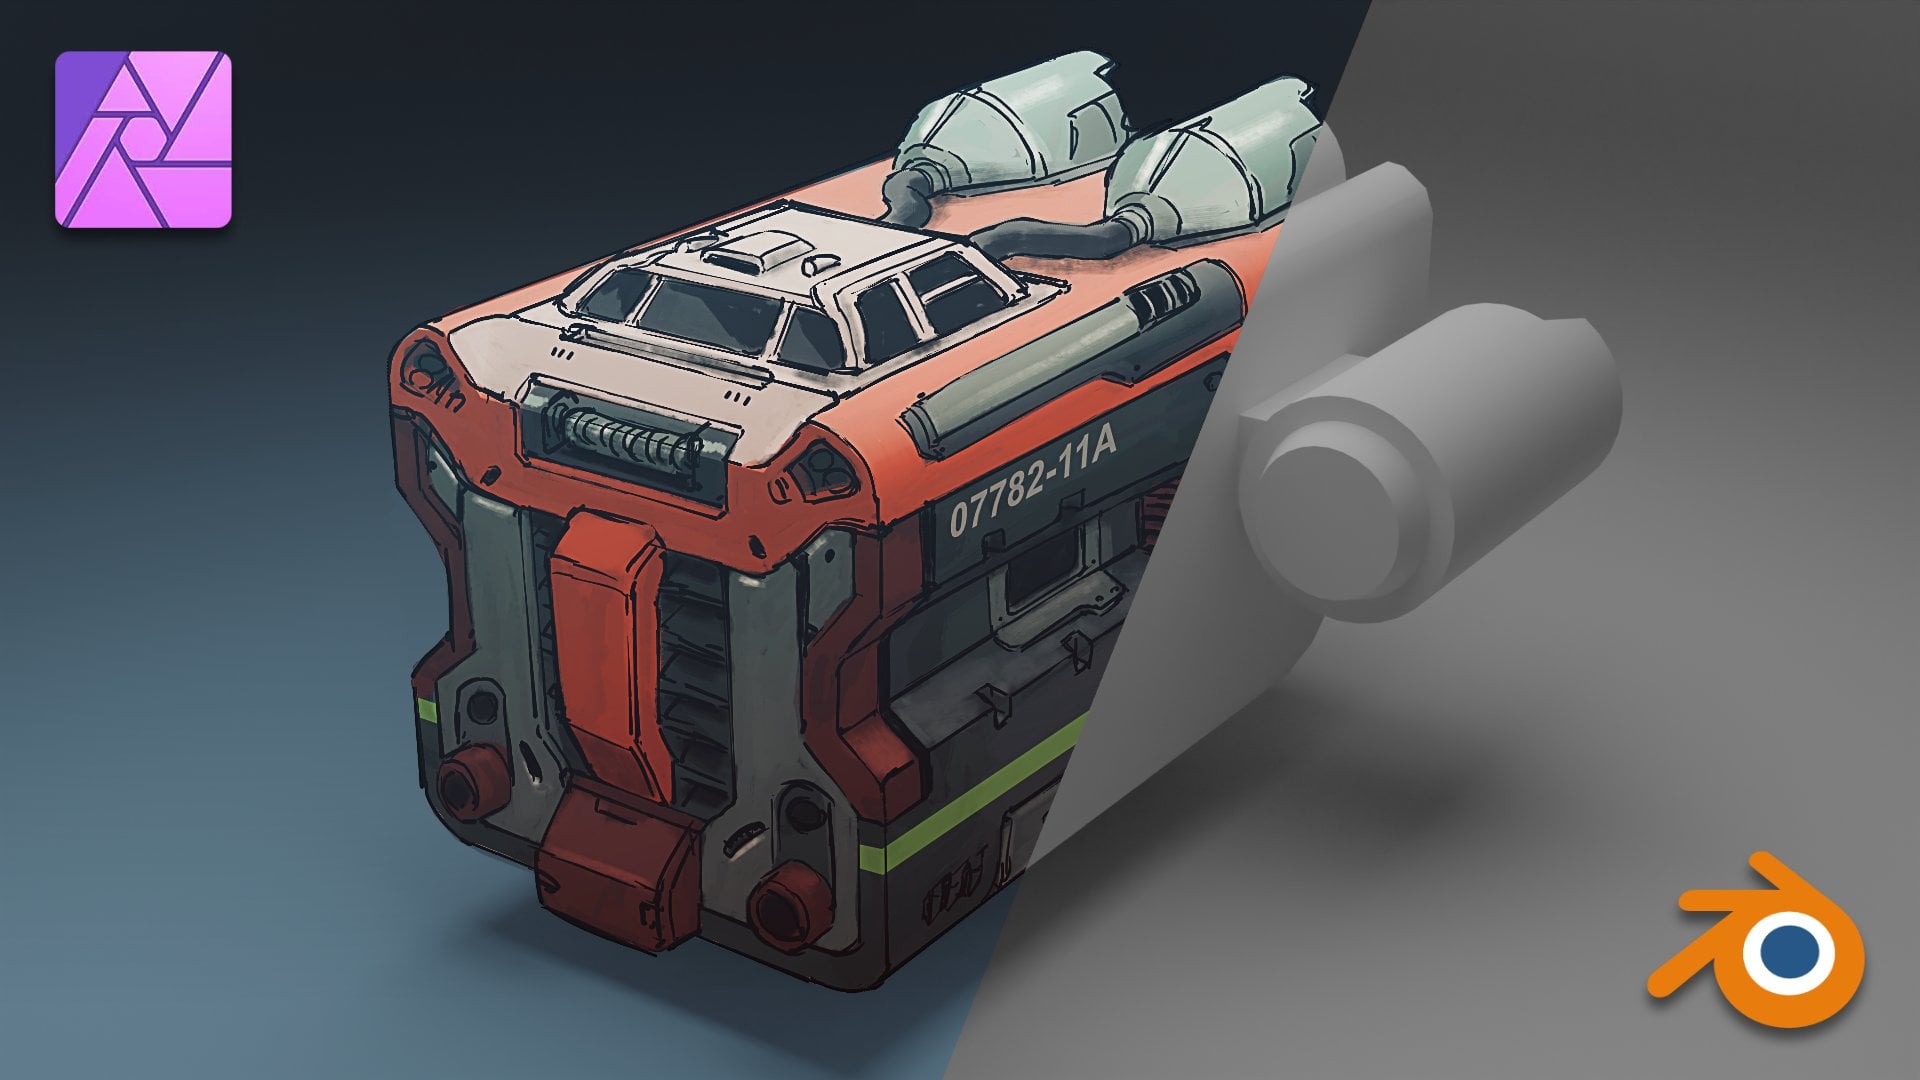
in this class would be blender and of course
substance painter. While it would be helpful
to know the basics of each program for following
along the videos. There's a couple of things to
do before getting started. If you're brand new, study
the user interface and hotkeys cheat sheets for each program included
in this class. And spend a few minutes getting acclimated to the
programs on your own. Once you get the hang of it, then dive into the videos. Now let's get started.
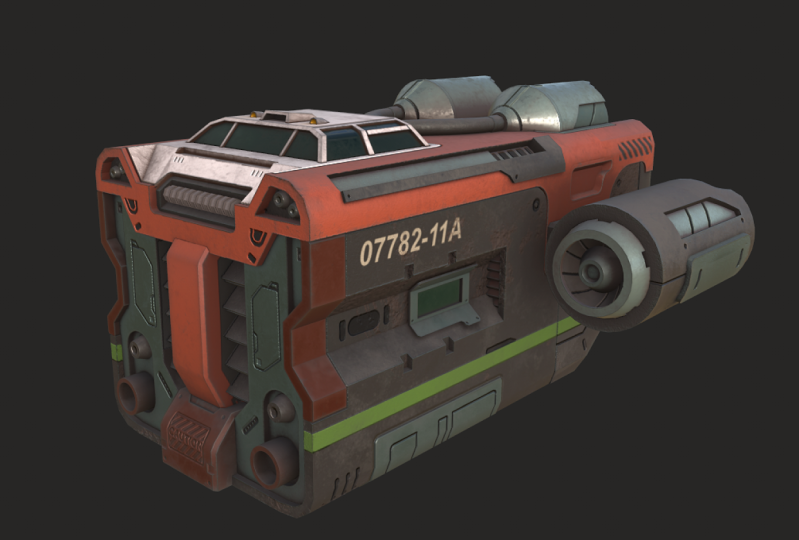
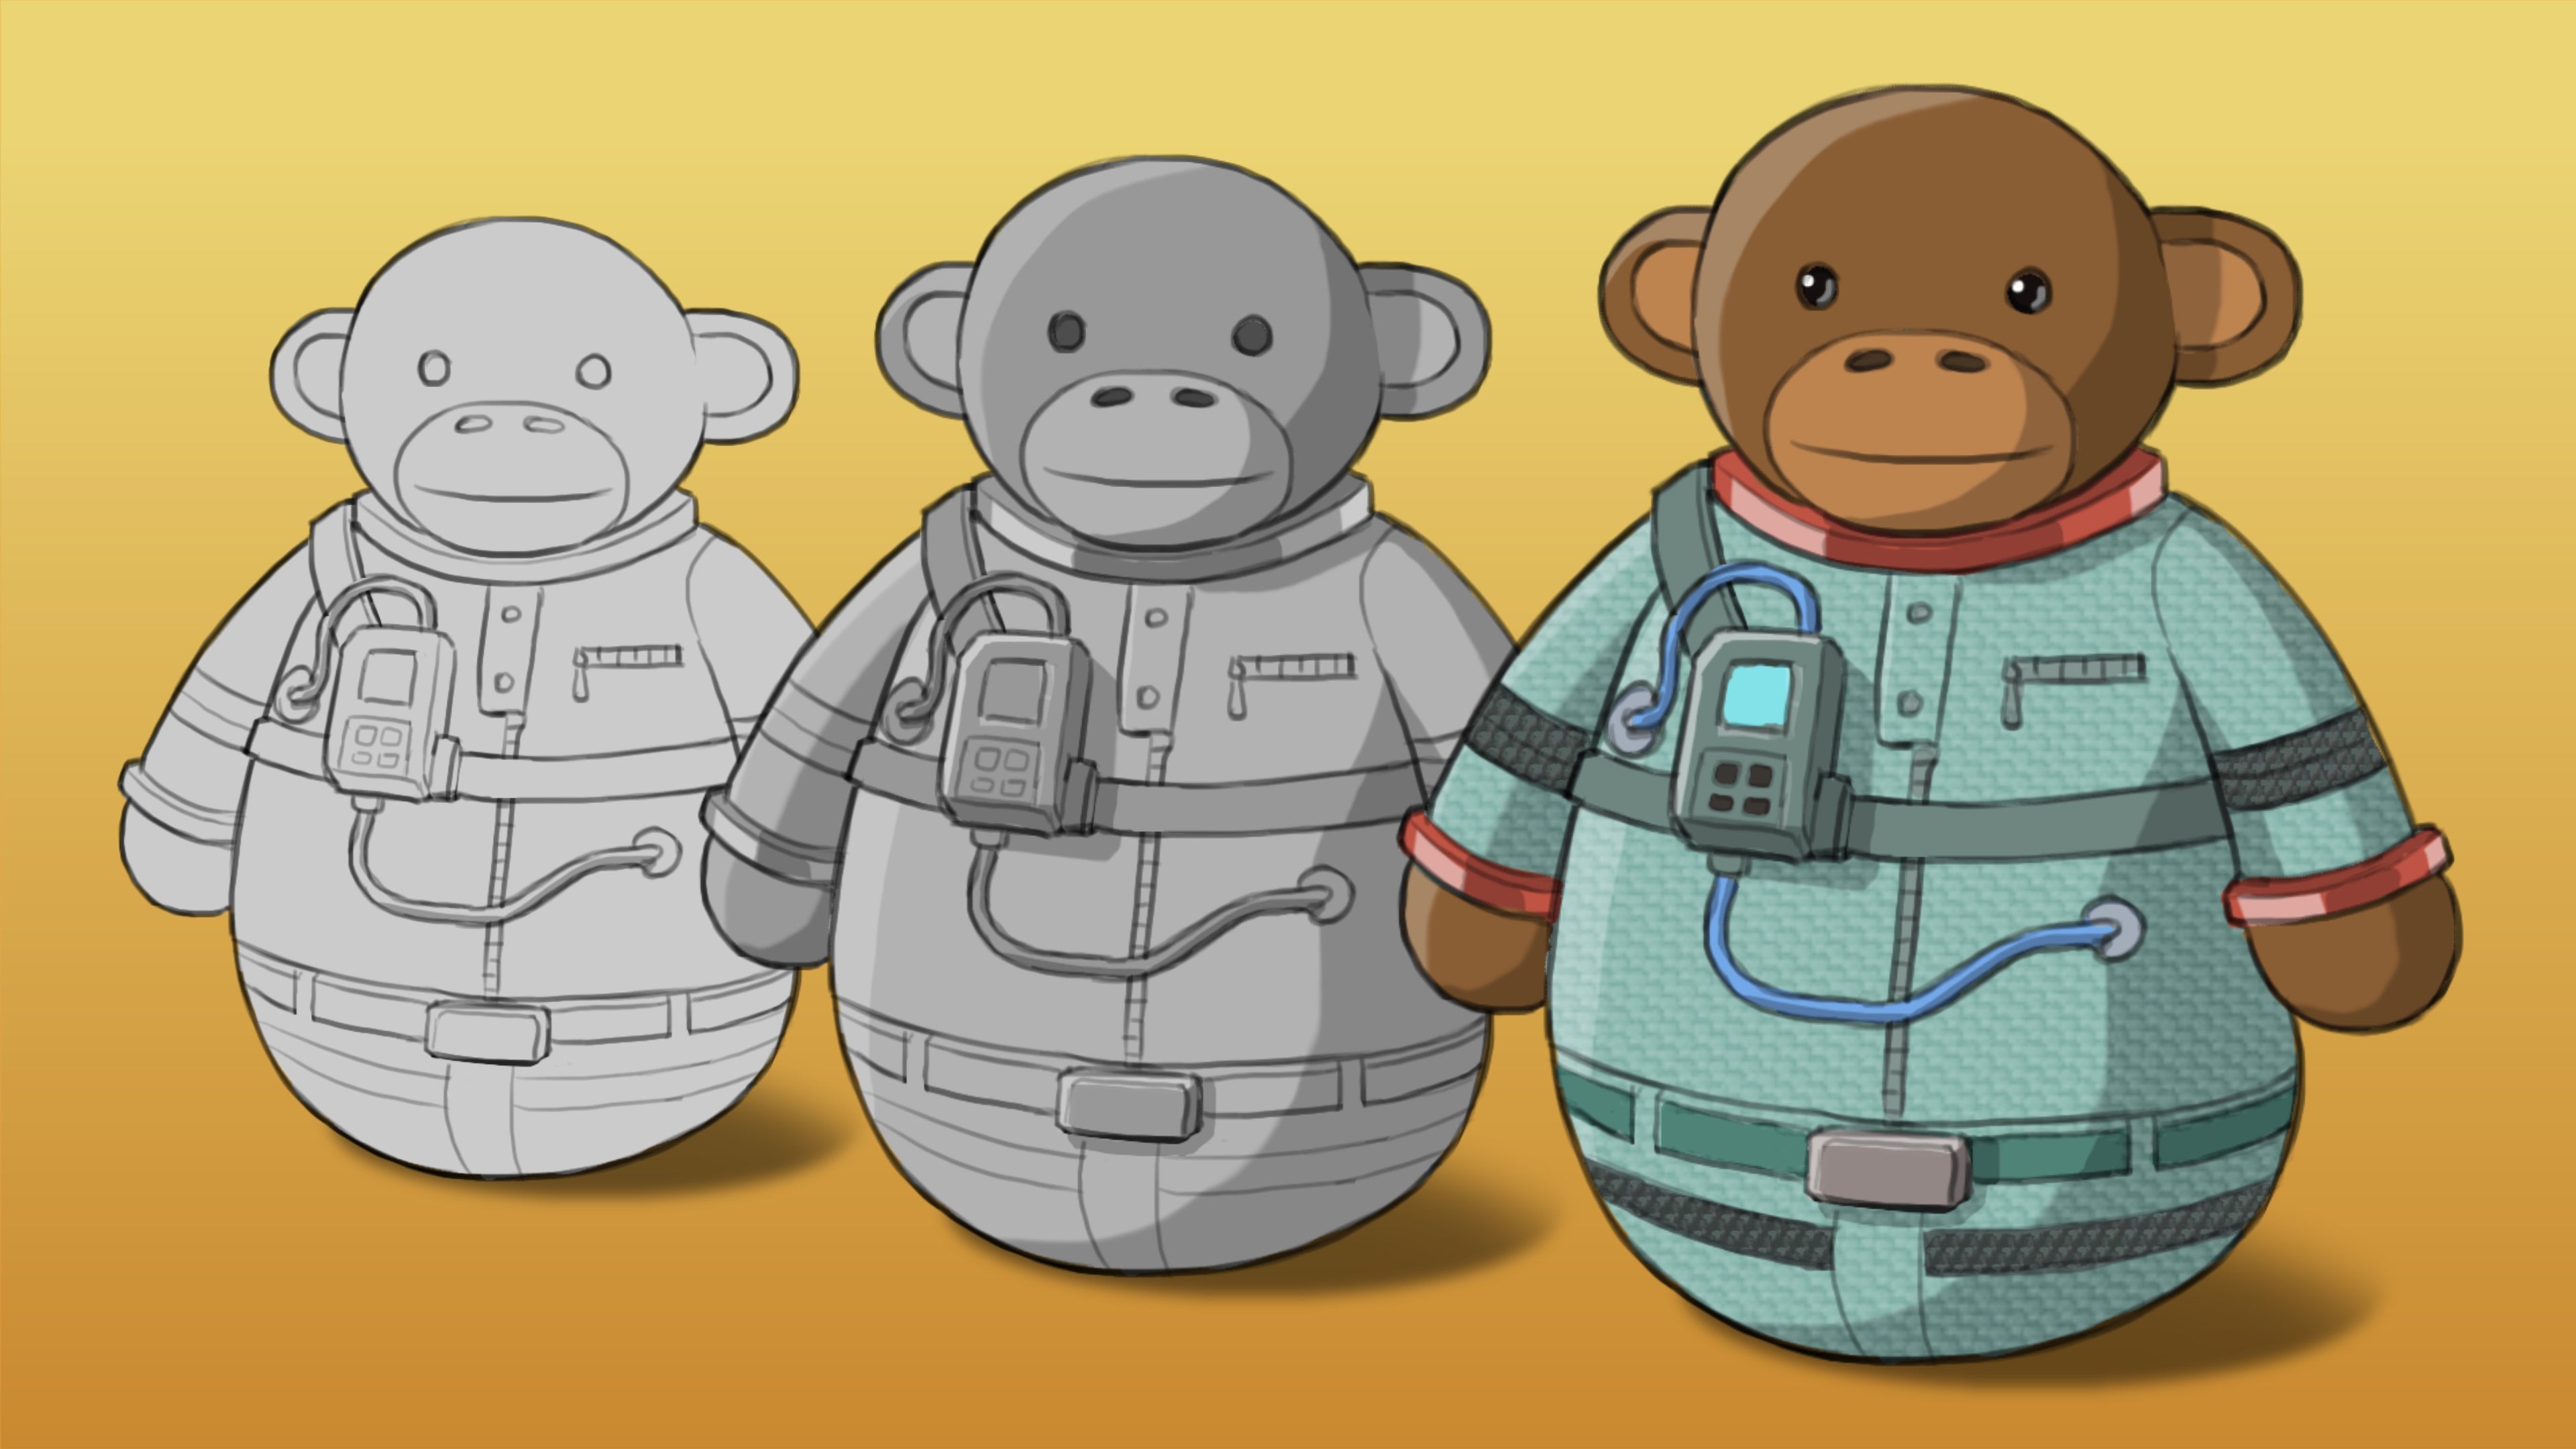
2. Blender Scene Setup: This is going to be a class
on modeling a spaceship. As you can see, we already have a block mesh to start with and also a piece of concept art to follow and use as reference. In fact, this block mesh was used in the making
of that concept art. So the proportions and
the size and scale and everything is already a
match with the concept art. Now, you could pull up the concept image and set it up on the side
of your monitor, but We're going to try
something where we can have it inside of
blender the entire time. And the way to do that is bring your mouse cursor to the
edge of the view here. And when you right
click on your mouse, you have an option to split
horizontal or vertical. We're going to choose
vertical slide the divider somewhere over here, and we have this second view. Here, we're going to
choose a flat view and add a reference image. So I'm going to look
for my concept dart. There it is. And let's
blow it up a bit. Okay, so this is the goal, where we want to
take this model. And right now, we don't care
about the color so much. So let's scoot it over and
zoom in on the line art, which will be much more
helpful with our modeling. Okay. And back to
the original view, let's push this guy way to
the back out of the way. And now we have a nice setup
where we very conveniently have our concept art to the side that we can look
at while remodeling.
3. Blocking In Jet Engines: Let's start out by blocking
in all the major shapes. We're doing strokes
for now and then we'll worry about
smaller details later. Just to start things off. How we start with this engine, and let's temporarily turn
off this mirror modifier. I'm going to create a inset just like in the concept image. A little cone
sticking out there? Probably. Oh, I see
what's going on. This I believe this is a separate piece of GO
from from the one here. So let's get rid of this face. And that way, Okay. That way we can deepen push this further back
there without it. Overlapping with another
piece of geometry, but there's still
another face here. Okay. Okay. Let's clear that out and is there
something. I see. Yeah. So we can push this
back further without it overlapping with another GO. Let's scale that down, like so. And turn back on the
mirror modifier. And let's bring our attention to these engines up top on
the roof of the spaceship. I notice in the concept, these are protruding out like so. Okay. Kind of like that, and then get rid of
the front face here. Let's add these
little fins up top. I'll just grab a handful
of faces there, it. Then I'm going to snap these vertices so we
have a little taper. I got magnetic tool or the snap snap mode
turn to vertex mode, and then I also have this auto
merge vertices toggled on, so that when I move vertices close to another one next to it, it'll just snap and
weld. Snap and weld. Okay. And then while we're at it, you might as well
add these tubes. For that, let's add a cylinder. Actually, let's add a cylinder
with a a fewer faces. I bring it down to even. Okay. Turn off snapping for now. Actually, I guess these pipes They should be sitting on top. Okay. So let's adjust what we just
did for the engines here. So that this still
pipes in to the jets. So I'll make a copy of this to plant where
it's going to end. I think it's somewhere
about there. Then let's get rid
of these faces, get rid of these faces as well. Let's join these so that we can bridge these edges together. Then we're going to bump up
the number of cuts like so. You can keep it fairly low. Let's shade smooth. Let's also slap on
a mirror modifier. But before we do that, we want to set the
origin to the cursor. Then if we add the mirror
modifier, Hold on. After we set the
origin to cursor, let's zero out the transforms, but going to object apply
and all transforms. It's all nice and zeroed out scales set to one
and every axis. Now when we add mirror modifier, it's going to mirror
this pipe correctly. That'll do it for
blocking in the engines.
4. Blocking In Cockpit: Let's move on to the
cockpit of this model. So we've got some
windows along the front and the sides and
a few details up on the top looks like
a vent in the middle there and some sort of
a parking light, maybe. Right? And then behind, there's
some detail that connects to the pipes or these cables that
we modeled earlier. So first, I want to split this piece and
half so that we only have to model half of it and
mirror the other half over. M. I'm going to make sure that these
vertices are right along the middle of the scene by switching our snap tube mode to increment and checking on
the absolute grid snap box. Okay. That's good to switch it back to vertex. Turn
it off for a second. Oh, and I also wanted to Okay. Finish I started here. Let's extra face at the
bottom there we don't need. And this piece is protruding into the body of the spaceship. There's all this extra
surface that we don't need. We can just get rid of
this excess geometry. Let's also make sure
this is nice and even. I'd like to just scale
things down to zero in two axes to check that
they're straight. Okay. Way. Let's go ahead and put
on the mirror modifier. And so as we work, we can
see the other half update. Right now, I'm going
to start creating the window frames
and inset this face. Let's continue this edge to the bottom and continue
this edge to the center. And now we don't
need these edges. Let's go ahead and
dissolve hoops. Let's dissolve those
edges, doesn't want me to. We can do this one
vertice at a time. We can do that thing we did
before where we simply snap. Okay. Vertices to nearby vertex
and just weld it to that. You'll see I'm flipping
on x ray mode on and off, which you can toggle with
either this button or shortcut. Let's go ahead and
extrude this in. We don't need these faces, and we don't need this face. And there's this
little bar here. We can add a cube.
Scale it down. Oops. For some reason, this is a
part of that previous geo, so let's go ahead and
separate by selection and set origin to the geometry and
continue scaling it down. We do not need this top
bottom and back face delete those and let's fit
it into the window. Okay. Rotate it to
the right angle. And I think it sits
right around there. Let's set the origin of
this guy to three D cursor, and I inherited the
mirror modifier from this piece and we have the
GO Mure on the other side. See if make some
minor adjustments like that to be as close to
the concept as possible. We'll leave that alone for
now and move on to the side, and let's carve out
the openings here. For that, I think the
easiest way would be to add a couple of edge
loops like that. And maybe another
one around there. While we're adding edge loops, let's keep adding some
more to create this bar, and we'll just straighten these out by zeroing it
out in the y axis. It looks like sits
right about here. And then before we go ahead
and extrude these faces, let's just go ahead and add this bar to while we're at it. Okay. I think it looks like that. Now, we got all the edges
in the right place. All we got to do
is extrude or push these phases in, like that. Oh, I made a mistake. So these faces
should be connected, and now let's push it in. Maybe just the position. Okay. Cool. There's probably some
excess faces down there, so we'll get rid of those. Now, let's add these
details on the roof. For that, we can just add some primitive
cubes, scale them. Not going to need
the bottom face. Delete that. Okay. Separate. Set origin to geometry
and place it on the roof. Okay. That seems about right. I want to use the
inset faces tool here to create a
little vent opening. And there's going to be
faces we don't need there. Let's delete that. Then we can push this
face in a bit like so. Okay. And also, let's bring these top edges in a bit so that it doesn't
stick straight out. But rather, there's
a slight slope on the sides and same idea here on the back let's
pull this edge forward. And lastly, we can use a
pair of cylinders with much lower vertices and much smaller scale
rotated forward. Let's extrude the back
face and shrink it down. Something like that set origin to three
Dcursor add mirror. Let's also give this
shade smooth and then harden the front edges
by marking it sharp. But also, you need to go into the properties tab
and expand normals, check this box on
next to auto smooth, and let's bump this up to 60, then it's going to give
us that smooth shade since it's a round object. So that'll complete the blocking in of the cockpit section
of the spaceship.
5. Blocking In Hull: I we haven't touched the
body of the spaceship yet, so let's get started on that. Right away, there's
a major shape change in the side of this spaceship. Let's carve out this
little area first. Now, This Geo was built purely for to be used as a
base for this concept art. So the geometry is not clean
or optimized in any way. In fact, it's a mess, and that's going to
make it a challenge to manipulate it at this moment. Let's resolve some of the issues with the topology by getting rid of
a bunch of edges. Okay The reason I'm not selecting all of the edges and doing them at once is to avoid the geometry
collapsing on itself, which it will do
sometimes if there aren't enough edges to support
any given face. That's much better. Okay. So I'm not going to go all the way in, you know, optimizing
the topology of this mess here just yet. I'm just going to
clear it out all of the extra edges so that they don't
get in the way of us trying to create
this divot area. And I'll start out using the edge loop or rather the loop cut tool to create additional
edges where I need it. Then that'll only
take you so far, especially with piece of geometry like this
where it can't detect to loops all the
way around the mesh, so then I can finish it off with the knife tool and tell it exactly to connect those edges. So I think this should
be approximately there. And again, I'm going to whip out the knife tool to
continue these edges. Okay. Okay. Also, when
you use the knife tool, you give up some of the precision that the loop
cut tool will give you. So in order to
straighten this edge, I'll just select this vertex, have the magnet or the snap
moo turned on and snap it to the same position
as this vertex. Same idea here. Now we know these edges are
perfectly straight. Now let's adjust how far
back this edge goes. I think it stops somewhere about there right next to the front of this engine that
looks about right. Let's also cut in a
little trapezoid here. L strain this line by zeroing it out in this axis, the x axis. And then we can
delete these faces, grab these edges
along the front, extrude it to the back
along the y axis. I did that by holding this manipulator tool
and hitting the key. With the snap mode on, I'm just going to
snap to this edge. Okay. And since we have the auto
merge vertices turned on, this should be welded. All we got to do is
close up this gap, either using the fill
action or bridge. I'm going to switch
to the front view here and straighten this out. And let's compare it
to the concept again. Maybe these edges
are further apart. Actually, before I do that, let's connect these edges. Okay. And it's not cooperating, so I can just get
rid of those faces and just bridge these two edges. So we have clean faces. Then it's just a
matter of snapping these vertices to this edge. So they're nice and straight. Now when we pull
these edges apart, shouldn't give us that issue with the faces going in
different directions. That looks about right. Let me go over to the object
data properties tab here, and the auto smooth
checkbox is already on, which means I just have
to mark these edges sharp so that it will
display hard edges like so. Okay. And instead of repeating all this work for
the other side, you know that I like to mirror things to save ourself
some time and some effort. So I'm going to
create an edge that goes all around the center. Now, you notice just
now you can skip edges and continue to choose
the end point of your cut. But when you do that, your cut is going to be at an angle, basically, whichever direction you're looking at the model. But if you know that
you want those cuts to be at the center
of all these edges, then you simply
need to let's see, hold control, before you
click on your endpoint. So we've got that
center edge all the way around our spaceship hull. Let's select this half of the ship and get
rid of those faces. Okay. Okay. And when we apply
the mirror modifier, should give us a clean
mirror of what we just did. That will conclude
the blocking in of the spaceship side
wall here. Okay.
6. Blocking In Front Area: The only part of the spaceship that has been left untouched is the front part. So let's start to work in these details you see here in our drawing. So first let's take a look at the faces that make up the front part. I want to start by cutting in some edge loops to create this line here. So I'm going to turn on my knife tool and just roughly getting that in there like that. 0 it out in the z-axis. To make sure the lines are nice and straight. Looks like this line should be roughly lined up with this edge. In terms of the angle. Something like that. Can I also want to continue adding more edges to express this sort of Grill opening. So I think it starts around here. Comes down, turns here. Again because I laid those down by hand. I don't know how straight these are, so I'm gonna grab these edges zeroed out in the x-axis. Same down here. Oops. So now I know these edges are perfectly vertical. And then I'm going to add this edge here to other way to straight now edges is to just snap it to the adjacent vertex. And you can do that with the stat mode. Turned on. Let's go ahead and extrude this in. And let's extrude this out. Can bring this down a bit like so, and remove faces that we don't need. I suspect we have some extra faces hidden in here as well. So let's get rid of that. I'm going to push these phases in a bit tighter. And let's line this vertex up to be straight in front and back. Bring this in a bit like that. Let's block in this guy that kind of sits right in the middle of this opening. Going to add a cube. Let's scale it to match the concept. Extrude the bottom face here, and push in this edge. Let's use the loop cut tool to add an edge here, which would let us push this edge in pink. We can pull out this face a tad. And we have a bunch of faces. That are intersecting the rest of the spaceship, which we can't see. So we might as well get rid of them. And I got maybe we can keep this face, so I'll bring that back. So now that part is in not too worried about the individual fins here. Just yet. We can come back to that later. Let's create this little opening here where the winch fits into. So for that, need to use our knife tool again to cut open a little area. And again, be sure to straighten out these edges. And for this, since it's at an angle, I think the cleanest way to a string this out is to turn the snap mode on and then just choose one vertex to snap it to. By moving it in. Just this plane. Gonna get rid of this edge. So let's not forget to strain this out also. Okay, and now I'm going to delete these faces, grab one of these edges, pull it down in the z-axis, and then bridge that edge with this one. And bridge again these two edges to close off the gap. Now let's look at the object data properties to check that the normals auto smooth is on. And let's see if we can push this up or down to get this to fix the normals, but I think we just have to will have to manually set these edges too sharp by marking them sharp. Write this number is kind of like a blanket angle that blender throws on this, this entire object. But the more complex the geometry, you will have to go in and manually designate edges as, as sharp or not sharp. So one last thing. To finish off, blocking in the front of the spaceship. Let's add a very low poly cylinder to represent this coiled up winch cables. It's not a lot, not a lot of room here to fit this in. So I'm going to pull this edge back like that. Maybe even add another one. And now this can fit comfortably into this little space. Don't need these faces at the ends. Let's smooth this out. That's going to wrap up this section on blocking in all the sort of major shapes. And coming up, we're going to go in and start modeling out these smaller surface details.
7. Modeling Side Engine Pt 1: We've got our spaceship nice and blocked out for the most part. So now we can go ahead and jump in, start adding the surface details that we haven't had a chance to, to begin yet. And since we started with the jet engines, Let's just go back to those and start there. So let's see. Let's start at the front. Where I notice. We can add some more geometry to this piece, but let's first separate it by selection from the rest of the engine. And that's just going to make it so much easier to manipulate than if we had everything together. Wanna get rid of this face and think there's too many. There's way more edges than we really need. So let's go choose every other edge and delete them, dissolve edges. So now it's much more manageable. And instead of using the fill because that's going to give us some ugly edges. Let's just extrude, scale it down. Snap it to this rim. And we can go ahead and zoom in on our reference here. Focus in on that jet drawing. And let me turn off the snap mode there. It's kind of getting in the way of the modeling. It's going to push that in a bit. And then let's seal this off. Instead of just bringing all of these edges towards the center and turning this into like a pizza slices. I like to close off for a circular openings like this. So I'm imagining later on using the subdivision modifier to bump up the resolution and smooth out all our geometry. And it's best to avoid triangles because they tend to end up looking weird when you apply subdivision to them. Just a rule of thumb. Not a hard and fast rule. All right. So we have a neat, topologically clean cap there. Yeah, so I like to have the snap mode on and off. You really have to get used to the hotkey for toggling it because it'll help while your modelling and other times it gets in the way while you're modeling. So I think that'll do it for this little cone piece inside the engine. Now let's move on to this part. And again, I'm going to separate it from the rest of the engine by separating it by selection. Try and close that gap that we created by making this cone more narrow. I want to make sure it's intersecting. And let's go ahead and make modeling these details. So for that, I'll add an edge loop around there. And choose two faces. Every other three faces. So select two phases, skipped three faces. Hopefully it's going to work out when we reach the other side. And there's still evenly spaced out. Nope. Okay. So it doesn't work out like that. Maybe. What happens if we skip four faces? And it still doesn't quite line up. Maybe you can select three faces. Well, but then that's going to be too wide. So we can try this. We got the top, bottom, left, and right. So it looks like if we select two faces, skip two faces. Then when we go around, there are nice and evenly spaced. But I like to get to be larger between these divots. So I think we can achieve that by using the inset tool and pushing those in. So now we have the wider gap between these holes. And then from there we can switch to the extrude mode. And extrude that. Okay? And now we can add another edge loop. They're actually sort of inside, so we don't see it. And let's select all these faces that we can't see. Delete faces. Okay, So now we have these modeled in. And then we need to do something about the inside of this engine. Think I'll add an edge loop right here. And as for the spiral going in, I think that detail we can save for the texture work. So that's gonna do it for the front part of the engine.
8. Modeling Side Engine Pt 2: Picking up where we left off. Let's model in the surface details that go along the side of this engine. Actually really easy one can knock out right away is this connecting piece that attaches the engine to the side of the spaceship. Let's go ahead and separate this out. And all of this needs is a bevel along these edges. Add those bevels like that. Also. Let's keep an eye out for extra faces. We don't need find them, delete them. And I'm going to pull out this edge so it doesn't intersect as deeply into the side there. Okay? Then moving on to this larger piece, right away, I know that this should be a smooth curve. So let's introduce some more edge loops along here. Let's separate this part. So after adding a couple of edge loops here on this face and pushing them forward a bit. We do get a bit of that curve that we see in the concept. Let me isolate this piece and go even further. So knowing that we're going to eventually add subdivision to all of these pieces to smooth it out and bump up the resolution. Well, we want to resolve n guns like these, which are basically any faces that have more than four edges that make up that face. What's do it? A little bit of manual read topology work to ensure that when we do apply the subdivision, that we don't have any visual artifacts. And actually let's, let's do what we did up here. On this side. Versus this back a bit straight. Now these edges delete others that we don't need. And then you can use the slide vertices action there. For situations where if you were to move it around manually by hand, it's going to bring that vertex off the contour of the surface that you're working on. I'm going to straighten out these edges. Let's get rid of this edge. So that I got the topology flowing more or less the way I wanted. It's still kinda rough. Let's get rid of this. And this. I don't know what that's doing there. And we're also going to have to resolve what's going on in here. Let's straighten this out. I just want to select these edges on the inside. Straighten it out. Same here. And just to see what kind of effect that has on subdividing, let's go ahead and turn on subdivision surface for this this piece. And if you try to add this before we did what we did with fixing the edge flow and everything. This would have turned out basically a mess, wouldn't look anywhere as smooth as it is now. We're going to turn that off again because we are saving that for much later. This is, needs to be a little bit more work to be done on the geometry before it's ready for subdivision. But this way I just have it kinda halfway primed for that process later on. Now let's bring back the rest of the ship so we can see it in context. And let's just bring back the front here. The reason I deleted this faces because I didn't need it surface all the way to the inside. I just needed to come up to this point. In fact, let's so this concept are being sort of a rough sketch. Looks smooth from this front angle, but not so much in the back. But I think we can still go with this version. So I like the way that looks just a tad better. Now what is consistent is that we've got these panels on the side. Let's go ahead and create some more edge loops where we can insert those those panels. So this first edge loop can work as this edge here. And let's just zoom out, check that's in the right spot. Right around there probably. And then this edge kind of follows along this angle. So I'm going to use the knife tool. So we can be more accurate with our edge placement. Maybe, something like that. So let's select the faces that are going to be roughly this shape and push it in just a bit. Let me try that again. Well, we can push it a little deeper. Like so. And maybe even scale it down just a tad. In this plane. Let's go ahead and also add this panel. For that. We can just select the faces that approximate that shape extruded out. And let's select these corners, these corners or edges and give them a bevel. Like so. Far as this back piece is concerned. Think I'll scale this down a bit. And just like the front part of this engine, we don't need nearly as many faces or edges, rather scary to those. And let's close off this opening. And that'll do it for modelling the side engine. These smaller details like these, nuts and bolts and details like these. We can save that for texturing.
9. Modeling Top Engine: Let's turn our attention towards the engines that are sitting on top of the spaceship here. And let's take a quick look at the concept to see what we need to do. So first I want to start by separating different pieces apart from one another. So I want to separate this piece by selection. And I see that these edges are sitting pretty deep inside this shape. So let's pull it back out, resize it. And also this, we want to scale down because it looks like it kind of tapers as this piece goes inwards. And this piece, we need to delete this face because it's intersecting with this piece. And then we can't see this inside taper of this rim object. And actually there's even more geometry underneath that's also getting in the way. So let's grab this and push it back. Like so. And now we can see what's going on back here. Let's delete that face. Let's select every other edge. And let's close up this gap. Bridge those, these faces together. Let's add a couple of edge loops inside. Use the bridge action again. And then we can use the fill whole action to fill up these corners. There's a gap here between this piece and this piece. Let's grab this and extrude those faces. They're kind of off-center. So I use the snap mode, turned on to snap back to this point. And this point. Now it's back to center. And I also want to snap to this soda. Now it's flat and flush. And now we've covered up that gap. So in this, in this drawing here I see a bit of a curve here where these two angles meet. So let's see if we can just select those edges and use the bevel. So that works pretty good. I'm also noticing that this edge, this, this part is much thinner and the drawing. So let's try and replicate that by pulling this edge. Now let me isolate this. And it looks like we have some issues down here that need to be resolved. Let's add an edge there and an edge here. Let's bring back the rest of the ship. And let's take a look at the front part of this. So again, want to separate this piece out, separate by selection. And you can see there's a lot of faces down here, which aren't very useful for us, so we can get rid of those. But just before we do that, let's cut a, cut an edge from here to here. Same with the other side, from here to here. And now let's select these faces below. Let's get rid of this face. And let's clean up this topology by redirecting the edge flow to something like this. And then let's get rid of these diagonal edges. Dissolve edges. We can get rid of every other edge along the top here. So that's looking much nicer and cleaner. And we don't have those extra phases underneath. Now I did notice a lot of extra faces on this cylindrical piece here that we can also get rid of. And let's see if we can't combine these together. And we can do that by first making sure that the number of edges along this piece and the number of edges along this front piece are matching and aligning. Get rid of too many edges though there's some that we still need for this shape, the holdup. And in fact, let's get rid of these two. Okay? So I'm going to select both of these pieces and join them. Now makes sure the auto merge vertices is turned on. And let's have our snap mode set to vertex. Snap with center. It defaults at closest, but for our purposes, center is going to work better for what we're trying to do, which is just weld these vertices to the closest one, one at a time. All right, so now it's one nice big piece. And let's close up the front here. Let me snap this bottom vertex to this one, so it goes down and not in. Also, we can pull this down a tad so it's intersecting with this roof surface. And with that out of the way, we can grab these faces and bridge them together. In fact, let's isolate this by hiding the rest of the geometry. And we can add some edge loops here. Bridge these two edges, and then use the fill action for those corners. Let's unhide the spaceship so we can see it in context. In, there you go. This edge, let's mark sharp to maintain the hard edge there as seen in the concept. And we could add in another edge loop across to create this rim shape. Right now it's not letting me do that. So there must be 0. It's because of this. We need to resolve this. For that the edge loop tool to work. Put two edge loops on either side and then use the knife tool to cut across. And then worry about the topology here a little bit later. But having this edge loop here will now allow us to create one on, across this surface. Okay, I'm just going to select this strip and extrude. In effect, Let's change our extrude mode to this one where it's extruding along normals before it was only extruding upwards, but I wanted to kinda spread out radially. So there we go. And we can pinch it in this direction. So we've got that little shape going on there. And oops. Let's model in this shape here. It's kinda interesting. Shape. We can use the knife tool to cut through here. And then diagonal. Oops, they're down diagonal. Like. So. Let's select these faces. And we can select these faces and push it in. But there's going to be an issue here that I'm anticipating as soon as we do that. So you can push it in like so. And we need to, we can just get rid of these faces, actually. Get rid of these as well. And then just fill in this gap. There we go. Get rid of these faces, which we don't need anymore. We can combine this welded to that vertex. Let's take a look at this piece through second. Yes. We can flatten this to so it's flush with the rest of this face. And let's work on these pipes for a moment. We can add an edge loop here. Extrude this along the normals. Just a tad. So we don't want it to come outside this, this shape here. Probably push this edge in a little bit. We want to maintain sharpness along those edges. Let's check our Object Data Properties tab under normals and make sure auto smooth is turned on, bump up the degrees to around 60. And we can do the same here. Add an edge loop along there. Select this loop of faces and extrude. Just a tad. Push in those edges. That'll be it for now for the roof engines.
10. Modeling Cockpit Area: This time we're going to realize some of the details that are around in and around the cockpit. So let's start actually just behind the cockpit where these pipes neat. Think we can start out with a cube primitive. Bringing it into place. Scale it to the right shape. And we don't need this bottom face in front face. Also, we can push these up. And I'm specifically looking at this guy right here. I'm going to add a couple of edge loops. You only need to actually need four altogether. So I can push this down and we can build these corners. And finally, let's try and match the angle of this piece to this angle of the back of the cockpit. For that, I will select these backwards facing faces. Tilt it ever so slightly. And then if I scale it out, then it's going to uniformly skew this face. And the face, the face is will still be flush. So one problem is that these pipes are not fitting in here. So let's grab the first few group of vertices and turn on the proportional editing toggles so that it's going to smoothly move kind of the rest of this pipe backwards. As we push this backwards, I'm using my scroll wheel to expand and contract this ring which decreases or increases the area of influence. So something like that is going to allow it to fit into this piece of night a lot better. Just needed a little bit of nudging to get into the right place. So now that's working. And let's also pull these vertices back. Remember to turn this off once you've done using the proportional editing, will pull that back a bit. And now onto the actual cockpit itself. Got a model in this detail here. I think we can do that pretty simply just by using the inset tool to push these phases in along the same plane. And then if we isolate this, can get rid of what we can get rid of this face. Move this to the center and also use the knife tool to extend this edge. And then we can get rid of this edge. Dissolve. Now let's bring back the rest of the spaceship. And now we have this shape that we need for pushing it in, like in the concept. So let's push that in. And there's definitely going to be some extraneous faces here and here. Let's remember to delete those. So we have a similar problem that we had before with the, the pipes is these pieces just don't want to fit into one another. So I think, I think we need to select all the vertices and the pipes and kind of scale it down. So I'm going to reconnect it to the engines in the back there. And using proportional editing once again, I'm going to nudge this back to where it needs to be. Okay. And now that the pipes are much smaller, I can afford to shrink this piece down to fit it under this shape. And now we've got it working. Just barely. Moving on. Let's revisit these pieces on the roof here. Forgot to turn off proportional editing. So these actually look pretty good. Or the event here is fine. The one thing I'll do is grab the front faces. And remember that trick earlier where I just tilt it ever so slightly and then push it out by scaling in when one direction. And then it's going to give us a nice flush surface in at an angle. So that feels more aerodynamic than the way we had it before where it was just sticking straight up. And now I want to fix these parking lights so that instead of curving inward like that at the bottom, I wanted to go straight down. So I want to start by deleting. Actually, let's just delete all these faces. Deleting these faces, selecting these side edges, and then just extruded along the z-axis straight down. And you do that by as you're holding the manipulator tool after using the hotkey for extrusion, press the letter of the axis that you want to, to extrude along, which in our case is Z. So I press the Z to make that extrude straight down. Now let's close up the gaps in the front and back. There's something going on here. I think we have a duplicate. Yeah, we gotta duplicate here. Let's oh, okay. Let's turn off or remove the mirror mirror modifier on this piece. And I think we'll resolve the error that we were having. Sometimes when you apply the mirror modifier to do one object and somewhere along the line you use split them apart. The different pieces are going to inherit the modifiers that you've added previously. So that's probably what, what that was. Kinda keep moving forward and focus on this part. Let's use our knife tool to carve out this little shape. And to make sure that these lines are straight, I'm going to line this vertex up with this one with stat mode turned on. Same idea here. Okay? And let's get rid of these faces. Let's get rid of this edge. So we have the same number of edges when we bridge it. And then I'm going to add an edge loop there. And it looks like the concept, I, I believe it's this shape is doing something like this. Oh, and then let's close up this gap here. And it looks roughly right as far as the width goes. So that'll do it for touching up this cockpit area. Next, I think we can just keep moving forward and focus on all this delicious detail in the front here. Coming up next.
11. Modeling Front Area Pt 1: For the front details, Let's start towards the top. Here around the winch area. So I see that there's this shape just around the winch. Think would be best to use a knife tool for that. So I'll draw some new edges. Like so. I'm going to 0 out this edge in the z-axis. And I'm going to snap this vertex to this one in the red plane. And let's also line these vertices up by zeroing them out in the x-axis. With that, out of the way, we're going to push it in. But I want to get rid of these faces first. So they don't get in the way. Let's go ahead and push these faces inward. Let's grab these faces that we don't want. Delete them. I'm gonna grab this edge, pull it up. This edge ought to be pulled out a bit as well. And let's check the auto smooth setting here. So bringing this down is actually getting rid of the smooth shading on this edge. So let's just go in and mark these as edges as sharp. Select them first, go the context menu and mark sharp. And then the winch cable itself needs to be pushed back in deeper. And now that those faces that we removed earlier, we can bring them back. Let's close that gap. There's something odd going on here. Oh, let's push this vertex up to the nearest one there. Now, I think see the winch cables are still intersecting this pocket here. So let's just push this even further and add another edge loop. So we have something like this going on. Let me investigate with this is it looks like an extra face we don't need. Okay, so now our winch cables fit a lot more comfortably now that we've pushed in the back of this socket here. And let me just add a bit of a bevel in these corners. To reflect the concept. So I've selected these edges. I hit the hockey for the bevel. So we get something like this. I think this edge here could also use a bevel supply shade smooth again. And so these edges have our March sharp so we can just clear the sharp to make it Shade Smooth. So that's looking a lot more closer to what we have here. Spend a moment to add a little more detail to the winch itself. I'm going to merge these vertices at the center. Oops. Again, merge vertices at the center. Let's check on auto smooth for this object here. Bump up the settings. Then I'm just going to copy and paste this object to create this joint piece that connects this cylinder to the spaceship here. Something like that. And these pieces don't need to end caps. So let's select all the faces and then just de-select the ones in the middle. And then let's go to what it looks like the spaceship equivalent of the grill. All the edges in this piece looks like has a bevel on it. So let's just select those edges and add a bevel about that much. And these edges, we can push them apart a bit like so. Let's check on auto smooth. Apply, Shade Smooth, and play with the angle settings. I don't want all of the edges to be hard edges. Maybe just this outer edge. We can mark chart and see how that looks. Maybe this this set of edges also can use the mark sharp. And then everything else can stay smooth. Let's, let's isolate this piece for a moment and check out what's going on up here. So I wonder if we even need this face up on the top. I think we could get rid of it and just push this edge to intersect this surface. And this bottom phase is already been removed. So that's good. Let me just push this slightly so it intersects. And then let's add these thins and start with the primitive. Let's get rid of the faces we won't be able to see. Let's also rotate it at an angle downward. And from here, since we're just, just need copies of the same shape to go all the way up and fill in this gap. We can use an array modifier. Have it set to offsetting in the z-axis. And before we do that, actually, let's, let's apply, go to Object, Apply all transforms. That way. It's going to make a copy that goes directly outward in the z-axis as opposed to, you know, kind of going up at an angle like before. And that's because this, because this object contained rotation information, it made the modifier think that this was the z-axis and not straight up and down. So let's count how many there are in the concept. I count five. And so we have five copies going up. Can play with the offset number here. That just about does it. Maybe I can push it back just a tad. Like so. And then let's push a little further ahead. By modelling out this chin piece. Will grab those faces and separate by a selection. And then just like with this piece in the middle, Let's grab these outer edges and give it a bevel. I think would be easier if we just isolate this first. Let's bring back what was hidden. And I want to check what the setting is for the auto smooth. So again, let's just select these edges and mark them sharp. Also, let's bevel this edge. And now we got something looking closer to a concept. Yep. So we just went from the top of the front area all the way down the middle to the bottom here. So next up we're going to look at sort of these headlight type of objects along the front corner of the spaceship. We'll do that next.
12. Modeling Front Area Pt 2: Let's pick up where we left off and continue modeling the details. In this front area of the spaceship. You can start with whatever this is, looks like a headlight type of object. Let's create a inset and push this in it like that. And then we need to create an opening on this surface that's in this shape right above this object sticking out. Let's copy and paste this shape. And use that to create a do a Boolean operation to carve out this little shape. I want to select the bottom half of the cylinder and let's extruded downward. Okay. When I get this out of the way, we'll copy over the headlight object from earlier. But first, we want to clear the area and do the Boolean operations. So selecting the surface here, Let's add a Boolean modifier which targets this object we just created. And then it's going to be the difference. So if we hide this, we should have that opening. So in order to keep this, this carve out, Let's go ahead and apply the Boolean modifier. And then you see the mirror modifier updates it to the other side. Then we can get rid of this shape. And let's copy this over to this side. And let me just check if it's got a face in the back that we don't need, which it does. So we're going to get rid of that. Also, if we set the origin of this object to the 3D cursor, which is at the very center of this whole scene. And we apply a mirror modifier. Then we know it's a perfect duplicate from this side to this side. And effect to get rid of this little fascinating, Let's add Shade Smooth. Go to the Object Data Properties tab, expanded normals, and let's turn on auto smooth. Just before we move on. Wouldn't be a bad idea to clean up. Clean this up just a bit, delete all of these faces, and use the bridge tool, psych that can fill it with new face from edges. And from there we use the knife tool. Get rid of the n gone. And now we have a clean set of faces inside this little dugout. And we'll worry about the topology along the surface a little bit later once we've finished adding the details. So let's unhide and bring back the rest of the ship. There's a little object there. Let's add that real quick. Add Cylinder. We can definitely have bumped down the resolution. And let's set this in place. I'm going to snap it to these vertices along the outer edge here to line it up. And maybe for visual interest, we can bring that front face in. So it looks more and more dynamic. Let's set the shade too smooth and turn on auto smooth. And we can set the origin of this object to the 3D cursor so that when we apply the mirror modifier, it's going to copy it to the other side. Okay. Let's focus our attention on this chin piece. For a moment. I want to create this little detail on the either side. So for that, I'm going to add an edge loop here and another edge loop around there. I think I have one more here. And let's select these two faces. Delete them. Extrude this in the x-axis. Let's line it up to this edge and then bridge the two edges. And then we can close the gap with the new face from edges. And then now that that's in place, we'll just make a few adjustments to match. The concept. Looks like this should be lower. And let's set these two edges too sharp. And I'm going to scrunch these faces like. So. It looks like adjusting the auto smooth slider is, and I'm going to do much. So I'm going to have to go in here and manually designate the sharp edges. And then right up here we're going to create this little detail. For that, I will start again with the edge loop tool here in here. And other one around there. Select these two faces. And let's hide the rest so we can see what we're doing. Extrude this, bridge, these two edges and create new face for images. Unhide everything. And then I'll make this adjustment where I just push these edges inward. So you get this diagonal line there. And so we've added that detail. Let's go for this, this rim around the, along the edges. That would be that seems to be a pretty important detail to capture. So I'm going to use the knife tool to roughly set down the edges that we're going to need. And then let's straighten out these edges by scaling them out to 0. So we know these are straight up and down. Oops. And then for the rest we can just eyeball it. Okay. Just need one more edge that goes up and down, right about here. Okay, so we should be ready to start working off these edges that we just laid down. Okay, I got these faces selected. Let's hit Extrude. Turn the snap off. It's gonna go, make your extrude go wild. So Extrude just a tad forward. And that's gonna give us this separation from the rest of the front surface. Can get rid of this face. And I think we can push in this piece here, this face, little backwards. Let's get rid of these faces. Let's grab these faces and push them forward with an extrude. And now to wrap up the front here, Let's whip out our knife tool again to cut out this shape, something roughly like this. And then we can make some small adjustments to our vertices. And then let's go ahead and give it the extrusion inwards, something like that. And then for these little circles inside, we can just copy and paste this piece since it looks pretty similar. Let's set the origin to geometry so we can manipulate it more easily and just set it in place so we need a pair. So I'll copy and paste that once more. Set it right next to it. And now we have these shapes represented. So we can join these. Oops. Think one of them has a mirror modifier attached to it. So actually if we were to set the origin to 3D cursor for both of these, then it's going to mirror to the other side. The front of the ship is now at a pretty good, a pretty good place. We can move on to the side here. There's plenty of details on the side that we need to model in. And we're going to be doing that in the next video.
13. Modeling Hull Pt 1: Now we're going to model the side of the spaceship. Let's take a look at the wireframe. So let's start out by creating this edge right here. So that's going to start from this point all the way back here. It's gonna go a little bit past this, this edge here. And then down, presumably end somewhere around there. Maybe it keeps going to the back. Let me just park this vertex right there and let me consult the concept for a second here. So yeah, you can see it looks like this line goes down, kind of dips down and back up. So let's pick up our knife tool again and then just continue this edge. Like so. And both of these edges are actually, we're going to bring them closer together and have them touch this object here. Maybe this, bring this up a bit. So now that the edges are in place, let's go back and make sure they're all nice and straight. I got the snap turned on. And just going to snap it to this first vertex and go all the way down. And even though it looked pretty straight, you can see we're off by a little. So you've seen me line up edges by zeroing them out in one axis. That's just one way. Here's another way. Right here. Just snap vertices 0 and let's line this up with this edge. Okay? Let's detach the faces below this line. From the one above it. See there's still intact right now. Seem to be separated already. So I think the best way would be to grab everything, all the faces, and then we can subtract from this selection. Like so. We don't have to worry about the back for now. Let's just go ahead and separate this, this objects pretty large. So want to break it down, separate it where it makes sense. So we're going to separate by selection. So now it's going to be much easier to work on this piece without worrying about how it's going to affect this piece. Still a fairly large Peace. We may want to find opportunities to break it apart even further. So already I know that we want to separate these. Okay. Just making sure that I got all my selections correct. And so I'm going to separate this by selection again. So now this piece is separate from this, this shell. Okay, it looks like, Let's try that again. I missed a few faces here. And hopefully, oh, actually along with this one. And that should be all the faces I was missing. Yeah. That looks much better now. So we have this shell of an object. I think there's something funky going on at the bottom here. Yeah, so this is why you want to break up large pieces of geo. Because then as you work in one area, it's going to affect other parts of it. It's much easier to manage smaller pieces. So what I'm gonna do right now, I'm going to create an edge here and cut off the back of this piece. Just want to focus on the side. So let's start there and then draw an edge all the way along the bottom. And let's scale this in the y-axis to 0 so that we know it's perfectly straight. And then I'm going to go off of this edge here, try and find where that might be. It's probably just around there. And then with face mode on, we're going to break off this whole back section. Okay, so now all we need to worry about is this shell piece right here. Now looking at the concept, Here's an easy detail. We just have to, we already have an edge loop where we need it to separate this little piece. And I think it's already in the right place. So let's just go in and go ahead and add another edge loop on the side right around here. So we can create this edge. We'll use the knife tool to continue this edge all around. And then we're going to turn on the snap mode, is that these vertices, so there are aligned with this edge. Now, let's select this edge. We don't need this can dissolve that alza leftover from what we were doing before with the front of the spaceship. And so now we have the edges. We need to select these faces and separate them from the rest of the whole. So let's go ahead and do that separate by selection. And then let's cut out this piece here. So we're already taking care of this edge. Let's add an edge loop around here. Since it's not taking us all the way to the edge without the knife tool to finish it off. Again, snap it to the adjacent vertex to align them in a straight line. And then we need another edge loop somewhere. Let's see, somewhere around here, maybe a little further back. Okay, that seems about right. I'm going to select these faces. And since we don't have a concept art view from underneath the ship, will just have to do bit of guessing as far as how far this piece goes in. Maybe it stops here, maybe maybe it stops further in. I think. I think this is fine. It can break off this piece like so. And with that, we've basically separated out all of our main pieces for the side of the ship here. And having this all set up before we go in and start modeling in these nooks and crannies. That's going to make our lives a lot easier to just to take care of all this ahead of time. But we're gonna go into those nooks and crannies in the next video.
14. Modeling Hull Pt 2: In the previous video, we finished setting up the side of the ship to be ready for additional detail modelling. Let's start out with this piece. So it is separated from the rest of the whole. But we need to do some more modeling along the edges to make that separation more readily visible. Right now it's just a faint line. Let's go ahead and select the piece. Go into edge mode, and we'll add some edge loops on the bottom, along the top and up and down, where it butts up against the adjacent piece. With those in place, I'm going to select the outermost edges and push it in slightly. And so now it's way more obvious that there's a seam here. Let's just take care of which edges are going to be smooth and which are sharp. I think pretty much all of these edges should be sharp. And if we could isolate this piece for a moment and go to vertex editing mode, Let's go ahead and snap. Snap it to the corner vertex. Otherwise we have this awkward quad just sitting in the corner. And now we can bring back the rest of the ship. And there you have. This were a visual separation that we want, just like in the concept art. So let's do something very similar to this larger piece, where we go ahead and add an edge loop along this front edge. And another one here where it's meets the bottom of the first object. And we could also use another one at the very top. And because that actually we just added that just stops here. Let's go ahead and finish it off manually with the knife tool. And if we jump into edit mode, Let's snap it to the adjacent vertex so that we know it's straight. Also. Let's go ahead and snap these vertices to the one in the corner. And then let's grab those edges. Just making sure we're only grabbing the edges we need by looking at it with the X-ray view. Okay, so now let's push it in slightly. Then all there is left to do is select the new edges that we just added and mark them sharp. Obviously, these edges don't need to be. So let's take a quick look and it's looking more like the concept. And the edges that we add it up top is also creating separation of these objects to this top piece. An easy one we can knock out right now is this face here has a little vent detail. I'm going to add an edge loop around there and select this or this face and push it in a bit. Let's just fix these edges and mark them sharp. And then let's add a queue, which we're going to scale down and flattened to turn into the vent girl, throwing a fit it into this little pocket here. And it's obvious that we don't need these faces. So we can safely delete those. Let's tilt this down a tad. We don't need this back face either. So set it at an angle and let's use a array modifier to duplicate this. Sort of create a row of these fins, but it's offsetting at an angle because we tilted it. We have to apply transform and then it's going to copy it directly downwards. So we don't need quite so many. Think six will do. So that's in there. And I believe this is supposed to be a window from inside the spaceship. So obviously this cockpit, these are windows, but maybe there's like a lower level below the cockpit, just below the cockpit. Or you can also look out of from inside the ship. And for that, it should be pretty straightforward. We just need to add a couple of edge loops somewhere along the middle, like so. And then actually let's add another one here and another one here. And then we can select a handful of faces that roughly follow this shape. Let's extrude this. And actually I'm going to switch through the different extrude modes. There's a bunch of different modes of extrusion going to try this one. And I think that's going to give me an extrusion that kind of follows along the normal where the Extrude is happening. So that's all I need. Just a little sort of looks like a rim plate type of thing where holds the class in place. And then I just need a couple of more edge loops in there too. Then finally cut out the actual window piece and actually we just add a couple more edges along the top and bottom. And now. We've got the faces that represent the actual glass part of the window. So I'm going to select those faces and push it in a tad. Like so. And let's go ahead and bevel these edges. That's not going to work too good. You know what? Actually, this bevel is so slight that we may be able to just take care of that in the geometry smoothing process. But this edge here, this edge is definitely need bevel. So that's roughly how we want the windows to be. Let's check again if it's in the right place, maybe we can just slide it along more towards the front. So I'll actually just select this whole bunch of vertices. I can slide it down to our liking. Maybe you can just stretch out this front part a tad. And now it's going to match our concept. So something else I'm seeing are these little divots along the edges where it kind of forms a valley. So we're going to use pretty much the same trick, except due to the angle bonds that were formed by the bevels we just created. The edge loops or the loop cut tool won't actually cut all the way through. And actually, while we're on the subject of bevels, let's go ahead and make some minor adjustments here because the bevel didn't turn out the way I wanted right off the bat. It's kinda stretched sideways. So that's much closer to what I intended. And then as for these n guns, we may be able to fix them just by. First we need a snap it to align with this vertical, vertical edges. And then let's begin to weld these vertices together where it makes sense. And then it's still not going to allow us to cut loops all the way around. And that's because we need to allow these, these vertices to determinate into a quad. So I'm going to get as far as I can with the loop cut tool. But then at some point, we will have to use the knife tool to manually complete these edges. Let's 0 out these edges along the y. And then what I mentioned earlier about allowing these faces to terminate into a triangle or a quad. That's something we can do again with a knife tool. Right? So this face here, it's got 12345 edges. And if you just break it up into two like that, they become a quad and a triangle. So that's what was causing our loop cut tool to get confused and not know what to do. Actually, we got another n gone here that needs fixing. Same process. Get rid of those n guns. And now we're free to add the edge loops that we need to create these divots. Let's go ahead and do that. And so there's a pair That's right along in the middle of where the window is. So what I'm gonna do, I'm actually just going to set down an edge loop where I think this is supposed to be another one right around there. And then I'll select those edges and Bevel them. This way. Instead of eyeballing the width of these debits. When I beveled them both at the same time, I know they're the same width. And then also need to define edge. Edges are horizontal edges. Okay? So we had a pretty easy time of adding edges for these divots. But that was only because we spent the time to fix the N guns that were surrounding this window. So now if we can remember where these divots, where it's good, it's getting a little confusing with so many edges everywhere. But I believe these were where the, these are supposed to be. So with all the faces selected, Let's extrude them and push them in. Now, in vertex edit mode, I'm going to turn on the snap mode and start welding vertices like so. Okay, and now we simply need to select the edges that we want to be sharp. Because in the process of welding, vertices, blender has arbitrarily decided that these edges are smooth now. So we just manually mark them sharp. Actually. We're going to want to mark these sharp as well. And now they're looking correct. And if we take a step back and compare it to the concept, we got the location of the debits more or less correct? In fact, the only thing I might change is the first couple of dividends. I want to push down more towards the front end. Yeah. Now it's now it's one-to-one with the concept. So there's a few more details that we still need a cover along the lower portion of the hall. But this takes care of the, the bulk of the details that you see in the concept here. So we'll go and finish the rest of the side panels here in the next video.
15. Modeling Side Panels: Let's wrap up the work we're doing on the side of the spaceship here, we're going to focus on. So these paneling details along the top corner and some additional small details on the bottom as well. So that's what's on the plate for this video. This this piece should be fairly straightforward. I'm looking to see if we can use either these existing edges to create these shapes. I'll grab this edge and push it towards the back. Maybe around this point. And this edge can stay where it is. I'm going to add another edge loop, a couple of edge loops in this area. And I want to weld these vertices over to the next set of vertices. And you'll see that we now have a shape that's pretty similar to this one here in the drawing. But it's not quite right yet. I think I need another edge loop here. Sometimes when you're adding edge loops with the snap mode turned on, it will just snap it to the next the nearest edge. And that's why it wasn't appearing. But search the snap off at the edge loop and I'm going to snap this forward to right there. I'm going to move these over to the front. And now when we make our selection of faces, That's more or less what we need. So I'm going to see in the drawing, it's just that there's not much of an indication as to whether or not this panel is sticking out or if it's kind of dug out of the shell here. Here's what I'm gonna do. Could add another edge loop here. And I'm going to push these set of faces inward. And then I'm going to push these faces outward. And it looks like a hot mess, but we just need to fix up or tell blender which edges to smooth and keep sharp. So I want to mark these edges as sharp. So as well as these edges. Some more edges. Okay, and now, now it looks a lot more, a lot neater. Then it was a moment ago. And this doesn't need to stick out quite as much. So let me push it just a tad back in. I'm just noticing there's something going on. Towards the back here. Let's represent that by adding another edge loop and pushing just this back part in and a little further. And so out of was fairly ambiguous. Detail is just a set of lines here. I interpreted in a way that I thought was the most visually interesting. You know, instead of all of them sticking out or all of them being pushed in, just went for a combination of both. It's still matches the concept art more or less. So we can move over to the middle here. For this panel. For that, let's isolate this piece and see what's going on here. Okay. Do a little clean up first. Be good to continue this this edge loop all the way to the center. Let's just zeroed out in the y. With that tiny little bit of clean up should be easier now to add additional edge loops here to create more detail. All I'm doing is planting edge loops to approximate the shape I'm trying to create. And then we'll do a series of bevels and extrusions to create this panel. But first, I think it'd be easier to create this curves in the back if we go ahead and smooth out the corners here and here. So for that, I want to isolate this or hide, hide the rest of the model again so we can just focus on this piece. And the easiest way to create that bevel might be just to add there. So that when I push this vertex forward, creates this polygonal. But what's beginning to look more like a curve. So same here. I'll push this back. And you can just keep adding more edge loops. Push some vertices around. Instead of using something like the Bevel tool, we're just creating it. Manually. Straighten these edges out to keep our model neat and clean. And you can see that even with just three edges, that already begins to suggest a roundedness. So let's go back. There's some Z fighting around the corner here because this lower piece is on the exact same plane. Rather than trying to go through and, and round out this corner, I may be easier if we just push the whole thing in. Bye. Selecting all these vertices and just get, just push it in ever so slightly, like so. And then this corner is going to get tucked underneath this top piece. And we'll do the same here. Just grab these vertices and you're going to want to turn on x-ray to make sure that all the hidden vertices that you can't see from your view gets selected as well. And then we're just going to push it in slightly and tuck it underneath. And now let's go back to the panel we were trying to create earlier. And now with this curve in place, we can now push these vertices to where we want it. Something like that. Select these faces. Actually this one can be a bit lower. And then I'm going to use the inset tool. Select this, this border, and let's push it in. And we'll see how that looks. I think this piece, in fact, we can separate this. Yes, I am. Tweaking the edges that are inside the panel to basically kinda close up this gap so it's not so wide. And in the process we got some edges that became smooth. So let's mark them sharp again. The panels along the bottom here. Let's work on the seam, making that more, more visually obvious, kinda like what we did with the same here. Because right now it's kinda hard to see that separation and the line is very faint. I want to I want this piece to kinda continue around deeper into the bottom instead of cutting off right here. Let's separate out this piece. Combine it, join them together. And let's, well, these vertices. Oops. Okay, Now let's select the outer edges and just extruded in. And in fact, let me change the extrude mode to extrude along normals and see if it'll let me do that. Maybe not. Okay. We can go back to extrude region and then just look at it through x-ray mode to kind of move it into place. Maybe play around with the scale. And if we select the edges again and do a bevel operation, and then harden the edges on that bevel. Now we get a little bit more of that visual separation that we're going for between panels. So let's leave the side of the spaceship now. And then in the next video we can, we definitely need to bring our attention to the back here because we've barely touched it. See you next video.
16. Modeling Back Area Pt 1: This entire time we've neglected the back of the spaceship. So let's get up to speed in bringing up these details up to par with the rest of the ship. So the very first thing I wanna do to make our lives easier is to separate out the back face or backside of faces. Pull it off from the side. And we will reattach them at a later point. But for now, this will just make it a lot easier to work with. And let's also look at what kinda topology we have. It's pretty sparse as far as edges go. So let's pull out our knife tool and start putting down some, some edges. Fact, let me isolate it first. And let's see if that'll Yep. So it wasn't letting me use the knife tool earlier because there was a lot of stuff in the way. So this is in no way The, gonna be the final topology. But at least if we resolve all of these end guns, we're going to have a lot easier time adding in new edge loops. Just want to straight note these edges by aligning them to these vertices. Okay, Now we can unhide everything. Let's add in this major detail this seam where the cargo bay doors will open and the back. And we can use our Edge Loop tool to get us most of the way. And then we'll finish it off with the knife tool, linus up to this vertex. And then we can just, well this to this vertex. Let's continue eliminating n guns wherever we see them. Just to keep our model clean, the cleaner your model is that the easier it is to work with when you're adding more details. So in the concept, we don't quite see how the rest of this bay door looks like on this side. So we'll have to do a little bit of guessing. But I think it ends around here. So let's line this up to this vertex. Maybe. We can add another edge loop here. We're almost ready to use the inset tool to create the gap indoor here. But just before I do that, I want to add this little detail should be simple enough. Just with the knife tool, I can carve out that shape. And I want these vertices to be lined up vertically. It's all zeroed out in the z-axis. And let's clean up this topology. We don't need this edge. So I'm going to dissolve that. We can bring this closer to the center. And that just about does it. We can go ahead and cut out a little bevel there. Now let's select these faces. We're going to separate it from the, the rest of the back here. And then let's select the same faces. And then use the inset tool. Push it in. Let's drag these faces down a bit. So we have equal width. In this border. I'm going to slide this edge. Just bump it up a bit. Now let's select all the outer edges. De-select the ones near the bottom. And I'm just going to push this forward in the y-axis. And then I'll push these, these edges a little bit in the y and a little bit in the z axis. I pushed it up a tad. Now, in the process, everything on this, this piece became smooth. Let's slit the edges that we want to stay sharp. And actually these can say smooth, and we're going to mark those edges sharp. I made a mistake in creating this seam down the middle. But that's an easy fix. You just fit. We just select these faces in the center, delete them. And let's bring these edges into the middle. But first, we'll set our snap snap to settings to increment. And with the absolute Grid Snap checked on. We're going to snap it to this center grid line and close up that gap. So that's pretty much how we want it. And let's grab the edges of the outer peace and extrude them in. Okay, and I think I push them in a bit too far. Only need to go in about that much. So let's see how that looks. That looks okay to mean this corner here. There's a seam right there, which tells me I can select these faces and just break it off separate by selection. And then I can attach this piece, so this piece and this piece to this piece. Any opportunities you can see two, separate your geo. Go ahead and take it because it's going to make it easier to combine with other pieces. These two pieces are a lot easier to combine then. This whole thing to this, for instance. Oh yeah, look at this, this shape change right here. And the middle back, our spaceship. What we have now is just flat. But it's supposed to be angled like a slope here. So let me add oh, there's already an edge there. To remind me unhide. Let's just take this top edge here and push it in. But just before I do that, I think it bends some point above this edge actually. So I'm going to add another edge loop there, then grab the top edge and push it in closer to the engines. Obviously this edge needs to be sharpened. And then let's adjust this top piece here to match me. Change my step two settings to vertex. That way I can snap this edge to this edge. So in the next video, we'll just continue on working on the details on the back here.
17. Modeling Back Area Pt 2: We're going to pick up where we left off with the back of the spaceship here. We took care of the biggest detailed in the back here with the cargo bay door seam. So we can start towards the top here, this little seat where the engine is resting. We, let's clear out all these faces and create a new geometry here that's more rounded in and clean. Let's start by creating a cylinder. We can bump down the resolution to something like 12 vertices. And let's rotate it 90 degrees, like so. We're going to move it into place. And let's get rid of some faces we no longer need, namely the front, back and the top faces. Let's get rid of those and we're left with just a piece that we want. Now. Currently, if we switch our view, go to Viewport Shading, pull-down menu and check the box next to back face culling under Options. And then it's going to show the faces as there'll be represented in the final render and in game engines or wherever this model is going to end up it, the faces are facing away. Let's select the faces and go to the Mesh pull-down menu. And next to normals, you'll see the first option flip is going to do the trick for us. So let's turn the snap mode on and use the existing engine that's in place to more accurately positioned this piece to be aligned with the engine. Right? So I just use this vertex and this vertex to get it centered. And let's resize it a bit. Now it's roughly in place. And in fact, let's get rid of this. And let's create a gap between these vertices and the vertices on the new piece of GO that we just created. I want to shade smooth. Let's isolate these pieces. Get rid of these faces. And we're going to need to find a way to combine these two. So let's add an edge loop here. And with the auto merge vertices checked on. And the Snap mode turned on as well. We're going to start welling these two separate pieces together. So when I push, I push this vertex here so I can get rid of these edges. And we no longer need this face. So that gets deleted. And let's double-check that these are welded properly and they are not. That's because these are still separate objects. So let's not forget to join them. And now the auto welding is going to actually come through. Does seem like we need a snap it to the adjacent vertex again. What's the line up these vertices to do this edge? Plug up this whole. But first, let's resolve this issue here by finishing off this vertex into that corner. We won't need that anymore. And we can simply use the fill action and see what kind of automatic edges are placed for us. It's looking okay, we just need to get rid of a couple of the extraneous edges. And let's unhide everything else. To see things in context. Let's now combine this back piece to this top piece. I just realized it's gonna be kinda tricky to work with this massive monolithic piece that we have on top here. So before attempting to combine it with these other pieces on the back-end side. And I want to break this up first. So let's isolate this piece and try and find some strategic places to break it up. And I want to select our concept art here. So I can use that as a guide as to where I can break things up. Just looking at the concept that the problem is it, it is represented as this singular connected piece. Which is fine. We could always recombine pieces that we've separated later on. This edge. Could be a good spot to break off this top piece. Let's not forget these faces tucked inside there. And we're going to separate by selection. Now we can just focus on this, this upper back piece without worrying about how it's going to affect the rest of this. Now, I think there's another opportunity here to separate this top piece. Looks like this edge here is pretty close to where this edge is supposed to be. So I'm going to select faces starting from this point. Let's create a, an edge right here. Actually, I know we deleted it from earlier, but now I see that could be handy. Since now we can select this face and just kinda continue this selection in a straight line towards the center. So I'm going to separate this by selection. I'm going to unhide the rest of the ship. We now have a set of meshes that are much more manageable in terms of combining with other pieces. So straight away, I know want to join these two. And let's weld these vertices together. Now I want to create this profile here. So as it, This seat kinda curves, begins to curve outward. This it goes down very suddenly and that turns again at a right angle. So let's try and recreate that. I think the easiest way to do that would be too about the knife tool real quick. We'll delete these faces. Will also, well, some of these. Vertices together. Let me clean up the topology here just a bit. Actually, I don't like this. I don't like the shape of this quad. Let me even things out. Okay, that's looking way cleaner. Let's straighten out this row of vertices. So now we have that shape that I was talking about earlier where it curves down, begins to curve up, go straight down, and then out again. We have that in there now. And this, this piece, which kinda continues along that line. We now know that this edge is too high. It should be around down lower here in order for it to line up with this opening. On the one hand, you know, from this angle it looks correct. Enter into coordinates with what we see in the concept. But it's not lining up in the back. So we just, we just encountered an instance where even though the perspective and proportions are accurate overall, because these smaller details were drawn in by hand. They're not going to be completely accurate and they're not going to completely lineup, you know, between the back view and the front view. So now as the model are trying to interpret this concept and bring it to life, we have to do our best to kind of fudge the details a bit so that they do line up in the 3D model. So let's see what happens if we grab these edges and just kinda push them down as, as far as they'll go. And we'll adjust these vertices to maintain that nice bell curve. Let's do this. So in the concept it appears that this edge and this edge are aligned, right? Even on the back view here, they appear to be aligned. But if we were to try and remain faithful to that and lower this edge down to meet where this edges, that mean, That would mean that we need to come, come around to the front and adjust everything and the front as well. So here we can just kind of reached a compromise where we leave this as is. When we leave this as is and just kind of give up trying to line these up just like in the concept. Because really it's not the most important detail that would be the easiest solution to resolve this mismatch. So continuing on, this face doesn't need to come up as far. All right. You can just end there. And let's go ahead and close up this gap. By extruding these edges to that vertex. Let's push this vertex out. This can be pushed up. I'm going to bridge these two edges and close this gap with the fill tool just to cover it up real quick. And then from there we can touch up the topology by adding some more edges. We started out with this weird, lumpy, sort of messy curve to now like a proper clean curve where this engine can sit. And we've found strategic places for, for us to separate this giant top piece where it'll make our lives easier to combine these pieces in the back.
18. Cleaning Up Model Pt 1: In this video, we're going to look to wrap things up in terms of the modelling. Of course, you can keep going and going and going with modelling every single one of these details that are displayed in the concept. But a lot of those details can be added in the texturing process inside of such this painter. So really it's a matter of deciding how much time you want to spend on the modelling versus texturing. For our purposes, we're just going to move on to texturing now that we've modeled in really a lot of the most important details, just before we do that, we do want to comb through our model just to check for any visual errors one last time. Mainly, we want to keep a lookout for, for gaps in the geometry where we could possibly look into inside the model. So let's do a visual inspection to make sure that our model is airtight. So already down here by the cargo bay door, I see a gap. There's also a gap here. A pretty big gaping gap appear. Since going to extrude this along this entire length. So we've filled up those large gaps along here. Seems like everything in the back is air tight spot actually. Yes, I just combine these two pieces and all the vertices together. All right, so I believe I plugged up everything along the back. Bottom looks fine. So there's a gap here. Just going to pull this back. And that should take care of that gap. And everything else looks fine. Is like a hairline gap. Along here. It looks like Okay, and that should do it. Okay. And then another thing I want to check for is to make sure we have all of our edges smoothed where we want it smooth and sharp where we wanted to sharp. So right here on this roof jets, I want these edges to be smooth. But they're, but they're not, they're faceted. So let's see if we can go into the Properties tab and adjust the auto smooth setting by adjusting the angle at which it auto smooths. And that kinda did the trick. Same thing here with these side jets. Just bump up the auto smooth, setting a tad to get these to smooth out. We missed missed a spot where there's a gap here.
19. Cleaning Up Model Pt 2: I want this curve to be smooth. Just need to set the shapes move on. That looks like another gap here. So now all the edges that need to be sharp or a sharp and all the edges that I want to be smooth are looking smooth. We could, we could start thinking about sending this out to painter. But we do actually want to clean up the GO wherever possible. Because substance from my experience tends to have errors when it comes to n guns. And we have a bunch of guns all over the place. So it'd be worth it to just comb through for, for topology as well. Yeah, clean topology is even more important if you plan on using substance painters auto unwrap feature. We definitely will be using just over here. We had quite a messy overlapping GO here. Definitely don't want that. I believe in guns for this piece have been eliminated. So now everything's triangles and quads. And actually just discovered a few more spots I missed.
20. Cleaning Up Model Pt 3: All right, that takes care of the cockpit topology and the bag is already pretty clean. Take care of the topology on this engine. I think that takes care of the engine. Yeah, much better than it was before. Okay. We have this to deal with. This. This surface or this face here is just massive n gon, make our lives easier if there weren't so many faces in here. This way we have less vertices to connect to the rim here. And for this, I think it would be easiest to cut out a shape around this opening and delete the face, faces that are surrounding it. And then we can, oh, hold up. Let's get rid of these vertices. So we can extrude. Extrude, extrude out. From this shape. Will weld a bunch, a bunch of these vertices together like this. We're reducing the amount of vertices on the outside. So from here. Instead of having to worry about, however, however many edges this shape is, we're only concerned with six sides to connect with, with the outer edges, which is a lot more manageable. And from here we just connect, connect the outer vertices to this six edges. Now we have everything, all these faces are in quadrant triangles. Actually, I missed a spot right here. Now there are in quads and triangles.
21. Cleaning Up Model Pt 4: Let's look at this piece. That takes care of that piece. There's one more thing I missed. This for a moment. Feel like there could be a lot of cleanup done for this one. I think would be best if we separate separate out this piece from, from the rest. I'm going to separate it by selection. Because really most of the edges here recreated for this little window. What if we just separate it out? Then all of a sudden, we don't need this, all this stuff here. I'm going to close this gap here, actually. These edges together like so. And delete all these edges, which we no longer need. Let's see if the geometry holds up. Even if I delete all these edges all at once, it might mess it up. Actually I worked. Hello. I actually forgot more edges here as a huge improvement. And from the amount of edges that we had previously. Now let's fix this window. Okay, that takes care of the window. I think these these little cylinders in the front may be the only thing left. I'm using the inset tool. And then just merging all those vertices to the center. Convert my selection two vertices. So I want to bump down the amount of faces the cylinders have because they're pretty higher as compared to the rest of the model. So just for consistency, let me knock down the resolution jpeg. Let's see an opportunity to optimize some more geometry in this little piece. It's got way more edges that then it really needs. Yeah, that's much better. Let's see what this engine looks like if we bumped down the resolution, just like the other cylinders. Still looks good. Just gotta remember to adjust the auto smooth settings for the cylinders that we lowered the resolution of. That concludes the step where we clean up and take it one step closer to being ready for texturing.
22. About Fixing Graphical Errors: With this finished model, we're going to do the best we can to clean up all the end guns and overlapping vertices are vertices that haven't been welded. We're going to try and find all of those, do a full sweep. And once we feel like we've caught all of those, we can go ahead and select everything, export it, and bringing it into Substance Painter. Now, there's going to be visual errors that you discover in substance painter as you try to bake maps. And it's going to be sort of a back-and-forth process as you address those errors back in blender, export it out, and then you catch another dirty geometry in some corner that you missed. And I've already gone through handful of those iterations with this model here. I just wanted to make a note of that because it may appear that what I brought into Substance Painter that the first try was error-free and just good to go. And that's often that's not going to be the case, especially for models that are complex. Just to save you the pain of watching me go through that back and forth. I already took care of all of those things. In the background is namely small gaps between geometry and guns that were producing baking errors. Things along those lines, once you pinpoint where they are, It's pretty straightforward how to fix it. So I'm going to select everything and export as an FBX or OBJ. And I'll see you over substance painter.
23. Baking Maps: All right, We're inside of substance painter. Let's go to File, hit New. And we're going to select a file. The geometry that we want to paint under import settings. Be sure to check the box next to auto unwrap. And if we open up options next to that, let's be sure to set recompute all because we don't have any UV data in this geometry. We've skipped that step entirely and we're going to rely completely on the substance painter auto and wrap feature, which does a fairly decent job of unwrapping the UVs for you. If you were to do it manually, it would take some time. Can be pretty tedious, especially for complex models. But for our purposes, we're going to take advantage of this feature and just jump straight to the fun part which is texturing. Hit, Okay? Okay, there's our ship. Let's resize the panels on the side to get a better view. First thing I'd like to do is go over to the display settings. Let's scroll down to activate temporal anti-aliasing. And that's going to smooth out the edges in our 3D view considerably. So it's just gonna make things much easier on the eyes as we work on textures. And then the next thing would be to look under this texture Settings tab. Scroll down to the mesh maps section, and we want to hit mesh maps. So there's all kinds of options and settings and check boxes. The important thing to know is that all of these maps, it just looks at your geometry and finds out where all the nooks and crannies and crevices and corners are and generates, automatically, generates several maps out of that information. A lot of the procedural textures are being driven by, by that data. So starting out, I'll leave this output size to 512. Just as a quick render. Make sure that things look correct. So let's hit the back button. We're seeing the ambient occlusion bake on our model. So let's just kinda rotate our model around to make sure there aren't any, you know, visual errors or dark spots or anything like that. And when you first bring a model into Substance Painter, there'll be fairly common to encounter those visual errors, but I've already gone through the trouble of fixing them. And it's worth mentioning that the first time I brought the model in here, there were a handful of baking errors that I needed to address by going back to Blender and finding those Troublespots and hiring it out before exporting it back in. So this is the cleaned up version after a few of those iterations. And the baked maps that I mentioned. These are sort of the thumbnail of those maps. Okay. And on all of these things are, are essential for taking full advantage of the substance materials. So now that I've checked that there are no baking errors, I'm going to return to d, Make mesh maps window and bump this resolution way up. Now normally you'd be all right with 1024 or 2048. But since this is a larger asset, you know, it's an entire vehicle, I'm going to select the four K Option and then hit big selected textures once again. And this time it's gonna take a little extra time. Right? And you can see why just to test if things look alright. You want to keep the settings at the low resolution. Okay, now we have the high-resolution bake. And we can switch tabs to the Layer tab. Now we have everything properly set up to begin texturing.
24. Blocking In Color Pt 1: So now with the baking out of the way, first thing I wanna do is start to create a bunch of masked layers that represent the different materials and colors that we're going to be using to, to cover this spaceship. And I have with me on the side of my monitor the concept art that I'll be constantly referring to for the color scheme and the detail texture work that I need to put in here. You have, you have a large monitor, just have that in the corner or if you have a second monitor, even better. So first off, I notice that dark gray kinda covering the majority of the surface. So let's just do a color fill with this icon, the paint bucket icon, and turn that into a dark gray k. And then we can use that as, as the bottom most base layer. And then the other major color I see is the bright highlight orange, mostly along the top. So let's pick out a color for that. Okay, that's pretty close. And then right-click on this layer and add a black mask. So when you add a black mask that you need to add areas of white in this mask to start introducing this orange, right? If you added a white mask, then the mass would be opaque and everything would be orange. Sorry that you can't see the rest of this pop-up menu, but you can right-click on this layer for yourself and see the list of options there. And at the very top is where you got your ad white mask or black mask options. From here, I like to go over to the toolbar and choose the polygon fill. And that allows us to select specific faces and the geometry to inform, you know, where this mask is exposing the color. First off, let's switch to the polygon film mode to mesh fill as opposed to polygon fill. And let's see what that does. So it chooses an entire mesh as long as they're combined together. But that's not really what we wanted. Let's see. Let's switch the view to the 2D view, which you can do by pressing the hotkeys F2 and F3. Or you can just come up here and press this pull-down option here and switch. This way. You can see the corresponding hotkeys next to them. So I want to look for yeah, this, this UV island right here. And in order to select that, let's switch the polygon fill mode to UV chunk fill. And choose. Choose this UV islands returned to the 3D view. And it's done a lot of the selection that we wanted. Okay, Same with this back corner and the same with this piece here. Okay, so the polygon tool is really about looking at your situation and choosing the right approach from the many options that are offered here. And let's just continue on. Another measure color is this white for the cockpit? So let's start a new fill layer for that. Now I don't want it to be like a super bright white. I'll make it like go off. Off white, light gray instead. Again, right-click add black mask. Another way you can do is select the layer, click on this Add Mask icon and choose the add black mask option. I should have mentioned this earlier when you're using the poly fill tool, it only works if you have the Mask icon selected, right? Notice how this toolbar gets grayed out. If you just select the color icon, choose the mask icon, then these options become available. So let's do the same thing. We can use the UV chunk fill mode of the polygon fill tool to just select this whole piece. And then I'm going to switch back to polygon fill, which allows me to select specific faces. And then I want to come down to the properties of the polygon fill tool and bring this slider all the way down to black. And then when I select these faces, it's going to mask away the white fill color. And I'm going to switch this back to white. And I want to add these vertical frames back into the mask. And then we can, we can again switch back to the polygon fill mode to select which faces are going to be this white material. And since this geometry is connected to this larger piece, the best approach here would be just to select these faces individually. And that's not so hard to do since this model is so low poly. So I'm checking that I got all my selections. And so now we have our white layer blocked in. Oh, actually, this should include these rooftop elements as well.
25. Blocking In Color Pt 2: Looking at the, the concept, I noticed another major color or material rather is the gray metal surfaces. Let's add a new fill layer for that. And this time, I'm going to scroll down under the Properties fill window here and look for the metallic slider. Now let's bump this up. A whole bunch. Maybe even close to all the way. Just the roughness to get the right level of shine that you want. All right, so now that it's looking nice and metallic actually, I want to change the base color to a bit to something a tad darker and with like a slightly greenish tint. Just like in the concept. And with that, I will add a black mask once again and go around using the polygon fill tool. Let's see if we can't take care of these engines with the mesh fill mode K. And that worked out pretty well. I'm going to switch to the polygon film mode and make some selections here. But I do want to select this face tucked under there. So I think that may be it for the shiny metal surface and noticing sort of maybe two versions of metal surfaces. One that is kind of shiny and silver and the other is more of a, a dollar. Darker metal will create a new layer for that second metal type. But first I noticed on the orange layer, we shouldn't have orange on these faces surrounding the winch. There we go. Instead of creating a brand new fill layer. Since the second darker metal is pretty similar to this one that we have. Now let's just Control D and make a copy. Will remove this mask so we can start fresh with a clean mask. And let's, let's make our first selections for this metals masks. And let me see. Maybe you can find it in the 2D view will be easier. Yeah, here we go. There are many ways to use the polygon fill tool. You can use it in the 3D mode or in certain situations, it might be easier in 2D, which is what I am doing it now. So with that selection, let's go ahead and change this gray into something darker and less shiny. So little duller. So I want to adjust the roughness, bump, bump that up a bit. And let's go around continuing our mask selection for this new layer. Going to switch back to the 2D view. And we're trying to find where this is. It's a little bit hard to make the selections in the 3D view because of this thing on the way. Well, I guess one easy way to get to find out where, where this is is to pick a bright, something like a bright red. And just do that. And then now it stands out and the 2D view, it's right here. So we can delete that now. I'm just gonna go and select the rest of these by hand. Oh, you know what, there's a gap here. I should probably fix that before we get to that, let's just continue what we're doing now. There's other areas that need this dark gray metal. So this is one of the drawbacks of using substance painters automatic unwrap. It kind of does a pretty decent job of unwrapping the UVs in a way that allows you to paint right away. But it does kinda lay the EV islands out in a chaotic, disorganized way. So it's hard to track down which part of the UV corresponds to which part of the model. Had this been done? Late to the V spin laid out by hand back in Blender. Be, everything would be at right angles, are organized. There's pros and cons, on the other hand, going this route and on automatically unwrapping. It did save us a pretty good chunk of time that we would have otherwise spent unwrapping this in Blender. All right. So would have been easier had I found this somewhere here, but I figured I would just be faster if I select the faces by hand and for me to try and find it here. So with that out of the way, I believe all the parts that need that dark gray are now covered with that dark gray material. So there's some additional colors that we haven't touched, but these are the major ones. So we just finished blocking in the main colors.
26. Texturing Glass Windows: It's pretty easy to get overwhelmed by a large vehicle asset like this. I'm going to start by focusing on the cockpit area. And then we can work our way around to the rest of the ship. And not a bad idea to pick a focal point to focus your attention and work on the ship section by section. Firstly, let's take a look at the glass windows. Right now. It's a fairly flat, dull material. Wanted to turn it into something that's very shiny and more glass-like. Let me add a new fill layer with a mask. We're going to select all the glass surface. And then let's scroll down under the Properties window for this layer and change the roughness slider into something that's going to into a very low value close to 0. Because that's being represented as something shiny. And with glass, I tend to bump up the metallic slider as well. It, it enhances the shiny look, makes it look more like glass. And I, let's change the color as well. Something darker, maybe with a dark green, green, bluish tint. Okay, so that's a nice shiny glass. I'll go ahead and rename this glass windows. I want to duplicate this layer and call it glass windows. Dirt. This is going to stand in for dirt layer on top of the glass. So I'm going to choose a color that is more desert-like. So like a dark brown, dark gray, dark brown. I'm going to make the roughness very high because the dirt shouldn't be reflecting light. Turned on metallic all the way down. We could pick one of these brushes. And Let's see, Let's filter the search. Two brushes we could pain in the dirt manually by hand. But I usually like to save the hand painted stuff to the very end. And at the beginning, I'll throw on some generators, which can do by right-click and click on Add generator. And then in the properties window, you have to choose one of a few different generator options. And the one that'll work well for this is the dirt generator. So you can look at the the window surface here and see that painter has procedurally generated a dirt mask which uses baking data that we got from earlier. See how the dirt is hugging along these corners where it should be darker. Think it's a bit much so I want to dial it down. So with this dirt generator selected, I'm just going to look at some values under Properties and maybe bump the dirt level slider down. Play with contrast. And it's okay if you look at a label for a slider and you're not sure what it's referring to, what it means. You can quickly find out just by pushing this side or up and down and seeing what kind of effect it has in the 3D window. So I might bump the dirt backup tiny bit more and then move on to the frame of the cockpit. We're going to be adding a lot of different layers from here on out. So it would be good practice to label your new layers as you go. D is I'm going to leave alone because often I'll create a new layer or a new material that goes on top of these base colors. And then I don't need them anymore. My delete them later on. Sometimes I'll take the base color and just modify it. And that works too.
27. Texturing Cockpit Area: Moving on to the cockpit frame, Let's take this base color and modify it so that it's closer to the material that we actually want. The material is dollar right now because the rough decider is set too low. It's not as shiny as I want it. So I'm going to pull the roughness slider down to increase the shine on this white surface. Maybe bump up the metallic. Even if this part is made out of metal, it's covered in metal paint. So we wouldn't want this all the way up to one. I think I've adjusted the roughness and metallic sliders where I want it to be. Okay, so I want to add a dirt layer on top of this. We're going to leave this layer as is, create a new layer above it. Add a mask to the folder, and let's copy the mask from the base color layer into this new folder layer. So paste into Mask. And then inside this folder I'm going to add a fill color, which I will change to the appropriate dirt color. And I'll adjust the roughness for to be very dull. And I'm going to add a layer or sorry, I'm going to add a mask to this dirt layer and then add a generator to that mask. We use the dirt generator again. And that's going to give us a nice procedural accumulation of dirt in these sort of corners and crevices. But there's definitely too much dirt. So we want these procedural textures to be more subtle then what the default spits out. So we'll call this the cockpit dirt group. This is a 100 dirt. You can see behind the cockpit to dirt is accumulating the most right beneath these pipes. And in fact, seeing this, I may want to make some adjustments here. Let's take a moment to organize all the new layers we just added. So these can be grouped together. I'm selecting multiple layers by holding down Shift and clicking on another layer. I'll use the hockey Control G to group them under a folder. I'll call this the window group. Collapse that and appear. I came Control G, the cockpit layers, call it the cockpit group and collapse that. And I believe this this window group layer needs to remain beneath this orange layer because if I try to move it next to the cockpit, then some colors cover up the orange which we don't want. And then this layer one at the very bottom is not in use whatsoever, so we can clear up some space by deleting that. Okay, now we have a nice and tidy Layer window. Will continue doing what we just did, adding procedural texture details, two more surfaces.
28. About Staying Organized: So I just noticed that there's some procedural textures on the side of the ship, which we eventually want. But it is bleeding from what we did for the cockpit. And generally, we want to keep things separate so that we're not piling generators on top of one another. Which can look messy. Later on. We need to mask out this window under layer, which is the cause of this. So I'm gonna go to the root folder, the window group folder and add a mask to this. I'll copy the mask from the glass window layer and paste it into the folder layer. And that will ensure that whatever is going on inside of this folder is remains within the bounds of where the glass surface is. So yeah, that's something to keep in mind as you add layers at textures, at generators, be sure that you organize them in and that they're being applied only on to surfaces that you've intended. You can imagine how further down the road, when we have hundreds of layers and dozens of generators applied to our asset. And Let's say you want to change something. The last thing you want is to have to dig through hundreds of layers and folders just to find out which generator or which folder which layer is influencing, you know, which part of your ship. So just a little housekeeping there.
29. Texturing Orange Surfaces: Let's tackle the orange surfaces. That's going to be this layer. Right here. Let's add a new fill layer on top. Choose the appropriate shirt color. Bump up the roughness to make it shiny. And then we're going to add a mask. And we're going to add a generator to that mask. Select generator. And then we're going to make adjustments to that. But a bump down the dirt level under parameters. And right now this layer is, is, dirt layer is being applied to the whole ship. But we'll take care of that in a moment by grouping these two layers in a under a folder. I like how this dirt generator looks. Overall. I don't like how it gathers up and goes completely opaque. I'll go to the right of the layer and dial down the opacity. So it's not as severe. Same thing was going on under these jets. So around 70. Looks good. And I'm noticing that this part here shouldn't be covered in orange, according to the concept is like a dark gray. So let me go to the orange fill layer and de-select these faces. If we're lucky, they're part of a UV island. But it looks like we'll just have to select these faces individually. Which isn't too bad because this is low poly. Let's go check on the other side. I should have turned on symmetry for this because I have to do the same thing over on this side. Again, not a, not a big deal. All right. Same deal over here. Okay, so now everything that shouldn't be orange is no longer orange. And we're going to group these two layers under the same folder. Add a mask to this folder. Copy the mass from the orange layer, paste it into the group folder. And now we limit the influence of this dirt layer, how we can find it just within the orange surfaces. Let's see if we can bump up the levels since we turn down the transparency. Let's make a quick adjustment to the orange base color material itself. We haven't really touched these sliders, so let's adjust them until it's the way we want it. I want, I want the orange to be slightly glossy. That's kinda how I pictured in my head. I could probably leave the metallic alone are actually called bump this up a bit. Just doesn't feel. Right now we got a bit of a metallic vibe with the orange material. Also want to adjust the orange one to push this closer to red, right? It's like an orangey red. Before we move on, let's rename this folder into the orange group. Can call this dirt orange material. Okay, and now we got our new layers organized into a folder that we can easily find later on.
30. Texturing Dark Gray and Maroon Surfaces: The dark gray material, That's the layer at the very bottom that covers the majority of the surface on this asset. So let's go ahead and do a quick dirt layer for this color. And to add a normal fill layer. Add a mask at a generator to that mask. Selector. Bring down the dirt level, turn down the opacity of the layer itself, and change the actual color. And because the this dark gray area is so dark to begin with, instead of dark brown for the dirt, we can try something lighter so it contrasts with what we have K and that cell. The idea of there being like dust accumulating on the dark gray surfaces. Let's go ahead and group these layers together, call it the dark grey group. Call this rename this layer dust. And then could just call this dark gray color or dark gray metal, rather. Speaking of metal. Let's go to the metallic slider and bump that up. Now it looks more metallic. And let's see if there's a better roughness value. Then when we had, I still think it's going to be relatively dull, so keep it around the middle there. Next thing I wanna do is add. We want to add the colors that we missed in the initial color blocking. So let's add a black mask to this new layer. And using the poly fill tool, I want to select this piece and the front. Let's try it and find it in the 2D view. So it looks like it's down here. Switch the mode to UV chunk fill and just select this same on the other side. So the selections that I'm making for this mask, the surfaces that I'm selecting are supposed to be this dark maroon, red. Okay, so now that I've made the selections, Let's go ahead and change this layer color to that maroon. Maroon, red OS. Talking about is going to be something like that. It's bump up the metallic. And let's adjust the color. Once again. Somewhere, somewhere around there. All right, and let's rename this layer material. While we're at it. We could also add a dirt layer to this to the maroon red surfaces. Want to copy the mask and paste it into this dirt layer. Choose our dark brown dark color. Bring up the roughness value. And then excuse me, we don't want to copy the mask from, from the maroon material. We want to add generator, a dirt generator. And you see how it's affecting the entire ship. We don't want that. So let's group this together called the maroon red group. Rename this dirt. And we want to paste a mask into this folder layer to properly isolate the effect of our dirt layer inside this folder.
31. Texturing Light and Medium Gray Surfaces: I think maybe the desk color on the dark gray is too bright. Let me turn it down a tad. So now we have just a couple of materials left to give the same treatment we've been giving to all the other color layers. Now I want to make a quick adjustment to the masking on this light metallic layer. Remember to set the poly fill value to 0 or black if you're trying to de-select from the mask. But I'm noticing that in the concept, the inside of this front part of the jet here is not the light metallic color. So I'm going to de-select those faces. De-select the inside here. Oh, it's already de-selected. I see. So let's do the same for the other side. So with that, let's add a new layer. And this is going to be used again for dirt. We're going to pick a dirt like color up up the roughness. Set a mask and a generator. Bring down the dirt level. Let's bring the opacity down a tad. We're going to group these two layers together under the light metallic group. Rename the dirt layer as dirt. And then we want to copy the masking information from the color layer to the folder layer. And that way this dirt layer doesn't influence anything outside of the light metal surfaces. Finally, we have this sort of middle gray metal material. Let's add a dirt color fill for this layer as well. So I made a mistake and adjusted the height slider, which is causing the ship to look very strange. So let's set that back to 0. Going back to the dirt generator, make adjustments so it's not too much dirt caked on. And because this middle gray is similar to the light metallic, it's kinda hard to see the effect of our dirt layer. Let's go ahead and group these layers together. Call this the medium gray. And let's copy the mask from the original color layer and paste into the folder mask. And now when we adjust the settings in the dirt generator, we can see how it affects just just the medium gray areas. So all of our group folders have their own mask on it. Now, I've mentioned before this dark gray, since it's all the way at the bottom, it's not going to overlap anything, so it's fine if it doesn't have a mask. But this cockpit group doesn't have a mask. Even though we took care of it with inside the folder, wouldn't be a bad idea to just add a mask to the folder layer anyway. And that's just covering for the fact that maybe we'll come back to this folder later and add additional details and layers. We would still want all of that to be contained within just the cockpit area or the cockpit section. So I'm going to copy the mask from one of these layers and paste it onto the folder layer. And now we have every section grouped by the base material color. And they're all neatly organized into grouped folders that are labeled that we can easily find it and go back into and add stuff later. But we just finished a dirt pass on all of our materials. Kinda of removing the plastic CGI look by simply adding some procedural dirt on top of everything.
32. Detail Texturing Cockpit Pt 1: We are returning to the cockpit section once more. This time we're gonna do a detailed pass. C, find the cockpit group folder. And here I'm going to add a fill layer. Choose a near black color, and bump up the roughness all the way to one. Let's add a black mask and we use this as, as a way to draw in details. Now let me turn on the symmetry button on. This red line down the middle indicates the axis along which the mirroring will happen. So if I just draw on this side, it's going to replicate the same strokes on the other side. And looking at the concept, there's like three vent holes right around this area. I'm going gonna go ahead and draw those holes. In fact, going back to the, the color of this fill layer, I'm going to bring the height down to maybe negative 0.5. And now when I click on the mask again to draw, it's going to trade a little bit of depth in my brushstrokes. So all I need are three short lines next to each other. I'm going to try and get them as even as I can, but then can also straighten them. You can straighten out these lines by changing your brush color from one to 0. And that's going to be at the very bottom of the properties window. You can barely make out the slider here. It's just the way that my user interface is presenting itself for some reason. But there should be a grayscale slider all the way at the bottom. And then I'm going to effectively erase the excess length of these lines, right? And now they're equal length. Let me play with the height here. Because if, if it's set to load, then you don't really see the the the black bars, the black color. And as far as other details go, There's a little bit of something In the back here. So let me change the value of my brush back to one. So that's not really giving me what I want. So I'll duplicate this layer and clear the mask. And I want to sharpen my brush as well. So you can see when you hold down control and the right mouse button, drag your mouse up and down. With control and the right mouse button held down. You're going to adjust the blurriness or sharpness of your brush. You can see that updating and the cursor and also in the properties window. So I'm going to bring that all the way up so it's sharp. Resize it. Print that dot in there. And in this layer I want the height to be deeper. And then instead of just this gaping hole, we could plug it back in by changing our brush to 0 and scaling our brush down a bit and then clicking on the inside of that hole again. So now we have something like more of a large bowl instead of just a hole.
33. Detail Texturing Cockpit Pt 2: And just realize the in the cockpit mask. This line isn't completely straight. Maybe. I can use the brush tool to paint in this line to be straighter. But I forgot that the grayscale is 0 or bring it back up to one. And then, okay, so that's having no effect because all of the layers inside this group are already have their own mask. So let me select the cockpit base layer and paint on that mask. Oh, okay. Nothing was updating the view here because this whole layer is bound by the original mask that it was assigned. So I deleted that mask and now I can go back to this layer. Get rid of this squiggly line. Bring the brush value back to one. And now I can painting. We don't want it painting in our painting over the pipe. So there's an easy way to isolate this surface and remove these pipes from your view so you can paint the things underneath with more ease. A few look to the right of this layer, there's a dotted line box. Click on this. And when you hover over the 3D view, the various different 3D objects will become highlighted in blue overlay. And if I select these pipes, you can see now it has this gray stripes. And that means that this layer is no longer going to have influence on these grayed out objects. And so if I go in here and try and paint, again, it's not going to paint over the pipes, but there's still an issue. The paint being applied to this orange surface is still registering the pipes as being above it. So our, our stroke is interrupted right beneath those pipes. All we need to do is go to this button here, just above the viewport and click on this button to toggle off the objects in this layer that we've deselected in this box that will only become invisible when we're selecting this layer. So if we select adjacent layers, then it brings back into view. So now we can return to painting without worrying about the pipes. This is a very handy but relatively new feature and Substance Painter. So this is the new and updated mask that I want to copy and paste into the dirt mask. Okay. So you see the dirt, the procedural dirt now extends to this border and then we can paste it onto the group folder. Let me return to this layer. This detail layer where we're drawing in painting in details and use the same technique of eliminating the pipes from view. And then painting in this detail that I see in the concept. Let's bring up the slider to one. And in fact, let me de-select this piece as well. Because that's kind of in the way. And I'm going to include the cockpit itself. So now, now I can paint this area without worrying about it affecting other objects that I don't want it to. Now I don't want to leave this just a giant blink. So I'm going to fill it back in a bit with something like this. Maybe it's some sort of a great. And now let's bring everything back into view. Okay, so that's working for me. I didn't notice though that in this layer, this this area is an opaque for some reason, isn't included in the mask. This tool where you can mask geometry is very handy for painting underneath tight spaces. The detail that I drew in here earlier is no longer visible. It's possible because I've excluded this object from this layer. You can kind of understand how, how this feature is operating as soon as I include all reincarnated, all the geometry that I've excluded. It's not that you haven't been painting all over the place. It just math those mistakes. So I have to keep this setting on for this folder layer, but remove it for this second detail layer. And in fact, let me label this so quick detail to detail one. So there could be a couple of reasons to use this feature. You can use it as a way to, to temporarily hide geometry so you can paint more easily. But the second reason to use it would be to just hi, The painting that you did on one surface that kinda bled onto another object. Here I just want to erase to paint off of this back here. Doesn't have to be perfect. And then I'm going to include everything back. Yeah, and I would release any sort of geometry masking from layers that don't need it.
34. Detail Texturing Cockpit Pt 3: Another detail we can add, just using layers that we already have. Think I'll make use of detail one layer to draw in some lines along the frame of the cockpit. So I see something going like, I certainly have the eraser selected. Let's select the correct tool, which is the brush. And I'm going to resize my brush and start drawing. I'm going to hold Shift to help me draw straight lines and draw a line all the way across the top of the roof here. And then I'm gonna do the same thing to separate the sort of frame pieces. And then lastly, these pieces are supposed to be sort of like headlamps. So I'm going to add a new layer, add a mask. I'm going to exclude everything because I just want this piece. Okay, and that isolates everything else. And now I can paint in a circular mask are all fit some sort of a bulb. And then here I'm going to bump up the height or maybe bump it down. Let me try this again. I think I think I'm going to bump it out, make it shiny and metallic, and change the color to yellow. And let's see how that looks. Cool, That's good enough for now. We can always refine it later.
35. Texturing Overall Details Pt 1: In this video, we're going
to start paying attention to smaller details that
are covering the ship. Let's start by adding
a new fill layer. Let's drag that layer
outside of any folder. And let's create a mask. Will create a black mask. And let's change some of
the settings for the, the color will change the base color to all
the way to black. And then let's bump
the height down as well to negative 0.7. Click back on the Mask icon. Let's check that we have
our symmetry toggled on. And let's begin. In the front here. I do have a wake on tablet, a pen tablet connected
to my computer. And this will make it way
easier to draw these shapes. You can still use your mouse. But if you have a pen
tablet available, this will process
would be much easier. Okay, let's go into
our brush settings. And let's bring up the hardness
to something like 0.5. And I'll start out
creating this detail. Let me increase the
size of the brush. And when I hold the Shift
button down as I click, that allows me to
create straight lines. Let's start over and
do that for all the, all four sides of
this rectangle. And then let me actually let
me just leave it at that. I was going to fill it in,
but I think it looks better. Just like this. The added benefit of using
a pen tablet is not only that you can draw as if
using a pen and paper, but you can also factor
in pressure sensitivity. So the harder I
press, the deeper. This is detail, this, this height map difference. And then when I draw softly, the brush becomes thinner. Now, if I didn't want the pen pressure to
affect the size of the brush, then I would turn off
this toggle here. So let's see looking
at the concept, there is another detail here. Goes something like that. Actually I think
it's just a dot. There we go. And there's
something over here. Looks something like that. Let's move over to the side here and draw in some details. As seen in the concept. There's something like an
event here along the side. So if I scroll all the way down and this Properties window, I can set the slider
from one to 0. And then when I
draw on the mask, we can add back in the masking and
straighten these lines. Yeah, we can go for
something like that. But I'm going to
need more precision. So I'm going to hold down Shift. To keep my strokes straight. I need to set the
slider back to one. And with a very thin brush, Let's draw in some details
along the side here. K. So far, so good. Now, let's set the
slider back to 0 for our brush and clean
up these corners.
36. Texturing Overall Details Pt 2: Back to one. So as you can see, this is just a very quick
and effective way of adding small details that you didn't
get around to modelling. The results will probably be better most times
if you actually model then and you bake down from a high resolution model
down to a low poly model. But if you need to add
details in a pinch, is a great way to do it
without having to go back and update the 3D geometry. Forgot to set the
slider back to one, so that now we're
adding into the mask. I want to draw a
diagonal line here. Get it as close to the
edge as I can without going over and then go back
and cleaning, clean it up. Let's swing the light
around to the other side. Holding Shift and the
right mouse button. So there's a lot of details
in the back here that I skipped an entirely in
the 3D modeling phase. So now it's time to
add it all back in. Let's carefully color
in the rest of this. There's also something up here. Let me start that over. And there's some
things going on here. I wanna kinda way this
entire shape here after I've drawn in the outline, chip away at what's inside
as carefully as I can. Then I want to add back
some things like so. This will probably have
to be a different color, but we can revisit that later.
37. Texturing Overall Details Pt 3: There are some things
we can do here. Definitely not the
best way to do it, but it is quick. Let's use straight
lines over here. Same with the engine's up top. And I'm okay with going
in pretty quick and rough because I can just we can use the poly fill tool to
exclude specific faces. So we'll just go
around and clicking the faces where we drew. Now it seems like when we were making our selection
from behind this engine, it also made some unwanted
selection is in the front. So for that we'll just
set the slider of this polyphenol fill
tool back to one. And then actually,
we can't bring back, we can't bring back the
lines we drew here. We'll just have to draw them in. Again. Something like that. Poly fill tool set it to 0. And we'll select the
faces where we don't want the lines to extend. So at a distance it
looks pretty decent. It looks like we had some
accidental poly fill selection over here as well. So we'll just have to draw it in this line again. Clean up. It's looking a little
cricket it from this angle, but I think maybe
can't be helped. Let's try again, see if we can get something
a little better. Yes, probably. Just hard to avoid completely. And we do need some holes here. Actually, I think it'd
be easier if I use the poly fill tool and just
select this whole face. And then using the
brush tool set to 0. I'll bring back these metal bars to form the event. Yeah, it looks good. It looks to me like
that might be all we need for details that indent. Let's create a new layer. And let's uncheck
the color and other, all the other channels
except for height. And set this to 0.7 so
that whatever we draw, it's going to have the effect, the appearance of kinda
popping out of the surface. I'm going to give
this a black mask. And then you see that when
I draw into that mask, it's going to
create details that kinda stick above the surface. We need something like
that for this part. And let me fill in the rest. Because sheep, Let's use the poly fill tool
set to black to remove the details from this
this sort of strip of metal. And going back to
the previous layer, I just noticed that detail
that we overlooked. Something that goes like this. Let's set the brush to 0
to clean up this corner. That's better. We could use a line going
across here to kind of emphasize the separation between this white surface and
the orange surface. Like so. Let's hide these pipes. Set this excluded
geometry toggle on. And then we may draw the rest of our seam line without having to worry about the
pipes getting in the way. Let's bring back the pipe. Little bit of cleanup. Okay. So we just drew in a bunch of lines and dots and vents
onto the surface of our ship. Adding a whole lot of
much needed detail in a very fast and easy manner straight inside of
substance painter. Let's take a moment to
label these layers. This is the indent details. This is the the details
that are bumped out. We can throw these under
the details folder and just see the difference that we created in a very
short period of time.
38. Texturing Winch and Lower Windows: We just did a detailed pass
that covered the entire ship. But there's one detail
that's pretty important. And we missed, which
is the winch here. Let me, for the
sake of simplicity, let's just start a new layer
for this and create a mask. Let's poly select this piece
of GEO and this layer. And then instead of drawing lines all across this cylinder, I think there's an
easier way to do this. Let's click on the height
button and try and look for try and look for something. In our resources. I just typed in a
search for Stripe. And let's see if
we can make use of this to create what the
effect that we need. So I'm just playing around
with our settings here. Adjust the scale or
rotation to try and mold this into something that looks like a
wound up winch. So that's looking roughly 21 it, Let's change the color
to something else. Matching our concept is going to be a certain type of gray. Want to bump up the
metallic slider? Just the roughness. Okay, and then we very quickly have the effect that
we were going for. I'm going to go for
a slightly lighter gray just so it doesn't blend in with a darker
gray that it's sitting in. And this little square here, I believe that's meant
to be a class panel. So let's look for the layer that contains this shiny
glass material. Good thing, we have
everything labeled so I can find it fairly easily. So here it is. I'm going to click on the
Mask icon of that layer. And I already have the
polygon fill tool selected. Let me switch it to
the polygon fill as opposed to the mesh
fill that I was on. And let's see, did we get it? Oh, it appears it's
not showing up because it's sitting under
additional layers. So all we did was update the masking on the
glass window layer without taking into account
the fact that there's a, another masking component in the folder that
houses this layer. So let's click on the
mask for the folder. And click on this
class panel again. And something changed, but still not the effect that we want. And that's because it's
covered by this dirt layer. Let me set the slider to black and paint
back in this mask. And let's just paint this
area by hand instead, because it looks like this face extends all the way
across to the back here. And we just want this portion to shine through as
a glass material. And then the reason
it's not shining very much is because of
this dirt layer. It's very strong. So maybe we can go into the
generator layer and see if we can't bump down the dirt level. It's too bad. If I
bring this down. A lot, solves this area, but then I don't feel there's enough
dirt up along the top. We can do this. Let's duplicate the window dirt layer and group one of them under a
folder with the Black Mask. Let's hide the original
window dirt layer. And then I'm going to paint in paint into the mask so that the glass
surface shows through. I'm going to put the
original window dirt layer under another folder. This time we'll give
it a white mask. And then with the brush
tool again, set to black, I'm going to de-select this lower window area. So you can see that folder too is having no
effect on this window. And then Folder one does. So under Folder 1, we can set E loops. We can bring the dirt
level backup where it was. And let's rename these dirt dirt up or is that right? Yeah. So we have
duplicate duplicates of the window dirt layers that are masked to only affect the cockpit windows and the
bottom windows separately. Looking at the other side, we need to make sure the mask is working for the
other side as well. The what appears and doesn't
appear as being throttled by the mask layer for
the parent folder group. So we gotta select
the folder mask and paint this window in. What we'll do the same for the mask layers
inside that folder. For the dirt layer
in the glass layers. And now we have nice shiny
glass on both sides. And I think the dirt
up or folder is having an effect on, on this class. So let's remember to
paint out the mask. So it's nice and shiny. Speaking of shiny,
the sort of aluminum, lighter colored metals are
looking duller than I like. So let's close up the window folders and look for the light metal folder
which is right here. And on the light middle layer, I'm just going to fiddle with the roughness
slider and see if I can add a little more shine. So there's a lot of
materials on this ship that are pretty Fairly mat. So be good to have some
contrast with shinier metals.
39. Additional Details and Decals Pt 1: Let's look at the
medium gray metal. And let's click on
the folder mask. And color in this shape here. I'm going to sharpen my brush
by holding down Control and right mouse button. And then depending on whether
I drag my mouse down or up, It's going to sharpen our
blur the edge of the brush. Let's make sure that
the grayscale slider is set to one so that we're actually
painting in value. We want to scale my brush
down for these sharp corners. And I should have
had the symmetry. Since now I have to do the
same thing, but on this side, let's copy this mask and paste it into the
gray material mask. We just missed a spot there. This site looks good. Let's copy that. Copy that
mask again, copy and paste. All right. We can
turn off symmetry. I don't remember putting
this square here, but try and get rid of it. Yeah, it's too late on. Turning the symmetry on. Not a big deal though, it's
pretty, pretty simple. I just remembered there's a lime green stripe that
goes across the side here. While we're in the
details folder, we can just add
another layer here. We already know that we want some sort of lime green color. Looks something like that. We'll add a black mask and draw that stripe
across the hall here. Let's remember to
turn on symmetry. And it's gonna go
from here to there. Keep this going. And the front. And then to tidy it up, we'll use the polygon fill tool to erase where we over painted. And actually, I think we should extend this
stripe further back. And then I'll set the brush to 0 or black
and then erase this tip. Just felt weird seeing
it stop right there. And I also want to continue this scene
line to this edge. I don't think it would hurt
to bump this stripe up a bit to make it look
like a D cow that has been applied on top of this metal surface
painted on top of. And then let's play around
with the roughness so that maybe it's glossier than the metal surface
it's sitting on. Or maybe it's dull
instead actually because the surface has some some
shininess to it already. Materials to conduct
contrast from each other. And we can definitely change this neon green to
something more toned down. You have to go back to
the orange group folder. And just above the
orange material. Let's add a black mask. Color in these color in these
little balls in the back. Will pick the appropriate
headlight color. Maybe it's like so. And we're also going to
want it to be fairly shiny. Metallic as well. Metallic works well for materials that you're trying
to make look like class. Let's see, Let's go
into details folder and make a quick adjustment
to the indent details layer. This is where it was
at, kinda shining. I want it to be
more on this side.
40. Additional Details and Decals Pt 2: I want to use the
polygon fill tool to select these faces here. Rubber to set the color to one. If you want to affect anything. That would be making
the mask opaque. So I imagined the back of
these jets to just be. Let's see how that looks. Now, remembering some
reference images I saw of actual jets and what the
opening in the back looks like. It turns out they're not
these giant gaping holes, but rather a smaller hole. So let's create another layer, a black mask. We're going to
search for Alphas. And I'm looking for something. I believe there's something
in here that looks similar to something in the concept
for this back upper corner. Let me just type in stripes. And this is what
I'm looking for. So let's resize by, I'm holding down Control
and right mouse button. And I'm moving the mouse left to right to re-size the scale here. So that looks about right, and I'm going to stamp
this right there. I want to, first of all, let's do that again. But with the symmetry mode
toggled on, my substance, painter is kinda squish, so you don't see all
the UI elements, but this is where it would be. So now when I put this down, it's going to come off,
come out on the other side. Now I just want to change the
color to something darker. And let's make sure that there's a little
bit of contrast in the roughness compared to the surface that
it's sitting on. The surface is fairly shiny. So maybe we can make
this more dull. Maybe give it a
tiny bit of height. I don't think it needs that. We just keep it flat. So there's a decal and the back. So I'm just noticing now there
are some details missing from this front orange surface. It be easy enough to just
add it back in real quick. Let me remove the alpha that we selected from earlier
so that we're back to the basic round brush. Let's select the
basic round brush. Or I guess it's called shape. And bring back the couple of details that were
sitting right here. Let's turn on symmetry. These lines are looking a
little thicker than I like, so I'm going to chip
away at the edges. So that wasn't too bad, bring those back out. So if we collapse the
details folder and just toggle the visibility, we can again assess the
progress that we made. Just formatting details are getting very close to the end. Let's look towards
wrapping up very soon.
41. Additional Details and Decals Pt 3: So up until now, we were very concerned with matching up with
the concept art. And what I wanna do now is go a little bit
off the script, if you will, and
start throwing in details that are
not in the concept. But you know, just
looking at this model and the view port here, there are spots that are
very sparse, very plain. I'm looking at this
front surface here, this side panel here, where I think there's some
opportunities for more detail. So I'm going to go find the layer where we added
a bunch of line detail, which will be the
indent details layer. I'm going to select the
Mask icon on that layer. Make adjustments
to my brush while holding down the
control key on it. My brush to be small and sharp. And let's turn on the
symmetry mode here, which is just add a view. Let's go in here and just
kinda improvise a new detail. We can add here. And
there's nothing showing up. The grayscale is
set to 0 or black. I'm going to slide it
all the way up to one. And now our strokes should be visible on my brush
even smaller. And now let's go ahead
and add those details. Let me bring the
brush setting to 0 so I can clean up
the corners here. Back to one again. Something wrong with this detail that we added a while back, but it's easy enough
to add it back in. Just looking for any opportunity to add a few more details. To use the polygon tool. Set to 0 to clean up
the ends of this line, so just fits in on this surface. I also want to fill this in as well as this
little pocket. And in record time, we've added a bunch of small details on this
medium gray surface, which moment ago
was just completely blank and kind of
boring to look at. Now I don't wanna go overboard. There's such a thing as
too much detail where your eye doesn't have
a chance to rest. We don't want that. So I
think this is good enough. We can move on to
this part here. And then let's
carefully clean up. We just did using techniques
we've been using before. As you can see,
the simple details that I like to use
over and over again. Either dots or little slits. They're pretty easy to
add and they fit well with almost any kind of
sci-fi hard surface asset. So let's give the same treatment to the side of the shape here. I think these vast
stretches of just flat, nothing desperately needs some more of these line details. I'm going to draw a panel
in the middle here. For that when you want to
use a very thin brush, I am just improvising some interesting shapes that fall along the contour of the surface that
it's sitting in. Psalm following along this line, along this line, but also
adding some diagonal angles. These shapes are pretty random. You're just adding
them to taste. There's some diagonal
lines inside here. This is one of the
things I was missing. The concept. Let me give these lines more
of a slant so that it matches this line on
the other engine. And then to clean
up, we're going to use the polygon fill tool. Also keep in mind a lot of these instances I'm
holding the Shift key down nor to maintain
straight lines as I draw. Again, the polygon
fill tool set to black to clean up the
hands of my lines. This is a detail that's
also from the concept art.
42. Overall Wear and Tear Pt 1: For the lines that we just drew around these twin engines here. I'm going to want to fill this in with a different material. Then what's inside of those
lines right now? Let me fine. What this material is? The dark gray. Looks like this, is it. All right. This is the one that's sitting at
the very bottom. So I'm actually going
to need to chip away from the orange
material mask. So let's start at the
parent folder mask. Okay, there we go. We're just going to trace along the
border that we just drew. And then it's pretty
simple to fill in the inside with a larger brush. All right, great. Same over here. I'll include this little
trapezoid as well. So we just spent
some time filling in these large empty spaces
with some line detail. Now let's go back to
the details folder to the top of everything else, we can start thinking about
adding overall textures. I mainly thinking of a weathering effects
like overall dust layer. So to do that, I'm going
to throw in a fill layer. I'll add a mask to it. Doesn't matter if
it's black or white. We're going to add a
generator to that mask. And then from here
up to this point, we've mainly use
the dirt generator. But this time we're going to
try the position generator. And the great thing about this, as you can see, it applies an overall texture like a gradient
from top to bottom. So this works great as a overall dust layer that sits on top of all
of your texture work. So let's go back to
the color properties, the color setting of
this layer and change that to a dirt color. We're going to bump up the
roughness so that it's almost completely dull
as dust should be. And then instead of just
this uniform gradient, it'd be great if we can break
that up with a texture. So let's slot in a texture pattern by picking
one from out of our library. Let's see what comes up for you. Just punch in dirt
in the search. And maybe we can try
this grunge texture. And let's see what
that does for us. So we need to enable the texture by bumping
up the texture opacity, a 100, the texture section. I'm going to leave
it to around there. And then back to the
parameters under image inputs. I'm going to play around
with the balanced slider. And the contrast slider. Maybe hit the random button next to see it a couple times. And actually I want to pick
out a different texture, something that's a
little smoother, not quite as rough. And then let's play around
with the scale so that the details aren't
so large like that. And now that I think about it, I think it be better
instead of this gradient being opaque at the top and then fading out
as it goes down. Let's flip that.
That's that words. Then that's just
flipping the texture. Let's flip that upside down. And I think that's done here. Top to bottom. Here we go. We got to expand the top to
bottom section and select, Set the invert to true. So now we have all that dirt
texture underneath the ship. I think that makes way more
sense than it being on top. If you think of how many
times this spaceship lands on some dusty
planet somewhere. So this dust is
looking pretty good. It's very convincing. I think it's a bit heavy, so I wanted to tone, tone the effect down. Let's just go to
the balanced slider here and tone it down a tad. We haven't been doing a good job of naming our layers here. This one Let's call
the bottom dust. This is the stripes detail. This is the green stripe detail. Let's change this
to a winch texture. Let's make another fill layer
with a mask and generator. Now this time, I'm
going to choose a metal edge where. Okay? And this is going
to be great for our spaceship since it's
mostly made out of metal. And we definitely want to
add some wear and tear to the edges of some
parts of the ship. So first, let's adjust
the material itself. I'm going to choose a color
that feels more metallic. Maybe give it a
slightly blue tint. Towards a dark gray. We're going to make it a bit shiny and
of course metallic. And also check out what happens when we bumped
down the height slider. Don't want to do too much. So let's go in and punch or really punch
in a really low number. To make it very subtle. Then we have this nice
overall metallic edge where all around the
ship see the difference. Now, let's kinda everywhere. And I want to be a little
bit more selective about where the metal Azure is. So I'm going to throw
that layer under a folder and then give
that folder a white mask. The white mask will make it so that we can just chip
away at this edge where, where we don't want it, instead of having to add
it back in everywhere. Really just depends
whether you want to be adding in the edge
where or erasing away, and I'd rather erase it away. Now, we've done this
before where we through a material layer under a folder in case you
missed why we're doing it. It's because the masking for this layer is already
occupied by the generator. In order to mask this layer, we need to create
another parent folder that we can add a mask do. Let's quickly name this
middle edge where. Then we'll call this
middle edge where mask. So I'm going to make
my brush nice and big, make the edges blurry. And then after checking that, my brush is set to black, I'm going to start painting away where I don't want
the edge where to appear. Now, right now if I just
click someplace once, it'll completely
erase the edge where. But instead of that, let's reduce the
flow of my brush so that I can kinda chip away at the edge where instead of erasing
it completely. All right, just so
trying to find places where maybe it doesn't make as much sense for
the edge where to be. So that's pretty good.
Again, I started with the white math because
I knew I didn't want to erase too much just a
bit here and there. So it's not all uniform
Azure Everywhere.
43. Overall Wear and Tear Pt 2: And thinking we can add one
more overall detail layer. Again with the mask
and the generator. This time. Let's see what a curvature
generator will give us. So for this one, let's change the color to a dark gray with the red tone. And then let's play around
with the curvature settings. So I'm bringing the
gulp global balance slider down so that it's not, not too much going on. I wanted to be this layer to
have a very subtle effect. I think it does a nice
job of giving our ship just another indication
of where in use. But it's fairly subtle. I had to label this layer, I guess I'll just say curvature. Dirt. On this new fill layer. I want to add a different
kinda generator again. And this time, let's see what world space
normals gives us. Okay, this one's pretty cool. The world space normals
generator gives the appearance of
small particles just landing on the
top of our asset. So when the color is set to something close
to white like this, it looks like a layer of snow is sitting
on top of our ship. This is a great and easy way to add snow or frost
effect on your asset. But in our case, we
don't want that. We're going to use this to add a very thin and
subtle layer of dirt. So I'm going to pick
a medium, light gray. Of course, don't want
it to be shiny at all. And this is very dusty. So I want to tone down this
generator by quite a bit. By pushing this global
balanced slider down as low as it'll go without
completely deleting it. And let's use a texture to
break up this uniformity. So again, from our
resources window, we want to find something. Maybe if I punch in Cloud, we can have a smooth
texture break up. So I could turn up the texture capacity to
make use of the texture. Play around with the scale. So I was, I was pushing the global balance
slider under Parameters. There's another balanced cider
underworld space normal. Let's play with that. Okay? So the brightness slider. When we push that down, that does a lot to pull
back on this generator. And you can see the texture, the cloud texture that we added, doing a good job of breaking up the monotony of this dirt layer. So it's easier to see when
you set your model at an angle so you can
see how the light reflects off the surface. And that's looking pretty good. If you still want to
tone back the dirt, you can use the opacity
of the layer itself. And don't forget that when you're adjusting the
opacity of this layer, it's only affecting the
color, the base color. So if you want to have an effect on the
roughness as well, you have to switch this tab
over to roughness mode. And then you'll see that this capacity jumps
right back up to a 100. Because for, for
each of these modes, they have a different capacity
value attached to them. So looking at this from an angle to see
the light reflection, I'm going to play with this slider to back
to base color. And then let's check out what
this dirt layer is doing. So before, especially the top of this
engine was looking like a like it was made out of plastic because it's
too perfect and smooth. But with this layer
added on, it's, it's adding a nice bit of realism through this
subtle dirt effect. Hey, so we just added
some last minute additional line
details to fill in a bunch of empty spots. And then we added a handful of overall texture layers using generators to create
realistic weathering effects. Now let's collapse the
details folder and swing the light
around the ship and see the effect of all the
detail layers that we added. All right, So without looks like a toy and now looks
more believable. So obviously, if you
have more time to spend, you can always add more
cows, more details. And instead of the sort of
overall, procedural textures, can always go in
and manually add in individual
scratches and dirt, which will only improve the texture work. But
that's up to you. It really depends on
what this acid is. Four. Is it sitting far away
in the background? Or are you going to feature
it and be able to see it up close in order for
your using a four.
44. Export and Conclusion: Congratulations on
making it this far. I hope this was helpful
and informative. I hope you picked up a
couple of new techniques. If you're already familiar with substance painter or if
you're brand new, baby, this is opened up your eyes to the sheer power of Substance Painter and what you
can do with that software. So from here, depending on what you want
to use this asset for, when you export the textures. You're going to want to choose where you're going
to save those textures. And of course, pick the
appropriate template. If you want to use this as a game asset for
the Unity engine, you have some options for unity. If you're using
the Unreal Engine, there are some output
templates for, for unit, for unreal as well. Or if you just want to make some renders
inside of Blender, then I would recommend using the PBR metallic
roughness template. And depending on
what you choose, you're going to get a set of texture maps with different
data packed into them. And don't forget, when we brought this model into
Substance Painter, we did it without
a full set of UVs. And in fact, we created the UV data inside
of Substance Painter using its automatic UV feature. So it's very important that you not only
export your textures, but you also need to export your mesh and apply the export
of textures to that mesh. All right, that's it.
Thanks for watching.
 Design Boy, 3D Designer