Transcripts
1. Welcome: Well, hi fellow artists. Come on into my studio. I'm Carrie Sanders and I'm
an art teacher, a creative, and I love to share what I know and share the
love of art with others. I have had the pleasure
of learning from fabulous teachers all
across the United States, as well as even traveling to other countries to take classes. And I just want to share the love of art with as
many people as I can. I've been teaching
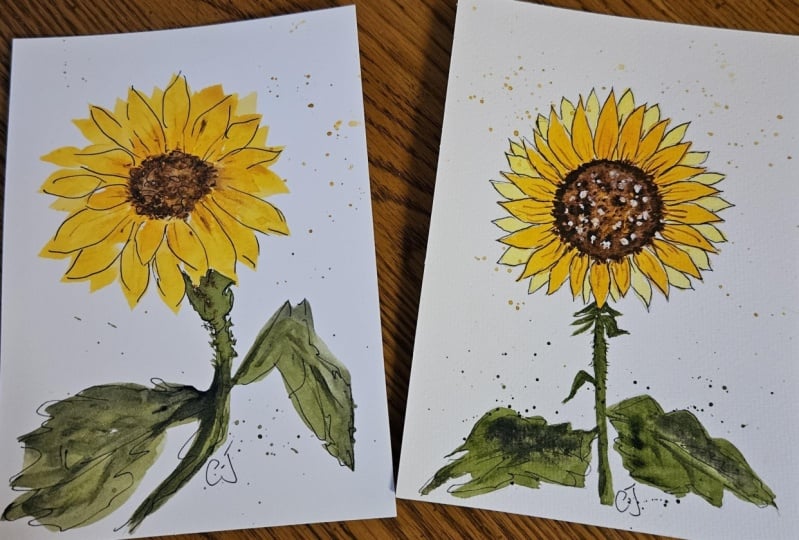
for many, many years. Today we're going to do three flowers with three
totally different techniques. Each of these techniques
is going to help you further in your art
journey for yourself. The first one we're
going to do is I'm going to show you
some pictures of a trip that I took and I felt
just acres of wild flowers that inspired me to do this sunflower with
watercolor and ink. And you can even just
use a ballpoint pen. This technique is
going to help you with your sketchbook
and your journal. And even if you just
have a piece of paper in your pocket and
you're out and about, the next one is a
beautiful, delicate lily. This water lily I saw
when I was out golfing. I don't know how many
of you love to golf, but they have those big ponds and it was filled with delicate, beautiful pink water lilies. And I wanted to
maintain that delicacy. And so I thought this
would be a great time to teach on how to do
transparent flowers. Now if you shied away from
that technique thinking, oh, it's a little bit tricky, and I might lift off the
layers and have to start over. No, I'm going to show you a way to do it where we
work with the water, we work with the paper,
we work with the paint, and it does the work for you. We just kind of coax it along. And I can guarantee
you're going to have a good result if
you follow me carefully. All right. And
then the last one, I took a journey to Connecticut for three
weeks and went to this beautiful garden by
of this huge mansion, Hibiscus plants were in bloom. And I'm telling
you those flowers were this big, so inspiring. And we're going to do a
Hibiscus with lots of blazing, some dry brushing,
lifting off highlights. That's going to help
you learn how to add layer upon layer to
achieve the color values, the shading, the
highlighting that you want in order to get
that dimensional look. Three flowers, three techniques that will help you
with your art journey. Come along with me,
grab your supplies, and let's get started together.
2. Supplies and Petal Stroke: Let's do a quick review of our palette before we
start our cute sunflower. The paints that
we're going to be using are pretty minimal. For this, we will be using naples yellow cad,
yellow medium, gamboge, burnt umber
and raw umber, Hookers green and
undersea green. And that's it and you are welcome to substitute
anything that you have. Then I'll also be using
some blue proof white to add some highlights
for our inking. I'll be using two
different pens. If you've done inking
with me before, you know that I like to use different type of fine pen for each I've demonstrated here, I use a Muji fine tip as well
as a Uniball fine point. Even though they're
both fine points, they're just a
slight difference. And I like having
that ability to use a little bit thicker and a little bit
thinner here and there. But you can use the
same pen for both. You can even just use a
ballpoint pen if you want to use what you've
got again at home. Whatever works for you is great. As far as brushes go, we'll be using a variety of flats rounds and liner brushes. I will list what I use
out on the supplies list. You can always refer to
that PDF on this page. But here's what I've got is
a couple of liner brushes, ones a little bit thicker
than the other one. I'm going to be using
a large size round. I think this is a ten or 12. Yep, it's a 12. As well as my favorite brush,
the number four. And then I'll also be
using a medium size. This is an eight,
but not disguise. That has a really fine tip. I like this because it
holds a lot of water, but I have precision
with that tip. Then I'll be using a
couple of different flats. This is a ten, but it's a really small ten. This is an eight. I know
it doesn't make sense, but this is more like
almost a half an inch. And this one's on an angle, which I'll be using to
lift out some highlights, but use what you have. You're going to see me lay
my brush down over here. And just to avoid E
mails and questions. I just picked this up on Amazon. It's meant to be used for a bar of soap in the
shower or by the sink, but it's really perfect for
setting down wet brushes. I use that frequently. Then you will be needing
some tracing paper. If you're going to trace the
pattern for our sunflower, we got three flowers
today that we're doing, three different techniques
for the sunflower. Guys, I really recommend that you do not
trace the pattern. I have provided it for you
in case you would like to refer to it or you're
more comfortable that way. But even if you're a beginner and you've never
done this before, I still recommend that
you not use the pattern. Trust me, I'm going to walk you through it every
step of the way, and you'll be fine
without a pattern. I am going to be using an
eight x eight sheet today. I always recommend using
140 pounds or better. On your water color, you'll
have a much better result. It reacts really
well with the water and the paint and your brushes. We can lift off and put on
and it absorbs it well. 140 pounds or better. Go ahead and gatherers. Oh, did I mention my
handy dandy tissue? This is my favorite tool of all. We are definitely going to
be needing some tissue. All right. Grab your supplies and we will go ahead and
get started painting. All right. The first thing
that we're going to do is place the center
of our sunflower. And for this you want to
start with a nice circle. I love to use this
little circle tool. I just picked it up at
Hobby Lobby for five bucks. It's called Helix
and it just gives you any size circle that you like and does it
perfect every time. But you can
definitely just trace a cap or a jar or whatever
you have that's handy. This is going to be the
center of our sunflower and I would place it a little
above center of your paper. And I'm just going to
go ahead and All right, so go ahead and place
that and that's the only thing that we're
going to pencil in guys. I'm going to start out using
this number 12 Escota round and let's just practice before we actually start on our flower, let's pick up some of
this Cad yellow medium. We're going to use what's called the petal stroke or
the comma stroke. And you want to feel your brush. You see I'm pressing down here. It pulls the paint all
the way to the top of the brush and we're
going to touch press. Then as we pull
down, we lift up. Let me do that in a darker paint actually, so you can see it. I'm going to use some green. All right, here we go again. We're going to touch press. As we pull down, we lift up and it makes a
wonderful petal or a leaf. You can use it for
all kinds of things. You can do a curved
in either direction. I want you to practice a
bunch of those before we, now that one's a little
wide on the end, so you can just go back,
just add a little tip to it. But practice a bunch
of these on your scrap of paper until you
are comfortable, and then we'll go ahead and
get started on our subflow.
3. Sunflower Petals: We're going to go ahead and add our first layer of petals. These are going to be the
ones in the background. The lighter yellow, Just
take a mixture, about 50, 50 of your cad yellow, medium, and naples yellow. And mix a good amount
on your palette. Water it down a bit
and probably about, I would say 60%
water and 40% paint, a 60, 40 ratio. You just have a nice milky
yellow that Naples calms down cad yellow
so it's not quite so in your face so to speak. And that's what we're
going to go ahead and start with now, because it's in the background, we want it nice and light, but we also want to
leave some space for the petals that are
going to go on top of it. You want to come out
about an inch and a half? I always just start with
one on top and just keep it straight. Bring it down. Now bring it down
a little bit past your circle because you don't want that petal
to be floating. You want it to look
like it's attached? I'm just going to keep rotating my pad as you should as well. Just rotate your paper.
That's usually the easiest. And I'm just going to keep
about a half an inch, Just about a half
inch or so between those petals, so pretty. Don't be afraid to
curve a couple of them. We want to have
some fun with this. We don't want to look too
stilted, like a sunshine. Now, when you get
about halfway down, this is where your stem
is going to come in. We want to have shorter ones. You can add a little
tip if it gets a little too blunt, great. Okay, now that needs to completely dry before we can
come in with our next layer. Using the same brush. I've now added a
little puddle of gamboge next to our mixture of Cad yellow medium
and naples yellow. What we're going to
do is just pick up a little bit our first
mixture that we already used, but we don't want
to lay that on top, look exactly the same. We're going to pick
up a little bit of this gamboge just to
mix it up a little. We're going to go
right over the top. But in between we can go ahead and just add
variations of that color. I'm going to make it
a little bit darker. It's coming in a
little light again. Go ahead and curve some. I'm going to add a little
tip on there. There we go. Make sure you're bringing it
down into that circle a bit, but it's okay to
have a little space between if you want to. So pretty, I love
gamboge on yellow. It just really makes it pop beautiful. Okay. Again, let's let that dry.
4. Sunflower Center: Our petals should
be completely dry. Now we're going to come in, I like to use a flat so that I get a really nice clean edge. Remember, with water
color, that paint flows. Wherever water goes, we're going to come in and just
use water on a brush. And follow our circle line. And keep in mind that wherever
you're putting this water, that's where your
paint is going to go. It's automatically flow
through this wet on wet technique that
we're going to use to put in the center. Go ahead and turn your paper. It'll be easier now. Just make sure that
that entire surface is evenly coated with water. While that's still wet, I'm going to come in with
my number four round, picking up some burnt
umber pretty thick. This is going to be probably
a 9010 pretty thick. I'm just going to touch that, going around, look at it, go. That's the beauty of wet on wet. You've already done the
work with the water, now we're going to
let that paint flow. I'm staying away from the
middle for just a minute. Let's see how far it does. I didn't come right
out to my edge either. Let's just see how it
does for a minute. Now, I'm going to slowly
work it in a teeny bit more. I'm going to work it
out just a touch. We're going to come in with
raw umber on the outside. I don't really care if
this goes all the way out. Let's pick up some of
our Cad yellow medium and put some yellow
dots in here. Just let those flow out. Now I'm coming back to the burnt umber and
going between some of that yellow look at you
your free style in it. Isn't this fun. There's no right or wrong That water is going to continue to
work with their paint, it's going to
continue to spread. Let's pick up some of
our raw umber now, let's pick up some of
the raw umber now, and we're going to come
out to this outer edge. I'm making this movement because I don't want it
to be smooth anymore. We're going to work on that a little bit
more in a minute. But even laying it in, we want to be intentional. It's probably 90%
paint, 10% water. Great. Now I'm going to pick up
just a little bit of water, so we're going to take it down
to probably an 80, 20 mix. And let's just bring up some
of those dots a little bit. Bring them in, all right. Now, because my
paper is quite dry, I'm just going to pick
up water on my brush. No paint, but I don't need it. I dripping. I just want to be
able to soften this, manipulate it a little bit. I'm using an up and down
motion and touching. We want it to look spotty. We want those little
sunflower seeds in there. This just helps splend
it a little bit. Bring some more of
that number in. Okay. What I'm going to do is
pick up water on my brush. This is the number four
I'm going to protect just a little bit
and I'm going to splatter some water on there. And what it's going
to do is lift off some spots of paint. Then we need to let it sit. This is the hard part.
Sitting is the hard part. Water will lift off spots. It just makes it look
more texturized. I do this a lot with the beach or if I'm painting the cliffs
that surround us here. Sand, You just want to add that texture. This
is such a great way to. We have to be patient and allow the water to work with
the paint and the paper. You cannot use a hair dryer or a heat tool to blow it
for this technique, we're just going to have
to sit and wait it out. Let's let it dry and I'll
see you in just a moment. All right. Our center
should be completely dry. Now, how did you do
how did you did you get some nice open areas? It looks so lumpy, bumpy. It's just how it should be. I am switching now to my thicker of my two liners that I pulled out today.
This is a number one. I'm going back to raw umber
and it's about a 50 50 ratio. 50 paint, 50 water. I'm going to add some little holes of paint
that are going to come out, just like in between
some of the petals. Not every single one of them, but just to make it look
a little more natural. Make some longer than others
and some close together, some further apart like that. So I'm going to
take that around. Okay, I've switched now
to my smaller liner. It's also a number one. Let me show you the difference. You can see this is almost
more like a rigger. It's really long, but this
is just a little bit finer. I'm coming over to
our mixture that we used on our second
set of petals, and I added just a tiny bit more of the gamboge to make it a little bit deeper Color this up, I want a fine, fine
tip on my brush. I'm rolling it between my thumb and finger
as I pull it up, because that way I can
get a nice fine line. And we're going to add a
few veins to our petals. We want to make
sure that we follow the contour of the petal. Usually like one main one
that goes 34 the way down. And then a couple of course, you could add on the lighter
ones that are tucked behind. But in general, I'm not going to because we'll do
some of that with the inking to be over
keel, so to speak. When we splattered the center, I had a few drops of
water that went out onto some of these petals,
which is no big deal. But I am going to just pick
up a touch of this cad, yellow and lots of water. I just want to go over a couple of these petals
that lightened up too much. If you have that situation, this would be a great time to do a little patch and repair. Great. Okay, coming back to the center. Now I'm picking up some of this burnt umber and we're just going to add a few
dots and it's pretty thick. Probably an 80, 20 mix. And I'm just using the very tip of the brush, putting them in. We need to let that dry.
We don't want to smear it, and we also want to
come back white. And we can't do that
until that's dry. Let's let that dry
and come back. It's time to pick up our Dr.
Martin's bleedproof white. You could also use white
guash if you wanted to. I like to put a little bit on my scrap of paper so it's handy. And I'm using my
smallest liner brush. I'm rolling it to
a fine tip here. We're just going to add just an indication of
maybe some little seeds. These are going to be more in
a row as some flowers are. Hey, and then we
can just put some, a couple of rows
of dots and they kind of go in a circular motion. Mother nature is not always perfect, is she? I don't know. Maybe not on my paper. Oh, no. Okay. That works for me.
5. Sunflower Stem and Leaves: I'm using my number four
round now and I picked up some Hookers Green here and it's probably
about a 50, 50 mix. And I'm going to start
by putting in a stem. Just bring that down. I don't want it to be
an exact straight line. And I'm going to add a
few little prickly delis, that's a technical term. All right? Then at the top, I just swirl some of
these out like that. I just want to give an indicator of where we're going to bring our first little leaf here. Our second one is going
to start down lower. That just helps give
me a little guide. We're going to pick up a flat. This is where I like
to use my ankle brush. Ok, I'm just going to now, if you want to put your pattern
in for this, that's okay. But I really think that you
could just go ahead and the handed I'd like to have
the tip droop down, it looks a little
more natural there. I'd like to base
it in like that. Just wash it in. And then come in with water
on your brush. And just pull down the middle. Pull off the highlight there. It might look funny for
a minute. That's okay. The water's going to work
with it to blend it a little bit and we're going to come
in with some undersea green. Or you could use a moss green, Just a darker green that's earthy and add some
while it's still wet. Then I'm going to use that angle to just add a little bit of a vein and the water's
going to let it soften. That's okay guys, We're
going to leave it like that. All right, let's pick up
some more of our hookers. Green, we go, I'm going to
start with my curved end, lock it in a little bit. All right, and now we're
going to lift out some, just water on the brush and I'm going to come in
with some undersea green. One more to go, let's add a cute little fella
towards the top there. I'm going to come
in with the green, light green Hookers Green. This one I'm going to, it's easier for me to
visualize if I start with the shape that's tilted down and bring that up because it's almost
like a triangle. And then it just comes up
to the stem like that. Then you're going to, I'm lifting off a little bit just because that's going to
be a little bit lighter. The sun's going to
catch that part of it. This tip is going to be darker. Let's come in with some of our undersea green
and touch that. All right, now we can stick
with this undersea green for a minute and add a touch
of shading to our stem. Sticking with the number four. It's about a 50, 50 mix still. Let's just add a
little here and there. Right up next to that flour. All right? It's going to
have a water right there. Nice. We're going to
do some splattering. So make sure that you
cover up your flour and we want to try and keep the green just
on this lower half. I mixed a little
of the two greens together and added
a bunch of water. And I'm just going to stick with my number four and
Yep, I like that. And then we're going
to do the same thing. Rinse out really good guys. We're going to do the same
thing with our yellow. I'm picking up this mixture
that we used earlier. I'm going to lighten mine
up just to touch with the yellow, All right? It looks like I got a little
on my petals right there. If you get it on your
petals or somewhere you don't like or say
it's too strong, let's say you don't
like it there, just touch it and you can see that it lightens
it right up. In fact, I like a mixture of both because it just makes
it more interesting. You've got the light in
the dark, all right? Now, it's just a
personal preference that I like to keep
them separate. I didn't want heavy
green up here, but if you want to mix
and match, you can. If you want green
all over the place, go ahead and put
green up at the top. That's totally fine. All right, we're going to let
this totally dry and we'll come back and
start our inking.
6. Sunflower Inking: I'm going to start
by using my Uji pen. You can use any
ballpoint pen, guys, you don't have to
use a special pen, but this is a fine point pen, but it's a little
bit thinner than the other fine point that
we'll be using because we're going to be doing our petals just follow
the contour lines. This is also a great time to make any corrections
that you need to. If something is not pointed enough in some way that you
don't want it to be fine, this is a great time to do that. All right. You may have noticed that I only did the darker ones the way to the bottom
even if there was a gap and I could have brought the yellow one all the
way down, I did not. I don't want it to
get too congested down the base of the flower, and that's why I did that. But it's a personal preference. Do it the way that you would
like to do it because now we're going to come in
and we're going to do a little bit of contour lining. We are going to do it, at least I am on the
lighter background petals. You can see how it would be really congested if we
had a bunch of lines. Great. How'd you do guys switching over now to my Uniball fine point. I'm going to go ahead and
do some outlining here. These, I don't even try to
stay right on my paint line. I think it looks
more fun and more free and loose if you don't. Okay, the last thing
we're going to do is add some dots around the
base of the petals. So let's pull our paint
out one more time. Let's come back to
my smaller liner. Number one, I'm picking up some raw and fairly thick,
probably 70, 30. And I'm just going to add a few. Not many huge. Now I'm going to add
a few white ones. Great. I think we've wrapped
up with this one. I hope that you enjoy
doing some three hand work here and it's time for
us to go ahead and sign. Name. Always claim
your artwork, guys. Be really proud of what you do. Remember that you
have a special talent and I'm so proud of you
for taking this class. Thank you so much for
spending your time with me. And I'll see you
in the next video.
7. Hibiscus Supplies and Pattern: Let's dive right into our beautiful Hibiscus using glazing and wet on
wet techniques. If you are going to
trace your pattern, you'll need some tracing paper. I've provided for
you the pattern in PDF form that you can download
from this main page of skill share and just
go ahead and trace that onto some of this tracing paper and
you'll be ready to go. You will need a piece of graphite paper to transfer
that to your watercolor, and I will show you
how to do that in the next portion once you have that onto your
watercolor paper, and by the way, I always recommend that you use 140 pounds watercolor paper or better watercolor paper is probably your
wisest investment. You'll have a better outcome because this paper will hold up to the many layers of water that we're going
to apply and paint. And it, it swells and contracts and it knows how to interact well
with the water. The paint brushes and holds up until you'll have
a much better result. If you have 140 pounds or
better color for our palette. Today we'll be using
a limited palette. We're going to be lemon yellow yellow,
medium yellow ochre. That one's optional,
but I'll be using it. Yamboge violet or any purple
that you have will do Cad, red light, Hooker's green
and undersea green. Or if you have an olive green or just some brownish earthy
green would be fine. We're also going to be using
some bleedproof white. I will be using
some drawing gum. Now if you are a new beginner
and don't have this, don't feel like you have
to go out and buy it. I'll show you a workaround. But I will be using
it and I'm going to just use a toothpick to apply
it rather than a brush. Okay, for our
brushes I'm going to be using just a variety of rounds and flats
for my rounds, I'm going to be using
some larger ones. This is a 12 and an eight. This eight has a nice sharp tip which is going to
be really important for some things that
we'll be doing today, as well as my very
favorite number four. You see me use this in
every video that I do. Then for some line work, I have two different
liner brushes. They're both number one. This one is a little bit longer, It's more like a rigger
and it holds more water. This does more fine work and I may be using both or I might just use
the more fine one. Use what you have,
it'll be just fine. Then I have three flats
that I might be using, a larger one, a medium
one, and an angular one. I can tell you the numbers,
but it doesn't make sense. This is an eight, this is a ten, and then this is a
number six angle brush. I always put all of the supplies listed out in
detail on the supply sheet, which is a PDF on this
page for you to download. Of course, we'll always need my favorite tool, ever tissue. And we'll need some shop towel, some clean water, and
you'll see me use this. I just explain it because
I'll get E mails if I don't. This is really meant
for a bar soap. I just got it off Amazon
for a couple of bucks, but I find it quite
convenient for putting wet brushes
down as I'm using them. And I just set them
there. It's just been a great little tool for
me and that's what that is. It's no big deal. All right,
gather your supplies. In the next shot, I'll be showing you how to apply the pattern and then we'll go ahead and get started painting. Let's go ahead and
apply our pattern. I have downloaded the PDF. It's provided for you on
this page of skill share just onto a piece of tracing paper and then take a
piece of graphite paper. There are two sides, you can see there's a
difference in the two sides. And test it out, so you know which side makes a
mark when you go over it and put that side down and then you just go ahead
and trace it around again. I'm using a stylus. It has a round ball on the end instead of
a pen or a pencil, so that it doesn't
damage my pattern. And I can reuse
this over and over. I'm going to go ahead and
speed up the camera and all I'm going to do is
trace all of the lines. And then I'll talk to
you just a moment. We have a beautiful
pattern ready to go. You may have noticed that as I was going along
applying the pattern, I would lift up and just check how dark it
was going on and making sure that it was dark
enough for me to refer to. Also, I always do a
thorough check before I completely remove the pattern off to make sure I
didn't miss a spot. Sometimes you might have missed a few lines that were important. Those are just a
couple of tips for you there before you
apply your pattern. Once you've applied
your pattern, let's move on and go ahead and get started painting.
I can't wait.
8. Hibiscus Background Washes and Wet-on-Wet: I've turned my board upside down because we're
going to start in this top quarter quadrant using my number eight
rounds of the pointy tip, picking up some
Cad yellow medium, and it's going to
be quite watery. This is a ratio of 95% 5% paint. We're just going to go
ahead and wash that. We're going to do a little
wet on wet technique here. This is where I like to use that fine little tip
because it lets me get in all the little crevices
of this hypos leaf. We don't want to lose that
beautiful Ed edge right there. I'm just going to soften that. Just take some water and just soften that edge a
little bit with water. Great. Now rinse
that out a little bit and pick up some of
this red, same thing, it's about a 9055 and
just put some on the edge of that yellow and let the water's going to take
it and let it land for you. Now, I'm going to turn
this back around. Sorry guys, but that's going to let us see how close the
edge we wanted to go. So now I'm going to
start to noodle it a little with I'm just
going to wiggle it out. I like an uneven edge. If you want it to go all the
way to the top, do that. If you want it to be square
or rod or whatever you want, this is your peas. Have fun with it and do
what you like to do. I just like it to look
a little splashy, I guess it and I might just
add a little more intensity. All right. Now just
picking up water, just to soften this
outer edge here, a little tissue dab that helps blend that outer
edge here as well. I just want that to
fade into nothing. If you want a hard edge, that's great. Do what you want to do. Okay. Well, this is
still slightly damp. I'm just going to
cover the flour and we're going to do a
little bit of splattering. I've mixed the yellow and red together here on my palette. If it gets on your flower, just touch it with your tissue. All right, let's do
the bottom corner now. Okay, we're going to do between these two leaves down here. I'm using the same number, eight and some violet. Again, a 9055 ratio and it's going to bring
it down part way. This is just water on my
brush now. Just so back. All right. You can't overwork
that too much or it will lift off on the bottom edge
and you'll have a line. I know it's tempting,
but don't overwork it. Let's go ahead and
do some splattering. Just a little bit, because I
want to come in with green and splatter once
we do our leaves. But let's throw a
little purple in here. Just it will really add some
depth and texture again. We're going to cover our flower
and I'm actually going to protect the leaves a bit
over here in the corner. I like to do it while it's wet. So it blooms out a bit. That's gorgeous. Okay, let's let that dry
for a minute. All right. We're going to do just
this little quadrant here and we're going to start with some
Cad yellow medium. Now, I had to go rinse out my water in order
to true yellow. So if you need to do that, take a moment because
you don't want to have any purple mixed
in with your yellow. Nice. And bring
it in, touch red. I like the red to meet
up with the violet. Get a little bit stronger here. Let's let this dry. I'm not
going to splatter this area. All right, If you are 100% dry, then we're going to
go ahead and get started on our flower. You notice that I have
cleaned my palette. I have fresh water because when you're
working with yellows, you need everything
crisp and clean in order to get a true yellow
that we're working with. So let's go ahead and
move on to the next step. Okay, I'm the drawing gum to apply a line for a
highlight on these petals. And I'm just a tooth pick because I want to
really fine line. Now typically you would use
a paintbrush to apply this. You can absolutely for this too, but I just figured
most beginners, maybe haven't used this before. This is an easy way to do it. If you're using a paintbrush, make sure that you're
rubbing the tip of your brush in some soap first
so that you don't ruin it, because this will not
wash off unless you've put soap on the tip of your
brush to preserve that. Just a nice fine line. You notice these
lines that we drew on are for our highlight there, a guideline for a shading line that
we're going to put in, but I'm putting the
highlight next to it. Use that for your contour line. Once we apply this, we have
to let it dry really well. Okay, let's let that dry.
9. Hibiscus Yellow Petals: Are you ready to get
started? Here we go. I'm using my number four round, picking up some
Cad yellow medium. This is about a
9010 ratio on this. We're basically
going to wash this in now that I've laid
in that top part. I'm just going to bring
in a little more water, brush and pull it down. Now, I'm just going to take some water on my
brush, wipe it off. And I'm just going to
swish it about right there and that's going
to leave a highlight. It might look a little
funny right now, but that's okay because
we're going to be working on top of it
also, the paper is wet. It's going to soften
it by itself. Let's just go ahead and
move on to the next one. Water on the brush
to bring it down. Now I am going to, this is just a clean brush. I'm going to lighten this
outer edge a little bit. Right where it folds over. Just lift off a little
bit of that paint. And I'm just going to
come in and again, left a little highlight there. Great, how you
doing. I'm going to go ahead and turn my board.
We're going to keep going. I'm sure we're keeping those delicate
little fringy edges that we worked so hard to keep when we were
doing our background. Hey, it's water on the brush at, remember, we're trying
to avoid a little halo, so don't be afraid to bring that right out to
your background. Edges off and swoosh. Nice highlight. Okay. Last but not least, here we go. At this point, I'm not worried
about that stem that comes up because this is so watered down and light, it
doesn't matter. Remember that water
color always dries one value lighter, beautiful. Let's let this dry completely and we'll come and glaze
some colors on top of it. This should be completely dry. Now we're coming back to our Cad yellow medium
using the number four. This is still
probably 9010 ratio. We're just going to wash in
a little around the edges, but we want a nice soft blend. We don't want it to be harsh. Let's just go ahead and start by putting it around the edge and then we're
going to soften it. Sorry, I keep turning my paper here then where our
lines are that we drew. Go ahead and add some shading and a little
bit on the bottom. All right. Now, just pick up, we're going to manipulate
it with some water. Let's just soften. Good. Can you see
how that works? That's what we're going
to do all the way around. I'm going to speed
up the camera. Okay, on this petal, we're going to just
stay on the inner edge. This petal folds upward, so we don't want to have
anything on this outer edge. We want that to stay nice and light and this to be
nice and dark so it looks like it's
folded over great. Now on this pedal, I am going to go around the stem and our last one. All right, how'd you do? You can see how it's
already looking like it's curved out because
of our highlight. And we've deepened
the shading here, as well as the edges. It's looking beautiful.
Let's let that dry.
10. Hibiscus Shading Petals: All right. This needs to
be completely dry and I'm going to remove the gum. I do this with a needed eraser. It comes right up without
damaging the paper. If you have fingernails, you
can just peel it up as well. These darn acrylic nails just don't want to
help me out with that. A needed eraser does the job just nice. Okay, now obviously
we don't want a zebra striped flower here. We're going to pick
up some lemon yellow. I'm going to just use my
nice white flat for this. We're just going to, we want
to maintain that brightness. That's why I'm switching
to a lemon yellow. You can see here
on the palette how much brighter it is than
the Cad yellow medium. We're just going to
wash a little over. We don't want to lose
this nice highlight we have going up here. Just a light wash. Probably a 9010 X, but trust me when I say that's
going to show up as we go along with
more of our glazing. Okay, now I'm just going
to soften this a touch, while I have the flat, I'm going to use
the chiseled edge, meaning straight up and down. Just carve out a few
more highlights, They'll be subtle when I say it makes a difference
in adding texture and depth. Just that slight little,
you can see it right there. Just that little highlight. Great. Okay, let's let that dry before we add
our next glaze. Sticking with my number four, I'm picking up some gamboge
which is really watered down. It's probably a 95% water, 9055. I'm just going to start
adding some emphasis to areas that are like this
petal is underneath that one. I'm going to add a little
bit of shadow here. Okay. I'm going to bring some
water over and just soften this edge on my shadow lines, those lines that we drew in, go ahead and just add those in and give me a few
more down here. Beautiful. Now along the top we're going to add little
cracks and crevices. Now the key guys
is to fall in line with the contours that you've
already created up here. For example, I made
sure I brought it down. I could have done a continuous
line all the way down, but I didn't want to. But what I'm saying is
to make sure that you're following that same contour so that your pedal makes sense, okay? I don't like, if you do
one and you don't like it, just take it off, okay? All right. When you
finish a pedal, it's a good idea to
step back six feet. Take a look at it and make sure you're on
the right track. We are going to come back
and noodle it some more. So this is just our
first go around. But make sure that you're not
doing too many or too few. It's how you want it to do because we're laying
the groundwork here. Everything we do should
be very intentional at this point. Touch
my tissue here. I'm touching the upper portion just to take some of the
water out of the brush tip. Now you may notice that this
leaf is on top of that one. I didn't put any darkening here. Same with this, this petal
is on top of that one. I'm not going to put any of this gamboge on that
edge just to keep. Extra strong. I'm going to start
underneath this shaded area. This petal is on
top of that one, so I'm not going to
come down that edge or this one. It's also on top. So that's why I used water
to just fade it out. Great. Okay, let's let
that dry completely. I'm picking up some yellow
ochre, pretty solid. I would say this is a 70, 30 and I'm going to
put in this stem. Now if you don't
have yellow ochre, just go ahead and mix up Cad yellow medium
with your gamboge. Now, while this is still wet, let's pick up a little
bit of this Cad red. Let's just put it on
the bottom of blend. I'm just dabbing it in. Then when we have the red out, we might as well
go ahead and put in the little
nodules at the top. Then I just lift out a little highlight on the two front ones and
leave the back one darker. All right, and also
while we have our red, let's go ahead and
add in that center. There's actually
just a little bit that goes around the base here. I'm going to switch
to a liner brush. I'm going to use my number one. This is the thinner one. Now if you notice
on our pattern, we put a little red
around the base. We have a ring right here, that's going to be
violet and then this outer ring is
going to be our red. But we want to really put
it in as little lines. Beautiful. Let's go ahead and
pick up some of our violet. About a 70, 30 mix on this. Just taking off some
of the water there. While the red, the reds
still a little bit wet. Oh, that's pretty all right. Now my red around the base of the stem
is pretty wet still. So I'm being a little
ginger here just carefully. I don't mind if it mixes
up a little so it's okay but I don't
want to overtake it. Are great. Okay. While we're still
working with the bread, I'm just going to do some
little lines on the stem here. Just bringing that
up a little just to give it a little texture. Now, we aren't going to worry about these little guys just yet or the
detail on the top, because we still need to come in and do a little bit
more on the petals. What we need to do now
is just let this dry completely so we don't smear any of this
beautiful red and violet. And then we're going to come
back in and do a little more glazing and layering.
11. Hibiscus Lifting & Drybrushing Highlights: Now that everything's dry, the next thing we're
going to do is lift out some little
highlights down here. It's just going to help you want this to look
like it's coming out. I'm going to use a smaller flat. This is a number ten
and coming up on a chiseled edge with just water and our handy dandy tissue, we're just going to lift
out some highlight. All you do is touch and just stroke over the same
spot a couple times. Touch it with your
tissue and you can see right there
how it lifted out. Just do that here and there. You don't need to do a ton. But we don't want it to be all solid shadow down there
because this will help. If you follow the curve of your strokes, you
can see those two. Now, that just helps add a little more dimension in depth and that's
what we're going for. You'll notice, particularly if a petal was on top of another, I went in and lifted out just a little
bit of a high light there just for that added
emphasis on spot right there. But it's surprising what
that little bit adds your eye picks up on.
Go ahead and do that. Also, I have a petal that's
curling over right there. I have two spots. It
just happened naturally, so I'm going to go with it now. Let's go ahead and
pick up some of this gamboge again
with our liner brush. I'm actually going
to soften it now. I'm going to pick up some of this yellow medium
and mix with it, probably a 50, 50 mix and
water it down a little bit. It's about 80, 20 mix. And now we can just
go ahead and add in a few more definitive lines. And they're just going
to be super subtle, okay, Okay, using the same mixture of gamboge and Cad yellow
medium and our fine liner. Again, we're just going
to outline per se, but just if you have
a dark pencil mark, that's a great place to add
a little touch of paint. It's just going to add
a little definition. I'm not going to touch
it there because that's got a nice amount
of paint on it. I have a dark pencil mark here. Bring down a couple
of these lines a little bit further, just fine. Now, this petal that's behind, I'm definitely going
to add that here, but it's going to be kind
of a broken line and we're almost done. Great. How'd you do? Let's let
that dry. All right. I'm coming back to my small flat and just water on my brush and
we're going to lift off some highlights on the top edges of our
in places like this, for example, where it flips up and it would
catch some light. Go ahead and scrub
that a little bit. Touch it with your tissue. It might take a time or two. You can see how that
lightens it up just to touch where it would
just catch the light. It might seem like
a little tedious, but this is what makes
it look dimensional. We've done half and you can see how just those little tips here and there make a difference compared to just all
yellow over there. So I promise your
efforts are worthwhile. I live in St. ⁇ George, which is very close to
Zion's National Park, and I went hiking up there last week and took a
lot of great photos. Honestly, the greatest photos come from high and low contrast, when you have these
beautiful shadows next to bright sunlit rock. The same thing with
our painting here, That's why we take the time
to lift out highlights. Put in shadows, do it again. Add glazes to make it darker, and add highlights
to make it lighter. And put them next to each other so that we have that
beautiful contrasting. It all comes out to be
such a nicer painting. It's worth the
effort. If you need to just get up and walk
away for a minute, do that. I like working with a flat brush because I can come up
on the chisel ledge, I can go sideways, or I can go the total flat way. You have so much versatility. And for those of you that have been
in art school, you probably already know this. But there are some
classes, art teachers, that make you paint
everything with a flat when you're learning just to give you that experience and to learn to manipulate
brushes properly. Great. Okay guys, I have picked up some of
my bleed proof white. You can also use white Gh and we're going to do some
highlighting by dry brushing. If you've never
dry brush before, it means you literally
use a dry brush, you don't dip it in water first, just pick up some
paint and then wipe, wipe off a bunch on your tissue or spare
watercolor paper. Then we're just going to emphasize some of our
highlights this very lightly. It almost looks like the paint that's worn off on the
side of a barn door. I don't know how
else to describe it, but we're just going to
put it here and there. And again, we want to
make sure that we're following the contour
of our flower. You can get carried
away with this really fast. So be careful. Doesn't that just
add some pop to it? I just love it so much. Now I'm not coming down here. We're going to approach that in a different way
in just a moment. This really makes that
beautiful lemon yellow. We put on our highlights pop. All right, so let's go ahead and rinse our brush. All right. Picking up my number one, but it's my larger one
that's more like a rigor. It's got a longer
bristles on it. I'm actually toning down this. This is probably more
of a 60, 40 ratio. Now, I'm just going to add a few highlighted lines now
see how delicate it is, but it makes a nice difference. Every layer we add, guys, makes a difference. It's intentional, it's
beautiful, it's dimensional in areas that are really strong.
12. Hibiscus Leaves and Splatter: I'm going to use my
smaller liner brush and I'm going to pick up just the
tiniest amount of violet. While that's drying,
let's pick up some red and put the top on. I'm going to do just a hint of white that I've
got left out here. The edge that catches
the light right there. Okay, now coming into
the yellow ochre. Again, if you don't
have this, you can just mix your gamboge with
your Cad yellow medium. I want this to be pretty strong. I would say 50, 50 ratio. Let's just pull out a bunch of, I don't know what
they're called, these little frilly
things that stick out. Another technical
term, there we go. And we're going to
pick up more red. We don't want to glob, but we do want to make a statement, we don't want to do it twice. That would not be good, just put a little dot on
the end of these guys. And I would say, don't even worry about making
sure it's on the end, I'm just going to
dot them all over. There we go. Let's let that dry. Okay. Everything
should be totally dry. And I'm coming in
with my angle breast. You could also just use a flat. I'm picking up this
Hooker screen and I'm and this is about
a 50, 50 ratio. We add some water
to bring it down. I'm going to come in, pick up a water brush, just water on my brush, and I'm going to just
lift out a high light, just a big old high
light down half of it. A little soften. While that's still wet. I'm coming into my
undersea green, Whatever darker
green you're using. A little shadow
under the flower. I'm just going to slap it on. I don't want to be
meticulous and careful. I want it to look more natural
then while it's still wet. I'm just going to use my
chiseled edge, bring up a vein. It's going to blend because
it's still wet. Great. Still using that chiseled edge. Just going to bring out a
couple more veins. Great. That one ready for round two? Here we go, picking up
some hooker screen. Let's lift out some highlight now and bring out
some of the starker. Now if you want to, you
can splatter some green. I'm going to do that. So
let's switch brushes. I've mixed just a
touch of hookers green into my undersea green, using my number four round
and adding lots of water. Probably a 9010. I want to be so careful guys, you don't want to get
this on your petals, but I want to bring in just
a touch of green down here. Yeah, love it. Let's let that dry and see how we need
to do also, six feet. And take a look while
this is drying and see if there's anything
that you want to adjust. Okay. Everything
should be dry now. And I stood back
six feet and really felt like I needed to add a little purple to the
background over here. I brought up just the slightest amount of yellow over here. If you decide to do that, I'll just caution you to
be really careful because we have splattered and you don't want to smear
your splatter. Use an up and down motion and be super gentle and careful. But to me, that's how I
felt mine needed to be you. Do what's best for you. Now it's time to take
off the tape and we will go ahead
and sign our name. We're all finished up, guys. Thank you so much for
taking this class with me. I really appreciate your
time and your efforts and I'm so proud of you
for finishing this piece. I hope you learn some things
and enjoyed the process. And always sign your name, Always claim your artwork. You are unique, you are
special, you are talented. And always sign your name
to it and be really proud of what you've done because I'm super proud of you as well. Wonderful. I will see
you in the next video.
13. Lily Supplies: All right, are you ready to paint this
beautiful water lily? It's going to be such
a great technique to learn this transparency. And I'll teach you a way to
do it that is quite simple. We let the water do
the work for us. So let's just review
what we need. I'm going to be using 140
pound watercolor paper just as a matter of info. This is not 100% cotton today and the thing that I feel
is most important for this project is it's a little more smooth surface as you run your fingers over it. It doesn't have as much tooth as some of the other
watercolor papers do. The reason I chose this
one is because we want to have a nice fine edge
on each of our petals, and if you have a lot of tooth
that you're working with, it makes it a
little more tricky. I just went through
what I had at home and this is the most smooth
and that's what I chose. But you do want 140 pound paper, or better for our palette. Super limited on this
one. Which is awesome. We're going to be using
rose opera della medium, Hookers green and
undersea green. That's it, just the four colors which is super
easy to work with. You're going to need
a little pencil to make a few tiny marks. I have provided a
pattern for you as a PDF on the main
pages of skill share. I do not want you to use
it. Please do not use it. I provided it for
you as a reference, but we're just going
to freehand this. If you tried to apply this with graphite,
it would be a mess. Please trust me.
I'm going to walk you through every
step of the way. It'll be simple and we can do it easily without a pattern. One of the most important tools you're going to need today is a really good shop
towel or paper towel. We will be using our
handy Andy tissue. But it's up to what we need to do to lift off
water from the petals. You need something heavier. I recommend some shop towels or paper towels along with
some of our tissue. As far as brushes go, I'm only using three. I'll be using a larger
brush. This is a ten round. The most important key here
is as a nice fine tip, find one of your brushes
that has a good tip on it. Then I'll be using
a number eight. Same thing, a nice
fine tip on that. Then for splattering at the end, if you choose to splatter, you don't have to,
but you know me, I love to splatter everything. I always use my number four so I get a more fine granular. So that's all you need
that number four for. That's it. You, of course, need some clean
water and a towel. You'll see me use this to
hold my brushes, guys. I found this on Amazon
for a couple of bucks. It's actually to
hold a bar of soap, but it works really wonderfully for holding a wet paint brush, so I don't have to
lay it down somewhere else or have it roll away. I just let you know
that because I'll get questions wondering what
in the world that is. All right, gather your
supplies and we will go ahead and start painting
this beautiful water, Lily.
14. Lily Technique: Before we start on our project, let's practice the technique on a scrap of watercolor paper. I have a nice well filled with
90% water, 10% rose opera. So we want to have that
already prepared so that we use the same value
on all the petals. I'm using my nice big round. This is a number ten that
has a nice pointy tip on. We're going to use
the petal stroke, which is a touch press lift
down the other side, okay? And now just tap and let some
of that paint come into it. Be nice and generous. And let's do another one
that's press and lift. That's press and lift again. Let's be generous
with the paint. Let that sit on your
paper for just a moment. I'm going to use
the pointy tip to just make a nice pointy
tip on my petal. All right. Now here's the secret that will
help you in lifting out. We're going to dip
into our water, clean off our brush, but just leave that
water on your brush. I'm not going to
touch my paper towel and add water to
what we just did. Now, the water is
not going to expand out beyond what you
already painted. That's the beauty
of water color. I love it so much. And we're
just going to add water. It won't go beyond what
you already did now. That's going to
lift off the paint that we already laid down
and make our job easier. Now we're going to dry our brush pretty good on our
paper towel by tapping. All we have to do is
lightly touch our flower. Our brush is going to work with the water in lifting paint. You don't have to press hard. You're not going to
stress out your paper and see how beautifully
that pigment lifts off. We just want to be
careful to stay within our lines and look how beautiful
that transparency comes. And then remember that it's
going to dry one value lighter, isn't that gorgeous. Okay, clean our brush. Dry it pretty well. And again, just gently lift it off. It leaves a nice outline, which is just what
we need because we're going to start
layering these. Gorgeous. All right. Take that tiny bit off. Beautiful. Now we would
need to let that dry, or I really recommend
that you use a hair dryer in this class or a drying utensil so that
it speeds up the process. All right, practice that
until you're comfortable with it and then we will
get started on our project.
15. Lily Lovely Petals: Since we're not using a pattern, we still need a little bit
of a guideline just so that we don't get a
kitty wampus flower. I've gone and going
just a little bit, slightly higher than halfway, I just put a little dot. Then for the top of our flour, I put another dot,
about 2.5 " up. I didn't measure guys, I'm
just eyeballing about 2.5 ", A little dot there, come out about two on a 2 "
and about 2.5 ". That's just going to give
us a nice little triangle for a guideline, and that's really all
we're going to need. Let's go ahead and get started. I have replenished my well
of paint and here we go. Just going to pick up a
generous amount of paint. Let's start with our top one and we're just
going to touch and press and lift water. Lilies have narrow petals. I'm not going to make them
too fat, just about there. Then we're going
to tap, tap, tap. Get some paint in there. I'm going to bring
it to a nice point. Great. I'm going
to turn my paper, and I'm basically doing the
first three as my guideline. And the other one,
notice I'm not letting them touch. All right. Now let's go in and
add some water. Be generous with the water. It's not going to go beyond the boundaries of what
you've already placed. That's going to help us
lift out. All right. Now we're going to
go ahead and dry off our brush and just
lightly pull that out. Beautiful in. Alright. Take a deep breath. Were you holding your breath? I know I was. All right. We need those to
dry and then we're going to come in with
our next set of petals. That was fun. Let's keep going. Here we go. Just loading
up with some good paint. And I'm just going
to basically go in between de generous
with your paint. I don't want these
two to touch now, rinse and we're
going to add water. I'm not touching my paper towel, I'm just going to add
water to lift paint. And now we're going
to dry our brush. Great, Let's let those dry. Okay, our water Lily
is going to have a bunch that are clustered
at the top here. So let's go ahead
and add one here at the top of narrow, Beautiful. One more, again, we
don't want these to touch and let's rinse. Had some water. You can just see
the water lift off the pigment and lift off this one. Beautiful. Let's dry those. All right. Let's throw in a couple
towards the top middle there that have a little bit
of a curl to the tip. Hey. Still in here. Okay, let's add some
water and let's lift off. You'll notice I'm using a much lighter touch when I get down here on
top of other petals. There's no need to press hard. That water does the work for us. And you don't want to
lift off the paint that's underneath by pressing hard? Oh, that's looking so good. All right. Let's dry that. Let's keep on going. I think we can do a couple
more while we're here. I don't think I would do
more than four because we've got to lift off before
they get too settled, let's add our water to get
it lifting off for us. Okay, now let's
start lifting off. Okay, let's start
lifting these off. Now, a nice light touch. Remember we don't want to
damage anything underneath now, since these all come
together right there, I'm going to add just a
hint of cad yellow medium. Just touching a touch. It's all still wet, so it's going to bloom. Just adding a little bit at the center, at
the bottom there. I'm watching it closely, I'm not going to
let it get too far. It's so pretty. I hope you're enjoying
this as much as I am. This is such a fun technique for doing flowers, All right? I'm going to go ahead
and dry my petals. All right? How are
you doing guys? We are almost done
with this one. Let's just add some
smaller petals that are coming out
towards the bottom. If you get a drop like that, just let your tissue
don't swipe it but just touch it with tissue and
then just absorb it. Just slipped right off my brush and then I'll
right on top of it and it won't matter. Okay. Now, let's add our water. All right? And let's go
ahead and remove the paint. Very light. Touch down here. We don't want to lose all those beautiful lines from
the other petals. Now, while those are wet, I'm going to add a little bit more of this
Cad yellow medium. I don't want it to go too far. That's about it.
So I'm going to go ahead and dry it before
it goes further.
16. Lily Flower Bud: Okay, just a couple. We just want a couple more
that are towards the center. It's kind of coming
up from here. Yeah, that looks good. And let me go ahead and do, We're going to have our
stem that comes down here. Sorry, I keep turning
my board guys, but don't be afraid
to turn your board. Great. Okay, let's make sure we've got a big puddle of paint now. Let's add some water. Let's go ahead and take of, let's dry off real good. Oh, that's pretty, isn't it? Okay. Let's rinse and repeat. Beautiful. And our last two, I'm going to leave this one
just to touch darker, just because it's by
itself down there. All right, let's go dry those. I'm going to switch
to a smaller brush. Before I was using a ten, now I'm going to use an eight. You can see the size
difference because it will keep me in line with
doing a smaller flower. I'm just going to tilt my board because I want it to be
angled out this direction. It's going to be a stem
that's coming out this way. We're just going to go ahead
and start the same process, picking up a puddle of paint. These are going to be
quite tight as you can see from the picture
I've posted for you. But we'll just go ahead and
start with our main three, same as we did before. Okay, And let's load up
the paint and rinse out. And we're going to add
some water and rinse out. Dry off, and let's pull it off. Okay, let's go dry that. Okay. We're going to do a couple
more fairly tall ones, and then we'll come in with
some small ones at the base, and we'll be ready
to put our stem in. Great. Okay, let's
add some water. It's better. Okay, And
let's take it off. All right. Let's go
ahead and dry this. Hey, just a couple smaller
ones as if it was just a bud. Let's add some water and let's take it off. So, pretty great. Okay, let's go
ahead and dry that.
17. Lily Stem and Splatter: All right. We
obviously we're not painting the water
and the lily pads, but we still want to
put an indication of the stem that's coming
up out of the water. And so we're going to start
with just a light stem. I'm still using my number eight round and I'm picking
up some hooker screen. Watered down pretty good, It's probably a 9010 mixture. And I'm just going to start up here carefully next
to the flower base. I'm just going to bring it down. I think I'm going to
curve it a little bit. Let's give it a
little elegant curve. I'm going to go ahead and
just jug out a little bit of greenery here like that. The same thing for
this cute little guy. We're going to come up and over. Maybe over and down is easier. Let's just start up here, should we All right, I like that. Let's just a little bit of this and let's just curve it down there and then we'll
add a little strength to it. That's a little weak.
Great. Now it's almost dry. Not totally. Let's add
some of our darker green. This is undersea green. Well, it's still wet. Let's just add a little shading
here and there. Lots of wet on wet today, guys. Now, if you'd like, we
could do some splattering. Or if you like
this very minimal, simple, elegant look,
you can call it good. Personally, I'm going
to do just a little bit of splattering
because you know me, I love to splatter. Let's go ahead and add
some of that, all right? I usually splatter with my number four round
because I like smaller dots And I'm just going to pick
up some of this great mix that we already have. I don't really want it
on my flowers per se, so I'm going to
protect them a bit. And yeah, I might put just a touch of
green down here on the stam. And is the darker just picking up some of
this darker green? Yeah, just a touch there. I like that. All right. Let's let that dry. I always recommend that you
step back and take a good look at your piece
and see if there's anything that you want to adjust
before you finish. When I stepped back
and looked at mine, I decided to add one more little of Cad yellow
medium right there. And then I just added one more, just kind of a soft touch
of shading on the stem. And I pulled out a
couple little thorns or whatever you want to called. I don't think there's
thorns on them, but anyway, I just added some texture, I guess on the stem to just make it a little
more interesting. So I'm going to go ahead and remove the tape and I'll see
you in just a moment guys. Hey, we did it guys. We're all finished with
this beautiful water. Lily and I so appreciate you taking the time to take this class with me. Thank you. I hope you learned a new technique here that
was fun and inventive. And something that you can move forward and do on your own now. And always sign your name
to your art projects. Always claim your piece and be really proud
of what you've done. You have a special talent, a special gift that
most people don't have. Always make sure that
you sign your name. Let's go ahead and sign
our name together. I'm really proud of you. I'm proud of you for taking this on and accomplishing
this project. I'm so excited that we
spent this time together. I will see you in
the next video.
18. Project: Okay guys, Your
class project is to complete one or all three
of these beautiful flowers. Learning the different
techniques that I show you, just follow the
videos step by step. Stop and start them as needed
to complete these steps. Once you have
finished, if you could snap a pick and upload that into the class gallery below
by looking for this button, all you need to do
is upload that. That allows us to
communicate freely. That way I can comment
on your piece, other people can like it. And it's so fun to see how
each other's pieces turn out. You know, it's kind of
like baking a cake, and you give everybody
the same recipe and they all turn out a little bit different
because we all have our own unique talents
and creativity. So I'm really excited to see how you create your
beautiful flowers.
19. Congratulations and Bloopers: Hey, congratulations. You have finished this project
and I'm so proud of you. And I do appreciate you taking
the time to take my class. If you felt like this
class was a benefit to you and you know someone else that might benefit from it, all you need to do is look for this link on the home
page of skill share here. And you can share
that with them. And both you and your
friend will benefit financially, which
is pretty cool. Also, if you would
like to follow me, you can look for me on
Instagram at this address, or you can check out my
website at this address. You can see more in depth of my portfolio and what's
happening in my world here. I would love to be able
to communicate with you. The best way to do
that is simply by snapping a picture
of your piece and looking for this button on this page and upload that
into our class gallery. That way I'll get a notification and you and I can
talk freely there. It's so fun to see what each
other has done in the class. Please take a moment
to share your project. No judgment, nothing but
love here guys. All right. If you could take a moment to check out some of
my other classes, I would sure love to
spend more time with you. All you need to do is go to the search bar and type in
my name, Carrie Sanders. And all the classes that I
have here on skill share, we'll populate and you can check those out and see if something's of interest to you. All right guys,
until the next time. I guess that's good bye. Oh, I think I have plenty
of bloopers today. Bye bye. Take here,
Okay, let's take. I got this. I got this.
Okay. Here we go. That you can use in
your sketchbook, in your journal, on cards. As a quick, I don't
know what I'm saying, but all this pond was filled with amazing,
delicate little lily. What are they called?
Care? You can do it. Esta you can do
it. Yes, you can. Okay. This is the last take. Oh, I didn't start the timer.
 Kerrie Sanders, Artist, Teacher, Creator.