Transcripts
1. Let's Go ! : Have you heard about
drawing freehand portraits without any knowledge
of face anatomy, but with the right proportions, and also in three easy steps? I'm Ritika, I'm an artist
specialized in portraits and calligrapher and also a top teacher here
on Skillshare. I love sketching portraits
more than any other subject, and that is why I
know how complex it can be to bring out
a person's identity. That too within a
short span of time. During the course of
my practice journey, I figured out that it only takes three easy steps to create
absolutely stunning portraits. That is what we are going to see and explore in this class. [MUSIC] I'll be teaching you portrait drawing in
iPad using portrait, using my three-step recipe. That is geometric sketch, defined sketch and shading. Using these steps you can draw any human face at
any given angle. Not just straight angle. You don't need an iPad or
procreate to take up this task. You can also apply the same three-step method in
any traditional medium too. If you're going to follow
the steps on the iPad, I recommend this class
for those who have some basic knowledge about procreate and about
portraits too. I'll be showing you the
process of sketching of three high portrait
and procreate using these three easy steps. The first is the
geometric sketching. Then we'll be breaking down the complex structure of
the face into basic shapes. The next is the defined sketch, here we'll be
focusing on building our outline with
all those details. Next is the shading, we will be adding the depth and light to our portrait
within dark, mid and light values. Of course, the project
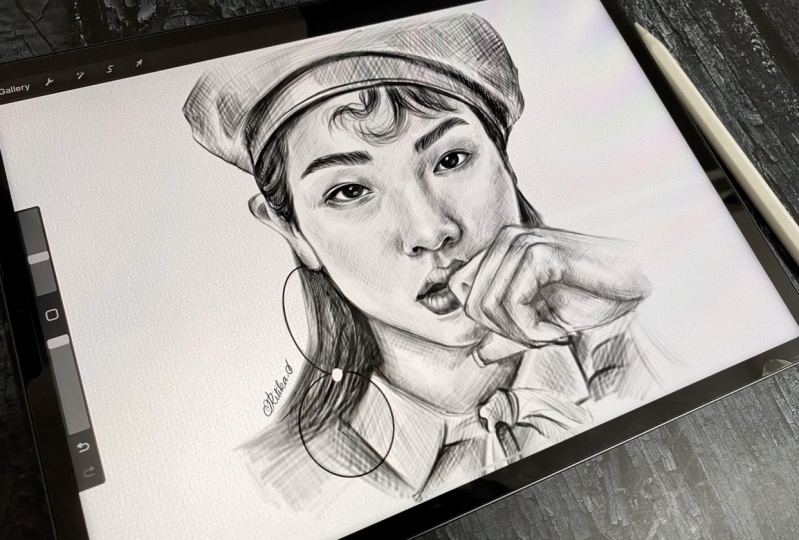
is going to be drawing a portrait along with
three exercises. For those exercises, I'll be attaching new worksheet
in the resource tab. The reason I chose this
topic is because I can't wait to share the knowledge
about geometric sketch. I think it is easy and it is not complicated when you compare to drawing portraits
with face anatomy. You can actually use the skills and techniques from
this class and apply it to any other
subject, not just portraits. You can use the same
three-step method and apply it on any landscape, still life and so on [MUSIC]. Don't wait further, jump into the next lesson and
let's get started. [MUSIC]
2. Class Project: [MUSIC] As I told you, in this class we're
going to see how to sketch portraits in Procreate. The project for
today's class is the same along with few
other exercises. Each exercise is
going to be short, so we'll be covering it
up within 10-15 minutes. We'll be seeing how to sketch
geometric sketching of the portraits and
then we're going redefine and shade one of them. All of these will be
time consuming and a bit exhausting so I
recommend you to to cover it up within 2-3 days. But all these things I've put together worksheets
for your reference. You're welcome to
use any medium. I'm going to demonstrate
this class in Procreate so [inaudible]
use the digital templates, or use the tradition
templates and practice it in traditional medium
such as charcoal or graphite Before getting started,
I recommend you to download the sheets
and keep them handy. As you keep practicing, you can feel free to share your pictures and videos
of your explorations to the project gallery
so that we can all get inspired by
each of those work. I'd also be doing the
project and will be sharing to the project gallery
and also on Instagram. If you chose to share
it on Instagram, don't forget to tag
me @Rikita_Sridhar. I will be glad to see your post stories in this
and re-share your work. With that said I
don't want you to worry about sharing
your work as you explore because the pressure of sharing your
work can sometimes be overwhelming and can get in the way of
your explorations. If that is something
that bothers you absolutely you don't
have to share your work. But of course I would love
to see what you will create, but the most important
thing is you need to practice and explore without
setting yourself any limit. [MUSIC] After you finish, you can decide if you
want to share it or not. [MUSIC] Last but not least, do not worry much about getting the perfect anatomy portraits and about the sharing methods, and also how the redoing and
erasing are going to affect the timelapse because
Procreate itself removes part wherever
you undo Let loose of yourself and
have fun in the process of creating and also
learn new things. In the next lesson, I'm going to show you
my three-step recipe for creating stunning portraits. [MUSIC]
3. 3-Step Recipe: [MUSIC] In this lesson, I'm going to show you the
technical specifications like the Canvas information and the brushes that
I'm going to use, and then we're going to see the three-step recipe for creating absolutely
stunning portraits. Coming to the Canvas,
I'm going to use an A4 size from the
default sizes here. You can also use the
same or if you're going to print it later
on a bigger size sheet, then go for a
bigger size canvas. Coming to the references, these are the reference images that I've chosen for the class. You can pick one
among them or you can pick any portrait
of your choice. You can also find a lot of options of portraits
in my Pinterest board. You can find the link to my Pinterest board
in digital stamp. If you're confused
about choosing a reference image I have a specific lesson dedicated
for that purpose in one of my classes Off
The Grid- Understanding Facial Features To Draw
Better Freehand Portraits. With that class you can
get a lot of information about the things
that you have to consider while selecting
a reference image, the dos and the don'ts of it. In that class, you can
also find information about drawing facial
features in detail. I also teach how to understand and analyze each facial feature, face on a dummy, eyes, nose, lips, ears, and then draw them in
traditional media, that is charcoal and graphite. With that note let me show you the brush that I want
to use for this class. [MUSIC] Coming to the brushes
I actually like working on pencil-like brushes
because it gives me a traditional feel like I am actually working with
pencil on paper. My suggestions are 6B
pencil, HB pencil, and Peppermint from the
default Procreate brushes. Talking about other paid
and my go-to brushes, I usually prefer using Jingsketch Sketch Round
and Clean Sketch brush. This is my favorite option. If you are looking for a paid
one you can go for this. If not, you can just continue with the default
Procreate brushes. That will also look
very good and fine. Not only that, now, I've chosen my
pencil-like brush, the next thing is to select
a paper-like background. For that, I prefer using any watercolor textures
on the canvas. My go-to is Freya's
watercolor background. Coming onto the three-step
recipe for our today's class. As I told you, the first is
the geometric sketching. It is nothing but
dividing or breaking the facial features
of the portrait into basic lines
or basic shapes. What we're going to
do first is take our image and then
we're going to divide or segregate the outlines into basic lines or
even basic shapes. That is how we are going to
obtain a geometric sketch. The next step is going
to be converting the geometric sketch
into a defined sketch. There we'll be outlining the portrait with
all those details. We will start with each shape or each part and focus
on the details in it. That will be our defined sketch. The last step is going to
be shading our portrait. It is based on the
lighting in our portrait. I'll be using hatching, line shading and [inaudible], and also mix of one
or two among them. That is how we are
going to shade our portrait at the last step. This is the three-step
process for our portrait. [inaudible] find the exercises
at each of our steps. I'm really excited to
show you the process if you were to do it further.
Let's get started.
4. Step 1: Geometric sketch Demo : [MUSIC] In this lesson let me show you the first step
in our three-step process, that is the geometric sketching. Geometric sketching is
nothing but breaking down a complex structure into
basic lines and shapes. Now when you take a portrait, there are a lot of
features like eyes, nose, lips, and ears, so you cannot name it as one basic shape. That is why it's really
complex to draw. What we're going to do is divide complex structure into basic, and then we are going to sketch. Let me show you
how that is done. I'll demonstrate
with the worksheet. First thing we're going to do is to simplify the outer shape of the image into basic
lines. Like this. Consider the outer
part of the portrait. You can see we can
format as lines. This is what we're
going to do now. I'm adding a new
layer because I don't want to draw in the
same layer as my image. First I'm taking this line, and I'm measuring the height of it from the top of the image. From that, draw a line
with the same angle. You cannot measure the angles, so visualize yourself, and see the space between
the image and the subject. That is the space between
the image and deceptive. Then again, I'm measuring
the height of it. Now I'm sketching the outer
part of the clotting. Same way I'm going to measure
each and every place. I'm just going to imagine the angle and
recreate the same line. Whenever you draw a line, make sure you measure the
height and the length of it. That is the space
from the outer edge. Now let me explain
a simple concept, positive and negative space. This space where our subject is present in the image is
called the positive, and the space after that
is the negative space, that is the background. Now I'm measuring and
rechecking the lines, measure the distance and market, and then draw the line
with the same angle. By measuring the angle, I mean, just observe
it and draw it. You can see me redoing it again, and again because I want to
be accurate with proportions. Just visualize, just measure it, and then sketch it accordingly. Now the outer part of
the image is just done, I'm going to just
reduce the transparency and add a new layer
because I'm going to draw the inner part of the image of the portrait
with another layer. Now I'm measuring the distance
from the hand to the cap. Then again, I'm
repeating the same. If you're feeling difficult to draw it straight
on the Canvas, you can draw on the image on the left so that it will be
easy for you to visualize. Now I feel this part is wrong, so I'm erasing and redrawing. You can see me doing it. Wherever you feel
the lines might be very cross or not exult, just measured it and change it. Don't worry about darkening the lines because this
is digital drawing. You can always reduce
the transparency. I feel this is wrong,
so I'm redoing. Then this part of the image. The head, measuring it. I'm drawing the lines
on the reference, and I'm going to recreate
the same lines on mine. Just measure, and draw. As you can see I'm not measuring
with any other tool, I'm just using my Apple pencil, and measuring the
distance with my finger. I draw this horizontal
line just to make sure where the chin and
the hand meets. You can also do the same. Draw lines from the
reference to your artwork. Now I'm checking the distance. It feels wrong, so I'm going
to erase it and redo it. In the same way I'm going to finish the rest of the portrait. Don't focus much of the details. Just draw the outer part first. Check it, redefine it, and then proceed for the
inner part of the portrait. The geometric sketching of
this portrayed is almost done. Since this is a demo, I'm not going to draw the geometric schedule of
all the facial features. In the next lesson,
I'm going to show you the geometric sketching of another portrait with all
the facial features as well. That is where we're
going to redefine the outline and shade
it later. [MUSIC]
5. Step 1: Geometric sketch : [MUSIC] Now let me show you the geometric
sketching of another portrait. I'm adding the image, you don't have to
do all these steps because I've already done it for you and given it
to you as a worksheet, you can simply use
the worksheet. I'm just simply
fitting the image so that I can draw the
portrait next to it itself. I'm placing a duplicate
of the image, I'm measuring if the
place is enough. Now I'm making some adjustments and I want to draw a border. Now I've got the border. I will have the
same canvas size as the image so that you cannot go wrong with
the proportions. Let me add a new layer and
I grab the extra canvas. Now, just like in
the previous lesson, I'm going to draw the
outer part first. I will observe the angles, the height, and draw it. You can do it like we did
in the previous lesson. First, you can draw the lines on the reference image and then
draw it on your canvas. If you're a complete beginner, you can go with that step
but now I'm going to skip that step and I'm
going to draw just from observation
for the outer part. For the facial features, again I'd be measuring
and drawing. Just like that, I will
draw this side as well. Check how far the image
or the subject is from the outer line and just
draw the same lines. I'm drawing the
inclination and just recreating the lines so that I will not go
wrong with the angle. Again, I'm measuring it. Wherever you feel you're not drawing with the
exact proportion, just measure with
your pencil and your finger and redo it. Don't think about redoing it
because drawing an art is all about trial and error and geometric sketching
is also the same. Now I'm done with
the outer part, let me go for the inner
part that is a cap. Again the same steps. [MUSIC] I measure the top of the cap. To know where it is
coming, I'll mark that. Then I'm going to make sure from that position to the
top of my shirt. Then for the chin, I'll draw the line so that you
don't go wrong with it. Next the same steps so I'm
going to fasten the video a little and join with you later when I draw
the facial features. The outer part is done, I'm moving on to the
facial features. I'm starting with the eyebrow. Measure the height, the
shape and draw the lines. Again, this also
I'm drawing with the lines that is basic
lines not with curves. I'm drawing a line
vertically here so that now I can see the gap
between the two eyebrows. Now I'm drawing here
another eyebrow. You can see I'm not drawing
all the curves in just with the basic lines
with sharp edges. We later begin drawing
it and define it later with curves
in the next lesson. The lip is coming just
next to the hands. I observe the shape and draw it. Now to know where the
nose actually ends, I'm going to draw a line
from the eyebrow like this. You can use dark line
as a guide and draw the ending of the nose same
way on the other side. [MUSIC] Next the eyes. Now I know where the
eyes actually start. It actually starts with the same line where
the nose ends. Observe all the similarities
between the facial features, like the connecting lines from the eyebrow to the nose
and the eyes to the nose. I'll feel the half of the
face that is from the nose to the rightmost part of the face is very
small in my sketch. I'm measuring the distance and yes I can find the distance. What I'm going to
do is correct it by selecting these parts. I'm just going to move
this towards, again, I'm rechecking the length, now it's almost right. All this is almost done. Now, I'll reduce
transparency of this. Again, I'm going
to draw and repeat the same step for the end of the portrait to
make sure our lines are similar or acute
to the reference. This is again the same process. Again measure, observe the line, observe the angle of it, and the heights, the distance, and whatever it is, the space between two facial features, the face between the
ears and the chin, ears and the nose likewise. Observe it and I'm redrawing it. The hairlines are not
actually the shapes, but I'm observing it as a whole, as a shape and I'm
drawing it and the eyebrows and the
distance between them. The distance between the
eyebrows are important, and as well as the place where
the nose ends and starts. I'm measuring the
height of the lip and its distance and then
I'm drawing the shape. Feel that this chin part
is actually not exact, so amount on recheck the
measurement for that portion. I'm checking the height from
here to here to each part, I'm checking the height of
cap to the eyebrow line. This feels a bit wrong. To correct it, I'm also
drawing the line and observing the distance you
can see it is misplaced. To correct it, now
I will just select the eyebrows and just
move it upwards. Just like this, a later
you can, it is theorist. As well, since we
moved the eyebrows it seems the distance
between the eyebrow on the eyes also is more. Again, I'm selecting it
and moving it upwards. We check the nose line as well. The midline seems to be correct, but not the right and
the left nostrils. I'm rechecking that
and changing it. The lip line again, I'm measuring the
chin's height now. It has to come over like this. I've almost checked
the measurements of the entire portrait, so it's almost done. Now let me erase
all the unwanted and the extra lines
on the guidelines. This is the geometric
sketch of a portrait. Now in the next lesson, let
me show you how to redefine this geometric sketch
into a finished outline.
6. Step 2 : Defined sketch : [MUSIC] Great. Now, we're done with our
first basic step. Now, come to little
detail surface, but trust me, the results
are going to be amazing. Let me show you how to transform a geometric sketch into a
defined and edited outline. First, before getting started, duplicate your work until
the previous tip and then rename it for
better clarifications. Then I'm adding a
new layer and I'm reducing the transparency
of the old layer. Also, combine all
the unwanted and the previous layers
together into one layer. You can also rename the layer so that you'll know
which is what. Now lets start. I'm starting from
the older sketch, first the cap and then the face. Feel free to zoom it
how much ever you want. I'm observing the shapes
and the curves in the portrait and I'm sketching
it from observation. Since we have the
geometric sketch, it acts like a guide to know where we should start
and finish each feature. You must look into the shape
of the face very carefully because that actually defines
the shape of the portrait. Now, the outer sketch
is almost done. Now, let's move to
the facial features. I'm starting this in, again, a new layer. This, again, has to be done very slowly by measuring
at each step. Now, is where we have
to measure and observe the curves and the fine
details of the eyebrows. When we did the
geometric sketch, we only used sharp lines. Now, when we are
redefining the outline, it's time to look at the
fine details in the curves. Again, the upper line
is a simple curve and then the bottom
line goes like this. Next, I'm drawing
the iris and filling it except for the
highlight part. All this is done
with observation, but whenever you feel
you're going wrong, you can always
measure the distance, or the height, or
even the angle. Next, the nose. To know where exactly
our nose begins in drawing a straight
line from the eyes, I'm using it as a guide. To check the proportions, you can draw wherever a
line is required and see if it's going out of line or if the proportions
are right or wrong. I've sketched the nostrils. I feel there's something wrong with the measurement
of the nose so, again, I'm drawing
a vertical line. This line will help me to see the length of the
nose on each side. Now, having the mid-line
as the base or the guide, I'm drawing the nostrils
on either side. Also, from here to here I'm measuring and drawing
the end of the nose. Our nose is almost done. After you finish,
don't forget to erase all the guidelines. Next, I'm roughly shading
the eyebrows with some lines to see if the
eyebrow shape is correct. To draw the other eye, I'm going to measure
the distance from the start of another eye. I would like to [inaudible]. Usually, the distance
or the gap between the two eyes will be
equal to that of an eye, so check that and see you if your outline is
coming out correct. Then in there, remember to erase the lines that we
drew for guidelines. Always make sure that
your final sketch or the sketch that you're doing
currently is in a new layer. Since we are doing all
these from observations, there might be a lot of changes
or mistakes at the end, so we will be
correcting it later. I'll be showing you how
to do that as well. Now, we'll go for the lips. Starting with the
lips, the lip will always have a V like structure. I've drawn that and
then from that, I'm drawing lines and curves. Compare with your reference
image and see how thick or thin is the
lip and draw that. Some might have a sharp lips or some might have a bulged one, so observe whatever there is in your reference image and
try to draw it like that. Next comes the hand. First, I'll correct the outer
part of it and then let me draw the partition
of each fingers. Simply observing gap between them or measure it
if you're not sure. Notice all the folds and lines, and then try to recreate it. If you feel difficult
to draw any part of it, try to trace it out on the reference image
that is on the left. Draw it above the image and
then try to recreate it. Now, let's redefine
the parts like the forehead hair
and earring, etc. Lastly, I'm going to reach
at the measurements. The nose seems to be misplaced so I'm going to move it
slightly towards the right. The snapping seems to be on, so I'll turn off the
snapping and then select the nose and move
it towards the right. The eyes has to be
tilted a little, and now the distance from the eyes to the face
lines seems to be more, so I will select this part and
move it towards the right. Check, check, check until you get the measurements
right or accurate. It's not wrong to redo
it again and again, but ensure the
measurements are accurate. [MUSIC]
7. Step 3 : Shading Basics: [MUSIC] Almost done with our portrait but
just one last to do, that is shading of portrait. You might have a question, should we necessarily
shade a portrait? No, that is not necessary. You can simply find drawing outline and have the
output like this. But of course, shading of portrait will have
a different output. The purpose of shading
is actually to depict the depth
and the lightness in the subject that is formed due to the light
hitting this subject, so it actually brings a
3D form to the subject. To get started with
shading of portrait, first let me show
you the basic chain [MUSIC] I'm going to explain 3-4 shading
methods in this video. So first draw lines at one certain angle and then
on the opposite directions. So just like what I'm doing. Use same amount of
pressure toward the shading and try to
draw lines of same angle, and leave even amount
of space between them. So this is called crosshatching. I would love to use
this for mid-tones, that is not very
dark or very light. So next shading is only
with lines like this. I feel the spacing
is very uneven, so I'm going to redo it. This is line shading, I suggest you to use it
for very lighter tones. Then for the next one, just incline the pencil towards the I-pad
at certain angle like this and just
shade it like how I do. Remember you shouldn't
see just lines, but just continues
and even shading. I'm sharing from
dark to light tone, so this is just shading. Since we are using a pencil
of light textured brush, we get the real effect. Then for the last one, this is a combination of
shading and crosshatching. I'll be using this for very
dark tones of the shadows. You can see I've shaded, and then I'm going to do
crosshatching about this. So throughout the portrait, I'll be using all these types. Let me show you the demo of it.
8. Step 3 : Shading the Portrait : [MUSIC] Now let me show you the entire process
of shading this portrait. I'm duplicating it
for safer side, and removing the image and
other unwanted layers. I'm also combining
those layers together. I have deleted the
reference image. Now I'm going to fit the outline alone for
the entire canvas. [MUSIC] Since I removed the reference
image from the canvas, I'm adding it in the
reference here and having it aside so that I will know wherever we will have to add dark
and light tones. I always prefer starting
from the eyes shading. First starting with the eye, I'm drawing a thick dark
line for the upper eye line. [MUSIC] Then for the iris, I'm shading it entirely. [MUSIC] Then wherever required I'll use crosshatching
line shading or shading and the mixture of both, or three wherever needed. For here the lower eyelid,
I'm using crosshatching. You cannot identify that, so simply use line
shading or crosshatching. But since it is very dark there, I'm using shading
and crosshatching. For the other, I'm sharing it lightly. Next, for the upper eyelid, I'm shading it with lines. Then for this small part,
I'm using crosshatching. [MUSIC] In the same we have finished the
shading for the other eye, I will show you how to
shade the eyebrows now. First I've added a basic
layer of shading and then about that I'm adding
eyebrow hairs just like this. Each eyebrow hair will have
a different angle so turn it towards whichever
feels comfortable for you and draw those lines. That's it. First, the basic shading and
then those lines. [MUSIC] Now for this edge again I'm using crosshatching and shading because the edge
where the nose and the eyes meet actually
is very dark, and here as well seems
to be very dark. Depending upon the tones use whichever shading
type that you prefer. [MUSIC] For the nostrils, I have shaded it
entirely with black. When you're shading this
entire portrait make sure that you're
using the color black only because sometimes you
will select a mid-tone between any other specific
color or the black so the entire portrait will
have a monochrome color. We should have only
the black tone. [MUSIC] For these parts of the nose, I'm using crosshatching here as well because it
seems to be dark. Then gradually while going up, I'm going to use
only line shading. These are line shading and whenever you feel the tones are dark,
just crosshatch it. [MUSIC] The shading
seems to be very light in the video because there will always
be a difference from the original and the video. To see the exact tone, check the tones in
the bonus lesson. There you will have the
exact tone of the portrait. [MUSIC] Now for the lips, let me start first
with some basic lines, and with basic shading. On the upper lip I'm shading it. [MUSIC] To increase the tones, layer it above and above. For lower lip, I'm reducing
the transparency and giving it even shade first, and then I'm going to darken it with line shading
and shading. [MUSIC] Next I can see some highlights
here and there so for that I'll be using
erasers to lighten it. [MUSIC] Next let's start the ears. Here I have a very dark tone. I'll crosshatch it
and shade it there. It's nothing but using
the combination of all those shading types
wherever you see is suitable. Let me start shading
the cheeks now. For that first I'm starting with line shading and then variable. The tone seems to be
dark, I'll crosshatch it. [MUSIC] I'm repeating
the shading with lines and crosshatching
over and over again. Again, I'm just reminding you to see the exact
tone of the shading, just go and check the
bonus lesson where I have presented you the time-lapse
video of this portrait. Only there you can see the exact tone that
I'm actually applying. With this video you cannot
see the exact tone. [MUSIC] Next always find
details about this, it seems to be the dark, so again, shade it. [MUSIC] Then you can see
there's a shadow formed below the lips and
also due to the hands. For that alone, I'm
giving a dark tone, for the rest of the areas I'm
giving a mid-tone shading. There is no specific
rule that you should use crosshatching here
or line shading there. I prefer using crosshatching and shading for darker tones. You can also use
the same or just explore with your own methods. It's the same repeated
process again, so I'll speed up the
video a little and meet you when I shade the hair. [MUSIC] For shading the
hair I prefer using 2-3 layers of line shading
and crosshatching. For here when I shade I'm
going to shade each strand. First I've shaded one
strand, and then the next. For the next time entirely
shading throughout because only at the end there
was a very dark strand. Now I'm layering it with
lines, just like this. Darken it until you
feel it's appropriate. [MUSIC] I think this
part is extremely dark, so I'm darkening it like this. [MUSIC] Satisfied with dark shading, so first I'm going to
differentiate each strand. First this strand and then
the rest of the part. Wherever you have a dark shadow, just repeat 3-4 layers of shading in that particular area. [MUSIC] Now to shade the hand, first let me correct
the outlines a little. [MUSIC] Here there is actually
a very dark shadow so use a crosshatching and
shading and make it dark. [MUSIC] For all these areas, the tones are actually mild. You can use anything, but make sure the
tones are lighter, not so very dark. Wherever you have a
fold in the fingers, make it dark with another
layer of shading. [MUSIC] It's all about in the details. Wherever you see fine lines in hands just draw those
lines and then shade it. For each fold, draw and shade the
lines 2-3 layers. [MUSIC] Next for
shading the gap, first starting it with the dark shadow that you can
see, the dark line there. I'm using the same
sketch round brush. For here I'm using
crosshatching and then shading, just like this. Feel free to turn the canvas to whichever position you want so that it will be
convenient for you to shade it in that particular
angle of the subject. For the rest of the
tones are in the cap, we can use line shading
or crosshatching. If the angle is different, at least try to use 2-3
layers in each direction. First draw it in one direction, and then turn the canvas and shade it in the
other direction. Now let me simply shade it entirely with
the line shading here. Here you can see there's
tone in the angle, so I'm shading it with
line and crosshatching. The same processes repeated. [MUSIC] There's a
small pearl present here so for that I'm going
to erase that portion or just use white brush
and draw those spots. Next for the clothing. I see a very dark shadow here, so I'm shading it with first crosshatching and then shading. For the rest of the areas, just shade it with light, mid, and dark tones
wherever necessary. You can observe we're almost
done with the portrait. Since we spent a lot of time
in perfecting our outline, you can see the output
is really good. If you haven't focused
much on the outline, the output will differ for sure. The beginning will be
difficult at first. But with practice, they'll
be very easy for you. You can see the shading
is a very simple process. It is a combination of all those basic
shading techniques. [MUSIC] For the last step I
would like to erase certain portions wherever I see a very bright highlight
in the image. I see a lot of highlights
here and there. For those areas, I'm using
white color and shading it. In the forehead, there's is
a hair strands like this, so for this, I'm not using
crosshatching, line shading, or anything, just I'm drawing the individual
hairs by observing the angle of it and just
shade it like this. Reduce the thickness of
the brush then and there, and keep doing the same process. I'm drawing each and every hair. Our portrait is finally done. Now lastly I'll add
my signature to it. I hope you loved the process of creating the standing
portrait with me. Don't just stop with this, keep drawing a lot of portraits.
9. Final Thoughts: [MUSIC] If you have finished at least one geometric sketch or if you have finished the portrait with the complete
shading, cheers to you. I'm so proud of you. I hope that you have
discovered something new and exciting in this class. You can even practice
geometric and define sketch each and [inaudible]. Later you can track
your progress. With practices like these, you can start and finish sketching within
10 to 15 minutes. I am beyond excited to
see what you will create. You can even share other
subjects like the landscapes and the still life that you sketched with the
techniques from this class. You have now mastered the
three-step recipe for creating stunning
portraits like a pro. Do connect with me on Instagram
at Ritika on social club. Do not forget to tag me
when you share your works. I'll be thrilled to re-share your works on my [inaudible]
and to connect with you. I share my portrait commissions and my other works on Instagram so you can just follow me if you would like to tag
along in my journey. Just a reminder, you
can draw anything with these techniques,
not just portraits. Breaking the face
into basic shapes and then sketching them
is very efficient. You can apply this technique for any position of the face
at any given angle. Also, you know that each face is unique so practice until
you feel confident about drawing
portraits and explore different type of
face and expressions. I also have few other color pencil drawing and portrait drawing
classes here on SkillShare so do check
them out and hit the follow button
so that you'll get notified whenever I
publish a new class. Thanks for joining me
on such a lovely day. Keep creating and spread love.
 Ritika Sridhar, Artist, Illustrator