Transcripts
1. Welcome!: Hello. Hello. My name is Rita. I am a pastry chef,
cookbook author, pastry teacher, and pastry
content creator from Portugal. Today, I bring you a new
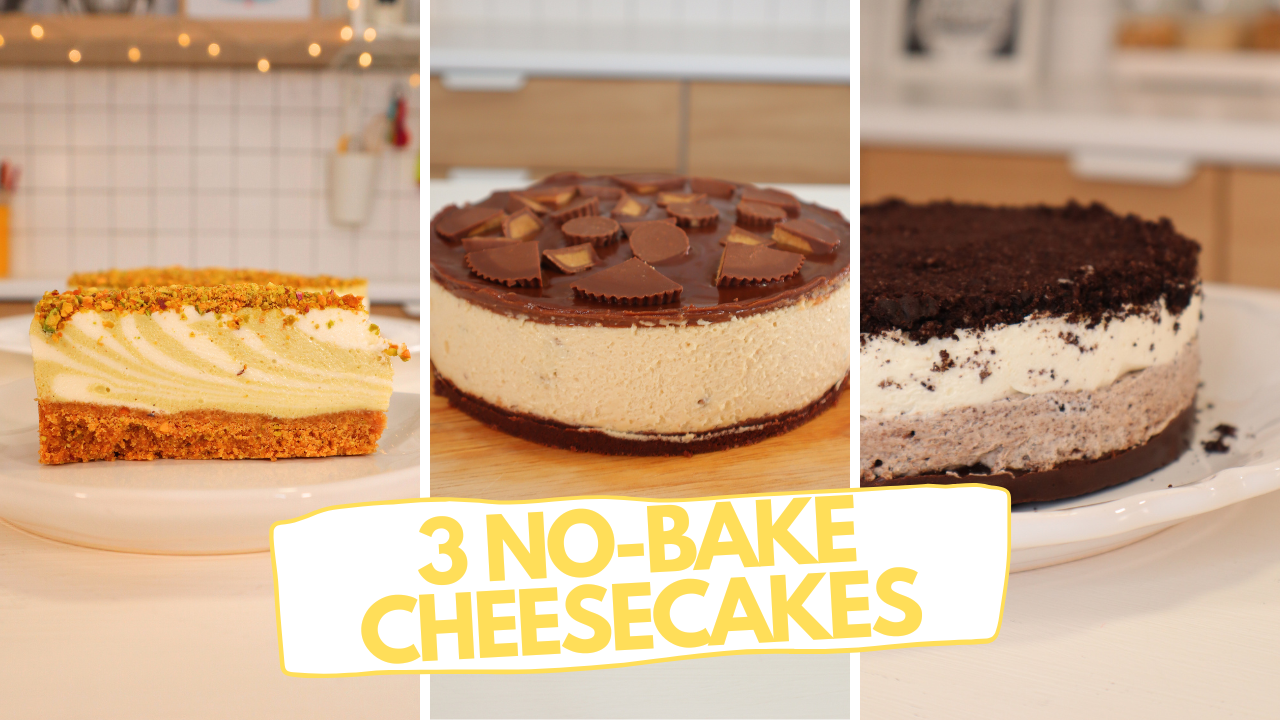
class where you can learn how to make three easy,
no baked cheesecakes. In this class, I will
teach you this style of cheesecakes that are not baked like traditional
American cheesecakes. They are just set in the fridge. They are very easy and fast make. They are very versatile and they can be made
in a lot of flavors. I chose three of my
favorites to share with you. So in this class, you are going to learn how to
make a cookies and cream cheese cake that has a chocolate base and two layers, a peanut butter cheesecake
for the peanut butter lovers, and a pistachio zebra
cheesecake that is not only delicious but also very beautiful because it
has a lot of layers. If you love cheesecakes
and easy desserts, I'm sure you're going
to like this class.
2. Ingredients for the cheesecakes: Before we start
with the recipes, let's talk a little
bit about ingredients. This recipes are
going to be made in a very similar way and with very few and
simple ingredients. Most cheesecakes
have three elements. The base usually made
with cookies and butter. The filling part that
has the cream cheese, that is the star ingredient
and usually something to cover it like marmalade or a ganache depending
on the flavor. Starting from the bottom
and for the base, we are going to some
kind of a plain, simple cookie that
is a little bit dry. In the United States, it's very common to use gram crackers here in
Europe. We don't have those. So a good alternative is digestive cookies or digestive
biscuits or maria cookies. Use more or less the kind
of cookies for your base. And butter. For the
cream cheese filling, we are obviously going
to need cream cheese, and the most popular
brand is Philadelphia. It is almost in every country, but you don't need to
use this specific brand, but use something
that is very similar. In the United States, there is a block cream cheese
that is thicker and it is usually used for cheesecake Europe,
we don't have that. So we have to use that cream cheese that is a
little bit more spreadable, but it works perfectly fine for these kinds of
cheesecakes, as well. Besides the cream cheese, we are going to
need powdered sugar or icing sugar, heavy cream, and gelatin, because these
are not baked cheesecakes, so they need the gelatin to set. Here in Portugal, it is very common to use sheet
gelatins like this one. This is what we have
more commonly available. If in your country you don't
have gelatin like this, you can use powder
gelatin, as well. These are the basic ingredients, and depending on the flavor, we are going to add some other
things to our cheesecakes like nut spreads or
chocolate or cookies, and you can also use
these recipes as an inspiration to create your
own flavors of cheesecakes.
3. Cheesecake pan: Usually, we make cheesecakes in a cheesecake,
spring foam pan. Those pans that have
something that can be open, and then it releases the
cheesecake and they have a base. Because the cheesecakes
are very creamy, it's easier to do them
in one of these molds. And in this class, I'm going
to do smaller cheesecake. So I'm going to use this pan. But if you want to make
bigger cheesecakes, like in a standard
mold like this, you can just double the amount of all the
ingredients in the recipes, and you can make a big
cheesecake instead. Use this pan as is and just
build here the cheesecake. And when it's time to
take it out of the pan, you can just slide
a little spatula or a knife here
around and separate your cheesecake from the
pan and then open it and then carefully do the
same thing on the base. But if you are not very
comfortable doing that, you can cut a circle made
out of parchment paper, place it here on the base. And you can also put
parchment paper around here. In fact, there are this parchment paper that comes in this shape
it comes in a roll. You can just cut the size
of your pan like this and then cut this stripe and then place it inside
of your cake pan. Maybe put a little bit of a baking spray or a
little bit of butter. So just the paper sticks to
the pan and it doesn't move. And now that we
have talked about the ingredients and the
cake pans, mine is ready. Let's start with the recipe.
4. Peanut Butter Cups No-Bake Cheesecake: We are going to start with a peanut butter
cheesecake that is ideal if you like this peanut
butter and chocolate combo. For this cheesecake, I'm going to do a chocolate cookie base, and I am using chocolate
short bread biscuits that I'm going to
puverize in a processor, then add the melted butter, mix very well until it has
this wet sand consistency. This is very easy and the
classic cheesecake base. We are going to press
this mixture onto the base of our cheesecake
pan until it's flat, and we'll put this in the fridge while we
start with the filling. The first step is to hydrate
the gelatin in cold water, and while it's hydrating, we are going to start
doing our cream. In a bowl, you're going to mix the cream cheese,
the powdered sugar, and the heavy cream with a stand mixer or
a hand mixer for about three to 5 minutes until it thickens and becomes
more like a mousse. Now we'll add the peanut butter and we'll keep on mixing for about 1 minute more until the peanut butter is well
incorporated with the cream. At this point, it
should look like a beautiful peanut butter use. To finish the cream, take the
gelatin out of the water, squeeze it, and melt it in the microwave for a
couple of seconds. Add a little bit of the cream to the melted gelatin, mix well, and then add this mixture into the cream slowly and always mixing until everything is well incorporated and your
cream is very smooth. All we have to do is to add the peanut butter cups
into our filling, and we are going to chop
them into small chunks, and you can use smaller ones
like I'm using or big ones. It doesn't matter
because they will end up being in small pieces. Add them to the cream
and mix very well. Put the filling into the
cheesecake pan, even out, give them a few shakes
and take to the fridge for about 8 hours
until it solidifies. At this point, we are
going to cover it with chocolate ganache and a few more peanut butter
cups for decoration. You can use the smaller
ones or the big ones. For the ganache, we
are going to melt together the cream
and the chocolate, and we are going to melt it in the microwave or over Ban Me and mix it well until it's
even until it's very smooth. Place it on top of your set cheesecake and
spread it so it is even. And now decorate with your peanut butter
cups as you wish. You can use them whole
or you can chop them. You can do an even decoration, or you can do, like a
rustic one like I did. And now place it in the
fridge for about one or 2 hours more until the
chocolate ganache sets. Now it's time to unmold our cheesecake and
it's ready to serve.
5. Oreo No-Bake Cheesecake: If you like Oreo cookies and cookies and cream
flavored things, this cheesecake is going
to be perfect for you. For this cheesecake,
I'm going to do a different kind of base. It's going to be
a chocolate base, and I'm going to
place a piece of parchment paper on the base
of the cheesecake pan. And you can actually do this for all cheesecakes,
but for this one, you're going to need
to do that so you can take your base
out of the mold. First step is to
melt the chocolate, and then we are going to in the processor pulverize the
Oreos, filling and oil. And we are going to mix the pulverized Oreos with
the melted chocolate. So here, instead of using melted butter for the
traditional cheesecake base, I'm going to use
chocolate instead. The mixture, it has this
kind of slimy consistency. It's just like that.
Don't worry about it. You're going to spread it on the base of your cheesecake pan. You can leave it as it is, or you can add a few more Oreo cookies that you're going to
break with your hand, so it has a crunch when you're
eating your cheesecake. You can put less or more it's up to you and place in the fridge for
now for the filling. First step is always to hydrate the gelatin
in cold water. Meanwhile, for the cream, you are going to beat
together either with a stand mixer or hand
mixer, the heavy cream, the cream cheese and
the powdered sugar for about three to
5 minutes until it thickens and has a mousse like consistency
like this one. Let's take the gelatin
out of the water, squeeze it very well, place it in a smaller bowl and take it to the
microwave to melt. It usually takes about
three to 5 seconds until it melts completely. Place a few tablespoons of the cream into the
gelatin, mix very well, and then add this
gelatin mixture into the previous cream, mixing very well until
everything is combined, and the mixture is very smooth. Divide this mixture into one
you're going to leave as is, and to the other one,
you're going to mix more pulverized oles
with the filling. You're going to mix it until
it becomes like an oomus. You're going to
place the umuse onto your pan on top of that chocolate base that
we made previously. You're going to smooth the top. You can clean the
cheesecake pan around. So it has two even layers that are clean and you can see
them both individually. Tap a little bit, so
it becomes smooth, and then you can carefully place the cheesecake filling
that is plain on top. Then you get more crumbs and you place it on top
and you smooth it with a spoon so it glues to
the cream and take it to the fridge for
about 8 hours to set. And here it is ready
to be enjoyed.
6. Pistacio Zebra No-Bake Cheesecake: Pistachio is super
popular right now. So if you make this cheesecake, I'm sure everybody
will rave about it. Let's start by rating the
gelatin in cold water, set it aside, and
now in a processor, let's pulverize the pistachios. It should look like
a fine powder, like a pistachio flour. And now, using the
same processor, we're going to
pulverize our cookies. I'm using digestive. Here, you can use gram crackers or any kind of cookies
that you want. Cookie crumbs,
we're going to add half of the pistachio flour, and the melted
butter mix very well until you have a wet
sand consistency. Place the cookie paste
onto your cheesecake pan, press very well, and even
your crust the best you can. You can use a spatula, a spoon, or even your hands. And when you're done, place your cheesecake pan in the fridge while you
make the filling. Sour gelatin is
already hydrating, all we have to do is to beat very well the cream
cheese, the heavy cream, and the powdered sugar in a stand mixer or using
a hand mixer for about three to 5 minutes or until it's thick and
it looks like a mouse. Let's take the gelatin
out of the water. It very well and place
it in a smaller bowl. Take it to the microwave for a few seconds until
it's completely melted. Usually, three to 5
seconds is enough. Take a few tablespoons
of the mixture and mix it very well
with the gelatin. And now slowly and
always mixing, add this gelatin mixture
into your cream. Mix very well until everything
is smooth and very well combined and divide this
cream in half into two balls. To one bowl, you're going
to add pistachio cream, pistachio paste, or
even pistachio spread. Mix very well until the pistachio is incorporated with the cream and it
has an even color. Perfect. Now we have all our elements to
make our cheesecake. We have the pistachio filling. We also have the plain filling, and we have our cookie base. Build this cheesecake,
we are going to alternate the creams in
the center of the pan. So we are going to put a portion of the pistachio filling and then a portion of
the plain filling on top and on the center of
the previous filling. I am using a scale, so I am weighing and using the same amount of
the fillings each time, I'm placing a little
bit of the filling, but you can measure
by tablespoons. It's also important
to move around the pan so the filling
gets even out and spreads. And to finish our cheesecake, I'm going to use the rest of the pistachio flour we made in the beginning
of the recipe. Now, let's take this
to the fridge for about 8 hours until
it's completely set. When it's set, all we have to do is to very carefully
release it from the pan. I like to use a
spatula and then place it in a plate and it
looks pretty like this, but it's really pretty
when you cut a slice, and it reveals all the layers. It's ready to take a bite.
7. Goodbye!: I hope you have
enjoyed this class, and I hope you feel inspired to bake these no
baked cheesecake. See you in my next class and
happy cheesecake baking. Bye.
 Rita Nascimento, Pastry chef, Youtuber, Cookbook author