Transcripts
1. Welcome: Well, hi, everyone. My
name is Carrie Sanders. Welcome on into my studio. Happy to have you.
Today, I have for you a series of three
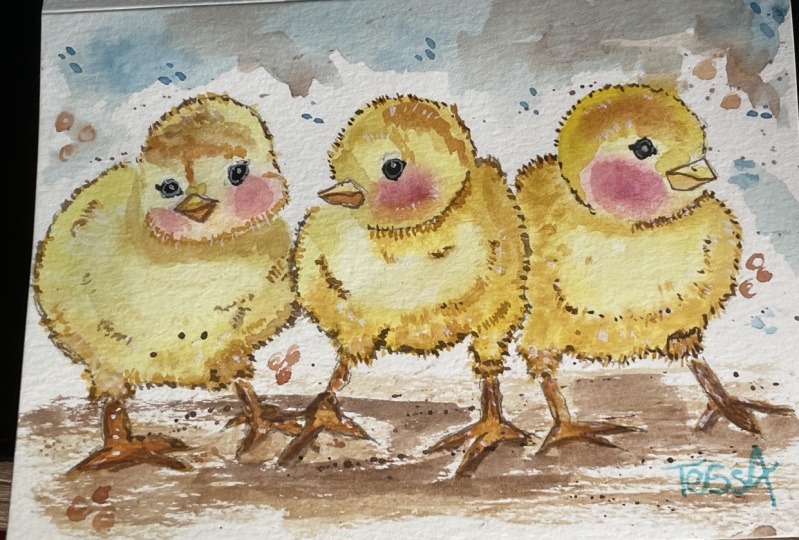
adorable chicks. And it's the same pattern but
done three different ways. So there's a little
something here for everyone. We are going to be doing
some watercolor and ink, or if you're a
purist and want to do pure watercolor, here
it is for you there. And if you're adventuresome, and you want to learn how
to do some color mixing and see what different
colors mixed together do. I have it here for you in color. This is actually a third set
in my series of color play. First, we did colorful sheep, and then we did colorful birds
and now colorful chicks. And you can find these other
two classes on Skillshare. Hey, I have been teaching
for years and years, and I just have such a love
for sharing art with people. I was fortunate enough to have my art picked up by
a big Bog store, and we published a book
that went out over 10,000 copies sold along with some pattern packets
that went with that. And I've also had art that's
won awards and contests. I've just been
really fortunate to have an ability to
share art with people. And that's what I'm here
today to do with you. And I hope that you will
join me as we work on some washing and glazing, highlighting,
shadowing, splattering. We'll be doing color mixes, as I mentioned earlier. There's something
here for everyone, whether you're a beginner
or you're more advanced, and you want to relax and take something and sharpen
your skills a little bit. I hope you'll join me today. I hope you'll take a
moment to follow me. Just click that little button. And then you'll get notices when I have a new
class coming out, if you would like
to take more of my classes or see what
I have available, all you need to do is type
my name in the search bar, Carrie Sanders and
all my classes will populate here
on Skillshare. All right, go grab
your supplies, and let's go ahead
and get started on these cute chicks together.
2. Projects: Okay, my friends
and fellow artists, your class project
is to complete one, two, or all three of
these adorable chicks. But I especially hope that you will do the color
play challenge. It's so good to learn how to make color mixes on our palette, and that will help you in your future projects
along your art path. Once you have finished, if you could please just
take a moment and snap a pick and upload that
into our class gallery. All you need to do is
look for this button, and it's easy to upload that. It'll only take a
moment. But that allows me to get a notification. It allows me to chat
with you there. And I would love so
much to be able to take a look at what you've done and tell you great
things about it. Nothing but love,
nothing but love. And also, it allows us to see what each other
has accomplished. I always say it's a bit
like baking a cake. We give everyone the same recipe and they all turn out a
little bit differently. That's the beauty of art. You have a special gift. You have a special talent. You are unique. I would love to see how each piece
turns out differently. Please take a moment and upload that into our gallery and let's support one another there.
3. Supplies & Pattern For All 3 Projects: Welcome on in. It's
time for us to review our supplies for these cute little baby chicks that
we're going to be doing. We're going to do some
great color exploration and mixing for our
colorful ones, and we're going to learn some inking methods
with these and we'll do some plain watercolor
techniques with these. So we have a lot
in store for you today and you can do
one or all three of. So first of all, let's review
what you're going to need. If you can go to the main
page of skill share, you can print out the
PDF of the pattern. It's super simple if you want to just go ahead
and sketch your own, it's a matter of doing two
circles and adding some feet. So that would be great as well. You'll need some
tracing paper to take your pattern and trace
that onto tracing paper. That's what you're
choosing to do. And once you have your
tracing paper piece, you'll need a piece of
graphite paper so that you can apply that to your watercolor
paper and for beginners, I'll show you how to
do that step by step. Today, I'm going to be using
140 pound hot press paper. You can also use cold press. But the important
thing is to be using 140 pound, always always guys. If you can just use a higher quality paper
that's 140 pound or better. You'll have a better outcome. To me, that's more
important than buying good brushes or top quality
professional grade paints. Your paper is going to make the biggest
difference for you, and so that's a great
place to do that. I'm using hot press so that I have a little smoother surface. You can use cold press. It will have a little
bit more tooth to it, and that's fine as well. So you're always going to need
my favorite tool, always, of course, is the
handy dandy tissue. We'll be using some of this. And you'll need two
bowls of water, one to keep one really
clean because whenever we're using yellows and whites, you're going to need clean,
clean water to work with. So clean and dirty water dishes and of course, some
towels to use. For our brushes today, super simple We're going to be using some
rounds all rounds. I have a number four, which
if you've taken my classes, you know, that's my very
favorite brush always. This is a number six. You can see it's been well
loved as well, a six and eight ten.
All of those are great. This is a 12. We're
going to be doing a little bit of background wash. You want something
on the larger side. Then we'll be doing
some fine detail work around the little chicken eyes, so this is a 20. Um, so just to have
something that has a really fine tip that
you can work with. And then if you're going to
be applying your pattern, you can use a stylus or
a pencil to apply that. My favorite pencil always
is the black wing. And then for our inking, there are two patterns
that need ink, and I'm going to be
using a Muji ME JI, fine point pen today. Just make sure whatever
you use is waterproof. Make sure you
actually test it out and know for a fact
that it's waterproof. That will be really
important for you. All right. Let's review
our palette quickly. This is the palette that will be used for all three birds, and then for the colorful birds, we'll add some of these and not use it on
the first two sets. We'll be using lemon
yellow, yellow medium, yellow ochre, ambos, permanent
rose, buff titanium. It's an off white sandy color, Serian blue, violet,
Windsor violet, burnt umber, raw umber and
just the tiniest touch of pains gray for covering the
eyes a little bit and mixing. So for those of you that want to do the color play chicks, and I hope you will
because it's going to be so cute and so fun. But also, it's a
great exercise to learn how to start color mixing. If you haven't done it much, it's so amazing how mixing two colors
together can give you such a variety on your palette and make it so much more interesting and fun. So we're going to be
using this titanium buff. And mixing up cerilian blue
and this is what you get. We'll also mix it with the violet and this is what you get. It just gives it a nice soft almost romantic Victorian feel just softens it down. We'll also be using
yellow ocher as a base. We'll be adding that to
some permanent rows. Depending on how much
permanent rows you add, you get totally
different colors. That's what all of
these mixtures are, is just yellow ocher
with permanent rows. If you add a little more rose, you get this pinker
version, obviously. If you add more yellow ocher, you get more of a peachy color. And this last one, if you add just the tiniest
hint of pains gray, then look at this awesome
shaded color you get, and it is a beautiful addition to the mix that you've made. So I challenge you to go ahead and make these
mixes with me. We'll do that as we get to
that third set of chickens, and we do that color
play series there. Okay. And lastly, I'm going to be using bleed proof white. This is doctor P H Martins. You could use white guash,
if you would like to. I like to use this bled proof white because it's more opaque. And so I get a better result when I want to really cover
something up with white. This is what I'm
going to be using, for those of you that haven't
used a stylist before, this is what I'll be using
to apply my pattern next, and it just has a round tip. And this way, it preserves
the integrity of my pattern versus a pencil where I'm actually
drawing on it. But you can use a pencil
or you can use a pen, whatever you want.
It's not a problem. So I'm going to
speed up the camera now and show you how
to apply the pattern. If you already know how,
just skip this little part, and I'll see you right
after we're finished here. Okay. Now, I just want to
point out that I did not make every mark when I was applying my pattern that shows on the
PDF that I provided for you. I did that so that you
could see it closely and kind of get a feel for where we're going
to be painting. But you want to be able to have some latitude
when you're painting, and so you don't want to
put every single mark. I did dotted lines,
as you can see. So go ahead and apply your pattern and I'll see
you in the next video. We'll start painting.
4. Inked Chick One: All right. We're
going to dive right in with our three
chicks that have a little bit of inking and a little bit of the
ground underneath them. I think this will be
the best one to tackle first because it
has a little bit of everything in it
except the color play, and it'll get us nicely warmed up for our next two afterward. So I have applied my pattern and I've got
some tissues handy. I always just kind
of break them off in squares of two and
kind of have those handy. We're going to go
ahead and start with some very clean water
on our number four, and just go ahead
and get that head. We're just going to stick
to the head right now. Go ahead and just
get water there. I'm just going to
go over everything, the beak, the eyes,
doesn't matter. I just want to start getting some interplay with the
water and the paper. Okay. And we're going to come
in with some lemon yellow. This is probably a 9055 ratio. You'll see you refer to ratios frequently throughout
the video because I think it helps you understand how much water and paint
we're working with. Very little paint and we're just going to go over what
we just did with our water. I'm just helping it
along because it's not super important to let
this spread by itself, like we typically
do in wet on wet. It's kind of Okay. Now, I'm going to wipe off. I'm going to pick
up off the beak. Pull that off, wipe it off, you can see it whitens there. I'm also going to use
that same mixture, but I'm going to
put it on a little bit darker on the outer edge. This is why I like the paper. Let us manipulate in
this type of situation. Not always, but for
this, we want to. Let's go ahead and pick up
some of our cad yellow. Same thing, we're just
going to put a little bit darker up towards the top there. And then that will
do the blending for us because everything is wet. Just a teeny bit down here. I'm not going to touch
the cheeks too much because we're going to come
in with something else. Okay. I just have
water on my brush, I'm going to pick
up a little bit of this beautiful permanent rose and all the tiniest
amount will do. This is probably 9082 on
the ratio, 98% water. Now we're going to do
a true wet on wet, where we just touch that on these little cheeks and
let that start to spread. It's going to spread
all by itself. That's great. What
we're going to watch for is we don't really want
it to come onto the beak. If it does use that wipe off technique that
we did just now, let's give that a second
to see where it goes. I'm going to move it
down here a little bit. Just manipulate it a little bit. Okay. I can see I need a little
more cad yellow down here, so kind of determine
where you want your darker and lighter
to remain Okay. But while it's wet,
this is a great time to do those blending
techniques. All right. We're going to let that just
keep playing for a minute. Let's pick up a little
bit of this yellow ochre. It's probably a 9055. And we're going to come down right between the eyes.
We're going to emphasize. Notice I'm doing
a dabbing motion, not a straight line because you know, little fuzzy feathers. Little on his forehead, a little above the eyes. Not necessarily eyebrows, but just a little here
and there. Okay. Great. Okay. I'm going to take that pink
off the beak again. Good. I'm going to pick up a little more stronger
yellow ocher now, probably a 90 ten. And just put a little on
that lower edge of the beak. Okay. Now, because we're
going to be inking, we don't have to be super with some of these
things right now. We'll come in and do a little
more shading on that face. But see if you're happy
with those cheeks. I'm going to add just a
tiny bit more over here. I'm going to add a tiny
bit of yellow to it. Yeah, I like that color better. Thing over here. Add a
little lemon yellow. Cute. Remember that watercolor will dry one value lighter. Don't be super worried. I'm going to switch to
my number six round. Same thing, we're going to
add some water to the body. Stay that face for a minute. Let that dry a bit more. I'm not going into the legs, either. Just the body. Okay. Same thing. We're
going to pick up a little lemon yellow,
probably in 9055. And if you look at
the reference photo, I'm going to leave
the tummy lighter. To get clean water, clean water on my brush and just let just add a
little extra water and see how that just blends. We have a nice blend and it makes a nice
highlight on his tummy. Or maybe it's a. Now I'm going to pick up a little
bit of this cad yellow. Same thing, I'm going
to deepen here and there around the face. Again, I'm using
this up and down motion rather than
a smooth motion because I want to
give that fuzzy. If you did my colorful sheep, it's kind of that
same technique, kind of an up and
down wiggly motion. That's a technical
term. All right. Now, let's go into some of our yellow ocher
while it's still it. All of these are about a
90 ten mix at this point. Now, this is tucked
behind that chick, so it's going to be
darker over here, and we will come in with
some gambos in a minute. But we still want to underlay
it with some of this poker. I'm going around the
the legs on top, it's going to be lighter, I'm just going to come
up, not all the way. I'm going to bring
this up a little bit higher And underneath the head, there would be a little
shadow. Oh, this is fun. No, I just have clean
water on my brush. I'm just going to soften. Okay. Good. We're not going to come
in with gambos just yet. We can pick up some
of this yellow ocher and you can stick
with the number six, you can go back to
the number four, if you're more comfortable. And I'm just going to add in
these little toes talons. I'm not great with
chicken anatomy, okay. This foot is underneath its
next door neighbor's foot, so it's a little bit
tricky right there. We don't need to fully
define it until we ink. All right. That's
looking pretty cute. We're going to let that dry
and move on to the next one. I'm going to go back
to my number four. Let's get this head going. Now, because his is sideways,
I'm going to avoid it. Great. You want
our lemon yellow? It's going to help that along. We want the lemon
yellow everywhere. And I want a around
this power edge. Okay. Cad yellow medium. Add that to the forehead, ran around down here where
the shadow would fall. Okay. You know what's next? Permanent rosy cheeks in there. Now, you decide how big you
want your rosy cheek to be. You can go with the pattern line here or make it go all the
way down to the bottom. I'm just touching
it in and I'm going to see where the water takes it. I'm going to leave that
be for just a minute. While that's doing its thing, I'm going to pick up some
yellow ocher and just do the bottom half of
this a little dry. Going to fill that in. Just wash it in one color right now. Okay. Well, my permanent rose
didn't bloom out very much. I live in Utah and
it's very dry here. Today is a beautiful day. Everything is drying
pretty fast on my palette. So I just put some water
on it. There we go. Okay.
5. Inked Chick Two: Number six. Picking up water.
I'm going to try and not come up right against that little chicken
next door there. And same thing with the head. Stay away from the
head a little bit. Okay. You know the drill. Let's pick up some
lemon yellow, 9055 mix. I lay it in. We can lay
it in fairly quickly. Bring it down onto the top of that leg and bring it down
on this hind leg as well. Now, even though
this is right here, this edge is going to be
our highlighted edge. We're using lemon yellow, which is our highest color, our lightest color value, but I'm still going to bring that all the way to the edge. I'll still look
like a highlight. Great. I'm going up some
yellow deep cute little belly. I just like saying
that word belly. Puts some on the legs. Definitely over here
on the shadow side, and under the neck. Remember there we have. Okay, let the water
work its magic there. I'm going to bring a
little of this cad yellow down to the beak. Down that forehead
where we did there. We're going to bring
some yellow ak I'm just going to put a
little more base in there. Thing down here under the cheek. I want to cheek a little bit. I love that permanent rose and
the yellow mixed together. That's so pretty. Let's pick up a little bit of yellow ochre. Let's bring my palette so dry. I definitely want to here. Up and under. And this hind leg will be definitely hitting
this with some gamboge, so don't forget that we
will be making it darker, so don't try to make its final value with
the yellow ocher. It's not going to be that way. And a little on
the forehead Yes. Great. Okay, we
need to do our legs back to number four
ands yellow ch. A. Again, we're just
washing this in. A wash is a thin layer of
paint that's all one value. You'll do this frequently
in water color. Then once it dries,
we'll add to it. We can glaze another
color value on top of it, or we can add highlights
or shadows for dimension. We just want to base it in
first. We want to wash it in. Do that. I just wanted to add a little
hint of feathers around this little cheek,
a little marks. Yeah. I think I'll add a
few on this one, too. I like that. Add a few over here. I couldn't do it before because
it was too wet. Now I can just add a
little indication. Great. Hey, let's go
to our guy on the end. Hey, I'm going to avoid the beak since he's tuning sideways. We have the ability to do that. And some lemon yellow, 9055. This is, this is a
nice relaxing piece. Okay, I'm going
to add some depth of color around the outer edge. And I'm going to put
a little off there. I have a little dimension. I can add some yellow up on top. This guy is on the end, kind further away from the sun and he's more in the shadow. I'm going to make him
is what I'm getting at. Okay. Clean water on
my brush, number six. Trying to avoid the head
and the chicken next to me. Great. I got some lemon yellow. Again, you don't have to
be super careful with this first layer because it
just needs to go everywhere. And then you can make it
stronger here and there. Definitely strengthen in
the shadow right here. He and then picking
up some yellow. Emphasize that area. Little under the neck. I flip. Great. And let's
pick up some yellow curve. Again, these are all about
a 90 ten mix at this point. I'm just going to definitely
use an up and down motion. Put that in. Love it. Don't you love wet
on wet technique? It's just so interesting and it's always a little surprise. You learn what to anticipate. But depending on the day, the weather, just like today, it's so dry, it comes out just a little
bit different each time. I so fun. I'm going to put a
little under the neck. Again, this is our
more shadowed one. We're going to come
in with gamboge. Put b on the head. If you live where
it's more humid, you're going to have a
different outcome than I've got here in the dry climate. Hey, guess what? We
didn't do the cheek. Or some of you
sitting there going, are, you didn't do the
cheek. Are, can you hear me? You didn't do the
cheek. That's okay. I'm going to add the
cheek right now, and I might just add a
little bit of water. Get some movement out of it. I'm actually going to pick
up a little bit of yellow. Love it. There we go. Never fear we can fix anything. That's the beauty of watercolor. So many people are
afraid of watercolor, and yet you really can't
fix almost everything. What did Bob Ross say one of my favorite guys?
Here's my Bob Ross. He sits with me
every time I paint. Happy little accidents, guys.
Don't let it get to you. All right. Okay. We need to come in
and do this beak, but my cheek is too wet, so let's do the feet. Well, we wait for just a moment. This is just our
wash all one value. Yellow ch, 90 ten. And I'm not being super careful. We're going to
come in and in it, so I'm not stressing
over any lines. Isn't this just
relaxing a fun piece? Great. Now, if you're able, let's do just the bottom
side of the beak. And I need to add a little
between the eyes there. Feathers there.
Okay. And I think I'd like to add just a few now that this
is dry over here. Let's add a over here. And I think I'm
going to add just a few on this outer edge. Here and there, not
everywhere. Yep. Like that. Face head. I like that. Okay. I'm going to define a
little bit more here. Good. I think we're on a roll. Let's
keep going with this idea. Only if your paper
is dry though. If it's still wet, it will lose the intention
we're trying to put out. So I'm just trying to
put little feathers. I can't do it on
my third bird yet. It's too wet. We're going to come in and ink these
little indicators. I don't like that one.
You don't like something to touch it with your
tissue and pull it off. I have a little bit here. All right. I'm going to
switch to my finest liner. This is a 20 oh. You could use a one, a double, a five oh, whatever you
have, something really fine. I'm going to pick up
some of this gamboge, which is a very
transparent color, it's great for washing or adding accent to something because it lets the color
underneath that show. I'm just going to add
basically some texture on these talons. Let's put some on the
bottom side of the beak. So we're glazing
it. We're putting a different color value on top of a color value that
has been placed and dried. That is a nice Great. And now I'm still using this. I'm just going to
add a little Okay. Glazing in the shadow area. I'm being lazy and using
the same little brush. You can switch to a bigger one, but I'm doing such a small area and I don't want to
get carried away. I'm just going to stay
with this little brush. You see how that just deepens
the shadow right there. I love this gamboge It has
such a yellow gold tint to it. It's perfect for
our little chicks. I might put just a tiny tiny amount underneath
the chin here. Then a bit by. Okay, great.
6. Inked Chick Ground & Splatter: I'm sticking with this
little brush because it's going to keep me in check. I'm not going to get carried
away with this gamboge. I definitely want some
on this hind leg. And back here. Good. This one. My bird's finally dry enough. I can work on it over here.
This one is picking it up. Okay. Okay, let's just pick up. Maybe you already did this and I couldn't do it because
mine was too wet, but I'm back to yellow cher. And I'm just adding fine
with lions here and there. M. You know, on the legs. In the head. And then, I'm going to add just a
few around the cheek. Now, I'm going to take a
little bit of this cad yellow, super watered down, sticking
with my tiny brush. And just a hint on the beak
We don't want a white beak. I just wanted to
highlighted. That's good. All right. Let's make sure
our feet are completely dry, and then we're going to come
in and do some ground work. I highly recommend that you
take a moment and step back six feet and see if
something needs to be tweaked before we move
on, which is what I did. I have the studio lights
that shine so brightly that I didn't realize how washed out my first chick looks. I'm going to go ahead and just make this a little bit
deeper color value. If you need to do
the same, go for it. But again, step back
and see where you need to make any adjustments before we move forward
with the ground. I am just washing in
a little more color. Using the same colors that we already used. I just
here and there. That's feeling better now. I still need to do
this cheek too. I'm going to mix a little cad yellow with my permanent rose. Only because my paper
is already dry, so it wouldn't mix
very well by itself. I just want a little more color. I know chicks don't
have, you know, blush on their cheeks, but I wanted a little color. That's feeling a
little better to me. I'm going to start by picking
up some yellow ocher, the 90 ten mix. I'm just going to use
side by side motion, touching the paper
here and there, going right over the legs, but super lightly so they
don't just blend out. There, leave like that. Then we can pick up
while it's still wet, we'll pick up some
of this brut number. Thing, ten here and there. Okay. And then while it's still wet, I'm going to do just
the tiniest amount of splattering with the number and it's going
to spread because it's wet. I'm going to use my number four and I'm going to do a little bit of splattering while it's
still wet so that it spread. I don't really at this point, I don't really want
it to hit my chicken. I'm going to cover
it a little bit. See how that will spread where it's wet and
that's what I want. I want it to look like they've been scratching in the dirt and there's little d c
and seeds and whatever. If there's a spot
that you don't like, like on the feet
there, let's touch. That's okay. Let's just go. Okay. All right. And then I'm going to put
that dry a little bit more. And then we'll splatter
some more. Just a second. And don't worry
about these up here. We're going to add
to those actually. Okay, I'm coming
back to my large, and I'm going to
pick up just the tiniest a bit of a raw umber. A little excess water there. Okay, and I'm just going
to add a another layer. On top of our umber,
on top of our ocher. And I'm going to let that dry and then we'll do
some splattering. But this time, I'm
going to let it dry because I think I have
enough spots down there. While that is drying, I'm using my number four
to pick up some yellow ocher and just put a little bit of shading
in around the beak. So that when we in it, it looks nice and dimensional. I'm just going to put
a wash 90 ten mix. Literally around the beak. Okay. And I think I'll put
If you see places, this is a good time to emphasize any shaded areas that might need a little extra attention. Under the legs. Under the
belly, where the legs met. I'm just using yellow ocher. Water on my brush to
smooth here and there. I make the transition. I'm going to add a touch of lemon yellow here. Okay. All right. I think we're dry
enough that we can splatter. Let's pick up water
on our brush, using our number four,
picking up raw umber. Bringing it up on the sides now. I'm going to bring more dimension by
touching here and there, that makes some of
them fade away. Leaving some of them. Let's dry completely, and
we're going to come in with white and we'll
also do the eyes.
7. Inked Chick Highlights & Eyes: Okay. Again, I would highly recommend that you step back six feet and
take a close look, see if there's anything
that you want to tweak. And I noticed that
my feet are looking a little transparent
from the washes. And so I'm going to come back in and I'm going to
pick up a little bit of the burnt number using my
number four and a 90 ten ratio, see how that's pre
th at this point. I'm just going to add
to some of that water. We are going to define this obviously when
we do our inking, but that will just add
a little more texture. It's not so see through
here and there. If you need to do
that. Go for it. We are going to add
some highlight to it with our white in just a moment. But this needed
to be done first. Also a little shadow
underneath where it meets the top of the feathers. There much better. Very good. Let's pick up some of our white. Going to use this
bleed proof white. I'm going to stick
with my number four. I just like to put
a little bit in the cap and then I wash
the cap out frequently, so it doesn't get all goofy. I'm just going to
put them in here and a little bit of clean
water. Not much though. This is just the
opposite of paint this is probably I don't know, 95% paint and 5% water. I want this quite opaque. I'm going to go ahead
and you can see me I'm rolling this so that as I pull up and I'm just getting some
of the paint off, but also bringing it
up to a fine tip. We're just going
to add some little highlighted feathers
here and there. Cute? It just brings out
some great highlights. Just where the sun
would catch some of those by fuzzy feathers. Just here and there.
Same on the forehead, eyebrows. A few on the cheeks. Anyway, you get the idea, so kind enjoy the moment
and see where it takes you. I'm going to kind
do half this beak. I did the other half
in yellow ocher, the sun's catching it and go up. O. If it goes on too strong, just wipe it off. Yeah. Didn't like that. There, go. Good. Now, let's put
some on the as well. Great. Okay, I've pulled
out my Mogi pen. We're not going to start
all of the inking just yet, but we do want to
lay in the eye. And I think for this, it's fine to just go ahead
and lay it in with the pen, and then we'll go
over it with paint. Just kind of line
it in just lines. And because there's yellow
showing through, that's okay. Because we'll come in with
our pans gray and cover it. Oh. Alrighty. Yeah, let's go ahead and come in with
our paints gray. Okay. I just gave this a light. Let's get rid of the yellow. For me to see because the
light is reflecting on it. Now, I always do this,
and then I will turn it upside down and do it again. Because when you're trying
to make a round circle, it's hard to do from
just one angle. You almost need to look at
it from the opposite side. So I'm going to go ahead and
turn my board upside down. Sorry. That makes you
dizzy for a second. And let's go ahead and just Just check the
correctness of your circle. You can do some repair work
with your pan, of course. After this is dry, I should say. Okay. Let's look
that dry completely.
8. Inked Chick Feather Details & Sign: All right, we're going
to start to land. Little feathers. And these are broken lines and some
are taller than others. And for the feet. I try to
avoid having a straight line, and I do pretty quickly
and broken lines. I like that. Be careful here. Remember this is where we're going to be fine. This little guys flits on top of the other one,
stepping on my feet. There we go. Refer
back to the pattern if you need to Good. Notice, I'm just
avoiding the eye area. My eyes aren't dry. I just want to make sure I don't smear. Of course, you can always
use a heating tool or a hair dryer to
dry those faster. Make sure you're paying
attention to which bird is on top of the other one here. Great. Now. When you're doing
the head and the cheek, just keep in mind,
the the roundness. I always want to
follow the contour of the piece that you are inking. Okay. Here we go on the beak. About the only place I actually do kind of a straight line. A. We're almost done, guys. And once we finish this part, then we can come
in and add a white highlight to our eyes. Okay. All right. Let's break out
our white one last time. Okay, I'm back to my 20, back to my bleed proof white, and probably 95% pain, 5% water. I'm rolling this and pulling
it up to a fine tip. And we're just going to do a soft broken line around
the outer edge of the b. We're also going to put a dot. And then we're going
to put eyelashes, but little fuzzy feathers. It might feel like eyelashes
for a second here, but just if you look at the actual photo of
the chicks that I gave you that we used
the reference photo, I have a white something or
other around their eyes, so I'm going to go ahead and do that here as well. I'm
thinking about it. Who? I think the trick to these
is to just make sure they're all different lengths and make sure it's
a broken line. Great. Okay. Let's step
back one last time. Take a close look,
see if there's anything else that you
want to change your ad, and then we can sign
our name to this one, and we'll be ready
to move on to the next. All right, guys. I think we have finished up on our first set of
cute little chicks. I hope you enjoyed this
piece and maybe learned a few things or sharpened
your skills along the way. I know I had fun
doing this with you, and I always say, take a look in the
mirror and tell yourself what a great
artist you are. You have a talent and a gift
that most people don't have, and I'm so proud of you for completing this
piece and for taking the time to learn something and improve your skills and make yourself
a better person. So, good job. I'm really happy that you spent
this time with me. Thank you so much.
Let's go ahead and sign our name together and
claim our artwork. Okay. All right. I hope I see you
in the next two classes. We will be doing
the three chicks without any inky now
that we're warmed up. In gives us a little
forgiveness, right? So we're going to
be doing a piece without any inky now that
we know what we're doing. And we will be wrapping
up with some color play and doing our own color mixing and really learning some
fun things with this one. I'll see you in the next video.
9. Pure Watercolor Washing in Bodies: Welcome back. We are going to start our next set of chicks. This is going to be the set
that's just pure water color, no inking, and we're going to go ahead and
start with the body. Go ahead and pick up
your medium size round. This is a number six and pick up just some clean
water and let's put in some water on the paper going around the head
and just do the body. We'll let that
start to absorb in. Okay. And then we can pick
up some of our lemon yellow. Yeah, we'll just wash this in. I'm going to pick up
a little bit more and make it a little darker
towards the outer edge. Because the paper is wet, it should do most of
the blending for us. I'm going to go underneath
the head as well, and in this dark
corner over here. Nice. Now, while
this is still wet, I'm going to pick up
some of this cave medium and touch darker areas underneath the chin
in this corner. And around the top of
the leg under the belly. Notice I'm kind of padding it. I'm not stroking it because I want it to look kind
of light and fluffy. And I'm going to leave that
center area here light. It's got the yellow on
it. It's nice and light. All right. We're going
to leave that for now. We can go ahead to the next one. Same thing. Some of the lemon yellow. Just wash that in at this point. All one value is fine. Now I'm going to pick
up a little bit more. Add emphasis on the outer
edge here and there. And a little yellow. Okay. Now here at the bottom on that leg and
this leg on the belly. Great. Let's come
back to this one. We were just letting it
soak in a little bit. And now we can pick up
some of the yellow ocher. And we can put some down
around the bottom edge. Bring it in more broadly in this dark corner.
Underneath the chin. I just have clean
water on my brush, and I'm just going
to smooth that is a dead where it
needs to blend. And let's pick up some
of this yellow ocher, bring it over here
on this little guy. Same thing, clean water. Just take some of
the excess off. Just soften that a little bit. Great. Okay. Yeah,
let's come over to this one. Lemon yellow. M. Cad yellow. Remember this bird. It's kind of more in the shadow. It's going to be a little bit
darker than the other two. I'm going to still leave a lie little highlight
here on his tummy. Great, let's pick up some
of this yellow ocher. And some clean water. And I'm
just going to soften this. Good. Let's let those absorb. Switching to my
number four round. I'm picking up clean water
out of our clean water. Go and do the head over here. Remember paint flows
where the water goes, so we want to be a
little bit careful here. Nice. Let's speak of
our lemon yellow. Great. Now, let's lift off beak. Just touch and press and then touch your tissue, and
it comes right off. And let's add some cad
yellow to the shadow side. Down here between the eyes. On the bottom. Great. And for the
cheek this time, I'm going to take some
of this cad yellow, and I'm going to do a little mix here with the permanent rose. I'm going to have it.
I'm going to start out slow slow and go. You
can always add more. But I'm going to start out
slow because we won't be doing any king I'm just going to do a slow buildup and make sure that it stays
where I want it to stay and it's the right value
that I want it to be. Keeping it off good bee.
10. Pure Watercolor Washing in Heads: Just have water on my brush. He's going to try and keep
that chin a little bit light. I think I'm going to
let this dry here now. Sorry. I'm going to add a
little bit of yellow ocher above the beak and
up that line there. Above the eye here. I just starting that
settle in with the water. There. Okay. I can tell. I'm going to remember it
dries one value lighter. I'm going to want another
layer, but slow and go. I'm just going to let
that dry a little bit. And while that's drying, I'm going to go ahead and wash in this first set
of legs over here. A little more careful this
time because we aren't inking. I just lifted off a little bit of highlight here and there. M. Okay, good start there. Okay, I'm going to let
this one dry pretty good, and let's move on
to the next one. I'm not going to put
water on the beak. It's okay to go over the eye. Okay, lemon yellow. As and Cad Yellow. You guys know the drill by now. Okay. Okay. Just water
on my brush now. Just smoothing it
out a little bit. Just have yellow and a
little bit of this rose. And touch that on. Yes. Mm. All right, this one's
fairly dry now, and while we have this
mixture already going here. Let's wash on. If you need it, look
at your own piece and decide how rosy
you want the cheeks. I'm going to rosy mine
up a little bit more. But I like this yellowed down version with
the C yellow medium. It just tempers it a bit. I said, since we're
not doing the inking, I'm going to be a little
bit more cautious. Blending that with water
and softening little chin. Good. I like that. All right. This is still a little bit too wet for me to play with there. Let's go ahead to our next one. Picking up some clean water. This is lemon yellow. A. Ad. Good. Okay, a bit of k. Remember,
this is our darker one. He's over here in the shadow. Okay. I'm just going to lift off a little
bit right here. Before I put the cheek
in. I like that better. Okay. Now I'm going
to pick up some yellow and some permanent rows. Nice yellowy pink. And now I think I can
put a second coat over there while
I've got this going. It's almost a peach
color on the palette. But it's just the right touch on this yellow background,
this yellow base. Good. I can't redo this one yet. Okay. Let's go ahead and
finish putting in our feet down here picking up
some yellow ocher. Too much water. There we go. Hey, we're bore. Oh.
11. Pure Watercolor Glazing and Feathers: Number four and do the
bottom half of the beak. And it's going to be
a little bit thicker, probably in 80 20, x. And on this one, we
do the top half. This one bottom half. Same over here. Now, let's pick up sticking
with my number four. Let's pick up some
of this gamboge, a 90 ten mix. And let's just wash in a little bit of a glaze
in the shadow areas. Under the chin. And in the
shaded area on the side here. A little bit on the belly. And to soften this
edge with water. And I'm going to add
just a tiny amount on the shaded side of his head. Okay. T with the next one. A little bit there. Hey, we'll soften
that with water. A little bit. I'm going to add a little bit
on his head, too. The water on my brush. There we go. And
last but not at. Okay. And just clean water.
Salt in those edges. I'm going to round this out a little bit more so it looks. Remember to follow
the contour lines of your project, whatever
you're doing. And let's put a little
bit up here on his head. Good. Let's let that dry because we're going to come in
and we're going to do lots of little tiny feathers
with our smallest brush. And we're going to pick
up some lemon yellow and just put a few little fur
lines on the outer edge. I'm just taking off a
little of that water. And because we're not inking it, we want to just add a little
indication of feathers. I think I said fur before. I didn't mean. I meant feathers. I do a lot of pet portraits, and so I have fur on
the mind at the moment. I'm going to do a few
on the bottom here, but I'm not going to go
into this yellow ocher. We'll do some
yellow ocher there. Right now, we're working
with our lemon yellow. Let's just add a few. I don't know if you can see
them very well, but they're really short. They go in different
directions so that it's not just all in one direction
like a zipper or something. Just a little indicator. Let's do this on all
three of our cute guys. I'm going to leave
out for yellow ocher, but I will put some over here a few here and a few around the leg. That looks great. Let's pick up some yellow ocher and we're just back to our 90 ten ratio. All right. And just to
start down at the bottom, we get a feel for things. That probably shows up a little better for you to see on camera. I'm leaving space
between them up here. Now, while I'm
still on this one, I'm going to put a little indicator around
the tummy here and there, just like we did
on the last ones. But again, we won't
be inking them in. It's going to have
a different feel. I'm going to add a few more
down towards the bottom. Just to give that feel
of fluffy feathers. Different lengths
here and there. Okay, I'm going to bring
it up the side here. I'm going to put some
underneath his little head. You are going to come in
and do some white as well. And we're going to
put little line that goes up from their
beak up to their forehead. Make sure you curve
it a little bit. These aren't really eyebrows, but just a something
above the eyes. Kind of up here towards the top. Cute. All right. And now, I'm just going to emphasize
a little bit more on these feet because we're
not doing any king. We just need to shape
these a little bit. I'm just going to make
them look texture. Just give them a little lumpy
bumpy on that outer edge. I have made a few little
curved strokes there. I couldn't help but
do this other foot. They're overlapping,
and it's kind of confusing if you know
just got to keep going. The goal. Might as well do this one
since we're down here. It. Yeah. Keep that in 90 ten so that it moves easily for you on
your little line of brush. Sometimes you have to rinse out your brush and start fresh. What I'm going to do here. Looks like I forgot some
little feathers over here. There we go. Yeah, I didn't finish. I must have got
sidetracked somewhere. I didn't finish going up around his cheek either. Hey.
12. Pure Watercolor Feathers: All right. Over here, we're going to go to our lemon yellow. 90 ten. Same thing. I'm going to pick up
some of the ocher. Around the eyes a
little bit above the e on the top of the head. M. This starts to feel kind of tedious, your hands getting, you're
holding it too tight. Set the brush down for a
minute and take a deep breath, go get a drink or something, and come back refreshed because you don't
want to put these on and regret the way
that they were placed. Now we're going to put a lot
of little feathers here. To strong. Just touch it With a tissue if it's
too strong somewhere. Oh. I'm going to put just a few lemon yellows right in that section there,
so I'm going to leave it. This one's in the shaded area, so he's going to get quite
a few feathers here. Darkening underneath
the beak there. Coming into lemon yellow. Little spot here
on his forehead. All right. You need to do his feet with some of
this yellow ocher. Okay, great. It's a good
time to step back and assess and see if you want to do any more little yellow
ocher feathers anywhere. If you're good to
go and it's dry, then let's go ahead and
pick up our number four. We're just going to add a bit
of our watered down a bit. Is going to touch it here and there to add a
little more shading. A. Maybe yours doesn't need it. I just need it a bit more. And I wanted to add a
little bit over here, this was a light. I wanted to shape this
round right here. Yeah. Soften this blend. Yep. Hey, and I wanted to pick
up a little bit of this burn number and just
add a little more texture to the feet to make it a
little more interesting. Yeah. That's better,
don't you think? Go slow and go on
this and go easy. Tu on here. Have you ever touched
a baby chick? They're just so
soft. Oh, my gosh. Their little feathers
just so gentle. My dad was raised on a farm. And so we always had
chickens in our backyard, even though we lived in a town. And I just love the baby chicks so much when they were
born. So adorable. Okay. Let's take a look and
see what we need to add. I think I would like to
add the tiniest amount. Like, this is a 9055 wash
here? Just a little bit? Like this leg here
is pretty shadowed. So I'm going to add a
little bit of a wash there? Like that. Maybe a
little bit here. Because we don't
have the inking to do identification
of certain things. We need to do that with paint. Great, like that better. I think you're going
to add just a bit. This one is our darker
one. He's in the shadow. I'm going to put a little
bit under his neck. I'm not doing a straight line because we want to maintain that little feathery feel
with water on my brush, I'm just bringing it
down a little bit. Okay. I like that.
The ever so lightly. Over here. It's the tiny. I get it. Okay. That's feeling better. Let that dry. We're
going to come in and work on the eyes next.
13. Pure Watercolor Adding Eyes & Details: Okay. Okay, I've come to my
smallest brush, my 20 out, and I'm actually
going to start with the burnt umber watered down. This is called
Carry's Safety Net. Because if I were
to make a mistake, I could easily wash this brown into the
yellow and start over. If I came right in with black, I'd have a tough time
getting rid of black. But also, if I were a beginner and some of you
are beginners out there. Then this is a great way
to safely trust yourself, trust your painting
skills and start out. Put the pen away and just go ahead and paint it in first try. And you can see that it's
working out just fine. You gives you the confidence
to do what you need to do. And it also gives you the
ability to back it out and start over if you need to, there's nothing
wrong with that. All right. So I'm pretty happy
with the shape of those. I'm just going to
go ahead and wash those in with the burnt number. And then I'm going to come
over it with the pans gray. But because we're
still shaping the eye, this is a great
way to fill it in. Make sure you're completely happy with the
shape of that eye. Okay. That's looking good. Now,
while we have this out, let's just add the
tiniest amount of shading on the
bottom up the beak, and I'm just going to put
that kind of right underneath that upper lip, upper
whatever recall. Just like it was a shadow. Okay. All right. Let's pick up
some of our pains gray now and only do this if your
burnt umber eyes are dry. I'm going to go pretty
darker on this, 70 30 split. As I did in some of
the other birds, I'm going to go way down and I'm going to turn my board upside
down and do the other half. It's hard to do a nice circle
without turning your board, and there's nothing
wrong with turning your board to go for it. Excuse me while I turn. Now it's shot. And you notice I always start
in the center of the eye, and then I work my
way down slowly. That just helps me
so I don't know, get misshapen right
off the back. Oh. Okay. All right. Since
we're not inking, something that I like
to do when I have tiny eyes like this is to just kind of a kind
of wash out a smear. So we have our eye and I just have clean
water on the brush, and I'm just going to Kind of a zigzagging motion, a little bit of that paint because I'm just using
a clean water brush, it goes very faint. And so you can see how
it works like that. It just sinks your eye in. Then we're going to
come back with some white and define the eye. But that's what I
would like to do next. If that makes you nervous, practice practice on a piece of paper there like I just did. And just slow and go, you don't have to
press too far out. Just a little ways. We're
not giving him eyelashes. We're just kind of
setting that eye in. Then if we need to come back and add more paint in the
center, we can do that. But see, there's an example. You can see the
difference in the two, and that's what we're
trying to accomplish. We'll clean out your
brush for the next one. We want to start
with clean water. It's just kind of a
fun little technique. And one more. You can see why you have
to let it dry first. If you tried to do
this while it was wet, it would look like eyelashes, and that's not what
we're intending. Great. Now, let's let those dry and then we'll come back and
just put a little bit of extra paints gray right
in the center of the eye. While that's drying, step back, take a good look and see if there's something
else that you want to add to the little bit of feathering we've
got going on. All right. When I step back, I realized I hadn't put any
yellow ocher around the beak. We're going to be
really careful. We don't want to
mess with our eyes. This is going to be
a 90 ten mixture. We're just going to
add a little bit of a shadow underneath the beak. And a little above here. Of course, we're
on the side view. So we'll just put a little on the side here and a
little on the side there. And then I'm just going to
add a bit I don't know. I just don't want
that to be straight, so I'm just going to
add a marking there. Here and same thing. Ok. Then also, these little guys
have I don't know what it is a little
bump above there. Be little round which we're going to highlight in
white, but let's put it in. Hey. That's looking good. Let's go ahead and put our pains gray in to
the center of that eye. Only if you need it. Make
sure it doesn't drip. I want it to be nice
and dark in the center. Great. Okay. Let's let that dry completely. Sorry,
one more thing. If you want to and I'm going to add just a little
bit of a triangle, like the corner of the eye
indicator. You don't have to. I'm going to add also a little you haven't
done it already. Just a little nostril. Good. Okay. Let's let all of
that dry completely and pull out our white. I.
14. Pure Watercolor White of Eyes Highlights & Sign: Okay, I picked out my
bleed proof white. This is probably 95%
paint and 5% water. I just the opposite of what we do with our watercolor paint. I'm rolling this and lifting and bringing it to as fine a tip as I possibly can. And then I'm just
going to do kind a broken line to indicate
where the eye would go. It doesn't even need to
go all the way around. It can, if you want it to. Okay. And then
we're going to pick up a dot. Great. Now, we're going to add in some cute white
feathers to highlight. Where the light
picks up some light shining on those feathers. You need to clean up a one. This is a great way to do it. Go around that little white dot. It goes on stronger
than you like. Touch it with your
finger or your tissue, or you can even remove it with
some water on your brush. And since we're not thinking, I'm going to be a
little more liberal. A little more white. Before I forget. We need to put that
little bit of white around the eyes feathers. Make sure they're going
in different directions. They're different height.
These are not eyelashes. I'm going to put
too many over in the dark side or
on the dark leg. I took the time to completely
wash out my brush. I'll do that
frequently when you're working with this white. Even if you're working
with white guash, you don't want to build up. Okay. Not very many on this darker leg, either. I think we're about ready
to step back, six feet, take a good look and see if there's anything
that needs to be adjusted. With this one because
it was just so clean. I didn't feel like doing any splattering or any
ground beneath it. I'm going to leave
it just the way it is with that simple, pure white background,
and it makes our chicks stand
forward by themselves. So I'm ready to sign, always sign your artwork, claim your art, and be
really proud of it. And look at yourself
and remind yourself how wonderful you are
and how talented you are and what a great
ability you have. And I'm so proud of you
for taking this class, and I'm so proud of you for practicing and
pursuing excellence. And let's go ahead and
sign our name together, and then we'll move on to our final piece of
colorful chicks. So you in the next video.
15. Color Chick Mixing & Washing In: Before we get started on
these cute colorful chicks. I just want to review quickly a couple of the color mixes that we'll be doing ourselves. Yes, you can do it.
I believe in you. First of all, let's
try this buff. Let's go with this buff. This will be a good
base for color mixing. You'll just pick up
some of this buff and we're going to add
in a little bit of the ciilian blue and it
just tones it down nicely. Let me get a little
more water here. And you can see how that just softens that color and tones it down nicely as such. Then we're going to do the
same thing with violet. I'm using Windsor violet. You can use whatever
violet you have. There you go. Some nice
muted tones there. We just don't want to overpower. We want these baby chips
to be nice and soft. Now here's the one that I really wanted to go over with you. We're going to use yellow
ocher as our base mix here and we're going to pair
that up with permanent rows. Depending on how much
permanent rows you start with It will
determine your color. Obviously, if you add
more of the rows to it, you're going to have
a stronger red color. We add even more. But let's go with
more yellow ocher this time and just a little bit of the rows and you'll
see how it goes almost we're going to be using both of
these in our piece. Guys, you have the choice. You get to choose
what color you like. How pink you want it to be, how peach you want it to be. If you look at this
center one in the middle, I used a lot of
peach on that one. You choose what color you like, but I recommend that
you play with this a little bit on a scrap of paper and we'll mix these
together as we go along. If I didn't do this one. If you want it a
little more gray, let's do that one real quick. All you do is you take
your yellow ocher, pick up that permanent rose, and a touch is the tiniest
amount of your panes gray. And that will gray that down. Oh, isn't that
beautiful? Love it. These are great for
doing floral bouquets, any kind of flower
or Victorian type of boho type of feel. This is a great color mix to use on your palette for a
lot of different things. Play with that, and
let's go ahead and get started on our piece. Let's start with clean water
on our number four brush, and we're going to get our
first chick head nice and wet. Let that start interacting
with our paper. I'm going to go
ahead and go right over the beak on this one, like we have on the other two. Hopefully, you painted
the first two chicks. Nicely warmed up before
we tackle this one. I'm going to pick up
some lemon yellow. It's going to be
a 90 ten mixture. Go ahead and wash that in. Remember a wash is just
a thin down value, and we're going to keep
that same value throughout. Great. Now I'm going to come
in with some yellow medium, and I'm just going to add some
strength along the top of the head and on the chin and down between the eyes where
those little feathers will start poking out
when we get to them. And for the cheeks, I'm going to go with
tad yellow medium and some permanent rows mixed together. And let me get back. More water there. You see the color I'm
trying to achieve here. It's a little more pink. I could have done
the yellow ocher as we did with our color mixing, but I wanted it to be
a little more pink, so I'm sticking with the yellow, and the permanent rows Keeping it off the beak. Just
wipe that onto your tissue. Ill it settles
down a little bit. Here we go. Okay. All right. Now, I'm
going to pick up a little this yellow ocher. And at the eyes between the eyes towards the top. And because it's still wet, it's going to blend a little bit. Okay. This is looking good. It's going to soften this
a bit was a little dry, so it didn't go out quite
as far as I'd hope. I'm going to help it along. Great. Now we're going
to start the body, and I'm going to go yellow, pinky and blue on this one just to give
you a little heads up. I'm going to start with
just a little water and about a third of the way. This is the fun part. I'm so
excited to do this with you. Steering clear of
those wet cheeks. Picking up some lemon
yellow, floating that in. I'm keeping it darker on
the outside if you can tell and lightening it up as we
get towards the center, towards the roundness
of his belly. Now this next section, let's go ahead and mix
them up first over here. I'm going to take
some yellow ocher and I'm going to mix in
some permanent rows. Okay. I like that. Okay. Now, let's
get this a little bit wet. It's okay. I've got a
little pink tinge on there. I didn't clean my brush real
great, but that's all right. About a third of the way over, it's okay to go down
into the leg there. Let's pick up that
mixture we just made. Drop that in. So pretty. A little dark
underneath his chin. Great. Let's see how that blends by itself before
we help it along. Coming next to it, I'm
just coming in with water to get rid of some of
that pink that went in there. Now, I am going to pick up some buff and some
of our serian blue. Because it's in the shadow area, I'm going to make
it a little bit stronger out there and come
in right on top of that. Now, see how nicely that's
blended by itself over here. And I've just got clean
water on my brush. Just going to soften that edge a tiny bit and give it a minute
and see how it does there. And while that's blending, I'm going to bring a
little of this pink. Just a little further
into the yellow. Get some clean
water, soften that. There, I like that better. Okay. Check out your cheeks, see how your cheeks are doing. I think that's pretty good. I'm going to leave that. We can go ahead and take a little of the yellow ocher
and wash in feet. We're pretty good at these
feet by now, aren't we? At this stage, we can
just do all one value. This is where we go underneath those toes from our next
door neighbor there. Great. All right. And that feels pretty dry. My face is pretty dry. I'm going to pick up some
pretty strong yellow ocher and just do the bottom
portion of the beak. Only do this if
it's if it's wet, it will just spread. If that happens,
it's not the end of the world because
we are going to put some shadow in
there. Here we go. This seems to be doing
pretty well there. We'll come in and add a
little more shading to it, but we're going to
let that dry first. Let's go ahead and move
on to our next one. Let's clean out our
brush really good because we're going
to work with yellow, go to your clean water. Let's go ahead and
get the head wet. Now, this time, we're going
to stay away from the beak. Since it's in a better position, we can just go around it easily. Lemon yellow. Oh. Great. Let's pick up some cad yellow and add some darker color around the top, around
the outer edge. And especially on
this shaded side over here towards the bottom as well. Let's give the water a
minute to work with that.
16. Color Chick Washing In Chicks: Okay. While that is blending, let's create the color that
you want for your cheek. I'm picking up
some yellow ocher. Last time we did CAD yellow. This time, I am
going to do yellow ocher and some permanent rose. I'm going to go pretty rosy. I'm doing this because
I'm going to do a lot of peach on his tummy, and so I want it to be in the same value,
same family values. This in. Just have clean
water on my brush. I'm just going to help it
along a little bit here, a little dry on mine. I'm going to do that if you
need to. Add a little more. Let's give that a minute
and see how it does, and while it's spreading out, let's go ahead and add some from the from the beau
around the eye. So up on the head and
around a little bit. It's a little too strong. I'm going to lift
that out just to Tad. If something goes on too strong, you just need a clean water
brush and you touch it and touch your tissue and
it'll come lift right off. Nice. Okay. I'm
loving this color. This is great. I'm going to
soften that a little bit. Good. All right. Let's check out our
mixture for this body. I'm going to do yellow, and then more of a peachy
color and lavender. Decide what colors you want to do and let's get them mixed up. Color. Let's come over to
our yellow Coming rose. Now for the peachy color, you need more ochre than rose. Don't be afraid to test
it out on your palette. Make sure it's what
you like before you put it on your cute little bird. That works for me. And
also going to pick up some buff and violet. That's too strong, more buff. That's better. All right. Then we're
ready to put some water. Go ahead and rinse your
brush out really well in your clean water and
apply water to the body. I'm trying not to touch the blue in case that's still
a little bit wet. But if it is and it bleeds
over into your other one, it's not the end of the world. You could do this
with a bigger brush, but I'm partial to
my number four. I like to have the control of a smaller brush
for smaller areas. I come down carefully into this leg because this is where some of our darker color
will go. Great. All right. Here we go. Let's get
our lemon yellow. I'm going to go a little
stronger with this one because as we get further over, they're going to be more
and more in the shadow. Now notice I'm curving this. Always stay with the contour
of whatever you're painting. That looks beautiful. Hey, let's pick up our mixture over here. This peach color. I need a little bit more. Great. We'll let that see how it
blends with the yellow. We can help it along in
a minute if we need to. I'm just going to get
this a little more wet. The air here must
be extra dry today because things drying
so fast. All right. Picking up some of this
mixture we made with our buff and our violet. Oh, isn't that? Great. Put that on. We're also going to use this on the leg that's in the shadow. I'm going to put a
touch over here on this leg right over that yellow. If you had yellow or
whatever there, that's fine. Let's give it a second
and see what it does, and then we'll help it
along with some water. Rinse your brush out really
well with clean water, and I have a strip here, so I've definitely
got to help out. I'm going to add a
le bit of yellow. In some of our mixture here and let those two
blend a little bit better. Bring it up a little more.
Great. That's looking better. Just using a very
light light touch. Okay, and before I
mix with the purple. Again, I'm rinsing out using
a very clean water brush. Let's see what this does here. There we go. See
how that water to soften that edge
right up beautifully. All right. And we
have our leg here. I'm going to add just a little
more violet to our mix. Touch of water. And just create a little bit
more of a shadow here. No. Soften that with some water. There we go. That looks better. A few feather lines here. Better here. I'm just going to add a
few feather lines. Good. And we'll come in and a
touch a shading in a bit. Now, how do your cheeks? How does your cheek?
I think I'm okay. Mint's not nice and
round, but that's okay. I might just touch a bit here. The little feathers after all. It's not supposed to be smooth. There we go. That feels better. Okay, let's go ahead and
wash in our feet and legs, keep it old yellow
ocher, 90 ten mix. You know, the drill. We've done this lots of times by now. I am staying away
from the purple. Great. Hey. Let's do our next one. Let's go ahead, have a very
clean brush and the head wet. Avoid the beak. Since it's pointing in the other
direction, that should be easy. Yes, I'm aware we didn't
go in and paint that be. We're going to we'll get to it. Great. Let's do some yellow. A. This felt strong. I take a little off. Great. Now, let's mix up
our cheek color. I'm going to do cad yellow
and permanent rose. I got a lot of water on here, so I'm going to
have to watch this. Okay. I'm going to keep it in control. Okay. Let's add some yellow
towards the top. Cheeks are growing, so I
got to pull them back down. If they keep going, I
just have clean water on my brush and I'm just
touching my tissue, and that just pulls
it back down. Okay, let's pick
up a little bit of our y from the not around the eye. Wonderful. And while we have this on our brush,
let's do the beat. Let's do the bottom. Okay, can't do that
one yet it's too wet.
17. Color Chick Background & Splattering: While that's blending, let's
put some on these legs. This one's underneath
everything. It's under this bird. It's under his tummy. In other words, it can be fairly dark. I don't want to do that. Okay, but it starts going up. I touched the tummy and it started going up into the peak. You just have to pull it
down, touch your tissue. And that's okay. Now, on this side,
I'm going to do it a bit because it's on the
liner side of the bird. But it's still underneath,
so I'm going to do blue. Pulling out some feathers. All right. Let's see how we're blending here. Pretty good. I don't want a straight down. I'm going to bring
it up a little bit. I'm going to have a
little again down here. This is just water on my brush. There. Yes. Hey, and I think the blue
is going to be fine. I'm going to add a little
more depth to the che. Take a look at your cheek
and see how it's looking. I did yellow for this one. I'm going to mix up
just a little bit more. Add just a touch more. Yep. I like that better. We know chicks don't really
have rosy cheeks. But they're sure cute
when they have them. It's up to you how rosy or not. Maybe you don't want
them rosy at all. You can just keep them yellow. That's fine too. Like that. Hey, let's go ahead and put
in the legs, yellow cher. Stay away from the
blue. That's too dark. Ten it down a little bit.
We just want to wash. We don't want it keep it in 90 ten. Okay. Now, I can't do the
bottom of my beak yet because the cheek is still wet. But if you're able, you can put in the bottom
half of your beak, or if not, you can wait for me. It'll be just a
moment. All right, let's go ahead and
put in the bottom of the beak that's not
quite finished yet. Just a 90 ten mixture
of our yellow. Okay. Okay. And actually, while we
have this on our brush, let's go ahead and wash
in just a little bit of a shadow around the top and
the bottom of each of these. A bit. Great. Going to
soften this a little. Bring that up just to touch. What I love about watercolor
is you can really manipulate where you
want the paint to go. It's so versatile. Great. All right. Let's go ahead and take our
large I'm using a number 12. Any large brush that
you have will work, but we're going to work on
the background a little bit. This is going to be
about a 9055 ratio. Quite watered down, and I'm
just going to bring some out. If I'm using yellow
on the background, it's going to come from a
yellow portion of the chick. So, you know, and you want
it to look not square, not straight. You
know what I mean? You want it to be kind
of natural looking, kind of a little
explosion of color. Here as well. Okay, let's pick up a little
of this pink here. Yellow. Maybe you still
have some on your palette. That would be great. Okay to likely go
right over the feet. We're going to come back
into those feet anyway. I'm going to have a
little right there, too. To add just the slightest
amount of purple there. Cute. To add just a
tiny bit of blue. Yeah. You be a touch. Be careful not to sat
on the head on this. And I need to add a little
more of that yellow over here. Have fun with this. Step back, take a look at it and add as much or keep it as small as you
would like it to be. This is totally dry now. My background is completely dry, and I'm picking up
my number four and coming into my Cerilian
blue with lots of water. Is probably 9055 mixture. I'm going to do
some splattering, but I don't want a lot to go
onto my cute little chicks. I'm just going to hold a
tissue over and splatter. I'll just move the
tissue as I go along. Now, before that dries, I'm going to lift some of them off and leave
some of them on. Just so I have a variety, and it looks like I have
a couple get up there on the chick. That's okay. You can also, if you want
to emphasize some of them, just touch them with water
and they get bigger. And since this is the blue area, that's what I'm going
to allow happen here. Okay. Ready for
the next section. I'm tapping ones over here
first to get the bulk of the paint off so it
doesn't go on too big. I don't want to overpower
our cute little chicks. They just have a
gentle softness to them that I want to maintain. Great. Okay. Before those dry, I'm going
to soften some of them. Just here and there,
not everywhere. Good. Okay. How to do? We need to let that completely, and then we're going
to come in and we're going to do a
little added shading.
18. Color Chick Deepening Shading: I'm going to stick
with my number four. So clean water. All right. I'd like to just start from
here and move my way over, and this is where we're
going to tweak it and make the final
touches that we want. So I'm looking to see if I
have the shading on the face. Are the cheeks the
way I want them? Did I shade around the beak? Yes, to all of those,
but I am going to emphasize just
maybe a little bit more of a line there
above the beak. Then we could put in just a few little individual
feathers here and there. Remember we're going to come
in and in some of this in, but you do want something
underneath the ink in general. We'll just emphasize that.
Then same around the legs. Shading in a little bit
with some feathers. Cute. See they start to get
their little personality. We need to add a
little to the feet, add some texture lines,
and little bumps. Add a bit of the go as well. Just to throw in
some more color. Great. Okay. Now, I'm still not
happy with around the leg. So I'm going to deepen that shadow picking up
some of our mixture. I'm just going to touch
in a little bit there. A bit more on the bottom. The clean water on my
brush here as I soften that as it comes up the belly
a little bit. There we go. There we go. Okay. Now, I am going to deepen the shadow in
the corner there. I'm just going to pick up
some cerlian no buff added, but I am watering it down. A teeny bit in that corner. And then soften the
edge with water. There. Nice. See how that just makes a nice shadow
under bringing it down where it touches
the bird next to it, a little bit on the bottom. That adds some nice
depth and dimension. Nice. And if you wanted
to, let's just do it. Let's add a tiny bit
of this yellow medium. P 9055. Just a smidge. Just to define the difference between the face and the body. There would be a little
shadow cast on the body. You see how it makes
the face stand out. If you want something to stand out or a highlight
to be stronger, you have to put something
darker behind it. That's what we just did right there, and
that looks great. All right. Let's move
over to our next one. Actually, before we move over, I just want to add
the slightest amount. Sightest I mean, teeniest amount shadow on this part this
half of his beak on the top. Okay. No. Just take a look at
your own and see if it needs any more emphasis or if you're feeling
good about it, then leave it the way it is. Remember, we're
going to ink here. I'm going to darken the
bottom of this beak. I'm going to darken the bottom of that beak too, actually. All right. Let's
look at this yellow, and maybe add a touch. Same thing. Had yellow medium right under that beak on
the body. That's better. Bring it right on over. I like that. In fact,
I like it so much. I'm going to come back
and put a little of this yellow right on
top of that peak. Yep. That looks good. It's a little reflection of
his yellow feathers from the face down onto
the chest. All right. So let's look at what we need to do to add some
shadowing down here. This is our yellow ocher one. It's kind of on the peachy side. And I just want to touch in around the leg a little
bit, bring it up, Tad Bring it across the
tummy a little bit. Now, this leg is tucked
totally under the body, so we'll leave that alone. Now I'm going to use some
water and soften that up. Love that color. It's
beautiful. Okay. That's nice. Okay. And
then on our Purple. I'm just going to. Just a few little
feathers that are dark mixed amongst
the lighter ones. And I know we darken this once. I'm going to do just a
touch more soften a bit. Yeah. And same up
towards the top. Just going to add some around
underneath the head here. Down. He soften that with water. There. That's better. Okay. And then I am going to take a touch
of yellow ocher. Very little. Okay, great. Now let's
look at this one. I definitely need to strengthen somebody these
feathers right here. Right from the beak. A few around the cheek. Softly over. Super light on the upper beak, super light, but
we just don't want to leave it plain white. Okay. Now let's
look at the blue. That looks good. I'm probably not going
to add more to mine. But I will add some more to
the pink down here and it's the pink Clean water, soften that. Carefully bringing it up. Red blue make purple,
so it would be okay, because we've got purple
right next to it, but I want to keep a
definition if I can. And I'm going to add just a touch yellow. Good. Great. Now, let's just add
a few strong feathers. And we'll be good. A
little shadow there. Now, when you sleep
to do those feet, let's pick up some yellow ocher. We want this to be a 90 ten. And pick up some
of your gamboge. And I say this part for
last so that we can clear up any of the splattering that might
be too strong on the feet. This is a great time
to just clear those out. This one too light. I'm going to darken it. Okay. I can't wait to ink this. It's turning out so cute. I
hope you're loving yours. I hope you're having
fun. Throw in some gambo That Gambo just darkens it up so nicely even though
it's so transparent. Right. Okay, let's let this
dry completely.
19. Color Chick Feathers & Eyes: Okay, let's put some more
of our little feathers in. Using our yellow ocher
and our number four. Just little indicators. I don't I still got
too much water. When you see me touch my tissue, I'm just pulling some of
the water off my brush. Okay. Goodness. All right. A little darker. Great. Okay. I think we're
ready to put in the eyes. So go ahead and grab your pen. Okay. Let's go and
start with a circle. And I'd like to
put just a little. Great. Now, I'm going to
just put little lines, but we'll come in
with some of our pans gray and go over it so that
there's no yellow showing. And it also makes it
so it's not shiny. You can see right now because
the pen ink makes it shiny, but the bird is not shiny and so we want to have
a nice mat finish. Say one more. Great. Okay. Let's
go ahead and set our panicide pick up
small liner brush, whatever you're using, -20 ought and pick up some
of the pines pray. We're going to want
that pretty dark, so I would say 50 50 or 60 40 and just come over
what we just threw in. You don't even
really need to take it all the way to
the outer edge. We're mostly trying to fill
in that center portion. Then we'll come in with
some white and give it a soft broken line outline to define the eye a and
give it a highlight. One more. But this will have
to dry completely. Okay. Let's let that dry. Okay, I'm working with my 20 out and I have picked up
bleed proof white. I put a little bit
in my cap and work with it here because when
you have this tiny breast, you have to reload so frequently that it's just easier
to have it right here, and then I'll rinse out the cap frequently and make sure
it's nice and clean. But what we're going to do
is let's start with the eye And I notice I'm rolling this between my thumb and
my finger and as I do, I'm pulling up and that gives me a nice fine tip on my brush. This works with most any
round brush that you have. When we're doing
fine work, you want as tiny a tip as you can get. With these eyes, what
we're going to do is kind of a little
broken line of white goes around the
outer edge, like that. And then we're going to
pick up a little dot. Not that big of it out
and not in the center, so it'll be up towards the
top and a little to the side. Just make sure you do it to
the same side on both eyes. Okay. Then with these chicks, if you look at the
reference photo of the live chicks
that I gave you, they have this little white Not eyelashes. I don't
know what it is. Little scaly things or
something around the eye. Anyway, it's white, we're just going to do a
little indicator of that and just make
some horizontal, some vertical and
different sizes. So you don't want to look like it has a ring of
white eyelashes. Let's move R your brush out
really good between with these because the
white will build up and we want to keep
it as fine as possible. When we go around the eye, it's so important to
have a very fine tip. Y? Let's get a little
white. One more to go. Right. Ooh. Hold. Were
you holding your breath? I know I was. Take
a deep breath. Now, I'm going to add a
little bit of a highlight. On each of these beaks. Let's go ahead and add some highlighting
feathers, little feathers. Just we're following
the contour, see how we got our arch, but they're all
different lengths, not in a row per se. The above the eyes. Turning out so cute. This is
when I just love doing this. Now all of them have this
no thing right above their. We're going to want
to put that in white. Then we're going to make it really show up
with the inking. I'm going to put a few
feathers around these cheeks. And then I'm going to have
just some random feathers. Keeping them tiny.
Just a little pop of light catching
these feathers. Now around the legs. I'm
going to do a little more. Some texture on these talons. Okay. Let's move
to our next guy. That will lump above
his beak right there. And emphasize that highlight
right there. Touch. There. All right. And then some random feathers. And on the legs. Nice. Okay. And let's
come over to the sky. Now you see why we did that
with the yellow ocher. It just makes our little
white feathers pop up. And we're going to come
in and ink it as well. All going to come together. All right, let's step back and take a look and see if
there's anything else that we want to add with paint before we ink
and we'll be finished.
20. Color Chick Inking & Sign: Okay. I'm pulling
out my MG pen, MJ. It's just a ballpoint pen, but it's great for artwork because it's
completely waterproof, and I encourage you to use whatever you're
comfortable with. But I would make sure that it's waterproof and you
might be saying, well, are, we're finished painting,
so it shouldn't matter. Yes, that is correct.
You're right. However, if you finish inking
and then you're like, Oh, I wish I could go in and add this one little thing and you are unable to do that because you didn't use a waterproof pen, then you're going to wish
that you had Trust me. That's the voice of
experience here. So that's why I always say use a waterproof pen if you can. Just to be on the safe side. So no, you don't have
to at this point. We don't intend to go
in and paint anything. But never, never. All right, so these
little feathers that go around the outside are little Vs,
little broken lines. They're disconnected
and unevenly spaced. Just to give it a little
more natural look. It's up to you,
how many you want? If you want a really
heavily inked look, then put more in. I'm going to keep a
more delicate look. You might want to keep
a piece of paper handy just in case you need
to revive the tip. We won't say those
are eyebrows per se. But if you look at
the actual photo, it does have some
kind of I don't know, it was just a little
bit darker there. I'm going to be really careful because you can't
really do a line. There we go. I'm going to put a little nostril indication. Then I'm going to go
around this little bump. I don't know if you look
at the actual photo, I don't know what
it is. I'm sorry. I'm not very good
at chicken anatomy. All right, that's
looking pretty cute. I'm going to put just a few
here and there on the body. Just keeping in line with the
yellow ocher that we did. That's why we
wanted that kind of underneath our inking
to give it some depth. Then when it comes to
our feet and legs, notice I'm making
a squiggly line. Not going over the top with it, but they are definitely
textured feet, so I'm going to do
this one while I'm down here because it
always bothers me. Every time I've
done this, this is probably the tenth
one I've done now. It bothers me that they overlap. Let's keep on going. Now, we just want to make
sure that we're following the contour Keeping
in good shape. I can't wait to
see your projects. Please snap a pick
and put those into our class galleries so we can see each other's cute chicks. They're all going to turn
out different and amazing. Notice I slow down
to do the head when I'm doing the heads because
they stand out more. It's kind of our focal point. The body you can go
through the head, you need to be careful
especially these beaks. Great. Hey, last buddy over here. Sir. How you doing? Looking
pretty good. All right. Down to our last
cute little face. Notice the curved lines there. Refer to your pattern if
you've lost your guidelines. And notice that
the head comes up beneath kind of a round and
beneath the beak on this one. You. All right. Okay, let's step
back, six speak. Take a close look, see if there's anything
else we need to ink. All right. I think
we are finished. I feel great about this.
I hope you do too. I hope that you learned
something and you had a great experience
painting this, what was relaxing and enjoyable. Please take a moment
to look in the mirror and tell yourself how
talented you are. You truly have a gift and a talent that most
people don't have. I'm so proud of you for taking this class and
completing your project and taking the time to invest in yourself and making
yourself a better artist, a better person, for learning something new and improving the talents that
you already have. Thank you for spending
your time with me. It truly is special to me to have you take
this class. Thank you. All right. Let's
go ahead and sign our name together and
claim our artwork. Okay. All right. That's
it for this class. I hope you took the time to take the other two chicks
if you didn't. I hope you'll come back
to it at some point. I will see you in the next
video, and we will wrap up. Okay.
21. Congratulations & Bloopers: Well, congratulations,
guys. You did it. You finished your project. If you found this class to
be a benefit to you and you know someone else who would enjoy this class or
benefit from it, could you just take a
moment to find this link? It's on the main page of
the class of this class, and just share this
link with them, and both you and your
friend will benefit financially from Skillshare,
which is pretty cool. Also, if you could remember to just snap a pick and upload it. You look for this
button on again, the main page of this class. That will put it in
our class gallery, and I will have the opportunity
to speak with you there, and we can see what
each other has accomplished and
support one another, and that would be
really awesome. Also, if you would like to take another one of my classes, I would be thrilled to
spend more time with you, and all you need
to do is go up to the search button at the top of this page,
type in my name, Carrie Sanders, and all the
classes that I have here on skill share will populate
and maybe something would be interesting for
you to take there. Okay. Lastly, if you would
like to follow me, just click the follow
button and you'll get a little notification when
my new classes come out, and maybe we can spend
some more time together? That would be fun. Thank you so much for spending your
valuable time with me. I really do appreciate that. Thank you. All right, guys, I think I have 1
million bloopers today. It's early in the
morning here in Utah. I've had a hard time
getting my lips going, so until the next
time. Take care. Okay, my fellow artists and
friends, your class Oh. Take 20. Here we go. You can upload it easily
onto skill shares page. Wow. This is going to be a blooper day. I'm going to have a
lot of bloopers today. Focus. Okay. I can do this. Breathe.
 Kerrie Sanders, Artist, Teacher, Creator.