

How to Rig in Blender: A Step-by-Step Tutorial | Skillshare Blog
Master the basics of character rigging in Blender with this step-by-step tutorial, perfect for beginners looking to enhance their 3D animation skills.


Rigging forms the backbone of 3D animation, allowing characters and objects to move realistically.
Here, you can learn the fundamentals of rigging within Blender, a popular (and totally free) 3D software. Whether you're animating characters for a game, film or personal project, understanding rigging is crucial for bringing your creations to life.
Step 1: Understand the Basics of Rigging
In 3D animation, "rigging" refers to the process of creating a skeletal structure within a 3D model, which allows it to move and deform in a realistic way. This structure, known as an armature, consists of interconnected bones that define the model's movement.
Rigging forms the foundation upon which animations are built by providing the framework that allows characters and objects to interact with their environment and each other. From simple movements like walking to complex ones like combat, rigging makes convincing Blender animation possible.
Pro tip: Remember to save your work frequently throughout the rigging process.
Step 2: Prepare Your Model for Rigging
Before diving into rigging, it's essential to properly prepare your model. This means addressing two key prerequisites:
- Clean topology: This is the organization and structure of the model's mesh. It's essential because it ensures that the model deforms smoothly during animation.
- Proper symmetry: Symmetry is crucial for humanoid characters. That's because it allows symmetrical bones and weights to be mirrored across the model.
Follow these steps to prepare your 3D model for rigging:
- Import your model: Launch Blender and open your model file.
- Check for clean topology: Switch to Edit Mode. Inspect the model's mesh for any irregularities, and use Blender's mesh editing tools to clean them up.
- Verify symmetry: In Edit Mode, enable Blender's X Mirror option from the Options panel to ensure X-axis symmetry.
- Fix flipped normals: In Edit Mode, enable Face Orientation display from the Viewport Overlays menu. Flipped faces will appear in red—select them and use Blender's Recalculate Normals function to correct them.
- Remove unnecessary vertices: Select and delete any extraneous vertices, edges, or faces.
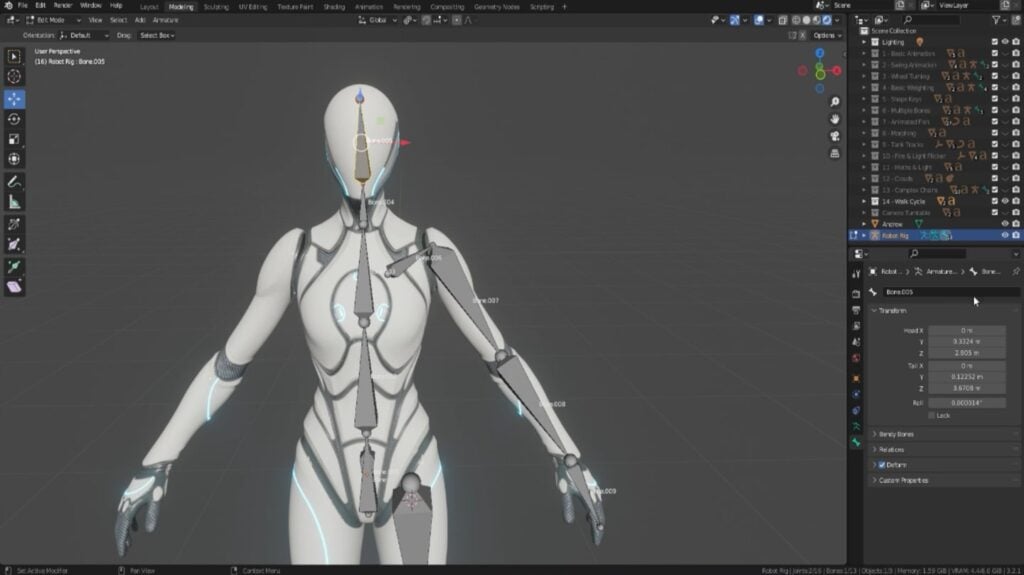
Step 3: Create a Basic Armature
When rigging a character in Blender, you’ll need to create an armature that defines the character's movement.
Here's how:
- Open Blender and import your model: Launch Blender and open your 3D model. Switch to Object Mode.
- Add an armature: Press Shift + A (or open the Add menu). Select "Armature" from the list of options.
- Position the armature: Use the transform tools (G, R and S) to position the armature in the scene and align it with the model's pose.
- Enter edit mode: With the armature selected, switch to Edit Mode.
- Add spine bones: Select the existing bone at the base of the armature, then press E to extrude a new bone from it. Position the new bone at the base of the spine, then repeat to complete the rest of the spine, extruding each new bone from the previous one.
- Add limb bones: Select the bone at the end of the spine, then press E to extrude a new bone for the upper arm. Position and size the bone to match the proportions of the character's arm. Repeat for all remaining limbs.
- Adjust bone placement: Use the transform tools to adjust each bone's placement and orientation.
- Mirror bones: Select all the bones on one side of the armature, then go to the armature menu and select "Symmetrize."
- Name bones: Select each bone individually and enter a descriptive name in the Bone Properties panel. Once you've finished adding, adjusting and naming bones, exit Edit Mode.
Step 4: Define Bone Hierarchies
In rigging, parent-child bone relationships refer to the hierarchical connections between bones within an armature. These relationships dictate how bones move and interact with each other during animation, so defining them is crucial.
This is how you can set up hierarchies and adjust bone pivots to ensure proper character animation:
- Enter Edit Mode: Select the armature object and enter Edit Mode.
- Select bones: Choose the bones you want to establish parent-child relationships for. Typically, you'll start with the root bone and go from there.
- Set parent: With the bones selected, press Ctrl + P to bring up the Set Parent menu. Choose "Connected" to make the selected bones children of the nearest parent bone. Or, choose "Keep Offset" to maintain the relative position of the child bones to their parent.
- Adjust pivot points: Select a bone and go to the Bone Properties panel. Under the Transform tab, you can adjust its pivot point.
- Rotate bone pivots: Use the rotation controls in the Transform tab to rotate the bone's pivot point if necessary.
- Repeat for other bones: Repeat the process for each bone in the armature. Once you're finished, exit Edit Mode.
Step 5: Add Constraints and Controllers
Constraints impose specific rules or conditions on how bones can move. By using them, you can create rigs that behave more predictably, resulting in smoother, more realistic animations.
Here's how to add and configure constraints in your rig:
- Select the bone: Start by selecting the bone you want to add a constraint to.
- Add a constraint: With the bone selected, navigate to the Constraints tab in the Bone Properties panel and click "Add Constraint."
- Choose a constraint type: Choose the type of constraint you want to add from the list.
- Configure settings: Once you've added a constraint, configure its settings to customize its behavior.
- Repeat for other bones: Repeat the process for other bones in the armature, adding and configuring constraints as needed.
And here’s how to create custom rig controllers for even better animation control and improved workflow efficiency:
- Add control objects: Create simple objects to serve as controllers.
- Parent bones to controllers: Parent the bones of your rig to the control objects you created.
- Add constraints to control objects: Add constraints to the control objects for even more control.
- Configure control object settings: Adjust the settings of the control objects and constraints as needed.
Step 6: Test & Fine-Tune the Rig
Fine-tuning the rig is a crucial step that ensures the character deforms and moves realistically during animation.
You can fine-tune your rig by using weight painting, and by posing your character.
Weight Painting Techniques
- Access Weight Paint mode: Select the mesh of the character and select Weight Paint mode. In the Tool Shelf (T), adjust the brush settings as needed.
- Paint weights: Select a bone and paint over the mesh where you want that bone to influence deformation. Different colors represent different levels of influence, with red indicating full influence and blue indicating none.
- Refine weight painting: Use the blur and smooth brushes to refine your work.
Posing the Character to Test Joints
- Select pose mode: Select the armature object and switch to Pose Mode.
- Start posing: Use controllers or manipulate bones to pose the character.
- Test range of motion: Move each joint through its full range of motion to test how the rig behaves and reveal any issues.
- Refine posing: Make adjustments as necessary.
Learn 3D Animation & Blender with Skillshare
By following this guide and embracing continuous learning, you can develop the skills you need to create captivating animations using your own custom rigs.
And for the ultimate continuous learning resource, Skillshare is your one-stop shop for Blender knowledge. With online classes geared toward Blender beginners, professional 3D animators and everyone in between, you’re sure to find a class that caters to you.
Related Reading:
Carrie Buchholz
Carrie Buchholz is a freelance writer who lives in Northern Colorado with her husband and dog.
Learn Animation with Skillshare – Start your 7-Day Trial Today!
Get Started- Hands-on classes with animation pros
- Unlimited access to all classes
- Browse a variety of animation platforms


