

How to Resize Images in Photoshop: A Complete Guide
Resize any image in Photoshop without affecting its quality by using the Image Resize tool to adjust photo resolution, dimension and fit.


You might want to learn how to resize an image in Photoshop because you need to increase the resolution of a digital creation so you can print it without any graininess. You could also add this new Photoshop skill to your repertoire if you want to resize an image for social media, reduce the size of a file, thumbnails for your YouTube videos, or because you’re working on making a mockup in Adobe Photoshop.
With only a few steps, you can resize an image in Photoshop without stretching it or reducing its quality. Even if you’re still learning the basics of Photoshop or don’t identify as a tech wizz, you can learn to resize images for your next project.
When to Resize an Image?
If you’re a photographer who does a lot of photo editing, you might have clients who need their final photos for different projects. One client might need a headshot for LinkedIn, another could want a photo to post to their Instagram and another might need a picture of a model for their brand’s website.
Since LinkedIn allows a maximum image size of 7680 x 4320 pixels and Instagram only allows images with a maximum width of 1080 pixels, the platform your client will be using their image on will affect the size of the image you’ll want to give to your client. An SEO website designer might use Photoshop to resize an image to a lower resolution to reduce the time it takes for a website page to load. You might need to resize your images to save space on your computer, get a picture to fit your phone screensaver or print the right size photos for your holiday cards.
If you already have another photo editing app, you might be wondering about the differences between resizing an image in Procreate vs. Photoshop. Since Procreate in a digital art app rather than an editing app, you’ll have more control over the dimensions of your final project. If you already have Procreate and don’t need to make your file size too large, you can use Resampling Canvas to change its size.
You can also use Adobe Fresco instead of Adobe Photoshop to resize your images, but similarly to Procreate, Adobe Fresco is a digital art app and won’t have the same capabilities as Photoshop.
4 Steps to Resize an Image in Photoshop
No matter if you’re here for graphic design help or want to learn how to scale an image in Photoshop for a personal project, the way you’ll go about resizing an image in Photoshop will be the same. Remember that it might take you a few tries or a few different projects to be able to resize any image or design without having to think things through. You’re welcome to save this guide and come back to it as needed.
1. Go to Image > Image Size.
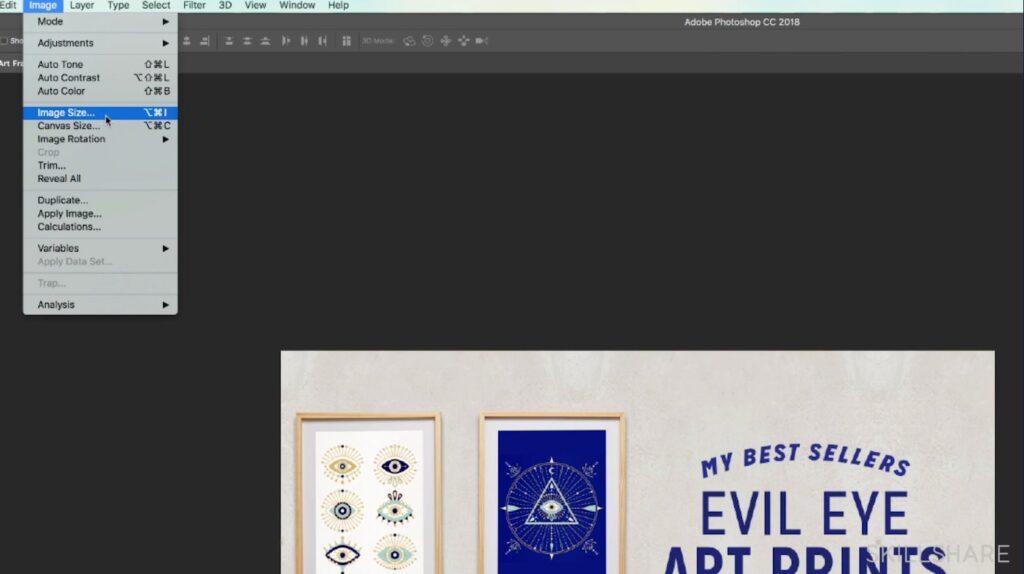
To open the Image Size editor, navigate to the menu bar at the top of your screen. Next, click on “Image,” which will reveal a dropdown menu. Finally, click on “Image Size.” A menu will pop up which will reveal the resize tool in Photoshop.
2. Adjust the Width and Height Dimensions.
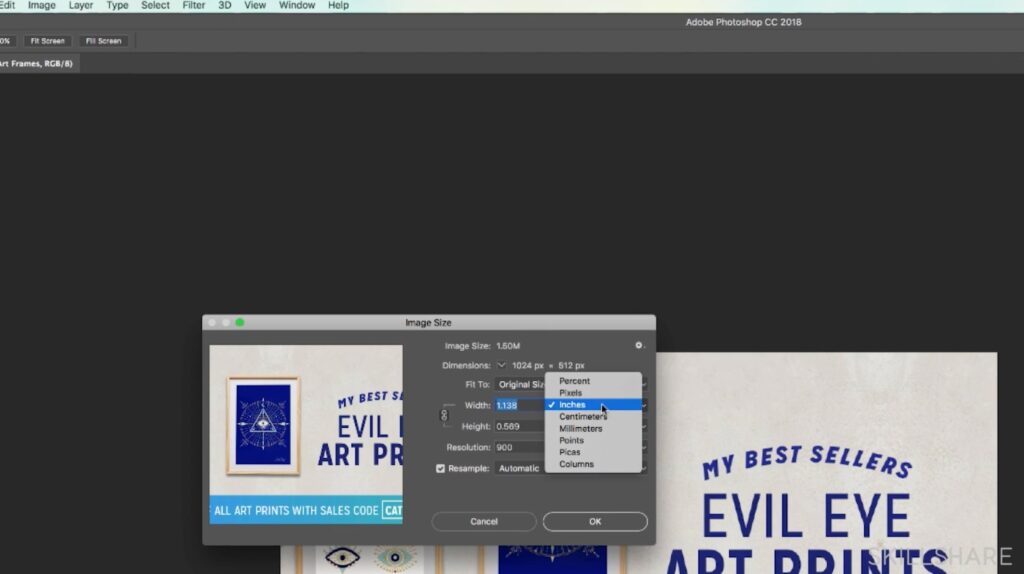
Before you adjust your dimensions, make sure you know the optimal image size for your image’s final destination. Websites, printed projects and social media platforms will all require images of different sizes. If you’re making a poster for your babysitting services, you might want to resize your design in inches. You can change your image’s unit of measurement to the right of the width and height boxes.
3. Keep the Checkbox Next to “Resample Selected” to Keep the Image Dimensions the Same While Adjusting the resolution.
The resolution of an image represents its visual quality. The higher the resolution, the more detail it holds and the larger it can be stretched without becoming grainy or fuzzy. A lower resolution image will have less detail, but will also have a smaller final file size, which is ideal for saving to a computer without a lot of storage or optimizing images of a website.
You can keep the dimension of your image the same while adjusting its resolution, by keeping the checkbox next to “Resample” selected. This will ensure Photoshop doesn’t stretch your image.
4. Click OK to Apply the Changes.
To apply and save any adjustments you made to your image, click “OK.”
Tips For Resizing an Image
While resizing an image in Photoshop can be fairly straightforward, there are a few things to remember if you’re newer to photo editing. Consider writing down these final tips or copying them to your notes app so you can remember them as you work through any upcoming projects.
While resizing an image, keep in mind that you can:
- Create a new, smaller file by using the Export function instead of adjusting the dimensions and resolution of your image within the Image Size menu.
- Choose a unit of measurement based on how the image will be used. Printed images are usually measured in inches or centimeters while digital images are usually measured in pixels. Picas and points are most often used for text and typography.
- Choose an interpolation method to specify how data is resampled. When your image is resampled Photoshop creates new pixel information in order to enlarge or shrink the image. You can adjust the way that Photoshop creates that new information by adjusting how the image will be resampled.
- Consider the end goal for your image when choosing a resolution. Instagram, for example, will resize any image with a width larger than 1080 pixels. Make sure images are 1080 pixels wide if you don’t want to lose quality after uploading.
Start Resizing Images in Photoshop
Learning how to resize images in Photoshop is a skill any new or advanced Photoshop user will likely use in projects ranging from advertising campaigns to social media posts and more. If you spend the next few days resizing your images and testing different image resizing settings, you’ll be resizing images like a pro in no time. You can also head to Skillshare to find the best class selection for beginners to advanced if you’re really looking to become a Photoshop expert.
Calli Zarpas
Producer & Writer by occupation. Ceramicist & Newsletter Editor by avocation.
Try Skillshare for free! Sign up for a 7 day free trial today!
Get Started- Unlimited access to every class
- Supportive online creative community
- Learn offline with Skillshare's app


