

Drawing Anatomy: A Step by Step Guide
Graduate from stick figures and learn how you can start drawing anatomy. We’ll take you through every part in this step-by-step guide.


Whether you want to create muscular superheroes or tall, lithe fashion illustrations, understanding how to draw human anatomy is critical for drawing bodies. By understanding the basic structure of the human body, you’ll have a better instinct for how it moves, so you can draw your figures in more realistic and engaging poses.
However, drawing anatomy can be one of the hardest concepts for an artist to master. The human body is complex, and understanding how to draw every part of it can be intimidating. In this article, we break down how to draw anatomy step by step so you can level up your characters.
Why Learn How to Draw Human Anatomy
By nature, your audience has a basic understanding of how the human body is supposed to look and move. That means if something isn’t right about your character—for instance, their proportions aren’t correct or joints don’t bend the right way—that character will lose believability. And this applies even if you’re drawing cartoon characters who aren’t meant to look realistic. If something is fundamentally off about how your character looks or moves, your audience will notice.
Understanding the basics of human anatomy (and how to draw it) will give your characters life and believability—and set up your story or illustration for success.
The First Anatomical Drawings
Perhaps the artist most well known for anatomical drawings is Leonardo da Vinci. In the early 1500s, da Vinci created over 240 detailed drawings of the human body based on dissections of human corpses in hospitals in Florence, Milan, and Rome. The drawings include detailed depictions of the human skeleton and its muscles and sinews. Ultimately, da Vinci developed a masterful understanding of how the human body moves—a great contribution to both art and science.
While your goal may not be to create anatomically correct drawings for scientific purposes, an understanding of the human body can equip you to draw more realistic and believable characters.

How to Draw Anatomy Step by Step
You can simplify the process of drawing human anatomy into three general steps:
- Blocking: Using basic shapes to create the general silhouette of the figure
- Shaping: Building the muscle structure and anatomy on top of those shapes
- Defining: Adding in the appropriate level of detail depending on the style of your illustration
When drawing human anatomy, strive to understand not only how certain body parts and muscles look, but also how they work—because each muscle’s function has a visual effect on the body’s movement and positioning. For instance, even something as simple as a smile doesn’t only affect a figure’s mouth; it can change the positioning of the subject’s eyes, mouth, and neck.
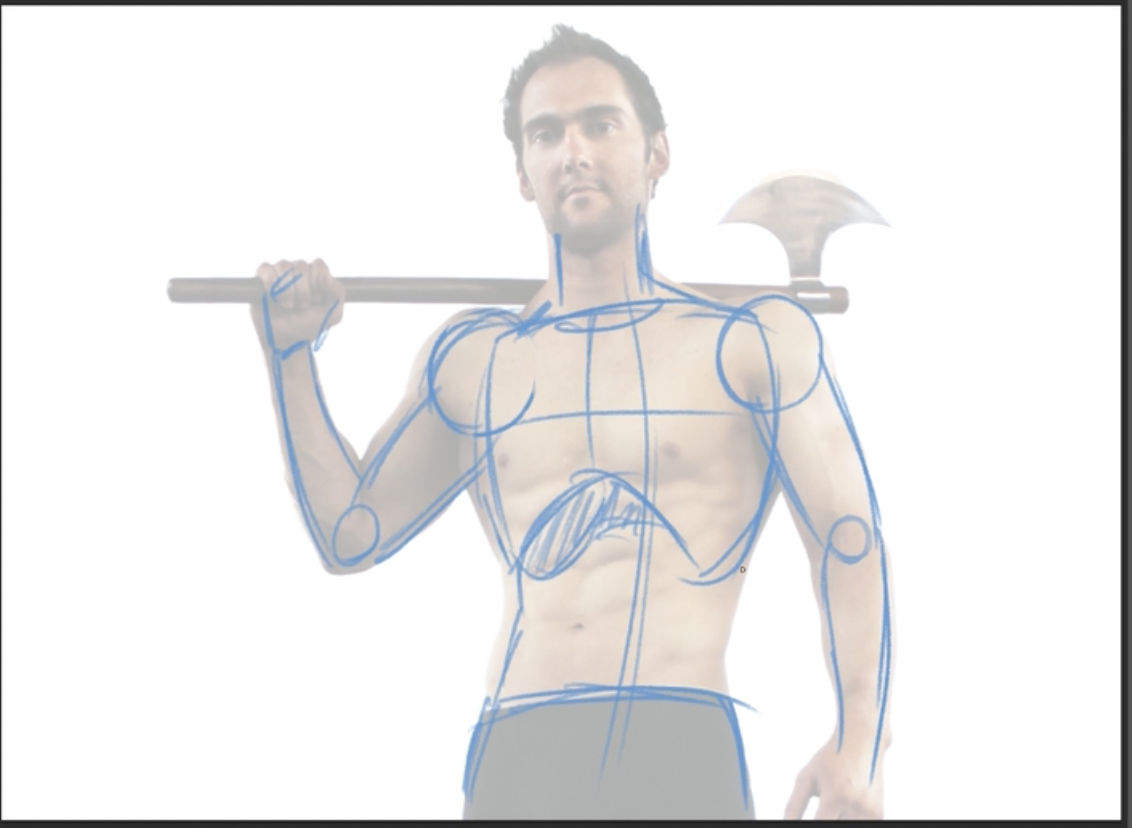
Step 1: Start With Basic Blocking
It’s easy to get overwhelmed by the complex details of all the muscles in a body, so instead, think of the body in basic shapes: a circle for the head, a rectangle for the chest, an oval for the pelvis, circles for main joints like shoulders, hips, elbows, and knees, and a curved line for the spine.
Using these basic shapes, sketch out the fundamental shape of the figure. It can be helpful to use a reference photo for this step to make sure you get the proportions right. As you gain more experience, you’ll eventually become comfortable enough to complete this step without a reference.
Step 2: Draw the Muscle Structure
Now, with a basic drawing of your figure, you can fill in more details of the anatomy and muscle structure.
The human body is complex, so creating anatomically correct drawings isn’t something you can learn in a day; it may take weeks of practice and studying reference drawings to truly understand the shape of each muscle and how they all connect. However, the tips below can help you refine each main area of the body.
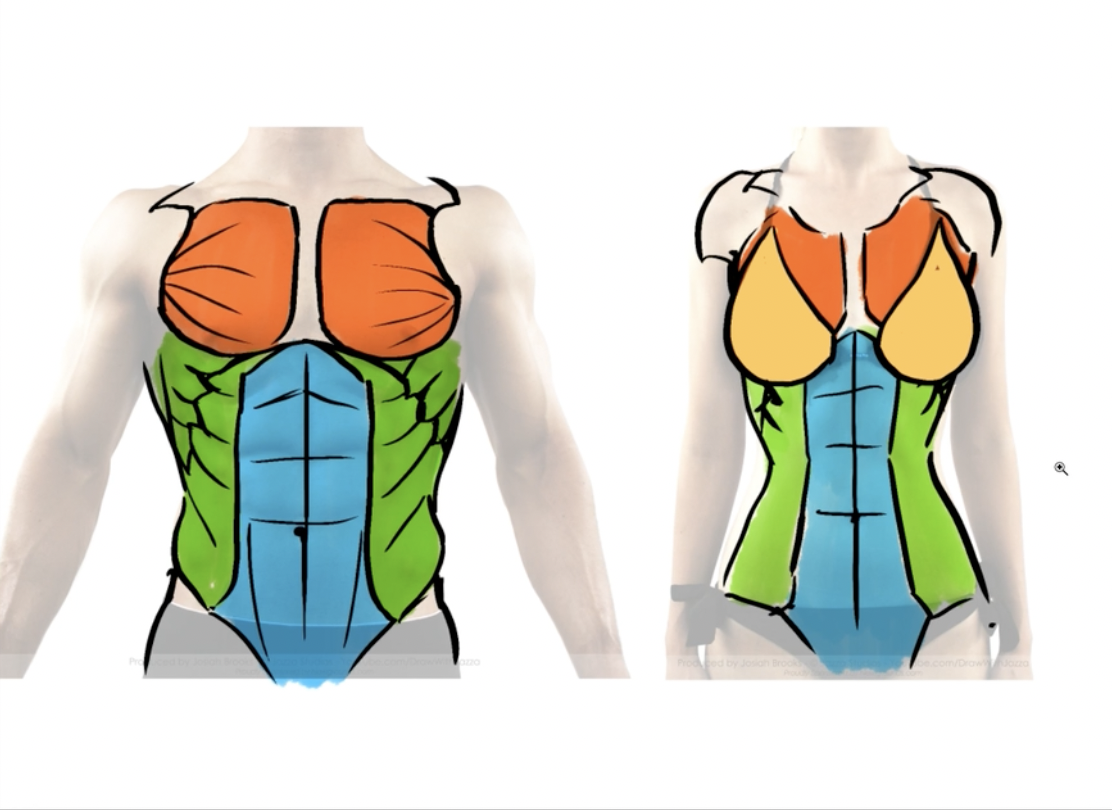
Torso
While there are a wide range of different body types, they all start from the same general structural foundation. There are, however, fundamental differences between male and female torsos. On a male torso, for example, the shoulders are broader than the hips. On a female, the hips and shoulders typically extend to about the same point.
Generally, the muscle structure of the torso includes two large chest muscles, the abdomen muscles, and the muscles on the side of the abdomen, which wrap around to the back. The same structure applies to both men and women, with a few minor differences. For example, women generally have a smaller waist and breasts that extend from the front of the chest muscles (typically, you will draw these in when blocking the initial figure).
Head and Face
Creating an anatomically correct drawing of a head and face is all about getting the proportions right. A proportionate face can be broken down into three equal sections: the top of the head to the top of the eyes, the top of the eyes to the bottom of the nose, and the bottom of the nose to the bottom of the chin. The ears fall in the middle section, extending from the top of the eyes down to the bottom of the nose.
You can further break down the face using a few vertical sections: the inner corners of the eyes should line up with the outer corners of the nose, and the outer corners of the mouth should line up with the center of the eyes.
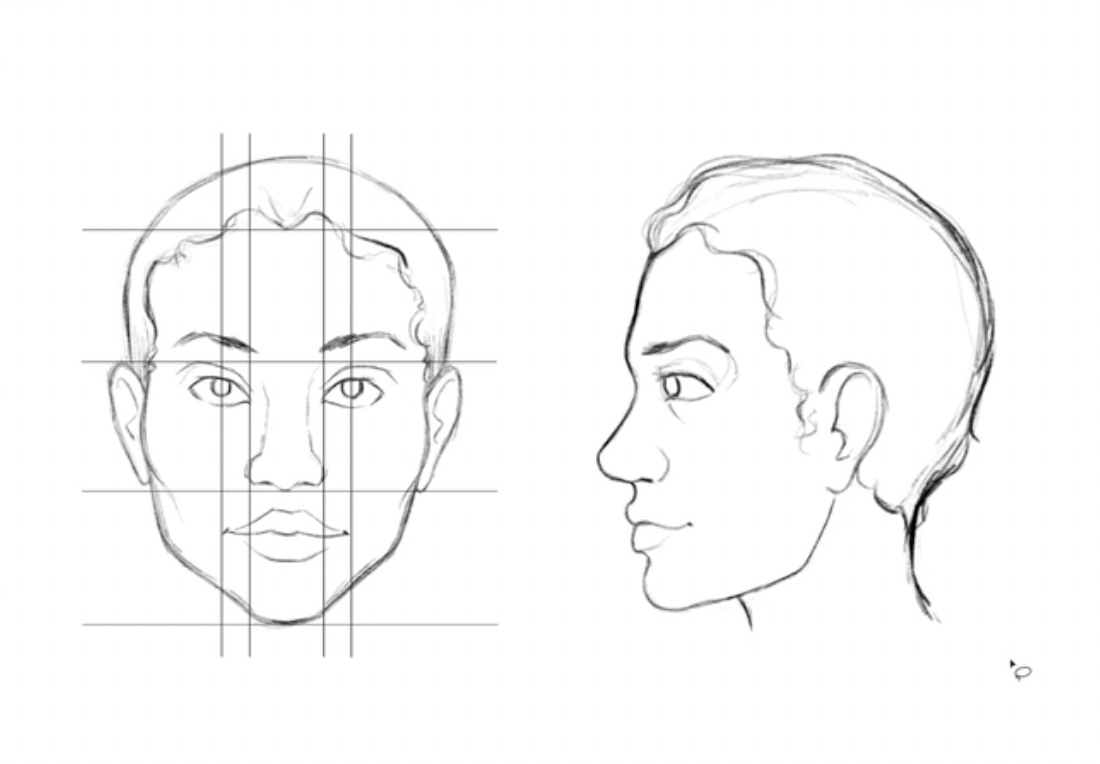
It’s also important to consider the bone, cartilage, and muscle structure of the face, as these will inform how you draw expressions. Pay particular attention to the cheek bands, which extend from the nose, around the mouth, and down to the chin. Understanding how these bands pull and stretch when a figure smiles, for instance, can help you draw more realistic, engaging expressions.
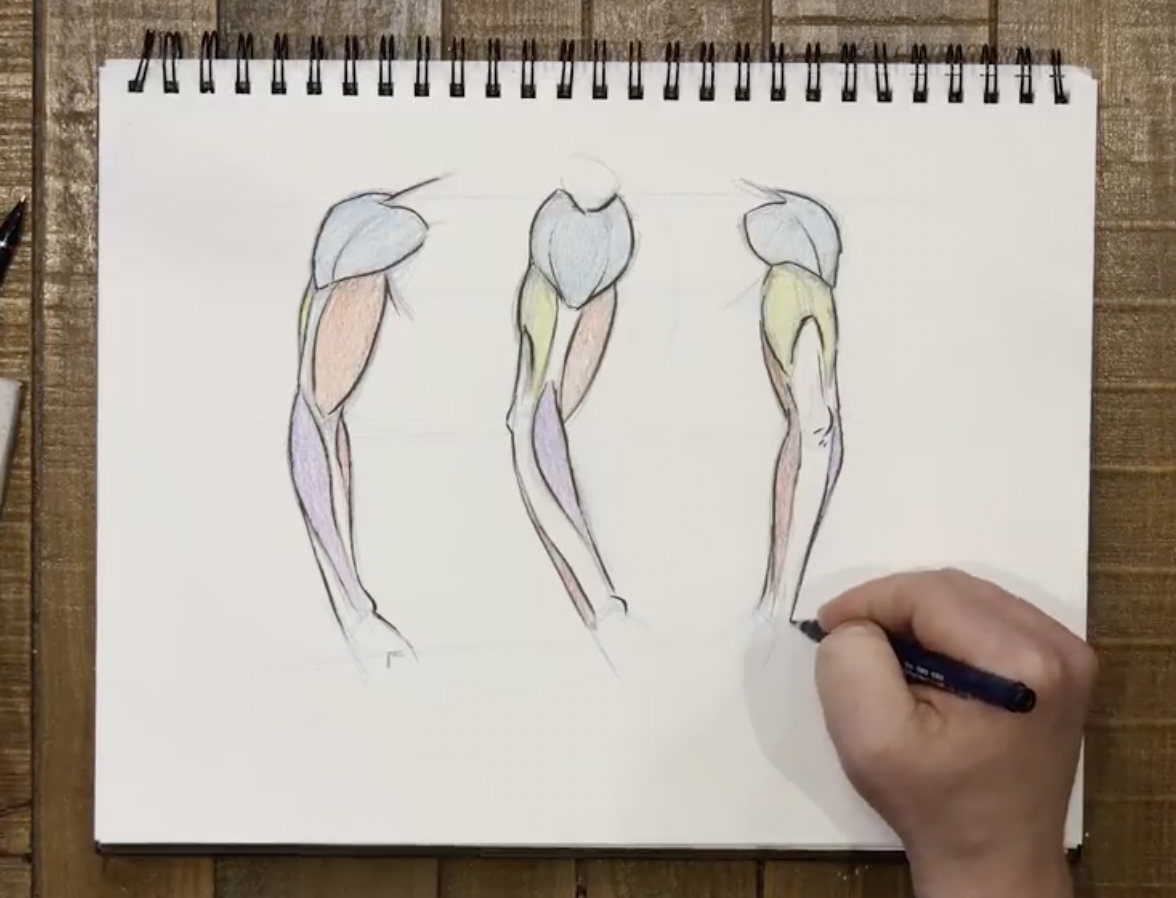
Arms
The arm consists of three main muscle groups: the shoulder, the upper arm, and the lower arm. The shoulder muscle resembles a slightly misshapen heart, with the back and chest muscles extending from the top of the heart and the bicep and tricep coming down from the bottom point. Then, the inner and outer forearm muscles extend from the elbow and connect to the hand near the pinkie finger.
Legs
When drawing anatomy of the leg muscles, start at the top, where the leg connects to the pelvis. From there, the legs follow the same general form and function of the arms, although the legs contain a few more muscle groups. The front of the leg contains three main muscles that run about parallel from the hip down to the knee. The back of the leg contains the large glute muscle above the hamstring muscle, which extends to the back of the knee.
The calf muscles dominate the lower half of the leg, although you may also choose to add in a muscle across the shin of the leg.

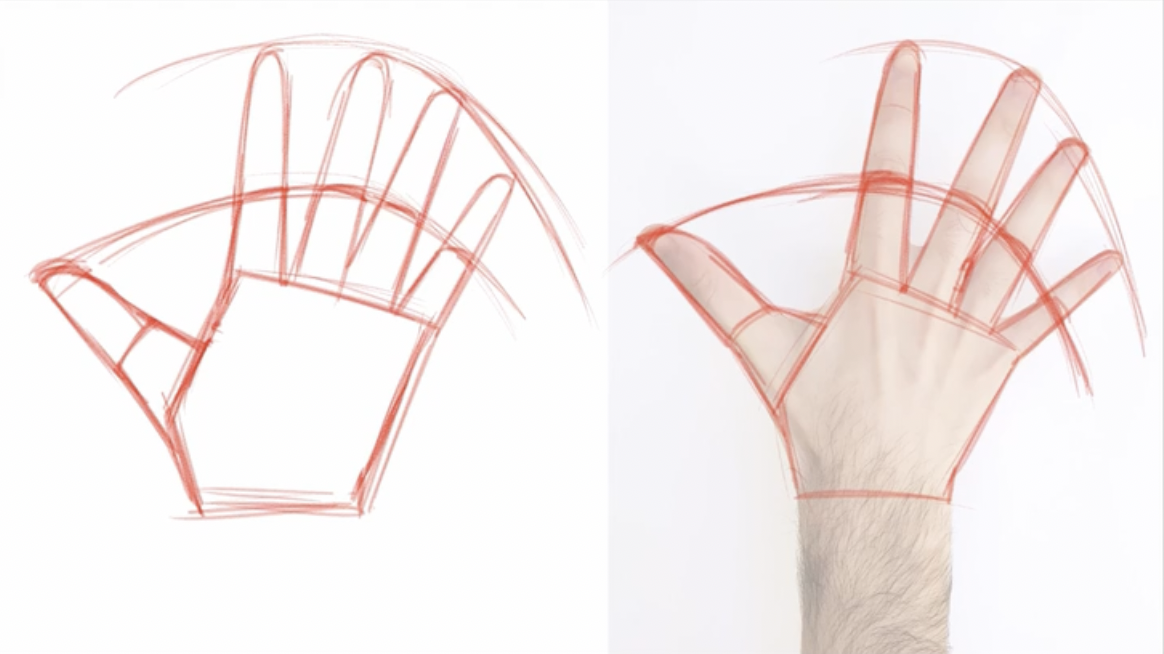
Hands and Feet
While hands and feet may seem less complex than the muscular structure of arms and legs, they can still be intimidating to draw—especially if your goal is a realistic and anatomically correct drawing.
It can be helpful to first identify the basic shapes of the hands and feet using a reference photo. You could, for example, draw the palm of the hand as a pentagon, and then add long, rounded rectangles for the fingers. Once you have the basic shape, make sure to add details such as fingernails and knuckles.
Step 3: Define the Final Figure
Finally, you will decide how much detail will be visible in your final drawing and make adjustments accordingly. Essentially, you should now determine if and how to scale back or simplify your initial drawing. If your character is a bodybuilder, then yes, every line of muscle definition may show. However, for other characters—especially those in cartoon or less realistic style—you can strategically decide how much detail to display in your drawing.

Flex Your Drawing Muscles
Once you learn to draw anatomy and become increasingly familiar with the human form, you’ll find it easier and easier to illustrate figures in a wide variety of poses—even without reference photos. Your characters will become more realistic and believable, and you will become a stronger, more versatile artist.

Put it All Together
28-Day Drawing Challenge: Anatomy for Illustration and Comics
Try Skillshare for free! Sign up for a 7 day free trial today!
Get Started- Unlimited access to every class
- Supportive online creative community
- Learn offline with Skillshare's app


