

Bird Photography: Art Taking Flight
Feathers, colors, wings, quirky walks, and of course, flying. Photographing birds is fun and rewarding. Pick up your camera, head outside, and see for yourself.


Birds are so common, yet somehow otherworldly. As soon as they lift into the air, they’re hard to see, ascending to vantage points most of us can only dream about.
One way to get a hint of that magic is through bird photography. We might not be able to take flight with them, but up close views of their feathers, eyes and movement can be almost as enthralling.
What Is Bird Photography?
As a form of nature photography, bird photography gets you and your viewers up close and personal with these descendants of the dinosaurs.
While other wildlife photography subjects stay mostly on the ground, capturing images of birds involves creatures not as bound by gravity. Birds can launch into the air at any moment, often moving so quickly that you can’t follow their path. This can be challenging for beginners, to say the least.
Fortunately, technological advancements and an understanding of bird behavior are on your side. With those, you can capture incredible images, many too fast to see with the naked eye.
Bird Photography Equipment and Settings
Like other types of photography, bird photography is possible with only a basic camera, even your cell phone camera. However, to improve wildlife photography skills and get remarkable pictures, or turn your hobby into a photography side hustle, specific equipment is essential.
Cameras and Lenses
Birds move fast and often don’t let you get too close. Thus, the most important camera capabilities for birders include:
- Fast shutter speed
- Good autofocus
- Powerful telephoto lens
How fast, good and powerful these capabilities must be for your work depends on the kinds of birds you’ll be photographing and how much money you’re planning to spend.
For example, you’ll need a faster shutter speed and to capture sharp photos of high speed hummingbirds than for meandering geese. And you’ll need a more powerful telephoto lens for an owl in a high tree than a duck in a city pond. Of course, more advanced capabilities will cost more.
Bird Photography Camera
Whether you go with Canon, Nikon or Sony, an APS-C (advanced photo system type C) camera is better than a full-frame camera for bird photography, as it provides a greater depth of field. These cameras also tend to be smaller, making them easier to carry out in the field.
Consider opting for a mirrorless camera over a DSLR (digital single-lens reflex) camera. With a mirrorless camera, you can choose a focal point for the camera to track across the entire frame. Some mirrorless cameras even offer an animal eye detection feature, which is game-changing for avian photography.
Lens for Bird Photography
You’ll want at least a 200mm telephoto lens, though you’re going to have far more distance options with a 500mm or larger lens. To save money, you may want to look for used quality lenses.
Again, this depends on the kind of bird you’re photographing and how much you can spend. Birds in the park are used to humans and may let you get much closer than those in remote areas. If you’re trying to shoot from a distance in the woods, you’re going to need greater magnification.
Mobile Photography
While smartphones have limited lens and sensor sizes, a good photo app and the right settings can get you a long way. Look for apps that let you adjust:
- Shutter speed: Flying birds quickly blur with a slow shutter speed, so you’ll want some control over how fast your phone snaps pictures.
- Shutter timing: Using the timed camera feature or even a remote trigger will minimize vibration and blur in your photos.
- ISO: ISO measures the camera’s light sensitivity, so you’ll want to adjust depending on where the bird is hanging out.
- File size: The bigger the image the more information it provides for editing. Set your phone to save images with as many pixels as possible.
Zooming in for a picture isn’t the same as using a telephoto lens; it’s only making the pixels bigger. Even a great editing app isn’t going to fix that, though it can improve things like sharpness and color.
You can always enhance your phone’s capabilities with a scope and tripod to increase telephoto reach and stability.
Other Bird Photography Equipment
If you’re serious about bird photography and want to expand your skill and options, other equipment and tools will help along the way.
- Tripod: The smaller and faster the bird, the more blurry it will become if your camera moves at all during the shot. A tripod provides stillness, especially if you use a remote shutter release. It will also make things easier for your arms and hands.
- Field guide: Not only is this useful for learning to identify birds, it will also provide information on their behavior. This will help as you seek out specific species and try to predict their movements. In book form, a field guide doesn’t require battery power or an internet connection–perfect for remote locations.
- ID app: Several organizations offer free apps for identifying birds in various ways, such as The Audubon, Merlin and eBird.
- A blind: When shooting far from buildings, cars and other structures, it’s helpful to have a “hiding” spot, like a hunting blind. You can construct something temporary yourself using branches and leaves you to find or purchase a camouflage photography blind.
- Editing software: Brands like Adobe provide a range of photo editing programs such as Lightroom and Photoshop for post-processing. Choose whatever works best for your skill level and image goals.
Bird Photography Settings
Getting the camera settings just right will hinge on your bird subject, camera and lens capabilities, weather conditions and artistic goals. Try different settings and get to know various bird species to figure out what works best.
Birds make almost imperceptible movements, even when they appear to be sitting still. In general, certain settings will make it easier to get clear, attractive bird photographs, no matter what the little creatures are doing.
- Shutter speed: Get lots of pictures quickly with a shutter speed between 1/800 and 1/1600.
- Aperture priority: This will allow you to set the f-stop (number that corresponds to the aperture) while the camera automatically chooses the ideal shutter speed needed for exposure compensation.
- Auto ISO: If your camera has this option, it’s another way to not have to worry about light conditions. You can also set a maximum and minimum for the auto setting to stay within.
- RAW files: JPEG files come with some convenience, though RAW files will give you more to work with in the editing stage.
Bird Photography Ideas
How you set up and take bird photos will change depending on the type of images you want. Do you want still portraits or action shots? What season provides the best backdrop for your images?
Birds in Flight Photography
Unsurprisingly, pictures of birds flying are highly sought after. While seeing a bird in flight is common, a clear shot of the action is far less common. It’s difficult, and often requires the capabilities of more expensive gear.
If you’re new to this kind of bird photography, start with larger birds. They move slower and have more predictable flight patterns. Give the camera time to focus before snapping the shutter, and be ready for the whole flock to fly off as soon as one launches into the air (if photographing a flock).

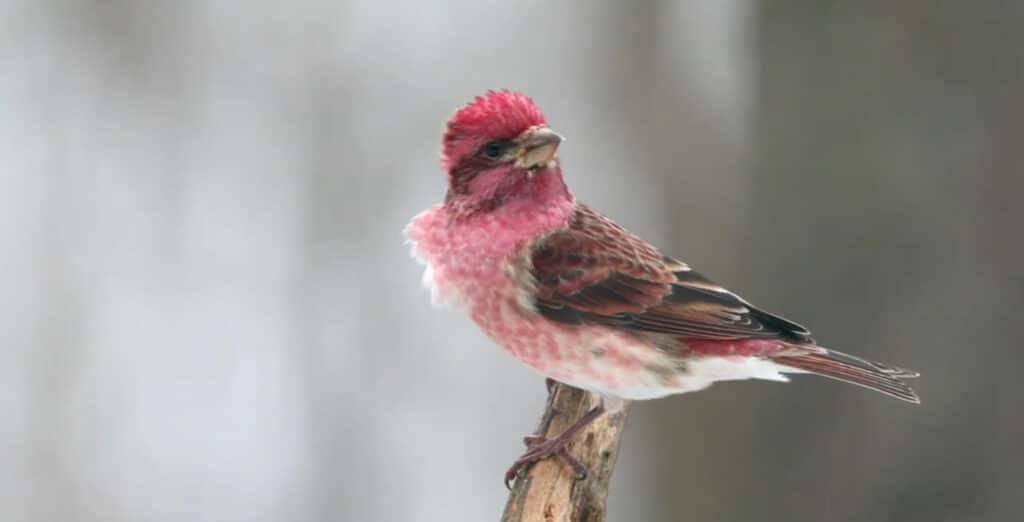
Bird Portraits
By taking a bird portrait, you have a chance to capture details of the face, feathers and stance. These shots are less about action and more about still beauty, so consider your background carefully.
Typically, a simple background, such as the sky or water, is preferable to a busy one, like flowering trees or buildings. It helps if you can get a nice blur (bokeh) over the back and foregrounds, which keeps the focus entirely on the bird.
If possible, wait for the bird’s head to be angled ever so slightly toward your camera. The resulting image will be noticeably more intimate than a side view or when the bird’s head is turned away.
Groups of Birds
Perhaps you’re less interested in specific action shots or portraits and more excited to photograph groups of birds. Be it a flock, congress, brood or flotilla, a group of birds gives us a glimpse into their social structures.
You’re more likely to see multiple birds together near wetlands and other open areas, as opposed to the woods. While this might mean fewer places to hide, the upside is that the birds have each other to distract from your presence.

Bird Photography Tips
Increase your chances for capturing the best images with some education and creative thinking.
Choose the Right Time of Day
You want times when the birds are most active, and the light is just right. Generally, this means early in the morning or late in the afternoon. This is when birds are out and about, chattering, and looking for food. Further, the “golden hour” light makes for easier setup and more magical images.
Whatever the time of day, try to keep your back to the sun, and avoid shooting on a cloudy day.
Fill the Frame
If you’re taking a picture of only one bird, you’ll want it to fill the frame of your final image. This makes for incredible detail and images viewers rarely see in real life. This is something you can do even if you’re only just learning bird photography.
For higher interest, don’t center the bird in the exact middle of the frame, unless it’s an intentional stylistic choice.
Focus on the Eye
One of the absolute most important things about a photograph of a bird is to have an eye (or both eyes, if you can see them) in focus and catching the light. You can get away with blurred wings or obscure feathers, but an out-of-focus eye makes the entire bird look lifeless.
Approach Appropriately
Remember that you are encroaching on the bird’s territory. If you scare it off, all of your work will be for naught.
Approach slowly, and in a zig-zag motion to appear nonthreatening. Don’t stare directly at the bird, and don’t make any sudden movements. You might even want to click your camera to get the bird used to the sound.
Options that can support everyone’s comfort is to try out some backyard bird photography or shoot from the car. A still car isn’t scary for the birds and it means not having to carry your equipment.
Most importantly, do no harm to wildlife or the environment. For more, check out The Audubon’s guide to ethical bird photography.
Watch for Non-Flying Action
Birds do more than fly, and you can tell a story that involves the bird, its environment and even other wildlife.
For example, watch for birds feeding their young, showing affection to mates and capturing prey.
Give yourself greater access to bird action with a backyard bird garden.
Eye Level
If you’re photographing birds on the ground, get down to their level. A duckling or sparrow will appear larger and more interesting when seen from their own height.
Like a Duck to Water…
Becoming a wildlife photographer is full of challenges, but you’ll find it’s well worth it. After just a little time out in nature and getting familiar with your subjects, you’ll feel quite at home listening for calls and watching for those tiny movements.
The best way to start is to get out there and start taking pictures, even if you only have a cell phone. Before you know it, you’ll have amazing images of these small and fascinating creatures.
Katie Mitchell
Katie lives in Michigan with her husband, kids and pets. She enjoys cooking, travel and live music.
Learn Photography with Skillshare — Start Your 7-Day Free Trial Now!
Start Your Free Trial Today!- Unlimited access to all classes
- Hands-on classes with pro photographers
- Learn offline with Skillshare's app


