

Astrophotography: Revealing Heavenly Bodies to the Naked Eye
Want to capture images of planets, nebulae, and other astronomical phenomena? Learn about astrophotography. Why should NASA have all the fun?


You want to see what’s hiding in the sky, capture it for yourself and share it with others. Once you really start looking, you realize how much of the sky and outer space simply can’t be seen from Earth with the naked eye, and you want to get a better look.
Astrophotography is calling your name, adventurer! Something that was, historically, only accessible to those with highly advanced NASA technology and knowledge has become available to photography professionals and hobbyists alike. Ready to get a closer look? It’s easier than you might think.
What Is Astrophotography?

Also called astronomical imaging, astrophotography is taking pictures of the sky, usually at night, and capturing images of particular celestial objects. Many of these pictures show elements you can’t see with the naked eye, or even traditional cameras.
You’ll quickly learn that the astrophotography process differs from other forms of nature photography because of the incredible distance between your camera and the planets, stars, galaxies and events you’re photographing. Fortunately, plenty of astrophotographers are ready to guide you into the outer reaches.
Astrophotography Equipment
Sure, you can point your traditional camera or cell phone at the night sky and snap a picture, but you aren’t likely to capture anything breathtaking. The technology simply can’t make up for things like light pollution and distance. You’ll need equipment specially designed for peering beyond our atmosphere in this highly-specialized form of landscape photography.
Note: Carry extra batteries for any equipment that takes batteries.
Choose Your Camera
You can get started with a DSLR (digital single-lens reflex) or mirrorless camera. Whether Canon, Sony, or Nikon, choosing which will come down to personal preference, so spend time comparing camera types and reviewing tutorials before deciding.
Key things to look for in a first-time astrophotography camera include:
- A manual focus mode–most sensors won’t focus well in low light on a dark sky using autofocus
- Full frame with a larger sensor to capture more light, though crop-sensor cameras are getting better for astrophotography.
Night photography camera settings work a bit differently than camera settings for other forms of photography. For example, getting the signal-to-noise ratio (the ratio of light from your subject to light from other, distracting sources) right can be tricky if you don’t know how to tweak your settings. Familiarize yourself with the concepts before trekking out to capture nightscapes and nebula.
While it’s not ideal, astrophotography with a cell phone is possible. You’ll find it easier to use it to highlight daylight phenomena or photograph the moon and nearby planets than for nighttime scenes of distant galaxies.
Still, if you have a recent, top-of-the-line cell phone, understand the camera settings and observe some smartphone guidelines, you can manage impressive deep-sky shots with Android or iPhone astrophotography.
Experiment With Lenses
Depending on what you want to take pictures of, you may need to experiment to learn which camera lens works best for you.
A wide-angle lens allows you to capture a large portion of the sky as well as any earthly landscape you want to include.
You’ll also want a large maximum aperture (with an f-stop number of f/2.8 or lower, called a fast lens) to bring as much light into the camera as possible.
Consider an Astrophotography Telescope
Once you know what lenses suit your astrophotography goals, think about whether you want to add a telescope to the setup.
A telescope is basically just a more advanced lens to enhance magnification and see further into space. Prime-focus astrophotography is the practice of attaching your camera directly onto the telescope with an adapter. Depending on the telescope, this can get you amazing views of our solar system or much farther away elements.
Use a Tripod and Remote Shutter Release
When you’re focusing on distant objects in the night sky, it’s vital that your camera doesn’t shake or vibrate during the actual shot. This is next to impossible if you’re holding the camera in your hands.
For this reason, a tripod is almost as important as the camera itself. It also protects your equipment from being dropped. To avoid having to touch your camera while shooting, use a remote shutter release cable or even a wireless version. If you don't have a remote shutter release, you can also use the timer delay on your camera.
Carry a Headlamp With Night Vision
The last thing you need when on location for your shoot is to not be able to see the terrain, your gear, and the tiny details of your camera settings. A headlamp is ideal for hands-free illumination. If it’s got a night vision setting, often called a red light, even better. This will make it easier for your eyes to adjust from the artificial light to the natural light of the environment.
Try an Astrophotography Star Tracker
A star tracker, positioned between a tripod and camera, moves your lens along with Earth’s rotation. This allows for extremely long exposure shots that don’t turn the stars into blurry trails.
Star trackers are highly portable and easy to integrate into your setup. Simply align the device to the North Star, Polaris, and go from there. For the best outcomes, be sure to use a start tracker with a smooth motion.
Add Filters
Try using filters to sharpen and enhance your nighttime astrophotography images. The type you choose will depend on your subject matter and your environment.
For example, some filters offer noise reduction and eliminate light pollution while others diffuse light for more saturated colors. In daylight astrophotography, solar filters help your camera get better views of the sun.
Edit Your Photos
You don’t have to bring your astrophotography photos into editing software, but it’s an option worth knowing about. Options such as Adobe Lightroom or Photoshop are ideal for post-processing, where you’ll analyze and clean up your astro images.
Types of Astrophotography
Your options for what to photograph in our immense sky are, almost literally, endless. Learning the types of astrophotography and what attracts you most will help you determine where to go, what equipment to use, and how to tweak your setup.
Star Trails Astrophotography
Because Earth rotates, the stars appear to move around the sky. Using an ultra long exposure time, as much as a few hours, you can capture their path in the form of a streak of light. The star trails photo result is a stunning, colorful circular or spiral effect.
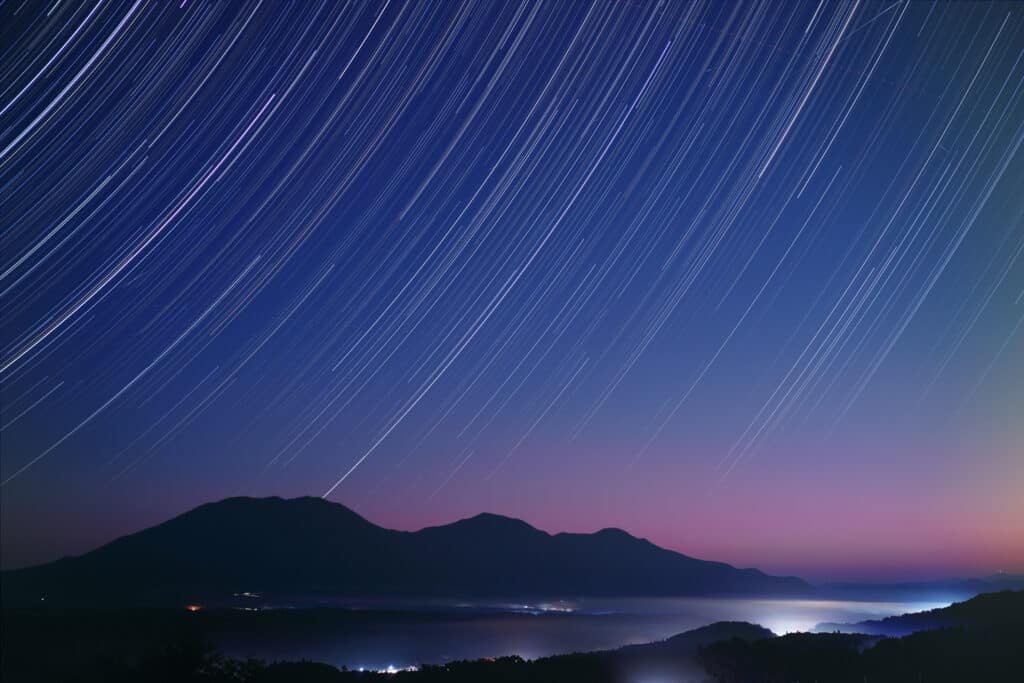
Landscape Astrophotography
To give some context and contrast to your images of space, include Earthly formations like mountains, trees and even buildings. Not only does the landscape provide variation–it gives you a sense of just how vast the sky really is. Learn landscape astrophotography for a new perspective on the universe.
iStock ID: 156499278

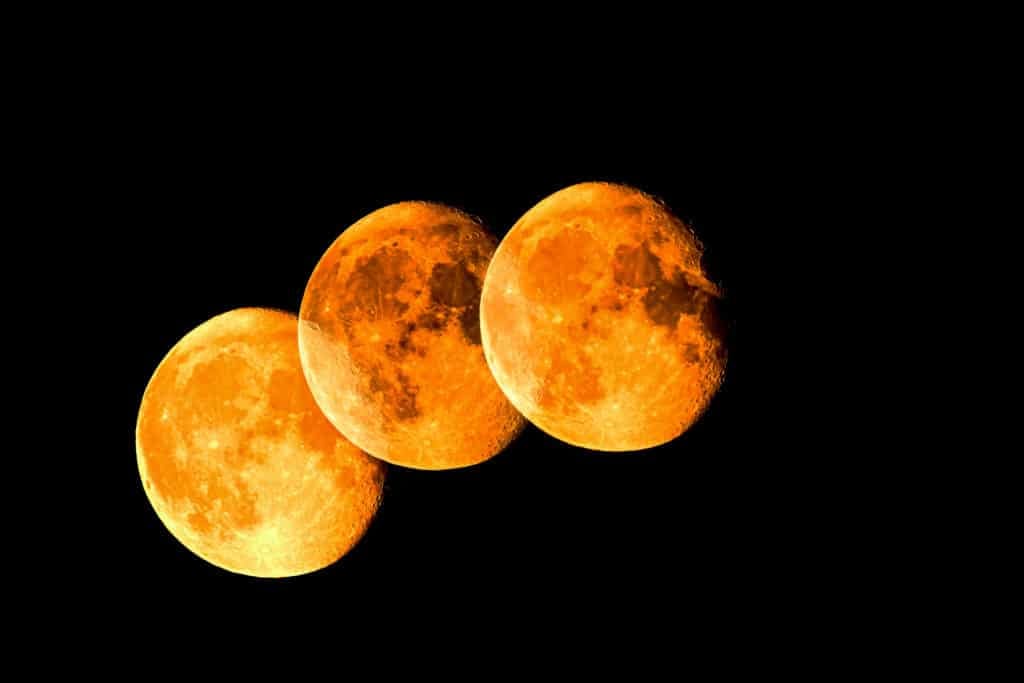
Time-Lapse Astrophotography
To see how objects move across the sky (from Earth’s point of view), time-lapse astrophotography uses longer exposures and multiple images to compile multiple phases into one image. This might mean circular trails of light from the stars, or multiple moons shining brightly across the entire horizon.
iStock ID: 1409347285
Astrophotography Tips
Keeping a few tips and tricks in the front of your mind as you learn will make the entire process easier.
Choose Your Location and Subject First
Astrophotography takes a lot of work, and you’ll enjoy it more if you’re shooting a subject you genuinely enjoy. Further, having a specific image goal in mind will direct the equipment you choose and how you set it up. Are you aiming for constellations like Orion, planets such as Saturn or Jupiter, or capturing the magic of the Milky Way? Learn to plan an astrophotography shoot based on where your favorite subjects will be and when.
The 500 Rule
When setting your camera’s shutter speed and exposure length, remember the 500 rule for astrophotography. Your exposure length should be 500 divided by your lens’ focal length. For example, if you have a 24-millimeter wide-angle lens, divide 500 by 24 to get 20.83. You can then round that up to 21 seconds for your exposure length.
No Full Moon Shoots
The best time to shoot the night sky is during a new moon, when the light reflected off the moon toward Earth is practically undetectable. When the moon is bright, the light from it will make it harder to find a dark spot in the sky and interfere with focusing on other celestial bodies.
Have Warm Clothing and Warming Gear
Astrophotography often requires you to be outside at night for hours at a time. Depending on your goals and location, it might also be during the colder months of the year. Be prepared with proper clothing, as well as food and drink to keep yourself alert and comfortable.
Hand and lens warmers are useful on especially cold nights. They help your fingers manage your gear better, and your lenses are less vulnerable to the effects of frost.
Time to Dance With the Stars
NASA might still be the authority when it comes to outer space, but you have the power to capture some of the magic too. Whether you’re exploring astrophotography for beginners or are expanding your skills into the deeper reaches, you’re sure to find the practice thrilling, awe-inspiring and even a little bit addictive. Shine on!
Related Reading
Katie Mitchell
Katie lives in Michigan with her husband, kids and pets. She enjoys cooking, travel and live music.
Learn Photography with Skillshare — Start Your 7-Day Free Trial Now!
Start Your Free Trial Today!- Unlimited access to all classes
- Hands-on classes with pro photographers
- Learn offline with Skillshare's app


