

The Beginner’s Guide to Affinity Designer
New to Affinity Designer? Learn the tools, tips, and steps to create your first project with confidence.
Table of Contents
- What Exactly Is Affinity Designer?
- Affinity Designer vs. Illustrator, Photoshop and Procreate
- How to Get and Launch Affinity Designer
- Get to Know the Interface
- Essential Tools and How to Use Them
- Use Personas Like a Pro
- Create Your First Project: A Step-By-Step Walkthrough
- Exporting Your Work
- Common Mistakes to Avoid
- Take the Next Steps in Your Design Journey


Whether you’re a budding graphic designer, passionate illustrator or casual hobbyist, if you’re looking for a professional design tool without a monthly subscription, Affinity Designer is a powerful option that could be a game-changer for you. With its smooth performance, clean interface and one-time purchase model, Affinity Designer has gained a loyal following over the years, and for good reason.
In this guide, we’ll walk you through everything you need to know to get started with Affinity Designer, from understanding the basics of vector and raster design to exploring Affinity’s tools, navigating the interface and exporting your work. Even if you’ve never used a design app before, you’ll be able to follow along step-by-step, get to know Affinity Designer at your own pace and complete your very first project with confidence.
What Exactly Is Affinity Designer?
Affinity Designer is a professional-grade graphics software created by Serif, a British software development company that’s known for producing powerful yet affordable creative tools. Initially released in 2014, Affinity Designer was built from the ground up as a modern alternative to traditional design programs like Adobe Illustrator.
One of the standout features of Affinity Designer is its flexibility—for instance, designers can use it to create either vector or raster graphics, depending on the desired outcome (more on vector vs. raster graphics in the next section). This means users can seamlessly switch between vector illustration and pixel-level editing, all within the same app.
Affinity Designer is used by a wide range of creatives, including graphic designers, illustrators, UI/UX designers and marketing professionals. So whether you're designing a logo, creating a digital illustration, making your own surface pattern or building assets for a mobile app, Affinity Designer offers the tools you need with a one-time purchase, no subscription required.
Affinity Designer vs. Illustrator, Photoshop and Procreate
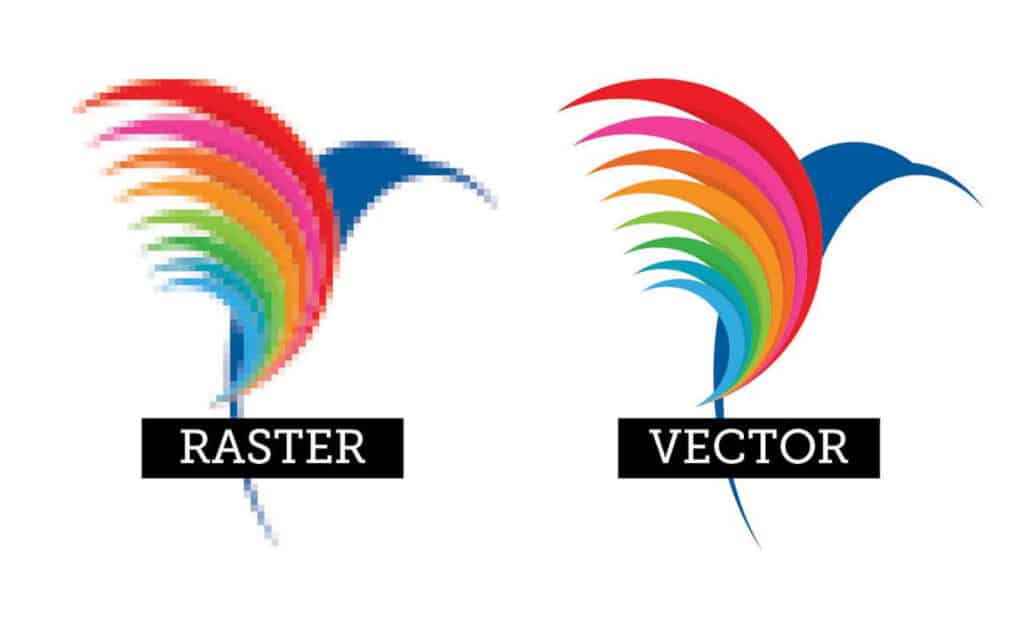
Before diving into comparisons, it’s important to understand the difference between two fundamental types of digital imagery: vector and raster graphics.
Vector graphics are made up of paths defined by mathematical equations. This means they can be scaled infinitely without losing quality, making them ideal for applications such as logos, icons, and typography.
Raster graphics, on the other hand, are made up of pixels, and those pixels become visible if you zoom in far enough. That makes raster graphics resolution dependent, which makes them better suited for detailed photographs and images with complex colors.
Most graphics editing programs are either vector- or raster-based, but Affinity Designer stands out because it combines both capabilities into one program. With it, you can create crisp vector shapes before switching to pixel mode to add textures or shading, all without leaving the app.
Here’s how Affinity Designer stacks up against some of the biggest names in the design software industry:
Affinity Designer vs. Adobe Illustrator
Adobe Illustrator is a powerful, industry-standard vector design tool. It’s widely used by professionals and amateurs alike, but it comes with a monthly subscription fee that can add up quickly.
Affinity Designer offers many of the same core vector features as Illustrator—including the Pen Tool, shape building and typography tools—without the ongoing cost. As an added bonus, Affinity Designer’s performance is often faster and more responsive, especially on less powerful hardware.
Affinity Designer vs. Adobe Photoshop
Adobe Photoshop is a raster-based image creator, photo editor and graphic design program. While it can handle vector shapes, it’s not built for vector design in the same way that Affinity Designer and Adobe Illustrator are.
Affinity Designer offers a more focused, streamlined experience than Photoshop for creating scalable graphics, although it can also handle raster brushes and pixel-level editing via its Pixel Persona.
Pro tip: If you’re looking for a subscription-free alternative to Photoshop, check out Affinity Photo—it’s made by the same developers as Affinity Designer, and you can purchase it with a one-time fee.
Affinity Designer vs. Procreate
Procreate is a raster-based drawing app that can only be used on an iPad. It excels at digital illustration and painting, and features an intuitive interface and responsive brushes. And like Affinity Designer, Procreate is available as a one-time purchase, with no additional subscription fees required.
However, the Procreate app doesn’t support vector graphics. So if your work requires scalable designs or needs to transition between raster and vector formats, Affinity Designer will likely be a more versatile choice (it’s even available for iPad, too).
How to Get and Launch Affinity Designer
Whether you’re using a desktop or an iPad, getting started with Affinity Designer is a straightforward process. Here’s a step-by-step guide to purchasing, downloading and launching the app, no matter which platform you’re on.
On Desktop (Windows or macOS)
- Go to the official website: Visit the official Affinity website at https://affinity.serif.com.
- Choose Affinity Designer: Click on the "Designer” tab at the top of the website’s homepage.
- Buy the app: Click the “Buy Now” button at the top of the page. Then, choose the individual license to purchase Affinity Designer alone, or select the Universal License if you want to get all three Affinity apps (Designer, Photo and Publisher) across desktop and iPad. Make your purchase and create an account when prompted.
- Download the installer: After completing your purchase, you’ll be provided with download links for either Windows or macOS. Click to download the appropriate version.
- Install the app: Open the downloaded file and follow the on-screen instructions to install Affinity Designer on your computer.
- Launch the program: Once installed, launch Affinity Designer from your applications folder (macOS) or start menu (Windows). You’ll also be prompted to accept the license agreement and log in to your Affinity account.
On iPad
- Open the App Store: On your iPad, open the Apple App Store.
- Search for Affinity Designer: Type “Affinity Designer 2” into the search bar. Make sure it’s the official app from Serif Labs.
- Purchase and download: Tap the price button to purchase the app. After the transaction, the app will automatically download to your iPad.
- Open Affinity Designer: Once the download is complete, tap the Affinity Designer app’s icon.
Get to Know the Interface
When you first open Affinity Designer, the interface might feel a little overwhelming. But with just a little orientation, you’ll start to feel at home in no time.
Here’s a simple breakdown of how to navigate and perform common actions in the app:
- Open a New Project
- Click File > New on desktop, or tap the “+” icon on iPad. Choose your canvas size, resolution and color format, then click Create.
- Click File > New on desktop, or tap the “+” icon on iPad. Choose your canvas size, resolution and color format, then click Create.
- Zoom In and Out
- On desktop: Use the Zoom Tool by pressing Z on your keyboard, or scroll your mouse wheel while holding Ctrl/Cmd.
- On iPad: Pinch with two fingers to zoom in and out.
- On desktop: Use the Zoom Tool by pressing Z on your keyboard, or scroll your mouse wheel while holding Ctrl/Cmd.
- On iPad: Pinch with two fingers to zoom in and out.
- Pan Around the Canvas
- On desktop: Hold down the spacebar (or open the View Tool by pressing H) and drag with your mouse.
- On iPad: Use two fingers to drag across the canvas.
- On desktop: Hold down the spacebar (or open the View Tool by pressing H) and drag with your mouse.
- On iPad: Use two fingers to drag across the canvas.
- Select and Move Objects
- Use the Move tool (arrow icon) from the toolbar to select, resize or reposition shapes, images and text elements on the canvas.
- Use the Move tool (arrow icon) from the toolbar to select, resize or reposition shapes, images and text elements on the canvas.
- Import Images or Assets
- On desktop: Go to File > Place, then choose an image to drop onto the canvas.
- On iPad: Go to the Document Menu then Place, and select the image you want to import. Or, drag and drop images from your Photos or Files app.
- On desktop: Go to File > Place, then choose an image to drop onto the canvas.
- On iPad: Go to the Document Menu then Place, and select the image you want to import. Or, drag and drop images from your Photos or Files app.
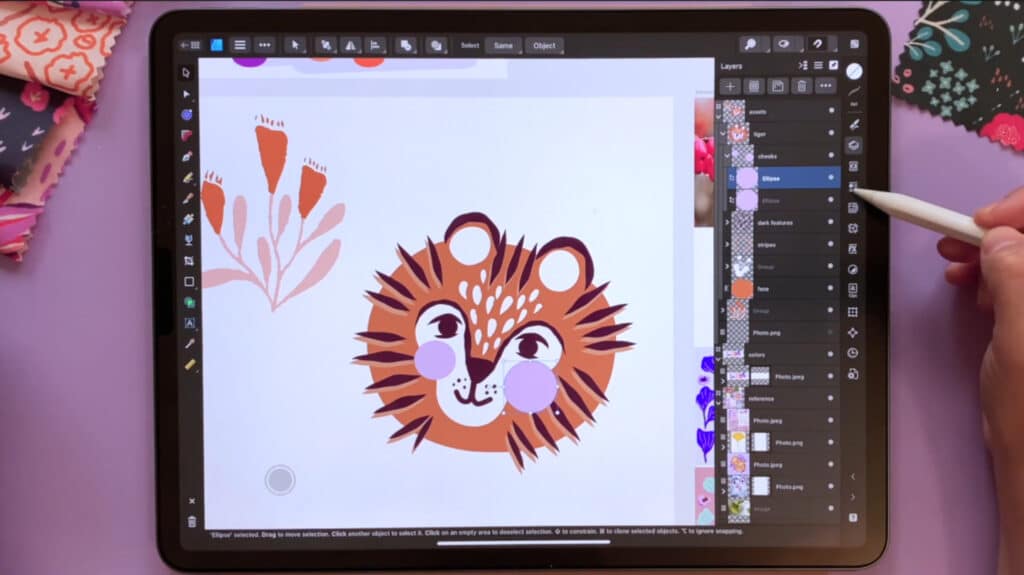
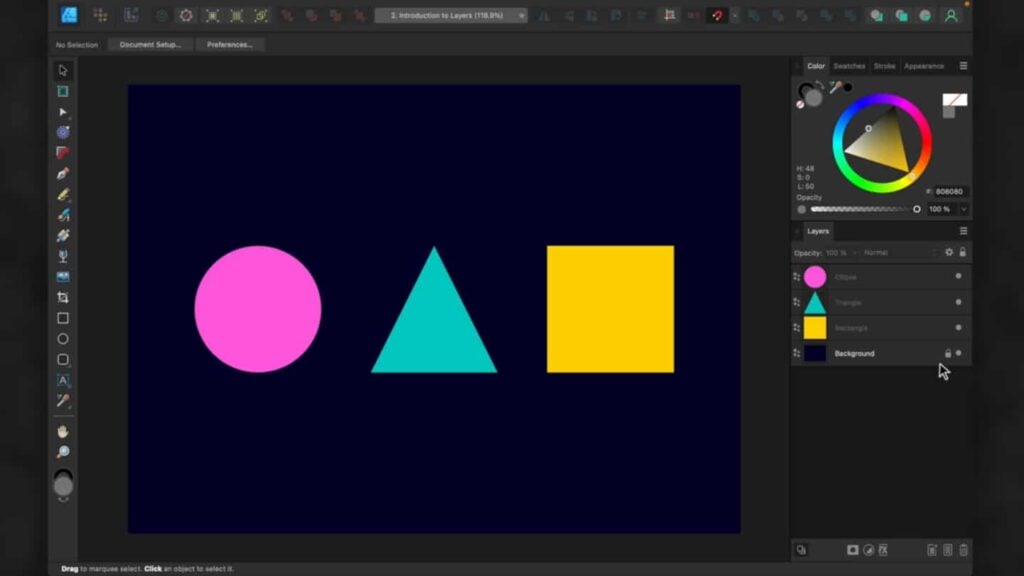
- Work with Layers
- Use the Layers panel (located on the right-hand side of the interface) to see and manage all your objects. From there, you can drag layers up or down to change their order, group layers together, and lock, hide or rename layers.
- Use the Layers panel (located on the right-hand side of the interface) to see and manage all your objects. From there, you can drag layers up or down to change their order, group layers together, and lock, hide or rename layers.
- Undo/Redo
- On desktop: Use Ctrl/Cmd + Z (undo) and Ctrl/Cmd + Shift + Z (redo)
- On iPad: Tap with two fingers (undo) or three fingers (redo)
- On desktop: Use Ctrl/Cmd + Z (undo) and Ctrl/Cmd + Shift + Z (redo)
- On iPad: Tap with two fingers (undo) or three fingers (redo)
- Save Your Work
- On desktop: Go to File > Save As to save your project as an .afdesign file.
- On iPad: Tap the back button in the upper left to go to the Home screen, tap the Live Docs tab and click the icon that looks like three lines next to the project you want to save. Then, tap Save or Save As.
- On desktop: Go to File > Save As to save your project as an .afdesign file.
- On iPad: Tap the back button in the upper left to go to the Home screen, tap the Live Docs tab and click the icon that looks like three lines next to the project you want to save. Then, tap Save or Save As.
- Click File > New on desktop, or tap the “+” icon on iPad. Choose your canvas size, resolution and color format, then click Create.
- On desktop: Use the Zoom Tool by pressing Z on your keyboard, or scroll your mouse wheel while holding Ctrl/Cmd.
- On iPad: Pinch with two fingers to zoom in and out.
- On desktop: Hold down the spacebar (or open the View Tool by pressing H) and drag with your mouse.
- On iPad: Use two fingers to drag across the canvas.
- Use the Move tool (arrow icon) from the toolbar to select, resize or reposition shapes, images and text elements on the canvas.
- On desktop: Go to File > Place, then choose an image to drop onto the canvas.
- On iPad: Go to the Document Menu then Place, and select the image you want to import. Or, drag and drop images from your Photos or Files app.
- Use the Layers panel (located on the right-hand side of the interface) to see and manage all your objects. From there, you can drag layers up or down to change their order, group layers together, and lock, hide or rename layers.
- On desktop: Use Ctrl/Cmd + Z (undo) and Ctrl/Cmd + Shift + Z (redo)
- On iPad: Tap with two fingers (undo) or three fingers (redo)
- On desktop: Go to File > Save As to save your project as an .afdesign file.
- On iPad: Tap the back button in the upper left to go to the Home screen, tap the Live Docs tab and click the icon that looks like three lines next to the project you want to save. Then, tap Save or Save As.
Essential Tools and How to Use Them
Affinity Designer comes packed with powerful tools, but as a beginner, you only need to master a handful to start creating confidently. Below is a list of essential tools, what they do and how you can use them effectively.
- Move Tool (V)
- The default selection tool. Use it to select, move, resize and rotate objects on the canvas.
- Click, drag and drop an object to reposition it. Use handles on the bounding box to scale or rotate.
- The default selection tool. Use it to select, move, resize and rotate objects on the canvas.
- Click, drag and drop an object to reposition it. Use handles on the bounding box to scale or rotate.
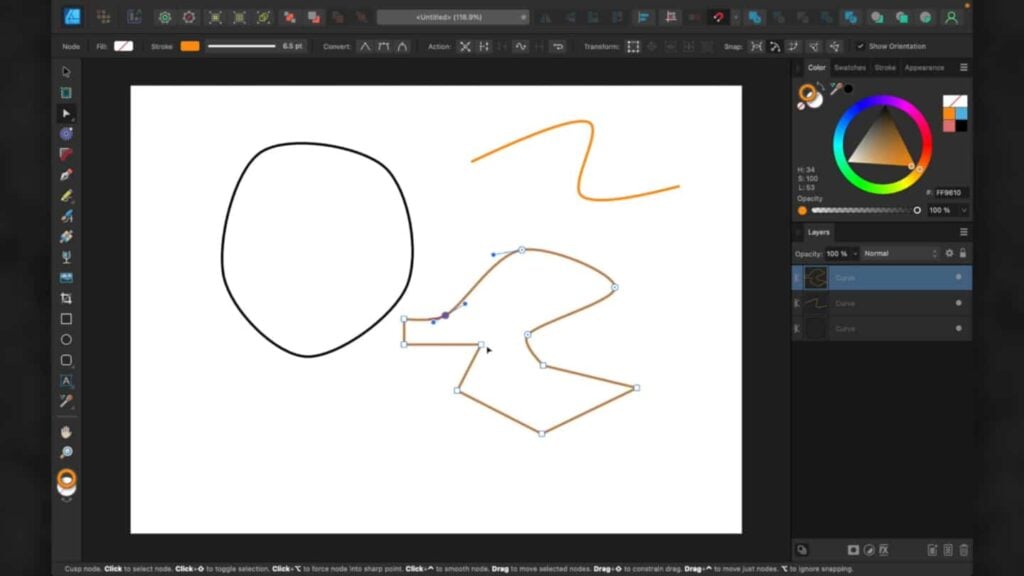
- Node Tool (A)
- Lets you edit the individual nodes (points) along existing curves and shapes.
- Click on any vector shape or line to see its nodes, then drag them (or the lines between them) to adjust the curves or reshape paths.
- Lets you edit the individual nodes (points) along existing curves and shapes.
- Click on any vector shape or line to see its nodes, then drag them (or the lines between them) to adjust the curves or reshape paths.
- Pen Tool (P)
- A precision tool for drawing custom vector paths using anchor points and curves. The path you draw can be converted to a text frame or text path.
- Click to place individual points, click-drag for curved lines or click and drag for straight lines. Complete the path without closing it by pressing the Esc key, or close the path by clicking on the first Node.
- Pencil Tool (N)
- Draws freehand vector lines that automatically smooth into curves.
- Perfect for sketching quick organic shapes or achieving a hand-drawn look.
- Draws freehand vector lines that automatically smooth into curves.
- Perfect for sketching quick organic shapes or achieving a hand-drawn look.
- Corner Tool ( C )
- Used to round off sharp corners on geometric shapes, or on lines and shapes you drew with the Pen Tool.
- Click on the node of the sharp corner you want to round, then drag the center of the ring to adjust the corner’s size.
- Used to round off sharp corners on geometric shapes, or on lines and shapes you drew with the Pen Tool.
- Click on the node of the sharp corner you want to round, then drag the center of the ring to adjust the corner’s size.
- Vector Flood Fill Tool ( R )
- Allows you to quickly fill in areas of your vector design.
- Select your preferred fill type in the Color, Swatches or Tools panel. Then, click an object to fill it with color.
- Allows you to quickly fill in areas of your vector design.
- Select your preferred fill type in the Color, Swatches or Tools panel. Then, click an object to fill it with color.
- Flood Fill Tool
- Does the same thing as the Vector Flood Fill Tool, but works on pixels.
- Select the color you want from the Color panel, then click the object you want to recolor.
- Does the same thing as the Vector Flood Fill Tool, but works on pixels.
- Select the color you want from the Color panel, then click the object you want to recolor.
- Transparency Tool (Y)
- Applies transparency gradients.
- Drag across an object to fade it from opaque to transparent.
- Applies transparency gradients.
- Drag across an object to fade it from opaque to transparent.
- Artistic Text Tool and Frame Text Tool (T)
- Adds text to your design. Both the Artistic and Frame Text Tools are grouped together; hold the T key to switch between them.
- Use the Artistic Text Tool to create prominent words or phrases, and the Frame Text Tool to create paragraphs of text.
- Adds text to your design. Both the Artistic and Frame Text Tools are grouped together; hold the T key to switch between them.
- Use the Artistic Text Tool to create prominent words or phrases, and the Frame Text Tool to create paragraphs of text.
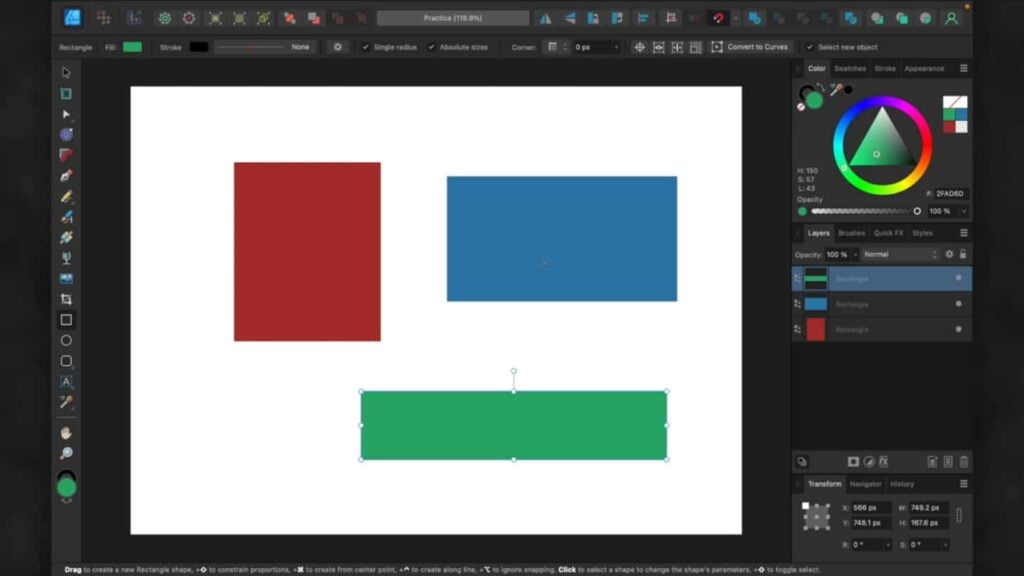
- Shape Tools
- Includes Rectangle, Ellipse, Triangle, Star, Crescent, Trapezoid and many more.
- Click and drag to draw a shape. Or, Ctrl/Cmd-click on the page, then enter the precise dimensions you want. Press OK to create the shape.
- Includes Rectangle, Ellipse, Triangle, Star, Crescent, Trapezoid and many more.
- Click and drag to draw a shape. Or, Ctrl/Cmd-click on the page, then enter the precise dimensions you want. Press OK to create the shape.
- Color Picker Tool (I)
- Samples a color from anywhere on the canvas, or even outside Affinity Designer.
- Simply click to pick up any color from the page. Alternatively, drag to open a magnifier; using this, you can select a color from anywhere inside or outside the app.
- Samples a color from anywhere on the canvas, or even outside Affinity Designer.
- Simply click to pick up any color from the page. Alternatively, drag to open a magnifier; using this, you can select a color from anywhere inside or outside the app.
- Artboard Tool
- Allows you to create, move, and resize multiple artboards within a project.
- Artboards are great for creating multiple variations of a single concept.
- Allows you to create, move, and resize multiple artboards within a project.
- Artboards are great for creating multiple variations of a single concept.
- The default selection tool. Use it to select, move, resize and rotate objects on the canvas.
- Click, drag and drop an object to reposition it. Use handles on the bounding box to scale or rotate.
- Lets you edit the individual nodes (points) along existing curves and shapes.
- Click on any vector shape or line to see its nodes, then drag them (or the lines between them) to adjust the curves or reshape paths.
- A precision tool for drawing custom vector paths using anchor points and curves. The path you draw can be converted to a text frame or text path.
- Click to place individual points, click-drag for curved lines or click and drag for straight lines. Complete the path without closing it by pressing the Esc key, or close the path by clicking on the first Node.
- Draws freehand vector lines that automatically smooth into curves.
- Perfect for sketching quick organic shapes or achieving a hand-drawn look.
- Used to round off sharp corners on geometric shapes, or on lines and shapes you drew with the Pen Tool.
- Click on the node of the sharp corner you want to round, then drag the center of the ring to adjust the corner’s size.
- Allows you to quickly fill in areas of your vector design.
- Select your preferred fill type in the Color, Swatches or Tools panel. Then, click an object to fill it with color.
- Does the same thing as the Vector Flood Fill Tool, but works on pixels.
- Select the color you want from the Color panel, then click the object you want to recolor.
- Applies transparency gradients.
- Drag across an object to fade it from opaque to transparent.
- Adds text to your design. Both the Artistic and Frame Text Tools are grouped together; hold the T key to switch between them.
- Use the Artistic Text Tool to create prominent words or phrases, and the Frame Text Tool to create paragraphs of text.
- Includes Rectangle, Ellipse, Triangle, Star, Crescent, Trapezoid and many more.
- Click and drag to draw a shape. Or, Ctrl/Cmd-click on the page, then enter the precise dimensions you want. Press OK to create the shape.
- Samples a color from anywhere on the canvas, or even outside Affinity Designer.
- Simply click to pick up any color from the page. Alternatively, drag to open a magnifier; using this, you can select a color from anywhere inside or outside the app.
- Allows you to create, move, and resize multiple artboards within a project.
- Artboards are great for creating multiple variations of a single concept.
Each tool comes with additional options in the Context Toolbar at the top of the screen, which changes based on the tool you’ve selected. Spend a little time with each tool to understand how it behaves, and you’ll quickly build muscle memory to make your design process quicker and easier.
Use Personas Like a Pro
One of Affinity Designer’s most unique features is its Persona system. Personas represent different work modes, each tailored to a specific part of the design process. So instead of switching between different apps, or digging through a convoluted menu system to find the tool you want, you can simply switch between Personas with a single click.
You’ll find the Persona options in the top-left corner of your workspace, whether you’re on desktop or iPad. Here’s what each Persona does:
The Three Personas in Affinity Designer
- Designer Persona
- Also known as “vector mode,” this is the default mode for vector art and layout work.
- Featured tools include the Pen Tool, Node Tool, Shape Tools and more.
- Also known as “vector mode,” this is the default mode for vector art and layout work.
- Featured tools include the Pen Tool, Node Tool, Shape Tools and more.
- Pixel Persona
- Also known as “raster mode,” this Persona switches to a raster (i.e., pixel-based) environment that’s ideal for painting, shading or adding texture.
- Tools include pixel selection, brush and retouching tools.
- Also known as “raster mode,” this Persona switches to a raster (i.e., pixel-based) environment that’s ideal for painting, shading or adding texture.
- Tools include pixel selection, brush and retouching tools.
- Export Persona
- A dedicated space for slicing and exporting your artwork or assets.
- Allows for precise control over what you export, in what format and at what resolution.
- A dedicated space for slicing and exporting your artwork or assets.
- Allows for precise control over what you export, in what format and at what resolution.
- Also known as “vector mode,” this is the default mode for vector art and layout work.
- Featured tools include the Pen Tool, Node Tool, Shape Tools and more.
- Also known as “raster mode,” this Persona switches to a raster (i.e., pixel-based) environment that’s ideal for painting, shading or adding texture.
- Tools include pixel selection, brush and retouching tools.
- A dedicated space for slicing and exporting your artwork or assets.
- Allows for precise control over what you export, in what format and at what resolution.
When to Use Each Persona
Use the Designer Persona when you're:
- Drawing clean vector shapes.
- Creating logos, icons or layouts.
- Using vector-based tools like the Pen or Node Tool.
Switch to the Pixel Persona when you want to:
- Add hand-drawn textures to digital art.
- Perform pixel-by-pixel editing.
- Create grain, shading or painting effects without leaving the app.
Jump into the Export Persona when you're ready to:
- Export your entire project, individual artboards or selected layers.
- Prepare multiple file sizes or formats (e.g. PNGs for web, PDFs for print).
- Set up slices for UI/UX assets, or batch export components.
By learning how to use Personas efficiently, you can move from scalable vector design to detailed texture work to asset export, all within a single file and without opening another program.
Create Your First Project: A Step-By-Step Walkthrough
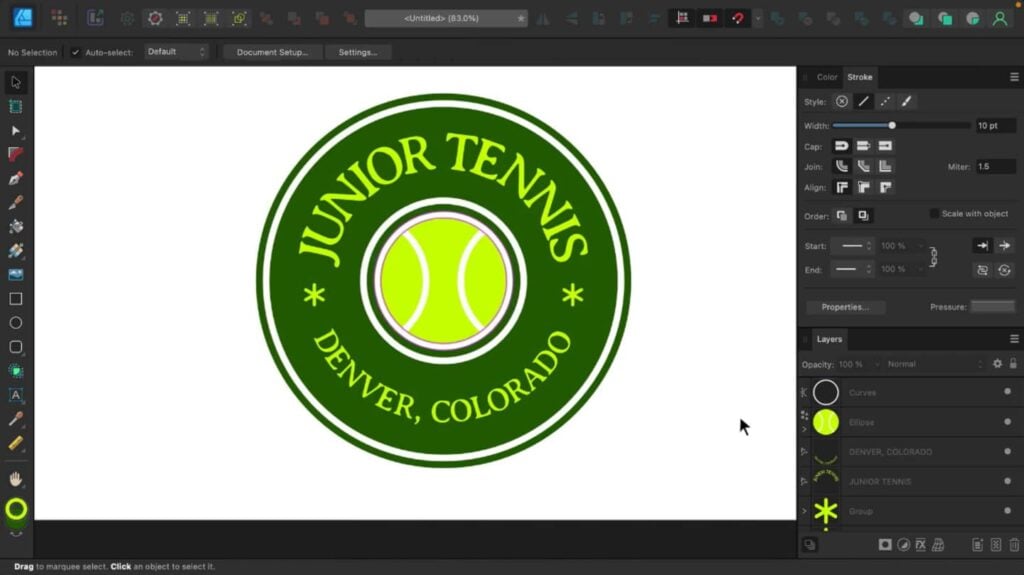
Try putting everything you’ve learned into action by designing a simple badge logo. This is a fantastic beginner-friendly project that uses shapes, text and basic styling to create a professional-grade logo.
Step 1: Start a New Document
- Go to File > New (or tap the "+" on iPad).
- Set the canvas size to something manageable, like 1000 x 1000 pixels.
- Choose RGB color mode and 72 DPI (300 DPI is better for print work).
- Ensure you’re using the Designer Persona.
Step 2: Draw a Circle Background
- Select the Ellipse Tool from the toolbar.
- Hold Shift while dragging to create a perfect circle (or tap and hold while drawing on iPad).
- Use the Vector Flood Fill Tool to add a background color (e.g., navy blue).
Step 3: Add a Shape or Icon
- Choose a shape from the Shape Tools, such as a star, triangle or smaller circle.
- Place it in the center of your first circle using the Move Tool. Change its color for contrast.
- Use the Corner Tool to slightly round the edges if desired.
Step 4: Add Text
- Create a new circle and put it inside your first circle to serve as a guide for your text.
- Select the Artistic Text Tool (T) and click the circle you just created.
- Type your badge name, like “Adventure Club” or “Design Co.”
- Change the font and size in the Context Toolbar.
- Repeat the process to add a second line of text at the bottom (e.g., “Since 2025”).
Step 5: Group and Tidy
- In the Layers panel, Ctrl/Cmd + Click each layer.
- Then, click “Group Layers” on the Layers panel. Alternatively, navigate to Arrange > Group.
- Double-click your group and select “Rename Layer” from the Layer menu. Rename it as something like “Badge Logo” for easy reference.
That’s it—you’ve created your first custom logo! In just five steps, you’ve worked with shapes, text, alignment, color and export settings.
Exporting Your Work
Once your design is finished, it’s time to practice saving it outside of Affinity Designer. The app offers two main ways to export your work: the Export function and the Export Persona. Both are useful, but they serve different purposes.
Export Function vs. Export Persona
- Export Function (File > Export)
- Best for quickly exporting your entire canvas, an artboard or selected objects.
- Supports common formats like PNG, JPG, SVG, PDF and more.
- Fast, straightforward and ideal for most beginners.
- Best for quickly exporting your entire canvas, an artboard or selected objects.
- Supports common formats like PNG, JPG, SVG, PDF and more.
- Fast, straightforward and ideal for most beginners.
- Best for quickly exporting your entire canvas, an artboard or selected objects.
- Supports common formats like PNG, JPG, SVG, PDF and more.
- Fast, straightforward and ideal for most beginners.
- Export Persona
- A specialized workspace for more advanced export needs.
- Lets you create slices (custom export regions), export multiple objects at once or generate multiple versions.
- Great for UI/UX designers, or preparing a batch of assets.
- A specialized workspace for more advanced export needs.
- Lets you create slices (custom export regions), export multiple objects at once or generate multiple versions.
- Great for UI/UX designers, or preparing a batch of assets.
- A specialized workspace for more advanced export needs.
- Lets you create slices (custom export regions), export multiple objects at once or generate multiple versions.
- Great for UI/UX designers, or preparing a batch of assets.
How to Export a Project Using the Export Function
- Go to File > Export (desktop only).
- Choose your file format: For example, you can choose PNG or JPG for web and social media, SVG for scalable vector graphics, or PSD for Photoshop compatibility.
- Set export options: You can choose to export the whole document, current artboard or selection only. Adjust the resolution and background transparency if needed.
- Finish: Click Export, choose a location to save the file and click Save.
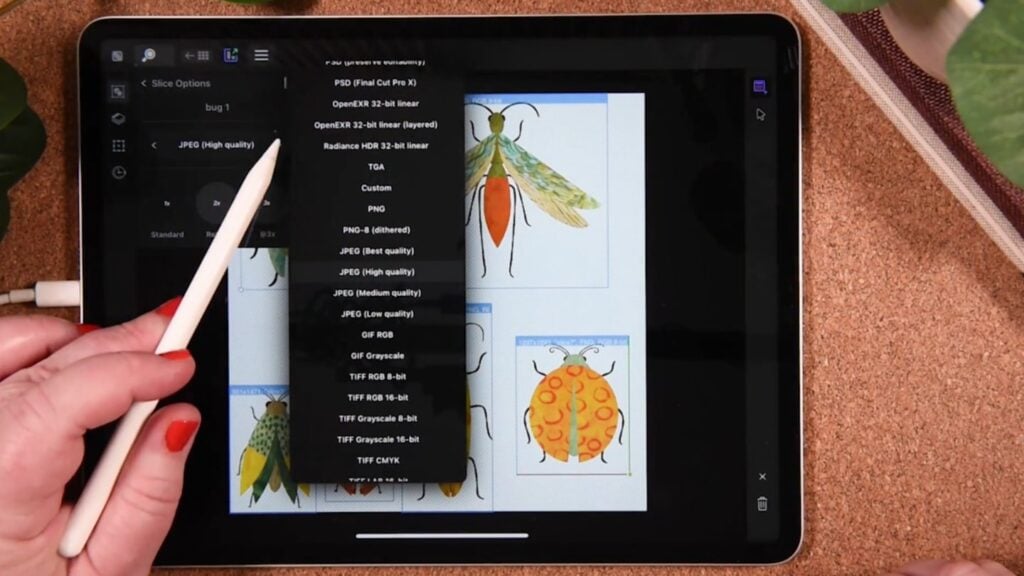
How to Use the Export Persona
- Switch to the Export Persona: Click the Export Persona icon in the top-left toolbar.
- Use the Slice Tool: Select the Slice Tool from the toolbar. Click on layers or artboards in the Layers panel to auto-generate slices, or draw custom slices directly on the canvas.
- Adjust export settings for each slice: In the Export Options panel, choose your preferred settings.
- Finish: Select some or all of your slices, then click Export Slices to save them to your chosen folder.
Common Mistakes to Avoid
Even with an intuitive interface, Affinity Designer has its quirks. And like any creative software, it’s easy to run into avoidable pitfalls when you’re just starting out.
Here are some common mistakes beginners tend to make, and how you can avoid them:
- Not locking layers you don’t want to move: Accidentally shifting a background or key element is frustrating. Use the lock icon in the Layers panel to keep important layers in place.
- Ignoring layer naming and organization: Layers with generic names make complex files hard to manage. Get in the habit of naming layers and organizing them into groups early on.
- Forgetting to use Artboards for multiple layouts: Creating different designs on a single canvas without artboards can get messy. Use Artboards to keep variations, pages or screens discrete, organized and export-ready.
- Working in the wrong Persona: Always double-check to ensure you're in the correct Persona for the task at hand.
- Not saving as you go: Affinity Designer is stable, but it's always smart to save your work manually—especially before trying something new or complex.
- Exporting at the wrong resolution: Exporting for print? Make sure your document is set to 300 DPI. For web or screen, 72 DPI is usually fine. Check your document setup and export settings.
Take the Next Steps in Your Design Journey
Whether you're crafting brand logos, graphic illustrations or surface patterns, you now have the tools and knowledge to start exploring your creative potential in Affinity Designer. The more you practice, the more you'll be able to do with this powerful software—all without making a single monthly payment.
Remember, design is a journey, and learning the basics of Affinity Designer is just the first step. When you’re ready to go further, Skillshare classes are here to help. With expert teachers and engaging class projects, our online Affinity Designer classes can take your skills to the next level.
Related Reading
Carrie Buchholz
Carrie Buchholz is a freelance writer who lives in Northern Colorado with her husband and dog.
Try Skillshare for free! Sign up for a 7 day free trial today!
Get Started- Unlimited access to every class
- Supportive online creative community
- Learn offline with Skillshare's app


