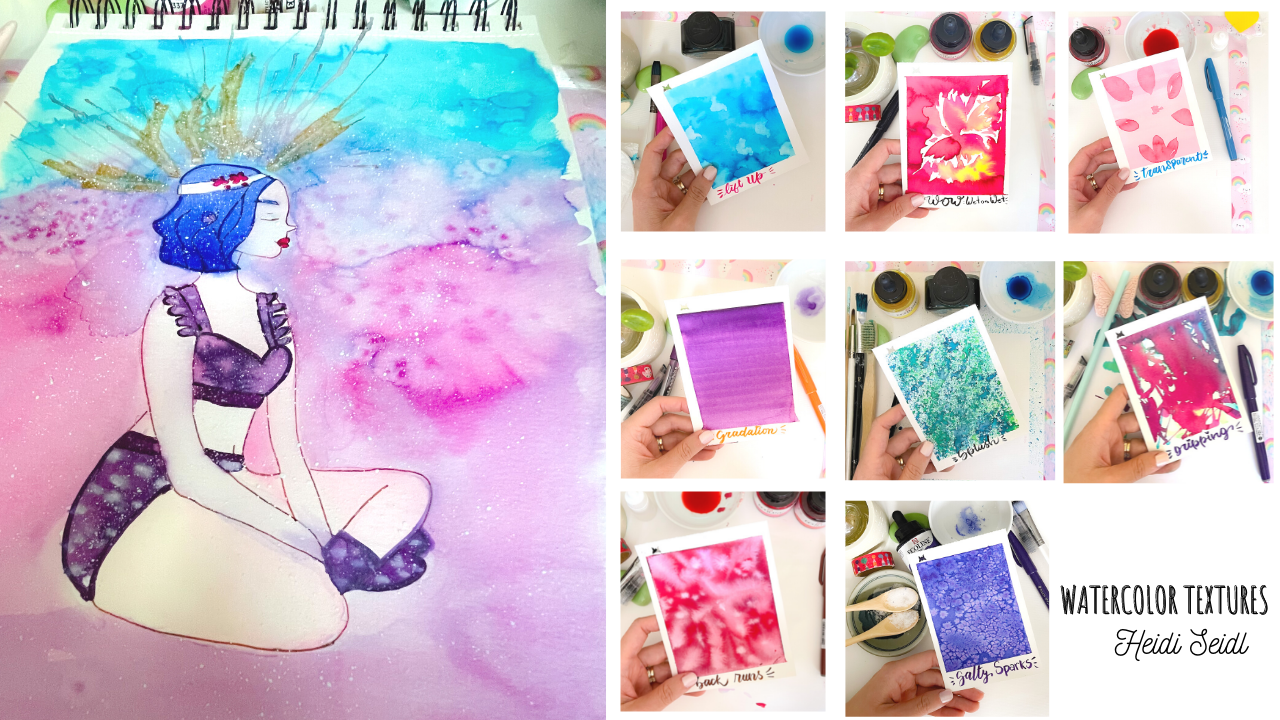
Transcription
1. Intro: Bonjour et bienvenue dans ce
cours. Je m'appelle Heidi. Je vous guide dans le
merveilleux processus de création de textures dans vos
aquarelles. Je vais donc partager avec vous quelques techniques que
nous apprenons à travailler. Une qualité que vous allez adorer. Vous pouvez les utiliser ensemble ou
en utiliser dix séparément. Et vous verrez l'amélioration
du travail des toxicomanes. Et à la fin du cours, je vais vous montrer comment
combiner toutes les techniques et créer
une belle peinture. matériel fantaisiste,
méditant comme ça. J'espère que vous vous joindrez
à moi pour
ce cours et n'oubliez pas de me suivre ici sur Skillshare pour
ne manquer aucun cours. Je te verrai dans
la prochaine vidéo.
2. Aperçu des fournitures: Voici un aperçu
de toutes les fournitures que nous allons
utiliser pendant ce cours. N'oubliez pas que nous apprenons des techniques pour utiliser l'aquarelle et créer une belle texture. Regardons-les. Nous allons donc travailler
huit et de nouvelles techniques. Et pour cela, nous avons
besoin d'un coton, serviette en
papier ou d'une serviette propre. Vous pouvez utiliser ce que
vous avez sous la main. Ce n'est qu'un exemple. Ensuite, en faisant de l'eau, avons-nous toujours besoin d'eau ? Une peinture blanche. Il peut s'agir d'acrylique ou de gouache, en a. Les aquarelles, quelle que soit la
forme que
vous avez, vous pouvez utiliser des marqueurs ou
des aquarelles
liquides, liquides ou des aquarelles
normales. Un tapis mélangeur ou un récipient. Paille. Tu peux utiliser
ce que tu as. À la maison. Un gros pinceau plat
ou un pinceau à eau. C'est très
pratique d'utiliser un système intégré facile pour la technique avec
laquelle nous travaillons. Au pinceau. Quel que soit le pinceau que vous avez. Si vous n'
avez pas d'autres pinceaux que je vous montre, utilisez simplement ce que vous avez. Vous aurez besoin d'un
pinceau plat dans un bâton de bambou. Nous aurons également besoin de sel. J'ai deux types de sel ou du sel
ordinaire et du sel feuilleté. Vous pouvez également utiliser du sel rose. Papier aquarelle. Il s'agit d'un papier aquarelle
Canson pressé à froid. Et format de type A4. Vous aurez donc également besoin rubans washi pour
fixer la surface de votre papier, pour mettre votre papier
et faire du désordre. Au début de
chaque technique, je vais vous expliquer
et vous indiquer les fournitures
exactes dont vous aurez
besoin pour pratiquer cette technique. Alors le souci, et je vous
verrai dans la prochaine vidéo.
3. Mini toile: Créons notre mini
Canvas pour cela. Nous avons besoin d'une fente pour
Piper, d'une roulette, et de votre papier aquarelle dans un soldat
fou pour
endommager votre surface. Je vais donc simplement découper mon papier aquarelle au format A4 pour
en faire une petite toile. Et au total, j'ai vraiment fait pour chaque journal
, puis quatre autres
pour l'autre. Au total, nous
allons créer huit mini toiles sur lesquelles
travailler ou techniques. Vous pouvez utiliser
la taille que vous voulez. C'est. Il n'est pas obligatoire de
faire la même chose FIN ici. C'est la justice, c'est une
source d'inspiration pour toi. Vous pouvez donc utiliser l'API, obtenir du papier, du papier
modéré ou des formats
mini, mini. Papier. Peu importe qu'
ils soient quittes. Ce n'est pas là le problème. Je ferai de même
avec ce document. Ensuite, nous terminerons
ou huit
feuilles de papier sur lesquelles nous commencerons à travailler. Ou huit techniques simples pour
créer de la texture dans votre
peinture à l'aquarelle. Et c'est un
cours très amusant où vous allez apprendre à améliorer
la qualité des retouches. Ajoutez de la texture. Rendez toujours vos peintures vraiment belles et fascinantes pour les personnes qui les
regardent. Je suis alors en train
de terminer les deux dernières pièces. Ensuite, j'aurai huit
feuilles de papier aquarelle. Ou je les appelle
le mini-campus. Pour mieux organiser
les techniques. Je vous suggère de
créer un bundle avec Azure. Huit techniques pour cela, avons-nous besoin d'un perforateur, d'une bande de bande textile ? Vos papiers, bien sûr, vous devez perforer votre papier
avec l'Égypte perforée. Ainsi, vous pouvez passer
à travers le texte encore un. Vous pouvez donc créer votre bundle avec toutes vos
huit belles techniques. Vous pouvez utiliser une autre méthode. Si tu veux. Vous pouvez peut-être peindre
des techniques dans un carnet de croquis. Vous les avez donc
tous sur une seule page. Il suffit donc de les voir et de
savoir quelle technique utilisez-vous là-bas et de vous référer à Assad
pour vos futurs travaux. Je pense que faire
cela comme ça parce que pour moi, c'est Marfan d'avoir un stylo dans la main pendant que je
crée une pièce. Ou simplement pour vous référer, quelle technique
dois-je utiliser pour cette peinture spécifique ? Et puis je peux
les choisir, les mélanger. Et l'idée est de
les tenir tous pour qu'ils l'obtiennent à
la fin du cours. Je vous verrai donc
dans la prochaine vidéo.
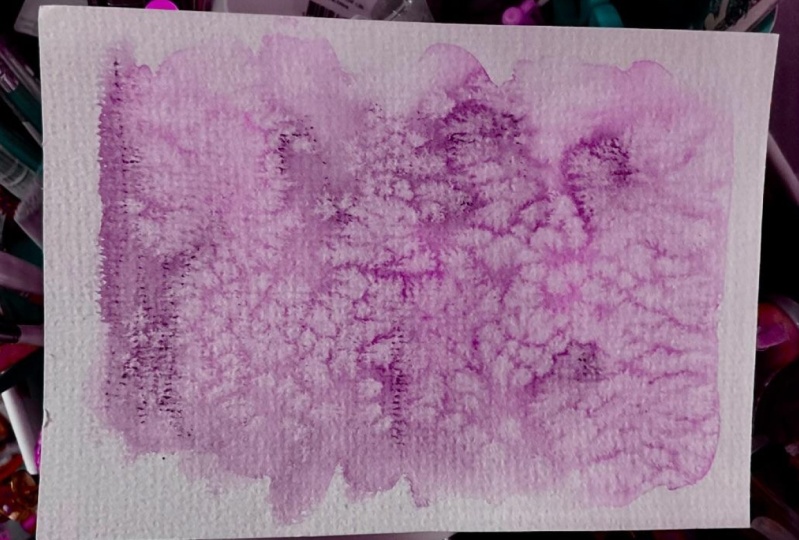
4. Texture 1 : Les étincelants salés: J'ai ici tous les
matériaux que nous
allons utiliser et je vais les
décrire. Nous avons besoin de sel en flocons
ou en taille normale. Huit pinceaux, pinceau plat ou
pinceau rond, tout ce que vous avez à portée de main à
l'aide d'aquarelles liquides. Ici. C'est une
couleur indigo et je les remplace et sur mon contenant afin que je puisse
commencer à les ramasser facilement. Si vous n'avez pas d'aquarelle
liquide, vous pouvez utiliser des pinceaux pour aquarelle ou tout autre type d'aquarelle. N'hésitez pas à utiliser
ce que vous avez chez vous. Vous allez voir des cellules et des rubans washi
et nous allons
fixer ou du papier sur la
surface du dimanche 18, notre eau et peut-être
un pinceau à eau. Nous allons donc réparer notre papier
aquarelle que nous faisions par le passé. Les gens laissent un peu d'espace pour écrire le
nom de cette technique, qui est des étincelles salées. Mais nous le ferons à
la fin de la technique. Fixons donc notre
papier sur la surface en utilisant ma merveilleuse
technique pour les rubans washi. Donc, le tuyau de forage n'endommage pas. J'utilise ma serviette propre. D'abord, mes deux bandes adhésives
lavées sur cette tour de refroidissement. Donc la colle du washi tape, un peu de
foi pour qu'elle ne
colle pas trop fort à mon poivre. Lors de la facturation et de la désactivation. J'ai partagé cette technique
dans mes autres cours. Je vous invite donc à
suivre mes autres cours. Tu apprendras beaucoup de mes conseils pour que tu aies du beau travail. Vous pouvez les consulter dans mon
profil ici sur Skillshare. Et je vais déposer
les derniers rubans adhésifs washi
goutte à goutte sur mon papier. Et mon papier sera
fixé à ma surface. Ensuite, nous pouvons commencer
à peindre et à créer la texture
avec ce beau sel. Maintenant, nous pouvons cliquer sur stat. Je vais utiliser mon pinceau
plat dans l'eau,
dans l'eau propre. Puis
prendre la couleur et peindre ma surface sur
mon pépin d'un côté à l'autre. Je vais essayer de garder la
couleur un peu plus foncée. La technique apparaît donc plus
belle à voir. Si vous avez besoin de plus d'eau, vous pouvez ajouter de l'eau. Essaie de garder le journal un
peu. Qu'avons-nous fait ? Les aquarelles n'
ont pas besoin d'être sèches car nous avons besoin du sel pour se dissoudre
dans l'aquarelle. Ils verront si vous avez besoin de
plus de couleur pour ajouter plus de couleur. Comme je le fais ici, je veux créer un peu
d'obscurité à un endroit donné. Donc c'est mieux si, si nous, si nous utilisons la couleur
dans le papier. Maintenant, on jette la
dette sur le sel. J'utiliserai les deux types
de sel que j'ai ici. Ainsi, vous pouvez voir la différence
qui ne sait pas grand-chose. Alors n'hésitez pas ou n'hésitez pas, ne doutez pas
de cette technique. Ensuite, vous vous rendez compte que vous pouvez utiliser n'importe quel sel
à portée de main. Le sel va réagir avec l'
eau qui se dissout. Et vous verrez le magnifique
parc qu'il crée. Je vais donc laisser sécher
complètement et vous devez également le laisser sécher
complètement. Vous pouvez y ajouter plus de sel là
où vous voyez que vous avez besoin un peu plus d'étincelles jouer avec et le
rendre beau. Tu crois que tu en as besoin.
Maintenant, ma peinture est complètement sèche et
avec mon pinceau sec, je vais éliminer toutes les particules de
sel qui se trouvent à la surface de ma
peinture comme je le fais ici. Vous pouvez le voir très
doux, ne pas se précipiter. Et si je remarque
des grappes de sel, je vais peut-être utiliser
mes mains pour
les enlever très soigneusement afin de
ne pas endommager la peinture. Et vous pouvez déjà voir à
quel point
cette technique est fantastique cette technique est fantastique et utiliser cette technique pour
peut-être des arrière-plans, des motifs, pour un ciel, pour des peintures de
type galaxies. Si c'est vraiment beau
quand ils les utilisent, ou simplement pour ajouter un peu
de funky à la peinture. J'enlève donc tout le sel avant de peler
les bandes lavées. Comme vous pouvez le voir ici. Et
vous pouvez voir à quel point ce motif se forme
naturellement avec de l'eau, aquarelle et du sel est mignon. Maintenant vous pouvez voir
que mon ruban adhésif lavable décolle très facilement grâce à ma fabuleuse technique que je vous ai montrée dans la dernière
partie de ce cours. tellement satisfaisant,
ou la peinture est prête. Je vais maintenant écrire le
nom de cette technique. Je sais donc quelle est
cette technique pour référence future. Résolvez ces parcs. Facile à mémoriser. Je vous suggère de faire de même parce que
vous oublierez la
technique que vous utilisez ici. Vous pouvez également écrire
la description et le matériel dont vous avez besoin
au dos de cette carte. Je ne le fais pas,
mais tu peux le faire. Voici donc notre
technique, les étincelles salées. Et regardez comme c'est beau et beau. On dirait. Vous pouvez l'utiliser avec
différentes couleurs et vous
verrez à quel point les réactions sont belles. Je te verrai dans
la prochaine vidéo.
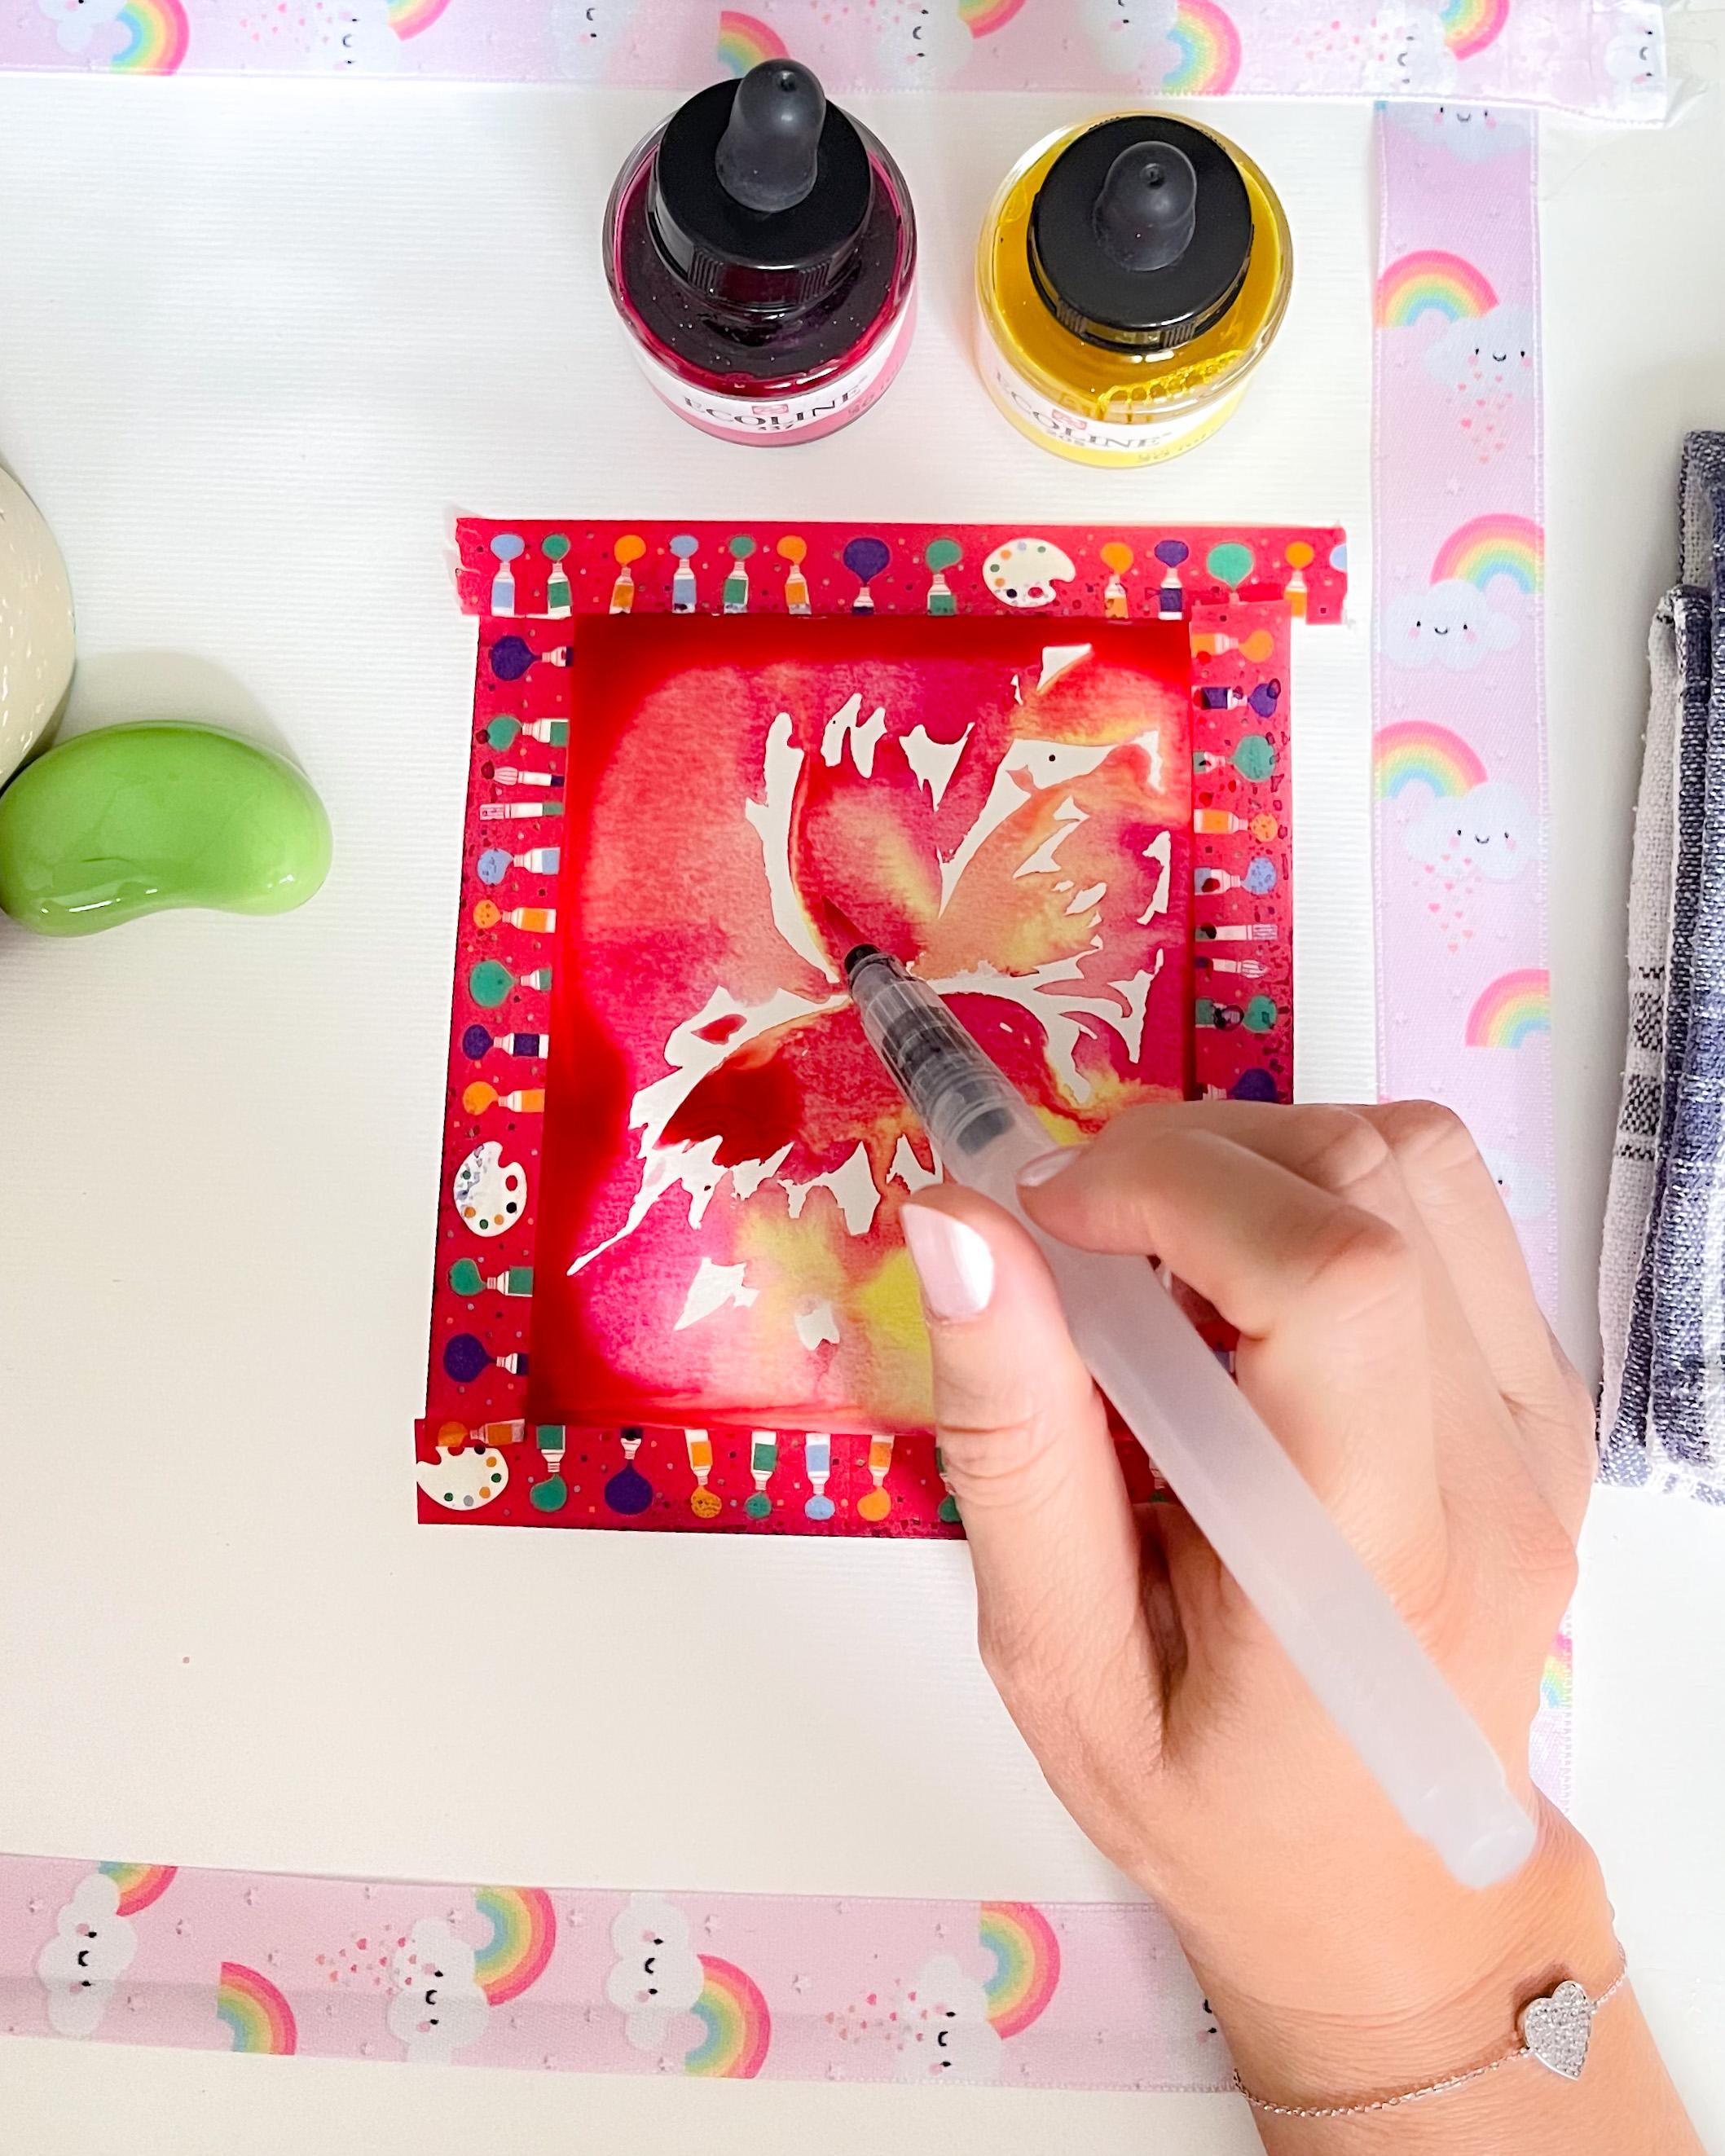
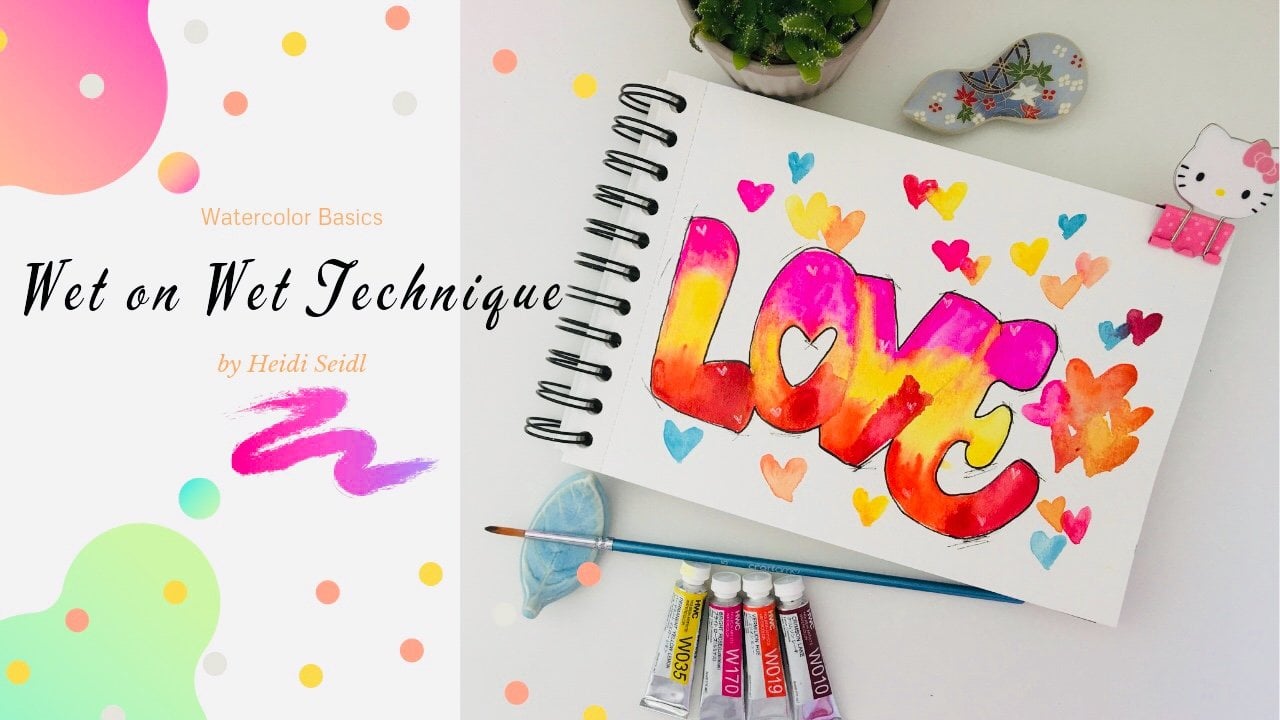
5. Texture 2 : l'effet WOW = humide sur l'humidité: J'ai du matériel VMA. Nous allons
utiliser le, quoi ? Les aquarelles du Pradesh. Je n'utilise pas d'
aquarelle liquide pour cette technique. Et j'ai ma version papier. Commençons donc. Et si votre papier, cette technique est
appelée la technique, ou mieux connue sous le nom de mouillé. Sur technique humide. Nous commencerons à ajouter de l'eau à notre papier sous la
forme que vous souhaitez, identifiant le domaine de la peinture
abstraite ici. Maintenant, nous faisons de l'aquarelle. Utilisation des aquarelles liquides. Placez l'aquarelle sur
un coin de peinture. Si vous utilisez
une autre aquarelle simplement avec votre pinceau
sur l'aquarelle, puis placez-la sur une
coordonnée de votre peinture. Et vous verrez la magie
opérer de façon très belle. Cela s'est passé ici. Je vais simplement laisser ma
créativité, ma créativité s'écouler. Ensuite, je ferai quelques
ajustements comme je le fais ici et je verrai ce que renferme
ce beau papier. Je suis allée voir le mélange et toute la réaction de l'
eau avec l'aquarelle. Je vais donc ajouter plus ou moins
d'eau, ramasser la couleur
avec mon pinceau et faire couler dans l'eau. Et à mon journal. Ça a l'air tellement magique.
Tout simplement magique. Cette technique est très utile et l'une
des plus utiles. Utilisez les techniques
sur les aquarelles. Parce que cela donne un
bel effet. Et montrez la
magie de l'aquarelle, qui donne vie à Excel. Vous pouvez l'utiliser sous
la forme que vous souhaitez pour peindre le fond
pour le rendre beau. Ciel, pour peindre des fleurs, ou où vous voulez. Même la flûte et
bien d'autres choses encore. La technique humide et humide est une ferme pour donner vie à une couleur un peu
plus humide. Bonjour, j'ai ajouté de l'eau
sur mon papier pour le mouiller. Et j'ai mon
aquarelle liquide humide et je ne fais que rajouter
quelques éclaboussures ou points
de couleur sur mon papier. Qu'est-ce que c'est, quand il est
déjà mouillé avec le mot. Si facile et si beau. Vous verrez quand il sera sec que les couleurs créent un
bel effet. Dans ce cas, peinture abstraite. Pour fabriquer mon papier couleur, j'ai simplement ajouté de l'eau au
papier avec mon pinceau à eau. C'est la magie de
ce pinceau à eau, c'est que vous pouvez appuyer sur le
pinceau, puis l'eau
sort et les aquarelles
réagissent et s'activent d'elles-mêmes. Courir à travers le papier, comme vous pouvez le voir ici, c' est juste que
j'appuie sur mon pinceau à eau, puis l'eau sort et
ils aquarellent, prenez-la pour elle-même. Nous allons le laisser sécher complètement. Comme vous pouvez le voir,
il est maintenant super sec et les couleurs sont éclatantes
et magnifiques. Mélangez-le, puis il suffit de le vider, ils le lavent. Nous pouvons donc voir la technique
magique. Comme c'est beau,
simple et facile. Maintenant, éclairons le
nom de cette technique, qui est wow, technique
ou technique mouillé sur mouillé. J'espère que vous appréciez
ces techniques et j'ai hâte de voir ce que vous créerez avec ces
belles techniques. N'oubliez pas que vous pouvez
télécharger votre travail en cours, votre matériel,
ce que vous voulez. La
section du projet de classe pour cette classe. Et il y a un laboratoire ici. Waouh, technique, technique mouillé
sur mouillé. Je te verrai donc dans le
prochain Habib pour avoir plus
de techniques sur notre palette remplie
dans la prochaine vidéo.
6. Texture 3 : Gradation: Pour cette technique,
je vais utiliser un pinceau aquarelle. Je l'ai ici. Mon pinceau aquarelle et mon pinceau à eau tombent
accidentellement, je suis parti et je ne pouvais pas
sentir la partie féroce. Mais je vais l'expliquer maintenant. Je ne fais que tracer des lignes avec mon pinceau aquarelle
sur mon papier. Si vous utilisez un autre
type d'aquarelle, nous avons fait de même pour l'aquarelle
Pradesh Andrew. Juste des lignes et laissé un
gros morceau de papier, blanc à la fin. Maintenant, avec un
pinceau aquarelle humide ou un pinceau à eau, il suffit de passer sur chaque ligne en
essayant de les faire dissoudre. Cette technique s'appelle
une bonne observation. Nous passons donc de l'obscurité
à la lumière, les couleurs. Et c'est un très
beau et vous pouvez l'
utiliser pour différentes pièces, pour les cheveux, peut-être aussi pour les
arrière-plans. Et c'est super facile à faire. Ensuite, nous avons fait un pinceau à eau et juste ajouté un peu
d'eau à la fin. Et déplacez simplement la couleur jusqu'à ce que votre espace
blanc soit couvert. Nettoyez votre pinceau si vous en avez
besoin car il peut être
saturé d'une couleur. Vous obtenez ainsi la gradation
parfaite. Et si vous voyez que vous avez besoin d'un peu plus de cette bonté au
début de la couleur. Il suffit d'ajouter un peu
plus d'aquarelle. Tout simplement. Ensuite, il suffit
de le laisser sécher complètement pour voir le
bel effet. Cette technique
demande un peu de patience et de temps. Vous obtenez donc une selle prête, la dérivation ou la sous-peinture. Alors prends ton temps. Comme je le fais ici. Comme vous pouvez le voir, je suis en train de nettoyer mon
pinceau à eau claire. Ensuite, je repasserai en revue l'ensemble du tableau
avec cette équipe. Pinceau d'eau et
ramassage de la couleur, excès de couleur sur les bords
de ma peinture ici. Je reçois donc la belle prédation de la couleur foncée à la couleur plus claire, ajoutant plus littéral avec
le meurtre du pigment. C'est là que j'
ai besoin d'un
peu plus de pigment. Et je ramasse un peu de couleur là où je vois qu'il
y en a trop. Toujours. Il suffit de suivre le
courant, ça prend ton temps. Et vous verrez que le désordre final
serait très varié. Maintenant, laissez sécher
complètement et voyez à quel point le résultat
est
beau pour ce candidat. Mais sur le dessus et
plus léger sur le bas. Maintenant, je n'adorerais pas
les bandes lavées,
écrire le nom de
cette technique. Cette technique
s'appelle la gravitation. Et la couleur que j'ai utilisée pour
cela était le violet ou le violet. De l'obscurité à la lumière. C'est une belle technique
dans un beau restocké. Écrivons le
nom en bas. Nous avons notre
ensemble de techniques d'organisation. Vous pouvez également utiliser
deux couleurs ici. Mais je voulais te montrer à
quoi ça ressemble de faire ça avec le même labo. Nous avons maintenant notre carte de fin d'études prête à entrer dans le lot. Je te verrai dans
la prochaine vidéo.
7. Texture 4 : les pistes du dos blanc: Pour cette technique, nous
allons utiliser de la peinture blanche. Il peut également s'agir d'un lavage
ou d'une critique. Quoi ? Un récipient propre. Aquarelles dans des tons similaires. Un pinceau. Et votre
brosse à eau, une serviette propre. Et votre papier est fixé sur
la surface de préférence. Ajoutons donc cela. J'ajouterai de l'eau à ma salle de bain pour
pouvoir mouiller ma brosse. Ensuite, j'ajouterai mes
aquarelles sur le papier. Ce Colorado
similaire, vous pouvez utiliser deux couleurs différentes demain. Effet spectaculaire. Et puis juste avec
votre peinture humide, la surface de votre papier
aquarelle. Nous utilisons deux couleurs différentes, deux couleurs différentes mais de
forme similaire. Dans ce cas. Pour faire un
peu de contraste. Pour utiliser deux couleurs
totalement différentes, si vous préférez. Mon MBA ici consiste à utiliser
une couleur plus foncée et une couleur plus claire. Voilà donc nos craintes. Mais pour cette technique, et comme vous pouvez le voir, j'ai fini en aquarelle
un peu mouillée comme habitude car nous en avons besoin cette eau qui coule
librement sur le papier. Si vous utilisez un autre
type d'aquarelle, un
autre liquide, assurez-vous
simplement que votre aquarelle est mouillée. Maintenant, nous faisons ce que le
pinceau avec de l'eau à l'intérieur. Prenez un peu de
peinture blanche sur le bout. Et juste avec la pointe
de votre pinceau à eau. Pour fabriquer des torches. Dans ton papier aquarelle. Vous verrez que l'
eau dans le papier
gagnera son argent d'elle-même. Je n'avais pas besoin d'en faire trop. Mais si vous voyez
qu'ils ont besoin d' un peu d'aide. J'ai juste pris ton papier et tes aquarelles et fais
autant de torches que tu veux. Vous pouvez voir comment votre
peinture blanche à l'aquarelle réagit, comment elles se mélangent et comment elles dansent
sur du papier non numérique. À présent, cela ne ressemble à rien, mais vous verrez quand il sera sec, la magie se manifestera. Et puis j'ai juste fait quelques
lignes pour que la douleur blanche
passe à travers l'
eau de mon journal. L'effet handicap,
magnifique. Et vous pouvez utiliser cette technique pour de nombreuses peintures différentes. Pour un penseur de vent peint. C'est la technique parfaite. Cependant, comme beaucoup, vous ont
simplement demandé ce qui peut maintenant conduire le chemin du temps
et devenir sec. Comme ça. Comme vous pouvez le voir, cela ressemble vraiment à de la magie. Maintenant, retirons
les bandes adhésives lavées. La mer, ou une belle technique. Cette technique est
appelée « back grants ». Dans ce K, fonds blancs, vous pouvez utiliser peut-être du jello
ou une autre couleur. Or ou argent, ou gris, ou n'importe quelle couleur si vous préférez. Comme c'est beau. Maintenant, écrivons le nom de cette technique au
bas de notre carte. Dos trans, dans ce cas blanc. Mais les clans. Comme
cette technique est facile et belle. J'ai hâte de voir
ce que tu crées. Et si vous créez l'
une de ces techniques, demandé, oui, de télécharger votre travail dans la section projet
de ce cours. J'ai hâte de voir
ce que tu crées. C'est donc une technique à huit passes. Je vous le dirais
dans la prochaine vidéo.
8. Texture 5 : transparente: J'ai ici les matériaux pour cette prochaine technique,
qui est transparente. Je vais utiliser un
pinceau plat qui me reste de
ma
technique précédente à l'aquarelle. Un peu d'eau. Je nettoie. Mon papier est fixé à la
surface et nous
commençons à le peindre. Je vais ajouter une grande
quantité d'eau sur
mon aquarelle gauche
pour la diluer, la couleur soit plus claire. Et avec mon pinceau, je vais commencer à peindre. Et comme vous pouvez le voir, les couleurs, la couleur n'est pas très, très transparente comme l'est
cette technique. Pour Betty transparent. L'astuce consiste à
utiliser un gros monticule d' eau pour diluer le pigment
de votre aquarelle. Et comme toujours, vous pouvez utiliser type d'
aquarelle que vous avez. Il n'est pas nécessaire que ce soit
l'aquarelle liquide. Vous pouvez utiliser des aquarelles normales, des marqueurs, des
aquarelles, des crayons aquarelles
ou n'importe quelle couleur. Dans le type le plus traditionnel. Je vais peindre toute la
surface de mon papier avec ce karité dilué de grep. Ensuite, je vais laisser sécher ça. Mais assure toute la surface, à peine même si vous voyez que vous devez ajouter plus d'eau
que simplement ajouter plus d'eau. Pour rendre cette couleur super,
super transparente. Quand tu auras fini de
peindre toi-même. Vérifiez ces espaces. Où pensez-vous que la
couleur n'est pas uniforme ? Ensuite, allez avec votre pinceau. Vous pouvez peut-être le mouiller sur de l'eau et
le laisser sécher complètement. Maintenant, mon fond
est complètement sec, et maintenant nous peignons avec une aquarelle plus pigmentée sur ce fond transparent que nous venons de peindre avec la technique
transparente. Et vous verrez que
cette technique
vous aidera à créer différents registres
lorsque vous peignez, par
exemple, des montagnes
ou des fleurs ou tout autre tableau que
vous souhaitez réaliser. Cet effet dont quelque chose
est proche ou loin derrière. Cette technique est très
utile à cet effet. Et vous pouvez avoir
beaucoup de plaisir à créer cette expérience pour les
personnes qui regarderont. Au travail. Je vais peindre quelques
pétales autour de ma surface. Rappelez-vous qu'il s'agit d'une mini toile. Ma peinture est donc petite. Mais vous pouvez l'utiliser
d'une autre manière. Peut-être. Vous pouvez peindre des montagnes et faire comme
ce beau paysage. Tableaux ou peintures. C'est vraiment magnifique. Je vais garder un peu de peinture, quelques motifs et avec le
pigment que l'aquarelle. Et puis, bien sûr, je vais laisser sécher ça. Et vous verrez le
bel effet que vous pouvez créer avec ce jet. Belle technique. Bon, maintenant la peinture est
sèche et je vais décoller les bandes de lavage très lentement et doucement pour
ne pas endommager mon papier. Que j'utilise cette technique pour
rendre les rubans lavés un peu plus doux sur mon papier
afin qu'il ne l'endommage pas. Et maintenant, nous pouvons voir notre magnifique transparent
avec les pétales sur le dessus que nous venons de faire pour avoir le
temps d'écrire le nom. Mais de cette technique
au bas de notre caméra à la moitié
ou peut-être à un ensemble de techniques supplémentaires. Merci parent, c'est ça. J'ai hâte de voir
ce que vous créerez, comment votre créativité
jouera un rôle important ici. J'ai vraiment hâte de voir
la belle création que tu as, comment jouerais-tu avec
ces belles techniques ? Finissons ce lettrage. Et wallah, nous ajoutons dame avec notre prochaine carte pour un
ensemble de techniques. J'espère que cette technique vous plaira
et que vous la trouverez très utile. Et je te verrai
dans la prochaine vidéo.
9. Texture 6 : Soulever des questions: Nous sommes prêts pour
la prochaine technique et voici les fournitures
que nous allons utiliser. J'ai réparé mon papier et
vous aurez besoin d'un coton, d'une serviette en papier ou d'une tour à clic. L'un d'eux, un pinceau, selon celui qui a de
l'aquarelle. Dans toutes les formes que vous avez
dans un récipient à mélanger. Mon papier est composé de figues avec les rubans
washi et nous sommes prêts à commencer cette belle
technique appelée lift up. Et comme son nom l'indique, soulevez la couleur
du papier. Je vais commencer par mélanger mon
aquarelle avec de l'eau. Ensuite, commencez simplement à
peindre sur ma toile. Il n'a pas besoin de directives. Peignez simplement votre toile et laissez certains espaces
plus foncés que les autres. Vous pouvez choisir plus de pigment, plus de couleur et l'ajouter
au papier égyptien. Does est l'idée. Cette belle technique est très utile lorsque vous peignez,
peignez des ciels ou des plantes succulentes. Ou le C est très beau
quand on peut utiliser cette technique pour
réaliser la texture de ces paysages naturels. À faire. Nous verrons pourquoi dans une minute. Essayez de laisser un peu
de ce qui est pour l'aquarelle
liquide et liquide. Maintenant, avec votre papier, votre coton
ou votre serviette, commencez
simplement à lever la couleur. À certains endroits de votre peinture, peu importe où, mais essayez de les distribuer
seuls. Et tu peins. Il suffit de jouer et
le coton, le papier
ou le, ou la tour,
regardez à quel point
les motifs changent lorsque j'
utilise ou le chemin, le coton ou
l'essuie-tout. Vous pouvez également utiliser
un Q-tip c'est très, peu importe ce qu'
il faut utiliser. Et Wallah a dû dire à quel point le marbrage de
ce motif est magnifique. Après qu'il soit sec. C'est vraiment fantastique. Et j'adore cette technique et voir à quel point
elle est facile à créer. Maintenant, je retire
les bandes adhésives délavées pour voir
notre belle création. Soulever la couleur
du papier avec apporter dans la peinture à un autre niveau et créer ces
beaux motifs. Mais ils ont pensé, j'espère que
vous aimez cette texture. Autant que je le fais. On dirait de l'eau. Cookies, un mot. Maintenant, indiquons le nom
au bas de la carte. Nous avons donc notre coupe
prête pour le bundle. Nous en avons presque fini avec toutes les techniques que nous
apprenons aujourd'hui dans ce cours. En soulevant. Cette technique est très avancée. Levage. Maintenant c'est fini et il va
falloir de la technique. Je te verrai dans
la prochaine vidéo.
10. Texture7 : éclaboussures: Pour la prochaine technique, nous allons travailler
avec cette technique. Et pour cela, nous avons
besoin d'un pinceau plat, un peu solide. Sur un bâton de bambou. Quelle est la couleur des cartes ? Et le groupe informatique pour les mixer. Du blanc, de la peinture, une serviette
propre, de l'eau. Et j'utilise ici
deux couleurs
d'aquarelle différentes pour le rendre
un peu plus contrasté. Et vous pouvez voir dans le blanc et j'ai un
autre pinceau, pinceau
rond, jouez avec. Je vais te montrer comment faire. C'est donc très simple. C'est très, très simple. Pour utiliser cette technique. Vous avez besoin d'une texture
aquarelle très fluide. Liquide. Et puis vous pouvez,
avec votre brossage, votre pigment, avec
votre pinceau plat. Et nous faisons du piquet de bambou. Ensuite, nous allons passer au pinceau avec
l'autocollant pour
pare-chocs, faisant éclabousser ces petits
confettis. Et vous verrez que c'est
une technique très amusante. Ça peut être un peu salissant. Alors soyez prudent autour de vous et persévérez. Espace de travail. Essaie de tout couvrir. Cachez votre ordinateur et
vos autres appareils car les éclaboussures peuvent les
atteindre très facilement. J'ai déjà eu ce problème par le passé. Alors maintenant j'ai tout couvert avant de commencer à
utiliser cette technique. Je m'en suis rendu compte avec le bleu. Ensuite, je vais changer
et nettoyer mon pinceau, introduire la couleur plus claire
dans ce cas est Jell-O. Vous pouvez utiliser deux
couleurs différentes, comme vous le souhaitez. Faites de même avec le
brossage de l'aquarelle. Et puis avec ton bombastic. Il suffit de passer dans le pinceau. Sortez la couleur dans
les éclaboussures comme à la mode. C'est une façon de procéder. Mais vous pouvez également utiliser une autre méthode que je vais vous
montrer dans une minute. Utiliser un robot comme brosse à dents. Je vais te montrer. Ne t'inquiète pas. Si vous n'
avez pas de pinceau plat comme celui-ci, vous pouvez utiliser le pinceau etas. Je vais te charger dans une minute. Ajoutez ensuite quelques éclaboussures
à l'aide de mon pinceau rond. Il s'agit d'une autre technique. Ce n'est pas ma technique
préférée, mais je voulais juste
vous montrer qu'elle est très, très facile. Il suffit de mouiller votre pinceau
et de l'
attacher pour qu'il soit de la peinture blanche, très fluide pour qu'elle puisse
pénétrer dans le papier. J'entends un peu
près du journal. Vous pouvez donc le voir parce que
c'est très difficile. Parce que cette
technique est la plus adaptée aux galaxies ou au ciel sombre du ciel. Et les couleurs que j'ai
ici sont deux, plus claires. Vous ne pouvez donc pas voir
clairement les éclaboussures ou le jeton. Je pense que tu peux. Maintenant, avec la brosse à dents, vous pouvez l'utiliser avec le bâton de bambou et
créer des éclaboussures. La même technique juste avec la brosse à dents à
l'aquarelle. Ensuite, avec le bâton de bambou, passez le papier
et faites les confettis. Ils ont avoué les éclaboussures. Utilisez plus de couleur si vous en avez besoin. J'ai ce reste et
j'en rajoute juste un
peu plus pour pouvoir
mouiller ma brosse à dents. Et je mouille ma
brosse à dents dans l'eau. Ce n'est pas grave parce que c'est bleu et donc ça
ne pose aucun problème ici. Mais si vous avez une autre
couleur que l'eau pour être propre, vous
n'aurez pas de désordre. Les éclaboussures avec la brosse à dents
sont minuscules, minuscules. Il s'agit donc d'une autre texture
que vous êtes en train de créer ici. Faites attention à ce que le pinceau, ce pinceau ne soit pas
trop coulant. L'eau ne doit pas couler sur la brosse à dents car elles peuvent être et de plus grosses éclaboussures. Je vais vous montrer
un peu plus près. Peut-être que vous pouvez voir un
peu mieux à quel point ces éclaboussures sont
minuscules
avec la brosse à dents. C'est très amusant et l'
effet est très beau. Vous pouvez l'utiliser pour les arbres. Et ils font de très
beaux arbres. Ou pour les galaxies, les gars, sur chaque nébuleuse, un ciel, un ciel. C'était vraiment très sympa. Bill a donc offert les bandes délavées pour voir une belle création
et vous pouvez
les voir fouiller dans mon papier que j'ai mis sur mon bureau. Mais cela n'a pas d'importance
car il s'agit d'un appareil amovible. Voilà donc de
magnifiques éclaboussures. Comme c'est beau, facile et
amusant à faire. Maintenant, mettons tout en
bas le nom de cette technique en tant que blush. Avoir une autre voiture pour
notre ensemble de techniques. Splash. Vous pouvez également l'utiliser pour l'eau. Des éclaboussures d'eau Peut-être si vous
peignez une fleur et que vous faites du jardinage
dans la peinture. Ensuite, vous pouvez utiliser cette
technique car l'eau qui sort de l'eau peut entendre qu'elle est prête à être intégrée à notre
ensemble de techniques. J'espère que celui-ci vous plaira, et il est très, très facile. Je te verrai dans
la prochaine vidéo.
11. Texture 8 : Goutter des gouttes: Nous sommes donc prêts pour
la dernière technique, qui est le
dégoulinant de couleurs. C'est une
technique amusante pour laquelle nous avons besoin d'un pinceau ou d'un pinceau. Nous avons besoin d'un AVC. Peu importe ce que vous avez chez vous. Nous avons besoin de trois
couleurs différentes d'aquarelle. Une serviette propre, du papier de type, fixée sur la surface. Et nous allons commencer par
ajouter quelques touches de couleur. aide d'un pinceau à eau Il suffit de déposer quelques
gouttes sur le papier. Il a besoin d'eau. Il doit être très liquide. La technique fonctionne donc. Donc ces gouttes ou gouttes de couleur et le
truc amusant avec l'eau contre le
jet sur lequel vous pouvez appuyer, le pinceau et l'eau
sortent et cela devient vraiment fluide. Et puis nous avons juste commencé à faire
sauter ces gouttes. Et pour créer l'effet dégoulinant. C'est très amusant et ludique. Et tu peux jouer
avec comme tu veux. La fusion souffle le mode
des couleurs se rejoignent. Gardez cela à l'esprit si vous
ne voulez pas que cela se produise. Maintenant, nettoyez votre pinceau à eau et prenez l'autre couleur
de la palette d'aquarelle. Dans ce cas, c'est la
couleur jello et faites de même. Il suffit de presser votre pinceau dans l'eau avec de la
couleur et ensuite vous pouvez faire sauter ces gouttes avec
votre restaurant. Si vous n'avez pas de
brosse à eau, ne vous inquiétez pas, vous pouvez procéder de la même manière
avec votre pinceau normal. Juste un goutte si profond dans l'eau. Comme vous pouvez le voir, je ne
fais que rajouter les gouttes avec l'aquarelle sur le papier,
puis je les fais exploser. Et c'est très simple
et très intuitif. Vous pouvez jouer avec les
lignes avec un dégoulinant. Où voulez-vous que
la couleur aille et que
la couleur y soit soufflée ? Et si vous remarquez que
vous avez besoin de plus de couleur que d'ajouter plus de couleur pour rendre votre peinture plus
cohérente et plus belle. Cette technique est
très amusante et
commence à peindre dans un État étranger. Peut-être votre campagne,
un fruit coupé en deux. Ensuite, vous pouvez utiliser cette
technique pour faire comme si le jus du fruit
sortait. Dans. Ça a l'air super sympa. Comme vous pouvez le voir
ici, la couleur que je mélange parce que l'eau s'accumule
à un endroit de mon papier, mais cela n'a pas d'
importance car c' est le flux de cette peinture. Je cherche plus. Aster. Je suis ensuite passé à sec. Regarde comme c'est cool ce look. Il n'aime pas ces
peintures abstraites dans la galerie d'art. Maintenant, je retire les cassettes délavées pour dire « Oh, beau tableau ». Cette technique est
vraiment très salissante. Faites donc attention à
ce que vous avez autour de vous. Vous pouvez peut-être mettre une surface en plastique ou imperméable en dessous pour
peindre votre peinture sur papier. Ainsi, lorsque les couleurs contrastent , cela n'endommage pas
votre lieu de travail. Et regarde comme c'est joli
et beau. Il est maintenant temps d'écrire le nom de cette technique au
bas de notre carte. Des couleurs dégoulinantes avec
les couleurs roses. Si beau et
vraiment amusant à utiliser. Vous pouvez l'utiliser avec vos
enfants parce qu'ils les
adoreront car vous pourrez
être à nouveau actif, c'est plutôt sympa. La voiture est prête pour notre offre groupée. Et avec cela, nous avons terminé
les huitièmes techniques. Nous allons maintenant
voir comment utiliser cette technique
dans une peinture. Je vous verrai donc
dans la prochaine vidéo.
12. Assembler le paquet: C'est le moment de
s'organiser et de
regrouper toutes nos
techniques. Et voici mes
techniques de tank et le texte du ruban, il va rebondir que nous
allons utiliser pour créer le bundle avec
les huit techniques. N'oubliez pas que vous pouvez utiliser. Une autre méthode est celle que vous préférez. Mais c'est comme ça que je veux le faire parce qu'il est
plus facile pour moi regarder N2 et avoir toutes mes
techniques répertoriées. Je peux donc m'y référer lorsque je crée des pièces. Et c'est très simple. Vous pouvez les emporter
où que vous alliez. Et tu peux consulter. Fais des liens. Chaque fois que vous avez besoin d'inspiration
pour une belle texture. Maintenant que je ne fais rien,
d' avoir facilement accès à toutes les belles techniques que nous venons de créer
dans ce cours. Voici à quoi cela ressemble et
découvrez comment EC2 peut désactiver toutes les techniques depuis la création de votre annonce. Facile à utiliser J'espère donc que
vous trouverez cet ensemble de techniques utiles
et qu'ils
les utiliseront pour créer votre propre bundle. Je te verrai dans
la prochaine vidéo.
13. Fille Whymsical : utiliser toutes les textures: Bon, il est temps de
mettre en pratique toutes les techniques que nous venons d'apprendre dans
tout ce cours. J'ai ici un sujet qui est une
belle fille méditante. Et j'ai tout le
matériel dont j'ai
besoin pour chacune des
techniques que nous avons apprises. Je vais commencer par
la technique mouillé sur mouillé. Tu le sais très bien. Je vais mouiller mon papier
puis ajouter les couleurs. Je vais accélérer un
peu les vidéos pour qu'elles
ne deviennent pas trop longues et
trop ennuyeuses parce que
nous utilisons simplement la technique que vous venez d'
apprendre dans toute la classe. Ne vous inquiétez pas et
suivez simplement le courant. Vous pouvez utiliser n'importe quel
sujet. Et si vous voulez ce sujet, faites-le moi savoir et je vérifierai cela avec vous. Dans la classe. Ressources du projet. Je vais peindre un ciel, puis j'utiliserai
la prochaine Technique, qui est le sel dans les parcs. Je viens ensuite d'ajouter une pincée
de sel dans le ciel. Cela fait donc sa magie. La prochaine technique que
nous allons
utiliser est le soulèvement. J'ai mon papier et mon chemin, et je vais simplement commencer à lever ces couleurs en utilisant
ces deux médiums, le coton dans
l'essuie-tout, pour créer un beau ciel. Maintenant, je vais commencer
à peindre dans la partie inférieure de ma peinture en utilisant la technique
humide sur mouillé et
le sel est des parcs. Il suffit donc d'utiliser une autre couleur pour lui donner un
peu de contraste et beau mélange de couleurs
en utilisant la couleur très claire. C'est donc super
joli avec les parents. Chose transparente,
maquillage, beau contraste avec l'
engrenage au centre. Ajoutez plus de couleur
et mélangez simplement ces couleurs en utilisant les mêmes
techniques. Mouillé sur mouillé. Soulever et résoudre cette boîte. Comme vous pouvez le voir, mouillez sur des étincelles humides et
salées et
soulevez les couleurs. J'ai plus, un peu de transparence comme vous pouvez le
voir et de soulever. J'ai beaucoup d'autres
techniques à utiliser, alors allons-y. Le prochain que j'utiliserai
est surtout pour les cheveux. J'ai encore mon pinceau marqueur, marché de
lave-aquarelle, un pinceau et de l'eau
et je l'ai nettoyé. Nous allons faire
monter la tête de train. Du bas vers
le haut. Je vais juste commencer à peindre. Ensuite, faites l'effet d'élévation. On dirait vraiment une
jolie technique sur ses cheveux. Et je vais ensuite, maintenant peindre le corps à l' aide d'un pinceau marqueur à
nouveau au pinceau à l'eau. Et nous allons utiliser
la technique de la transparence. Ainsi, la peau est vraiment uniforme dans de beaux fromages méditant. Elle est donc presque partie. Donc, ces couleurs rendent les
cheveux éclatants, beaux. Assurez-vous de laisser
cette couleur se
fondre vraiment et utilisez de l'eau et du lifting si vous en
avez besoin dans certaines parties. Et vous verrez que la
peau est assez naturelle. Alors peut-être en écoutant. Maintenant prêt avec la peau. Je vais juste ajouter un
peu de couleur dans cet espace. C'est le fond des cheveux. Donc ça a l'air uniforme. La prochaine technique que je
vais utiliser est les plans de sauvegarde pour les cheveux. Pour les cheveux, les arrière-plans
rapprochés utilisent la
peinture blanche à l'aquarelle. Bonjour, je mélange le
bleu avec le rouge, donc ça me donne un ton violet. Et puis nous
allons ajouter
les courses de seau comme
décoration pour elle,
pour son costume de
nos nuages de tête. C'est le moment d'ajouter le fond. Je prends juste un peu de
blanc avec mon pinceau à eau, les glandes de couleur
dans l'aquarelle. Et vous verrez que la
magie opère ici. Je ferai de même avec les
cartes qu'elle porte. Il semble donc maintenant je peindrais ce tableau
et que je ferais le même processus. Je veux vous montrer
de plus près comment cette technique fait sa magie. C'est donc un peu plus près. Vous pouvez voir comment le blanc se retrouve dans les aquarelles mouillées
dans les hit-charts. Maintenant que le sel est complètement sec, le fond est
complètement sec, je vais enlever les grappes de sel avec mon pinceau propre et sec. N'oubliez pas que si une partie du
sel colle au papier, utilisez
simplement votre main. C'est très gentil, très doux. Maintenant, pour la tête de cheveux, je veux faire comme des rayons de lumière
brillants. J'utiliserai la technique du
goutte à goutte. J'ai ici, de l'
encre dorée et mon trait. Je vais juste placer quelques gouttes
de cette encre que vous pouvez utiliser. Ou une aquarelle dorée ou une autre
couleur que vous préférez. Et utilisez la technique
pour l'effet. Il suffit de placer les gouttes. Et puis la magie opère. Maintenant je vais exploser. Avec mon AVC. Je me suis rendu compte que cette encre
est un peu trop épaisse. Je vais aider les lignes avec
mon pinceau mouillé dedans, le pinceau dans l'eau
et les lignes. Ensuite, je diluerai un
peu d'encre et j'essaierai à nouveau avec un effet goutte à goutte. Ici, je l'ai dilué, ils ont appelé, et je vais maintenant utiliser un
peu plus d'un médium plus léger. Ensuite, je vais exploser à nouveau avec ma paille
et voir ce qui se passe. Ouais. Il est beaucoup plus beau
car il n'est pas trop épais. N'oubliez pas que vous pouvez toujours corriger et ajuster
leurs peintures. Pour la dernière
technique que nous
allons utiliser, un splash. Pour cela, nous
allons utiliser de la peinture blanche, un pinceau plat, et nous sommes bombastes, et aucun des deux ne pourra voir
les petites éclaboussures sur le tableau avec une peinture
blanche parce que les couleurs sont plus saturés
et plus beaux et vibrants est
vraiment joli. Et maintenant, nous sommes prêts pour les
dernières touches en bouche. Et chaque fois qu'il
faut un peu de couleur pour faire le tableau. est donc ici. Notre peinture est prête et nous utilisons la huitième technique dans
ce magnifique tableau. Tous sont inclus et
ils sont tellement amusants et faciles. Et le travail fini
est tellement beau. Et j'espère que vous serez inspiré pour les utiliser
dans votre prochain tableau. Et n'oubliez pas que vous
pouvez toujours télécharger votre travail dans la
section projet de travail de ce cours. Je vais donc vous montrer un
peu plus de ce tableau, et je vous verrai
dans la prochaine vidéo.
14. Projet de classe: Vous êtes maintenant prêt à créer
votre propre projet de classe. Et il est très facile de venir discuter avec nous
quand vous le souhaitez. Arrêté devant vos matériaux, votre processus de travail en cours. Ou sur la chaise Logan, il
suffit de couper votre travail
ou vos dernières pièces. J'ai hâte de voir
ce que tu crées. Et s'il vous plaît, lorsque vous aurez
vos idées à partager avec nous,
mettez-les hors la loi dans la section des projets de
classe dans les robinets pour les projets de classe. Dans ce cours. J'ai hâte de voir
quelle sera votre journée et je vous verrai dans
la prochaine vidéo.
15. Merci: Merci beaucoup
d'avoir suivi mon cours, et j'espère que vous avez apprécié ce
cours autant que moi. Dites-lui, mangez avec et
dites-moi laquelle
des huit techniques était votre chapitre
préféré que nous
rencontrerons dans la
section discussion de ce cours ou dans votre projet de classe
lorsque vous
les téléchargerez dans le
section projet de classe pour ce cours, je vous invite à
me suivre ici sur Skillshare afin ne manquer aucun nouveau cours que je crée et de le partager avec vous. Et si vous avez la gentillesse laisser un commentaire pour
ce cours en me disant, qu'est-ce que vous aimez ou comment
je peux améliorer mes cours. Merci beaucoup d'avance. Vous pouvez également me suivre sur Instagram si vous
créez votre œuvre. Et vous avez dit qu'
en toute bonne foi, je viens m'
apprendre et je vais également
revoir votre travail. Merci beaucoup. Encore une fois. Je peux attendre de voir quel diplôme et je te
verrai dans mon prochain cours. Au revoir.
 Artjourneywithme Heidi, ARTIST AND FACILITATOR