Transcripts
1. Class Preview: Hey guys, welcome to my brand new studio master class on Skillshare, where I'm gonna be taking you step-by-step in creating this awesome artistic 3D render for Instagram. So here's what you want to learn in this masterclass, we will start off with the basics, setting up the camera, lighting materials and a whole lot more. Additionally, we will also learn how to use this awesome plugin called scatter to scattered radius landscape elements on your site. Using its powerful new features like the composition editor, 3D, bizarre, random rotation, translation, and create high-quality landscape renderings. We will also be working with the latest new features in VBA five Update too, such as the chaos cosmos materials, new virion material features, thin-walled feature, and a whole lot more. An auto mentioned that we will be leveraging the power of Quicksilver bridge, my grasslands and transmitter to add in high-quality 3D materials and models onto our sketch obscene. Towards the end of the course, I will show you how to use the read a frame buffer to have more artistic control in the post-production process. So we will do the entire post-production within the 3D frame buffer without having to use Photoshop, using light makes composite and more. There's a whole lot more that you learn in this class. And most importantly, you will learn the process step-by-step in creating high-quality visualizations using BD and sketch up. Now without further ado, there's some straight to the class and creators, awesome 3D artistic render. See you in the class and say, chairs.
2. Installing Sketchup, Vray, Skatter, Artisans Tools: Hey guys. In this video, I'll show you how to install the plugins and the software that we need for this course. So it's called on in the about section, you will find a link called the master links Google sheet. Just click on that door, open it up. Now you'll find the links to all the plugins that we need for the course. So you can start off with SketchUp. So you can open SketchUp as a fairly simple browsers to download and install it scheduled. So all you need to do is select the category which you fall under. So I'm gonna select for personal projects and use the scatter plot. So click on Start free trial and then you need to sign in. And it is a fairly simple step-by-step process to download and install it scheduled. So once you download and open SketchUp for the first time, you will be asked to sign-in. So you would need an active Internet connection. Make sure to sign in with the same email ID that you want to be using to register in this website. And you will get your 30-day three Sketch Up. Next is 3D, which is similar to sketch up. So open though VD link. And then you can click on typhi, which is really a favorite SketchUp. Can click on Start your brain. And then you would need to create an account or sign into your existing account. If you are new to reread, you will need to clear the argon. So adding your credentials, click on continue almost there, and then click on Create a con. So they will send a link to your email, which you would then have to activate by opening your email. So open the e-mail and click on Activate icon, and then you can say none. And once you sign in, depending on the country you're from, you wouldn't need to further verify argon. So does add in your phone number and then click on get verification good, and add in your verification floored and click on Continue. And now you can select your category. If you're a student, you can select student, make sure to send them a valid student ID and you would get a discount for your yearly subscription as well. So my guess I'm going to select individual and then click on Start metronome. So now you've got it. And they will send an e-mail with for the information as well. So click on Download. And then you would read adducted do the download page of girls group. And then you can select media for SketchUp. Wasn't that you have for SketchUp. It comes from 2015 all the way to 2021 and want to select only to anyone. And then select the latest version, which is really a fav update to click on Download. And then it would download to your system. So once the setup is downloaded to your system, you can open it as an administrator. You're going open it as a tendril as well. And then follow the instructions to install it into your system. And wanted to install your system. Towards the end it would be read adducted chaos license. So we'll just make sure that you're being installed with the same email ID that you use to register for the 30 day trial lessons. And if it's not at the CME molarity, you can click on Online licensing se naught, and then sign in with the CME me lady, and then you would get your 30 day trial license. So once we read installed and you'll open SketchUp, it would populate with the rule was no. If you don't see the 3D rule buds, you can go to View Toolbars. And when you scroll to the bottom, you would find these really toolbar. So make sure that the switch them on. And then it would show up your and then simply dock them in place. Next we can download scatter and installed scatter and also transmit door so you can open the scatter link in the Google sheet. You will get a Drell for S-CAR-GO as well. So click on Download, and then you can click on click here to download the installer. So that would download the RBC, which is a 100 MB. Or you can also install it from the extension rows. So I'm gonna open SketchUp. So to download and install S-CAR-GO from the extension rattles, you can open sketch up, go to Extensions, click on extension rattles. And who generally show up in the Start under featured extensions. Or you can also search for scatter. Make sure you are downloading and installing scattered. Do. So click on scattered tool. And then click on Yes. And it would install it into your system. And once you install scheduled or chew up in SketchUp, I knew me after restarts, ghetto was red and if it still doesn't show up, you can go to View Toolbars, scroll down, and you'll find scattered source which start on. So once you've installed sky, don't you open it up for the first time we're asked for the license. So simply use the email ID that you use to register on the website. So once on the scatter where Plato can clear it and are gone if you haven't registered yet. So I don't know credentials click on Register, and then a verification email will be sent to your mail. So open the e-mail and click on the link to verify your icon, and then click on Start 15-year trail. So no, it would start go 15-year Dre for your scatter icon. Once you're happy with the product, you can also go ahead and purchase the license. Next two can download and install transporter, which is a standalone application and also comes as a plugin boost SketchUp. So open transmitter, click on Download Raul, and then select Windows or Mac depending on which system to use. And we're going to say like windows. And this would come as a standalone application. So you can open this I don't fail. Click on I agree. And go ahead with the installation process. The licensing for transmittal would be similar to scattered Israel and you would get off 15 new trail. And we also use Grexit omega scans and have a separate video for that when we reach the Quicksilver mega scans part of the course. Now we're going to install our descent bools plugin. So click on the artisan goods link to open it up. For either some do's, we need to download it from the main website. So you can use the 315 year trail. Good day lessons. Click on get 15 year trial, click on Accept, and click on Checkout. You also need to put in your details and you can switch off their newsletters if you order a C When he newsletters from them, and then click on Next, and then click on Submit. You will then receive a mail with the installation instructions. So this is a male maturity from artisan tools. You're going to click on the download link to download Artisan brewed first. Click on Download artisan, I go to Windows Extension Manager and click on Install Extension. And finally, we can install R are the same tools. So you can accelerate BMI doesn't and click on open. This is our artisan pool noodle actuator. You're going to click on adolescents. Had your mail, and then the license key, and click on Activate lasers. And now you can start using decibels as well. Polite. So with these plugins installed and ready to go, we can tackle our exterior scene. Since you get next video.
3. Using the Exercise Files: Hello. In this video, I'll show you how to use the Exercise Files on Skillshare. So just go to a boat and at the bottom you'll find the Exercise Files. Click on this link. So you can either download the zip file. So we have this afraid which contains all the exercise files together back in one single folder. It's an odd fail, so you need when you open it up or even winds up. Or you can also go to each folder and download the specific file for each video. So every lesson comes with DO files, the start file and finish. The finished file is essentially what happens after you're done going through the lesson. So you can start at the start frame and then follow along. Or you can also open the finished violet and check how it looks once the lesson has done. Some lessons also come with additional files which you can use for that particular lesson. So that is a quick video into exercise files. If you have any doubts, please reach out to me in the class discussions and I'd be happy to answer any of them. See you guys in the next video.
4. Before We Start : Hi guys. In this, we don't want to show you how to use SketchUp or rather how I use up when I work on projects. And this will also help you follow the course metal because I followed the same workflow in most projects and also most of my courses as well. So the first thing, what I'm gonna do is switch on this large schools at bond the left. So go to View Toolbars. Scroll down a bit and you will find something called the large toolset. So switch that on. And you will find the common tools that we use in scatter up on the left side of your window. And then of course we have the VTA toolbars, which I showed you in the previous video, and the other plugins which we will use in this course. Next is how I use SketchUp saw. First thing is how I make groups. So the traditional assembly do enter the group, select or faces or edges that you want to make a group. Right-click and click on Make group. Now there's a shortcut which I use, which is actually for competence but MG Institute group. So what I do is make a rectangle. And if I wanted to make this a group as simply double-click and press G on my keyboard. So that would make groups last two. I'm cutting down two steps and in the long-term, I would save a lot of diamonds. Next is switching to valid projection or perspective mode. So use the shortcut Alt W. So this would switch to valid projection mode. And if I switch back for all w Again, it would switch back to perspective. So what it does is if I want to quickly go to my top view, it would help me go to my top view as well. So for the top view with Alt D and front view is all f. So you can see that we are in elevation, moderate know. So we'll press Alt W goes to perspective. Alt W again goes to value protection. So if you're wondering how to assign the shortcuts, you can go to Windows, go to preferences, go-to shortcuts. The first shot, which I'm going to assign a scaling group. So search for group. Now in the bottom of the list you will find Edit may group. So you can see that our saying, Gee, Gaussain, you're going to just simply blessed Tokyo. Press G and click on the plus button and then assign the shotgun. And so once you are saying press OK and you're done. So we also need a US entity, more shortcuts. So go to Windows, references, shortcuts. And I'm going to search for camera. So under camera via valid projection. So you can see that as an old plus w. So simply click and press Alt W and then assign the shortcut. Similarly, I also have a shortcut for the top view, which is Alt D, and the front view, which is odd. Now blood from these shortcuts, the other shotguns, whichever sign is Haidt. So if I search for Haidt, you can see that era st, F2 for height and night all F4 and handmade last is f three. There's another shortcut which is height desk to the model. So you see view slash company and edit sludge high dose the model which is j. Now I will show you hold these shortcuts work as well. So let's press Okay to save our shortcuts. And the palate production are used to switch between these two modes. We are going to camera and then clicking on perspective or valid projection. But since he had the shortcut, it's made life easy for us. Now coming to the height bools know, for example, if I want to hide this group, I can simply select this and press F2 to hide the group. But as F32 ornate all. And if I select hide this, hide this. And best effort, it doesn't unhide all the objects in your scene. Now another cool feature which I use a lot is the hide just to the model or toggle visibility tool, which is assigned as G. So for example, if I enter this group and I don't want to see the objects at ONE this group and I'm editing those group members GAP toggle visibility. Now the problem with this model is that it is not being modeled as groups. So each of these elements are not groups and it would be a big problem while editing the mode Alito in gives you want to make changes. But since you are doing only the exterior window for the scene, it should be fine. So that those toggle visibility. Let me just enter this group so you can see that the rest of the model heads, but if I press J again, it would toggle visibility. Now some additional stuff which I want to show you in SketchUp is making a copy. So use the move tool. So press M to activate the Move tool. And to make a copy, you can press the Control key. So now you can see that dog goes through changes to a plus button. To null, I just need to click and then release, click and release, and then move your object. And then click again. So let me show that to you again. So with the move tool activated, press Control, switch on the copy mode. Click ones, release the key mode outside, and then click again to copy. As simple as that. Now if you want to make an RNA copy, so for example, if you want to copy this 10 times, select this object, press M, press Control again. To make a copy. I'm going to reference this distance. So I'm going to click from this point, release and click on this edge. And now without touching any keys on the keyboard or clicking your mouse again, simply type in x then, and then press Enter on your keyboard. So that would add a copy way then times yours. Another cool feature in case you change your mind and is not dead names without clicking anywhere or pressing any keys on your keyboard, simply type in the value again, which is x five or six, presenter x and x 15 and 0. So that would update in real time. And once you're done, then press the spacebar dual, other escape key and new arrayed copy stuff. Now another important workflow that I use a lot is locking stuff in SketchUp, moving it around, lock it to these axis, which is the green axis, the red axis, and the blue axis not to lock, we can either use the arrow keys or we can also press the Shift key on your keyboard. So for example, if I want to move this along the red axis, I'm going to select this object for us or this group, press M, and then press Control on my keyboard to activate the copy dude, I'm going to click once at the corner of this group. And now you can see that when I drag it, it's not locking to the red axis. So if I want to lock it and want to press the right arrow key to know where it is locked. So even if I move my cursor to the bottom, adoptive screening will always move along the red axis. Similarly. So let me just place this year. Similarly, if you want to lock into the green axis, click once and press the left arrow key and the statement would move along the green axis. Same goes for Google Doc access as well by pressing the up arrow key. And if you do not want to use your arrow keys, you can also use the Shift key. So press M, click ones. Now once you move and you're aligned along the red axis or changes to a dark lane on Febreze shift, it would lock the dotted line and make it darker, which means that it's locked along the red axis. So just get into the habit of locking stuff and using the arrow keys on your keyboard to align it and move it along a certain axis in SketchUp. Finally, we do reference materials and to use the same media and in your dog objects you can use the paint bucket tool. So press B to activate the paint bucket tool. Click yo to sample the beam, which is this button. And then select the material and apply it on your groups. That's the basic stuff in SketchUp, which I'm sure you already know. And another cool workflow that I use is the rotate tool. So if you want to rotate those objects here, for example, in the x-y plane or YZ plane or whatever, rescue to activate the rotate tool. And now before clicking anywhere or purchasing any keys on your keyboard, press the right arrow key so that would lock to the red axis. Does the left arrow key that will lock to the green axis and press the up arrow key, and that would lock to the top axis. I'm going to press the left arrow key block or to the green axis. And then I'm going to click once, release, click again, release again. And then you can either type in your value. You can see in the bottom left we have an angle. So let's type in 30 and then press Enter. So that would oriented along the green axis at an angle of 30. So one last step, which I will show you guys is, for example, if you want to edit some lanes and move some lines around, you would need to enter the group. Now let's say I want to move this line, so I'm going to select this line and just like how I lock stuff along an axis, you can also select the line plus the move tool and then lock it along an axis by holding the Shift key or by pressing the right arrow key. So this way, your line wouldn't go here and go on other bins. And if you make a copy, then they do not extend. Our groups would be careful when you are selecting lanes and moving it. Not the best way to select this lane is either by selecting this lane or by making your direct selection from the top left to the bottom late. So that would select the line. If you drag select from the bottom rate to the top-left, I could select the faces well, and that would move the entire group. So make sure you're always dragging from top left to the bottom rate so that it selects water was within that box and then you can move that on. So that was a quick video into how I use SketchUp. And it goes most of how I would be working. Let's catch up into courses. Well, in case you get stuck, you can replay the videos and you can also reach out to me in the discussions or in the notes. So I'll see you guys in the next video.
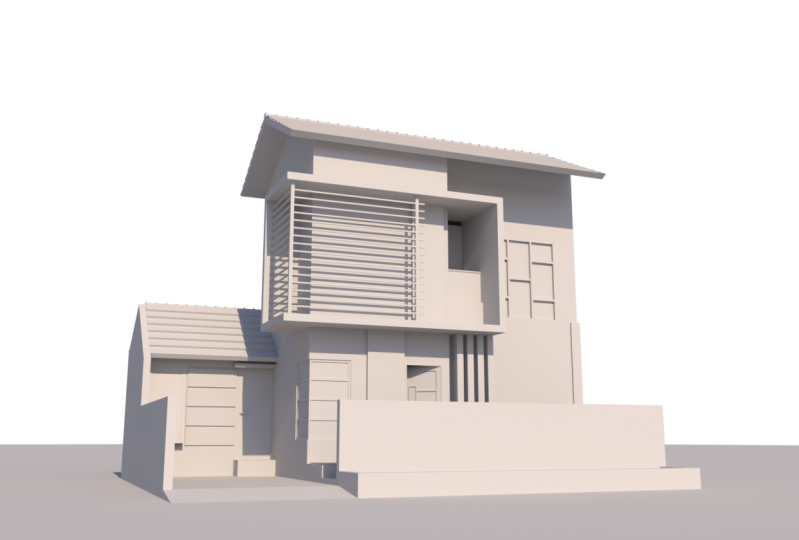
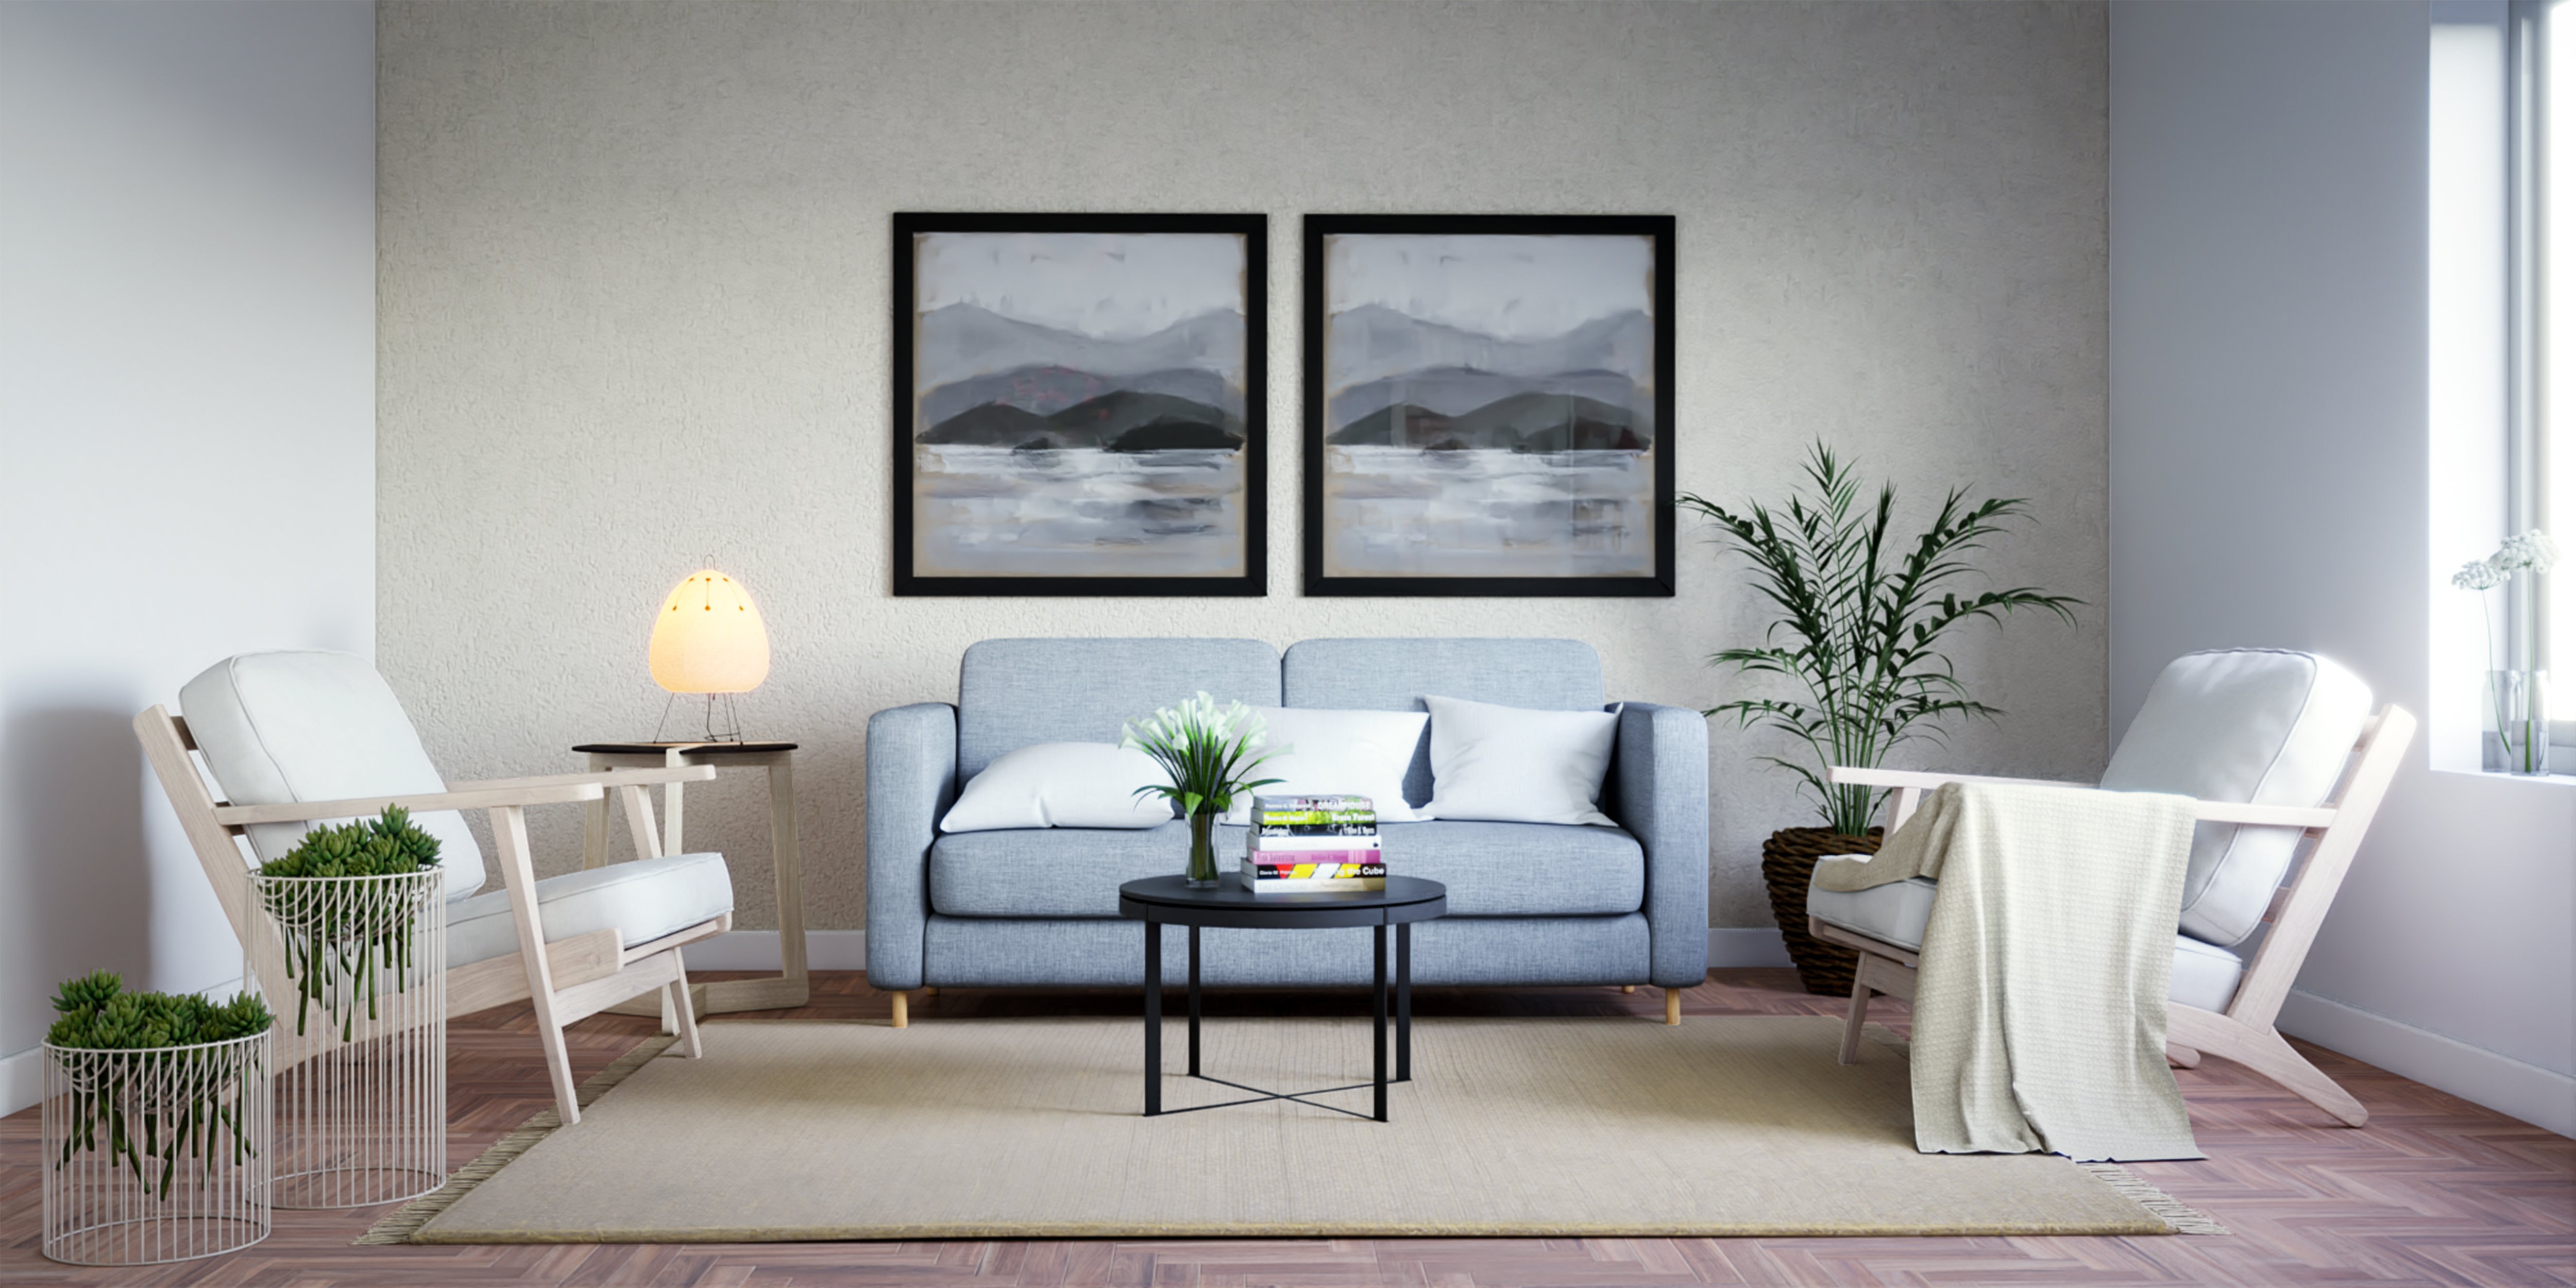
5. Position the Camera: Hey guys, In this video we're going to play a DVD rentals model and then position the camera. So go to Windows studios. And so to a modern holds. Know that our radius hoses, you guys can go ahead and use any more than that you laid. But the ones I laid from 30 arrows are the ones made from us. So I'm just going to open the module, click on, see more details and go to Ross's prefer allows designs Eastern Brazil, he's got some really nice models. And you can definitely use these models to practice your editing skills. So for this course, we're going to use the modern holes, which is you're so that we can play with the landscape, but we have a slope landscape. You're, so we're going to use this for the rest of the workshop. So click your click on Download and click on Yes. And we're gonna place it and goes through the origin. Now, the first thing what you need rules check the dimensions. So I'm going to press the deep blue or the tape measure tools plus d dark with the peer pressure bool, click ones. And when you hover on top, you can see that it's had on Ben feet, which is the standard hate for boardroom as well. So the scale seems rate. And now we can start positioning our gambler. To position the camera. I'm going to use the video frame buffer to help me with the composition of the film. And we're also going to be rendering this for Instagram. So we need to change that and our output. So preferably as the camera and everything, I'm just going to go to my acidotic. Go to click on the V button there, and go to settings and water and output. And we need to change the aspect ratio. So we want to change this from 16, nine widescreen, do one is to one squared, which is perfect for Instagram. And Botswana genes are. So if you're able to legal system, you can work with you and in your interactive lentils. And finally, I need a switch on CFR him. So click on CF, frame the switch it on. Now we need to use the interactive render. Know, I've mentioned this in my previous workshops as well. If you do not have the RDX graphics card, you can use the CPU graphic card. And it'll work perfectly if you're using an older system. But if you do have an r, dx and Africa, use the idx mode. If you do not have the RDX graphics card, please do not use CUDA or RDX. Stick to CBO. I'm going to click on RDX, click on interactive. So John Donne ISO and change the stool and IO. And once it will not be, it affects to wrap it to that egg and see that denies our blade as soon as it starts. Knowing what a lot of my camera settings open this Let's check the advanced camera pedometers. This looks perfect for exterior shots. I'm going to leave it as is. And I'm going to save these interactive render settings out. So click on Save. Call this interactive settings. And click on save. I laid this is done. This is our first step so that we can see this black box here, which basically shows the window of what is going to be rendered in the schedule view. So if I switch off the CF name, you can see that that black box goes away. It's always switch on the CFE and then walk with this mode. When you are setting up your freedom and SketchUp XOR I don't want to do is run in refractory render and then start positioning the camera. So I'm going to run an interactive render. So click on Render with 3D interactive, with art interactive settings applied. So this is the interactive setting with day in vitamin late and Sunday. So I'm just going to listen to the radio. And they listed the left one's ever going to drag these boxes to the side so that I can see my sketch off. You also want to temporarily close my default dream. And now I can start positioning the camera. Another quick tip, which I would give us do use the rule of thirds while positioning the camera. So you can lord, and the rule of thirds as a background in the video frame before. So to do that, let me just drag back layers of color correction controls. I'm going to add a background to click on the plus button. And then click on background. Then we're going to load our image. So I'll select the rule of thirds from our exercise files and click on Open. And all to be added to the backgrounds, we need to add it to our foreground. So just simply toggled as forward on button on. So now you can see the rule of third lanes in image. And now we can start positioning our camera. So I'm just going to briefly position my camera like this. And a multiple antigens the field of view. So if I press zed on my keyboard, you can see that our field of view is showing us 56. Now this is ideal for the exterior doors if you want to show more of the environment. But if you want to highlight the house in your Endo, then I would suggest that you change the field of Udot smaller number. So we're going to play with 31st. So I'm going to type in the value 35 with our zoom tool activated and then press Enter. Now you can see that it is simply zooms into that house there. That looks fine. Maybe just add as seen for this so that we can see the differences between the various field of views. I'm going to quickly switch on my default dream and then add a scene. So this is going to be renamed as field of 35. Or you can close the default dragon. So the idea is to sort of have negative spirits in our render and show objects of interests close to the intersection of the rule of third lines. So generally in rule of thirds, the objects of interests, like for example, in our studios, we can maybe add trees, see maybe some birds, something which is closer to these intersections. And it's also a good idea to be more distinct and sort of use a lot of negative space, which can be a sky. So that you approach your render as a photographer and make each render look like it's been photographed by Yvonne Bond, who was a famous architectural photographer. So think like an architectural photographer, daily work with space light. You will see on those improved drastically. So this is 35. Now let's check 25. So I'm going to activate the Zoom tool again and we're going to check 25. So you can see that that zooms in a bit more. All right, that looks good. I'm also gonna switch on the two-point perspective. And maybe this bit down a bit so that my camera's position such a way that it has a height of around seven feet or six feet and it's looking up to the exterior Endo. Straight training. Just type in the value and scroll out. Don't click and zoom out, but simply scroll out. Because if you click and zoom out, then the field of view might change. So deepen the value and then scroll over. I'm going to switch on 2 perspective. So I'm sort of placing the building the middle of the scene so that the sky and the ground as equal proportion or we did in the image. We may have to adjust it later on in the workshop once we add in our roads. But for this, it's a good start. So I'm going to add another scene. So click on Add and rename this to field of view. So you can see that our field of view is 20. So 20 works well. Sort of an elevation kind of render. You can work with other field of views as well. For example, 35, it seem more moral than vitamin. This works well as well. But I'm going to be sticking with the feel of your afternoon or later position the camera to my liking and do my artistic dentist. In the next video, we're gonna tweak the exterior lighting. So see you guys in the next video.
6. Adding the VFB Layers and Presets : Hey guys, welcome back. Now before we start with this video, I always make it a point of saving my than those do the history VFB, which has window track the progress of the renders as well. So we want to stop them, Dr. Randall, going to maximize this. And I'm gonna drag this window to the right. Now if you don't see this window, you can go to options. We have three settings. Go to history, and then enable your history VFB. Click on Lord dear, to a folder called VFB, and then click on Select Folder. Once you specify the folder, you can click on Save and Close. Now what I lose, simply add this to the history VFB. And this would get added to go history VFB. Now you can see that we have some dark patches. This might be a bug from Vireo, which girls group will go ahead and fix and no future versions. Otherwise, if you double-click on, it will show up in the main window of various to VFB. So now we're going to start tweaking the late. So the first thing what I'm gonna do is I'm going to add some color correction controls before tweaking the camera and also adding HDRI endorsing. So I'm gonna drag this to the left ear. And now we have some default color corrections. And in the latest version, which is really if I update, do you have added something called the sharpened blow? So you can enable this by clicking on calculated sharpened blow, and this would enable it for your scene. And then you can start increasing the sharpening amount for your Endo within the frame buffer. Don't need to use Photoshop or dawn because the latest versions or VD as everything back into it. So I'm going to sort of reduce the sharpness because we don't need too much of sharpness in our scene. And now the first thing which I'm going to add, this golden exposures and the exposure layer. I'm going to increase the exposure a bit. Now, as soon as you increase the exposure, you can see that we have some borne out areas to fix this. We can simply reduce the highlight bonds. And that would fix the order ex-post bond O. Areas in our M dose as well can increase the contrast a bit. Very subtle values not do much. And now I can add a curve as well. Some will add a curve. And I'm going to click on the bottom left and drag this to the bottom. You click on the top plate. And what happens is it boosts the highlights here. So this would sort of booster highlights in your scene. And by clicking on the bottom and dragging it to the bottom, this would boost those shadows in your scene. So this would add that extra depth in your Endo. So if you can see if I switch design, it fixes a wash stored image and it makes it look much better. So an S gov is what you have to go for. In any Lando. You can also do eat the individual RGB values, but I generally stick to the master and make an S-curve. Next I'm going to add a white balance. Who click on white balance. And you can either make it warm or cool. So let's make little slightly cool. And finally, I'm going to also add a filmic don't map, which would add that extra boost in our image. And if it's a little too much, you can reduce the value 0. Now if you don't see the dialogue, you just need to drag this to the left and you can see the Bellagio and simply click on the data and reduce the value to have less effect on the image. And office which dissolve. You can see that slayed that's in your Endo. All right. So I've placed my color corrections. I'm going to click on savior to save these color corrections, OK. And I'm going to call this the initial color correction. And click on Save. So sometimes as you are working with the project, these settings may get lost. So you can simply click on lord and then Lord though VFB and failed. So if you open switch you appeal. You can also add these display collections or layers. Do something called a presets folder. So which is the O. So if you click here, you can see that oh, pieces for Lowes not specified. So we can specify your presets for low to what options we have PHP settings, click on Laos and click on open, not open presets. Now create a folder called presets. Open it up and click on Select Folder, and click on Save and Close. Now I can see the settings again. Do that presets for Lusaka cons here. Go to your presets folder called this initial color correction, and click on Save. So now what happens is if I click here, you can see that there's VFB L color correction factor shows up. And we can use this in our future projects as well. So in the long-term, you will see a lot of time and you do not have to keep adding these layers or at an orbit, again, a lead. So that is a quick video in the video frame buffer and how glad Leo's and the 3D frame buffer. The next video, we will start tweaking a late and adding some HDR days. And I will show you the multiple HDR, a cool new feature which comes with video five Update do. I'll see you guys in the next video.
7. Lighting with Multiple HDRI: Hey guys, welcome back. Now in this video we're going to add some shadows in our scene and new stage Joe's food laden RDX studio scene. So when the new version of 3D, which is really a favor up D2L, they've added something called a multiple HDRI so you can use multiple days and see how it lights up your scene. So before I had managed Jasmine want to disable the environment late and maybe also the sunlight and use the sunlight later in the course. So let's open asymmetric door corner settings. Go to environment and switch it off. You can use your H2RAs and vitamin. Texas law does value, but I prefer using the dominate because it has the adaptive feature, which has N leaping up our scenes better. I can also go to my late courtesan late. We'll open this up and switch out the sunlight as well. Let's close this and let's start placing dominate. So I'm going to click on the dorm lady button, which is vital for layouts and the period toolbar. So click on normally and place it in the scene. So that's one. We can play a stool more dorm, late supplicant dominate again and place it in the scene. And let's be as another dominate. So click again and please in industry, it doesn't matter where you place your dominate because it's gone envelope, you're seeing what it does is it works as a dorm in your scene and envelopes the endosome with the 360 degree HDR, a panoramic image. So I'm going to move these non relates to the, say, the bit and want to start loading and my HDRI and movies dominate. So let's open PRs Cosmos. You can also go to FCRA hearing and download that CROs that work for you. But gas cosmos H2RAs work equally well as well. So open girls Cosmos do need an active Internet connection to use kiosk cosmos. And I would suggest to keep the internet on. Either is openness. There's a new category called materials with the new version, which we will use later on in the course. The first thing what we need to do is add some HDRI SQL Edge DREs. So let's add in some shadows. So click on beer. So maybe I could add D 34. So download HDRI and then load it in. Let's go to evening. Can use a mix of D and evening. So it's Lord in Sunset fav. So you can see that these hemisphere H2RAs, sphere H2RAs would include the ground as well. But in this case, that data comes only with this guy. So maybe I'm going to use some 38. So click on 738 and load that in as well. Or you can go ahead and use any HDRI which works for you and check their background. Check the background and C rich books for you. This looks cool as well. Now if I'm not happy with HDR a, I'll come back and reload and library. It's yellow. So we loaded into the IRAs and it will show up in our Asset Editor. Flaws, chaos, cosmos. Let's open acid editor and click on textual 0. So you can see that we did 34 and 38 and sunset faith. So we're gonna copy this to our DOM late bitmap slots. So I'm going to right-click on 34 and click on Copy. And they've I'm to go relates, click on Guam late. And then I want to be esters as an instance. So if I based it as an instance, if a tends the values on the environment, it would change orders. So I'm going to be tested as instance. Since it's a hemisphere, we can leave it as hemisphere, but I have an OCD of changing this shipped or sphere. So I'm gonna change that to sphere. And I'm going to do the same for the rest as well. So I'm gonna go textures called a son 38 copy this. I'm also gonna rename the late. So this was the 34 rename. Call this D 34 to System.out.print. Let's be late for us. So click on dominate one, right-click and click on Instance. And change this to spheroidal x1 and x2. X1 dot a2, click rename some 38. And finally we are sunset 000 faith to copy this. Click on dorm lead number 2 and nbsp is to as instance and renamed as well. Since he doesn't read 000 sunset 0 phase. And also make sure to change the shape of the sphere. You can see that mix some Amato difference. Let's stay on the CFS aid and use the shepherd's field. We can leave the rest of the settings as is. And we can change the. Direction of the FCRA by entering the extra slot, which I will show you in those two VFB lead to place three lights are switched off, the Enlightenment late and the sunlight as well. And we want to play with three HDR does not look play with these HDRI leads and need to use something called a late mix. So we're going to add the late mixin. So under and elements, you can click on and elements and then add in the late mixer, click on late mix, and that would add in your late mix. And now we can use this to do week god laid photo studio scene. So let's go to Settings, Check them DACA Render Settings. Before it Endo, I always click on the scene. So click on field of field Wendy. And then click on rainbow with really interact. Well let's all we have added and you can see that it's had quite an impact in our scene. Now we can tweak the late settings by clicking on the source light mix and then switching off all the lights. So that would make it dark because obviously there's no laden our scene. So let's start with D 34. So click on data folder. So this is the 34. Now you can reduce the value of D 34 that would make it darker. And this way you can mix it with our day to day as well. So if I switch on Sunday, you can see that that adds an impact on your scene. And I can reduce or increase the impact of somebody else. And finally, if I switch on sun 005, you can see that that has an impact on scene as well and makes the ground radar. So you can either use it or increase the value. This is mixing or less, yellows together with the default as the background. Now if you wanted to end the call ophiolite, you can do that as well. So if I click, you're going to either make the late warmer. You can see that sort of has that warm effect on your scene. So this would make the embarrassing and look too warm. So let's keep it at the nominal value. And now we can see that if I switch off, my shadows are just switch off all the lights and switch to foster later on you can see that this is our background. Now if I switch on the second HDRI can see that that overlaps with first FCRA. And finally, if I search on that last one, you can see that the DHA ARA blends with the evening HDI data zone so that DHS seems a bit too strong. So it can sort of reduce this. Maybe keep it 0 do just to make it. And Zubaida. And that works well in our scene. The clouds come from sunset 005. And son 38 as well. The DHA altar as few clouds. So does the sun. 38 under sunset. As soon as you've sort of mix the edge shadows together and we have this nice gold background. Now if you want to rotate HDRI and see different background, you can do that as well. So you'll have to start the interactive render, an open you're acidotic, don't know, you need to select the dorm late from the late settings and opened its gyrate extra slot. And under texture placement you have go ape and mapping. So make sure to select environment. It will be default as enlightenment and make sure the mapping as spherical. So when you select spherical, it might change the lighting a bit. But if you wanted to, you in the position of the HDI in your render. All you need to do is rotate the edge values. Source, click your foot or did they tell you? And then you can see the background change as well. So you can do it for all the dorm lates are either one or the dominates as well. So let's take all the dorm latency. What kind of an effect we get. Make sure you are use transformers switched off. Or the background wouldn't change. So make sure you use transformers switched off and then open the texture slot. And it will be the texture. Let's see what effect it has on the scene. Maybe let's try a positive value. And simply rotating the dorm by this amount and giving our different effect and leucine. All right, and finally let's trace and 700 faith, which I'll use transform. It would be donned off as default. And then Gn geo mapping to surgical and change the value. So you can see that that changes the background dramatically. So that's all you can change the values and see rich lading works for you. And then use those dinner end of the scene. But I'm gonna stick to 0 because I like the initial labeling. So let me just go back to these dominates and make them all zeros. And use this as our background for the rest of the course. So this is all your blend dominates using the late mix. And it's also a good idea to see if these late mixed settings old. So click on save and call this layering multiple loads. You know, in case you lose the settings, you can click on Lord and Lord in that late mix setting. So that is a quick tutorial N2 using multiple H2RAs in vD of faith for sketch up. In the next video, I'll show you how to use late June, which is a new feature and 3d5 to simulate multiple lighting scenarios. So you guys next video shows.
8. Using Lighten to Generate Lighting: Hey guys, welcome back. In this video, I'm gonna show you how to you the late turn to January, different exterior lighting scenarios in Yasi. So let's open the USSR and take the light. So as you can see, we have our three PhD IRAs. So we're going to use the light Jen, do mix-and-match these H2RAs and generate different HDR a lightning scenarios for us in. So to start the legend, you can click on the light chain, but it comes with 3d5, which is the leader's login. This is an exterior scenes. I'm going to select stdio, and then I'm going to select HDR. Now you can also use your custom HDR set. So you can simply pick Design and Lord our folder, which contains all the customer HDR days. But I'm going to use the chaos cosmos HDRI. So I'm gonna pick that off. Now you can see that with the default settings, it is going to generate around a 140 radians. I don't need that many radians. So I want to reduce the number of unique state, which is the number of present SDRs. And I want to increase the radiation, which is basically the rotation of the HDR. And I want to keep the seed value at 16, which is the random variation for each edge. We can also increase the size of the thumbnails, but 160 shoots or phase and then click on Generate the radians. So now you go ahead and combine those HDLs and start Magendie different lighting scenarios for your scene. Alright, so as you can see, we've generated different lighting scenarios for our scene. And now we can use any of these in the video frame buffer. So before I do that, I'm going to see at this old also please note that disabled later on application is done on default, which basically means that any artificial lights in your scene worn be calculated in the late June, late in a lowly gag lead either your dorm late. The way the sun and sky. Not do use any of these agents adopt in your video frame buffer. Foster need to run the interactive render. So I'm going to run them tracker window. So you can see that though we reframed more for the dog, so we need to start applying late June, late in the video frame before. So all you need to lose this open-door login window and then simply click on the legend gradient that you like. And it would load it. No footstool doesn't Lord, in your laughter, check your mic settings. So let's go to source light mix. So you can see that we have this laid 10 bone. It will simply switch design. So now you can apply any of these lighting scenarios in your scene. So if I click on this, you can see that updates as I click on any of the variance in Adelaide genes. So this way you do not have food to eat, HDR dilates. And you can play with various lighting scenarios simply by using the late June feature in video 5. You can also add this history VFB. So for add the CEO, it would show up on your CV FV, and then you can go ahead and add them other layers as well. Maybe we could try this and then add this to the three VFB. And then we can do a before and after. So now you can see though difference between those two late. So I'm liking this late for the scene. So I'm going to be using this for the rest of the workshop. So I'm going to stop that Endo. And which is the latest that you've clicked on that would be applied to your lead gen dorm zeros. So if I switch this off, you can see the light goes away. And you can also reduce the impact that has in your scene. So let's give it at one, and it works perfect for our scene. Now if you want to see if these latent set out and use it in another project, you can click on Save and then save it out. Yeah. And the next day when you open late June, so let me just close this and click on Login or click on Reset. And then if you click on lord, you can load than the enlightened set. So this comes with the variants from this product. But we wouldn't be using this for the rest of the workshop. In the next video, I want to modify the data in, add some roads and more before I start adding the materials. Since you guys in the next video.
9. Using Artisan Tools to Modify Terrain: Hey guys, welcome back. In this video, I'm going to modify the data in a bit and also the roads and more. So to modify the data in, I'm going to use a plugin called artisan tools, which is super useful when it comes to Teddy and modelling in SketchUp. So I'm going to go to View Toolbars and such on the AutoSum tool set. And we click on Close. Ready to start off, I'm going to enter this group. You can see the indole group is exploited and the deadline is known as hybrid group. So I'm gonna double-click the spheres, hold Control on my keyboard and double-click on spheres. And then I'm gonna make this a group. So I'm going to press G to make it a group. So now if I had done but it is a bleed from art. How's model? So now you can see that if I click on FOBT, This doesn't seem realistic. So what I will do sort of bring this down and I'm going to use the arccosine tools. So before I do that, I'm just going to delete the side of the purines. So I'm gonna double-click, double-click again and select that. And Delphi's to select there and dephase plus g. And then click on delete. Hello, know what I Lewis and build this group. And I'm going to start using the asymptote. So before I use the R, doesn't do it. If I double-click, you can see that this face is subdivided, but it is not subdivided to an extent that will allow me to modify that they're in. So I will need to subdivide it further. So what you can do is select all the faces and then click on the sub-divide selection button. So if I click on soft gray, you can see that it starts to subdivide the face. We're going to subdivide it again. Click once more. The more number of times you click, the longer it takes to subdivide the face as well because it has to calculate all these edges. Let's see if we can walk with this. This seems to work fine. So now we can use that isn't rules to modify it. This the first thing or they need to sort of move this edge to the side and then bring it down. So I'm gonna go to my top view, so all W or d. So this is my top view. I'm also going to make a scene out of it. So let's go to C and 0 and click on the Plus button to create a scene and rename this to the top view. And then what I'll do is I'll click on the word excellent tool to click on Select. So these are radius what x's in our model. So now what I have to do with simply drag a selection from the top left to the bottom rate. And this would make a selection of disease. You can also switch on hidden geometry. So go to View, click ahead and genres. You will see the edges of our brain are gone. And now what I can do is click on the word next move. And then simply move this to the right. So you can see that it snaps and you can move to the right. Scholar mood, the sphere. That looks good. And then what I'm gonna do is modify this steady. And so let me just select this again. You can see that it is subdivided to let see if we can work with this. If we are unable to work with the subdivision, we love to celebrate it even more. So we're going to use this sculpt to Brush Tool. So click on sculpt brush. So that would enable the scalp flush toilet. Now if you click on the arrow keys and see the left or the right arrow keys. So far click on the Left Arrow key, I can make the brush size bigger. Same goal so that arrow key as well. And if I hold a dog arrow key on my keyboard, I could gender orientation do either push or pull to create depressions in that direction or do inflate that they're in as well. So in this case I will need to bring it down. So I'm going to bring it down. I use a size and then start clicking to bring this down. So you can see that sort of starts to bring the terrain down. So the artisan tools is amazing when it comes to sculpting in SketchUp, it gives you more artistic freedom. You can also press Control Z in case you didn't like some parts where, for example, you are given it a little too much. Let me just bring it down that way. Just bring these down. You can also right-click and switch to the smooth brush tool and then start smoothing it out. It's better to change the orientation when smoothing it out. All right, I'm going to change it back to sculpt. So let's right-click on scalp. Want to change, change it to the down arrow to clear depressions. Once we want to increase the size. Right. And I'm also going to reduce the intensity, want to reduce the intensity or the depression. So the more lonely i o is, the greater the intensity. So you can see that that's more than dense. So I'm going to reduce it. This keep it close to the circle. I don't that, and now I can slowly start sculpting and Don. I can also use the move or x2. So if I click on the silicone, or I can maybe select this part and then click on them. What next move, and then simply move those down along the blue axis. That also works. And then you can switch back to the Sculpt Tool and then Start scalping and done. We do not have to worry too much about these extra edges. We can then use the Smooth tool to sort of fix that. Right leg. Lecun's mood. Change the arrow to DHAP, change with to-go, up arrow. And sort of small denote the size of the arrows. Let's go back to those Skype dual. Mode is down. That's also delete this back face here because I don't need that. So I'm going to double-click on the backrest, make it a group and delete. And now it's easier for me to edit. These were diseases. So let's go back to the top view. Until this group. Click on and select these edges. And then click on the move and bring it down. I can do it for the entire line as well. So let's go back to the top. You select what x again. If we just de-select these words and only use these. And also select these vertices here. And then click on the Text tool. Click on any edge, and then lower down. So there is no option to lock it to the blue axis. So you will need to hovered along the blue line and then bring it down. All right, that looks good. Now let's go back to US colored brush tool and then start scalping this. Here's another trick. Now in case you're happy with the edges and you don't really want the edges to expand anymore. You can use the edge tool. So I'm gonna select the face, hold Control Shift to select a face and only select the edges. So double-click on the face Control Shift and select the fields again to only select the edges. And then go to Tools. Hard person. Please selection and chin the score blue edges and vertices and click on, Okay. So the subquery stages. And now when I start to sculpt on the edge, Let's enter the group first. Then scope brush. Now if you notice that if I use the Sculpt Tool and then start scalloping this year, it wouldn't affect the edges and it would always be within the boundary. So when I click on smooth and then simply smooth this out. So it is a Taylor narrow using the artisan rules, but it gives you good creative capabilities and it'll help you create your dairy and faster as well. It works best with topographic lines. Now since this model came with that existing data and we were able to use the tools to exercise working with existing Delhi into Israel. Alright, that looks decent. Let's go back to front view. And now you can see that we have a slope Ghana for Daryn, which looks perfect for our scene. Now we can add our roads as well. So I'm going to add a footpath first. So it's a simple rectangle for both the old and the foot, but so I'm going to snap it to the blue axis. So albedo key, click once on the edge and drag it out. Now you can see the bottom rate is given the diamond to a 111 feet by eight feet. If I want exact eight feet as the width, I'm just going to type in comma and then type in eight feet and then press Enter. So that's an eight feet wide football. Going to make this a group and the low group and give a thickness of around 40 inches. Now for the road, I'm just going to copy this to the bottom here and then extend it out to make our road. So now if I go back to front view, we have our road footpath and that they're in as well. So hope you guys found this video useful. Do go ahead and use the arts and tools to create the terrain and the smoothed out and sculpt out your favorite count those as well. So I'll see you guys next video.
10. Adding Materials with Chaos Cosmos: Hey guys, welcome back. In this video, we're going to add some materials into our scene using the kiosk cosmos media library, which is part of the newest update, which is really a favor or what opened gas cosmos and maximize this. And off I go to my materials. You can see that we have various materials which are high-quality, comes with displacement maps normally mobs reflection, glossiness maps, and a whole lot more. So we're going to start off with the wall, so click on walls. So we have blast away while it's takeaways. First irregular. So I'm going to use blast away. So click on Download and a good start on loading the medulla and biasing. You can also go to concrete and use any of these copy and materials as well. It's got concrete banded, which is super useful because most of the studios these days use concrete panels. I'm gonna go back to all and use the plasterboard. So once you download it, you can click on Import. So this would import it into your acid Editor under the name of plaster weight. So let's open up the door. It's called a materials. And at the bottom you can see we have blasto eight. So we can now apply this material on our wall. So I'm going to close this zooming and the other group and there's be direct with the bucket tool. So you can see that the active material is blast away at 070 centimeters. So I'll play this and I'm going to play this yard as well here. And on this side as well. So whether we're in the middle is showing up in their window is about I will apply the median and also needed check the SASE. So I'm going to check the size. So the 70 centimeters, which is two feet, three inches. So if even if I take the 70 centimeter value here, you can see that it comes as feet, three inches. So the best by the board girth cosmos materials is that if you are modelling in the late skin, it will be added in those eight scale as well, bridges 70 centimeters. Now let's add some additional materials. So I'm going to teens dystonia. So let's go back to chaos cosmos. So let's go to stone. You can use any materials. You can use sandstone. Ordering the rock orange. Oh, let me see if there's any other media do. Let's go to bricks. So I'm going to use the brick wall material, which is white brick wall rate. So I'm going to download and load this in. And then I'm going to go to my oscillator, DO select brickwall rate, and then start applying on our office. So until the group select the face, use the bucket tool and apply the material. So this medial or two comes in the right scale. I'm also going up late on our pillow, 0. Not have to worry about applying them to us. And so you're just creating this wonder and awe for this workshop. You can go ahead and apply the middle every way in case you want to be at multiple vendors of the same model. But in our case it's going to create one window for now. Let's go back. Can also add a ground material. So we have grass to your roots as far as for the road. So you can apply these materials for the road as well. I'm going to use some simple glass material. So maybe this medians go to sin. So there's grass 39 by 150 centimeters. I need to update this for the carry-in to enter the data in group, select the grass material. You can right-click here and click on operator selection. And it will apply all mondo grass as well. Alright, so you apply it as basic materials. So let's go back to field of view and then click on the Adobe 3D interactive. All right, This looks good. I have grass is looking good as well. And I'm going to add this to our scene. So click on Add and it'll get added throughout history VFB. So now if I do a before and after, so this is a and B. You can see how much of a difference the grass and the materials making arsine stopped or Endo goes this. You guys can go ahead and add the remaining materials as well. For example, the road, the curbs, sidewalk. Maybe this by 3 or you can play around with your creative abilities and change the materials as well. North, that are some ideal which are missing in the cosmos library. And you want to add it from manga scans. I will show it to you in the next video. So you guys the next video.
11. Install Quixel Bridge Megascans : All right, so before we proceed with a future tutorial, I'm going to show you how to install Quicksilver my gas cans because we're going to use some acids and materials from manga scans library. So you need a search for quickselect magazines and then click on quicksand mangoes scans to open it up. And then you need to click on Subscribe to create a new account. Click on Begin for free, add-in all your details and then sign in with games are gone. So I'm going to sign in. So once you sign in to Quicksilver, get an option to download the Greeks will mega scans software, also known as quicksilver bridge. So click on bridge to open it up and click on Download bridge. So once it's downloaded, you can open the setup and then go ahead with the installation instructions. I would suggest that you download and install the setup in another directory so that you'll see Dave is always three with a lot of space. So only have Quicksilver bridge installed, so we'll open it up. So this is Quicksilver bridge and it comes with a lot of awesome acids and materials which a lot of 3D artists are using known and are able to create amazing renders with. And now because of transmitter, you can bring these mega skin acids in SketchUp. So I'm gonna show you how to connect Quicksilver with transporter. So you can just click on any material and it shows up here on the right. We're done various options. Now what I'm gonna do is next to Duke resolution, we had those settings button, so click on that and click on Export Settings. Now, in your export target, it would be defaulted to Unreal Engine. Just scroll down and click on Custom socket Export. Now you need a copy the socket bought from your dad, smooth and paste it here. So I'm going to open transporter, which also comes as a standalone application and also as a plug-in in SketchUp. So open transmitter. Go to settings. And then when you scroll down you'll find omega scans bridge, socket board. So copy this and then be a studio and go back to once you've pasted it. And you want to bring a certain model into transmitter, all you need to do is click on Download. It will download the model and then you can export. So once you click on Export and choose Export successfully, and it shows up in your transmitter. Now, transporter hells convert your OBJ 3ds Max files into dark, scheduled fails and they give you options as well. So what I do generally is simplify the mesh so that object is not too heavy. So I'm going to drag this slider to the right of it, done on 77%. Check the materials as well. The materials come with manga scans library, and then I simply click on transport. So once you click on transferred, you get an option to save this sketch. I'll fail. I generally save it in the download folder of quickselect rich. In case you want to look at this, no load for law, simply go to Quicksilver bridge. Click here, and click on Go to fails. So now you know the location or where your Quicksilver bridge acids are located in your system as well. So in this case is located. Now if I want to use the same location, here's a quick hack which you can do, which I learned in my previous company. Simply click your copy this data geo-location, go back to your transmitter. Click on transmute, and then pesto location. So I'm going to be a student presenter. So you can see that it's come to the correct location and then simply click on C7. So it's transmuted object. And if I open SketchUp now and bs that directory, you can see that we have a sketch or fail open it up. And you can see that we have our object here as well. And these are the ID to random models which you can directly place in your SketchUp scenes. So we will be placing some Bieber's, some say the rod gobs and a whole lot more from Quicksilver gas cans. So in the next video, we will be adding some models and mode into arsine. See you guys next video.
12. Adding Additional Materials with Quixel Megascans: Hey guys, welcome back in the studio. The triode add materials from our quicksilver bridge or megapascal slavery. So I'm gonna open Quicksilver, but edge first. We're going to add some materials like.org, the foot part and more. So let's go to the Home and click on surfaces. And all we have something called asphalt. So let's click on asphalt. So here we have different materials for our road. I'm going to use this fine American road because it comes to the side marking and also the median marking. So you can click on download by clicking on the green button once you sign in with becames icon. Also, if you're noticing that you will have to purchase to make our scans library, you will need to download Unreal Engine first because Meghan scans comes free with Unreal Engine. So I'm gonna click on download and open this acid. So click on the hazard, open it up. And once you click on Download, we can open the bitmap files for this madrigals soup. Flick on this three button and click on Code profiles. So this is the for loop which has the materials. So I'm going to copy the location of this for loop and start adding in these materials to really isolate ago. So let's open video. Let's clear the genetic material. Rename this, call those support. Fine. And let's start adding in our bitmaps. So click on the axis, right-click on Bitmap via stun the location of your fails, and start adding in a hybrid mode. For the diffuse texture slaughters all if albedo bitmap, as you can see the image as well. So click on Open and go back. And then let's add our reflection. So let's go to bitmap. We can use ambient occlusion for our reflection. So click on that and open. Go back again. So that would make it super reflective. So in that case, we need to add some roughness map. So the roughness can be used by changing the self-control to use softness. And then adding or appropriate bitmap in our reflection roughness slot. So in this case it's going to be the roughness map here. Click on Open and chins the student experience linear as well. Now let's go back. That looks good. Let's add our bump stanzas to normal map, because we have a normal map in our for loop and go to bitmap benzylic, the nominal my appeal. Click on Open and t in the Sudan. And you can add a displacement map as well. So click on the Add attribute and click on displacement switch. The disbursement on genes is to do the displacement and Lord in your texture slot. So I'm going to use the bouquet displacement map, click on Open genders to renting space linear, go back. And also it gives them on to you added all our bitmaps. Do I thought maybe you didn't or we can apply the road. Maybe we'll do our scene. So close the asteroid ago and others group, select the face, use the bucket tool and then apply the media. So obviously the scale is model, so we need to adjust this. So they click, click on textual, click on position, and only use the green pen to increase the sales. So I'm gonna rotate it as well. I'm using only the green pen. And it snaps domain D. And the other axis, as you can slightly we go, Let's look a little bit. I'm going to place the slain global afoot, But I click and click on Done. And that is not the fruit, but so I need to understand again. Okay. That looks good. Now if I go back to front view, you can see the dark lord. You know, if you want to see more of the road, you can also zoom out of the SR it. So for Zomato can see that we have modeled that ordinal. But I will add this studly. Young kids that orders enjoying up as much. Next is the foot Bhatia. So let's open Quicksilver my gas cans again. Also after you've applied the road and you want to use this in your future projects. You can do the acidotic go. Click here. And I've created a material, I recall the edX Studio Multimedia Library. So this is simply a folder which contains subfolders. So if I open this, you can see that this is a 3D exterior medullaris, which is simply a folder. And under this mean for of sub folders, for example, background, roads, sidewalks. So I can view it, adores folders as well. Maybe for example, bricks. And then make sure you don't open this up for loop, but the main folder, so click on Select Folder. And that would load in your custom material library. And once you load it in medieval library, you can click on, for example, rods. So this would show the submitted earlier. And if you want to add this in, you can. Firstly, let me just rename this called this new. And if Addison get added to the media library, and when you're working with a new project, all you need rules and be bagless, do yard metal, steel, and start using it in your project. Since this is a CMA dealer, I'm going to delete this and just use the new material that we created. Similarly, I've also created some additional materials. For example, a sidewalk suffered bag this in. So this is another material which I took from Quicksilver, my grass Gans, which you can also find by searching for those materials, for example, sidewalk. And then click on surfaces. You can see that we have stone and then floor and then different floodings that we can use for our sidewalk. So they have a lot of materials and it takes time to sort them out. So each time you download and medulla, it's always a good idea to add it. Your gusto material OB. So when I do my foot, but we're going to enter this group and then apply the material. And I want to go into T and the skill. So let's say four feet, maybe even eight feet. Yeah, that looks fine. Perfect actually. Because this is an aid feed weighed foot, but are they too are seen as comic relief. And we did it on an interact with Endo and then destroyed history. We are free. In the next video, I'll show you how to use transmitter to bring in my graphic and models, 3D models along with its medians. So in this way, I can add the roadside curbs and UDL models into our scene, which is not available in chaos cosmos or TD rattles. So I'll see you guys next video. Job's.
13. Adding Megascan Models with Transmutr: Hey guys, welcome back. In this, we don't want to add something like rescan acids into our scene using those awesome plugin called transmitter clustering or do you need to do is open transmitter. So you can open the standard loan application or you can open the plug-in as well. Now if I go to settings and the bottom you can see that we have something called omega scans pillage socket board. So this is 24981 and my guess who copy this? And then open Greeks in my gosh scans. So now we can load in any offer models. So I've said a roadside Gabe's, you can also search for cobia or clubs. You can search for cobia. And then they'll select and you have the girls or you can also select the food part and either DOC. So I'm just going to add some code works for our scene. So I'm going to use the steep God and then click on download. And once it's downloaded, you can export this to transmitter. To export this, you need to turn the settings first. So click on the Settings and click on Export Settings, and then change it from the default of Unreal Engine to something called custom socket export. So click on Custom soccer export best though, socket number, which you got from transmitter. And then simply go back. Once you've done that and click on Export. And then it will chew up in transfer dot. So you can see that it shows up and dance murder. And now I can see that this ODE. So before I save it out, and we want to simplify as the mesh so that it's not a heavy model. So you can use the mesh simplification feature on transmitter. Going to drag this to the radio bit. Right, that looks good and then click on transport. Now it's always a good idea to see these ghetto fails to the same folder which contains the materials as well. So if you wanna find the folder location, you can go back to Quicksilver bridge. Then click here and click on go to files. So this is our folder location. So copulas click on transport again and paste the location Nero, and then save it out. So I've already saved this schedule file so I can use the same fail in our scene as well. So once you save it, you can then import it into SketchUp. By going to fail. Click on Import, Paste the location, select it, and click on Import. You can also drag and drop the file and then place it in place. You can see that we've placed our nice-looking go. And now you need a simpler more so that it's in line with this. Maybe we can also scale it out to bid exactly four feet and select this, go to top view. And then copy it from this edge, this edge. And then multiply it by 10. That looks good. And I can also copy this, de-select the domain and copy it to the side. Make sure to copy by pressing the Control key and place it elsewhere. Perfect. List, I rotate globe now if I select the material for this, so I'll go to my bucket tool, click this medieval and go to add oscillator. You can see that it comes in with all the maps, the bump map, that displacement map, and the correct values as well. So this is why I like using my GSK and materials because transmitted openings them in with that. A trial users who don't want to just build this group and bring the thickness of the Bodoni. And finally, I'm gonna make this entire thing OR group. So let's go to top view. Select, then diode or curb, de-select, dominates, then make it a group. So now I can select this, select the road, and move it up a bit. And that should be fine for our scene. So let's go back to front view, and it looks good. So now fed on an interactive render. You can see are awesome looking roadside code. It's also a good idea to move that white line out to bid order. It looks fine. All right. Maybe just a little bit, right, looks good, awesome. So similarly, you guys can go ahead and add in multiple acids. So if I go to Home, click on 3D assets. We have buildings, beams, combined, door, below walls as well. A lot of glasses which you can add to your scene, and also in DDI acids. So these are generally used in games, but you can also use it for layered architecture and interior scenes. So I'm looking forward to seeing what kind of acids you guys bringing into sketch up and also create amazing artistic, the EDR vendors and lead. So that was a quick tutorial in do using Vygotskian acids in SketchUp. And the next we didn't show you the easier way to add entourage 3D models into our scene using gas cosmos and see you guys next video shows.
14. Adding Entourage with Chaos Cosmos: Hey guys, welcome back. In this, we don't want to add some entourage in our scene using the chaos cosmos acids. So open the exercise file for this lesson and then open Carol's cosmos. So first thing what I'm gonna do that cause or equal than our scene. So we'll do equals. So you guys can go ahead and add any vehicle. There's one personal failure domain, which is the posh. So I'm going to download the model and then click on Import. So once you click on import, it would shift to the sketch off you and then you can place your model in the scene. So I'm going to place it on the road, select the model and then rotate it using total D2, rotated by 90, and then place it close to build rotate code. Now, I'm also going to zoom in and make sure that is touching the road. So we want to select this end point of the dial and snap it to the blue axis and then use the road as that reference to align the wheels to the root. Now if I go there for VTE 20, you can see that the god is, I would say the scenes, I laughed and move it in. And that looks perfect. Now we can add some trees. So let's go to Gaussian cosmos again, glue vegetation, and then go to trees. So you can use any tree that you like. And there's some good ones that I like to experiment with and also be creative with. So I'm going to use this Chinese Magnolia because it would become as a focal point in that Endo. So we want to download this tree and then click on Import and then place it in there front of the line. I'm also going to move it out. Select all three and mode 02 bit. That looks good. I also need to play some additional landscape elements on the lasagna. So let's go to God's cosmos again. And let's go to floss grass and rocks. So now we can start placing in some of these plants here. So click on Download and maybe there's Mexican feather grass as well. Some blue for x2, smaller ones. And this C1's can replace maybe somewhat oxygen. Let's use this boulder limestone. And please have in place. Now, we're going to use another plugin in the next video, we'll just call scattered due to scatter, these objects are on the lawn and also do play with the size and the scale of these objects. So what I lose this, move it to the side for now, and then place it in the next video. So now let's go back to front view. I'm Abby with these minimal entourage acids that I've added to the scene, you guys can go ahead and group the easy and also add some additional trees, plants and more. And maybe in the frontier. That's because looking at it, lynne. So you can maybe add some plants here and whatever you like. So let's go to field of view 20 and then click on Render. Interactive. Scene is looking nice with the background and beautiful looking scale. The back. In the next video, I'll show you how to add some 3D grass and also scattered those objects which you've added from chaos cosmos onto this lasagna. So I'll see you guys next video shows.
15. Adding Landscape with Skatter 2 and Chaos Cosmos: Hey guys. In this video I'll show you how to use this awesome plugin called scattered to do scatter elements along at. In the previous video we added some acids from chaos, cosmos, and both loggers and rock. So you guys can go ahead and add these acids and in case you have not added them yet. So it would show up, you're on the radio, or you can use the previous exercise fail as well. And also now we need to add some grass and scattered these acids along this Darien. So the first thing what I'm gonna do is add the grass. So I'm gonna open 3D bizarre. So click on 3D was our make sure you have an actor Internet connection as well. So what's Gatto? You get 3D puzzled and composition editor. And in the 3D vis-a-vis has some fatty acids. So I'm going to use something called those scattered dog grass. So click on download. And once you download, you'll have an option to import this. Make sure to import this as a proxy. You will scatter graph style and then click on Import. So now it would import into scatter composition agriculture and also create a composition is called Scatter Dot grass. To me, close this of assets. So we've added the scattered object, which is the scapula grass. So now we need to select the horse. Before we select the horse, we need to make sure this Adyen group is not inside any other group. So I'm gonna switch the select tool and then tell you to select a date. So you can see that it is insane. I mean, host groups. So we need to move this out of the main host group. So what we can do, select this group, press Control X to cut it. And then you're still inside the main group. So press Escape to exit, and now we rotate. Now go to edit and click on Paste in Place. So now we know that this group is outside. So click on pig surface and then select the group. So now we can see that the grass being scattered. So now we have different options. What I'll do is increase the density. So as he more grass, and then click on gender. Now there's two modes to generate the grass. You can either generate and render Only mode or you can generate it as a grass in the model. So if I switch this off and click on January. Now you can see that it comes as a proxy, which would be either DOC. I don't really need this because I will be seeing the grouse allele in the handle. So I'm going to press Control Z. Switch to only render more than the amplicon generate locally it. So now let's see how this grass looks in the endosome. Let's go to field of view current D and then click on Render with the impact of lets us know you can see our grads and it's looking great. But you can see that some patches are still left out, especially at the borders. So we need to fix that. So let's start that Endo and let's add this to our district VFB Israel. Close this. And now we need to add another scattered object called a scatter border. So you can close the composition at the door opened to the bazaar. Scrawled on select scattered dollar grass again. And teens. This option from scattergram do scatter graph Porto. Use the default proxy and then click on Import. So this would be added to another composition. So for open competition editor, you can see that we have two compositions known. We also scattered dollar grass and we add the scattered dollar grass Bordeaux. So similarly to those scattered diagram for this composition, we need to add the host as well. So I'm going to click on big surface and then select this group. So now you can see that the glass is being added to the border of this group. Also, I'm going to increase the density a little bit. And then click on January. So hope scatters starting to make sense for you also scattered object that is basically the objects you want to scatter on a group or on a host. And the host is simply a group or a surface which is going to contain these gathered objects. I'm going to close this, go to field of fuel 20 and then click on 3D intact. Now you don't have to worry about the lighting since it's a little too dark. We want to fix that later in the course by using some artificial light. And that's an O. You can see that the borders also get filled up. Perfect. Now let's start the render. Now comes the magic where we want to scatter these objects onto doctrine. So this time we're going to create a fresh composition. So click on composition manager, and then click on the Plus button to create a new composition. And we'll call this random objects on deadline and then start adding in our scattered objects. So I'm going to click on the plus button, select bolder limestone. Select. I smile, Florio. And then select the grass object. The Mexican Federal grass. And they'll blue Feizi. Soon. Now we have the different scattered objects and we need to select the horse. So click on big surface and select the host. So now you can see that it starts to scatter all these objects on the debt in snowy have the option to mix and match these objects. So if I scroll down, we have an option called random scale. So if I switch this on, you can see that the objects would scale from a rally of AD plus n two all the way to 120 percent. I don't need wx to go bigger, but I would want the object becomes smaller. So maybe from 40% to abort a 100 percent. I have an option to randomly draw dead these objects. So I'm going to click on random rotation, snow, you can see that all the objects would randomly rotate. And finally, the main cool feature is to simply increase the probability of some objects on the deadline and reduce the probability of others. So if I go to my border limestone, which is blue, so all of these blue boxes, you're simply indicates the position of a boiler limestone. Again, they use the scale of this, so maybe keep it at 50 percent so you can see that the blue box will become smaller. Can also increase the scale if you want. You can also increase the probability of these bold objects and, or if I reduce it, you can see that it goes away and it'll scattered only in some areas of the terrain. Similarly, I can do it for the grass as well to affect click on this. These green boxes is the grass. So I can say that the grass and the probability of the grass as well showing up on the screen. So this is where grass would show up. Similarly, the Adobe grass, which isn't black in color. So these ones can do the scale and keep it at a probability of around AD. So once you've done doing all of that, then you can click on Generate. Make sure it is in read only mode. You can go ahead and generate it in the model, but it would make your model heavy. So make sure it's an oily more than amplicon to 100. So now if I go to my front view, do not worry if you close like a scatter and these objects glory, because it will show up in your interactive render. So now if I click on Render would really interactive. You can see though scattered objects in our scene. And this looks, makes it look even more awesome and realistic. That so that is a quick tutorial and do using scattered. There's a lot more options that scatter has and I will be exploring scandal in detail in another workshop. In the next video, we will be adding some artificial lights because our exterior seems a little doodle. And I will say using artificial lights to sourdough bread ended up. So as you guys, the next video shows.
16. Adding Artificial Lights to our Exterior Scene: Hey guys, welcome back. In this video, I'm going to show you how to add some artificial lights and make these areas of the random look better on break. So to start off, I'm going to play some street lights, so forth, Redlands who want to use the rectangular lights. So click on that, emulate. And please, you're going to move it up. So I'm using the wall, is that influenza because it's easier. And I'm also going to rotate it by 180. I'm going to go to my top view. And then mode and place, just so that it is highlighting the areas where it shows up in the render. I'm going to make a copy and multiply by two. So we have three artificial lights with the same settings and also gonna make this a group. So let's copy this and place it so that it brightens afoot But and artificial glass. And I'm also going to play some late CEO so that it brightens this area of the grasses. So we're gonna go back to my top view. I'm going to copy this year. We're going to enter that group, delete these two late. And I'm going to make this unique sandals group. Select the rectangular late and click on make unique. Now I want to make a copy this year. So we have blue lights there, which has gone on. Brighten up the landscape but often seen. So you have enough light to brighten up the C. Now we need are the settings for these late. So let's go to our athletic logo relate to the rectangle laid one is our street late. So I'm going to rename this. And I'm also gonna go to Options. Make sure the sources invisible, so click on invisible. And then we're going to change the directionality so that the light doesn't get scattered away at the top and it is thrown on the road correctly. Similarly for landscape later as well. So rename this. So once you make a late unique, it would duplicate with the same name and add or add a number to the end. So in this case, we know that this is odd. Landscape blades solutions is landscape blade. And then similarly, make sure this is invisible and increase the direction. Alright, now let's test these late tote and see what kind of an impact it has on the scene. Let's call a field of view. And then click on their ability to interact with highlights. And all you can see that I've grasses become brighter and it's brighten up that orders, well, we can change the color of these artificial lights if you like. If you go to Source late mix, you can see that each of these layers come as individual lights. No, that's not what I want. I want them to come as an instance. So I'm going to stop that Endo. Want to join the late Ming settings, go to court, do URN elements here, select the late mix and change the group from individual lights to groupby instances. So now if I run into tracker window and if I go to my source lab mix, you can see that they all come as one late. So now you can adjust the value of these late. So for example, the street late, if I make it warmer, that would make the doctor render warmer as well. And I can also increase the intensity. So let's see if I move. So that would make the entire road brighten up, which looks really cool as well. And the landscape we laid looks cool. So if I switch that off, it just adds that little bit of latency on the landscape. So let me change this to three, maybe three years, a little too much. So let's keep it at one. And let's leave it at the default value. Hello, I'm liking this. Now what I'll do is also add some lights for the 30, and some indeed violates. So let's stop the render. Let's add this to the STFT and minimize this. Now we need to add some indeed relates also some late TO. So what I'll do is again go to rectangle late. They say rectangular later. Now I'm gonna make this a circular late to Gloria oscillator correlates. And this is the new rectangular YouTube playlist. I click rename this called the street late. And TNS, the shape from rectangle to disk. And also go to options and switches on to make sure it is invisible. Increase the directionality. Or we can increase the size of this by using the scale tool and also rotating it along good at axis. So no, it would throw some light on this wall, which would make it look really cool as well. It's maybe just move it out a bit so that maybe some shadows of the tree fall on the wall. Just trying to be a little creative with our scene. Finally, we need to play some india late, so I'm going to play as a sphere later. So let's click on the sphere late. And PS30 also select delete and more it up. So that's once you're late. I'm going to copy this. I'm going to make a copy of this. Select these two sphere. Let's make it a group, and now enter the group. Now it's easier to edit if I plus j, you can see that easier to control them. So I'm going to move this to the stack is area. So let's move this to the rate to the left, right. So after move this to the stack is here, there. There can also use the X-Ray mode, which is y. So this way it helps in working in groups or by using tags as well. Luckily in this model, they have assigned the roof to a direct call roof. So if you switch this off, you can switch off the roof and then it's easier to play as though sphere layer. So I'm going to place it close to the bedroom and also reduce the size of the second layer and bring it down so that's not seen from the window. Shoots a face. And also copy this rectangular laid down and place it inside this room. Let me just check if it's placed in perfectly. All right, That should work fine. You can notice that I'm using the arrow keys and the shift key on my keyboard. This helps in aligning the LAITS and placing it in the correct areas. All right. So I've listed the India lates. No, I need to adjust the settings. So what I'll do is go to my acidotic go. So all it relates government one setting which is not ideal. So I'll just make this sphere late unique. Other two layers can be auto, select this layer and do the group. Select the late and a ligand you're going make unique. So soon as you make unique. Now to create a duplicate of the late widow number the end. So this is the first flow. So rename this, so called this top flawed or the phosphor late. And this would be the bottom floor late. So rename this called this bottom floor. We can leave the settings of these lattices and then adjusted in the late mix. So once you change to it, just go to Options, make sure that there's invisible. Similarly this later. So now we can go to our front view and then adjust our late in the late MAC settings. So let's run an interactive render. Let's go source light mix. Does give it a bit for the latest update. And now we can start adding our distinct or late. So the bottom floor late as this to maybe keep it down then sooner you can see that this laid protons up your can also change the temperature of the lake. Then seems a bit too much. Let's keep it at faith. Now. The dolphin or late. So let's keep this at then. So you can see that Bayesians up there change the intensity as well. Maybe 20. I wonder way, the satellite is not showing up, so we need to check that. So this looks good. Let me do is add this to the history VFB. You can also see this back later, which is our circular late, late. So maybe you can turn this Ben or maybe even fave and late value. So you can see that that gives a nice cool effect on the wall. You could do that for these walls as well. But I just want to be minimal in the scene. And then add this to a USB. Now this looks good as is. Let me just check that one sphere late on the left there, whether it's overlapping in say at any fears or as you can see, a forgotten move it. I forgot to copy it at Adam mood, thus fewer late. So I'm going to select the sphere late into the group, select the sphere late, and then move on. So we are bullets with the same settings and it's, it's an instance. So now let's go back to front view and then click on Render with really attractive. Give it a bit for the late mixed settings to adjust. And now we can see late, late coming from your in the back as well. Maybe just increased the top relate to make it more darker. Found.ee, maybe. Now if the interior lights is not as bright as you want it to be, we can also adjust it later using the composite and the video frame buffer. I will be showing that towards the end of the course. I'll let, so this is looking good. Let me just switch off the background. This is pretty good for Instagram as well, but I can make it look even more better by adding some reflections on the window. And then using some random element to maybe increase the lighting and sort of adjust the light SIADH and make that ended look much better. So we're coming towards the end of the workshop. I hope you guys are finding it useful and see you guys in the next video.
17. Adding Reflection to Window with Raytrace Properties: Hey guys, welcome back. In this video, I'll show you how to add reflections for our windows. So to start off, I'm going to check the glass material. So I'm gonna use the bucket tool and select the glass material. So let's go to oscillator. So this is our glass material. You can change the color to black, increase the reflection color to full quarter refraction, and increase the refraction conduct a full as well. Now if your glasses it didn't while you can switch on thin-walled and that good at additional deflections do your materials. So this is a new feature in the latest update of really only two Eve to eat the glass material. Now let's check the glass materials. So let me build this group so you can see that it doesn't single pin. So what I'll do is select these faces, make a group and another group. Because jejudoga visibility. And then I'm going to give it thickness of our own phi m. It's always a good idea to give some amount of thickness. Do your glass material. Now here's the magic where we're going to add some reflections to this class. So obviously, materials and you do reflect something great and end opposite side of this glass. We do not have anything to reflect apart from our DOM late. So what we need to do is add an image at the back of this glass. So I'm going to draw a rectangle on the green axis this way. And also please make it a group and also more width so that it is aligned right on top when we move it down a bit. And also so that it is facing the window. And now we need to apply an image on our group here. So to apply and images extra ended this group first select the face, then go to file import. Change the format to JPEG. Select this bigger menu which I got from Unsplash, which is a free website and get copulate three images and then make sure to use the images a texture, and then click on Import. So once we import the image, you can then place it on the object and then it would also make sure, let me just zoom out and then maybe position this the sphere. So it's a good idea to check the scale of the image. So if I measure this, does around 13 feet, which is a little too much. So let me just bring it down a bit. I click done, and now if I measure this, it's an ongoing feet. It'll bring it down a bit more. And lemon featured refund, which is an ideal height for image. It's also good idea to apply this image on the back side of the face. So select this image and target group and are paid on the backseat. Make sure you're sampling this same image layer and applying it at the back so that detailing is correct. So now comes the magic. So let me go to isolate ago. So this is a major. So now we need to add something called retries properties. So if you click on Add, add attributes, you have something called a trace properties. So click on that. And if I open this, we have an option to disable this image to the camera and also disable the cast shadows. So I'm going to disable that, which is visible look camera and also cast shadows. So that's the only settings which you need to update. And also if you like those back on your own or use it in the future, you can add it to your background 0. So now we can test this out. So let's go to our front view again and then run an interactive render. You could see a bit amount of reflection. Let me just switch off the interior layer. So you can see that reflection on the glass. What I'll do is maybe move the image a bit up. So I'll have to lock your camera orientation so that it doesn't affect the scene. And then I'm going to select this group, then moved up a bit to the side as well. So you can see that D and some Almodovar elections coming on the glass, maybe just mowed down a bit. What you can also do is maybe add some trees from the chaos cosmos library. So if I go to chaos cosmos Color trees, I can add these big to ease into our scene. Maybe this banyan tree and place the tomato. Make sure slave in front of the glass. But not overlapping with the camera, of course. Maybe not the banyan tree. Let me check if there's any other tree which I can use. The straight this ash tree, I would need to be a straight in front of the window for it to reflect. I like holders to your solid sitting on the left here on the top. So what I'll do is just move it up a bit and then more to the left, right, so the reflection is looking good. But I could increase the reflection a bit more. So what I'll do is let me just stop that window, open this, then enter this group. Now I'm going to select this glass been, and I'm simply going to make it a WAR spins. So that is double refraction. And that would increase the number of reflections. So if you have two glasses with that thickness w nuclease the reflection off the glasses. Also, what I will have to do is call it the materials switch often wall because now it is not anymore done and it has a thickness and it also W glass. So now if I go to my front view, can see that tree is sitting right at the top left of the frame, which is perfect for our scene. You can also go ahead and add maybe an additional plant. Just to sort of get an effect. If you're like, I may even remove it if it's interfering too much with the composition of the film. So less than n factor. And again, you can also go ahead and select part of the rainbow, so it's called region renders. So if you select the region random intellectually the glass, to render only the glass, and that would speed up your workflow as well. So let me just move this to the radio and then lock the camera orientation. And one last thing what I'll do is going to be presented those group. Moved on. And it gets lately we go Let's see how that affects the scene on a grid. So now you can see the reflections and the window. I can also switch on the interior lights. It sort of reduces the reflection, so maybe keep it around then. And now you can see a little bit of reflection, which is nice. So you can either use an image to add reflection bureaus. We know simply place the image opposite the window and add the radius properties. Or you can also add some chaos cosmos trees, which will reflect on the windows. So now you can see how much of an effect adding reflections on the windows has on your scene and adds that extra bit of realism as well. So hope you guys found this video useful. In the next video, we'll set up our scene for our final render at some lambda elements and then do some post-production in Davide frame buffer. So I'll see you guys next video shows.
18. Final Render of Scene: Hey guys, welcome back. In this video, we'll do the final render and also some post-production in the video frame buffer. So before we do our final render, I'm just going to add some additional land elements. So let's go to Asset Editor, Goddard and elements, right-click and add group format. Then once you add though crypto Matt also tend to ID date from object name to material limbs so that each material has a color plane. And then you can go ahead and also add, for example, reflection, specular reflection of required and multimap materials as well. Now we don't generally need multimap because we've applied crypto mat, which will randomly generate colors, do your different mediums in the scene and help end up post-production process. I'll let know we need a setup for the final render. So go to settings. So it's often directive. And such as progressive as well, which we'll switch to the bucket render mode. Teens quality to high or hopeless. I want to keep it too high. You can leave update effects at the end so that it shows up towards the end and genes or deny. The rest of the settings can be as us. So the camera can be others that would carry 2000 by 2000. And we can see if these final settings all desert. So click on save and call this final render settings. So we've added our brand elements and also set up they'll find learner settings. So before we'd end up with, let's see. So File Save, click on field of view 20 just to make sure you're under 18, and then click on the button. So now we're going to start rendering the image pixel by pixel from the top left all the way, depending on the scene. So I'll see you guys in a bit ones though, dendogram. Well, there you go. So that renders done and let's check how long it took. So Fukuda, my stamp tool, can see that took about nine minutes, 25 seconds to render the scene, which is decent photo next video scene. Now let's add some additional post-production before we do some composite work. So we've added there'll be a six dof would do the exposure. There's one cool layer which you can add, which is called the luck layer or the lookup table yellow. So let's add the lookup table layer. And you can load in any lag phase which you use or which most photographers use for that Instagram photos. So let's open the lab fail. So I'm going to use is called DB FE, which is my personal collection. And then click on Open. So you can see the effect it has on the scene diarrhea. You can also change the blending mode. So from, for example, or at eight we continue to, for example, screen that would make them DOC in a door. And I can also reduce the opacity of the blend. So for a radio set can see maybe at 0.3 that we'll just add a little more platelets to arsine, which looks next. Latest version also comes with something called the sharpened globe, which I showed on the start. So you can increase the sharpness amount. Go haywire with it just a little bit. And I can also enable lens effects. So let's enable lens effect. And it gives essays. And then density of lens. The lens effect will be more pronounced if you have a source laid in, say the holes. Now since we do not have a source late, it wouldn't make much of a difference, but it still helps in adding little extra pop in your scene. Alright, to evaded the basic stuff, not the lookup table seems a little too bright, so I'm going to switch it off for now. Or maybe just a bit more. Maybe keep it around 10 percent. Just a little touch.
19. Post Production in the Vray Frame Buffer: So now I can composite this image in the video frame buffer. So let's go to late mix and then click on to composite, or you can also select composite deal. So let's click on to compensate. So it would move all these rand elements and the late do a folder called plate mix. So let's say you want to just adopt for late. So I'm gonna select the dog folate. And then what I'll do is I'll right-click, click on new layer and then click on calls. So this goes layer will only be applied to the top few layers. And then what I can do is again select the top rate and sort of drag it out. So you can see that that increases though laboring and say though bedroom. How cool is that? I can also go to the top floor late and maybe increased our module. So that would increase the lighting in DDO scene as well. So maybe let's keep it at around seven. That should be fine. And we can also change to go from say, four or eight and see screen. And that would increase the brightness as well. So that's pretty cool. Now let's say you want to change the color of the daily schedule for whatever reason, what you can do is you can first add a folder. So I'm going to add a folder. I'm going to move it out a bit. And then I'm gonna select the folder and I'm going to add a crypto Matte mask. So with the crypto Matte mask, I can select this material. So you need to click on the big medieval and then select the brick wall rate. So this is the green are the brickwall rate. So if a show, you can see that lead, the big ball weight would get selected. And now you can change the color of this. So to change it, what you can do is simply right-click, go to New Layer and click on Use saturation. Now if agenda you, you can see that the huge changes. You can also decrease the saturation of the bricks so that it is sort of dish. Or you can also increase the saturation. You can also increase the lateness, make it dark gray. Philae had that cool effect. So now this would add some depth in your scene as well. You can also click on the logo, the New Layer, and click on Color Balance. And then sort of genes the color this way as well, if you like. And then you can switch off and switch on these values and see what kind of an impact it has in your scene. Finally, you can also add additional layers. So for example, if I had a goes layer, now this is going to be added IOS, so I just need a mole on top. And then underscores Leo, I can right-click go to, go to new layer and then click on crypto Matte mask. And now we can select the window. So click on pick and select the window. And you can also show the preview. So the window is selected. And then you can go back to properties. And similarly hallway I just did the property of the window glass. You can do it this way. I'm going to select the bottom left and make our direct selection to sort of increase the contrast of the glass. You can also reduce the opacity. So it works similar to Photoshop. I can do the same for the ground as well. So if I click on exposure layer, I can click on the exposure Layer. New Layer Mask, click on pick and select the gone. So now you can see the scatter graphs get selected and go to Properties and reduced highlight bonds and reduce the exposure to make a dark or increase the exposure to make it black dots can increase the contrast as well. Oh cool is that you can do the entire post-production Within the video frame buffer using Leo's. Now finally, what ALU is here, these Leo stacks out. So click on save and call this final layer tree. So you can load in my settings and see how it affects the arsine. To load it in, you can simply click on load and load those Leo preset. You can also play with different Leo presets. So we have something called the Leo presets folder. So to enable this folder and one of the options we have B settings, Galileo's and then Lord in our presets folder. So I've created a folder called Presets and click on Select Folder, click on Save and Close. So now I can see it. There's settings, I'll do that please. It's folder. So click on Save and go to the presets for loop all this final preset. So now if I click on the preset icon, you can see that we have find a preset and we also initial color correction, which is the first phone without any sort of labor. You can also use that and elements for your post-production. So to add an element, what you need to do is first add a folder. So I'm going to add a folder, make sure this folder is outside them in composite. And then what they do is they click on the full logo to New Layer and click on the end element. So this would add an RGB color for the entire window, which is not what I want. So I'm gonna change that end element to reflection. And I'm going to add the reflection document only to the glass. So to do that, I click on the reflection layer, go to New Layer, and click on crypto magic mosque. And then simply picked a glass material. So now you can see that that would automatically increase the reflection in your reading frame buffer seen. Similarly, I can also right-click on the new folder called a new layer. Click on brand element. Change this to refraction. And then again right-click, go to New Layer, click on crypto Matte Mask, and then pick the glass material. Now you can see that our glass material looks much, much better. Solutes dissolve. You can see how much of an effect that end element has on the glass material. So that is a quick tutorial and was producing within the video frame buffers. As you can see, we do not have to use for the shop anymore because we re frame buffer as all the capabilities, if not more, to do awesome postproduction within it. And one last thing, what we need to do and see the result. So click on Save, call this the final render, and click on Save. All right, so this is the final render that we were able to create, which we can then go ahead and upload on Instagram and get awesome number of legs. I hope you guys found this workshop useful. Please do share your work in the class assignment and also do shattered on social media and biogas, which is SketchUp grew official and see you guys in the future workshops and classes. Digger zeros to punish Paul Simon signing off, shows.
 Manish Paul Simon, Architect | 3D Artist | BIM Expert