Transcripts
1. Introduction to Adobe XD Essentials training course: [MUSIC] Hi everyone. My name is Dan Scott and I am an Adobe
Certified Instructor. Together, you and me are
going to learn how to become a UX designer using
the software Adobe XD. Now, this course is aimed at people completely new to
the Adobe XD software. Also, it's aimed at
people who are completely new to UX design in general. We'll start the course right at the beginning and work our
way through step-by-step. First, we'll describe
the brief and how we're going to work with a UX persona. Then you'll learn how to
create simple wireframes. From there we'll learn
how to implement colors and images
properly in your designs. You'll learn the do's
and don'ts of choosing fonts for both web and
mobile applications. You'll learn how to
create your own icons, buttons, and all UI components. I'll share with you
all the secret tricks inside of Adobe XD that'll
help speed up your workflow, also make our lives
easier by using free UI kits and preexisting
templates in XD. We'll get off the computer
and I'll show you how to test your designs
actually on your phone. We'll build a simple style guide ready for a
client handoff. We'll have fun making
these micro indirections, page transitions,
and animations. Before the end of this course, we'll have a fully
interactive prototype all the way through
to collaborating with other team members and
exporting the right files ready for handoff to our
developer or software engineer. Throughout the course as well, I'll cover some of
the expectations of you as a new UX designer. Now, I've got assignments
throughout the course to help you practice what we're
learning as we work through, and also to build something
unique for your portfolio. All right, it is time
to go from Adobe XD zero to UX hero,
join me in class. Now, honest opinion, are you thinking, "That's a
cool light he's got there. How cool is that?" Or [LAUGHTER] this is all the way
through the course, are you thinking, "What's
the lame pink light for?"
2. Getting started with your Adobe XD project.: Hi everyone. Welcome to
the getting started video. First thing you need to do is to download the exercise files. There'll be a link
on this screen here, so click, download those
before we move on. Also, I can talk really
fast when I get excited. There is a cog that way. [LAUGHTER] There's a little
gear icon down here. You can speed me up
or slow me down, if I talk too fast,
I talk too fast. Also make sure that you've
installed Adobe XD. We're going to be using
the full version of it. There is a free version, they call it, at the
moment, the starter-plan. It's new, it might go away, they might change
the name of it. You might have to
figure that out. The differences at the moment is that it's for
personal use only, that free version
called starter-plan. Also, there's some
restrictions around how many people you can share the document with and
collaborate with. But at the moment, you can do this course 100 percent with it. They do change
that all the time. We are going to focus
on the main version. You might run into a
couple little changes if you are using that starter version
throughout the course, but at the moment, 100 percent,
you can totally do it. Another thing to note is that
Adobe XD is relatively new. They're updating it a load. Every time I make a course, they go in and change
the name or something. If it's a fundamental change, I'll re-record one
of the videos. If it's a slight tweak and it's change shape or
moved a little bit, I'll make a note, either a little
pop-up like this, [NOISE] or check the
comments underneath. It might be something
new and other students have figured it out. So just check underneath. I'll try and keep it
up-to-date as much as I can, but there are little
changes that they're go and do all the time
with Adobe XD. Lastly, Mac versus PC,
which do you need? It does not matter. You can do this entire
course with PC or Mac. All the functions are the same, the UI is slightly different, but not a big change. I'm going to be using a
Mac in this course for no good reason [LAUGHTER]
other than it looks cool. [LAUGHTER] I'm sold on
looking like a designer, look at the glasses, got the MAC, it's on the stand. Got the light, the light is
off. [LAUGHTER] Look at this. Does absolutely nothing
to the quality of your work except my
ambiance looks cool. [LAUGHTER] But Mac, BC, it does not matter. Let's get onto the next video.
3. What is Adobe XD for & does it do the coding: Hi, everyone. Let's talk
about what Adobe XD is for. Can you just export
the code and have the app or the website
directly from Adobe XD? It's a question I
get asked a lot. No, Adobe XD is a design tool, and then once the
design is made, then you pass it on to the next phase which
is to get it coded, either in Xcode or PHP or whatever language
is being used to develop that app
or that website. You might thinking, well, why don't you just
do it straight in code? That is a way of doing it. It's like building a house and designing it
at the same time, it's very hard to make changes. As a designer, I can
move things around, change the colors,
add an extra page, and it takes minutes or hours depending on [LAUGHTER] how
much changes needs to happen. But to do those
exact same changes once it's being coded is a very big deal and requires more talent
than I have in coding. I can do some basic
front-end coding but nothing that will
build a complex site. Often, I'll work as a team. I do the design side and the
testing and the UI and UX, which we'll discuss
in the next video, then hand it off a developer or an engineer or a coder or what
you're going to call them, and they'll build it
based on that design. You'd be like, well, it seems like two people doing one job. That is one way I look at it, but what's really efficient is my skills as a designer
is to take the brief, understand the brief, come up with some
kind of hypotheses. Not a good day. You
know the word I mean. Come up with some things you
want that you think will address this problem,
and then test them. That's the really nice
thing about Adobe XD. If you gave me an
idea right now, said, I got a new idea for a
sign-up page for our website, can you create it? I could take that brief and
I could do it very quickly. Let's say, it could be
done in a few hours, I could mock up
this different kind of sign-up page on your website, get it to potential customers
and get them to test it. It doesn't really work, it's not fully integrated, but for the person testing it, it's good enough
to get feedback. I can either watch them doing it or record the screen
with them doing it, and find any bugs and be like, I thought that we'd go
there, they're not. All of that process is
done through Adobe XD. You can see how quickly
it can be done, and I can make 20 different
versions before I'm like, success, they know
how to sign up for, that's the best
way of signing up. Then I can head to the developer
with one thing and say, go make this for me. I hand it off to the developer, they go and build it. That is an efficient workflow. To be coding it and doing the same thing would
take a long time, and the skills I don't have to do a complex sign-up
process, I just can't do it. [LAUGHTER] We need a couple of people involved in the process. That is what Adobe XD do. It's about prototyping quickly, and you can work with a client, they can sign up, they can say, I love this site, and then you hand it off to get. You got to be clear with your
client that this process, even though they can see it, you'll hear them a link, that it's not actually the
finished product. It is something that needs to go off and get developed next. Now, you might be
like, I don't have a developer [LAUGHTER] or
an engineer or a coder. You can do these
things yourself. It depends on the job,
and who the client is, and the size of the company. You'll design in Adobe
XD, get the design right, and then if you are
not going out to a developer coder and you
want to do it all yourself, there are no code options, things like Webflow and
Elementor and WordPress. I've got courses on a lot of the things that I'm talking
about, especially those, either out now or coming out
very soon so that you can, as a designer, do the
complete package, deliver a website completely. But there will be other
times where you're working with a
development inside of a larger company or with a developer building
some custom things. Your role in XD will be handing that
off to the developer. The things you can do
to help them along, you can give them a
lot of the style code, which we'll do in this course, you give them all the images and the elements that they
need to get going. You can code it yourself. If you are designing
a simple website, I've got a class on
Dreamweaver and VS Code. The VS Code one is
probably the best one to be able to learn how to do HTML and CSS yourself
and build your own things, or go for the no code
options. There is a lot. Squarespace, Wix, Webflow, Elementor, the two
that I'm focusing on, WordPress, there's lots of
no code designing options. You still design it in XD
because it's quick and great, and then build it out afterwards once the
client has approval, which takes a little bit longer. It does not export
code to a developer, but it will give them elements that they need or that you'll use if you are hand
coding it yourself. That is this video over.
4. What's the difference between UI and UX in Adobe XD: Hello. In this video, we are going to talk
about UI versus UX. If you already are very
clear about those terms, you can keep moving
along to the next video. For those who need
a little bit of just an explanation to make it clear, let's go
through that now. We'll start with UI, part of the UI/UX. It's a term. Those two terms get thrown
around quite a lot, and together they're similar but different in Adobe XD.
It's all mixed in there. UI design or user
experience design is a term used when you are designing
the look and feel of a website or an app or
whatever it happens to be. I used to work as a UI
designer for a long time. Before UX became popular
and I got interested in it, I was purely just a UI designer. What that looked like was that I get a brief
from the clients, research what they needed, there was a lot of my own
experience coming in there, like what should go where and what their
clients would love. The client would sign
it off and we'd get it made by a developer or
I'd make it myself. That was me as a UI designer. Where UX is different is that it's often
same kind of tools. I'd use my experience
to do what I think, but it's a lot more
humility involved with what I think would be a good solution for the client. I need to think this
is my hypothesis, this is my what I think the
client is going to love, at least their customers
are going to love, and then putting it to the test. That's where we start moving
into UX. It's a big field. I'm going to try and
cover as much of UX design as I can
in this course. But it's saying, this is what I think
finding the right users to test my hypothesis or my design, and then figuring
out what worked, what didn't work and
then iterating on that. Not just once, not just twice, as many times as it needs. Let's say it's a sign-up process for a website that you've
been asked to create, or a whole website or an app for something completely new. The client wants something, you have an idea about
how to deliver that. It's putting those ideas to the test is where we start
becoming a UX designer. Working with clients, testing, figuring out what works,
and then iterating. That's why Adobe
XD is really good. It is very fast. You can iterate really quickly, you can go back out to
those same people to test on the fly or
make some changes, send it to them
then the next day, get it tested again
until you get to a point where you are accomplishing
your tasks that you said. It might be the fastest
time to sign up, or at least the most amount
of people signed up. Whatever your goal is, you can test with the client to work through that process. That's the difference
between UI and UX. UI user interface
design is how it looks, but then adding that level of user experience design is where you actually
go in and test this. There's various ways of testing, but that's the
simplistic version. How it looks for UI
and user experience is more to do with
testing and iteration. Does that make sense? We'll explain it a bit more
as we go through the course, but that is UI/UX
through over there. I'm not sure why,
but that's them. Let's get onto the next video.
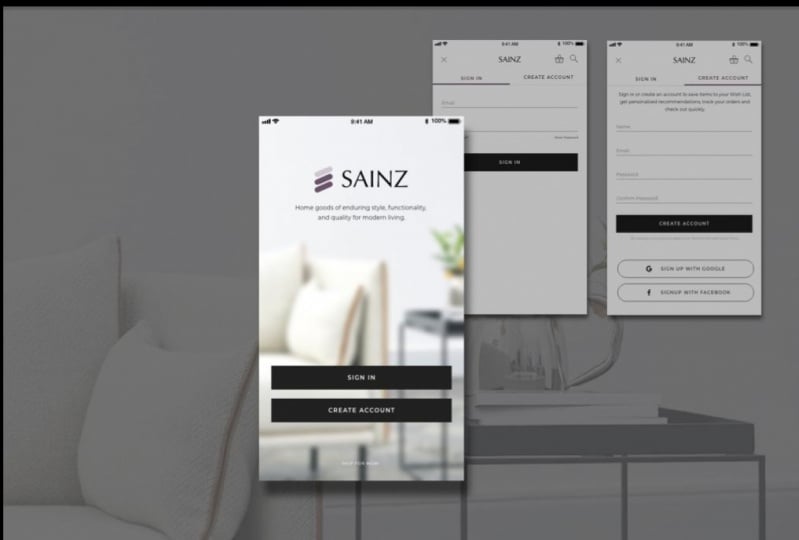
5. What we are making in this Adobe XD course: Hi everyone. In this video, I want to show you
where we are going. This is the stuff we're going
to make in this course. We will start with
making a wireframe. Just a simple wireframe to get the basics of XD under our belt. There will be some transitions, and we'll do some
testing on phones, and build some basic stuff
and some simple animation. Just to get our feet
wet in Adobe XD, then we'll start building
out our mood board, how to present it to clients, and then start on our
high fidelity version. All these terms I'll explain
later in the course. But let's have a look at these. I've got multiple options for the cover. Let's have a look. As animations, you can seen what we make.
Let's have a look. It's got a nav, we've got Buy Now buttons, we've got functioning things, [LAUGHTER] switches that turn on and off for no
reason down here, [LAUGHTER] but they look cool, with some animation as well. That's what we're
building in this course. I want to give you a peak early on so we know where we're going. You like the toggle switch, look cool, [LAUGHTER] what
was the van doing? You too can build
animations like mine, with the truck's
doing little wheelie. [LAUGHTER] Anyway, let's
jump in and get started.
6. What is a persona & task flow in UX design: Hi everyone. In this video, we're going to talk about
the brief, the persona, and the task flow
for this course, and what those terms mean. The brief, nice and
simple, Scotts Green Tea. They are a small local
business in Limerick, Ireland where I live, and they deliver green
tea to your door. That's the short brief. Let's talk about persona
which is this next chunk. What is persona? Persona is a word used to
describe the target customer. In our case, let's
read it together. Our ideal customer is
a woman named Zoe. Zoe is in her 40
's, she is married, she has a doctoral degree, Dr. Zoe, and works
in a busy team. She lives in Limerick and she's somewhat familiar
with their product, but enjoy spending time
considering the next purchase. Why is this useful? First of all, when we're
going to do our UX testing, there's no point
getting me to do the testing because I'm Dan. I live in Limerick
but I don't have a doctoral degree and I'm not a 40 year-old
woman who's married. It allows us to find
the right people to be testing this which
is super important. What's also important
is as a designer, what I've tended to do, especially at the
beginning of my career, I designed for myself, trying to imagine myself
liking green tea. I live in Limerick
which is good, but I'm not from limerick, I'm from New Zealand. There was this disconnect
where I design for what I think would be great, and then I'd be
battling with what the client thinks
they should want. The client is not right, I'm
not right, Zoe is right. It's about putting
a persona out there so that me and the client
can talk about Zoe, and it becomes a little
less passionate. I don't like green or
I don't like purple. Well, what does Zoe like? You can have a
third-party discussions about this other person, and it becomes a little less. You're a little less hurt
as a designer because you are talking about this
other person which is handy. But also it allows you to make decisions around the types
of font, types of colors, the way that their
website or app is constructed because she's somewhat familiar
with the product, but really enjoys spending time considering the next purchase. We're going to have to
make sure that there is a lot of detail
about this product. The idea here is not
to be the quickest ordering app in all the world, because that's not what
our persona wants. Our persona enjoys spending
time considering it. There's going to be maybe some potential this versus
that, some comparisons. Those things have really framed up what I'm going
to be designing here, and it's only a
couple of sentences. Otherwise, I end up designing
either for the client, what they want, and they
are not being user. They're the customer for you, but not the customer for this app or website
you're making. Or I design for myself. Or you end up, the worst place is designing for everybody, every need group out there. Designing for everybody
is designing for nobody. You end up with this website or an app that doesn't really
do anything for anybody, [LAUGHTER] let alone one
group. That's what a persona. It gives you empathy
for the client, for things that you, green tea, I don't
even like green tea. [LAUGHTER] Our persona
lets me understand, what about Zoe might be interested in green tea
and allow me to develop her design and look and feel and flow based on her
wants and needs. That's the short
version of persona. You can go into a
lot more depth. That's some advice. I'm going to give
you of my advice throughout this course is to, if there are things you like, I understood that, [LAUGHTER] he explained that. Make it a little note in
your notebook and say, I'm going to research that after this video or after this course. Personas is one one of
those things where there's a lot more than what I have experience in and I'm able to communicate in
one of these short videos, so go learn more about personas. But that's the short
version. Next up, let's talk about task flows. This is the task that we've
been asked to design. As a designer you've been asked to give a company, who it's for. This is what we need to produce
or mock up in Adobe XD, is we need a
homepage/marketing page. We need our product details
page, about green tea. We need a checkout page and
some order confirmation. This is the task flow. A task flow is quite linear. Otherwise, if you don't have agreed upon a thing
you are designing for, either being headed to you
from your product manager, or your boss, or from the client, you end
up creating way too much. You can end up designing the
terms and conditions page, which for what we need now
and getting out to testing to Zoe or Zoe-type
people, is not useful. Useful at the end,
but it's not useful in getting this tested
in the hands of clients. We've got an agreed
upon task flow, and this is it for this course. Now, task flow is a term, get used for this linear
step-by-step approach. Let's look at another
term, user flow. Task flow versus user flow. This is a really good article. Thank you, Erika Harano. Check it out. There'll
be a link on the screen popping up down in the
bottom corner there. Why are we're not
developing a user flow in this particular course? It's interesting. Well, it's useful to know
the difference between task flows and user flows. This one's got a really good
example of this task flow. Finding a pancake recipe. You go to the homepage
you search for pancakes. In the search results, they find something for a super
banana pancake recipe page. That is a task flow,
we can design to that. But a user flow is
the same thing. Same beginning, same end. But let's have a look at
this particular here. This is a user flow. It has the same elements. You start at the homepage, they go to the search results, they find the super
banana recipe. But that original
task flow neglects all the other paths that the
user might go to get to, let's say they need to
get to the end here. Can you see this flowchart?
Can I zoom it in? I can. Homepage, and in our task flow, we assume they're going to
use the search results. But you can see here
there's this decision. You can see the
little icons here. These are decision nodes. These are interactions
with the websites. These are different
pages they ended up. Homepage, did they actually
use the search bar? You might find through testing that very few people who
actually use the search bar. They end up down here. No, if they use this
browse categories, you might end up spending
a lot more of your time building out a very clear
category browse option. Or alternatively, it
might be the opposite. You might build this amazing navigation drop-down
extravaganza of a drop-down menu.
Nobody uses it. Everyone uses search, or
it's a mixture of both. That's what these user
flows are here for, to find dead ends. You might be assuming this, but people are trying to find something else that
it's not there. That's where something
like this user flow can be good at the beginning, when you're scoping out a job. You still get to the right place and
you're not still designing the terms
and conditions page, which probably not
important for the app or website that you are
doing at this stage. [LAUGHTER] You might
find it very important. But at this initial stage, it's a bigger job doing a user flow rather
than just a task flow. But we're keeping this course concise and doing a
small part of the flow. Task flow is quite linear, step-by-step and a
user flow is often non-linear decision
tree and it's a more complete testing option for going out to user testing. More complex.
Simpler. It'll depend on the job you've
been asked to do. In our case, it's this job. We get to design
these four pages. I've kept this quite simple to make it easy for this course. But you can get into a lot more detail with
the brief, especially. You might get given jobs
that have no brief. Hey, I want a website. That might be your
brief. You might get ones that are
super detailed. They might come through
a larger company where there has been a team of
people, UX researchers. You might have team leaders, and product managers, and, I don't know, VPs and everybody working
on a project and you get handed a quite a
detailed project to do. For me, often I'm working
with small products, small clients, and often I get the no brief option,
or very limited. I don't know. Are you seeing it in here that, with a persona, and a brief, and a task flow, I know what I need to do now. A lot of the hard work is done. Even though it's quite simple
looking on the screen, it's very clear what
the client is going to get and what I need to deliver. If you don't and
you're new to this, it's hard to do when you're new, but you need to
think about pushing back to the client
or your boss about, what is it, who is the persona? What are the actual pages
that I'm designing? Is it a user flow, task flow? What
does it look like? The other last thing that's
neglected out of here is things like brand values
and mission statements. We don't know much
about Scotts Green Tea. We don't know, are they
all about efficiency? Are their robot serving them? Or is it all about
back to the farmer and the farmer gets
the higher prices, but the farmer gets
paid a fair wage? That staff is super important. Find out, if you're working
for a larger company they're going to have a mission
statement and values, guideline, and lots of documentation to give you
a feel of the business. For a smaller company, it's
going to be a lot harder. It's probably going to just
be a conversation with the owner about what
they want to do, what they're trying
to do, and getting a little bit of
understanding that way. For me now as a more
mature UX designer, old [LAUGHTER], I'll push back on all of
these things because I know my life is really hard, if I'm not really sure
whom designing for. If I'm really clear who
the target market is, who the persona is, and
what I'm meant to be doing, I can knock this
stuff out clearly, I can get into testing really quickly and deliver
an awesome product. All my problems throughout my career either as
a graphic designer, or a motion graphics artist, or a photo retoucher, or a web designer, all these things that I've done, most of the problems come from unclear expectations,
either through a brief. It's mainly because I
like getting scared. [LAUGHTER] It gets
good pushing back. You're, can you do this
job? You're, okay. You go off and then
you realize you don't have enough
information about it. As you get more experienced
in UX Design, you'd be, there's a big hole
in my understanding and go back to the
client early and quickly so that it's not the day before it's
meant to be delivered, but starting the conversations with these things like briefs, personas, and task flows. Wow, that was a long one and
a little bit long-winded. Start showing me, "[LAUGHTER] It's like
clicking the buttons, Dan." We'll do that. Are we doing that next? I think we might be
really soon at least. [LAUGHTER] Next video.
7. Class Project 01 - Create your own brief: Hi everyone. It is
class project time. Don't consider this homework. It's like homework, but it is a way for you to
follow in this course, not just blindly following and watching videos
getting you to do stuff. What I've done is,
I'm making sure that everyone is a
little bit unique. In your exercise files, you will see there's not much in there now because I'm
building the course, but they'll be something
called class projects. Open that up and it'll
look something like this. It'll tell you what
you need to do for this particular class project.
This one's pretty easy. It's generating your
own brief and persona. I've made a website. Well, the Bring Your
Own Laptop team have made a website for you. It's called a
randomprojectgenerator.com. Go there and
generate your brief. Basically, once you're here, I want you to go to the
one that says Adobe XD , enter your name. Use your last name,
your friend's name, your pet's name, something to give your business
a unique name. Signing into mine.
Scott is my last name, that's what I'm going to use, and then enter your location. I'm living in Limerick and then we hit
''Generate Project''. That is the product that
you're going to be selling. We're in the food
delivery theme. In this case it's
Scott's cheese. You saw in the last
video that I did, I've already done
this and I ended up with Scott's green tea. That was it. Yours
will be different. It'll be unique, except the name and the place where the
business is being held. It's in your area because you'll know what the area will
support and be like. But over here this
will be all different. Now, if you're like, I'm so not doing cheese, you can hit ''Retry'',
but just once. You might decide potato
chips, that's the one I want. No more. You know that I
go through and just keep hitting ''Retry''
and finding one, use the first or the second one. Do not hit it the third
time. There'll be trouble. Once you've got your brief, it is really handy when you get something that
you're not sure about. If you've like, I've never
eaten potato chip in my life, that's a great
product to work with, because you're going to
have to really understand Sebastian and what he's like in his late 20s and figure out what he
likes as a freelancer. Once you've got your brief,
either take a screenshot or click this
'''Download as PNG'', and that is what
you're going to work along with this course with. We're going to build
the same stuff, but what I don't
want to do is have everyone looking the same
as me with green tea. We're going to all follow along. You're going to pick images and fonts and colors that
are different from mine because I want you to
build something great for your portfolio at
the end of this. That's just so that when you
are submitting homework, we're not all doing
the exact same thing. It's a bit of creativity there. It says do that. It says enter your
name and location, save the brief to your
computer and the deliverables. There's going to be
deliverables on all of these. This one is just
upload your JPEG or your PNG screenshot
to the assignments or the projects or the comment
section of this website. That's all you have
to do, nothing else. I will see you in
the next video. Get your brief, be excited by your cheese or
whatever it might be. We will see you in
the next video.
8. What is Lo Fi Wireframe vs High Fidelity in Adobe XD: Hi, everyone. In this video, we're going to talk about
LoFi versus HiFi or, aka, wireframes versus high
fidelity or pretty versions. A wireframe is where
we're going to start in this course and where you
should start as a designer. It could take me a few
minutes to mock up this. Some simple boxes and I can get it in the hands of
somebody to test and iterate really quickly the
power of UX design, an MVP, the Minimum Viable Product, and get it out and get
it tested before you spend ages doing all
the stuff where you end up spending
half a day kerning [LAUGHTER] or leading
or picking images. This won't give me a
better-experienced test. This version won't give me a better and quicker test result from my user than this will. This, super quick and easy, make adjustments while
they're sitting there. It also takes out a lot of the when you're doing
your initial concepts, handing something like this to the client, they can use it, they can test it, but they don't come back with
strange things like, "Hey, that's the
wrong font," to, "I don't know where
the color are," because at the beginning of the process that's not our goal is to not
pick the colors, is to make sure the
functionalities right. Let's get the core
right before we start spending time on
leading and kerning. Colors, they do not or do like, you can see it would
have been removed text. This is my marketing message so that we're not diving into, "Oh, we can't say that," or, "we'd like to call
it something else." We're just getting the
functionality of this job, which is a task flow and the
task flow is very simple. We're just doing
these four things. Once we get the mechanics right, then we can spend time. It's still important, but it's not important
at the beginning. Skip the wireframing chunk of
the process at your peril. Now, that's the
wireframe that I made. Look fancy rounded corners. [LAUGHTER] Try and keep away. Boring foam, boring colors. Switch it to black and
white, no rounded corners. This is not the only look. Let's have a look.
It's up to you to figure out what
the job requires. Is it going to be super simple, or is it going to be a
little bit more advanced? Still keeping out the design. But you can tell this
one one spending a lot more time getting
this thing to look nice. Not all wireframes
are created equal. I'm in for the get
it done quickly and out unless it's going
in my portfolio. Then I'll make the
wireframe look pretty, and buy pretty I mean
something more like this where there's a little bit more
design gone into it, a lot more time with
leading and kerning, but it's a portfolio piece. Just keep that in mind.
Wireframes or low fidelity, high fidelity, and down here, this is my high fidelity or good-looking version
or HiFi vision. This is what we're
making in the class. It's going to be fun. [LAUGHTER] Here's
a fun exercise. Anyway, that's it. LoFi, HiFi. Let's get onto the next video.
9. Artboards & how wide should my website or app be in Adobe XD: Hey everyone. In this
video, we're going to draw four [LAUGHTER]
white rectangles, it's going to be exciting. We're going to explore
what artboards are. We'll talk about mobile
tablet or desktop first design and some
basic navigation shortcuts to get you going, but let's go make some boxes. To get started open up Adobe XD, and we're going to start with either a new file
which will give you just a generic starting
file or you can pick from one of the presets over here. I'll just show you. I click "New File" and it defaults to whatever
it thinks you want. It's going to say, "Hey, you got a page that is a website size," and you might be like,
"That's not what I want." File close it, and what we're go do is
pick from the presets. Mobile stuff, web stuff, social media sizes, a lot of design is
getting done in Adobe XD instead of maybe something like Illustrator because people
are getting used to it. It's quite quick. Often you have a lot
of your colors and assets already in Adobe XD, so people are doing a lot
of social media stuff, design work in XD. There's nothing wrong with that, and obviously
you've got a custom size that you can type out. Now, I'm going to start with mobile for this wire frame, and in here up to you. I'm going to start with
iPhone 8; this SE size, because it's just a really
generic size at the moment. In the future some of these
tall or thinner sizes, you might be watching this and there might be an iPhone 50. Just Google what is the
most common phone size and start working with that. This one here is good for
Apple and Android sizes, so I'm going to
start with iPhone 8. Now, what we can do in here is we can click
on the name along the top. Let's click off, click back on. Over here, can you
see this adjust? It's contextually
sensitive which means it changes depending
on what you have selected. If you need to change the
art board, click on it. You can say over here
actually I need it to be this new size which is 400
pixels across, bit wider. I'm going to undo that,
it's not what I want. Undo is Edit. I'm going to use
Command Z on a Mac, Control Z on a PC
for the rest of this course but you
probably know Undo. The other thing
you can do is you can draw your own custom size. You get in here,
it's the wrong one. You can click on it;
click on the name, hit "Delete" on your
keyboard and you go to this generic white matrix; no land thing, and you can go over here. This is your art board tool. Your art board
tool; click on it, and we get all those defaults. Again over here they're
all laid out this way. There's watches in
their social media, but let's say we want to
go back to iPhone 8 SE. Here we go. Those
are default ones, you can just drag them out. You might be designing something that needs
to be dragged out. You can just click and drag
these things out as you like. Click on the names on the
top and you can delete them. For some reason mine opens
up not quite wide enough. Now just a note about
picking the size, pick generic or pick
what your client has. If your client is going to
be testing this thing and he or she has got a
specific phone size, you can tell that they've
got an iPhone 13. Design that size because
they're going to be able to easily use it. Later on when it goes to
coding and your developer is building it plus with your
help with a responsive design, it'll actually adjust to
different phone sizes. You got to pick one
size to start with, and when it goes into
development it will adjust to different phone sizes. What we want to do now
is we want to rename it. What we can do is where it says iPhone 8 or whatever you've
got along on top of it, double-click that and
let's change to this one. This is going to be my
homepage/marketing page. I'm going to enter
on my keyboard so we can name our artboards. Artboards is just another
word of saying our page. Now you can see them over here. If you can't you might
be on this thing, or that thing, or that thing, so we're going to be on
this layer option over here and it's showing me
my different artboards. Now we're going to
create four pages. Well before we move on, I want to shuffle my page over. We're not going to get into
too many shortcuts early on, but there are some
essential ones. Holding down the Space bar key gives you this little hand, and then you click and
hold, and drag your mouse. Hold "Space bar"
down, click, hold, and drag because what I want to do is click
on the top of this. I've clicked the whole artboard. I'm going to go on a Mac, Command C, Command
V; copy and paste. On a PC it's Control C, Control V. Double-click
it over here, and I'm going to fill out
my different task flow. You can check the task flow, it's in our Exercise Files here. We're building this
one: Homepage, Product Details, Checkout,
and Confirmation. The next one is
going to be called Product Details. Copy paste. [LAUGHTER] If you click once with your artboard tool it just throws it in
where it felt like it, so I'm going to hit
"Delete" on my keyboard. Space bar, [inaudible].
Double-click over here. This is called, I
can't remember. [LAUGHTER] Let me check
out, and then the last one. Do we get into too
many shortcuts? Or do one more little shortcut. Two earlier in the
course standby. With your artboard
tool selected, I can drag this around just like an object,
like a square. I'm going to undo
to move it back. I can hold down my
Option key on a Mac, Alt key on a PC, and just drag out another version of it. You can see if I
get close to it, there's some of the magic of XD. Look at this. You get
it close to here. It says, "Would you like to line up and would you like to
be in the same spacing?" You're like, "Yes,"
same spacing. [LAUGHTER] I find it exciting. Our last one is
called Confirmation. Have I spelled that right?
I haven't [LAUGHTER]. I'll be right back. I'm
back, I can't spell. [LAUGHTER] If you've done
any of my other courses, you already know this
but it's confirmation. There you go. We've got our four artboards. They
don't quite fit in. My Space bar technique; remember hold "Spacebar",
click and drag. Zooming out is another shortcut, the last one I promise. Hold down the Command
key on a Mac, control key on a PC, and hit minus on your
keyboard to go out. You can probably guess
how to go in, it's plus. Hold down "Command" on Mac, "Control" on a PC, and hit plus or minus.
There's smart boards. Now we're going to be
focusing on mobile. There's no reason why you couldn't now grab
your artboard tool, and say actually I'm going
to go and figure out my tablet size and
I'm using iPad Pro. I'm going to start doing this, I'm going to work on the iPad. You might decide
actually I'm going to move that down here. Remember grab the
name and drag it. Click and move the thing around , and I could do the same thing. I can copy and paste, and build a Homepage, Product Details, Checkout Confirmation, and
start building the tablet, and then the desktop version. In this course we will
do a desktop version, and you will probably
be expected to do a tablet and desktop version
for your mockup depending. If it's an app for
a phone, then no. You don't need a
desktop version. What we're doing here is a
mobile website, not an app. There's going to have
to be a tablet and a desktop version because we
want our clients to be able to order our cheese or green tea from
either their computer, or their phone, or their tablet, but for now let's
just stick to mobile. Well just briefly, we're
using mobile first design. We call it mobile first because we're going
to design and put our effort into designing
this mobile design first, and then later on adapt it
for tablet and desktop. We'll make it good
for those, but we're designing mobile first because we know that
through user research, through a good guess that most people are going to be ordering via their phone. We're designing first for that. If you're designing a desktop
app and you know that people access your site or this product
via desktop first, then do a desktop first design. I'll be laying this out
in desktop version. When I say desktop, I mean
these ones here; web desktop. If you're unsure what
to design for it'd be really common to
do this one here; 1366, but also google. What is the most common
desktop size at the moment? Google will tell you,
you can design for that. Last thing we're going
to do is name it, otherwise we're going
to have untitled. Man, you'll end up with a lot
of untitles. Don't worry. We're going to name it by double-clicking it
at the top here. We're going to give
it a name, I'm going to call this one. I'm not calling it a Checkout, I'm calling it Scott
for the client name. Scott Tea is our client
name. This is how I name it. You can name it
anything you like except you call it Final. [LAUGHTER] Final
V1, V2, complete. You've done it
before [LAUGHTER]. Give it something
nice and iterative. Instead of calling it this, I'm calling this my Checkout Taskflow because that's what we've been asked to design
and it's going to be V1, or A1, or whatever
you want to use. When we make significant
changes we can change it to V2, and just keep
updating it that way. Don't call it Final. Let's hit "Save" and we're
away. That's going to be it. I'm not going to set
proper homework. I just want you to
draw a four pages. I'm not going to check it, but name it with the name that you've got from the
random project generator. Name it and have your four pages here
ready for the next video. Don't skip the homework, that's how you'll
end up remembering this stuff for a longer time. I'll see you in the next video.
10. Working with type in your XD wireframes: Hello my friend. If you thought four white rectangles
was exciting, you wait for five ticks bits. [LAUGHTER] We're going to
look at the basics of type. We are going to not
get into the weeds. Everything to do with
type in this one video. We're going to get
enough to get us going. A lot of stuff I'm not even
going to explain because it's how to boot and underline, click the
underline button. That will give the strange
things for Adobe XD. Also note that we will get
into the weeds with them. When I say weeds, get into the details of type
later on in the course. There's another video
called Font and Text Level 2 later in the course where we get
into a bit more detail. I just want to get us
going quickly and yeah, let's get into the introduction
to text in this video. The type tool, it's
this one here, looks like a capital
T. You knew that. Shortcuts in this
course, can you see if you hover above any
of these tools, these and quite often, you'll learn the shortcut. That T, you can see in
the brackets there, is for the type tool. V is a really common one, gets you back up to the
selection tool here. Because select starts with V. But some of them are a little bit more
Alpha rectangle. You know, this is
going to be circle, no, it will be ellipse,
E for ellipse. T for the Type Tool.
There's two ways of putting in text boxes. Click once and you'll get a
box that goes on forever. If you go back to the
Type Tool and click out and drag a box down here, and if you click
and drag the box, it's got what's
called a fixed width and it means that when I type, it'll break and move
down to the next line. Good for paragraph text. Lots of copy, and this is
good for generic stuff, buttons and buttons [LAUGHTER]. We do lots of buttons.
You can switch them. You got to select the box first so grab your selection tool, click on the box once, and you can see actually
you are now auto width. Now when I start typing in
it, it'll go on forever. Same with this one over here. Select it with your
selection tool. Click on this guy and
say actually now you're auto fixed height or
auto height, sorry. It means that it'll get to
the end and then break over. That's those two. What we need now is we
need a couple of things. I'm going to click
on delete them. I'm going to grab my
T for my type tool, then I click once. We're going to put in
our placeholder logo, so we've got Scott. Actually I'm going
to do capitals, Scott green tea, so type in your version. What we're going to do is grab my section tool,
move it up here. When you are designing, especially if the company's new, they might not have a logo. Just type it in, have just a text version. Don't be half trying to
design it at this stage. The other thing is if the
company already has a logo, just try and use a black
and white version of it, so that you're not introducing
color at this stage. Wireframes need to be
simple for testing, quick, no color, and speaking of that, you're not allowed to pick
fonts either. No fonts? But I'm not ready to lie
now, I want to do fonts. You get to do fonts
later on when we do our high fidelity version, which we'll talk about later on. But at this stage you want to
take any design out of it. It's about functionality
for testing, so even if you really
like Brush Script, you're not allowed
to use it here, you got to pick
something simple. In terms of simple, mine is defaulted to Helvetica
Neue because I'm on a Mac. But something like
if you're unsure about what's good looking
generic because Arial, I'm not even fond of
Helvetica. Don't tell anyone. I think I've committed
a designer sin, but Helvetica is boring. Roboto, I know it's not
that much [LAUGHTER]. Less boring, but it's just a really good font
to use for wireframes, for anything, any body copy. It's clear, it's
very accessible, it is free if you don't have it on your computer
now you can go download it. It's the new Arial, I don't
know, I like it better. Other good ones are Open Sans is a really common generic font. Open Sans, Source
Sans, Source Sans Pro. All of these can
be found online. I'm pretty sure
they're all free, you'll be able to download
them from somewhere. What you don't want to
do is when you start doing this, testing
your wireframes, which will do really quickly at the beginning,
is you don't want, especially when you got a
client and they are like, oh, it's not the corporate
font or hey, we can't use that
or if you've added character to the
fonts at this stage, you can end up in
conversations with the client about what kinds of fonts, this is not the right one, and it'll take away your
time for being fast. Keep it simple.
Pick just one font, you have one font limit. You can play around
with the white. That is to do with down here, so semi bold, bold black. This is why I like Roboto.
Roboto. Let's have a look. Roboto is really handy for, it's got lots of
these and you can actually get more
to Roboto as well. Open Sans is a pretty
decent one as well. In terms of italics, thins, and pick some mediums. [LAUGHTER] I was saying
don't pick fonts in here. Me going after different fonts and
their different weights. Anyway. Put your
title at the top. I'm going to pick
Roboto for my one. You pick whatever
you like. I clicked once and I got this one. I'm going to add another bit of text here and I'm going
to make it a fixed width because this is going to be my marketing message and I want it to sit within this space. I'm going to type in,
this is my marketing. It remembers the last
font you were using, so I'm going to have
to change this. This is my marketing message. I'm going to select
all the text, drag a box around it. I'm going to go Roboto and
I'm going to not go bold. I'm just going to go to medium. I keep saying fixed width. It's called auto height. This is the one
called fixed size. Adobe likes to call it different
in different programs. The second one in,
the auto height, I'm not going to cover all things properly
like font sizes here. You know how to pick font
size, I'm going to pick 48. That's too big [LAUGHTER]. I'm going to center it,
work your way through it. Little icons give it away. This one here is the
space between letters. If I open it up to 20, you can see the space
between letters open up, I'm going to undo. This is your leading
or the line spacing. At the moment I'm going to go
to open it up a little bit. This is the space
after paragraphs. We'll talk about
this stuff later on. You can click these,
it's terribly hard. Underline. [LAUGHTER].
The one thing you are picking fonts here is that you're not meant
to be styling them. Even though I've gone
and done a little bit, is you're picking sizes because this is my main
marketing message. This one I maybe want
to be a bit smaller. We going to go down to 16. I'm going to make it bold. I'm making decisions now
about how big this should be. This is come down to legibility, how easy is it to read,
maybe accessibility issues. I'm going to say accessibility
throughout this course. We don't cover it
in a lot of detail, but it's making sure that
people can actually read it. Other button's is big
enough. In this case, is this marketing
message big enough? Totally is, but is
it big enough in terms of getting my
marketing message across? Now, you can spend a lot
of time designing this, but what happens
when I zoom out? If you're designing this way, you're going to end up picking font sizes at this size. Now what you might
think is going, I'm going to click on this,
I'm going to go 100 percent. Perfect. This will depend on
where it's being displayed. If I pick up my phone
here, you can't see me, but I've got my phone,
I'm picking it up, putting it in from my
monitors now and it's about twice the size too big. I know if I keep holding my
phone up next to it and I go command minus
or control minus. That's about right. When I'm making design choices now about is this big enough? If I'm at 75 percent, I know I'm close. Yours will be different, yours might be at a 100 percent. You might have to
be a lot smaller. It depends on your
settings on your monitor. What's really true
though is you should be testing on the device. We're going to do that in this class as well, not right now, but I'll show you how you can publish this to your phones. You can actually make
really good choices. We're just going to get
in the ballpark here. A couple of other
things to get us going is if I copy
and paste text, so I select it with
my selection tool on a Mac command C, command V, or control C, control V on a PC, you'll notice that it
didn't really do anything. There's two versions
of it, there's Scott green tea there, there's Scott green tea
there, but they're on top of each other,
just so you know. It doesn't put them
off to the side. This one here is going to
be called my product shot. I'm going to have
a picture up here. We're using text
as a placeholder for the moment.
Moving this down. You'll notice as well, a, this is centered because
we did that earlier. Left align centered. You'll notice that in XD, whenever I drag anything around
using my selection tool, you see, look at that, it really wants to
be in the middle of the page or double
middle of page. Super handy. I'm going
to put that there. Now I want to text down here
for buttons so instead of copying and pasting
that same trick that we did for remember
duplicating this. Who remembers what it
was? That's right. You hold down the
Option key on a Mac, Alt key on a PC, when
you're dragging something. You can duplicate it at the
same instance as moving it. This one's going
to be my Buy Now. I'm going to duplicate this out. This one's going to be
my Learn More button. All right, that'll
be it for now. Other interesting
things that are quite specific for Adobe XD. I'm going to zoom in. Let's look at say green tea up here. You've got this
little white dot down the bottom for a fixed, I keep calling it fixed width. It's called auto height,
isn't it? Auto height box. Remember the one that
breaks onto the next line. You don't have the same
controls, kind of do. This has four white dots
so you can expand it out. This one because we
clicked once and is called a Auto width, has one dot and you're
like, Oh, what does it do? Does a couple of things,
it's a strange guy. Zoom in. I can drag it down
and up and it resizes it. Interesting, instead
of using this, you might just go, there you go. The other thing it
does is instead of clicking on it, watch this. If I just move over there. You see the icon change? Too far, right, the magic spot. You can actually
rotate it. You can do all of those
things over here. You can just say I need it to be 45 degrees and type it in. Or you can just be
hovering up there. That's what it does. You can do it down here,
select on this one. If I drag the bottom,
it doesn't do the size, but it does do the rotation. Here we go. All right. I promised not to get in
the weeds of this one and I got a little
bit in the weeds, but here you go. All right, that's it for text. Let's get into the next video.
11. Rectangles, Circles, Buttons and Rounded corners in Adobe XD: Hello, welcome back. You're still here,
which is a good sign. This video, we're going to
look at drawing rectangles. We're going to add rounded
corners to the edges, we'll draw ellipses, and a few of the shortcuts will be thrown in here
for navigation as well. Don't skip along
if you think you can draw a rectangle
with the best of them, and there's a few
navigation shortcuts that I'll show you
throughout. Let's jump in. To draw a rectangle,
not surprisingly, you hit the rectangle tool, and then you just drag it out. Often when you're
doing a wireframe, you won't actually
put the images. I'm just putting a
placeholder for the images. In this case, it's
going to be a box. It's going to bring us to layer ordering because
I've drawn a box, and by default,
all the boxes have a white fill and
this gray border. You can turn the fill
off to see the text, but what we want to learn is how to play with
the layer order. Here, is I'm going to
grab my selection tool, and I want to move
it behind the text. There is about a thousand
ways of doing it. I'm going to show
you the common ways. Just know that
throughout this course, I'm going to give you either
the most appropriate at your level or the
most common way. There's going to be four or
five [LAUGHTER] other ways of doing things in the
splits of software. If you do discover some
other way and you're like, "Why didn't Dan show
me that way?" My bad. [LAUGHTER] I'm going to try
and give you the best way, and/or the way that it's appropriate at this
level of the course, and we'll get more
advanced as we go. I want to move this to the back. Probably the easiest way is
to right-click it and say, Send to Back, and it's behind this text. I'm going to show you a
couple of other ways. Just get us working and doing stuff in XD,
so I'm going to undo. What you can do as well is
this the long format way. Up here I can go to object, I think it is, and then go to
Arrange, and send it back. It's the same thing,
it does the same job. The other way is
I'm going to undo is over here in my layers panel. You can see there's my homepage, and that's the page that
I'm working on here. You can see there's a rectangle, and it's on top of
my product shot. If I click Hold and Drag underneath my product
shot, you're already? Look at that, it's underneath
like Photoshop works. The way that I always
use is a shortcut way. Let's undo that, is I select it, and you can tell the shortcuts. If I right-click, you see you send it back.
There is he there. Anything you're using quite
often, you'll get to know. I never use the Hide enough
to know the shortcut is. I need to right-click
it. But I use Send To Back all the time,
and Send To Front. In my case, this
hieroglyphics here is Shift Command and
the square bracket, and it's the square bracket
down by your P-key. On a PC, it'll be Control
Shift square bracket. That's what [NOISE] I
do. Let's undo that. Command Shift square bracket. Forward back, forward back, forward back. I'm
using that square key. [NOISE] Lots of ways of
doing the same thing. Let's get that in
there. Let's get this. You can align things officially, but can you see it
really just wants to be in the middle. It's
really handy that way. But you can align them properly, so you select both of
them and say over here, Align Center, Align This Way. [LAUGHTER] It doesn't work
if it's already there. You can see I can align
these guys to the center. Up to you, but you
will find that, actually, it's pretty
sweet in Adobe XD. It just wants to
find the middle of everything without asking. Next step, Rounded Corners. I'm using my selection tool, clicking on this box. You might have to zoom in because we won't be
able to see these. If you zoom in far out, those little circles,
they're still there. [LAUGHTER] They get harder if it's a really small
object on the page. I'm zooming in enough
to see these things. These, if I click
"Hold" and drag them right rounded
corners, look at that. You can decide. You can
manually type them in, so I'm going to undo that. Where is it? [LAUGHTER] See
what I was doing there? I was dragging this and seeing where it was in the Properties
panel. There it is. [LAUGHTER] If you
need it to be exact, you're using 15, you
can just type it in, hit "Enter", [NOISE] and it
will be 15 for all of them. It's good when you
want to match them across different documents. Another thing you can do just
because it's interesting, if you hold down the
Option key on a Mac, Alt key on a PC, and click and drag one of them, and you can click and drag
one of them at a time. [NOISE] I can decide
this one and this one. Look at this. [LAUGHTER] I'm going to
reset them all back to zero. You can see here, it's broken
it down into different, so that one is set to 29. Let's move it over here, so we can edit it
nicely. Watch this. If I drag this, [NOISE]
it's doing all of them. Hold down the Option key
on a Mac, Alt key on a PC. Can you see that it's
just affecting this? It goes around top left, top right, bottom right, [LAUGHTER] bottom
left. I can do that. That's that. Reset it. I'm going to go back to all
and say you're all at zero. Thank you very much. Do I want rounded
corners on the stage? I do want a little bit. [NOISE] Just a
little hint there. I want two of these
for the buttons, so instead of drawing
out a rectangle and then typing in
five afterwards, I'm going to use that
hold down the Option key, Alt key on a PC, just so that we're consistent. You see, even when I resize it using my selection tool and just dragging one
of the corners, it still sticks to that five. It doesn't scale with it. I'm doing a lot of my
sweet duplication skills. Now in this case, are
they in the center? Probably. Let's
check. Maybe not. There you go. [LAUGHTER]
Rounded corners. Let's look at last one, the circle, which is not called a circle. It's
called an ellipse. I'm going to select all of
this using my selection tool, and just move you down, so
I've got a bit of space. I'm going to grab the
ellipse tool, E for ellipse. It's got to bring me a point
where if I click and drag, you get an oval or an ellipse. If you want it to be
a perfect circle, you hold down the Shift
key while you're dragging, and it will lock in
the height and width. That's the same for
the rectangle tool. For the rectangle tool, hold down Shift, perfect square. [NOISE] I've got
a perfect circle. I need it to move there. I want it to be about there. I want a little
plus symbol in it. We're not going to draw a plus. We're going to just type a plus, so Type Tool, plus. That's [LAUGHTER]
clearly a equal sign. I'm going to pick an
appropriate weight for it. There we go. Size-wise, maybe you can drag
the bottom of it. It seems weird, but you actually do use that little plus thing, the little white
dot, quite a lot, so that, I think
that's a good weight, [NOISE] then go there. Another good point is because
it is quite snap happy, you're like, "Stop
snapping to everything." You can get it close, and then use it with
your selection tool. Just use your arrow keys. Down on your keyboard, you
got the up-down, left-right, just up-down, left-right it,
and get it close enough. Zoom all the way out. I
wasn't going to do shortcuts. We're just going to
introduce them. I'll do then loads so you remember them. If you're like, "Man, that guy's freaking me out with the
shortcuts," don't worry. [LAUGHTER] I'll just
keep saying them loads. They'll, eventually,
get in your brain. Really handy one to
go all the way out, there's a couple of shortcuts. Command 1, goes to100 percent. Command 2, I never use, goes to 200 percent. Command 0, holding
down Command on a Mac, it's Control on a PC, and hit 0 shows you everything, which is probably
the most handy one. Command 1 and Command 0, I use a lot because it
gets you out of a normal. If you're in really typing
here, working on something, you can go Command 0 or
Command 1 to come out to 100 percent or Command
0 to see everything. We're going to have some relative organization
in this course. It would be very common
though [LAUGHTER] as a designer to have all stuff
going on all over the place. I'm copying and pasting these. You end up with junk everywhere. If I'm over here, [NOISE] assuming
they're the wrong bit, if I hit Command or
Control on a PC 0, can you see it shows
me everything, and it's just super handy. Goodbye all those artboards, and Command 0 again. There you go.
That's a handy one. A little bit more
navigation for you. That's it. We've drawn
a couple of rectangles. We drew a circle.
Excitement over. Let's get on to the next video.
12. How to use color in Adobe XD: Hi everyone. In this video, we're going to look at
using color in Adobe XD. We're going to end up with
just simple green boxes, but we'll talk a bit about
what's going on in here and different things for Adobe
XD in terms of color, plus we'll start with one of
the shortcuts that I totally forgot to show you
in the last video. We'll start with that and
then we'll dive in to color. We're going to start with
nothing about color. We're going to do a shortcut
that I forgot earlier on. We remember if you hold
down Command on Mac, Control on a PC and tap ''1'', it goes to 100 percent.
You can see up here. Remember that same key
in ''2'', 200 percent. Who remembers how we see the whole thing? It's
a test. That's right. Hold the Command
key down on a Mac, Control key on a
PC and hit ''0''. Shows me everything.
There's one thing that I didn't share with you,
that I use loads. I'm going to pretend
like I left it till now, but I just forgot. I'm going to click on
the name of a document, then hit ''Command''
or ''Control 3''. That puts that one thing that you've got selected
into full view. That's just another little
shortcut I'm going to end up using and you're going
to go, how do you do that? Here we go, Command
or Control 3. We're in. Let's add some color. I'm going to click
on this, by default everything is white
with a gray border. First of all, I'm
going to convince you not to use any colors, but you could see from the intro that we ended up using it. When you are dealing
with wire frames, you want to keep things like color out of the
conversation as well. The wire is like fonts. If you pick a range of colors, you can end up with
discussions not about the functionality of our
task flow and how it works, but people picking
things like, hey, that's the wrong green for your company or I
don't like red. Is red really
communicating right? That's a discussion
for later on, after the wire frames. Keep the wire frames
super-simple. I've got it selected over here, I'm going to click on this. Now, you've probably used
one of these before. If not, you've got
your hue slider along here to get your
color in the range. Let's say you want blue, you get this little dot in
the bluish range. Then you click over here. You can click once or often I just click
and drag it around. You can see it
adjusting over here. This gets your hue correct, and then within this
hue you can pick things like really saturated,
super-duper blue, or desaturated, which is
all the way over here, white and variations of light, dark, saturated, not saturated. Work within here, get something
for your particular one. My advice is you
should use gray. Grays are all over here. It can be on any hue slider, it doesn't matter if you've
dragged it all the way, and you don't have
to get it perfect. You just getting it there, actually, it has a little
bit of the green in it. But if you drag it
past and I'm holding my mouse key down and to
slams into the side there, then I let go, then
it's completely desaturated and it's a gray
that I can use along here. If you want full white, click ''Hold'' and
drag it into the top-left until you go past
where you need to be. That's full white the same
with black down there. Actually, black has two spots. Pick a color, just one. Try not to use more than one. Use gray. Gray is the
official no color, but it'd be common to
add just one color. It might be the brand color
that you're working on, just one. I'm going
to pick a color. I'll pick orange.
[LAUGHTER] It's been way too long
picking orange. There you go. That's the color
I'm going to pick. [LAUGHTER] Don't spend ages picking colors.
We've got our color. The other thing is
the transparency. This is how transparent it is, how see-through in it it is. If you want to manually
type it then you can do it down the bottom here. Now if you are not used
to using hue, saturation, and brightness, that's this HSB, you could use the RGB. The actual color
is the exact same. There's nothing
different about it. It depends on the last
thing that you had going. You could use the
hexadecimal number. If you are a web developer
or a web designer, you might know
these colors and be able to work with
these better or you might be copying and
pasting them from a corporate spec manual, whatever works down here. You can type in your RGB values. I end up just dragging
this around at this stage. If it's a color you're
going to reuse, you probably hit this little
plus button because then it stays down here and you
can reuse it later on. The other one is the eyedropper. Let's use the eyedropper
tool properly. Click off, click on this guy and you're like, I
don't want it to be white. There's a couple of ways of
getting the eyedropper tool. You can go into here, click on this version and
then can you see it zooms in so you can
get quite accurate? It's pretty easy to
get a big square here, but you can do it that way. You can close it
down and actually, this just goes straight. Cut to the chase, give
me the eyedropper tool. Boom. What you might find over time because
I'm going to undo that, is the I on your keyboard, not the eyedropper as
an E-Y-E, the letter I. If you've click on this
first, I've got to select it, hit the ''I'' tool and
then click on this, it's pretty common
way of doing things. Lots of ways of doing
the exact same thing. Now before we go, I don't
know XD really wants that. [LAUGHTER] To be a little
bit tucked in there, keeps defaulting to it. For the boarder here,
you can click on the exact same features. Again, you can see there's
my reusable thing, color. I could make it
green so it matches or I could probably
just turn it off. How to turn the border off, you can make it
completely invisible. That's one way, probably
not the best way, is just is to reduce
the size to zero. No, that's a bad way as
well, just untick it there. It has no border. You, I'm going to do the
same for this one here. Now, how do I select
two of them at the same time? Hold
down the Shift key. I've got my selection tool,
I've got you selected, hold ''Shift'', click on this other one, and
they're both selected. Now I can say both
have no borders. Nice. We'll get into strokes a bit further on and we'll get into fancier color
stuff later on, gradients, and we'll look at color styles and those
things later in the course. But for now, that's
the colors 101. Don't use colors
[LAUGHTER] maybe just one, but don't let me
catch you using two. There'll be trouble. That's it. I will see you in
the next video.
13. Strokes & copy & paste appearance in Adobe XD: Hi, everyone. In this video, I'm going to show you
how to make lines and all the different things
you need to know about using these borders
or strokes or lines, whatever you want to call them. Plus, I'll also show you how to change everything at
once because at the moment, everything defaults to this white line with the gray border. I'm going to show you how to
do some cool shortcuts to copy the appearance of this
and match it over here. Let's jump in. Adding
a stroke is easy. Well, basically everything
comes with a stroke. Draw a rectangle, and look, you get a stroke
around the outside. To adjust the size
of the stroke, let's start with something
simple, actually. Let's go back to this rectangle
here, [NOISE] Command 3. Zoom in on the thing
you've got selected, maybe back it off to just one. With it selected, you can see I've got a border. Turn it on. The color border here, it's normally referred
to as a stroke, but I'm going to call it a stroke because that's
what I know it by. We're going to pick a color
for it that we can see. The size is there.
We can change it to zero or we can bump it up. Now, you can just
type it in here. If I want 10 points, I can hit 10 and hit Enter. Often, it's handy for any of these little fields that have typing it is, I
can click in here. You see my little
cursor is flashing, and then I can use the
up and down arrows, so up to add. Because often at
this design stage, you don't know what you need. You know if you know it needs
to be five later on, great. Type it in, but often
at the beginning you're like about there. There you go. I'm
going to use two. You can just as another
little interesting tidbit is if you hold Shift and use up, it goes in chunks of 10. See if you hold Shift
and use the up arrow, [NOISE] 32, [NOISE] 42, and [NOISE] that
works on everything. If I've got this and I'm like, "I just want it to be
a little bit bigger,16 , choose my up
arrow, [NOISE] up, up, up, up, up, up, hold Shift, and I go from 22 to
[NOISE] 32, [NOISE] 42. [NOISE] That's in any of these. You want to move it over
one pixel? [NOISE] Up. [NOISE] Takes a lot of time. Hold Shift. [NOISE] Bam,
moves across loads. Totally wrecked
it. I have no idea what that's meant to be or
where it's meant to be, but you get the idea. Our border/stroke, you
can obviously do dashes, so I want to space of
five [NOISE] pixels, and it's defaulting
to five of the dash, and then a gap of five,
but you can adjust that. You might put that
as 15 or just one, [LAUGHTER] five. That's dashes. I'm going to go to zero, [NOISE] and a gap of zero. [NOISE] There you go. Adding strokes. Let's add a line to the middle. Now, we're going to use
this, the line tool. I'm going to click
on this, and I'm going to click hold and
drag from this side. I want to, again, go black, so I'm going
to click on the color. Go like this. Remember, just drag past that corner. Then the size, I'm
going to go up one, and that's going to be my
black line through it. Now, it's very common to
maybe not write Product Shot. I'm going to delete
that, and just draw a line through
this box here. A line through a box is secret designer code for placeholder image that
the image is going to go. We're reluctant to put images
in this wireframe mode. The reason we don't
want to use colors and fonts is we end up in a conversation about what
image we should be using. Is it the right image-bearers? We just want to really rough, really quick wireframe to
either get signed off by the client or to do some testing with just some real
basic quick testing, so we'll put a placeholder
image in here. Now, one thing you're
going to get driven mad by is every time
you draw a line, at the moment, you can't
change the defaults. Man, it kills me about XD, but hey, that's what we got. You might in the future, see if there's a way of
changing defaults, but at the moment, the easy way to get rounded is to do one of a
couple of things. One is just to duplicate.
Just see this line here. I could grab it, duplicate
it, and I can rotate it. Now, see this little dot
in here. Where is he? We go there. He does nothing. You can drag it over,
and try and line it up or can you see over
here? It's a reflect. There's a reflect
horizontal and vertical, and you can do that
to duplicate it. Another nice way is something called Copy and Paste Properties. I'm going
to delete that one. This one here, this line here, [NOISE] it's
got what I need. I can go to just
use my shortcut, Command C on a Mac, Control C on a PC, just regular old copy. Instead of just pasting though, [NOISE] and then moving
it and flipping it over, [NOISE] what we're going
to do is I'm going to delete that, is we've copied it. Great going to click
on this other thing. That's this one that's wrong, wrong size, wrong color, and there's an option
here, it says, Edit, Paste Appearance. You'll learn that
shortcut eventually, and it just means that you can
Copy and Paste Appearance. [NOISE] We still got it
copied. I can click on you. How do I select more than one? That's right, hold shift,
and click both of these. Then using my sweet
shortcut on a Mac, it's Command Option V, on a PC, it's Control Alt V, or you can go up
to the Edit menu, [NOISE] and look at that. Doesn't really matter it's remembered that the
stroke was black, and it doesn't really matter if the stroke was on this or
if it's on the buttons. You can select big
bunch of stuff and apply that appearance. Does that makes sense?
[NOISE] Am I getting too much detail too early
in the course? Oh, well. The other thing is
we're here now, so what you can do is
you can say, "Actually, I liked this, but I've ended up picking black because I'm
allowed to use one color." But let's say that I've
got something over here, type tool other thing, and it is some other font. It's this, and it's 10 point, and it's the wrong color. You can do the same thing. Select it, go to copy, [NOISE] just regular old copy, and then select this one. You can go to edit or use the
shortcut or right-click it. Remember, loads of ways to
the same place. Look at that. It does it for fonts
as well as rectangles, fills, borders around
the outside fonts, copy and paste appearance. Those are my lines there.
I've got some strokes there. Let's look at some
other strokes. We're going to put that
little burger menu in the top right-hand corner. I'm going to zoom in a bit, [NOISE] so we can
see what I'm doing. [NOISE] Remember
that's Command Plus or Control Plus on a PC. I'm going to grab my
little line tool, and I draw a line, bloody gray thing
[LAUGHTER] that is one pixel. Never mind. I'm going to get back
to my selection tool, and I need three of these. One thing that I
just glossed over there though is, I
grab the line tool. If you click and drag out, it'll probably get close
to being straight. It's not [LAUGHTER]. Like we did before,
remember with the rectangle tool
or the ellipse tool, if I hold down Shift,
it puts it into a perfect height and width. [NOISE] E for the ellipse tool, hold down Shift, perfect
height and width. That same tool
[NOISE] when drawing a line will make it straight. Let's delete all that junk,
hold for the line tool, [NOISE] and then
click hold and drag. If I hold down Shift, watch, snap, it wants to
go straight well. Once it lock into different
degrees like different. Is it 90 degrees?
Forty-five degrees. There, there, there,
there, there. I'm holding shift
down the whole time. I'm not letting go of my mouse, and I can get
something straight. There you go. I'm going to
get them into position. I'm going to say
duplicate U. I'm using my Alt on a PC drag or
Option on a PC drag. I'm going to do another one. What you'll notice is
can you see all it says, "Do you want this to be exactly 11 pixels like
the one above it?" I'm like, "Yeah,
I do. Good work." This is going to be my little
burger menu or nav sandwich or I don't know, mobile
navigation icon. Whatever you want
to call it, this is this little stripy lines. It's going to allow me to
do a couple of things. First of all, I'm going
to use my size-wise. For me, it was about 75 percent was roughly the right size on my phone as
compared to my screen. Most people call it
the burger menu. I call it a nav sandwich. I heard that earlier on
and it stuck with me. [LAUGHTER] I might be the
only one calling it a nav sandwich, but here you go. You're looking at this
size, you're like, "This stroke, well, it's
is too low. I can go here. I'm going to stroke size.
Is that about right? Yeah. It matches
everything else I'm doing. Maybe up one more.
That's too big, but again, remember, you should be testing
on your phone. But I'm going to
zoom in, Command or Control 3 to be on the
thing you've got selected. Zoom right in, but too close. I'm going to zoom
back a little bit because I want to show
you a few other things. We're going to pick black, and also select these guys
and these options here. This happens. We've got this unfortunately named first one. That's the default. That's where the line ends and
butts up to the end. The next one is the
round cap. Look at that. Your line is this long but
it circulates over the end. You can see what's going on. [LAUGHTER] There's the
square end as well. There are times where
you use all of them, mainly just use first two. I'm going to use rounded caps
because it looks pretty, and it matches my
rounded corners. I'm starting to creep
into the adding design where we should be
really just keeping it simple for our navigation. [NOISE] But hey, you're
not the boss of me. I'm the boss, and
I can decide to put rounded corners
on if I like. You can see there
it seems too thick, but let's go back out to 75, and my computer seems
about the right size. Yours might be 100 percent, so just still feels a bit big. Now, you can adjust them all. [NOISE] I can select them all, and just go like
something like that. [NOISE] There's
no official size, [NOISE] but you might go check somebody else's icons
if you're [LAUGHTER] finding it really tough to draw three lines that looks like
a real normal nav menu. Go and check other people's
online what they've used. Another thing while we're here
is I'm sticking to lines. The lines through
is pretty common, but actually, it
would be common to put an icon in here
instead of these lines. We'll do icons later in the
course, but I wanted to, while we're here talking about lines and placeholder images, I googled it, there it is there. It'd be common to put
an icon like this. You don't have to
draw it. I'll show you later on how to get most of these for free from places, [NOISE] but you might get rid of those lines and dump
that icon in there. That is all I've got
to talk about strokes. Yes, I'm going to get
these texts to match. I'm going to select all of
them holding my Shift key, and say, "You, my friend,
again, in black." Because I'm going to fix that. Actually, I'm going to select
this, move back, copy, U Command Option V on a Mac, Control Option V on a PC. What I actually might do
is bring it to the front. There's many ways, you use
the way that you like. I'm a shortcut nerd, so Command Shift square
brackets to the front. Oh, no. [LAUGHTER] The
text is behind it. You to the front.
You behind there. There we go. That's
an interesting point. Let's say I want to
move this back one, I wanted to move it behind
this, but not that. You might've seen in
there. I can have this selected instead of
saying right-click, Send to the Back, which
goes behind everything. You're like, "No, just behind this circle." [NOISE] You can say
send it backward. There you go. We'll go
back just one level. You can go backward a
few different times depending on [NOISE] where
you need your layer order. Again, black, [NOISE]
and somewhere like that. [NOISE] That is it. Let's get on to the next video.
14. Class Project 02 - Wireframe: Hi everyone, it is
class project time, a slightly bigger one to do. Actually before you move
on, if you're like I'm not doing the homework,
and I'm skipping. Before you do that,
before I get into my spiel about why you
should do your homework, there is actually
some useful stuff towards the end of the video, so if you are going
to skip naughty, but you can't skip to the end because we'll talk
about how I'll make the pages longer and
triangles and stuff. But for those of you
who are thinking, I'll do the homework later on
after watching the videos, hey, you won't
because nobody does, and it's great to practice what you've learned
and it really helps, it stay with you for longer
than a day after this video. Do these and what
I would love to see is your project
at the end of this, what you make out
of it because we're using our own random
project generator, it will be unique for you, so that's my spiel. Let's get going. You should be able to do
everything in here. There is a couple of like, that's just a rectangle with a white fill and gaze and
nothing fancy going on. These things, these
radio buttons, they're not radio buttons, they are just two circles. It doesn't have to look
exactly like mine, but get the rough
structure the same, because throughout this course I want to be able to take
you along in this journey, but I'd like you to
build something that is unique for your
own portfolio. So instead of doing
Scott Green Tea, use whatever was on
that brief that you got from the
randomprojectgenerator.com, in case yours might
be Smith honey, or bubbly tea, or whatever it was. Victoria told me bubbly
tea was cool and hip. That's why it's in
there as an option. I don't know what that is, but I'm trying to be cool and hip. Use your own name. You can pick your own color,
you can pick your own font, but keep it really simple and see if you can build
this thing out. There's four pages. This is your actual
requirements. I want you to build
that wireframe. If you can't see it, you can either
pause the video for a second ago, pause this here, or in your exercise files, I've made a PDF of it
in there that you can copy from if you can't quite
see the small version. It's called wireframe
example, so four pages. Those are the four pages, your own color, your own font. When you finish, take a
screenshot of what you're up to and upload it here
to either the comments, or the assignments
on the projects depending on where
you're watching us. If you've never done
a screenshot before, on a Mac, I know what it is. I hit Command Shift 4 and then I can drag
a box around this, and on your desktop with that screenshot that
you can upload. If you're on a PC, I'm not sure. I think you do a
print screen and then paste it into something, but Google how to
do a screenshot. You can take a photo with your phone of your
screen, that's fine. Do those things,
there's two things that might give you a
tiny little hiccup, is how do you draw an arrow? You can't draw arrows in XD. I'm ashamed to say
at the moment. It is just the, see over here, the polygon tool and
I drew a triangle, I rotated it around.
How did I rotate it? You can use this
thing or you can hover in the corners and just drag it around and that's a pretty good thing
I should probably mention. You can just hover
around things around the edges and rotate them
or type it in there. The other thing, the
really important thing, the reason you listen
to this whole video, even if you're not doing
the homework naughty, is this, there's an
extra long page here. If you've got a
page that doesn't quite fit like my one doesn't, you can click on the page name and you can just drag it bigger. Then you get this dotted line. Ignore that for the moment. Don't move it, you can move
it, but don't move it yet. We'll talk about that
in a later course, but you can actually just
click on the name of the page or the art board and just make it longer as you need, and we'll show you how to do scrolling and things later on. You might squeeze
it all up there. I don't know why I did that.
Look there's plenty room. [LAUGHTER] But that is it.
That is your homework. Let's not call it
a homework, fun exercises to help
practice and learn stuff. But anyway, that is
it. I will see you in the next video after
you've done this.
15. Free icons for your Adobe XD & UX UI projects: Hi there. This video we're
going to look at where to get free icons for your
wire-frame mock-up, how to choose them, some introduction to some of the licensing around
some of the free ones, and in terms of what format you should
be finding your icons. In this case, PNG versus SVGs. All right, let's jump
in. Finding free icons. Especially at this
wire-frame stage, we don't want to be sitting here designing our own icons
which you can totally do. What we want to do is go off and get some least placeholders. There are lots of places
to find free icons online. I'm going to show you
iconfinder.com, I really like it. But if this is no longer here or the quality is not
up to your standards, you can use what we're
learning here about free icon finding
for any website. In this case, I'm
going to be looking for an account icon. I want that little
many person thing that you click on when you
want to get into your details. At this stage I'm
looking for free stuff. They have amazing paid stuff as well which is
totally worth it. But at the moment I'm
looking for free because I'm just getting this
mock-up up and out. What I'm also looking
for as licensing. This is the important part. There's commercial use, something called the
Creative Commons license. You'll need to check
what you're using. In this case, I want to use
not only commercial use because this commercial
use requires a back-link. I want the one that says
no back-link required. You can see here,
commercial use and doesn't require any sort of back-link
to the original creator. Said but it's not what
I'm ready for right now. I just needs some quick stuff for a mock-up or at
least my wire-frame. But it does cut down
what's available. In this case, there's plenty
for me to get started. Something that looks like a personnie thing
I'm going to go for. Now, [LAUGHTER] only me and the edited note that
I was staring at the screen for
about two minutes. Hopefully the editor cut
that [LAUGHTER] section out. I'm really quickly
picking one but I didn't. I spent ages picking one. Obviously, we're trying
to avoid stuff with very high style because that'll start a conversation
about what colors, is that really the
thing we want? We want something generic, but I wanted it to be nice. This brings us to
one of the big part. Other than licensing, what
you need to do is format. PNG is something people
know and love already, and SVG you may or
may not know already. We will look at both of them. I'm going to download
this appropriately size 48 pixel PNG and I'll download
this SVG version and I'll show you the
difference right there. Alright, so I've
downloaded the PNG version and the SVG version. How do we get them in?
That's a good point. In XD, there's the long way file import or the
shortcut there. You can go and find them.
There they are there. You can bring in
more than one by holding "Shift" and
clicking two of them. I'm going to bring in both
of them. There they are. Here's our two little guys. What we want to do now is
have a little look at them. Command three to zoom on them. Then I'm back at that little bit because
that's a bit close. You can see the difference.
PNG bad, SVG good. PNGs aren't necessarily bad, I've exaggerated this by
downloading a small one, but it's made up of these
little cubes called pixels whereas SVG stands for
Scalable Vector Graphic. You might know the word vector. The nice thing about vector is when I try and scale it up, hold "Shift" to lock
the proportion. I can make it nice and big
and it doesn't lose quality. It's a really big,
it could be as big as a bus, as a mountain. In the file size will
still be relatively small and it will still
have great crisp edges. Whereas this, even if you
download a larger one, so let's jump back to the site. I downloaded the low one. Let's download the
really big one. We'll have a look
at that. I've just downloaded the large version. The difference is, it'll look great and
I'll show you the way that I import stuff into XD. It is the non-official way. What I do is, I don't use all the shortcuts. I am lazy, I don't know. I drag it on. That
works [LAUGHTER]. Wow it's big. That is it. I've downloaded the really big
version and you'd be like, yes, that's good quality. The problem is the
trade-off is file size. I can check this in my exercise files and
there we use this. This is the two PNGs, this is the small one
and it is two kilobytes, just the same size as the SVG. Whereas the big version,
look how big it is, very big in terms of web sizes. Multiples larger than
the smaller PNG. PNG isn't fine, not scalable. The other big thing
you can't do with PNG is you can't color it. Let's go back into
here. "Command" or "Ctrl+3" [NOISE] zoom
out a little bit. It seems weird, that's
the way I do it anyway. You zoom in how you like. This thing here
can't be colored. You can take it into
Photoshop and color it. Whereas this you can
click on it and say, I want you to be
whatever color I like. SVGs are good. Make sure you've got the
license to use them. Don't be afraid of
paying for them. I don't want to say that
you shouldn't pay for them, but at this stage,
for this wire-frame, I'm not at that stage, we're not committing to any of them. We just need them here
for some basic testing and for client approval,
that type of thing. The last thing while
we're lumping in SVG versus PNG icons is,
this is editable. This one here can't be changed. You can't move it around. We'll do this in our later video in just one or two of them. But I want to throw
it in here as well. I've double-clicked it and
you can move it around. Hey, that's the other
perk for SVGs. Jump cut. Coming back here because there's one other thing important about finding for your icons that I forgot to mention
when I was in here. We've found this
like account icon. Well, often, every
time you're going to need more than just one icon. If you're looking
for free icons, before you commit, actually
have a look at them. In this particular website, you can click on the actual
icon and go into it. You can find down here, look, it's part of a larger pack. The nice thing is
that, I can then go and find because
I'm going to need, don't like the big menu
but shopping cart I like. There's an alternative
for the account. There's a plus and all
the other kinds of icons that I'm probably going
to need in the same sort. That's quite handy when you are making a choice is to find one that is not just a lone
ranger all by himself. It needs to be part
of a larger group to make your life easier. But also be prepared that there's going to be
icons that aren't part of every pack that you're
going to need to make yourself and you
sometimes end up just re-creating the whole set eventually because you want a style change and
there's not enough in that style or it's off-brand. [LAUGHTER] Start with free icons at this wire-framing stage, but be prepared to make
your own later on. We'll do in this course
too. I'll show you how. That is it for free icons. The last thing I want
to throw in there is that they don't
have to be free. You can totally be
paying for these especially if you're
working at a company, the money you're
paying for icons is pretty low and it supports
the people making it. What I tend to do is I've got a subscription to
some stock sites. Stock is the stuff that's
pre-made that's paid. I pay a monthly
subscription to two places, weirdly, Adobe Stock
and Envato Elements. Both of those places have different flavors
of good things. I can go in there and check
and instead of having to scrimp on because you're looking at
free stuff and not get the icon that
you really want. I've got subscriptions
to those sites. I pay monthly and it means that it doesn't cost
me anymore to get a great set of icons
that maybe sports, the artists/designers
who make them [inaudible] That is
it for free icons. I will see you in
the next video.
16. How to find and use existing UI kits in Adobe XD: Hi there. This video, we're going to look at
something called UI kits. They've got other names and I'll describe them in a second, but basically instead of looking for individual icon
sets is to look at existing other people's XD files that you can open
and borrow icons from. I've got a couple here that
we're going to look at, and I'll show you
what to look for, how to get them and we can
use them for our project. Probably the easiest term
to Google is XD UI kits. Kits is the word we want, the pre-made kit and it's
going to have icons in it. But it's going to
also have other elements that we might need. Let's have a quick look at
the ones I've downloaded. This one here, you
can see it has buttons all ready to go. There are a bit too stylized, but we could down style these. But there's a big kit and
this one more download. All sorts of things
that you just like. Yeah, I need a loading thing and I need an image placeholder. I don't like that one. I
need a heart. There you go. All checkboxes, all
these, where'd you go, my radio buttons that [LAUGHTER] you might
need help with. It's hard to know what it
should exactly look like. UI kits is one word. Another word that
you might be looking for is sticker sheet. That's what people
sometimes call it as well, they call
that a sticker sheet. It's like this. This
is a sticker sheet. All sorts of stuff all over the place to help
you build things. Another one is a design system. Now design system
is quite the big. We'll talk about design systems towards the end of the course. It's what a larger
company will produce to help describe what they are building when it's
huge, big company. But also you can use
that term to find stuff, even if you just want to
steal icons out of it. Steal is the wrong word,
appropriate, borrow. Like this one here is
the Google UI kit, and Google Android
to be specific. If you're trying
to mock up a phone and use all the buttons that are naturally on a phone, it's good to use this because it looks like it instead
of you trying to copy what it might look like in terms of the user interface, you can use these
dialogues and it will match the fonts and the right
positioning and styling. Forget I said the word stealing,
appropriation is better. UI kits, sticker sheets, design systems, that's
what we're looking for. What we end up getting is, I did this search here and I
ended up with these results. They can be tricky.
Why are they tricky? Finding free stuff
online and a lot of people are doing
good and bad things. Sometimes you end up going
and finding this nugget. Great, I found this site. I like XD Guru, they're really good and
they've got free UI kits. Great, this one we're
looking for and it's probably going to be XD
because it's called XD Guru. But some of the links
don't work anymore. That one there says free, but I just chased that one down [LAUGHTER] and it's not
free anymore, it's $5. I don't think this person
should be selling it for free, it says free and then it's
not which is disappointing. Plus lots of them have
sign up for email stuff. These are people paid for that. That's what I want you
to say is that It's sometimes a little bit spammy that way where you've got
a download and login and sign up for free
something or rather, it's all free but you going to enter [LAUGHTER] a
lot of personal details. Some of these work,
some of them don't. What I tend to do is Adobe. I've got this here.
This will change. They seem to change it. They might update it. Adobe.com/products/xd/features/UI-kits.html. I'll actually post this link now in
the exercise files. I will call it XD UI kit link [LAUGHTER]. Look for that file. Maybe you end up here
and it's cool because it has the kit for Apple. I've shown you the kit
that we've got for, they call it Google Material. Google Material is
what is the name of all the design system
for Android devices. I'm an Android person that's
why we've got this one. If you're an Apple person, download the Apple kit, you'll end up with a
similar style in here, things will laid out nicely
that you can go and grab. Also in here down the bottom, there is a bunch of
other ones, these ones. The kits are just direct link. To sign over your privacy, you just download these. I've downloaded one
of them. Which one? I think I downloaded
the hand-drawn UI kit in your exercise files so that you can have a look
at it. Where is it? In our exercise files. I've got these two UI kits just to save you some time
if you want to look at one. But this is the
material from Google, remember Android, and there
is the UI hand-drawn one. In a file, just double-click
them and open them, they open up in Adobe XD. Let's look at the
other hand-drawn one. That's what this one is. Look, it's a bunch of icons. It's just a nice
way to get started finding other people's UI kits. It's already an XD. It's not only icons, it can be things like
buttons and you can build your full wireframe
with all of this stuff. How do you zoom
out to see at all? Anybody remember? You remember. Command or control zero. Look at that, it's pretty complete and
then how do you use it? You copy and paste it. Sometimes
they might be grouped. We'll look at grouping and
some other bits in a second. But let's say you
really want that thing. That's the icon in
the middle. You can see it's part of all of this. I can right-click it
and say, let's ungroup. Still grouped. [LAUGHTER]
Ungroup it again. Now it's all in pieces. I'm going to select these two, hold shift and click these two. [LAUGHTER] I leave this in there because
that's what happens. They're grouped together and sometimes to pull them apart, you need to ungroup
them a few times, shift-click them,
join them back up. I'm going to select
both of these, group them again, and copy it. Switch to my other
project and paste it. There it is there.
You might use this instead of my little cross
and I'm going to say you are black and
I'm going to get rid of these lines. There we go. Enduring sound effects.
UI kits are handy. Build stuff fast with
a certain style, this sketchy, hand-drawn stuff, I'd be reluctant to use
the hand-drawn style. Why? Because there's bound to be an icon that I don't have, that's not in here
that'll have to do and I'll have to try and make
it look all hand-drawn. I will end up spending ages for something
that's not going to help my user experience
testing process when people are checking this and making sure my
wireframe works. They're not going care that
it's hand sketchy wrigley, but it's going to cause me
problems actually making it. When I say that,
I probably would , I've done it before, because it looks cool,
sketchy. That is it. You're looking for UI
kits, sticker sheets, or design systems
particularly for Adobe XD. Open them up and start
appropriating pieces. That is it. I'll see
you in the next video.
17. Groups & issues editing icons in Adobe XD: Hi, everyone. This
video is all about the weird things that
happen in Adobe XD. The trouble is when you're either self-taught or
this part of the course, is there's some things that
are going to make sense later at the end when we're awesome and
we know everything, but that'll catch us
out really early on. I want to describe them here now and if you do get to the end of this video
and you're like, I understood but not
really, that's on purpose, introduce it early and we'll
cover it over and over again throughout the course and it'll
be super easy at the end. First things first, is this
little panel over here. We've got 1, 2 and 3. We'll cover plugins in a bit. We're going to look
at as it's a tiny little bit right here because
it's going to show us some other issues
and then there's this layers panel which we'll
spend most of our time on. We've got a confirmation. See these are
artboards, AKA pages. There's our homepage
marketing which I like at the top and product details which I like in
chronological order, up too. No real drama there, so those are the pages.
What is this pasteboard? It's because you might
not have it. Watch this. If I delete this, I go
back to my artboards. Well, I've got nothing selected. Look, no pasteboard.
If I undo it, look, we've got this pasteboard. It's like its own page,
everything around here. You will always have pasteboard. Nobody's ever that tidy. Things end up all on a page even up with these crazy workings
all over the place. If you do that, don't
worry, I do it too. That's this weird
pasteboard thing. Nothing too weird about it. It gets weird when you do
this, half on, half off. Look at that. You can
sometimes have something that is on it. Let's do it here. Can you see that?
Where did it go? That's the pasteboard. It's just that guy. It
say's no pasteboard, that thing's down there. He's just holding on by the teeniest tiny visible list a bit onto this page
here. That happens. Sometimes you end up going, I am just working on this
project and you get that. That's one of the issues.
It's not even an issue. It's just now you know and that's what the
pasteboard thing is. The next thing I
want to show you is when you are copying and pasting from one document to
the other, actually, I end up doing this quite a
lot and you're like, how's he jumping
between documents? On a Mac, it's ''Command''
and the grave key, or ''Control'' and
the grave key. You're like, the hanger
is the ''Grave'' key. It's the ''Tilde''
key and you're like, that's not more helpful,
it's this key here. I think it's this one
here but they are often combined with this. I think that's the ''Tilde'' and that's the ''Grave'' key. I'm unsure, but you're looking
for that on your keyboard. If you hold down
''Command'' and hit it on a Mac it will change between open documents and hit
''Control'' and hit it on a PC and it will do it. That's how I toggle between
and copy and paste quickly. Anyway, that's a little
bit of a sidetrack. Let's get back to the weirdness. I'm going need to swap. Let's go to let's say this
one here and let's say that you want to grab this and you want to copy it and paste it and use it
in your document. You're like, great, I'm just going to grab it
and you're going to ignore that little diamond in the top left-hand corner because you're like, I
don't know what that is. That's going to causes problems. We're going to jump
over to our document. I'm going to paste it and
look down here it says, well if you're pasting links across documents, you
can publish library. That is well above what
we need right now. Too hardcore, so we're
going to close it down. We'll look at libraries
and components later on. What you need to do
really is if you bring stuff across and that warning appears and/or you go to this little option here, can you see it says libraries? If I click on that, you've
got these components in here. We'll learn components
later on and it'll be easy but for now we need to just disassemble
it so we can work with it and not going
to give us trouble. The problem is, if I copy and paste this and I've two of them, if I update one,
they both update. Which is cool later on when
we're more experienced but for now it causes
us just problems. What we do is we bring in
components that come into our component library
or in our layers. Let's have a look on
now if I select it. You see there it's
got the diamond icon, it's doing some funny stuff. All we need to do is
right-click it and say ungroup component and then
you right-click and you say, there's still another
one, there's components within components here. The designer who made the
other UI kit did this. Sometimes you need
to keep going until there is no ungroup components. Now it's just a
regular old circle with a rectangle and will
cause you less trouble. If you ignore it
being a component, it will probably still
work but you'll end up changing one icon
and everyone will update plus there's
that warning down the bottom there so
I guess I told you this earlier in the course
because it could be troubling. Because I'm going to get you
make some icons in a second, you're going to run
into that problem. That's why I've done it here. If you don't understand
what components are yet, don't worry, we're
going to cover those later in the course. What I'm going to do now
is I got it down here, I'm going to say actually just
group them back together. Now it's just a dumb old switch. It doesn't do anything fancy. I'm going to give it a name. Over here I'm going to
call this one toggle switch and the other thing is, this depends on
your level of OCD. I'm going to click on
my "Assets'' panel and this we're going to cover later on as
well but there's these little components.
We don't need them. We've turned that into
just its own little group, they're not connected now. I know they're not
connected because there is no little diamond in
the corner and if I right-click them it doesn't
say ungroup component, just regular old ungroup and you can see all of this stuff, I've selected them all with the ''Shift'' key, and
I'm going to get rid you. Super tidy. Look
how tidy we are. Was it helpful? Maybe it wasn't. If it wasn't, carry on. Carry on with the course, you will learn
components later on and you probably won't run into too many troubles but that's the component issue
you might have. You will find like
this one here, if I copy this from
this person's UI, it's whoever made the UI kit, did they turn them
all into components? The Google people did. This one if I copy and paste
it over, first of all, I know it's not because it doesn't have the
little diamond in the corner and if I paste
it over here, where is it, there it is, put
up my pasteboard, you can see it didn't appear on my components and
in my layers panel. It's just a group, doesn't have that little diamond.
I know it's a group. Can you see that
little folder icon? That's the signal
for being a group. You can double-click it
to look inside the group. It's a group in a group and then there's some paths
that make this up. That's right. But I know
it's not a component. It's not going to
give me any trouble. Let's get into some editing. I'm going to ignore
those ones there. I'm going to bring
in some icons. So, it's up to you how
you bring them in, file import or use the shortcut. I'll do what I do and
just go, what do we want? In your exercise files
I want you to bring in the account 1 and maybe cart 1, those two and just drag
them on before I do. When you bringing in icons
from different places, there'll be different sizes. That's one thing, they're
different colors. The next step is trying to
get these things to match, and some of the
issues you might run into because I'm going to ask you to make some icons and
make a little matching set. What I want to is, first of
all get them the right size. Now, trust me when I say it's easier to work on them
when they're really large. If they're really small, let's say they're
really small like this. Let's have a look at them.
They're still vector, so it's great, I'm zooming in. Let's say I want to move this little circle here
because that annoys me. To get into it, I can
do one of two things. I can right-click it and say ungroup, and ungroup,
and ungroup, ungroup until it's in bids, or I can do object editing. I can go into it by
double-clicking it. I can double-click
it, double-click it again. There you go. It's a way of going inside of a group without
having to ungroup it because I can move
it around now and then double-click the
background and come out. It's up to you whether
you like to ungroup things or double-click
them to go inside. You can see it here. I went inside of it by
double-clicking it, I've double-clicked this again, and I've got this thing here. Fill 112, is this wheel, and we've got to
run to the problem with it being very small. I've exaggerated it
to be very small to exacerbate the problem , I think that's
the word I want. Watch this, if I go move
just a little bit across up [inaudible] get it? It's so small it's actually trying to align to pixels,
if you know what those are. It's got nowhere to go. It needs to line up with one
of the pixels down here. You can't see them, they're little squares that it's
trying to line up with, so it's not really fun anyway. What you can do is grab both of these
because they're SVGs. Remember command minus to zoom out or control minus on a PC. I'm going to drag
them nice and big, holding shift, so that
they get nice and big. Another trick while we're here, hold shift and option on a
Mac or shift and alt on a PC, instead of going
from the top right, it will go from the center. That's shift option on a Mac and shift alt on a PC while
you're dragging it. I do that loads and I'll
do it loads more in the course. Let's
make it nice and big. Let's get you nice
and big as well. Get them roughly the right size to try and get these things to match. Looks good to me. Now when I double-click
it to go inside, double-click it again, watch, I can have lots of adjustment. Let's get in there.
Loads of adjustment. We can move it in nice
little small pieces and make it bigger and bigger and to get this adjustment you need, you can use your
arrow key, tap, tap, tap, tap, tap, tap, it'll
move one pixel at a time. I'm going to make mine
a little bit bigger, gigantic icons, okay, we'll make them
smaller in a second. We're going to get
into drawing later in the course a lot more, but for the moment we're
doing enough to get by to make our wireframes usable and over to the client and
to the customer for testing. Scale them up. The other
thing we're going to do is we're going to
try and like this, this a little bit
sticking out now. To edit it, I'm going
to double-click it, double-click it again, this bit and I'm going
to click it once more. I'm going to go inside
the actual shape. In this case, there's a group, there he is there.
This is my cart. If I double-click it, I get
inside this other group. I didn't make it,
somebody made it. Group inside of a group. Then inside of that
is this part here, which is fill 110. If I go the last little bit, I can start seeing
all the anchor points and I can do some adjustments. This is what you can do. This one has two points
there, which is weird. Again, I didn't make it. These are the things
you're going to run into. This one here. Look, its hid behind,
and it's great. That's how you do
your adjustments. You might decide that, actually
this one holding shift, I can click all of
these and maybe, there you go. Move this
down a little bit. Fiddle it and move
it around and get it how you want to try
and match these two. The other thing you
might do is to get the stroke weight up
or at least matching. Can you see this one's slightly
thicker than this one? It's not really, but I'm
going to imagine it is. I'm going to show
you what to do. A couple of things I want to do is I want to get
these colors to match. I click on "New", use my little eyedropper.
We know how to do that. Excellent. They're
matching the same color. Let's say I want this
to be a bit thicker. It's a bit thin and
spindly for what I need or at least this one needs to be thicker,
let's do it for this one. At the moment, it is this
fill that I can adjust, but I can add a little line around the outside. Watch this. I've clicked off in the
background, de-selected it, click on it once, and say, let's add a big border. It needs to be the right color, so I'm going to click
on it and say you. In my stroke or the
border matches the fill, so I can't really see
it, but watch this, I can click in here
and use my up arrow. You can see I make it
fuller or lighter. I might decide that
that's what I need for the size or the way
it's being viewed. The same with this
one I'm going to say, and I add a border. I'm going to, in this case, copy the properties because
it's basically the same, edit, copy, you edit
paste appearance, and you might decide that
actually this one needs to be one little square, that one is 11, and I'm going to bring the
down one to 10, and now they are perfect-ish. That's how to get the matching. Let's look at the last
little weirdness that happens in Adobe XD
when I'm scaling. They are massive now. I'm going to zoom
all the way up, remember command zero or
control zero, everything. Look at these join on the scale. I want to scale them down, so let's grab two of them. I've duplicated them, and I'm going to make you nice
and small. Watch this. Get it down to icon size. Look what's happening. I'm exaggerating it to show you what's happening. Often what people do, they'll just go and
not realize they've actually done what I'm going to explain now.
Let's go really small. Because what ends up
happening is the stroke or the border is still 11. That guy is 11, and
that guy is 11, so it doesn't come
down proportionately. There is a way of
getting around that. Let's leave that
guy where he was. This fella here, we're
going to right-click it and we're going to say something called outline stroke. It's going to stop it
being this adjustment, we can't adjust the
size again easily, you're going to
do it once you've finished in getting
them all matched up. But if I outline
the stroke, nothing appears to happen differently, but except that when
I scale it down, you can see there it scales
down proportionately, and that is a more
appropriate size. Hard to click, but that
is the difference. Strokes do not scale, they stay exactly
what you put them as. That is true of these
buttons here as well. That's by default really handy because it
means that I can make a big button and it's not proportionately
thicker than this button, it's the same size. That was a video that had to be made with some strange
things that happen. What were they? When
you copy and paste, sometimes they come
through as components. Right-click them and ungroup component
until they're gone, and if you're really tidy, delete them from the components. You don't have to, just if
you want to be nice and tidy. The other thing
is the art board. That is this page here
on our layers panel. It's considered a
page on its own, and that's where these
guys live when they're not on a page and they can sometimes accidentally be on a
page and you're not realizing it and
disappear, gone. What else did we learn? We learned that we can either ungroup or just double-click on an icon to get inside
of it to make adjustments, and if we keep
clicking, eventually we can start editing shapes. The last one was that the
strokes do not scale, they stay the same and we
can right-click and outline stroke if we need
them to stay fixed. I hope that was helpful, if it's a little bit murky
and you're like, I got it? As we go through this
course, you'll be like, and why did we even have
that video earlier on? It'll be that clear. Hopefully, if I do my job right. That is it. I will see
you in the next video.
18. Class Project 03 - Icons: Hi, everyone. It's
class project time. This one comes with some bonus
tips and tricks as well, so don't skip this one. Let's talk about
what you have to do. We need four icons along the top and three down the bottom. You'll probably end up
using these ones home. A user can log in and change
the password and stuff. A cart that takes them to the purchase page
or what they have in their cart and I'll pop out menu thing we've
already designed. What I want you to do is
get them to match each, using the techniques
we've learned so far, getting the strokes right. You might even get them
all from the same place. I can find a good set. I'm okay with that, same
with the social media icons. Pick the social media icons that are appropriate for
your target audience. Have a look at your
user profile and say, are they a Linkedln
person, Twitter person, or they going to be sharing on Tiktok or whatever
it's going to be? Add a bit of text about
for them to share their purchase and then add the appropriate
social media icons. Then I want you to take a
screenshot and upload it to the comments section
or the assignments on this page or in the next section depending
on where you are doing this, and this is just an example. It doesn't have to be like this, but something like this. I promised you some
shortcut-y bonus-y stuff. Let's look at that. While you are working on it, one of the things
you can do is I needed to find a home icon. It wasn't part of that
group that I found on. I can find it's way to get
it from a different one. I had to add a stroke
around the outside. I'm going to bring
it in Command Shift I is the shortcut on a
Mac and Control Shift I on a PC to import or
you can drag in like I've been doing a
little homework. The difference
between this one is that it wasn't
quite thick enough. Can you see it was quite thin? You know how I said scale
it up and start working. I didn't want to bother
because all I had to do is add a little stroke
around the outside and I wanted to share with you, I was like, oh, that's
actually handy. Is that when you do add a border and you do
pick the right color, is that one is not the smallest size.
You can go down to 0.5. That's why I want to talk about, you can go down to 0.1. In this case, I
think I picked 0.25, and try to scale it and match
these are the icons here. That's just the point
I wanted to make. You can use teeny tiny
fractional sizes for the stroke. Next on my tips and tricks is you probably
want to group stuff. Especially if you want to
use this next tricks of, can you see they're
not quite lined up. It's hard to get them
visually lined up. You select them all and you
say actually I want them all over here are your alignment
tools aligned to the top, line them to the middle. You can see because
this is not grouped, it's smashing them altogether. I'm going to say you navigation is either right-click
and go to group. It's one of those things. You'll probably use
it enough that you'll get the shortcut
Command G on a Mac, Control G on a PC. Now when they're grouped,
I can select them all. I'm just using my
selection tool and just dragging a
box over them all. I'm going to say align them
across the middle, please. Now that's not always
visually true. Sometimes you like it's working, but this guy needs
to go up a couple. That is totally allowed as well. It doesn't have to be
mathematically correct. It has to be close
enough visually correct. The other one is are
they distributed? They're not. This one's a
bit closer than this one. Again, you can do it if they're all grouped
individually, grouped separately
from each other. I can select them, and
there's this option here. This will horizontal
distribution. There's a shortcut that
you'll never learn. What's that? Option Command H. I'll never remember that one.
I don't use enough. I can do that and we'll try and separate them all individually. But because sometimes that there are these
negative spaces here, sometimes you actually
this guy just needs to go just a little bit that
way. That's allowed. I give you permission to boop things but that needs
to go up again. That is the alignment
and distribution. Also what you can do is you can select them
all and copy them. Because what I need to do is I need to zoom
all the way up. Who remembers what that is? Command Z or Control Z on a PC. I've copied them all. What you can do is you can say actually, I want to get rid of
you, this guy's gone. You go onto is I can say you can click on the
name of it and hit Paste. It will put it exactly the right place it needs
to on the page, as long as they're
the same size pages. That's a handy one for updating the pages instead of
trying to line them up. The other thing you
can do is you can do more than one. I'm
going to undo that. I can say you hold Shift on my keyboard and click the names of these three
and then hit Paste. That is your bonuses. Now, go do your homework and
get those icons on. I will see you in
the next video.
19. How to add interaction to your prototype in Adobe XD: Hi, everyone. In this video, we're going to look
at prototyping our little mobile website and all these little
wires here when they are all connected
up like they are. I can go through and
say, learn more, go back to the homepage, go to the cart page. Adding a little bit
of navigation to prototype our design is what we're going to
do. Let's jump in. To add the interaction, we're going to
switch from design, which would be up been
the moment to prototype. Nothing really looks like
it changes except for this little panel
changes a little bit. Now, to activate everything, click on the name of
one of the artboards. Let's do the first
page, the homepage. What we're going to do is
when this page is clicked, we're going to get it to
go to this artboard here. You just click-hold and
drag that little blue thing and so you can
see it says this one. Then we're going to
give it a preview, so let's preview it up here, hitting that little
"Play" button, and click it and your
artboard will load up. Cool. What we do is at
the moment just click anywhere and it's
going to move to the next artboard.
There to there. Simple. Click again
and it goes nowhere because we've only
rigged up one artboard. What we can do is you
don't actually have to close this down.
This can stay open. For me often keep it
on my other screen over here that you can't see, or we can just keep it here in this instance and it just
hovers above everything. You can close it down
again and open it back up, no problem, but that's that. The other thing to note is that it might be starting
on the wrong page. You might be like,
that's not the homepage. It doesn't assume that
you want to start on the far left because you
can have one over here. It doesn't really know
which one to start with. What you do is to initiate it, if I want to start at the
Checkout page to preview this, just have that page selected
or the artboard selected. You can leave this
open, you don't have to reset it. You can
just click over here. [LAUGHTER] You see this adjusts depending on the
artboard you have selected, so this thing doesn't
need to be closed. What we're going to do on
the Product Details page is we're going to
say you go there, and then on the Checkout page
you are going to go there, so real basic rig. To start back at the beginning, I'm going to click on
this "Homepage" and say click. Look at this. Fancish. [LAUGHTER] But at
the moment though that's using the entire thing,
clicking anywhere. What we want to do is have
these buttons to go to places. What we'll do is
we'll close this down so it's not confusing. To get rid of these,
there's a couple of ways. The way I do it anyway
is click on homepage. To remove this
connection is you just click-hold and drag
it to nowhere. Not there, just round here. You can go back home,
just anywhere over here, and let go, and it
breaks that link. That's one way of doing it. The more official way is
I've got Checkout selected, and over here it's
added a tap trigger. by dragging this little thing across it is assuming
a few things; that you're going to
click somewhere or tap, on a phone obviously is a tap, to click on a desktop. It's going to add
a transition to the Confirmation
page and it's going to use the default for dissolve. You can say go nowhere. You can see just goes
nowhere now. There you go. We've broken all that
down because what we want to do is work
on actual objects. What we want to do is instead of clicking on the whole page, to get to the
Product Details page is going to be my
Learn More button, and what I'm going to do
is I'm not going to have the text selected,
let's zoom in. Let's hit the button selected, just so there's a bit
more of a clickable area and then you can
drag it here. Go on. Marketing homepage,
let's click "Play" and nothing's clickable
except for this guy. That's the basics
of prototyping. Now, what we might do is I want to go back
to that homepage, I'm going to go you my friend
go back here. There you go. We're accepting
all the defaults, we'll talk about
easing and stuff in a future video but
for the moment, this is what you end up doing; homepage, Learn more. Homepage, and just rigging this thing up with all
your musical wires, and they're connected
to different pages. Another thing you can do
in that preview is instead of trying to wire it all up
just for your own navigation, you can use left and right
arrows to move through them. If you just want to see what the Checkout page looks like, you don't want to use
all interactions, you can just use left
and right and it'll just cycle through them all. Now the really neat
thing about this is because it's always open, watch this, the design
can actually change. You see, you can prototype it, be working on this, and being seeing what it
looks like on this design without having to close it
and restart it or refresh it. There's no real refresh button, I wish there was a go back to homepage
[LAUGHTER] but there's not. You click on this to get
back to the beginning, we'll use these arrow keys. While I'm working, I'll always have this screen open
and I'll just have it over here on my other
monitor and be working. It just shows me what it looks like over there all the time. One last little tip
for prototyping is we did the homepage,
where did we do it? Well, two little tips
now that I think of it, I'm going to select all; so command A on a mac, control A on a PC, where is it? Select all, if you're
in prototype mode, it'll select all and show you all the wires which can be handy just to know what you
have and haven't done. It will be like, I've
done that home one, but you can see this one
hasn't connected up. That happens a lot
with navigation. Let's say that we don't
have an accounts page, so we're not going
to use this one. It's not part of our task flow, but this one here does. We're going to say, you
go to the Checkout page. You could just go,
you go to Homepage and that's fine with
only four artboards. But what you can do is only
if you're in prototype mode, if you select all of these
four our and copy them. We deleted this strip earlier, and we delete these, click on the title
and paste them. Can you see it brings
back the links, it doesn't bring back
this one because we are already on the homepage. If I go to this one,
delete those guys, paste them, this one didn't pay because we're
on the Checkout page. It obviously can't show
the wire go into itself, but the homepage one works. This one is going to show
me loads. Get what I mean? See the homepage and
the cart page is there. If you are doing lots
of repetitive stuff, make sure you're copying
pasting in prototype. The reason I show you
that is let's do it the other way so that
one doesn't have it. If I do it in design view
and I go here and go, where is one, this
one here, copy. It won't bring through
all of those wires. If I go here, delete paste. If I've got a prototype mode, can you see it didn't copy
and paste these wires? You have to be in prototype mode to be copying and pasting wires. You'll get caught out
eventually and wonder why the interaction is
not coming through, just got to be in prototype mode when you're copying and pasting. In this case, we're
mocking up a mobile phone. It doesn't matter whether you're mocking up a mobile phone or a website design
or a tablet design, this little thing pops
up just the same. We just take into
mobile now because it's becoming the most popular for lots of especially
this e-commerce stuff. I end up starting a
lot more in mobile, but that's not to say a desktop version or
rectangular horizontal version isn't where you should be
starting and prototyping. The tips and tricks we're learning here
all work the same. All right, that is it, let's
get onto the next video.
20. Prototype animation & easing in Adobe XD: Hi, everyone. In this video, we're going to take prototyping
a little bit further. We're going to look at the
different kinds of animation, what easing is, and we'll make
something like this. Watch these things push
across rather than just dissolving if I go
back using my arrows. We're also going to
create this monstrosity. Ready? [LAUGHTER] Bad bad. It's cool, it's bad. Let me show you how to
do these in Adobe XD. To create that
amazing animation, we are going to just get a little bit deeper
into prototyping. Now, you'll notice
this one's called Level 1 of prototyping
this video because there is Level 2
later in the course because we throw the
kitchen sink in there now. I'd like to get you to a bit of proficiency early
on in the course, and then we can dive in deeper
on some of these things, like prototyping later on. It's a little bit more now. First thing is that this is quite a small amount
of artboards, but let's say that by now page it might be 30
pages or 50 pages. Instead of trying to drag them and get to all the
different places, what you can do is
you can just click on the button and over here, well, let's click on it and say, I would like the transition
to go to the artboard called the very
well-named page Artboard, also checkout and
it will go there. If you don't name your pages, it's called Artboard
1-52, which will happen. I'm naming mine here mainly
because you're watching. But that makes it easy. If you do name them, you
can actually pick them from the destination.
That's one thing. The other thing I
want to explain in this one is that over here, the default is a
transition of dissolve. Let's change ours to Slide Left. We won't go through them all, but let's look at Slide Left versus Push Left because
they seem very similar. I want the Purchase
button to go here. You notice it remembers the
last thing you've done. If you change anything
and keep adding it, it's going to keep
going to slide left. That's good actually. If you get something you
like, you can keep adding it and it will remember the
last thing you've applied. I'm going to change
mine to Push Left. Let's have a little look and see because they
seem the same thing. You play, let's have
a look at Buy Now, Slide left, where are you at? Slide over the top and
Purchase is a push left, there's no overlapping
it just pushes the left so you
decide what you want. Also double-check that you're not designing something
that can't be actually at least easily
done by your developer. If you sell it into
your client bounce and you saw at the beginning and the developers are like we can't do that, and the client is been heart
set on it bouncing in, you're going to have problems. Talk to your developer.
Have a good dialogue early on about what
you can and can't do. Let's leave that here.
We'll leave it there. Let's look at the other
thing called easing. I'll let you play around
with the other animations. It's not very exciting. Dissolve or None, none just means it's
going to jump to it like a jump cut and you can play around with
these different ones. Let's look at the easing because without
easing it's rigid. Let's preview it. Watch this by now,
there's no finesse to it. Easing is slowing it
down at this case, slowing down the easing out means that when
it gets close to the end it's going to
slow down a little bit because it like
a natural feel, even though it's digital. We can exaggerate it, let's go up to two seconds,
which is too long, but it'll help understand
easing a little bit better. Let's play this
guy, let's buy now. Can you see it slows down as
it gets close to the end? Just how real gravity works [LAUGHTER] if gravity
could slide it sideways. Anyway, that's easing and you can mess around with what
you feel, it looks nice. One thing you are
forbidden from though, is you can try it
once in this course, and then you're not
allowed to use it anymore, is the bounce. [LAUGHTER] Bounce
is the worst one. Two-second bounce is even worse. Let's go have a look. It is the bound doors if you've done my Premier Pro video
editing course or what's bound doors, another bad one
transition? Page peel. This is the equivalent
for Adobe XD. Ready? [LAUGHTER] It's cool for about three or four clicks to the button and
then it gets tiring. I'm not judging, you can use Bounce. Other ones in there. I'll let you go
through them all. Just I'll do one more with
you, interesting ones. Ready? That's got, what
do they call that? Let me think. I
thought about it. [LAUGHTER] I was thinking
about it for ages. I had to Google animation
rules anticipation. If you don't know the
rules of animation, it is a handy thing to
know as a designer, especially a UX designer. Go check out Lucas Ridley, he's got a great course on
the basics of animation. Anticipation is
when you lean back on your heels before
you move forward, you put your weight
backwards to go forward. It's helping people
anticipate what's about to happen because
nobody just launches forward. You put on your weight in the back foot before you
push yourself forward. That's what's going on here. Let's have a look
by now, wind up. Let's make it one second, and then that's ready by now, goes forward before it goes
backwards or vice versa. Do you see that? It's nice. That is going to be it
for this one I think. Play around with the
different animations, have a play around with
the different types of easing and how long they take, find a bit of a
thing that you like. We will do more prototyping
later in the course, some more hardcore stuff. But for the moment
I think we've got enough to continue on. Let's do that.
Let's continue on.
21. How see your design on XD App on iPhone & Android: Hi, everyone. It's
me out in the wild. This one is a video
about showing you how to get a statistic on a tree
on your mobile device. Because, well, we need to see what
it looks like on the device to pick things like fonts and actually
do the testing rather than trying to use
the thing on the screen. This is my setup, this is what it looks like
from the other side. Normally, this is partly messy, not too messy though,
it gets worse. What we need to do,
I'm going to show you two different
ways of doing it. That live update way with the USB cord. You know
what the USB cord is? [LAUGHTER] We do this way and then I'll show you a way of doing it via the Cloud. Both have their pros and cons. This one is the
most exciting way. I'm going to show it to you. It's easy. Regardless which way we do it, you need to download
the app for your phone. If you are on Android or
Apple, doesn't matter, go to your app store or your Play Store depending on
your flavor of phone, and download the Adobe XD app. To download that,
you'll need to login with your Adobe ID and password, which you will always
have forgotten, and need a reset password. Once you've done
that, [LAUGHTER] and you're actually logged into it. It's pretty easy. You
need to find a USB cord. You know what those are,
then you plug it in. Actually, what I'll do
is I'll set up this, so the camera can see
both of them, hopefully. You wait there. Back inside the computer here for a second. Once you've connected your
USB cord to your phone, go up the top here, can you see these
little device thing? You should hopefully see your little device here
and click on this. This is my Pixel
4, click on that, and then let's jump back
out to the other camera. This is my little setup here. [LAUGHTER] I've opened
the app on my phone. I've got my Adobe XD opened, I clicked on the little icon you just saw on the top corner. Depending on sometimes
it just jumps to it but sometimes see down
the bottom here there's this little icon. It's connected
device. Look at that. They match. They do,
they match exactly. What's really nice
about it is watch this. It's live updating. Cool way. You can have this plugged
in and be actually working on things
like font sizes. You can say, that is not
working quite right. Maybe the font size
is too big on here, so I'm going to go down to 30. It's so much easier
designing icons now because you can actually
start touching them and go, is that big enough to touch? Click on it. Let's click
on the "Shopping cart." Oh, went to the shopping cart. How cool is that? I love it. This is like I made
something and look, it's working, and
it's out there. Homepage, learn more. [LAUGHTER] Even a bounce effect. [LAUGHTER] That is prototyping
live on your device. You can obviously update it and it'll jump to the pages that you're
working on as well. Can you see in the
page names here? I don't know why I've
done this loads, but it's just something magical
about it updating nicely. The other thing to note is, we've got our label fine. You can have your tablet version sitting there,
horizontal, vertical. You can plug in more
than one device and connect to them all. Awesome. One thing is
there's a couple of things. One is if, say, because what we're
using this for is so you can design with it. This is like this function here. You could have the client
sitting with you and using it on their phone as well. You could do it
with user testing, so you can have
your people using it and plugged
into the computer. I'll show you another
way in a second, that's probably better for that. But there are things like hints. Which is if I click somewhere, can you see up at the top there? It's going to be a
little bit hard. I'm not sure if the
editor can zoom in. But it's got a little
highlights there. Let's go back to the
homepage actually. It's little high because
I'm not holding my phone. I don't want to wreck the shot. But can you see if I click over, see these things highlight
to give a bit of a visual cue of what you can click because we're not
going to rig up everything. I don't want to create
an account page. Haven't been asked to
make one. It's going to help people know
where they're allowed to go within this mock-up
and how to get out of it. You're like, My phone
was trapped in here. You can triple-click,
ready, one, two, three. It gives you stuff. You can say those hotspot hints, that I just showed you,
you can turn those off. Swipe navigation,
we haven't gotten any swipe navigation yet. We do. By default, you'll find
will move from next page to next page without you having
to rig it up with the wires. That's one thing. But the three
click gets you into this. It gives you a few
more controls, we won't go through them all. They are relatively
self-explanatory, take a screenshot,
which is cool, and an exit prototype. That's the way to
get out of here. What's quite cool
about this is actually I can unplug this now. Weirdly, even though we
weren't live update now, I can't live update it. Can you see me moving it? Probably can't, but
it won't live update, but I can resume the preview and it will
cache it and remember it. I can take this now
into my meeting and it will still be there. If it's a very large document, say it's loads of
images and it's 100 pages long or 100 uploads long. Plug it in and wait for a long time and cycle
through the different pages, so make sure it's all
loaded before you unplug it, it'll
eventually load. For this thing because
it's quite simple, it loaded super quick. But yeah, it all works even
with it up being unplugged. [LAUGHTER] That's the one
version, of plugging it in. Let me show you the other
version. We're back in. Let me show you the other way. It's quite similar, but you need to do
a couple of things. The drawback is there
is no live update. It means that
you're not going to be wiggling things around
and it's totally updating, but that's useful when
you're designing. But let's say you're taking
it to the client meeting or to one of your potential
users to do some testing. What you first need to
do is make sure that this little icons
here might not be updating like mine, they
are little Cloud icon. They may remove that. But I am saved to
the Cloud right now. That is the default
for Adobe XD. You might be one of the people
who are fighting it going you are File Save As
my local document. This particular update
isn't going to work. You need to save it
to the Cloud because that's going to upload it to your Creative Cloud library or your assets
panel in the Cloud, magically, the Adobe XD app
that we just downloaded. You still need to
download that app, will have access to
it wherever you are. Just won't live update.
Let's have a look. If you have got them saved on your computer.
Let's have a look. I've got a desktop
version I made. Look, no cloud. What you need
to do to make this work, you need to save
it to the Cloud. File, Save As. By doing that, it's
going to default to the Creative Cloud
and it's going to go with all the other documents. It will do this. The
cool thing about the Cloud saving is that
it's always auto saving. I never save in XD. It just saves magically all on its own without
having to do it. You can do it. Well,
if it's grayed out, it means it's already
done it for you. But watch this, if I move that, you'll notice that
every now and again it will go and try
and update itself. There's always a live
update in the Adobe Cloud. You can hit, "Manually save." If you're still in
the habit of it, you can see it doing it there. It means now that let's jump out to the app
and the other camera. We're out and because this
doesn't live update anymore. It's like a disconnect. What happens is you
save it like we just did to the Cloud and then open up your Adobe
XD app, the same one. But instead of this third icon you use this first one,
which is your Cloud docs. There's my little updated guy. Look, he's updated two
minutes ago. Open him up. Hopefully, there we go. We've got our little
animation going. We've got our little
prototype going. You can still interact with
it like the other one. There he is there. [LAUGHTER]
He is still there. The only difference is that
it doesn't live update, but it also means you
don't need a USB cord, you decide what you want to do. This may change in the future. It might use wireless
technology the moment it uses wired USB connection
to do that live update. But hey, this is totally fine. Often I just do it this way
because I'm not designing. At the same time, I just want to give it
a look over on a test in stages rather than live. Same thing, triple-click to
get out. Let's update it. Because it doesn't update
live, what do you do? What you can do is even
if you're in here, what I'm going to do is
let's say we want to change. I'm going to say until
the obvious, I'm going to read you go to my computer here
and I'm going to change the color of this. You can't see me doing it, but I'm going to pick this
fetching color. There we go. I'm going to hit
"Save" on my computer, just to force it to
update to the Cloud. I've done that now. I've
changed it on my desktop, triple-click then exit
and just load it back up. It'll go look for the right one. Hey, it's pink. I find that
it's a good way to do it. The other thing is
every time it starts, it starts at this page. Why? Let me jump back
onto the computer now and I'll show you how to force it to start at
a particular page. To get it to start
on particular page, what we need to do is you
need to be on prototype mode. Then if you click
on these pages, what ends up happening
is, can you see here? See this little icon here, that is going to just
indicate to the app, but this is the way to start. Ignore flow, we'll talk
about that later on. But the basics is this is
where the flow starts. You can have multiple flows by having two of them clicked. Then you can decide
which flow to follow. We'll do the later on probably. But for now, just have one flow. You can turn on and off. Just have it on
the page you want to display first
in your prototype. That is how to make
sure that happens. right is testing on a device. It doesn't have to
be a mobile phone, it could be a tablet, obviously testing on a computer, you can just do it
on your computer. You're running Adobe XD on. That is it. I will see
you in the next video.
22. Class Project 04 - Testing on your phone: Hi everyone, class project time. We're going to test on
your phone. We, you are. Guess, I want you to
download the app and test your prototype on it and
when you're finished, I want you to take a photo
of your phone with it on. It can be tricky because you probably the only camera
you have is on your phone, so borrow somebody
else's phone or see if you can do some magic
with your laptop camera. If none of that works, you can just take a screenshot, just a flat screenshot of
your screen that's okay too. I want you to test
it on your phone. Do your own testing, make sure everything
clicks and I want you to be excited by the thing that you made
on a phone working. It's so cool when
it comes out of the computer and actually starts being, I don't know real. I get excited anyway. Now there's a couple of
things you might run into when you are doing your testing and we'll
cover those now. Let's look at Adobe XD. You might have noticed in the last video that some of the buttons
that I was clicking, I had to click a couple of
times, which is not good. [LAUGHTER] There's
a couple of things you can do depending
on your icon. This one here is relatively
easy to click because it's quite a big square thing but there's a lot of
wasted space around here. What you can do is, this thing here,
it's called home. It's in a group.
What's in this group? Nothing, not a lot. What I'm going to do is
going to rectangle tool and I'm going to just draw a
bigger clickable area. There's this, I can
remove the border. I'm actually going to
remove the fill as well so there's no
fill, no border. It's still here, just
can't really see it. That's going to be
my clickable area. I'm going to select
both of them, I'm going to group them
hitting Command G or Control G on a PC or
you can right-click it. Let's give it a name
because why not? Let's be fancy. I
call mine Icon-Home. I used the generic name first and then the more
identifying things, so then this one here
is my Icon-Cart. Just it's a nicer
way of doing this. You can clearly see where
the icons are and same as my view button by now or button primary
or something like that. Anyway, go through, add a bit more to
the buttons if you need to test at first,
might work perfect. You also might decide
that, I don't know, they're too close together or
you've got big fat fingers. [LAUGHTER] You can't help
but click two of them. Do some testing on your
own on your phone. Now, there's an app
involved and I'm not sure if everybody's
phone can do it, so you get a whole part as
if it just doesn't work, but I'd like you
to give it a try. The other thing I
want you to watch out for is font sizes because, I'm going to go Command 100%. I know that that for my particular screen
is not the right size. I've designed it at this size, you might look on your phone go, too big, it's really easy to see and you're
like "too small." It's very common to have
16 as a body copy size, but you might decide
actually it needs to be bigger for that particular
thing or smaller. Have a little look
on your phone, do some testing,
adjust font sizes. We're not doing too
much in terms of styling but give it a test. Make sure all the buttons
work. Do they go to the bits? Often you'll click, you rig it up and
then you'll start testing and you realize you
can get trapped on a page. You forgot to rig
up the checkout, did every other page, but there's no way out of this page. Give it a test,
take a screenshot, upload it to the comments or the assignments or projects depending on where
you are doing this. The other thing you
might do is that, I've done size for my phone which is a generic
android size phone, you might be using a plus
size or I don't know, the iPhones are a lot longer, so you are allowed to. Make it perfect for your phone. You can click on it and
change the height and width. You can Google what
the pixel width and height is for your phone. You can look at the default. With this selected, you
can go to the Apple tool, and actually, it doesn't update but you
can't see in here. If you know you've
got an iPhone 13, here you go, you
could type these in. Well, you don't
have to remember, you can just start
typing them up here. What is it? Size it
a little bit wider, 390 and just do that
for each of them. Readjust it so it's looking
good on your phone. The one thing you
might have to do is let's have a little look. We're going to do it
properly later on. But one thing that you
might run into a problem. Let's have a look
how tall is this, 844 is a lot longer. [LAUGHTER] Wow, a lot bigger. That phone. I'm not
even sure which one I picked. iPhone 13. This thing here, this is your
viewport down the bottom. You can see here
your viewport match it to wherever the
height of your phone is. If it's 844, make it 844, otherwise it'll
crop it off a little bit. Just make whatever that is the height and I will
explain viewport. You can just skip
ahead to viewport if you're total bamboozled by it. There's a video coming up, but that's one thing
you might change. Test on your phone. Be
excited about your design, being in the world, test it, make adjustments,
take a screenshot, and I will see you
in the next video.
23. Getting started with auto-animations in Adobe XD: Hi people. Are you ready for
your first bit of animation? We've been doing animation. More transitions,
we've been doing this. The whole page
transition is over. Now what we want to do; that's entire page animation,
is individual objects. Are you ready? How
do I get there? [LAUGHTER] Here we go. Now are you ready? Well, look at that. That falls down, the arrow
moves across, fades in. That is animation in Adobe XD, and you and me are
going to to do that right now. Let's jump in. Let's make that animation. So let's look at this
little arrow here, so our Confirmation page. The way this works it's weird, it's not like normal
animation if you're from Adobe Flash days or, Adobe Animate, or After Effects, or anything [LAUGHTER]
that has an animation. This is a non-timeline
animation, we duplicate artboards
and connect them up. If it seems weird it's
a little bit weird; a little bit clunky,
but it works. What we're going to do is on this first page I'm going
to have this arrow. Mine is in two pieces. I'm going to have
it over this side, keep it on the artboard
for the moment. One of the basics in
this video and then in the next video we'll go a
little bit more extreme, or mainly show yourself
that might catch you out. We're going to
have this arrow on the side and we
duplicate this artboard. You can select the name, you can right-click it, and you duplicate it, copy, paste. I just use the command C or Control Z on a PC and V. Copy, paste. So the two of them. Hyphen 1, we should probably
call it something better, but hey hyphen been
is working for me. What we need to do with
whether this works, there's a couple of things
that have to happen. Hey, you need more than one artboard
and the other one is the thing that you
want to animate needs to be named the
same on both sides. In our case I want mine grouped
because I don't want to animate the arrow separately
from the stalking bit; that's up to you,
so I'm going to select both of them
holding "Shift". Well, hit. I'm going
to hit "Group" so you can right-click
it or go Command G, Control G on a PC to group them. Over here this one's called Group 13 and this one's
called Polygon 1, and Path 1, and Path 2.
That's not going to work. It looks for the names, so that's how it does
its magic when you use something called auto animate and it won't work without it. So again group them over here. One's called 13 and this one's called 14, so
that's not going to work. Let's call them both 13. It's handy if you name them before you
duplicate the artboard, but I want to show you the
hard way [LAUGHTER] so you can do it the easy way
later on. These are the same. Something needs to be different, I'm moving this one across. If you hold "Shift" while
you're dragging it, it'll do it in a straight line. Now nothing's going to happen, we need to add the animation. Let's click on the arrow, let's switch to Prototype mode. I don't want to get
too hard to shortcuts, but can you see up here
if I hover above it on my Mac it's option 1, option 2. There's a lot of when
you're doing stuff. On a PC it's Alt 1 and 2, so 1, 2, 1, 2, 1, 2, 1, 2. Switching between
design and prototype, or just click the button. Prototype, I'm going to
say you go over here. By default it's on transition, and that's what we did
in the last videos. We transitioned
the whole page and split across and
we added easing. In this case, we're
going to go from type to order animate. This just well looks
for the same name and fills in all
the gaps for us. It was at group 13 and
looks for group 13, and just try to combine the two. Let's just preview it.
Let's click on the name "Conformation" and
let's hit "Play". We're going to do
this a few times, so I'm going to leave this
open permanently here. Let's give it a
tap. We are there, we did it [LAUGHTER]. First part of the animation. Congratulations,
you give it a go. There's animation, that's
the basics anyway. I'll use my Arrow
keys to go back. You can go down
here and purchase. Click, [NOISE] it moves across. It's working. It's
not what I want, I want it to
automatically go across. Let's do that thing next to it. At the moment we've got
this when it is tapped, do this auto animate to this other page called
Conformation too. It's not what I want. What I'm going to do is break that link. You remember drag it back off, and this is why I do. What we're going
to do is the whole page instead of just the arrow, because I want to click that. I want the whole
page to go here. It should remember the
last thing you've done. It's going to say whole
page Auto- Animate when it's tapped,
and it'll work. Let's go over here,
so let's click on this one down to checkout. When I click anywhere,
it moves across. It's still not quite right. What I want to do on this page is I wanted to auto- animate, but I don't want it to tap. I just want to set it after
a certain amount of time, and in my case zero seconds. From this page to this
page after zero seconds, auto-animate to this other page. That makes sense, so checkout. Click. Hey, look at us. We did it,and auto animate it. For the user if we go
back a couple of arrows, they only see one
arrow moving across. It's not really a trouble,
it's just the way that XD have decided to do it; is that they have decided that every key frame is an actual artboard and
that's how you animate it. Complex animation inside
of XD is troublesome. I've done animations
where they can be 10 or 20 of these artboards, and it's not great. There are other tools for
doing animation for the web. Things like Adobe
Animate is a good one, but have you heard
that prototype place? Also, I should note that we're
doing animation in here. We shouldn't really be
doing it at wire frame, but this is a course
and it's fun. I wouldn't be doing animation
at this stage just because it's not the time to be
delighting customers. These sorts of animations,
or micro-interactions, or little success things should happen later on the
final developments. It's the icing on the cake; not the wireframe, but we need to learn these
things for this course. So moving arrow it is. We've done movement, you
can do lots of things. I'm going to switch
back to Design mode, and I'm going to
make that smaller. Well, that didn't work
because it's trying to keep our stroke size and line
it all up and be fancy. By default we'll look
at this again later on. Responsive Resize,
that is fancy. It's trying to do some stuff that we don't want
to do right now. With this selected I'm going
to say turn that off thing, so I'm going to say you there. It's going to be at a
bigger size over here, let's give that a go. Let's click on this
artboard here. Click on "Purchase". Hurrah. It gets bigger
and moves across. You can do other things,
you can decide on rotation. I'm going to decide to do it. It's going to start
180 from where it is, it's going to flip around. Let's have a little look. What would you see
there? I missed it. You click one, click one more. Hurrah. [LAUGHTER] You
get the idea like that. Remember to rotate things. I got my selection tool. Hover it just outside of here, you can do it manually. I'm going to turn
mine off because it looked not desirable. The other things.
Size, you can do. You can do rotation,
and you can do opacity. What I can't do is I can't
delete it from here. If I delete it from the side hoping that it's gone
from here and it will appear over here and maybe magically fade in,
it's not going to. Let's go Purchase, and it just appears. It doesn't know what to do, because I don't know where
the original one is. I'm just going to fade
in as the default. What we need to
do; is undo that, is we don't delete it. We just turn the appearance; this opacity here, turn it right down or as much as or
a little as you like. It's going to start there
and move over to this one. Let's give that a
go now, checkout. Ready. Fades in
and moves across. Now we haven't
played around with easing, so let's
have a little look. Confirmation page is going
to switch to prototype, and it's going to ease in and
out. What does that look? It looks quite nice,
you can ease maybe out. Easing out is like
imagine adding some sticky glue to
either the in or the out. The out is this side; the finished part
of the animation and the ease in is
the other side. If I ease out if I click on this one and just
go here. Watch it. It's going to start fast
and then gluey sticky out. Ready? It might be hard to see your easing because the duration is quite short, so let's go up to one second. We saw it, they didn't hear. You can see it starts fast
and go slower at the end. I'm hating my animation, but [LAUGHTER] the size
things is killing me. Let's go to Design
and undo that size. It's hard to see it, I'm
just guessing it the size. Yeah, it looks
lesser. Have a play around with the
easing on your own. Let's have a look at
prototype, so we'll ease out. Have a play around with them. You know what a bounce does. Have a look at snap and wind up, and most of the time if you're unsure just
to ease in and out. It puts glue on both ends, so it's slow at both
ends and it goes faster in the middle and
often it looks really nice. That is often a nice natural and then digital
[inaudible] movement. The rules for animation, you need at least two artboards. On those artboards you
need something that changes that has the same name. Let's just do one
little example. We've got two artboards.
This thing here is called. Over here this one's
called Icon-Twitter. Great, so I didn't
have to change it. If you've actually
manually named things, it remembers that and goes, "Probably it wants
to keep that name." Whereas if that was a random
group or random line, it just duplicates it and
you end up with group 10, 11, 12, those things. Same name, that's the
arrow; two artboards. Something between the two. In our case let's do
the bouncing down here, so it's just going to move down. That's only difference.
Are you ready for it? We're going to both
delight you and bring up another problem that I unintentionally want to cover.
Balance, so you're ready? Cool. Look at that. You see, you're like, "Oh, that is good for that
though but the arrow is weird." Can I do it separately? No. It's pretty
rudimentary as in the animation or the whole art
board has to do its thing. You can't apply separate
bits of easing and animation to individual parts mostly. I'll show you
in the next video. We'll get a little
bit more deep dive, but two artboards have to be named the same, something
different size. You can use color, you can use rotation, you can use opacity, and they have to
be named the same. Do I see them? Anyway.
That is it for this video, let's jump into the next one.
24. Understanding more about animation in Adobe XD: Hi, everyone. We're going
to take our animation to the next level.
Don't get too excited. But let's go
"Purchase" slides from off-screen and then
check appears. It's to show you the next step. We did something quite
simple in the last video, and this is going
to show us how to do some extra different timing, how to start it
off the artboard, and a couple of problems that
you're going to run into. It's maybe a little bit advanced for this stage of the course, but we need to cover
these things early enough so that we can
repeat them a few times, and I'm going to set some class projects and you're
probably going to run into a couple of the
issues that I will clarify as best I
can in this video. If you're ready, I'm
ready. Let's do this. To do that animation
and let's look at it. So if you want things to
happen like at the moment, everything happens
at the same time, which is like those things that happen and they all
happen at the same time; same easing, same timing. What I want to do is actually
I want things to happen. I want that little
checkmark to come in only after the arrow is gone. What I'm going to do
is to tidy things up and show you how
to tidy things up. I don't want that bouncing
for Twitter because it's just a bit distracting
for this tutorial. What I'm going to do
is take that off, I just deleted him, so
you'll notice he's gone now. Let's go back one. It's there and it doesn't know what to do with it,
so I've deleted it. It just fades out. What I'm going to do
is actually grab it, copy it, paste it over here, double-check it
has the same name, sometimes it gets added a
little number afterwards. But no, not the same. Let's preview it
again. Yeah, go. Just the arrows working,
but what I want to do is I want the tick
box to appear. What I'm going to do
is over on the side, I'm going to turn
back to design. I'm going to make,
whereas my little arrow? The arrow is going to be
the opposite way round. I want it to start in and then
fade out. Let's test that. Always be testing. I feel like I'm super
good at this stuff. If I try and do five steps thinking
it's going to be great, I will preview it and realize
something went wrong. So just test after every
little change that you've made just to make sure you haven't gone
correct everything. Because it's no fun
hitting undo 10 times to start again for something simple that you might have
corrected at the beginning. We've got that animation. Next is we want the
checkbox to appear. What we end up doing is copying and pasting and
having another one. It goes here, it fades out. It stays faded out and what I
want is the tick to appear. What I need to do
is have tick on this one and on this one. Let's bring it in
our file import, Command Shift I. I guess
it is Command Shift I, and your exercise
files, where are those? There's one called Icon tick. You can get your own
one. Ginormous tick. Hold Shift, scale it down, so it's going to start here. I'm going to copy
it, paste it here, so it's in exact same position, and this one, I want the opacity to be
down. Look at that. Let's give it a go,
so we've got 1, 2, 3 of these. By now checkbox and
nothing happens. Do you know why? [LAUGHTER]
I'm going to pretend that I did that on purpose
to teach you a lesson. But no, I forgot. There
is this page here. If we go to prototype
mode, it says go there after some time, exactly zero seconds go there. This one did not
know the same thing, just gets to here and goes,
I don't know what to do. [LAUGHTER] We can
actually go here after it remembered the
last thing I did time zero seconds and I'm not
going to get it to bounce. I'm going to get it to start. When things fade in,
other than bounce, it doesn't really
matter if you ease out, ease in or none. It's so hard to tell an easing with just things
that are fading. Don't sweat it, so let's start on this page.
Let's go play. Let's go and
purchase this thing, slides across, and then that
fades in. Look at that. If you're like all
that happened, I wanted the arrow
to be gone for a little while before
the tick appeared. You can do little
things like that. So this one here, we say, when it gets to this page, start moving on straightaway, you can say actually
just wait two seconds, man, chill out. You wait there. Let's go. By now this page
plays the first two, waits for a bit,
plays the second. Two seconds is too
long it feels. [LAUGHTER] You get the
feeling, I don't know. We took it to another level. We added three. You can have 15 if
you want to try and get XD to do your
animation, bend to your will. It does get a lot of
complicated though, but take it step-by-step.
That's fine. The last thing I want to show you, it's reasonably
complicated. I'd love it to be
later in the course, but I know that I'm going to set a class project and
you're going to go off and run into this problem. So let's identify it
and get in there now. Again, if it feels like
it's a bit too hard, it is a bit too hard
earlier in this course. We will do it again later on and it'll become easier and easier. I'm pretending I am you, I am your hands himself and
I'm going to go Design, I'm going to go to my artboard. Then I said I've got
to make animation, I'm going to pick this phone. I'm going to move my down
here for no good reason just to keep it separate. I know that I'm going to
grab a circle, draw it out. I'm going to pick
a fill color and it's going to be my animation. I'm going to pick, I don't know. Wow, what is that color?
That's the color. The rules were you
need two of them. I'm going to copy and
paste two of them and what I'm going to do is I need to make sure that
it's the same name, so this one is called Elipse 6. We will call this
one Animation 1 and I'll call this
one Animation 2. You don't have to
name them, just to make it clear in this course. On Animation 1, there is
something called Elipse 6. This is called Elipse 6,
great. That's going to work. What I'm going to do
is I want to start you off-screen and that is where
the big problem happens. This is where we've made a
mistake because you like, I'm going to start
them off-screen and then I'm going to
move them across. Starts here, remember Dan said, I want to switch to prototype. I want to connect
these two pages up. I want the trigger to be
just after some time, maybe after zero seconds to
order animate over here. Because the name is the
same, it's going to work. When I hit "Play", it's just fading in
instead of moving in. The problem is, this is not
actually on Animation 1. It is on, remember
the pasteboard? Remember I've got all my pages and then there's
random Pasteboard 1. That is the problem.
How do you fix it? It's all about timing. If I undo this, so
I'm back to here. I haven't added my trigger and I haven't moved
this off-screen. Before you do anything, is this whole animation. If I say now before I
move it off-screen, if I add this animation
that says trigger time, I've done all that, and if
I move it off now, it goes, "Hey, it's going to try and move this
off the pasteboard, but it's going to break
my auto animation. So I'm not going to let
him, it's off the screen, but it's not on the
pasteboard anymore. It's still on. My naming has gone [inaudible] too much,
but you get the idea. Remember Hyphen 1, Hyphen 2. It's still on hyphen 1, even though I've
pushed that over here. So make sure you add the auto animate before you start moving across and it will try and
keep it connected for you. The only other trouble
is how is that, it's disappeared in the
pasteboard over here. You can select it.
It's a bit tricky. Over here, like I said, there are some funny quirks
for the XD and animation, but I've got it selected. Let's play it now. It moves on. It needs some easing. Let's go easing snap. We'll look at that one. Ready? Play. It's got this snap ease. It goes forward a little
bit and back a little bit, going back a bit
and a little bit, it looks quite nice. That is it. If you're doing
animation, get you to pages and just add
auto animate early on, and it means that if
you end up dragging anything off the edge
to the pasteboard, it'll keep it connected. Can you drag it to the right page afterwards?
I can't work out a way. You might work out a way, but you've got to break
it apart and start again, add the order animate early. Now, this version up
here is totally going to work mainly because I added the auto animate first
before I'm going to drag it off. Let me just show you. I'm going to add
some spacing here so I can actually
move it off-screen. Remember it starts
over here and look, it's still part of this
confirmation page because auto animate is already applied before I drag it
off. Is this useful? I feel like this is pretty complicated this
far in the course, but we're getting there.
Where are you again? Hey, it starts off-screen, does a little bounce, fades out and we'll wait for
our little tick to appear. That takes too long. That
is next-level animation. We've got an extra artboard to play around with timing
because we know that we have to do the same
easing and the same type of animation between
entire artboard, not individual ones, but we can fake it by having more
than one artboard, and you might run into problems if you're trying
to get something off on the side and dragging it in if you don't add
the auto animate first. It ends up on the
pasteboard, which is bad. This is going to
become more and more useful when we do
things like navigation. Later in the course, we're
going to click on this, and the whole navigation
is going to slide in, not just a lame arrow, and we need to do that trick, otherwise, it will end
up on the pasteboard. That is it. I will see
you in the next video.
25. Class Project 05 - My first animation: Okay, class project time. You're going to create
your first animation. If you are new to animation and you're
finding this little tricky, just recreate what we did in
the video and upload that. If you are feeling brave and confident and you are
going to do something, I want you to do something
slightly different. Getting the arrows slide
and there's no fun. Think about what you might do. You might get it to come in
from a different direction. It might be a different shape,
maybe a different icon. Have a little think about how
you would convey the order received idea and
I'd like to see it. Depending on your
computer, Mac, and PC, what you can do is you
can actually record your animation and upload that. I'll show you how to do it. In XD, you can preview
your animation, so I'm going to give
you. What you can do. Can you see this little
record button on a PC, it's over this left-hand side. On a Mac is relatively
simple, you click it. It's going to ask me to
over my system preferences. Let it do the recording, that's fine. You right them. Open the settings under my
one one XD needs permission, quit, and reopen later. It seems to just work
when you do later. Now if I hit recording, can you set a
little timer going? I'm going to go to this and that's my animation.
I'm going to stop it. It's going to ask me
where to save it. Let me put mine
on my desktop for the moment. Let's
go see what we got. So desktop, you've got a little MP4 showing me my
little animation and that's the one I want you to upload
both to your [inaudible]. It's a circle now because it's meant to represent a finger using your touchpad or at
least touching your screen. So on a Mac, that's
relatively easy. On a PC, it's not as easy. I think the record buttons
on the left and might ask you to use
somebody's software. I think it uses Microsoft Xbox records software and
see how far you get. If you're like, I need to
install stuff that's too hard. If everybody is in
the too hard basket, I love you to try because I'd
like to see your animation. But what you can do
is actually just screenshot all of these three of your animation or two if you've
already done two. If you've got the time and
you'll want to practice, do 10 different kinds
of things going on. But if you just want the basics, just do that one
simple animation and take a screenshot
of it, upload it. I'd love to see this one. So up until now, you've been uploading
it in the comments and all the assignments
feature on the website. What you can do now is I'd like to actually start
seeing stuff on social media. In your exercise files, there is a group page called Bring Your
Own Laptop Online. It's a Facebook group. There's a similarly
named LinkedIn group. It's called the Bring Your
Own Laptop LinkedIn group. All these are my handles
for Instagram and Twitter, tag me in those and I
actually like to see it. You can also go have
a look and see what other people have done. Use the hashtag XD, it helps you search for things and see other
people's work. But yeah, do it, upload it to the regular place, but also look to upload
it to social media, and when you are uploading
to social media, you put up there like, hey, this is my first animation. I'd love some feedback and
we're a really friendly bunch. If you are a little
bit worried about it, we don't know you put it up. We make sure we
moderate our group. I know we set some great values in there that this
is for new people, if you're a new person upload
it, get some feedback. Tell us what problems you had, what things you
would like to do. How did that person do that one? Can you show me or
what can you tell me? It's that kind of
Facebook group. It's less of Instagram glamour show and more of,
look what I made. I'm excited, even though maybe in the grand
world of animation, it might not be the world's
best, but that's okay. We're here to learn, ask for
criticism if you want it, otherwise post it and say this
is what I made thumbs up. Let us know how you're
finding the course. One thing is when
you are uploading it to the various places, some social media will
let you just dump the video straight into
them and make it work. But some of the comments and some of the
assignment uploads, you will have to
upload it to something like YouTube or Behance or Vimeo or something else first
and then paste the link in. It will be viewed
through the link rather than the actual video itself. If that sounds too hard for you, just do screenshots.
That is fine. But I'd love to see it remember
and posting it up onto free YouTube account
or Vimeo account or into Behance or whatever you
can do to host it somewhere, your video, and then
just post the link. So that is it. Do your first animation, simple or advanced, upload it, I'd love to see it. That's it. Go to your homework and I'll see you
in the next video.
26. Sharing Wireframes for comments in Adobe XD: Hi everyone. In this video, we are going to share
our wireframe with our client in this case. We're
going to send it to them. They're going to be able
to express his name, Neil and they're going to add comments and different pins. This one here, they
can add pins to mock specific things to tell me, yeah, to give me feedback. As a designer, I'm
going to show you how to create the link, send it to them, and
how you work with these comments between
you and your client. Let's jump in to get going. Let's go to this third tab here. Design reviews,
prototype reviews, now let's look at share. Share allows us
on this side here to send a link to,
let's call him Neil. Neil is a fictional character.
He's a simple creature. I use him as an example because I want to keep this simple for whoever
I'm sending it to. Because I don't
know their level of expertise on a computer, that type of thing,
so that's a Neil. The first thing we
need to do is we need to set weird this
animation starts. Back here in prototype, click on where you
want this thing to go. If you've got two
like I just did, you turn one, off and
just have one on. You can have multiple flows. That's too much for
what we're on now, but we're just going
to have one flow, at least on one of these pages. This is where it's
going to start. I can get to share, I'm
going to choose flow 1, and the most common
one is design review. It's going to allow
for commenting, which is the big thing. It's up to you and how
secure you need to be, whether it's going to
be password protected, you just give it a password or people that you've emailed, still not password protected but not anybody with the
link can access it. I want that anybody
with a link to access. All you do is click
"Create Link, " it thinks about
it for a second and you should get a little URL. That's the thing
you want to share. You can send it to Behance, you can embed it on a
website if you like. We're just going to send a link. We're going to
copy the link, and I'm going to open it up
and pretend to be Neil. You wait there, I'm going
to put my Neil hat on. I'm Neil and I've
got the link in an email or DM or something,
you've sent it to him. I open it up for him and
this is what Neil sees. The nice thing about it is that Neil doesn't
have to log in, which is probably one of
the really big perks here. It falls down a bit when
you've got to sign up for an Adobe ID just to
review your work. This one here, they can
do everything as a guest. They can start
interacting with it. I'm Neal, going
through and I'm going like, this seems good. [LAUGHTER] Let's go back. I don't have any of my links
sorted out. Bad, bad, bad. I don't have my links
working, which is bad, I should fix those for Neil but there is some basic navigation. You might have to
educate your client a little bit about
how do this works. Homepage, cycling through it. They can use the arrow keys
and where it gets nice is that let's say that they
do decide that this is, let's go to learn
more, this bounce, and I like man, they
want to add a comment. They can add two
kinds of comments, just generic one, hit "Submit", and they can
decide whether they're going to sign in
with your Adobe ID to be a bit more official. It's free to sign
up for an Adobe ID. You don't have to have a
creative Cloud license, a paid one you can use just a free ID or
they can do this. We'll do that for Neil. The
cool thing about it is, Neil gets to interact, add comments without going down the rabbit hole of signing up and passwords and that stuff. That's really cool. You can do a generic one for
this particular page, but also you can do
a more specific one. See this page, place the pin, this is where the education might have to be
with the client. Explain that you can do
pins and generic comments. Depending here, you can
decide on this one here. They're going to say
something like this isn't our logo is it? Submit. That's a bit more
specific with a pin. It's actually pointing
at something, whereas this one is
just a bit more all over the place like
generic feedback. How do you access it on
your site as a designer? No longer Neil, goodbye Neil. I'm going to be Dan the
designer. Not at the moment. We keep talking about
it, but they're going to potentially bring in the comments inside of the app which you'd be like,
why is that there? Just isn't at the moment.
What you do as a designer is, you get an email explaining that somebody's added a
comment to your link. You'll get an email
notifying it. Or you can just go to
the web-based version. Even though this link
here is for Neil, you can actually just use it for yourself. I'm going
to copy the link. There you go. I am the
same link as Neil, but because I'm logged
in with my Adobe ID, I get to do a few extra things. I get to see Neil's guest
comments, which is cool. Let's have a look.
This is in our logo. If I click on it, you see
it took me to the page and it has like little
pin that lines up. More than one pin you'll
have different numbers. Cool. I can go back and say no. Submit it, and that will
add to this story here. Now, Neil can go back as
a guest and keep adding comments as well and
check on it as well. Well, I might decide that
I've done it all and I'm going to actually go into
here and resolve this one, so it's gone off that list. Gone, it's done, I've
checked that off my list. That's how you do commenting. You can decide to
do it as a guest or get the person to log in, a little bit more extra
details for them because they'll get notified
when there's been an update or apply for you. Let's say that I do
though decide that whatever is bouncing here,
I'm going to go fix that. Back to being Dan the designer, I'm going to go
into here and it's this page here. I'm going
to go back to prototype. This page here has this
button here, isn't it? Let's zoom in. It's
this button here. It has push left bounce. We're just going
to do an ease-out, and we're going to save it. How do we update it? It doesn't update automatically. You've got to tell it to update. You go to share and
you go to this one. Can you see the update link?
All it does is it looks at your document and updates anything. The link
is still the same. You don't have to
send out a new one , and you can say, "Hey, Neil, check out that link again, " or send it to him again and say, "Hey, check it out. What
do you think of this?" I'm back being Neil, and I've gone to the link again. I can still see my
comment because the standard designer
hasn't replied to it, but let's have a little look. Home page, let's click on this and more of a bit at ease. What do we think of that?
I say, "Good job Dan." [LAUGHTER] That is commenting or the basics of
commenting in Adobe XD. The only thing to
keep an eye out is, that they may at some stage
bring it into the app. I really want them to, they
don't at the moment though. I'm inside Adobe XD
rather than a browser, I want to be able to see them
down here. Come on, guys. But until that, just use that web link to
see the comments. You'll get notified
via email when they do get posted there though. That is sharing your
wireframes with Neil. Goodbye, you. Goodbye Neil, and goodbye me. I will see you in
the next video.
27. Mood Boards & resources for Hi fidelity UI design in Adobe XD: Hi everyone. This video we're
going to talk about getting inspired about your
high fidelity work. So far we've been looking in low fidelity. We talked
about that earlier. Remember, low
fidelity wireframes and high fidelity fancy word for all the images, colors, and fonts, looking and feeling like a finished app. Before I get on and start
actually designing anything I like to get a bit of a mood board for a
couple of reasons. One to get my own ideas of like what those things
is going to look like, the feeling for it, but also to send to the client. Before I start designing, I like to share a mood board to make sure that I'm on track. We both aligned and we're both rowing in the same direction. Sharing a mood board
early on in the piece with your client or
Product Manager, whoever it is, so
that they can say, yeah, that's what I'm feeling. Whereas you might
go down this whole, indie rock, skater
brands style of tea. Because that's what
you feel the Zoe Owl, persona would like, but the client is
completely at odds with that and it might not be that you're right
and they're wrong, it's more that you
need to at least be understanding one
another or at least understanding the
persona together. Getting a mood board
made quickly and out early to the client
will stop you spending forever making 10 versions
of it and sending them all over to the
client and hopefully [LAUGHTER] one of them is good. Getting inspiration,
all this mood board, where do you get it from?
There's lots of places. Every time I suggest one on
one of these videos though, they go and close it or add
a paywall or something. I'm going to stick to
the two main big ones. If you've got one that you like, that you get inspired for, especially around UX or UI, put a comment down below with a URL for it so that other
people can have a look. If it's you, go have a look now and
see what's down there. Here are the two main food
groups are Dribbble and Behance and I'll throw in awards because it's been
there for a long time. Dribbble especially has become a very UI style where
people share their work. You just have a look through, find stuff you like and
like, oh, that's cool. I like that avatar, I like
how this bends around here. We're not here to steal ideas, we're here to be inspired by and even if we do like
this bendy up thing, we're like, not this person is going to be the
logo in there. The logo means a different
color and you end up using it as a starting post. But what you might do is go
into it and say screenshot. Remember on my Mac it's Command, Shift 4 and just drink as
much detail as you can. For me personally, because you want to be able to
go back to that URL. In this case, I want my mood
board to be very pretty, so I'm just going to
screenshot this chunk in here. You just gather up screenshots
for your mood board. If you're on a PC, you'll have to check how
to do a screenshot. But yeah, that's how
you get started. Now, these are all very
different but similar. If you've being
to both of these, they have a different flavor
and so I use both of them. What gets more exciting though is when you get
a bit more specific. Let's say in here, I'm looking for tea. Maybe tea even in UI, so do searches specifically
around the thing that you're making and it cuts it
down to stuff you like. Oh yeah, I love this idea of the coffee beans
spilling over the type, but maybe I'll do
it with tea leaves. This is another way to get a little bit more
specific mood boards, screenshot them,
in the next video, we'll dump them onto a
mood board looking page. Exactly the same for Behance,
do specific searches. We did that in Dribbble
when we looked at category in terms
of food and tea. This one here you might be doing your task flow is a lot
around the checkout, so what we might go
and say cart UI, just to see a bit more specific. Carts, probably the
wrong word in this case, there's a bit of cart going on, but probably, let's look at
checkout UI or checkout page. You might have to find
the right language to get the right one and then
start going through and go, cool, that's there. You might just
notice things that you've forgotten to add,
you're like, oh, yeah, we need that recapture
or the subtotal. You can get quite
specific in these and that's why I include awards. Awards is with three ws and the cool thing about this is it's really funny
one to navigate, but once you get into it,
it's actually really handy. In the menu here, I'm going to go look
at all the nominees. This is an awards thing. Nominees, let's have a look, and you can go categories. You can say, I want to
see stuff that has, you can see it, I can't
see it, food and drink. That'll loop, and
it's nailed it. Brought it down to here
and the cool thing about this is that it's very curated, so
beautiful stuff. Also you might get in further and look at tags
and go actually, I want to find stuff that has contact page because that's
what I'm working on. You might get some ideas
about specific things. Again, when I hit a
copy just to get ideas, get our creative juices flowing. Lots of screenshots,
dump them into a folder, and then we'll see you in the next video.
Oh, no, we won't. One thing I forgot to mention is we looking on a website for stuff and it's very
important to be looking on your phone as well, because what I do
often on my phone and take screenshots is not so
much looking for inspiration, but actually looking
at competitors. I did some already.
Let me show you. I've created this folder
called Mood Board, and I was just going
on my phone and typing in buy green tea. I took screenshots of places
you could buy green tea. Now the trouble and bad. [LAUGHTER] Some of them
good, some of them bad. Just to have a look and
get inspired by it. What I do find though, is that often what
I'll have to do is if I do buy green tea online, it's going to give me a
very localized result and I don't live in the hippest, trendiest part of the world. I live in Limerick, Ireland, which is not hip and
trendy, but I don't know. Some of the designs
can be, I don't know. Let's call them predictable, boring, predictable
though is a better word. Often what I'll do is, with these other screenshots, see these ones
here, I don't know. Do you get a sense
for them being a little bit more exciting? I typed buy New York
green tea online. I picked New York. I don't know. For me, [LAUGHTER]
Paris, New York, I just pick places
that seem fancy, and I'm probably
going to have the right vibe that I want. Zoe, the person who I'm
designing for from my persona, she's looking for that style. Look for Paris and Los Angeles and if you
are living in some place that's maybe a little bit not the height of
international design, put it in some other terms, take screenshots, even
if they're not good, just the things to avoid
colors that you might like because we might
have to do this logo as part of our design. Maybe we love this
Instagram reels jammed up, Pinterest thing, so
you get the idea. Looking at competitors as well because they're having
to deal with a lot of the same problems as you
are, the same things. Go through the cart, take
screenshots, look at the menu. Menu on the left, I'm not sure. That is going to be it. Is that it? No. There's
one last thing. Last I promise, is Instagram. Even if you're not
Instagram person, you're like, hey, I
don't do Instagram. You might try it. Do some searches for
some tags for UX, UI design, and it's amazing. It'll start delivering you
really cool stuff like that. The good stuff bubbles
to the service, I found myself taking
lots of screenshots for jobs that I might not
even be doing it. I'm just looking at
Instagram, man is a cool font, must find
out what that is. Screenshot, send to myself. Just spend some time
on a place like that even if you're already there,
obviously it's perfect. But it's quite a visual place. Good place, find nice designs, follow a couple of hashtags
like UI design, UX design, daily UX inspiration,
things like that, and you will potentially come across stuff that'll
get you inspired. All right, that is
it for how I get inspired before I start doing
my high fidelity mockups, I'll share it with the
client to make sure we're on the right
track together. All right, that
is it. Let's jump in and build a mood board.
28. How to create a mood board in Adobe XD: Hi everyone. We
are going to make a couple of mood
boards in Adobe XD. This first one here,
really simple one, basically just images dumped on a page for your
own reference, and then we'll show you
how and why you might make this more curated mood board
that goes out to a client. Let's jump in. How to make a mood board. There's two versions I'm
going to share with you. There is going to be the caveman doing it for myself way, and then I'll do a slightly
more thoughtful way that might go out to our
clients or stakeholders. I've gone through and
done on my screenshots. I've got them sitting
in my exercise files. I've left them in there for you too just in case
you wanted to have. Check out my ones, assigned
to exercise files. There's one they
call mood board. This is just what I went round the Internet
and had a look for and things that I had
a good feeling about. Some competitors
in there as well. What I want to do, I'll
show you the caveman way. Select everything, grab it, drag it onto XD, let go. [LAUGHTER] That is it, mood board done. I use this. Often, I'll scale it down so I'm going to zoom all the way out. Remember Command 0,
and grab all of this, and then I'm going to move
it across and scale it down. This is good enough
for when I'm working just for my own personal
mood board. Mood board done. Command Plus or Control
Plus to zoom in, and that's what I use when
I start making my designs. I'm like, yeah, but at that
but like how I did that. It didn't go anywhere,
mood board done. If you're going to
do it this way, you bring in all those images, there is a little problem. Over here, did you notice back then it was all the
way to the edge? It's actually gone
off the pasteboard. The pasteboard is not infinite. If you're like, "Hey, there's this many, but look at all of these ones."
I've selected them all. Can you see they are
on my pasteboard, they're not on any art board, but they're one
of my pasteboard. But there's all this like
where are these guys go. They were just off the page, didn't know what
to do with them. You can do one of two things. If this next bit
is really tough, just drag in a couple at a time, then they're not going to appear off the page and there you go. I know that all of
these are selected, so I can see these cabinets. I click on this, hold Shift, click on this top
one, and then I should be able to click O. [LAUGHTER] How do I do it? [LAUGHTER] U, U, U. Can I zoom out even further? Can't, how we get you across? [LAUGHTER] Wait there. I can't think of it.
I've got this way, hold Shift and use
the left arrow. That worked really
good. [LAUGHTER] How I do it in the past,
I can't remember. All I did was use to undo is I actually just hit the
left arrow and it just went, I'm all the way
over here and I'm going to jump all the way in. You do that same way, so just
select them all in here. Use your any of your arrow
keys and they just launch themselves back
onto the pad here. Scale these down and
add them to my mix. That is what I do
when I am doing my own personal art board and
it's enough to get going. When I'm scaling this, a good point is I've
selected lots of them and if I grab the edge, they do some weird
resizing stuff. What I want to do is hold Shift down and grab the corner and it will resize them all together
the way we can want. That is caveman mood board. Let's say that now though
that I want to send this to my client because
it's important for getting my own
ideas, a mood board, but it's also
really important to convey where you're
going in a direction to your like the word stakeholders
gets used a lot in UX design and stakeholder is
anybody that is the client, customers, anybody that
has a stake in this. It might be your boss,
your product manager, it might be other team members, they will have a stake
in this project. That is stakeholder,
a word that I hate. But yes, so let's say we are sending it to
the client in this case. This is not going to do, A because we're charging them. [LAUGHTER] They want to see better than just stuff
dumped onto our page. Also it has to be more
considered because this on here is very confusing for stakeholder or client
because they are like, I don't want to look like that. It's hard to say this is the direction when they're
comparing these two. We're going to have to
go through and say, this is actually just for
me and not for the client. What I want to do is impart on the client the
direction I'm heading, and in my case, it's mainly
these ones on the top here, plus I'm going to sit
them out a bit nicer. We're going to cover images and cropping them
later on in the course. We're doing mood board,
so I'll show you what I'll do. I'm going
to add a page. I'm going to my new page tool. I'm going to add just
this website desktop one, and I'm going to
call it mood board. What I'm going to do
is I'm going to create some rectangles and
you wait there. I'm just going to
draw some rectangles with the rectangle
tool. You write them. What is all that junk
for? Just some rectangles and what we can do is with it, I like to use this
dragging method. There is masking and
stuff in a later video, but if you want to do
the quick and easy way, find the ones that you are
really into and just drag them from your finder on Mac or PC and just drag them
straight into a box. It allows us to pick the ones we really like and it makes
them look a bit nicer. I'm going to drag
a few of these in. What I'm doing
here is I'm making sure because for me like, I like this one, I like the colors in here, but it'll be very hard
to communicate to the client that
this is a direction when also this is direction. I'm going to be a bit more clear about what I put in
here because I want to try and title together so that it feels like I'm
hitting a certain way. What you want to do is find
the one that is closest to the direction and
make it the biggest one, some smaller bits, smaller supportive staff just
to get a sense of it all, try and communicate your idea through images of the
direction you're hitting. For these, these little things
here you might go through and use the eyedropper
tool and actually go. I want to pull some
colors from it. We'll do colors again
later on as well, but you might get some sample colors out of
this just to get a sense of a taste of colors that
you might be using in this. This document would be
sending it out to the client. You might have more than one. There might be a direction
here that you feel like the client has asked for and maybe another
one that you do, another mood board with
something that you you might be more appropriate
for the user, and send a couple of different creative mood
board options over. Now, some of the
skills in here in terms of making this mood board and with you yet for cropping images and moving them around, working on colors. We'll do that as we go
through the course. But I wanted to show you at
this stage of my process, my caveman mood board and the slightly more
curated mood board that I'll share with the
client that is random shapes, but [LAUGHTER] nicely aligned. That is it for my mood
boards at this stage. Let's get onto the next video.
29. Class project - Mood Board: Hi everyone, it's
class project time. I want you to build
a mood board. You can make a fancy one like this stakeholder example
we did in the last video, but know that we're
lacking some of the skills with cropping
and picking colors. We'll do those later on. At
this stage we might just do the big old lumped
them all in there. Now I dumped mine all in. You can just go to File Import and bring them in in
a more sensible way. But once you've got them all in, take a screenshot
and upload it to comments or the assignments depending on where
you are doing this. That is it. Create a mood board. One thing I haven't
covered is with this whole task flow in this
whole project we're doing, we're assuming a new
company that doesn't have a really strong
brand already. If there is an existing brand, what you might do is you might
not skip the mood board, but it might be a lot
more restrictive. They might be examples of
maybe printed material I have, their existing website that
you've got a tie in with. Mood board might not
be as exciting or as different as this is. The other thing you might
have is product shots. I'm going to use stock
imagery for a green tea, but if this is a real client, they might already
have the photographs. They might be shot
in a specific way to help drive the design. They might already have a
logo which we don't have. Pulling a logo into
your mood board and pulling colors from that is
going to be helpful as well. But for the moment we've
got a company brand new. It doesn't have a logo so
we can go a little bit more exciting and broad
with our mood board. Do that and I will see
you in the next video.
30. How to work with Columns & Grids in Adobe XD: Hi everyone. In this video, we are going to talk about
columns, these tealy things. Why there's 12 of them.
Why sometimes you use six. Why you use a grid
instead of columns. It's all to do with
responsive web design and things like breakpoints. Now, if that stuff
is, if you'd like, I'm a web designer, I understand that this video is going
to be quick and easy. If you're new to web
design and UX design, and you haven't experienced responsive web design and
these columns before, I'm going to try my best to try and explain it all in one video. That's why this one's a
teensy bit longer than the other ones because
there's a little bit of theory that goes on here. I'm going to try my best
to try and explain it all. I hope I do a good job. Let's get started. Go get
a cup of tea, sit back. You might have to
watch this one twice. I hope not. Let's get going. Let's talk columns, and it's easier to start. We're talking about
columns on desktop, and then we'll work on mobile. I find it easier to
understand anyway. We're going to do
upward tool over here. We're going to pick
size for our website. These are really common ones in terms of the size for
a desktop website. Google most common desktop
or web browser size, in the year that you're in, and it will come up, I'm
going to pick 1920 here. This one is also
another common one. 1920 is going to give me
enough space to do my website. I'm going to drag it
down here, and I'm going to call this
one my homepage. We're going to have to
develop our website or our desktop version of our mobile website as well because it's going to
be viewed on both of them. We're going to
probably start with mobile first and design for that and then look to do a
desktop version afterwards. But in terms of the columns, let's start with this. I got my desktop. I'm going
to click on the name here. If you're unsure how I'm
moving these around, I'm clicking on the
name and dragging them just with the
selection tool. Now, to add the columns with it selected over here there's
this thing called grid. Can you turn this
little tick on? There is either
square or layout. Layout is what we want,
and it uses columns. It should default to 12
if it doesn't use 12. First of all, why
are we using 12? The first reason is
because everyone uses it and this is good enough
for a reason as any. If you decided you
want to do columns of, I don't know, 13, you'd be in trouble with
a couple of people, and mainly your developer, because 13 is a weird
number to divide things by. Its hard to divide in
half as columns go. It's also not divisible by lots. It's a funny old number. The other reason is your
developer is going to be mad. Mainly because a
developer often is not going to be coding
your website or your app completely
from scratch. They're going to use
some shortcuts or frameworks that already exist
to speed up the workflow. A lot of those frameworks
we'll use things like a pre-existing column system, and it's probably
going to be 12. Talk to your developer first, make sure that you're
on the right track. Say, I'm new to this. If I use a 12 column grid, does that going to be
okay? Probably, yes. The other reason
it's really good is the same reason is it is for when you're doing
say, magazine layout. It gives you consistency
across pages. It means that things laid up on this page
when I jumped to, say my contact us page,
everything is reshuffling. There's a bit of
design consistency, a bit of flow through at all. Other reason is 12 is
good and divisible. I'm going to make this
page a bit longer. Let's say I'm going
to rectangle tool. I'm going to mock up a
really rudimentary website. I've got my navigation
bar along the top. I've got my hero
box along the top. We've got space to work from. This is a big call-to-action, sale now on, check out our latest
product hero box here. Then down the bottom here
we've got our features box, and I'm going to
design one that has. Now these are often
called cards like repeatable little units
that you can use for different products, maybe
different services. What I'm going to do is I'm
going to duplicate them, so I've got 1, 2, 3. You can see how 12 is a handy size because it means
that I can go full width. I can have three down
the bottom here. Let's say if I need four, what I can do is
actually go just divide this 12, here we go, and I can make one, selecting both of
them holding down my Alt or Option key on a PC. Actually, that's the opposite. Alt on a PC and
option on the Mac. You can see how 12 is handy for this. I can say here we go. You could do two, you can
do one, you can't do five. That is one of the
drawbacks here. Like I want five
boxes then you can. That's why we have 12. It gets even better when we are doing what's called
responsive web design. Because we're going to have
to figure out what this looks like on let's say mobile. Let's say we lay
this out on mobile. We'll just do a new one.
Let's do a new one. Go on. A new artboard. We're going to make it the size that you're designing
for. On this one. Let's say that I'm using 12 as well because it uses
the same framework, doesn't matter if it's tablet
or a mobile or desktop. It's the same website
that just responds to the size of the device,
responsive design. Let us look at 12. I'm going
to get rid of my margins. That's the stuff
on the edges here, zero and same designing for it. I've designed this site.
What does it look like? A mobile, basically the same. I've got my navbar
on the top here. I've got my hero box
that slightly different because we have so much space on the desktop version,
I've got this huge, big column white padding, whereas this one
I have to go full to the edges because
we just don't have the size to play
around with on mobile. When we get down to these guys, down the bottom here,
there's no way that I can lay out four
along the bottom. I could. The trouble is that they're just going to
be too small, hard to read. There we go. That's
not going to work. What often you'll do is
you'll go actually on mobile, we're going to get this box just to do something
different instead of this box trying to go
across the three columns, we tell it in code to say, you don't have to
worry about this, but it's an insight
to the developer. You might already
know better coding, so this might be easy
for you, but if not, your developer it's going
to go that box instead of being three columns is
actually going to be, let's say six columns. You just have to change
that in the code on device called mobile
B6 instead of three. It means that it's super easy to implement different design
across different sizes. You've decided that
instead of four across, you've decided to do this like four boxes but stacked
on top of each other. Or you might decide
that actually, you want the massive on a mobile device is
you're going to just stack them all on top of
each other, four of them. The coder can go through and
say actually that first box, you are actually the
full width of 12. What ends up happening though,
where you're designing, if this 12 column grid, even though it's being used, it's hard to design on top of because these columns
are really small, and it can be really
common just to say, I'm going to fake it
and just write six. Even though 12 might be used, it's still six goes
into 12 twice, or it can be sometimes
four as what gets used, again four is divisible by 12. You might just design
for four just to make things because you don't need that much detail when
it gets to that. I often do it to six. It's really common to do it
to four as well, up to you. We can't go too deep into
what responsive design is, but let me give you a
little brief demo here. This site here, HubSpot, they've got some really
good resources here for web design and UX design. But this is their
big website version. You'll notice that over
here on the sides, there's this big empty area, so the website actually only
occupies this middle bit. When we are designing
on a desktop version, often you can see here by default it's giving me
these extra margins here. You might decide that you've
also got these margins, or you might decide that you're designing for
a really big screen. I'm going to duplicate this, and I'm going to say I want the width to be a lot bigger, so instead of 1,920, I'm going to make this 2,000. That's not really
bigger. Three hundred. It's a bad day. Come on. We can do this then. Come on. Here we go. Three thousand. You might decide to design for this really big
screen because you've got a really big screen and
you know your client does. But inside of here, you're going to have some
really big margins either side. You can actually design
this website in here. It actually stays
inside this little bit, and you make it all fit
within your 12 columns. But you can actually add some stuff in the
background here. In this case, they've
got nothing much. This extends out, there's color, there's colored box, you might add some different
graphics back here, but know that on some devices, they're only going
to see this version. You might design
for this version but keep this version here. That's why you have those
margins on the edges here. These margins here, you might just make a
really big site, design inside your columns here, but be aware that something
has to appear over here on really big screens and it might just be an extension probably, or background color or some
repeat pattern or something. That's one thing. When
you're designing, design with a bit
of margin on there. When you're designing
for tablets, let's say the designer for
this HubSpot homepage here, has had to design in XD, the web page version,
the big version, the small version, and then watch what happens
when we get down here. Look at that. The design version where on this size screen, that graphic just gets smaller and gets pushed
off to the right. Down further, look at that. It went from being a website to assuming you're on some
tablet or mobile device. Can you see the big
change? The menu was a big change. Look at that. Really common to design
a mobile version, a tablet version, and
a desktop version. If you are working
in a larger company, they call breakpoints. They might be designing for five different
sizes: tinny mobile, big mobile, tablet, small
screen, big screen. You might have to talk
to them about that, about what the developer
wants from you. Basically is just mobile and
desktop and leaving tablet out and letting it just assume it's going to be
the website version, but that's for smaller jobs. But if you are doing a larger client with
more demanding website, you might have to end up
doing five breakpoints, seven. Hopefully not soon. But just so you know, we're designing to
in this course. We're just going to do
desktop and mobile, but there might be
an expectation for tablet in bits
in-between as well. Other things we
need to know about these columns is the
space between them. This space between
here is up to you just so you know a
really common one. These are the gutters,
these are your margins, and these are your columns. Column width at the moment just expands to fit the
space provided. You control the gutter
and the margins, you just let the column fill
up the space left behind. It'd be really common to
have a gutter width of 18. On a mobile device, it might be something more like I
got a width of eight. On a desktop, it could
be 16, it could be 24. You're working in
increments of eight. You'll just see that
a lot in web design, there's a lot of
increments of eight. So 8, 16, 24, so it happens. Eight is another easily
divisible number. When we get into app design rather than mobile
website design, it's quite a common
grid size as well. Let's actually talk about that. Before we talk about
app design sizes, I'm just going to
just, I don't know. I've got a homepage, it has got 12 columns. I'm using a gutter width
of 16 or 24 or eight, whatever you want to
use, make it divisible by eight to make things easier. In terms of the margin, you've got to remember
if you are using 140 from both sides, so that's 280, you're taking off
this because you're actually designing or
I can't do that math. 1,920 minus 280. You can actually do
math in these fields. You're actually designing
a website for 1,640. I'm going to undo. That is
that space in there, 1,640. Does it say it
anywhere? It doesn't. But you have minus the
margin of both sides, so that's the size
in the middle here. But don't get too hung up
about the exact width because we all know everyone's got different size computer screens, laptop screens, mobile devices, you can turn them on the
side, portrait landscape. Just get them generic and
your developer will help with the whole responsiveness
or you'll do it if you understand basic responsive
web design. But it's CSS. If you are interested
in doing that, maybe you're interested, and even if you're not going
to become a web developer, understanding some
front-end web design is really handy
as a UX designer, especially when designing
web and mobile web. If you are interested in that, you might want to check out my other courses on web design. There's a responsive
web design course. Probably the best one
is Visual Studio Code. There is a web
designer essentials that'll get you through in understanding the basics
of web design handy. The last one I want
to talk about is designing a mobile phone. Instead of finding a mobile
website design which we have, which is a website that's
just viewed on desktop, tablet, or mobile, we're
actually designing an app. What we want to do here is
instead of designing columns, because it's not going
to be responsive, it's going to be quite
a fixed measurement, either Android or iPhone, and they use something
differently instead of things try and respond, they use this very quite
rigid square system, and they use eight pixels
as the square size. Use this to space things out. Space away from the sides, keep things apart
from each other. That will be what your developer will be using when you're using the frameworks that they'll use for their mobile app design. Columns for websites and
this grid system for apps. A little bit more rigid and
specific for app design. Holy smoke, was that useful? One last little thing is, let's say that I
do make a new one. It's got this fork and you're
like, I want this one. What you can do is
you can select on this one and say actually, I want to make it the default, and then click on this one
and say, use the default. That's a way of getting it onto multiple different artboards to make sure they're all
the same. That is it. That was a long one and
a brain bender, I know. I hope it was useful. Let's
get onto the next video.
31. View port aka dotted line on the page in Adobe XD: Hi, everyone. In this video, what is this dotted line
that appears sometimes, but then no other times? What does it do? I
can move it around, doesn't seem to do anything. The short version is, there's a longer video
[LAUGHTER] version, but the short version is, it's just like what to preview when I hit this little
preview button, my view port is
what it's called. That's one of my review, and people can scroll down here. But if you move it down
here, watch what happens. I can say, get out of my way. It means that when
you're demoing it, your view ports huge and it's trying to show you at all,
which is a bit weird. That's what it does.
Let me go into a teeny bit more
detail in this video. Let's look at those
dotted lines. First of all, let's
turn the columns off. They're great when
you're getting layout, once you've got a basic
structure in there, and you want to turn those off. There is this [inaudible], click on the title and you
can just turn this tick off. It turns them off
from everything. There was a shortcut view, it is this one here, show layout grid and
you'll see on a PC it's different and it'll
be Control Shift'. On a Mac it's Command Shift'. Cool. We've got them off. Now what is that
weird dotted line? We hinted at earlier on,
it's called the view port. Basically remember
I drag this down, it was up here and
I dragged it down. It only appears once you've
dragged something down. This one here, it's
not going to have it. Where is my dotted line? There it is there. Because what needs to happen is it
needs to know two things. How long is your page
and what do you want to show on your preview? I'll
show you what I mean. If I have this up here
and I go to Preview, got the name of it,
preview this page. Look at that, it shows
me my mobile design. But if I drag this bigger, and I put something down
here that we can see, I'm just going to
make a red box. Same thing. Preview this. It's going to work nicely but except now there's
some scrolling. But if I'm like, man, these dotted lines
are annoying us, I'm just going to move
it down the bottom here. Get rid of it.
There you go, gone. What's going to
happen? Watch this. [LAUGHTER] Hedge
yarns visual effect. You're telling it that the
view port is really big, so I'm going to try and
show it all for you. That's what that is.
I'm going to undo that. You can change it over
here to type it in. Can you see view port height? You might decide
that you're working on a larger size
and it needs to be 750 or you can just drag
it. That's what it does. Let me open up the preview constantly so don't
go away, watch this. That's what it's
doing. It's just weird if you don't
know what it does. The same for desktop. If I click on this, it's showing me my whole
desktop in this tiny screen, so I'm going to close
it, open it again. Big version. There it is, there.
You might decide your view port is going
to be a bit bigger. It doesn't change the
output of the side, it's just the preview. When you create previews
for your clients to check, it's going to have the
same view port size. Just make sure that if you have messed around with
it, preview it, check to make sure
it's actually doing some okay stuff and
not showing off. It'd be tricky, like I've done it before where you get
a really long page, you design loads because
there's loads of scrolling in the site and
you've just gone, get the **** out of here. You send it to the
client and their face with this when they go to
preview and they're like, Dan, what's up with this? [LAUGHTER] You got
to go in and say, what's an appropriate
size for my view port? In this case, it's
going to be 1080. Check what a normal
standard size is for most common websites height and Google will tell
you what it is, changes all the time, but that's what that little
dotted line does. I don't like it
because it's always on when you're working. I
want to get rid of it. Currently, there's no
show view port line. There might be when you're
later in the future. Often I'll design
it down here and just move it down here
because I hit the little dotted line in my way. I got to be mindful that when I send it off for making a link, I've got to drag their
view port back up, then create the
link and share it. Does that make sense? That's what the view port does. That is it, I will see
you in the next video.
32. How to add & delete guides to Adobe XD: Hi everyone. If
you are like, man, those columns, I don't
want columns just give me some plain
old basic guides. Like these guides, just
simple ones you can drag out and move around and just
do what you want with. If you want to not do
columns, that's totally fine. There's no rules you
have to do columns, especially if you're doing
a self-directed project or it's a little bit more artsy. There's not a huge, big structured
website that needs all this rigid
control with columns, you need some guides, this is the heavy medium. Let me show you
how to make them. Actually spoiler alert, you just drag them off from
the edge here. There you go. Why is this video so long? Because there's some tips
and tricks and other things, but that's how you get
them. Let me show you how. To make some guides, I've made a blank page
just to get started. It's an iPhone 13, first of all, you need
to be on your Move tool, won't work if you're on other
tools, or Selection tool, the little arrow at the
top beyond that one, you might have already
stumbled across it. They just appeared
one day in XD. Watch this, if you hover just outside the
page, they are there. Click Hold, drag it in,
you've made a guide. That's it. You can
go on from the top, drag in from the top. I'm hitting Enter
to get rid of them. If they still won't appear, you might be under View, under Guides and you
might have gone to my case I can see
them so I can go to let's actually drag one on. So I can say somebody
you might have accidentally used the shortcut
for height or guides. So then they're not
working, no guides. You go into here and
just check that it says the right one. Show hide, you get the idea. Make sure you can see them. Let's be a little bit more specific. Let's say you
want to get rid of them. How do you get rid of
them? Click on them and hit Delete, it does not work. You click Hold and
just drag them back into this area over here. Look a little icon, trash can, there you go,
its how to get rid of them. Let's be a little
bit more precise. So let's say you
want to put like a 24 pixel border around. So I'm going to click
and drag it out, and you can see I can be very accurate and got 24, perfect. I can do it there
too. If you've got a touchpad you're trying
to do your design work on? I do all the time when I'm driving. You can't
be that accurate. So what you can do
is you might be, it's just easy sometimes
to grab the square tool, drag out something,
type it in there, 24 and if you tab, you can go down from
width to height 24. That's not essential,
just a handy trick. Grab the Selection tool, drag into the corner, and then go watch this. Suppose zoom in a little bit,
it'll snap to my square. You get the idea, drag, snap, top one, snap, grab that guy, cut
them down here, paste that guy, get
him in the corner. It's just a quick
way now you can't drag them from the
bottom or the top. So there's a little bit of
fun scrolling going on. Remember, hold Spacebar, click and hold and drag or you use either method you be using [LAUGHTER] so
far in this course. You've got this far, you've worked at a
way of moving around. I hold the Spacebar down. This is a little bit
of that going on, like move it down,
drag up a little bit. Then that guy, sorry
buddy, you're gone. Don't need you anymore.
Command 0 to fire out, select it, Command or Control
3 clicks on that app board. With that, we've got guides. If you don't want
to use the grids like we did in the last
one or the columns. You just want a few little
guides, then here you go, drag them out, delete
them, and drag them back. You can just turn them off because sometimes
they're handy to get started and then you
want to turn them off. Go to View Guides and
you've got Hide Guides. You can lock them as well
because they are movable. You can click on
them and drag them. You might decide that
please stop doing that. Go to View and just lock
them for the time being. If you've got another
project and you need to copy the guides across,
you probably saw it there. Let's go to you. You can see my guides
haven't come across. They do come across if you obviously duplicate
the artboard, remember holding down the
Option on a Mac Alt on the PC. I just want to copy
these across so you can select on the artboard, you want to take them
from go to View Guides, Copy Guides, click on this one, view guides, paste guides. Guides, there you go. You might turn them off just because this is a
pain in the butt. You accidentally keep
dragging things out from the top and the
bottom and there you go. That is Guides in Adobe XD.
33. Color Inspiration & the eyedropper in XD: Hi everyone. This
video we're going to look at color inspiration. We're going to work on
color in this next section. Here where do you get
started? How do you pick colors that go together? Yeah, that's what
this one's about. You can go anywhere
on the internet, color inspiration, type it in. You'll find loads.
Places I go, Color Hunt. I like it for color
swatches that match. What you can do is you can go have a look and say
this is for me. You can see this
little code here. It's a hexadecimal number, a little hash code for it. If I click it, it
says it's copied. Nice. If I now go
back into XD and grab a rectangle and draw it out
and click over here my fill. You'll see down here, we're being using HSB for parts. There's this hex number and
I can paste it in there, hit "Enter" on my keyboard,
and I brought it over. You can just keep copying and pasting and you'll
start adding these to your document and
start using that, for the basis for your colors. You might end up changing
them, of course, but it's a place to get started. Now, another place I
use quite a lot is Adobe color or color.adobe.com. It's free. You don't need a
paid license for this one. What I really like is
things like explore, along the top there
they do travel this website around
so you might have to find where explores move
to, but you can do searches. You can decide on like,
let's look at tea, and get inspired by tea colors that other
people have decided. You might decide
that, here we go. Here's some tea colors and
questionable tea colors. It's to get the creative
juices flowing. These are tea color and, well, yeah, some things
that are lacking. Let's say that you do decide that this is it,
you're like, yeah, I find it quite hard to pick different Browns
that go together, look at this, this
one [LAUGHTER]. This one, I like it, I do. You can go "Enter" and copy and paste the hexadecimal numbers like we did
in the last one. Just click on that and
copy it and paste it. What you can do though, is you can use the
Adobe library. I'm going to cancel out. Before I say "Add to Library" we need just need to
make sure you're logged in to your Adobe
account, adobe.com. You can see my little face up
the top there. There it is. What you need to do
is make sure that you've got the right
libraries selected. Create a library,
you can add one. I've got this XD class one here, and it means that it's going
to add to that library. Otherwise, there's
a bit of a mystery knowing which library is
going to be added to. Let's go "Add to Library" and there's not a
lot that happens [LAUGHTER]. It's just the library. How do you access
the library in XD? Inside of here, we've
got these different, we've been going between
layers and our assets panel, and we haven't used
plug-ins really yet. But this top one here,
which is normally assets, you can actually go
back one from it. It's a strange place for it. If you're thinking
this seems like a strange place for it, It is. Here's your document
assets, back to libraries. Document assets,
back to libraries, just so you know, it's
easy to get lost in here. You can see all the libraries
and if you're like me, you got a million libraries. Here's my XD class and
there's that color, that tea one I just did. How to use it? Let's
click on a rectangle. You can just hover above
and go to that one. You go in that one. You might go grab a bunch of different ones and just start experimenting with the
use of these colors. The one thing I did
say was you can copy and paste the
hexadecimal number. Let's pick totally random, nothing tea related to this one. But let's copy it and over here, when I said, just paste
it like we did before. You've got to change it to, I have already told
you this, haven't I? [LAUGHTER] My brain is melting. I have already showed
you how to do hex. I'll show you twice.
There you go. That is picking five
swatches out of context. What I like to do is use
either our mood board or just a site like dribble and you just looking through for
colors rather than style. You might be like, I really love these purply black colors, even though their content
is not quite right, you might decide that the
colors are right for you. Just take a screenshot
and do what we did with the mood board and bring in
your screenshot into XD. I've already got some stuff. What I've done for my one is, we know what's on my mood board. I got captivated by
a couple of colors. I like this. This is tealy green smoke
color and there's a bit of warm coffee tea
color in there as well, so those are the colors
I wanted to steal, I mean, appropriate, borrow. Can you steal a color?
What you can do is you can grab your rectangle tool,
draw something out. Then over here, can you see, I'm going to get
rid of my border. See the fill has the
eyedropper click on the "Eyedropper" tool
and then you can just move it around and say, I want you [LAUGHTER]. Looks blackish. But
if you go into here, can you see it's
part of that hue and you decide that
I actually want to move it up to here. You can see that's that
color, just more saturated. The top unto the right
is more saturated. Same width. Let's
do another one. Let me grab a couple
of colors from here. I'm going to decide
eyedropper tool. I'm going to grab
this brown in here. You can grab it by the
pixel, two, one looks good. Oh, give me the
pixel [LAUGHTER]. Here we go. Again, you might decide I
like that color, but I want a lighter
version of it as well. To be honest, this
is often how I end up with my color ideas. It's not always, but often
I get, I'm like, man, I love what they've
done here and I'll go and borrow the colors
and ended up going, okay, I like this color, but it's too warm. I want to move it this way. You can see you can
desaturate it moving it to the left and just
go at one in there. You may end up with
this fully costumed color palette that
you might start with. You're going to get to a
point where you're like, I need a darker version,
I need a lighter version. because you need a button or the contrast is not enough for
a button on top of here or the text is too light or too dark and you end up
adjusting it as you go, but it's a good place
to get started. Adobe Color, Color Hunt, and lots of screenshots and appropriating colors
from other people. Now the other thing to
consider is that you might be driven by existing
product photography, existing brand colors,
so your brand color or your color inspiration journey
might be pretty stunted. You might have to
pick the colors that the company already
uses in here. You might be able to sneak in a complimentary color or a secondary color
to their existing. If they're using
red, you might be able to sneak in
something else that supports that red to give you a bit of contrast on the site, especially if they haven't
done much webby stuff before. There's just so
many elements that need different colors to show a hierarchy of needs
like what's important, what's not important, what the next step
might be, buttons, often in different colors from other non-clickable items, so that indicates to people, helps them navigate
around the site. I'm babbling now, that is it. I will see you in
the next video.
34. How to create a color palette in Adobe XD: Hi everyone. In this video, we're going to build this
color swatch system, the primary, secondary,
and our accent colors, plus we'll build
out gray swatches. You can probably tell
maybe that this is a cooler set of grays that
I'm going to use and whites. Let me show you why we make them and how to make
them. Let's get going. To get started,
I've got a bunch of stuff that we're using in the last videos that are placeholders and just
making this place a mess, even more messy than
it currently is. I'm just using my
selection tool, drag a box around them all, hitting "Delete" on my keyboard. What we're going to
do is I'm liking this color, from the last video, I stole it from there, not into this brown
at the moment, so I liking this tan
color that's in there. Let me grab that.
You wait there. He's grabbing the eyedropper
tool and I'm going to grab something in there. I like that little combination. That slide is in there as well, but I am digging
this thing, maybe. When we're dealing with
colors for UI/UX project, often you need a primary
and a secondary color, which I've got here. Often you'll need an
accent color as well. Let's have a look. Let's say that the
primary color is this dark slate in
the background here, black, not quite and this
is the secondary color. There's gray, gets used
there, it gets there, and then accent color
is this yellow in here. That's how they break out
information, bulk stuff, important stuff,
clickable things, or little updateable things. There's other ones,
this green is gray in the background,
primary, secondary. Do they have an accent
color to this blue one? The accent color can often be quite a strong version quite a distinctive color
and gets used quite, only used a little bit. It really helps important
things, little accent color. Now I'm giving you hints
at how to do this. There's no reason why you
can't use a million colors, two colors, one color
black and white. There's no color police. Nobody's arrested me
yet [LAUGHTER] even though I've committed lots
of crimes against color. I'm just giving you
my way of doing it. If you do want to
do color theory in a little bit more
scientific and thoughtful way, check out Sarah Parkinson, she's got a color theory course, Google it where you're
watching it now and you will find
her course on that. She's brilliant at it and
better at it than me. Just giving you my tips
and tricks on how I work. I've got these two colors, I want a third accent color. I don't know what it is yet. I played around with this [LAUGHTER] weak yellow in here, and you're like,
yeah, that's good. I like this one as well. It's yellow that I
probably wouldn't pick this like lemony
yellow canary color. I like kiddish.
I'm not sure yet. There's no reason
why you have to pick it and not change it. It's just going to give
us a starting point. I don't like it already.
[LAUGHTER] It's two in that green. I'm just going to bring it down just to the yellows a bit more. I'm going to even dragging
it just a little bit. There you go. I'm just not sure. Anyway. Often once
you've got your colors, you're going to need a
darker and a lighter one like we saw at
the beginning there. What I'm going to do
is I'm going to make a little nine-column grid. This one is already quite light, so I'm probably only going
to go darker with it. I'm going to probably go, remember before HSB, I like this one, hue
saturation brightness. In terms of the brightness, I'm going to use my
up and down arrow. I can only use my down
arrow, in this case, to darken it up. I might find that I don't actually use the accent
color other than its full blast because
that looks a bit minky. But let's give
ourselves some options. Again, use the
eyedropper tool and then go from this and go
a bit darker as well. What I might find
as well when it gets dark is I might
have to increase the saturation by
either dragging it this way or using my
little saturation, go up a little bit just to add a bit more volume to the color. I don't like it. Let's look
at this one here. Let's go. You just go to saturate my brightness up or
down, like that. This one is probably too dark to maybe start with from mid-tone, and this one here is going
to go always the wrong way. I like this. Good.
Same with this one. Let's see what it looks
like when it's lighter. I think this whole
bunch is close, but it's too bluey. I want to go a little bit
further into the greens by just dragging this down a
little bit. Here you go. I did like that slate. I'm going [LAUGHTER] diluent
the wrong way with it. Your idea, I'm going to
find something that I like. I'm into that digging
in a little bit. That's why you're like,
I'm stealing colors, and then two seconds later, you've customized them to
be the thing that you want. Actually, why the
heck is he making different color swatches always. There's just times
where you want to use this color and
you can't use it on top of this may be because
the contrast isn't enough. You need to actually either
go to a darker version, or that doesn't work
or a lighter version or this goes up to that one
for a really good contrast, it's a way of doing
some combinations. Primary color, secondary color, accent color, in my case. Again, no font police
to arrest you. Just do what you like. The other thing we're
going to talk about is to do with blacks and whites. Blacks and whites
are relatively easy. I guess you go here and if
you want a full-blown white, you just drag it
up into the corner member over to the edge here. But what ends up happening here? Obviously, a white is, I don't really need
a color swatch. Why? Because it's easy to find. But what I might do is
you can have off-whites. It's like in here is too far, but just a little bit. I've got this white that is
just a little bit warmer. I could do a cool white.
Let's look at this one. Instead of a warm white, which is in my yellow hues, I'm going to go to
bluey-greeny color. I've exaggerating a
little bit to show you, but you can see how that white, they're the same brightness, but this one is warmer
and this one is cooler. Both of them though, are
probably a little bit too much, so in terms of
brightness, probably 98. Hundred is full blast white, and this is just little hints. I'm not sure exactly what I
want to do here for this one. The other reason to
have an off-white is let's say you've
got an interface, let's say you've
got your iPhone, and you want to have a pop-up. I'm going to bring
it to the front. Remember right-click, you can send it back, bring to front. You can say, all this, and at least now if I add
something like a drop shadow, we're not doing drop shadow
probably in this video, but you can see you've
got this pop-up, is enough of a contrast
to keep you just going and the drop shadow
really helps push it out. You do it the other
way around. This can be that and that could
be your interface popup. Just to give it a bit of
contrast when it does up here. You get what I mean?
I'm going to go down the slightly bluer version, and I'm going to do the
rest of the colors. Let's go here, go here. I got five of them. Let's
start with the blacks. The black says the same thing. You can go full black down the bottom here,
or a rich black. Let's say regular old
black, and these two here. This one here, you
can add a bit more of a cool character. Same thing in the
blues and greens, it's still black, but there's just a little bit
of something going on. Is it there? Just a little bit. Same with this one, you
can make it in the warms, go, I want this one just
a little bit warmer. It's hard to see there, but when they start
lightening up, let's say we go here, and we go this one here, we drag the lightness
down or up. Can you see it's more of
a cobalt nato gray color? Then over here, if
I line this one up, what you can see it starts
appearing out here, especially at this brown
as it gets lighter, I'm probably going to
have to remove not only make it lighter, but also remove some
of the saturation, so it's still warm but just
in a less obvious way. You can decide where
you want to go. You might go just regular
old black and white. Or in my case, I'm going
to go down this bluey, steely, stormy nato gray. There's so many names of gray. If you've ever tried
to pick gray from a paint swatch or
wallpaper or something, you'll know grays are
out-painted in the black. I'm just going to
work my way down to lower versions by going here and going here and
going further up, please. Probably as it gets lighter, removing some of the
saturation as well. That's saturation in there, we just drag it
to the left-hand. I'll show why I love clicking
the [LAUGHTER] keyboard. There we go. It's just going
to be my color scheme. It just gives you
a place to start. You can adjust this
afterwards, but later on, when you've picked 40
different kinds of gray because you haven't had
color swatches to pick from, that's going to be
trouble to update. But now if you've just got enough to pick from with
a bit of variation, that you can update
them all later on when we get into
things like color styles. That is my color
swatches to get started. It is not set in stone, I
don't like that one yet. You'll probably see it
changed in the next video. But that is it for the moment, I'm going to tinker
with this a little bit more and I'll see you
in the next video. That's it, I just
remove some saturation. That's enough. Let's
actually get going now.
35. How to create gradients in Adobe XD: Hi everyone, its gradient time. We're going to make some
sweet gradients here in Adobe XD. Now let
me show you how. To make a gradient,
let's start over here, selecting it Command 3 or
Control 3 on a PC to zoom in. Then I have to back out
a little bit [LAUGHTER] Let's just grab any old square. It can be a circle, it can be
any old shape you've drawn. With it selected, you change
them over here under Fill. Click on Fill, and
at the top here we've got Solid and
you can pick that various kinds of gradients
so Angular Gradient. We'll start with that one because you're not
allowed to use it. I don't know [LAUGHTER] Wait, all gradient is evaded. Linear is probably
the most common. To change the
colors of the ends, you just click on
either into them. You can see it updates
over here so top, I'm going to say, you are green. It's got full longer.
Let's go for the, in my opinion, the worst
gradient in all the world. Click on the bottom one,
adjust the hue, go blue. No, red, where is it?
That is the worst. That could be the ugliest
gradient in all the world. You might love it. That's okay. I'm changing the direction. You just grab any of
these little handles here or these little dots at
the end and drag them out. You can decide which
way they want to go. You can have it pass the screen. You can have it quite
tight in the middle. Depending on what you want
to do. It's looking great. Now if you want a third color, you can do that easily by either clicking here in
the middle of the line. You see the arrow there? It's got a little plus
next to it says hue. I'm going to add even more
exceptional gradients. Oh, it's bad or you can do it up here in this line up here,
it doesn't matter. You can click on this to add an extra little swatch that
you can adjust the color for. Let's get this good. Yellow. That's what
we need. You can delete them by clicking
on one of them here. Let's say we want to
get rid of the blue, just hit Delete
on your keyboard. This is linear gradient. Radial gradient
works much the same. They're pretty easy
to self teach. Center moves around. There are two of
these, which is weird. This outside one, is the extent like big and
wofty outside the edges. I use this quite a lot for this gradient that's
not quite a gradient. Can you see it's just
like it's there. It's giving a bit of
fullness to the color without it being a very
strong gradient in red. This one down here distorts it. Depends on what you
want to do. Again, you can add more of these
little points here, adjust them up or click
them to delete them. Now, to get inspired
by gradients, there's a cool site that I use. I always come back
to here. Grabient, grabient.com and you will find just interesting gradients that you might not have explored. Let's say that you
want this one here. You can click on this little
dot and you see there's a little hexadecimal
number. Click on that. You can copy that
and into Adobe XD, find the beginning swatch. Then down the bottom
instead of HSB, hue saturation and brightness, just type in the
hexadecimal number. Return, copy, paste this one out and find this end swatch, replace them and we'll get rid of the random
one in the middle here. Goodbye. There you've
got a gradient. Of course, you can do
the exact same thing with your eyedropper
tool from any of your Command 0 or Control
0 to get everything, is to go and pick these colors. You might decide
that I want this. I want the inside one, which is you to be
this other color. You Command 3, Control
3 on a PC and Gradient. One last thing I
want to show you is we've done quite
deliberate gradients, which is cool and I'll
use them in my designs. Often, I don't know, you can use really subtle gradients. Let's say that this
is going to be my mock-up of my
high fidelity form. I'm going to bin
everything that's on it. This one is going to
be my homepage and this one is going to be my
Hi-Fi for high fidelity. I want to start
with a background, really slight
gradient, and you can do it for your art
board as well. You can select your art board
by clicking the name at the top and basically treat it like we did that rectangle. Click on Fill and just
go Linear Gradient. In this case, what I want to do is I want to maybe just
use a slight off-white. Actually, this is not
what I want to do. I want to go over here and
find my little color swatches. Click on you, back into this, pick this first color, use the eyedropper
tool and I'm going to go for something like this. How good is this going to be? [LAUGHTER] We'll
see in a second? Something like that
in the background or maybe something
like that to that [LAUGHTER] Undecided but you can add a gradient to the back of your art
board just so you know. It might just be a little off white gradient in this thing. Sometimes I find instead of
being quite deliberate as in starting and
stopping either side, is I'll extend these
past where I need them to be just because I want
the hint of the color. I want it to tie it together, but without it being
so very obvious. Like at a first glance, it's just a milky version
of those two colors. But anyway, that is
gradients in Adobe XD.
36. How to save and reused color swatches in Adobe XD: Hi everyone. Instead of using the Eye Dropper
tool over and over, trying to reuse colors, I'm going to show you
how to add them down the bottom here for
saved swatches. The simple version is
click then hit Plus. [LAUGHTER] There's a couple of little things I'm
going to show you so you can be master of the
color swatches. Let's go. Instead of using that
Eye Dropper tool, what we're going to do is we're going to add them in
a nice handy place, let's add this one first
to saved swatches, that's this little
list down here. You might already have
some by accident. If you don't well,
either way hit Plus. With this selected, it's going to say add this to this list, same with this one here, and just work your way
through and add them in. Let's add these
three and then I'll give you some other tips,
we'll add them all. If you get them order mixed up. Like actually I want
that there, it's all. You can do that and it
just means now instead of, say, I'm all the way down here, and I need this tick now
not to be that green, I need it to be the new green, look at that oh, just handy to reuse that stuff. If you've got something in
there, you want to remove. With the selected, actually, to remove stuff doesn't really matter what you have selected, you got to just drag it into
no man's land. There you go. I'm going to go through now, use my speedy speed
editing technique and add all my swatches just
so we've got them there, so you wait there. It was painful to watch
and it was painful to do. [LAUGHTER] Click,
click, click, click. I've got them added and one thing to note
is that gradient, some mix these up
in-between a video, k is they won't apply gradients for some
reason at the moment. Try now, you might be in the future and it might
work, but if you edit, just throws in a solid color and I need to get
rid of that one. [inaudible]. Let me try again. That was interesting,
I didn't realize that. What it's done is, can you see the one
flushing down there? It says, hey, I've already
got that color gradient. You're like yeah you do. It will try and edit
as a full swatch and if you've already got it, it won't edit again
which is cool. You wait there I'll mix
up another gradient. My favorite in all the world, if you try and add a gradient, it will just pick
one of the colors. Can you see it there?
Right. Get rid of it? Nice. All right. That's handy, have your colors ready at the beginning
just so you know, my process isn't this systematic
when I'm in the scrappy, don't know really
what I'm doing days of the design where I'm just
working through things. I won't be as good with these because I don't really know what
color I need here, I'll be trying all sorts, but it doesn't take long before
you get into your process. We do have a committed
color or you've got a client color
that you can't change, it's part of their
brand guidelines. It's stuck in there, you can add them in here so you're
not trying to mix it up every time or eye
dropper tooling it. Those are saved
swatches in Adobe XD, let's get onto the next video. Say goodbye little radio.
37. Class Project 07 - Colors & Columns: Hi everyone, it's time for a
class project creative-ish. We're going to do some boring
all pages and columns, then we'll mix some colors. The first thing is I want you to create your HiFidelity pages. What we're going to
do in this course is, because we only have a couple
of pages to work with, we're going to leave
our wireframes up here. Often I'll do them in
a separate document, but for this one, because we do have quite a small amount
in this task flow, four pages plus some
extra for animation, let's keep the hi-fi on the same as the low-fi
with wireframes. Just create four pages they're the exact same name
except I've added hi-fi to the end of them. Homepage, product, checkout
and confirmation hi-fi. Now in this case, pick the phone that you are going
to be testing on. Figure out what phone
you've got and what pixel, height and width it is
and you can pick that from when you make
your new pages. Have four of those
into the same thing for the desktop version. I don't mind what
size you're using, you decide what you
feel is comfortable, and for website design page. I'm using the 1920
pixels across, but I'm tucking it
in at the edge, and put in your columns. Again, you might
decide that do 12 for the desktop for
me and for the phone, either six or four
wherever you feel like. What you will find
when you're doing it though [NOISE] is that XD, because it uses pixels, it sometimes can't
divide everything, like my phone size here, which is 375 is [LAUGHTER] a divisible
number that's quite tough because it's five pixels or it's an odd number,
that's what it is. It does some squirrely
stuff around the edges that goes to make this all be consistent gutters because that's really
important to XD. It, adjust the edges
to make it all fit. If you finding it's close but are a little bit
off, don't worry. In this case, just
go with the flow. It's just part of using this absolute measurement and designing for something
that's going to be responsive later on. There's a little bit
of a disconnect so just ignore the edge bit there. If you get it.
Hopefully you'll end up with wherever the phone
size you're working with happens to be an easily
divisible number and XD will look great
once you've done that; Four pages, both desktop, mobile and the columns, draft out your color palette. There's four parts you need. [NOISE] Where is it. I'll zoom out. That's a
shortcut I haven't shown. You can use this or
you can hold down the Command and Space bar key, just randomly say if
you're doing anything, you can hold down Command
and Space bar and [NOISE] just drag a box around. You saw there's
pop-up on my screen? That's Quick launch Mission
Control cameras called. On a PC that's Control Space bar and you can just drag
around, zoom in. That shortcut might be taken on PC as well. Anyway, digression. I want you to do a primary,
a secondary color, an accent color, your grays, and at least one gradient.
I don't mind what it is. Don't commit too much now we just, it's part
of the course. Pick some colors, look at
those color inspiration, pick it from your mood boards and you can change it
later on, don't worry. Take a screenshot and
upload your pages, your colors and then I want you to save them all into
your saved swatches, [NOISE] which is at
the bottom of there. So if you can get
that into some order, take a screenshot for
that for your homework and do that. I'll see
you in the next video.
38. What fonts can I use in my web or app design in Adobe XD: Hi everyone. In this video, we're going to look at what
fonts you're allowed to use in your web
design or app design. I'll show you a
couple of good places to get them from
and how to maybe pair them up so you've got some nice matching
fonts. Let's go. Why can't you use any old
font that's on your machine? Because it needs to
be a special web version or app version. They're not all built the same. Often there is a version. Even if you find it on your
hard drive and you love it, or maybe the client has it and they've got
a font that they use, you might be able to find
a web version of it. If they don't, you're
going to have to have a chat about
something that's close enough to what they're using and that is
available online. Just figure out
what it is and see if there's a web version available and if they have to
license it or if it's free. It's a weird thing
that's happened in web designers that there
is a bunch of free, nearly free, inexpensive fonts. Adobe Fonts is the
place we're going to start because this is the free. You're paying a license to Adobe to use these
fonts in your designs. You're not paying
anything extra for them, but you are paying
for that license. Fonts.adobe.com is a great
place to get started. It's a really great website. This changes all the time, so your layouts are not
going to look like mine. But find that all fonts
or browse all fonts, you end up in
something like this. What I like to do is
I like to paste in the material I'm working on, which is beautiful green tea. That's their marketing
message that's going to be in middle of here. This is my marketing message. What I was looking for was I really love this
combination in here. This really big, narrow, thick, bold with this more
hand-drawn or a little bit more friendly colloquial text. That's what I was looking for anyway. That's what
I went and did. The cool thing about
this is you can type in your marketing message. You can work with
the actual letters, and then over here you can
decide that I want it to be clean or I'm going
to view them all. I want my one to
be none of those. There's two parts.
There's these tags and then there's like official
font classifications. I want san serif,
which is font that don't have these little feet
that poke off the edges. These are serifs. San serif
is without those serifs, so I want san serif. It's going to get
rid of all of those. Great. See these ones
here? I don't want that. I want just ones that are, in my case, I want the
weight really thick. I want a font that is san
serif that has a nice, thick weight, so bold basically, and I want it to be narrow. You can decide over
here, I want it to be a narrow font or compressed, or there's different
versions of it. But you can see in here, I at least narrow it
down quickly to stuff. Interesting, I like that one. Then you just work
your way through here, we decide which one you want, and then click on let's say
that we do want Interstate. I'm pretty sure I've
got that on my machine. No, we don't. You
view the family. They're pretty easy to install, and then you hit
"Activate Fonts". There's a compressed version
and a condensed version. There are just different levels
of how squished they are. You can see this
partially squished, super squished, and regular. You can activate part of them or all of them and start
working on your design. The thing you've got to check when you are downloading this is that they are available
for web licensing. In my case, these can
be used on a website. Perfect. So just double-check. If you're getting it from a site where some of those free sites like 1001 Free Fonts or DaFont or one of
those Font Squirrel, check that they're actually
able to be used on a website. Some of them aren't. One thing you can do I think in
this is I can go back one and I can say actually I thought there was a way of choosing only show me the web ones,
but you can see it down here. That shows me that it's
available to be used on a website and it used to be something you
had to watch out for, but so much of it is actually available for online use now. View them, activate them, they just stop here, and
next day it's just magic. They use the Adobe
Creative Cloud and you can start
working with them. Let me show you another
site that you can work with is Google Fonts. Fonts.google.com is a
really common site, even more common than
the Adobe Fonts site. These are all free to use,
you don't need any license. They're just limited. Adobe Fonts has more fonts, but Google Fonts has a brilliant amount as
well. In here, same thing. I'm going to type
in my beautiful green tea and just
work the same way. Their category searching
is not as fun. They've just got the
basic categories in here without all the tags. A bit of options, you
can go into this. I'm going to go into
this one and look for handwriting and I
was looking for something not exactly
what was in that mockup, but something like it. Here it's a little bit
different from downloading. Let's say that you
do like Pacifico. You open it up, you
download the family. All of these Google
Fonts are going to be available to use via web or app. Check the license, but
you'll find they will work. Then you download the family, you will end up with this
zip file that comes down. If you're on Mac and PC,
they're pretty easy, just double click them. Keep double-clicking
them until they install. Installing fonts is pretty easy. If not, Google it and figure out how to install
fonts on your machine, but you shouldn't
run into a problem. Kind of free, totally free, and then paying for fonts. Don't be afraid to
pay for a font. There are just some
jobs where you can't and don't
have the resources to and then there's
jobs where you've got a bit more time and
a bit more thought. I don't want to discourage
people from buying fonts. I do all the time for projects. Let's have a look
at this. It doesn't matter what foundry it is. I'm looking at klim.co.nz. It's an amazing foundry. They make their own fonts. They are based in
New Zealand where I'm from. I just like them. I feel a good connection
to the font when I am downloading it. Instead of just saying
I picked a font, I'm able to discuss how
the font was inspired, what it means to me personally, what it means to the client. But you do have to pay for them. So don't be afraid to pay for fonts. I bought this
one the other day. When it comes to buying fonts, let's say we want
to buy this one. You've got to decide
what you need it for. Desktop is a traditional
graphic design, and that's what I bought it for. Yeah, I bought that one there. Let's have a look
at our web version. When you buy a web version, you've got to tell them like
it's going onto a website. What's the monthly
unique visitors? On my side, I'm about 10,000, so that's what's
going to it costs depending on how
many unique visitors there are and you can decide on actually
that web version. Does it get you all of
them or just one of them? The web version, if
you just want one, you're just going to
use a thin and medium. It's going to cost me $100. Work that into your budget when you are selling on concepts. If your company that
you're working for already has a font and there
is a web version, you're going to have to
go off and figure out, is it a free font
that they're using? Are they using Roboto,
which is free to use, or are they using something else that needs to be licensed?
Just double-check that. If they don't want to,
they're going to have to find something else free
that's similar. How I end up picking fonts
is say here on Adobe Fonts, it's really great to see
them in sample text. You can just get
pretty close and then you download a bunch of stuff that you're
not going to use. You're going to use one
of them and then I spend my time in XD. Where are we? Here we go. I end up having
copy after copy after copy, all in different fonts, playing with different
ones and you're like, jeez, he's been half
a day doing it. If that's you too, don't worry. It happens to all of us.
The other nice thing and useful bit is font pairing. If you are at something like
Adobe Fonts and you're like, I've got to use this
one for my headings, but what am I going to
use for my body copy? Font pairing is a
really good word. I've typed that in here.
I did font pairing Adobe Fonts or font
pairing Google Fonts. I opened a bunch of these
randomly to have a look and I found other people
that have done font pairing. You can say, I like that. You can decide on these, and these are available
on Adobe Fonts. You can say, I am sold on.
I'm trying to think of one. I don't like any of
those combinations. [LAUGHTER] Same thing
here, I just Googled it. Adobe Fonts appeared
from the Adobe blog and there's some cool
resources on what to pick. It's nice to see them in
context because sometimes seeing them all lonely on
here isn't super helpful. Some of them do
have it. Let's say that we want to
look at Interstate. If we look at this family, sometimes not all of them, they'll have a use case. Not a lot going on here, but they can have a bunch
of these things in here. I wish Adobe would
put more on there. But yeah, have a look around, see what might work. It might be like, I love
these two together. Font pairing, downloading fonts. I think even Adobe
internally Interstate has recommendations
for matching pairs. Somebody's done it, but it's a little bit too much going on. I'll take it back, but I do
like to see them in a bit more contexts than on a website. What fonts did I pick?
Let me show you. I'll speed download them
and get them installed. These are the ones. This is my first concept anyway. I liked this one,
this Bernina Sans. I like it because it
works as a heading because it's got like a
full bold and narrowness. Narrow is really handy
on phones as well. Watch this, the
non-narrow version. Look, it got wider. It's wider. It just means you can fit more stuff along in a
larger size on a phone, which is quite narrow.
So that can be handy. Also though it has a
really nice, simple, easily readable body copy size, so I can get down to
something like 16. It's nice and legible. I'm going to get
rid of the leading, just a space between the lines, and that's going to work
nicely as body copy as well. I can use that version
and that version. Same font, body copy, heading, and this is going to be
my little accent font. My only trouble
with this one is, first of all, it was too light, but luckily there's
a thicker version and the other problem
is it's caps only. If you get stuck in this, the client is going to say, can we do it in some other way? Can we do a lowercase? You're
like, not with that font. Because Ametic doesn't
have a lowercase. I like it enough,
I'm going to do it. But those are my fonts. Actually, before we go, I
wanted to throw this in here. I don't want you thinking
the next day like, man, he just goes in
and picks a font, picks a subheading font,
and then he's off. Nope. If you're like me and you're laughing because your XD document
looks more like this, this is Illustrator, I know. But I'll put together
a quick t-shirt and 100 revisions later. All variations of
the same thing, lots of different fonts. If you are like that, don't worry, I'm like that too. My XD files get all messy
before they get tidy. I wanted to own up
to that in case you felt like you
were doing it wrong. Yeah, things get messy. That is font selection in Adobe XD. I'll see you in the next video. Look at that, I spent ages
trying to get that look. That's where I ended
up, but I was trying so hard for this like indie, Japanesey, skateboardy thing. I love XD, you get it. That is it. I'll see
you in the next video.
39. Check what other font’s people have used: Hi, everyone. In this video, I want to show you ways of checking what other
people's fonts are. Let's say this side here, potential competitor, you want to know what
font they're using. I like this one because it's
clear and it's slightly condensed so that it can fit
a lot in these categories. Let's say you want
to know what it is. I'm using Chrome, potentially the most common of browsers. You might not be using it,
so you'll have to figure it out for your own one
or install Chrome. Let's say this one here,
you just right-click it and you can go to this
one called Inspect. On a Mac, you might have
to option-click it. This thing appears
and you might have to drag it around and
move it around a bit. What you're looking
for is on this side here is this thing
called Computed. Computed would tell
you, eventually, you might scroll down a
bit what the font family is and you can see
in this case it's Roboto Condensed
and you're like, "Awesome," so I know
what font it is. Then you can go to something
like Adobe Fonts or Google Fonts or search
the Internet and just go, "I want to find Roboto." Super common body copy font. You can see there's a couple. There's a Roboto Slab. This looks more like it. In here, there is a ton of
different weights and what's. That looks like there is Roboto Condensed.
That looks like it. You can then
activate it already. I'm using Roboto for
another project, but here you go. It's a Google font, so you'll
find it in there as well. Yes, so that's how you potentially can do
it from websites. Let's say that you
just have a screengrab or PDF or something. What you can do is you'll need a JPEG or
a PNG version of it. These are from our mood boards and I really liked that font
there. I wonder what it is. What you can do is
weirdly at Adobe, it doesn't matter where you are, it seems you can just
drag something in. There's an official way and it's called not sure [LAUGHTER]
wait for it to load. Visual search. I mentioned it's under fonts and it is in there somewhere.
You'll find it. I just dumped it
in there. It says, is this the font you want? You can move this around
to the things you want. I'm like, no, I was good. I'm going to erect it. Next step, its going to
try and guess the text. [LAUGHTER] I've moved it off. It finds it tough
with these really thin parts of these serifs. I'm going to type in, TEA STORE. Here you go. It
gets it normally. Then it's going to
give me some fonts. Look at that. It's pretty
close. It's not exact. Can you see this little
ear here and that little pokey out a
bit? That's different. Can I see any of
them that have that one? It depends as well. You might be like, actually, I liked that ear,
they're better. That has the little
flat end or you like the one that has
this little bit? It just gets you close
and then you can activate them and
start working on them. It's not always going to
get them make can-do. There's other services. WhatTheFont! Is a cool
one that I used to use, but I've started
using adobe fonts because It's nice
to find something close enough and activate it and start working in my
design concepts. That is exploring fonts
that are already out there online or in pitches and grabbing them and
using them in your design. A little side note, Adobe has an app called Adobe Capture. It's on Android and iPhone. You can actually
do that on the fly while you're moving
around. It's cool. If you're out and you're
like, oh, that's cool, you can actually try and
capture the font live on your phone and it will download
and install it for you. That is it. Let's get
on to the next video.
40. What common font sizes should I choose in web design: Hello you. This video we are going to explore what
font sizes you should use. The short answer is you
can use anything you like. But there are some rules
for using fonts on devices and on websites that I'll
explore and give you some of the defaults to get
yourself started so that you can break the rules, but you've got to know the
rules to break the rules. [LAUGHTER] Let's get started. So font sizes, you
can make anything. There's no official rules, there's just some defaults that you should be aware of because you'll see them loads, and a lot of web development
is built on frameworks, basically templated
things, and they've got some sizes that are default
and they get used a lot, so what are they? Let's look at this, let's call, this one Heading. For a heading, the biggest size heading you can
probably use, well, the biggest one normally is 72, 72 is a massive heading. They go down there,
down from there, so 48 is next. Let's make this left aligns, they all line up a bit better
and let me go through them. These are them 72, then it drops down to 48, then we go down to
32, then there's 24, and then there's 18, and that's your normal headings. Let me actually write these in here so you can see them better. Those are the sizes
typically for headings. They'll also call this one
Heading 0 because it's massive and this
one is Heading 1. In web design, this is a pretty common standard
way of calling things, and the standard sizing, you can use them or not
use them, it's up to you. The other thing is, is you call them Heading 0. Your coder or developer
will probably call it H0 and in here, they'll call it H1 and
so forth and so on. Often when I'm talking
to my developer or I do a little
bit of web design, I'll be working with H1s
instead of Heading 1 equals 48, the default is going to be H1, and it will default to 48 when I'm coding it in
unless I change it, and that's a good point,
you can change it. It just means that
the developer has to go through and maybe make it 1.5 of the original size, so those are the defaults,
at least for headings. The next one is your paragraph
for your body copy text. That gets referred to
as your paragraph text, or your P text, and often that is 16 and
often it's not bold. It's a regular font and that's what I'm going
to use in this case. But again, it will depend on your font type because some fonts just look smaller even though
they're 16 point. They might have their baseline
in the same point and the x-height in same but
it might be really thin, so it needs to be
bigger to be seen. So you can break these rules, just a good starting point. The other thing to
be doing is that when you are picking
a paragraph text, you're like 16-point,
is that big enough? You've got to make sure
that when we're doing something like some
body text shuffle, is that when you are doing it, you're viewing it a size. Now we know that
my 100 percent on my screen is actually not
appropriate for my device. I can either do
some sneaky stuff, 75 seems to be a good again, I'm holding up my
phone that's about the right size of my screen, yours might be 100
percent perfect. Try it 100 percent,
try it lower, it's a good gauge but don't forget to be testing
on your devices, especially if you're building
a mobile first or an app, get it on there with
that Adobe XD app and be previewing it on there so that you can actually
like that's actually doable because you do run into problems if you do
want to be like, I wouldn't be super cool
and get it down to 12. It might look interesting, but things like search engines, it's not 100
percent, but they're going to look at your
site and say, hey, this site is not accessible for somebody on a mobile phone. When somebody searches
on a mobile phone, potentially your site is going to be not
completely black flagged, but it will be ranked lower than a site of equal quality that uses font sizes that are deemed accessible
or the right size. To have a little look through, it's one of your tasks after this course is
to have a look at term of accessibility
and font sizes. So for me it's two things you
need it be the right size, so 16 is perfect, can't really go
wrong with it and it needs to be a high contrast. Google will also not
like it if you're trying to do this,
because it's spammy, it is adding lots
of keywords and people use to try and
do it to trick Google. But Google figures this out
like very low contrast, so we're going to hurt your rankings because
it's not that useful for people watching
it so why show it to people? Google's
clever that way. Have I got my paragraph text, is it the right size? It's 18, there we go. Test on your device, you
can start with these. You don't have to, because
I've got another font I'm going to grab all of these guys. I'm going to duplicate them
and I'm going to go right align and I'm going to
align them up here. So this is your alignment
tools. Have we done that yet? I don't know. Not that hot.
Flip the line, red line. I'm going to go to that
other font that I've got, which I can't
remember the name of. It's called, something,
and I think that's it. This is my fonts, my more playful,
colloquial marketing font. Not as easy to read, not good for body
copy because it looks too small so I'm
going to get rid of that, probably that one as
well and that's probably the smallest I need to use
this in a Heading too. But can you see
the eligibility of Heading 2 in this font? I've picked Bernina. Bernina sans versus
this one here. This one has to be
quite big and not essential to the
use of your slides. So I wouldn't use this as a navigation because it
is too hard to read. But for our cool
little marketing messaging things throughout, as long as we use
it nice and big, I think it's going to be fine. That is my Font 101, you can totally ignore
it or take it on board, up to you, but now you know. Let's get into the next video.
41. How to make Character Styles in Adobe XD: Hi everyone. This video is
all about character styles, reusable things that we
can click on bits and go, hey you are now that and
that, well, that's a white. [LAUGHTER] Let's use
the black version. You can go through, have some predefined styles that
you can use and reuse. I'm going to show you
how to make those. We'll make some white
versions of the text as well. Then at the end there, we'll do a little production part of
the video where not so much learning more just having
to make some stuff and I'll show you some of the issues that I run into while I'm working. That's why this video is a
little bit extra special long. Yeah. Let's get into
it, character styles. To create our character styles , I'll leave this in there. [LAUGHTER] I've
closed this down. I close this down often to take screenshots for you for different
things for the courses. You can just click on them. You might accidentally close on, just click it again,
opens back up. We've looked at layers mostly. We've looked at a little
bit of this Assets panel. We basically [LAUGHTER]
deleted everything out of it. But you can see in here some
of our predefined styles. There's our character style. Let's say that we have decided that this is our
headings and things we can just select all of them using our selection
tool and just go, boom. It just means later
on when we're typing, and I'm typing, you can say actually I
want it to be this one, or that one, or this one. Those are your paragraph styles. You can add them
one at a time or as a big group like I just did. You might want to add up to you. You might decide that actually instead of
calling it this, we're going to call it maybe heading, what was that one, zero, heading hyphen
[LAUGHTER] Heading zero, you might go through
and name all of those. I'm going to leave
mine as they were. The cool thing about
using styles is obviously we can just
click and type them, touch them in here and
pick a different size. It also means it's going to be great later on when we update. The client comes back
and says, no way, man. I'm totally not into Bernina. I need it to be something
else here it is. They email to you
and you go, okay. So what you do is you
right-click it and you say Edit. You can say all right the client wants it, we're
going to give it to them. Here we go. Classic
joke, dad joke. The cool thing about
it is that it's updated over here and it updated all the
times it was used. I should've done that
a little bit more excitingly. We undo. If you have all the way through, all different apps, across all sorts of
different pages, then go and update it. [inaudible] joke, or at least the exciting
part of it all. Styles can be easily updated, easily added and easily renamed. I'm going to do
the same for these guys and add these three. It's up to you how messy
you want to go into this. You might decide that
actually I'm going to have another separate group of these and they're all
going to be white. Because there's going to
be lots of this app that actually going to be
on white version. Same thing with this. There's going to be
a white version. Depending if you
think it's going to be powerful or just
messy in here. Depending on how new you are and how you can close it down,
get into the messiness. Now the weird thing
about this is, if you have come from
other Adobe products, we use character
styles and you have to apply them, not apply them, that's not applied InDesign,
Illustrator, Photoshop. It's not like that in this one. Let's say that this
is Amatic bold 48. If I just type it in here, they're not connected to
the style and I type in [NOISE] and I make it Amatic, and I make it 48 and I make it bold and it probably is less to
be that black color, even though it's not
connected to a style is no like that was
what I was doing. I was like, how do I apply
the style now that I've made? It just goes, if
you want to change anything in this document that happens to be
the right font, or the right color,
or the right size, I can go and just say
edit it and you watch, it'll adjust them all. You see just the color of
this one and this one, there's no re-connecting it. It just looks
through the document for anything that happens to be the right font size and
the right font color, etc. You can see it didn't touch
that one up there because it's the wrong color.
Didn't make sense. Just for those people who do use character styles in
other applications, you might be looking
for some, I don't know, some more detail where there
aren't any. It's clever. Now the other thing we
haven't done we've made a style for is this
paragraph style down here. We've been in this box here, this just expanding width. Remember we looked at that
earlier in the class. For a paragraph, probably what I want is this box here because what I want
to be able to do is, let's just paste this in a few times, is
the line height. Look, this is not what I want. My style at the moment
has a line height of 45, ginormous. Yours might be set to
something more appropriate. I've ended up messing
with mine at some stage. You can turn this back. Now in terms of what size it should be, again there's no exact size, but about half the font size, the smaller sizes works good
[LAUGHTER] 1.5 then say 20. It's not a science rule. [LAUGHTER] I take it back. [LAUGHTER] That rule works good when you're working with 8, 9, 10 point sizes. It doesn't seem to
work as good at 16. Anyway, decide on a font size. Remember, I'm just using
my up and down arrow, gets something like my line
spacing is there perfect. What you're also going
to have to decide on is the paragraph breaks. We haven't really
looked at this. If I put a return
in, at the moment, there is a return there I just
hit Enter on my keyboard, but there's no space,
no paragraph spacing. What I'm going to do, select it all and this is option here. At the moment, there's zero spaces
between our paragraphs. You'd have to do this, the old double return
trick. That's too big. Then you're trying
to highlight that text and you're like, if I make that down to a
point, will that work? No. [LAUGHTER] What we're
going to do is select it all and use this to
space paragraphs out. We're going to make this
half the size of the font. That's my little rule. It's half the size
[LAUGHTER] of the font is good for the space
between paragraphs, not the space between lines. I'm going to pretend that's
what it was anyway, it is. [LAUGHTER] Now what
we need to do is, we need to update
our paragraph style. We're probably going to have to delete it and start it again. I don't think we haven't been able to limit
this. Let's check together. You could just edit it and
be doing it like this, but what I'm going
to do is just delete it and then add it again. That brings up a good
point. It's edit again. Instead of this, I'm going
to call this one body copy. You can move them around
in order depending on your level of OCD of
where they need to be. It gets really confusing
if they're all mixed up, it gives you a little preview
which gets you close. You might decide actually it's easier instead of trying
to read all this, you can call this one H1. We talked about this earlier. Actually, that's H theorem. You're going to
call this one H2. It can count. [LAUGHTER] This one here is going
to be h. What was that? Four is the lowest one.
I'll split the next one up. You might decide
that [LAUGHTER]. I'm not sure why I had
soaked them all in to prove it. But it's done. Again, no exact rules, but this is handy, especially when you have
to update it later on, even if you don't officially put all this in here
and you just need to update a bunch of fonts to save this one
needs to be updated. You could just edit. You add only to go
in here to edit it. You can see all the things
that you use it are updated. You might use it for that and that certainly you can delete your stuff and don't
delete the actual font, delete the actual style. Now, you just going
to used it to go through and change all of your body copy throughout
a document without using styles. All right. Another thing you
might do is you might add a body copy
for bold as well. This one here, I'm
going to add a version. This guy here is body copy. I'm going to create
another version that is the bold version of my one. Instead of narrow, irregular, I'm going to go narrow bold, and I'm going to add this one, and I'm going to give it
a name of Body Copy Bold. It's very common to call
it paragraph as well. This body copy, I don't know. Body Copy Body, Bold even, know [LAUGHTER]. All right. I've got
those two versions. Anything else that
I want to share? Yes, there is, I have
checked my notes. I want to let you know that
you can't add it twice. This one is already this
Body Copy Bold [LAUGHTER]. If I edit again, look, little warning would be helpful, but it just means, I'm already in there don't be
adding me again. If I go through and make
this a weird number like 17 and I can edit now watch
[NOISE] there he is there. Adoring sound effects. Can you drag them
out? You can't. Right-click, delete them. I'm going to undo actually that, so I go back to my normal one. Another thing I wanted
to share with you is, if you are from other
Adobe programs, you're part of the Adobe land, you might have come something from Illustrator or InDesign, Premiere Pro, any of them. The cool thing about Adobe and their library
system is that, let's say you do already
have some fonts in another, this happens to be
Adobe Illustrator. It could be anything that
has character styles, InDesign, Photoshop,
that type of thing. What you can do is
open up your libraries in whatever program
you're using. Select the thing, hit the little "Plus" in the
bottom here and say, yeah, let's add this character
style to my library. I'm adding it to this
one called XD class, and it doesn't work with
paragraph styles at the moment, XD, I don't know, I think there's too much
complexity in there. That's my guess anyway. That might change in the future, but at the moment, character
styles come through. There is there, it's called
new character style. If I go into XD, and who
remembers what the library is? It's in a really weird place. Used to open up in
its own little panel. Now though, you remember, you go to click on this little arrow
back here and you end up back in your library. There's my libraries,
there's my assets. Add assets into my libraries and I'm going to find
my XD1, XD class. These are character style, you, now we're going to be
whatever style that was, which happened to be Museo
Sans Rounded size 10, not an appropriate size, but it might save you some time if you've already got libraries, you've got some brand
guidelines through some good CC libraries already. This stuff can be accessible
rather than re-creating it. Now, you might be
asking yourself, does he do this every
time he starts a new job? Gets the official colors and all the fonts and add styles? No, we don't. It can be handy to be updating
stuff as you go along. You might already
have some brand guidelines that you
have to follow, so yeah, why not? But often this is happens after you get a bit of
a feel for the design. You retrospectively create
these so that you're being consistent but the pure concept stage when
everything is a mess, no, I'm not using too many
character styles, but it doesn't take long
before you're like, oh, I can use a character style and that will happen to
you eventually as well. This next little bit is more of, I just need to do some
work for this course so we can move along because at the moment has been
a lot of theory. I need to get through
some things on the page. You're allowed to skip it. These things can be handy. This also, I say skip it
all the time and there's always some negative information if you do want to hang about. I am going to start laying
out what's called a card. You saw at the beginning
they're just a reasonable bit of my product details. I'm going to put in
some of what I've learned into practice.
That's what I'm going to do. I want to turn on my columns. I'm going to turn on
my columns by clicking the name of it at the
top of the arrow key. Let's go to the layout grid. Now, depending on what
you started with, I was looking at my design and I want a little bit of
padding on the outside. I've decided that I don't have to fit a lot of
information in my design. I'm going to switch to
this four column option. What I'm going to do is, I guess I want to keep
this in here and not just show you that
you should beg for. That it is fluid in terms of how big should that guarded
be, what margin you want? It's coming down to your design. I wanted these columns
because I really find them useful for
consistency across pages. You might decide that
actually I'm just going to lay it out anywhere
I like [LAUGHTER]. That's fine. It's going to be a little bit tricky
for your developer. What I'm going to go
to the four column. I want how much from the side. When I began this
course or this design, I was going to push
it all to the edges. That's why I can
add zero padding on the margin on the edges. But now I'm thinking actually
I want some margin on the left and right.
I'm going to use this. I didn't cover it
because I didn't do it, but you put margin
along the top, along the bottom, or just
the left and the right, it's up to you or
you want to do. There's that negative bit of information that you
hang around for. Again, multiples of eight
is really handy here, so 16 how much I actually do, 22 multiples of eight, 24 on the edges and I
might open up the width, the gutter as well to say 16. I'm just looking at again.
Can we live with 24? We'll give it a go. Remember
I can make it my default. Select all these guys and go use default and probably
change it 20 more times as we go
along. It's okay. What I want is I want
a rectangle showing my product and how far
do I want it across? I'm going to totally break
my rules any second now. I know it [LAUGHTER]. It's going to be a
placeholder for the image. I'm going to grab my type
tool. I'm going to type in the product hitting. These are going to be my
different features of this green tea. Click once. What am I on? I was on a circle tool for some reason.
Let's grab the type tool. Click once, and
this is going to be Tencha Mimoto [LAUGHTER].
Something to do with green tea. There we go. We got
sweet size in there. Again, that works for me. Body copy. I'm going
to grab my type tool. I'm going to click
and drag out a box. I'm going to put
it in body copy. I might just repeat that
over a couple of times. Actually I might make it
all the way across this, get this to line up and
go body copy where you, all right, styles getting you starting to use our columns. We're getting some consistency
across the padding. This is starting in
the right space using some of our color swatches. Let me go. Here we go. Turn the columns off now. Remember there is
shortcuts for that columns are on and off. I call it columns. It's
called the layout grid. We did the squares
or the columns. That's that crazy
shortcut there. Yours will be different on a PC. Shift, Command,
Apostrophe. There we go. What I want to do is
have multiples of this, there we go. We'll look at the spacing. I'm just going to adjust this. Let's do it in super fast mode. All right, run into
my first problem. It fits just but I'm probably going to find
something longer. I'm going to ignore that
problem at the moment. I might have to in
this particular font, go down to something else like
44 or something later on, but we'll see what
we run into then. For the moment, I'm happy. I can't remember why
we started this video. What were we doing? We were
doing character styles. That's why [LAUGHTER]
it took me a while. We ended up doing
a little bit of production video stuff
where we actually have to make some things and
hopefully show you some insights into actually, while you're working, things can adapt and change
as you go along. All right, that is it for this very long video, and
I'll see you in the next one.
42. Plugin - Adding our first Plugin Lorem Ipsum to Adobe XD: Hi everyone. In this video, we are going to install our very first plugin into
Adobe XD. What are plugins? Plugins are things that Adobe
XD doesn't do on its own, somebody else other than
Adobe have created them, and they do things
like in this case, bringing icons, bringing UI
Faces, placeholder text. There are lots of different
plugins to extend Adobe XD beyond
what's in the system. I'm going to show you
how to install them. We're going to work with
this Lorem ipsum one, which is placeholder text. For us in this case
we're going to set a writing body copy
over and over. We're going to put in some
mixed up Latin words that look like good sentences without them actually being actual sentences. Let's install our first plugin. To get plugins
going in Adobe XD, down here we've
looked at layers, we've looked at our assets, panel with a different
character styles. Look at this last one down here, plugins. Nothing
really happening. Either hit ''Plus'' or
hit ''Discover Plugins''. It's going to open
up this thing. This is the Creative Cloud app. If you haven't got it installed yet or it's
not open, give it a sec. You might think, is
it doing anything? It's just taking a
little while to load. This thing changes. They
reorganize this quite a bit. So, I've ended up at this stock and marketplace and plugins. You can do searches for it. At the moment, it's
got featured ones. I want to look at all plugins. Now if you can't find the
screen for Creative Cloud, you don't have the
app installed, you need the Creative
Cloud app installed, but you can get to this
via the web browser. Go to exchange.adobe.com, and we're dealing
with Creative Cloud. In here you can
find things like, down here, let's
find things for XD. You can find
different extensions or plugins for this in here. We're going to go the proper way via the Creative Cloud app. It's ordering it by most
popular which is handy. The ones that have good stars and then are downloaded loads, they're often the better ones. But there are hundreds of
different ones to go through. So, spend some little time, have a little look and
you might be like, I use that or I use that one. You can connect other maybe
workflows that you're doing to what you're
doing here in XD to save some time like
there's a mirror one. I use the mirror boards
quite a lot for work. The one we're going to
use is this Lorem ipsum. Lorem ipsum, if you haven't
heard of it before, is just placeholder
text. There you go. Click ''Install'', agree
to their terms and conditions and eventually
it'll tell you, look at that. That is now installed.
If you go back into XD, there is him. There he is. For it to work, you have to actually set and text first because
I've used body copy, body copy. That's no fun. If you hit this and just
hit this one here says, ''Quick Lorem ipsum'', and it will just throw
in some basic stuff. Do you agree to this? You agree. You have no choice [LAUGHTER]. So, it's added. These are Latin words, actual words just mixed
up so they make no sense. It's just easy when
you are designing to have these as placeholders rather than actual text because you might not
have text from the client or you end up in discussions
with the client about, you can't write that here and you're like, don't
worry about the texts, it's just placeholder
text just there to give you a design idea. You might go through and
go you, just become this. You can see it's using my style. It doesn't even
have to be a style. It's just using what was in
that box for it to work. If you have nothing selected, you'll get this or that one. Yeah, no text selected. Have something selected first. I'm not going to go
through all of this. Well, I'll go through just
a tiny bit of this one. This ''Quick'', is just going to
dump whatever it is and try and match it. There is this first one here. You can do some
fancier stuff like, do you want it to
be Lorem ipsum? There's other different
placeholder texts and you can decide, I want to end it with the
punctuation of full stop. Do you want some line
breaks in there too? Do you want to trim
the text area to fit? Remember we've got
this auto height. It might trim it up
to fit it perfectly. Just added a full stop. You'll get to know
different plugins like this one here might not be there when you come to check, or it might be some other
awesome placeholder text app that you choose, or is it the top of the popular? There are in here, they all
work slightly differently. This one even has a shortcut. Look at that. That is it
for this particular plugin. We'll do a few more
throughout the course. If you need to get rid of
them, you can right-click them and manage it and it'll open
up your Creative Cloud. In my case, it's there. I can either disable it or
uninstall it and/or remove it. That's how to add one and that's how to remove
it. But they're fun. You'll find stuff in there that has some connecting
to other apps, doing stuff that Adobe XD
itself doesn't do yet. Some of these I've
had at the beginning, there were a lot of
plugins that I used that I just don't need anymore
because Adobe XD, I'm assuming, looks at some
of those plugins and goes, man, that's being
downloaded a zillion times. People like it, we
should probably bring that into the
app and that happens. But we'll do a few more
throughout the course. But for the moment, that is it. That is installing our very
first plug-in. Next video.
43. Class project 08 - Text: It's project time.
I'm going to get you to get at this stage. In your class projects, you'll see Class Project 8. I'm going to need
to create a logo. Up to you. You can do it
super simple like me. I just used my font and I use a bold version
and a light version. That's the fanciest
I'm going to go. But if you want to spend
a bit more time making a cool logo for your
brand, please do that. Then I want you to
create on your homepage. I want your homepage just to
have your marketing message. You're going to have
to think about this for your company. The one you got earlier on from that random project generator, give it a marketing message. You can copy somebody else's. It's just a filler. At the moment, you
won't believe it. I made my own on a beautiful
green tea to your door. Unique to me, I know. Create something in here. Try and use a couple
of different fonts because what I want you to do is part of it is sending
me this stack up here. Even though so you
don't have to do this stage of the project, what I want to do
is just get you making these things and
I want you two make sure they're in
your assets library and your styles as well. Practice that, add
them in there. Take a screenshot of that and a screenshot of these two pages. This page here is
slightly different. We're going to see it a
bit of homework outside of this homework, a
research project. I've talked about cards before. I want you to research
what is UI card? Just have a little look and
your homework is 10 minutes. Go spend and read up a
little bit about it. There's going to be lots
of terms that I used in this course that you're going
to go that's new to me, new x, and it's outside of this course to go through
every single term. So go out and research it. I want you to figure out what a card is, what it's used for. The short version is it's these reusable nuggets of information. I've got some examples
in your exercise files. They are there. The UI card
examples. I've grabbed a few. You get a sense
of what they are. These repeatable and you
can make them unique. Just means that they
fit on a website. They can be structured
and broken down responsively for
different devices. But have a little research
on what is a UI card for. Have a look through
some of my examples. I want you to come up with
your own for your brand. I've gone for something simple. I've pulled look, not
following my guides, pulled this in from
the edges there. I've added a drop shadow. I don't want you doing
too much design work yet. But drop shadow is easy
to turn on and off. We'll look at more
effects later in the course, but have something, have at least three different
things for your product. You don't have to think
of these as well. I borrowed these
from a competitor just to have something to use. These are going to
be images when we get into that part
of the course. You do the same at placeholder
circles or squares. I want you to go
about installing your very first plug-in as well. There's lots to do for this one. Homepage at the marketing
message placeholder, create your own text
styles we've talked about, install a plugin. The Loren Ipsum placeholder one. It doesn't have to be
the won that I use, but something that you can
use to fill in these gaps. Even used these product
titles as specific ones, like go and found some features that your product
has just so you got some content going on and
research the UI cards, create those little
feature cards and screenshot of that,
screenshot of that. That's what you really
need to do to send in. We're finally moving off from being like all this
stuff up until now is just research projects and not very visually
stimulating. Now, we are visually stimulating and I want you to share it now
via social media. There's an Instagram account, a Twitter account, Facebook
group, and LinkedIn. Up to you how you
want to do it and tag me on Instagram or Twitter. The Facebook group
is pretty amazing, and so is the LinkedIn
group about sharing your designs and
asked for feedback if you wanted to say pay, this is my very first thing
and ever in UX or Adobe XD, what do you guys think? Be prepared to get criticized a comfortably like
these places here, I feel like we've got
a really nice sense of like, yeah, it's not a ruthless Reddit
style, ruthlessness. It's a nice group full of people like you who are
getting started. Also while you're there, make sure you
comment on somebody else's because part of it, becoming a good designer, UX designer is being able to identify other people's work, things that you
really like about it, that you might take away for
your own thing or being able to deliver criticism in a way that doesn't
make people cry. That's something you can
practice there as well. About feeding back
to other people like what you did hear. If it was me, I'd probably
look at doing X, Y, and Z. That's the vibe we've
got on these groups. So give it a try both
upload your work and also delivered
to others as well, because that's a big part
of being a designer. It's being able to
deliver and take criticism without
crying too much. I cry still, don't worry. Go do your homework, quite lot to do. I will see you in
the next video.
44. Drawing & editing shapes in Adobe XD: Hi everyone. This video we are going to make some simple shapes using the shape
tools in Adobe XD. I'll show you some
of the secrets inside of the polygon tool and how to get into something called object editing mode to
customize some of these shapes. Let's jump in. Let's
do some drawing. I'm just working on this
empty artboard here. We'll start with
the rectangle tool. We've done a bit
with this already, so I've got this rectangle. Who remembers what I
hold down on my keyboard to make it straight to
what at least the square. You got it hold down "Shift", before I start
dragging, drag it out and you get a perfect square. I don't want a
square [LAUGHTER]. I want something that
looks like that, it's going to be that little
price taggy thing icon. Now, one of the cool
things about shapes in Adobe XD is that you can do things like the
rounded corners, just drag them out. But if you end up in something called object editing mode, I don't even know
if it has a name. It's what I call it anyway. If I grab my Selection tool
and I double-click it, you might be in here all the time by accident because
you're a double-clicker. You love double-clicking
stuff, you're like that changed, click back out, come out
of object editing mode, go back in. While I'm out. I have all this lovely
control because it's called a primitive
shape, it knows. The computer knows that,
that is a rectangle, and as such, I can do cool
rounded corner stuff to it. But if you go into here and
you edit this, watch this. When I'm in this
object editing mode, which says these things go anchor points and
I can move around. Hey, drag these little handles to change the type of curve. You can go inside any shape, double-click it,
and start messing about in here and
totally reckon it. The trouble is, is
if I come out by just clicking in the background
and now I click on it, those rounded corners, you know I haven't
missed this one up. The XD goes, I don't know
what you are anymore. [LAUGHTER] Is that? I know, we're calling it a teabag. Looks like teabag, but I don't
have that control anymore. So that's the only
drawback of going into object editing mode
and missing about, but we need to make our own
custom icons and shapes, and I'm going to undo
this until it's back. I know it's back because
these things appear again. I'm going to get rid of those, because what I want to do
is double-click it and go over here and add a point. I'm in this, I can edit it, edit existing points,
but watch this. If I hover above
this little icon, it's the pen tool
I can click once, and it's giving me a point, look at that I can drag
it up. Here we go. My little house slash
price tag thing. That's object editing mode,
to get back out of it, just click anywhere in the
background and now it's just a regular old shape
that harder to destroy. A little circle in here, what do we hold down to
make it perfectly round? That's right, "Shift". I'm
going to Selection tool, which is the V key. Select "V", select
both of these, I'm going to say make sure
you are aligned vertically. I drew it perfect, nice. The other thing to
know about objects as you can rotate them. I've selected both of
them again, remember, there will resize it and
just outside of here, there it is there, it's like
no man's land, not there, not there, for this
like little round one, you can click and drag it. I'm going to scale mine down by holding "Shift"
and dragging it. Remember the stroke?
That's okay. I'm okay with that size. The next thing I
wanted to do is I want to go and look at
some of these other tools. So square, circle, this one here has some
special abilities. We drew an arrowhead
earlier on in the course. Same thing, hold "Shift" to
get a perfect equilateral. I don't know what it's called.
[LAUGHTER] same sizes. You get a triangle,
the triangle though, has some secret abilities. It's this like
little group here. Or if you hover above it, you can see that one,
you see little icon? It's a star. Let's have a look, so sides wise let's
go 14, decagon. I'm not even going
to guess these [LAUGHTER] I'm so bad at this. I enjoyed math, not
very good at that, five is my hexagon, pentagon. I'm going
to stop guessing. But you just tap inside and
you can get different sides. The other thing you can do is this star inset
here, this one here. If you type it in, let's go full 10 percent spiky star thing. I'm going to go, let's say five, and I'm going to go 50 percent
gives you, five sides, 50 percent star inset gives you that traditional star
that we're going to use for our little voting
thing five-star reviews, which you should be leaving
by the way on this course. Let's have a look. One
of the options it has is this rounded corner so
I put in its pixels, it's probably a bit much, a lot of these controls
actually are on it. Can you see if I zoom in? There's this bit here
which is the star inset, you see and this one here, which is how pointy it is. You go, you, so you just
want a little bit of there and start to
look like that. I'm going to go
there. Here we go. So that is the secrets
to the triangle, or I think it's called
the polygon tool. It is because it's all polygons. Last couple of
things with shapes. Well, I think one more
with it selected, you can go to object and
there's under Transform, you can flip horizontally, vertically or it does nothing for a star because
it's symmetrical then, [LAUGHTER] it's like this one, and it's not grouped, and so it is got Object,
Transform Flip Horizontally. There we go. There's
a flip vertically, but you get the idea. That's how to do
that if you need to. That's basics of
creating shapes. You can double-click them to go inside of them and adjust them. But you do lose some of that control like we have with things like
that with the star. That is creating simple stuff
with some drawing shapes. Onto the next video.
45. Strangeness with shapes in Adobe XD: Hi everyone. This video is
weird stuff in Adobe XD. It's going to be
basically around this which is if I scale this down, it turns into this blob. Earlier in the course
Dan showed us a way way right-clicking
say Outline Stroke, that's going to give you
even weirder results. I'm going to show you
how to get around them, alternatives for Outline Stroke, and do my best to explain it. It's a tricky one, but let's get started in. Take number 5. [LAUGHTER] I've recorded
this so many times. It is a tricky one to explain; it turns out, because it's weird stuff so it's
weird to explain. You don't know I've
done five times, but [LAUGHTER] you'll
probably get from my maniac behavior that I have done it a
few times already. Let's focus it in,
let's get in there. What is the problem? Let's forget about you. Things give me a
problem, [LAUGHTER] so let's hope this fixes it. I've got a star, it's
got to fill in a border. I got rounded
corners, you can see. Where is my little
rounded corner? It's there. There it is there. It has got five edges,
and it's got a standard set 47 percent and it's got
rounded corners of two. I want to make it
smaller, so I'm going to duplicate it, make it smaller. What's happening? We ran into
this earlier in the course. Remember when we tried to scale stuff and the stroke
didn't come along with it? We use the method that's not
going to work right now, but that default of scaling is really useful when we're using things like the rectangle tool. Rectangle tool, we add
a few rounded corners, and then we use it for
our cards, or boxes, or buttons and then later on
we make one different size. Different size; a
really big one, and you can see it retains
the rounded corner sizes. It's happening to
our star as well. It happens to a few
different shapes in XD, and that can
be a little weird. What we didn't pass to lock
it in and it works now, is we right-clicked it and
said outline the stroke, and then what we did was
is we scaled it down. That was great as long as
it didn't have a fill. What is going on? That's
some of the weirdness. What happens is when you
outline a stroke that has a fill it basically
just separates it out, so I have my fill detached from the stroke around the outside or the
border in this case. That's one thing, you're like,
"I can get rid of that." Just pin him and scale him down, and you're
like, "Great." Now I'll just fill him. Why is he not filling? He has been converted
into a fill. That whole process of outlining the stroke
basically what it does is it turns your stroke
into two parts; that fill and then this thing, and this is also a fill. If I double-click
it to go inside the editing mode it's
hard to describe, but this now looks like a stroke but
it's actually a fill. It's just a nice thin fill here. I can't add a fill, I can add a boarder
to it. Look at that. I can add a weird
side border to it. Let's make it even
smaller so you can see. I can add a border on the
outside to my fill like I can with all the other shapes but it's not what I wanted here, so how do you get around that? I'm going to show
you a different way of approaching that. If that doesn't work and Outlines Stroke gets you
some weird behavior, I'm going to do the
same thing again. Instead of
right-clicking "Outline Stroke" let's use
a different way. With it selected go to
Object and go to Path. There's one in there
called Convert to Path. Let's click on
that. What ends up happening is that
this thing here, it basically just broken all
of the rounded cornerness. If I undo, [NOISE] I've got all that lovely stuff that's says I got five sides, I got rounded corners,
I got standard set. If I go to Object, and go to Path, and
say Convert to Path, it just breaks all of that
stuff like what we did when we did object editing mode, when we did the tag
in the last video. Click on that, it
looks the same. It still got a board size, but it means when
I scale it down the rounded corners I'm going
to come for the right way. I've still got the problem with the size of it so I'm going to have to make an
appropriate border on it, but at least my rounded corners aren't going to be affected. That works the same
way if you've got a square that has
a rounded corner. It's still got these
rounded corners , you want to bust those. Go to Object, and
you go to Path, and you say Convert
to Path instead of this lovely thing called a
primitive that is adjustable. Now if I adjust it, look, it's not quite what I
want with a rectangle but hopefully especially
because we're going to draw more and more icons there's going to be times
where you're like, "Oh, why won't you do
what I wanted to do?" Converting it to a path
first can be nice. Sometimes outlining the
stroke can be good when you want to separate the
fill from the outside, and then the border around the outside is editable and
you can treat it like a fill. I'm going to stop there. I feel like I might have done this one. I feel like it might
have explained it, I'm not going [LAUGHTER]
to keep talking. We'll do it again in the
course, don't worry. But know that there's more
than just Outline Stroke, there is Convert
to Path as well. One or two of those
will work for you. That's a take,
that's a rap people. I needed a break. Weirdness in Adobe XD, done for the moment. That could be me
done for the day. I'll see you in the next video.
46. Learn to draw with the pen tool in Adobe XD: Hold onto your hats everyone, we're going to draw some amazing shapes using the Pen tool. We'll get slightly
better with this one down the bottom here
but I guess I want to introduce the Pen tool
because it's one of the tools and really
useful in Adobe XD. It's not going to be a full
tutorial on everything the Pen tool can or of an introduction to
get you started. It's a handy tool if you
don't know how to use it. Let me show you how. We'll start with the Pen tool. It's this like little
fountain pen thing here. You've got two modes. There's clicking once, will give you a corner point. Eventually, you want to finish it off by completing
it and watch this. You get close to the
edge and it goes pop [LAUGHTER] I'm not sure where that
sound effect come from, that's new for this course. [LAUGHTER] But you
can see there, it connects up and you click once and it will join it all up. Then you can add a fill.
I'm going to stroke. You can just click
all over the place. Now, the trouble
with it is there are straight lines but they're
not very parallel, so let's move this over here. Let's grab the Pen tool again. If I hold "Shift"
while I'm clicking, so holding "Shift" key down, I can click once and
you can see it locks it into 45-degree angles, so it means I can go you, you. I'm going to draw a
little house, 45 degrees. This is my little
house. There you go. There's my little house,
pick a different color. Some great color
choices here then. Clicking once gives
you a corner. The other thing it does
is let you do curves, so I'm going to try
and draw a circle. The weird thing
about the Pen tool, remember if you do want to go
further with this Pen tool, this is like a
quick basic intro, and the tool is mainly used in something
like Adobe Illustrator. You might want to check
out my course on that, Adobe Illustrator essentials, or somebody else's
course or learn online how to use the Pen tool
but this is the basics. I'm going to draw a
circle. I'm going to click, hold and drag. Clicking once gives
you a corner. If you click hold and drag gives you this cornering thing. Click hold and drag,
wobbly circle coming. Click hold and drag, and
you can accidentally drag it the wrong way
and it does weird stuff. Sometimes you need
to drag it out and just keep
wiggling it around. There we go. Then back here, what you really want to do is just
click it once. But what happens
when you click once? You get this corner point
and that's not what we want. Can you see that it's
going to be ugly corner. Again, even with
the finished one, click hold and drag. Here we go, one wonky circle. [LAUGHTER] What else we got? Not got it selected. Select it all, give it a fill. If you want to edit any of these points, nothing's working. Why won't you have a fill? Fill please, now you have
a fill and there we go. Oh, it's over there. Look, it had a fill of white. [LAUGHTER]. Just
drag it over there, then you're probably
screaming at the screen, he's doing it wrong
and there we go. All's well in the world again. If you want to
edit any of these, we need to go inside them and edit them because
with the black arrow, if I click off in
the background, click on them once, we just
get to do resize this stuff. Hold "Shift" to scale the height and width proportionately so it
scales up and down. But who remembers how
I get inside there and start working on
those anchor points? We did it earlier on, so I
just double-click on it. Can you go into this
object editing mode? You can then get in here
and go actually that. It's a little bit like this and that needs to be probably
down there a little bit. If you want it to be curved
but sharpery curved, you bring them closer
to the anchor point. Still curved, click off but
[LAUGHTER] I'm not as good. Those are three ugly shapes. Let's make something a
little bit more pretty. In my case, it's going
to be a tea leaf. When you're drawing
your own icons, it's going to be relative to your company that
you're working for. But we're going to
combine the two, but it curves bit
of end corners. Pen tool again. I'm just going to do it and then
we'll do it a second time. I'm going to click all once for a corner because I wanted to have a pointy tea
leaf at the top. Then I'm going to click hold
and drag for a roundy bit. Then down here, even
though it's not perfect, I'm like, that's not perfect. I'm going to click
once for a corner. Often you just get the points
in and then edit it later. Over here, I want it
to be another curve. Click, hold and drag,
and then back here, I want it to be a nice
little pointy corner. Do you click and drag for a corner or click once
for a corner? You got it. You click once. There we go. There's one wonky tea leaf. I'm going to go to my selection tool and I'm
already in object editing mode. But if you do click
off and click back on, you get double-click it. There we go. Then this guy down the bottom here, let's go here. I can move it smaller. Don't be afraid to move the actual anchor point as well here you go. That's my little
tea leafy thing. What I might do is
have a duplicate of them so copy-paste,
so the two of them. This one is going to be green
because it's a tea leaf. But I'm going to use my
not very tea leaf color. [LAUGHTER] More tea
leafy. Getting better. This one is going to be filled
with white with no border. You are going to have no border. Where did that guy go? There he is there.
Let's make him smaller. I'm not holding
shift in this case because I want to distort them, so I'm just dragging it around. I'm not holding shift and
rotation members just on the outside there so that's
my little tea leafy thing. Could you do it in one go? You can, when you get
better, just so you know, the Pen tool is probably the hardest thing to
learn on the internet. It's tricky for those of you
who know and can use it, you'll sit there smugly going. I know how to use it [LAUGHTER] but it took me ages
because it's plain. If you are new and you
are finding it difficult. That's just part
of the Pen tool. It takes a lot of experience. Out of this scope
of this course, do a lot of practice but
I wanted to give you some basics so you can
at least give it a try. I was going to do that now, I click once for a corner, click and drag out, get down to here, click once. I'm going to do a curve
in here, click once, go cut in here so instead of
having two separate shapes, can you see I can start doing
this now. It's not perfect. Don't click and
drag, click once. If the line doesn't connect
up and you're like, how do I get you over there? You select on this
one, the one you want to start joining up, and grab the Pen
tool, there he is , and click this first one. You actually don't have
to click it first. Just grab the Pen tool, click the point you want
to start with, and that gets it
connected again. There he is. The
basics are there. I'm going to you,
I'm going to here. That's a better tea leaf. There are other
ways of doing it. I don't want to get into the weeds with this
just so you know, there are fancy ways
of using the Pen tool. That's close enough
for what I need. That is the Pen tool
brief coverage. Click once for a corner,
click and drag for a curve and be prepared to be
adjusting it afterwards, and also prepare to be a
little bit frustrated. It's a tricky thing to learn. That was meant to be
the end of the video. It was the end of the video. I've come back from the future because
there's a couple of things I did not mention
so far about the Pen tool. It's useful and it's about any shape that you've
created in XD. We all know how to get inside and edit this thing,
so double-click it. If you want to add
an extra point, just hovering on the
edge, there you go. Just click once and you can get an extra point then you
can drag that around. You can add more anchor
points if you need them. The same way, you can remove them and say that there's too much in this one. Clicking once sound as like, I don't want that one anymore. I don't want this one or just click it and hit
"Delete" on your keyboard. That's how to add and
remove anchor points. Another thing that
I wanted to show you was converting them. Let's say that this one here
started life as a corner. Can you like it? That was
good. I don't want it to be a corner anymore.
I want you to be curvy. All you have to do is remember
double-click to go inside the object and then double-click it and it
converts it from curve, corner, curve, corner. These ones are going
to be a little bit, oh, just double-click
it, curve corner. Converting the points
after the fact, and then it doesn't matter
whether you've drawn them with the Pen tool or started destroying some of
these regular shapes we did earlier in the course. But yeah, those are the extras I wanted to add to
this video to give you a bit more complete
understanding of some of these paths
and how they work. That is definitely
it for this video, I will see you in the next one.
47. Working with stokes & lines in Adobe XD: Hi, everyone. Welcome to
the Border Extravaganza. We're going to look at lines, borders, strokes, whatever
you want to call them. We'll look at dotted lines, we'll look at these
guys that some have flat ends, rounded ends. Then we'll look at
some shapes and some of the weirdness
it does where some of them go round and
some of them get lopped off and some
of them are pointed. We'll explore all of that in
this video. Let's get in. I keep calling them strokes. XD calls them borders.
Just so you know. We're going to create that
line through the middle of these two to separate
them out a bit. It doesn't matter
whether you use the line tool or the pen tool, in this case, you'll end up with the exact same end result. I'm going to use the line
tool and drag it out. How do I get it to go straight? Hold down, "Shift".
In this case, it really wants to anyway, I don't have to
hold anything down, but hold "Shift"
just to make sure. I get my border slash stroke. Now, I could, I'm
going to delete that. Use the Pen tool. Click once, hold "Shift", click twice. I end up with the same thing. Back to my Selection tool. Doesn't matter how you want
to create these things. First of all, what I
want to do is I want to make it my off-white. Let's zoom in a little bit. Spacebar, drag it across. I have my little lines selected. Let's look at the easy one. Let's look at under here. You got to have the
border applied. Otherwise, it's
not going to work. You won't see any of
this information down here and have
something selected, in our case, our line. Size-wise, I'm going
to put it up to two so you can see it easier, and the dotted line or dashed
line is just this one here. You decide on how big
you want the dashes. I typed in five pixels, it will assume that you want
the gap to be the same size. But you can adjust that, you might want a 10 gap. You can decide on how
big the dashes are versus how big the
gap is in-between. This illustrates a couple
of these other points. Mainly this one here. By default, you've got this
first one called Butt Cap. I think I make a
joke in every course I make [LAUGHTER] about that. I really want to but I'm
going to try not to. Let's move on to the more
appropriate name, Rounded Cap. Let's have a look
at the difference. That's how you get strokes that have this
little rounded end. It doesn't matter if you
have a dashed or not. If I turn the dash back to 0 and the gap to 0,
can you still see? It has the rounded ends there. It doesn't matter if
it's a dashed line, but you've got the Butt Cap, you've got the Round Cap. Let's put our dashed back in
to show you the next one. This one here, you can see from the little icon, what they do. The Butt Cap is right
against the edge there, rounded, goes around the
end of that angle point. This one here, it's called
the Projecting Cap. Projects out past. Let's go from Butt
Cap to Projected Cap. This one, this one. Can
you see what it does? It's still the same line
but it goes out and around. You might find that
you've got two icons and you've got the
same stroke on. You're like, why is this
one looking different? You might have imported it from somebody else's XD document
and you've created one, and they just don't match. It's maybe that one
is set to Butt Cap, and one is set to
Projecting Cap. I'm going to leave that there, my little dotted line. Command 0 is not
really what I wanted, but [LAUGHTER] we've
zoomed all the way out. I'm going to click on this
one and go Command 3. You can use any shape that
you might have created, or you can just draw a
rectangle, it doesn't matter. I'm going to use this
one because it's a good illustration
of the next thing I want to show you. I'm
going to add a border. Now, I'm going to add a border
of maybe four pixels just to illustrate our issue here. These three here are
quite important. By default, I can't even
remember what the default is. I can't remember the
last thing you do, but the first one is the way that the stroke
is applied to it. This one here, we'll try
and squeeze on the inside. Let's have two versions of
this, one without a stroke. You won't have a stroke. This one here, though
the exact same size. Can you see? I'll bring
him to the front. He's the exact same
size. The stroke is trying to be on the
inside of this. If you do this other one, it tries to be on the outside. It's a bit wider. There'll be times
where you need both. Can you see the
inside one is doing some weird stuff here
with the stroke? You might find that when
you are trying to apply strokes that it's not
quite doing what you want. You might adjust
these ones outside or this default one which tries
to span the middle here. You can see, there's my
little blue line there, it's a little bit in,
a little bit out. Another thing we're
going to look at is the way that the
edges are dealt with. This is Miter Join, which is the default,
which gets to a point. If the angle isn't too sharp, it has this pointy edge. You got to, I guess, look at. Let me try and get it
close so we can zoom in. You can see, these are
the different ones. Just click through it
and you'll get an idea. This is the main one
you might want to do is the rounded corners. If you want to try
and match icons, you're rounding the
edges of that border. This one here, I never use. It slices off the corners. Can be handy when you're doing really spiky things sometimes. It's probably this first
one or the second one. You can see in here,
what is it doing? Basically, what it's doing is it's such a tight angle there, you can't put the little
point on it because the point would end up being, can
you follow my arrow? It would be so out of here, so the Miter Join has a limit
where it goes too pointy. [LAUGHTER] This one is
starting to get really long. This one here is just too
long so it lops it off. If you do have bits that have been lopped
off and you're like, "Hey, why are you doing that?" It's because it's too
sharp, which is why, can you see, that happens. There you go. That is the download on strokes. It can be useful when
you are trying to mix in some other icons that
you might have got from other places with your
own custom icons, and trying to get
them to be the same, use the same stroke style
so that they match. That is it for stroke and lines, also called borders in XD. Let's get on to the next video.
48. Class Project 09 - Icons & Buttons: Hi everyone. Class project time. You're like, boo, no more class projects. Come on, you are enjoying it. I can see it, you are. This one here, you have
to do a few things. The first one is
make two buttons with texts, you're
like, buttons. Maybe we've been doing buttons.
We're going to do fancy like connecting it up later on. But at the moment,
all we're going to do is basically what
button is a rectangle. [LAUGHTER] You are going
to draw two of them. I learned more and by now, I've used my colors. You don't have to
use rounded corners, just two buttons, all
they are is text. I've got one with green text, on my accent color. This one here is just got an outline which has got
a border and no fill. This one here with white text. Two buttons and two rectangles with text in the middle, easy. This one here, not as easy. This one here is going
to be a nice challenge. A is, you need to create
three icons minimum. You can do them all if you
are ready for the challenge. There's three essential
ones that are required. The custom logo, I want
you to spend some time trying to draw something relatively connected
to your product. If it's coffee, try
to draw a coffee cup. If it's honey, try and draw a bee or a honey
jar or whatever it is. Some icon up here above your marketing message that I want you to see if
you could draw it. The goal here is not to
do something beautiful, the goal here is just to do
something in practicing. This is where you are
right now, and share. I'd love to see
what you guys do, especially via social media
feedback if you want it. It's just, yeah, some people are going
to have really good. You're going to see
other people out, then you're like I've
done great ones, I'm not going to post mine. Because some people
are going to have experience from
other programs with the pen tool in different
shapes and do amazing things, but don't worry,
bring your laptop. What we're doing
here is all about learning and getting started. Don't be afraid to
share your stuff. Even if you think
it's not great, it's going to be
great milestone in two years from now
when you go back and look [LAUGHTER] at
the icon that I made, but get it out
there, feels good. Draw some icon.
It can be simple. You don't have to
use the pen tool. You can use any shapes you like, like this I drew this icon
here for my search icon. It's a circle, and then
I drew a rectangle. Then I went bloop. [LAUGHTER] There was
my little stick. You're going to get creative of how are you going
to draw these things. Same with this rectangle. There was a triangle, and
a couple of rectangles. I don't really like my house, but anyway get creative. The ones I have to do
is that custom icon. I want you to do
the burger menu, if you haven't done it
already. This is line. Just make sure
that you are being conscious of the border style, which is when you've
selected a line tool, it's these guys down here. Like how does it
sit on the stroke? What capping does it have? I want you to just be conscious
when you're doing that. I've gone for a
lovely rounded cap. Bigger menu, relatively easy. A home icon because we're going to need it
for this course. Try and draw a better
house than me. [LAUGHTER] Google house icons, and find something that, A, you think represents
a good house icon, and it's something that you can actually capable of drawing. The rest of them are optional. I've put them in
the order of what I feel personally as a teacher, what is the easiest to draw? Well, [LAUGHTER] actually I'm going to move this
one to the bottom. This one potentially
could be the hardest one. I don't know that. Bugger
menu is just three lines. Account icon, you've seen an account
icon there it is there. It depends on which one you
go for. They can be tricky. I've put them in order of
what I think is the hardest. Do the three, do five
if you're feeling King, try and do them all. If you're feeling you've got a bit of time you
want to practice. The thing I want
you to remember is that it actually can be handy to start off with
a square as a guide. When I started drawing mine, I put them in squares so that at least they were
proportionately the same. I ended up changing
them quite a bit, but at least it gives you
some dimensions to it. Otherwise, you end up maybe
making them all weird sizes. I started with a size
that's 48 by 48 pixels. It's a good enough size, it's big enough that you can get some detail in there
without being too big, and going a bit
crazy because it's going to be an icon.
Let me write down. Just a couple of rectangles
that I started drawing in are actually squares
that are 48 by 48. It's a good starting point. Other things, you can use
the rounded corner function. Remember if you're
drawing something, and you're like pen
tool is killing me. You can use the round corners
or who remembers how you can just get one corner working with your racking
your brain you're like, Oh, I remember. You hold
down the option key. Or Alt key on a PC and
you can drag one of them. This might be the beginnings
of the shape that you need. You might be like,
all right here it is. Now I can double-click
go inside of it and make my adjustments. Because that's easier than
using say the pen tool, or some of the other tools. [LAUGHTER] You get the idea. Also when you're
scaling it up and down, remember outlining stroke. I had to do it with these ones, because remember
when they scale down there are keeping
the border size. I didn't want that
when it got smaller. You see that. I right-clicked and
went to outline stroke. Remember earlier
on in the course, sometimes that doesn't work
for you, try that first. If that doesn't work for you, there is the other option of object path and convert to path. You might run into problems
with those you, might not. Also, you can copy
and paste appearance. Every time you draw something in Adobe XD, it's
pain in the butt. You're like boring gray
line one stroke white fill. Remember, you can say
you hit it, copy, you edit, paste appearance, at least get started
in the right zone. The other thing is I
want you to test it on your XD app on your phone because when you're
laying these things out, they may feel the right size, but when you actually see them on your phone and
try and click them, and you can't
because they're too close together or they're just massive and you're like
this is some big buttons. Always be testing on your
phone just to see what works. I know that this guy
is a bit smaller. I'm looking at my phone here. He's a bit small for
what I need. That is it. Once you've done it, take a screenshot of the icons
that you've created, put a couple of them up here. If you only do a couple, like 1, 2, and 3, just take a
screenshot of your page. Probably the homepage
is the best, because it's along
with your buttons. I'm going to see all of
this. If you've done more, just put them on a page
screenshot and put them up. I'd love to see all the
ones that you create. Looking forward to seeing
what you come up with for this. It's going
to be interesting. Share it here, and then upload it to social media
as well, love to see it. Instagram, Twitter, Facebook
group, LinkedIn, group, whatever is your flavor, and I'd love to see it. That is it, onto the next video. Actually, you go
do your homework. I will see you in the next
video once you're done. See you then.
49. Do I need to know Illustrator with Adobe XD: Because I'm going to show you, it'll start with
just some easy stuff about the differences between using and drawing in Adobe
XD and Adobe Illustrator. Towards the end, I'm
going to show you some of the issues that come up when you are going
from one to the other. If you have no idea what
Adobe Illustrator is, it's just another
program that Adobe does. It specializes in drawing and illustration and
really good at typography. We're going to draw
some shapes like this, bring it in from
Illustrator to XD. But yeah, let's get started. To answer the first question, do you need to know Adobe Illustrator to
be a UX designer? The answer is no. It is a useful tool and
probably a next stage for you after this course if you really enjoy this part
of the UX process. So the actual UI design, the actual making things, drawing buttons and icons, there are any so far you
can get with Adobe XD. It's got enough and you
can get good at it, but there'll be just times
where you can't do things. XD is made for
rapid prototyping, not for a full illustration. That's where Illustrator
might come in useful for you. I use it all the
time in my process. Let me give you a couple
of quick for instance. I'm in Adobe Illustrator, you'll see that it
has some of the tools like there's pen tool.
There's a rectangle tool. I'm going to draw that coffee cup like you
saw at the beginning. There's a lot of
similarities, which is nice. I've got this rectangle. Well look, the same little dots. A lot of it is the same. I'm going to design
my little coffee cup, rounded at the top and shift, click these bottom ones and
drag those up. There you go. There's a coffee cup. Where
it gets different is, actually where it's the
same, the pen tool. I'm going to click and drag
out curves for a handle. [LAUGHTER] There is a handle. I want it to have a
fill and not a stroke. I can grab the
stroke, move it up. This is not an
Illustrator course. If you do want an
Illustrator course, I know a guy got an essentials
and an advanced course. But where it differs is
let's say that I want to change this stroke to
be a variable width, you can't do that in Adobe XD. You can grab the width tool
here in Illustrator and go [NOISE] again with
the sound effects. You can see I can make
a variable width now. We can fancy it up. I'm going to show you a
couple of the reasons why you might jump out
and learn Illustrator. If you've already
got skills on this, you might be like, I
can draw a coffee cup. [LAUGHTER] You can hang around for this video if you are
Master of Illustrator. There's a couple
little connections between XD and Illustrator. I'm going to grab
my pen tool again. I'm going to draw my
little curvy thing. It's meant to be steam
coming from my green tea. So again, the width tool, I can do this little
bit tiny down in there. If you haven't used
the width tool and you are an Illustrator person. Oh so cool. I love it. I'm going to switch my stroke to not from that first one, that second one round cap. So width tool is
one of the ones I like about Illustrator.
There's many. This is just a
little, for instance, where it gets really cool
is different strokes. So I'm going to draw a waft, clicking and dragging
for a curve. Probably a bit too tall and
again with the sound effects. So something like that. What we can do is instead
of just playing on strokes, there is a whole subset
of things like brushes. I'm going to use just artistic
chalk charcoal pencil. Well, look at that. Looks
like a chalk charcoal pencil. So these are some of the
benefits of using Illustrator. Another benefit is when
you're dealing with fonts. So let me give you a quick, for instance, if
I click on this, if I type in cafe, I'm going to use my Amatic. I've got a font called,
you've seen it, Amatic. I've got this font. But I want that
cafe that says has a little, I can't remember
what it's called. The thing off the top of the
E. That makes it seem fancy and French. The glyphs. They're called glyphs.
They're under type. Lots of fonts have
them, not all of them. This one does, but
we can't access all those glyphs in XD. It's not built for a huge
amount of typography. Illustrator loves topography.
As you can see in here, look at these extra characters that you're missing out on. In my case, if I hover
select E, here it is there. Actually, I want the other
E, the E with the bit. Let's have a look. Where is the E with the bit?
You wait there. Spotted him. Double-click on him and I got the E with
a little dash on it. So glyphs are
another handy thing, gets even fancy I love glyphs. Glyphs are awesome. They get even fancier when
we look at different fonts. Let's look at another font.
Let's look at this one here. So Alicia, this one here has a bunch of glyphs, so I'm going
to close it down. Can you see that? Look at all these juicy
ones. Look at this. I want this e at the end.
So let's highlight there. But look, I can change the
end one, like that guy. Look at all the swirls and
bits and you might decide, oh I do want a different
a. I don't like that a. I'm going
to go for that one or so it connects up with
a C. Maybe that one. You can do some fun stuff. Well, this is the reason why Illustrator might
be part of your tool set when you are designing in Adobe XD because you get access
to all these extra stuff. Now, to bring them across
from one to the other, I'm going to, okay not
as pretty as I'd hoped. [LAUGHTER] My cup doesn't look as dainty as I thought.
It's a bit squashed. Anyway, select them all and copy them and when you bring
them across into XD, some things are going to be still editable and some things aren't. Well, let's bring it in. I'm going to paste it
in and I got this. I'm going to fill it
with one of my colors. Yeah, this one. What you'll find is I
can double-click to go inside still. I'm
inside this thing. I can double-click
it again and look, there's part of my guy. You can still separate them. You could still work on them. But let's say this stroke here, look what
happened to that. It's in here and I
can mess with it. It's just made of all
these little pieces, whereas in Illustrator, it is this one little
line that I can use, in my case, this
direct selection tool, select the end, go [NOISE]. So you can do a lot of your
editing in Illustrator and then just copy and paste
the final result into XD. You can adjust it and
play around with it. But that would be the process, just copying and pasting. You can be fancier and in
here, go to my libraries, find your XD class and
go [inaudible] Well, I'll just copy and paste
the font actually. Did that all go in? Let's
have a look. Let's go in. Let's actually
drag it out again. I got part of my guy in there. So did I grab it all? I'm going to group it, then
put them in. That's better. Now in Adobe XD. I'm going to go,
remember who knows where the libraries are in
that weird place. Assets, here. They may move. Where's my XD class? There is it. Cool and I
can say, there you go. That's the official way of
bringing it in. Look at that. It lost my little stroke. [LAUGHTER] That happens to you, we're going a bit too
deep into Illustrator. You might run into this problem. Copy and paste it,
then it's fine. It's the same
solution that we had in XD when we run into problems. Here though it's under object, path and there's one in
there called outline stroke. It fixes all problems.
Now, jump in there. [NOISE] Now, come back in XD, going on a tangent and
Artwork 3, but it works. Hey, we run into
problems. We fix them. Let's look at one last thing. It's copying and pasting fonts. I can't remember what it
does. Bring it across, paste, I think
it's just going to outline it into a shape. It has. Double-click it. Is a text? It is editable text except does it know what
to do that last one? It doesn't. What else ends in E? I can't think of a single word. [LAUGHTER] I don't know, tea? [LAUGHTER] You put me on
the spot, and you can see in this case the
bits that were fine, just normal old texts. They came through
fine. This thing, which has come through as
a shape. Look at that. It deals with it and it works
same with this one I bet. Will the E come through? No, this E is editable.
Look at that. That is one of your regular E's. So I can delete that
and keep going. So you will find
intermittent issues. This one here is, remember can't think of
a word. Come on then. Got one. [LAUGHTER] So it's separated the glyphs out from the regular old
text, but that's okay. I can work with that. The cool thing about them,
even if it is a shape, it's still scalable and
it's lovely Victor. Goodness. That is
going to be it. You do not need to
know Adobe Illustrator to be a UX designer
and Adobe XD, but it's handy and I know
a guy that can teach you. If you are an experienced
Illustrator user, you might want to check out my advanced Illustrator course. If you're just getting
started, check out essentials. It doesn't have to be mine, but it's a skill
you probably want to nurture along the
way on your journey. That is it. I will see
you in the next video.
50. Masking & cropping images in Adobe XD: Hello you. In this
video, we're going to do masking in Adobe XD. The short version is put a
shape on top of an image, select them both and go
object mask with shape. There are a few other things
to editing both the shape and the image that I
want to share with you, so continue watching. But if that's all you
came for, you're done. But if everyone else,
let's get going. Let's bring in an image. It doesn't matter file
import or drag them from the finder into it like I normally do. I'll
bring this first one. With images often this happens, they commented this
gigantic size. If you hold shift on one of the corners and option on a Mac, on a PC you scale them
down to appropriateness. Just so you know if you are
a web designer or developer, it's not important to get
these images the correct size and either the right resolution or right
chronic quality before XD, you do it exporting from XD, which we'll do later
in the course. It is bringing
them in their full glorious selves
and you can export them down to a more appropriate
web design size later on. Get onto masking then. The official way is to have an image then draw a
shape of it, on top of it. It can be any shape
will draw a rectangle. I'm going to make a
couple of duplicates over these just so I can show
you different ways. Select them both. The thing on top that you want to mask inside of it needs
to be on the top. You might have to right-click
it and say bring to front. Select them both, and then say, the long way is object and
go to make with shape. No this is mask with shape even. Click on that and you
go, our first step. Any on shape works. It doesn't matter as
long as it's on top. The shortcut is command shift m depending on how much
images you end up doing. Shortcut I remember
somehow and that's command shift m on a mac and
control shift m on a PC. They can be any shape you
didn't even have to draw it, can be something that somebody else's drawn that
you've imported. Let's do something crazish
or we got there didn't draw. I didn't draw this twitter logo. As long as it's on the top. Which mine happens to be. You can select it
and say command shift m. You can do your own custom one
with the pen tool as well. You might decide that I'm going to select of
everything, grab the pen tool. I'm going to click there and remember clicking and
dragging for a curve, click once for a corner, clicking and dragging it's
the world's worst mask. Select them both and
then use your shortcut. Mine didn't work. Why
did mine didn't work? I didn't think I had
them both selected. Well, that's it. Make sure they're
both selected and the shape is on top
and you can mask away. That is one way of masking. You have two separate shapes
and smash them together. Often what I'll
do is you'll have existing shapes that
you want to fill. Let's say down here I've got these placeholder colors and you can just drag
straight into them. Requires you to be able
to get the finder window, either Mac or PC
and just have on the top of the XD edge,
tricky for some people. You can just drag
straight in here into the space and it will be appropriately sized and scaled
and in the right shape. You can update images really easily by just dragging
over the top of them. Say you're like, that's great, but I need to change that
one out for something else. You just click hold
and just drag over the top and it will
switch it out. Adjusting masks. Let's do that. [LAUGHTER] Beginning. Say you wanted to adjust
the positioning of this. You double-click
it to go inside of it and you'll end up
access to this image. You can, in the middle here
just click hold and drag it. You can decide actually
this is the bit that I want and then click out
when you're finished. The same as our
object editing mode when we're doing those icons and the next thing
you might want to do is you might want
to adjust the edge. So double-click it to go inside, you can, if you grab
the edge of it, adjust the edge or squish it or double-click it and get into the object editing mode
and do some weird stuff. [inaudible] happy little
tea, smiley face [LAUGHTER]. Not so smiley. That is
editing your masks. It's the same with
these, where is it? You scroll. This guy here, double-click it. You might decide that it's this. You want to scale it up,
just use your shift key, grab one of the corners, decide if that's
what you want to do. Double click of and you go, we're masking and
editing our mask. That is making masks either dragging them
into existing shapes or selecting both of them and go
into object mask with shape. I'll see you in the next video.
51. Free images to use in your XD mockups - Unsplash Pexels Freeimage: Hi everyone. We're
going to talk about free stock images that we can use commercially
inside of our XD mockups, plus I'll discuss some of
the paid sites that I use. Let's jump in. Free images, you're looking for
ones that can be used commercially,
commercial free images. My favorites are unsplash.com, pixels.com, free images.com. Those are the main
free ones that I'll go and check
looking for images, maybe either for my mockups or maybe I've got a
client that doesn't have the money to buy images. Don't be afraid
of buying images. There are stock library
sites out there, the main ones that I use and
pay for are stock.adobe.com. This one's about £20 and
I get 10 images a month. Or I also in addition, have a subscription to Envato Elements which
has a very similar, probably not a depth of imagery, that's why I have both of them, but it has other things
as well that I use a lot of templates and sound
effects in music. I end up having both of these. But there are lots of
occasions where free is good. The one thing you just
got to be careful, not careful of,
but when you are, like if I want green tea, you will find that.
See this thing here? This first bit is an ad, iStock. That's another
stock library site. Not better or worse than
the ones that I explained, but that's how they make
their money on Unsplash. They get commissions
based on these ones. You might be like, oh,
that's the one I want, and you can't use it
because it's paid, so you end up going down here and there's
some great ones. You can see the
ones that I've got here because I can share
them in the course. They're cool, but there
are just lots [LAUGHTER]. The quality of the ones in
the stock library stuff are professional-shot
knowing they're going to be used in ads and
websites and stuff, so often can be really good. But there are lovely free
stuff around as well. Keep an eye out for the ads. [OVERLAPPING] For those, there's nothing really
too much about them. You might want to
double-check the licenses. Let's say that I do want to use, I really want that one,
but I'm using green tea. That's not green tea. That's
a, what do you call those? Chai latte. Is that what I want? Let's say I want
to use this one. Just be double-checking that you get free to use under
the Unsplash license. Have a little check, make sure it's got everything you need, does for what I need to do, but also double-check before
you sell it into the client. Likewise, if you do start
using stock images, make sure that the client
knows that there is an extra cost that
you're going to build onto them for images, which doesn't have to be much. Like I'm paying £20
for my 10 images, if I use five or six of
them, not a big cost. But there you go, those
are my favorite free stuff and my favorite paid
stock imagery libraries. That is it. Carry on.
52. Darkening background images with opacity in XD: Hi everyone, in this
video, we are going to make this image in the
background go like this, dark and moody so
that we can read out text in the background. Spoiler alert, it's
just a rectangle on the top that has some
opacity applied to it. Like always hang around
and I'll show you some other tips and tricks as we go along. Let's get going. All right, to get started, I'm going to duplicate
this homepage. A couple of things is
you can't just select the page and go add
background image. It's actually just
an image like we've been doing in the
last videos that happens to be at the back, there is no option in
here at the moment. The other interesting
thing is I want to draw a rectangle and
cover the background. But if you've got
the page selected and then you've got
the rectangle tool and you go like I'm going to
start up here and draw across, it's going to do this. It goes back to
being add page tool. Sometimes you either need
to do one or two things. Click off in the background,
then draw a rectangle. Nice, or often, while sometimes is
I'll be at this, I'll go to the
rectangle tool and I'll just draw it a
little bit smaller. Go to my selection
tool and expand that out. That'll happen to you. I'll leave it in there.
We've got our rectangle, we're going to add our image. What are we going
to use? We're going to use this one, no. Alright, I'm going
to use that one. I'm not even sure if
that's green tea. Anyway, we've got this image and we just
send it to the back. But you don't darken
the actual image. There's no way of doing that. If you change the fill to black, the actual box becomes black, there's no image
in there anymore. What we want to do is we
actually have two rectangles. I'm going to draw a second one. Again, just smaller, grab my selection tool
and just make it bigger. I've got two boxes, one white, one with an image and
this one here at the top, I'm going to say you are black and I'm going to lower
the opacity a bit. Then there you go,
that's how you do it. I've got these two, I'm going to send them both to the back. How do I do that? I'm going to hit "Command Shift square bracket," that will send the black one to the back. Then, I'm going do it for the second one as
well and that's "Control Shift square
bracket" on a PC. They are both in the back and I can select them like this. You can click on this top one and then
decide on the opacity, how dark you need it to
be for the contrast here. You can use little shortcuts, with just the black
rectangle selected. You can hit all the number
keys just above your letters. Not the number keys on the side, just the ones above the letters. If I hit two, it's 20 percent. You see it's over there.
Let's get that close. Two is 20 percent, if I
type in five is 50 percent, if I type in seven
twice really quickly, you watch what happens,
it's 77 percent. I end up doing a lot of this, about their 60%
looks good to me. That's how you
darken a background, it's just a black box on the top that is slightly transparent. You can tint the background
as well by going not black, but I can use red or my
green or my dark green. I might select it and
actually play with the opacity of my shortcuts
and you'd be like, that's cool, but I want
it to be actually darker. You can tint it that way. Either way it's two different shapes on
top of each other. The top one is just a little bit transparent or the
opacity is lower. That is it, I will see
you in the next video.
53. Blurring backgrounds and objects in Adobe XD: Hi, everyone. We're going
to take our doc and background and blur the
background and document. We'll show you how to actually
blur objects as well, and we'll do
something fancy where this UI on the top and it's blurring the background
to stand off, cool. All right, so blurring stuff objects and backgrounds in
this video, let's get going. All right, which
do we start with? Let's start with
the map one because it's cool and it's the
simplest actually. I'm going to speed this
up. I'm just going to import a background image. All right, so I'll just
put it in an image, drew a white rectangle
and then edit some text, and to make that
background blurry, all you do is select
the object on top. You say I would like the
background to be blurred. At the moment, it's probably
a little bit too blurry, I want it to be just
hinting at the background, still making this legible, you can play around
with how light or dark it is depending
on what you're doing. I'm going to go just a little
bit whiter than I need to. This last one here
is like how much of the original shape you can see. If your shape happened to
be like at the moment red, you can't see anything,
but watch this file. If I raise this up, you can start see
that red rectangle. Maybe occasions
where you need both, both seeing a bit of the original object and maybe lightening
and darkening it. That's how to do that one. Let's look at doing
the background blur. We did this thing and let's say it's still too much detail. I'm going to select on this. Let's look at object glyph
first just on its own, so you stay over there. I can click on an object,
let's say it's already dark, it's not, but let's say it's dark enough and we
can read all this. We just want a
blurry, out-of-focus. You can say you, my friend, instead of background blur, you say you are object
blur, there you go. The only problem
with object blur is that you get this fuzzy edge. You might like that.
It might be perfect. If you don't like
the fuzzy edge, you've got a couple of
things to do and you can make sure the background is not of a high contrast color, so I can say you
are fill of white, so that when this
guy is on here, it's just not that noticeable. But you've got that ghosting
and don't really like it. What I do is, you can actually mask it again. Watch this, I've got
this shape here. I am going to bring it to
the front just to be clear, I'm going to grab
the rectangle tool. I'm going to draw a
rectangle inside of it. Select both the blurry
thing and this new square, and just like we did before, we're going to use the
object mask with shape. Then that blurry object,
can you see it in there? You just like trimmed
off the outsides. That is one way of doing it and that's the way I often do it to get rid of the blurry edge
is to mask it afterwards. Then you can stick this
back on top and use that to control how dark it
is if you need to. Because you'll notice that the object blur at the moment, if I go inside of it to click on it because click
on mask, remember, you can see that even though
it has an object blur, there's none of that extra stuff that the background blur had, we could lower and darken it. Maybe that'll come around.
We've got these two and I'm going to send him to
the back, you to the back. I'm using my shortcuts
remember, It's this one here. Send to back Shift
Command square bracket or Control Shift square
bracket on a PC. That's how to background blur it and play with the opacity. The other thing you could do is, what we did up here, but it doesn't always work. I'm going to show it
to you in case it works better in the future, or it might work perfectly
for what you need. What are we going to do?
Let's get rid of that guy. Actually, let's get rid
of the whole thing. We'll start with this one. The alternative is, because you might
be why don't we just use the background
blur like we did? You can. Watch this. If I say background blur, the problem with it is that it doesn't get blurry enough
and it does a weird blur. They seem to be two
different blurs. Look at that, that's full blur. That is also at full blur.
That's so different. That's why I don't
use this one much. This might change. There might
be more control in here. Because it would be
perfect because you can control the lightness
and the darkness of it. But I don't know because
look at this, like an angelic heavenly
glow to it all. I just don't like
whatever method they're using to blur the
background behind it. I use this method where
I blur the object, might have to trim it up
because the edges get a bit fuzzy and then just
lay that up at the top. Yeah, easy and painful depending
on what you want to do, you can click on any
old object and just say, you are blurry. There you go. That
might be what you want [LAUGHTER] from
this whole video. Just started with
that. I don't know. I wanted the background blur
so that's what we've done. Yeah. All right. I hope
you enjoyed the video. I will see you in the next one. But it won't be for a little
while because it's Friday. Hooray. It might
not be your Friday, but it's my Friday and it's
the last video of the day. I hit my targets today, and
I will see you again in the very next video
and it will be Monday. I wonder if you can tell
the difference in my voice. Will I be more excited? [LAUGHTER] Probably less excited, it'll be Monday
[LAUGHTER] morning. All right, but that is the
end of this video, blurring. Fantasticness. I will see you
after the weekend.
54. Do I need to know Photoshop with Adobe XD: Hi everyone. In this video, we are going to look
at whether you need Photoshop skills
as a UX designer. I will also show you the interaction between
using Photoshop, there's some pros
and cons for that, using Photoshop with Adobe XD. Also, at the end of the course, I'll show you how to take
this image, which is, I don't know, some
medium season. Imagine if it was winter, [NOISE] look at
that it's winter. What about a sunset? [LAUGHTER] It is a very tenuous
connection to the course, except that I'm showing you the connection
with Photoshop, and because I'm the
boss of this video and I like to show
you a cool stuff. That'll be towards
the end of the video. But for now, let's
build the suspense, do I need Photoshop
to be a UX designer? Drum all please? Yes is the short answer. You probably need
some Photoshop skills mainly to do with masking. You can get by without
Adobe Illustrator, which is down to this
drawing of shapes, you can do the
fundamentals in XD, but in terms of
any good masking, you can't do it, in XD
and you need Photoshop. Now we're not going
to cover how to use Photoshop obviously
in this course, but if you do have
Photoshop skills or you'll probably end up working with Photoshop documents
at some stage, I'll show you the
pros and cons of working with PSDs and how, if you do have some
Photoshop skills, best interact with XD. First up, let's just do some
pledging importing of PSDs. If somebody else's made
it, you might've made it. There are some tricks
and some weirdness. This may in the future
ion itself out. XD is a relatively a new
product and the interaction with PSDs at the moment isn't a 100 percent,
just you know. Let's bring in a PSD, let's go File Import and let's bring
in something that works. I've got in your exercise files, Photoshop 01, 02, 03, 04. Let's bring in 01, bring it
in and here's a giant PSD. You're like [NOISE] so it
brings in PSD documents. The cool thing about
it, and one of the pros is that if you look at my PSD, here it is in Photoshop, you can see I've masked
that out for you. There's this layer here and the background
that fills it in. What's happened in XD is that it's brought in both
layers and I can see them both. But watch this, I can
go inside it, remember, double-click and look,
they're separate. I can go to this
background layer and either delete it because
it brings it in. Let's have a look,
let's bring it in on our Layers panel, you can see here there's my PSD, I've got the laptop, and I can
either click this layer on here or over here and hit
Delete, get that works. I've got just my laptop
or I can go over here, you see these little eyeballs, I can say background
is eye hidden or hide. That's the cool thing
about using PSD, is you're going to
display a document, turn things on and
off as you need them. Let's move him down here or
over there, he's quite big. Let's bring another file
that has some problems. I'm going to go to shortcut
Command Shift I on a Mac, Control Shift I on PC. Let's bring in this 02. Let's have a look
of it in Photoshop. I'll open it in Photoshop here. Here it is in Photoshop, I've
masked up this top layer, and I've just got
this red box in the background for
no good reason. [LAUGHTER] Just to show
you that it's masked. Walls on this background here and I masked
it out real quick. What ends up happening in XD
is, currently watch this. If I bring it in and I go out, here you go. What's happened? It's not masked anymore.
For some reason, I don't know why it
ignores this layer mask. I can convert it
into a smart object if you know where that
is, that doesn't fix it. What you can do if you
do get this point, you're like parts of
it are not masked, but clearly there's a mask
going on here in Photoshop. What you can do is
you can right-click the mask and just say apply it. This is bad and
very destructive, but it'll fix it. I'm going to save it now, it doesn't update automatically. It's a one-way street so I'm
going to import it again. If you don't know Photoshop, that's the one thing
you might have to do. Go in and see if you can
squish the layers and get rid of all the fancy non-destructive masks because that works. Again, I can go
to the background here and look at this, it actually brought
through the fill of this. Where is it there, I can
go [NOISE] or [NOISE]. Some things are really
cool and then some thing's just a
little bit broken. These things will
update in the future, so some layer masks
don't come through. Another way of working
with Photoshop, it's just pure old
copy and paste. I'm in Photoshop now, I can do a selection. I'm just going to use my
Rectangle Marquee Tool to the selection angle, copy and I'm using edit, copy come out as shortcut, go to XD and you can paste it. As long as it's not too complex, with little masks and
adjustment layers and stuff, it just copies and pastes. That's a good easy
way if we can get in stuff from Photoshop into XD. Now let's do the official way, at least what I think should be the official way is
using libraries. I'm going to do a
quick mask in here. Again, I don't expect you to do this or be able to do this, if you do get excited
by what we do here. Checkout, either
mine or somebody else's Photoshop course, I've got an essentials and an advanced course if he came, but I'm going to go
to Select Subject which is a sweet cool feature, and make selection around it. I'm going to add a Layer
Mask down the bottom here. Remember we talked about this being a little
bit of an issue, if we go for the libraries
that seems to fix it. The libraries is
a way of sharing between Adobe applications, it's like shared libraries. I'm going to go to My Libraries. There's my library
for Adobe XD class. I'm going to close
that down to make it a little bit bigger
for everybody. What I'm going to do is grab my selection tool and just click hold and drag it
anywhere and end here. There he goes, let's
give him a name, phone. Where is he, he is
there. Now in XD, remember our libraries are under Assets panel the top here. That's under, you might have to go remember
back a couple at the top until you find XD class. Here's my phone, here's buddy, I'm going to put them over
here, might be a bit big. [NOISE] He is here,
the official way. We've touched on CC
libraries a little bit, if you haven't used them
before, they're awesome. They're a way of
connecting because I can use the same phone
and just dump it into my Premiere Pro Video file for social media stuff and putting it into InDesign
for a magazine layout, all shared assets
saying with the colors. That's an easy way of doing it, and it fixes the problem with
our layer being like this. Now a couple of perks of
using it this way is, you can see as linked, which might be myopic, is in back in Photoshop I can go into here and it's
a one-way street. If you add something from
your Photoshop into this, this is it's own separate item. If I adjust this now, it's not going to adjust
the library item. I'm going to finish with
this, I'm done with you don't say [NOISE] Don't save. But I can open up this thing, it's my phone, PSD, they're not connected to
the original and if I do something like, I'm just going to
invert it, command I, it's really easy one and clear Control I on a PC and hit Save. It was very visually clear. I can go into this one. I want to see this
little link here, I can double-click
it, here in XD, it takes a little while, it didn't do anything. Little bit slow on update, but it just went and changed. That's one of the perks and
obviously if you're using an InDesign or Illustrator
or something else, Premiere Pro, it
will update as well. The last one I want to show you, it doesn't have a
whole lot [LAUGHTER] to do with user
experience design. It's just some of the, I guess I want to hammer
on why Photoshop is, I'm a bit of a Photoshop fan, so there are alternatives
for Photoshop. GIMP is an unfortunately
named one, and what's the other one? Not Canva [NOISE] can't
remember the other ones. But there's just
some things that Photoshop do a spectacularly,
is one of the new ones. You can open up
this if you want to give it a test yourself
because it's pretty cool. Photoshop 04. We're
going to go to filter, and we're going to go
to Neural Filters, they might change
the name of this. They've changed it earlier. I'm going to use this one
called Landscape Mixer. It's got a lame
name, turn it on. You might have to
download, it might take a little while to
download this feature. It might have moved out of
here, currently it's in Beta. It's amazing, but it may end up just in
the filter somewhere, but lookout for landscape mixer. In here, I'm going to say
you just make this one, because I need it
now to be winter. Just going to drag out the
winter slider, kickback, watch this, here it goes, ready. [NOISE] Come on, let's go. It's worth waiting
for more stalling. Edited cut to it being done. It was done this is right away. But look at that [NOISE]. It just made it winter. I'm not even sure
those are tea leaves, but there was a vague
connection to the course. But look at that, can't believe how
cool this thing is. Let's do one more and
then I'll let you go. Let's do sunset. Let's drag up sunset
not to full maximum just I want to see
some adjusting images, like you're trying to
connect them together, it is such a sunset. Look at it and l
look at this tree. It became summery and sun-setty. Looked at it, there's more
foliage on the trees. I have a play with
some of these, open that folder,
go to the images, free image sites
that I showed you, Unsplash and pixels
and have a look at it. It's really good at landscapes, it's not so good with
sea things like organic, or it's really good
with organic stuff, not good for man-made
things, but men. That's why probably always
you're going to need Photoshop as an option if you're going to be a UX designer, especially if you're
really want to be involved in the
design in UI side. I got super excited and I
want you to go do Photoshop. Remember I've got
an essentials and advanced course if you
want to check those out, but that's going to
be it for this video. I will see you in the next one.
55. Snack bar Toast banners using masked image in Adobe XD: Hi everyone. In this video, I want to introduce you to this thing, that is a snack bar. I want to introduce
the term to you and also show you when you're
working with masked images, how you can get backgrounds into them
and things like that. Let's get going on this video. First step, snack bar. What is he talking about? Snack bars are the little
messages that appear in the bottom of a phone to give you a little
bit of information. You've seen those before. Maybe this one here, is an Android version just
pops out on the bottom and just explains what's going
on, like a little snack. They also get called
toast because they pop up and go
back down like toast. They are there to
give you information without interrupting the
flow of like your, you know. The primary operation,
whatever you're doing, the thing that you are
in the middle of these, give you little snacks
and extra bits. We're going to
create one of those, that's what we're making. I'm going to make
mine just underneath the product details page. Now, we're going to
bring in Photoshop file, the one we made earlier. If you are up for it, you can go through and use
Photoshop O3, mask it out, bring it in via your library, or if you want to cheat, when you don't have
much Photoshop skills, just bring it in Photoshop O5, it's one that I've already
masked out for us. It's very big. I'm reluctant to make these all the
right size because, I don't know, the
ones that you bring in are going to be
the wrong size too. I'm going to bring it in, bring it down to
a reasonable size you saw at the beginning
of it I'm going to cut it inside the
little snack box. My snack box is going
to be in this case, like a customer support. It's going to be about
that sizes bit longer. Now what I want to do is actually let's get
the text them first, are you right there? This is what I'm going
to do. I'm going to break it down a little bit. Some information text, it
doesn't have to be clickable. Mine is going to be. Little trick for all of this. There is an underlying there. But Command U on a Mac
or Control U on a PC, will do underline and Command B, bold Control B, there some basics there. Actually those work across
every program ever made. I'm going to do this
one, I don't want to cut this into the background. Weird things that
happen, I've got a mask. First of all, I want
it to be on top, so I'm going to right-click
it, bring to front. I'm going to get it
the appropriate size. Remember, rotation
is just hovering just outside, the outside thing. Something like that is what I want, and change the
background color. I'm liking this colorless
less than this. [LAUGHTER] Anyway, what I want to do is
mask it inside of this. I need two boxes. You could just use
this one and this one, and use the make mask, Command Shift M or Control
Shift M or object, or is it make mask with shape? The problem is the yellow
box has gone, it's hollow. I can't color it now,
if I try and color it, it will not do anything,
[LAUGHTER] color it. What we need is just two boxes. I'm going to undo and
I'll show you what to do, I'm going to copy
this Command C, Control C on a PC, then make my mask. Let
me use my shortcut. Then I'm just going
to paste it again. If I just hit "Command V, Control V" on a PC, I'm going to stop the
shortcuts for the easy things like edit and copy paste, deal. I've got this one,
it's just on top. If I move it to the back now, it's just to copy it and because it pastes it
back where it got it, you end up with one box just sitting on top
of the other one. It's not ideal, but
hey **, that works. I'm going to really
quickly draw a closed box. Actually I was going
to speed it up. I'm not speeding it up. Just some things. I'm going to add this. Remember drawing out a
circle, just a reminder, hold down Shift while you're
dragging it out gives you a completely proportional, I think is the word, the height and the
width is the same. What I'm going to do a cross. Don't try and draw with the
pen tool, takes forever. Use the type tool. Hit your "Plus." I'm going
to use white one. I'm going to pick the
right size and weight. Mine is already
the right size and the right weight.
Something like that. What I like to do is actually convert it from being text, it's just easier when
it's just a shape. Remember how we did that. We're going to go
to Object and we're going to go to Path, convert to path and
we've done that. I'm not sure if we
have. There we go. That's how you turn
text into a shape. I'm going to take both of these, get them right in the middle and then I'm going
to make it across. I'm going to go you, remember if you hold
Shift it will snap. Make mine a little bit bigger. If you do find that's
not absolutely perfectly in the middle, that's just a problem with really small pixel sizes in XD, this will be generated in
a different way in code. There you go, that's good. I'm going to group mine. Let's look up there so
that we can close it. I'm probably going
to add it up here. I'm going to add a
drop shadow probably. There we go. Drop shadow. A bigger one, 3 by 3 by 10, and make it a little
bit darker, just goes. Here we go, it's going
to be a little pop-up, a little toast thing that pops up and then goes back down, but you can turn it off if you need to. We need
this for later on. We're going to do some little more fancy prototyping and I wanted to show you masks within masks
with the background. There you go. That is it. You are dismissed. I will
see you in the next video.
56. Class Project - Add images: It's that time again. It
is class project time. This one is to do with images. I want you to add
images to document, or at least to your
mobile design. I'm not worried about exactly where and
how and how many, it's more about I want to
control your design here. But when you are
looking for images, either through paid
stock libraries, if you've got access to them, or some of the free stuff
like on special pixels, but keep your persona in mind when you
are picking images. Is this right for this person, is it fulfilling my brief? Then I want you to add images like here's a good
place for the images. I want you to
experiment maybe with the background
image here as well. Even if you decide to have
an option 1 and an option 2, I want you to play around
with blurring the images and also I want you to
build out two pages for me, the confirmation page, which is just a map
in the background, you can take your
own screenshot. This is close to where I live. But you might decide that you
might take a map of where you or at least
your brief is set, and then add this blurry
confirmation of the top. Exactly how you do it,
it's not important. It's more just
practicing with it. Also I want you to
add this snack bar. I want you to do it with
either the images that I've given you or if
you filling up for it, find your own
image, mask it out, put it down the bottom here. Doesn't have to be asked a
question, something like that, some like pop-up notification, maybe a did you know, or a sale that's on, something like
that because we're going to lead to
animate that later on. Add all the images, create the snack bar and add the map and the dialog box to your confirmation page
and then upload it. It starting to get
to a point where I can't wait to see
what you've done. I want to see it on Instagram, Twitter, and our Facebook
group or our LinkedIn group. Also upload it to the
assignments section of this website as well.
That is your homework. Go do it to find some images and let your design
come to life. That is it. I will see
you in the next video.
57. How to make & use components in Adobe XD: Hi everyone. In this video,
we are going to look at how to make
components in Adobe XD. Let me quickly show
you what they do. I can adjust this one
called the main component, and all of his buddies
over here watch. They're all connected, so you can do one thing once and they all come
along for the ride. It means you can work on lots of different art boards
perfect for this top nav, adjust one and they all flow
along and adjust as well. That is basically what
a component does. Let me show you how to make one. Let's make a component. First of all, let's clear out all the components you've got. Let's go to our Assets panel and you might have Character
Styles twirl down. I want you to just click
the chevron to tidy it up. Under Components, you might have a bunch
of junk already. If you copy and paste, we did
this earlier in the course. Remember I said if you
copy and paste stuff, it might bring through
these components in here. We just ungroup
them and moved on. Now we're actually
going to understand properly what they are, and if you've got stuff
in there already, it just means you've copied and pasted them from
other documents, so delete those out. You just right-click them
and delete them all. Select them and hit
Delete on your keyboard, clear out the components. If your view looks
different from mine, I've been on list view
this whole course. You might go through
some character styles. You might have been on this view and it looked
very different from mine. I like to be on list
view for some reason. Up to you, but I'm going
to be on list view, makes it easier to rename them. Let's understand
components by making one, select all of this top nav. I'm doing it on this other page. It doesn't matter what you
turn into a component. I'm going to select all of
these little things here, and you can either
right-click them, and say Make Component, use the shortcut Command
K or Control K on a PC. It's a really common thing, so it's got a really
common shortcut. Under Object, same
saying, where is it? There it is there,
Make component. How do I know? If I undo it, can you see it's got this
blue border and if I hit my Command K or Control K
on a PC, it goes green? That's why I know
it's a component. That's one of the visual cues. It appeared in my
components library. It appears in your
layers as well. You can see it there, component, so it appears a few
different ways. Let's rename it. It's much easier to
do when you're on list view this little
option up here, and you just
double-click the word, and we're going to
call this Top Nav. You can leave it as component 1. There's nothing wrong with
it except you'll be judged by other designers that
you're sloppy layer naming. But if I'm honest and
we're all honest, everyone has got component
57 in their list. But for today, we are
lovely named Top Nav. What's so useful about
components? Let me show you. I've got this one,
I'm going to copy it and I'm going to paste it onto this one and maybe paste
it onto this one as well. The difference between this
first one, first of all, is, can you see here's
called the main component or our first one, or the parent or the primary. The technical word is
the main component. What's the difference
between him and this one? Is the visual differences. Can you see the thick green
diamond? You see this guy? He's got an empty diamond, so this is the main one, this is called the instance. You are the boss, you follow along what the
boss says, parent-child. What's cool about it
is that I can grab this first one and I'm going to zoom out so we
can see all three. I can go into it. Remember how I go inside of these things? I can
double-click it. Here we go, and grab this
and watch this and go. Can you see them all moving? Hey, come on, that's the reason that
components are really good, is that you can do one thing, it can go across 100
different art boards, and you can control it just by updating the main component. Here you go, what a
lot of people will do is they'll keep the main over here on the pasteboard
or on another art board, just something out
of the actual flow, and keep all their main
components together, and then they'll copy
and paste the instance. If you copy another
instance from these guys, it'll just keep making
duplicates of this main one. It just means that you're not trying to figure
out where the heck the main one was [LAUGHTER] which art board
you created it on. You've got a central place. It means up here, you
can say actually I want to get this moved over. Look at that. That's how
you make a component. It can be a bit of a pain sometimes if you
want to detach it. You can just
right-click and say, you are Ungroup Component, and it'll just
break it apart now. Now when I adjust this, the guy is like he's his own boss again,
he's a lone ranger. He can do whatever he wants. That is how to make a component. I've come back from the future. Later in the course,
I'm like, hey, I should probably
mention that earlier. I'm going to show
you one little thing about components is that we draw a toggle
switch later in the course, and this is where I'm like, hey, I should
probably tell them. We make this little
toggle switch. It's rectangle, rounded corners. You click it and it
moves over here. It's going to be
fun, stay tuned. But what happens is
let's say I've got this, I'm getting my color
in your color. If I select both of them, and I hold Shift and scale
it, it scales nicely. If I make a duplicate though, and I group it, and I scale it, it
works perfectly. But if I make it a component
and do the exact same thing [LAUGHTER] so what ends up happening is it applies this thing called
responsive design, and it tries to be
all very clever. Because it is clever
when you do this, watch, that's really cool when you're
making a button, you want to make it longer, but when you want to
resize something, you're like I just want
to make it smaller, it can, doesn't always,
cause you trouble. What you can do is just
turn off responsive resize, and then work your magic. Just not going to do that whole
thing like we did before. Just extended on its own. You can turn it on and
off though, watch this. I can make it really small. Turn that back on, and
do that fancy thing. That is a word from future Dan. Let me show you what we make,
it was hiding down here, I was like, let's show you. Look at this toggle switch. Look how far we've
got [LAUGHTER] It's later in the course
so stick around. Look at this toggle
switch. Look at that. It's in the micro-interactions
bit in the course. That is future Dan
coming back to help you with responsive resizing. Right now though, we'll get back to the component creating. There's more to show you in the next video,
I'll see you there. PS, don't tell the next version of Dan in the next
video that I was here. Deal. Carry on.
58. Difference between Main & Instance Components in Adobe XD: Hi, everyone. In this video, we are going to take our
components to the next level. Clearly, the next level is Brush Script
[LAUGHTER] as a font, but also means that I can have these unique instances with
what's called overrides. That means they can
be different colors, different sizes,
have different text in them, and watch this, I can go in here and say
I still want to control some of it using
my main component. You're ready for just
a delightful font. There we go. They all update, but you can see the
text is still unique. This one says Buy Now, this one still says Learn More, but they are somewhat controlled
by this main component. Let's jump in for our
Comic Sans extravaganza. We're going to start
with this button here. I'm just going to
copy and paste them, and then move them down here
just because. There it goes. I want to just make a
basic button, there we go. I'm going to start
with that actually. [LAUGHTER] It's perfect now. I've got this button. It would be a great contender
for a component. Yes, because I want to
use that multiple times. I'm going to select both the
text and the background, well, my little
button rectangle. I'm selecting both of them. Maybe a Command K or control K, and now it's a component. Now I should name it. When you're naming
things like buttons, it'd be really common. You don't want to call it
Buy Now button [NOISE] because we'll actually use this button for lots
of different words. It'd be the Buy Now,
it'll be the Learn More, it'll be the Delete
My Account button. What I would do is
I'd say it's button, and this is going to be
my medium one because I plan on later on having a
small and a large button. That's it. You will
see this a lot. It'll be BTN underscore MED underscore maybe Primary because it might be your primary color. There's no official rule. I don't know why. I like button, and I like hyphens, and I
like it to be called medium. [NOISE] But you can do
it all cody language, if you prefer that way,
and you'll see both. I'm going to keep it quite vague at the moment and we'll talk about some of the other
things you can do. We've got a name,
we've got a button. Let's make two of them. Remember, the top one here is called our main and this is
an instance of the main. Let's actually make
three of them. Everyone has three for me. This one here, we know that if I adjust this top one by
double-clicking it, we can adjust them all. If I adjust the
text on the master, so this is now my
Learn More button. I should probably make my text centered and move
it into the middle. When I do make text
changes for my Delete, so at least it adjusts
left and right perfectly. That's the center
option for the text. What we can do is we can
leave this as Buy Now. Now, I'll leave it as
Learn More centered. What we can do is
these instances we want to actually change. You're like, "Well, I don't want them all
called Learn More because you'll end up with a button
called button Learn More, button Buy Now, button
everything, Ts & Cs." What you can do is these
instances can be adjusted. The code overrides.
That means that I can say this one's my Buy Now. This one can be my Clear button or my Delete button,
or something else. The cool thing about it is,
watch this, this master, it can control anything that hasn't been adjusted
down here. Watch this. Let's create another one
of these. There we go. Is this going to make
sense? Hopefully, it does. You can adjust the
texts on these instances to make them unique. You can see there
our little option, adjust, see the little thing? He's got some overrides. Anything that you've changed is considered an override
to the master. Things that you
haven't changed like the position or the
background color, we haven't changed that in
all of them. Watch this. If I change the background color by double-clicking it to go in, you can say actually
you are this other color and they all change. But if I undo, if I say this Buy Now
button though is I go inside of it and I
override it and say, "Hey, you're not the boss of me, I'm going to be this color. No this color, I'm going
to be that color." [LAUGHTER] This guy, our little lone ranger
has gotten override. If I go to this
master now and I say, "Hey, I want everybody
to be green." There's green. Do you see? Everything adjusts. It
hasn't been changed. We didn't change the
background on this one or this one, but this guy, we said, "Hey, be something different," we didn't override. That's some of the
powerful parts of it. We can have a bunch
of buttons that look different but
are controlled by this one primary or main
button. Does that make sense? This text, it started
out as Learn More, then we changed it to Buy Now, and we changed this to Clear. Those are overrides. But this
guy so-called Learn More, what if I change this to button? Do you get what I mean?
Anything that hasn't been changed will
still be overridden. Anything you have changed
like these two guys will try and hold on forever
and their new style. You can end up
overriding everything, but it's a great way of having a generic
button that comes out. You can actually drag
them out of here rather than just
duplicating their master and say, "Actually, I want this guy to
be this other color, and I want the text to be
something more visible." But have some control. I can go into this and say, "You are now going to have 10
pixel around the corners." Everything that hasn't been changed in terms of around the corners comes along
for the ride. That is the difference
between main and instances. They can be adjusted
slightly to make them custom but have some overall
main control. Did that work? If
that worked, okay. [LAUGHTER] Let's do another one. In the moment as well, if I go [NOISE], look at that. If I hold down Option
on my Mac or on a PC, I'm just grabbing
the edge of this, dragging it out, look at
this, we can adjust the size. [NOISE] But what if
I go to this guy? This is our rebel. This is
the guy who wants to do everything on his/her own. If I say, "I'm going
to be actually this giant button, you're
not the boss of me." But this one master says, "Hey, be a different size." Look? Overrides work on
all sorts of things. Anything you can think of,
you can override and it will ignore the changes
happening to the master. Just to prove the point, I'm going to go to
this one and say, you are Comic Sans,
living life on the edge. This one here,
going to this one, and I'm going to say, "No way, I'm going to be Impact." [LAUGHTER] Two of
my hated fonts. This, it will change, except for the one
that's got the override, but it gets handy. This is a big example of
all the different bits. Where it gets quite handy
is up here. Watch this. I've got this navigation. That was the navigation
that I made. Remember, if I undo or zoom out, if I change the master, which I've got up here, you
might have it somewhere else. Remember, if I change the
master, they all change. But this one's not changing. You're like, "Well, do I have
to have two navigations?" No, because you're thinking, "We could do that
thing you did with the button," where we
just adjust it. This one here I'm going
to delete, you go away. I'm going to use an instance. It doesn't matter if
you duplicate this one, duplicate this one, or
drag it out of here. Not that one, where is it?
Top Nav, it doesn't matter. It's an instance and nothing has changed about it because
it has the boring, old, white diamond, but
it's the wrong color. What I can do now is dig into it and actually go
into this one and say, "You are now a font
color of white, and you are going to be
a fill color of white." You wait there. I'm
going to speed this up. There you go. Here's
an instance of it. It just means I can still
go into our master, there, and make adjustments and have lots of different
versions of this, a light mode and a dark mode. It's just a simple change, but you can see the power
over hopefully now. Components are awesome. Couple of things,
you might be like, this guy down here has got a
little bit too much power. He thinks he can't
be controlled by anybody and we need
to reel him back in. I'm not sure where
[LAUGHTER] I'm going with my boss and subordinate
analogy here, but hey, we've come this far. What you can do is you can
right-click them and say, "Actually, let's just reset
you back to main state." Now look who's the boss? You can go back if you need to. Might be doing something
weird and you're like, "Why isn't it adjusting
compared to the main?" You might do that,
readjust it back. You might decide the opposite and you're like, "I don't want." Because the moment
the positioning of this keeps
changing, you're like, "No, I don't want this to
be an instance anymore. I don't want it
connected at all." Maybe it's the
beginning of a new button or something else. You can right-click
it in here and say, it doesn't say
disconnect or anything, it just says Ungroup Component. Remember earlier on the course
I got you to do it when we copied and pasted from
other people's UI kits? We just did this. That's why. We just broke it so
it's not connected to anybody else's document,
anybody else's button. This now is just a
regular role button on his own, doing his own thing. He could now become
his own component. We can make him a component
and he could be [NOISE] Button Large and he could have his own instances or
children. There you go. He's the boss now of
his own little clan. Other things that are
useful, at the moment, we've got quite a small
little group of components. Later on, you might
have hundreds in here, if it's a big UI project
you're working on. But there'll be times
we're actually like, "That button, where is that?"
You can hover above it. Can you see there's
three instances of this? There's four instances
of this one? There's five of this
one? You're like, "Where is this
button being used?" You're not even sure. Let's
go over here. Right-click it. You can say Highlight on canvas. That doesn't work [LAUGHTER] unless you're zoomed
all the way out. It has highlighted it. Who remembers the shortcut
for zooming out to see all the art boards,
everything that's going on? That's right.
Command 0 on a Mac, Control 0 on a PC. There you go. You can see him, he's
highlighted down there. It's not super useful, but we chose to do
the Button Large and keep an eye out.
It's over there. Let's go to Highlight on canvas, it's
highlighted over there. But you're like,
"That's not useful." But remember you can zoom in on the things
you've got selected. You're like, "That's right.
Command or Control 3." No, two, no, three. [LAUGHTER] That doesn't work if you've got more
than one selected. Where is it? There you go. It doesn't actually
select them that way. I lie. I take that back. You can't Command 3 to zoom in. You made me look
like a fool, XD. Next thing I wanted
to show you is this one here, Edit
Main component. There might be a time
where you're like, "I've made this thing here," and you have no idea where
the main component. I know it's there. With
the little diamond one, you'd be like, "I
know it's up there." But down here, weeks from now working on
somebody else's project, you're like, "It's the instance. But where is the main one?" I can say either
right-click it here and either go Edit Main
component or over here, same thing, Edit Main
component and what it'll do, it should jump to it. Hey. What happens
if I delete it? Wow, [LAUGHTER] what would
happen if you delete it? That seems unretrievable. But XD does something fancy
where you go right-click, even if it's gone and it's
not in your document at all. That's a great way of
keeping things tidy. You can still edit component. What it'll do is it just open it up and dump it on
the page for you. [NOISE] It wasn't
down there before, it just went here's
the space and opened it up and just
threw it on there. You've now got a main component. When you are working with
other people's documents, you might find there
is no main component. This one here is deleted. You'd be like, "Where
is this thing?" Go to Edit Main component
and it will just throw it somewhere on your
document and take you to it. You'd be like,
"Yeah, there he is." Now I can go through
and do my adjustments. But he doesn't need to be
there, just so you know. One last thing is
you might be like, "Which one is that actually
in my Components panel?" I'm going to close it
down, whereas it's pretty easy because it has
a visually quite different, but you'll end up with
lots of buttons that look the same from a distance and it's hard to
tell the size of them in the teeny-tiny
components for you. You can right-click
any of these guys. Sometimes you click off in the background with
your Selection tool. Select it once, right-click it. There's one that says Reveal
Component in Assets panel. It's going to reveal
it, watch it. It opened it up and
highlighted it. You know that is the person
that is controlling this one. We got a little bit
further with components, looking at the main
and instances. The real big perk is
that you can make overrides or make little
changes to the instances while still retaining a lot of the control from
the main component. That is it. I will see
you in the next video.
59. How to create component hover states in XD: Hello my friend, watch this. The button has a hover state. Look at that. I'm not doing
anything, just rolls over. It's one of the other
perks for components. Let me show you a
more boring option. Here we go, look at
my radio buttons. Look at that, exciting a continuum on and
off in a preview. They are called
components states, and I will show you how
to make those now in XD. Before we get started,
just so you know, I went and cleaned up all
those buttons that I had. Buttons everywhere. What I've done is I've
created just a new button. It's not a component,
it's nothing. It's just a rectangle
with some text in the middle and I'll
pick my corporate font, bringing them, but also the font police came
and it was harsh words. We've picked a bit of
font. First of all, to make our state, we need to select it and make it a component just like before. A Command K on Mac, Control K on a PC. We're going to work on
our master in this case. It won't work if
you're trying to do states on the instance. Remember if you've
working on the instance, you've got to
right-click it and say, "Let's edit the main
component," and it should take you to that main component. I'm going to delete that one. I'm in the main ones,
it's got the diamond. Over here, there's this thing. Once you create it into a
component, there's this one. I'm in component main. This is the default state. What we can do is we can add a state and we're going to add this hover one
to start with. Hover. We're not going to do anything else and
nothing's going to work. We've got default
state, hover state. You might have to click
off, click back on. This just need to be different. If I click on "Hover State"
so it's highlighted, I can say double-click
to go inside of it. I can say you are going to
be my darker version of it. Click back out on the outside, click back on it.
Now watch this. I've got a default state
and a hover state. I don't have to
do anything else. Let's start being on a default state and
then let's preview it. Actually, this needs to be
on one of my artboards. I'm going to put
them onto which one? Let's be on my homepage. I'm going to move
them down here. I'm going to click on
the name. Let's preview this one and there it
is there. You're ready? I picked a color
that you can't see, It works. To hit it as state, you just go and
click on it once. Over here you can say, "Don't pick that color
because you can't see it." I'm going to go double-click
it to go inside of that little group and I'm going to say,
"Don't pick that color. We'll use that one. Let's
go for a super black." Now let's go back
to our preview. Remember it's going
to default to whatever the top
one is in my flow, unless you click the
name over the top here. Let's play it and look at
that. Nothing happens. More problems. This is a problem you're
going to run into. I'm going to close this down. What happens is it will remember the last thing
I had clicked here. You got to be on default state. Whichever one you have
selected will be the one that it switches to
or will preview in. I'm going to be
on default state, then preview it, and now
the hover will work. Wow. I made it harder
than it should be. But that is how to
do a hover state. It's really easy. Hover state is one
of the default ones. Just got to remember that when you are finished working
on the hover state, go back to default and
then click off and that'll keep it remembering
that state there. The other really common
state is the toggle state. I'm going to do it
for this page here, click on the name Command
or Control 3 to zoom in. It's going to be these
little radio buttons here. I'm going to zoom in. If you
haven't made one of these, you just need to
draw two circles. I'm going to select
both of these and I'm going to
do mine over here. This here is just a circle with a fill on a circle with
a stroke around the outside. I'm going to select
both of them. We can use our Command
K or Control K, or sometimes randomly I
click on this button, does the same thing.
Component plus. It's given me the same thing, got my little main component. What I want to do is
I want another state, and this is the other
default state called toggle. Instead of calling it toggle, I'm going to call
it a off because toggle doesn't make a
whole lot of sense. What I want is on the default
state for it to maybe be on and then on the off switch. I want to go inside of here
and you can delete it and it will work in this instance but it is actually
bit of practice too. Instead of deleting
it, just turn the opacity down on the
thing you want gone. It just means later on if you get into more complex states, deleting it causes
future issues, whereas lowering
the opacity means later on you can turn it
back up if you need to. Trust me, it's easier just
to lower the opacity. I've got two states. I got the
default and the off-state. You decide which way you want it to start remember by
picking which one, like on the hover
state of the button. This is the state that I
want it to be defaulting to. I'm going to get rid of
this one and replace him. Let's give it a preview.
It's on the page. You need to click the page to have the page
selected or just an object on the page and hit "Play" and it will know
which page you mean. You can see this. Look at that. Default is this. There you go. Toggle by
default, can you see that fade? It's not really what I want. We're going to
adjust that as well. Actually, before we do that, you can actually
just use this for, it might not be for
prototyping or animation, you just got a button
and you used it. It might be a checkmark
like a tick box. You use a bunch of
them. Then instead of animating or anything, you just go, actually, I
want this one to be off and this one to be off
and this one will be on. That's all you use it for
just having one unit. You can copy and
paste and then turn on and off and switch it back. Back to the animation, we
don't like the little fade. The reason that when we
added the toggle state, basically what it's doing
is you set it for rig this up yourself and it was a bit
of a pain in the button. But now what it does is it actually a bunch
of animation for you. You can adjust that
afterwards if you'd like. You can go into this
and say you prototype. It's edited this thing here. Goes nowhere, but it
says this default state. When it is tapped, it auto animates using an easing of 0.3 seconds and
that's the fading. It's going to ease out. What
I want to do is say tap it. I don't want you to
auto-animate, I want you to do a transition and I want the animation to be none
and say you get rid of it. Now it's going to transition, but it's not going
to do any animation. Let's give it a preview
now, go to selected, hit "Play" and now it's just
a boring old radio button. Does it one way but watch
this, it fades back in. You got to do it both sides. I've done it for
the default state. Let's do it for the off-state. Same thing, no auto animate. Transition. I would like the no dissolve now should do it both sides.
Let's give it a play. Boring animation, but more how our
radio button works. In this case, all the animation, these instances
remember the fades. Did they all update? Let's have a look.
Maybe they did. I seem they didn't look at that. They all update. The animation, if you adjust the
master, they all update. It doesn't look like a
regular radio button though. If you knew about them normally
you can only pick one. You can't make that happen and it's out of the side
of the scope of XD, but you get the idea. That's the toggle state.
It will go back and forth. Hover is the hovery one. You know what I mean. That's where I'm going
to leave this one. There's a little
bit more I want to show you in the next video. But hey, we need a
break. I need a break. Go get a cup of tea. Do you wee and I will see you in the next video and
we'll cover a little bit more of some states in
Adobe XD. Back in a sec.
60. Class Project 11 - Buttons: Hi, everyone. It is
class project time. We're going to
make some buttons, aka components.
There's two to make. Just to set up the ground rules, this one's going
to be the hottest class assignment you've done. [NOISE] It's going
to be a tough one. So be prepared. [LAUGHTER] I'm not
sure why I zoomed in. [LAUGHTER] You're going
to make two buttons. Using components and states can be tricky, you
will get there. I've got these two examples. You're going to make
a regular old button like we have here, the Buy Now and Learn More
button, then a checkmark, which is basically the same as the Radio button that
we made earlier. So the button, let's talk
about this one first. What I'd like you to do
is let's preview it. That's what I want. I
want you to be able to hover over and then to change. Mine only changing slightly
so that's one thing. One thing that I
should point out now, you might be thinking it already maybe like, does he know? I know you can't hover
on a mobile phone. You can wave your
finger above it, but it doesn't actually change. I guess this course
we're learning both desktop buttons and
mobile device stuff, but just focusing on building
the actual mobile version. Do the hovers even though it's a bit weird on
a mobile device. What I'd like you to
do, the rule is these two need to share the
same main component. Watch this, they are all sharing even though they're
visually quite different, I want you to see
if you can do it. In my assets panel. Let's close that down. There's my button there.
Here's my main one, and it's just one button that
I've styled differently. This is quite tricky even
though the videos I've done, people pay for trickiness. If you want to keep
it less tricky, if you're finding this
course difficult, don't do a line around the outside with different
fills and stuff, just do a slight color variation on this Buy Now button
for the learn more. That'll save time/ to make
it more interesting is, when you play it, I want
you to connect it up. So when I click hover above
works but when I click it, it jumps over to the
Checkout page, and do that. There's something we haven't done we've been design lots, if want prototype page, it's automatically
added this animation and we learn before that
we could turn it off. Let's go. We don't want the
fade, we just wanted to jump. You can say go to transition
and I don't want a dissolve, just wanted to jump
straight across. That's what this thing is. This is telling it,
doesn't go anywhere. Just goes to this
electric thing. This just says the
animation happening here is going to none. But I also want it to
go somewhere else. You can have two actions
on one components. So in this case I'm going to
say you go to this thing. Do you see you can
have more than one? You can see now when I tap
this one goes to the default. It goes to tap, transition to this
page animation, dissolve or none,
let me go none. It's also going to
when it's hovering, do a transition of none. You can have more than
one, you can have three. I'm not sure why
you'd have three? It's going to freak
out because it's going to try and
go to both pages. I'm not sure which one
it'll actually go to, but just know that you can get a button to do more
than one thing. In our case, play
our hover animation. N, go to a page, save for the learn more.
There's Learn More button. I wanted to go to this one, the product details,
learn more about this product. Go to preview. By now, it's going to take us to our second part of our
class project and more. There is this. It's
like the radio button. I want to see if
you can make that. It's like a toggle switch. That's the hover,
this is the toggle. In terms of the tick, I just drew that. I drew
it with a pin tool. You too can draw it or find something from Icon
Finder or an SVG somewhere, somebody else's UI kit. What you'll find
when you draw it, your tick will look
like no other tick. [LAUGHTER] It's really hard
to draw like the tick, I feel like I got
there eventually, but I redrew that ticket
few times. Let us check. Buy Now button, they must
be the same main component and hover state at that
second prototype interaction. When you click on it
and goes to that page, checkmark, same as a radio
button, toggle on and off. When you finish, record a video of you
interacting with it. On a Mac remember it's up here, PC, it's over there. Also remember that some of
the places you can upload it, especially social
media, you just dump the video up there and it
processes it and it's fine. Often with the assignments
and their comments, you might have to upload this video that you
make to something like YouTube or Vimeo or Behance or some other video hosting
and just share the link. If you try it in the
last earlier video and you just couldn't
for the life you record a video, that's okay. Just take a screenshot
and upload that. Two screenshots one on, one off. That is it my friends. I'd love to see what you make, shared on social media as well. We're starting to get somewhere. See you in the next video.
61. How to use the repeat grid in Adobe XD: Hey everyone. This video
I'm going to show you probably the most exciting
feature in Adobe XD. You can click on things
and select little COD. I need you also to know,
imagine if you could just go, look at that, there
are loads of them. But what if we
needed some images? Look, I can just drag some
images in and they all update. I can play with the
spacing and get them all separated out amazingness
in the repeat grid. Let me show you how
it works in Adobe XD. To get started,
Product Details page, I've made it longer
and I've moved out little snack bar down there. I'm building all of this
hard work that we've done and also I might get rid of the image and just
switch it out for a fill just like
back to square one. If I was doing this and
there's multiples of these, it's really easy to use
the repeat grid on this. I'm going to select everything that I want to be part of it. I give it a wiggle often
to make sure I've got everything and I don't have
anything I shouldn't have. You're going to have
to group it, but you can click on this one here, Repeat Grid [LAUGHTER] That's a new scientific for
this course by the way. All you do is drag it down. You're a repeat grid
master, look at this. Things you can do, let's get
a few of them. Here we go. He'd be like, I need this to come up a little bit,
the gap's too big. Watch this hover, hover, hover, and just I'm not doing anything, I'm just clicking,
holding, and dragging. You can get it to
overlap, you can do this [LAUGHTER] This
is not what I want, but I'm going to get mine
to be quite tight in there, maybe even a little bit
like that. Here we go. Now, I'm going up and down
because we've got that, but you can definitely
go this way as well, it doesn't matter. If you're doing the desktop
version, you can go left, right, you can go up and down. I'm just going to go
down in this case. What makes it cool is that
it's continually adjustable. Once you're finished with
it, you just click on back. You can tell, can
you see this stuff around the outside and
these little guys? These don't go away.
They stay there so you can later on add more
and more if you need to. Now what makes this lovely
is that you can go through, and where's my copy? I can add individual
texts for these things. Let's add these and let's add this one. I'm just
double-clicking them. You can edit them and there's
still got that lovely. If I click off as
I double-click it, go inside member and our
object editing mode, I click off click back in, and I've still got
this and it means that I can still play with
all of the spacing, even though they're
quite individual same with these boxes
here for images. Now with the images you can
just drag in one at a time. Let's grab our exercise
files, there they are. Let's grab image one
and just drag it in. Then you can go at you at this. I want this one to be that one. It assumes all you're
doing alternate ones. You're like, no. I'm
just going to do each individual,
let's do that one. You go there and you just keep adding them as you go through up to how you want to do it. Often what you can do is, let's undo that [NOISE]
You can just grab, I've got four of them there. I can grab four of
these, grab even four. Just drag one in and it will assume that
you're going to do this lovely little repeat
grid. It's great for you. You can make them individual, but you can control
them all together. The spacing is one thing, what I find useful
is this here you decide that actually later on
we're not using that font. We're going to use, do I have Trajan Pro?
Another lovely font. You can see I can adjust these
things or maybe it's just the size and actually
this needs to be a little bit bigger and I
can move it across there, or it's not quite fitting, so I need to make it smaller. You got this, I say, lovely a lot on to
the repeat grid. It's one of the
real big perks of XD over the competitors. You can change fonts,
you can change colors, you can change
spacing all together, but some bits can be individual, like the actual text in
it and the images in it. Also around the
corners you can go, I'll have five please and they all go and change. Here you go. There will be a
point you're like, actually could you
just stop with the whole updating moles want to bang them apart because
I'm going to do something more
individual with them. I want to shuffle them
around separately. What you can do is you
can click on it once, click off, click it once. Over here there's an ungrouped grid and you just
click on that and it just smashes them apart into individual objects.
What individual? Here you go. I can get into this one and say actually you are going to be a right aligned image on
this like you go there, you go there, and you go there. You want to change this to a specific different
font, here you go. You can break them apart. You can't stick them
back together once they're broken apart,
I just ended there. You can hear my loud
keyboard tapping away command Z or control Z in a
PC to get them back together. Great for these card type of things, anything
that repeats. It might be a list
item, see these here. It might be a big long list or bullet points,
anything like that. You use it for
navigation as well. We'll do nav later
on in the video, but navigation bar down the side here of a mobile nav where it says home and account and that. You make one and then just
duplicate them along. Another use case that I use it for is these Moodboards,
big ugly moodboard. What you can do is just
go rectangle and go you something
representatively sized wise [LAUGHTER] and not so big. Last time we drag them in and
they were hitting off into the distance to the right
and they were quite big. What you can do is make a moodboard this a
little bit more, I don't know, less like that. I can do this. Get roughly
the number I need. Grab my moodboard where
was that moodboard? Just dump all of these in. Look how awesome we're
going to be, are you ready? Look how awesome we are
and you can control the spacing like before. [LAUGHTER] Spacing, you
might get them overlapping. That's not good [LAUGHTER] just get on with it then
that's the end of the video. A repeat grid, super useful and handy for this. You might find that it
actually repeats as well. If yo can see I've I haven't
got enough just so you know. I've got this and you can see
this guy repeating twice. Well, there's the first
one and it repeats this, so I don't really
need, what did I do? [LAUGHTER] Random
right-click and I locked it. You can lock stuff,
did you know? You can lock it so it doesn't
move around. There you go. I didn't do that a lot in XD
anyway, except by accident. I'm going to go, don't really
need this one. Here you go. This my moodboard. That
is it for this video, I will see you in the next one.
62. Class Project 12 - Repeat Grid: You can tell from
the video title, it's another class project. This one here is Repeat Grids. We are going to be
making this review page. Well, we're not going to
be making it, you are. In your class projects document, this is Project 12 here. The first thing is, I
want you to research the way a review card looks. I bet you haven't made one
before or maybe you have. But just go to Google and
type in Review Card.Ui, or into Dribble or into Behance, whatever you like to
get inspiration from. Google, we switch to
images and add the word UI to the end so that review
card could be too broad. Do that, get some examples,
take some screenshots. You can have a mood board
for your review card. That's okay. I want you
to create a new artboard. I know it's outside of the
scope of our task flow, we've only been asked to
make this full pages, but hey, this is a course. We may get to break the rules. [NOISE] We're going to make
a new artboard code reviews, and I want you to build
your very own review card [NOISE] and then repeat it
[NOISE] using the Repeat Grid. Do one, repeat it, and then I'm going to get you to experiment with at
least two plug-ins to populate your group. Don't use the ones
I'm using, not good. I'm not going to show you how to use them because I guess I want you to explore
how plug-ins work. They're not all the
same and I want you to find the frustration
and then overcome it, and then realize, okay, plug-ins are all made by various people and they
all work differently. So the ones I ended up using for this particular example, you can use different ones, I ended up learning some
we installed earlier, Faker XD and UI Faces. I'm not like advocates
for these two, they've worked, they were good, but there are lots in there. Have a look through
the plug-ins. Remember to get to plug-ins, is down here this last option
and you might have to hit "Plus" and will open up
your Creative Cloud app. If you need to search,
you can search over here and just got to make sure XD is ticked and
I'm going to go, I don't know, face [LAUGHTER] and you can see there's a bunch of different
ones. Have a look. [NOISE] In this case, the UI Faces one
it's pretty cool. You can click on it and you
can pick from the source. Remember Unsplash and pixels? There you go.
They're very common. This person does not exist. [LAUGHTER] Interesting.
It's complicated but not too complicated. The trick is, with most
of these plug-ins, you got to have something
selected first. Like if I select on this
text it says not supported, whereas I click on
this and it says, hey, I know what to do, and you might find
like in this case, you hit "Select Photos"
and you can pick different ones and
there's lots to it. Just to explore it a little bit, figure it out,
have a go with it. Try a different one other than this one. This one's
quite awesome. It's got lots of
different filters and only happy people, and also different features. This particular one, it acknowledges that is Repeat Grid and goes all the way
through and fills them all in. This other one, Faker, where I wanted to have this text selected,
this one's weird. I'm going to show you
just a quick demo of this one because, if you're new to plug-ins, they all work so differently. This one here is a bit funny. Leave it there, I've
got my text selected, you can go through so much. You can say, all right,
I got to get a date that I need to put in and you can put in dates and it will randomly
put them in there for you. But this one here
is not so random. Well, let me show
you how it works. I said I wanted you
to explore them, [LAUGHTER] but then
I thought actually this particular one
works in a strange way. Got this. I'm going to say name. There's one that says
all generate names for me and if I double-click this, you'd be like, what happens? At the top here, can
you see what it did? If I click on this, it just adds another variable
string, I'm not sure. But it's got some
code at the top here. [NOISE] What I'm going to do is, I want it to be first name
and then a last name, and it puts it in
the wrong order, Watch this, if I hit "Generate", now it's put in
there Cara Little. There you go. It's put
it the wrong way around, so I can grab that, cut it, [NOISE] put it above, and because I put a return, what happens? Return goes in. Up here, you can make this
wider just so you know. I can delete this. Do I want a space
in there? I want a little space, generate. You can see it's very
customizable, which is awesome. Montserrat. [LAUGHTER]
Oberbrunner. Here you go. Oberbrunner? This one though, won't go through
and do everything. You've got to go which
is no big drama, but at least gives
you a random stuff, whereas the other plug-in will automatically go through
and update them all. You could use those two. I want you to explore some of your own ones, just to
get the hang of them. You might be like, man, that is [LAUGHTER] not very good. It's something you need
to explore because all of these aren't
made by Adobe. They don't all work very well, and their reviews can be good
and it's terrible to use, but go and explore
it, figure out. You can do it for Loren
ipsum, for the names. For this, you might
have a different part of your reviews, you might have something
completely different. But it's fun to explore
those plug-ins. The other thing I
wanted to mention is that in this case, I've got to the end here. Can you see? On my prototype, if I play this, you can see it? Well, you can't see, but
I can't scroll down. What I'm going to do is,
I just want to reiterate, we covered earlier in the course but I think it was
a long time ago. I'm going to make this
longer than I need. Remember this thing? As
long as we don't move that, it will get cut off
there and scroll down here. Let's play it. Now I can scroll and have
lots of these different ones. Remember if I end
up moving this, it tries to squeeze it
all in that one page, it won't scroll anymore
and it's a bit weird. I'm going to go you,
I'm going to undo that. You can drag it or you can adjust it over
here. Where was I? I think maybe I have
to click the page. I click the page, there you go. Viewport height,
that's it there. You might type in the
size of your phone, meaning how high it is. [NOISE] Last things
to do is that I want you to create a Reviews
button on the homepage. [NOISE] On the homepage, just the link to this page, otherwise it's got a way
of getting to it and on the homepage I've
added a fake review, more Reviews button
that allows me and my prototype to jump to that
page and scroll up and down. I should add that as well. [NOISE] You don't actually
have to have the code here. You might just have
a Reviews button. It doesn't have to be a
button, it can be text. It's up to you, just
some way of linking the homepage to
the reviews page. Then go and take a screenshot, and upload it to the course
assignments and also share on social media and tag it with the hashtag XD in
the social medias, just so that you can have a look yourself to see what other
people did for the reviews. It's interesting to see what a review card looks like
from different people, different cultures, and
your particular industry. It's nerdy, I know, but you are a nerd now; you are a UI nerd, you're interested in this stuff, so it's interesting to see
what other people make. Who would have
thought a review card would be so interesting? That is it. I will see
you in the next video.
63. Updating & issues with repeat grids of the edge: Hi everyone. In this video,
I'm going to show you how to add to our repeat grid
after you've made it, and also some of the issues
that happens when you like, hey I want to make it
bigger, but it's all cutoff. Why is it cut off? I
want it to get bigger. That is what I'm going to
show you next in Adobe XD. The first one is easy.
Let's say I want to add this little number
after these stars. It's not currently in there now, so what you can do is you
can get into position. It doesn't have to
be in the position. [LAUGHTER] But I'm going
to. I'm going to cut it. It's going to go to edit, cut. I'm going to double-click
to go inside. Just have anything
selected in here, doesn't matter which it
is and then just hit "Paste". Then it goes in. You can see, it's on
all of them. That's how to add something else to it. I'm going to use my arrow
key just to tap it around. Well, the problem
you might run into is you want to extend this, the white background, making
it smaller is easier, but I want to make it bigger. If you make it bigger
and you're like, I just want to make it
a little bit bigger. I want to move it over there. Can you see it's cropped
off the edge here? Actually making it color won't help. But you get the idea. You can see, it gets cropped off that side, if I make it bigger in
that side, it's stuck in this repeat grid board here. If I extend it out, I'm like, okay, I'll click on it. Where do we go?
Click on it once. Here's my edge. I'm just
going to drag it bigger. You're like, it's not
quite what I wanted. What you end up doing and I
undo before I wrecked it. [NOISE] It doesn't
really matter if you do this before or after. Stretch it before or after. I'm going to do it afterwards. All you need to do is make it, mine's long, and you'll be able to see that
handle, where is it? On it be out, click it
once. There you go. There's the handle. If I
make this handle bigger, you just need to stretch
this over first. Give yourself a bit of space, then make this bigger, and then drag this back. Maybe click "Off",
click back on it, and you get rid of that again. It gives you a bit more space. Happens a lot for me when I
go from desktop to mobile. Copy this and I go to my desktop view
and I got more space, so I get to make things
a different size. Just make it bigger. Give yourself a gap. Then extend that out. Then we can extend
that out and then come back to here and shrink
it back in. There you go. Updating and also
some little updates, well, fixing the edge, if you do need to
make it bigger. Sometimes though, instead
of doing any of that, sometimes trying to
adjust this thing afterwards can be quite complicated depending
on what you've got. Sometimes select it and go, ungroup grid and just go, you guys are all gone, and start again, and just start repeat grid with the new
size and you're away again. You're going to have to
update these things, but sometimes just ungroup it and start again
might be easier. That is it for the video, my friend, I will see
you in the next one.
64. How to use stacks in XD to make a form: Hold onto your hats people, it is the second most
exciting feature in Adobe XD called stacks. What do they do? Watch this. The name on the card needs to go below and our email
needs to be the top. Watch this. I'll
get them shuffle. I can play around
with this spacing of them all or just one. It gets better. Look at this. Got these cards, I can go like this. I need to shuffle them
because the client keeps changing their mind. Look at that, even better. Let's do this menu
at the top here. You need to be over here now. Actually, the search, come on, Dan, it needs to be
over that right side. Look at them all
shuffle, all automatic. It's one of those lovely
metrical tools in Adobe XD. Let's jump in and I'll
show you how they work. First up, we need something to stack. You guys wait there. You're back, I made some stuff. This is a form and you might've seen
in the speed version, I made it with the Repeat Grid because it's a lot of repeating. To use stacks, in this case, we're going to ungroup it. Repeat Grid was great for
creating it, but for stacks, they can't be like that or
they can't be a Repeat Grid. These are all units that just what Repeat
Grid did for me. But if you're not, they need to be in groups. That's what the stacks
know how to adjust. You see these, not in groups. So what I want to do is
select this and group it, and grouping something
is Command G or Ctrl+G. This one here is simple as well, so it doesn't need
to be grouped. You can see I reused
it from my assets. I got to use my
character styles. Look at me, all fancy. Now what we need to do
is just select them all. Over here, we say
you are a stack. Where is it? It
won't be like that. [LAUGHTER] So these things
need to be grouped, but the whole thing needs
to be a group as well, like one universal group. Individual groups, great. I'm going to group it again. We'll use long way.
Use this to group it. You can see in my layers
panel, there it is there. This my group. I call it
Form because I don't know, let's be fancy. Got my form. Now I can do a stack. Where is it? There's
it there. Turn it on. It should default
to the right one, whether it's vertical stack
or holds onto a stack. Ready, let's click inside of it. Now, watch, watch, watch, look at that,
does name go first? Doesn't another go first?
Does this go first? So good. You can restack and you can do them horizontally as well, or I'll undo that. You can hold Shift while
you're dragging it and it will move it straight
up and down. Look at that, you might
decide that that goes first or this goes first. What goes first? Email. Let's do that one. Let's do that one. If you need to add another one, you need the, I don't know, the month. You can just select one of them and go copy-paste,
you got another one. You can see it bumps it down, which is the really cool thing. So you might go like this. You might say expiry. [LAUGHTER] That's how
bad a speller I am. I don't know, it
just doesn't go in. Anyway. You can see as well
and it calls on all of these. Geez, they need to
be the same then , spell it correctly. [LAUGHTER] You copy
and paste them, add to them, and push them
out. You can delete one. You might decide that
actually you've come back and I don't need
this one anymore, so double-click it to go inside. Click on it, delete it, and
they all move up and down. You can still work with them
individually because these aren't Repeat Grids anymore. So I can grab this one
and double-click it. I've ended up clicking it once, just click the whole stack. Double-clicking it to
go inside this group. I want to go inside the group
again, double click again. You can do a little bit of
that and it happens a bit. I'm going to do this one and I'm going to grab that unit, double-click it to go
inside, copy-paste. Look at that, and what is it? CVV. Is it CVV? It's one of those. It's
not that it's a CVC. [LAUGHTER] One of those. Yeah. That's how
you make a stack. You group the things
you want to be shufflable and
then the whole lot of it needs to be in a group, then you just click
on "Stack" here. You can adjust the
spacing. Watch this. You can click on it
once, the whole thing, double-click on it and you will hover between your
groups and look at that, they all come along. You can do them individually like this just by
hovering above them. I'm going to undo. You
can undo them altogether. You hold down something,
I'm guessing Shift. I guess right, yay. So hold down Shift, and
they will all move. You might decide
that that's perfect. That one there, that one there. Like I say, stacks
is super handy. Another thing you can do is
you can squeeze things in. So we've copied
and pasted, right? If I want another one of these, I just select it, copy-paste. But let's say you go to
the rectangle tool and you want to add something,
I'm not sure what it is. Let's say it needs to be
an upload image thing. You're going to see I'm just
using my rectangle tool. If I just drag it up, it just makes a little
gift for itself, making a rectangle in there for no reason. Same
with the type tool. Grab the type tool
and go, actually, I want to put type in
there, and now I can type. My type happens to be white. [LAUGHTER] Not useful. But you get the idea, they are pretty resilient. I'm going to undo to
get rid of those. But there are times where
actually you're like, actually, I don't want it
to be a stack anymore. I want to move these up here
because if I try and do it, it just goes [NOISE]. I'm going to undo that. You can unstack it by just turning this little tick off.
So I've got it selected. Turn this off. It's still
in a group, which is fine. You can right-click it and ungroup it somewhere,
if you need to. It's all now little pieces. But what I'm going do is I'm going to show
you a cool thing. I said resilient before, it's just really robust is
probably the word I want. It's a stack, I'm
going to unstack it. Nope, that's padding. [LAUGHTER] I've
already unstacked it. I'm going to go
inside the group. I'm inside form and I'm going to move it over here because
that's what I wanted, and then come out of it. Select it again. Remember,
it has to be a group. I can just turn the stack
back on and something magic happens where it
grouped this line. Can you see this one at the top? That one, that one, this one. Now I can move
through all of this. Just, I don't know,
it is pretty cool. Somehow it knew it was on the same horizontal
plane and it worked. If I hold Shift, grab
them all up the same. You can type it in over here. If you double-click until
you see the pink things, you can click on that
little pink gap. You can see here you can
start messing around with it at the top
and the bottom, if you want it to
be all very exact. You're using an
eight pixel grid, or 16 pixels top and bottom, or eight at the top
and 16 at the bottom, you can be very specific and
actually tell it what to do. Last thing is, is over here,
we've got our form group. Let's name all of these. This first one here you
can see it's called email. Double-click the name
and call it Email. Remember if you can't, if I go back out of this, [LAUGHTER] it's
not what I wanted. Click on this name, go Command 3 to see it
all, click on this. I've got the layer names, and the thing I wanted to
show you was typing this one, Email, then we'll
type the next one, and you can double-click
on that one and type Name. A little shortcut, it's not the word Name,
the shortcut is tab. So it's still flashing,
tab down so I don't have to take my
hands off the keyboard. Is that a fun shortcut? It is for me anyway. That's
the expiry and CVC or CVV, whatever it is. There you go. You can tab down to rename things handy when
you're about to hand your work over to
somebody and you wanted to look like you're not a crazy person with like a zillion unnamed
layers like me. Group 32, [LAUGHTER]
that's not a good sign. That is the stacks. Actually, I want to show you
a couple of other examples. Here's this website here and it's got a navigation
on the top. What I'm going to do is I'm
going to click both of these. I'm just holding Shift, clicking the first one and
then the second one. I'm going to group them so
that these guys move together. These last two are
already grouped. What I can do is
I'm going to say, I want Shift you, you, you, you, and you, you can become a stack. Why is it not over
here as a stack? You know the whole thing
needs to be grouped, Command G or Ctrl+G.
You say you. You can see in this case, just somehow XD is magic and knows whether you want a horizontal or vertical stack. Cool. Then you can
say you go into it, double-click it, and
say you go there. You can see how handy
it is for these types of things, these navigations. You can say actually
this needs to be first, COVID info is going to go there. Move the search bar goes here. Let's do the same over here. I've got this mobile events page and I'm just going to
make sure of that. They don't have to be
grouped, these two bits. You can, to make things a little bit easy,
you don't have to be. This thing here I will. Well, let's see
what the stacks do. Let's see if how much, how clever it is because
it's quite complex. I'm going to grab all of this, don't need the top nav, and zoom out even more. Grab it all. Let's do it. Let's say make it a stack. Won't be a stack
until we group it. Then we say make it a stack
and it assumed up and down or vertical, and
let's give it a go. So double-click it to go inside. You're going to say you, I can Shift+Click both of these and say actually, you go there. Look at that. If you hold Shift
while you're dragging it, it'll go straight down. Look at that, it'll stack
and above it. There you go. Let's try and get
this one below this. Oh, it's too good.
Good work, XD. This bottom chunk is a
too much of a whole unit. So it's ending up
underneath this. The one thing I
might have to do is, this was a big unit
group beforehand, I might have to
separate that out before I do my stack.
So give it a try. Throw the stack at it, see if it does what you want, and then undo it and
maybe you have to do some fancy
grouping beforehand. Last one, a shotgun
stack here ready. I've got all these
individual bits. Client is going
make me move them. I'm going to group them
together, make it a stack, double-click it and say
that one's over there, that one's there, and
then one has to go there. Hold Shift while you're
dragging them, people. [LAUGHTER] Otherwise, they end up in all
sorts of places. Then look, out, click, stack off,
hands-off, done. Well done, XD. That is so good. I love stacks. That is it. I'll see you in the next video.
65. Class Project 13 - Stacks & Checkout Page: Hello, now it is
class project time. This one, I'm going
to get you to build your checkout page. I want you to both research what a checkout page and credit card form look like, the
different options. There are just different
ways of doing it. You decide for your user
profile which might be better. I'll put all mine onto one
page which is assuming some level of like it's tougher to do and it's
all dumped on one page. You might decide to separate it out to three checkout pages. You might have decided
on new quantity, pick shipping into credit card
details and then purchase. You might have three
different checkout pages. That's totally up to you. But have a little look. Have
a look at checkout pages for mobile example and
just a little bit of exploration to decide what
you want yours to look like. The other reason is I want
you to explore stacks. Even if you've got it all laid out perfectly play around with stacks just so that you get
a feel for what they do, what breaks them,
what makes them work. It's great for things
like these lists. This is when it gets
really nice with that. Let's have a quick look. Research, credit card
and checkout pages. Just spend five minutes
having a look around, come up with an idea for
what you want yours too, and then complete your form
on your checkout page. Make sure you
experiment with stacks, create a purchase button and link it to the
confirmation page. My prototype here, if you go there and you go
down and purchase, it goes to the
confirmation page. Do that and send
me a screenshot, upload it to the usual places, and that is it. I'll see
you in the next video.
66. The difference between animation & micro interactions: Hi, everyone. This video we're going to talk
about the difference between animation and
microinteractions. They're quite similar. They're differently the same
in the way you create them. It's just around
their purpose and the term microinteractions,
I don't know. If you know UX, you
probably know the term. For those of you
who are new to UX, which are probably lots of the people watching this video, you've probably never
heard of the term. Let's quickly describe
the differences between animation and
microinteractions. What you're looking
at the screen now, here is basically
all animations. They are there to delight
the visitor to your website, maybe to communicate
an idea more fully. Might be a little information
diagram type animation, something that you can't
communicate with a single image, you might decide to animate it. The difference between
microinteraction and animation is
microinteractions are, let's look at an example. These small user interface
notification style animations. These [LAUGHTER] on the screen
going at the same time, it's a bit distracting another. A Microinteraction generally is done as a response
to user input. That means when you click
on the little heart, it bounces up and down to let you know that
you've done something. Have you ever clicked on
something and it doesn't do enough and you
keep clicking it? It's like your digital
camera on your phone, makes the weird clicking noise. It doesn't need [LAUGHTER]
a weird clicking noise, but us, silly humans need
that little click to know that something's happened [LAUGHTER] so we
can carry on with our day. It's the same thing
with microinteraction. Now the lines get a bit blurry between animations and
microinteractions. This one here, I would say
not a microinteraction, more just an animation. It's just showing you stuff. It's cool there, looks nice, but it's not
actually communicating anything. Something like this is. It's a small little animation. But if I was clicking
this, clicking it, it's a way of showing
me that I can use the same real estate on my page. Instead of having two
buttons, plus, and minus, this thing can transition and this little
animation helps me. Things that move,
attract the eyes, and it helps go like, this
and that thing there. It's just small. It's
just a little bit extra. It's a microinteractions. Let's have a look at
a few other ones. Animation. This is my
humble opinion as well. I'm not the boss of what a microinteraction
[LAUGHTER] is. You're allowed to not agree, but I'm just giving
you my feedback. This one's a good
one. If you click the search button
and it opens up, then you can click
it to close it. It's delightful definitely,
nice little interaction, but it actually helps
communicate what's going on, that you've actually
done something. Let's have a look
at some other ones. I want these sites. This
one's called lottiefiles.com. It's handy for animations
that are online. We're not going to cover too much more information on that. Same with this one, is
called codemyui.com, and this is under the tag
called microinteractions. Now, whenever I suggest
a site on my courses, it's like the case of death. [LAUGHTER] I bet you this, I wouldn't be here
when you come, so these are just
examples sites. If I have a look here,
see this thing here? That is not a microinteraction even though is labeled this one, it is just animation.
Actually, it's a game. Let's have a look, some
good microinteractions. This one here is a nice one. If you've ever
done that thing on your iPhone when you're trying to get the thumbprint to
do the security stuff, that little wiggly line stuff is enough to know that
you're doing something. Because otherwise
if it just says do it and wiggle around, you don't know if you're
like, "I'm I getting closer or is it working?" That little lines around the
thumb don't do anything. The computer is not going,
"Oh look, I see a line." It's just a little
animation to help us as humans know that
you've taken a photo, you can hear the
click. Other ones. Note, this is fun
but an animation. Doesn't help. It's there to be impressive, not to communicate feedback. Generally, a microinteraction
is UI feedback. Let's have a look and
that's page transition. This one here, I don't know.
They get a bit blurry. Sometimes you're
waiting, so that's good. That little load screen and that little [LAUGHTER]
confetti at the end. I'm going to lump that into
the microinteractions, but it's a little
bit on the border. Let's look at one more page. Ads will follow you
everywhere on this site. You can tell what I've
been buying lately. [LAUGHTER] UX designers/car
wirra needing bits. Let's have a look.
Animation. A bit of both. I have micro-interaction.
Let's see. This is a good one.
Look at this. Watch it. Green, all means
you've completed it. Let's watch the next one. It's got a good one.
It goes red. Watch it. Can you see it shakes? Means no. It's not saying anything, it's just visually
communicating the no to you. You get the idea. Any other ones?
Animation. That's cool. Here we go,
microinteraction, helpful. That is going to
be it, I promise. Any last ones? [LAUGHTER]
One last place is, just go to something
like Dribbble or Behance and type in microinteraction
and you will find, again, a mixture of both. But this one here is good as long as you're
using American dollars. There was one. I'm not going to go through them
all. You get the idea. Look. Downloading and
something's happening. That little line, little
microinteractions. Last one, promise.
Little loading, clouds flying by on the microinteraction
side, in my opinion. That, my friends, is a little brief introduction
to microinteractions. Let's go and make one
in the next video.
67. Dan drawing stuff in Adobe XD: Hi everyone. Welcome to the most boring
video I've ever made. I thought making this video when I was playing it
out, I was like, yeah, I'll make a video where I'm going to draw this
stuff and it has to be drawn instead of just
skipping to it being drawn. I thought I'd do it
and you could come along for the ride and
be super interesting. It wasn't, but it's still here [LAUGHTER] so you can
skip along because nothing really exciting
happens except very average, looking truck icon box thing. Guess what that is?
I hope you think it's a box because meanwhile, I need you to decide
on how to make a package as the icon, but anyway, I'm
going to draw these, I'm going to cover
basically things we've covered already
in the course, it was a while ago since we did some drawing so we're going
to throw them all in here, you're going to see me
make these ugly things and that's it, nothing else just going
to be landed on the page. But yeah, we'll animate
them in the next video. There you go, enjoy
or skip ahead, I don't mind. Drawing begins. Now you might be
tempted to start drawing over here
on the pasteboard. The problem with doing it
over here is that you're going to scale reference and you end up drawing
it really big or too small and then having
to scale it up, but you end up with wonky
looking houses like this [LAUGHTER] because you have to resize it and pick new
borders and line things up. It's best to actually just draw on your actual art
board that it's going, so you'll get some comparisons. With this art board though
there's lots on it, and I don't want to move it, because it's all just pieces. You can select everything
on the art board, right-click it and say lock it, just so that it can't be moved. You can select the whole
thing, actually, select it, all, right-click it
and say unlock as well, or we can just hide it. It's up to you. I'm
going to draw this. We start with a rectangle tool, and I'm going to
draw out something, my process was,
just so you know, I went and googled truck icon, and package icon and I just ended up looking
at things that I like and some of them are
close and some of them weren't and they just ended up with a bit of a mesh up. Yeah. I'm going to
pick a fill color, I'm going to have no
stroke, around the corners, some of them hold on option or Alt on a PC,
get the bottom corner. Now Pin to for the cab. I'm just going to draw
with straight lines. Let me do it like a little
cut-out for the window. If it doesn't line up,
yeah, it lined up nicely. I'm going to grab
the Selection tool, which is the V key. We are going to
double-click it first. Whatever we attempted to go
to Illustrator to do this, probably not to say you know something like icons and
stuff Xd is perfect for. Let's give this a fill. Actually no, I'm not sure what
I was going to say there. [LAUGHTER] If you are going
to do things like strokes, can see things that line up? You've got to remember we
did earlier in the course, there was a way of saying B, let me make it bigger
so you can see. Half tutorial, half
watch me do it. You can see you can
put it on the inside, there might be times
where that is necessary, don't need it in my case.
I got to draw some wheels. I thought this might
be interesting but [LAUGHTER] its not, thankful. Yeah. [LAUGHTER] I didn't really think this would be hard, it doesn't be good for people. [LAUGHTER] It's definitely not. All right, so that's
going to be my truck. Let's draw the box. I'm going to get it to
fall into that thing. Thing is with this, when I was looking
for icons of boxes, they're all three-dimensions
and they don't work with my little
one-dimensional truck, so I had to try and figure
out a way around that. First of all, some
kind of stroke and I want rounded edges, let's go border
all around, three. Now you can see the rounded borders aren't
working, you're like, uh, why is it not doing
more rounded corners? It's got the rounded
corners, three is not much, but it's also can you see it's all trying to cram
it on the inside, so when it gets to the inside, it gains up being sharp. What do I mean by that is, outside more pronounced
on the middle. I don't know what I was looking
for, something like that. We got to have tape. For the rectangle tool, let us give it a fill of that, two of those please, does
that look like tape? Two of those please, hold Shift, select all those,
go in the middle, start talking Dan [inaudible] . You [LAUGHTER] get
one little arrow for that like this is the only thing to make
it look like a box, is if you have a little
this way up Arrow, I wasn't going to draw
the glass shattered, fragile thing, but I'm
using the Pin tool, make a little arrow at the top, I'll stoke at the bottom. I'm going to play around with, make sure I get the right color, make sure I get the right size. This is my up arrow,
something appropriate. I want them to have
the little blobby ends and I'm going to group it
and I want two of them, then I'm going to say
you go with there. Does that look like a box
now or kind of like a box? Select both of them, hold Shift otherwise they
do some weird stuff. Hold Shift, squiggle
them in, here you go. See these little points
at the top here, I'm going to ungroup them, so I've got the border selected and instead of
the little mitered edge, I'm going to go around
with that all rounding. All right, I'm going
to select it all, I'm going to group it, I'm going to give it a name, I'm going to call this one Box. This one here is going to be my truck. Do I
like the truck? [LAUGHTER] I don't really. Double-click it to go in. I'm going to delete
that anchor point, just by selecting it and
deleting it and I'm going to do a bigger window. I don't want the
sloping roof anymore, I want to Mack truck. There we go. All
right. That is enough. You are not truck it, so
I'm going to select it all, group it, control
G, and go truck. That my friend, that exciting
episode [LAUGHTER] was me drawing a box and all
questionable truck. All right, let's go and
animate it in the next video.
68. More animation in Adobe XD: Hi everyone. It's time
to do some animation. We've done animation before. We just did a really basic
one early on in the course. I wanted to introduce it then, but now we've got a lot
of drawing skills and other skills, computer
hacking skills. We want to now take that and take what we
learned in the animation and just make something
slightly more complex or at least prettier. I'm going to go and
buy now button, I purchased ready. This is
what we're going to make. Look at them come in,
look at it bouncing. He does a little
wheelie and leaves. We're going to
build this together using a lot of the
techniques we already know. I know, I promised
we're going to do micro-interactions
in [LAUGHTER] one of the previous videos. We're not, we're
just doing full-on animation at the moment
to get our skills up. Then I feel like it's better
to do that then get into the micro-interactions
in the next dish videos. [LAUGHTER] That is it. Let's get started with our
sweet truck one more time. Let's get going. Let's
start animating. First step, I'm going
to select everything because parts of it were locked. I'm going to right-click it.
Weirdly you can't unlock it. You can lock at all
and then right-click and unlock it so that works. Or if I undo, you can see on here, undo that. You can see a bunch
of them are locked. [NOISE] I'm in my layers
panel, up to you. What I want to do
is get rid of that. I can't live with the map.
You can keep the map. You might love the map, but I find it too distracting
for this one. I'm going to just do
something like this. I'm in prototype mode, should be in design
mode. Here we go. Good practice for animation is I'm going to have enough space because you saw at the beginning starts off screen, so I need a bit of space here. I'm holding shift so that
this art board moves across. I'm going to duplicate
this art board by holding down the option key and
dragging or Alt key on a PC, copy paste. It gives
you another one. The big issue with animating, and I half forget every
time I'm doing it, is that I'm like, over here I wanted to start off screen and then move over here. But it's not going to
work because it's ended up in this massive pasteboard. It doesn't matter what I
do now it won't animate across because it
doesn't know it's on this art board anymore. The trick with animation
is, first of all, group, this is all going to operate at the exact
same speed, not separated. These things are
separate objects. They're going to animate
this one I'm trying to say. I've named them truck and
box and grouped them. That's good practice and the
name the same over here. The trick to doing
anything is to add the animation first or
at least the transition. If I got a prototype. Does
it even matter what I add? Don't care what's over here. It just means now when
I drag this off and design view or prototype
mode, can you still see? [LAUGHTER] That didn't work. Prototype mode, it's connected over here. Don't
need two of them. Why don't you work? Give
me a sec. I'm back. You can see the time
up there probably. [LAUGHTER] [inaudible]. It was a good minute
or so me going, I have remember how to do it. I can't remember.
I'm going to undo. Happens to the best of
us. I figured it out. What happens is you've got
to add your animation, but it has to be auto animate
if it's just on transition. I can drag it off watch. Look, it goes to the baseboard. But if I add my animation, so prototype and my animation. But that animation happens
to be auto animate then it locks those guys in and you can see
and drag them off. He's not off onto
the pasteboard now he's still on the
confirmation HIFI. We all learned something. I'm going to start
them off screen. He's going to end up
on the middle there. Let's give it a preview. Click on the heading here. Preview. Yours might not
do the exact same thing. Mindset to, it might be
tap. Yours is set to. I want mine after some time
and I want it to be able to zero time to then auto animate
to this other destination. You can decide you
want to ease out. Ease out is probably the
nicest one and this one. It's going to go faster
at the beginning and go slowly at the out. I'm going to mess around
with this. I'm going to do one second. Let's
have a little look. There's a lot of playing with
the easing and just going. There you go. I feel
like he's, I feel good. [LAUGHTER] Now this one is
going to fall into the truck. Well, I'll show you
another trick is I'm going to delete
this one over here. I'm going to go to
my design view. I want it to end up here.
There we go, there. I'm going to copy it and then go over here.
It's called box. Over this one, I'm
going to paste it goes back in the exact
same spot, which is great. It's still go box
which is going to work and I'm going to move
it up holding Shift. That's what I want to do. Actually, that's not
what I want to do. What I want to do is get
him off this first one. I wanted to be a progression. What I don't want to happen is everything to happen at the
same time because watch this, they're going to use the
same easing which is, see that. It works. But I'm going to end up
doing them in a progression. What I want to do is
say not on this one. Don't do that,
just minus it out. Get in the habit of that.
Let's duplicate this one. Make sure that under prototype, it's got some connection
remembering what, it's what I animated.
Don't forget that. What I want is on this
one, I wanted to be up. Then this thing here
I want it to be, let's have a look
at, bounce finally. It's bounce time, everyone
might actually work. Let's give it a go. Go
back here, click "Play". It did it. Is there
a pause on this one? The time delay is 0 seconds. Bounce just takes
a little time to get on it's merry way. It
was pretty good though. I'm happy with myself.
[LAUGHTER] Now let's get the truck to move
off. Duplicate it. Get in the habit of going
on Prototype Member. Double-check it is auto
animate because I want it to go off screen
and my one is going to back to design mode. It's going to do
a little wheelie. Both of the masks, I'm
going to take both of them [LAUGHTER] and hit off. Hopefully it doesn't end
up in the pasteboard. Other than the easing let's
have a look. It bounces off. [LAUGHTER] It doesn't look good. Looks like it has a bit of a
crash. Let's give it a go. Falls in. [LAUGHTER]
Heads of all. I'm just going to
use the prototype. This one, I'm going
to go instead of bounce, windup
it's pretty good one, like uses the anticipation that whole move back
before it goes forward. Let's give it a preview. Watching. Nice and bit of
a delay between these two. You after zero seconds, I'm going to have
maybe 1.5 seconds. Another one preview. Too long. Maybe just a half
a second pause, 0.5 seconds. The other thing is that box. I want it to start up
here under design mode, I would like it to be opacity zero so it appears from nowhere. Maybe we will get
it to fall out from behind this. You're ready? Can you see it comes down
with a lot more force? That's interesting
because what's end up happening is between
this one and this one, is a prototype mode between, I'm giving it one
second for the bounce. The further it has to move, watch this up here. I've still got one second to
get all the way down here. It's going to go a lot faster, has to get to here in one
second and do it's bounce. Watch, it's a lot faster. That's the timing that you'll
need to play around with. From here, I want it to
probably be about two seconds. Just keep playing with that. You can see I can do
some basic design, at least move things around
while I'm in prototype mode. You don't have to. You can switch between design
and prototype. I bet it's option one
to get between the two. On a PC, it's Alt one and two. If it's not Alt because I don't have a PC
in front of me anymore, just hover above it and it'll
tell you which one it is. I got distracted by
the PC shortcut. Let's give it a preview.
Last one, I promise. It comes in, bounces in why takes way too
long and then off. Look at our little animation, probably needs a little
confirmation tick now. Or continue shopping button or return home button or maybe just after a
certain amount of time. It goes you after,
use a shortcut. After some time, you
can just drag it, you can just click it. Say actually after
some time I want it to go to the homepage. Now look how messy this is. I want homepage
marketing, HIFI. I think. Name your pages, people. Don't bounce and I don't
want it to auto animate. I just wanted to
transition to that page. Dissolve. Don't
want it to bounce. Even with a bounce, you're
not going to actually see it with a transition, doesn't really matter
what using you do. You can't really tell.
I said last time, this is the last time. I don't want to change that
room. 2.5 ready, steady. We're back to the homepage. Lovely. My friends,
that is an animation, a recap of some of
this stuff we know. If you're going to have anything
off screen at any point, remember to add the animation first. What do you have to do? What prototype animation
do you have to add to it? Auto animate, otherwise it
goes into the pasteboard. Last one. Buy now. Purchase button. Look at that, that's the go, we made. [LAUGHTER] That
is definitely it. It is finished.
69. Class Project - My Second Animation: This class project is
your second animation. Remember we did one way
back with the little arrow. I want you to do
something else and unique for your current project. I've done this van thing. You can do something similar. Do a little bit of research. Look for confirmation page
or checkout animation. Look for those
types of things you might integrate your
actual product. I've just done that
regular old box. Depending on what yours is, could be tea leaves or whatever you got stuck with
in this course. Be creative, be simple. It's up to you. You can be elaborate. The minimum is three. Something, something, something, but you might go crazy. They might be 20 of them. Play around with the different
auto animate easings. When you're done,
record a video of it. Remember on a Mac it's
easy, it's up there. On a PC, it's harder over there. You might be using some other
screen recording software. That's fine as long
as you can record your animation and either upload the video or the link to it. Upload it to YouTube or Vimeo or Behance or something
and send us the link. If you've not been able
to crack the video code, you can just do a screenshot of all those pages like this so we can
see what's going on, all of those ones
and upload that. Make sure you share it both in the assignments and
also on social media. It's one of the more
exciting things to see is everyone's animations. Simple as they may be, don't worry, it doesn't
have to be amazing. Your drawing skills are
allowed to be horrible. We're learning, we're
getting started, it's totally okay.
Share them anyway. I think that's it. Draw your own elements,
three frames minimum, create your own animation, and that is it. I will see you in the
next video everyone.
70. Micro interaction toggle switch in Adobe XD: Hi everyone. Welcome
to toggle switches. We're going to do a
little micro interaction. We're going to combine
our skills from animation plus some of the
things like states. Remember that toggle state
we did for this one? We're going to
combine the animation and do a cool little
toggle switch. It's a rite of passage as
a UX designer so sit back, relax and let's get all toggly. Now we're basically combining two different things we've done. We've done the toggle option, like this little button here. Remember we did a
state and it has a toggle option and we're going to add some of our animation
that we've learned. The difference between this animation and
animation we're going to do is that it happens
within the component. It doesn't go from art
board to art board. You need this because we need the timing whereas
micro-interaction is just a small little
animation that happens within a component.
Let's build it. Let's just build
something really quick and not good to start with. We won't worry about
the design points. We'll get the mechanics
going and then we'll make it look pretty at the end. Rectangle tool. Make the
outside corners round. Some pill shape, circle tool, hold Shift, give
it a fill color. That's all we need. I'm going to select
both of them, convert it into a component, Command K or click that button. What we need here is
we need one state, we need another state,
just like we did before. We did the toggle, like the little radio
button we just saw, and we're going
to have on state. All we do is we go,
make sure we're on on, double-click it to go inside
and do something different. What's going to happen is
it's going to default to the auto-animate animation
and let's give it a go. Actually, let's just
preview at first. Can't really preview because
it's not on an art board. Let's stick them on something. I'm going to make this bigger. We build on art boards
people. Here we go. My giant toggle
switch, my giant. Let's go and preview. It is here, watch. Cool. It's such a cool feeling making things like this.
[LAUGHTER] work. It was just too boring old shapes and look
at what we did. So that is how to do the toggle switch. That's
a rite of passage. You have to build this toggle
switch as a UX designer. You don't even need it. It's very rare than I need
a toggle switch other than teaching new UX designers how to build a toggle switch. But it's a really good
micro-interaction, it's a really good
clear what's happening. We can make it clearer. So let's make it more
micro-interactioney. We're going to go
in and style it. Now, what is easier is well you style it before
you turn it into a component. We'll do something now
while it is a component, just adjust it and then
I'll just show you the normal way of doing
it. Let's go inside of it. Let's decide on which
state we want to be on, Do we want to be adjusting
this state or this state. Let's do this one first. What we're going to do
is maybe make it dull. Let's make it off and use
the international off color, which is going to be red
disabled, something like that. It's generally
either gray or red. We'll use red because
it looks fancy. I clearly don't like red. I'm going for some
sort of not red. We've got this first
one and then on the on-state over here, remember, it will be the same on both sides of our auto
animate unless we change it. At the moment, we've updated our default state and
it's not different on the on so it's going to
stay red over here though. We're going to say actually
now you're going to be green. Let's go for a bright
green, too bright. Now let's preview
it. You're going to, play button where are you? On, off, on, off. Why did it start green? Do you know? You do. You remember, it's
because we left it. Wherever you leave
this on, remember, that's the starting point. We're going to
assume that it's off and turn it on to be green. Cool. Let's get even
fancier with the animation. It's added some default stuff
and you might not like it. Where do you adjust the easing? Do you remember? Where
would you go? Have a think. Where would you go now
if you were left to it? I'll select it. You
go to Prototype. You can see this little,
I'm going nowhere. It has got the Default state, has a Tap, which is what I want. It's auto animating,
which is perfect. Destination, it's going to the on-state and what
kind of easing? It's easing out. I'm going to do in and out, and
let's preview it. Let's have a look, in and out. It just looks nicer
in my opinion. It means it starts slow and ends slow and goes fast
in the middle. Now the one thing is it's
hard to notice in that one, let's make it the crazy
Bounce and preview it. What ends up happening
is watch this, and then the back one, why is it not going
back the other way? You just got to remember that you've got these two states. At the moment we've got
the default state and its auto animating with balance but if I click on
on, can you see? It's all changing. It's
using the ease out. If you want to do it on
both of them, there you go. [LAUGHTER] old mechanical
switch, it feels like. In terms of the style, now I'll just give you some basics because I want
to introduce something. I also want to show you the
normal way that I do it. What I would generally do is not do all this on-state stuff. You can delete a state. Just go back to this first one, I should go to Design. I've still got my
state. It's still a component and it's
still poorly named. We're going to have
a Button Toggle. It doesn't really
matter whether you are a styling it before
you make a component, but just before you
add all the states because it makes it tricky to go and edit them all
to make them match because I'm going to
do lots of changes. I'm double-clicking
to go inside of it. I'm holding Shift
and scaling it up. I'm going to, what
I want to show you is you get bonus points if
you do an inner shadow. I got my inner shadow here and actually I'm going to
give it a fill color of what, then the interface color, an old Windows color
that goes in there. There's no rules on what
you can do for this. If you are designing for, say, Android or Apple phones, you're using the
operating system. Often you can't change these toggle switches
that default so you might just copy and paste from one
of the UI kits from Apple, iOS they call it or Google
call it Google material. You're just going to
paste them out here. We though want to do our own custom buttons because
we're awesome. I'm doing an inner shadow,
you can see there. This is X and Y is
how far down from the top and how in from
the right it is, and B is the blue. This little option here
is how dark it is. So I'm going to use the black, this is the transparency. You can have an inner shadow
of red. I don't want that. You can decide on how
dark this thing is. I'm going to get it like this and then I'm
going to go how blur. Use my arrow keys to
move up and down, something like that and
get rid of the border. I kind of need the border. This one here, we're going
to add a drop shadow too because, why? Just because. Blurry down as well, maybe two and maybe this just
needs to be one and one. Maybe a little bit darker. You can see, you
can mess around for a long time before you make the next stage to try
and make it nicer. I might make mine just
a plain old like that. Now I can add my extra
state. Is that pretty? We're going to have our
own state and this one is going to have the micro-interactions
of going over here. It will go green. Actually, instead
of going green, we can make the
background go green. So the background
color is going to go like a positive color. Find a good green and maybe we'll make this
go white. Here you go. Remember, our initial
state is going to be off. Let's give it a preview. Is it any good? It looks cool. You can see the
inner shadow thing works differently from far back. It's good to have
this thing open. I have it open on
another screen. You can't see that
screen, but just so when I'm designing
really close in. Watch this, well, you pretend that it's
on another screen. I can go in here and I
can start messing with the shadow and be seeing a
really far away version. Even better if you've got
it on your phone because then you can touch
it as you're going. The other thing I want to share with you as we
looked at it way earlier in the course, was
Responsive Resize. It doesn't happen when
it's a irregular shape, but when it is a component like this, watch this, if I go, actually it's too big
and I make it smaller, holding Shift and scale it
down. What are you you doing? It does some weird stuff. It's because that gets turned
on when it's a component. It's trying to be fancy
where you can do this. That's great, kind of,
readjusting button. We've loved it so far
but for this thing we want to scale it all
proportionately. It's doing some weird stuff. You can turn it off, then hold shift and scale
it down the regular way. You'll notice that the
inner shadow can you see? Is staying the same so
you'll have to adjust that, and you can turn Responsive
Resize back on once it's small and make your adjustments
like you did before. But that's just a reminder
when you are doing components, they get this Responsive
Resize turned on. All right, Suite toggle. Go make you toggle, be part of the UX
design community. There's checks at
design conferences to make sure that you've
done your toggle switch, they'll check it at the door so make sure you make
your toggle switches. I'm going to make you do a
toggle switch in a couple of lessons for your
class practice. practice now and you'll be making one for sure
in a little bit. All right. That is it. Toggle switch is over.
71. Micro interaction burger menu turned into a cross in XD: Hello you. You feeling
like a UX designer yet? We're quite foreign
to this course. You should start
feeling very UXy. If you're not feeling UXy, you go into after this. Watch this. It's another
rite of passage animation. It's the cross that turns into the burger menu or
the other way around. Like the toggle switch,
it's a rite of passage. The same as like learning
the lens flare in photoshop. Remember when you
learned that? Anyway, let me show you how to
make this in Adobe XD. Let's make this one. Just need three lines, 1, 2, 3. I'm not going to spend too
much time designing them. I'm just going to make
them look okay enough. Using the size arrow up and down and make little
rounded ends. That looks appropriate. Cool. Let's turn it
into a component. Hit "Command" key key "Control" key on a PC and
just click the button. We're going to have two states. Default state is going to
be the big menu and then this toggle state is going to be the cross, we'll call it. What we're going
to do is we leave default state as it
is and the cross, we're going to
double-click to go inside. This middle one, remember,
don't delete it. Just turn the opacity down, so it goes away and fades out. This top one is going
to be 45 degrees. This bottom one
here is going to be minus 45 degrees.
Select them both. Then up here, we're
going to go align middle and just check. I'm going to click
off, click back on. I'm just going to
check if they line up , and they line up. Perfect. Let's start
on the default state. Let's give this a play. Let's go down here.
Are you ready? [LAUGHTER]. I love that one. Let's go. I've done that a
bazillion times, but it's still exciting. You do it, you'll be excited. Give it a click. It's hard to stop clicking. It doesn't
even do anything. A little bit later
in the course, we'll build a menu
that actually pops in little side nav that appears
on the mobile device. [LAUGHTER]. I'm going to stop
clicking it and we'll move on to the next video. We'll actually just do one little thing,
just to reiterate. If you do want to
change the timing, remember have your
state selected, burger menu selected,
and then go to prototype and you can click
on the different states. Default state, if you want it to be or do
ease in and out, that's my favorite one. How quick? 0.5, not going to practice,
I'm not sure, actually. I definitely like
ease in and out. I'm doing it both of these, so they both do the same thing. We'll do 0.5. Let's
see how it goes. Preview. I don't know, maybe a bit slow,
maybe it back 2.3, but there you go. Toggling menu. Click them all. That's it. I'll see
you in the next video.
72. Class Project 15 - Micro interaction: It's time to make your
own micro interactions. There's going to be two
that we've already made. If you haven't done
them already, make sure you do those ones. That's the toggle switch and the burger menu that
turns into a cross. Then your own custom one. Toggle switch can be
real, simple, and basic. They can all be real,
simple, and basic. You might be just
trying to fly through this course to get on with it, but if you have got
a bit more time, have a little research. There are some really
cool things you can do with a toggle switch. Now in this case, because this is a course, you can make it as
fancy as you like. In the real world, you
probably want it to be really simple and clear and not
a full-blown animation, but you have full
permission to go crazy with it if you have
time and the desire. Look at toggle switches,
they're some really cool stuff around. Burger menu. There's not much you
can do with that one. [LAUGHTER] Tends
to draw a cross. There's different
ways of turning it into a cross. There you go. The own custom one. Again, if you've got the time, I'd like you to have
a little explore with something like, Dribbble is a better
place and has these really easy
thumbnails to preview. Just have a look. You might go for something quite extravagant. That's almost animation and not actually that useful as
a micro interaction. Or you might go
something simple, like this looks a toggle switch. Look at that blobby one. How would you do that?
There's some awesome things. It depends on your skill level and your animation and ability. But have a little look,
find one that you like and that you might
be able to reproduce, customize it, and try and get
it to work within your app. Look at your document
and go, what on here? Can I update or animate
as a little interaction? It could be simple, it
could be quite extravagant. It's up to you. Three of them, deliverables, record
the video, if you can, upload it to a
video hosting site, and share it with us, and
share on social media. If you can't do the video stuff, like before, just
take a screenshot. That is it. Class project, micro interactions. Have fun. It's quite exciting.
Well, I like to think it is. [LAUGHTER] I enjoy doing micro
interactions. Hope you do too. Go, do it. I'll see
you in the next video.
73. How to pin navigation to the top in Adobe XD: Hi everyone. How do
you pin stuff so that it doesn't scroll
with the rest of the page? See the navigation
on the top which we hit the scrolls underneath, so we can always
access my navigation. We'll do the same for our little snack bar down the bottom here, and I'll show you
in the end how to turn this off as well. It's looking pretty complete.
Let me show you how. First thing is, you need a
page that actually scrolls. This one here is not long enough to scroll
so I can make it work, but I won't be able
to visually test it. This page is long enough. If I preview it, there
is scrolling involved. Whereas this first page, I
can't scroll up and down. I'm using my scroll
wheel, it doesn't work, so you either need to
make your page longer. I've already got one
that's longer, but go to design view with the
page name selected. Just make sure it's long enough. You see this dotted line and at least there's some
scrolling going on. I'm going to work on this page and work on this navigation. All you needed to do
whatever you want pinned, have it selected,
switch to prototype, and then go over here and
say "Fixed position when scrolling," and you're done. Let's play it and look at that. It's fixed to the
top. My trouble is that my layer order
is not quite right. Depending on who was made last or who's at the
top of the layer order, you might have to bring this
to the front. Let's do that. With it selected, I'll use the shortcut Command Shift square bracket all the time. The square brackets are the
ones over by your P key. It's Control Shift and square brackets I am to bring
it forward and back. When we right-click,
send it back. Now I want it to right-click and bring it to front.
Let's preview it now. Let's keep it over
here, watch this. Now it goes over the
top of everything. It's not very usable though. It's very common to add a bit of a background color.
Back to design view. I could go inside my component
and edit in here and it'll appear on all
of them or it could be separate where I'll just
have to copy and paste it, not part of the component
just in the background, but I have to copy and
paste it to every page. Let's try and smush it
under the components. It's going to make this a bit
more of a pain in the back though because we came
into this problem before. Remember if we try and
add stuff out here, there's going to be pain in
the back, but we'll see. Inside my Top Nav
component from earlier, if you're jumping to this video and you haven't gone
through the course, or you're just jumping back and it doesn't have to
be in the component. We're just doing it
because you're going to probably need to at some stage. I'm going to send
it to the back. I'm going to get
rid of the border. At the moment it's just
white, it's up to you. Let's preview it, so I'll preview this page. It is there, and
it stays on top. There's a couple of
things people do is you might go inside of it, grab that white rectangle in the background, and
add a drop shadow. I'm going to leave
it as the default. Let's preview that.
Let's preview this. Here we go, got a drop
shadow above it or below it. Or, and so either or you can select it and
actually put the fill, its just lower the opacity a little bit so that it's there, but you can see through it. Do you know want I
mean? Probably begins to be a little bit more opaque, but there you go. Pin it to the top. Now
you can pin anything. Where is that little
this thing here? It's one little here.
Remember our little snack bar , our little toasty thing? Might keep it at
the bottom here. Oh, actually with it selected, who remembers where you go to get it to fix or pin
it? Do you remember? Oh, you do. That's
under prototype. Look, prototype. They're
is this, super easy. Let's preview this and
look everything stays. Can I close it at the moment? It looks like I can
or you're going to want to know how to
close it on, aren't you? You are. We'll do that as well, but let's underline pinning. We've pinned the top and the bottom because more
work for me and you. The things you need to remember is that the page
needs to be long enough to scroll and you might have to play with
your layer order. Then you might add a drop shadow background
transparency thing to make it a little bit more legible when you are scrolling. That is the halfway end. Now let's figure out how
to get this to close. Let's shut that down. Let's have a look. I
planned on doing this later in the course. Well, I was going to
do a different way. But we're here, it's interesting and I'm going
to show you my process. I'm going to zoom out,
grab all of these things, it's getting messy,
then, select it. What you end up doing is you
end up having two pages. Actually no, we'll
do it this way. This way is even
cleverer, I think. We're going to go
to design view, and have this clicked. We're going to have
a toggle. Is this all part of the
same thing? It is. It's a group. What we're
going to do is we'll use toggle a few times and
turn the opacity down. Do you get what we're going
to do? I'm going to say you are a component with
a state of toggle. Once it's toggled,
it's going to be off. Then the off-state in here, can we turn down
the entire thing? It's on. No, you can't do the entire thing, I thought so, so you needed
to do the individual bits. For some reason, if you do the appearance of the component, it will do it both
in this state and that state. You there. The state if I turn it back on, there's my parent's back on. Can you see it
affects both of them? We need to go inside
the off-state. Go inside of this,
select everything. Now, I've double-clicked to
go inside the component. I hit, "Command A" on my keyboard because it's
the shortcut that I remember and you can
go to "Select all." It's Control A, on a PC or just go to
hit it, "Select all." I've gotten inside my component, I've selected all and
I'm just going to lower the opacity of
everything inside of it. Weird. You're not
lowering the opacity of the actual outside
wrapper component. You've gotten inside of
it and lower the opacity. We're getting a little bit, I don't know what is it
called, Inception. You know that new movie? You do. There we go. Let's give it a go. I'm going to select
this invisible thing now and go back to
the default state, and when it is prototype, when it is tapped, it's going to auto animate. Actually, we're just going
to get it to auto animate. It's just going to
fade out, isn't it? Destination. Let's go into the off-state and it's
going to ease out slowly. You could speed that
up. Let's give it a go on the fly training. I didn't plan to do this
here, but hey, we're here. Look at this, scroll in.
How did you get it back? [LAUGHTER] It's not absolutely [LAUGHTER] foolproof.
No, that's it. Xd is not making a complete
actual version of it, there's a lot of
fakery going on, which makes it quick and easy. Not a huge amount of
settings, not hugely complex. But there are some
things you just got to grin and bear in terms of the mock-ups where you can't make it absolutely like an app, but close enough for
testing and demoing. That's pinning, plus how to
turn that little thing off. Onto the next video.
74. How to add a popup overlay modal in Adobe XD: Hi everyone. In this video,
we're going to make this. We're going to click
this ''Button'', and it's going to have this
like little popup overlay. Can we close it, open it again, close it again. Let me show you how to
make that in Adobe XD. To get started, I did
a couple of things. I edit a button to our
product details page, I move this thing off because
it was just in the way, and I created this. This is going to be the pop-up you saw at the beginning is just a bunch of rectangles
and circles and text. It can be anything, and so
you need something that's going to pop up and you need a button that's going
to activate it. Those are the two
things to get started. The way this works is, this button or texting me
anything that activates it, it wants to call it an
artboard and overlay it, so this thing here is
not going to work. It's just in the pasteboard, just hanging out by himself. What we need to do is
convert it into an artboard, and we don't really convert
it into an artboard, we just click off
in the background, if you have nothing selected, grab the artboard tool, like we've done before,
we've been adding artboard. I just click once in. I
can actually drag out a custom artboard over the top because it snaps
to the right size. We've turned our little
graphic here into an artboard. I'm going to name it,
I'm going to call this one modal cart, and now I can connect them up. The way they connect them up,
click on your ''Button''. This is not a component,
it's nothing, it's just anything
can trigger it. I'm going to select
both of those and say actually under prototype, when this thing is clicked, what we've been doing is
we've been under prototype, is we've been dragging things. You can click on this, actually just click on one
of them or group these two, so I'm just going to click
on the ''Green box''. We've been dragging them
to connect to pages. You can or do it the other way. With it selected, we're
going to add an interaction, it's going to be a tap, and by default it
wants to go to auto animate or transition depending on the last thing you did. The magic happens under
here, under overlay. When this is tapped
overlay, what artboard? The modal cart one, please, and that's
the big change. Can you see this
appeared? Wasn't there a second ago? Now it's there. Let's give it a test run as is, and let's
see what it does. I scroll down my button. Hey, look at that, and I can click it,
close it look at that. The cool thing about
it is that you don't actually need
to action the close, it just wants to revert
back by default. Even though there's a
cross there on my mock-up, it's just a circle
with a cross in it. I haven't rigged it
up, you can actually click anywhere and
it just goes away. It just works, but I
haven't had to do anything. That's the basics of it. There's going to be a
couple of things you like. Hey, did you have a drop shadow? You'd probably didn't
even see the drop shadow. I spent ages crafting
my drop shadow, but it's gone, and it's really hard because you can't
really see the background. A few little things that
happen is, it's over here. I'm going to go back
to design mode, option one on a PC. I think it's all one,
sorry, PC people. What I want to do
is the artboard and the white box in the background are
actually several things. There's artboard, white box. To get the idea, white box. See the white box and
the artboard separated. The problem with it, can you see there's my lovely
little drop shadow, but because it's over the edge of the white box
is getting cropped out, so you can do one of two things. You can make your white box
small, so you can see it, or you can grab your artboard and make that bigger,
so you can see it. Now let's give it a preview, let's go back into this
guy, let's go to you, here and its got a
drop shadow now. Yeah, works. I think my white box is a bit
too big to fill the screen. But yeah, we probably
need a duller background. We'll do that as well. We're getting a bit
advance, but hey. One thing is can you see by adding that overlay
function to this, what it did to this artboard was actually disable the
appearance of the background. You can do that manually, but it does it
automatically so that you can see the drop shadow, but see the rest of this page underneath rather than
being a big white box. What I wanted to do is
you saw at the beginning there I had that like dark
fade in the background. Actually before we do that, there's one bit that often
gets my students confused, so what get you confused? Let me try and unconfuse it. Is with it selected,
I'm going to switch back to my
prototype mode, and I give this a click, is where this appears. Let's say that I put
it right above rich. That would reach there.
It's right above that. If I got to play and I
go down here and I say, it should appear
right above Rich. Boom. It appeared in
the middle of my thing. That's weird. What's happening? Basically this thing
here, this overview, I keep saying overview, overlay is referencing what's
called the viewport. The viewport is the top of the document to this
little line here. Remember we've been talking about that throughout
the course, so it's looking at
the bottom there, not what's underneath
in the content. It's a fixed positioning. If I move it down here, not above organic but really close to the bottom of the page, it's going to be
at the bottom of the page and probably
be in the way, you just click it, and you go. That's what that reference is. Can you get it to pin
to actual things? Not that I know of right now. You try and use fixed
positioning on it, it ends up fixed positioning, the button, not the overlay. Let's get into the slightly
more inception bit, where we will dull
the background. It's a trick, is currently not an option in here to
fade out background. What we do is we
just put this on a different size artboard
that covers the whole thing. At the moment my
artboard is this size. What I want to do is
move it over here, I want to make it the same
size as the viewport for this. It is how wide, but go to my design view.
I've clicked on my artboard. I know that it's 375, so I say you are now 375 paste. How high should it be? Click on this, so my
viewport is up to this, so 667 or they're all 667. It doesn't matter which
one I get it off. You give me a height of 667, and then I say you're
going to be in the middle. Can you get what I'm
doing? Use my arrow keys just to pop it over the top. I need to make it smaller. It's one of those times
we're responsive, resize is actually brilliant. Most of the time it's brilliant. You saw a couple of times you need to turn it off,
but that was great. What I did was there, so I grab the edge, and if
I just grab it, it works, but if I hold down
the "Option Key", it does it from both
sides at the same time, that's Alt on a PC. I've got that, I want it
to be up into the middle, and now what I want to do
is just add a background of black with no border. I want to lower the
opacity of the fill, and I want it to be at the back. We've got an artboard, got
a black faded background now that matches the viewport. If you were like, you
had me at overview, but now you've lost
me. It's okay. This is advanced stuff. If you're getting it
high-five you. Are you ready? I hope this works. [LAUGHTER]. Talking a
good game then come on, it didn't work [LAUGHTER]. I know why now, but it was pretty confident that
was going to work straight. What is wrong? The positioning. We positioned it when it was just a small little rectangle, so if we go to
prototype view now, when we click on this, it's doing exactly what we said in relation
to the viewport. Can you see it's
overlapping the bottom. I want to say you
come to the top. Now let's do this. Ready? Even though you don't
have to click the 'X', you must click the 'X'. That's cool. I love
little pop-ups, and that is how to
make them in Adobe XD. All right, buddies, I will
see you in the next video.
75. Slide in mobile nav menu overlay in Adobe XD : Hi everyone. In this
video, we're going to make this little mobile nav
that pops from the side, that we can close. It works. You can click on things,
go to different pages, jump back, so that's what we're going to make
in this video. Ready, set, go. You already know all the skills
to make that work. There's just one little setting we need to change
to make it happen. What I'm going to do
is just do a real simple version of it, real crude, ugly thing. Then we'll make it pretty
at the end because you're here to look out how
this thing slides on and off. What we do is, we need to design a menu. This is about as far
as I'm going to go. You decide how much you
want this to slide in. I'm going to go on that far. You can go all the
way across. I draw with a rectangle first. But like in a
previous video where it has to be an artboard,
it has to be an artboard. You could start drawing an outboard
on top of here, and they get a bit smashed
and things jump layers. It's a pain in the butt, so just draw it with a rectangle first and then de-select in the background,
so nothing selected. Then grab the artboard tool, and then draw this over
the top, the right size. Now that white box, you can keep it there, you can delete it. I'm going to leave it
there because I want to do that whole drop-shadow
thing in a second. I told you I wasn't
going to design it. Don't design it then. All we need to do now is, find something
that activates it. I'm going to use this, obviously the bigger menu, so I'm
going to click once, click twice to have that
selected, go to my prototype. This thing here, I'm going
to add an interaction, or I'm going to drag
it here and say, when this thing is
tapped, go to overlay. It might be on transition
or auto-animate, depending on the
last thing you did. That's basically it, and
that's what we did for our pop-up in the last one
and then it'll pop-up modal. The only difference is instead
of animation dissolve, we're going to get
it just slide right. Can you remember?
Does it slide in from the right or slide to the right? Can try one, try the other one. I'm pretty sure that's
right. Slide in and out, and that
looks good to me. Let's give it a preview and
look at that, we've done it. That's the basics of your menu. I'm going to go and style
it now and add stuff to it. But that is basically it. You can leave now, I'm going to design my menu and you can
hang around if you want. Design mode, option one or
whatever the need to check. It's probably old one. I know all of them off by heart, but I'm pretty sure that one
is a different one on a PC I mean. What I'm going to do? I'm going to have
another version of the logo double-click copy. I'm going to borrow this. Borrow that, and borrow both. Can you see my little
selection technique? Like I want that, it's really small to click and hold "Shift" and
everything's in the way. Often what I'll do is I'll
just nothing selected. I just got my selection tool and just drag a box around this. It'll select everything that's underneath that little
blue box there. Then I hold "Shift" to deselect. You can do that one by one by holding Shift and just clicking the things
you don't want. Or what I do is I hold "Shift" and drag a box around,
all that stuff. It means nothing holding down. I want all of this and then hold "Shift" to de-select
that. Do you do that? No, I do. I'm going
to "Alt" drag it over here or option
drag it on a PC. I'm going to end
my menu new items. In this case, because I want them
to be clickable, I don't want to use
like a big long menu, return, return menu. What I want to do is have them all as their
own little unit. This first one is going
to be correct details. I'm going to go to my
sweet character styles. Probably the bold version. Now I'm pretty sure
you still can't do bullet points in
Adobe XD, can you? Bullet, no, and that might appear in
the future over here. It might be the now, not there. You can do a few different
types of things. What I often do is on a Mac, at least it's "Option, 8". It's not what is it
on this keyboard? "Option, Shift, 8" will give
you a little bullet point. On a PC, you might have to Google what the
shortcut is to make a bullet point and I use that because there is
no option over here. I don't think. I've got this and I'm going to use my repeat grid just for
something simple like this. How many options have I got? Probably about four. Make them big enough so they are clickable and the
nice thing about this is I can double-click on them and make them go
to different places, so part of details can go there. Remember, it will remember the last thing you did decide. I don't want it to
do an overlay now, I want it to transition to
that page using slide right? Probably not just dissolve or none, just get
it to jump there. Now this one, I'm going to change the name and
this one's going to be, actually, that first one
needs to be home, doesn't it? Great. I will say
the checkout page? I'm calling the checkout page. It's probably more likely
to be called the shopping cart. I got an accounts page. I don't actually
have that page made, but you can see how it's easy
to use the under design, to use the what's it? That thing there,
the repeat grid. I'm going to say get
rid of you. You don't have to break it to
start working with it. You can leave it here. I need
a home at the top there. If I click on this top one and I go copy-paste,
It's not working, it's copying and pasting that individual item and these
are just mirror copy, so it's not working
like we want to, so how do we fix that? I'm going to ungroup it and
what can we turn it into? Well, we can start switching the order and adding new ones. We remember it's a stack. How do you turn into a stack? Make sure its component. Then it says stack. Now I can select on
this top one and go copy-paste another one.
Now we're at home. What did it do with
the prototype? I don't know. We
retained the top one. To readjust this,
I'm going to grab it and break it off there
and say you go there. Now you, my friend, are going to go there and because it remembers
the last thing you did, it should be all very nice now. Because I can't see
this other one, instead of dragging it over, I'm going to just
say add interaction. Remembers everything
except the artboard. I'm going to say go to my
checkout page. Which one? I have way too many. I would check out Hi-Fi, I don't think I want to go. Now, I've in this course
kept the wireframes as part of this document just to make life hard.
That's what I did. I would be more likely to have
these on another document now just because they are causing more trouble than
they're worth at the moment. It was going to get
started because it's easy to copy the layout. But now, I just Save As, File, Save As, make another copy, one called wireframe and
one called high fidelity. You waited around for this. Look how beautiful it is. Sometimes I know I leave these
in because sometimes it is useful to see other
people's workings. Then again, like
the repeat grid, it means that the stack, I can do some of
that nice stuff. Who remembers what I hold down
to mess with this spacing? That wasn't it.
Anybody remember? You got to go inside it and
you just hover above it, but I wanted to do
all at the same time. What do you hold down?
Did you remember? You're looking at the keyboard,
it's shift. You got it. Let's give this a preview. You, my friend, I'm going to play and we're
going to click it and it's much prettier nice. How do I get it to
go on each page? That is a very good point. What I'm going to
do is let's say that I'm going to
put it on this page. Let's ignore about changing
the color for the moment. I'm just going to go inside
this one and make it darker. I'm going to go here
and delete that one. Well, let's just
delete that one. I'm going to move this
one across because it contains inside of
here my prototype, that go inside that
links back to this. As long as I copy and paste this navigation whilst
in prototype mode, it'll bring that link across. I'm going to say you copy, go to this one, and paste. You don't need a different
artboard for everyone. Let's name it right to one. I do need to add some like a rectangle in the
background here, so "R" for rectangle, got
to be in design view, otherwise, R doesn't, I
don't know what they did. I did nothing. Let's
drag this out. Let's put a new few, let's pick this color, this color is color opacity. Send it to the back, so
now that should work. Let's give it a go. Product details. Great. You appear,
I can close it. Well, you appear, I want to go to product details, but it's still the menu
available. We have that. Now I can go you connect
to home goes to home. We have that going today.
I did give it a preview. You would test, a lot of
testing. Back to home. That product details. That is a slide-in menu. It's pretty easy to get going. Just your overview,
just make sure it's on its own artboard matches the same size as your
viewport and you can link multiple
things or back to it. Once you've rigged
up your component up the top here in terms
of I say rig up, but I mean like
connecting the prototype, all these little dotted lines
here is once you've got it, make sure you copy and
paste it in prototype mode, not design mode because
design mode will strip all of those
parties topping off. That is it, sliding side menu. I'm going to lower the
opacity of this a little bit. You can go about
your business now. Let's have a look at it.
There's you store around. Spectacular, not really legible. That's enough for this video. I'll see you in the next one.
76. Class Project 16 - Popup & Navigation: Hi everyone, class project time. I'm going to get you to make
a pop-up and a navigation. The navigation is
easy. It's this one. It doesn't have to be
exactly like mine. I have a little
bit of a research. Have a look on your phone,
just websites that you frequent a lot and see how they've done navigation,
things you like, things you don't like
and maybe look at things like Dribbble or Behance or even just Google and look for mobile Nav UI just to see different styles
and the way that they're actually interacting and how they actually work
or how did they come into the page and style
this little panel as well. Nicer than mine, boring
old bullet points. The other part is pop-ups.
There's going to be two. I want you to do a pop-up like we've done. We did this one. We've used this ''Add
to Cart'' confirmation. You can do that, that's fine. But also we've done that. You might have done it
through the course, so have a look at maybe doing
something else as a pop-up. Have a look at your
design. What else could be something that pops up but
returns you to that same page. It might be something
like a tooltip. There's either an
I for information, or a little question
mark where you can click it and it gives you
more information. Exact same principle.
We did the clicking the ''Purchase'' button to
show the cart confirmation, but you could do it
for a tooltip as well. Don't click it in.
[LAUGHTER] Clickable. You can totally think of
anything else as well, as long as there's a
clickable pop-up then. He's going to make us do our
newsletter modal sign-up. Modal if you haven't
known already, it's their word used
for a little unit, especially that pops up. Something that
appears is a modal. Doesn't take you away to
another page to do something. It's this little information
screen where you can do something and potentially
return to where you are. It's not a separate page. It appears on top of an
existing page, so modal. I want you to do a
newsletter sign-up. They pop up on pages or
when you try and leave, they're like, hey, would
you like it as gone? So, sign up newsletter
modal or something like, 10 percent off if you sign
up for our email newsletter. Now the difference between this and say the tooltip or the ''Add to Cart'' one is
that I want it to be a timed pop up and you're like, he didn't show us how
to do that on purpose. What I want to do is I guess instead of just following
me through this thing, I feel like at this point of
our class or our lessons, you might or might not have the ability to
see if you can do that. What I mean by it, just
in case you're unsure, is that I don't click
anything. It's not on tap. It's just some time after
a certain amount of time, a pop-up modal appears and
it's the newsletter sign-up, and then you can
click it to close it. Instead of on tap, you're going to try and
get it to load on a timer. That is going to be tricky. If you can't do it,
check the comments. [LAUGHTER] Hopefully somebody
else can give you a hand, but I guess I want
to teach you to fish instead of giving you fish. How that goes? You get the idea. See if you can make it work.
If you can't, no drama. You have to do some googling. Ask in the comments, ask in the groups if you are
finding it tough, but give it a go yourself first
if you can figure it out. Timed pop-up modal. [NOISE] If you can record them, if you can't take a
screenshot and share them to the regular places,
I'd like to see what you do. Buddies, happy navigation
and pop-up making. Good luck with the timed pop up. Onto the next video.
77. What are Flows in Adobe XD: Hi everyone. This video, we're going to look at these
things that are flows. We had a little look
earlier in the course. We had flow 1, but now
we're going to have a various different flows
that we can share out. Let me show you
how to make them. To make a flow, your first one, let's look at this is my
homepage for my first one, I created a flow earlier. We click on this little
Home icon and flow 1 appeared and we earlier on
in the course, ignored it. It means that if you
have nothing selected, absolutely nothing in your play, that's why we've
been studying here. [LAUGHTER] I have been
dealing with that ignoring part until
here because this is a bit further
in the course that we've got the blank space
to work out what flows are. I've got a wireframe. Instead of called flow 1, what I'm going to do is make sure we switch
to prototype mode, actually no to share mode. Remember it is command option 1, 2, or 3 to switch between these, and you're not doing
that a lot, 1, 2, 3 and remember, it's PC, it's Alt 1, 2, 3, and double-check that. This is flow 1.
We can rename it. You can actually name it here or over here, it doesn't matter. This is going to
be my wireframe. It means I can have
the same document and I can create a link
to share with people. I'm linking for review. We did this way back earlier
in the course remember, I've got one link waiting. There you go. It's got its own unique link. What we can do is actually create a
different one for this, we can go back to prototype.
We can click on this. I can make this another
starting point by clicking the little Home button
and then prototype mode and then share. I think you can click
on the Home button and share as well. This one can be
my high fidelity. I can create a second link. I'm going to create
another one right there. Magic, High Fidelity one of the images took about a quarter of the time
to make the link. Now, we can share this
link with somebody. We've got the same document
to keep our brains all in the same
place as a designer. But for the people reviewing it, we can share it with
separate links. At the top here, you can decide now let's say we changing it, instead of everyone,
we're going to only invite specific people. We can decide whether
we're doing that for the wireframe or the Hi-Fi version that
we're sending out. Now we've got just two here. You could have as
many as you like. Like we've separated at
wireframe, High Fidelity, you might end up having one
that is like concept 1, concept 2 or colorway 1, colorway 2 different colors. Or in this case, you
might have another one on share, you can't do it. You got have to do it on
prototype. Here we go. Even if you can't see it, I know that this
little Home icon, you can see it there, just it doesn't have enough
space to be viewed. Do that. When you get
in there, it's there, when you zoom out it disappears. Let's go one more. It's too tiny, but you can
still click on it. This one could be
my desktop view. I can share that
link with people. But because my assets
are on the same thing, all of the logo and all the
colors and bugs and stuff, it's just easier to keep them
in one document sometimes. Sometimes you need to split them into two different
documents because they are doing hidden because there's just
too much going on. That is flows in Adobe XD.
78. How to share your document with clients & stakeholders & user testers: Hi everyone. In this video, we are going to look at sharing our document to
our stakeholders, or to our clients, or to user testers. Basically, the Share tab here we covered a little bit
earlier in the course, but we're going to go
into a little bit more of a deep dive and we're
going to go through the different options that XD can produce and what
they're good for. Let's jump in. We did a little bit of sharing
right back at the beginning. Remember, we shared our
design for commenting and so let's recover some of the
things we need to remember. First of all, when you
are sharing a link, you need to tell XD
which is your homepage, which is the first page
somebody's going to see. You do it by being in prototype mode and clicking
this little house. Sometimes you can't
see the house. Watch this, zooming
out. It is zooming out. Sometimes it turns in
just a little tab. What you can do is you
can say this is actually my homepage or click on
the name of this one. This is going to be it. When you do click it, we've already done
this earlier on, remember when we did flows. But here, you might say
actually this is it. It's going to give it a
flow name and this is maybe my confirmation animation. This might be a good
point where I'm going to share just this link because that's what
we're talking about. That's the only thing
left to do, is like, hey, have you made those changes to the
confirmation animation? What we might do is
just share this link, and to share that link, you click on whatever
one you want. To share, go to
the Share tab and decide which of these view settings
you're going to create, create a link, and that's
what you're going to share. You can decide on link access. Can anybody with the link? Obviously this is less secure, but nobody's going to
stumble across it. It's a crazy link that
nobody's going to guess. But if you want to
be more secure, you can invite
people with e-mails. If you know their
e-mail address, you can invite
them specifically. Or the third option is to
anybody that has the password, not just the people with
the right email address, anybody that has the link
and knows the password. You can decide which
of these you need. You create the link
and you share it. Another interesting
thing is let's say that this Hi-Fi is going to be
the one I want to share, and you'll notice that
the Hi-Fi includes this plus the confirmation. It's like an addition
to, but it's going to start from this page. Even though these guys
are first in line, whoever using these is
just overlays remember. So that house is
really important. The other thing is, it's going to show me
what's not included. There's no connection between any of these up
to my wireframes, so these are not going
to be part of that link. Same with these little
options for the homepage, different versions we did. You just got to be mindful. Have a look what is
included, what's not. So none of this desktop stuff, none of this stuff over here. What happens is say prototype, it's looking for one
of these connections. Can you see reviews only has one little
connection to them? If I grab this chunk and
accidentally delete it and then go back to Share and I click on "Hi-Fi", can you
see it's grayed out? It just means that
that's not included. I'm going to hit
"Undo" on my keyboard, so he's back in the game. We created a link earlier on. We've made lots of
changes since then, so we're going to
click "Update Link". I can copy that link
and e-mail it off. It's telling me when
it was last updated. I'm really clear that this is the updated link and I can put it into an
e-mail, send it off. Now if I want to
send my wireframes, if I click on this, it is a
completely different link. Even though they're
in the same document, there's no way of
connecting across these, so we have to create update. Can you see this
one was done awhile ago on 11th of February? I need to update
this link and they run separately for the people viewing it on the other side. There's a wireframe version
and a high fidelity version, and you can use that
for different teams, different parts of the flow. You might be sending a
part of it to legal. Some of it might be
going to copyrights, it might be your studio manager. You can create different flows and just know that
they're different links. Let's look at the
different view settings. We did design view earlier
on and I'll show you. I've opened them all up because I'm going to go through quickly what all these
different ones do, but basically the
same thing with different ways of viewing it. Design review is when we're
going out to design review. This would be great for your client or any of
your stakeholders that might be any people that have
a stake in this project. It might be your greater team. It might be going
out to clients. It might be just going
to a buddy to check, and it's the one I use the most. Let's have a look at it.
This first tab here, it gives you nearly everything. It gives you basic
navigation down here. So your client, if they're
not very savvy and don't know how to use it and can just
work the way through, they can use the arrow
keys on their keyboard. It's pretty robust. Plus,
it has the commenting. Remember, you can pin those
comments in specific places. [NOISE] I can submit it. The other thing design view
gives you is these hints. You could watch this.
If I click anywhere, can you see the highlights like, hey, you mean to
click these things. That is some of the differences
between the other ones. Let's have a look design review. Development we'll do in another
video because it's quite specific going to your web
developer, web designer. If you're coding it,
that's quite specific. But the only real
difference visually is that you can see commenting. If I didn't have my
own comment in there, the only difference is, can
you see this option here? We can get into
some of the code, so not a huge difference. If you give a designer
the development one, that's going to be fine. They
can still do everything. There's a little bit extra, and maybe this is just
a good all-around one. Even though it says developer, it doesn't have to be a
developer receiving it. [NOISE] Let's have a
look at another one. This one here can be
great presentation. Basically, it's just
going to stick it into full screen mode. If you send the
link to somebody, it's going to be full screen
and it has the hinting. It gets rid of all this
junk. It's very clear. Even though it might
be you presenting it, you might just use this to
send to clients that you know they just want to see it. They don't need to comment and get confused by everything. It's nice, clean version. But it does have the
hinting to help them along. Make sure you link
up all your buttons. [LAUGHTER] I think
I've got us to a page where nothing works, so test it yourself because there's no
escaping this page. All those hints are only
for radio buttons in here. Now I'd be going back
to XD and going Hi-Fi. I can get to this page. If I look at my prototype, what I've noticed is
I don't have any of these navigation tools
working. Purchase worked. Why don't I click
on old scrolling? There you go. That brings
up a good point as well. That presentation mode is like all of these links I'm showing
you are on my desktop. We should be, if you're
going for a mobile device, sharing them, especially for user testing
actually on a phone. We would skip these links here. Remember when we did testing on a phone earlier on, that's
what you'd be doing. You'd be sharing the link, opening up on the XD app, and meeting with somebody to do some user testing and just seeing how they
interact with the app, somebody that's close
to your user profile. Even if it's just
colleagues or friends or family that are doing
some basic user testing, get them to do on
the phone because this is weird when you are trying to decide on size
because I know it's a bit big. My monitor just
makes it a bit big, and I'm using my mouse
and not my little finger. These might have to be big or
little targets to hit and I know I don't have navigation up here, but I have a button. I'd be making sure I go in here, find one that's got
the navigation on it. This one has it. I haven't rigged up
these two things yet, but I remember I can copy it as long as we're in
prototype mode and go. You delete. Actually, I want this
whole thing done. I copy and paste. The navigation comes along. Now that I've done
that, what do I do? Under Share, you've got to make sure you update the link. Even if you've
just in the wires, there's nothing physically
different about it, mine was. But even if you just change
the minimal list of options, you've got to update the link
and send them a new one. When I say send them a new one, you don't have to
send them a new one. You update the link and it
will update on their side. One link doesn't need to be. You don't need to
send them and say, hey, here's a new link. They'll just need to
refresh their page or open it up again and it will start working.
Let me show you. If I go to Design and I go into here and I decide that
this button here, we've decided for
some reason that it's the wrong color and we change it to something
really obvious. I save it. I go to Share and all I have to
do is update the link, make sure I'm on the right one. Do you see it defaulted
to wireframe Hi-Fi? Update the link, and then
in these mockups here, wait for it to do its
thing. It's done it. Over here now, if
I hit "Refresh", when the person opens
the link again, watch this button should update. Here you go. That same link
doesn't need to be reshared. We've talked about design
review development. We're doing a bit presentation. User testing is basically
the same thing, except there's no hinting. These two are exactly the same, except this one doesn't
have the hinting. You don't want to guide
your user testers too much because you want to figure out whether they
can do it on their own. Presentation, this one here, the same but the hints are off. Whereas this one here,
it's the same thing, but I've got these lovely hints. This one, no hinting. Awesome. Other
options is custom. Basically, you can decide which of these things you like. A full screen is what
happens when you are doing user testing and
presentation. Show hotspots. Remember that was
the only difference between user testing
and presentation, that little fleshy thing
to help people move along. You can just decide, show
navigation controls. Let's have a look. That's these things
down the bottom here. Can they move around? It adds or removes this. You can decide whether
that's useful or not, and allow commenting
is commenting. Now, it is handy to
update the links, but there are times
where I like to just make a new link because I want to retain
that old version, like a version 1, version 2. You might have noticed
through the course I've made version 1, 2, 3, 4. Even though it's
brilliantly saved, I have different versions for myself because I can't stop it. [LAUGHTER] You meant to just
keep the same document. What I like to do is let's say I send
this off commenting. What I like to do, especially
if I'm the reviewer, I love to be able to see
what comments I made because sometimes I'll mark
up something and say, hey, can you change
this and this, and my UX designer will
send me an updated version. I can't remember what I had
problems with last time, so it's hard to amend. The way to get around
that is let's say that we've sent this
off with comments. We've updated our link and sent it off and I want to
retain that version. What I can do is just
save the document. So if I go "File", "Save As", and I'm going to
make a new version, I'm still saving
it to the cloud. Version 5, can you see here? Update link went away. If I open up the old
version, version 4, it will still be in that
we were just a minute ago, you'd be able to go to Share, and its updating link. Those links stay
around and I can go back and check that link and
go, that was the comments. Whereas this new version, you
have to generate new ones. You've still got your
flows like all mapped out, but the links are
going to be new. Does that makes sense?
Last thing to be mindful of is your viewport. We've talked about
it a few times. Selecting it, Command 3, Control 3 on a PC to select
it all is this thing here. Remember if you've
got a short page, you're not going to see it. But as soon as you've got a longer page, that
thing appears. Just make sure it's in
the right position. It matches everything else, matches your testing document, even on the desktop view. If you're doing a
desktop view, if you drag this down, there it is. This should be we want it to be. Because if you forget
and you just move because I get annoyed by it. [LAUGHTER] I wish there
was a not-view viewport. There's not at the moment. I'm just going to
move it either way. If you remove it either way,
like I'll just move it over there so I can design this. Then if you export this,
you'll end up with this. [LAUGHTER] You're going to
be like it's a little small. Just make sure it's
in the right place. In my case, I want it
to be at, where is it? 667 because that's
what I'm testing on. I'm testing on my
phone that I've got. That's the right
size. That is it. We will do more sending off to a developer in the next video. Let's jump over there and
learn all about that.
79. Talking to your developer early in the XD design process: Hey, everyone. I'm out. We're being jammed in that
laptop computer screen too long, so I'm
out in the open. I wanted to talk to you about talking with your developer. There's going to be times where there's some of you out
there that are going to be being UX designer and being
the web app builder yourself. There'll be lots of developers
watching this course to get you Adobe XD skills. But the majority of
you are going to be designers or creators that
want to do UX design, and you're going
to have to start working with the developer. Some of you might
be new to this. It's like a pip talk, how to do it thing
because initially, I did it when I got started, it's scary working with a
developer or an engineer, depending on what
they call themselves, web designer, web
developer engineer. You've done your design,
you've got it tested, and now, they're going
to go and build it. What you don't want to do
is you do not want this to be the first time that you've chatted to them. You want to have had a
discussion all the way through. It can be intimidating
and scary, I know, because I was
intimidated and scared working. Handing it off to
developer, you're like, you send them an e-mail, first time I've
chatted to Sally, you send it off to them
and you hope for the best. That is, without a doubt, all the jobs that have
gone really badly, is jobs that have followed
that line of process. The jobs that go extremely
well are the ones where I will find out
who the developer is, if it's somebody that I'm
working with constantly, like developers that I work with all the time so I've got really good
relationship with them. But let's say it's for
another client and the client's organizing the developer, you're
not even sure. It's to find out that person early on and get them involved. Because what you don't
want to do is to be you versus developer,
which can happen. The designer gave me this thing and I'm
trying to build it, and they know nothing. You, scared of the developer. It's just a bad
way of delivering that product to the developer because it becomes
you versus them, it becomes, why have
they done this? Where if it's early, there's so many times
in a project where I've assumed things are too hard
and we'll do that later. I've chatted to my developer, it doesn't have to be
an official meeting, it's just like, hey, this is my first
wireframes, hey, this is the brief, and just talking about what
you want to do. It's just great
because you're like, that thing that you thought
was really hard and you're going to do later
on, maybe in phase two, is actually really easy
and they're like, no way, that thing is already
happening on this side, just call something else, or is this something different, or it's built into the
framework that I'm using. You can get that stuff in early in working
with the client. The opposite way is sometimes, you'd be thinking, this
would be really good. Awesome. This seems easy. Then the developer is
like, that ain't easy. Seems easy to you but the way that maybe the
logic or the platform or the code base that
they're using already is just not capable and
it's a big job to get it. You might have to then
just allow more time for the job or push
it over to phase two. Phase two is a nice way of saying it'll get done in the
future, but probably never. You don't want to
tell the client, that can't happen ever. You do it in phase two, which is never, but it sounds better. It can be formal, I find it just conversational, finding out who it is,
meeting with them, because there's no official way. I'm going to show
you ways of giving stuff to the developer, but there's no like x, y, and z. Giving it to a printer, if
you're a graphic designer, there's a specific
way, you can find out. Bleeding, cropping, resolution, and those
things, with the developer, it's going to depend on them, they're going to want some
specific things, definite. Then lots of it is
the way that they want to work and how
they're building it. If it's an update to a new
site or creating a new site, they're going to need
a lot more from you. If it's an update to an
existing site, basically, they're going to be just
using your designs as a visual guide and just doing everything
separately from you. All you need to supply
them is probably images. That is what I wanted to say is that if you're scared
of developers, don't worry, developers are scared of UX designers as well. It's the same but
on the other side. Getting a conversation
in early makes the project just work 10 times
better, trust me on this. You've talked to your
developer and now, it's time to give
them some stuff. Let's jump into XD now
and give them stuff.
80. Export the right image file formats from Adobe XD: Hi everyone. In this video, we are going to export
images out of Adobe XD, ready to hand over
to our developer. We're going to look at both the mechanics of
actually exporting some of the tricks and
also some of the formats. That's why this one's
a little bit longer. We'll cover when
you should be using a JPEG versus PNG versus SVG. Let's get all imaging. The first thing you should do probably when
you're exporting images is just give an
overview of images, a PDF with just two pages. You can just go to File, Export, All Artboards. The trouble with that
is that it's going to export everything
that's an artboard. Having just a
reference document, I'm going to use it for
anything other than to place the images as in you send them 400 images and they're
like, "Where do these go?" You can make a PDF just so that they can see
where everything goes. They could obviously
use the link as well. To do that, you can select
just the pages you want. Click the name hold Shift, click the ones that
you want to go out. I'm just going to
export these four and I'm going to go to File, Export, and then I'm going
to go to Export Selected, then we'll do the
whole art board. From the format, PDF is
really good, multiple pages, good resolution, and
we can hit Export. I've already done
one because this is the second time
I've recorded this. Lost my way there. Here we go. We've got a PDF and we
can just send that, include that in our
things that go out. That's just for reference, things that they might
actually be using. We can use the same technique. This image here, I need to
get it out for the developer. Why this getting export
and not this text. They're going to rebuild
the text in HTML, or it depends on
how they're making, if it's an app versus a website. They're going to not want
pitches of your text. They're not going to
want anything you've drawn, things like buttons. You're not going to want
this box for your form because they'll use
code to create it. With your buttons here,
there's a button. Weirdly, even though you've put a lot of effort into
your drop shadow, they will build it again using code, even the drop shadow. The things that do get
exported that are considered images are things that look
like images which are clear. We've got a bunch of
those everywhere. The things that you've
drawn like these icons. These icons here
we'll get exported as "images". We'll do those. This image is going to go out. To get one image out, you can just go File
Export Selected. I want to show you this
way just because I want to really briefly
go through formats. You might have to research
this a little bit more, but you're going to be dealing
with one of these four. PDF you probably
know already about. That was just a good
overview document format. We're not going to
use that anymore. JPEG versus PNG versus SVG. When it comes to images
like we are exploiting now it's either PNG or JPEG. The difference is that a PNG allows for
some transparency. Let me have a look at this one. Let's see, this one
has to be a PNG. I'd rather it be a JPEG. Why? Because JPEGs or smaller. You can get great quality at
a really small file sizes. File size is pretty important when it comes to like
websites loading. Can you see why
this one might have to be a PNG compared
to this one? Rounded corners. This one here has
rounded corners. There has to be like some
transparent corners. JPEGs won't let any
transparency through. Let's compare these two. I'm going to export it twice. File Export as selected. We'll do it both as a JPEG. The quality, we'll talk
about that in a sec as well, but let's export this one, and then let's export
one more time as PNG. We exported it. I'm
just going to bring it back in to show you
the difference. We'll do it maybe over. We'll create an art
board over here. I've got a big document
with contrast on it. I'm going to use import. I'm going to say here
are these two ones. Import them two at a time. You see the difference
there on the edges? I know the quality. We'll
talk about that in a second. But you can see a PNG allows
for that transparentness, whereas JPEGs, even though
they're great for images, they're not great for images
where you need transparency. If you've done some
funny fancy mask, it's going to have to be a PNG. If it is just a full on square or rectangle,
where are we? This one here, because
he has nice sharp edges, no transparency is needed, he's going to be a JPEG. Let's talk about what
size he should be. File Export Selected. We've decided that this
one has to be a JPEG. Quality, now, it depends on how much
you know about this. Good safe zone is 80 percent, 60 percent is probably
going to be fine as well. Anything lower than that, it's going to make the
file size nice and small, but it's going to make the
quality not very good. A 100 percent is
too high for going out to in our case a website. One of these two. Depends
on how precious it is. Ours is the product, it's the thing you're
trying to sell, so the best quality you can do, 80 percent is probably
important for this. If it's just supportive
background things, say this background
image back here. This one here doesn't have to
be beautiful and it's huge. That one there would be
fine at 40 or 60 percent, because it's faded
in the background. Nobody's going to
notice the quality, whereas the product
you are trying to buy probably needs to be
as good as it can be. Let's also have a look
at JPEG versus PNG. Can you see the size difference? JPEG, they're both the same finished version
except for transparency. We use JPEGs because
they're smaller. You can get the same quality, but at our case, nearly half or a little bit
over half the file size and file size is important. PNGs are amazing, but big. JPEGs are tiny, but
don't have transparency. We're ignoring SVGs
at the moment. When I do get to here and I
do go to exporting selected. We are going to do our JPEG. We've talked about the
quality and the export size. This is important. What ends up happening is if you export it the size it is, let's do one the size it is. I already did one
that was at two. Let's do another one at
one. I'll speed this up. I've exported that three times, at the one size, at the two size, and
at the full size. Why do you need full sizes? You don't need four sizes. Often two is what's required. The reason you have one and a two and a four or
as many as you like, is that at that size
the quality is fine, but if you get onto a
slightly bigger phone, remember, we have to adapt
for different phones. If I do this, for this
phone and then it goes on to bigger phone with
a different display, it's going to look
not very nice. What people do is they'll
do at times two size. That's that at two symbol. We add that just to
identify which is which, because they've all
got the same filename. We've sacrificed being more than double the
size than the first one, but it allows us some
flexibility when it goes out to different devices
at different sizes. It's very common to
do at times two. At times four is more
into app design. They'll want even larger sizes just because the resolutions on screens versus desktop
devices and websites, it can be exceptional like
you might be in the future. It might be at times 20 because the resolution on
phones later on or in virtual reality or future stuff might need different sizes, but that's why you end up maybe exporting something
that's twice the size. It's because it's got
some squishing this, there's a bit of it can be big, be smaller, and it's still
got good enough quality. When you are exporting,
especially for web, either mobile web
or desktop web, the expectation is
at the double size, talk to the developer, maybe like what size
do you want it? They'll be like, I don't care. I'm a developer who's
in them at times too. If you just send them one
kind you don't need to add. I always fancy an add two or at 2x is another common
way of writing it. You won't have to
write any of that. You just go, here's
all your images. I've bin that, I
don't need those. There you go. Does that make sense? JPEGs: low file
size, great quality, no transparency, and
generally you just export them at twice
the size you need. You'll notice as
well that they took the name of what's
listed over here. You might not have
noticed, but this got its name from my image
that I imported. That's where it
got its name from. You can adjust the name in here, you can decide that it's
not a very good name. You might be an eco person
and you might be going, "Okay, it needs to be
called tea-green-cheap. Terrible eco, but that's where it's going
to get its name from. If I export that now, File, Export, Selected, it'll take that name. There you go, tea-green-cheap. You can obviously change it on the fly now as
you go through. That's where it
gets its name from, and that happens more
and more when you start doing things like the next step. Let's say I want to
export this image. You've got to decide or maybe
chat with your developer, do they just want this image and they will tint it to it
because they can do it in code or do they want
you to just stick it together so they've got
this one unit they can use? Figure that out or
send them both. We'll send them one
knowing that they might come back and ask for
a different kind. What we're going to do
now is it's two parts. If I export two parts: File, Export, Selected, it's going to export them into
separate files. If I go, "Here you go,"
and export this one, I already got one in there just because I was playing around with
this. Where did that one go? I've ended up with this image separate from the rectangle. The rectangle is no good for nobody and this might
be just what you need, but if you want to connect them up they need to be grouped. One box, one image, I'm going to select them
both and group them. I'm going to use
Command G or Control G, and this is where
naming comes in. You might call this one
background and call it -homepage. Now you can use hyphens
or underscores. It'd be really common
in web design to use no actual spaces. You can get away
with spaces now, so it doesn't really
matter but you might just stick to what
everyone knows, and loves, and use
either hyphens, or underscores, or again
maybe a conversation for the developer. What do you prefer?
I prefer hyphens. Most developers like
underscores, but there you go. If you need to export things
that are two separate parts, group them up first. We're exploiting single
images in this video, and you can export
multiple single images. We're going to do batch exporting in a SQL which is a little bit more
robust for bigger jobs, but let's say you
just need this image. What else do we got?
This lady here. What you can do is
you can select this, hold "Shift", click on this one. It can be hard to
select them all, and I can go Shift
click that one. If I hit my "Command
O", "Control O", I've actually got three things selected and I can export them, and so it's going to export
three separate images. You've got to Shift click
a couple of things, and you'll get the
three separate images. The last file format I want
to talk to you about is SVGs. We talked about SVGs earlier. Remember scalable
vector graphics. If you're old school, print EPS or AI file. Let's look at this. I'm
going to double-click this; it's got a terrible name, so I'm going to call it icon-search. I'll do the same thing
for my little home one. There you go. Again, I name them this way backwards to help just order
them in your file menu, make it easy for people to find. I've got these two. I'm going
to select both of them, hold "Shift" because
I know I can do File, Export, and Selected, and I get both of
these things out. Now, we're going to use SVG. SVG; Scalable Vector Graphic. It means it can be
scaled up and down. All that drama we had before by going, how big should it be? It shouldn't be 2x. What
quality should it be? All of that goes away with SVG. Why can't you use SVGs for say
this tea leaves over here? Because SVGs only will deal with those anchor points
or vector graphics. What I mean by that is if I double-click on
these eventually, it's made up of these
little coordinates. Here's my own. It's not
made up of anything. Where's my tea leaves?
That's a big one. Select it, Command 3. If I double-click it, it's actually made up
of these coordinates. It's math that makes it, so it does the two
things amazingly well. It means it's scalable because
if I scale anything up, it's an SVG or vector. It scales forever, be
the size of a planet. It's a really small file size because that's the
other half of it. SVG is super small. You File, Export, Selected, and you're going to be an SVG and leave the
defaults for here. If you are unsure, this is getting quite hardcore about what you'll probably
ever need to know about SVGs. I'm not going to
go in this class, but leave it all in the default. One thing you might do
is this outline stroke. We've done it before where let's say this thing here if
we added a stroke to it, and you can decide what
you want it to do. You can force it to outline it. You can say Outline Stroke now, and then it doesn't really
matter what you tick in the next option when you're exporting because it will
be already outlined. But remember if I don't do that it means that
when it scales up, it's got a size of four
if I scale it up now. Even it's really big
it's still four, and maybe that's what you
want because it matches other elements on the
page or if you want it to scale proportionately
as in you outline the stroke and when
it gets bigger so does the stroke
around the outside. You notice they call it
stroke on the export, but border in here
that's to test you. I'm going to go File, I'm
going to go to Export, Export Selected, and SVGs. Leave it all and
just click "Export". I should have named
my layer first, but I can do it here on the fly. This is not an icon anymore. It's going be my graphic and
it's going to be tea leaves. Hopefully in here we'll
have something like an SVG. Remember we got these
as icons earlier on. You see it's
teeny-tiny, 900 bytes. It's not even one
kilobyte, and it's huge. It can be huge, you can
scale that up as you want. There are going to be some
oddballs like this one here. We do some fancy
cropping down here. I'm going to double-click it. You can see here I've
got this Mask Group, so let's export that. Let's go to File,
Export, Selected. We know that we could do it as a JPEG versus PNG.
You wait there. Here are my
poorly-named options. You can see in here I've got
this one that is masked. JPEG, nice and small. PNG; really big, but it's got the
transparency that I need. But there's all this stuff, and you're like, "I don't
really need that stuff." Sometimes there's some things where you got to go, " Well, I'm inside of a component,"
so I'm going to copy it, put it off in the background,
come out of everything, and just paste it,
double-click it, and find my little mask and edit that just so that when I export this it's just
not such a big image. It can be a lot
smaller. Let's File, Export it. Here we go. There's the PNG
that's really big, and there's that second
one that I exported. You'll notice that
the file size is significantly smaller and
you're like three kilobytes. Hey, it all counts. That's your all-in-one
file format/how to export single images
out of Adobe XD. There's a long one on
there. There you go. I will see you in next video.
81. Batch export images at once using Mark for Export in XD: Hi everyone. We're going to look at something called batch exporting or mark for export. What it allows us to do is give the power to the developer, the person building
the app or website. They can use the link
that we created before, that shareable development link, and they can click on
stuff and they can say, it's going to be an
SVG or PNG or JPEG. You can let them choose.
It's super handy. Let me show you how to
do it now in Adobe XD. First thing is you need to mark them for this batch export. You do that by selecting on
the thing you want to be exported and saying
either mark the export, there's a little tick box
there, or I'll undo that. You can right click
it and say mark for export or in your layers panel, that little icon there next
to that layer will export it. Make sure they're
grouped the way you want and that they are named the way you want because remember, they'll retain that name and
just work your way through. Say, this logo here
needs to be exported, so I'm going to do that one. I should name these
really nicely. Let's make sure on
the right groups. I've dived into this component because I don't want to export the entire thing because it
would just be one big unit. I'm going to go
inside, grab that and say you are exported. Go inside, grab, not
just the roof, the part. I'm ignoring the
names for the moment. You ignore them with me. Once you've done that, you could go to
file export batch. That's what that thing does. It will export everything
as a batch and that's fine. It depends on how your developer how they
want to do it. Sometimes they just
want the images. The trouble with it
is I've got to decide all of these, exported as PNGs. Let's do that. I'll
stick it on my desktop, create a new folder. I have to export all
of them as PNGs, all of them as SVGs, and all of them as JPEGs, in three separate goes
and delete the ones I don't want in formats,
so that's no fun. The real reason we do
this is that when we go now to share and
we go to this one, development, which
we ignored earlier, you need to decide what
development process is going. Is it going to be a
website, which houses, mobile website or
is it going for iPhone or is it going
onto the Google Android? It'll use the right naming
conventions for you. Well, this is going up for web and then this should
be clickable. Why isn't this clickable, Dan? Because I've got the wrong flow. Multiple flows is handy
but also problematic. In here, now I can go to development and now
I can go to web. Look. Now there's four assets
that I've actually tagged. Now I can click this. This is really handy now
because once they're ticked, even if I make changes
to these leaves, it'll still be as
part of this so I can just re-export it.
Let's do that. Let's click "Create Link". What this downloadable assets does is when the
developer goes to it, so let me open it up,
now we've got these [inaudible] over here,
like design view. What I can do though is
you've got this option here. What it's going to show me,
we're dealing with images, so ignore everything that's
not this assets folder. We'll look at these
other ones in a minute. But you can see all
these lovely images. There's my graphic-tea1
that I named, there's my logo, and there
is my unnamed icons. The cool thing that
they can do is they can select it and
down the bottom here they can decide SVG, PDF, JPEG. They might freak out
because they don't know which file format
they should be using. There's [inaudible]
job that will depend on the developer. It might require some
education from you. You should be okay
with it depending on their background,
how new they are, but it gives them
the flexibility, but requires them to come into here and click on them
and download them. They might just be expecting a big old images folder,
so chat to them. Show them this and say hey, you can click on
things and look, I can download it,
or I can click off on nothing and go
through the folders here. This one, this one, here. It gives them
information about it. But did I even mark
them on for export? I didn't. Which one
did I mark for export? I just did ones on this page. No, I just did those icons. Make sure you mark
all of these for export so that they can
go through and just click on them and
download them over here. If you don't, they can't. Interesting factoid
to finish us off, is that in XD, if you do this first one
because it's in a repeat grid, sorry, back in Design
View, double-click it. If I mark this one for export, they all get marked for export. If you don't want that
to happen, you'll have to ungroup the repeat grid, and then mark them all
individually as you want. But it's a pretty cool way working with a developer like the ones you
want from export. Make sure you test it first
before you send it over. Ask me how I know because I sent stuff to developer
all the time he's, you haven't marked
them for export. You're going to
check these things. Yes, that is it. That's batch exporting or marked
for export and the best way to use it as via the share and via
that development. Make sure that you
pick the right flow. That's it. Let's get
onto the next video.
82. How to export code in XD for engineers using Design Specs: Hi everyone. I'm
going to show you how to get the code out of Adobe XD ready for your developer so that
they can click on things, figure out the spacing, the padding, the size of it, the CSS elements,
what colors are being used, what fonts, actual text that's
inside of things, it's actually very
easy to actually do, so let's do it. First though to make this
work is not a whole lot, you can do it badly quickly,
let's put it that way. I'm going to go to my share, we just need to make
sure that we click on the right flow and
go Development, then either generate the link or in our case, update the link. You send that link over to a developer and this
is what they get. The big thing, the
education that you might have to give them is that the only real thing is
they need to know to click this little view specs icon that's going to give them
everything they need, it's going to default comments, but for a developer, they probably want all of this. From there, they should
be able to muddle their way through and get
everything they need. Because it just automatically
puts in things like this with my design size, my viewport, there's those images that we
tagged in the last video, all the colors they need. Unfortunately, they're
not going to be going copy, paste, code and just stick it into their code
editor and it will work, they're going to rebuild it using bits and pieces
of what you've made. Like the colors, they
are going to have some CSS that defines
the different colors, and what they can do now is easily go in here and say
they need this color, they just click on it, and
you can see down there, it said it's copied,
and they go into the code editor
and just go paste, and they'll just pull
little bits like that, they can look at some of
your character styles. Now, when you are naming
your character styles, we lift it by
default in Adobe XD. Remember we did that thing, was it design view, we did this. We created these ones, where there were H0s, H1s, H2s, and then we just went
add to character styles, maybe we like that and we
just click that button. It's gone, and by default put the name of the font or
the size of the font, which is handy and readable, but for the developer, they're probably more used
to getting something like, can you see their H0, H1, 2, 3, 4. This often gets called
just the P tag, so it depends on your level of coding ability and how helpful
you want to be to them, so you might go through and rename these before you go out, same with naming the images that you're going
to be exporting. Here, it's got a good name, I think, under my Layers panel, it's called
graphic-tea, so go do your naming along with your character styles
and that can help out. Other things that
are useful for them. They might go, great, actually where is the H1. Actually, it's only showing
me the things on this page, not my entire character styles. You'll notice that if I
go through the pages, the colors are going to change and the character styles used
are going to be changed. This body copy, and what they'll do is say great,
this is the body copy, and they will be able to rebuild based on
your style here. What they can also
do is, can you see the highlights over here? They can get a little
bit deeper, and they can say you look at that. They can select on it and
it gives them the CSS. Again, they're unlikely
just to copy it verbatim out of
here because it's probably too much
detail for most people, but it gives them a bunch of the right syntax
they can use, especially for things
like the font. They can also decide, if I click out of here, they can decide whether
they're dealing with pixels or they're going to do
with points or dps, depending on how
they're working. Other really useful things is
to do with size and layout. Again, let's say that
this here is my font, they've worked out, they know
what the actual font is. This one here, they can
click on it, it copies it, they can paste it in
the code version, but they can also with it
selected to see how far it is. Can you see it hovering
around? It tells me that it's 22 pixels down on this box, so when they're building
it and doing the padding, they'll say padding is 22. If I click on this box
first and I'll hover there, it's a margin of
six either side. Look at that super
helpful stuff, oh and it has a drop shadow,
look at that, and it tells them exactly what
kind of drop shadow, how blurry it is, all super useful stuff, instead of them just
trying to guess it. There it is there, that's
the actual syntax, I'd grab that whole
thing and pop it into my CSS file because it's all done and it's in the right
format, super handy. Other useful things
that we use it for is copying your text. You've probably spent
a lot of time with the client and got
the language right, and they're going to do a lot
of selecting and describing this and copying the text and
pasting it into their file. Also, they can find
is the interaction, so let's move to another page. You'll see here if I close
up character styles, they'll be able, because let's say if you find one that's
a bit more exciting. This one here remember,
is an interaction, if I click "Off"
under interactions, they will be able to
see that I have added, there's a button here and
it goes to something, it tells them which
page it's going to, and if they click on
it, [LAUGHTER] it takes them to the next page, that's no what I want to do. Let's go back to my little, I want to see one of
these two things, is, you can see all these
different triggers here, and if you over above them, can you see it highlights them? What it does is, if you
click it, can you see? It gives them both states
so they can switch between the different states
and be then going. Actually, what's the
background color of this? Switch back to the
default state, which is the background
color of this. Though you might have spent a long time building
these different states, but they can't see
them if you just give them a PDF or a JPEG, they can't see what
this has meant to do, the same with this one. They're not going to
see the interaction like animated here, but when they're
grabbing all the code, they will be able
to switch between the default state and
the active state. They can interact with it, they just need to come out of this development mode and go
back into commenting mode, then they can go and go high up. That's that thing
works, go into it, click on it and
decide the colors, look round, cap, center stroke, all that good
stuff, so there was a little bit of
education to work with the developer who might
or not have worked with somebody as good as
you in Adobe XD. You are good, now we're getting through this course
and I promise you so many designers
are self-taught and they know enough of XD, they'll do beautiful work, but they won't know some of the super features
like these ones, but you do, so chat
to your developer, see how much they know, and maybe just spend
a little bit of time working through
these different options. That is it, that's how to get all the codey bits
to your developer, or if you're building
yourself how to extract all the data
ready for coding. That's it, I'll see
you in the next video.
83. What is a style guide in Adobe XD: Everyone, in this video we
are going to look at what our design style guide is versus maybe a sticker sheet
and a design system. We're going to create
something simple for the work that we've done
so far and I'm going to explain to you the
different levels that you can hit when you are doing some of these
style guides. We'll start with a style guide. A style guide often it's just a simple brand guidelines if you've come from
branding or design. It's just, in my case, just a one-pager
that I can give to the business to show some of the designs decisions I've
made to make it clear, let's say you're a contractor working for a larger company. Their designers are going to
need some rules to work too. Depending on what you've done, you can decide on
what goes in here. I've done a real basic one. It got some fonts, the font
weights that I've used. I'd be tempted now to go
and now that I see this, to go put in my H1s, H2s, H3s. Where are they? Well, these ones. Maybe in
a prettier version just to see what I've decided for the various hierarchy
of headings. The colors, the color
codes that have used. When it comes to colors, you'll see things like
primary secondary accent, maybe just primary secondary, maybe it'll end up color one, color 20 depending on the
company and the brand, how many colors you've used. But you will see this primary, secondary accent quite a bit. I've labeled them one
two three on this side. Over here you'll see
I've labeled 100, 300, 500, 700. That is really common
in design as well, it comes from coding
a little bit. But it just means that
I've got five of them, the highest is 1,000, which is my solid black and gray 100 is my lowest
color that I can go. I've skipped the 200 and 400. Why? Because I have chosen not to use a
huge amount of them, but it gives me
some flexibility. If I do decide that I
need something in here. I need something
that's not quite that, but not quite this, I've got 800 that I could
use. You'll see that around. There's nothing special
about it other than it's a common naming convention with, you might've seen it in
fonts, especially the whites. You might have Futura 100, which is the light version, and the 900, which is
the black version. You'll see both of those.
I wouldn't mix them up. I've just put them in here
[LAUGHTER] to help you. This one might be 300, 500, 700, giving me room for something lighter and something
darker potentially, but 1,2,3 is fine too. Here you can decide like we
were in charge of the logo and when I say logo they request that we just typed it out. But you might be deciding
things like minimum width, the clear space around it. How close can these
other buttons get to, decisions that you've made? What colors it's
going to be used on, what it looks like against
white versus dark. When you've done
the light version. What does it look
like against dark? Does it have to be bigger? Those kinds of design decisions. I've also included the
brief and I've typed out my user flow to
make it look fancy. Put it in boxes. [LAUGHTER]
I've made it orange. But let's have a look
at some other levels. There is no rule on like
how much you have to do. It'll depend on the job,
the budget they've got, how much work you put into it, and what your role was. If your role was just
this task flow down here, you might not have
done any design, so no style guide is required. You might just have a
document explaining your thoughts on the flow. How we go to these places
and if you have made any more UI decisions about like colors or when to use the bolds
in this particular setup. Your style guide might be very descriptive of the models that you've created or the order in which they are delivered
to the user. I'm babbling. Let's have a look at
some of the other ones. I just went into trouble
and typed in style guide. You can see there's
just some, see this? That is beautiful, away
past what I've got. This background, graphics, there's a faded
out further on it. It's just a really beautiful, it's a design product in itself. If it's a big project
and you're doing a lot of the design
work as well, then something
like this might be super important to
deliver to the client. It shows a commitment to
the design that you've made rather than this which is
very just like here you go. Here's a little
bit is on a page. You can see, let's have a
look at some other ones. Some of these are what you'd call brand guidelines,
more for print. This one here. We're getting close, look at it. See, this is the same one but they've turned out the page. It looks cool. Here
it's on a laptop. I'm going to get you to
make one of these because there's nothing technical you
need to learn about this. It's more to get all of
your information on a page. But in terms of this course, it's about building something
for your portfolio. Do this, but also mock
it up on a laptop. Do something nice with it. You can see here, this one
here is not a huge amount of content but look how
pretty it is. I love it. You can decide on what level
you're going to go to. But have a little look
through and just like there's no absolute rule on how much should go into
your style guides. Where do you go
from style guide? Sorry, one more to
look at it together. Say, it's interesting
the way that colors get like I've gone
for this over the top, blinding things because
that's what I always do, but they've laid out
their colors differently. They've gone for
the full gray-scale down the bottom here,
they've got them. Know that you can't quite
read it there, but it is 100, 200, 300 using all the
gray colors. Crazy guys. Over here, you can
see they've laid out there hitting 1,2,3,4,5. Another thing you can do is
let's say that this font, you know where it is,
but you know that the client is not going to and they're going to
email you at the time. What you can do is you
can link these things. This is one bit of technical stuff we
haven't covered is, we're going to go here,
we're going to go to prototype. This is
a weird prototype. We're going to add
interaction when it's tapped. Not for transition,
not order animate. We're going to go, not overlay, we've
done that one too. We're going to go to hyperlink
and then you can type it in here and you can go to wherever you've
got that font. We got ours from remember, Google Fonts and Adobe
fonts so you can link to wherever it was so that people can go and link it so they click
and download it. You might have to add a
little bit of notation there that they can download it, but that's one
thing you can do to help connect up some
of these pieces. They might be images that
you've used or maybe repository for all the different logo sizes that you've created. You can add a link to it.
There are different levels. Style guide there's
no specific rules, but it's often informational, whereas a sticker
sheet is another term you should probably, well, I'm introducing to you
now and it's less of design piece to show everybody what is going on and it's just dumping everything onto a page. The sticker sheet, that's a good example
of a sticker sheet. It's just everything laid out. There's no explanations. It's just a big old
often a sticker sheet can just be an XD document. You can just throw
everything because at the moment a lot of
our buttons are hidden in a component which
somebody who doesn't know XD or maybe he's using a
different UI design system. I can grab this and I can lay out all the
different buttons, all the different colors, label them out and label that. That's primary,
that's the secondary, that is my Cancel button. Just drag all these pieces out and start labeling them up. Even then you don't
need to label them up. It's more about just exposing all the different options
that somebody can see. That would be a sticker sheet. A little bit like a style guide, but more just like throwing
them all onto the page. They blur the lines
a little bit. Some of them I'm looking at
here are a little bit sticky. That is definitely a good
sticker sheet in my opinion. This one here is started
getting into bit of both, a bit of a style guide, very beautiful, tall branded, but everything is laid out there as well. So
a bit of a hybrid. Now, where do you go from here? After a style guide
and sticker sheet, you end up at what's
called a design system. What I've showed you now
is not a design system. A design system is massive. It is a way where somebody, many people can all. I'll
stick with this one. This one's got
animation. These are all the design systems that
I went and pulled out. Basically what they are is like a ginormous brand
guidelines that explain not only things like what the button
should look like, but also why we're doing things. It's communicating things
like vision and mission. It'll have information
about accessibility, it'll have things
you used to do, and this is what we
don't do anymore. It is a huge project. I've never done a full
design system before. I've worked within them and why they're good is if
I started doing some work for Shopify for a task when they said,
"Hey, can you do this?" I could work my
way through this, understand what we're doing, what colors are being used and find all the elements
that I need to do it. There'll be nothing
I actually have to make or try and make a decision on
because there'll be an understanding of it in here. These are huge, big projects
for Shopify to build. Shopify make these, they
give me a name like Polaris. It just means that there are tens of thousands
of employees across all different countries can all share the same design system. [LAUGHTER] Actually I've got a button to do and I'm
not sure what kind. I can go through and say, here's some examples of their buttons. I can see them working. Let's have a look. What
are the slim buttons? Look, there's a slim variant. I can find it. They've even shown me this
is what the web version versus Android versus iOS. They are huge big things. Let's have a look at what
they're doing for forms. If I have to design a form, I'm not going to go
in XD and be just dragging it out randomly going where maybe
rounded corners, maybe not rounded corners. There's going to
be very clear and specific rules about
the actual things, but also there was a lot to do with understanding
who their client is, what their values are, why we are designing
these things. Material design is what Google uses for the Android system. It's a little bit
hard to navigate, but I find this really
useful when designing apps. You can have lots
of stuff in here. They haven't have XD
documents you can download, but let's have a
look at their icons. Just wondering around now, but they'll explain how they got lot of their
design choices. Look at this. You
even get to see how they got to
this. Look at that. Look at navigation.
You get the idea. These are big,
big, big projects. We're doing a style guide. Know that you could do a style
guides, a sticker sheet, somewhere in-between
and you either might be working from a design system
if a company has one, or you might be creating one, which you might do
one day, very soon. The other one I pulled out was Salesforce. I'm not sure why. Just if you want to design
a chart in Salesforce, these are the rules, these
are things not to do. There you go. I hope
that was interesting. Introduced a few little
terms but that is it. Onto the next video.
84. Class Project 17 - Final Design: Holy moly, it is the
last class project. It is called final design,
reasonably big one. It's mainly to finish
out your mobile design, create a desktop version
of it, and a style guide. Do some testing with
your mobile design and just figure out
what you've left off. This is a course. We've just ignored bits and left
a few little bits. Go through ED, play with it on your phone and just see if there's
anything that's missing. Things that don't work, we don't have a search bar. Maybe you design something that pops down, there's
a little search option. Maybe get rid of search and
you add something else. Maybe set Account button, go through and just add
anything that's missing, then see if you can translate
it into a desktop version. They should use a lot of
the same design elements, but there were different format. That's a fun project
and a tricky one. I find it easier to start with desktop and move into
mobile afterwards. But in our project here, we knew from our client and from our persona that it's mainly
going to be used on mobile. We started designing
with mobile. If you know it's the
opposite and most of the business on for the company
is done via the website, and you design this first and then translate it
down to this one here. I want you to do three
pages, the homepage, the product page, and
the checkout page. They can be relatively simple. I don't want you to
re-create the whole design, use the elements from
the mobile version and get them ready for desktop. You might have to go back
and watch the video, remember when we did
things like the layout and get that going again so that you've got some
consistency across here. Decide on how wide you want
to make it and you can't get away with making it
a narrower website, if you're finding
it hard to stretch what is quite a
simple design out? Narrow the website incase
it's not trying to smear it across and it just looks a little bit lonely
and lost and then, I want you to do a style guide. It can be super simple, more simple than mine, if it is possible,
and turn those off. Where is my one, Command 0, Control 0, something like this. It can be something like
a sticker sheet as well. Pull out some of the buttons. I'm happy for it to be
either a sticker sheet or a style guide or
something in-between. Because remember now
this is something that can be really great
for your portfolio. You've got your own company, it's got its own
colors and themes, got your own unique user. It can be that first piece for your UX project, if
you're brand new. So when you've done
it, I like to see screenshots of your
finished mobile, your finished desktop,
and your style guide. Do them in separate snapshots
so we can see them nicely, upload them to the assignments, but also share them
on social media. I love to see where
you finished. Ask for feedback if you
want to, from the group, especially these groups here are more useful
for that feedback. This is a little bit
more one way posting, liking, sharing type things. That is your final class
project for the course. Settle in, get that one done, and let's jump into the next
section, the last section.
85. Whats next after Adobe XD Essentials: Whoa, where, where are the end? Mean you were here, you made it. I hope you're sitting there quite proud of
yourself, quite smug. Everyone else is watching
Netflix and you have just finished omega long
course, exciting content. So yeah, you should be
really proud of yourself. Not let people start courses and even fewer finished them so well done you have
what to do next. And what to do next would be potentially to join
me in another course. What would it be useful for you after XD essentials,
what you're doing? Now. The next step might be if you want to understand
code a little bit more. Even if you want to maybe create your own sites or maybe just understand the
role of the developer. It will really help you, okay? Responsive Web essentials might be a good next step for that. And we're going from
this course afterwards, as well as after. Xd essentials, is if you want actually start
putting it into practice without using code. So not coding, do something
like Webflow or Elementor, which is kinda like a
WordPress website builder. I'm making courses on
both of those snail soon. What I'm doing after this
layout right now, I don't know, maybe it's a chick, but otherwise, responsible
way of essentials. And either Webflow or Elemental, which is kinda like a
no code kinda course. And I will be doing in XD
advanced eventually as well. Okay, I'm going to move on to do those wind flow in
Elementor next, and I'll get back
to double back to XD to do the advanced one. So keep an eye out on, on those other courses
you could do. And I've got a Photoshop course, Photoshop, Illustrator
essentials, and advanced. I'm not sure where
I said there are long cause I think I said Photoshop
Illustrator essentials. It's not what I mean. There's
a Photoshop, Illustrator, InDesign, After
Effects, Premier Pro. And I've got lots of
courses and there's often an essentials and
advanced on all of those. So there's other
courses that might be ready for your viewing. Pleasure. I'd like to thank my editors, just animals and Taylor Coleman. They do a lot of work, kind of post MI recording them. So thank you for those guys. And big thank you to Stephen Butler and his
teaching assistants. You might have bumped
into him or one and his team throughout this course can help you with
answers and questions. And thanks so much for
those guys, for the help. Also, if you've
liked this course, make sure you leave a review. And also if you can think of a way of referring
it to other people, telling them about
how great it was. Any way that you know how, I'd appreciate that as well. The more people that
get to see my courses, the more courses I get to make. Also, make sure you follow
me on social media. It's been through
all the course, but here they are again, make sure you join
me and all of those. And lastly, let's talk about
our ui UX designer yet, because that can be
quite scary to kind of hang that shingle out, hanging that sign-out
to say, yep, I'm a UX designer, I'm available for work. There is no official paperwork. I still worry that somebody somebody's gonna knock
on my door and say, Hey, you call yourself
a UX designer. Show me show me the certificate. You got all the degree
that you've got all the the official
stamp of approval. There is none. It's more of a mindset
change to say that yes, I am now calling myself a UX designer
and it can be tough. But just know that
there's levels. You can be a junior UX designer. You can be a terrible, bad, just getting started
UX designer, whatever helps you in your head, kind of embrace it. It's all about
really enjoying it, wanting to know more. And now's the beginning
of our journey. You might already
call yourself a UX designer, that's cool. But a lot of us suffer
from imposter syndrome. When is it okay? A lot of people
wait until they get their first gig and then
call themself a UX designer. But I give you permission
to start calling yourself a UX designer from
now on because it's a, it's an attitude is you don't know everything
yet, but that's okay. You're off on your
journey as a UX designer. That my friends is gonna be it. I hope you enjoyed the course. I really love and making it. Okay, I'm gonna go take
a nice long break now. You should to actually
you're going to work on your different projects if you haven't submitted them yet. Yeah, that's the
end of the course. How do you ended waving? And then we fade to black. So what we're gonna do
in this one anyway, because I can't think
of anything else to do. It's the end of the course. No, going back, I hope to
see you in another course. Alright, waving fade
to black, databank. Have they gone?
 Daniel Scott, Designer & Teacher