Transcripts
1. 1 Intro: I I'm Bill Singleton, and, uh, just looking at my notebook. I keep a garden journal, Stillman and Burn notebook, and, uh, it's got great papers, tongue paper. So it's towards the end of September, and there's all kinds of mushrooms popping up in my yard right now. A lot of fungal activity painted these last few weeks. This one, I think, yesterday and today. I'm gonna paint another one that I just saw this morning. Well, it's a cluster, actually. So what I do? I always try to paint on location if I can. But sometimes, like this shot here, I use my iPhone camera, which is great, by the way, for nature shots. And I haven't probably about an inch off the ground and took this shot. So the largest mushroom there's probably about four inches across. Pretty good size is growing in my garden, and so I'll use this photo for reference, and we'll use acrylic wash, which is what I've been painting with. So let me show you the paint's great. Got it. These plastic shoeboxes is acrylic wash, so it's liquid text. This is what I've been using. It's basically acrylic paint that behaves like Wash. And so what I've done is, uh, whenever I open him, I, uh you find a little seal thing on the top of here. So what I do usually is, uh, I'll take it off. It's right there and then I'll just rub it on the lid. That way, I know what colors I have. So then that way, at a glance, I don't have to reading labels. I could just grab the color of pain. These sort of, uh, a Skoda brushes can use any kind of rush. But these are the ones I'm using right now. And paper, as I said before is a Stillman and burn toned notebook. And this, I think, is believe is the Nova Siri's. And this is how the final version is gonna look when we're all done. So let's get started
2. 2 Drawing: Okay, let's get started drawing here. It was a mission before, and some of my other tutorials. I don't do a really detailed drawing generally because ah, lot of times I lose the lines is in painting. So? So the drawing is really just a kind of a roadmap toe. Let me know where toe block in the main stuff. Here. So this k this, uh, mushroom here looks like it kind of split open. It's gonna orange going across it. Here. See that underneath it is a second mushroom. So I do a lot of my drawing with the paintbrush. It's It's a way more fun. Waited to drop number six, just getting in some of the main shapes here and stuff. So just indicates, um leaves here a bunch of leaves here. Uh, I think that's, uh, maybe about it. And I think actually, this should be bigger here. This goes across here. I think that's about it. My other drawing tool is a kneaded eraser. Don't be afraid to erase, especially when you're doing construction lines, which is what I call these. You're just basically putting some general the lines on the canvas. So you know what you're doing from the canvas. Sam used to painting on canvas on the paper to let you know where you're going. The biggest problem I see with most people starting out doing this, is that they their lines are too heavy. They sort of trying to edge it out like they're carving in stone. Just draw a really light because you're probably gonna erase most of those lines. So and this I consider this part of my drawing tool. These are my drawing tools. Gotta have them both. I think that's good enough to get started. Next. Let's go to the block in.
3. 3 Setup: okay before we start, get going here and just wanted to go over some materials stuff. So right now I'm using a Stillman and burn Nova Series sketchbook, and it's got great paper, great owned paper, which I really like and for my palette. What I've got here is a metal clipboard, George. Really good. And I put a similar color of great paper on here. And the reason is is because Is your mixing colors over here? It helps. It's easier to see what you're doing if you have the same color. If I had this white, or if I had it purple or something, it would throw off our your color relationships as you're doing it and would look different here than it does here because of simultaneous contrast. So I tried to work, um, similar palette color as the paper that I'm doing, but I don't paint on the paper itself. So what you usually do is get a clear sheet of Ah, I use this transparency film, which a using copiers and stuff. So you get a clear sheet of this and put that over so that's gonna be my palate. And for the paints, I think When I was talking early, I think I said Acrylic wash. It's actually acrylic wash. Ah, whole bihn is another company that makes a similar products. Almost the same thing called acrylic wash liquid Tex version is a cruel it gosh, So I'm just going to use white and black. I use white and black and almost every painting and for the nature stuff used this burn number and almost every painting, too. So these three, I usually have pretty much all the time. And in this painting there's gonna be a little bit of gala and there's some leaves around the mushroom, so going to go with emerald green color. So I think we'll paint probably the entire painting with these five colors. I may possibly had one or two more other ones, but we'll see as we go along. So let's get going. So the white when in putting it out lower this a little is he tried to put a stripe of white because use white quite a bit and you don't want it contaminated. So I find if you put it out in the line like that, you can dip in your brush at different areas here that I haven't been contaminated with other paints so black. I don't need much black and burn number. One thing I've done with the burn number is it's a little thicker paint than the white and black. So what I did was I cut the this down further, so it's a wider hole. So you see, compare. These is so you just cut the tip off of here. But here, I cut it further down. Yeah, brown or prime need more of that. All right. I think we'll just get started with those three colors just to do the block in for now. And then the other thing I do is I keep another a little led here to keep my wandering so I can wash my Russia. Well, not to wash my brush up, but to moisten my brush up when the colors get a little too thick for washing my brush out . I just keep a big jar of water here. Oops. All right, let's get going. Let's start blocking in some paint. You know what? I guess I will need the green, because I'm gonna have to block in some leaves here. This will put everything out here now. All right? Now we can get going. So on this side is the mushroom I painted a day or two ago.
4. 4 Block In: all right. The stage. We're just gonna be blocking in. So just black and white and love a bit of this burn number here. I'm just sort of tracing out the main outline of this mushroom and this mushroom. It was just pretty much basic kind of layout stuff here. It's kind of a fun stage to cause you're really looking at the big picture in a way, getting the main kind of shapes and laying in basic colors. Plus, it's kind of fun. You can do some kind of cool brushwork, sort of expressionistic brushwork. All right, kind of get the outline of where those air at this indicates the Stipe's here. All right, I think that's pretty good. Lay in Al. It's at a little bit of the white for the mushrooms, so these air white, but they're not like bone white. They have a lot of brown, and I'm tear. But anyway, at this stage, what we're doing is just laying in kind of the main values and colors. All right, I think that's good enough for the mushrooms. Now let's indicate some of this foliage around it. Some of the leaves now this green here is Well, way too intense. Uh, great. Down a little bit. I think that's pretty ages for the block in stage. Maybe a little too light. Okay, these are the leaves around it here. And then there's a stem that goes through here. So I'm guessing the stem must have been what split this open as the mushroom. You grew past it here, This kind of pushed it open and then indicate some of these leaves down here. All right, I think that's pretty good. That's all we need at this stage for the block in. So we'll go do some finer detail next.
5. 5 Painting: Let's start working on some value. So I switch brushes. I was using this big flat one here. No switching to Ah, a round brush, Little more pointing this to it and we'll start indicating since more of the values get a little closer. So the first stage here just kind of blocked in. And once again it's kind like the drawing. In a way, it's like a road map. So now, going into a little bit a closer approximation of the of the true values and colors here. So this right in here is pretty shadowy. And in this natural scene here, it's a lot of twigs and brush and things growing. So the lines are going everywhere. So you don't want a less like the straight lines across like that. I want to kind of have him buried. Looks more much more naturalistic. So mostly what I'm using here is black. In this burn number, these are the darkest areas in the painting. Someone just gonna paint right through some of this stuff here, like this branch and print painting over it. We can come back and fix it up later. This indicates some of this other stuff out here twigs and and stuff, just kind of blocking it in. You know, that's my brush is a little bit drier out here. Get sort of these sort of scum bling effects. Stumbling is when you have a dry brush and you sort of raking across and you kind of catch the paper like that, like to have a nice variety of strokes and just makes a painting more interesting. The other thing I'm doing here. If you noticed most nature stuff like this, the shadows air usually warm there warmer, relatively speaking, than other parts of the painting where this sunlight well, I should say Skylight is hitting this. It's not necessarily direct sunlight, but where the light from the sky is hitting this, it's cooler. And where there's shadows, area areas are it's warmer. So that's something I use a lot, and it really helps catch that illusion of, uh, natural lighting. You'll see what I mean in a bit. So here we're sort of in you getting off the illustration onto the page so you can kind of that your breast drugs kind of flow in. However you want everyone. So I use my finger is a smearing tool. All right, that's looking pretty good. Still a little bit in the mushroom right now. The mushroom caps. Once again, we're still kind of laying in more for start refining things a little later. I don't know exactly what kind of mushrooms these are. They might be liberties. Clarify, Lem, but not sure about that. That's one of the main mushrooms you see just in people's lawns and in parks and stuff. But I don't know enough about mushrooms. Teoh really identify any of them? And it doesn't matter, Really? For these purposes, I'm not gonna eat him. All right? So just indicating that there that's looking pretty good indicate a little bit of this Stipe on this one here. It's kind of getting lost. Alright. Starting to take shape here. See, I think I work in these leaves a little bit, So get this green and white. It gets a little too late. That's a little closer. All right, get this leaf here. Coming down. So it's cool to see these mushrooms grow. How they just pushed their way up right through the leaves. Actually, I think I will paint some of the stem the leaf stands behind these leaves That air catching the light here. So these air back in here. So I put a little bit of burn number on these back in here. You'll see they're not in the back yet, but they will be. And thats so that it pushes him back into the shadows because the warms air gonna read as Shano, shadowy areas. So this is just kind of background area we're doing here. Once again, it's a little bit of birth number in this green. And then there's the leaves down here, which are in the shadow. So they're gonna have more of this brown number color mixed in with the green. These are the shadowy leaves in this. When you put that brown, it really puts the leaves back down under here. Okay, I think that's just about enough background leaves. My mission indicate this this, uh, branch here before I lose it. Sometimes I'm painting. I start losing some of my lines that I've done. And so it's good to kind of go in everyone so on, touch it up so you don't lose it. Totally. All right. Starting to take shape here. All right, So now that I went and did these background leaves. Now I'm gonna do the foreground leaves like the leaves areas where the light is hitting it , so these will be a little cooler. So as these had more brown in him, the ones that are in the light have a little more white in them, and white is a cool color. It's not really a color, but everything is a color in a way, and the white always makes things cooler when you add it. Excuse me so you can see the difference in these two will come back and refine this a little more later. A lot of the way I paint now is it's sort of a Siris of relationships of breast stroke. So the first strokes you put down the first colors and values you, you sort of approximated. And as you keep going, as you keep painting, you start refining those. So they made the color that you thought was the lightest color when you first started, you may have to just that later on, so it's a series of adjustments, basically, so you see how this works. So got these The green were added. White is lighter where the light's hitting it. And these greens in the background have a little more brown in them. So it pushes him back down into the shadow area. The sleep here is right on top. Syndicate, view these veins here in the leaves. All right. I think that's enough of those for now. Up here. I'm gonna work on these. Now. These air little a little more in shade. So their little darker. So let's do this thing I like about these paints is that there are opaque, pretty opaque, so I can come in with these colors. I could paint light over dark. You can't do that when in water color at all. Which is why you squash for nature journaling stuff. And that's why in most of the artists for the last several 100 years of used wash for nature studies, because you can paint light over dark and dark over light, and you can't do that with just regular watercolor. Okay, I'm adding more brown in here. Is I get up into these shadow areas here. I think there's a little bit of leaves over in here. Okay, so I think I'm about done with this part of the leaves just not done. But I'm done for now. I'll come back and working these tonalities a little more after I refined some of the mushroom colors. Like I said, this is all just a series of adjustments. Okay. All right. I'm gonna quit using green for a little bit, and we'll go back into just thes, uh, black, white and brown here for the mushroom caps. So start going in here. So you saw the colors I got there. I think that maybe a little bit too much brown. Let's put a little more white in it. Maybe just a touch of black to neutralize it. So when a man in black and white and basic, it's basically gray some green down the area here, bring it down to match the color. So this is where more daylight areas hitting this mushroom here. So adding white cools it down, which is what we want. Because light coming from this guy is generally cool light. It's coming off of the blue sky. Even though you think of the sun is being yellow and warm. Um, some of the stuff that's in direct sunlight, maybe kind of warm but generally a lot of them or ambient light is coming from the sky around. It's not coming directly from the sun, and so it's a little cooler. I mean, that blue sky really cools off color. So wherever that ambient skylight is hitting something, it's always cool. Unless it's sunrise or sunset or something like that in this different. So putting in his cooler lights here relatively cooler, it's starting to work pretty good there. I'll do the same thing down here. So this is where the light is, catching it here up in here to live more shadowy. So it'll be a little warmer color when I say warm and cool. That's relatively speaking. Within this painting, this painting has its own reality, its own set of rules. And so the warm and cool that I'm talking about is about what's happening in this little world that we're creating here inside this painting. That's where the warms and cools are. So as we go into the shadows here will start to warm it up a little, maybe a little bit of black to darken it just a bit, and then this has some little specks in it. I don't know what they are from when this thing was pushing up. So you see, it's starting to take shape here. Now these here, this is sort of black specks on it, but they're really kind of gray looking. So as these go into the shadow area, we need to make a warmer and warmer. So wash that out just a little bit, and then get some more brown and black hair and start warming these up here is they go into this shadow area, you continue that really kind of pulled it back into space there, and I'll just keep going over to here. You could see a little bit of the gills here on this one. They're, like, really dark. The cool thing about this kind of paint to is that since it's opaque, you can paint over areas so you see have kind of refined this edge. The edge was sticking out more. And when I talk to you more earlier about drawing with my paintbrush, that's what I'm doing. So I just change this edge here by putting this dark edge on. It was out further enough. I've made it go in a bit. So some dark Gilles right through here in this area is really dark. So this shadow area here in here, really the darkest parts of the painting. So it's get some black and burnt number, so I'm putting the burn number in the black toe. Warm it up because we want warm shadows. If you do those warm shadows, it starts making it really look deep, and you get some depth to the painting. So, yeah, that's working some painting fairly big areas Right now. I will eventually go to my smaller brush size. But as in painting a Zaev said before I think of brushes is sort of like gears in a car that big that wide brush his first gear. If you're taking off your moving your doing big areas and then as you get going a little faster, put it in the second year and you can. Is this a medium sized brush? And after a while you're in high gear, which is a real fine brush going for details. So that's generally the way I paint. So it looks like I lost some of this Stipe here. If we can kind of relocate it, and once again I'm drawing with my paintbrush, so defining these edges here with the paint. The good thing about painting with your paintbrushes, your your work doesn't look so linear. I mean, if your styles linear, that's fine. Do that. But the style I'm doing here is not a linear style. It's more of, ah, naturalistic, impressionistic style. So for that, you don't want a lot of these hard edges. It looks like a, uh, a lithograph for line drawing. Not for this style of painting. All right, let's put a few dark areas back in here. Kind of helps to find that that background looks like they're stuff growing back here. So now that I'm putting this darker dark in here, I see that these greens maybe a little too light so I could go back and adjust them to if I need to You. So what I'm using right now is that black and and Bert Amber color. So as you see, I'm going along here, it's sort of helping to find the top edge of that mushroom. More puts on these little speckles here. I don't know what that stuff is from left over from the mushroom when it's growing up getting so now you can see I can get some really good detail of this fine tip of this brush here and these medium sized rounds air. Great, because you can get pretty fat areas back in here. And if you want to just use the tip, you can get some really fine little detail, although for the finest final detail, just get this the smaller round brush out. So all right, taking shape here. All right, that's starting to really get some depth to it. It's got depth in these shadows here in these areas. Here in the light pop forward, these leaves with White and him popping forward. And that's going to be even and do that. Even Maura's This goes on here. I will push that warm, cool relationship and make these really start popping. All right, I think you're ready for a smaller brush. So what's this one is a number six Skoda. Look, let's go down the size Teoh number four a little bit smaller tip do a little bit more detail, So I'm gonna go into this mushroom cap here area here, start at a little bit more detail in here. So this is white with just a little bit of black in it. And black is a cool color, too. Some people go and blacks not a color to value, and it is. But it also has a color to it, at least in the painting. And most blacks are fairly cool. At least most of the blacks in my palette. Pretty cool. Blacks and white is always cool. So you see his Imagine more this white. This really starts coming forward here. Just put these old areas where the light is catching on here and this isn't pure. Why do you know this is kind of mixed down a little bit. This catch right where the light is hitting there. That's what really starts given it. That naturalistic three d kind of look okay, that's working pretty good for those mushroom caps. Now I think I'll go into these leaves a little bit and refined them, and one color I haven't really used yet is yellow. So it's going to start mixing a little bit of yellow in here with this green, I kind of warned these leaves up a little bit so that these areas where the light is really catching on these leaves right here. I'm just hitting the areas where the lights catching it. Now, let's do sort of a shadow leaf area, which has a little more brown. And it I think this will be a good color for this leaf branch hair. Okay, taking shape. So we're doing yellow and burn number and green here. So getting some of these leafy areas at her a little more in the shadow. It's pretty little to to, uh, yellow skill them or green in that, all right.
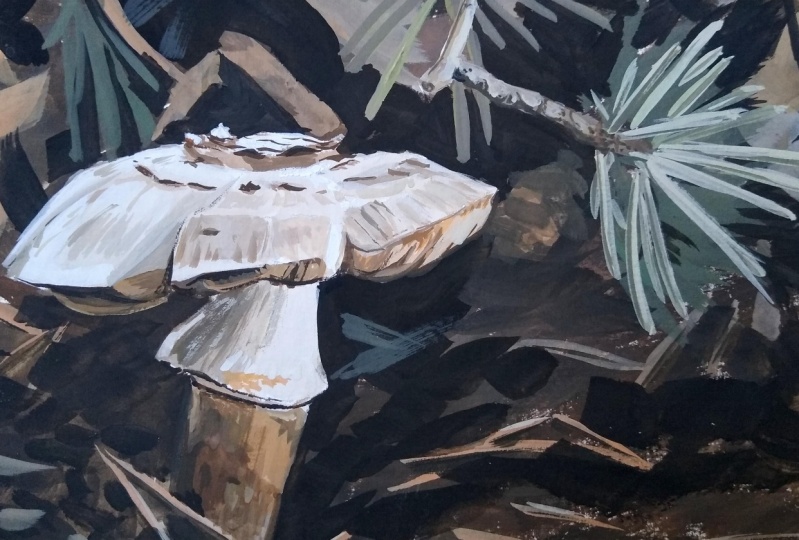
6. 6 Final Touches: all right, I'm gonna go in with some final touches now. So what? A little trick I found is that if we whenever you have a warm shadow, usually have cool highlights. If you have warm highlights and you have cool shadows, so that's the way it just always seems to work anyway. So in this painting, we have warm shadows, so we're gonna have cool highlights. And as I told you before, white is a cool color. But I found if you mix just a tiny bit of blue in it And for this I'm using this, uh, light blue not so much that it shows, really, but just a tiny touch. But somehow you're I can detect that, and then we can go in here and find some of these areas. It's right where there the light is hitting it the strongest that really makes that kind of pop forward. And, uh, give that that push pool of no one where your lights and shadows are. I think that works pretty good there. I could see it here also in this mushroom just for the the light is catching at the strongest. Just put these little highlights in here. So, you know, I was using white in this area before, but it was mixed down just a little bit, with some mixed in with some white and some brown. So now it's almost pure white with just a touch of blue. And you can see how that this point really pops here truly, really makes it come forward. Really helps with that illusion of light and dark and natural light. A little stick coming down here. Put a little bit of this right in here would be a touch on some of these leaves there where the light is really starting to catch it. Okay, Now it's going to the background just a little bit more. Catch some of these little highlights in here. These twigs and a little think of the jiggers in the soil. Here, put a few little highlights and some of these areas all right in here. So these mesquite pods. So coming with a little bit, this yellow ochre color just about done. Just were starting to wrap this thing up here. So these are just fine. A little touches here. It's some of the highlights in these leaves. On one thing, we should have here where this branches touching the mushroom need to have a little bit of a shadow on that. So come in with some of this black and burn number here, Just put it right along in here. That helps give it a little bit of that depth. And then right where it's really touching. It's just getting extra little dark line right there. All right, I think that works pretty good. I think we're done. I don't see anything else that needs. I mean, this is just a sketchbook. Uh, illustration here. So it's not like we're doing a lot of details, so I think that's about it would be dark in just a little right in here. All right. It looks pretty good. I don't see anything that needs really anymore work. All right, we're done. So what did we learn here? Uh, one is the warm and cool relationship. So you see these shadows in here are the warmest and darkest areas in here. And then these highlights where the light's hitting on the mushroom cap are the lightest lights. So between those two, we get this push pull, and between the warm and the cool relative colors. We get this depth. And then with the green we went in with, um, the lighter green, which was cooler because we put white in it, which makes those look like they're coming up into the light and then behind those or some darker leaves in the background. And down in here, shadowy leaves where, um, they're getting that more reflected light from the ground, so they're much warmer, so that pretty much wraps it up. Hope you like the video, and I'd like to see what you guys can do, whether from photos or real life. Um, try these acrylic wash paint's work early rate, great for the capacity. And next, I'll probably right in my my little daily observations, so that would be next.
7. 7 Recap: Okay, Here's the final painting here. So we started out fairly expressionistic and painterly. Can see some of these strokes in here. And then we just gradually refined it got smaller and smaller brushes. Do you get to the final? Here's my Burbage here. 28 19 Backyard. At least 50 of these type of mushrooms in the area right now. Possibly clarify limb a lib ditties. I'm not sure when I'm never sure about mushrooms. I just don't know that much about. And there's a lot of similar mushrooms in the year. Two was when I did a couple days ago. We go. Another journal page enjoying video. Thanks. Bye.
 Bill Singleton, Illustration & Fine Art