Transcrições
1. Introdução: Olá, meu nome é Shivani. Sou modelador 3D e artista. Finalmente decidi
criar essa classe. Você será apresentado
aos conceitos de renderização de
visuais realistas para o lúmen. Você aprenderá como
criar um modelo, como adicionar materiais e como renderizar
imagens e vídeos. De qualquer forma, espero que esta aula online seja benéfica para você. Me avise se você tiver
alguma dúvida. Obrigado.
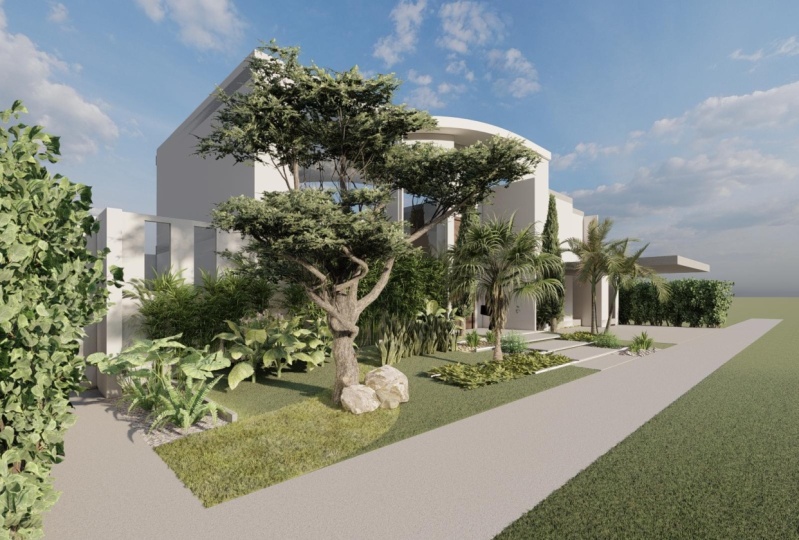
2. Desenhando seu modelo 3D no SkethcUp: Esta é nossa primeira palestra em
que criaremos nosso modelo. Vamos começar criando
nossa modelagem SketchUp. Você pode ver aqui que temos
várias opções para medições como metros,
centímetros ou milímetros. Vou escolher medidores
aqui, pois estamos projetando uma paisagem e não precisamos
fazer pequenas
medições detalhadas. Esta é a interface que você
obterá ao abrir o SketchUp. Verifique se a visualização da câmera está definida para uma visualização em perspectiva para que você possa ter um fluxo de trabalho suave
trabalhando com o modelo. Vou adicionar uma estrutura
única aqui para dar a minha paisagem
e uma visão atraente. Vou adicionar uma estátua aqui. Você pode adicionar qualquer coisa, um templo
ou uma casa ou qualquer coisa. Eu carreguei esse modelo de estátua para o depósito no SketchUp, ou você pode baixar
na seção de arquivo abaixo. Então, vou baixá-lo
aqui em nosso modelo. Vou levá-lo para um 0 ou centro porque
é longe demais. Agora você pode ver claramente o quão grande ele é comparado
à altura humana média. Vou desligar bordas
e perfis
da seção de estilo
aqui para que você possa ter uma visão suave
da estátua. Você pode vê-lo agora, vou deixar isso de lado, pois
não precisamos dele no momento. Com a ajuda do Sandbox Tools, criaremos um plano se você não conseguir
encontrá-lo em sua barra de ferramentas,
não se preocupe, você pode
clicar com o botão direito
do mouse em qualquer lugar da seção de ferramentas e apenas
ativar o painel sandbox. Usarei a ferramenta do
zero para criar um plano e o prefeito Kip
montanhoso mais tarde, clique para deixar o primeiro
indeciso sua largura. Ou você pode passar o
mouse e escolher a largura, ou você pode ver no canto
inferior direito, ele exibe o
comprimento da caixa. Você pode inserir a largura
desejada aqui. Vou a 150 metros. Isso é bom. Agora, para
o comprimento da placa. Da mesma forma, você pode passar o
mouse com o mouse e dizer ou
digitá-lo diretamente. Você pode se mover em todos os
bits pressionando o botão de rolagem
e mudando juntos. Deixe-me mover para que você
possa vê-lo corretamente. Vou entrar em 350 metros pois isso é suficiente para nós. Agora. Você pode ver o quão grande é comparado à estátua
e à altura humana. Vou ligar as bordas e podemos criar alguns
solavancos e nossa montanha. Você pode editar esse plano
clicando duas vezes com o botão esquerdo nele. Como você pode ver, a ferramenta suave que você pode clicar em qualquer ponto
e levantar facilmente, pressioná-la para baixo para criar
uma colisão ou uma pequena poça. O raio da nossa
ferramenta suave é ajustado para 30 metros, o que você pode mudar
conforme desejar. Começarei com isso aqui, onde vou
criar uma pequena montanha e colocar a estátua lá em cima. Certifique-se de fazer um completamente
aleatório e ser você mesmo, brinque com ele e crie um design completamente
assimétrico. Vou colocar essas
áreas para criar espaço,
para criar um
lago de água ou riacho aqui. Este é um processo melhor de tomar
tempo, então vou avançar um pouco. Vou mudar o raio para
60 para mover mais quantidade de pontos e torná-lo um pouco
mais rápido de um processo. Estou criando solavancos completamente
aleatórios aqui para que pareça natural. Você pode fazer o que quiser. Então, vou passar para o nosso ponto de onde vamos
renderizar as imagens. Você pode ver que uma enorme colisão na parte de trás parece um pouco grande. Então, vou pressioná-lo para baixo. Portanto, nosso foco principal é
na estátua e ela
não bloqueará os raios são a
visão da nuvem do lado de trás. Ok, então uma vez que
você terminar, vamos colocar esta estátua
sobre a montanha. Vou desligar as bordas para que
você possa vê-lo corretamente. Este será o nosso ponto de vista, e eu vou colocar
na estátua aqui. Vou movê-lo com
a ferramenta de movimento aqui, bem na
montanha que criamos. Vamos dar uma olhada do
ponto de vista para ver como ele se parece. Vou fazer algumas pequenas alterações
para que pareça natural. Clique duas vezes no plano
novamente, duas editam-no. Vou mudar algumas áreas aqui. Isso parece bom. Agora. Vou mudar a
montanha um pouco novamente. Certifique-se de torná-lo
completamente aleatório. Vou apenas aumentar a altura dele e torná-lo um pouco plano. Abençoe esta propriedade de estátua. Agora vamos alinhar a estátua
no topo da montanha. Vou mudar ligeiramente
o topo da montanha para torná-lo plano para a estátua. Vou colocá-lo aqui em cima. Agora vou para o
fundo do nosso modelo e rodar a
estátua um pouco com a ferramenta girar para
mudar seu rosto na direção para que tenhamos uma boa
visão do nosso ponto de câmera. Isso parece bom agora e
nosso modelo está pronto. Obrigado por assistir caras. Na próxima palestra,
aprenderemos como
exportar esse modelo para o lúmen. Além disso, você pode baixar os
modelos usados neste vídeo
a partir da descrição e sinta-se à vontade para comentar se
tiver alguma dúvida. Obrigado.
3. Exportando seu modelo para Lumion: Olá, Na lição anterior, aprendemos a
criar esse modelo. Nesta lição, aprenderemos como você pode exportar em lúmen. Para exportá-lo,
clique no Arquivo e, em
seguida, clique em Exportar
e escolha o modelo 3D. Você pode salvá-lo em qualquer lugar. Certifique-se de
salvá-lo como um arquivo DIE. Isso significa arquivo Collado. Vou nomeá-lo como um modelo
3D de paisagem e clicar em x-bar. À medida que nosso modelo é exportado. Vamos começar o lúmen para importá-lo. Você terá este
espaço de trabalho no lúmen, escolherá as cadeias de montanhas onde projetam uma vista da
paisagem. Então clique nele. É assim que um olhar. Agora, para importar o modelo. Clique na
opção de importação abaixo e selecione a opção Importar
novo modelo. Agora escolha o arquivo DAT que
exportamos do SketchUp
e clique em abrir. Agora clique em até a biblioteca e seu modelo será
transmitado no Lumen. Obrigado por assistir caras. Na próxima palestra,
aprenderemos como alinhar
nosso modelo com um plano de fundo adequado e
adicionar materiais a ele. Além disso, você pode baixar o modelo exportado
usado neste vídeo para a descrição e sinta-se à vontade para comentar se tiver
alguma dúvida. Obrigado.
4. Adição de materiais ao seu modelo: À medida que aprendemos a
importar modelos no Lumen, vamos adicionar
materiais realistas ao nosso modelo. Clique na
ferramenta Materiais no lado esquerdo, que mostra o balde. Quando você arrastar o
mouse sobre o plano, ele será destacado. Clique nele. Você pode ver que temos muitos tipos de categorias
de material aqui. À medida que os salões ganham modelo, selecionarei a natureza e
adicionarei grama natural. Então, esses são todos os tipos
de texturas de grama que receberão. Você pode escolher o que você quer. Quero que seja grama verde
clara. Então, selecionarei grama verde clara dos
materiais disponíveis aqui. Certo, isso parece ótimo. Agora vamos adicionar material
à estátua. Vou clicar nele para
dar uma textura. É uma estátua grande, então vou dar-lhe uma textura de
rocha aqui. Vou para a natureza e
selecionarei materiais rochosos. Como você pode ver,
todas essas são rochas de designer e
podem parecer antinaturais. Vou escolher ao ar livre e ir para pedra para ver o que temos aqui. Este material de
textura de pedra de pavimento ficará perfeito nele. Então, vou selecionar isso aqui. Nosso modelo está pronto com materiais
realistas. Na próxima palestra,
aprenderemos como
criar água e adicionar
objetos ao nosso modelo. Sinta-se à vontade para comentar se você
tiver alguma dúvida. Obrigado.
5. Criando água e adicionando objetos na sua cena: Olá. Nós emprestamos a quais
materiais realistas para o nosso modelo. Agora vamos passar para o
principal, criando a cena. Vou mostrar alguns métodos rápidos para adicionar objetos rapidamente com a ferramenta de posicionamento em massa
criará a parede do primeiro. Para fazer isso, clique na opção
paisagem nas Ferramentas. Selecione a segunda opção mostrando
linhas de água em ziguezague simples. Em seguida, clique no ponto de
vértice e desenhe um plano que se estende até o canto
oposto do nosso modelo. Você pode ver que nossa água está pronta. Você pode editar a área por quatro opções de erro encurraladas
aqui chamada stretch. Agora vamos diminuir a altura
do plano e levá-lo para o lugar certo com
a opção de ferramenta altura. Isso parece ótimo. Agora,
vamos para o ponto de vista e ver. Agora vamos adicionar
objetos por aqui, como árvores, rochas, flores e alguns pássaros. Vá para a barra de ferramentas Objetos
do lado esquerdo. Clique na natureza, depois clique
nos objetos e escolha qualquer
tipo de árvore que desejar. Você pode colocá-lo em
qualquer lugar do avião para colocar mais árvores ou qualquer
outro objeto a qualquer momento. O que faremos aqui é selecionar o ícone de barra abaixo
da ferramenta de posicionamento,
que é a ferramenta de
posicionamento em massa. Agora, selecione a árvore que você
deseja colocar na cena. Agora clique em um poste onde você deseja começar a colocar
objetos e você
verá uma linha e eu a
arrasto para o endpoint
onde você deseja parar de colocar o objeto e
clique com o botão esquerdo do mouse. Você pode ver que ele
mostrará esta tabela. Então clique no
ícone de mais para adicionar minhas árvores. Você pode adicionar quantos quiser. Clique em Salvar. Agora, vamos aleatorizar o posicionamento com
ferramentas dentro da mesa. Vou criar outro posicionamento de
máscara aqui. Com uma opção de vários
itens, você pode aumentar ou diminuir o número de objetos colocados entre os
pontos finais da linha. Com a opção de
direção aleatória ele irá girar os objetos são seu lugar aleatoriamente com um espaçamento aleatório
ao longo da opção de linha, você pode aleatorizar
o espaço entre cada objeto para faça com que pareça mais natural com o deslocamento
aleatório da opção de linha, ele colocará os
objetos longe
da linha com largura aleatória. Com uma opção de direção, ele mudará a
direção do posicionamento. Eu não quero mudá-lo aqui, então vou deixar ser. Este é um processo que leva tempo, então estou encaminhando rapidamente. Alguns pontos principais a
ter em mente ao colocar um objeto em cenas
naturais ou paisagísticas são que o posicionamento deve
ser completamente aleatório. Dê tempo, não se apresse, brinque com ferramentas para
aprendê-las melhor e coloque árvores e outros objetos
completamente aleatoriamente para torná-lo mais natural. Depois de colocar árvores por toda
parte, parece algo assim. Estarei colocando outros
objetos ao redor. Como você pode ver aqui. Aqui está uma sugestão. Sempre volte e
vá para o ponto de vista. Eles estão colocando objetos
para verificar como ele se parece. A razão pela qual estou avançando rapidamente
é porque você precisa criar cenas de paisagem completamente diferentes
e aleatórias. Isso lhe dará
novas ideias e ajudará você a criar um design exclusivo. Sempre coloque árvores aleatoriamente, brinque com ferramentas, dê tempo e não se apresse. Você também pode adicionar animais
e pássaros para fazer isso, ir para a opção de animais e pássaros. Você pode ver que temos uma ampla
gama de opções aqui. Há pássaros, animais
e peixes, pássaros voadores. Quando você coloca um ponto, o ponto será o ponto
central em torno
do qual o pássaro voa
em círculos. Depois de colocar o pássaro, você deve levantar os pontos para
cima e ele mudará a altura da cama
da superfície do solo. Esses muitos pássaros serão suficientes. Você pode adicionar quantos desejar. Na próxima lição, tornaremos essa cena
em uma imagem realista. Sinta-se à vontade para comentar
se você tiver algum baixo. Obrigado.
6. Imagens de renderização: Olá, Aprendemos
a criar um modelo até
agora entrar na lição
principal do curso. Vamos aprender
a renderizar imagens. Quando terminar de
projetar seu modelo, clique no ícone da câmera
no canto direito da tela. Esses dez
quadros de câmera são predefinidos. Você pode ter dez
pontos de vista predefinidos, de segurança ou modelo de cada vez. Você também pode rolar e
navegar dentro desse quadro. A área que você vê
aqui no quadro é o que será
renderizado na imagem. Aqui temos uma opção de
distância focal que funciona exatamente
como uma câmera real. Você pode ampliar ou diminuir
o zoom da distância focal em um objeto que é visto em sugestões mantendo seu
ponto de vista longe e, em seguida, aumentar o comprimento vocal
para uma visão melhor. À medida que eu aumento a distância focal e ajustei o quadro aqui, você pode ver que ele está
melhor agora e mais definido. Aqui está uma opção chamada halite, que você pode ligar ou desligar
e ajustar sua intensidade. É útil quando
estamos prestando uma entrevista com a noite. Os anúncios efeitos realistas
da luz em nossas renderizações. Então, vamos parar. Vamos para um novo efeito, iremos para a câmera e escolheremos a opção de
visão em perspectiva de dois pontos aqui. À medida que você ativa a opção, você terá maior
controle para endireitar estruturas que
parecem estar inclinando enquanto
corrigem linhas que parecem distorcidas e desorientadoras. Agora vamos aos efeitos novamente e adicionaremos efeitos ao nosso modelo. Com isso, geralmente,
podemos ajustar a orientação solar e
os efeitos em nosso modelo. Altura do filho. Você pode ajustar
a altura do sol, onde se você trazê-lo abaixo de 0, o sol irá abaixo do
horizonte e a noite estará ligada. Com uma opção de subtítulo, você pode ajustar a maneira como seu
filho está indo ou seu lugar. Circulando na
altura, colocamos a opção de sol alto com
algum brilho. Você pode ajustar o brilho dos raios da projeção na cena com
a opção Tamanho do Disco
Solar, você pode ajustar o
tamanho do sol, voltará a ele mais tarde. Agora vamos adicionar os
efeitos da nuvem do nosso modelo. Podemos ajustar as nuvens
existentes em nosso modelo. Aqui temos nossas configurações de nuvem
com essa opção de nuvem, você pode alterar a forma como a nuvem
aparece em sua renderização. O cliente desempenha um
papel vital em nossa visão de paisagem. Você tem que se certificar de que
eles são naturais, não muito brilhantes ou não muito escuros. Vamos entender todas
essas configurações de nuvens. Com a opção de posição, você pode alternar a
posição das nuvens. Essa opção de velocidade da nuvem
é para renderizar vídeo. Bem-vindo à TI
nas próximas lições, o valor da nuvem mestre define a proporção da
nuvem em nosso modelo. Com essa opção de nuvem baixa, você pode ajustar o número
de nuvens baixas no modelo, e é o mesmo
com a nuvem alta. A opção de brilho da nuvem
ajustará o brilho
da nuvem, que afetará nosso modelo. Como você pode ver como ele está
refletindo na água. É preferível
mantê-lo um pouco baixo para evitar que a água mude de cor
devido à folha ou atividade. Com uma opção de suavidade na nuvem, você pode ver como ela
muda o corpo da cor. Isso o torna mais suave
e software e aumenta,
o que parece bom. A opção de brilho do céu é diferente do brilho da nuvem. Ele ajustará o
brilho do céu. Ao diminuí-lo, ele tornará o fundo mais escuro,
como a temporada de monções. A predefinição Cloud
ajustará automaticamente a localização da nuvem na cena, dependendo
das variáveis. Você pode alterá-lo. Não é necessariamente a
predefinição de nuvem alta ajustará as predefinições como a opção de predefinição da
nuvem. Mas para as nuvens altas, nuvens
HBCU na
renderização de filmes serão utilizadas e renderizando o filme
que veremos mais tarde. Agora vamos ajustar
as configurações do sol. Aprendemos sobre o
pôr do sol antes. Vou ajustá-los para uma renderização. Ao fazer isso,
deixe-me dar algumas dicas. A paisagem Sonya
deve ser metade coberta se você deseja uma visão aleatória
matinal ou noturna, o que lhe confere uma visão estética
natural. Aqui vou criar uma vista noturna onde os raios do sol estão refletindo
na água e eu vou
manter o céu um pouco de laranja é rosa. Ao ajustar esses
parâmetros com a seta do mouse, se você pressionar Shift, poderá ajustá-los para três decimais. Em suma, a linha se
moverá lentamente. Você pode ver como o sol está
mudando sua posição em uma direção circular a uma certa altura com a opção de direção do
filho. Você aprenderá sobre essas ferramentas
depois de praticar o suficiente, brincar com todas as ferramentas, entendê-las
e dar tempo. O sol, esta ferramenta mudará o tamanho do
sol no modelo. Vamos renderizar uma imagem após pouco mais ajustes
com parâmetros. Estou acendendo a luz hiper porque vai
ser uma visão noturna. E isso dará efeitos de
luz realistas às árvores. Vou iniciar esse efeito
predefinido para a câmera aqui. E agora chegando à renderização, aqui estão algumas opções que
você pode ver e-mails ou gerar uma imagem de baixa qualidade de
1280 em 720 pixels. Da mesma forma, você pode ver os pixels escritos
abaixo das opções. Quando você quiser uma imagem de
alta qualidade, você pode escolher a qualidade de impressão
ou pôster. Você levará mais algum tempo para processar e renderizar a imagem. Estou escolhendo o Desktop aqui
porque isso é suficiente por enquanto. Vou salvá-lo como um arquivo PNG. Agora estou ignorando o
procedimento que levará três a cinco
minutos, dependendo
da qualidade de renderização que você escolher. Uma renderização de imagem está concluída. Vamos vê-lo. Como você pode ver os detalhes aqui, a lente brilha do Sol, das árvores e suas sombras,
nuvens, céu e
pássaros voando. Isso parece ótimo, mas aqueles pequenos
arbustos abaixo do bloqueio da montanha, farei algumas mudanças
nisso e renderizarei novamente. Como já
estudamos os parâmetros do sol e da nuvem, vou
avançar isso rapidamente. Você deve dar tempo, alterar todas as configurações para que
você possa entendê-lo. Eu me certifico de que seu design seja
aleatório porque isso o
tornará mais natural ao
projetar uma paisagem. Como você pode ver,
não há nada decidido. Estou tentando todos os parâmetros aqui
até obter a visão que desejo. Você deve tentar tudo isso, alterná-los até
conseguir o que deseja. Você pode entendê-los tanto
quanto você pratica. nova renderização está pronta.
Vamos verificá-lo. Você pode ver nossas diminuições
de brilho ou nascer do sol e não
refletir na água, e isso parece um nascer do sol. Eu também deixei o Cloud mais suave. É isso para esta lição. Na próxima lição,
aprenderemos como criar um vídeo de
lapso de tempo noturno no Lumen. Tire tempo e pratique. Sinta-se à vontade para comentar se
você tiver alguma dúvida. Obrigado.
7. Renderização de tempo: Olá. Aprendemos a renderizar imagens até agora nesta lição, aprenderemos como
renderizar o vídeo de lapso de tempo passo a passo. Na tela principal, clique no ícone do filme e
agora pressione o botão de gravação. É semelhante à renderização imagens que você
viu esse quadro
aparecerá em seu vídeo e você pode ajustar a
distância focal de forma semelhante. O que vou fazer aqui é
escolher um ponto e definir o quadro nele de onde
quero que meu vídeo comece. Você pode ajustar a altura
da sua câmera a partir desses botões depois de terminar, a decisão do nosso
ponto de partida clicará
no ícone da câmera grande
na parte inferior da tela. Você pode ver aqui
nosso ponto de partida é segurança aqui é um quadro. Então, vamos escolher
o quadro final. Vou mantê-lo um
pouco longe disso. OK, então, chegando
ao próximo passo aqui, você pode decidir o atraso entre o primeiro quadro para o segundo, ou você pode definir a
duração do clipe. Eu vou com cinco segundos porque isso é suficiente por enquanto. Você pode mantê-lo o
quanto quiser. No momento em que você mantém
o lento e suave. O vídeo estará
entre seus quadros e também levará
mais tempo para renderizá-lo. Você também pode manter mais
pontos de quadros, mas criando um lapso de tempo
simples, então só precisamos de dois. Agora vamos visualizá-lo. É assim que minha câmera ficará do quadro um a quatro da manhã. Então, vamos salvá-lo
e trabalhar nisso. Aqui você pode adicionar vários clipes e renderizá-los todos juntos. Todos os clipes individuais de uma só vez. A partir desta opção, você
pode editar o clipe novamente se quiser fazer alterações no quadro do ponto
inicial e final, você pode adicionar efeitos. Da mesma forma, como adicionamos
na renderização de imagens, então vamos primeiro uma
perspectiva de dois pontos para obter uma
visão em um ângulo adequado. Agora vamos adicionar efeitos sonoros, como fizemos em uma renderização de imagem. Isso é completamente semelhante
à renderização de imagens. Você pode ver todos esses parâmetros funcionam da mesma forma ao alterá-los. Não vamos fazer efeitos de nuvem agora. As promessas de Carl e a
renderização de vídeo
também são as mesmas que tínhamos
na renderização de imagens. Agora, vamos começar adicionando movimento ao Sol para o
nosso vídeo de lapso de tempo, então teremos que primeiro
apontar apenas o Sol. O lugar de onde ele
iniciará seu movimento. Vou fazer
o Sol se mover da esquerda para a direita
no vídeo renderizado, então vou colocá-lo
no lado esquerdo e também ajustar outros
parâmetros. OK, isso parece bom agora. Você deve ter notado esse botão nas opções de renderização de vídeo. É chamado quadro-chave e é usado para dar movimento a esses
parâmetros no vídeo. O que vou fazer é
adicionar um quadro-chave
no início do vídeo
e no final do vídeo. Portanto, os parâmetros mudarão em ambos os quadros-chave
à medida que eu os defino. Para adicionar um conjunto de quadros-chave, o ponto de vídeo no qual
o efeito de quadro-chave deve parar como eu quero
no início do meu
vídeo, eu adoro isso aqui. Basta clicar nele e ele
será adicionado no ponto que você quiser com a configuração atual
desse parâmetro. Então aqui está nosso primeiro quadro-chave. Vamos adicionar outro em algum lugar ao redor do final do vídeo. Agora, passe o mouse para esse
ponto e adicione-o lá. Agora clique nele novamente e ele será adicionado
ao segundo ponto. Portanto, esses são os dois quadros-chave. Então agora vou ajustá-lo para
o segundo quadro-chave. Clique no segundo quadro de
clique e defina o
parâmetro específico desejado. Se eu souber apenas
o título Sun, será o mesmo
durante todo o vídeo, a menos e até que eu adicione
quadros-chave no ponto, como fiz com Sundheim. Com essas
linhas menores, você pode alternar entre o quadro-chave
e esses pontos. Vou para o primeiro
quadro-chave e adicionarei
um quadro-chave para a opção de
cabeçalho Sun aqui. É semelhante ao que fizemos
antes de adicionar um quadro-chave. Então, acabei de fazer o parâmetro aqui e adicionei o
primeiro quadro-chave. Agora vou para o
segundo quadro-chave e alternarei o
parâmetro do cabeçalho do filho para esse ponto. Então, vamos ver como isso vai
animar no vídeo. Farei menos
alterações nos parâmetros porque ele não
atende às minhas expectativas. Eu usaria a altura do sol e o Sol indo para
o lado direito. OK, estamos todos prontos com
o Sol e o Sol encabeçando este pressionamento de tecla do anúncio
para um pouco de brilho. Ele é o primeiro pressionamento de tecla
e é um segundo. OK, vamos alternar
parâmetros agora. OK. Tudo isso está pronto. Agora vamos passar para
as configurações de nuvem e adicionar
quadro-chave para nuvens. O que faremos é
vender promessas aqui, como eu quero durante todo o vídeo, depois adicionaremos
quadros-chave para opções. Queremos animar todas as
mudanças no vídeo. OK, isso parece bom. Vamos passar para o
início do vídeo
e do quadro-chave para
a posição da nuvem. Ele vai para o primeiro
quadro-chave e seu segundo eu vou aumentar
a opção de posição ,
pois geralmente
muda de posição, então poderemos
mover nuvens no vídeo. OK, vamos jogar. É assim que parece. Farei pequenas alterações nas configurações de som aqui
porque parece muito brilhante. Preciso mudar o título
em breve porque o Sol está indo na direção
errada aqui. OK, isso parece ótimo. Então, vamos ativar o Hitch Ku
Clouds na renderização de filmes para obter nuvens de alta qualidade
no vídeo de renderização. Depois de terminar,
o que faremos é clicar neste grande ícone chamado
Salvar o filme. Aqui estão algumas opções que você
obterá para a qualidade final da
saída. Você pode escolher o
máximo que quiser, mas
lembre-se de que eles
demorarão mais tempo para renderizar, pois
a qualidade será maior. Irei com a
qualidade da produção, que é média, e escolherei 25 quadros
por segundo e qualidade 720p. Você pode escolher como quiser. Agora, clique no botão Parar exportação de
filme nome do
corredor como
lapso de tempo de paisagem e, em seguida, clique em Salvar. Vou pular o processo de
renderização de vídeo porque levará algum tempo. Então nosso vídeo é
exportado com sucesso. Vamos verificar ele. Você pode ver os detalhes em animações de
luz do dia aqui. Isso parece ótimo. Os pássaros na água também
são animados aqui. As nuvens se movem e
tudo parece ótimo aqui. Então é isso por isso, porque se vocês tiverem alguma dúvida, sinta-se à vontade para entrar. Obrigado.
8. Dicas e sugestões: Olá pessoal. Nesta lição, vou lhe dar algumas dicas
e insights que pratico enquanto
trabalho no Lumen. Espero que essas sugestões e
dicas sejam úteis para você. A primeira coisa é diminuir
a qualidade e o modo de editor. Para alterar isso, vá para as configurações no canto inferior direito. E você pode desligar árvores
e grama de
alta qualidade no editor. Desativando isso,
reduziremos a qualidade das árvores e da grama
no modo editor, o que tornará seu fluxo de trabalho
mais suave, rápido e fácil. Reduzir a desigualdade
não afeta as renderizações, então não se preocupe com isso. A próxima coisa é o terreno de
alta qualidade. Isso é o mesmo
que fizemos com as árvores. Isso afetará apenas
o modo editor, não as saídas de renderização. A próxima opção aqui é
a opção de sons silenciosos. Isso é opcional. Você pode desativá-lo se
quiser silenciar os sons que você adicionou a cena enquanto
estiver no modo editor. Agora, o principal, qualidade do
editor, eu sempre prefiro usá-lo
na configuração mais baixa. Isso ajudará você a trabalhar
mais rápido e levará muito menos tempo na navegação e carregamento do modelo de camada de
objetos. O resto das opções
aqui são opcionais. Você pode alterá-los como quiser. Tudo bem, a próxima coisa principal e mais importante que
você deve ter
em mente é sempre adicionar
detalhes quando necessário. Deixe-me mostrar-lhe
neste modelo de paisagem, você pode ver aqui Eu
só adicionei as árvores e outros detalhes dos lugares que são visíveis do
nosso ponto de câmera. O resto dos
lugares está vazio. Isso reduzirá a carga
em seu laptop ou computador, ajudando você a carregar mais rápido. E o principal, isso
economizará tempo. Portanto, certifique-se de primeiro
decidir os pontos de onde você deseja renderizar
suas imagens ou videoclipes
e, em seguida, nossos detalhes para essas áreas visíveis a
partir de seus pontos. A próxima coisa é a visão em
perspectiva de dois pontos. Eu uso esse recurso de câmera
em todos os meus trabalhos de renderização. Sempre adicione esses efeitos de
câmera e ligue-o em suas renderizações. Como isso ajuda? Você terá maior controle para endireitar
estruturas que parecem estar se
inclinando enquanto corrigem linhas que parecem
distorcidas e desorientadoras. Além disso, fará com que sua renderização
pareça direta, começando a próxima coisa que você deve
ter notado que eu uso lente
focal, exceto para navegar para
frente até o ponto. Então, sugiro que você sempre renderize imagens a
alguma distância
do ponto da câmera e aumente a distância focal mais tarde de
acordo com suas necessidades. Aumento da distância focal
Hampshire renderização parece perfeitamente focada em uma visualização e
certifique-se de que a área renderizada seja modificada. Ao renderizar um videoclipe, eu sempre prefiro
fazer clipes curtos. Como você sugeriria que
você faça clipes curtos em vez de um filme longo? Cada um começando
e terminando em pontos
cuidadosamente escolhidos em seu modelo. Isso permite que você mostre
mais do seu modelo e se concentre no ponto
que deseja enfatizar. Mais uma coisa que eu
gostaria de adicionar com dicas de câmera, permitir que o espectador dê uma boa olhada no que você está tentando mostrar diminuindo os movimentos
da câmera,
passe pelos objetos
que você deseja compartilhar de perto e devagar o suficiente para
que possa ser apreciado. Simplesmente tiradas duas fotos são
muito próximas umas das outras no lúmen para fazer um único clipe
pode ser muito eficaz. Finalmente, além de tudo isso, eu sempre acrescentaria para tentar ser criativo com ideias únicas, brincar com ferramentas para
entendê-las melhor e dar tempo. Obrigado.
9. Projeto do curso: Olá. Nesta aula, aprendemos a projetar e renderizar o
modelo paisagístico com lúmen. Portanto, você deve tentar
criar algo como parte do seu projeto de classe
e enviá-lo aqui. Tente pensar em uma ideia para o design de uma cena de paisagem e, em
seguida, projete-a como um
plano no SketchUp ou em qualquer exportação de
software de modelagem 3D, materiais de anúncios
iluminados e, em seguida renderize com diferentes efeitos
e seu design criativo. Você pode encontrar esses detalhes
na seção de projetos. Carreguei todos os arquivos usados
na sala de aula para referência, mas tentei criar
uma nova ideia criativa. Estarei ansioso por
seus trabalhos de projeto. Por favor, deixe-me saber
na seção de comentários se você tiver alguma dúvida. Obrigado.
 Shivam Jogi ⭐, Architectural Designer, Civil Engineer,