Transcripts
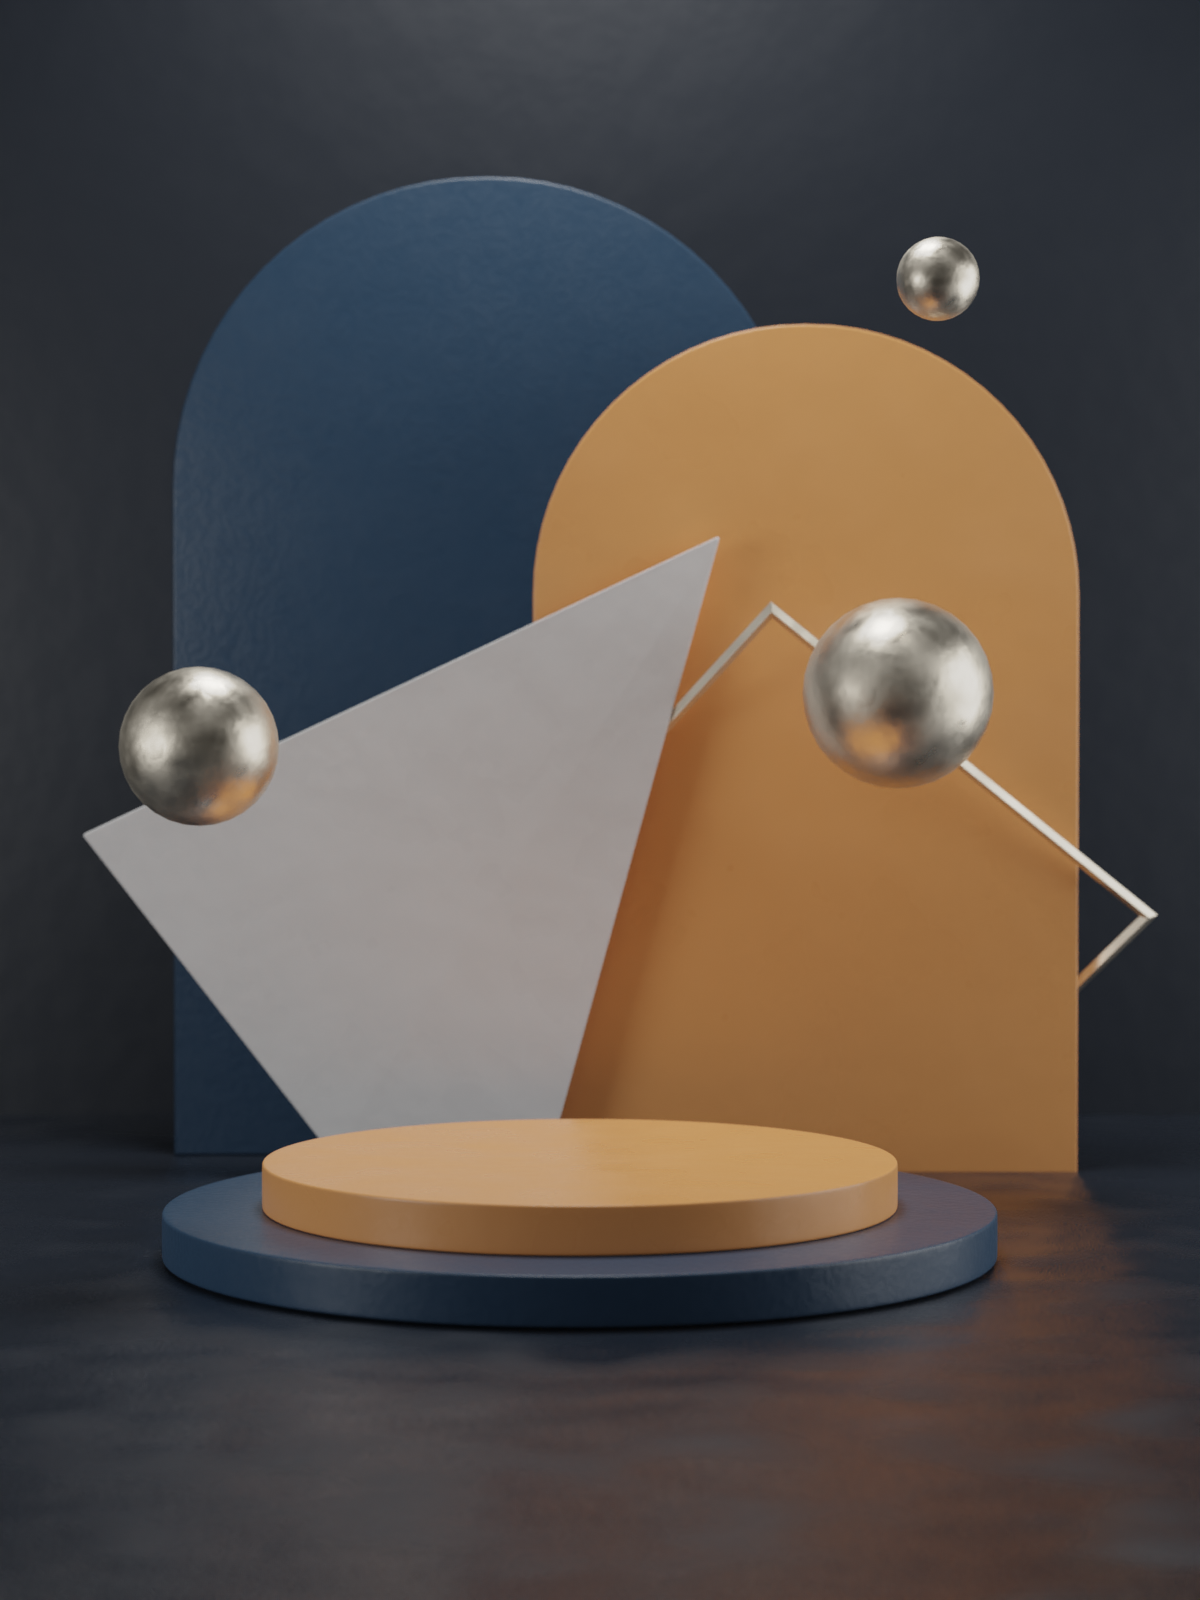
1. Introduction: My name is Ronny. I'm S e g artist. With around 10 years of experience in the graphics industry, I've used many software do my career on have only recently discovered Lender. I was really impressed by how good it was on the amount of features it has all given for free. So head onto blender that or go and download software, whether it is for Windows, Mac or Linux. I recommend before you start watching this tutorial to check the fundamentals plate. It's on YouTube so you can understand the basics of navigating in the software. Our class project will be this image you see here. I will start by modeling the scene with simple objects. You will then add the camera and fixed lay out of our objects. I would like the scene after it, using area lights and blender. Well, then add some colors and materials using color palettes. After that, I'll add some noise and textures to make our surfaces in perfect. We will finally render everything using cycles and composed it all inside of blender. Finally, I will give you some extra tips on how to add. External models were seen on how to easily change the colors within the same project found . I really hope you would like this class and let's get started.
2. Modelling the scene: Okay, so we opened blender, and this is the first thing we see. Default light cube and camera. I just want to set up a short cut. Uh, that will help me view my wife frame. So if you click here on the overlays, I can turn it off and on here and that can assign this to shortcuts. If I right, click signed shortcut and at press control F, for example, Now control F will toggle on and off my wife frame. Another thing I want to add is in the preference. So edit preference. Adan's search for Wrangler Andi, I want to add the node Wrangler This strips with blender. So you just enabled It will help us later on with the materials. So now we can start modeling. Let's delete the cube. I want to make my floor. So shift a will Take me to the ad mode mesh plane. Andi, keep in mind that every square is one meter. So when you're scaling and your, uh, modeling, make sure that you understand how much you're going, how big your going So s to scale are actually let's do this in edit mode. So tab on. If if it's selected, Um, just fine If it's not just a and that was select all and let's scale it up a bit Now on a scale it on the y, so s y, and it will scale on the Y Then a bit more on the X s X and that should work tap to exit the edit mode Now shift d will duplicate it. I wanna rotated 90 degrees under Why? So are will rotate. Why 90? So right 90 dark 90 on the people would press enter Then you have it on our rotated 90 degrees. Now if I press on the screen button here making Teoh left side So uh, yeah, we can, despite high first g to move it. Andi just let it intersect with so back wall And so displaying is so she double click here because sometimes it gets to misuse. So just make sure you name your moles and we can also add them to collections are very right Click on empty space here New collection. Call it Oh, let's say environment. Andi at the floor had the back wall and now we have this environment that we can turn on. I'm gonna delete this light, so just selected. Now let's add a cylinder to start with our basic shift a mesh cylinder and I want to make sure that my cylinder so that's to control F. I want to make sure that I have some geometry here for when I do the devil's in a bit. So click on that cylinder than Capt. Phil Type changes to triangle fan. That's point. So tab into edit mode and let's scale on the said So s and set Jeez it up on this. Make it closer to go floor. Now I want to scare a bit more without touching visit. So if I do s and then shifts that it will scale it on all the axes except set So will scale on the X and y so s then shift said. And move your mouse that escaped on. Now let's click on these the edge mood. If I all click on an edge, it will select the loop. Then I will shift and then click on the other opposite edge. And that was like these two loops Now control be to bevel and I can with my mom's So Susan of my mouse. I will see the level. If I rotate my wheel up, I will get more detail in the Bengals. So this simple, too high, maybe two or three on make it small. If you want to be more precise, you can press shift while you're moving, and that will move in smaller increments. So this is good. Now control have to see what it looks like. That looks good. So right. We want to click on it, right click and shaded smooth. But also I want to make sure that this stays flat and it doesn't try to suit to blend with the with the other edges. So if I kick here on the object that our properties, I go to normals and I say what awesome And I didn't see a lot of change, but that should fix it if there was any problems. Now I want to add the subdivision surface mortar fire to make it smoother old around. So kick on the modifiers here at the modifier, then subdivision surface and let's keep it to default because it renders with two subdivisions. But the view port is set to one on Lee just so our view Portis Faster. Now I want to duplicate this. So shifty, then, is it? I'm moving it up now. I want to scale it down, but I want to do it inside the edit mode. So time eight, select everything s and then scale it down. And actually let's keep it the same height. So shift said and scale it down. So I'm only scaling on the X and the Y without affecting visit. So let's do this. That's about right. We will change if we have to change the scales of all these once we set up to see. Now let's go And, uh, with ease in a new collection called Geometry on. So, like those two cylinders and put them here, um, I let's turn off the geometry for a minute and let's shift a to add a plane. So now I want to draw the arcs. We can also during off the environment just to see here, uh, start with an empty plane. So shift a at the plain tap into edit mode. Let's go to the Vertex selection. Um, so, like those two g extreme with them down something like that. And how I want to bevel the Vergis ease and not the edges like we did before. So this work it for that is control shift be or command ship. If you're on a Mac or you can right click on level Virgie's so soon as I move my mouse, uh, they will start beveling and coming closer to each other. So what we want is we want to these We want to move these so that these two overseas almost touch and it's OK if they give this artifact because we're gonna weld them in a minute. So make sure they come as close as you can teach other on. Move your mouse wheel up until you get a smoother, uh, curvature. We will not be adding a service, a subdivision surface modifier to that later. So let's make sure we have it as a so we can click. And those two verses that we see here we can will them together by selecting them and right click merger it sees at center. And now they're one. So now I want to give this some thickness. So, uh, let's stay in the top in the edit mode. Go to the polygon eight to select everything be to extrude Andi just a bit. Where the thickness of your desire. Um, now, Dr Exit this. Let's rotate. It's our why 90 degrees Move it up, G said, But more, she said, Uh, okay, so now I actually want to go back into edit mode on select these Vertu sees these edges old click, and then shift off click on this edge and that will select the whole group on the two sides . And if I press control, be again or command be on the Mac and I move my mouse wild pressing shift. So move slowly and let's but less with my mouse wheel. But less segments there. So and that should work. Fine. Okay, click on it. Uh, right click shapes. Um, on if you have any artefacts, make sure that you go here and said the normals to autos, so Okay, you can see here to extend ege. Okay, let's turn everything back on again. And all this are now g andi x two Put it back. Move it a bit to the side. Maybe scale it or let's deal with that later. So g and why I moved to the side now shift d why I moved to this side so shifty to duplicated. Why? To move it on the Y axis now G extra. Move it a bit to the front and let's going to edit moments of time. Eight. Select everything and then I want to scale it down a bit so that it's smaller than the other one on G. Said, Let's do this cheese at on. That should work nicely. Uh, it's proficient back a bit. Okay, let's get this for now. Now I will create the triangle shape, so shift a mesh plane par. Why 90 g set and G x g to move it. Now, if I pressed ob to go into edit mode, I can select my vertex and move it on the screen anyway, I see fit. So, like the very Tex move it, I'm gonna hide the bottom behind this from the commerce perspective. And let's do that. So something like that doesn't have to be your final shape. Because once we set up the camera, you will be changing everything again. So this works for now. Now, uh, kick on the polygon mode. Eight. Select everything he to extrude unless extrude it to the same of cigarettes become, it says before Andi. Let's bevel the edges. So if I said like this face and this face this time control be Andi was slightly It still have said things from four so patchwork. He could also bevel the these edges. If do you think we're going to see them? So it's just a matter off on the edge year. It's like this edge all selected. Then we're not going to see those. So just those two. So all shift also like the other edge. And now control be again and this slightly on. Then you have a small wrong trace. Another thing we want to add is the frame. So that also comes from simple brains of shift a mesh plane again, or why 19 with it up G and move it. Now I want to add wife frame using the mortar fire. So get on the modifiers at wife rain and that should give me like a border. Let's get foundry on, make it slightly thicker than apply this. Now we cannot change it. Eso If you had to change it, just make sure you have the right thickness or you can do controls that and just change it and apply. Now I happen to edit moat and let's select everything A and then control B two level all the edges. So control be. And now I remove my mouse on. Remember to press shift so it doesn't move that far out on Just do it slightly. And this will help it also catch better reflections when you go into liking. So now we wanna place this in the back so g x cheap. All right, so I want to rotate this to make the illusion that it's coming behind this, but also in front of it on this side. So first, let's rotate it on the X through this Andi. Now let's rotate it on the Why so something like that. So from this side, it will look, let's make it smaller. So scale it slightly. Andi, rotate on the X. We can. Andi. Yes, we will have something similar to that G. Why? I'm gonna move this here, then I'm gonna of this pound of it. So that's per said then she Why on also you can place it anywhere you want? Uh, are X. Just make sure that wherever it it's looking unrealistic like here. Just make sure from the camera perspective, explain. So I'm gonna take this back on Notion X, so Yeah, it seems like it might work. We might change this later on, depending on our camera here. Andi. Last thing. I want Addis those three spheres. So shift a, um you re sphere as to scale it g to move it. Right click Chaisson. Andi. It's just duplicated three times and then we'll worry about placing them a bit later.
3. Camera and Layout: Okay, so let's pick up where we left off. Uh, I want to set up the camera, and I already have one here, so I don't need to create a new one. If I click on this button here, it will take me to the camera. If you point now, a cool trick that I like to use is to look my view port movement to my camera so that I can move my view port around and fixed the camera at the same time. So and that helps if you don't have a numb pad. If you're using a laptop and you can't use the shortcuts like zero and other shortcuts in blender, so press end and you will get this transform menu, click on view and then lock camera to view. And now, when I'm moving, I'm moving the camera and not just I'm navigating. So let's just try to get something almost straight on. Now, make sure to unlock it, because sometimes you really need to move around on. Do you would be changing your camera. So when you uncheck this, you will actually, uh, locked the camera to its place. So, uh, now I want to change the aspect ratio off my output image. Okay. I chose to have an image that is vertical. So depends on what you need. Let's here changed the X and y. So see, 1002 100 by 1006 100. Okay, so Okay, that works. Now I will click here. So my cameras selected in fact, like here on the camera properties, I'm going to change the focal length. And the higher this is, the straighter the lines in perspective are. And the lower this is the more fish I the comrades. So I want to set this to around 70 on that will make them straighter, but it will also zoom in. So now look camera to view again. And now zoom out. So okay, actually, in what we can also do is press G and then click once on your middle. Ah, well on your scroll wheel and then move the camera and you can move it slightly. So this works so you can also use the regular movement also, G said Well, actually move the camera as well. So let's consider this done. Andi unchecked this and now I'm well startling out everything based on this camera view. So the first thing we notice is that I need to make this longer. So tap into edit mode. I can select this edge on G X and move it. And now I can see that it works. Um, get this on for now just so I can move around whenever I need to. So I will take this slightly down and I won't take those two and scare them both up. So s and scare up now, G said, Actually, let's scare them less than this s scale of G. Zet. Two thumbs up, Andi. Let's move them. So why on G? Why? Let's just try to get them, uh, fit like that somehow. Now, this needs some more rotation on the Y guests who are? Why as to scale. Andi, let's just go here. She move it like that far. Why, Andi, if I click outside? Okay, that looks good. Now, Tab on, Select. He's here. Make sure we're on Vertex G. Okay, So, uh, we actually need to go into wife frame. So shift said and that way it will select the verses in the back as well. So let's try this. So just fixing. Okay? so she said again to go back to our regular mood and ah, that's good thes to be closer. So I wanna make this year scale it down. Andi, I think this may be here on this one around. Let's see here. Now let's disperse them in space. So G and X with this to the back are actually let's move to the front G said G x to the back and this one g x and competitive in the front so that they're not all in the same plane that scale this up a bit. And okay, that works. So, uh, I can actually go to the camera. Andi, I can use a future in lender called composition guides. So if you click on view port display and you can see the composition guys here on, that will give us some guides for our layout. Eso We can fix our objects based on the camera, so this is based on the Golden Triangle. I guess it's based on the golden ratio. You can get the center of your image thirds so you can turn these on Andi. Try to move them along these lines, and that will result in a more pleasing image. Theoretically. So let's say one of this along this line on this one is almost parallel to this. Maybe we can rotate it on the ex slightly and it up. Andi, maybe take this to fit. Maybe on this side, because if there's no, um, not really any science and doing and just trying to base my models on these lines. But obviously you don't have to, so this looks good. It seems, uh, let's go back to the camera and turn 2/3 off. Let's see what else we can do here. Maybe this whose hair on this one tab shifts it. Andi, it's maybe try something. It's parallel to this war. Maybe let these be hidden away. Okay, I'm gonna call that done. She said to go back on and, uh, make sure you turn off your guides again. Andi. Yeah. Okay. So that kind of works
4. Lighting: Okay, so now that I set up my camera and layout of my objects, I want to start lighting it. So in order to, uh, you to see the effect of the lights on my objects and to go here and click on view porch eating mood on that will take us to a version of TV. And if you happen to get these artifacts that keep happening on my machine, you can just go to the render engine, make sure it's TV, And then if you turn on screen space reflections, that usually fixes it. Okay, and now it's start because I don't have any lights. So, um, and I'll be actually using cycles to render this out. But ive eased Orender engine that is used here for the view porch eating. So, Aiken, go to cycles here. Andi, I also get evey run. Uh, first thing we can see is that, uh, lender ships with this default, it's your eye image that we can rotate around Andi. So this is to fix the shading. It will give you a default light so ah can change the strength, the rotation and enable the background. But I don't really want that. So let's turn on the scene lights and the seen world and to change the seen world. Now it's set into for to a great color. So if we click work properties, we can see the color. Here we can see the strength off the world color. And there is basically acting looker spent. I'm gonna leave it like this for a minute, and then we'll deal with that later. So first thing I want to do is add a light so shift day and point light on G to move it around. So I wanna use sort of a three point lighting system, not the conventional one, but light from this side. There is strong light that is less strong from decide to complement Andi, remove some of the shadows and then, ah, top light top down light to eliminate as much as I can from the rest of the sea. So actually want this to be an area light. So even if I created the point light, I can flick on the light properties year and click area and that will make it in area light . We can see the size. Here is 0.25 meters so I can click here on you can see as I drag it. It's changing the size. So let's do around two meters. Andi Aiken use rotation. So are and then extra rotated. But I ought can also use this little dot here on then try to move it to the center. So this will be the center of my scene. So everything will be focusing around this cause this can be used later as a placeholder or like a studio lighting set up for some other moves that you have. So this is one, uh, let's increase the power. Let's say to 200 Andi, it's good the camera view and make sure so we don't want this line here, so let's select our light G. And no, I just selected Marie back. So, like the light here g on moving back until we do not see anything inside the image. Okay, so now I want to duplicate it to the other side. Sir. Shifty on Gets duplicated here. Now grab this yellow dot on point it around here now, I wanted to come a bit from the front, so g move it on drugs to the center and I want this to be, uh, less powerful. So let's start with 100. So this is half on day one last one that will be coming from the tops of shifty. But it's somewhere here and then track. This Andi was actually above everything on drag to the center. So let's see what that looks like in our scene. Andi, if we don't like the shadows, for example, let's say we want a softer shadows beside. So if we see each light separately, the slight is coming from the right side is giving these shadows. Now this side is giving this strong shadows. So if you want less of a shadow, we can get the light to be more from the front. So stewed this then that on this should give us a softer china. Also, the bigger the light, the softer the shadow. So if I increase the size of this, the shadows will spread more. Okay, so Andi, special work. And now let's see what our top flight is doing. It's eliminating the back mainly on If I wanted to eliminate a bit more, I can just make it slightly bigger, move it around on, maybe increased the power like 1 25 on when I turned everything on, which could should get something like this. So this is our main lighting. One thing I also would like to do to get a more realistic approach, uh, is turn on the depth of field, and that happens in the commerce. So if I go to camera Andi, I go to, uh that the field year, turn it on on my focus object will be this cylinder. So whatever my camera is, it will focus on this one on the smaller the F stop number is, the higher the focus will be. So you will get a very shallow that the field on. If this is high much like the rial camera, you will get less step the field. So to stay realistic. This is sort of a human size seen, so we shouldn't be seeing a lot of depth of field in the background, but we can increase this slightly for artistic purposes. Let's say 0.8 and yeah, this should make things slightly blurry in the background. Andi will just help with a bit of realism, so we're gonna go slightly door 0.7. Okay? Andi, that concludes our lighting process. If you want to see the image without all these, uh, helpers, you can just click on the gizmos here on on the overlays and that will clean up everything . Actually, the business are outside.
5. Colors and Materials: this. Listen, I want to start adding my materials and my colors to my scene, and I added my lights here to a collection in case I need to turn off all the lights at the same time so you can tidy this up as you see fit. Now, if I click on the top left corner on when I see that cross, I can click and drag to the right and that will split it. Ah, in the middle on click on the editor type on select Shader editor And now here I consume into half a better view of my camera Click end to close this up and let's click. And here as well. Now I also want to go to the bottom left corner of this window and drag up so I can get an image editor here. So click also again on the editor type and click Image editor. Now, for my colors, I'm using this website. You can pick your own colors, or you can choose color palettes from online websites. So color hunt that CEO will give us a selection off some trendy color palettes, and, uh, these are based on color theory and they're supposed to look good together. So when you pick one, just click on it. And then with this button, you can download the PNG to your computer. So I have a folder already here with a couple of color palace that I've tested. So inside blender, click on open in this image editor and then go to your textures folder. So go to the folder where you downloaded this and make sure you have thumbnails enabled here so that you can see which one you want. Andi double click on the one you need. So now I have my colors and my scene is showing here. Let's start adding new materials, so let's start with the floor. So I want to during this on again on Let's turn off the lights for a minute. So I have my floor selected. I can click on you and call this floor. Andi, this is our material, basically, and it has all these properties, so one is based color. We're going to use the metallic nous later on for the balls. Andi roughness decides what is glossy and what is rough. So one roughness is perfectly rough, and zero roughness is perfectly glossy. And then we are also going to use normal to bump up some details later on. So if I click on the base color, which is white, and I click on this color picker, I can go and select this purple stint here on. Let's turn on the lights and make sure we are in the view port changing so we can see this . And now we can see it. Um, if you don't want to see the lights, you can either click on this button. Andi, Actually, we can just turn off the whole thing. Now, uh, I'm gonna give the same color to my back wall, but I don't want it to be the same material because it's gonna have different values in the textures later on. So let's click on the wall and in here I can click Instead of clicking on you, I can click on this world icon and click the floor again. But once the florist selected this, it assigned the floor here. I can select on the number here Andi, that will create a new material called Floor 01 So that's basically copying the same material, and I'm gonna call it back wall, so we have the floor and the back wall. Now let's click on this cylinder here on Click New on and let's just call it Caller one on . Let's Big One of the colors here. So I will big this, um Fouchier color. Andi. I will also sign the same color 1 to 1 of my other objects in the scene. So this arc, So click on the Ark and then click on the world ball on select color one. So now we have those two assigned to this. Now my third color click on this one again. New call it. I called her to Andi, thick the third color here, and let's assign the same color. Do this cylinder now. So click on the cylinder and then here select color through. We are left with the last color. So the way I like to use this is the most dominant color is the 1st 1 the biggest one. So that's why I'm giving the main mood of the scene would be the purple here, and then you can split those three and probably the last one has to be the least in the scenes. I'm only giving it to the strangle. So select this one, you and call it color three on Let's big this color. Now for the balls and this frame, I want a metallic color. So let's create a new material. So select one of the balls. New material. Call it meto We can select the same corner as the off white before, but I want to make it slightly bit more yellowish. So I'm gonna drag this here. Andi. Now I want to raise the metallic nous of this. And as you can see when I change it, it's getting more metallic e and reflective. So I don't want to drag it right to the end just a bit more. And then I want to take the roughness slightly down and you can see those. Are our lights reflected here? I will have some variation in my sphere later on, so it will break these perfect reflections. Um, so just use any color for now. Andi, actually do it a bit more rough. And now just select the balls the other ones on and give them the metal Shader. So all of them, plus the frame here. So make sure the frame is selected to see your selection, you probably need to turn this on again. So, um, metal Andi, let's turn this off to see And then we got our basic colors and materials are seen. I might make this a bit more towards the orange, so it fits with the mood of the scene. And, uh, that's it for now. In the next listen, we will start adding some textures to have some surface imperfections.
6. Textures: All right, so now that I have my material set up, I want to add some textures to add some perfections to these surfaces. So in my shader editor, I press shift A and search for Musgrave texture, and that is just ah, generated noise, Dexter. And in order to, uh, get this to be mapped correctly on the surfaces, I, uh, can press on control t or command t on a Mac. And that is because we enabled the no drank blur here before. So make sure the Wrangler is enabled to be able to use these shortcuts, and that will basically Adam mapping notes. So I want to just change this from generated two objects. So just drag object to vector. And in order to see this, uh, effect of this on the surface, I can control, shift and click on the Musgrave texture, and that will show me what this texture looks like. And basically, when I connect this black and white ah, not map to the roughness, for example. Everything that is white will be one. So that will be very rough. And everything that is black will be, ah, super glossy. So let's change the scale a bit, so let's go to the camera viewpoint on bond. Just change this the way we want. Add in some details, lest I mentioned So we get this irregularity. Andi, let's connect this to the roughness and see what it looks like. So if I control shift or command shift on a Mac and press on the principle be SDF, we can see the effect it's having. So it's very glossy when it's black and it's very rough on its way, so I actually do not want them to be that extreme. So I need to map this black and white image. I need to map it to a grayish version off it so I can add a colder rams, a shift A and at Calder Ram on Bliss added between the factor off the Musgrave texture and the roughness. So control shift and press on the color ramp. Now I can click here and change the black to gray and then change the white to, ah, light gray so that they come a bit closer to each other and let's get them actually, to be closer to each other and to see the effect of this again control shift or command shift on the mark on the principle be SDF. And now we can play with these textures and see the effect they're having immediately. Okay, so if I feel that this is too, uh, reflective, then the black part of my ramp needs to go slightly whiter, so just make it a bit lighter. And as you can see, if I go really right, then it's coming back to a Matt surface. So I just want something that is still reflective, but not too much. Andi. Yeah, let's make this whiter so we can have this difference here. Now I can add also to this Musgrave texture, I can also add another noise sector and combined them together. So if I shift in A and search for a noise Dexter, let's get the same map ings from the vector here and added to defector control shift or command shift click to see what it looks like. So I want to combine this with this before I feed it into the corner around. So the way to do this is to add the mixed note. So shift a and add a makes note. So mix RGB on I will connect the output of the must restructure to the first quarter and the output off the noise sexual to the second quarter. And I will set the mix, uh, setting to value. And then this mixed color. I will add it to the ramp. So let's see what this gave us. So if I control shift on the value, this is what they look like mix. So this is 0% mixed. This is 100%. Thanks. So all you will see is the noise sexual. I want something slightly less so. I want a nice texture to be affected more than the Musgrave. So around 0.8, Andi, let's see what the color ramp looks like now and what the principal be SDF looks like. So, as you can see, it's slightly in perfect. But it's not that extreme. If I can always come back here and give it a bit of a darker material so we can get these types of, uh, looks now, I want to use the same. Let's move these slightly to the left. I want to use the same texture. So from the output of this value, I would have converted into a bump notes. So if I shift a and add bump, I can take the scholar and add this to the height, for example, and connect the normal, which is the output of the bump to the normal off my texture and that will give us the bump and it will be very rough. It will be very strong orginally so let's take this strength and lower it as much as we need. So remember, if you press shift, if you hold shift while you're moving, you can move it in smaller increments. So I'll just need a bit of bump just to give it some imperfection so around that should work. I feel that this is too glossy, so I'm gonna take it a bit back here. Okay, So that concept will be applied to all of the other materials. And the easiest way to do this is to take all these notes here, copy them so control. See Andi click on another US object at based him, so again connect the color to the roughness. So this is for the back wall and connect the bump to the normal. Andi, if we see this that like this is not very doesn't look great because the angle of the wall is scotching, more light. So I want this to be much less so Let's 2.1 here and let's make these slightly lighter in color so that they're more rough and we don't see a lot of these bumps. So something like that, you could also change the scale of the noise and off the Musgrave texture. So it it all depends on what you want. So I will now speed up the video and I will just copy all these the same way. I I did hear and copy all these to all the other textures. Andi, I will see you after them. Okay? And like that, I just added the same notes and connected them to the roughness and the normal value of each material. The only difference is that I changed these two colors and for the spheres only. I changed the scales off the noise texture in the Musgrave texture. And remember, every time you want to see what it looks like, you can control, shift and click on each Dexter to see what it looks like.
7. Rendering: Okay, so now that I've got everything set up, I want to fix it in the rendering in the final rendering. So first, let's grab this and connected here so that we can remove this image editor that we don't need anymore. And let's make sure that our render engine is cycles. So when we moved to cycles, we can see that it's a different render engine. So it's actually reflecting some certain things differently than what we had here in TV. And in order to have a quicker result or quicker feedback, I can select abortion off my scene and render only that. So if I control be or command be, I can get this on. I can draw a region here, and that should render only that region. So I want to have a bigger light casting on the sphere from the side. So if I go to three D view port and turn on my annotations, I can take this light, Andi, move it a bit further and scale it up and let's make sure it's pointing again to the center . So I just like to have it. Ah, more reflective and wider. And let's move this to that side. Andi, make sure it's pointing towards similar Oh, I also want to fix this light. Just move it slightly like that, Andi scale it with s. So again, let it point here. So let's drag region above the floor so controlled B and drag above the floor. And let's see if we can fix anything here. So click on the floor. Make sure we go back to the shader Editor. Andi, I just want to have these a bit less pronounced on increase the bump of it. So, as you can see here, so controlled be Andi, yet that looks fine. So this is mainly what we can do in the in the render settings. So actually want this to be less lit here. So go back to my with the view port on. Let's move this even further. And that should give us a darker spot on this site. Okay, so now we can take this to the composite er, So in order to do this, uh, first, I want to add a Denoix zing, uh, data so that I can de noise. If my image, my family image is noisy, there's a way to denies it. So if I click here on the layer properties, I can click on denies in data. Andi, just leave everything to default. Surrender is 1 28 samples that should work for us. And once we got that, I can click render to see my my first render. So if I click, render and render image it will start rendering Andi Let's wait for all of it to finish Andi. Then I'll show you what we can do in the compositing. Okay, so our image finished rendering. Now, let's just minimize this and go to the compositing camp. So in the composing top, this is basically it will act like on image editor like photo shop. I just want to, uh, fix the colors in it a bit Onda at the noise in data and that's it. So use nodes will use the last render that I had and it will send it to composite. So I want to add the viewer. So shift a viewer Andi, connect. Ah, the image to the viewer stood us so we can see what we're doing. Andi, When I click on the viewer, I can move this so and if I click here on view, a consuming out of it by decreasing this number. So just move it to the side. Now, if you notice here we have these Denoix zing data so that we can denies our image. So shift a and add a d noise er so d noise. And let's connect the noisy image to the image the d noisy, normal to the normal on the noisy albedo to the army toe. Andi, track this industry, the viewer. And now it would be calculating here. Andi, if you had any noise in your image that should fix it. Now all I want to do is add an RGB curve which is basically like a level just to increase the brightness in our image. So just search for RGB curves and added in between the viewer and the noise click on film like Andi. Let's just add a point here on the point here. This will let me increase the highlights, so drag it slightly upwards and I want to also decrease the black, so make the shadows stronger and drag this down. So this is like a small sleight s curve and that's it. So you can basically here that's that what you think might work better for your image on bond. Um, just making this slightly brighter. Wait for it to finish calculating, and then you will get your image. So now if I go back to my, uh, renders perfectly Grender and if you render, it should update with the new image, because here it's set to composite. So whatever, I changed their it should update here. Andi, that's it that you have your final image. Now you can click on image and save as just choose where you want to save it and call it. Ah, whatever you want on the format, keep it to PNG. You can keep everything to default If you want on, save the image and that's it. You have your image. Now, in the final video, I will show you guys how to add a bit more details and how to use this as ah, studio for your own models.
8. Extra Tips #1: So now that we've finished our scene, let me show you how we can import on external three D model Andi added to our scene, so I'll be using a model that I downloaded from this website. Three d scans dot com Andi, this is a website that gives you free three D scans off sculptures and whatnot. So I just downloaded one of thes I clicked on it. Andi, you just click download scan on that file should be downloaded in really high quality to your computer. So first thing we do is important. So file import on the extension Here is s steel. Go to the folder where you don't know what your file on and import the STL file on bond. Once you click on import, let's wait for it to load Now, once it has loaded, we noticed that we cannot see it in our scene. And that's because if we look up, it's ah huge, and it's far from the center of the scene. And this problem, you might have it with any model that you don't from the Internet. So let's fix that click here on the three d model in the outline. Er And then we can press console on our keyboard and then view selected, or you can just press console and the number three So first thing we need to do is to get the pivot off the model to the center of it. So if we click on the move, But in here we can see that the pivot is way further than where the model is. So should click here on object set origin and we can say origin to geometry. And that should make our pivot point in the middle of our geometry. Ah, second, I want to skate it down. So s on. Let's scale it down to around to your point 099 Let's start with this and then we'll see where we can take it. And now, since we have this year open, you can just press end to open it and click on item and let's set all these zeros so there s so it goes to the center of the scene. So Zeron X, Y and Zed and that should bring it to the center of our seen again. Let's do console and three, and that should zoom in on our selection we noticed that this still needs to scale down further, so s and scale it down a bit more. Now, if I press on X here, I can place this easily So you can either do it with the move toe or we can do it the same way we did it before, uh, Far Zet and rotated to face the camera. And I wanna skilled a bit more so s and skill. And then g zed to move it up on the set. Access I want also push this down slightly so something like that. And now we can add a shader to this. So if I go to my shader editor, click New Onda, we have a very basic shader. So let's call it culture. And let's copy the the textures that we've done before just so we can give it a bit of irregularity. So command, see or control, see, to copy and then go back to our bust and based connect the color around to the roughness and the bump too the normal so normal to normal. Andi, If I control shift and click on the Musgrave texture, I will notice that it's really small and That is because Blender is still seeing this model as this huge model that came in originally. So we need to apply the scale that we've done. And if we press in here, we can see that our model is 0.0 12 in terms of scale. So if I do control a or command a while having this selected, I can apply each of the properties. So let's apply old transformation on this fixed our texture on set the scale back to one so end to exit this. Andi. Let's see how we can shape this the way we want. I just want a bit of variation and then control shift, click on the noise texture and make it slightly smaller. And this is the mix of those two. Now let's go and see what it looks like on the actual model. Okay, it looks good. Let's increase that bump slightly. So just a bit now we have our models set up in the middle, and it's catching all the lights from the scene. Now, of course, if you want to have more or less reflection, we can change the color ramp, or we can also add the gamma node, which basically gives more or less contrast to our image. So if I control shift on the Gamma or through what that does, if I increase it, it will be darker. That means more reflective, and if I decrease, it will be rougher. So if wanted to be slightly more reflective, let's just put the governor to 1.5, and this will make our our sculpture reflective. But I actually I want to make it less rough, so I want to 0.85 and that's work for me. Another thing that we can do here is eyes copying the scene to test out different colors. So instead of saving the blender, file Andi testing out new colors on another file, we can do this all inside the same file. So what I can do is let me first get the image editor again. So drag this up and then image editor, and this is this the color palette we had before. So what I can do now is go to the scene here on top and click on this button, and I want a full copy, so I will copy everything. And now if you notice we have seen and seen 01 So this scene zeros here one, and all of these are named accordingly, is a copy of the older seen. So what I can do here is a contest, another color palette. So let's open this image. And now easily, I can click on the model in the view port and then click here color, pick it and just change the colors. And I want to make my metal shader slightly more silvery so but more to the white or bluish color on, and also an increase the bump on my Spheeris because I think they just look nicer that way . Okay, a bit more rough, so they're not like perfect tears Onda. We can also increase the darkness on this model so that there's contrast between the white in the background and the white on the sculpture. So let's just increase this. Maybe you can make it off white slightly, okay, and now you can just go click, render again and render the image and then save it, and everything that you've done before with the compositing applies. And that is how you can just change and switch between scenes and colors. So I hope you found this tutorial helpful. And I can't wait to see what you guys come up with. Thank you for watching.
9. Extra Tips #2: Hello. So in this extra lesson, I will show you how to optimize the scene for a smaller file size on a faster render and also how to improve the lighting using its your eyes. So let's get started. First thing I want to do is check this sculpture model that I got. So if I do control F if you remember, we added that shortcut in in the previous lessons. Or you can go here and then click on Wife Ring. You can see how dense this sculpture is, and it's it's because it's photos can't it has. If you look down here, it has a 1,000,006 100,000 verdicts. So what I would like to do is to get it to be much less so in the modifier tab, I can add a decimate modifier, and depending on your computer, this will take a long time to calculate because it's doing heavy processing. So one is 100% of this ratio, so I will do 0.5 That is 5% of this and I press enter, and now I have to wait for a bit until it does the calculation. So once this is done, you can see that it went from a 1,000,006 100,000 to only 84 1000 Vertex. And if I press control f, we can see that that is it didn't change our sculpture too much. It just reduced the Taliban's so I can apply now and be careful when you apply. You cannot go back. So make sure you have other files saved with sculpture Or, uh, just make sure this is the only modification you need to do. So I apply this which will which will also take some time now, after I applied this. This has become only 85,000. And if I save my file now, so I'm gonna save it as the eight. And I just would like to show you something here. Uh, V seven was 400,000. Uh, polygons V eight is only half of this because if you remember, we still have in scene in the original scene, we still have the same the same sculpture. So if you actually only had one scene and you reduce this, your file size will go back to around two or three megabytes per scene, which is great if you wanna send your file uploaded? Sending someone else so right. Click on this and shape soon. Now I want to go back to the render. Did this. Okay, now it's working. So this was flat. Now it's smoother. Uh, now, by clicking on this, I also want to increase the subsurface, uh, scattering on the sculpture, and this will give it a more waxy look. So if I increase this to the end, we can see now the lights will affect the model differently, as if it has translucency in it. So I don't want it to be that strong. It's only to give a small effects around point one between 0.1 point two, maybe even less so just 20.1, So just will give it thes read details, and you can change the color off the subsurface here, uh, to get a different result. I'm just gonna keep everything to default. Let me just put this 2.1. Now, um, I want to add innate your eye and it Your eyes are high dynamic range images that are photographs that are taken in real life it through different exposures, and that will make it usable in three d as in light case of the image will act as the light . And we have seen this before here. So if I click here, we can see that we have an image lighting in the background. So if I prove the blur, I have this image often interior of a room that is lighting. So if I remove all my lights and I go to the camera what slighting my scene here is only the HR I image so I can rotate it on. I can increase its strength. Okay, so sometimes this is used alone and sometimes it's used in conjunction with three D lights . But what this does it only gives you a lighting inside the view port when I actually go and render this this will not render out. And we need to do this from somewhere else. So let me go back to seeing world, which was if you remember here the color was grey. So this is what the seen world is. And I turned the lights on here in our shader of you I can go. Instead of clicking on objects, I can go to world up the world, just the world on. And here I have this scholar plugged into the surface off the world output, which is lighting with this great color. If I increase this or decrease it or even change the color, this will affect what the environment color is in addition to what our lights here are. So I want to get an HR image and the best website do get images from Is it your I haven. So if you go to this, you can download for free Uh, any type of interior or exterior that you would like. I think I downloaded the studio one I just found with the first image here. So choose any image you would like to have affect your scene. Andi. Once you click on it, it will take you to a different file formats or file sizes. So I think the two K is enough. So I downloaded this already. No. Shift a and add an image. Dexter, on open the image. You just downloaded the HR I image. So I put it in Dexter's for those studio open image. So I have it here. Ah, I want to set it this fear and connected to the color on let me just turn the lights off so we can see what's happening. So right now, it's still not affecting this properly. So if we have the node Wrangler enabled, you can press control T or command t on. Just remember to enable it from here. So no drank blur in the Adams and just take the check box. Andi, I would like to said this to object on, and now we have this interior around our scene. Onda, we don't have any lights here, okay? All the lights is coming from are coming from the HR I image so I can use No, sorry, not the location. I can use the zed rotation. And if you notice the spheres, I'm drivel taking the image around. And I'm giving changing the lighting basically around my scene. So I would like to have this to be on really low strength. So let's rise your appoint one. Because I only wanted to add the missing gaps in my scene because I already have lights. I just wanted to improve the reflections and improve my lighting. So let me turn the lighting on on. If this was zero, there's nothing. This is one this is fully at your eye, plus our lights. I want to blend between those two. So I think the value of your 0.1 works well. And now you can just rotate this to see how it's gonna affect my scene and what it's the best position for my image. So I want to make sure that it doesn't really give a lot of bad reflections or details on the background. On the same time, I wanted to be giving interesting reflections on the spheres. So let's do that, Andi, let's go to the lights on. And so these are my lights. This might your eye image alone says my dot light, which I'm gonna increase a bit. So 1 50 What on this one is the light coming from the left side, which I want to decrease, So I have more contrast. So I wanted to be darker from the side and brighter on this side 75 then this one lets just keep it the way it is, or maybe increase it a bit so to 20. And you can tweak this to your liking. But the main point is to get more details in your lights so that you're seeing looks even more realistic. I will also try to go back here to object on increase some of the details, even normal and maybe here, if more contrast on and lend more between the most grave Dexter that we've done and the noise texture. Just so we get different variations. Andi, that should do it. So now you need to make sure that it's looking good in cycles because remember, this is not the real render. This is TV, so if I go to cycles, this will take more time surrender. So especially because you have the subsurface scatter and the at your eye, so this will take more time. But let's make sure this is not overpowering our lightings or 0.8 maybe. And once you're happy with this, just make sure you go back and do a full render from here. So render image wait for image to finish on, and we should be doing, and that's it. Uh, you can now go ahead and save your image again on compared to what you had before with the improved lighting on the optimized team. Thank you guys for watching
 Rany Bechara, CG Artist