Transcripts
1. Introduction: Hi, guys. Welcome to my first ever skills checklist. I'm Emily Wasow for watercolor artist and educator based in the UK A lot of my work focuses on loose florals, and that's what we'll be covering today. We're going to be looking at six different brush strokes today, and for each one, we're going to look at how to paint to different flowers with technique. And then the final project will be a a loose level peace based on all of the things you've learned in the class. Learning these brush strokes really helped unlock loose florals for May I use them in my work every day. This isn't a class focused on teaching. You have pain specific flowers, but im how to master the techniques of loose morals so that you can use them to pay any type of flower you want. Don't forget to show your final piece of the end. You could put it into skill sharing to the Project section, where you composed toe on instagram and tackling. I'd love to see what you create. Alright, that's enough introduction. Let's get painting
2. Supplies You'll Need: All right, guys, before we get started, I just wanted to talk to you about supplies. So we're gonna need three main supplies for this paper paint and brushes. Now I'm using two different types of paper, so I have this cast art watercolor paper. It's £140 cold pressed. It's just a nice practice. Paper is great for practicing strokes. The cold press texture means that it's good for loose floral kind of bleeds on, allowing the paints to kind of mix together on the paper. Um, for the final piece and any practice flowers, I'm using this, which is from daily Maroni. So again £140 cold press quite a nice paper. The main difference with this is that the paper is glued at the edges. I don't if you can see that there, but it just means that when you paint with something very wets like you do it loose florals in use at the paper doesn't buckle on and create pools of water because it's fixed at the edges. Now, if you don't have a block, you can just tape your paper down with some masking tape, and that should hold it in place, but this is what I'll be using for paint. We're gonna be using Windsor and Newton. So this is my custom pilot Issa. Cheap kind of plastic pilot I got off Amazon on and it's filled with Windsor and Newton paints. You can see it's really filthy, So I used the professional range of Windsor and Newton watercolor paints. I buy them in the tubes just because that's cheaper. And then I squeeze them out into the wells on the palate and let it dry. And then when I want to paint, I just come in with a brush in some water and kind of activate that color, mixing into the wells and the pallets and add lots of other colors as well to create a mix . You can see that I had never play on this palette. I like to leave old mixtures there. You can reactivate them with just a bit of water if you want to use them again. Uhm, I'm going quite like the plastic pallets. It's easy, it folds up and I conserve, take you with me. So this is what I will be using here. Then for the brushes, I will mostly be using my size five Princeton heritage Synthetic round brush. So main reason we're using round brushes is that they're like a two in one brush because they have a little pointed tip there that you can use for really fine lines. And then they have a wider body that could be used for thicker lines as well. I also have a size eight here just for thicker strokes. The other thing you will need for this lesson is two cups of water. I am using these glasses. The reason I have two cups is because I wash my brush off in this one when I have cold colors or cool colors like blues and greens on this cup, when I have warm colors. So your reds, your yellows, your pinks, etcetera. The main reason for this is that if you only have one cup of water that cools and the warms get all mixed together and they create a sort of muddy color, and then when you dip your brush in and you put it back on your paper, you start making kind of dull, muddy colors on the paper. Eso I find it helps to have two cups. If you don't have two cups available, you can use just one cup, but make sure to keep changing the water regular so it doesn't make the colors muddy. And then finally, what I'll be using is just some regular paper towels. So this is ideal for, um, Why thing your brush off if you want to get some of the water off it, or if you make a mistake on your paper and you want to pick it up, you can use the paper title and double the paper and remove it, and that's everything.
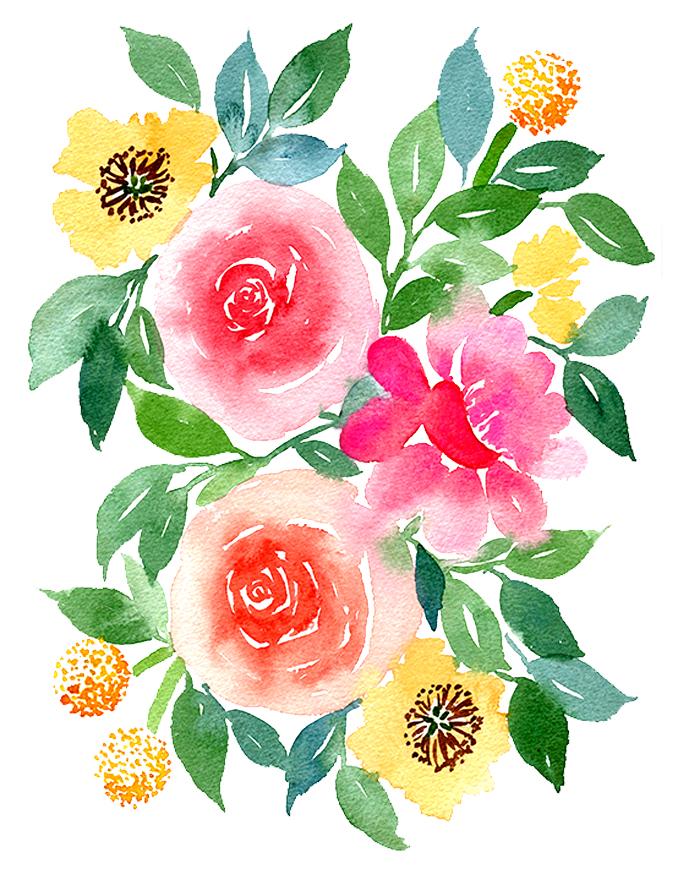
3. Bonus! My Top Tips: Okay, guys, before we get started, I just wanted to talk to you about some loose floral tips. Now a lot of people can struggle with loose florals. I think one of the main reasons for that is trying to capture too much detail on this is one of the pieces will be looking at later, but you can see how it's very low on detail. The point of loose florals is not to capture every single detail, every single part of the petal or every single part of the flower. It's simply to create a suggestion of the shape in loose free strokes without worrying about capturing every single detail. You know, the style is meant to be playful. So whenever you look a reference photos for loose florals, don't try and capture every single detail. Just do a loose suggestion of the component parts, and it will work so much better. Another tip is to focus on the shapes of flowers so you can see the overall shape Here is one that is a five petal with jagged edges, and so that's just the overall shape that we've used it to create. This, whereas if we look at something like a delphinium. The overall shape is one of a long, curved cone and then has little tiny details in there. So it's not every single petal. They're just loose strokes to capture the idea of it, but it's to focus on the shape of the flower rather than all of the details. Whenever you're looking at a flower to create a loose floral focus on really simplifying it and just choosing some of the parts to demonstrate, you don't need to put, you know there could be other flowers in hit. You could just take those out if they don't look right, or they start to look messy, simplified. Pick a few of the flowers you want to paint and just paint those. You don't need to paint everything. It's your painting. It doesn't need to be really life. Just simplify what you can see. Another really important aspect of this is to leave white space. Watercolor as a medium doesn't have a white. It doesn't allow you to add highlights back in. So it's really important when you're painting these florals to leave space white space in between things, so that it doesn't all start to melt together and create a bit of a mess. My top tip for painting loose florals is to really focus. On contrast is the one thing that lots of beginners forget about in their paintings, and often the results can be quite flat. So if we, for example, look it painting a quick flower here and it's all in the same cola, it's all in the same darkness value. It will look really flat, Um, and what happens is that it tends to, ah all turn into one sort, shapeless blob. Um, so the way around that is, do as you're painting, really focus on how you're going to create contrast. So start with one petal and then go back and allowed a darker color to it may be in the center and start creating that contrast at a much darker petal there, and you can already see how this is and allow the watercolor to make that contrast. For you allowed the Wellman technique to mean that the colors mix and blend and create. You know, areas of darker and lighter color create that contrast for you. You can also mixing other colors, you know, additive oranges. But to brown maybe orange, so that you can create contrast with different colors and different darkness is our values . All you need is to use more or less pigment or more or less water to create different effects, you know. And don't be afraid to go back in with darker pigment while it's still wet and drop some of it end. Let's see what happened. See what the effects are, focus on creating that level of contrast.
4. Dot Stroke: so the first straight we're going to do is a dark stroke, and this is going to be using just the very tip of your brush just pointed straight down. And then just tap the paper to make little dolls. You can go slowly and make little tiny light dots, or you can go quicker and make a regular dots. You can turn the brushes angle to make the point in different directions. You can go quickly or slowly to create whatever effect you want. It's a really simple stroke, but it's really great for creating texture like the center of flowers. Um, so practice that a few times on your sheet. Using the practice paper that we've got. Try varying the amount of water to see what happens so you can create much doc around the strokes like that, or dry a brush off on a paper towel and then create rougher, more textured strokes. So practices on your sheet of paper, and then we can start painting some flowers, so the first floor we're going to paint is across media eso. They have a textured surfaces you can see on a round shape. I'm going to use the different colors to create the illusion of the Rome shaped. So you're gonna need to mix up a yellow in a medium cola and take your brush and use the tip of it like we practiced and start tapping to create some dots. Move around in a round shape, try and vary the size of the dots to create a low contrast. Okay, then wash your brush off a little bit and come back in with a lighter tone to do the top part. Try and fill in some of the gaps. If you've got any little gaps in the okay, and then we're gonna makes a slightly darker Richard color and painting at the bottom to create the shadow here, I'm adding some dark yellow with the bottom to make it look around. All units need for the stem is a green color, and you can just pull it down, make sure it curves a little bit to make it looking natural and then add a little darker pigment on one edge. I think we'll make another little Chris treated by the side, so but with the yellow on the brush, you do this one a little bit lower make sure you're tapping down with the tip of your brush to stop building the shape out. Go back through the middle. If you see any that got a bit harsh edges, you want to smooth them out. Just go back through in top, some light of color in there at a little darker yeller to the bottom for shadow. If you notice that this is starting to look a bit separate, you can also go back and just move some of the darker colors up to smooth in the shadow line. There at a bit more to this one. Okay, we go. We can do the stem. Have a little darker color to the edge. There you go. That's your first flower done. The next fly we're going to paint with. This technique is in a still they, um, which has really delicate petals in an arc shaped, um, in a triangular shape. So we're going to mix up a pinky purple tone for this one. We're going to use the same dot technique with the tip of the brush. This time, we're going to make a sort of cone shape that arcs across the paper, so start again with the dots, you can go as quickly or slowly as you like. I sometimes like to go a little bit quicker. If I'm trying to get an irregular effect, stop building that shape up. I go at a bit more color who loved these flowers, and I love this effect. Just keep topping. You see it was starting to get a cone shape appearing. Now it's always important to make sure that when you're painting flowers, you use curves and arcs with them. If you have a look closely at a picture of a flower, you'll see that they very rarely have straight lines when the edges. So that looks a little too neat. So we're going to go make that a little more regular, especially underneath where the shadows are, having a little more purple now to get some shadows and can use some big adults as well to vary up the size and the texture especially larger around the base Dio, I'm gonna add a little pink to the lighter side. Mix up the colors a little, I'll have them to blend. That's one of the best things about watercolor lowering the cost of blend to make their own mixes on the paper. See, that looks a little too neat. It's gonna smudge my little some other dots going on the uses Light pink on the top edge you go. And then the stem is going to be the same thing. A little green, amusing sock green. Here there are Get up. They go. And then if you want, you can top it in through a little bit in the center and allow it to spread out. There you go. That's the second. So I was finished.
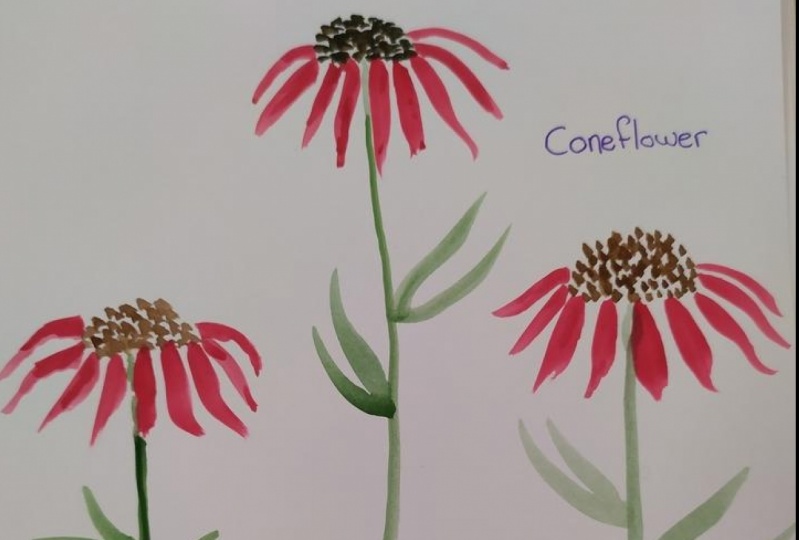
5. Single Stroke: So for a next stroke, we're going to practice the single stroke, which is going to use both the tip of the brush, the very end of the brush on the flat belly of the brush. So for this stroke, we go back to a practice sheet. We hold the brush it about a 45 degree angle, rest your hand on the paper, and then you put the tip of the brush down against the paper like that and then press down on pull and then lift up and come up to a point. Okay, I'm gonna load it with a bit more paint and do that again. But the tip of your brush on the paper press down cool and lift back up. So the idea is to go from one tip Oh, and then come back up to the tip very slowly. So if you start to get this happened, where you get a puddle at one end, you can go back and kind of move the paint around there so you don't get one end with a little poodle with hard edges. So once you've got the hang of this, keep practicing on your practice paper. and then we can try some variations so we can try doing a really long one. For example, put it down, pull and drag and then lift up. Or we can try doing really short ones tip and then back up. Do that again. Tip pulling dragon Lift back up quickly so you can see how this is really a useful straight when it comes to painting flower petals and leaves, as we'll see later on, Do you let the ones do you know the big one with the tip down? Press your brush down, pull along and then left back up straight in your brush back up is you left back up So you want to drag and then straighten the brush back up. You can also try them, for example, in different directions so you can pull this way with that way pulled down. So then you can start to see how you can create petals going in all directions. My practice that a few more times on the sheet and then we can start painting some flowers . So for our first fire, we're going to painted Daisy. These are some of my favorite fly was because they always look so happy. So we're going to start off with a brown mixture and paint a circle just for the center of the flower. Doesn't have to be perfect. It actually helps with florals if things aren't quite even, and then we're going to use the single stroke on pull outward. So starting at the center for the tip of your birth down press, pull out to create the petal. You go over again. There we go. We're gonna keep going with that. Just get a bit more color on the brush. And don't worry if, like that happens, the paint touches the center. That's okay. That's gonna create a nice effect. Pull back through. You just go around the center, pulling the petals out. Now, the trick to making these look natural is to very the size of the petal. So some of them were going to do longer ones. Some of them were going to do slightly shorter ones. Some of them are going to be thinner or thicker, depending on how hard you press the brush and that will make it look much more natural. You can see that's a nice thing around one just smooth that back through Guy was difficult for me to do it this angle. But you can see the intention if you get like here, where there's a little bit too much brown bleeding into that and you don't like it, simply want me brush off on a paper towel, smooth back through, and then you can fill him with some more yellow. If you've lifted too much paint off. If you want to push some of the Brownback through, you can also go and connected there so that it can start to bleed through. Hey, gonna create some nice effects. We're going to do the same thing for the stems. We're gonna take a little bit of green and just create a curved line. The most important thing with stems is to try and make sure that they aim towards the meat , the center of the flower, because that's where they would connect to the flower. You don't want to stem coming up over here or over there because it went like it's attached to the flower head. And then what we're going to do is take a bit more green and do the same stroke to create the leaves. going to put the tip of the brush down. Pull dry lift up. There we go. I will do the same thing on the other side. Tip, pull and drag and lift up. You can pull them in other directions as well. Pull that down the We're another one up here. So there is our first single stroke flower. So next we want to use the same technique to create a cone flower. So for this, we're going to do the brown in the sense, but going to use the dots technique that we learned in the last lesson. I said, take the tip of your brush, angle it down, and then are the dogs on to the paper and we're aiming for Sammy. Circle shape is going to create the little cone in the center. They would go rinse that off, and then this time I'm going to use some red, and then we're going to press the tip of the brush down near the center, on them pull and drag. There we go on the same thing here. We're just gonna put the petals underneath the cone. There we go. I'm just gonna turn the paper around. So that you can still see what I'm doing here. Sit down and then pull and drag and lift up. I'm again. Cool and dry as we get to the outside petals. Where you're gonna want to do is start curving them. I'm making them a bit thinner like that as they become the side petals. There we go. Discuss Made that back home. Maybe that shape, well touched center there. And then one last one over here. Use just a thin stroke put on drug. Okay from 10. That background. So you can see and then exactly the same thing. System a little green. Imagine it coming out from the center and then create the little stem that you can create some little leaves there as well. If you want, pull and drag. There you go. It's that lesson finished.
6. Split Stroke: Okay, so the next lesson is going to be split strokes. So this is essentially taking these single strokes here and combining them to create a double stroke. Use exactly the same technique. You put the tip of the brush down that we move this up a bit. You put the tip of the brush down and pull and drag. I left up again, as with a single stroke, and then you do exactly the same thing next to it and then meet at this top point. So pull and drag and then me to the top point. Smooth that back out. So the way to do this is to push to this side for that stroke and then pull towards the other side of meat at the top. So you're almost creating a little oval shape with a point of the end. So tip of the brush, pull and drag and push up to that side and then tip of the brush pulled down to the side and then meet back in the middle so you can do this where it leaves a little line in the middle, or you can do the same thing, but join them in the middle. OK, do that a couple more times Really slowly so you can see tip of the brush push on drug. Oh, back up and then we get a little more paint and then we use the tip of the brush. Pull and drag down on, then back up. And if you don't like the shape that you get left with, you can always go back through and just needing that up. Level it out. No, some variations. You can do this really long, Thin strokes. You can start down here, pull up to create a very long stroke. Just you stopped, if again. And then you could do the same on the other side. Pull it back through and also do the opposite and make this drugs very short. So more rounded. Needing that up, let me do another one of those so you can create short little petals or leaves. This is a great technique for leaves. Most of my leaves are done with this one. Okay, a couple more just to finish off. You can leave a gap in the middle like that one. So push round and then pull back and then start from the bottom point again. Bush around and pull back. Can you leave a little of white space in the middle? You can also leave jagged edges at the top. If you don't want your strokes to meet again at the top so you can push around and then stop and then push around and then stop. And so you end up with two tips, which is a nice effect. That's quite good with, um, things like sunflowers, which will show you later on in the lesson again. You can pull them up. You can create little flicks at the top, create jagged edges. Okay, let's get painting some flowers. Okay, so the first flower we're going to pay with this technique is a sunflower. Some flowers have nice big brown centers with lots of dots and details and then lovely rough yellow petals around the outside. And we're gonna use a short, rounded split stroke for this. Okay, so let's start with the center. Uhm, I'm going to sketch out the shape of it just so that I know roughly how big is going to be and then start filling that in with dots. We're gonna let some of the dots go over the line as well. Just to create a nice a regular effect. I'll speed this Pap. Okay. Once the centrist on, we're gonna pick up some yellow paint making nice watery wash of this so that we can get some good color bleeds. We're gonna start at the top, and we're gonna use the tip of the brush to connect, and then pull up the one side and then pull up the other and me. Okay, get a little more color and do that again. One side on the other side, on meat, so you can see we're making these a nice round shape. Get some nice bleeds going in there. Maybe a bit too much. Push that back in the come back for that later. Again. Try and connect the petals. Supplies have really dense, close battles, so it helps to try and connect them of it. Just gonna turn the paper round striking without getting my hand in the way of the camera so you can see what I'm doing. It helps to be able to practice doing these strokes in all directions, but there's nothing wrong with moving the paper. If you find it gives you a better angle again. You can see I'm adding color variations. So this here there are a few where the similar close. I'm going to go in with a really rich yellow. Now that's a nice variation. Don't worry if they're all different shapes, that's absolutely fine. The more irregular they are, the more naturally will look space for one little one in the Let them all bleed into each other. Consumers will go enough brown coming out here. It's gonna smudge that a little bit. Okay, very go. You can add some more, um, lines. If you want to think in a penny petals of Philip, any gaps on there as well? Otherwise we could move on to the stems and the leaves. So some flowers have a nice big thick stems we're gonna wet from the center down and then drawn. Nice fixed. I'm gonna come back up that side and even out. I like where is touched that petal that I'm not going toe mess with that of the yellow bleedin and then for the sunflower leaves, we're going to use the same techniques for the petals, but make them nice and big. So drew a little line so that the leaf doesn't start straight from the stem and then press around for one side, press room for the other side. Me to the top. Well, I'm gonna smooth that edge our little bit. That would go at a little yellow to the green if you want, Um, pull this leaf out, pull around on the one round, and then create a little tip. You know, close up that I don't like how that looks. Okay. There we have a some flour. Okay, so the next flower is going to be a little bit different, but using the same technique. So this is going to be a daily for this one. We're going to want a pink and purple mix again. Seven. When you got your dark color for the center, what we're going to do is create the strokes in a little star shaped for the middle. So very small split strokes here. It's all one, uh, a little on there. Pull them up to a little point, the and then another one there. Some guy washing brush off. Add a little bit more pink to the mixture. And they were going to do the same thing. We're going to do the strokes coming out from between these two petals. So start there simple out meat that Okay, We want to get slightly bigger and slightly lighter. As we move away from the center. I'm gonna fill in that gap medal. It's quite big. Do. It's not a little more pink again. And then come around to this side. There we go, then the last one here. Okay. Can you see the signs? Get some nice little bleeds in the Now we want to lighten up again, have a bit more pink and do exactly the same thing. And this time the petals are going to get even longer. Okay, hand another one. Ah, that's it. Stop mixing up. The color is a bit okay. They don't have to be perfectly in the gaps. Daily is a nice and Regula the guards touch better color in there. You see how it building this out? Just gonna turn paper round against that. You can see what I'm doing to make that bit more pointy. I'm feeling this guy with a little purple one. Okay? And then back in for one final layer. This is gonna need the lightest color, right to get plenty of water on your brush and then stop pulling out the biggest possibles . And we're just gonna go around These end petals should be almost touching. You have been more purple there. It's okay to use a few strokes to make the shape, especially if the angle isn't great for you. Go. Nice, big one. I'm just gonna fill in. I got that with a little cola. Had a bit more purple. There of color here. Nice light. One little tiny one there. I'm going to use this light color while I've got it on my brush to come and create some contrast down here. No g o at a bit more color. Just gonna turn this around little pink and they go spent more water that's quite dark. Smooth around. The more on that tip. Come back to that Not purple. Here. Go. And then what you need to do is have a look at the shape of its the Are there any bits that look a bit like that? Not very even. Um, And then we can use the last little stroke to kind of close those gaps. Feel free to go back in and drop some more color in any parts that you think could do with a bit of contrast and then want you happy with shape of it. And we could start adding the stems back to a green. Imagine it's coming out from the center, so we're going to join it the and then make sure to give it a better curve. You can actually leaves if you want to. The split stroke Mortars papers very dry at one more on the other side for balance. There you go.
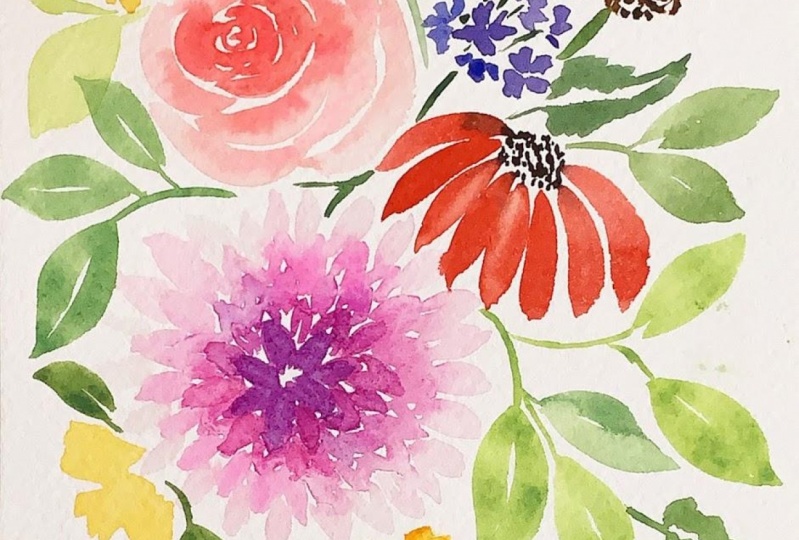
7. C-curve Stroke: All right, guys. Welcome back. Next, we're going to learn to paint, See strokes. So these are essentially brushstrokes in the curve shape of a See. Now I'm gonna be holding my brush. A kind of a 45 degree angle or a bit less. Just a rest my hand on the paper. And then we're going to touch the tip of the brush and pull it down around for a city you can create been ones or Thich ones. Me. Show you another angle. If I go over the top around to create an arc, can you see that? Okay. So try holding the brush of different angles so that you can create different shapes. Online sicknesses. You can create little thin ones. Well, you can create Thika ones or you can go really flat and start to create Really thinks tricks. Okay, so there were quite a few ways to do this. We can do these little tight ones like this or weaken dio much sina ones like that much longer ones. So you simply but the tip of your brush down and then push press down on left back up again . So it's like thesis. Ingle stroke but with a curve so you could make them more curved or straight off. As you prefer. You can dio tight curves. Will. Really takers bore straight, slight, curved lines like that on. The other thing you can do is make them really thick. So we touched on the tip that and then press pull, pull back up. This is a really good one. Petals. You see how we pull and then push back. You can pull the little tip in. You can try and make it really good. They go. Okay. Now we're gonna test these on some flowers. Okay? So the first flight we're going to do this with is a renown Kilis. So these flowers have lots of tightly packed battles, so I'm going to load up with a sick Red Cola and just use the very tip of the brush to start creating their seekers in the senator. All right, so we're going to imagine that we're looking straight on. It is ridiculous. So we start with the brush up, right, and we start creating little seekers. The You see that so you can keep the stroke quite short when they're in the center. That helps to hold the brush near the tip another, and so that you can control really tightly where it's going. And then you still ground strokes to create the center. All right, that looks nice and details. And then wash the brush off and tap it against the edge of your water cups that you can get a lighter value and then carry on around the center of that. Make sure to leave lots of white space between these strokes so they don't know blend into one. You can start to get thicker at this point. Do some crossover that's they don't look like rings. Keep it nice and irregular. Stop to press down a little bit more and get a little bit thicker. Hey, wash the brush off again and go for a really light value a little bit more, perhaps for the very edges that you go start to pull around. Okay, now we're gonna create on uneven edge so that they don't like to Perfect. We don't want that with flowers, and if you find that it's starting to get a bit the color stones get but say me, you can go back in with a darker cola and then just adds little bits that's creating nice effect. Smooth that round E g o just had a little bit darker. Color creates, um, shadows and mixtures again rents a little bit off if you think it's going. But duck, there we go. Okay. And then this one stem in the center so imagines coming out from the center and then pull it down. Helps to have a nice, bold green when you've got red flowers. So the nice complementary colors and then you can absolutely lives if you want to as well. You do that, Sam. Just using a sock green for this. Hello, Split stroke. That right? Perfect. Okay, The next fire we're going to paint with the sea stroke is a rose. You guys love first tutorials. It's one of my favorite flowers painting watercolor because it works really well with the wet on wet technique. So going to use a similar processes that ridiculous but just much thicker battles. So nice rich color. Get plenty on your brush and then make sure that using the tip to create the center see curves like uh, you can start to pull and drag of it mall with this one. Make them nice and curved enough. Get took the little edges of the petals in. Okay, Rinse off your brush top against the side of your glass of water cup and then do the same thing. Poland, Dropkick for a little sick of you can make the corners little 0.2. If you want a swell keep going lighter and lighter as we go out. And stop making them looser and slightly straighter than the very tightly curve center ones . I just took that little ended. You can use multiple strikes as well if you can always use a bigger brush for this. But I'm just gonna keep using this one now, okay? Her effect Don't really pushing that Burst sideways and dragging the color along. Create the last one here. You can start making these petals, Weida. Make sure they all touch in little places so that we can create nice effects. All right, then. You can also use some slightly thinner strikes if you think you want to balance out the shape of it. You somethin, districts that well, maybe the is to create a nice, uneven edge. Okay. And then we're going to do the magic. But this is where we go back in with the darkest color from the beginning and start to top that around so close and it gaps at any detail and then let it start to bleed out. If you get any bets like that, where the colors already dried, you can just wash off your brush, go back in with just water on it and the smooth out they go, pick up some more paint. Oh, look at that. Believe that's lovely. Top that, uh, start to create some nice effects in there. I had a little bit dark there. Wherever you feel like it needs a bit of contrast. I quite like how that looks. I just got a little bit more in that dark edge there. Pull a little thin petal around. Maybe a little more here, it's starting to look a bit blobby. It started out perfect. So I rather doing stomach this one. We're just gonna do some little leaves, Um, but that there, and let a little bleed happen and then do the splits stroke. It's difficult to do this towards you. You see, her creates a nice leaves. Let me just turn that around. There you go. That is hard painted loose roses
8. Loop Stroke: All right, guys, this next stroke is very similar to the C curve. But instead of making a curve, we're going to make a loop. So this is the loop stroke. So we're just going to do the same thing, but then pull it back around to the start point. So let me show you on the practice paper. Oh, you're start the base, pull press down, loop around, and then join the back of the stopped. Can you see how it creates a nice round edge of the top? So let's do that again. Start at the bottom, use the tip of your brush. Press down and flatten the brush, and then pull up around. I'm back down. Okay, one more time. Really Slowly. You know, start at the bottom, but the tip down. Press the body of the brush down. Pull up on, then swing round. Come back down. Okay, A couple more times. A bit faster. Okay. So there are a few different ways to do this. Strope you can do it and a loop circle. So press the tip down girl around the outside and then come fuck. And then you can either fill in the middle or leave open however you prefer so around from the book. Quite nice for leaving whitespace. You can do, um, a smaller my circular one. So round and back on itself, round back on itself During that little gap the you see how it creates a nice round edge. Do that again really slowly so you can see the tip down, swing it round and then pull back to create almost circle shape. You can also do this one the really big loop. So, for example, pull up whole background. So you have to kind of twist your wrist background as you pull. It takes a bit of getting used to, but once you got the knock, it will become really easy around twist and pull back down. You see how you almost twist the brush in your hand between your fingers? Twist, twist Worst Well, back down. Thank you. Okay, let's try this on some flowers. So the first fire we're going to test this on as in a nominee. Now our nominees have lovely light battles. I'm some using a really light washing Prussian blue. I'm just to give myself a bit of space for the centre I'm just gonna mark that out with a kind of loose circle. Okay, Then we'll get loaded up with some color and get going. Okay, So here, we're going to touch the brush there and then pull up around and look back down. I need a bit more water on there. Just fill that in. So going to touch that and then pull up by roomed. Um, meet again in the center. Very. Go just smooth out a bit, OK? Do another One roomed there again. And then one last one. Pull into the center. Okay. I'm just gonna add some more water. If you see your passel starting to dry off, you can just go back over them with a bit of water. We're gonna need them to be what? For the next stage. One of the things I love about this stroke is a creates little uneven edges. I'm, which is really great for making Sly wasn't natural. Okay, Now we're gonna take a dock, a bit of Prussian blue and just top of their on the inside edge around the circle and let it bleed out. You can also add a little bit to the flower edges if you want the Patil edges. Just a creative contrast. I had a bit more if you wanted to spread a bit further. Don't make it too dark because we've got the center still to add. I'm just gonna add some random little color bits here. You can also, if you think the petals looking a little too similar, you can go back in. Just top your brush on a piece of kitchen paper, um and then go back in and pick up some of the collective creative contrast. You do that, Perhaps not been there as well. Okay, while that dries or we'll do, is we'll paint the stem and the leaves so we're gonna use as we have been doing the same technique for this. You can mix up the petal shapes in the leaf shapes when you paint your own florals. But just while we're on this lesson, pull the stem up there and that just a little bit of a bleed Go on the and then we're going to create the leaf loops. Um, so little stem for the leaf and then up on roomed create a little roundly from your try a longer one as well said down room to create more of an oval doing last little one. Here they go. Do a couple more on the other side always helps to balance them, but just not symmetrical. Let's clean the edge up and then uses the dark paint for another one Trying to just about gay my hand in front of the camera. One of my favorite things with leaves is letting them touch and then letting a little bit of cola just going to do that. But there as well, like a little bit of cola go between leaves. Okay, Now we're gonna leave this to dry. Just let that dry, and then we're gonna come back in and paint the center. Okay, so now are petals A dry well run that you can see the nice effects that we've got there in the little bleeds where it's dried Love this medium we've got you can see the texture of the cold press paper. They're creating a nice effect as well. We're gonna dio is at the center of the enemy I'm gonna do is use a blue black mixture for this. So going to paint and a circle and son to just try and leave a little bit of white space for a bit detail, and then I'm going to use the tip of the brush Very tip to pull little, see curves a little flicks out of the center to create this statement. So you need a lot of paint on the tip of your brush and then press and flick person flick pull them out quite far, if you want. What I like to do is fall tonight, coming out and then going back in to create a nice variation of strokes. Okay? And then, for the final detail, we're gonna add little dots like we did in the first lesson. They have it. Okay, The next fly we're going to do with this is a pne. Now, this is technically a mixture of two strokes. We're going to use the Sikh of for the close, this petal, and then we're going toe using loops strokes for the other Pata Valls. So the first thing we're going to do is create a C stroke, so this is going to be the petal closest to the person who's looking at it. We're gonna do a kind of half semi circle there and wash off the color a bit. And then we're gonna create a few little jagged kind of strokes in here just to help. Give it a bit of, um, detail in the center, too. Great. A focal point. And then we're going to do a loop strokes. So starting in one of the details pulled up and round come back down, then add a bit more pigment to the center. There you go again. A little bit thinner. Maybe up and round. Back down. Another one here. Up and down. Background. There you go. Can I add a little side one there. I was going to smooth this out. I like the way that's drying. Had a little darker pink pigment at the base. Okay. And then we're going to do the same on the way down. So look around and back up. No more red around. Back up with a little try. Just gonna turn to pay for a little bit here so you can see what I'm doing and then had some side petals in around. Okay, Then what we're gonna do is go back him with dark of cola in the middle just to give it a bit of contrast. So certainly this battle here and allow it to touch the other. So it complete out and then add a bit more pink in some places, maybe a little bit there as well. Okay, perfect. Then, as with all the other flowers, were gonna go for stem and leaves. This time, we're going to imagine that the stem comes down here, pull that down there, and then peonies have long lives. I'm gonna use a long split strict for these. Start there, and then press and drug come up to a point and then do the other side pressing drug and come up to a point. Now, I'm gonna do that on the other side and start from a slightly different angle and then press and drag culture point one more time. Just gonna join that base. There may have it
9. Wiggle Stroke: Okay, guys, the last straight we're gonna look at in this class is what I am going to call the wiggle stroke. No, I don't know if that's the right term for it. It's probably not, but that's what I'm going to call it. Um, all I really want you to do with this stroke is to wiggle your brush back and forth, almost like you're making a zigzag on. There are two ways to do this. We can do this with the tip of the brush and create a little back and forth like that little scribble. Maybe we should call it scribble stroke. Um, or you can lay your brush flatter and do a back and forth like that that you're scrubbing, okay, back and forth. Once you've done that a few times and you've got the hang of it, then we can start to try this with different shapes. So, for example, we could start from a central point on wiggle up and always pull back to the center in a teardrop shape. Can you say do that again? Really slightly. Pull up, pull back down, Be back in the center. The whole point of this stroke is that it's random and it's loose, and that's what gives it the nice effect. All right, So don't be afraid to go fast. Once you've got the hang of the backwards and forwards motion once more fast, you can go back in and odd other little details or lines. Or you can go back in a smooth one out if you think it looks uneven, but it gives us a nice random starting point and the same with doing that on the side. We can simply go back and forth and then pull back into the center at some more detail there, and you can see the beginnings off some loose floral shaped once more again, back and forth. There you go. Okay, some more tips on this one. Um, you can very the angle of your brush to change up the stroke so you can switch between having your brush up right and your brush back down so you can start there and then lay a brush downstream to back up, laid down, straighten back up, and you can start to create thinner sections and thicker sections here. Can you see how you've got some thick strokes there and then somethin A strokes here. Another thing you can do this trip has changed the direction and break it up into different sections. So you can have a couple going that way and then stopped and a couple going that way and then stop that way and that way, and then you've got yourself a little loose floral. You got a little bit contrast, the maybe get off the brush. But, uh, maybe even a couple of bits out. I'm I understand. And you've got yourself a nice loose floral. One last tip with these that I will show you is a way of moving white space between them. So this technique is going to need you to hold your brush up, right? Right as you can. And then we're going to touch it down on the paper, dragged back and forth and leave white space in the middle. And then you can pull that around and you started to get yourself a petal with little bits of white space in it. So let's do that again. Pull back and forth, dragged down, leave some whitespace and then you can build that shape into a flower. Can you see just have contrast. And then maybe some dots in the middle. This is a lot more abstract than the other strokes, but it's a really great way to step up your loose floor game. Once you've got that practice sheet done, let's move on to the flowers. Okay, So for the final two practice flows, we're gonna paint today we're gonna dio a California poppy Onda delphinium. Okay, so the California poppy is going to use yellow and orange colors, and we're just going to come in, impress and drag on, wiggle the little petals around. Okay, on another. There we go. Perfect. One more on the other side. Bever wiggle groups. If you splice it like that, don't worry. I do this all the time. Get a brush and lots of water. It's a little bit green, but it won't have quickly. Dob it with paper towel. Lift it back up. There you go. Like it never happened. Okay, you add a little more water to this mix and then pull another petal down there when that love water for this last one. Okay. Awesome. Just gonna connect some of these thing that I'm gonna add slightly richer yellow pull some of that detail into the middle. Okay, While that dries a little bit, we're gonna paint another one on use a bit more of an orange color. Okay, Down here, dragon. Wiggle more water on the same again. There. Let it touch for a nice bleed. A bit more color down here on that bleed again, back and forth. Just keep it nice and loose and organic. And don't worry too much. If the shape of it doesn't look right, that doesn't look great, But we can come back and fix that later. Wiggle again on then Wakaluk in. I had a little darker orange in the hopes that spit to duck around the edge. Fill in some of the governors. I'm just going to smooth some of that with a bit more water. If every your blends aren't working very well, what you can do is just add going and add some drops of water. Give it a bit of a wiggle and let them dry on their own. Okay, Next, we're gonna do this stems, um, poppies have a nice thick stems so you can pull quite nice ethical line down there and then if you want to add some detail. You had a bit McCullough and then just pull out some little flick e details, creative texture on the stem. Do this one. This stems gonna come out? Probably here. They had a bit more color. That's quite light. Well, not quite likely Effect. And then down there, Smith out. And then again with the little flick E details give a texture. Copies have nice roofs, Harry stems. Fact, I'm just gonna join up there. Okay? You know that that dry. And then we're gonna come back and do the senators. Okay? So to paint the centres of these poppies, we're going to create a little green detail in the center. Just a little star shape, okay? And then we're going to use a bright one with some yellow added to it to create the center stamen. So just like we did for the enemy, just flicking out very in going in and out in all the different directions. And then we can add some little dots. Tom detail. There you go with same again on this one flick and out trying. Always pull it back to the center and then add little dots around the outside. There you go. One mother. Okay, The final practice flower. We're gonna pain. Today's a delphinium. Delphiniums look quite complicated, but the trick to painting complex flowers is to start with a small section and then just repeat that as you expand out. So we're gonna do a little wiggle struck there week of the to create a little five petal flower, and then we're gonna do the same thing next to it. Wiggle in a few different directions. They don't need to be perfect. They don't need to have five petals and then one in this middle gap here. Okay, Perfect. No. When we get the edges of the delphiniums is the flower starts go around. The stem we're gonna do is paint some from the side. So we're just gonna choose a center point on, wiggle out to imagine a flower from the side, do that on the other side as well. There's a wiggle, and then paint another front facing one here. Okay, While this is all still what I'm gonna get a slightly darker blue and go in top that into the center there and let it bleed out. These ones that are very wet will come back to these when they've dried a little bit. Otherwise, this so much water on there that the bleeds aren't going to work. You're not gonna create a nice effect, OK? Do Somalo wiggly flowers spiking upwards. Go little bit more of a wigo. Okay, I might just fill in this gap picks. This feels like a bit of a gap. Okay, Can you see the shape of the delphiniums starting to work? So while that blue settles, a little bit we're gonna do is pick up a little bit green, Um, and then at the stem in. So this is going to be the stem a bit more green, the and then what you guys do is paint in the little gaps all the way to the top, and then we're gonna add some little buds here. So these a little on open flowers like that touch the blue there, and then just a few little stems in here create flower texture. That's okay. Wash the brush back off, pick up the dark blue again. Then we're gonna go and add to the flower centers. But the of the maybe pull a bit down here to the edges there. Wherever you can find, a little center detail could see that I've ever gap that where that doesn't look very that we go. All right, And then finally, we're going to do the leaves. Now Delfini leaves a great because you can use the wiggle stroke to create the leaf shape. So I pull a little stem out here so you can city. And then what we're going to do is turn the brush to the side and then wiggle backwards and forwards to create leaf and pull it into a point. Either side of this stem. All right, so backwards and forwards. Nice, irregular wiggle and pull a little straight back to the end and then backwards and forwards , um, pulled a bit out, and then you can go back through an odd, darker color in the center. We'll make it a bit more regular. If you think he looks to even pull a little bit out again and then you delphinium system
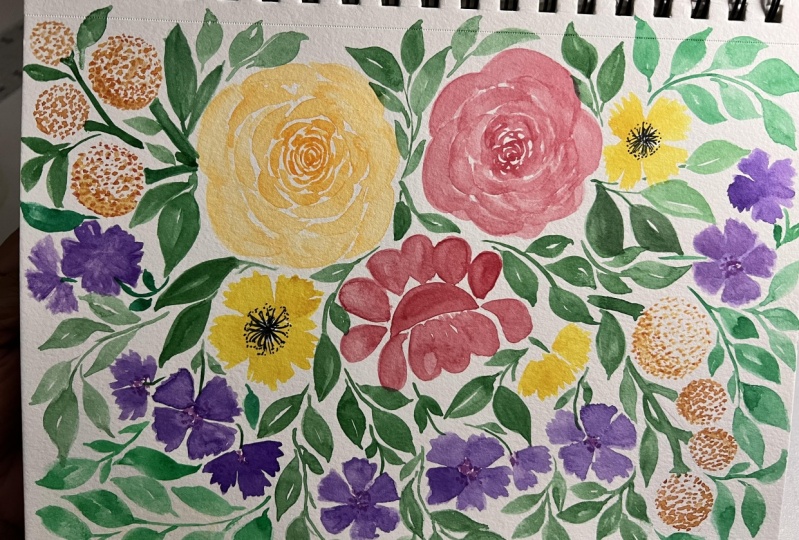
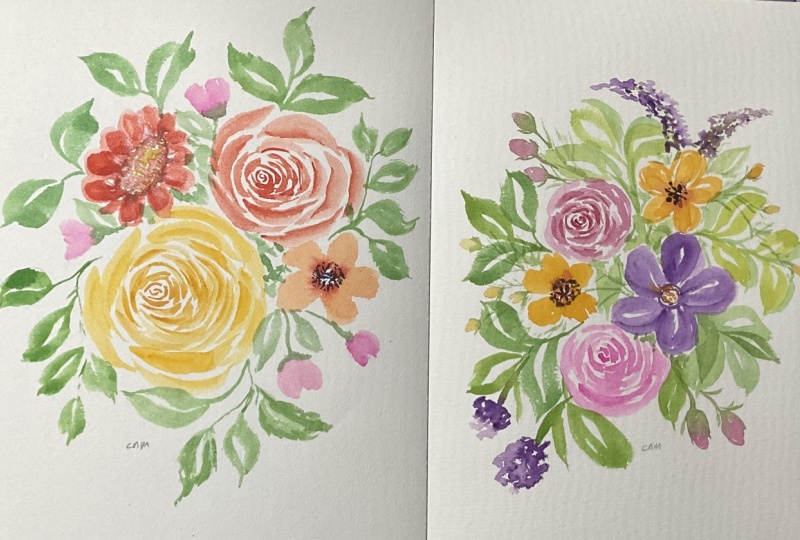
10. Project: Floral Composition: Okay, I So, for a final peace, we're going to put together all of the elements that we've learned in this class to make a complete loose floor piece. Now, you don't have to do the piece that I'm doing. You can create your own compositions from things we've learned. But if you want to follow along with May, I will paint this along real time so that you can, um, practice everything that you've learned so well, I'm gonna use quite a quite a simple three main floor piece composition to create a sort of triangle of the main elements. And then we're going to add some leaves and some smaller flowers around that as well. So I'm going to start over here at the top with of rose in deep red color. I'm going to keep all of the floral elements to warm reds, oranges and yellows and pinks, Um, and then the leaves to kind of mid green on the bluey green. So starting over here, we're gonna do the little see strokes to create Rose, just gently pulling them around. You can see I've got quite a deep red here, miss the brush off, and then just keep pulling that around too much That just keep renting a brush off in the water when you want the color to get a bit lighter. I do a bit more detail around this side. Then I'm gonna add some of that dark color back into the center of the can't. Nice Western. My effect bring a bit down here is Well, okay. Okay. Next we're going to paint PNE. So I'm using a pink and red mixture here. So we're gonna do this slightly on its side. Um, we're gonna do the see stroke to create 1/2 moon shape there, and I'm gonna pull the loop petals of the bottom around. This paper is so dry just concentrating on going those loops, right? And then we're gonna add much darker color back in here and let it bleed through. Have a little more detail here. Just gonna get some more pinks in that. Just gonna get some more pinks in there to vary the color, allow it to bleed out. And here where we've got some petals touching, I'm just gonna add some more pink less that it complete into the rose make a nice effect. There great. So to complete the triangle with I'm gonna put third flower down here. I'm a grad student of the rose. Could make this one a little bit more of an orangey red. So you can see this is a much warmer cola, and then you're into the brush off in the same see curves just a little bit. Touch there to allow the paint to bleed into the orange. And then we compulsive smaller strokes around, creating the shape, but the gap there that we can just fill. Then we'll go back in with some of the darkest color here. About to plead out. No, it looks lovely. Okay, so now we've got a mean three floor. No, it's timeto add some leaf detail between them so that we can start to get the shape. No, What I'm gonna try and do is pull a leaf strand ground here, a leaf strand down there and then the leaf strung up there. So as much as you can with loose floral compositions, try and get the leaves to come out between flowers Rather than coming out from the middle of flowers. It will make it look more natural that way. someone to mix up some mid tone sock green with a little Prussian blue And to get a nice, deep Larry green color, it'll be a nice contrast to the war. Yeah, I was the orange terms. So I'm gonna start up here, um, and pull a little stammer and then do some split stroke leaves. There you go. Had a bit more water lighter one over here. As much as you can allow the elements to touch in that way, they can start to create nice bleed effects, especially if they're still wet. And then we can touch the leaves together. I had a little darker one in here. Just feel like then I've ever liked a tone. Just gonna one appear reconnect about that. Okay, Sam again done here. And this time I'm gonna pull the leaves up on around the flower here, have a bit more blue from of contrast, it's a smaller leaves. The okay, I'm one less one I'm going to pull That leaves them through there and then no blue one. Just fill in some of the gaps with dark color and then head out the no, and I pulled out when it's a bit more of a point. Well, expensive. Have a rest. A green coming up here slightly like to turn their just talking under that flower. Okay, now we're going to do is bad. So little California poppies. I'm just around the edges where we confined little gaps. Um, maybe some small, crispy Aguirre's. Well, just to fill in those gaps, do a little wiggle. I'm here. I had a bit more the for a bit of contrast. I like the way that's bleeding. Do the same element appear in the top. Probably there. Okay, no moving into more of a yellow. We're gonna add some little crispy DEA details. I'm gonna have a couple down here and then a couple up here just gonna angle the brush a little bits that you can see what I'm doing to stop those little dots all the way around. Okay, then ever that some of the yellow turns to do this This side this time is the shadow side. I'm the same over here. Mix it in the doctor, you have already, and then start adding just a few more details for answer. Okay, I'm just gonna do the wanna at the top okay . And the same orange tone. We're gonna mirror the shape of this so it's gonna be the underneath, But try and make the shadow like a little crescent moon Are there in this awesome stems to just anchor There's a little bit, and then we can paint some leaves around them. So here the stem is going to come, uh, from leaves, and then here is going to come from behind this Rose Put them both from a similar angle. Okay, Now we're gonna add some blue town leaves. Hi, sir. Coming out again from between the flowers and then up into a split stroke coming up there. I'm just gonna go back over this, but and just add a little more blue there. Maybe this one here is. Well, uh, Pani wasn't quite dry. Just picked up a little bit, okay? And then coming out from this one, a normal flu, another green from around the coming up, bit richer. Well, that's better. Gonna do another one there as well. That that lead Okay, - well , mixed these colors up a little bit. Just spoke to that bleeding. I don't like the way that's trying. Just gonna pull that out on. Duh. Try and stop that, That's all. Maybe that's been much count a bit red, just like that'll Settle. Should hopefully bleed out a bit nicer. You could just smooth that in. We're gonna pull another self leaves down from here. Well, it's slightly green. Oh, on. And then do a nice big one down here. It's okay to use a few strokes to just get the shape that you want on these. I'm gonna answer more green picks. This is looking very blue. Just one more coming up from behind this flower. Just make that point yet. Merry go, Right, The composition. Looking out, it feels like it's got a bit of a gap here. And what I'm gonna do is fill that in with another California poppy. Just a really small one from the side. So it looks more like a bud. So I had a little wiggle here in there, and then just look a bit there. I would go going back to the greens. Yeah, I had a little stem coming up for that. And then just some more leaves coming out from the side. Miss is gonna be a bit blue. It's We haven't got that much blue in this section. Okay, so coming up from between the flowers and then pulling down have a lighter one coming up this way. So if we can't get a little bleed in there, the yellow I'm also going to pull one down a little bit greener down here, okay? It's just a little bit of a gap here. Fill that in. Don't be afraid, Teoh. Overlap the leaves and lay them on top of each other. Okay, keep taking a step back on analyzing. Does it feel folders? I feel like there's any gaps. And then we can look at filling those in with something, just checking these a dry, and then we can go in and at the detail over the top. So we had a little star shape the no and have a nice warm brown. I'm going out a bit orange to that to keep it nice and wall. And then we can start to dio love flicks. If you want to make it look, that's an angle. You could do these bottom on shorter, and then I'm gonna do the opposite hair. I'm gonna make holy in a one shorter top ones. Okay, No time for some adults. - I really like these. Please look at this. Little on here. The green that's gone in the O in these ones as well. It's loads of really interesting effects going on in here. Okay, I think we're done.
11. Final Thoughts: All right. There you go. He's finished. Well, done, Goes, Please don't forget to show your work. You can put it into the Project section and skill show. Or if you have instagramming composed down there, Tiger me so I can see. I would love to see what you create. One last thing I want to talk about before we finish painting is a skill, and it takes time and practice to get the hang of it. I see a lot of Begin is getting frustrated. It'll descent chances on. I felt the same when I first started, but learning to paint like this has taken me years. It's so easy, especially on social media, to be comparing your work to other people's, but it just doesn't make sense. I mean, how can you compare your first painting or even your fifth painting to something that might be their 50th painting or 500 painting? It doesn't make sense to compare your work to anyone else is. The most important thing is to pick up a paintbrush and start painting every day that you do that you will be better painting than you were this morning. If I can do this. You could do this. Just stick with it also, if he likes this class, Come and say hi on Instagram. I love to hear from you. We love any thoughts of feedback you've got or anything. I could do it in future class. I'd love to see what you pay. Keep painting and I will see you soon.
 Emily Wassell, Watercolour Artist & Educator