Transcripts
1. Promo: Hi, my name is Maria
of RAM awhile and I'm a filmmaker and an artist, and I'm here to teach
you storyboarding. Now, why do you need
to know storyboarding? If you want to get into
the film industry, becoming a storyboard artist, among the most farm
professionals to do because you get to be
a part of the story. Knowing storyboarding
is even more important if you're doing
your own short film. Storyboarding is a predecessor
of your whole film. Using simple images. With the storyboard, you can decide direction of your story. You can decide camera, angles, shots, and a lot more. This Is Your Story blueprint. And as a storyboard artist, you need to be a cinematographer and you need to know the
roles of filmmaking. This is what I'm going
to be teaching you here. So what are you
going to learn here? You're going to learn how
to work with a camera. What is a 180 degrees through? You're going to
learn about framing, how to convey motions using
camera angles and framing. And I'm going to give you
tips and tricks about what perspective and how to train yourself to sketch fast. And then we're going to
take the exercise of doing a storyboard
from script to finish. I hope to see you
inside the course.
2. Introduction: So what is storyboarding
and why do we need it? Storyboards were
widely implemented in the film industry and both
animation and live action. With Walt Disney Studios. Animators discovered that it was cheaper and more
productive and you got a better sense of
the story when the storyboarded to film before
the production started. Storyboard is exactly
what it says. It is boarding the whole story. It is basically the
blueprint for the story. The difference from the script
as that the storyboarding shows us exactly how the film will look
like on the screen. It takes care of problems as timing, camera angles, acting, and even gives us
guidelines what kind of props or scenery are there going to be needing for
the final film? The story border is the
directors or right hand. The director can change
the story depending on what he or she sees
on the storyboard. The storyboard panels are then collected into an antiemetic. Basically, you add it all
the boards into a film. Just with images. And they're, the director
can make changes. He or she can change the
course of the whole story. Because sometimes if you
see something on paper, it sounds good in the script, but it may not work
later on in the film. And this can be done
in a very cheap way. Storyboarding teams are
usually not a lot of people, is just a handful people that
can GEO2Enrichr the film many times over before even
the studio start production. That is what, for
example, Pixar algae, after every draft of the
script have story borders on site to draw the whole movie before they even
start filming orders. They start the production, before they even green
light up production. And sometimes the same movie can be bordered over and over again. That's why if you want to be a story boarder,
congratulations. You will become a part
of the story Tim. And story is a lot of fun. And you will make
major decisions and decisions that our
director needs to do. So that's why storyboarding
is important. And they are rules
of storyboarding. These are rules that osmotic refer needs to now, for example. So we are going to talk
about those roles here. Rules are not set in stone. So take those rules
as guidelines. Each story boarder has their
own language and a piece of script can be storyboarded in
many, many different ways. So here comes your sensibility of story, timing and character. How you're going to introduce
a piece of scripts, a piece of story
to the audience. And that are going to
be your strength and working with directors
and with good directors. So we're going to
talk about some of the roles and I'm going to give you some hints of how you can work and
how you can think. To become a good
storyboard artist. Let's get you started. If anything, is in group two.
3. Framing: Framing. In this section, we're
gonna talk about framing. As you are a
director's right hand. You need to know this rules
as a storyboard artist. Again, rules in
storyboarding and in film are only guidelines
of what has worked. You can break the rules
if it serves the story. You also need to know what rules you break
and why you do it. Now, Let's get started. Extreme wide shots or
so-called establishing shot. In this shot, we found the location of where
the action takes place. We can have the characters
farther away in the distance, or we may exclude them at all. Wide shot. In this framing,
we get closer to the characters and we see
the characters full size. In this framing,
we can recognize the character's body language. We can see their
facial expression and get closer today motions. Medium long shot. We frame the characters
even closer. And we make sure we don't
frame the characters in, cut them on the joints
like for example, their needs in this case. Just assuming is closest that the framing of the camera is a little bit
above their joints, above their knees, and in
the middle of their ties. This is kind of a
dream of medium shot. The camera is framing the characters a little
bit below their hips. Again, remember to
place the framing above or below important
joints of the body, like for example, the hips, in that case, medium close-up. Now the next three close ups are very similar to each other, although they want to
compare different ideas. The closer we get
to one character, the more we can identify with
the character's emotions. This framing is also used
in dialogue scenes where we can break the dynamic
between using medium shot, medium close up, close up, and sometimes even
medium long shot. Close up. Here we frame the
characters face. Extreme close-up. Here, we frame the
character's eyes. So what is the difference
between the three close ups? You may ask, as we
know that the eyes are the windows or salt or emotions. So the closer we get to
the character's eyes, the better we are to read
the character's emotions and therefore identify
ourselves with the character. Of course, that doesn't
mean that we have to keep the character in extreme
close up all the time. So we identify with
the characters, is just that in certain
moments we need to know what the
character is feeling. If the characteristic in
certain decision, for example, if it's going through
an emotional state, is good to show that struggle
in extreme close-up. But we'll talk about that
in the later sections. This framing is called
bird's-eye view. The camera is looking down from high above as if from
the eye of a bird. This framing is used to give us an overview of the surroundings. While a character is going the vastness of the tasks ahead. For example, if there
is an Armageddon, if it's so disaster, like for example,
a zombie attack. And we want to see that what
is happening in our house is happening in the neighborhood and the next neighborhood
and the whole town. Then we will go slowly
from our house. I'm live camera up to the next neighborhood and
we'll see the whole town that fires and distractions are happening all over the city. It will give us an overview of the
vastness of the disaster. Another example document
recognizes from horror films, like we have a
group of teenagers, but 10 spend vacation
in the words. And we start the film with an establishing shot
with a bird's-eye view, where we show that
the carbon is not near any city or any town. It's far in the woods, which makes us now that
when something happens, father in the movie, there'll be no one
around to help them. The bird's-eye view conveys
feeling of powerlessness, loneliness, Being alone in
a big world, for example. But it's not
necessarily our cell. It can also have a grand positive impact
like for example, crowd cheering after a victory. We use this shot to convey a very strong emotion
on a grander scale. High angle shot. This one is very similar
to a bird's-eye view, but the camera comes
closer to the character. We use this framing to convey
a sense of helplessness. The character is in
disadvantage, for example, the character is losing her or her position
in negotiation. We can have this shelf like looking down on the character, like the feel the characters pressure of losing
a negotiation. We use it to convey a fear
of being lost, feeling lost. It doesn't have to be that the character is
necessarily lost, but it's not that the character feel lost with this shelf. They also convey the feeling of that task is bigger than the character's potential
to overcome it. Low angle shot. In this shot, the camera is
looking up at the character. The character looks
big in screen. With this shot, we want to
convey a feeling of power, decisiveness, being
an advantage in negotiation or winning
a position of power. This includes even
personal power, feeling empowered or confident. Tilted, angled
shot. In this shot, we tilt the camera. So we create a dynamic
line of action. With this shot, we create a
feeling of dynamic movement, danger, excitement,
or disorientation. It gives a feeling
of pace and axiom. This shot is very much
used, for example, in car chases when there is
a danger in the situation. So those are a couple
of rules or guidelines that you can have in mind when
you do your storyboarding. And they're only
reason is to have a greater impact on your VR and tell a better story with
a greater emotional impact.
4. 180degreesRule: 180 degrees of role. 180 degrees role
applies to where the camera is standing
according to the characters. When, for example,
we have a dialogue. Let's see occurrence situation. If we have two characters talking or engaging
with each other, there is an invisible
line of action that is going exactly in the middle of the characters, hundreds, 90 degrees rule says that the
camera can be on any site, on any point of
this red line or on this one side of the line
pointing at the character. And why is this important? Let's see a current situation. If one character is talking
and we have the camera on the handwritten 80 degrees
side of the line of action. As long as we follow the
100 to 90 degrees roll, we can zoom in and out of the character as
much as we want. We can frame the character
either as a close up, as a middle shelf
or as a whole shot. Then it looks like one character
is talking to another. But what happens if we
crossed the 180 degree line? Then both of the
characters will be on the same side of the screen and they'll be turned
in the same direction. There will not be a
dialogue between them, but it will look like they're talking towards something else, someone else which
is not in the same. So 180 degrees
overall is basically for orientation
on the screen and for clarification of who is talking to whom and how the
characters are positioned. Now, can we break the 190
degrees roll and how? Yes, of course we can do that. We don't need to have the camera standing
on that position, on that size all the
time for the film, that will be boring. There is some certain
rules that can break the 190 degrees roll. One thing is to
position the camera exactly on the line and have the character looking
from the POV point of view. When we have the camera
exactly on the line, the next time we
shall the characters. We can have the camera being on the other side of the line. And now we have a new line of action on new 180 degrees line, which is on the other
side of the character. So we can't jump back and forth between one and the other. We can go 360 degrees or gas or viewers very confused of what
is happening on the screen. Another way to change the line of action or to
change the position of the camera is if we have one of the characters
are both moving. So if the character move, they basically
changed the line of action and the a 100 and 90
degrees line between them. Now we can position the
camera in a different place, but we still have to keep the 180 degrees of
role of the camera. Another way to break the 180 degrees role is to
have a pivoting of something. Something, for example, that
the character is looking at. Let's take an example as the character is pointing
at something further away in the distance on the other side of why the
camera has been so far. Like for example,
at the mountain, like the character is saying, Look, there is a
drag on over there. That point. We are changing the
position of the camera, breaking the dialogue
between these two to see what
he's pointing at. And then when we go back, we can see the character
from the other side of the line and break
the 180 degree rule. And now we have a new position of the
camera from the other side. So now you're allowed again to change the position of the
camera on the other side. Now, a 180 degrees roll apply also when the character
is in motion. Let's say that the character
is running in one direction. The next time we
see the character, we need to have the
character running from left to right again, so that we know that the character is running
in same direction. So for example, if we
have an action scene and the character is running
through different backgrounds, for example, it's
running in the field and she's running
through the words. We need to see her running
the same direction, in this case from left to right. What happens if we break the
100 to 90 degrees row here? Like for example, in this case. So if we have one scene where the character starts
running from left to right, and in the next scene, we change the camera and
we crossed a 180 degrees. She will be running from
right to left instead. So she's basically
switched direction without giving any reason
that she's done that. And that will make our
viewers very confused. Now how can we change the
direction of the character? One thing to do is, for example, if the character
stops and changes direction in the
screw on the screen. So now we have our character
incorrect here, who stops, looks at something and changes direction directly on same shot. Now, we can have the
camera on the other side, because now she's running
in a different direction. So we have justified
the movement from right to left
for this character. So this one can be a
little complicated, but it is as simple as that. Just have this in mind when
you draw your story posts.
5. 180degreesRule: Here I'm going to show you
how we use the framing and different angles
to convey an idea, to convey a strong story. In this sin, include confronts her father and wants him to take her to the battle
with the dragon. So we start with the
father sitting next to the fireplace and preparing
his swot for battle. We have Kim sitting
in one corner and we have the shading of
the room framing him. Then we have the shadow of Ingrid coming in
and covering him. And this conveys the idea of something troublesome
looming over him. So this is so symbolic
graphic language to show that there
is going to be a problem coming for him, like a shadow from a clear sky. So his daughter, Ingrid's, comes in the screen and she
stands tall in the screen. She's filling up the
space of the screen. And her picture, he is
small in the picture. She's coming with a strong
message and I'm with a strong decision of
what she wants to do and to convey this idea, we can see has four, almost in the middle
of the screen. We use a low angle
shot and frame the character Sadat's ingress is tantric towel next
to her father. Her father is still sitting down and we arrange the scene in does matter that his daughter is
in a more powerful position. So he's still sitting down
and doing his preparation, the web, his watch. While Ingrid is standing tall, n is just about to tell him
that what she's decided. We also tilt the
camera in diagonal. This is also to
enhance the sense of conflict between
father and delta. Ingrid says that I'm
coming with you. So in this same, Ingrid sells her father
that she wants to join them to fight the dragon who threatens
their village. And we framed the effector
so that we can see the father's expression and how he dwells upon what
to tell his daughter. He knows that she's very much like him, stubborn and brave. But again, of course, he doesn't want her to follow she now he
knows that already. He just doesn't know
how to tell her. And now we use a middle long shot to
describe the meeting. A father and Delta is a
meeting of two warriors. They are both alike,
brave and stubborn. But here for the first time, we see Ingrid very small. This time, her father
stands tall next to her because he's the authority. He is the one to tell her mother she's
gonna follow or not. The father says, You
are not coming in grid. And here the father stands
next to his daughter. It's going to be his. Well, we showed that
by having next to her, she must look up at him, which makes her look
like a little girl for the first time we see that she
is actually a little girl. And here in this picture, Ingrid's us, but that
was begging eyes. And we have a shot
over the shoulder, which is we are placing
the camera where we also see a big part
of the father. In fact, he is filling
up most of the screen. It is a high angle shot, which we're looking
down on a grid. So she feels in
disadvantage, shifted small. She feels like she's
losing the battle. And then the father, the father's dialogue here
is, I'm sorry, Ingrid. It is too dangerous
and you need to stay here and look after
your mother for me. He's trying to give her
a task so she doesn't feel useless because he knows
that she's just like him. She wants to do girl, she wants to be a warrior. So Ingrid's father bends
down to Ingrid's level. He admits that she is a warrior. And with this image, we want to convey
a feeling that he doesn't want to
hurt his daughter. He wants to protect her. He is her equal as
well as a warrior. But she's also has
storage systems to yarn. And here we use a
low angle shot, medium long shot, where Ingrid is very small
in the picture. Her father is big like a rock. He's taking over the screen. It's kills will now. And with this, we want to convey the idea of helplessness. Helplessness, Ingrid's
helplessness because she is or main character. It's not the father
has lost as fight. Her father is the
one who decides. She feels small. And we can see that visually on the screen by framing the
characters in this way. But then we keep the
camera on the same end. But Ingrid pushes her father
away and comes forward. The camera in pans with her. And we go from low angle shot on her father to a
low angle shot on Ingrid. And we see that she's
chaining confidence. She has grown visually on the screen by placing
the characters this way, having the characters
grow in the screen, you convey the idea that the
character has Jane momentum. It has made a serious decision and has Jane pack their power. And here, when Ingrid
takes this decision, will starts with medium shot. She's still very
small in screen and she's turned with
her back on us. That's where we start. And it's a low angle shot. And we see in grid, just press on one
side of the screen if she feels still lost. But then she starts
moving towards us, towards the camera and towards her father until she comes
very close to the screen. Her body is in diagonal and
is symbolizes conflict. And ingress says, and going, I'm not your little
girls anymore. And the warrior you've
taught me to be in, there is decisiveness in this dialogue and
in misbehavior. So we need to show
that with her. She holds her swot front, in front of the screen. She holds a tight
and the sort is almost as big as corrupt body. There are diagonals
of her spouse symbolizing dynamic
and conflict. So she confronts her father
and she's winning the fight. Keep this camera
angle and have her live the screen with
power and determination. It is her who was won the fight. We keep the diagonal
on her pose. The conflict between father
and daughter has grown. Now, Baker, father, Ingrid, he's trying to
stop her daughter, but he knows it's pointless. And we use high angle shot to show the gap growing between
father and daughter. The long shadow that Ingrid
casts on her father is a symbolic elements of the
worry that will hang over him. Carrying about his brave
daughter and lingering on the shelf living the father alone in the little
corner of the room. And on the screen show his helplessness
in this situation. He knows he can't stop Ingrid. There's nothing
he can do because his daughter is just like him. And we end this
scene in a close up. Eventually with to want to see how the father feels
about a situation. So we need to have a close
up and feel his emotions. We don't even need
dialogue to feel his pain and worry
about his daughter. We showed us in camera
angle and of course acting. He just looks away,
very thoughtful. And Orissa, and we're done, we end this sin. So you see how in, with a very simple
camera angles, you can convey the idea of
which part is the winning one. And that's how you use
different camera angles.
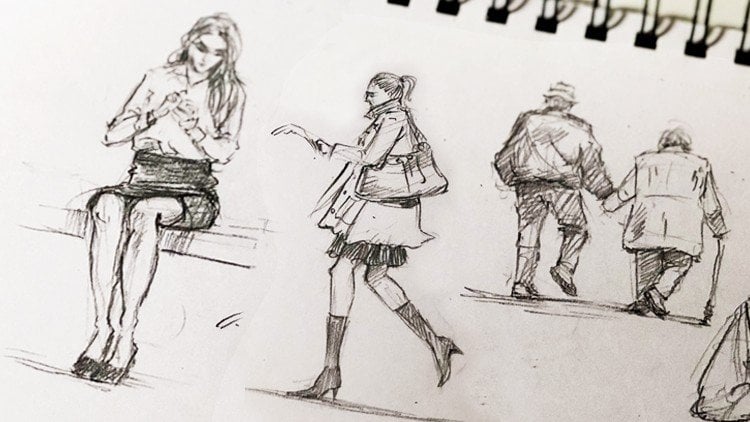
6. HowToSketch: To improve your drawing, you need to sketch
people from life. Here is one example of
how to go about when. If you want to know
more about it, go to my course, how to sketch people from life. So now that I have
chosen my model, how do I start and how do I
go about 19 start drawing. The first thing I
want to know is where my model is seated and how his spine
behaves according to the hips and according
to his shoulders. Even though I don't
see where he's seated. I tried to imagine if I continue the legs where
world his hips B. So I would just scan
scattered randomly anode, just try to find the
position for them. And I'll also go and try to
find where his shoulders are. And from this position here, I see that he's
slightly tilted in one side because he's
leaning on one of his hands. So I will just notified that and then I'll try
to figure out how the other parts of
the body are located and how they are relaxed or
tense and where they are. And this is something
that I eyeball. Something that I do is
also compare distances. The distance from the vase, for example, to the shoulder, the distance from the hand
compared to the body, the distance from the
need to the head. Also, I compare distances
in from the environment, just defined
anything to compare. And I never just draw
one thing at a time. And after I've done that, I'll just roughly sketch
the body parts in a very, very rough shapes, just
with round shapes on top of the joints that
I just measured. And I'll just find
the overall poster. So I'll be just dressing up the skeleton as I
showed you before, very roughly, just to
find if that makes sense, If this line that I
drew just make sense. If the proportions are really
correct that I've drawn. And I will, I'll just
adjust that afterwards. And then I'll have a drawing that is looking
something like that. One I've done that. I will start on
refine the drawing. So I'll just go with
a thicker pencil and, or with another color pencil. And I'll just refine on top
of this general shapes. Basically refine the man's body. And I will get
something like that, which looks actually
pretty neat and adult look like the
character in here. You can see that I have
the proportions, right? He's definitely seated,
He's definitely leaning. So I have graphed the
main proportions and the main balance of the body and the main character
for this man. And even though he
doesn't have a face, I have executed the
exercise, right? Because I have learned
from his posture and from this character how a guy like that will be
leaning or sitting. And I have put out
in my memory bank to gather one I needed later
on for my own projects. So how would it look
like if I didn't have the picture underneath
the firewalls on the spot. And I'm just drawing
these people from life. And this is the same
way I was going to be thinking as I showed
you on the picture. So basically this guy, I'm going to try to find
where his spine is. So basically he is m where his hips are,
where he's sitting. And I was going to basically try to find where the shoulders are and how the spine inside the body is bending
where the balance is. So I will see that he's
leaning on his arm. So I will quickly draw
justice arm here. And I will find
when he's leaning. And what I'm going, what I'm doing is basically comparing distances
like the arm. Where is the arm
compared to his belly? So I would like in my mind, draw an invisible line
to find the spot where this elbow and the part of the body are kind of
on the same line. So I would say. Approximately here does
how I would measure distances between different
parts of the body. So it's basically
eyeballing things so far. And then I would say, well, he's sitting like around here, so his store so is here. He's linked in this direction
and he's had is done leaning on his on his
hand approximately here. And this other arm is where the knee is
exactly what is needed. So I will try to
find the knee here. And he's a he's on the
upper part of his leg, but has a perspective
change to first because the seeds are a little bit bent in this direction. So our try to find the
shortening of the knees. And how do I do that? Again, I compare distances. I feel like Disney here, if I draw a line of whale
would dot point here, cross another part of the body. And I see that, okay. It passes through this shoulder. It's slightly on the
side of the shoulder. I'm doing all this by eyeballing
it compared to this arm, where does the seating
position ends? Well, it ends
approximately here. So this is kind of the
bending of the leg. And then our try to
eyeball again to see how the feedback and I
see that he's bending. He has turned a foot
in this direction, so I'm just going to know that. And again, compare it to
some other part of the body. And I will do that
for the other leg. Saw his hips are here sitting
down and spine is bent, and his legs are here. So I would draw a line between this leg and this leg to
see approximately where, how long the distance is
between the other leg. And I will measure data
at the same time when the feet so how long
is it from this point, from where his foot is
two the next point? Well, it's approximately here. I would say just eyeball it. And I can do another
measurements like the place where this
foot is ending. If I draw an invisible
line upwards, while without end, it will end approximately
here around his belly. So I would say, Well
maybe it's around here, which means that he's
light is bent that much and just draw the food. I will see that the food
is like sitting under the foot is placed on the
ground in this direction. And this is
approximately my sketch, the way I think of
this character. And then I would just go
ahead and add some details. One, I know the position
of this body parts. I would just go and refined and refined the
rest of the body. And now we'll just draw, okay, The food is here. And I'm doing that very roughly because you don't
have a lot of time to think when you draw a human's outside because
they change position. So you have to be able to really grasp the pose
very, very quickly. And you don't need to
really analyze so much. Just eyeball things
to start with. And you will learn to really see how this changes
go in perspective. One thing is to understand that. Another thing is to practice it and learn it
through practice. So I'm just going to quickly, I bought up and the hand I my schematic as a
cube or something. Because what I'm interested
in this position is really how the body
is and the posture. So I'm just going to do
the shoulder adjust that. I see that his shoulders
are a little band and he's looking at
me adopt position. He has noticed that
I'm filling him. So I'm just going to
draw the eye line. I'm not going to draw all
the face just to make sure the face and the head is in right proportions
according to his body. And I'm going to
draw his stomach. Now. I'm also going
to add the other arm. I see again that this
is his hand here. And his other arm
is the point where his other arm is is approximately
this point of his body. So I'm just going
to add that and adjust even the under arm and see if this really corks correspond to the
position of his body. And I'm going to tilt
his pointy little bit in this direction and just add briefly the place where
he's sitting just to make sure that he's sitting on
the right place like that. And I'm just going to add his stomach because it is a very specific part
of this guy's body. And it adds to his character and to his poker dot He's Lin for. So I'm just going to
find according to the proportions of the
body and what I see, how his stomach is leaned
forward just really roughly. And now I already
have the sketch. And from here, what I can do is basically just
to refine some stuff. And I see if
everything is correct, I can add some hat here. Now he's getting
more of a character. I can add my be the shadow
of his eyes like that. If I have time if I have EPA, he hasn't moved and
I remember that. But some of the things if
you notice the movement, some things you will remember and use that
also in your drawing. Tried to memorize how the
person was the post-doc. This person was n because
she will definitely move and you will
be very annoyed that you didn't grasp the pulse, but just pick up oppose that you memorize and try to
add that to your face. Why? Using what you know
about proportions. But it is way, what is
the most important is basically to grasp the balance, the proportions, and the
overall character of this guy. And later on you
can maybe just put some shadows here on this leg just to add more to
that perspective. You can add some
accents somewhere with the pen where he's
contacting the, some surfaces that add some more steadiness
to the character. And here we have
the sketch pretty much I have not used
from the picture. I have just observed the guy. And that is my basically
thinking process when I draw, when I draw these characters. Now, let me show you another
drawing as an example and use another pencil and to see a different
kind of approach. Drawing sketches.
7. OnePointPerspective: Hello there and welcome back. Now let's go into depth with
the perspective of rows. And let's start with the cube. In this lecture, I'm going
to use a basic ruler just to make things more cleans for you to understand
among get too messy. You can use that or you can just draw very roughly as I
did in the first lecture. The main point is for you to understand the principle behind the perspective and how this changes the way we
see the object. And the main thing that q. Now let's draw the
perspective line and assume that this horizontal line here. And let's assume
that we have a cube. And I'm going to talk about now 1 perspective and
two-point perspective. And what is the
difference between them? Now let's assume that we have a point, a vanishing points. And vanishing point
is the points where all the lines are
disappearing in the distance. And you know, when you
look at, for example, the railway city in
the railway station, you can see a very clear example how the lines disappear
in the distance. It's not because the
railroad gets smaller, is just because
the perspective is changing your perception of how they disappear and God gets smaller and smaller
in the distance. This is basically the simplest
way for me to explain it. So let's assume this is
our vanishing point, where and the orange
line disappear 1 and we don't see the cube
anymore or the lines anymore. And let's assume
we have one cube below and above the
perspective line. Now, if we have perspective with one vanishing point, means, it means that all the
sides of the cube will be perpendicular to or horizon. So it means it will have a cube. Let's assume it's one over here. And we are going to see
this cube from from the front and that a
vertical lines are perpendicular to the
horizontal line. So we'll just have
one over here. And we'll just drag
one over here. And we'll make the
ABL line over here. It's parallel to the
horizontal line. So there is no
difficulties in that. I'm just going to draw these lines and drag the
line for the other tq. Because they are
exactly the same. They are. There two sides are, but the lines are perpendicular or parallel to the
horizontal line. Let's have one. On the horizon, m1. I'm not going to have its place. Let's have one above, above the line and above the horizontal line
and one below. And I'm going to draw
one here and I'm going to eyeball the cube over here. So these are the front
science of these cubes. So how would we decide which
sides of the cube we see? Well, one thing is that
every corner of the cube, this one, and this one connects to the
vanishing point here. Let's do that. Let's connect all those lines, even among those that
are behind the cue, to the vanishing
point on the queue. And this one here. And let's do that to deal
with the other cube. You can be as precise
as you want to be. You can draw that
pretty quickly just, just by hand if you want to. But it's a kind of a
relaxing exercise. At the same time, if you don't want to
get too technical. This can be a little boring. I can totally understand that. But when you know that already, it will come naturally to you. It will get build-up
in your system and you will not have to think too much about the lines and want to
connect what not to connect, you just know it. So how do we decide
where the cube ends? While it's basically, there is not the right
way to measure it. Awhile. There could be, but I'm not
going to get too technical. I'm just going to
assume that the cube, the other side is
ending over here. I'm just going to
draw one line here and 11, one line here. So this line here that is intersecting the line
on each side that is intersecting with the
other parallel line of the backside of
the queue describes the basically the what side of the cubic going to
see in perspective. The same here. Now they're intersecting lines for the lower part of the queue, because now we have
a cube that is above or perspective line
or horizontal line. This will decide what line
we're going to see over here. And now, if we want to see where the other lines are here, what we'll do is take each point of this corners of the cube. And what you do is you just draw a perpendicular line
down, downwards. And here you do it with
the other point like that. And same here for
the upper tube. You just connect this point here up and you just draw
another perpendicular line. And what you get here now is two new points where the
lines of the cube crosses, which is this line, this point and this
0.1 does it gave us, it gave us the backside of the cube now and draw as if
the cube is transparent. So I'm just gonna
connect dot and here, where are those points? Obviously they're here. And here. Just has to be precise. So it doesn't have
become twist it. So it's approximately over here. So from all this mess, I'm just going to make
the lines very thick here so you can see exactly
how we got the queue. Now, these are the front
side of four cubed. This is the side we see. And this one is the side we see. And hear from the cube that
is below or horizontal line. These are the sides
and these are the backside of the cube as
if the cube is transparent. In case we need to know exactly where the
tube is standing, which we will do
for later purposes. Also, to show you how to draw
the shadows of this cube. So this is basically very
simple way to explain 1 perspective and how you basically decide or
perspective with this, this applies to the cube. The cube is lower down. It means that you
will see more of this part is going
to be more open. Or if the cube is more up and
until it comes to the top, if you look straight up, you will see just the lower part of the cube or the
cubist just below, straight down of where
you're standing. Eoc just the upper
part of the queue. So now I'm going to explain the two-point perspective
in the next lecture.
8. TwoPointsPerspective: So now let's continue with from where we started
with the cubes. And now let me talk about
two points perspective. Let's assume that this
cube is slightly turned, so we don't see the
cubes from sight, but we see the cubes corner. So if we see only this corner and this
corner will still be perpendicular to or a need to degrees of the horizontal line. Let's draw this one here. And now. If we have the same queue, if you say this is the corner of our Q, approximately over here. Now, how do we decide who are the other
two sides of the cube are? And these come with
2 perspective, which means that these lines
are not perpendicular. They are not parallel to the
horizontal line anymore, but they're also
changing in perspective. Let's say, how do we find that? We find a point here
in the horizon? It depends how this
cube is turned, what how we decide up
is while we observe in real life through a
live drawing and so on, did here, we'll do
just an assumption. And we have another point that
is going to be over here. Let's assume that is over there. So what it means to find the
other sides of the cube, and what we see from the cube is basically connect
the two sides of the cube of these corner to each these two
vanishing points. So we'll have one here and we'll have the other
vanishing point. Then. This is basically
clear mathematics. And so far, it doesn't have a lot to do with
creativity here. Because we are trying
to copy a real life. We trying to create the
illusion that what we see in real life is basically applied
correctly on the paper, and it applies to certain
rules depending on our vision. So how do we decide the
two sides of the cube? Well, this is just
an assumption. And again, if you have
this cube in real life, you will see that
you can measure dots with a line or aligning
into other objects, which I'm going to
show you later on. But let's assume that the other part on this side
of the cube is over here. So just draw another
perpendicular line, or 90 degrees from the
horizon, the horizontal line. And do that similar
on the other side. Let's assume it's over here. Now we have two other
points which are crossing with the lines that connect
to the vanishing points. And now we have two
more points to connect. So connect this line to
the vanishing point. Over here. As you see, the line is already connected to
this vanishing points. We don't have to redo that, connect this line, this point, to the vanishing point. Let's do that. And I also connect this one to the vanishing
point, the A-site. Again, it already connects. It is connected to
this vanishing line, and we have one more
line to connect, one more point to connect and to find another line from for this cube like that. And now we see that
what we find is a point over here where these two lines are
vanishing point connect. And you see automatically that actually if we've
done everything correct, the point here and the point of this line will draw
a line that is exactly perpendicular or forming 90 degrees above the
horizontal line. And yes, it does exactly that. You see and hear. What do we see now is
that the two sides of the cube and not only one-sided perspective
like it is here. So if basically this is the
side we see of the cube. This is the upper
part of the cube, that is because it is
below the horizontal line. And if it's the other
part that we see here. And now we can do the
same for the upper part, but let's change the
vanishing point. Afford a cube that is
above the horizontal line. So let's just go ahead and draw again the corner of the cube. Let's assume it's,
it's over here. So this point and this point. So let's use this vanishing
point for this Q2. But let's stretch
the vanishing point for this job over here. Again, where the
vanishing point is depends on where you're standing and which side you see the cube, how much you see from it. And this is something
that we can experiment with an observed from
real life drawing. That's why it's very important
to draw things from one. So let's connect these points again to this vanishing point, this one as well. And now we have a new
vanishing point here. Let's connect down here, and let's connect it on
the upper point here. Okay? So now we assume that the cube, that this is the
sides of the cube. Let's stretch these lines because they are
aligned, need to, need two degrees, 90 degrees, where that Q with
the horizontal line. So one will be here, and the next one is
going to be here. Let me draw the
rest of the lines so we complete the cube and you will have
a clear picture. What I'm talking about. So connect this
corner, this corner, and this corner to this line, and this corner to this line. And what is left to do
is have this point here. And now let's connect
it to this vanishing, the new vanishing
point M. Again, if we've done everything right, there will be a point here and a point here that
would be aligned, won't be able to align
that is 90 degrees with the horizontal line is perpendicular to the
horizontal line. And you see that is
pretty much correct. So we've done things right? So here we have a Q dot is
above all a horizontal line. And the size doesn't
we see are the sides. And as you see in this queue, when Miss changed
the vanishing point, we see much more of this side of the cube
rather than this side. And the next thing
is that if we have the cube on the horizontal
line for both cases, here, we will not have
any changes of the queue. See one square, we will not see any other side of the cube. And if we have this one, then we'll just have, we will have this line here. If it's exactly on
the horizontal line, will have two new points, which will be connected again to the vanishing points here. And here. Which
means that we will see on the two
sides of the cube. Now we have this side here. And if we continue down
the side and connect, this time the line to the
ultimate fishing point. Here. And here, you see
that we are not going to see either the lower and the upper part or the
lower part of the cube. But we're only going
to see the two sides. This one and this one. Just to clarify, I'm going to just make these corners darker. And you see how we
built these blocks and how the perspective
and the 2 vanishing, vanishing points change
how we see the cube. So I hope this was
not too confusing. As soon as you get a grip of it, we'll find that it is
even fun because suddenly you get a perfect cube,
perfect perspective. And I have used a ruler on purpose because you need to have positive feedback from the get-go when
you start drawing. And this is very
easy to achieve. I can just use this
mathematical principles. So I'm gonna go ahead
with the next lecture and the next shape that I'm going to show you the perspective of. See you there.
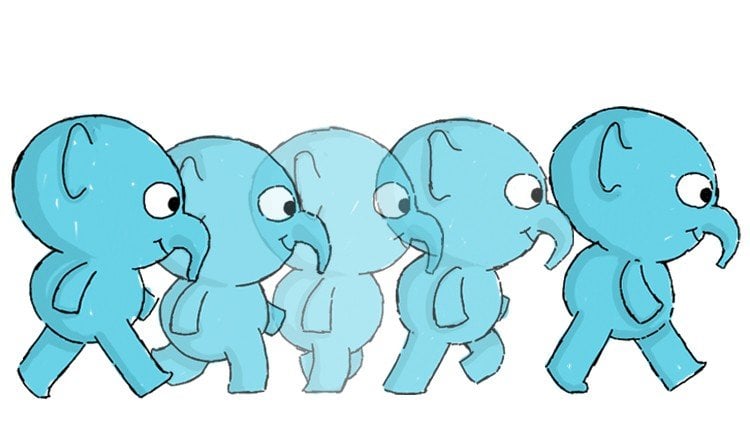
9. WarmUp: Before you start storyboarding, it is good to warm up. How you warm up is by trying to sketch really
fast your main characters. To do that, take
a piece of paper and draw one of your
main characters. For example, now,
on the empty space, choose a couple of poses that your character will likely take. With this process, you will also describe who the character is, how she or here reacts. How would she be happy? How would she be sad? How would she rest? Use the principle of sketching, using just stick
figure to start with. In same way that I
showed you in the video, where we'll sketch people
from life in that way, you will be able quickly
to find the proportions, to find the balance of the body and the main posture
of your character. This will help you to quickly go into the storyboarding and draft your panels without wasting your time trying to discover
who your character is, then why is important to warm up when you start storyboarding. Every time we get
away from drawing, we kind of slightly
forget how to draw, or we get caught up
in fear of drawing. This is not very useful
when the storyboard. So when you loosen up on a
sheet of paper before starting storyboarding will
help you to get into the process and overcome
even your fear of drawing. Each time you will approach the blank panels to learn more about how
to draw characters. Go to my course, how to draw cartoony humans.
10. FromScript toThumbnails: So now we're going to
break down the script and go through the process
of creating a storyboard. So here is our script. And it says exterior forest day. That is oral location in Grid
runs through the forest. Peter is just behind her. Ingrid turns around and sees the drag on the
protein behind them, sending fireballs
through the air. Pete, come on, hurry. Peter is trying to
catch up with her. He stumbles and falls. The dragon gets closer. Peter says, no
chance to run away. He closes his eyes and
waits for the worst. Just when ingress appears, she stands between
him and the dragon, encourage Rosco swatch and
fights the drug and as he attacks, include
fights furiously. Her swot digs into the dragons. The dragon screams in
pain and flies off. Ingrid goes back to
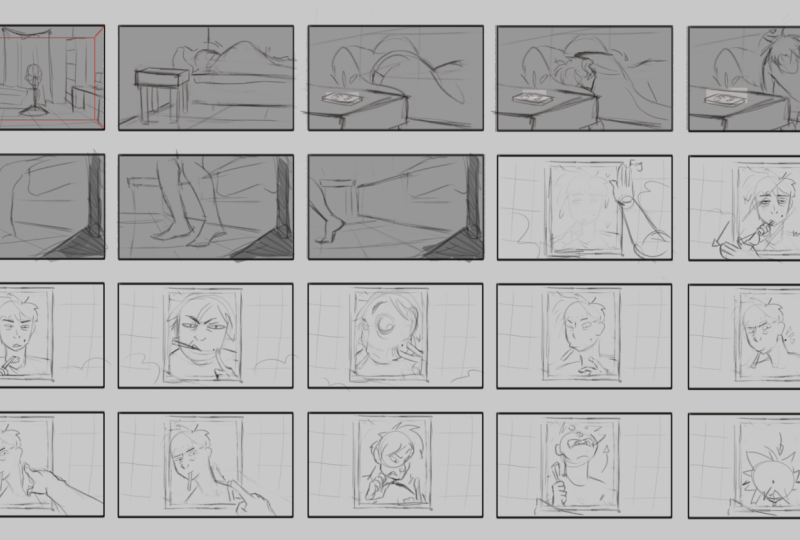
Peter. Are you okay? I'm fine. Or your something in grid? They're safe for now. So what I do first is prepare
a blank sheet of paper. I have fiscal paper or on
Photoshop or another program. And I put some frames. What I want to do
here is sketch very quickly and not really
think about it. Just feel the flow of
the story and the beat. So I'm going to start
with the first scene with drafting a scene where the
characters are running away. And here either I have the
character design or I don't. In this case, I can just imagine how the
characters would look like and kind of designed
the forests as well. So I'm starting with
that and drafting quickly while the characters
are going to run. And what I need to do first is to find what a
perspective face. So I quickly draft out with white lines just to give
an orientation how the perspective S. And
I'm going to use a diagonal angle here because the scene as dramatic
as it is action scene, and I want more diagonal
lines here to make sure I convey the drama
within the sequence. Next, I want to emphasize the dialogue where Ingrid
says Pete, Come on, hurry. So I'm going to
signify that and turn her head towards
Peter while she's running and still
keeping the same pace. Next, I want to show
her running away so she's she's much faster than Peter and she loses
sight of him in a way, trusting that he's
going to catch up water. In the next shot. I'm going to have a wide angle
where we see the location. And I'm going to have
the white Lengel from a bird's-eye view. Because I want to simplify that they're small children
in the big forest. There is a danger
looming over them. Also, I want to show the
location of the branch. Does pH is gone and
stumble and fall on. And just to have a hookup for the later action
in the scene. 10, I want to show him running and approach
in the branch, but he's not looking
ahead of him. She's trying to get away from the drag on and make sure that he is not safe distance. So he turns his
hat to the dragon. And in the next shot, I want to show the
dragon because I want to show what
he's looking at. It's still not his
point of view, so I'm not showing the
dragon from an angle. Where is Pete's point of view? But I'll still want to make sure to pointers attention to
what Peter is looking at. And now I am showing Peter from the dragons
points of view. And he is a small child
trying to run and the dragon is really
strong and dangerous. Notice that I keep
the direction of the running always from
screen left to screen right, because we have the camera on
that side of a 180 degrees. And as I showed that he's
approaching the branch. The next shot, I want to
have a closeup to make sure that the viewer
understands that he actually stumbled on the branch. So I'll put a close up
on his feet and branch. And next we want to
see Peter falling. So I'll do a medium shot where Peter is going
to fall forward. And I'm going to
signify with the arrow that the camera is follows
him down until he falls. And that is going to
be the next shot, the final pose of Peter
folding where the camera move. And now we want to go back and see what
ingredient is doing. Because now we've seen the story from bitters points
of point of view. And Ingrid's is also
a main character. So we'll have to go back
and see what she's doing. And in the script, it says that Peter was closing his eyes until Ingrid appears. But we also need to take part of how is she feeling and how does she discovered that
Peter is gone? So we go back to her and draw a picture drawn
frame where she is running. And she's still running
and now she is pulsing to make sure Peter is behind her and she doesn't find him there. So now she is really stressed. So we want to see
a real close up of her to show her emotions. And she looks up to
see even the drug. And so she gets even more
distressed and worried. And now we see from her
point of view what she's seeing and she's seen the
dragon approaching Peter. She takes very quick decision. And in the middle shot now
we will leave the close-up. We go back to the shot to the previous shot and where
she is in the middle shelf. And she changes direction now. So she goes from right to left. And now it's okay for her to run in this direction because, you know, we've
seen her changing direction in the screen. And now we see the
dragon approaching. We are going to signify this
where the shadow and have a bird's-eye view on our characters to signify
how helpless they are. So the shadow approaching,
looming over Peter. And we are closing
in two Peter to signify the danger
approaching over him. Also. It is a way of delaying action to have the viewer
wait for the payoff. And we have, we see the dragon from the
Peter points of view. And now we choose an angle, a low angle, where Peter
as all along his clothing, his eyes and he doesn't want to see what's going to happen next. But nothing is happening. And he opens his eyes to see. And now we bring ingredient. So we're basically changing the perspective of the
story for from back, from Peter's points of view. From Peter's perspective,
how he is experiencing the story and from
Ingrid's perspective, how she's experienced the story
and when she's coming in. So the script is really good base for interpretation for you
as storyboard artist. So now ingrate is coming
in fighting the dragon. And we're looking over the
shoulder now on Ingrid's, just to signify that
she's taking charge, she's gaining power
over the dragon. And again, she's
fighting the dragon. The dragon is pretty
serious enemy. And she's just a little girl. Some for dark matter, it is nice to choose different angles where
she is bigger in the picture and then
when the dragon is larger on the picture,
on the screen. And just to have that dynamic
of the fight being unequal. But then also for
introducing that, she is also very strong
and very skillful and has a chance to win. And then we have this
shot where she's nailing the drug and what has
worked in the dragons. I, by the dragon is taking a big part of the screen and Ingrid is adjust
the little girl, but still her success. Welfare larger. If we show a composition, a little girl is winning
over a beast of this size. Her heroic, her heroic
role is greater. At that. With that image, the dragon flies off. And now Ingrid is seeing
what's happening, making sure that
the dragon is gone. Before she pays attention to her friend and runs
off to check on Peter. And here at the end we
have the dialogue I, okay. And Peter saying, I'm fine a year, quite
something ingrate. And they're safe for now. Now this is a rough thumbnails. Now we'll have to break down
those thumbnails and make sure that they work as
a storyboard frames. I always do thumbnails
when I start story-boarding because you
can move these images around, you can skip an image or
you can add an image, and it is just your drawing
table before you go in. And drought frames that will
go into the antibiotic for a final approval of the director
or even out the editor. And that's what
we're gonna do next.
11. FromThumbnails toFinalPanels: So how do I go about one, I start drawing the real frames. This first shot, it's
a rather complex. It has a background and it
has a certain speed to it. The characters are basically
running through a forest. And, and I want to make sure that the background
is scanning the same. So it feels like a pays
for the same forest. Of course, you can
do that frame by frame on a sheet of paper and you can scan at later on and you can do the
forest very roughly. That's also okay because when
you work with storyboards, speed is very important to be able to get
the frames quickly. And so roughness is
rather to prefer, rather than nice drawings. But for the sake of it, if we have a lot of time
when the production where we can afford to
make nice drawings, I would have
something like that. So I would measure my frame for the format that
I want to work with. And I will place it in these
layers higher up so I can move through this scene
and actually safe frames, moving this part through
the whole forest like that. And I will maybe
start from here. And I have even there my
sketch to start with. And our cleaned up later and do some shading for the forest. And then I will have my characters placing
throughout the scene. And here is Peter's. So here is basically
the first frame. And I'll move this around
here and I'll just crop it. I'll crop it like
that image crop. And I'll save that as a JPEG. Save as. And here, I've already saved my
frames here in the folder, what I've named thumbnails. So this is my first frame
from the storyboard, from the Photoshop file. And here is my second frame, which comes from, I'm just
gonna cancel out here. And I'm going to undo, which comes from me moving this frame in
another direction. So I get a lot of
peace of this forest or even hear what I have
the same character, copy it on different layers. And I'm just going to have even Peter there
for the next frame. And I'll have something in the foreground just
to create pace. And I'm just gonna
do the same thing. I'm just going to crop the image to the
side to this size. And I'm going to
save it as a JPEG to which I already
have over here. And you see that you can feel the pace of these frames if
you scroll through them. And here I can have this
dialogue, compete, hurry. So these are basically
three frames from the same shots where the camera is the same
and there is no cut. And thus how I
signified that there is a continuum congruity
in the frame. So this frame and this whole
sequence image is complete. So I'm going to go then
to the next frame, this whole shot from
the bird's eye view. And here is I'm going to
name it as number two. And I'm going to have
this frame here. And I'm not going to have the whole woods because
I just want to signify that the characters are running through the woods and the camera is kind of still. So I usually always
start with drafting this perspective thing
and then drafting the, the characters where they are. And I'm adding the forest. And later on, if I have time, even if the
production allows it, I'm going to put some shading on it just to
have a nicer composition, to suggest the
lighting a little bit, and how the forest frames
this, this composition. And that is going to
be my frame number, my image number five. So the numbers I
give from my images here is just for me so I
can follow some order. Now, this images later on can
be renamed or they can be changed because the
director might want you to flip some shadows
here and there. Because when you get
to the first draft of your composition of your sequence as a storyboard and you put it in the enzymatic, then you can see the
flow of this animation of the storyboard if that works or if you
need to change it. So then here I want to see I have Peter
approaching the branch. But before that, it feels like I need to have
some more speed. I need to have
them running more. So this is something I see. One I work within this process. So what I do, what I
did here as I added another frame here
where Peter is running. So what I did is just, I took a piece of of the woods. And here I have peter
running into poses. And 11 of the spouses is
when he's running forward. And I just copy this layer. And I just make the
other posts very simple just to signify
that there is speed to it. And then I have another frame where I have
the same bowls of edges, turn his head
towards the dragon. I just want to simplify danger. And then I color this frames. Curious for this frame. And I'll close and open layers. And I get this layer. Whereas the background,
and for the next frame, I just move it a little bit. And eventually, what I get, if I see these frames, I get the sense of speed. Now, again, things
can be a really, really rough and the character
doesn't need to look exactly like this character
can be rough because again, the most important is that you can draw
these frames quickly. You can have a speed
in the production. And that's how I actually
go about through every single shot of
those shots and just create a couple of images
like this one for example, here I have sigma phi dot. We see, we follow
with Peter forward. And the frames that I'm doing in storyboard is basically
something like that. I draw this one and then move the background towards Peter. And then I have the other
frame where I just draw these two frames with Peter and have the background moving. And, and now I can cut on to this image and even have the dragon
approaching if you are. If you want to be
better in storyboard, you can even have the dragon flapping his wings
for two frames. Thus can make it even better. And here I have the close-up
and the Peter falling. And now you see that the
camera's going forward. And we have Ingrid in the same way with
two frames running. And again the same what? So basically I go through
every frame and break it down. And I want to show you another
frame that I've done here. For example, this frame
when Ingrid stops. And here I only
changed the eyes of the character because
it will sell like why the eyes is
important, are important. Well, it does because it
signifies direction and it gives the mode, the emotions towards
going on in the scene. So I have this frame where she's looking up and gas
basically the whole shot. So you want to pick up
all these small details, things that you can
think that will enrich your storyboard to put it in and make your
storyboard alive. So when the viewer
starts watching, they can get a clear sense of what the sequence
and scenes are about. And next, I'm going to show you the whole sequence
edited in the enigmatic. So you can see the ending, how this process ended.
12. Final Sequence: We start with the
characters running through the woods and the
pacing is fast. That drug a nice approaching. Peter is stumbling on the
branch and false. Ain't great. Continuous running. She turns around
to see if Peter is a k and sees the
dragon approaching. She takes the first decision and turns around and runs back. The drag on as a
looming over Peter. Close his eyes and
waits for the worst, but it doesn't happen. And Ingrid is coming in
and fighting the dragon. And she nails the
dragon in his eye. The dragon screams in
pain and flies off. Ingrid is making
sure that they're agonists away and
goals to Peter. Are you okay? I'm fine. Your something. And that's the final enigmatic
for this piece of script.
 Maria Avramova, Illustrator/Animator/Filmmaker