Transcripts
1. Introduction to the Class: Hi everyone. I'm treating digital
artist and committing ago. I've been doing for many, many, many years, doing
several things. These all these other things
you can see on the wall. Drawing is one of
them. My patient. This class, we're going to
learn a whole to do this. We're going to hold to
draw basically on papers. Okay? Because barrier is nice. You can touch it, you can
see it's in everything. The good thing with papers
is that you don't have, of course you will
need to use it after, but you don't have to stay all day long in front of dollar. You can draw basically everywhere in your
bed on your best of the nature of on the
patch, whatever you want. In this class, we learn
the whole to create mind-blowing and huge drawings
out of smaller pieces. Like these ones. This one's, this one's a, this one's, and so on and so forth. We learn how to
work efficiently, how to structure
your initial ideas. Of course, you can think
about whatever you want, but it's good to prove
things on paper first and to think how to draw it, memorize it, and how
to make it there. In order to work in this class, we're going to need
several tools. First, we're going to
need pencils in order to sketch and to do the
drafts of our drawings. Secondly, we're going
to need pens 0.05 to 0.5 millimeters to draw
the details of the joints. Then we're going to
need rubber so we can erase In part we don't
want from the sketch. We will need markers to color
and fill up the drawings. We're going to
need a light table to be able to see clearly
the details and also to be able to draw during the night graphic panel to work on graphic
design software. On the left up. Then,
of course we need a laptop to work
digitally on our drawing. In order to memorize the drinks. We're gonna need a scanner. Will work digitally at
the last spot so that you can derive your drinks
not only in two posters, but also in wherever you want, T-shirts, caps, skip
the boards wherever. This part is the last
part of the class and has not that much process, but still, it's interesting to see what you can do with
your drain afterwards. Take a cup of coffee,
cigarettes, you smoke. Let's get started right now.
2. Part I Inspiration: Hi again. As you can see, we
asked you in getting started and we are since his
younger self, which is nice. That's needs me to the first creation
process of this slide. The first thing you
need to know about yourself and about the way you draw is to understand
where it comes from. So let's start this class
with my inspiration. So you can't always counseling to talk
about my inspiration. The first thing we
need to talk about is comics or mangoes
or bond this unit, as we say in French. The main artist I'm going to mention are bent and Bill Smith who did coming slides
in 30 Deaf Night. Or one would. Another artist that
I like is actually wood pieces like ting girls,
Zombie versus robots. In order. Artists that I really like is Frank Miller who's really
famous for since CD. Batman ********. It's really contrasting
black and white. Very interesting. In the French comics. Bond this in a, we have like authors like and keep
the land who has been doing the comics Nico
bull, dogs email ten. I'm also the LTS Coleman. Works like Louis
Vuitton or veto pen. We have borne a really
famous artists Jiangxi hub more abuse with works like Lanka or all the
works of metal viola. Some more recent
artists like mature, bubbly and libeled 619 with
comics like carbon and CDC, Shangri-La and so
on and so forth. Talking about the mangoes, I would say a chore order is the most important one
of my inspiration with She's major work 12ths
gets real tonal also with the really famous Akira or I owe me as a
key with Nausicaa. Comics is not the
only inspiration. We can also talk about books. I'm a huge fan of sci-fi books, with my favorite
author being a London, as you French author. He's been writing
saints fictions, Cyberpunk books like Laszlo and you do that you can
provide if you're TIF. Philip K. **** is also a huge of the admire with Do Androids. Dream of Electric shape. You'll be Minority Report. We can also mention Greg
Nelson from William Gibson, a lot of them film wise, my main inspiration will
come with directors. So of course, we have
Stanley Kubrick, Christopher Nolan's Dennis when Martin Scorsese
Memorial, she gets real. I owe me as ICU again. Gi code. Yeah, Quentin Tarantino,
gear, Richie Wes Anderson. All of these movies
are greed and trances. So to help you get new
ideas and new pictures ACT. And of course, because
drawing is a long process, you can completely
draw in silence, but I do prefer to
do or in music. And my biggest inspiration
in music comes with the January called post-hoc
with bands like Godspeed, you block M pro,
Russian circles, Caspian, Pelikan, Bosque, Liege, and older bends off more popular and generally
like tool messy, better, edge 3d2 and called ditches shadow
and so on and so forth. So before starting
your drawings, I do advise you to download the huge playlist
of your favorite artists. So it gives you the mood, puts you in the vibes
and everything, and gives you a
lot of ideas are, so that's it for my inspiration. Know the important thing
for you is to understand where is your
inspiration coming from? To take it, to take
ideas from there. You don't need to
draw out of the blue. And it's really risky. So I would recommend you
to thin before drawing. So what am I? Why am I saying this? Because these sort of drawings
don't come out of nowhere. Means which themes
before, during this one? This one. Any other drawing? So
the first very step, your creation
process will be two, engage and to plan ahead. So because it's not easy to
come up with this drawing. At first, at some point we
see some strange brain mixing with CAN of painting with an altar radio and
some sort of shocks. Anyway, Yani, it's a real mess. So we need to think
ahead and to do so, I'm thinking about things
that I write down on the list or on my Instagram that I
sent to my wife, for example. Do this process like here. We can see what Zhongdu bigger
than a leverage effect is. You get xy, which became after Amnesty is getting
exceed our bottoms-up, which means pizza tree. Or Beller, which
is a speaker flow. Mandela Kelly Garcia. So it's calligraphy,
arabic man data. My quarterly phone,
Christian house. Madame BWA, which means
man with teeth in fingers. Anyway, you get the idea. Plan your ideas before even starting during them so
you know where to go. Now that we have talked
about inspiration, now that we have talked about the gears and tools
we're going to use. Let's talk about what we're
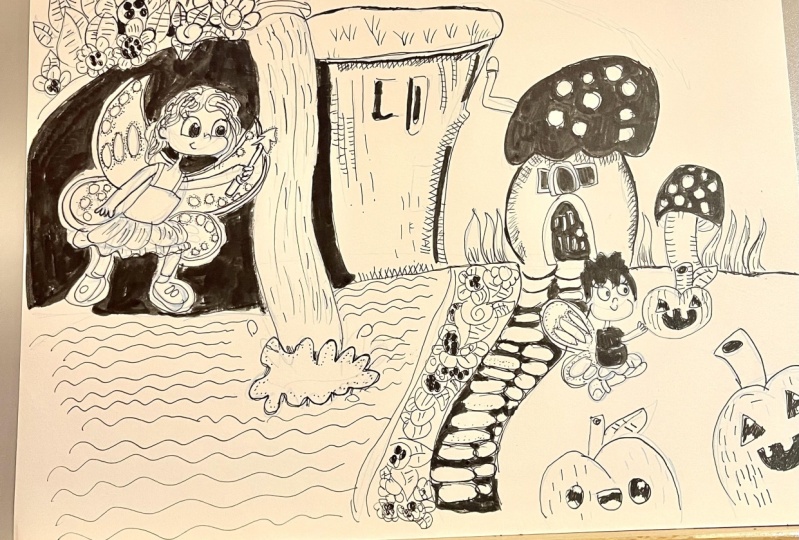
going to draw in this class. As I told you, we're going to draw cosmic tornado
that blowups. Tours of living East coffee cup and cathode are all normal with some shrimps all along the way and scrambled
pieces. Okay. This one comes from
these periods font. I was not so really happy with this because it's solid look, kind of not really
fixing anything else. What I wanted to do is to
continue something above and to have the two drawing
merging together. Let's get started. We started from this one, which is, by the way, assault of Mrs. universe
with whom she has galaxies inside and some
bubbles around with this one. And you're gonna see
how it goes in this.
3. Part II Sketching: Now in this part, we're going to learn
a whole to sketch, how to do a draft. By sketching, I'm
taking the idea and the big picture
of what you have in your mind on paper. We're going to draw this. Could it turn off the drawing? So as you can see
down the paper, because we are drawing out of a pre-existing during
which is Mrs. get xy. I start the new drawing by having the limitation
of the previous one. So we're gonna start
sketching from there. To sketch. We generally use pencils. It's pretty easy to work with. And you can see that we don't
spend too much time with details as we mainly
concentrate on the big picture. So I don't spend a lot of time focusing on
details because what we want to have here is the major idea and the
skeleton of the dream to come. Here you can see
that we have been drawing the voltage outlines, the builds outline, and the Lebanese coffee
could outline. After the first draft. When you are done
with the main idea. We can continue by having more details and
precising our sketches. And don't worry if you
mess up your sketch or your draft because
first we will draw, although the sketch later on. So he does not have to be super precise because
basically will be covered by Inc. suddenly we will erase the remaining
part of the draft. Wants the drawing and
coloring process is done. So don't worry, make beat lines, draw the skeleton
of the drawing. Have something really picture. What do you have in
your mind under paper? From there, you'll
be able to continue.
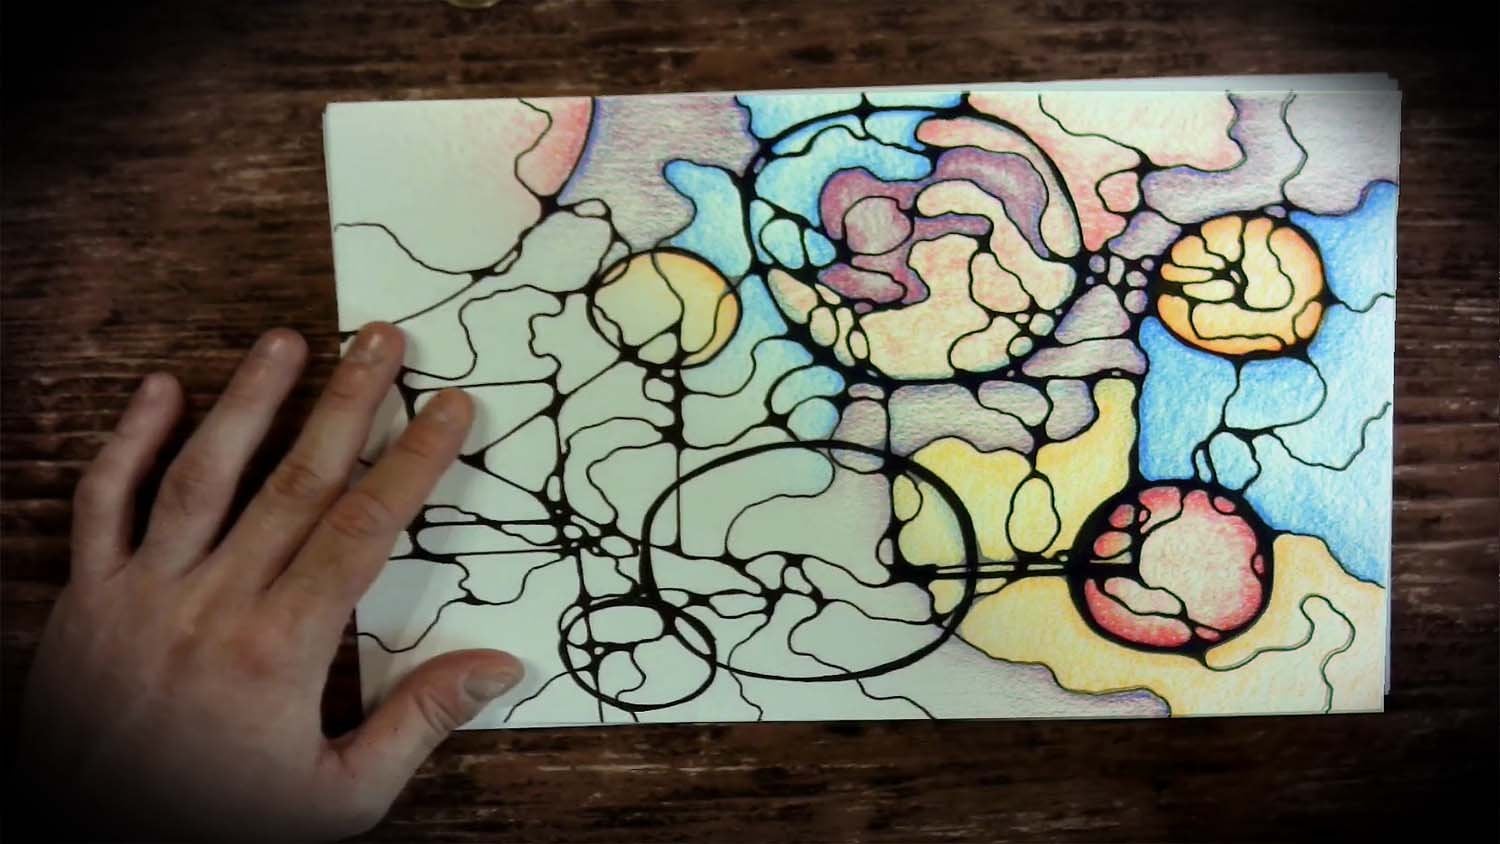
4. Part III Steps to Draw a Galactic Vortex: In this part, we will learn how to draw a galactic voltage. It does appear really difficult, but you're gonna see
it's pretty easy. We're going to start
from our sketch. I'll draft that gives us the main feature,
as you can see. And we will see the
different steps in drawing. Because I draw mainly in
black and white contrast. Only use black ink pens. As the one that I mentioned
in the introduction. The first step is to draw
the outlines and the n lines of the joy. To do so. And to be as precise
as possible, where we use thin pens from 0.05 millimeters
to 0.1 millimeter. So we run the line, all of the draft. As you can see. We take our time to
have a precise line. As you can see, we exclude
every different shapes. The aim is to always
close your line. As a loop. You can easily color
the inside of it. After. Once we are happy with the
inlines and the outlines, we can start filling up
the space inside them. I personally prefer to go for a second round on
the extremities of the line with a slightly
bigger pen from Etsy. Is 0.1 millimeter to
0.5 million meters. So I make sure not
to mess up with the boulder while coloring
and filling up the space. After sir, having secure the borders. We are good to go
and fill them up. Because we are drawing from
the MRS galaxy drawing. We're going to take the
same drawing process used to picture galaxies,
planets, and stars. In the previous drawing,
openness galaxy. We first sketch the rural
version of galaxies, star clusters with cycles. We know where to work. Because we working
from a different during the drawing process
will be a bit different also, as you can see in the MRS
galaxy during we have no line. Indeed, we tried to
imitate the glowy, shiny story Luke
of the galaxies. So we're gonna work with ducts. So we start from the
inside to the outside with a fairly thin pen of
0.05 millimeters. We do only one after the other. Nco cold, not too close, not too far from each other. As we go further out from
the center of the circle, we can use bigger pens from 0.1 millimeters and we start to
compress the dots a bit more. In order to finish
smoothly, cluster of stars, we will use a 0.3
millimeter pen and compress even more our dots till we almost get a compact
black color. The aim is to fade
into the black. Once we are done with it, we can finally fill up
the remaining space with the Beagle black pen or
as instance of the market.
5. Part IV Steps to Draw Scrabble People: In this part, we will draw an
EQ trick, scrambled people. Well, these concept my
sounds a bit weird, but you're gonna see
it's really easy. First because I decided to drill them after
my initial drafts. We will add them,
sketching them. Not that we are not
obliged to have a final draft at the beginning. I'm always upgrading
my drawings, undergo. That's the beauty of it. Follow your feelings
and your inspiration as you are getting
further in your drawing. Then I was crumbling people. Draft. We have u, x and S and
so on and so forth. Of course, you need to know
a bit your alphabets, but now let's add some lighting. Once the draft is done, we do the same process. Again. We draw in lines, the outlines of the
scrambled people and the lightings with a thin Ben. Secondly, the line thicker
with a second round, with a bigger pen. We feel that the inside space, because the scrambled people are surrounded by black area, is better to keep them right? We don't color inside yet. Once done coloring, we have a better understanding
of the composition. So we can then shade this crumbled people following a strict black and
white concept. So in this concept,
right equals white. So not drawing dark or shade
area Ecoles black coloring. Even if it's the first time
you do it, scrambled people, figures are pretty simple, pretty easy to follow. So we do the same process
inside this troubled people, and we do their shades in
black and the normal area. We don't do anything. We repeat the same
process of coloring. Once we have the
border of the shades, we could only inside,
and that's it.
6. Part V Steps to Draw a Skateboarder Bulldog: In this part, we will draw
a skateboarder bulldog. It's going to be a
bit more difficult because it is an organic matter, leaving species, animal,
human, whatever. It's not harmonious, it's not
soft nor flat, no precise. So there is a lot more
details in the shading. The first draft is
the same process we go over the biggest details. So as you can see, I'm
not good with the dogs. I saw just remove them
and put sunglasses on it. Then we do the shading sketch. It's important to sketched
the shade in advance so we know where our
black spot will. Once we did this, we repeat the same process. So first step is inline
outline borders. More precise, of course, because there is much more
details and everything. The second step is again, the Saigon round of the
shades with a thicker pen. The third step is the
coloring of the shape. At the end, my bulldog looks
like a bit of mutant cat, which has been drawn
in acetyl or wherever. But let's pretend it's a
bulldog doing skateboard. You don't really
care if it looks like the way you
imagine it at first, because basically
it's going to be a small details in
the overhaul drawing. So even though it's not as good as you
weren't planning it, it doesn't really matter.
7. Part VI Steps to Draw a Tower of Lebanese Coffee Cups: In this part, we
will learn how to draw a tour of live
in his coffee cup. And also cathedral mammoth. All the other things
of the drawings. Now it's time to draw the
upper boarder of the drawing. And because the
general shape is easy, we can do it's trades without having to really sketch
the first draft. We draw the outlines. When we finished with the
nature and role lines, we can precise our draft to get more details before
inking with the pens. And do the details for the
Lebanese coffee kept tower, and also for the
cathedral mammoth. Once we are done with sketching, we can continue
with the applying, which has much more detail and necessary and Greedo
work and agreed at a time. Don't hesitate to help you
from real life objects. As for instance, this real
live in nice coffee cup. There is no shame helping
you with examples. These parts, we will use the black and white
technique used previously with the
scrambled pupil and the skateboarder bulldozer. Attention is trick here because after having drawn the shade
of the Lebanese coffee cup, we can see that the
pattern of the curbs is both in the bright
and dark area. So in order to create
a nice effect, we will have the pattern white in the dark side and
black and the right side. Which means that one part
of the pattern is closed in black and the other side of
the pattern is open in white. They do not connect together. This gives us a much
more contrasty look. Once the outlines done, we're good to go
with the cigarette thicker around m,
the filling process. After getting used
to the process, in general, you are free to go around as you wish and
advanced where you want. So you can go for the
mammoth cathedral, Even though you haven't finished the Lebanese
coffee cup tower, you can go for the shrimps, you can go for the
mechanic arms, the styles and everything. You don't have a step-by-step
process to follow. Once you get use to the process. Attention when you
fill up with marker, make sure to add an
additional layer of paper below for the ink not to leave stains
beneath your drawing. So for example, if you
don't want your table to be full of marks of marker, put an additional
layer of paper. That's it. You're good to go and good to continue the jury everywhere. So creating the same process. First, drawing the
outlines, inlines, sagen to thicker them
with the video pens. And third, to fill
it up with Coda. Now we can see the final
results of our drawing. Now that we have fine
piece of drawing, we can merge this sheet
of paper, the next one. Before we do so, we need to clean it
and to memorize it. So we're going to use
this big guy over here, which is a scanner. We're going to
memorize the drink. We're going to turn
this guy, cancel.
8. Part VII Steps to Make Photoshop Adjustments: In this part, we will
digitally enhance our drawing and merge it
with the MRS galaxy one. Not that we aren't obliged
to work digitally. If you're drawing satisfies you as it is. It's a good thing. No need to go on the laptop. But it's still a good thing to numerous your drinks so you
can use it any way you want. It gives us a greater
variety of use. So let's get started. Let's first open our Mrs.
galaxy drawing in Photoshop. As you can see, we already
prepared the size of the file so it fits twice the
size of an A3 drawing. You can change the
size of your file, going to image and image size, and then you adjust
it the way you want. First thing we need to do is
to import all new drawing. We go to the folder we want
and then we drag our file, tilt the Photoshop window. Not that we'll have
two files because most scanner fit
only a full papers. So we had to do two
scans for an A3 paper. Once our file is imported, will have to rotate it going
to the upper tab and to enter the 90-degree value to put the file in its right angle. We then drag it on top and proceed the same way
with the sagen fight. As you can see, our two files are sort of matching together, but we can still clearly see that there are two
separated scans. The next step will be
to merge them together. To do so, we select each layer separately and erase
with the eraser tool the junction line to
make the merging smoother because the two
scans are overlapped him we can erase one
details without losing the drawing because it is still present on the layer beneath. This process makes the
merging of the two scans Mitch better till the
point we cannot see. It's a composition
of two pictures. In order to really make sure your two scans are
match perfectly, you can change the
opacity properties of the top layer and
click on multiply. Opacity moved. This will change the overlaying property of the layers so you can
see the one under it. And then you can make sure that the two are perfectly adjusted. Once we are happy
with the merging, we can group the
layers together, select both layers
and press Control. Cheap. Then we place are doing on
top of the MRS galaxy one. Select the group
and move it on top. I think all new drawing is a bit bigger than the
missus, get x, y1. Then we go on the top
bell and we click on the chain icon and then resize our group so it fits more
to the older during size. Again, make sure
your two drawings are fitting perfectly together. Play with the opacity property. Click on the multiply to have a view of the two
drawing and make the adjustment needed either
in size, place, rotation. Then we'll repeat
the same process for the tutoring
to blend smoothly. One with the old. Select the magic wand tool. Click on the white background. The MRS Galaxy Troy. As you can see,
it's a bit darker. So we do these two, only select the white. So when we erase the white, we cannot erase the drawing
which is not selected. We are good to go
with the eraser tool. As you can see, only the
white part is erased. We do the same process for the white background
of the purchasing. This to continue to enhance. We then focus on small details. The two bubbles aren't
really blending well. We select them with the rectangular marquee tool to exclude them from the
corresponding layer. So any change made will only affect the bubbles and
not the overhaul drawing. Then we transform them as we want to make
them fit better. We have our enter your drawing. Now we will enhance its
color and contrast. As you can see the memorization show the imperfection
of the choroid. We see the different ink opacity left by marker pens, etc. We will harmonize the whole by contrasting and making
the dark, darker. We cheek on brightness contrast to play first with the
contrast of the whole. Then we make the dark darker
by teaching on the level, changing the entry
point of the church. The more it is close to
the white. It will be. We correct this morning
perfection by pinching with an opec brush
tool on a new layer. Not to keep it obvious and ugly, we change the opacity
property of that layer. Solid black color will only be added to the space where
there is already black on it. That's it. We have our final
drawing and we can save it as a JPEG or a PNG
picture by going to File, Save Us and then
changing its format. Once done with it, you can do whatever you want
with your digital drawing. You can post it on social media, print it on shirt or Linux, etc. Something tells me
that this one would do perfectly as an artwork
on the skin bulb. I hope you enjoyed
this class and that it will help you to unleash your creativity
and produce cooled CKD leaking wheel but
competing pieces of drain. Now it's your turn to create
in the class project post your own artwork using the same techniques
seen in the class. You're free to reach me
anytime for further questions, I'm looking forward
to hear from you. Choose.
 Felix Brassier, Digital Artist / Languages Teacher