Transcripts
1. Introduction: Hi. My name is Mr School. In this class, we will be learning about something I don't have. And that is a nose. Oh, um, Mr School? Yeah. Can I please take over? Why? It's my glass. Oh, no care Guess. I think the nose is a very complex feature on its own and deserves our special time and attention. That's why I have decided to make this class. Were you present for approach minted, which are the three circles planes, Anatoly and shading. This class is filled with little explanations and plenty of examples. So you will not miss out on anything. Let's get into it.
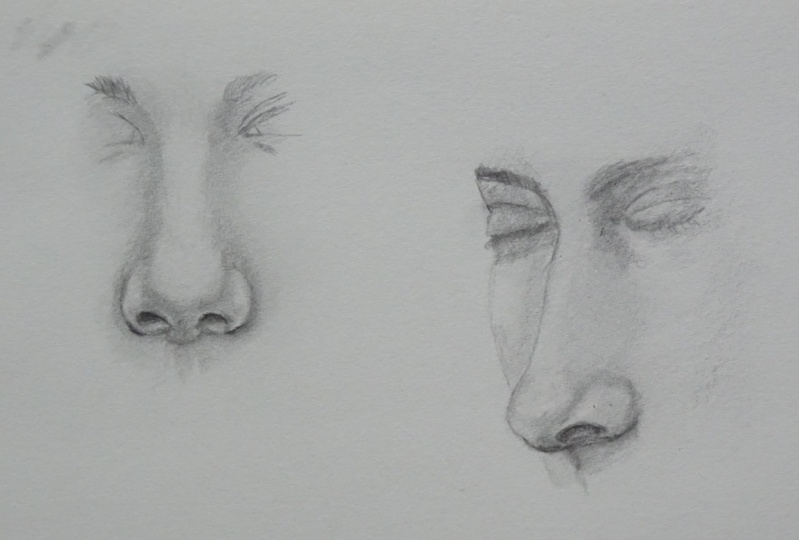
2. Three circles : The first method is the three circum. It is very simple as you draw three circles to begin your nose drawing to for the wings and one hooded zip. Then you draw the nostrils where the circles intercept. Then you follow the circle line with observing the reference and it should form a nose shape. Then we follow up from the circles and finish the whole knows. I will just sketch a nose so I can show you the parts of it. Since we are here, however, you will learn about how to finish the rest of the nose later in the curse. This part is only about the circles. So we have the root of the nose, the bridge. The big circle is called itself. You have the nostrils. Those ones are the wings. So now remember one big circle for the chip and choose most circles for the wings. Use those circles as your guidelines. Let me now show you from the side. One wing is not visible. Therefore, we make only two circles drawn nostril between them and connect them with lines. You can use this method for drawing the nose from any side. Just throw those circles according to decisis of departs. It's good to simplify things as much as possible because everything is made out of shapes. The more you will try to compare objects to shapes, the better and easier it'll be for you to draw. You might think that this matter is work in the garden kids. Well, yes, and that's the whole fun of it. The simplest things lead to more complex ones. Every artist should learn how to draw circles properly, just like the locates.
3. Planes: once upon a time, there was a cube. A cube? You ask? Yes, A cube. You see, the cube is a simple shape and you can kind of buildings from it. Before you understand more complex shapes. It is always better to know a bit. Aren't you about this very important thing? At least try to understand the perspective of it, how it looks from different angles and you'll be set. So from the Cube, we can make a more complex shape. And this one is the basic point of a nose. Let's get numbers to do planes. Red number one is the left side. Plain number two is the front plane, and number three is right side playing as you can see in the picture. The green one is the bottom plane. This plane is the simplest one as a divisive nose into three basic parts. Then we will form a more complex shape. From this one. You will just change the bottom plane, observe closely and now we have knows more defined. So the green number one and three are the nostril planes, and number two is the bottom part off the tip off the nose. No, we break it down even further. We make new wings as a separate plane. If you know this the nose bridge kind of ghost inside a tip of the nose. I will explain why in the anatomy part together, it forms this kind of shape. We erased this part and make it into occur. So now we have two new planes the wings, room number one inch you and we have the deplane more defined as well. You'll be able to form any knows from this plane. You won't even need honor to me to form a nose using this. However, if you want to master the nose completely, I highly recommend learning about the anatomy in the next part. I've also adopted reference. Try to go over this stage as we did and practice saying these parts of the nose a single planes Take a look at this. We can kind of go even deeper and form a shape like this. It should be clear to you. Hopefully try to observe their values are changing. For example, the tip of the nose kind of breaks here and it changes value because the bottom line is going away from light. Can you know, See why I wanted you to study the queue. You can also observe the car shadows which are the darkest parts of the nose. And it will be clear to you because usually the core shadows separate individual planes. Now we have displaying from the side again the red one which is hidden at the moment as we can't see it from this angle. And red three are decide points. And the rest too is the front plane. Then the green number one is the bottom plane. Now observe closely how we change days to do playing that resembles the knows. Better A reminder. Observe. How did sip off the nose broke and changed value More on that In the shading part we have no to additional planes green one and three being the nostril planes and to being the bottom part of the tip Now to the final one. So we have the wing a bit smaller, and then we have the big bowl That is the tape and the bridge going inside. - You can even draw these lines to have a feel off the shapes. Okay, so we have all of them now I'll put them in the description of the lesson for you. So again, side plane's front plane would complain. Two sides planes from plane to nostril planes. And what sensitive of the nose, more defined tip of the nose, the two wings from plain inside Blaine's no strip planes and bottom of the tip. The same goes to to play on the site, with some parts being hidden. The best approach to learn these is to start from the most basic plain and understand it. For example, you can take a reference photo and try to draw those over the noses Drury's planes from various angles and get good at this. Then you can follow along today's video and gradually construct the more complex planes.
4. Anatomy: Hi. It's me again. This is a lesson about nasal honor to me. Well, you see, I have the nasal bone right here between my eye sockets, however, are missing something. So there are stuff hanging from the nasal bone. Um, Mr School? Yeah. Stuff hanging. Oh, well, I don't think you're the best teacher. I'm sorry. Excuse me. I just explained is myself. Okay, well, let me demonstrate what is going on under the skin off the nose. So this stuff that Mr School was talking about his colt low over an upper lateral cartilage . This one is the lower one. And you can remember this one as it looks like a heart. Then there is the upper cartilage connecting to the lover one and then we have the nasal bone on top. There are wings connected to the cartilage. The lower cartilage is quite important as it shaves the tip of the nose. It is the easiest to remember as a heart shape or two circles connected together like this . And it also splits. As you can see on this example, some people have it more defund and others. Then the cars Liege and the wings are curling down to the nostrils. Um, it looks something like this. Then the upper cartilage kind of goes inside a lower one, forming a shape like case like it upside down. Gi ho. Let me now. Demonstrators from the side. See how I used simple circles to form the lower cartilage. Okay, so once again, remember the bomb hard shape that is the lower cartilage and the displayed. Try to get ahead of the curve. Ege. You can observe resume references. What I also wanted to mention is the transition between the nasal bone and the upper cartilage. Some news is like this one have been hardly visible. However, you can see it on the side of these noses as it forms a hump like this. This hump is basically what people want to get rid off if they go in plastic surgery or some of them have it quite large. And also remember this upside down keyhole shape. And you be said I wanted to show you my sketches from many years ago, as this one is a study from broke. Oh, in more realistic scheme. So there we have the lower cartilage, two wings, the upper cartilage nasal bone, and also pay attention to this bomb on the lower cartilage
5. Shading: Okay, So before we learn about how to share the nose, let me just demonstrate the basic shading concept so you know what's going on. Let's start with reflected light, which is bouncing off another object to our cube. Please know that this one is still darker than the mid stone. Then we have the brightest part of the cube, which is the highlight light area is called the Central Lights. Then we have a car shadow, the darkest part of the object, then mitt stones and a cast shadow. Now there is also the darkest part in the cast shadow, and that is called occlusion. Shadow often occurs where two objects meet Cuba and the table in this case, and there's no light in that area. You can kind of play with those shadows and lights when she know them. For example, make nice dark lines for the occlusion Shadow made the highlights more visible. Exit dra. You can see those on the nose here notice the occlusion shadows is India nostrils and often times just under the nose where the Castro does starts. You can also play around with the reflected light around nostrils and on the edge of the wings. I like to exaggerate it. It looks really nice, and also it shows that you gave it some thought. I'll show you later in my detailed drawings. Also note is the core shadows on the tape, which is caused by lower cartilage. Here you can have a look from the side. The most important thing before you start seeing details is to separate the nose into light and shadow like this. Let's take this knows. There seems to be a big studio light coming somehow from the front top. It makes light spread as it's very bright. This setting Mexico elastic knows which has the front plane in lights, the site planes in shadow and the bottom Blaine is the darkest who knows. It's also gusting a shadow, which is spread, therefore no dominant. In the second gays. The light is probably coming somewhere from the top side, which makes the frontline in light disciple in Izmit Zone and the bottom planted, darkest. And then it casts a shadow from the side. Quite dominant one in this case, always try to simplify objects like these before you break it down in smaller shapes, it will help you tremendously. Now a different lightning situation can also occur. You can have the light from the side and having this kind of no spines visible, you have the right side plan shadow as well as the first right nostril plane with lights spreading a bit on the neighbor planes. And then you would have the left side plights in just a little bit of shadow, and there would be a cash shadow on the right side of the nose. You can have different situations like this, and if you know where the planes are, you can easily identify which on his darker and which one is lighter.
6. Final drawing Front View: Okay, so let's start drawing Are three circles too small for new wings and one week foot its IP Joe nostrils, where the circles in this sector. Then we can connect those circles with lines. Also no days. How are making simple lines to suggest the garbage? Start suggesting JAL over cartilage by drawing two circles. Also, find a central light of the nose now. Ah, measuring where the bridge is going to end. And I found out it is approximately the size from wing to wing and 1/2. Then I drew the route, the ice, a kids and nose bridge going inside the city. I'm drawing the eye so kids as well so you can see how the nose could next to the rest of the face. Then I suggest they decide planes and also the cast shadow. When I'm happy with my construction, I erased the lines lightly with a pootie razor and drop pretty lines over. I also erase the original sketch so I won't end up confused with all the measuring lines. I make sure the bottom of the noses nicely lined up. Now I can even start suggesting the blinds around the wings and its IP notice again that I'm following this shape. Now we can start feeling the nose with the first stone. I chose to be pencil and basically drew in the shadow on the side planes, the root and the bottom. Blaine also notice the rhythm, for example, how I draw the side planes. It's kind of line that's going away from the nose. - Now I can take a dark four B pencil and go over the dark areas, which are the core shadows around the wings and its IP, the bottom part of the nose and the eye sockets and around the roots. - When we have old is done, begin smudge it with a tissue and end up with a nice foundation off tones. We can even take a curtain, but it's much more detailed areas in the cast shadow. Now we take dark a pencil and go over all the dark areas. Notice the cartridge bombs. Also, it may seem a bit confusing around the nostrils. Take a close look at the reference so you see what is going on and try to render it as long as you try to suggest the curving off the wings and the tip to the nostrils. You'll be good. You can even take a lighter pencil from champ time and bullish up the transition between values. - Now we can keep polishing up the drawing as we are adding more layers, we can un in the details, more and more also don't get all could've with coping the reference too much. The more important thing is to get the nose to look like nose with the help of anatomy and planes, not to copy every single tone from the reference. That's why the construction is so important. Take Deanna to me and planes as your buddies to help you out. Don't shy away from it, - So delight under the nostrils is dare, however, don't make it too bright as it is still part of the shadow group. And if you follow the shape of the custody on the new nose, you'll be all right down there. Kim darkening Abukar shadows on the tip. We can also suggest the filth room Cygnus smudging steak and use it for the area around the nostrils. You don't have to draw the nose in this much detail as I did. It's entirely up to you In what state you would like to stop. I just enjoy going really into it with the details, work around the roots and notice the rhythm of the lines. When your pencil is really sharp, you can go into the details and occlusion shadows into nostrils and underlines on the nose . - We have the highlights right here. Sometimes it looks really nice if you draw some lines around leg days just to stabilize it a little now for the reflected light around the nostrils. This is also makes the curving pop a bit more if you know there's the reflected light is in this shape, so phonied up a bit, so it's not too bright. I notice that my lower cartilage is a bit small, so I'm gonna lift up some gratified with a pretty A razor. There is also a bit of highlight on the side of the cartilage. Then we have reflected light on the side of the wings India , and we take a dark pencil underlined industrials and occlusion shadow lines. Yes, we are done
7. Final Drawing Side View: right. Let's draw two circles, one for doing and one foot its IP as we can see the other wing. Let's connect them with the nostril. No, we are going to draw lines over the circles. Let's draw the nose angle and measure where the bridge ends. Its approximately this ice from wing to wing from the top of the tip. Then we measured a bomb with being the nasal bone and the upper cartilage. They are approximately the same size now. I found out I didn't do the angle off the line correctly. So all joint again, I'll do to cast shadow from plane of the nose and wings. We can now leave the tip circle for the lower cartilage as it suggests it quite nicely. Also suggest the site playing in the eye socket, then go over the line so you won't lose them. And you can put the first stone on the site. Plain ice, a kits and the bottom plane. Also a good time to make some corrections. - Now we can start defining the dark tones, the bump on the lower cartilage, the shadows around the wings, the bottom plane and the cast shadow. When you feel comfortable Avijit zones. He can go ahead, and it's much. Please be careful with this smudging, and don't overdo it. The mori progress you're drawing, the less merging you need. Otherwise, it would lose all your tones and shapes. Also notice how I defined a curving by the shadows. Observe all the car shadows and bums on the reference. It's better for you. Just see the individual shapes. - Notice the rhythm off these lines as it's following the upper cartilage like this. - The home that we are shading here is this one. You can also suggest the highlight in darkened areas around the nasal bone. - It might seem confusing, as there are lots of bumps and shadows at this point. Trust me. Sometimes even I get confused. Just try to think about the shadows of the nose in the simplest way like this. Also notice the light on the wing is still darker than just sent a light on the front plane . It seems like it's the same color. However, if you check in for a show, delight area into wings is really much darker. You can also suggest the reflected light on the edge of doing on the tip and around the nostrils. Now it's about polishing up your drawing. Keep darkening of the shadows around the nostrils as well as the occlusion shadows. You can also bring the highlight framed by a line like this. After I thought I was finished, I still saw some details that needed some work. I think I might have done the nostril a bit. Two largest well, but never mind. - Now I think we're finished.
8. Conclusion: So what have we done here? First we have started to suggest the nose without three circles Second used planes to make it look three d third used honor to me to make it look really fourth, we have shaded it to give some tone. I have attached a boat of the nose A so it can try to yourself as a class project. Just Begoun. I hope this four approach method will help you to draw your next knows even better. Thank you so much for watching. And if you like this lesson, please follow for more by
 Helena Artbook, Artist and Illustrator