Transcripts
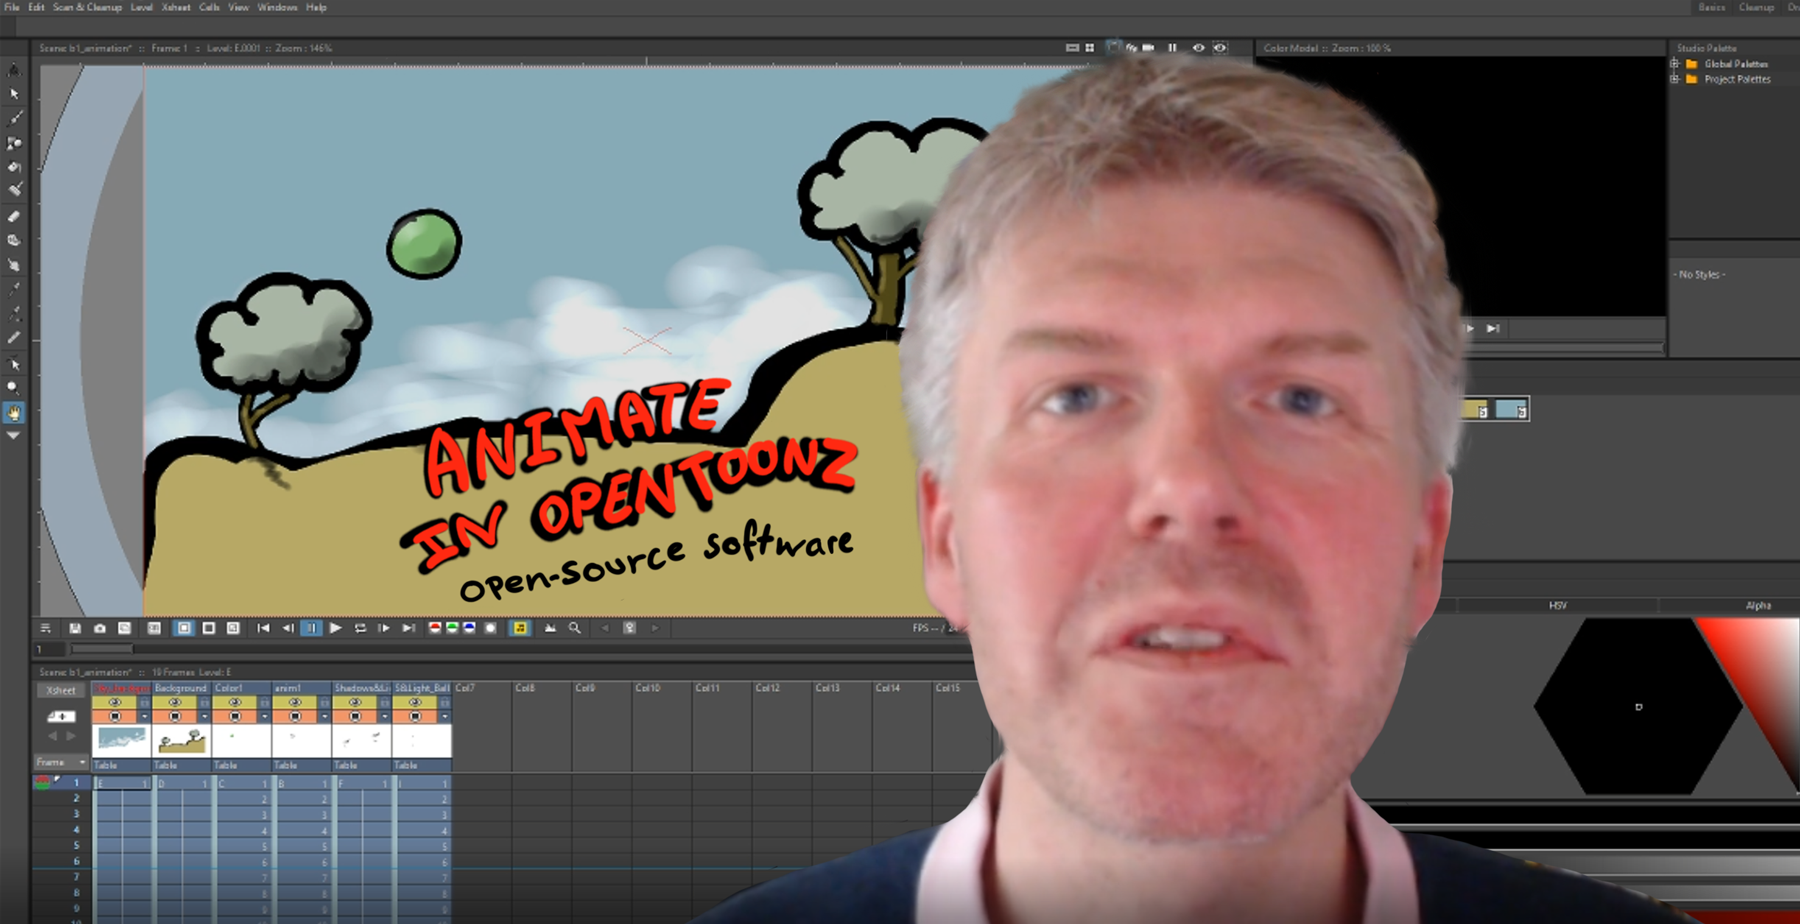
1. Intro: so hi there. My name is when that should I work as illustrator and any made that explain way start calmed in this cause. I'm going to show you how to any made begin animating because they suspected you haven't done it that much before. Begin animating in a totally free software that's called open tunes and I'll show it to you here. It didn't used to be a free software. It was actually used by studio deeply and other great animation studios. Um, but now today it's open source freeware so you can just go in on their home page and you can actually scroll down and you can download by clipping clip clicking on heroin insurance . Icon can hear the green one. You can choose it for windows so you can get it for your Mac. Ah, just follow the on screen instructions. Once you've downloaded it, it looks like this. I know it looks a little complicated, but hey, it's a professional software and you get it for free. And, uh, this class is all about showing you that it's not that complicated at all. I'll make you around 56 lectures here. The 1st 1 is going to be simply about how to draw in open tunes. I'm going to show you how to use the brush and how to choose the size of the brush and all these things. Um, the second lecture is going to be about how to make a simple, very simple animation in here. The next is going to be about how to add some color. And I'm going to show you that they got a great color palette in there. Uhm, I'm going to show you how to add a background, and then we're going to show you how to render it all to get your first animation and to save it again. For if you want to upload it to YouTube, all your VP vimeo account all you want. Teoh, do some Ah, work on it in after effects or so forth. All that you can do because you can save it here in all this standard files. Ok, um, going back to me. Yeah, Just click this off because you need one thing more if you haven't already got it. You it's not well, you can use your mouth for some of this, but it doesn't get that autistic. Use a drawing tablet like this. Welcome draw. Small can be used. I used it for my some of my classes, at least together with this software and works just great. All you cannot great to one of these if you don't already have them, It's also a way come into his probe. Um, no matter what you do, at the end of the course, you can upload me a small animation as your project, and then I'll value eight it for you. So if you're interested in learning how to any mate on all, just learn. If you're already animating and you want to learn how to use this software, then please also take this small course and I'll see you in class.
2. Drawing in OpenToonz: hi again and thank you for taking the class. I suspect that you have already downloaded the open Tunes software now. So let's go in there. So remember how I said that we were going to start out with a lesson on how to draw in open tunes? After having opened to software, you get a dialog box where you should give the scene and name and then press create. You can also change your mother settings in there like the canvas size and so forth. But you can play around with that yourself. What were mainly going to look at if I choose to brush here is what's over here and what is up here. And there are two modes that you can work in. One of them is the victim Haute. This is where if you do like this, they compute. This software will try to correct the line. And this means that this is very nice, because the computer will make some of your line drawings more smooth. But the problem is that you also, um ah, maybe not able to give it your own style. So what I usually do is I change it, go down to profile and then preferences. There you go to drawing, and then I go to instead of tunes vato level. I go there toe one of the hostile levels here. I'm not sure really about the differences on these two. But in order to do so, you need to choose a new layer over here because layers are what you have over here. Over here on the right side, you have all your pictures that are going to go into the animation and you have a layer here and you can paint on top of that in column two on part of a data column tree and so forth and so forth. If you discover that you have painted on top of something that should be under the other one, you just drag it over the other one by using your mouth or your pen. That's very easy. So let's start out in college in one in beta level. Ah, I'll just show you here. Well, it corrects I can choose a form here like this. Um, I can choose the size here off the brush size and which shape I can choose a circle instead , and everything's I have the brush and I have the shapes and I can choose which type of shapes. That's the basic thing. Oh, sorry. Not that one like that. And then I could choose the painting. Park it. And, um, whatever color is selected, I show you Colin. Later lesson. I go in here and I press, and then it gets black. This one? No, that's Scott Black because they haven't overlap here. Only gets flag only gets black, this one like that. Then I have another one called the a razor, so I could erase something in there. But as this is victor drawings, the computer will software will say, if I if I take a little away it we'll leave something here. Look, if I do like this, then it's trying to make the algorithm work. Still is trying to make the the function work still, so I prefer to work in a raster level, but that's a personal opinion. So in order to change to ask the level I need to go to another column over here, Another layer, uh, take the first picture here, then go up to file prefer and thats like so drawing and then hostile level Now it's use the brush again. Hit who? It doesn't look. It's It's so the opacity is quite high, but I can put that here. So now there's no opacity at all and I put the hardness very, very hard. Look at this. You can both set the hardness to lower. So it gets slightly less hard in the ends here and it decides here, and I can choose the minimum capacity and a maximum capacity that has something to do with my pressure, which I have ticked off here and meaning that it can go from this and then all the way to something that's even more dog. If I choose this one up here, then the minimum capacity is very low. The maximum is high. So I can do like this. And then if I press really hard, it gets to be like that. What if I do like this? So yeah, it's nice with high hardness up here on, I can also choose not of their ticked off pressure. Of course, if I didn't take of pressure, it would just stay the same all the time. If I take off pressure again and I put this for a high maximum. You can see there's a large circle here meaning that this will be when its maximum. So I press like this If it goes If I put this all the way, we're very, very low. Yeah, there will be a large difference between the lowest pressure and the highest pressure. So it starts out with the small pressure on then high pressure. And then so he gets like this. Okay, I just put capacity high and hardness high, and I tried to see how that works. So it starts. It gets like the small one and then gets like the big one because I put it minimum size and maximum size here. So if I take the the Razor and I did also choose for the race up here hardness, opacity, and so I can set the opacity lows. I can actually take some of it away. Send the more less after the way can make all kinds of shadow your fix putting their capacity high. It's quite a good race. Hardness of the race. I can also choose, uh, the size of the brush the sides of the race. I consent to really high, so I can choose to take a lot of this away. And if I now want to paint something, Well, I could choose to paint and I high prow there. I'm really using the pressure here. Then I could choose to set this for really small. I want to make some little more nitty gritty things there. The upper island? Yeah. And then this. Then the eyeball here. Like this? Yes. And then I could choose a lower opacity and ah, high this and then do like this Actually control set will bring you back. I would like hello capacity in so and then choose it really hard and really no really high capacity because I want to make the pupil like this. And then I put that in there. So iris and pupil, And then I choose the eraser and then I would like to take make it very low in size here and just take a little away because that's to be their light coming from above. Now, these are things you can do if you use the the raster mode. But that's always you can use to 22 draw so that to try for yourself to you try the raster level in used to brush the the shapes and the eraser and try to go to file and and preferences and and set it to the to the vato level. And then try the market, paint Barket together with brush and appreciates their and only by doing so, you learn quite a lot about drawing in this software. So that was the first lesson how to draw in this software.
3. Animating in OpenToonz: Okay. Welcome to lesson number two. And in list number two. I'm going to show you how to animate. There are some priest settings in here. If you go over here in the right side. You see, there are some Collins here. Call you. One is a layer called him to is a layer. Country is a layer. I suspected you might know about layers, but if you don't, you draw on top of each other. So you're able to draw a background behind a character, for instance. Now they're awesome settings up here where you can actually press here if you want to draw . We didn't use that before in the lesson number one, but we could have. Then you get a large area to drawn. You can also go over him. Present, drawing. Then these columns where you do the animation is set up right in front. Besides your canvas here, that's very, very nice. There is one thing you knew. Now it's just set to ah, last the level, and that's quite all right. We can do exactly the same in victor level. So you just need to remember that. So you see no correction here when I press, I want the lines would be a little smaller here. Okay, so I go over to the column one I set myself in picture number one picture to picture tree picture for 56 and so forth Go up to picture one again. That was just to show you the different pictures I can pay. So if I, like, make ah, faith here, and I can go over here and press down to paint the next picture. Um, and there is something I would like. I would like to see the old picture or the first picture that's below this picture. So, this one, Do you see this little red green one over here? That means where you are right now. If you go up here and press like that, you see the old drawing. And so now I can draw on top of that. And if I want this to be a our face, I would like to draw exactly the same and then draw like the most that starts coming here. I can then go down again and I see the old picture again. I make the mouth a little bigger. I make the mouth even bigger. And so I have my first little cartoon. If I go down here and pressure the you can see here you have backwards forwards run, pause all the way to the start. You have circling in loop here. You do like this. If you do like this serving in loop, then it keeps on running through all the animations over here. And you can see down here on the X sheet you have exactly the same. So you have your animation running present. Once again, it's stuff cycling. Of course, if you have drawn all the way down here, you just need to press it once and it'll run all the way down here. But sometimes nice to use this cycling. The speed you see over here, it's 24 frames per second down here. You can change it. But 24 frames per second is usually pretty good for working with. Now. I just go up there. You also have the possibilities who see the to picture the image. That is one Ah, picture ahead of you. Then you go down here. You see, I'm over here. I go down here and I press like this. Then you see you see this picture? This image here. Sorry. In in black. And you see this one in red down here and you see this one in green? This will be even easier to see if I, um Let's say I go here. I race all of this, make the race a little bigger. I go back here, I raise that one. I want to make something else to take that little one. I want to. I want to make the jumping for the usual jumping ball, which is a very good way of showing animation. No, if I'm like up here, I choose the brush and I want to make bowl that's falling down. It's squeezing. It's jumping up again. It's stretching a little up here. It's regaining its old shape on the way down. It's stretching again. That's one of the principles of rules of animation. Squeeze, squeeze on a stretch. A stretch. Well, it's too thick. My lines here to see that, But I want to make that this ball jumping. Okay, control set. Just the race It all again by this I go here once has said it a little smaller here light. So I go down here, you see the ball. It's getting a little round stretching even more. Let's say the ground is somewhere down here. Here we touch, gets it, stretches even well and no, it starts getting flat. See, like this and it gets even flatter. Remember that you should always aim for the same, um, the same volume. Then it gets rounded in and it starts to stretch as it goes up again. Here stretches much. I think the volume got a big too I hear on. So I'm not all conforming to the rules off the volume here. I think it I two just got a bit smaller. Now. I cannot remember where the ground was. I think it was somewhat here, but I can always go back. Yeah, the goddess. Look at this. It's somewhat higher here, but anyway, the doesn't matter. It's It's a higher ground here. Squeeze is very much. It's a softball. Every time I go up here, you can actually see the drawing before and you can see the drawing after. If I want to see one drawing more before I do like this. And I do like this and I live like this and what happened? I think it changed. There was off here somewhere. And then I got down there and down there, and you see all the ones going down there I can't even take all the way up there. Oh, the ah, that's a limit. There's a limit, apparently, to how many I can take before. And I can also mark off the ones after. So actually, get the whole motion here when I run it. It does like that. If I choose to sidle, that's like that. Yeah. If I think this is going too fast, I'll at in Cem some Ah, some some pictures in between here. You also have a possibility which I'm going to show you. If you wanted to stop here, you can actually drag it out there so it will stop for a while there. See? Stops. For a while here, you're actually having the same picture again and again and again. Go down here. No. Okay. And actually, what is happening here, iss that you're making this motion and that is actually how you make a small animation in this software. When you get more used to it, you can even use some settings down. Here's you see, that's very you have very many ways that you can go in and ah, g o in and change in this one. But that that would be with that. That's not in the scope off this class. These here, we only take the most basic things. Okay, so that's it. That was a lesson. Ah, listen. Number two animation. And now, in the next lesson, I'm going to show you how you can ah, make color Ah, and color to this.
4. Color: So we're back. Full lesson number, tree, and we're going to add in some color. And here we have our animation before I'm setting it suicidal now. So it keeps on moving here. And, um, As you can see, this bowl is not as beautiful as it would have been if we have been making it Invicta. And had we been making it in Vector, we could now go in in a different in the same layer and we could choose the bucket and we could just paint it like so. But we cannot use this on arrest the level. So this is where it's best. If you want to paint it very, very quickly, then you should use a vector level and think about that, Um, in in vector level, you get the possibility for squeezing and stretching your shape somewhere. Don't worry about using the Vettel level for something like this, but now where we used our across the level, then we need to paint them one by one. I still prefer last a little because it makes it more. I think that it makes the drawings more personal, but that's a personal opinion. And for some things It's nice to use later. And for some things, it's nice to use faster. So But, um, with when I'm really making out, then it's nice to use hostile. So no, In order for this to be more easy to look at, I'll just be turning off some of all these levels Tom bum bum and the bump of bunk from from now because I want to paint over here. I go up to the 1st 1 volume here, and I can even double click on this one. Yeah, I want to rename it. That usually goes like this. So I said, animation one. And I say, maybe I need to draw something in there. No. Anyway, Okay, so I want to paint below this. I can name it afterwards. I wanted to name it painting, but so I go in, I choose this. And now I want to add color. So I go over to my right. See, I hear on. I used a palette, the politica, And so if you want to add a new color, you simply go in. You just make it dot there and you see your color layer gets on top here If you make a little dot here, you can just erase it, but it's is responsive in that way. The for some reason it's very responsive in that way that you need just to press it somewhere over here in order for its to start off this color. Lee, you have a white collar and a black color, and that's usually when you have for it, really. So you go over here over to the right corner here. It's like a little map structure, something I can over here and you press that one. Then a new color comes up here. Now you go down here and get shoes a color, and it's sit for how to apply here. That's not the standard, but if you go down, usually you have to choose your color yourself and then go down and press apply. Then the college changes up here, and then this is suddenly the color that you're painting with. Now, you may think this is special set up down here and, um, you can choose wheel. It's rea Alfa area. GBU can off choose some of them off again, and I like actually this with the well in the H B are you the, uh, usually just. And then I can use all these nice colors in between. Go like there. Say, Wow, this is a nice color. And then, ah, choose to apply that one. But always remember, you need to apply it down here. This you apply, this gets screen. So you go to your layer structures. That has changed to down here because I'd shows the palate. Did you go to the first drawing? And then you paint this one and look, I paint on top of it. Oh my Oh, my, This is not looking nice. I wanted to be below my line. So what do you do? You drag it this way. You saw that I attracted. I'm down here now. I directed. They're so suddenly. It's below the line. Work of the ball. Here I go to the next one. I do exactly the same. Sometimes here I would like to increase my size of my brush. And this is exactly what I do. I have to paint every single one of these because of working in the rest a little. This is where it's much easier. Where if you are working in Victor but That's the usual stuff. Some things are more simple, more fast in the victor. And some things look better in the faster because that's that's more like old fashioned drawings were us That's not excited. The case with victory rised So Ah, Whoops. Oh, look at that. Over here. We chose a wrong cut over here. Help! We chose the wrong color. Now, going back to green. Go back to green here to thing that went down there. So for some reason, we selected it off. You can always selectees other call us down here and go, like So use the arrow keys down here if you don't like Oh, yeah. And by the way, this little ticket down here is how long your animation is playing. So if I put that down here down here, it will play until the end. There is one at the top of here to see up there. So and now when I play this inside ALS, it'll go like this. So suddenly I have a color on my board. I can No right, Carla one. So color one. An animation one. So this always goes below. What's here? So this is on top treatise on top of to force on top of a Tree and so forth. Okay, so that's that was listening on the tree for adding color, and the next one will be background.
5. Background: so welcome to listen them before in this open tunes tutorial and we're now going to add a background And we have our sidle with our green bowl jumping here and now I want to add a background. So I go up here, um really, always want to rename that one, but it doesn't really work. And now I'm I can draw a background so and choose the brush. Maybe I want to. He was, uh, little higher maximum lying here. Ah, I want to go down to have a look at where my just having to go down to see where is my yo somewhere down here on. And it's like that. So I just make like, ground here. I'll make a tree come up here. This is a little too are Klay. But now this is just for showing you this So and not so. I paint this background here and I want to choose Ah, new color. So I choose color number tree and I want to be very, very grass screen Little maybe a little doll in the car. I just wanted to be something else. So I go in here and I ah, paint this I could actually add it in a different layer like I did before, but now it's just for showing you, so I could Oh, it gets quite nice. I hope you realize what I'm doing here. I'm actually painting in the same layer as I drew the line, but I think that the line got a beard too big here. So I'm using the same layer. Actually, I could use start up 1/4 layer and put collars on the bank round. Uh, well, I worked. It shows not to hear. Just need to mark the green color again. There I chose not to hear because it's easier when I'm going to show you how to stretch it . So it feels every of these pictures in my animation, which is now approximately 20 pictures long so like that and it's Oh, that's someone nice. I tell you, think I'm going to make over here and new color on? I would actually like to. I can use texture. I can use some things over the here. Nobody only used tics turned and color, but, um, you can experiment with that, um, going to big a going to make a brown over here like that real round it, and I'm going to apply it. So now I can use it here inside. Oh, the last one. I want to make it a little like that. Like so So And I want to make you like that. And I want to make it like that. You can make all kinds of things here, Um, so that it gets really, really nice. So and now you see, the problem is, if I set this to cycle now, well, it's only on the first pictures that you picture that you have the backgrounds who go up there again, and then you go to this one, and then you stretch it all the way out. You stretch it all the way down there, don't there by pulling this little gray, pull it down there and then you do like this bump a bump. Ah, and look, Now the background goes, the background goes in front of this bulge. The dumping ball here. So what you need to do is unit again. Let's just call this background with pain. We know in this, so I'll just added over here again. So and so now it's the low earlier. So lower on top. On top, on top, on top, on top over. So let's look at it. No. Yeah. Okay. This looks a bit strange, but anyway, anyway, maybe we should have painted out background first. That was maybe a good idea, but you learned along the way, Um, we all a long the way now, actually, what I would like to as now, I'm standing in the first picture of the background up here, and I have already stretched it. And I just want to show you that if I paint something up here, it it gets to be where it gets, um, to be stretched. It goes for all the pictures down here. So I chose the more, like, sandy color. Remember to apply again. You can set it to out to apply. That means when you're choosing it, it's choosing it directly up here. That is maybe somewhat easier. Um, for some reason, I don't use it normally, but that's maybe me. Strange. I don't know. You decide. You decide about that. So painting, painting, pain. You see, this would, of course, have been much easier if I had chosen to make this in. Uh, Victor. Ah. Ah, but you know, maybe not as fun again. I choose a new color to go for this one for the night. I would even more. Yeah, like that. That's a great color gonna set for autumn fly. So yeah, I might want for this one. I maybe want to make in you. Yeah. You know, this comes to close out. I'll make a new layer for this one. You just go up here and you know, I'll just make that one. So just painted over of a boom, make it even lodges can easily. So, you know, I can just painted all over here. And the reason why I can paint it alot over here is that I'm just choosing this to be the background. You know, I'm just using this to be the background. So I called this sky background sky bread background like so. And then I put this all the way in the back, and then suddenly it moves back here, and I need to stretch it again here. So, like that and now in a put it for sales. Wow, we're getting there. We're getting somewhere. And that's your animation. So in the last tutorial, I'm going to show you how to render and save
6. Details, clean-up, saving and rendering: So we have finally arrived at the fifth and last lecture, which have called render and safe. But you can see that I have done a little extra here, Teoh to the through the picture. And ah, I have added in, Um, I have added in a little, whether in a little extra shadows are and a little sky background. I went down here and I chose the brush, and I and I chose Ah, the opacity to below. Then I painted with white. I also went to the layer with the ball and made little shadow up the up that was It shows the wild amid a little white up there. So where the sun comes So I say the sun comes from up here and now it it's getting better and better. And, you know, if I turn on the cycles, that's really nice there. So, um, and as you can see, I can keep on correcting it a little, because if I go to the color and I see here, you know the balls, not all that I chose the did the color somewhere. It's it's getting outside the balls, which was the razor, and I can just erase it a little. And then using my arrow key, keep on erasing a little Megan, even nicer all the way. And even though it's rough lines here, I can keep on erasing and erasing and making it despite being a rough animation, then making it even better. This is what I would call a clean up of my animation. Um, it's, of course, a rough cleanup. Um, again. And look, the shadow comes little outside here, off the off the ball here. So I might be able to take a little of that out. Us? Well, yeah, like that. So look, I added, even out of the shadow down here, that moves. It's not a good shadow, but it's just fast this It's very, very. It's very, very fast here. Perhaps it was a little green. Yeah, you can keep on like that, and then you can cite, live and see Well Wow. Nice. So now what? You can even add some music if you want down here. Okay, But that's beyond the scope of this tutorial. So now when you want to render this, you go up. You go up to the file up here, and you press and look at this. It looks like this when it comes down and and here it says that you can save or or you can save the scene. Or you can save this level. The level of the pictures, the scenes is the set up. So you need to save the scene and you need to save all the pictures so you can just instead of that used to save old and you save all and where do you save it to? Well, you can see that when you go into your output settings. If you press that one, then you get like, No, I'm going to show you get this one. And when you go ah, in here, you see the three things that you need to get specified. You namely, you see your output folder. Ah, and you can actually go in and change that to another place. But it's pretty smart that it's always being put in the output folder. So you need to locate that one. You can see that one. If you press the light, I can over it d the right end of this output sign here and now you give it then you give below that you give it a name and then you choose Ah, file type and SD fold. It's often set on on tiff, but you can choose a V. A V is very good and can be loaded into most of the programs that also into YouTube and Gmail after effects and all these and ah. Then you go all the way down and you render your out foot. You can also go to your ah, just close this box by pressing the X and then go back to file and shoes render. Then it will be the same and then you're render will be saved in your outward photo and here you can find it. And I think you should do that. You should make me a great animation. Then you should find it in your save it like this, find it in your output folder, and then send it to your YouTube or your V meal and then just sent ah, the link as a comment and ah, then I'll give you an evaluation off it. So thanks very much for choosing this class, staying here till the end, and I'm looking very much forward to see what you come up with. Thank you
 Brian Dall Schyth, Teacher, Illustrator & Animator