Transcripts
1. Adobe Photoshop 2021 Intro: My name is Greg Kang. I'm a Canadian content creator. Welcome to Adobe Photoshop 2021 Essentials. This course is for beginners. It's a very accessible course who we're going to cover some of the fundamentals like cropping, designing your canvas, as well as resizing your files. But the main focus of this course is going to be on the newer features that have me excited about Photoshop again, some of the features we're gonna cover include the pattern preview, allowing you to design your own patterns, remove the background and replace that background with the new patterns, the sky replacements. We're also going to be playing around with the neural filters where you can do fun things like apply make-up from a model like REI carry over to another photo. You can also make a photos age someone's face younger or older, or change the gaze of their eyeballs or make their hair longer. So we're going to cover all of that stuff as well as step-by-step workflows for publishing a YouTube video. And I'm going to introduce you to Adobe Spark, one of my favorite programs of the year, a complementary program to Photoshop. And he comes with your plan. It's like the program called Canva, which is popular for graphic design. And it's got all the social media templates that's going to allow you to quickly design amazing social media graphics very quickly. I look forward to seeing you in the course. So let's get started.
2. How can you access adobe photo 2021: Alright, Hi, I'm Greg Getting sh, show you how can you get Adobe Photoshop 2021. Okay. There's a number of ways. First of which is you can sign up for a free trial, go to Adobe's site Adobe.com and Adobe Creative Cloud. And you can search for Photoshop. And, or it can just find the Photoshop a little bit below. Click on try for free. So we'll give you a free trial and then it's gonna cost you, it's gonna be 2099 if you want this pipeline. But the photography plan is only 999. So you can try for seven days free and then you'll pay monthly and you'll get access to light room, as well as Adobe Spark, which is a gray program. That's something that I use. It's kind of like camera, the graphic design tool, but it's Adobe's answer. It's got a really good library of fonts, really good templates for different social media. And you can also subscribe to the Creative Cloud all apps plan. If you are a versatile creative, if you're doing video editing, you're doing motion graphics he wanted to do, but if everything that's supplying that I'm on and I recommend it, if you are a very serious creative that's going to be using all those apps. So I got a link below to the Creative Cloud plan. Another way that you can get Photoshop is if you get external hard drives by Seagate, I'm not sure if they still have these plans, but these types of hard drives, the external hard drives, will have a sticker on it and sometimes they'll get up to two to three months access to Photoshop. And that's how I got started up using Photoshop Again, it was actually, I was on an older version for a long time. And then I just kept on buying these external hard drives because I need them for my video storage. And that's how I got started using Photoshop and then I just couldn't stop using it. I needed it too much. So I'm going to show you what it looks like from the inside API do subscribed, and you do want to access it. So I'm logged into my Creative Cloud right now. And I'm just going to click on View All to see all the apps that I have. You will have to do an install on your computer the very first time that you use it. So if you click, View All apps, you'll see all the apps that you have access to. And then if you haven't installed it, you can just click on install. So I've got access to all these apps here that I haven't installed yet. And the ones that I do have access to are listed over here. So I can open it from here, but after you install it, it'll just show up on your menu. So mine is just over here and you just open it like irregular program. So that's how you can access Adobe Photoshop.
3. Photoshop 2021 reducing the file size: Hey, what's up, everyone today we're going to learn how to resize, reduce the image size of your image. Whether it's coming from your mirrorless camera, you're SLR your phone and you want to create a YouTube thumbnail or you want this image to go onto your website. So let's just quickly talk about why we need to reduce the image size while retaining the image quality. So for your website, it's important to keep the images small so that whether people are opening up on their computer or their phone, that the image size doesn't prevent the entire page from loading slowly. Because if it does load slowly, it's not going to help it with Google search rankings. So search engine optimization or SEO. When you're searching for something on Google or Bing or Yahoo, generally pages that load faster quickly. So basically you want to keep the image file sizes pretty small. So for YouTube thumbnails, it has also has a image size limit. I think it's anything over a, I think it's one megabytes, so we want to keep it under one megabyte. And we're gonna be using Adobe Photoshop to show you how to do that. So right now, I'm going to be creating a web graphic. And I think I've got this open and I'm going to go to image, image size. So the easiest way if you want to reduce the actual dimensions of the picture, which will also reduce the file size, is to type in the width there. So I've got this link, this constraint aspect ratio on. So if I type in a father's file size, smaller file size like 800, is going to automatically resize it. We can see here my image size is currently 2.64 megabytes. And that's pretty large for website generally we want something between 100 to 500 kilobytes. Let's type in 800 by 450. I'm looking for something that might be my featured image. I'll my Wordpress posts or an image I can actually put into the posts. And as a bonus, I'll take you through the full workflow when I'm publishing this image to my WordPress website. So I've resized it to 800 by 451. I just put in 800 and it automatically resize the high two hundred, four hundred fifty. So now our image size is one, just over one megabyte. There was previously 2.6 for now I'm going to hit OK. But this is not small enough. So how do we keep this image quality while resizing it? So we need to go to File Export. And then we can go to save for Web Legacy. They've moved that option around a little bit in Photoshop 2021. And we have to look a little bit hard to see, but we can see here, if I use the JPEG preset, JPEG, Hi, I'm gonna get a fall of 85.9 K, which is pretty good. So we're getting high-quality, but a small file size. So we went all the way from two megabytes to 85 K. So arena select Save. And I've got the name of my file and I'm just gonna call it web so I know that it's formed my website. So you would use the same process if you were going to make a YouTube thumbnail. Except for YouTube thumbnails, ideally you want 1280 by 720 P as your image dimension. At a minimum, you can, you want 1920 by 1080, which is full HD. Just so you get a nice image that doesn't have any black borders or anything. So you just want to make sure that you either reduce the image file size by creating the dimensions at the image size. So if you've got a large picture just by setting it to 1920 by 1080 or 1280 by 720 will reduce the file size. And then if you need to make it a little bit smaller, you can use that same technique by going to File exports, say for web, to just bring it down under the one megabyte mark. Okay, so now I'm going to my WordPress websites. And now I want to insert the image. So I'm going to upload the file and then just find it. There we go. So we are going to look at the original file size. Well, I think it said it was over two megs. So now this one is 87 kilobytes. So I'm just going to change the file name before I uploaded by just hitting enter with the file highlighted. And the reason why I wanted to do that is that Google's search engine spiders, they look at metadata. So metadata can come from anything from the actual name of the file to some of the fields here. So if I use the old text fields, you can find this feature on different website platforms, whether it's web flow or WordPress. It's important to actually put this in here so that you're getting your search engine ranking up. And I'm inserting that into the page there. So the image still looks pretty sharps look pretty good. And I also want to use this image as my featured image. There we go, 85 kilobytes set featured image. And now I'm going to publish. And then let's actually give you the page. There we go. So I hope this lesson helps you. And this is a pretty simple technique, but it's high frequency. If you're posting regularly to your website, which you should be. If you're creating YouTube thumbnails, which are really important, then you'll most likely be using this function to make sure you get the right file size. So it looks good and is under the file size limit, whether it's for your website or Youtube.
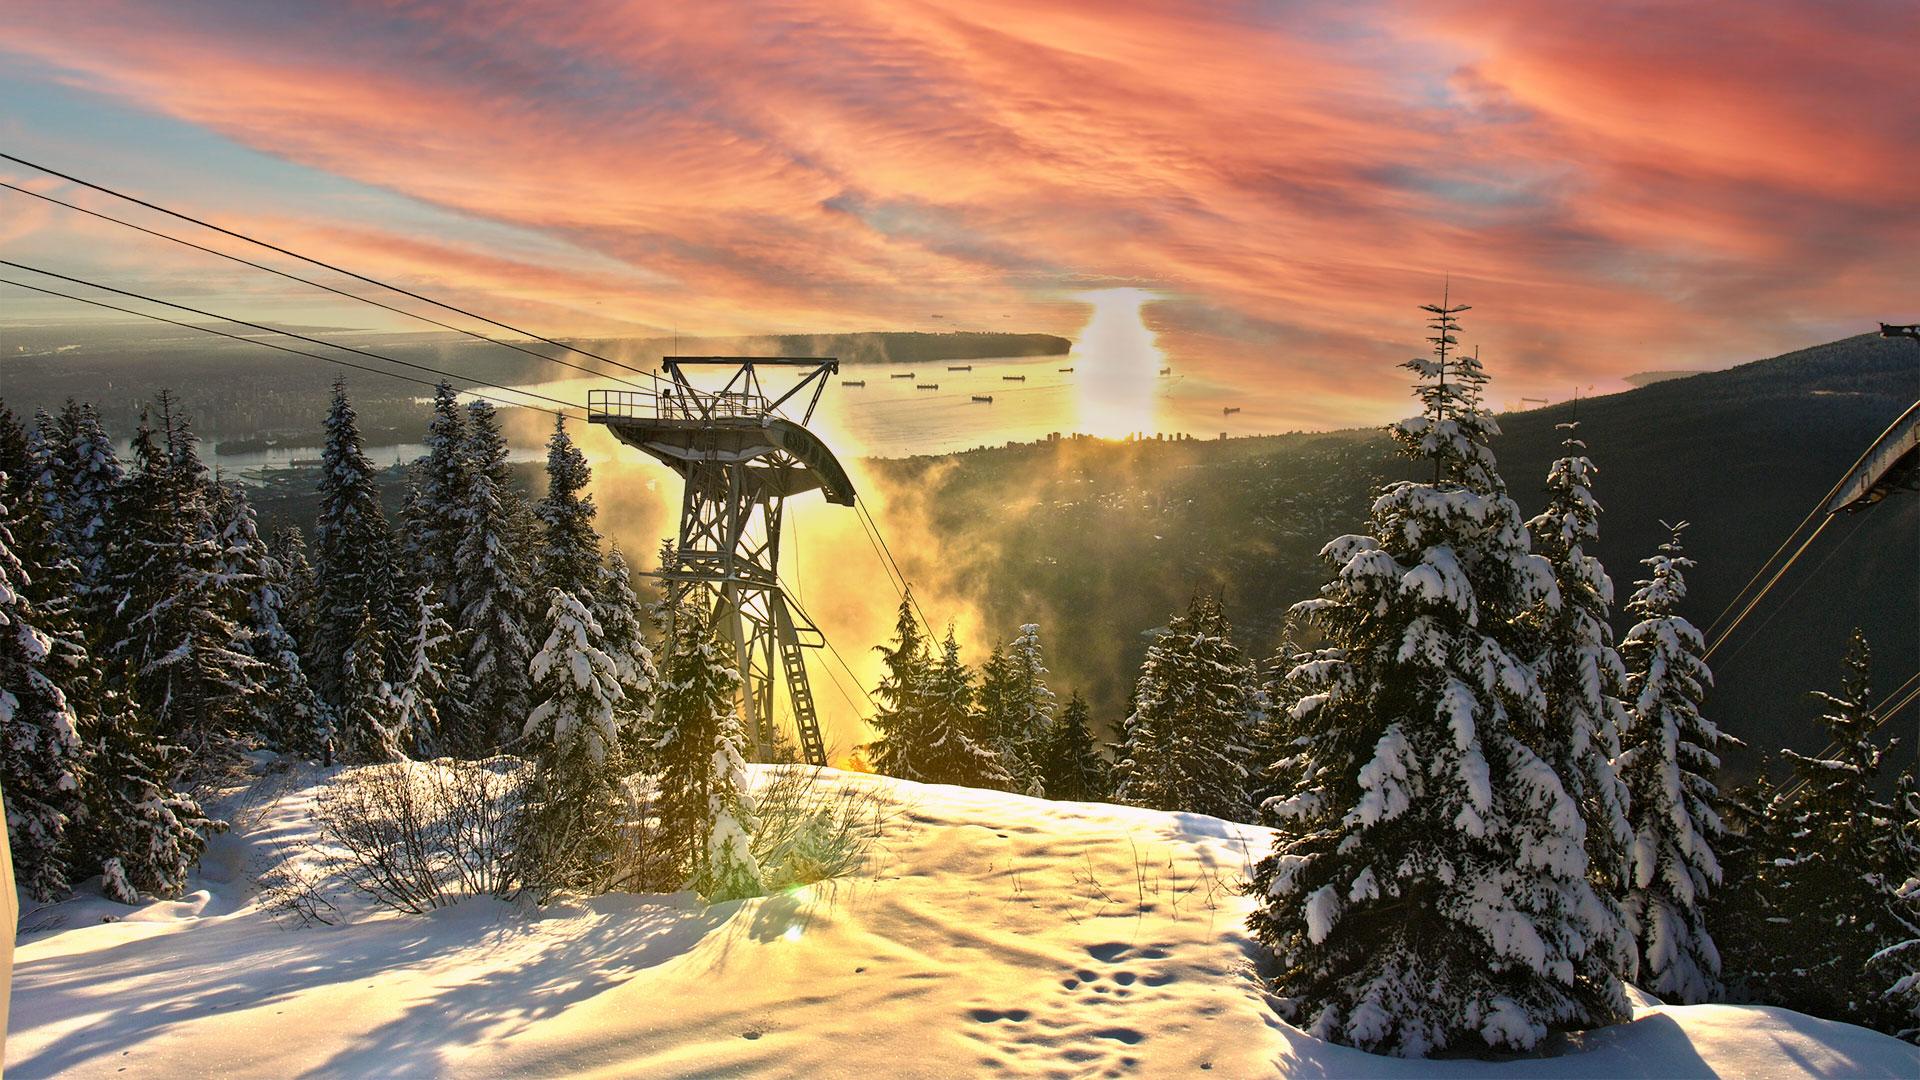
4. Photoshop basic color adjustments: Hey guys. So I'm going to just cover some of my basic workflow for creating basic color adjustments. I'm not a colour specialists, but I am familiar with some of the adjustments that you can make to make a photo looked better very quickly. If anything, if you want to make some simple adjustments, we can go over to image. You got auto tone, we have auto contrasts and auto color. Right? So that's going to use the software's engine to make those choices. So that's better than doing nothing. All right, so we're just going to undo that. Now if you want to get your hands a little bit dirtier, we can go over to image adjustments and now we can adjust something. So what I'll normally do is play around with the brightness and contrast. These are very sensitive, so you want to be careful don't go overboard. Depending on what look you're going for psalm, not a histogram guy. I'm more of a, you know, I just played by air. I just look at the image. Let's just say if I want to bring out the snow and the trees, I want to bring down the contrast a bit, right? So hit okay. Okay, and then we can go back image adjustments. Now we have exposures. This is a very powerful one. You can easily make it bright over here or darker if we bring it down. So I can do minus 0.5 and that's quite strong. Minus 0.1 is enough. And we can go back image adjustments. So vibrance is one I liked to go to the bring out some colors. If you use saturation, you can go overboard and put a little bit too much. So with Vibrance, you can bring that all the way up. And it's not too much repercussions for vibrance, so I like to keep that high. And then I'm gonna go back to adjustments and also like to look at shadows and highlights. Alright, so we can see there that the shadows, let's bring it back to 0. By bringing up the shadows were really bringing out the snow on the trees. So I want to bring that up as much as I can. And if we increase the highlights so you can see that we're also affecting the sky. We're making not stand out more. So my goal is to try to make the sky and the snow stand out. Okay, so there we go. So I'm just going to save this file here and then we'll just look at the original color corrected. Alright, so this is the colour corrected one. Let's open up the original, which is right over there so you can see the difference. So the original doesn't really bring out the snow. And this one does. So there's no wrong or right way, especially when it comes to creating graphics on the Internet. But that's where your main controls are. I would at a minimum Take a look at the contrasts, your exposure, your Vibrance and Saturation to bring out your colours, shadows and highlights to achieve look that you want. If you're worried about making mistakes, you can always use the auto as a starting point. But spending some time here is better than not doing anything.
5. Ailey smart filters 1 youtube: Alright, so we're going to try out some of the newer, newer filters, but we want to just cropped the image first. Sure, we're just focusing on the face. And maybe we can just make some adjustments on the exposure. Make it a little bit brighter. We're gonna go over to Filter neuro filters. Now we're going to click on beta filters here. Smart portraits. Alright, so let's just see if we can make this go from happy to angry. So you can see the circle is spinning. Still applying the effect. Okay. That's pretty interesting. So we can just take off the preview by clicking this icon here. And let's see what happens if we put that all the way to minus 50. That looks very unnatural. Okay, let's take that off. How about surprise? Ok. Yeah, that one not she looks realistic. How about happy? Let's see if we can get she's already happy. Let's CL much happier. She can get a little bit unnatural, but now one works. Okay, let's go minus 50 on happiness. So it actually closes their mouth. Interesting that one actually does work. Try facial age. So let's start off with minus 48. To see we can turn her into a teenager. Interesting. So it just changed our hair then. Yeah, there's there's some smudging around the hand there. So that didn't work out too well. Let's try minus 24. Okay, let's increase the facial age here. Okay, so it doesn't actually appear to be doing anything to your face. It's just changing our hair color. Okay, this one actually does. At a bigger wrinkles. Here doesn't look as young. It was very interesting and this is actually, I mean, this could be very realistic. Alright, so let's take that off. Very interesting. Okay, so let's take that off. Alright, we're on gaze here. Let's do minus 40 on the gays. I think we have a pretty good shot that clearly shows her where eyes are pointing. There we go. And that's a pretty good before after. So let's change that into the opposite direction. Pretty good, I would say. All right, let's try pair thickness. Very interesting. Head direction. And that's a bit unnatural. Let's try the opposite direction. Well, that's totally looks unnatural. So what I would say about this smart portrait features that if you want best results, it's good to just make sure it's well, let's so you can adjust the brightness or exposure, crop the photos so you can see mostly the face and then give it a try and have some fun.
6. Content aware fill: Alright, I'm going to show you how to use a tool called Content Aware fill. This is a great way to remove an object in the background. So if we look at this photo over here, we actually see that we've got other objects like this light switch and this heater that we don't want in the photo. So how do we use that tool? So let's just delete our layers over here. Okay, so we're gonna press l from the law school tool. I'm gonna draw a selection around here. And I'm gonna right-click and select Content Aware fill. You can see we've got our selection here and we've got some other options here to play with. So I can take a look at the preview of what it's gonna look like. So I can try go to color adoption high. And it says here we can allow horizontal flip for better match. Can try scale and applying it to new layer. So let's apply. Hit OK. And there we go. I think that did a pretty good job. We can take that off and enable it to see what type of a job and did it. And I think it did a really good job. So this is a great way if you wanted a solid color background and you want to just remove it so that it blends in with the solid color.
7. Create a Pattern and use as a fill: Okay, so I'm gonna show you how I created the book balls pattern, the full workflow. So this is actually from a video and I just did a screen grab from Premier Pro. So if we look at the image size, this is actually in 4K. That's pretty big. So let's just start off with a lower size image, image, image size. And let's just create a 901920 by 1080 or something close to that. Next, I want to crop out some of the pattern here. Let's just say just that. And let's see what our image size is now. Ok, so it's a format fall 1400 by 100000. Okay, so let's try out the new pattern tool here. Let's just change it to the Move tool hitting v0. And we're gonna go to View pattern preview. And now we're going to zoom out. Let's just go to 5%. So there it is. Looks pretty cool, right? And so if we want to save this, I can just click plus on the patterns panel. If you don't see it, you can go to window and select patterns. And we can click plus. I can call it 2c three. All right, and now this is one of the patterns that I can use. So let's just say I create a brand new document. And this is sates HD. And let's say I want to create a shape so the new triangle, right? And I want to fill it, and want to fill it with that new patterns. So I'm going to click on Phil. I'm going to select pattern. And I think I can find my Boko pattern. One of these guys. So right over there. Okay, so that's an example of how we can create our pattern and also use it as a fill.
8. Cynthia makeup transfer Neural Filter: Alright, we're going to try to learn how to use the makeup feature in Photoshop. This is the end result. This is Cynthia with Mariah Carey style makeup. So this is the original. And let's get the Mariah Carey example here. So we're going to use Photoshop 2021 to apply the same makeup to the original photo. Not this one, but the original. Okay, so I'm going to highlight the main layer. Go to Filter, neural filters. We're gonna go to beta filters, makeup transfer, select our reference image, which is Mariah Carey. And we're just going to let the software do its thing. So that's before. And that's after. Did a pretty good job. So we're going to select OK to apply it. Or we can apply some additional details on their smart portrait. So let's just see if we can increase the happiness. Okay, before and after. Let's try increase facial H2 30. Well, so sulfur is doing a pretty good job here. It's adding some wrinkles and it's removing some hair. Let's go to the other scale. Minus 50. There we go. Hit OK. And there we've got our new look. That's before. That's after. And then if you want to save it and choose it, and choose to save it as a Photoshop file, you want to continue to work in a buffer. The internet JPEG is the best. Yeah, so for best results, make sure it's a wallet image. It can also increase the brightness under adjustments before you apply these neuro filters. And then you can even crop the photo just to focusing on the head.
9. Neural filters on Ailey: Alright, so we're going to try out some of the newer, newer filters, but we want to just cropped the image first. Sure, we're just focusing on the face. Maybe we can just make some adjustments on the exposure. Make it a little bit brighter. We're gonna go over to Filter, Nero filters. Now we're going to click on beta filters here, smart portraits. All right, so let's just see if we can make this go from happy to angry. So you can see the circle is spinning. Still applying the effect. Okay. That's pretty interesting. So we can just take off the preview by clicking this icon here. And let's see what happens if we put that all the way to minus 50. All right, that looks very unnatural. Okay, let's take that off. How about surprise? Okay? Yeah, that one actually looks realistic. How about happy? Let's see if we can get she's already happy. Let's see. I'll much happier she can yet. Okay. Little bit unnatural, but one works. Okay, let's go minus 50 on happiness. So it actually closes their mouth. Interesting, that one actually does work. Okay, let's try facial Ange. So let's start off with minus 48. To see we can turn her into a teenager. Interesting. So it just changed our hair then. Yeah, there's there's some smudging around the hand there. So that didn't work called to all this try minus 24. Okay, let's increase the facial age. Okay. So it doesn't actually appear to be doing anything to her face is just changing our hair color. Okay. This one actually does add a bit of a wrinkle. Here, doesn't look as young. And it's very interesting. This is actually, I mean, this could be very realistic. Alright, so let's take that off. Very interesting. Okay, so let's take that off. Alright, we're on gaze here. So let's do minus 40 on the gays. I think we have a pretty good shot that clearly shows her where eyes are pointing. There we go. And that's pretty good. Before, after. So let's change that into the opposite direction. Pretty good, I would say. All right, let's try hair thickness. Very interesting. Head direction. And that's a bit unnatural. Let's try the opposite direction. Well, that totally looks unnatural. So I, what I would say about this smart portrait features that if you want best results, it's good to just make sure it's well, let's so you can adjust the brightness or exposure, crop the photos so you can see mostly the face and then give it a try. Have some fun.
10. Photoshop Young and happy: Okay, let's have some fun here and use the neuro filters to see what look that we can get from this photos. So with the main layer selected, we're gonna go to Filter neuro filters. And it helps if you've got a nice close-up shot of your subject. Ok, so what we can do is go over to the beta filters and we can click on smart portrait over here. Let's see what we can do here. Let's try to increase the happiness. It's gonna take some time to processes. You can just look at the circle over there. And we've got this icon over here to look before and after, before and after. So Photoshop did a good job there. So let's just try to play around with the facial age here. So let's go a little bit younger minus 35. Let's see what that does. Okay, so lets just see before and after. All right, so maybe Yogi vibes does like this. And let's just say we wanted to save it. So if we take that off, then we lose the changes. So the changes are in this layer. So we're going to save this to cloud documents, young Yogi. And save. So we can also save it locally on our computer. And then we can choose what type of file format. I'm just gonna choose JPEG. And then I like to look at the file size before I save it. So I got maximum 211 K is not that big. So there we go. And we can just double-check that we got our file search on my hard drive. And there it is. Little bit of digital surgery.
11. Plugins and Tutorial Help discovery: Alright, we're going to end the course by looking at the new helped feature called Discover, as well as plug-in. So if you go to help and you go to Photoshop help, this discover area is actually pretty useful these days. You can search for anything and these tutorials are pretty hands-on. Let's just say you want to shine some light on dark photo. You can not only read, but you can click Start Tutorial. It's got photo that you can actually start with is going to give you step-by-step instructions. You can see this blue arrow is pointing right here. And you can just follow along step-by-step if you need to look up something specific. So this tutorial is helpful because the bubble is pointing exactly where you need to be and it's telling you what to do. So a new adjustment layer, brightness contrast. And then you can just quickly fall along step-by-step to learn that new particular skill. The other thing I wanted to show you is plugins. So with the plugins, you can add additional functionality from, from third party developers. So you simply click plugins. You can browse your plugins if you want to find some new ones. I've already installed a watermark plugin. So you can just simply click gets. Some of them are pay plug-ins. And so I'll just show an example here of a plugging that I've installed. After you install the plugin, it'll show up on your plugins. So I got the watermark plugin, which lies it, add a logo or just a nice watermark If you have your website here. And I can choose the font. And I click the button to add watermark. So those are two powerful features in Photoshop 2021. The tutorials to look up information and plug-ins to enhance the functionality from third party. And maybe one day, you can even sell your own plug-in for Photoshop on their ecosystem.
12. Shapes and patterns: Alright, in this lesson we're going to cover some of the changes to the shapes. And we're going to start off by creating a new documents, full HD 1920 by 1080. And we're gonna go over to the shapes in the panel here. So the triangle is new. So pretty simple. Just click and drag it out to change the size. But we do have this new icon here that allows us to give it a round or shape here. So you can also find this in the rounded, rectangular tool. You'll see these little dots here. You can click and drag them to round it out. So if you want to change the color, you can click on the fill here. And you can choose from any one of the colors here just to, just to change it up. Or you can click on a pattern to give it a nice little different fill there. So you can really get creative and create something really interesting. The line tool is over here, so you can click and drag to draw a line. Not very exciting. So some other customizations you can do to line. You can change the pattern to something that's got dashes, and can also change the thickness in the stroke setting. Over there. The fill won't really make that much difference because it's just so, it's just so small and thin. So but the triangle, you can change the pattern by going to the fill there. Let's just make sure we got triangle selected pattern and select the pattern over there. We've also got gradients. And we can even use this. A nice application is to we can create a pattern. One of the new features is the pattern previews. So if we go over to view, we can select pattern preview. And if we zoom out, we can see what that would look like if we wanted to create a pattern. All right, so all these little changes make huge differences over here. So you don't have to create a pattern. I'm just showing you this is one of the newer features that you can use in combination with these new shapes and fills that you've got for your shapes. Alright, so let's just say you're happy with that pattern. You can actually define this as a pattern under at. It's just need to click there, select edits, and click on the Find pattern. Okay, and you can recall that later on in the patterns panel. So what did we do here? We learned some of the newer features with the shapes. We learned how to fill them with other patterns and how to fill them with gradients, swells the line. Some different ways to adjust the look of it. And the new feature pattern preview.
13. Smooth skin: Alright, we're going to try the skins smoothing under Filter, Nero filters. So let's enable it and see what it can come up with. We're going to output to a new layer. So we can experiment. Let's dial up the smoothness. So we can use this icon over here to take it off and apply it, take it off, apply it so you can see what it's doing over here. Let's go all the way to the maximum or almost at the maximum. Take it off, take it on. Okay. So we can see some improvements there. And that's the original. That's the original. Thus without it doesn't have that much difference, but with the smooth lists all the way up, we can definitely see some improvement there and also blurred a bit. So if we want to apply it, we can select new layer, which is the default. Hit OK. And it's nice that we can save this image with that new layer applied with the smoothing. Or we can just hide it over there. So that's how we can use the smoothing. And you can find that again under the neuro filters if you select the original layer.
14. Hdr toning: Hi there. In this video we're going to learn how to use the HDR toning in Adobe Photoshop. So this is a great way to get some different looks, some assistive looks that look really different. So you can get looks like surrealism. Let's see how that works. So if you have different layers, you need to make sure that the layers are flattened. But actually when you do go to Load HER toning, it'll just prompt you that it's going to do that. So we need to click on Image, Go to adjustments, and select HDR toning. So even the default preset already does some stuff. So what I like to do is check the different presets. Saturated is gonna make it more saturated. And if you want to go for really surreal type of look, you can trial the presets for surrealistic high contrast. As you can see that it really brings out the snow, but then I'm blows out the sky. And then you can make some adjustments here. You can look at the tone in detail. I just look for any sliders that are all the way to the end and then just dial those back right, to try to get a more usable look. I can also bring back the detail and I'm getting a really smoky type of look here. And also bring down the vibrance. So now created a custom look. Or I can just go to normal, surrealistic. Let's see what that looks like. I actually, so I got the two extremes here. This one is really bringing out the snow. And it's a little bit blown out on the sky. Because the highlights or all the way down. I'm not coloring specialists by any means, but I really like to play around in this HDR toning area. Some other cool looks are photorealistic. You can play around with the detail. This is a really powerful influencer in the HDR toning. So you can really create some nice custom looks. Another cool one is RCR C5. Alright, so that's very vibrance. Given a little bright, might want to bring back the exposure, but, but if you're just more conservative, you can even default will change the image. You can even go to saturated, that's a pretty safe one. But this is, this is a great way to make your photos stand out. And you can see if you cancel, it's going to bring it back to normal. If you do find a precisely alike, go ahead and hit OK. And as simple as that, if you're someone who's into doing toning curves, which I'm not. So things like S curves, you can find it over here and you can play around with it. Trying to mimic the S curve. You can do that over there. I'm not going to pretend that I know how to do this, but that option is also under HDR toning. So if we cancel, we can see what the original looks like and we're back to normal.
15. Sky replacement july 21 edit: Hey, what's up, everyone today we're going to learn how do we do a photo like this, where we're replacing the entire sky and replacing it with something that's spectacular, something that may be better than what you had in the photo. We're using Adobe Photoshop 2021. So let's get straight to it. We're going to start with my original photo over here. So get your photo open and get ready. Very simply going to go over to the Edit menu and we're going to select Sky Replacement. So again, this is a new feature in Adobe Photoshop 2021. So it's using the AI in the software, it's going to do it's magic. It's going to grab the sky. And then we can then click on this down arrow over here to look at some of the different options that we can use for places. So for example, let's open up blue skies. I'm going to move this window over to the right. And if I select one of these blue skies, you can see it's just replace that right over there. There's little bit of a delay, but it does a pretty good job, right? So it looks pretty natural here. Let's just use something a little bit more dramatic just to show you what is possible or here. So you've got a nice dramatic sunshine with gray clouds. And while I'm not sure many people would be able to tell this apart from the real thing. Let's see what else they have. If we scroll down, they've got some presets for sunsets as well. Let's choose one. That's got some red clouds over here. And we've got a few options here. We can play around with to see how they they react. You can see there we can shift the, shift the edge of where that effect begins. If I move it higher up, it's getting closer to the horizon. K fade edges at a 100. Okay, brightness and temperature can cool it off a bit more or warming up. Okay, now when we scale it up, It's sort of smudges everything together. Not the most pleasing effect. We can also flip things around. So there you go. That is an example of how you can do the sky replacement in Adobe Photoshop 2020 one. So the last step is to save this photo. We're gonna go to File, Save As save on to Cloud documents. I'll just show you an example. Grouse mounts and Vancouver, because we're in Vancouver at the moment. And December 2020 approaching Christmas red sky. And there you have it.
16. Photoshop 2021 Apply a lut: Hey, what's up, guys? In this video we're gonna go through how do we apply a lookup table or what is known as a lot to a photo in Photoshop. So in the video world, a lot is very popular for applying sort of a filter or color profile to the video. But now we're going to use the same type of files, which is a cubed file to a photo. So I've actually purchased third-party lots from Peter MacKinnon, the popular YouTube or for my video. But I've also discovered I can apply to a photo if I want to get a particular look. And so the first thing I'm gonna do is just dial down the image size. We have a humungous image which is a 140 megs, sorry, 23 megs. So I'm just going to reduce it by 50%. And let's just see here 75%. So now we need to go to Window and adjustments. And now we have the adjustments panel. We need to click on this grid here with the squares. And that's going to open up another panel under properties. And we're looking for 3D lot file. Now we want to click on the dropdown and you need to find your, your file. So if you need to find your fall, you can click on Load 3D lots, and then I'll just show you what it looks like. So these are what the Q files look like. So let's just say I wanted the codec killer. Lots. I can select it. Okay, we can click on layers to see the type of impact that it had. We can adjust it by changing the opacity over there so we can dial down the passage. Just reduced the effect. Now if I wanted to load another one, let's just try that. So let's go back. Windows, adjustments, grid. Let's load the teal and orange from Peter MacKinnon. That's actually this one here. Now we're going to click on layers and color lookup to. So that's, this is the teal and orange. So there's lot of different layers here because we have a lot of things going on. But if we wanted to dial that fact down, we're gonna bring that opacity down. So if we go all the way, that's what it looks like. So that's how we can apply a lot in Adobe Photoshop 2021.
17. Creating a youtube thumb and pubishing video full workflow: Hey, what's up, everyone? In this lesson we're going to learn my workflow for creating a YouTube thumbnail. I'm gonna put a lot of the skills that we've learned in this mini course. So let's get started. I've got a drone photo open in Adobe. And I usually take those photos near to 4K resolution. So we have it opened. The first thing I'm gonna do. And this is one of the really practical techniques. It's resizing. So we're gonna go to image, image size. And there's a number of ways you can do this. You can change it to percent and change the 50%. I wanna get it as close as possible to full HD, so 19-21. And then it automatically picks the height because i habits setups to automatically scale the height. You can uncheck that feature by clicking that icon there. And then I can actually just set the document height. But then when I do that, it's going to look skewed. So if I manually pick ten ADP, see it looks a bit warped. That's okay because my true intention is to bring this to Adobe Spark because the end goal is a YouTube thumbnail. And I want to use the text graphics that Adobe Spark does give us. So let's just go ahead and resize it image size. I'm going to select 19. Well, let's just put that on here. 1920 says turn it back on. 1920. Let it pick the height. And there we have a workable image to work with. Now, I have to decide, do I need to crop anything? Not really. I'm just going to work with us. So now I want to remove the sky. The sky is okay, but let's just make it more dramatic using one of the new features in 2021. Replace the sky. So go to Edit sky replacements. I'm going to let it do some thinking. And then I'm going to try on a number of different looks. So this one's pretty nice. We can play around with the look or changing the color temperature to make a more golden or a bit cooler over there. I can even flip it around. Alright, let's try some of the other looks. That's not bad. All right, now that's pretty good. So if we shift the edge there, it's actually bringing some of that red down into the city skyline, which is, I think it's pretty nice. Let's hit OK there. Alright, now the next step is I want to apply a lookup table. So a lot. So I'm gonna go down a window, judgments. I'm using a third party a lot from a popular YouTubers, Peter MacKinnon. So yes, some different looks. And we're gonna click on this grid here and the adjustments panel. And already have some of these lots load loaded there, actually dot cube files. So let's just try the teal and orange look pretty interesting. Let's take it off. Let's try the Kodak killer. Ok, let's try that till an orange again. Sorry, gives a surreal look. So I can click on layers. I can just dial that down a bit. Alright, now let's click on the actual image layer file. Image adjustments maybe let's just see what impacts increasing the shadows gives us. So by increasing the shadows, it's giving me more more focus. And by increasing the highlights, sort of putting focus on both myself and the background. Alright, now if we wanted to experiments, we can click on Filter and SAR image adjustments, HDR toning. So we're gonna flatten the documents flooding all these layers. Yes, that's fine. So this is a nice final step. Alright, so you can see right away that it did something there. I'm gonna go with saturated. That's a little bit much. So we can customize each of these profiles here. Let's try photorealistic. Little bit high on the detail. Let's try low contrasts, photorealistic. Let's try the high contrast. So this one really stands out here. It's pretty high on the detail. Alright, I'm gonna go that hit ok. And so I'm going to save this as a PNG. Okay, now I'm going to open up Adobe Spark. We have a good background image. Okay, so we're in Adobe Spark and this is a different program. And I'm just thinking about what's the title of this video is 3 thousand subscribers. Let's just see what other ideas we get from the templates. Let's click view all. Let's click YouTube, thumbnail. See more. Plus one's kinda nice. Select the font. So I'm going to create a remix click Curry from template. So we have a course on Adobe Spark. I use it for social media graphics and then I use Photoshop more for resizing, for changing the color. Ok, so let's just modify this narrowing go. So let's put some of the locations here. Cypress, gross, long still VC. Let's replace this image. Alright, I want to add my own image here. Remove background. Actually, I just want to replace this. Let's click replace image. In fact, let's just delete this photo. Adobe Spark is making a lot of changes to their program. Well, sometimes it's tough to work your way through it. Okay. So it looks pretty bare right now. Don't worry. Are texts is sold or it's just in white. There we are. Right? It's bringing the image into Adobe Spark. Alright, so let's select the image. Let's click Add to backgrounds. Boom. This text isn't really popping out. So what could I do? Let's try shadow. We may need to give this a shape. Okay. So let's just minimize this. Changed the color. Merry go. Let's just take all the BC. It's taking a blogger room. And then we can move this text on the ocean. Maybe move, move that up there to highlight the subscribers. Let's just delete that. And there we go. So there's my YouTube thumbnail. So let's just download this as a.jpeg. And we're pretty much done. Only thing we should have just rename a file because it does pick up the file name comes from the project. So let's do it again. And sometimes it creates a fall over a mag. And in that case, I will need to just reduce the image size in Photoshop because there is a one meg limit. So a little bit of work for the thumbnail, ok, and this is a great example because this is 1.3 megs. So I got to reopen this. In Photoshop. I know this may seem like a lot of steps, but that thumbnail is important. So final step. To save this and retain the quality we're gonna go to File Export, Save for Web Legacy. And we're gonna keep an eye on this figure here. We want to keep that under 100 K or under one meg, but we want the highest quality. So we're gonna go to JPEG high. And that brings us up to three 2k. And now the image sizes at 128720. So lower resolution than what we originally re-size it to in Photoshop, if you remember. So just gonna save that thumbnail there. Save. The last step is to go over to my YouTube channel. And then I'm going to rename, I'm going to add that thumbnail to my YouTube video. So I'm going to walk you through all the way. We're going to show you how that's done. Alright, so we're in Youtube Studio now. So you need your YouTube channel here. Now we click on content. This used to be, I think videos, they've changed that. And so here's the video. I'm just going to click the pencil icon details. So this is a video I've made for my 3 thousand. Finally hit 3 thousand subscribers on my YouTube channel, which has taken me over nine years. Alright, so I'm gonna select the photo, click open, keep your on the bottom left there. And that's pretty much it. You'll just need to save it. And I'm just going to click Next. For now. You should turn monetization on. Click Next. It's quite a process to publish your YouTube video. I'm not going over all the screens now. I just want to show you the save button because if we don't save it, we have to reorder it again. Alright, so this is step, step by step all the way till the end. Alright, so that thumbnail has been added. But I look here and It doesn't show so sometimes that it is there but it just hasn't updated. So let's just try again. Let's just make sure it's the right file and it's the right size. Yup, so this one is 329. Save, Changes, saved. It's good. And there we go. So that's how we do the full workflow for creating a YouTube thumbnail. Okay, so we're going to continue on just finishing all the details of the youtube channel. We added the thumbnail in the last video. But if you're interested, I'm assuming since you want to create a YouTube thumbnail that you want to get some tips on. How do I publish your YouTube videos? So let's go. So the first thing is the title. So I gotta think about what is an appropriate title. So It's driven by keyword research. So what I'm gonna do is do a keyword research. Because this video is not only about my 3 thousand subscribers, it is about exploring Vancouver. So I want to target the metadata based on search. So Vancouver, BC, that's actually it's got some good good search volume. Let's try. Cypress Mountains is one of the areas we explore in the video. Okay. And let's just see here. Okay, not as high as Vancouver, BC. And let's try Grouse Mountain. So this is, this is a whole different tool. Okay, so grouse has some decent traffic. Vancouver, BC looks like it's our go-to. Ok. So high volume, low SEO difficulty. So what I'm gonna do, I'm gonna go to YouTube and I'm going to look at one of the top videos. Let's just say Grouse Mountain. And we're gonna get some keywords from that video. Okay, let's go to this one has got a high number of views. So now I'm using. So I've got, just got an idea there. I'm going to put for k in the title. So I'm using a tool called vid IQ and to buddy. So with this tool we can actually copy the tags. And I'll see you here. They don't have a lot of tags, surprisingly. Okay, so now I've copied the tags. Now it's time to go back to the video. So we're gonna put for k in brackets, just like they did. Grow smells. Alright, so now let's go to the tags. So I'm gonna put my tags first and then I'll paste in some of there is actually, there's didn't have too many. 4k Vancouver, BC 202019, pandemic, rose smells and slight Paris. Mountain. Stock footage, gimble, ski, POV, Canada. And now I'm going to put the video location. Okay, and then I'm gonna put my links, put my gear kits. I've already got it here. So I'll just put some three hashtags at top. And then we'll decide one emoji here. I'll put some snow save. And that's very important. Right? Monetization, just one to place those ads. Because at the end of the day it's these ads that are going to pay us. Alright, so let's just bring the needle here. I'll probably put the ad just before the end. All that scene there. Actually, I'll just place it here. And then we'll delete that last one. Continue. Save. Alright, let's hit back. The last thing is the n screens. So the end screen is your opportunity to add your playlist lets your end screen. So click and screen. I'm going to select the one with playlists. Okay, so we're not done yet. So this red box here on the right, we need to click it. And then on the left, we need to click the pencil icon to select the appropriate playlists. Saga log playlist. Let's just search for Vancouver. Actually, these are not mine. So I'm going to select walking tours. Hit save, and boom, we are finally done. Quite a lot of work, isn't it? So there's our full workflow for publishing a YouTube video in 2020.
18. Drone Aerial Photo Edit - Behind the Scenes Photoshop Color Grade - South Africa: Soft everyone, Greg Kang here and we have Adobe Photoshop 2021. Today we're going to be editing some drone photos taken with the GI drone over the years. So we've got some exciting photos over here from South Africa, from Thailand. And you'd like some of these photos to practice with, let me know and I'll provide a link somewhere, wherever you're watching this. Let's get started. So we are using Photoshop 2021. And this is important, especially if you're going to be doing anything like sky replacement because that's the new feature in this version. And let's get started. We're using a N1 Mac Mini. If that makes any difference. We've got our photo open. And yeah, the first thing I'm gonna do, let's just see what image size we're working with here. Wow, 18 megs. So a lot of information here. I think we'll be able to make a difference here. So first thing I'm do go to image adjustments. Let's just start from top to bottom here. Let's look at the brightness it is. It is a bit dark, isn't it? And let's just move that up there. Well, you can see what a difference that makes those penguins are much more visible. Now we can decide if we bump up, the contrast, sort of gives an emphasis on some of the other penguins. But if we decrease it, we can see everything. I think it's nice to see everything. So let's just reduce that minus ten. Alright, let's look at our vibrance. I like vibrance for bumping up the color. We can increase the saturation of it. Alright. We lose control over image. Let's make sure we're selected on, we're on the right layer here. K. Sometimes I happened in Photoshop. So if you ever get lost, you can always go to Window, make for the layers is open, so that's a good starting point. Okay, let's go back to image adjustments. Now we've got our shadows and highlights. Wow, this really brings up a lot of brightness here. So the shadows also allows us to bring more into the picture, but we don't want that too much. It's nice if we just bump up the shadows, little bit. Highlights, kinda tones that down. I'm more of a, you know, if you ever learn an instrument like playing piano, I like to, as they say, play by ear. When I'm color grading, I like to play around with the settings and see what type of look that gives me. It's more than one way to do things. So I think by putting it at 20% and really puts the focus on the penguins in this area. Let's hit OK. All right. So I think we're in a good spot right here. So we could either apply some HDR toning to give us a completely different look, or we can apply a lot. So what I can do is I can just say three different version, version. So this is a base color grade. Alright. Now, if we wanted to apply a lookup table, we can go to Windows adjustments. We can click on color lookup. And they've got some included lots over here. So lots are look-up tables. I typically use these for my videos, but they work on Photoshop as well. I'm using the popular Canadian YouTube repeater make cannons. Lots. He's got some different lux. So we click on there. We can go to find our lots. So actually paid for these ones. You can purchase them on the Internet. And we've got some different looks here. So let's try Arctic Circle. Kinda gives kind of a arctic look. Very interesting. And so if we go to hurt, our layers, go, go back to layers. And the layers. If we dial down the opacity, we can decide how much of that. Then we can decide on the intensity of that blood. Because this kind of a nice look. It does kind of give an arctic cold. Looked, but it's by the ocean and there's no snow. All right, let's save this. And I'm creating different versions here. Okay, so let's actually just save this to my computer. And I want to save it as a PNG file. Actually as do a JPEG is a bit smaller because I might use this on my website or yeah, like a YouTube or Facebook. So JPEGS are smaller. All right, we can see the size here, six megs. That's pretty big. Okay, let's assist good eight and it's a good, happy medium. Alright. We can also crop out some of that ocean there. So the focus is more on the penguins over here. Hit Enter. And we can try out different looks. So let's take, let's take off that lookup table. There's different lookup tables. Let's just take that one off. Let's try the other ones. Now. Till an orange is a popular look on Instagram. But we have to use it sparingly. Says go back to our layers. And let's just try dial down the effect. That's kinda nice. Let's just take it off. Put it back on. So we're getting multiple different looks that we can post. The different plot warms the sea which performs best for us. Teal and orange. And if you want to get these lots, you can just search for Peter MacKinnon, lots. And there's multiple social media influencers that saw lots. Okay, so let's try, let's take that off. Let's try a more traditional, generic safe type Relook Kodak killer. Yeah, that's a very nice look, very pleasing to the eye. And it's just dial that down a little bit. Yes, let's save another version here. Codec killer. So it's great. If you save it as a Photoshop file, you can retain the full quality of the fall and it allows you to open it, make modifications or remix it, and then you can save it to a PNG or JPEG. From there, you lose information when you save it to a format like JPEG. But it is necessary because certain platforms like YouTube, they have a one megabyte style file size limit. And yeah, on your website, you also want small file sizes so that your website loads fast. We're better SCO from Google, better experience for the user and all that stuff. Alright, so let's just say the format to JPEG. And that's just over Meg. There we go. Alright, so now that we've done our edits, let's look at the original and let's look at some of the different remixes that we made. So here's original. Here's the one with the Arctic look. See how much visit and brighter it is. This one, this is from the teal and orange. And we cropped it a bit. And this is the codec killer look. Alright. So which one do you like the best? I kinda like the Arctic. Look. The basic color grades is good as well. So yeah, that's our edit for the penguin aerial photo from Betty's Bay in Cape Town, South Africa. Alright, so if you like this style of working behind the scenes, I'm gonna do a another drone photo edit. So check out that next video or next lesson.
19. Drone Aerial Photo Edit - Behind the Scenes (Thailand & Myanmar): Okay, so let's work fast here. We can see the sky doesn't look that great, so it's a little bit Claudian gray. This is Chiang Mai, Thailand. First thing I wanna do is just crop. This photo is a press escape. So crop functions over there. So let's crop that. Now. Let's go to image adjustments. Brightness. Yeah, I'm going to bring that up quite a bit to 60. And you can see there when we increase the contrast and really shows off the temple. But then if we decrease it, we can see more of the forests, the mountain forests. That's nice. Okay. Tell me why. Let's emphasize the temple. Let's go for that. No right or wrong way. To go to vibrance. Bring out those vivid colors. All right, good with that image. Let's go over to shadows and highlights. Whew. Alright, so if we increase the shadows, it's again showing the entire forests, giving a bit more definition. Now. I'm just focusing on the temple here and seeing what the highlights is doing. I think I just want to leave that for now. I'm going to try to actually do the sky replacement technique on this Edit sky replacement. Let's see if we can get something a bit more dramatic. Okay, so that's a clear blue sky. Look. Let's see what else we got here. Let's hang on a sec. We're working with the cloud. We're working on clouds in the cloud. That's a nice one. We're experiencing a bit of a delay here. Finally, it was worth the wait. Alright, so yeah, we've replaced the sky. It's still, let's, looks a little bit dark. I want to experiment with this by doing some HDR toning. So we're gonna flatten image. Yes. And you can see by default, while it's really lighten things up and this is barely doing anything. Let's see what the more saturated look. Looks like. Maybe a little bit too much. Let's tone down the detail. Let's increase the highlights. Let's dial down the saturation of it. Yeah, I think this look won't work. Let's try surrealistic high contrasts. I think if we increase exposure, decrease the detail, but we could get kind of a smoky look. I don't know. Are you a fan of the smoky look? Alright, so that's one option there. Personally. I think it looked better with the default HDR toning. So let's just go with the default. I thought this looked pretty dramatic as it is. So let's just save it like that. And we're going to save this file onto the cloud. Chiang Mai mountain, temple sky replaced. And then I'll see. So I saved the Photoshop file in the cloud, and then on my computer, I'm going to save a JPEG so I can use this for something. Ok, 1.4 megs. That's fine. This was the original and this is the finished photo color graded with HDR toning. Let's just zoom in. We can really see the detail in the temple and that sky replacement really made a huge difference. Alright, let's go to our next Edit. Ok. So this is actually in young gone Myanmar. Okay, so first thing I'm gonna do is crop it out a little bit. We want to focus on the temple. Kay, now let's go to our adjustments. So I want to focus on this temple right here. I want to bring that out. All right, so we're gonna decrease contrast, increase our Vibrance and Saturation. Just a bit. Okay, and now let's go over to our shadows and highlights. Ok. So when we increase the shadows that sir, it looks unnatural. Alright, so fact, I think it's good that we leave the shadows of 0. Highlights. I think a little bit, 10% is fine. And let's take a look at what it looks like if we do replace the sky, maybe we can find something that is a little bit more majestic, kinda like that. So we can actually play around with the settings, the temperature on the sky, the brightness. So it looks like a sunset. We can even see if there's some different sunsets that we can play around with. I like that one. Tap on the panel. Let's try just sort of bit. So looks a bit more natural. Justice Shift Edge, change the color temperature. Let's try flip it. Yeah, that looks better. Hit OK. And maybe just bump up the brightness and a little bit. Not too much. There we go, or decrease the contrast. Alright, so I'm liking this photo. Lastly, we could put a lot. So let's just click on our color lookup. Let's see what let's we have here a little bit of Kodak killer. So let's just go to our layers and dial down the opacity. That is nice. I'm liking that. Alright, so let's save this into the cloud. And I'm going to save a JPEG on my computer so we can compare it. Alright, I think we can afford to do level 91 megabyte. Okay, so here is the edited version. That's the original. So what did we do here? We cropped it, we've done some color grading. We replace a sky and we apply the lookup tables. So yeah, which one do you like? I'm actually liking this one. I think the sky replacement really gave a nice backdrop. When I took this photo, it was just before dusk. It took a long time to find a place I could actually take the drone off and pull off the shot away from this pagoda because you can't fly your drone around here. So, yeah, hope you enjoyed and learnt a lot from following my workflow for editing drone photos in Photoshop.
20. Honolulu photoshop ai generative fill key techniques: Okay. Adobe Genoa fill. My name is Greg Kong. I'm going to introduce you to this new AI Power
tool or Photoshop, and I'm still learning, but I want to get you started. I've had a bit of time to
test drive this feature out. And the first thing
you'll need to do is to download Photoshop Beta. So this is separate
from Photoshop. And the key feature here
is called generative fill. So uses AI capabilities
using a text prompt that is triggered by making
a selection on your canvas. So this is straight
from adobe site. Some things that you can
do are generate objects, so select an area in your image, and then you'll have this prompt over here to
describe what you want to see. And you can also create you can select different variations on what it creates for you. There are three
different variations, and I'll show you
how to do that. You can also generate
backgrounds. So select the background
behind your subject, and then just select inverse and then follow the steps
to generate an object. You can also extend images by extending the canvas and using
the crop tool to do that. And then using the
generative fill prompt and just leaving it blank. And that will basically, it'll read what is already in the canvas and it'll use that information
to fill up the rest. That's pretty cool. There's also object removal, so you can select the object that you
want to remove and then just hit Enter on the
text prompt to remove it. Alright, so what are the
benefits of doing this? It's sort of this similar theme across different AI tools, whether it's Mid Journey, even Chat GBT is a text prompt. We've got Bing Chat GBT. There's Adobe Firefly. So this is built on
the same platform, but they've brought
it into Photoshop. And Photoshop is one of the
flagship products from Adobe, and I'm pretty sure
they're going to be bringing this to Premiere
Pro on video later on. Right now, images is what
they're focusing on, the media format that
they're focusing on. And they said they've trained
it on Adobe's photos, so you can be pretty sure that
you're getting images that are trained on
hundreds of millions of professional grade
license high res images. Alright, so let's get started. I've already
downloaded the tool. So this is a GOP photo
taken from New York. So let's see if we
can remove myself. So select subjects,
generate a fill, generate, and let's see
if it can remove me. Okay, let's look at
the other variations. Mmm. Let's see what
was there before. Not bad. Not bad. Okay. So let's put something
else in front. Let's put something
like a hot dog stand. So I'm gonna go to
Selection Tool. Hot Dog stand with American flag and
customers waiting. Or maybe I'll even
try a photographer. Okay? I don't really
see the hot dog stand. Okay, it looks like it recreated the World Trade Center,
craft beer place. Let's remove this.
Alright, that's not bad. Now, let's extend this image. I'm just going to
slim this down. So I'm going to
select the crop tool. I'm just gonna expand
this a little bit. Expand that. Okay. So now we have these
white borders. Now, let me use the
selection tool. Let's highlight the blank area, and then let's just
highlight the blank area, but we're also going
to get some of the actual image for reference. Click Generate fill, click Generate. Let's
see what happens. This is going to be pretty cool if it can fill up the rest. So this is huge. If you've taken a photo, but, you know, it
wasn't wide enough. Alright, well, that
completely changed the image. Okay, that's a bit
more realistic. That's created not what
we want. Let's try again. Let's try just select
the blank area. And click Generate. It's a very complex pattern, so maybe that has
something to do with it. I can try the right side. Okay? That seemed to do a better job when I
didn't select the image. Wow, take a look at that. Now, for the right side, Okay, so just selected
the blank spot. Generative fill, leave the text prompt blank,
click Generate. Wow. That's pretty amazing. Let's see the variations. I think the first
one's the best. So let's try without W. Yeah, it's done a pretty good
job. See the left again. So if we want to
save this image, let's just go to File Export. Quick Export is PNG. NYC GN AI. Let's take a look at the image. So 34 megabytes as a PNG. And so this is the finish photo. I think that's pretty amazing. Should we do one more? Let me see if I can find
another photo here. First, let's remove
let's remove these guys. Generative Phil. Let's see if it just removes
them. Great job. Let's do the same for all these guys and
that bag on the beach. Great job. The Instagramers
are gonna love this tool. Okay, let's just get everyone
else generative fill. So this is a good example of removing unwanted
people in the photo. And while this is happening, I'm actually visualizing
what I want. Let's look at the variations. Okay, let's just remove
this guy if we can. Great job. Now, you
see the date here. Let's see if we can
remove that, as well. There's other ways of doing it, but let's just see if this is a one stop
shop for removal. I mean, you could
use the Sm tool. I think that might
take some time. This is a whole lot faster. Great. Die a great job. Okay, let's insert some stuff. Let's get a nice
luxury yacht docked. And what I can do is I can try to extend the
canvas a bit more. Okay, let's check out
the other yachts. Second one, third, one.
I like the third one. Okay, so now
minimizing the canvas. Now I'm going to
select the crop tool. We're gonna expand this. Okay, let's just do
it horizontally. Hit Enter, hit the
selection tool, highlight the blank space, hit Enter, generative
fill, hit Enter again. Let's see if we can
successfully extend this photo. Wow. Wow. Now we've got
more real estate for more luxury ats.
Okay, let's try that. Luxury yacht with
girls on board. Very nice. I like that. I like that. Alright, let's
take a look at the original. Let's take away
all these layers. So we had the boats. We had This is the
blank area we extended. There's the extra boats,
took away the date. Started taking away people. And we're left with
the original image. So let's just recap to
summarize to end this video. So we use the removal tool
to clean up the crowd. We remove the date. We
added a yacht in the water. So adding an object, we extended the photo, and we added another yacht. So let's save this. This is very happy with
how this turned out. This is an old photo that
I've been able to Recreate. So this is only 1.75 megabytes. But I like that. I like that. It's really kind of given a
new life to an old photo. And just so many
possibilities now. I mean, having a tool like
Doli or Mid journey is cool, but being able to use
these AI tools on existing images combined with the Power Photoshop is amazing. So I hope you found this
tutorial helpful, and good luck. Practice away and
have some fun. Bye.
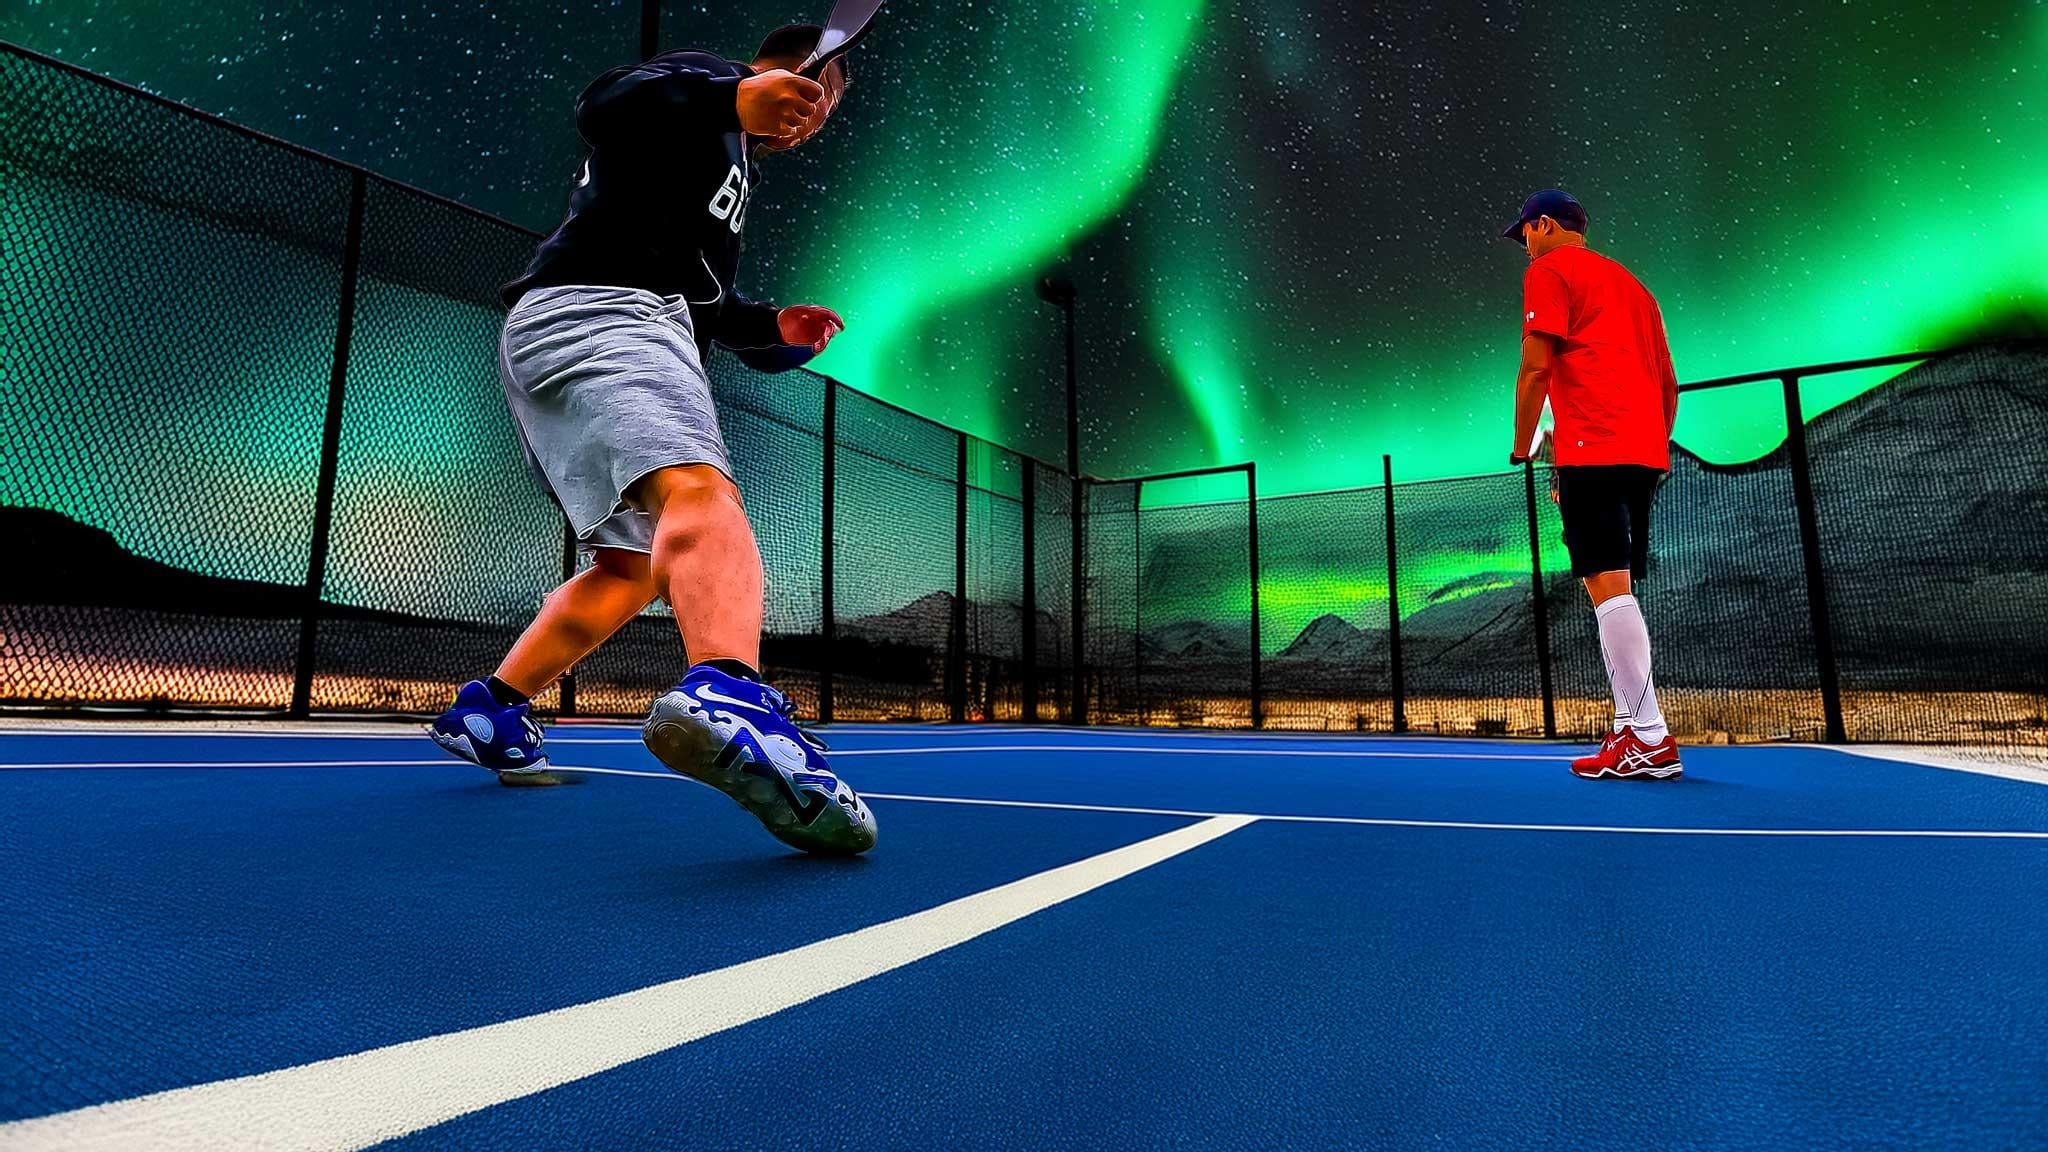
21. Adobe Photoshop 2025 Gen Ai Tutorial: Hey, it's Greg here
with another video on how to use Adobe
Photoshop 2025. Generative AI features. This is the Northern
Lights above Vancouver. I'm going to give you a behind the scenes look
of how I created this. So let's just remove
this layer here. So we can see that we've just got this is a drone photo
of downtown Vancouver, which is already pretty good. But you can use the features in Photoshop to
make it even more special. So we've got Edit
sky replacements. This has been around for, I think, a year, a few years, right, which is pretty good. But we recently had the
Northern lights in Vancouver, so we want to try to do that. So let's move this layer away. And I'm going to show you how we can create using
the power of GNEI. So we want to use
the selection tool. And I'm going to use
the polygon tool here. And I'm just going
to draw an outline. It's not going to be perfect, but should cover the skyline. Then let's just close
the polygon there. I'm going to click Genera fill. And now I'm going to put
Northern lights with asteroids. Just for fun, right? Ooh, those look scary. Okay, maybe let's change it with small meteor small meteors. Okay, so it takes a little
while to generate those. And we have some variations
here on the right panel. Let's try it just with the
meteors, Northern lights. So you can see where we're iterating here with
our creations. So we're creating and then we're we're seeing if
we like it or not. If we don't, we can actually
click the three dots. We can generate similar to create another set
of three creations. So this is one of the powerful
skill sets in JNAI, right? You create one piece of content, and then you iterate
off of that. Okay, so I don't like first two. This is not bad. It
looks a little fake. Kind of like this, right? Yeah, so I'm going to save this. We can actually just
save the project as a Photoshop file if you
want to come back to it. So I'm just going to save
Vancouver Northern Lights. And then if I want to
save an image that I use on like
Facebook or whatever, I'm going to just create a PNG. So file exports,
Quick Export as PNG. So there we go. That's
how we can use Photoshop 2025 to create the Northern
Lights using Gen AI. Please check out my
generative AI course where I do other
creations, images, videos, audio podcasts, and a lot more around the field of generative
AI for creative. So check it out and
we'll see you later. Bye.
22. Photosho summary edit: Congratulations on finishing the course. I hope you've learned something practical that you can take away and actually use for your business or your projects. I encourage you to post a project using one of the techniques learned in 2021, like the sky replacement or maybe it's a Neural filter and shared with the class. I'm also going to share my projects, so check it out and don't be intimidated by Photoshop 2021, there's a whole lot of features, some of which I don't even know. But I think it's great to have a grasp of the essentials and understand the newer features. And then if you need to look something up, you can look up the new discover feature to look up something very specific. And I think that's a good way to approach a lot of Adobe's products because they can do a lot of things. But if you're trying to learn every single little thing, you can get overwhelmed. I also invite you to check out my other course, Adobe Spark. If you want a deep dive into that program, it's a very complimentary program to Photoshop, as we saw in the step-by-step publishing for YouTube, and it comes with your package. So I think it's worth the time to invest in that. Good luck on your creative journey. Cia.
 Greg Hung, Travel Videographer