Transcripciones
1. Introducción y resumen: Hey chicos, Este es
Nick y bienvenidos a otro
curso de Skillshare donde estarás aprendiendo a hacer diez
efectos visuales para los videos musicales. Vamos a estar viendo cómo
agregar un texto detrás del tema. Cómo crear un emocionante efecto
de movimiento y sacudida. Cómo agregar un efecto súper zoom
para darle vida a tus metraje. Cómo agregar una estroboscópica, agregando humo y atmósfera y rastreándolo a la cámara. Creando este efecto de rastro de
eco único. Agregando
ondas de choque de desplazamiento a tus metraje. Movimiento bloqueando una cámara o
rastreando la cabeza de alguien. Agregando una
transición de diapositiva de látigo para cambiar entre dos tomas diferentes
así como fotogramas congelados. Estoy tan emocionado de
que ustedes
aprendan a hacer todos
estos efectos divertidos. Así que empecemos.
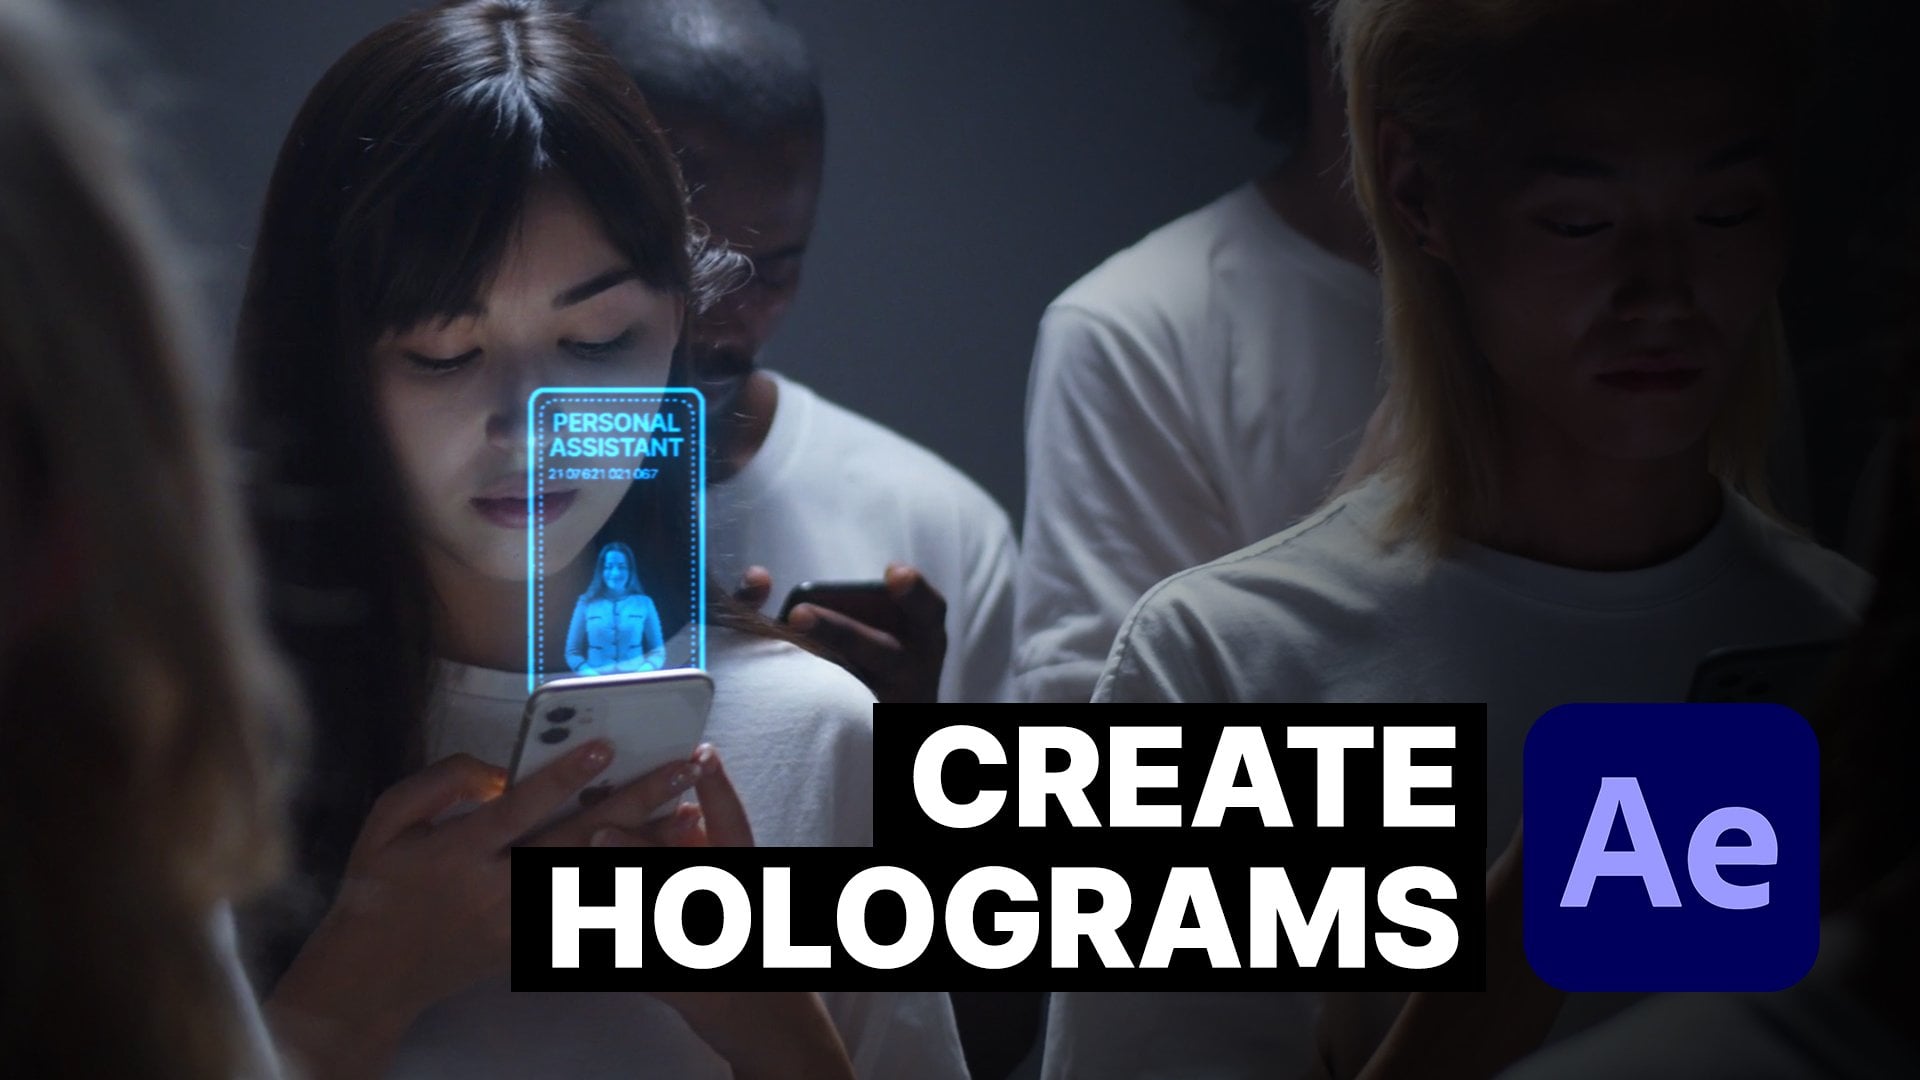
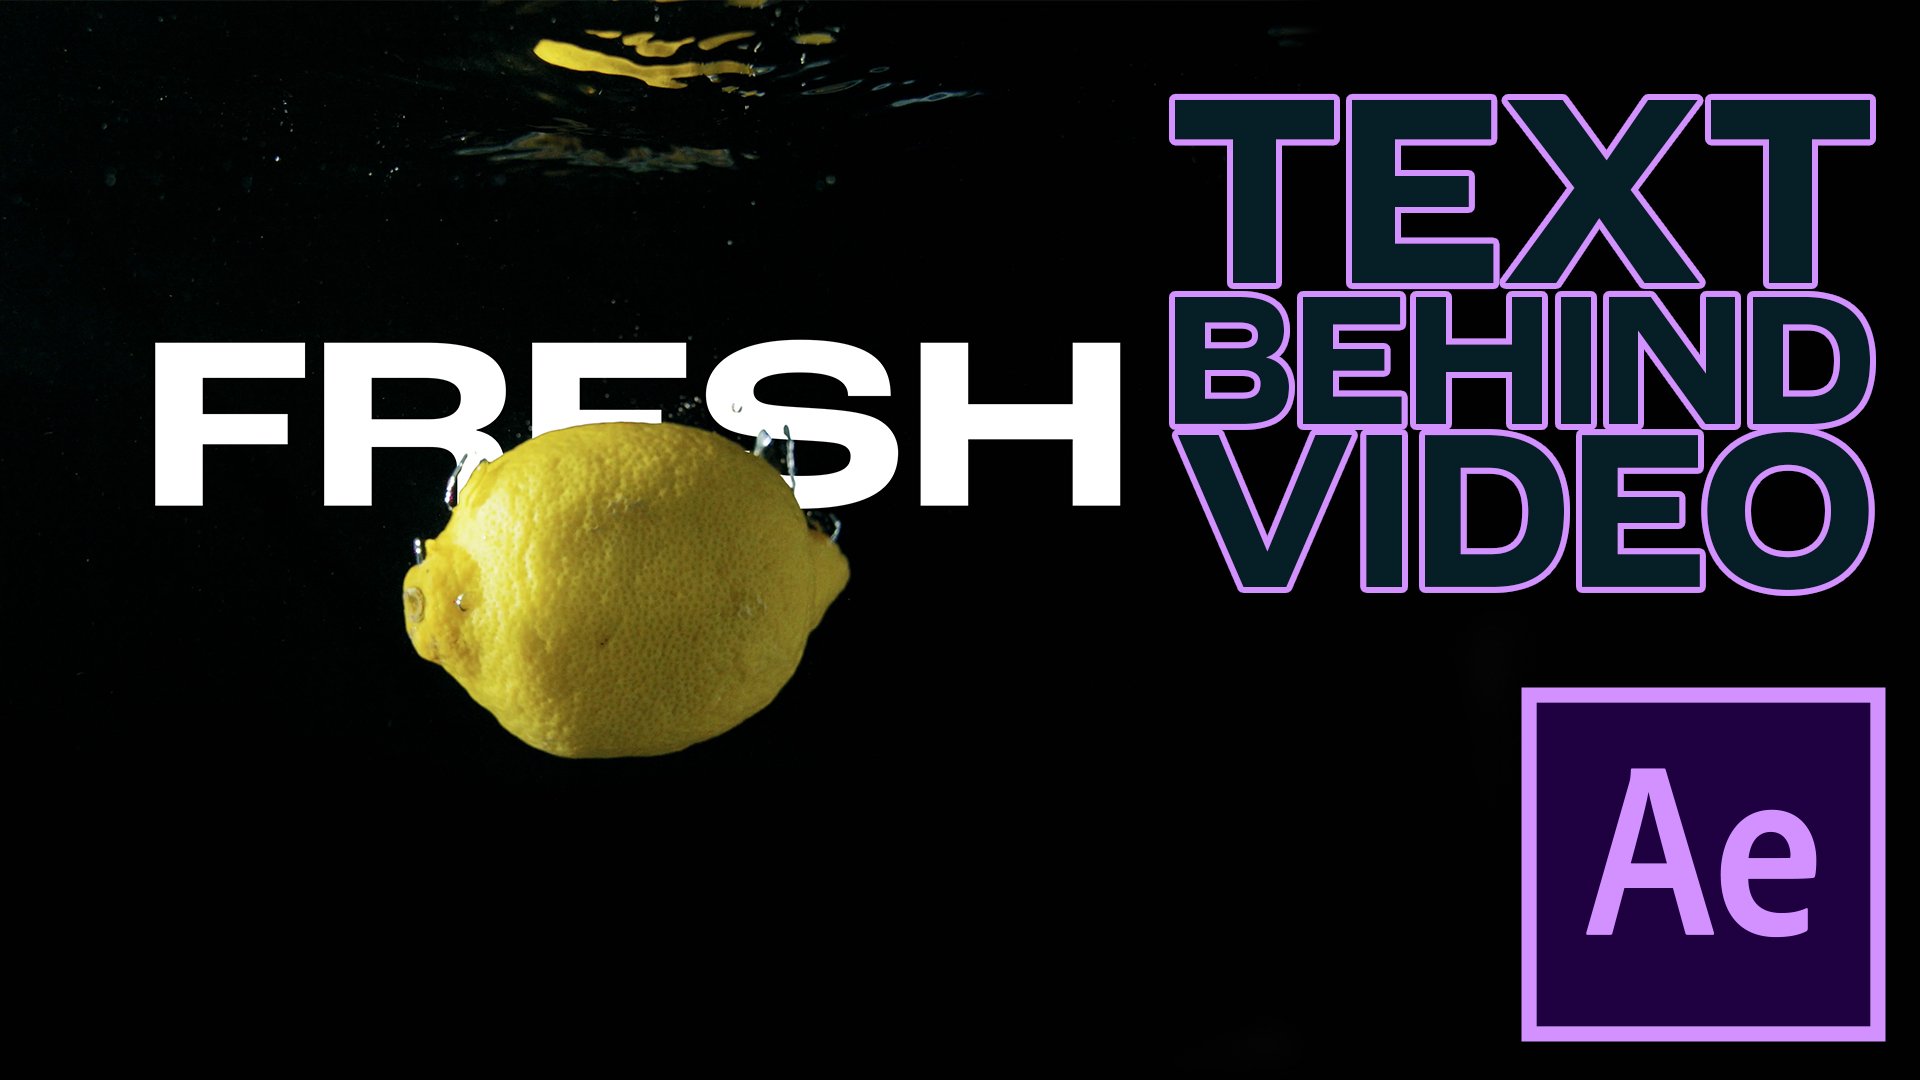
2. Texto Detrás De La Sujeción: Estoy tan emocionado de que ustedes
aprendan a hacer estos efectos. Entonces el primero con el que
vamos a empezar es agregar texto detrás de un tema. Vamos a seguir adelante y saltar a la derecha
en Adobe After Effects. Ahora que tenemos
After Effects abierto, lo primero que tienes que
hacer es tomar el texto detrás clip de
sujeto que puedes encontrar
abajo en el proyecto. Y sólo vamos
a tomarlo y arrastrarlo a este nuevo botón de
composición. Y va a hacer un policía
nuevo con nuestro clip. No quiero usar todo
el asunto sólo porque
va a ser demasiado largo para este video. Así que sólo voy a arrastrar este botón derecho trim
comp al área de trabajo. Sólo los soviéticos tienen un
clip más corto con el que trabajar. Y la idea aquí
es V1 para agregar texto. Y luego queremos
cortar a nuestro intérprete fuera y más o menos pegarse
al frente para que el
texto esté detrás de ellos. Vamos a seguir adelante y
empezar a hacer el texto. Sólo voy a escribir. Genial. Porque es muy guay. Y sólo escalarlo. Que sea grande. Perfecto. Y voy a entrar en una
línea y simplemente centrarla. Podemos bastante cool. Tal vez incluso un poco más grande. Perfecto. Genial. Ahora todo lo que tenemos que hacer es tomar nuestro video y lo
voy a renombrar pulsando Enter y
BG para background. Y voy a
duplicar el clip
pulsando Control D.
D para duplicar. Y una vez más,
acabaré de renombrar esto a F, G para primer plano. Y lo voy a arrastrar encima de
lo cool. Tenemos primer plano, fondo
fresco. Ahora si haces doble
clic en tu primer plano, se abrirá la capa. Aquí mismo se ve a esta
pequeña persona con un pincel. Por lo que esta es una herramienta Brocha roto
que te permite escribir un alcance. Cualquier cosa que quieras. Así que sea sólo quiero
que le corten. Entonces si solo tomas y arrastra, verás que el rosa se
delineará con lo que tienes. Eso va a ser recortado. Se puede ver que está seleccionada esta silla al fondo
o en el piso o algo así. Si mantiene Option
o Alt y
pinta, en realidad sacará
esas áreas. Y obviamente cuanto más,
cuanto más tiempo gastes en ello, mejores serán los resultados. Por el bien del tutorial, voy a tratar de correr a
través de él bastante rápido y avanzar rápidamente
algunas partes. Pero la idea es que selecciones lo que
quieras en primer plano. Ni siquiera tiene que
ser una persona. Se puede tener como coche, tener el texto detrás de un auto. Hay
formas ilimitadas de usar esto. Para este ejemplo, estoy
usando un artista aquí. Bien, tan perfecto. Permítanme acercar un poco
aquí en la línea de tiempo. Y simplemente saltaré
un par de marcos y veré
cómo se ve esto. Parece que se está
pegando bastante bien. Entonces la idea es que
solo vas a pasar por todo
este clip
y ajustarás cualquier cosa que se sienta como si no se
estuviera conectando como puedes ver aquí. El segundo marco, la selección en
lo de la sudadera con capucha, estamos en la chaqueta. Se está volviendo un
poco diferente. Sólo voy a
cortar esta parte. Realmente no me importa
esta pequeña cosa con cremallera. Simplemente iremos al siguiente
fotograma y se puede ver, solo trata de mantenerlo
consistente para que la máscara no se jiggle ni charla
mientras se está reproduciendo el video. Sólo voy a
avanzar rápidamente este
próximo bit como lo estoy
rotoscopando y verás en 1 segundo
cómo debería lucir. Eso debería ser bueno por ahora. Y como puedes ver, cuando
vuelves a la composición, puedes ver eso ahora. Se puede ver que ahora tiene su intérprete en el frente. Una cosa que podrías
notar es que los bordes son, son bastante afilados. Y la forma de arreglar eso es si vas a tus
Efectos y Presets. Ahora que los efectos
y presets cargados, lo que necesitas
hacer es escribir en soft. Y hay un efecto
llamado alfombra suave refinada. Y si lo arrastra encima de
tu FG, tu primer plano, y tomas un segundo y
puedes verlo tipo de empieza a expandir y
suavizar los bordes. Y creo que diez podrían ser un poco demasiado alto
para este ejemplo. Vamos a probar algo así como cuatro. Luciendo un poco mejor y se puede ver sobre todo en el cabello, realmente, realmente
ayuda a suavizarlo. Y luego obviamente con Frodo, si quieres
entrar y realmente limpiar partes como esta, todo lo que tienes que hacer
es ir a tu capa. Asegúrate de estar en el Pincel
Roto y afina el borde. Y luego con el Roto
Brush puedes entrar y refinar estas partes. En mi opinión, la alfombra suave
refinada realmente ayuda con el cabello rizado. O como, digamos que alguien lleva
un vestido o un suéter. Realmente ayuda a conseguir
esos bordes más limpios. Ahora si vuelves
a la composición, puedes ver que se ve muy bien comparado con solo un filo afilado. Así es como se agrega
el texto detrás. Y entonces siempre
puedes estilizarlo. Al igual que en el ejemplo que hice, seguí adelante y me
dieron una rampa de gradiente. Rampa de degradado agregada en. En el texto, se puso un poco de profundidad. Entonces me dupliqué,
me deshice de la rampa, hice trazo, así que
va a personaje. Vamos a quitar el color frontal. Añadir un trazo. Hagámoslo grueso. Literalmente. Eso es
lo que dice el texto. Y solo puedes
seguir adelante y conseguir resplandor, lanzando un efecto de brillo. Ampliemos realmente el radio. Y luego podemos simplemente copiarlo y pegarlo en el
fondo también. Y tal vez reduzca este umbral. Hagamos estos colores
un poco más brillantes para
que realmente el resplandor
parezca azul eléctrico. Sí, puedes ver
algo así. Y ahora obtienes este efecto
realmente genial. Y tu personaje
ahora está frente a ella. Entonces tienes a un artista actuando o
digamos que tienes un auto, cualquiera, cualquier objeto en el frente. Y realmente te ayuda a separarlo con
bordes realmente definidos también. Así que todo lo que tienes que hacer
es simplemente limpiarlo, ir marco por cuadro, y realmente usar la herramienta
Roto Brush para ayudarte a conseguir
esos bordes limpios. Genial. Acabas de aprender a
agregar texto detrás de temas. No puedo esperar a ver qué
vas a hacer con él. Y veamos el siguiente efecto.
3. Wiggle & Shake: Muy bien. Parece que
quieres saber cómo agregar un meneo o un batido
a tu metraje. Vamos a saltar a la derecha en Adobe
After Effects para empezar. Para este próximo efecto, va a ser sacudida de meneo. Así que voy a tomar el metraje, dejarlo caer en el proyecto. Una vez más, hacer una
nueva composición. Y la idea para éste
es que cuando es bailarina,
esto está terminando
muévete aquí mismo. No hay impacto en ello. Y queremos que
parezca intenso. No como acampar intenso. Video musical intenso. Vamos a hacer clic derecho
e ir al nuevo objeto nulo. Y podemos golpear Enter
y llamarlo meneando. Porque va a estar moviendo. Con el meneo seleccionado. Vas a ir a Effect. Controles de expresión. Control deslizador. Lo que esto hace es que te da un slider y el deslizador
no hace nada, pero te permite valores de fotogramas clave. Y esto es genial al
escribir expresiones, que es exactamente lo
que vas a hacer. Vamos a hacer clic en este triángulo y soltar el control deslizador. Entonces si tienes acceso a
esta opción de fotograma clave, además de soltar
la transformada para que
se mueva y agite. Probablemente hayas visto esto antes de usar la expresión de meneo. Entonces si mantiene la opción y hace clic en el cronómetro
junto a la posición, te permite escribir unas expresiones
y vamos a escribir en meneo, abrir paréntesis. El primer número es la velocidad. Por lo general, qué tan rápido pasa
algo. Así que sólo voy a
poner cinco comas. Y ahora el segundo
número es la intensidad. Entonces, por lo general, cuántos píxeles
se va a desplazar. Y en lugar de escribir un número, vamos a encontrar
esta expresión, escoger, látigo, click, y arrastrar al deslizador y podrás ver cómo lo resalta en el cuadro. Entonces déjalo ir y lo
ves lo pega. Cualquier número que esté en el deslizador es cuánto va
a afectar la posición. Para que como pueden ver, lo estoy
arrastrando en este momento y
se puede ver el objeto nulo moviéndose. Para que puedas ver si
solo escondes el metraje, puedes ver que el objeto
nulo aquí, porque box ahora se está moviendo mucho. Y si lo reduciste, digamos a los 77, ves que se mueve menos. Y puedes manivela hasta 1000 y puedes ver que está
rebotando por todo el lugar. Así es como
vamos a controlar cuánto sacude la pantalla. La idea aquí es justo
antes de que haga esta moción. Aquí mismo. Vamos a tomar nuestras metraje. Vamos a recoger,
azotarlo al wigglier. Ahora donde este
objeto nulo mueve nuestro metraje, sólo va a moverse con él. Vamos a seguir adelante y fotograma clave
el deslizador en el control. El control deslizador. Sólo para ocultar todo lo
que no se necesita. Voy a pegarte. Simplemente saca los fotogramas clave y solo tienes los
fotogramas clave con los que trabajar. Esto se establece en 0. No queremos que nada
pase aquí. Y encontremos la última parte. Entonces donde quieras que el
meneo se detenga al final. Digamos aquí, solo para que tome un poco de
tiempo ralentizar. Encontremos la parte donde
va a ser la más intensa. Entonces creo que donde
cruza sus dedos aquí, probablemente sea
lo más intenso para que
puedas tomarlo y
empezar a arrastrarlo. Entonces creo que tal vez esto debería
ser bueno, que es 146. Si juegas. Dale algo de tiempo para previsualizar. Solo voy a
recortar mi cronología a esta parte solo para
poder previsualizarla más rápido. Se puede ver que sacude. Ahora si quieres
sacudirlo más rápido, puedes cambiar este
número cinco a, hagamos algo como diez. Sólo voy a
bajar la calidad a
trimestre para que podamos ver
todo sucediendo más rápido. Ya se puede ver
que es batidos mucho más y es muy intenso. Una vez más, lo mismo si
solo te golpeas por el fotograma clave, siempre
puedes controlar
cuánto se necesita, para que puedas ver que podemos
manivela a algo como 300 y va a sacudir
aún más intenso. Creo que esto es demasiado
para nuestro objetivo aquí. Así que sólo voy a
reducirlo a 130. Eso se ve genial. Eso
se ve realmente genial. La otra idea es
que si golpeas el gráfico, el editor de gráficos y
haz clic en slider, puedes ver que
no hay ninguna curva a nuestros fotogramas clave es
simplemente todo muy sólido. Entonces, si solo seleccionas
todos los fotogramas clave, haz clic derecho sobre ellos, ve
a Keyframe Assistant. Fácil, Facilidad. Se va a suavizar
la curva del batido para que puedas ver que se
ralentiza mucho suavemente. Otro problema que
puedes ver aquí es que estamos consiguiendo esta pizarra ahora
están alrededor su metraje porque
no tienes suficiente metraje. ¿ Cuáles son las opciones? Podrías escalar tus imágenes. Mucha gente hace eso. Pero puedes entrar en los efectos
y presets y escribir en movimiento y escoger el azulejo de movimiento. Suéltalo en tu metraje. Ves que dice
anchura de salida y altura de salida. Puedes empezar a estirarlo y en realidad
estirará tu metraje. Hagamos 130 por ambos. Si golpeas
los bordes del espejo, solo lo espejos. En la mayoría de los casos, mucha gente ni
siquiera se dará cuenta de eso. Entonces aún mejor es que si
habilitas el desenfoque de movimiento a este pequeño, estos pequeños tres círculos, ayuda a mezclarlo aún más. Si no encuentras
el desenfoque de movimiento, solo
puedes hacer
alternar interruptores y modos o hacer clic derecho en
estas columnas y encontrarlo. Ahora si
lo previsuas, mira eso. Tienes un bonito batido. Echa un vistazo a eso. Ahora puedes motear tus metraje alrededor. En la siguiente,
aprenderás a agregar un súper zoom.
4. Super Zoom: Parece que quieres un súper
zoom en este video. Muy bien, salta a
Adobe After Effects. Y vamos a aprender esta cosa. Al igual que en los dos anteriores. Vamos a tomar nuestro clip, dejarlo caer en After Effects, y simplemente tirarlo
a una composición. Este es un clip 4k k, y como vas a
estar acercándose en él, voy a hacer nuestra composición, la tradicional 1920 por 1080. Perfecto. Sólo voy a
alejar solo para que encaja en nuestra comp. Literalmente 50%. La idea con este clip son UC, mudarse y bailar alrededor. El tiro se ve bastante bien. Pero quieres agregarle
algo de drama. Quieres que sea
agradable y dramático. Va a haber un par de cosas
diferentes que
vamos a hacer con esto. Pero lo primero que
vamos a hacer es hacer un nuevo objeto nulo. Vamos a tomar
o pinchar, arrastrarlo. Los padres tenían dos son objeto nulo. Y vamos a encontrar un lugar
donde quieras acercar. Creo que aquí mismo
donde salta al centro
de atención es una sección
bastante buena. Entonces voy a ir a mi nulo, golpear P para la posición, presionar el fotograma clave, y
luego golpear S para escala, golpear ese fotograma clave. Y luego si le pegas
U en el teclado, solo
voy a tirar hacia arriba todos los
fotogramas clave que has hecho. Vayamos a conseguir
esta sección
donde realmente salta
aquí mismo. El objetivo aquí es intentar
que el Zoom sea lo más rápido posible para que el
desenfoque de movimiento realmente lo mezcle. Así que vamos a jugar
con eso un poco. Pero creo que justo aquí
cuando aterrice, acerquemos. Sí, Dos al 100%. Bam. Somos amables y de cerca. Veamos qué tan rápido es ese Zoom. zoom no es lo suficientemente rápido. Así que sólo voy
a traer estos adentro. Veamos. Genial. Ahora ya ves cómo es
realmente, realmente áspero. El Zoom es realmente áspero. Para que podamos elegir por
todos los fotogramas clave. Haga clic derecho en
Asistente de fotogramas clave, Fácil, Facilidad. Ahora otra parte es
que vamos a elegir escala y abrir
el editor de gráficos. Empecemos a
acercar y ver
cómo se ven
realmente nuestros marcos clave. Ves que la curva
es bastante lisa. Ahora si quieres hacerlo
un poco más dramático, si quieres que
suceda el zoom, te vuelves más rápido. Si seleccionas ambos fotogramas clave, verás cómo
tienen estos mangos. Puedes controlar. Si mantienes turno de esa manera es
simplemente paralelo. Puedes arrastrar uno a un extremo y luego tomar el otro y
arrastrarlo hasta el otro extremo. Y ahora va a ser realmente
extremo. Mira eso. Eso en realidad podría ser
un poco demasiado extremo. El promedio va a
derribar eso una muesca. Vamos sólo, sólo un
poco fresco. Eso se ve bien. Mira eso. Eso se
ve bien. Podríamos hacer
lo mismo con las posiciones. Esto se ve bien. Ahora la idea aquí es
si una vez que enciendas el desenfoque de movimiento, mira que estás obteniendo este genial efecto borroso
cuando se está acercando. Me gusta agregar, una vez que se acerque, me gusta agregar algunos agradables efectos
frescos, crujientes. Lo que quiero decir con eso es, lo que quiero decir con eso es que
puedes tomar tu clip original, duplicarlo pulsando Control D o Comando
D si estás en un Mac. Y vamos en solitario este clip
solo para que sólo podamos verlo golpeando este
pequeño círculo aquí. Y en los Efectos y Presets, voy a escribir
en luma, luma Key. Y lo que hace
es que te permita separar las partes brillantes de la imagen de las partes oscuras
de la imagen. Ya ves que dice llave más oscura. Eso es exactamente lo que queremos. Para que podamos tomar nuestro umbral y empezar a arrancarlo
y mirar eso. Queremos las
partes frescas y brillantes de la chaqueta, así que echa un vistazo a eso. Eso se ve bastante fresco. Y lo que queremos
hacer con eso es que quieres que
parezca una floración. Al igual que se acerca y
estás de este humor. Si lo desahogas, puedes ver que
no está pasando nada. Y eso se debe a que nuestro
modo de mezcla está ajustado a la normalidad. No se apilar de ninguna manera
con el metraje original. Pero si lo configuras para agregar, puedes ver que lo hace
realmente brillante o pantalla. También lo hace brillante. Efectos y presets. Simplemente puedes conseguir
cualquier tipo de desenfoque. Voy a usar Fast Blur. Lánzalo en Repetir píxeles de borde. Y una vez que empieces a
aumentar el radio de desenfoque, realmente se
puede ver que está
agregando este efecto de brillo. La forma en que me gusta apilar la
mía es que golpeo T por opacidad. Y en el
primero lo puse a 90. Me gusta trabajar en
conjuntos de números, así que me gusta 906030. Esa es la forma en que he estado experimentando
y funciona para mí. Y se puede ver
cuál es el desenfoque de la caja. El primer set. Lo vamos a hacer muy,
muy ligeramente, como
un desenfoque de caja de diez. Y luego
duplicarlo una vez más. Golpea T, póngalo en 16, y aumenta el
desenfoque un poco más. Entonces puedes hacer lo
mismo que una t, 30906030 y luego 30, realmente
puedes desenfocar. Sólo como que le da más de un halo alrededor de todo el asunto. Realmente se puede ver que está
condimentando este efecto. Entonces otra buena idea
que también podrías hacer es crear una nueva capa de ajuste. Y sólo se puede tirar
sobre la exposición sobre él. Puedes derribarlo
para que sea más oscuro. Tomemos esta
capa de ajuste y la pongamos justo debajo de
todos nuestros
filtros extra Oliver extra del anuncio añadido en. Y la idea aquí es
que sólo vamos a enmascarar o intérprete. Estoy sosteniendo opción y control para
seleccionarlo desde el medio. Y bajo nuestro maestro
realmente va a hacer restar esa visión están separando a nuestro músico
del fondo. Y todo lo que tienes
que hacer es simplemente pluma la máscara y mira eso. Ahora, se ve
mucho más intenso. Este es el original. Aquí está con todos los
efectos que ves realmente le da un bonito look. La idea aquí es que lo vamos a tomar y
vamos a animar esto. Por lo que sólo aparece cuando
el zoom está sucediendo. Lo que podrías hacer es,
digamos que realiza para el hombre del zoológico. Él hace su pequeño movimiento. Genial. Y entonces tal vez aquí
si quieres alejar, si pudiera simplemente presionar los
dos botones de fotograma clave, entonces muévete por un
par de fotogramas. Toma nuestro
fotograma clave original, cópialo, controla C o Comando C en un Mac, y luego Control V o Comando V. Puedes ver que se pega. Entonces si tenemos un zoom
y alejamos, perfecto. Ahora tenemos un marco clave. La opacidad en todas estas capas. En todas nuestras copias extra del
metraje original con el desenfoque. Basta con hacer clic
en los cronómetros sobre la opacidad. Ve a donde
todavía está acercado, pulsa esos fotogramas clave. Y luego una vez que se
alejó, arrástrelos todos a 0. Y luego lo mismo
antes de que todo empiece. Para la
capa de ajuste, puedes hacer lo mismo
por la exposición. Puedes golpear el cronómetro una vez que
se acerque en la exposición, golpear U para tirar hacia arriba los fotogramas clave y ajustar
la exposición a 0. Presiona aquí el fotograma clave, vuelve a
ponerlo en 0. Así que más o menos cosas sólo
están sucediendo. Fui a acercado. Selecciona todos estos fotogramas clave. Haga clic derecho en Asistente de fotogramas clave Fácil, Facilidad para
introducir esa suavidad, esa suavidad a ellos. Ahora, echemos un
vistazo a lo que hicimos. Echemos un vistazo a este arte. Veamos este
arte que hicimos. Se puede ver hacer zoom en. Los efectos están empezando
a aplicarse. Y luego una cosa que notas
es que cuando se está acercando, hay alguna
parte faltante de la parte superior aquí. Y podemos arreglarlo de
la misma manera que lo hicimos antes con el azulejo de movimiento. Toma eso, tírala
al súper zoom. Extender el ancho y la
altura como un 110. Espejo de los bordes. Bam,
ni siquiera se puede decir más. Muy bien, así que una década
después de que mi computadora
decidiera renderlo, puedes ver aquí el efecto, tienes el super zoom. Tenemos algunos
efectos extra pasando. Y el video está buscando limpio que puedes súper zoom
en cualquier metraje que quieras. En el siguiente video, vas a
aprender a agregar
un efecto estroboscópicos.
5. Strobe: Parece que quieres aprender
a agregar un efecto estroboscóptico para
darle vida realmente a la iluminación
en tu escena. Saltemos a Adobe After
Effects y comencemos. Muy bien, para este efecto de texto, ya
lo sabes, toma el clip, tíralo a After Effects. Toma eso, arrástralo
a una nueva comp. Y encontremos una buena parte de este video que
quieras usar. Entonces como este es
un efecto estroboscópicas, quiero que la luz esté en
el tiro, así que eso es perfecto. Genial. Lo que vamos a
hacer es que sólo vamos
a seleccionar esa parte
que queremos con la luz. Haga clic derecho recortar
comp al área de trabajo. Ya que esta es la zona activa, vamos a estar trabajando
con ellos. Este efecto estroboscóptico. Vamos a utilizar algunos
de los conceptos similares que acabamos de explorar
en el efecto anterior. Donde vamos a empezar a
amontonar un par de cosas
diferentes para
jugar realmente con el efecto de la misma. Vamos a seguir adelante y empezar a
construir nuestra mirada. Voy a usar un framework
y enfocarme aquí mismo. Y voy a
duplicar el efecto. Llamemos a este primero BG
para antecedentes, el de arriba. Hagamos estroboscópicas. Uno. Vamos a
tomar nuestra llave luma, lanzarla, y vamos en solitario la capa estroboscópica para que
sólo podamos ver lo que está
pasando con ella. Para que como se puede ver, sigamos adelante y escojamos
solo las partes más brillantes, como, en realidad solo las partes
más brillantes como esta. Y ponle un desenfoque rápido de la caja. Y empecemos a
construir esto. Vamos a un-solo. Cambie el
modo de fusión a la pantalla. Y wow, realmente se está
volviendo brillante. Así que repita los píxeles de borde. Empieza a difuminar un poco esto. Esto se ve bien.
Golpea T por opacidad. Alumnos 90. Genial. Vamos a duplicar esto. T 60. Extender esto un poco más. Genial. Duplique este T 30. Expande aún más el desenfoque
para ese efecto halo. Muy bien, eso se
ve un poco bonito. Entonces otra
cosa extra que podríamos hacer es tomar nuestro fondo, duplicarlo,
llevarlo a la cima. Vamos en solitario. Tomemos el resplandor. Ponlo encima. Veamos qué va a hacer. Lo ves empezando a
colorear algo de esto. Esto podría ser bastante
genial si tomamos nuestro radio de resplandor y lo
ampliamos mucho. Mucho. Para éste tenemos que
hacer como 300. A continuación, puedes cambiar
el modo de fusión a pantalla y reducir la opacidad
a algo así como 20. Esto le va a dar
una floración general en todo el tiro. Otro concepto genial
que podrías hacer es añadir bengalas falsas. Y para hacer eso puedes tomar
el fondo, duplicarlo. Llamemos a esta bengala. Y ya que la luz refleja en la cámara
ahí al revés. Entonces, si solo golpeas R para rotación y
voltearla a 180 grados, entonces
puedes tomar el bucle, la tecla luma, teclear la parte
oscura aquí mismo. Así que sólo, sólo literalmente los puertos
más brillantes están aquí. Incluso podemos manivela solo
para que sea en su mayoría la luz. Entonces puedes tomar el desenfoque de la
lente de la cámara, tirar eso. Desenfocarlo. Cantidad decente. Veámosle. 59 se ve bien. Un-solo ella. Cambiemos eso a pantalla. Y vamos a reducir
la opacidad a 40. Eso va a hacer es la
moción que vas a ver. Va a ser más o menos
reflejando dónde está esta luz. Va a ir en
dirección opuesta. Y realmente va a
ayudar a agregar ese tipo de como una llamarada de lente
casi mirarla. Ahora v quería
hacerlo todo estroboscópicas. Para hacerla estroboscópica. Si vas a seguir adelante
y precomp todo esto, todo menos el fondo. Y llamemos a esto luces. Entonces se ve como no se
ve igual que lo que acaba de hacer. Y eso es porque V1 para comprobar este colapso
transformaciones lenguaje es básicamente solo usar
todos los modos. Aún así. Porque si
lo descompruebas, ves
cómo te da un look diferente. Ahora esto te permite controlar todas
las luces con un
solo deslizador de opacidad. Ya ves, ves que
puedes cambiar la intensidad de todo el efecto
sin efectuar,
sin traer más de 60% son
más del 30% o más del 20% sobre estos. Ahora va a ser una expresión de meneo fácil
donde solo haces opción y escribe en meneo. Y pongamos
algo muy rápido. Entonces 24, la velocidad para la intensidad, vamos con 200
porque quieres
asegurarte de que esté cubriendo y
yendo todo el camino a 0. Voy todo el camino para
hacerlo todo el camino a un 100. Voy a cambiar
la resolución a trimestre sólo para que en realidad
podamos verla. Ver que suceda más rápido. Ya ves como
sólo se está llegando a 28. No estoy viendo a 0 con demasiada frecuencia. Entonces lo que podrías
hacer es realmente
jugar y hacer como
digamos negativo 30. vez consiguiendo más valores entre 0100. Vamos a prever esto. Ya puedes ver que
tienes este Efecto Strobe. Y realmente te está dando
esta llamarada de lente Mira también. Se ve realmente bonito. Si solo el original, puedes ver la diferencia, no dinámica y dinámica. Impresionante. Tu metraje ahora se
ve mucho más dinámico. En el siguiente video,
vas a aprender a agregar humo y atmósfera para
darle sabor aún más. Vamos a saltar a eso
en el siguiente video.
6. Humo y atmósfera: Muy bien,
parece que quieres realmente condimentar el metraje. Realmente me gusta usar esto. E incluso si lo estás
haciendo un poco, incluso si solo estás agregando
un poco de
ella, realmente ayuda a sacar
tu metraje. Así que abramos Adobe After
Effects y comencemos. Deberíais
recordar esto de memoria. Ahora, toma tu clip, tíralo al proyecto, haz una nueva composición. Y echemos un vistazo a esto. Entonces voy a usar aquí
mismo donde la cámara
empiece a moverse más intensamente. Así que sólo voy a
recortar a esta parte aquí. Lo que quieres
hacer por esta escena es, acuerdo, se ve
bastante guay, ¿verdad? Se está moviendo por ahí. Está siendo activo,
haciendo algunos movimientos de baile, pero algo todavía
se siente aburrido al respecto. Entonces si quieres
añadir más atmósfera, algunas chispas, todas sin
usar ningún plug-ins. Lo que queremos hacer primero
es rastrear una cámara. Voy a
precomponer o metraje. Y vamos a mover todos los atributos
a la composición. Y llamemos a este
fondo para rastrear. Genial. Cuando lo abres,
debes tener antecedentes. Y lo que nos gustaría hacer es v no quiero que la computadora
coja en su movimiento. V solo quiero el fondo. Lo que voy a hacer
es que sólo voy a hacer una máscara realmente áspera. Y antes de hacer eso, déjame comprobar el auto bezier porque no me gusta
dibujar curvas. Quiero que las curvas
sean auto dibujadas para mí. Ahí vamos. La misa, Tim. Hagamos M para abrir
nuestras máscaras, seleccionar ninguno. Vamos a enmarcar la llave nuestro camino de la máscara. Porque V1 para pasar y acaba de conseguir un
área general de donde se está moviendo y cortarlo
porque si no quieres que la computadora
coja en su movimiento, pero v quiere tanto
de lo real fondo
como posiblemente podríamos obtener. Esto parece que es Stan
quedándose en estas fronteras. Sólo voy a
mover esto un poco aquí. Se puede ver que su camisa
sale un poco, así que sólo voy
a sacar esto. Este es un tipo de cabezas bastante decentes
de llegar a ella. Sólo voy a
mover esto un poco. Perfecto. Simplemente amplíe esto. Ampliar esto hacia fuera. Ampliar esto hacia fuera. Vale,
eso debería ser bueno. Ahora, si cambias
esto a Reste, nos hemos recortado más o menos. Y luego esto le da a la computadora más información sobre qué rastrear. Desde que nos
deshacemos de las cosas no queremos rastrear. Si seleccionas tu fondo para rastrear comp de nuevo en el original. Para que pueda moverme entre
comps pulsando tab. Por lo que ves aquí es
donde dibujamos nuestra máscara. Y luego si golpeas Tab, puedes volver a donde está sentado
esa comp. Entonces elegamos nuestros
antecedentes para rastrear. Vaya a tracker, y
sólo puede hacer clic en la cámara de seguimiento. Y cambiemos esto
a una resolución completa. Sólo tenemos que
esperar a que esto termine. Una vez que esta línea azul desaparezca, estarás todo listo. Perfecto, otros 50
años después y bueno. Ahora lo que tenemos que hacer es
golpear Crear cámara y bam, creó nuestra cámara. Si tienes 0 puntos, si quieres tener
algún tipo de referencia
de dónde se
deben colocar las cosas, realidad
podemos hacer clic derecho
en un punto y crear un nulo. Y al golpear P mientras
tiene seleccionado el null, te
dará las coordenadas de donde se encuentra ese punto. Esto es genial. Ahora
podemos volver a nuestro fondo y para la máscara, elegir ninguno y volver. Y bam, tenemos una coordenada 3D de donde
podemos colocar las cosas en el espacio. Ahora, ¿qué podemos hacer con él? Esa es la pregunta principal. Si abres o activos aquí, he proporcionado una muestra de humo. Puedes tomarlo y simplemente arrastrarlo directamente a la
comp. Simplemente puedes hacer eso. Hagámoslo 3D. Si pulsas
conmutadores y modos de cambio, o haz clic con el botón derecho en
las columnas y elige. Se llamaría no
sé cómo se
llamaría. Hashtags. No lo sé. Simplemente jugarías por ahí
hasta que encuentres eso. Si tuvieras 3D. Cambiemos el modo de
fusión a pantalla. Ahora se puede ver que
se mueve en el espacio 3D. Sobre todo si alejas el zoom, puede ver cuando la cámara
gira y se acerca, realidad
se está moviendo
en el espacio con nosotros. Eso es bastante droga. Vamos a seguir adelante y golpear a P. Y sólo voy a empezar a
moverlo un poco más
lejos porque cuando
la cámara se acerca, se acerca realmente. Perfecto. Podemos golpear S para escalarlo. Se puede cambiar la
opacidad. Golpear T. Cambiémoslo a 60. Puedes duplicarlo. Offset el tiempo en él. Golpear S, cambió la horizontal, tal vez añadir otros elementos. Pero aquí se puede ver que
hemos agregado el humo. Cambiemos la profundidad
en esto también. En la posición sólo
podemos moverlo. Golpea S para escalarlo. Vamos a asegurarnos de que esté conectado. Escalarlo hacia arriba. Ahora se puede ver tenemos humo que
se mueve con la cámara. Podrías hacer eso
con cualquier elemento. Para que puedas agregar humo, puedes encontrar clips de
partículas y demás. Voy a hacer que la
opacidad aquí sea un poco más baja. T. Incluso
puedes cambiar los
colores del humo. Entonces si vas a teñir, vamos a teñir blanco a,
digamos naranja. Naranja. Ya sabes, ya puedes ver
que este humo es naranja. Entonces en realidad,
hagamos que este sea azul. Ahora podría ser genial. Entonces hagamos este tinte
naranja en esto y hagamos este naranja.
Mira eso. Ahora te estás volviendo
fresco humo dimensional pasando por clip,
agregando profundidad. Y luego la parte genial, si haces un nuevo sólido, Make Comp Size, y
escribe en parte del carbón, puedes obtener Particle World. Lánzalo. La mejor parte es
este mundo de partículas. Déjame solo solo las partículas
y solo la cámara. Se puede ver que las partículas
también reaccionan a la cámara. La parte genial de esto es que puedes tomarlo, a la derecha, arrastrarlo. Entonces hay algún tiempo en que existían
las partículas. Podría entrar en el
productor o la física. Hagamos de esto un vórtice, o hagamos fuego. El productor. Podemos hacer el radio en la x, y, y z más grande
espacialmente y la z Entonces bajemos
la posición. Y hagamos clic derecho en el
tiempo, los tiempos se extienden. Vamos a frenarlo
literalmente diez veces. Vamos a sacar esto. Genial. Y luego para la partícula
real, vamos a elegir algo así
como la esfera theta. Eso se ve bastante genial. Incluso se podría hacer algo
fresco como
cuadrado de emoción o incluso mejor, polígono de
movimiento. Por lo que estos pequeños triángulos geniales. Podríamos probar polígono. Eso se ve bastante loco. Eso se ve bastante loco. Entonces hagamos los
colores de esto. Sólo hagamos gris y gris. Ahora, si echas un vistazo, tienes
estas locas volando por ahí. Podríamos cambiar el modo para agregar. Podrías cambiarlo a pantalla. Vamos a hacer sumar los extras. Podrías hacer taco de profundidad
y vamos a desvanecerse. Ahora se desvanece los
que están muy lejos. Y si lo tocas, literalmente
seguiría
a las cámaras. Así que ahora tienes estas
partículas locas volando por ahí. Tienes los colores que efectúan el humo flotando alrededor. Hay muchos
elementos diferentes que están interactuando con la escena. Así que vamos a poner esto en cuarto. Puedes previsualizarlo más rápido. Se puede ver la cámara en
movimiento y están siguiendo. Las partículas van junto
con el movimiento de la cámara. La mejor parte, obviamente, siempre se
puede escribir un alcance. El tipo de afuera no ha estado pasando por
delante y atrás. Incluso puedes hacer algo como teñir el metraje real aquí. Está en blanco y negro, todo lo demás está en color. Muchas formas diferentes de
hacer que esto funcione. Muchas formas geniales de
jugar con esto. no fue tan simple. Añade mucha más
profundidad a tus videos. Apuesto a que estarás usando
este mucho. En la siguiente,
vas a
aprender a agregar un rastro ICO.
7. Echo Trail: En este video, vas a
estar agregando senderos de eco a tu metraje para darle vida realmente a las cosas. Empecemos. Abre Adobe After Effects. Al igual que aprendiste antes, vamos a tomar nuestro
clip llamado Echo trail, dejarlo caer en un nuevo proyecto. Una vez más,
suéltala en una nueva comp. Y aquí tenemos el metraje con el que
vamos a estar jugando. Una vez más, el metraje
es un poco largo, así que sólo voy a tomar
una cierta sección de la misma. Probablemente en algún lugar
con mucho movimiento, como algo así como bueno. Y voy a hacer clic derecho
recortar comp al área de trabajo. Y tenemos el metraje con el
que estamos trabajando. Ahora sólo hay
dos partes en esto, y son bastante simples. Una es que vamos a estar reutilizando
la misma técnica de rotoscoping para aplicar a
la persona de frente. Entonces también
vamos a estar aplicando un efecto de eco para crear el rastro de eco que va a
estar yendo detrás de la bailarina. Vamos a seguir adelante y
duplicar nuestro metraje pulsando Control D
o Comando D en un Mac. Vamos a llamar r abajo uno, Eco. Y llamemos a la fila superior. Puedes cambiar el nombre pulsando
Enter en el teclado. Voy a pasar
y rotar a la persona. Sí, definitivamente deberíamos
establecer la resolución de pliegues para que en realidad podamos
escribir una cualidad popular. Voy a hacer un trabajo bastante
duro aquí porque quiero
poder avanzar rápidamente y mostrarles el resultado de eso vamos
para que no
tengan que verme hacer todo
este procedimiento. Sólo voy a estar mostrando
sólo la sección superior. ¿ Está bien? Entonces hasta aquí debería
ser bueno para este ejemplo. Si solo la capa del rotor, se
puede ver que tenemos a
la bailarina separada. Ahora, él parte real
donde llegamos a
jugar es si vas a tus Efectos y Presets
y tecleas en eco, puedes ver que hay
un efecto de eco. Así que adelante y aplíquelo
a la capa inferior. Como se puede ver,
comienza a iluminarlo. Y eso es porque nuestro
operador de eco está configurado para agregar. Y lo que podrías hacer es
que podrías hacer un compuesto
al frente por el número de ecos. Voy a jugar con
él y tal vez ponerlo en seis. Y tal vez veamos un
compuesto y de vuelta. Se ve un compuesto está en la
parte trasera se ve bastante bien. En realidad podemos tomar
esta capa de eco, cortarla, y
pegarla encima de nuestro Roboto. Se puede ver que Vr consiguiendo
esta genial repetición. Vamos a seguir adelante y
cambiarlo a compuesto al frente. Ahí vamos. Similar a otros videos de
rotoscoping de erato. Si solo tienes que seguir adelante
y tecleas una alfombrilla suave y
refinada y
aplícala justo después de la Herramienta Brocha
Roto. Te va a ayudar a
limpiar esos bordes. Y en este momento
probablemente va a estar bastante alto. Es a las diez. Una vez que lo haga es cosa, voy a
dejarlo caer a cuatro. Y el
radio de borde adicional siempre
depende de cuán grandes sean tus filmaciones. Si estás trabajando
con algo que es un bifurcación, metraje de calidad tendrías que traer ese
número más alto si estás trabajando con metraje ADP 112010, puedes bajar ese número. Siempre se basa
en tu caso de uso. La parte divertida aquí es que podemos animar el donde sucede
todo el efecto eco. Si sólo voy adelante y
apago el Roto Brush refinado tapete
suave y el eco. Podría simplemente jugar a través hasta separarme donde
creo que podría ser genial. Entonces digamos aquí mismo, ella hace este movimiento de codo. Para que podamos seguir adelante y animar la igualdad de tiempo
golpeando el cronómetro. Y si golpeas tu capa
y golpeas U en el teclado, traerá aquí arriba. Podría ser bueno. Hasta aquí, tal vez porque
tienes este movimiento de codo. Esto se ve bien aquí. Entonces vamos a golpear el cronómetro. Durante toda esta
parte de la secuencia, vas a tener
el efecto eco. Entonces hagámoslo. Cuando ella trae el brazo
hacia abajo, podría completarse. Por lo que solo puedes establecer esto en 0. Y luego lo mismo
para la estrella. Digamos que cuando las manos
empiezan a salir así,
tal vez sea entonces cuando voy a empezar. Puedes golpear Enter. Y si seleccionas todos
tus fotogramas clave e acudes al Editor de gráficos, puedes ver que la
animación es bastante áspera. No hay suavidad a ella. Si selecciona todos los fotogramas clave, haz clic con el botón derecho en uno de ellos. Vaya al asistente de fotogramas clave. Fácil, facilidad. Y si ves ahora
es mucho más suave. Sigamos adelante y volteamos
todos nuestros efectos. Previsualizar cómo se ve esto. Impresionante. Se puede
ver que anima en. Se llega a ver el efecto eco, y luego se anima hacia atrás. Puedes usar esto en
cualquier tipo de metraje. Una vez más, no tiene que
ser una persona bailando. Puede ser cualquier cosa
desde un auto en movimiento. Podría ser alguien
tirando algo. Literalmente formas ilimitadas de
usar este efecto. Siempre puedes
jugar con el eco. Para que siempre puedas agregar más eco. Puedes agregar menos eco, puedes agregar una decadencia para que te muestre
lo que hace la decadencia. Vamos a escoger este marco
sería un buen ejemplo. Si bajas la decadencia, verás que empieza a
desvanecerse las copias extra, solo dale un
segundo. Ahí vas. Ves que comienza a
desvanecerse la copia extra, por lo que casi hace que
parezca incluso un desenfoque de movimiento. Muchas formas en las que puedes usarlo. Se puede aumentar el
número de ecos. Efecto muy fresco. Y si lo usas muy bien
en tus videos musicales, veré realmente, realmente elegante que te estás haciendo eco
en todas partes. Mira a la perfección. Siguiente video,
estarás aprendiendo a agregar una onda de choque de desplazamiento. Nuevamente, otro
de mis favoritos.
8. Shockwave de desplazamiento: En este video,
vas a aprender a agregar el efecto de
onda de choque de desplazamiento. Es uno de mis favoritos. Realmente me gusta usar esto. Hay muchas
maneras diferentes en que podrías hacerlo. Así que empecemos. Abre Adobe After Effects. A continuación tengo uno de mis efectos favoritos
personales, y eso va a ser una onda de choque de
desplazamiento. Lleva nuestra garganta del clip
a los efectos posteriores, por
supuesto, crea
una nueva composición. Y echemos un
vistazo ahí bailando, están pasando un buen rato. Y una vez más, puedes recortar nuestro clip a la cantidad de tiempo
que quieras verlo. La idea aquí es que
cuando estén haciendo esto
como nuestra cosa del movimiento, lo haremos echar a cabo este
efecto de onda de choque que va a interrumpir el espacio y el tiempo. La forma en que vamos a
hacerlo tan simple. Vamos a hacer un nuevo sólido. Hagámoslo
más grande que nuestro video real. Y vas
a ver por qué es importante hacerlo
más grande que tu video real. Hagamos el color blanco. Golpeó, bien, pega bien. Ahora si haces clic derecho sobre él, vamos a precomponerlo. Claro, dejar todos los atributos en
el desplazamiento y
llamemos a esto, este mapa de colocación. Golpear enter. Ahora
si lo abres, ves que toda la app se
acaba de cuadrar sobre h al cuadrado. El idea que tenemos aquí
es ya que es un cuadrado, podemos seguir adelante y
elegir nuestra herramienta elipse. Con el sólido seleccionado, si acaba de hacer doble clic, se crea un círculo. Ahora antes de empezar a
animar nada, vamos a
entrar en nuestros efectos y presets y escribir
en bordes rugosos. Una vez que lo apliques, no
verás
demasiada diferencia, pero puedes ver que los bordes se están transformando extrañamente. Supongo. Si acabas de
subir el tamaño del borde, realmente
verás que el
efecto se lleva a cabo. Realmente está empezando a morph
cómo se ve nuestro círculo. Realmente haciendo que
parezca un iris. Como un iris o simplemente como
esta rara Shockwave. Si quieres hacer los
bordes un poco más afilados, siempre
puedes tomar
la complejidad y puedes empezar
a plantearla. Y realmente comienza a agregar más detalle y hace que
se vea realmente genial. Pero no tienes que
hacerlo demasiado alto. Porque lo que vamos a hacer es que
acabes difuminando esto al final del día para una especie de
ayuda a fusionar el
desplazamiento en nuestro video. La idea ahora es V1 para
animar este desplazamiento yendo del centro
al final y desapareciendo. La forma fácil de hacerlo
es si vas adelante y ves la máscara uno y
tienes la expansión de la máscara. Si empezamos a arrastrar la expansión de la
máscara
hasta el, hasta el punto donde
no la vemos. Se puede golpear el cronómetro. Vayamos quizá 20 marcos. 20 marcos deben ser buenos. Y apenas empieza a arrancarlo hasta el punto donde
está tocando los bordes. Eso se ve muy bien. Ahora, todo lo que es VC, sube. Pero también necesitábamos desaparecer. La gran manera de
hacerlo es si haces clic en tu máscara y luego
golpeas Control D o Comando
D. Si estás en un Mac. En lugar de agregar,
vas a hacer Reste. Ahora no verás
nada por el momento. Y eso es porque es exactamente
la misma máscara
que se restaba. Pero todo lo que tienes que hacer es
comenzar seleccionando tus fotogramas clave en máscara para
empezar a compensarlo por
un par de fotogramas, vas a
empezar a ver que está sucediendo este patrón. Y si lo compensas un
poco más y tal vez
un poco más, puedes ver que
sale de la nada, arrastra y
luego desaparece. Esa es una manera fácil para nosotros de
crear este anillo genial, el anillo de desplazamiento escolar. Ahora, la parte genial es que podemos seguir adelante y
escribir en Fast Blur. Arrástrelo encendido, repita los píxeles de borde, y se puede ver que lo extiende. Vamos a difuminarlo ligeramente. No tiene que estar demasiado loco. Cinco píxeles parecen buenos. Ahora si vuelves
a nuestro video real, ahora
puedes tiempo a donde ocurra
ese efecto. Aquí mismo. Vamos a hacer. Aquí mismo. Empiezan a
sacar las manos. Y creo que aquí es donde podría entrar
el desplazamiento y ellos sacarán las
manos. Perfecto. Y luego aquí lo
vuelven a hacer para que en realidad puedas
entrar en nuestro desplazamiento, comp, duplicar nuestro sólido, y simplemente moverlo
para que puedas ver que
sucede una vez y luego dos veces. Ahora se ve una, dos veces. Perfecto. Ahora, solo ves un
sólido blanco en este momento, realmente no está
cambiando nada. Aquí es donde sucede la parte
divertida, es si haces clic con el botón derecho, ve a Nueva Capa de Ajuste, y cambiémosla el nombre
pulsando Enter y escribiendo en esta ubicación y
arrastrándola debajo del mapa de desplazamiento. Si quisieras solo
afectar nuestro metraje. Debajo de los efectos y presets, puede escribir en desplazamiento. Encontremos mapa de desplazamiento. Tómalo, arrástralo a
nuestra nueva capa. Déjame hacer bajo
los efectos aquí, puedes elegir el mapa de
desplazamiento, el que
creamos, este anillo blanco, blanco, y negro aquí. Vamos a asegurarnos de
que todo esté bien haciendo un nuevo
sólido que sea negro. Que no hay capa Alpha, todo lo que estás viendo es solo
el negro y el blanco. Entonces el sólido blanco
es el anillo y el sólido
negro es solo
un fondo negro que está en el fondo. Ahora puedes ocultar tu mapa de
desplazamiento. No hace falta que lo veas más. Y en realidad se puede empezar a ver aquí que aquí está pasando un
desplazamiento. Y eso es porque ya
estaba preestablecido
usar rojo para horizontal
y verde para vertical. Puedes mantenerlo en
esos o puedes cambiarlo a luminancia. Simplemente
lo cambiaré por luminancia. Y si comienzas
a traer tus números, realmente
puedes empezar a ver que hay un
desplazamiento sucediendo. Perfecto. Una buena idea sería, como puedes ver aquí, que empiece a
desplazarlo tan pronto
como nuestro
clip de mapa de desplazamiento entre al marco. Porque comienza a
desplazar todos los píxeles. Lo que podrías hacer
es salir adelante ya sea envolver píxeles alrededor, lo que no siempre funciona
como puedes ver aquí. Podríamos hacer es, se puede ver aquí está en un
segundo, cuatro fotogramas. Así que sólo voy a
mover esto de vuelta al inicio
del video y tomar nuestros clips bidireccional y
moverlo a un segundo para fotogramas que está
cronometrado perfectamente. Ahí vamos. Ahora todo lo que podrías hacer es
que pudieras tomar tu clip. Tal vez puedas
escalarlo un
poco y moverlo para
que se ajuste al marco. Cuando lo miras, mira eso, obtienes este efecto de
desplazamiento loco. Cuando están moviendo los brazos. Te estás poniendo este tiempo
súper loco, efecto deformador del
tiempo. Y si quieres
suavizar los bordes de
cuándo está sucediendo,
todo lo que necesitas hacer es entrar en el mapa de desplazamiento
que creaste. Y solo puedes empezar a
difuminarlo aún más. Para que puedas ver el ejemplo aquí. Lo desenfocas más, no se vuelve tan intenso y
un poco más suave. Te borras menos, ves
más de esos detalles. Si te deshaces de lo
borroso por completo, realmente
puedes ver esos bordes. Realmente puedes
jugar con el desenfoque. Normalmente trato de mantener el, algún tipo de desenfoque
en él porque no
quiero que los bordes
sean súper afilados. Todavía quiero
sentir que el tiempo y el espacio se están deformando por ahí. No, no quiero que sienta
que es una ventaja que
realmente se puede ver bruscamente. Como siempre con cualquiera
de estos efectos, solo
puedes jugar alrededor,
puedes apilar. Puedes apilar el efecto
eco y el efecto estroboscópicos y el
súper zoom junto con esto y realmente crear algunos efectos visuales
realmente únicos para tus videos musicales. Nuevamente, esto fue
bastante simple de hacer, sin embargo se ve
realmente, realmente genial y hay formas
ilimitadas de usar esto. Siguiente video,
vas a
aprender a bloquear el movimiento tus metraje.
9. Bloqueo de movimiento: En este video,
vas a
aprender a bloquear el movimiento de tus metraje. Probablemente lo hayas visto
en muchos anuncios de Beats, apple, así como
diferentes videos musicales. Así que abramos Adobe After
Effects y comencemos. Muy bien, ya
conoces el simulacro. Toma tu clip,
tíralo al proyecto. Entonces eso en una
nueva composición. El idea para esto es
que se pueda ver que la cámara
va por todo el lugar, pero v1 se le debe
rastrear a la cara. Que su rostro está en
medio del marco. Esto es bastante sencillo de hacer. Entonces todo lo que tenemos que
hacer es hacer doble clic en nuestro metraje para que lo
abra en este panel de capas. Y encuentra un marco en el
que incluso se puede empezar. Aquí. Sólo quiero que todos los elementos
sean bastante afilados. La idea aquí es que
vamos a
rastrear diferentes partes de la cara. Entonces probablemente
usaré la esquina
del ojo y probablemente
otro rincón del ojo. Puedes golpear Track Motion. Se puede ver que te dan un 0.1. Así que voy a tomar esto
y lo extenderé. Cuáles son estas casillas limitadoras. El primero es el área
que se quiere rastrear. El segundo es el área de búsqueda donde
va a estar buscando esto. Así que si tu metraje
se está moviendo
realmente, muy rápido,
querrías hacerlo más grande. Pero si tu metraje y
moverte muy lento, puedes hacerlo más pequeño y
solo funcionará más rápido. Voy a seleccionar esto. Y ahora se puede ver que aquí
hay dos opciones en la parte inferior para comprobar la
rotación y la escala. Y sí queremos rotación. Asegurar, Hagamos escala también. Áreas de búsqueda más grandes, y lo
pondré aquí mismo. Entonces una vez que se ve bien, todo lo que tienes que hacer es que estén estos juguetones y
jugarlo al revés. Entonces vamos a reproducirlo
al revés para ir al inicio
del clip. Y luego una vez hecho eso, vamos a rastrear todo el
camino hasta el final del clip. Ahora vamos a rastrear hacia adelante. Se puede ver que
durante este seguimiento, los puntos tipo de
cambiaron demasiado. Voy a volver a
donde empezaron a cambiar. Y sólo voy a empezar a
hacer el área de búsqueda un poco más grande y el área de la pista. Entonces creo que aquí sigue bien, pero voy a
hacer esta zona un poco más grande. Lo mismo con aquí. Sólo voy a
alinearlo de nuevo a esta esquina. Sigamos rastreando
esto hacia adelante. Una vez más, estamos consiguiendo
algún cambio en la pista. Entonces vamos a encontrar el punto en el
que está sucediendo. Para esto me cambio. Estamos consiguiendo un poco
más de cambios aquí. Hasta aquí debería ser bueno. Simplemente no quiero seguir
estirando este tutorial para allí entonces más allá de lo necesario. Ahora la siguiente parte que es
importante es asegurarse que la cinta de pista se estabilice
en realidad. Editar Target. Y para el objetivo, debe ser la capa de video en la
que estás actualmente. Y se puede golpear,
Aplicar sobre x e y. golpear Bien. Ahora si echas un vistazo a estabilizar a la cara, pero es una especie de en un ángulo. Lo que queremos hacer es hacer clic derecho solo en
general y elegir Nuevo Objeto Null y tomar tu metraje y parentado
al objeto nulo. Aquí, si golpeas R, en realidad
puedes rotarlo. Perfecto. Puedes posicionarlo
más en el centro. Se puede escalar un poco. Perfecto. Ahora si juegas a través,
puedes ver que la cara ahora
es de vías hacia el medio. puede ver que en realidad podemos
escalarlo un poco más, sólo para que esté en
marco todo el tiempo. Perfecto. Y uno de los temas
que podrías notar es que nuestro video no llena
completamente los bordes. Lo que podrías hacer es que
podrías seguir escalándolo o puedes ir a los Efectos
y grabarlos movimiento, agarrar el mosaico de movimiento y
aplicarlo a tu capa de video. Y lo que esto hace
es que en realidad extiende el metraje
más allá de su límite. Entonces si solo haces clic en Mirror
edges, lo reflejará. Y un poco te ayuda a salirte con la
suya con ese efecto, sobre todo cuando
agregas algún desenfoque de movimiento, que haremos en
un segundo después de v, adelante y limpia
algunos de los marcos clave. Porque a veces lo que
el seguimiento como viste, pierde sus puntos. A menudo, sobre todo si el movimiento está sucediendo con bastante rapidez. Si acabas de pegarte. Puedes cerrar el rastreador. Solo queremos
ver punto de anclaje, posición, escala y rotación. Y la idea aquí es, digamos punto de anclaje. Y puedes hacer clic en
el editor de gráficos y puedes ver la curva. Entonces esto se ve bastante suave. Echemos un vistazo a la escala. Se puede ver aquí estamos consiguiendo un par de temas
con la escala. Echemos un vistazo a
dónde está sucediendo. Aquí mismo. Ves que es
como un salto abrupto. Lo que realmente podemos
hacer es que podríamos tomar esos fotogramas clave extremos
y simplemente eliminarlos. Ya se puede ver, vamos a deshacernos
de estos extremos también. Y éste. Y ahora es menos discorvante de una escala y un
poco más suave. Lo mismo aquí. Hay
un punto extremo a puntos extremos. Y solo puedes entrar y
hacer eso con tus metraje. Y lo mismo con la rotación. Se ve como una rotación discordante. Veamos si algo le está
pasando a los puntos de anclaje. Ahora. Se puede ver que hay
una rotación discordante. Así que podríamos simplemente
derribar eso. Ese tipo de ayuda a
limpiarlo un poco. Y si quieres ser
aún más extremo, puedes empezar a sacar algunos, algunos fotogramas clave más. Al igual que por ejemplo, podrías
sacarlos y luego
puedes empezar a suavizar estos
haciendo clic en Easy Ease. Y en realidad se puede empezar a
suavizar estos fotogramas clave hacia fuera. Esa es otra opción
que podrías hacer. Depende de cómo, cómo
en detalle quieras
ir a limpiar los marcos. Y luego el siguiente paso es solo
aplicar el desenfoque de movimiento. Así que asegúrate de que esté seleccionado
aquí y selecciónalo aquí. Y más o menos tu
pista está completa. Esto se ve bastante bien. Y si quieres
hacerlo aún más extremo, puedes ir y crear
una nueva capa de ajuste y agarrar el desenfoque radial. Puedes manivela eso más alto. Hagamos 20. Entonces todo lo que tienes que hacer
es agarrar la herramienta Elipse, dibujando alrededor de la cara. Estoy sosteniendo opción y
control al mismo tiempo. El rostro. Entonces haz Reste para
que haga todo
fuera del círculo. Y se puede aumentar
la pluma. Este tipo de lo hace
aún más extremo. Y obviamente si
sacas aún más la pluma, vas a mezclar esos
bordes un poco mejor. Y este tipo de hace que
el efecto sea aún más extremo con el seguimiento. También puedes seguir adelante y agarrar la exposición y exponerla hacia abajo. Esto agregará una viñeta. Tal vez el desenfocamiento sea
demasiado. Vamos a probar diez. Sí, si no
quieres volverse demasiado loco, creo que diez se ve bastante
bien. Ahí vamos. Así es como se hace el efecto de bloqueo de
movimiento. Como se pudo ver, esto
fue bastante sencillo. No puedo esperar a ver
qué van a hacer con este efecto de bloqueo de movimiento. En la siguiente,
vamos a aprender a hacer el látigo deslizar una transición. Personalmente realmente
me gustó esa. Te veré en el siguiente video.
10. Transición de deslizamiento de látigo: En este video,
vas a aprender a hacer la transición de la diapositiva de látigo. Realmente me gusta esto. Es bastante simple. Así que vamos a saltar justo adentro. Muy bien, para este próximo efecto, en realidad
vamos
a tomar dos videos. Así que sigamos adelante
y agarremos estroboscópicas. Y agarremos el tobogán de látigo, y dejemos caer estos adentro. La misma resolución,
que es perfecta. Así que tomemos estroboscópicas. Y sólo vamos a necesitar
los dos primeros segundos. Y echemos o
sitio web en la parte superior. La idea para esto es V1 y la transición rápidamente de
un tiro al otro. Desenfoque de movimiento. Y queremos que parezca
realmente efectivo. La idea aquí es que en realidad
vamos a
tener dos de este clip. Vamos a tomar el
azulejo de movimiento y tirarlo en nuestro clip. Esta diapositiva de látigo, una que está en la parte superior es la que
estamos en transición. Si pones tu ancho de salida. Así que simplemente deslizaré esto
para que puedas ver si mueves el ancho de salida a 300, en
realidad duplica tu clip
y vamos a golpear los bordes del espejo. Se puede ver que es el
doble del ancho. La idea ahora es simplemente
tomarlo y moverlo hacia costado justo a donde no lo vemos justo
fuera del marco. Entonces varíen en un boleto y lo
vamos a padres a la vamos a tomar el
trazo, el de abajo. Y lo vamos a
padres hasta la cima. Vamos a golpear
P en nuestro clip superior. Vamos a dos segundos
en ir al fotograma clave
para la posición. Voy a ir quizá 15 fotogramas. ¿ Quieres algo bastante rápido? Vamos a ir 15 fotogramas. Y luego vamos a restablecer esto
a, puedes literalmente simplemente
hacer clic derecho y presionar reset. Ahí vamos.
Restablece al principio. Ahora la parte más importante es el movimiento de fotograma clave real. Entonces, si vas a la posición y haces clic en el editor de gráficos, vas a ver que
aquí
hay un botón llamado Separate Dimensions. Y esto nos permitirá controlar
solo la posición x, que es lo que queremos, que es sólo el
movimiento horizontal sobre posición y. Simplemente puedes desmarcar eso. Puedes eliminar esos fotogramas clave. Y bajo exposición, sólo
podemos acercar ligeramente. Y si agarras estas, ves cómo
tienen estas asas. Solo vamos a mover estos mangos así para
hacer esta forma de curva en S. Echemos un vistazo a lo rápido
que está sucediendo el movimiento. Sí, eso es perfecto. La velocidad del
movimiento es grande. Me gusta la velocidad. Ahora lo único que
hay que hacer es encender. El desenfoque de movimiento. Te vas a notar es
que hay una brecha. Activa el desenfoque de movimiento
en ambos clips. Vas a notar
que hay un hueco, hueco negro entre los dos clips. Entonces lo que puedes hacer es tomar el azulejo de movimiento, tirarlo en el clip
inferior también, espejo los bordes
y lo vas a extender por algo como 150. Ahora lo mezcla un poco mejor. Eso es todo. Entonces éste es realmente sencillo. Este efecto es realmente simple
y realmente efectivo. Puedes usarlo.
No tienes que usarlo
solo horizontalmente. También puedes hacer lo
mismo verticalmente. Puedes aplicarlo
de diferentes maneras. Entonces, una vez más, puedes recubrirlo con unos efectos
diferentes. Para que pudieras hacer el eco en la parte superior y luego
transitar a esto. Hay muchas
formas interesantes en las que puedes usar esto. Mira que eres
un experto en sitios web. Ahora puedes usar esta
transición donde quieras, y es bastante simple. En este siguiente video, vas a aprender a
hacer el efecto congelar-fotograma.
11. Marco de congelación: Bienvenido al efecto
freeze-frame, el décimo de nuestra lista. Así que una vez más, saltemos a la derecha
en Adobe After Effects. Ahora nos estamos acercando a
nuestro último efecto, que va a
ser congelar-frame. Entonces toma el marco congelado, tírelo a los efectos posteriores, y agrégalo a una nueva columna. La idea aquí es, una vez más, sólo voy
a recortar un poco el video. Es este último marco
donde está sentada. Lo vas a congelar. Y entonces la vamos a tener bailando
frente a sí misma. Por lo que va a ser muy cool buscando y puedes usarlo
de muchas maneras diferentes. Lo primero que
queremos hacer es que quieras duplicar capas. Entonces también queremos
hacer clic derecho en nuevo objeto nulo. Y cambiemos el nombre de esto
pulsando Enter y
llamemos a este rastreador. Porque se puede ver
que este clip, la cámara se está moviendo así V1 o poder
rastrear el movimiento. Por lo que un doble clic en
la capa inferior. Vamos a hacer Track Motion. Para la primera,
vamos a hacerlo bastante grande. Sólo vamos a
rastrear este rincón aquí. Borde muy bonito,
realmente fácil de ver. Y luego por el segundo vamos a seguir adelante
e ir a la caída, golpear rotación y escala. Escalarlo hacia arriba. Perfecto, y
elige este borde de la lámpara. La idea es que quieras
elegir puntos que no se
cubran por el actor y puntos que no salen de marco. Sólo
vamos a golpear a Next. Muy bien, perfecto.
Parece que la pista está hecha. Se ve bastante sólido. Todo lo que tenemos que hacer
es golpear Editar Target. Asegúrate de que nuestro rastreador seleccionado, pulsa OK, Aplicar sobre x e y. tenemos nuestra pista. Ahora la idea es que
queremos congelar marco. Podríamos hacer es que podamos doble clic en el último fotograma que quieras usar aquí. Voy a sacar
el Roto Brush y más
o menos roto fuera. Genial. Ahora ya que solo quiero
poder solo
usar este marco, solo puedo hacer clic derecho y hacer pre-componer, mover
todos los atributos. Y llamemos a
este marco congelado. Presiona Enter y, a continuación,
haz clic con el botón derecho del ratón en Si lo sigues, verás que es sólo un marco congelado. Ahora, queremos poder agregarlo
al rastreador. Por lo que sólo tipo de hacer clic en esto y arrastramos
hacia el rastreador. Ya se puede ver que
sólo está sentada en ese
sofá todo el tiempo. Ahora puedes usar más o menos la misma técnica
que usamos antes, donde tomas tu metraje de
fondo, llévala a la parte superior. Llamemos a esta fila. Y ahora acabas de
sacar un roto el resto de la moción. Puede hacer doble clic en Roto. Toma un cepillo roto y
simplemente saca a la persona. No tienes que verme
simplemente tirando. Ya has
visto más o menos cómo funciona. Sólo tienes que ir
marco por cuadro y solo
asegúrate de que la persona esté
seleccionada. Aquí mismo. Perfecto. Ni siquiera tienes que
hacer toda la mano ya que sólo está
sentada aquí abajo. Y entonces donde
puedes hacer también es que podrías
aumentar la pluma o podrías seguir adelante y
elegir una alfombra suave refinada. Tira eso con algún valor
pequeño como para perfeccionar. Y eso realmente ayuda con
los bordes aquí
lo puedes ver realmente ayuda a fusionar los
bordes. Esa es la idea. Básicamente irías
marco a fotograma, como en las
secciones anteriores de este video. Aquí mismo. Brocha Roto. Y solo vas a ir marco
a cuadro y Frodo fuera y asegurarte de que el
camino esté limpio como aquí. Se puede ver que en realidad
falta. Vamos a conseguir esta ventaja aquí. Y más o menos
harías eso por un video. Así es como se usa el efecto
congelar-frame. También puedes
animarlo en si lo deseas. Muchas
formas diferentes de usarlo. Entonces lo mismo aquí otra vez
con el marco congelado, también
puedes aplicarle tapete
suave refinado a ella también. Si vas aquí, podríamos simplemente, si realmente abres la comp y aplicas
o refinadas alfombrilla suave. Otra vez con algo como
tal vez cuatro para éste. Ve muy bien mezclada. Eso es más o menos. Mira eso. Lo acabas de aprender. El décimo y último
efecto felicita. Te veré en el video de
conclusión donde te contaré
sobre la tarea. ¿ Cómo funciona un minuto, y cómo puedes probarlo con
tu propio metraje. Estamos usando el
que proporcioné.
12. Conclusión y asignación: Mira eso, eres un experto ahora tienes diez efectos
diferentes manga que puedes
usarla de la manera que quieras. Puedes mezclarlas y combinarlas,
puedes combinarlas. Posibilidades ilimitadas
para su asignación. He proporcionado todas las imágenes que me viste usando
en este curso. Puedes usarlo y jugar
con él tú mismo. Puedes seguir junto con el video,
seguirlo paso a paso. O si realmente
quieres ser creativo, puedes usar tu propio metraje u otro metraje
que hayas encontrado en línea. Ahora, después de que hayas seguido y
usando este metraje, puedes enviar tu proyecto
abajo para que pueda
echarle un vistazo. Otras personas pueden echarle un
vistazo y podemos revisarlo. Por lo que estoy muy emocionado de ver
qué van a hacer ustedes. Muchas gracias por ver, y los veré
en el próximo video.
 Nick Avloshenko, Providing Video Editing classes