Transcripts
1. Intro: Welcome to the beginning
of your Youtube adventure. Imagine having a platform
as a creative outlet, or that shows you a work
to the ideal audience, either by showing
your videos right in front of them or
via search engine. So powerful that
crosses over even into Google searches.
Hi, I'm Henry. And by daylight I capture
the world through my lens as a commercial and landscape
photographer and filmmaker. And by moonlight, I switch
gears to a Youtuber educator, although sometimes it's
the other way around. Over the past two years,
my Youtube journey has seen me welcome more
than 10,000 subscribers and over 100,000
views per month. But the most important number
and the real game changer, here are the 133
videos uploaded. This journey taught me
the ins and outs of editing and how to make this process smoother and quicker. This class is for you, if
you're feeling on the fence, feeling a bit
overwhelmed and really needing that nudge
to just dive in. Or perhaps you started already but you feel like something is missing or the process is
just way too time consuming. We're going to dive
into the basics of editing with the
Venture Resolve 18, the free version, which is
a fantastic starting point. I'll guide you through making
your edits look top notch. From organizing and trimming clips to mastering shortcuts, keyframing picture and
picture split screens, screen recordings,
audio management, voice overs, annotations,
and preparing a go to project template
ready to be edited. Plus I'm going to
walk you through all the export settings for
optimal quality on Youtube. By the end of this class,
you're going to have everything you need to
post your first video. And trust me, you're
going to love it. So I'm not taking
no for an answer. It's going to be an
epic journey and I can't wait to see you
in the next class.
2. Class Project: I'm thrilled to
have you on board. But here's the thing
about skillshare. It's not just about
watching classes, it's about rolling
up these leaves and getting some work done. As your class project,
you're going to be editing your first
Youtube video Now, ideally you would record yourself and edit
your first video. But I know that
stepping in front of the camera can be quite
scary in the beginning. So just this time I've
got you covered with some pre recorded talking head videos for you
to practice on. And you're going to find
all the clips you need. In the resources
section of this class, it is basically me talking about the features inside of
to resolve that you can use to edit your
videos so that you can apply exactly what you're
learning lesson by lesson. Now, although you could start editing right after you
watch the whole class, it's probably better if you
just do it lesson by lesson, watching and applying it, It's probably going to be way easier. Alongside the video clips,
you're going to find also a PDF summarizing
what you could do. But feel free also to
be creative with it and just apply whatever you learned throughout
the lessons. The end goal is
that this generates a video that you're going to export and upload to your
Youtube channel as unlisted. And then you can post it in the project section so that I can watch it and give
you some feedback. Today we're going to show you some things that you can do with the Vince resolve
the free version. It is one of the best video
editing softwares out there. And as you can see, we've got the media pool over here
with all your video clips. Down here is the
timeline where you can organize all your timeline, all your video clips that are going to be played in order. And here you have the inspector, which is where you're
going to change all the properties of all the video clips
in the software. You can key frame about
any kind of property you want like zoom or position, or even make anything move in real time across the
screen the way you want. If you're explaining
some concept that you need also to show a
screen recording. At the same time,
you can just be in the corner just like
I am here right now. And you can even choose in which side of the
screen you want me to be Or if you're just
explaining some key concept, think it's important to have some text on screen
just like this. You can make it
appear like this or maybe like this or
even like this. Color correction and
color grading is super coincide the software
but don't exaggerate, Take it easy, otherwise it's going to look a bit unnatural. If you want to make it
even more personal, you can add your own handwritten
effects and even add sound effects to make
the video even more immersive and personal.
If you need a voice over. It's also super easy and you can do everything
inside the app. When it's done, just
export and upload. All right, grab
all the resources. Download the latest
version of the venture. Result free, and I'll see
you in the next lesson.
3. Editing Basics: Welcome to the first
editing lesson. We're going to use the
Venture Resolve 18, the free version throughout
this whole class, Apart from one of the last lessons in which
I'm going to tell you just the differences between the free and the paid versions, and which features
of the paid are actually useful for
Youtube creators. I use it and I highly recommend
it, but to start with, I really think you should
just use the free version, get used to it, and then upgrade to the paid
version later on. Now the venture resolve
works for Mac and Windows. All you need to do is go to
the black magic website. Just be sure to get
the free version over this link over here, which is on the left. Because if you get
the one on the right, then it's going to ask
you for the license. And if you don't have
it yet, it won't work. Okay, let's take a look
inside the software. I'll show you what the
interface looks like. And I'm totally going to
focus on the features and everything that are useful
for you, two creators. So I'm not going to do a
rundown of all the features, everything you can do
with the software, but focus on the things that really matter.
Let's take a look. Okay, so I've
installed it already, and I'm just going
to come up here, and the icon is over
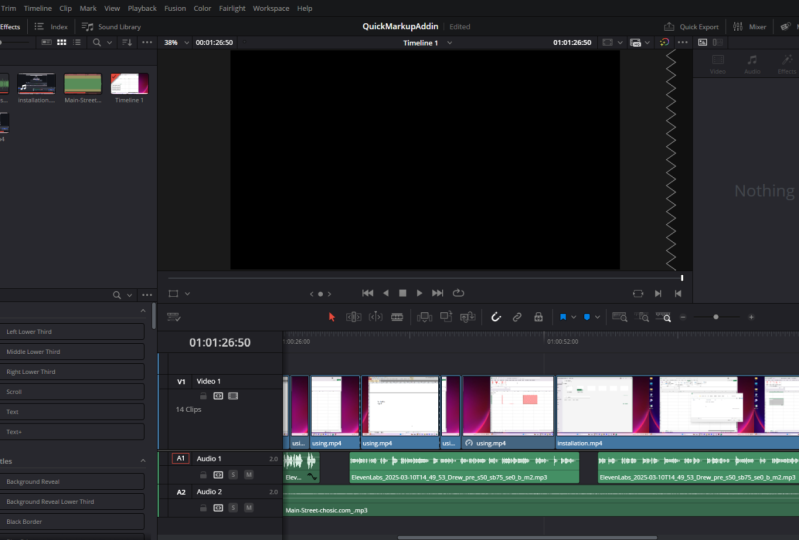
here. Let's open it up. Okay, so basically the way
that Da Vinci works is that it's got this
library of projects, and you can just create
a new one over here. I'm just going to
give it a name. So for example, skill share. Let's say Youtube Da Vinci. Okay, So now you're going to notice that down here
on the bottom we have several different pages and we're not going
to use all of them. But mainly we're going to
focus on the edit page, which is this one over here. And I'm going to tell you
about the other ones later. And here there are
mainly three parts. The media pool over
here on the left where all your lips are going to be the timeline
and the inspector, Let's import some
footage so that you can see exactly
how it works. As you can see, I have
some different folders in here and there's
one specific way of doing it to respect this folder structure
so that you don't go crazy while editing. The thing is you can just select everything that you
want to import and drag it over Master over
here on the top left part. This way all the folders
are going to be maintained. And you can see
everything inside there exactly as it is
on Explorer or Finder, depending on which
OS you're using. So as you can see, we've
got all our clips here on the left and we have already
a timeline set up here. But we don't know what are
the default settings of the. Let's just go here
to the settings in the bottom corner
on the right. And let's take a look
at how it's set up. Right now, the timeline
resolution is set to four K, meaning 38040 by 21
60, which is okay. And the timeline
frame rate here is set to 25 frames per second. And this depends on the kind
of footage that you have. The ones that I'm
providing are all at 25, so I suggest you do the same. But if you live
outside of Europe, chances are you're
going to have footage, if it's recorded by someone
or from your camera, that are going to be at 24 or
maybe 30 frames per second. So take a look just
to be sure how your footage was recorded
before setting it here. Now the rest we don't really need to change
anything right now. Let's just come to
Color management. And here I want to
come to this and select Da Vinci Y
RGB Color managed. And down here you can set to
automatic color management. Let's leave it
like this for now. I'm not going to go
into the details of how each one of these work, but this is going
to guarantee that we have perfect colors later on. Just save it. Now, if you just drag and drop the media from here
into the timeline, this timeline is going
to be set up exactly the way that we did the default
settings in that panel. So I'm just going to
grab this video here and drag and drop
in the timeline. And we can expand it
so that we can see everything clearly now
that it's on the timeline. You can zoom in and out by
using this handle over here, zooming in and out. Or you can use the
shortcut shift like this. It just adapts to the screen
that you have right now. We don't need a
media pool anymore. We're just going to deal
with what's around here. So we could even hide it. So I can just click
over here and hide it, so that we have more space to work with in the
time line shift. Now it expands and we have the
whole screen to work with. As you can see, the video is in this upper part here in
this line called video one. Below is the audio
associated with it, which is the audio one. And you can see the waveform. So you can see when I was talking and when I
was just silent. You can just hold your mouse over this
playhead here in red, and you can just crawl forward and backwards and
see what was going on. Now you can see that this video is quite gray and
without saturation. And this is because it was
recorded in log three. It's a special
kind of recording, a special picture profile from
the Sony camera that just guarantees optimal quality
to have it looking normal. There's a trick,
the way we set up the color management allows us to come over here
in the media pool, right click this and come
to input color space. And just choose what
is the camera, Sony, and what is the picture
profile we used, which is in this case
gamma three sine log three and boom. Now it has normal
colors so that we can work with something
a bit more natural. Not every video is going to
require exactly this setting. It really depends on
how you recorded. If it was on a smartphone or on a camera saying no
picture profile, You won't have to do
probably anything. If it was on any sort of professional camera
using a log profile, it's probably going to
look similar to this and then you have to choose
the appropriate one. If you have any doubts on how to adapt this to your camera, just write in the
discussion panel and we'll figure it out together here. Basically, we're
going to work with the timeline by
going forwards and backwards with the
playhead to see where we have to cut or we have
to do any kind of edit. And here up on the right
we have the inspector which is going to have all the properties that
we need to adjust. Let's see, for example,
we have here zoom. If I just position the
mouse over the number, you can see that there is
now this double arrow thing. And you can just
scroll to the right or to the left to zoom in and out. If you just want to go back
to the starting point, you can double click
the name and it's just going to reset
it as it was before. You can mess with the position, the rotation, or you can change many other
things like pitch. If you just want to make
everything go back, you can just double click
each of the features. Or you can just come
up here and this will reset everything
as it was before. Some of these features are also present in this box over here. So for example, if you choose transform in this one it's
going to allow you to change all of the
transform properties directly into the preview. So if you just grab the handle here and you make it
smaller or bigger, you can see that now the zoom
property there is changing. Or if I move it around now the position property
is changing. It's just another
way of doing it, depending if you prefer to use specific numbers
or if you want to do it manually on screen to
deactivate, just click here. It's going to turn off play. Controls are over here, but basically you're
going to need Spacebar, which is going to
play the video. And Spacebar again,
is going to posit. And most importantly,
what you're going to need here
is to cut the video. What you need to do is just position the playhead
wherever you want. And here, let's see, for
example, this party. Let's delete this gap. We can zoom in to see better, so we can use the handle we
talked about before to do it. Or we can also hold Alt or
Option on a Mac and use the scroll up and down
to zoom in and out, which makes it just
a little bit faster. The more you learn about the
short cuts in the long run, it's going to be faster
for you to edit. When you do more
and more videos. There are many ways
in which you can trim and cut your videos. The most basic one is
just using the blade two, which is this one over
here that you can click or you can access
using the letter B. And you can just come
over to the clip and just click where
you want to cut it. And it's going to create
the separations over here. But this is not very practical when you have to
do it many, many times. And it's not very
precise what you can do, I'm just going to undo it here is you can grab the
select two with A, which is this one over here, and you can just come with the playhead whenever
you want to cut. To do this, I always use
the waveform of the order, which makes it just much easier. Because you can see that I
stopped talking around here. So you can just prepare the
playhead to be around here. And you can use
the short cut, E, make a cut that you can
see right now over here. Then you can come to
the end of the silence, which is exactly until here. And you can just cut
everything that comes behind. The most traditional way would be to just
create another cut, select this piece,
and press Delete. And it's going to
delete everything, but this is just way
too many clicks. If you're doing it
for a very long clip, what you can do is you can just create one of the cuts with E and then come up to the end of the silence and
use the short cut, which is going to cut everything that is behind the playhead. You could also do the opposite. Let's undo this and let's create a cut right before the
end of the silence. Come up here and press, which is going to cut everything that is in front
of the playhead. So you can just do this for
all the clips so that you can eliminate all the
silence to save, you can just press
contro or command S, or it's just going to save automatically for you don't
need to worry that much. Now if you've used any other
kind of software before and you're very used with their shortcuts and you
want to use it here. Also, you can come up to the Vin Resolve
keyboard customization. And it has already
some presets over here related to other
software like Adult Premiere, Pro, Final Cut, Pro
Avid, all of these. But you can also create your own based on what Da
Vinci offers you. I would recommend you not
to change too much or try to adapt yourself to
the Da Vinci shortcuts. Because whenever you're
checking any kind of tutorial or class or
something online, probably people are going
to be referencing to shortcuts the way that it
is natively on Da Vinci. So it's just going
to make it easier for you to find things. But anyways, that's
not a problem. You can just find here what
is the thing that you want to do and assign whatever
letter you would prefer. Now, this is all
the basic editing you're going to need
here in the edit page. The only thing left
that I want to show you is the effects panel. This panel over
here, Let me close the media poo. It's
a little bit bigger. This panel of effects has video transitions,
audio transitions, titles generators, all
kinds of things that you can just grab and bring
it inside the timeline. Let's just do one,
for example here, like titles left, lower third, if you just pass
the mouse on top, it's going to give
you a preview. And you can bring
it over here on the timeline and you're
going to see that it's here. Now, there are many
types of effects here, For example, video transitions. Let's try, for
example, cross iris. Just by hovering the mouse
over the effect here, I can have an idea
of what's going to happen with the clip
on the timeline. Let's try one
transition, for example. Let's try this push
motion transition. I'll just click on it and
I'll grab it to the timeline. This one doesn't go
as a standalone box. It goes over the clips so that it just transitions
in between them. We have to find a gap. For example, here
there is a cut. And you can position it
before on top or after. Let's just put exactly in the
middle. Position it there. Let's play it. And then it just pushes the previous clip out
and pushes the new clip in. What I recommend you
is to just create a basic timeline with
the provided view in the resources section
and just come here and hover above all of these effects have an
idea of what exists. So that maybe you like some
of them, and if you do, you can actually come up here and just click
in this small star. So let's say for example,
this push transition is amazing, let's just click it. It's now Start, and
then it's going to come up to the favorites
bar over here. It's now down here, because I already had some other stuff, But it's going to
appear over here, so you don't need to
search it anymore. And just grab it here and
throw it on the timeline. Okay, this is all you need
from the editing page. Let me just show you a
couple of things from the interface that I haven't
talked about before, but they are useful to you. So for example, let's just
open the media pool over here. And this icon over here
allows you to have a preview of what you
have on the media pool. You can just scroll here and find a piece of video
that you want to insert. And here you have a preview
of what's on the time line. You can just come here, press for point,
and for outpoint. Now this part of the
clip is selected, and if you put the mouse over, you're going to see these
two boxes, video and audio. If you just want to
grab one of these, you could grab from here. Or if you grab from the
middle of the screen, you're going to bring both
of them to the timeline. I have the other piece of video on top of yours
on the timeline. Just pay attention
that whatever is on the top has the precedence
of what's on the bottom. If I'm here, I'm
seeing what's in here, because there's nothing above. When I have the
playhead over here, I see what's above, because this is
covering what's here. If I hide this line, let's click here and
disable video track. I'm going to be able
to see what's below. Another interesting
thing that you can activate from here
is coming up to the three dots and going over to show full
clip audio waveform. This is going to show also
the audio from this clip. This means that if
you just want to grab the part in which you're
talking, for example, I could just do it
here in or out, and I have selected
only the talking part. Okay, the other things
we're going to talk about in the next lesson, see there.
4. Start Keyframing: In this lesson, we're going to talk about a concept that is really important and not only
for the venture resolve, but for any other
kind of software, which are the key frames. These are points
in time in which a property has a certain value. Talking like this, it
sounds very complicated. But let me show you an example and you see how simple it is. So let me go back to the
normal preview here. And we're just
seeing the timeline. I'm going to use the short cut Z to make the preview
as big as the window. And I'm going to
close the media pool because we don't
need it right now. And I'm going to use the zoom as an example to show you
how the key frames work. So let's say that in
this moment here, I want the video to be
at the normal size, so 100% And some
point in the future, maybe after some seconds, I wanted to zoom in at
110% So I don't need to create all of the points in the middle
to make it zoom in, all I need to do is create
a point in the beginning. So here for example. And to do that I'm just going
to come to the inspector. And here in the zoom part, I'm going to click in this
diamond shape over here. And it tells me that
a key frame has been set for that moment in time. And I'm just going to come
up here a little like some seconds later and I'm
going to set another keyframe. And I'm going to zoom in
a little bit like this. Okay? So now if I
actually go back, going to see what's
happening automatically, the software is calculating
how much it should zoom in in the middle until it gets
to that final point. You can do like this to see, or you can use the
arrows here beside the keyframe to navigate through different keyframes and see the first and the last
points of each one. Now if you want to see
them on the timeline, it's also possible you have this keyframe icon just here on the bottom right
of each clip. If I click here,
it's going to show this additional bar
right below the clip. If I zoom in a little bit, you're going to be
able to see the two keyframes that I created. This is the last one
which is the 12% zoom. And if I come here, you're going to be able to see the first one, which is the normal size, From here until the end, it's zooming in 12%
If I want to go back, all I need is go here
to the future and set the property back to what
it was originally here. For example, I want
it to be back at 100% I don't need to create another key
frame by clicking here. All I need to do is to just
change the property directly. To do that, as I
told you before, you can just double
click here, the zoom, it's going to do 100% and it automatically created the key
frame as you can see here. Also what it's going
to do is it's going to zoom in and zoom out to 100% Everything
that you see in the inspector that has
one of these diamond shaped icons can be key framed. This basically means almost
everything in the inspector. As you can see, you can
change the position rotation, pitch and all of these
others also like cropping composite the
opacity of a clip with time. You're going to realize
how many things you can do with this technique, but one that you're going to see writing one of the
following lessons is how to make text pop into
the screen and disappear. For example, let's
just anticipate it and bring in a
title box here. I'm just going to grab
a text, for example. And then the text is
just on the screen. It appears and disappears. But if you want to make
it a little bit fancier, you could make it start outside. So let's come to
settings and put the position totally out
here and create a key frame, it's out of the screen. And then just go to the
future a little bit. And let's say that here you
want it to be inside already. I'll just double click
the position it's there. Now if I scroll back and
see what happens exactly, it's just slides in position. Of course, we can make it look much cooler than
it is right now, but we're going to see this in one of the following lessons. But anyways, this
is another option that you have by
using keyframes. Another way you can
change and interact with key frames is by
doing this visually. Instead of just moving it
around here in the inspector, you can come up here
to the clip and you can click this other icon, which is going to show you
a graphical interpretation of what the key
frames are doing. Basically, if you hover here, you're going to see
zoom 100% up here, 1.12 and here back to one. Instead of changing
the value up here, you could simply do it
by dragging and dropping this dot down or up to
create a different effect. Now for example,
I put it at 168, which means that the zoom is
going to be way stronger and then go back to 100% If you click here in
this drop down menu, you're going to be
able to see all of the other properties as well. So you can change anything from here or from the inspector. Now a pro tip to make
the keyframe look even cooler is not using
a linear motion, is using the in motion. Let me show you how to do
it. So here for example, in the textbox that
comes inside the screen, it comes at a constant speed. But instead, if I
come up here and I choose the last keyframe
that we created, meaning the position here, I can right click the keyframe
and I can choose linear or in is in means that it's going to
come at a higher speed. And then slow down. Just gives
that extra pro level look. Okay, this is all
about keyframing. Play a little bit
with the position zoom, with the linear, and also with the In option to see which ones
you like the most. Check each other
properties actually have keyframing enabled
so that you have an idea of what you
can do in the future. I'll see you in the next lesson.
5. Picture in Picture: In this lesson,
we're going to talk about the picture
in picture effect. Which just means that you
can position yourself. You're talking head video
in the corner of the image and just show something else like a screen
recording for example. Throughout this class you've
been seeing it a lot. And it's useful not only
for classes like this, but tutorials in general or anything that you
want to showcase some information without having that disconnection
from the viewer by just disappearing
and having them just look at a screen with
a mouse going around. There are basically
two ways of doing it. There's the hard manual, let's just do it
from scratch way, and there's also the smart
way inside the intsolve. I'm going to show
you both of them. Okay, To showcase this, I'm
just going to come up here to the screen recordings
folder that I have. And I'm just going
to grab a piece of any screen recording and
throw it on the timeline. So as you can see, we just have a small recording here from
one of the previous lessons. What I'm going to do is I'm just going to grab one piece of video from another clip like
this one here for example, and drag and drop it
here on the timeline. Okay, zooming in here, we can see that I'm just
completely covering the screen. And you cannot see
the screen recording that is actually below it. If I just wanted to do this
picture in picture effect, what I could do would
be just to click here. I'm just going to show the
full preview on screen. Let's make this bigger
media pool we don't need. You could simply zoom out, make it smaller and just move it to the corner of
the screen like this. This is the most
simple way of doing it and there's no fancy
effect, animation, nothing. It just comes from screen
recording to popping on screen. You continue and you
disappear. And that's it. And as I showed you
before, you could do this by either using the
inspector like I did here, zooming out and
changing the position, Or by clicking here
in this menu so that the box comes
and you can just reposition yourself wherever you want and just leave it there. Like for example, if I wanted it there or if I don't want
to cover the timeline, I'm just going to
put it over here. And that's how it works. Okay, now let's
do the smart way. Let's make a copy of this clip. And I'm just going
to out or option on a Mac and click and drag. It's going to make a copy of the video and the
audio I release. Now I have this here also. I'm going to reset all
of the settings And click here so that we're
back to zero, saving it. Now let's come up to
the effects and let's find the video collage effect. Now sometimes you search
here and the effects and you don't find it because you
have the two box selected. But it might be
under open effects. For example, the video
collage is exactly there and I had it start
already, probably. You saw that it was
actually here already. What you do is just drag
and drop it on the clip. Now you're going to
see that something weird is happening. Let's set it up first, come up here to the inspector. And you can see
that there's all of the settings here
already pre made, but we have to change
some things first, drop down menu, Create Tile. What we're going to
do is we're going to create a nine grid. And we're going to position
it either in the bottom left or bottom right
corner columns. We need three rows,
we need three. And then if you come
up here to tiles, we can choose where
we want them to be. If you just put preview layout, it's going to show you where
the tiles are numbered. So we're looking for tiles
number seven or number nine. Let's start with number
seven, active tile, you can change it
to seven, okay, and you can see that it's now selected by the stripes here. And just dis select
Preview Layout and okay, we're already here
in this corner now. Let's check the global settings for this. Columns are like this. You can change the
rounding if you like, left and right margins. I'm going to make them
way smaller than this. Okay? It's already
looking nicer like this. Now in the tile settings, you have many different
things you can do with this. For this case, there's
not much we need to do, but we can do some
styling to make it look even nicer right now. For example, I don't
have any border, the rounding is on, but I don't have
any colored border. If you want, you can
just come up here and make it bigger or
smaller so that I have a colorful border all around your
picturing picture. You can set the size, the color, and also the opacity
of this border. Maybe like this
looks nice to me. I'm going to leave it like that. You can add also a shadow, which by the full comes applied, but with zero strength here. If you just put the
strength up a little bit, you're going to be able
to see that there is now a nice shadow over
there of black color. You can change the angle, the distance, how blur is it? I'm happy the way it is. I'm not going to change
anything anymore. Tile animation is
something that is very, very nice and that
would take you way longer to do if you were
doing the traditional way. And this is exactly
using key framing, but it's doing
everything for you here. Let's say that we just want this to come from the
left of the screen. From outside, flying inside. So you can come to
animate and you can choose intro and outro,
or both of them. I'm going to choose
both of them, so I want it to come
in and then go out. Now in these two menus,
you choose which kind of animations you want for
fly and for shrink. In this case, we just want fly. So all you need to do is
come here and select Fly. Select shrink, and I want
it to fly from the left, so I'll just leave it as it is. If we come here
to the beginning, you're going to see that
the image is not there. And if you play, it's
just going to fly from the left and nicely stop in the position
that we had before. Okay, but it's a
little bit too slow. And this, you change exactly
here in the duration. Right now it's 60 frames, which is more than 2 seconds. Let's make it way faster. Let's say, for example, 18 frames. Let's see how it looks. Okay, Much faster, much nicer. Now there's one extra step
to make it even cooler, which is easing that I showed you with the
key frames before. Meaning that the speed changes
and makes it much nicer. And also blurring, meaning
if you have faster movement, it's going to blur this image. And when it slows down, it's going to be less blurry
until it's very sharp. So let's hear change motion in size is you're
going to put in and out is amount 0.5 Let's test this and see how it looks
analyzing a motion blur. I'm going to put some
value here in the middle. Let's see how it
looks right now. Okay, let's see. Very slowly to see
what's happening here, I'm just going to press
right and it's going to go frame by frame
here in the timeline. And as you can see, it
starts coming very blurry. Starts decelerating and stopping in place until it's
completely sharp. It looks way, way
nicer and much more professional in this way
as we chose in and out. It's going to fly in, it's
going to pass all this clip, and by the end here, it's just going to fly out of the screen. So this is a very
easy way to make a super professional picturing
picture without having to key frame everything
manually, working smarter. Now with time, you're going to realize that there are also some other things
that you can do with this video collage effect. Like for example, placing
another panel in the middle of the screen for you
to write something on or making transitions. Or even if you'd like
to do short videos, you can do those nice
five or three collages. There are many uses for it. Okay, play with it. I want
to see what you create. See you in the next lesson.
6. Creating On-Screen Text: There's always the moment
in which the image is just not enough and we need
to put text on the screen. In this lesson, we're
going to see three different ways in
which we can do it. And the first one is just
making the text pop on the screen like this or
maybe appearing like this. So basically what we
need is to just find the text effect over here
in the toolbox titles. And we're going
to find text plus drag and drop it here
on the timeline. And now we have
just a random text here in the middle
of the screen. Now if you just want it
to pop and disappear, you can just put it
there and then drag and drop this to be as long as you want and it
just disappears. These text boxes can be
customized by coming up here to the inspector
and clicking on title. Here you can change
the phones, the size, and many other features
of this text box. Like any other media or clip, you can just click and copy it. And you can also move
it around by clicking here and just moving
it to a new position. If you click up here, you can also rotate it as you'd like. This is great for quick emphasis without any distractions. Now one thing to pay attention
is where you position the text and the color
against the background. A white text over this
background here looks okay. It's readable, but
it's not very nice. It's very cluttered in the background for you to
be able to read properly. But instead, if I
position it over here, it already starts getting
a little bit better. But for example, if I changed the color by clicking
here in color and just selected something that is way too similar
to the background, like this, for example. It starts getting way, way more difficult to read this. So what I recommend
you is to look for cling parts of the
background and use colors that are completely contrasty with the
colors of your image. Another key aspect of this
is how long this text is going to be on the
screen because people need time to read it. So if it's just a
quick title like this, only a couple of seconds, it's going to be
more than enough. But if you're putting a
full quote from someone, then you need to read it
and be sure that everyone watching the video
is actually going to have proper time to do it. Also, now, level number two of this text creation
is doing animations, so you can play
with opacity size, font, all of these things, and key frame it. If you skipped the
lesson about keyframing, I highly suggest you to
go back and watch it. Let's set keyframes
for all of these. If you're lazy and you
just want to be sure that you created keyframes
for everything that you need, you can just click the
keyframe icon up here, which is going to
create keyframes for all of these properties. So let's say that you want
this to be totally hidden. Pop on the screen
like you saw before. Let's put the zoom as zero. It's completely
going to disappear even more person about here. I would like it to be
already at the normal size, here it be one frame before. Let's make it way
bigger like this. Okay, so now I'm just going to navigate
using the arrows here so that I know exactly where
I am during this clip here. It's where it's
completely hidden, right? So I'm going to create
another key frame, but it's time for the opacity. And here I want it to be at 0% when it's in the normal size. So I'm going to click here in the right arrow of the zoom, I want it to be 100% Let's just take a look
at how it is right now. So it starts completely
small and it begins to appear and
come up and zoom in. Okay, let's navigate
here, right? This is the 100% and this
is the bigger one here. I want it to fade out again, so let's just put the opacity back to zero and
let's see what's happening. Okay? It fades in and
out, and that's it. I'm not saying that this
looks extremely beautiful, but it's very interesting to know how to do it because you might have many other uses
for this in your videos. Okay, so now if you're ready for the level three
of text creation, this is what we are
going to be doing. So sometimes you just don't want or you just can't manage to put any kind of text
on the screen because it's just too confusing
the background. So you'd rather create
either a side panel or something that darkens
this area or blurs, or even both of them at
the same time so that the text can be on top
and very, very clear. And there are many
different ways in which you can achieve the same result. But this is one
that works for me, and I'll show you how I do it. First of all, let's start doing the dark panel on the left. To do that, I'm just going to come up to the effects and I'm going to search for an
effect called solid color. And I'm going to click two
box because it's inside here. And drag and drop it
here on the timeline. Okay, now this is just a complete frame
of the black color. So if I come to generator
here in the spector, I can change it to
whatever I want. I'm just going to leave
it as black right now. But the thing is the opacity is 100% so it's
covering everything. I'm going to come up
here to the settings and change the opacity
to maybe, let's say. 50% You can also enter
the value as you prefer, like this for example. But we don't need to cover
all the screen, right? We just need to cover
only the left portion. We can come up here to
the position and just drag and drop it until
where we think it's enough. Let's say just about here. Okay, so now we
have a panel here on the left that is
a little bit darker. If I position a text here
on top, for example, and just position
it here like this, you can see how much
easier it is to read instead of when
we don't have it. It just makes it look that
little bit more professional. But there are some extra
things that we can do over here to make
it look even nicer. The solid color is here. One of the things that I don't like about it is how it's so sharp here and you can clearly
clearly see where it ends. The way to make it a
little bit softer is coming up to the cropping
menu here on the crop, right? You can just crop a little bit and it's just going
to cut it a tiny bit. And you can adjust
the softness and make it a little bit bigger
like this, for example. And it just makes the transition a little bit nicer
than it was before. You can play with it, making the cropping a
little bit bigger, the softness a
little bit bigger, until you find the result
that you think it looks nice. As usual, to make it look nice, we can actually key
frame it in and out. For example, here
in the solid color, if I just make a keyframe
for the position, hand written seconds later, I do another key frame. Going back to the first one, now we're right in the start. We can just move it
completely out of the screen. We can see the hand
written effects. This is great if you
just want to highlight some keywords of what you're talking about
in that moment. Short, impactful, and
very, very clear to read. Okay, now your text is
quite well highlighted, but still the background is a
little bit too complicated. So this takes us to
level number three, which is adding a little
bit of blur just to make that separation from
the background even better. So let's take a
look how to do it. Okay, This one is going to be a little bit different and this is because the blur effect
cannot stand on its own. So you can't just add it to
the timeline or anything. You have to add it to something. Either a video clip or what
we're going to use here, which is an adjustment clip, leaves inside the toolbox. You grab it, bring it
here to the timeline, and you're going to see
that nothing changes because it's not holding
anything so far. You click it and it has
just the basic properties like it was a video clip. But the trick here is that we're going to add the blur to it. I'm going to close
here the effects and I'm going to go to
the color page. All you need to do is click
in this icon over here, and it's going to
bring you over here. This can be a little bit scary in the beginning
when you first see it, but later you guys are going to see that it's not
that complicated. It follows more or less
the same things that we've been seeing in
the added page before. The idea here is that you have all of the
controls for color. In this menu over here
we have our nodes, which are the ones that
are going to hold all of the effects that we're
adding to the image. So here we have the timeline, a representation
of the timeline. And what we're going to
do is we're going to create a mask that holds a blur. To do that, all we need
to do is come up here to the window panel and we're
going to choose one of these. What I like to use is this
gradient feature over here. As soon as you click it, it adds already here to the preview. And you can see that it
has this bar and an arrow. If you just move it
around like this, you can see anything
in the preview. But you can see it
here in the node. And let me make it a little
bit bigger for you to see. We're going to add the blur. The blur is added
by coming up here and just pulling this lever
up of the radius of blur, meaning that we're adding blur or adding sharpness
in this case. Let's just add a lot of blur
here like this, for example. As you can see, everything
that is in black is where it's being
affected by that mask. And what's gray is not
being affected here. We can just move it around. So push it left or
right to affect more or less the more we make this
arrow bigger or smaller, the transition between blur
and not blurry changes also I'm very happy with it being around
here more or less. But the thing is right
now at the moment where the black bar comes
to enter the scene, that's already blurry. And
that's not what we want. I just want to key
frame it and make it enter together
with the black panel. And to do that, we're going
to have to animate it, just like we animated all of the other things
by key framing. And the key framing sector is exactly here in
the color page. If you're not seen in it yet, you can just come up here to the right side and click
here on keyframes, sometimes it's the
scopes that are active, so you just click here on the keyframes and it's
going to be there. Okay, so let's just click
here on the adjustment clip. And I'm going to set a key
frame for the corrector one, which is exactly the effect
that we created here. Let's move it here a little bit and you're going to see that it already marked
here is red and it created the key
frames in this point. Let's go for a
little bit in time. Maybe here, for example, this is exactly where I
want the blur to stop. Let's just move it
here a little bit. And it created the
transition, okay? We go back and we can
just move it out of the screen like this
and see what happens. Slowly, you see that
it's moving in. The black panel is
also coming in, so it's making all that side blurry and dark
at the same time. But now you probably noticed
that we have a problem. Our text is also getting
blurry. Let's solve this. We come back to the added
page and it's getting blurry because it's position
below the adjustment clip. The blur is affecting everything that is below the
adjustment clip. All we need to do
is grab this and just pull it upwards like
that, and that's it. Now we can see how much clearer it is to read this
text over there instead of not having the blur or not having
even the black panel look. The huge difference that
just these two things make. Now you might be
thinking that, come on, this is just like
way too complicated to be doing that
every single time. But the trick is you
only need to do it once. And you can save this to be re, used in all of your
future Youtube videos. The way of doing it is by simply grabbing this
adjustment clip that you just created and dropping
it here in the dipole. And the same thing
for the solid color, which is the black panel. Just drag and drop in the dipo. If you just drag
and drop this from the Midi pool in any other
place of this video, the exact same effect
is going to be applied. Okay, now from these effects, let's go to the next
lesson where we're going to learn how
to screen record.
7. How To Screen Record: Regardless of which type
of video recording, probably at some point you're going to need screen recording. If you're doing some sort
of art lesson in which you need to show yourself drawing,
you're going to need it. But even if you
need just to show a website or how to
access some kind of system also screen recording is going to be super useful. So let me show you how to
do it on a Mac, Windows, and also on any kind
of mobile device, like a tablet or a smartphone. So first of all, for a Mac
or a Windows computer, my favorite option
is to use OBS. It's actually a platform
designed more for streaming, but its screen recording
capabilities are so good that I can't
recommend it enough. It's quite simple, but there are some tricks to it.
So let me show you. So here obviously I'm
recording the screen with another software
so that I can show you the screen
recording software, which is obvious and
it looks very tripy like this because it's
recording the screen itself. So it's just repeating itself. The only thing you
hear that you need to set properly is coming
here to the settings. And you need to set the output, meaning where your file
is going to end up. In this case here I
chose the folder where I'm saving all the
files for this project. And if you need the audio, which kind of audio do you need the desktop audio from,
where it should be coming? And also if you have a
microphone where it should be, okay, that's all you need there. The other very important
thing to do is to check here, The sources here is where
you're going to set, what is it going to record? In this case, I just said display capture means that it's going to capture
the whole screen. If I change to another
window, to another software, if I go back here to Da Vinci, for example, it's going to
record the Da Vinci screen. If I come back to OBS, it's going to record the screen
and that's how it works. But you can also set it to record only one specific window. You can come up here
to the plus sign and just choose
exactly what you want. Let's say for example,
that you just want here to capture a
specific window. You can give it a
name inside here. It's going to list inside the window all of the
software that you have open. You can select one of those, even if you just open another software on
top of that one. The screen recorder
is going to consider only that software the
moment that you add it. It's going to be here on top. So you can have
screen recordings on top of screen recordings,
in this case here. I don't want it, so I'm
just going to delete these, make erase it or just
like cancel it entirely. Yes, and I'm just going to keep the normal screen recording here for a computer and MX both. I'm going to use OBS if it's
on a smartphone or a tablet. I'm just going to use the internal screen
recording feature, which is going to be more
than enough for this. Now, one golden tip, especially if you're doing something like I'm
doing right now in which I'm showing you
the screen recording, but at the same time I'm
recording with a camera. So I have two
different video files, but I need also to
synchronize them. So while I'm talking, actually the correct thing
is appearing on screen. To do that, it's very
important that you set also the screen recording to record a microphone audio
like this one. This way you have the
audio on both videos and you can synchronize it
super easy on Da Vinci. I'm going to show
you how to do it. Okay. Screen recording is done. Let's go to the next lesson where we're going
to talk a little bit about color correction
and color grading.
8. Color Correction and Grading: The color page of
the Vint resolve has been famous for
a long time now. Many studios have been using
it for coloring movies. But after a while they
started developing so well the editing part
that it also became the editing software
of choice for many people's studios
and also Youtubers. I'm not going to go
too deep into it because there are so many
things you can do with it. But there are some
things that are specific for Youtube that
is going to help you to either have very
good colors for your videos or to at least
have a very fast workflow. Let me show you here.
So first of all, to access the color
page, you just come down here and you
click this icon. You're going to be
brought to the screen where you have the
preview up here, which is your original clip. Here you have your nodes, which is where all
of the effects and changes you're going to make
are going to be stored. Basically, you can
create as many nodes as you want to store
anything that you want. If you just want
to change white, balance the specific color
in one of the nodes, and just make everything
very well organized, you can in the middle part here, you have all of your clip
thumbnails, the timeline, and in the lower part you're
going to have the tools here and the scopes
showing you where the red, green, and blue color sit
all across your image. Basically, I just chose one
of the clips we have here, which is this small piece
of clip that we have. And I'm just going to make
very basic changes to it. So here in the primary
scholar wheels, which is this first
symbol over here, is one of the parts that
I highly recommend you to check and to see if you can improve your
image a little bit. You shouldn't go too crazy with changing the
colors of your images, especially depending on which of camera and how you recorded it. Some types of footage are more flexible and others
not that much. Unless you know very well
what you're dealing with, don't go too crazy
with this one and also with the one that I'm providing you in the
resources manual. You can change things
like for example, the contrast, a little bit of the white balance and
let's do it here. First of all, we've
got all of the wheels here representing
the dark parts, the mid tones, and
the highlights. If you use the wheel,
you can add color. Or if you use this
lower part here, you can add exposure. Or you can make it a little bit darker and see that everything you do is
reflected here in the scopes. All I want to do is add a
little bit of contrast. Let's do it by holding this and just moving
it to the right. Not that much like
this looks enough. The other thing
is that the white balance in this
shot, it looks okay. But if you have a clip that
has white balance problems, you can change here
the temperature, meaning from cold to
warm, blue to yellow. If you go to the right, you
make it more yellowish, if you go to the left
to make it more bluish. Or you can change also the tint which goes from
green to magenta. Right goes to magenta
and left goes to green. Let's just leave it about here. For example, if you have something white or
grayish in your image, you could use the speaker over
here and just click on it. And let the Vint resolve. Try to guess the white balance correctly for our image here. I'm just going to
leave it as it is. One other thing that
you could change if you wanted is coming
up here to the curves. And you have several
different curves here which are going
to change here. With saturation, you could totally tweak the
colors the way you want them, but as I said, you
shouldn't go too crazy depending on the
type of footage you have. You might not be able
to get away with it. But the first curve here
is going to change mostly the contrast if you use
it combined like this, one thing you could do
would be to create one dot over here and just
lower it a little bit. And one in three quarters
over here, more or less. And make it up a little bit, making a very smooth
S curve like this. This is going to
add a little bit of contrast to the
image if you haven't already and it might look good depending on the footage you have. I'm going to
leave it like this. I'm not going to make
any other changes to the image itself. I'm going to show
you now one trick to make your workflow
super, super easy. As you notice
probably here around this clip you can see the preview of what
we've done to the image. And you can see that all the other ones haven't been changed. But if we come back
here to the timeline, you can see that it's
just a sequence, right? It's the same clip
that we just cut, but the changes were applied just to this small
piece over here. So how can we apply
this to all of the others considering that it's actually the same original clip? There are two ways of doing it. One of them is just selecting all of the
other clips like this, for example, and right clicking
and going to apply grade. And this is just going to copy this change to all
of the others. Now this can be very practical, but there's one issue. Let's say that later on you decide to change
something about it, you're going to have to copy
replicate this color grading again to all of the clips so there's a better
way of doing it. You can write, click, and
go to use Remote Grades. And this is going
to allow you to make all of the
changes that you want. For example, contrast. And come up here to the curves and make it like
this a little bit. And do the same
changes we did here, making it a little bit darker. Okay, let's leave
it as it is now. You can see that not
only this instance of the clip was changed, but all of the others. You can see also by the colored square around
the number of the clip, meaning that all of
these were changed. And you can also see this icon
over here in all of them, meaning that now they're all
connected in between them. Once you have the same
clip in the timeline, just split in many
because you're deleting the gaps with
the silent spaces. You can just use this
technique to be able to grade all of
the clips at once. Okay, this is enough for now
with the color grading page. Let's go to a more artsy lesson, doing some scribbling and annotations on the screen
using your own handwriting.
9. Annotating and Scribbling: In this lesson, I'm going
to teach you how to do some of these scribblings
and annotations that you're seeing on
the screen right now by yourself using
your own handwriting. The trick here is that
you're going to need some sort of
smartphone or tablet. Somewhere where
you can draw these to be able then to import
them inside a Vince. Later on in my case, I'm going to use a
tablet and a pen, but you can use your smartphone with the finger. It's
more than enough. This is a very
cool way of adding some custom made animations
for your videos and also adding a little bit of
your own personality by using your handwriting
on the screen here. I'm using an app called Concept. And all I'm going to do,
drawing something dark like black lines on
a white background. So I'm just going to do things
like this, for example, or highlighting something,
or just making a circle, maybe an arrow. That's it. I'm screen recording this and
I'm going to send this file over to the computer where we're going to insert
it inside the Vinci. One way that I often see people teaching this is by
using a green screen, but it's completely unnecessary. This method is way, way easier. Here have the recording
and as you can see, it's just drawing
these small things. And I'm just going to throw
this on the timeline here. Okay? So like this, it doesn't look cool
at all because we have all of these things around
that we totally don't need. And we also have all the
white part here appearing. The trick is, first of all, let's crop this image. Let's see here where we see the first drawing,
which is about here. And in this case,
I'm going to use the crop tool from
this menu here. Which is going to make
it easier because we can do it directly
on the screen. I'm going to cut it here by
holding this handle here. Let's make it as
tight as possible. We don't need to
be that precise. Okay, right about here. Looks it's enough. And the trick to
make the white part disappear and have only
the black is coming up to the composite area here in the inspector and changing
the composite mold. You can try different ones. You can go scrolling here to
see which one works best. But usually the ones that keep only the dark areas are
darker, darker color. Or maybe you can try hard light in this case looks like multiply is
working pretty well. Let's take a look here and
see how it looks, okay? Okay, this seems
like it isolated pretty well, just
the scribbling. Let me go back here
to the transform. And now we can make it
a little bit bigger, we can change the place
where it's appearing. So let's just put it over here like I'm highlighting
the lamp for example. And you just play it. That's it. Now if you want to be
very fancy and make a co animation out of
it, you can cut it. Let's make it here
where it starts. Okay, let's delete
this using back space. Here is where it's
finishing, right? Okay, let's delete the rest. Now what you're going
to do is clicking on it out or Option and
copying it over. Now what happens is that it's finished and then it's
just going to start again, right, select the second one. Press R in the keyboard here. What you're going to do is
you're going to click on reverse speed and you're
going to increase the speed to maybe
-800% then change. You're going to see
now that it's way smaller and it's actually
going to be doing the opposite direction of
the movement it creates. The notation reaches the
end and just deletes. It looks very nice like this. If you want to
group this together so that wherever you move it, they go along
together like this. You can select both of them. Right click and
go to link clips. Now whenever you
move one of them, they're both going
to move together. This is how you create
scribbling or annotation in your videos using
your own handwriting. If you don't want to do this by yourself or you're trying to find something that it looks a little bit more professional. I'm going to leave a couple
of links below where you can find some free assets like
these to use in your videos. One of these websites
that usually has some free stuff about this
is called Motion Array. It is a paid platform, but they have a free
section in which many times you can find some of these scribblings
and it's very cool. Okay, enough with visuals. Let's talk a little bit in
the next lesson about audio.
10. Audio Essentials: Let's talk a little
bit about audio, music, and sound effects. Let's start off with music. Depending on the type of
videos you're editing, the type of music you're going to choose can be very different. For tutorials like
this, I usually prefer low fi music or musics that
are tagged as ambient. They tend to be a little
bit softer and they don't compete too much with
the voice of who's talking, which is also another
very important trick. Do not use music with lyrics when there's
someone speaking. It just as this
competition between both audio tracks and you can't understand
anything anymore. Now there are several
platforms where you can find some very good music. Pixabay is a very
good website or even Youtube has
an audio library with many songs
that you can use. I personally use a platform called Track Club
in which you can filter the songs you would like with many
different categories. You can choose
which type of song, which kind of instrument, which kind of mood you want. It just makes it
much faster to find a song to then be able
to edit the video. Now, many people ask me
if it's possible to use also copyrighted music
in the Youtube videos. The answer is yes, but no. The best scenario is
when the music is copyrighted and the revenue from your video is going to be redirected to the
owner of the song. The second and
intermediate scenario is when the music
is copyrighted, but it's not available
in your country. And since you're
exploring the video with only one audio track where the song and the
talking is combined, it's going to make your
video completely mute. But it's still not as bad as the third thing
that can happen, which is the song being
completely copyrighted and forbidden for use
without prior consentment. Which means that your
channel can even get a warning from Youtube
because of using it. Generally, I would not
recommend you try. Now, let me show you
inside Da Vinci, how I work with music
so that you can do it in your video to now. Here in the media
pool, you can see that I have one song here. And you can see already the wave form to edit to your video. All you need to do is drag and drop it inside the
timeline like this. And you can see the
wave form already. Let me close here
the media pool, so we can see it a
little bit better. And we have the whole
wave form over here. And now you can listen both
my voice and the song. But being this loud, it's almost impossible to
understand what I'm saying. Something very important to understand is the
relationship between the volume of the talking
head and the music behind it. And as soon as you play it, you're going to be able to
see the levels right here. And there are two
ways of changing the volume of these tracks. The first one just
coming to the inspector and doing it with the
volume slider over here. The second one is
using the mixer. And there's also a
third one which is doing it directly
on the timeline. As you can see, there's
this white line over here. If you drag it up and down, you can see how
even the waveform reflects how the
volume is changing. Let's just make a
rough adjustment here by making the song way lower, like for example, -37 DB and putting the voice
here around six or seven. Let's see how it sounds. Insert any other kind of scenes
or added something, okay? Now it seems much, much better. And usually the trick is keeping a relationship
between the volume of the audio and the
volume of the song being at least 20 DB apart. Meaning that if the
voice is reaching about -12 DB over here, the song should be
roughly -30 or -35 DB. This is a general rule,
but you can go by year just checking more or less if the song is a little bit more aggressive on the ears
or a little bit less. Now, another trick you
can use is to lower the volume of the song whenever
someone starts speaking. So for example, if
you have some bro, some images going on and then
someone starts speaking, you could just
lower the volume in that moment by altering it
directly on the timeline. Let's say, for example, that
this part of the clip here, I want the song to go
lower a little bit. What we can do is we can
come here to the beginning. We can create key frames
inside the volume. Also, the moment you position
the cursor over here, you're going to be able to
see this double sided arrow. You can hold Alt or Option
on a Mac and click here. And a little bit after, go to the end of that
portion that you want to lower the volume out. Click out, click here. This is just going to create a separate portion of the volume that you can drag up
and down independently. And just raise or lower the volume depending
on what you want to do. If you're happy
with it, perfect. But if you feel like you have
to adjust it a little bit, you can drag these keyframes
forwards or backwards, up and down still
here in the timeline. Okay. This is probably
everything that you're going to need about
audio at this time. Now, sound effects also
in the resources panel, you're going to
find many links to websites that offer you
free sound effects. Mainly Freesound.org is a very good resource and
pizza base is also very good. But inside a Vinci, there's
also a sound effect panel. Doesn't come by default. If you come up here
to sound library, now in mind you are going to be able to see this pen over here. If you're not seeing
it and you're seeing a download button,
you can click on it. It's going to download
this library for you and you just have to
install it separately. And then just close Da Vinci, reopen it, and
you're going to be able to see exactly
what I'm seeing here. Let's say, for example,
that I want to add a sound effect for one of those text animations that we did in the text lesson. I'll just go back
here to that portion where the black bars
come over the screen. And I'm going to search for woh here in the sound library. The woh is just
this type of sound. Okay? All you need
to do to add this is drag and drop it on
the time line like this. Very easy, very simple,
handwritten effect. Now you have a
small sound effect to enhance the quality
of your video. Now this sound library is
a little bit strange in the sense that you can't really see everything
that is there. You have to search for it. But I'm going to leave a list of common words and common sound effects that
you can search here, and that might be useful to your videos and
where to use them. Just one quick remark
here in the timeline. Pay attention to
the audio tracks, if they're marked here to
stereo or if they are no. It's going to appear
one and say mono here. The songs usually
come as stereo, but the sound effects
many times you're going to download and
they're going to be mono. Which means that if
you use headphones, you're going to
clearly notice that the audio is coming just from
the left or from the right. Normally you have to change the track type to
mono so that you can be sure that it's
going to be playing on both sides and not just one. Okay, There is enough about
music and sound effects, but we're not done
with audio yet. The next lesson we're going
to talk about voice overs.
11. Recording a Voice Over: It doesn't matter if your
videos are logs or tutorios. The truth is that at some point, you're probably going to
need to do some voice overs, meaning recording your voice
on top of some footage, either to tell a story or
to explain some of it. Instead of making it all
complicated by recording with a camera and then trying to synchronize with the video
you want to talk about. We can all just do it
inside Vin resolve. Let me show you how. Okay, so we're here in the edit page. And I just imported the bureau footage here of London and we're going
to talk over it. To do it, all we have to do is come up to the Fair Light page, which is this one
with the song symbol. The interface looks a
little bit complicated, but we don't need
to use everything that is available here. Basically, what we
need is to know that this is the
timeline of the audios. We don't have the videos
here, just the audios. And we're going to
create a new track by right clicking and going
to add track mono. Now we have the
track number five, which is the one we're
going to use to do our voice over basically. Now what we need is here on the right, we've
got the mixer. Let's expand this so that
we can see all the tracks. And we can see also the
track five here up here, you're going to be able to see
no input on none of these. We have to click on five, which is our track here, and go to Input. Now you're going to be
able to see the audio. Five is selected, which is
the destination, the source. We have to select
the microphone, which is going to
be this one, okay? And click on Patch. Now you can close this to
be able to begin recording, you have to activate the
track for recording. Here we have three buttons. This is the mute, where
you're just going to mute. The track is going to keep the audio coming
only from the track. And R is for the recording. This is the one that we're going to have to
activate right now. Okay. Now you can see
that even the levels are going up and down because it's capturing
everything that is coming from this
microphone over here. Let's just put the record
something and we're going to be able to see the file being
recorded in real time. Okay? This is just a test to see what's going
to happen with the audio in the timeline of the Fair Light page inside
the venture resolve. As you can see, it's showing
the wave form and it's just recording while it shows me the video clip that is in
the timeline right now, making it so much easier
to do voice overs now. As you can see, it created the audio file
inside the timeline. It's completely ready to be
used and it's a wave file, so you don't need to resource
to any other software or an external camera or recorder
to do this kind of job. Now, a tip that has nothing to do with the venture itself, but for the recordings
in general, it's usually better
to record audio in a room that doesn't
have that much echo. It's not that big or at
least it's covered with carpets or properly
with some audio panels. But if you don't
have any of these, just recording it in a closet or maybe
close to a wardrobe. Or if you also cannot manage
because you have like, for example, a
workstation and you cannot just take
your notebook there. You can also cover yourself
with a blanket or something like that just to try to
muffle the sound a little bit. It's probably going
to sound much, much better than if
you don't do it, even if it looks strange. Okay, that's all about
audio inside Da Vinci. Now let's take a look at some workflow hacks
inside the software that is going to make
your life so much easier when repeating projects
over and over.
12. Workflow Hacks - Part 01: This lesson is going to be especially helpful
for those of you who don't have a very powerful
computer to edit from. Devin resolve has many
different features built in inside to make everything
run much smoother. I'm going to show you a
little bit how they work and which ones can you implement
while you're editing. Let's see. Okay, we're
in the edit page. And the first step
here is for you to come up to the playback menu. And we have one option here
which is called Render cache. Currently, as the poll, it comes as none. But I recommend you to
put smart activated. This means that any
of the footage in the timeline that a venture resolve things that is
a little bit heavier. It's going to take
a little bit more for you to be able
to see the playback. It's going to be
marked with red on the top here and Da
Vic is going to start rendering these
files immediately while you don't do
anything on the timeline. If you're stopped,
you're not doing anything or you're just
visualizing the timeline, you're not editing properly. The venture resolve
in the background is working to make this become blue so that you can easily
play back without any leg. Now if for any reason it doesn't think that something
needs rendering, but you still cannot
see it in real time, you can right click
and you can go to Render Cache Fusion Output
and put it on immediately. The red line is going
to appear on top and the Vince is going to start
rendering that as well. This is definitely going to make your editing experience much, much smoother and faster. Another thing that
slows down a lot the playback is
the color grading. If you're trying
to scroll through the timeline and it's
just getting too slow, you can try coming
up to this icon over here and just
deactivating entirely the color grading to see if this can help a little bit
with the flow of editing. Now the last and
most important one. Before actually activating it, let's come up to the settings and I'm going to show
you what you have to change over here in this
first menu, Master Settings. If you go down, you're
going to be able to see optimize media and render cache Inside here you have
proxy media resolution. The idea here is
that you can create a lower resolution version
of all of your files, be it the screen
recordings or video clips, whatever you have, so that
you can edit using those. But in the moment of export, the Vinci reconnects
with the original files and export it in the highest
resolution possible. This makes editing
much, much faster. It's also super useful
if at some point you decide to work
with another editor, so you can send
only the proxies, the lowest resolution files, the person can edit it for
you and just give you back the project so that you can export using the original files. Here is exactly where you set the quality of the
files that you want. I'm doing the screen
recording on Windows, so these are the options that you're going
to see around here. First you have the
proximity resolution. Keeping it as half is already going to be more than
enough If you have four K, for example, and this is
the Proximita format. Usually DN HR is going to be the best codec for you to use to have very quick
playback on Windows. And the higher you go,
the best quality it is and the bigger are
going to be the files. I would just suggest you to keep somewhere
around the middle, maybe HQ or SQ. It's already going to be enough
for you to visualize well the videos while you're editing and have a much
smoother playback. Let's keep it HQ, for example. It save now for
everything that you want. Proxy is created, you can
just come to the media pool. And let's say for example, you want to create proxies
for these three files. You select them,
you write Click, and you just go to
generate proxy media. Immediately, the
Vince is going to start creating these proxies in the same folder where you have these files over here later. Why you're editing. Just to
be sure that the Vince is using the proxies to show you the playback and not
the original files. You can come to this
icon over here. Click the drop down menu
and be sure that you have prefer proxies activated
if they exist. The Vina is going to
show you the proxies. If they don't, it shows you
the original ones this way. It should be way easier for
you to edit your projects, especially if you're using very high resolution files like four K and slower machines. Okay, that's it for
optimizing your workflow. See you in the next lesson.
13. Workflow Hacks - Part 02: Usually we video
editing software. If you're going to
create a new project that is similar to
a previous one, you have to create
some sort of template, something that you can
just keep copying and repeating so that you always have your
assets inside of it. The Vinci actually has a
feature just for that, so you don't need to
resource to creating anything apart from
creating a new project. We're going to use
the power bins. Let me show you. Okay, we're
here in the added page. And you can see that I have here the text and those effects
that we created in some of the previous lessons I showed you that it was
possible to send all of these inside the media
pool so that you could re use it
the same project, but in another place. But what if I told you
that you can actually use it also in other projects? To do that, all you need to do is come up to here to
these three dots on the media pool and
be sure that you have show Power Beans activated. It's just going to
open this panel over here on the left in
which you can create all sorts of folders and categories that you
like and you can keep all assets that you are repeatedly going to
use inside here. For example, I have some
Youtube things here like logos, the name subscribe buttons, and all this kind of stuff. I have some sound effects, some film grain effects. These are all color coded here to make it even
easier to find. Okay, let's say that I
really like the way that we implemented that blurry panel on the left in one of
the previous lessons, this adjustment clip over here. What I can do is I can
bring this inside my Da Po, let's just drag it over
here to the media pool. Let's give it another name. For example, blurry panel. Okay, Now to be able to have this in every single project
I create in the future, all I have to do is drag this inside one of the folders that I have here
in the power bins. Maybe, let's put it in
the visual effects. And then it's just going
to be available over here and I can just drag and
drop it wherever I want. It's going to come
also with the name already implemented there. And wherever it appears, you can see that it's making
its magic over there. This is by far the best way
to keep assets that you're going to reuse in new
projects. Let's take a look. And I want to tell
you also where you can get some of these mainly in the folder called Youtube here on my Power Bins, you're going to be
able to see all of these assets related
to the channel. I've got this opening title, the lower thirds with my
name and the Instagram handle this cool subscribe
to Youtube animation. There's also this Instagram
Subscribe button. This here is the end card. You can find many of
these in websites like Pizza by Motion Array and Vato or just by Googling
Youtube free assets. But also if the
knowledge that you've got from the previous lessons, you might even be able to create some of
these on your own. I think the only one that
you can resource to what's inside of the venture resolve already are the lower thirds. The ones in which you put
your name and your Instagram handle or any social media handle that you
want to emphasize. There are some pretty
good ones here. All you need to do is
search for lower third. Now a pro tip about
the end screen. You can download it from
one of the websites that I mentioned before
or create your own. But you have to
keep in mind that Youtube allows you to showcase a new video for
people to click for up to 20 seconds by
the end of a video. Now, I've seen many
studies of people saying that just having
the end screen with the new video over there can be a little bit
of compromising the retention on the video
because no one's going to stay that long watching nothing. My recommendation to you is that you can use the end screen but also keep you talking at the same time
on one part of the screen, like this one I have
here, for example, in which you've got
the frame on the left where the suggested Youtube
video is going to pop over. But you can also
use this space over here to include a
talking head video. Just saying the final
considerations and telling people to click on this video and continue watching
videos on the channel. By now you have all
the information necessary to finish editing this video so that we can export it and upload
it to Youtube. The next lesson
we're going to take a look at the differences
between the venture resolve free and
the venture resolve studio about the features that might be useful to someone creating videos
for the Internet. For you to be specifically, so that you can decide by
yourself if it's worth it or not right after
we'll export the video.
14. DaVinci Free vs Studio: This is going to be
a very quick lesson which I just want to show you the differences between the paid and the free versions
of the venture resolve. So that you can decide
by yourself if these are features that
can really help your workflow or if they
don't really matter in this moment and you can just keep on with
the free version. I remind you that
I don't recommend you to buy it right away before trying the free version.
Just use it for a while. See if the software
works well Also on your system later if
this information, decide if it can be
worth it or not. Now let me show you some of
the features that I think are interesting
especially for Youtube. The first one is a feature
that is quite recent, which is the transcribing of the audio so that you
can edit with text. For example, let's go
up here to this file which is the talking head video that I was showing you before. Right click and go to
audio transcription. All you need is to
click transcribe, and Vince is going to analyze
the audio from that clip. And it's going to create
all of the text for you, but not only that,
you can navigate the text as I can
show you over here. And you can see that
while I select the text, the video is playing there
in the preview panel. Meaning that I can actually edit the video just by
selecting it here, putting the playhead I want
and just saying a pen. And it's going to add
that piece of video exactly from this text
inside the timeline. If this feature you don't
really need to put all of your clip in the timeline and begin cutting the
silences and everything. All you need to do is
take a look at the text, see which take was the good one. Select the text and it's going to insert the video
and the timeline. It's a huge timesaver, especially if you're
someone like me who makes many mistakes and never knows
which was the good take. Now another thing you
can do would be to select in and out points here in the timeline and coming up to timeline and create
subtitles from audio. What this is going to
do is exactly create subtitles with the transcript
that was generated before. And if you click here
on the subtitle, you're going to have the
complete subtitle panel over here on the right
in which you can fix anything that
is written wrong, that wasn't understood
perfectly by Da Vinci. And in the Track menu over here, you can change the
font, face color, the spacing, all kinds of character properties to make it look perfect the
way you want it. Just pay attention in
the export lesson, because if you want subtitles to be embedded inside the video, there's a special
box that you have to tick there to be sure that
it's going to happen. Now, two features that
are not connected exactly to the editing
process inside Da Vinci, but they are only present
in the paid version, are the possibility to
work with ten bit footage. Like for example, the one
that you're seeing here right now inside the software
is all ten bit. While I was creating
all the lessons for this class using
the free version, I wasn't even able to see these files
inside the software. They just don't appear or they are marked as media offline, like they don't even
exist Depending on the camera you have and the way that you're
planning to shoot, you might not be able to use
it with the free version. The second thing, which is
quite a downside also is that you cannot use your graphics
card in the export page, meaning that you're going
to take a little bit longer to be able to
export your files compared to if you had the paid version and using
your GPU at full power. Still, the Vince is quite fast. For videos up to 10
minutes for example. It's not going to
take that long. But still with the
GPU, it's way, way easier, especially if you
have heavy effects on it. To finish it off,
let me show you two features inside
the color page that I constantly use in my videos and only available
in the paid version. Here we've got this clip and
I'm just going to go over to the color page where we're
going to use this feature. Okay, the first one
is called Magic Mask, and you're going to
be able to access by clicking in this icon over here. What it does is that now it enables this pen
here on the preview, which I can use to
just draw myself here. A very rough line, then I'm able to
track it down here. Let's just press play
and let it do its magic. Now this part is tracked and
looks like nothing changes. But actually Da Vinci
now understands perfectly what is me and
what is the background. To be able to show you,
I'm going to have to add an alpha output over here. And connect this node
over there so that only the part that was recognized by the pen is
going to be shown. And Ola. This means that if we had, let's go back to the
edit page and I can duplicate this here
in the one below. I'm going to delete this. This means that now I
have one layer with all the image and one
layer with only me. If I wanted to add, for example, maybe some text and just
put it here in the middle, let's make it bigger. We would be able to position
anything we wanted, like text, for example, in between me and
the background. Making the videos much
more three dimensional. There are many other
features that could be used, but I'm not going
to go over them. These are the ones
that I think they are the most important ones for someone trying to
create Youtube videos. Use the free version,
have these ones in mind and later
decide by yourself. Okay, let's take a look at
the next lesson where we are finally going to export
your video to upload it.
15. Exporting your Project: It's finally time to
bake your video into a final product and
upload it to Youtube. Let's go to the delivery page
and see all the settings necessary to make it look perfect when you
upload it to Youtube. Okay, so first of all, we are in the added page and
what you need to do is tell the software exactly
what you want exported. So to do that, you have
to come up here to the beginning and you have
to do the in and out points. Let's say, for example,
that I want to export from here until the end of this part. Let's say this part over here. Okay, press You're going to be seeing that's very
clear from the top, what's selected and what's not. Now to export, you have to
come to the delivery page, which is this last one
here with the rocket. Now basically you've
got the settings on the left and the timeline down
here with all your clips, the export jobs
all cued up here. Now up here on the left, you're going to be able
to see that Da Vinci already have many different
kinds of presets, including one
dedicated to Youtube. All you need to do here
is just set a name, for example, Davinci
resolve Location. Let's choose where I'm
saving everything. Other basic settings
that it makes is exporting in full HD at
25 frames per second. The format is MP
four, it's fine. H 20064 is the codec. It's okay. You can leave all the rest a standard exactly as it is now. If your footage is four K and
you want to export in four, just click this
button over here. Once it's already,
all you need to do is press Add to render Q, it's going to pop up here
and then just go to Render. All another option
you have is also to upload it directly
to Youtube and you can even put the
title description. But these things, I would
recommend you to do it inside the Youtube studio because you have some other
features over there. They are going to
be very helpful. If you're ready, just click on Render All and it's
going to start processing and
exporting your video exactly to the place that
you selected up here. Now from my experience, this preset is more than enough to have a
very good quality. But if you want to set
everything manually, you can come to
custom export and just select all the
details manually. Here, if you want to choose another format, another codec, change the resolution, but mainly change the quality
of the final file. You can go with
automatic and just tell more or less the quality
what you want it to be. Or you can be very
precise and saying how many megabits per second
this export should have. If you expand these
two tabs down here, which is the advanced settings
and the subtitle settings, you're going to find some
extra information that can be useful basically
in the advanced settings. One thing that I
like to disselect is the bypass ring code impossible. I like to mark four sizing to highest quality and force
the bear to highest quality. This is just going to guarantee
that Da Vinci won't use any rendered files.
Export your video. It's just going to
do everything from scratch at the highest
quality possible. Down here you have
the subtitle settings that we didn't do for this file, but if we had we could
also put export subtitle. And you can choose if you
want it as a separate file or burned into the video so that it's part of the
final video itself. In this case, I'm
not going to market. We can just add it to the
Rendic and let it process. Now all I have to do is open your Youtube studio and
upload this video over there.
16. Conclusion: Congratulations, what a journey
we've been on together. We went super deep inside
the venture resolve, checking every single detail to make your Youtube videos pop. We talked about how to add text, how to scribble annotate, color grading,
doing voice overs, editing audio, music,
sound effects, how to improve your workflow. Picturing, picture,
screen recording, and much more, from the most basic to the most
advanced techniques. Now you have a set of tools that are going to
allow you to edit any kind of videos you'd like and upload it
to the platform. But I remind you that the
journey doesn't end here. I invite you to
connect with me in my social networks and tag me whenever you post something new so that I can
take a look at it. And also we have the
discussion panel down below where you can ask anything and I'll be more than happy
to help you guys. Also, speaking of projects, don't forget to upload
your video to Youtube as unlisted and put the link in the
project section below. This way, no one is going to
be able to find the video, only those with the link, meaning only me, in
the project section, so that I can give
your feedback. And also you get to ask
all the questions you'd like about the difficulties
you had while doing it. Can't wait to see what
you come up with. And if you're still hungry for more knowledge about
content creation, check my profile and
you're going to find many other classes on topics
that revolve around it. Also, for example, my class
about video production, in which I tell
you how to set up a small home studio to be able to record
videos that you'd like. And also my Cap Cut class
in which I'll show you how to add short
form video content, which is also useful for
Youtube with the shorts. All right, thank you so
much for joining me in this class and I hope
you keep learning, keep experimenting, and keep
creating until next time to.
 Enrico Luzi, Creative travel content