Transcripts
1. Introduction: This effect we will
create right now. Hi Jake and I, emotion designer. I want to introduce you to After Effects in a way
in which I've started. You could ask yourself, why should I learn
After Effects? First of all? Because
it's fun to be able to make visual
effects at home. But also, you can keep in
mind that most studios, TV shells, YouTube
channels, promos, intro, logo, animation
and other kinds of animations are made
using After Effects. This is why I invite you to
learn after effects with me while having fun
recreating cool effects. And then same time, getting
familiar with this software. This is why it's not
a problem if you are a beginner and don't know
anything about After Effects, I still can teach you how
to make this effect with the zeros skills will go through basics and we'll work
our way through it. I'll read your comments and will improve my future classes. I'll be happy to
get your feedback. With After Effects. You can do lots of things. You can even become next king or create your own projects. Read from those logos and more, possibilities are endless. I'll be happy to see you in
my class as also your result after following all the
steps, Let's get started.
2. Tracking of the Hand: I'm using Adobe
After Effects 2021. If you can see some panels which you can see on my screen, you can just go to Window
and enable it from here. For example,
character, character. You can also click here for the standard layout and you should see similar
balance to mine. So let's import our footage, go to file, import, file. This footage will be available in resource step to this class. So let's select it
and click Import. So let's create our
first composition. To create new composition, you can click here on this
icon degree in any position, or just simply select our video and drop
on this icon here, or on timeline, or on
this little icon here. Let's drop on timeline. As you can see, it's
graded in your composition with the exact same
dimension as this video. If we will, right mouse click here and go to
composition settings. We can see the resolution
of this video, which was published in 1920 by 108030 frames per second,
three seconds long. Let's set it so it would
start from 0 seconds. Let me give you a few tips how you need to
film your footage. So this effect would work fine. First of all, you need
to move your hand in two-dimensions in x
dimension and y-dimension, which basically means
that you need to move your hand just parallel
to the camera. Let me show you on this
example of the cloud image, which I've provided in
research stuff that is less. You can also drop it here. For example, you can move
your hands like this. You can also rotate
it like this. But you cannot move it
in three-dimensions. You cannot twist your hand towards the camera
because as you can see, it's flat image and this effect will not
look that believable. You cannot twist your hand like this because it
also will not work. So basically you want to move
your hand just like this, left or right or up and down, it will work fine. The next step, which we
want to do is to stick this image to our hand. So you can just drop this image into your composition
to have it here. For now, we will
not move it at all. Let me disabled it 3D capability because we will
use only in two dimensions. Basically we will
rotate as our hand. And let's also move this anchor point to this
point of this image. So basically this anchor
point is the point from which it will
rotate or scale. So as you can see, if
I'm changing rotation, you can just select your layer. Whereas our on keyboard to
see rotation and rotate it. By using this pen behind tool, we can move this anchor
point to this point here. And now if we will
rotate, as you can see, it rotates from this point, which is exactly what we want. Then let's select
the selection tool and let's stretch our footage. Basically, we want
to track our hand. So after effects
software would know how to move the image around. For this, we want to select our video and go to
animation track motion. This is basically why I drew
these markers on my hand. You don't actually need so
many markers on your head. I'm Joe, just in case if
some of them will not work. But these two can work fine. For better tracking, you
can draw them a bit bigger. So basically you want to
select this trigger point and just said to this position
of this X marker. And with the wheel on the mouse, you can zoom in and
our footage and change this outside square
and inside square. What the square means
with this smaller square, we want to assign what
we are tracking with this bigger square is the area where we are looking
for this little square. So basically, if our
footage will move, it will try to track
this point in this area. So you'll want to have
this bigger square, a lot bigger, but not so big because it will take
more time to track. With this one tracker, we can track only position. But as you know, I moved my
hand and rotate it a bit. So we want to check here
on this tracker panel. We want to click here on this checkbox to
enable rotation. So let's click here. And it gave us another
checker point. With these two tracker points, we can assign to
this marker here. We can track these
two positions and it will remember the
position of my hand. So let's make it this square
bigger and this as well. And basically just by clicking
here to Analyze forward, we can analyze our footage
and track it as well. Let's click it here
and see what happens. As you can see from first
movement of my hand, it loses this tracker. This is how we can fix this. We can just click here on
previous frame to go back. And as you can see, we didn't lose our tracker only
in these two frames. In cases where you will
move your hand too quick. You want to attract your footage frame-by-frame with
these buttons here, you can track, analyze
backwards and LAs forward. Let's look here.
Then we can just help our software
just like this. And by moving the
strikers to re-position, we can help Adobe After
Effects to track it better. And it only happens
when you have not that pronounced
tracker like mine. If you will draw
some bigger process, it will be a lot easier for
the After Effects to track. As you can see here, we
don't have any fs moment. By clicking allies
forward freeway frame. We can see that it
drags pretty well. Keeping in mind when you're
filming your own footage, to not move your hand too fast because it will
be harder to track. Finally, we can select
this voltage and press U on the keyboard
to see our keyframes. And as you can see
here at the beginning, we don't have any
tracker points. By clicking on this analyze
one frame backwards. We can track our footage
backwards just like this. And as you can see, it's
creating new keyframes. Now you can see that we
complete our trekking. And by the way, you
can just lift more sleek and drag here by this time courser to
preview our tracking. And it looks like
pretty good track. And at this point
we want to assign this data to null object, basically to the object
outside of this layer, because it's now stores in
this motion tracker effect. So for this, we want to go
to layer new null object. Let's select it. And here we've created
our Null Object. Now we want to go to the tracker panel and
click on Edit Target. And here we can select
our null object to assign this data to null object and
click Okay, and then apply. And also OK. And now as you can
see, we've created this null object which has all the data which we've
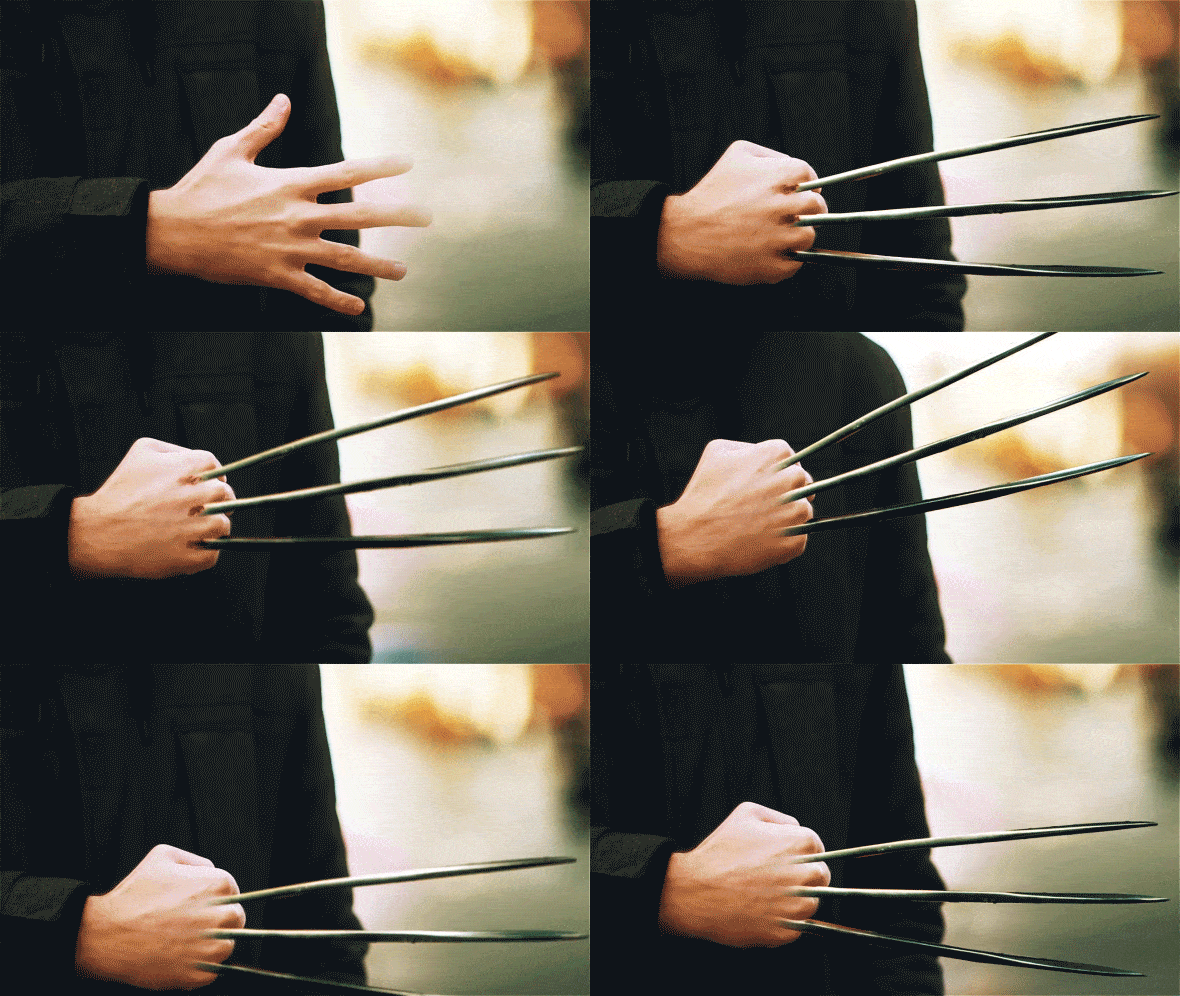
made with the trigger. Basically, this null object is completely stuck to our hand, which is exactly what we want. But we want to stick
this image to our hand. So at this point,
we just want to match our image to our hand. Just select your
Wolverine image. Breast are on keyboard to rotate and press S on
keyboard to change the scale. We want to make it bigger. Maybe 126 looks good. I want just to set it here
because it looks pretty cool. Once you've matched your image
to your hand as you want, you want to parent this
layer of the image to the null object
just by clicking on this pick whip to apparent here. If you cannot see
this pick whip, you just need to click
here to expand or collapse your panels to see
all the properties which you can get to
each of the layers. Let's let mostly on this pick whip and drag to
this null object to parent it. And I'll basically,
it will repeat exact same position and
rotation as this null object. And if we will scroll through, you can see it
stuck to our hand, which is exactly what we want. As you can see,
it's not that hard. So in the next video, I'm going to show
you how you can create a healing effect. See you in the next video.
3. Healing Effect: Now, before creating
a healing effect, I want to make a bit of animation to this video
because as you can see, I'm simulating lake this class are coming out from a hand. So basically what
we want to do is to press S on keyboard
to see our scale. We can also hold shift on
keyboard and press B to C also position and hold Shift and
press R to see also rotation. And let's drag it about here at the point
where we want to have our class completely out
from our hand. About here. Let's create a key frames. To create a keyframe, we want to leftmost leak on this position, on the scale and
on this rotation. Keyframes are the points
in time which remember, is the value of
certain properties. This keyframe will remember disposition of
property position. Also, this keyframe will
remember this appropriate scale. So basically, if we will drag by this time cursor to the left and change this position just by clicking on our image and
dragging to the left. Or by using these values, we can just move our image. And as you can see it, by
changing these values, it also created a new keyframe. Let's do the same for the scale. Let's make it smaller. I'm gonna change it
allows similarly this. And by the way, if you
will click on this icon, we will be able to
squish it like this, so it will fit in our hands. So I've set mine to 6242
and let's also rotate it. So it would look like it's
coming out in right dimension. Basically at this point in time, it remembers this
25s degree rotation. And if we will scroll
towards the beginning, as you can see, it goes from these values to these values. And this is the basics of the animation in
Adobe. After Effects. At this point, we
can cut our layer to these key frames so we will
not see it at the beginning. And also we can shut
off this null object, so it will not
distract us as well. Here we have this animation, but for more unnatural look, we want to click here on
this motion blur button and also here to enable it if
it's not enabled by default. And as you can see, we've added this a little motion blur, which will make this
animation look better. We can also press 0
number to preview this. And as you can see, it's
already, it looks pretty cool. And as you can guess,
this part we want to hide how we can hide this
underneath our skin. Basically, we want to
duplicate this video of ourselves by selecting and pressing Control D
to duplicate it. Or go into Edit, Duplicate control D
and move it on top. By using this pen tool, we can lift more slit
in it and create this simple mask around
our hand. Just like this. You can also leftmost
click and drag to create these curves
along our mask. Once we will finish, our mask, will close it here. We will get this mask on
top of our class effect. So if I'm going to click
on this solo button, as you can see, we've
just got it out. This part of the video itself. Let's un-solo this. And we can also press F on
keyboard to feather the edge. It will blend better
with our footage. If we will scroll with
this time cursor, you can see that it
doesn't follow our hand. So basically we want to
track this mask to our hand. Also. We can do this manually by
clicking on this mask to see this mask path and
gradient, this keyframe. Then skipping few frames and adjust the position
just like this. It will be the manual
way to do this. But luckily, we can do this
with the trach mask Fisher. Let's delete these keyframes. Make sure that your mask
is covered in this part of the hand because we want
to hide at this point. And then rightmost click on this mask and go to trach mask. It will open this tracker panel. And here we also have
these drucker buttons. As you remember, we can just go frame by frame or just
by clicking here. And it will go a lot faster. But we want to keep
checking it to see if it will lose our hand. It looks pretty good. But if it will
lose the tracking, you can also click
here to stop it. And then go to frame-by-frame
and adjust the mask and continue tracking just as we did with the
tracker points. So let's strike your
backwards as well. You can see it completely
stuck to our hand, which is exactly what we want. We can also change
this mask expansion. You just like this and
also this feather. So basically we
don't want to see these parts of the image. So don't go overboard
with mask better. Maybe let's keep it at 72 is
blends better with our hand, this mask expansion, we can control where this
edge of blending is. So in my case, maybe minus 19 works best. But you can play around
with these values to see what works best
on your footage. And at this point we want to precompose these both layers, which basically our image of the class and this null object to which our image
is parented to. Basically we would not lose
the tracking of our hand. So let's say these both layers and go to layer pre-compose. Let's call it class. Click here to move all
attributes and click Okay. Now as you can see, we have this image inside of
this composition. We can leftmost slipping it. To open it and see it inside. And as you can see, it's
still has this striking and it will come handy
later in this class. So let's go back to our
original composition. We can rename it these layers to keep everything organized. Let's select this layer on top, which is only our hand. You can click Enter on
keyboard to rename it. Let's call it maybe
a hint on top. And once again, if I'm going to click on this solo
button, as you can see, it's this hand which
basically covers our plus. This is our class and this
our original footage. This point we can create
our healing effect. So to create our
heel and effect, we want to duplicate
our composition, not here, but here. Basically, if we will
duplicate compositions here, it will not affect the
original composition. Let's say this class and
go to Edit, Duplicate. Let's rename it
this class position selected and press Enter, and let's call it blood and
click Enter to save it. Basically, if we will go to
class composition, NCHS, something here like disabling and open this blood composition, as you can see, it will not affect this original
composition. So basically, we have two
separate compositions, but with the same
kind of effect. So let's enable
it here and go to blood composition by double-clicking
on this composition. Here in blood composition, we are creating our
healing and effect. And it's pretty easy
to do because we just want to select
this rectangle tool, just leftmost click and hold. And you'll have
this dropdown menu and select this rectangle tool. Now we can just select
our class and left mostly about here and
create this rectangle. Basically, we want
to have this kind of short part of the class
to rotate this rectangle, we want to select
the selection tool, double-click on this
point of the mask. By clicking here
outside of the mask, we can leftmost click
and drag to the left. And as you can see, now
we can rotate our mask. So we will cut this
footage at the same size. At this point we can press F on the keyboard to
feather this edge. We can also click here to
Nazi this transparency grid. See about our footage. Here we can just set
our feathering to maybe 59 or 60 and maybe
make it a bit smaller. So let me quickly show
you how it will work. Let's go to our original
composition and drag this blood composition
inside here on top. If we will go to effects
and presets panel, wait for it to load up. And let's type fill effect. And leftmost click and drag on our blood composition
and release it. This will effect, we can just
colorize our blood layer. We would want to
have this kind of more deep red color
and click Okay. And it gives you a
now it looks like only our class are in the blood. And to fix this, we want to
go to blood composition. Let us go to effects and
presets and type your rough and edges leftmost slit
and drag it on our image. By the way, it's a good
idea to save your project because after effects from
time to time congrats, Let's go to File, Save As and save it wherever
you want on your computer. So as you can see with
this roughen edges, we can make these edges a
bit more, not that perfect. So let's change this
border, this scale, by association this border, we can change the
amount of this effect. But first of all, I
want to change this to the spike here because it
looks more interesting. And let's set border maybe 215. With this scale, we can change entire look of this
rough and effect. I'm going to set
mine to maybe 225. And if we will
scroll through it, we'll still have
this motion blur. And I don't want to have this motion blur on
the blood effect. So we can just disable
it by clicking here. And we can add some
lower by going to this effects and presets panel
and type in Gaussian blur, leftmost leak and drop
it on this image. Let's edit to four. And at this point we still have this animation
at the beginning. When it goes to the
left and scales down. Let's select this image and
press U on keyboard to see these key frames and make sure that your time
cursor is here. And then delete these keyframes. Because if you will set
this time precursor here, it will remember
these small values. So let's set this
time cursor here. Then select these keyframes and press Delete to delete them. And now we want to apply
new kinds of animation. We would want to
animate our border and fractal influence by clicking
on these stopwatches. Let's press U on keyboard
to see them here. And by setting this time
cursor here to the beginning, we can increase this
border to make our blood disappear and weight degrees
in this fractal influence, we can make sure that it
completely disappears. And at this point we can just select these both keyframes, press control C to copy, and about here, press
Control V to paste it. So basically this blood
will appear here at the beginning and slowly
disappearing right here. Maybe less spread these
keyframes a bit more. So this healing effect
will not go too fast. And now we can just go back
to our original composition and change this mode of
the blood to overlay. Because as you can see now
it looks not that cool. So let's change this
mode to overlay. And you can see it blends with
our foolish a lot better. Now let's press 0 or numbers
to see what we've got. It looks pretty cool. One thing which you
can do is go to blood composition and
spread it even more. If you want to have this
healing effect goes slower. And it may be a press F9, so it would be a
smaller till the end. And make sure that you
didn't make these values too big and just on the edge
before it will disappear, it will work better in this way. And to make this effect
even more complex, we can just duplicate
this layer, go to Edit, Duplicate and
apply some Gaussian blur. Just select it and
apply it on this one below it to maybe 30
to bloat it a bit. It would look like some blood is collected under our scheme, or maybe just play with this value to see
what works best. Maybe 25 will work better. Then we can apply an
effect called curves. Leftmost click and drag under the Gaussian blur effect
and go to alpha channel. And with this effect,
we can get this kind of feel like it goes
inside of our skin. I'm going to disable this layer. As you can see, it looks
like it's just on top. And with this layer below, we can make it look
like it goes deeper. And remember that with
this field color, we can just adjust the
color of our blood. Let's press on number
two, see what we've got. As you can see, it already
looks pretty good. And by the way, you
can move this blood a bit to the left by
going into block layer. And just by simply clicking
on this pen behind tool. And not by clicking on
this bankrupt point, but on image itself. You can move it around
a bit to the left. In this way, can move your blood healing effect
anywhere you want on your hand. By the way, you can
just press T on the keyboard to
make this opacity a bit smaller if you feel like
this effect is too bright. And the next video, I'm going to show you how to add this kind of look like these class
are beneath your hand. Cnn S video.
4. Blades Inside Hand: It. Now let's add these kind
of hints like this. Plus R inside of our hand
is pretty easy to do. We can just select this class and duplicate
it just by selecting and pressing Control D
to duplicate and drag it on top.
We will see them. Let's go back here where we would want to see
them inside of our hand. At this point, we can just cut this layer where we have
at the beginning here, then here a few frames and cut it to this moment,
it just like this. Then we want to
create another mask here to place it on
top of our image. Basically, we want to solve this original footage,
press Control D, and drag it on top and create
a mask around our hand. Just like this leftmost click
and drag to create a curve. Just roughly create
a mask around here and close it.
With this mask. We will also want to track it. Select this layer, press
M on keyboard to drag it. Right mouse click and
select trach mask. Let's just drag it frame-by-frame to make
sure it's stacked or hand. And said it this time, Coursera, at the beginning of
the tracking and drag backwards these few
frames and also got it. And now we can just
use this tract mask as a match to this glass
layer which will be inside. So let's press Enter on keyboard and rename
it to class inside. And change this track
matte to alpha matte, which basically means that this class will show up
only inside of this mask. Now we can just select this matte layer and
also rename it to maybe met and press F on keyboard to see are
the feather of this mask. And let's feather it. Because if we will not feather, as you can see, we will
have these crisp edges. So let's better a bit, maybe let's set it to 100. And let's click here two
times to open and see this mask expansion and shrink
it down just like this. So it will be only
inside of our hand. And about here, we can just select our class inside
and press T on keyboard. And up til the end, we can just set it
to 0 so it will disappear and blend
into our class. Something like this
will work fine. Now we can just select
these both layers just by selecting one of them, hold Control,
select another one, and go to layer pre-compose. And let's call it plus
inside and click Okey. And this point we
can just press T on keyboard to see our opacity, set it to a lower value. So it will look like it's
beneath of our skin. Maybe the value between
1525 will work best. And also we can just go to
layer, new adjustment layer. And to make this
look a bit more, by applying the effect which
called displacement map. Let's select it,
Displacement Map, select it and drag it on
the adjustment layer and set this displacement map
though our class inside. You can see we only
displacing here on our class. So we can just set this
value and maybe 24, not displace too much. And also we can go
inside of this class, inside this glass inside composition and apply
some Gaussian blur. And blur it a bit, maybe up to eight or ten. It will help to displace
this video a bit better. Just by changing this opacity. The class inside. We can make this displacement
look even more visible. And you can always go
to Adjustment layer and change these values. Maybe let's set it to minus 60 or something around
these numbers. As you can see, it's bulging out and looks even more interesting. It's up to you how much you
want to add this effect. So it would look
like it's inside. And as you can see,
it's also applying on top of our blood and
it's not what you want. So let's change this adjustment
layer and set it below our compositions,
just below them. This, and it will only affect this part and that will affect
our blood compositions. You can see it blends better and lose even
more interesting. You can always go to plus inside and change the opacity if you feel like it's too much. Let's press Zero on number
two, see how it looks. As you can see, it still
looks pretty fast. But at this point,
I don't like that. We can see these
parts of the image. So let's go to the
clause inside, and we can just load it out, select this clause inside. And let's apply
directional blur. Let's leftmost click and drag on top of this class inside. And let's increase
the lower layer. And by changing this direction, we could see in which
direction it will blur. So basically if I'm going to
set my blower to minus 92, I will get more
of the blower and we will not see those
edges too much, which is exactly what we want. And now we can see that
much of this edge, which will help
blur even better. You can always select your adjustment layer
and degrees the opacity to decrease this effect has also degrees effect
of the glass inside. In the next video, I'm going
to show you how you can add this subtle light
sweep effect across our image as also this
little color correction. So it will look even more interesting scene
in the next video.
5. Light Sweep and Color Grading: Now we can just select
our class effect, apply an effect called
CC light sweep. Drag it on plus here. And basically if we will
move around with this point, you can see that it creates
this kind of light-speed, which looks more interesting. First of all, we want to
change this direction. I'm gonna set maybe
it's minus 13. It will run across just
like this, this angle. We can also change the
width of this light sweep, as you can see, I'm
going to set mine to 75. And finally, we want
to add this kind of lay sweep motion about
here at the end, where it just appears
on our screen. Once again, select
your life sweep. So at this point, or just
by moving this first value, you can change this
position of late sweep. So let's set it here at the
root and the left side. We add a keyframe by clicking
on this center stopwatch. You can also press U to see this stopwatch about
here towards the end, we can just run at grass, looks just like this rotation, this first value, and you can see it will go through the here. You can always
change this space in between these two keyframes
to make it slower. Unless press 0 number two, you see how it looks. As you can see now we have
this little light sweep and it looks even
more interesting. By squishing these key
brings more together. We can speed up this
animation of the light sweep. You can always change this width if you want to
have a lot wider light sweep. Finally, let's add some
color correction to make it look even more
realistic and interesting. Let's go to layer,
new adjustment layer. And let's set it here on top, and let's rename it
to color grading. Let's also apply the
curves effect selected here and drop it here on our color gradient
adjustment layer. And with this RGB curve, we can set this kind of S-curve just like this to
add a bit of contrast. We can also go to
blockers by clicking here and drag it
down to introduce some warm colors and go to the red to add a bit of
more in the red curves. And finally, I want to show you how you can
remove these markers. Basically you just want to
isolate your original video. Press Control D to
duplicate it on top. Let's call it marker removal. And let's set it maybe below
color grading and select this rectangle tool leftmost
click and hold those. Select this ellipse tool and just create a mask around
one of the markers. Finally, we want to
track this position. So rightmost sleep
and select track, and just make sure to
check your markers. You can create a
mask for each of these markers and track it. I'm just going to show
on one of them to not waste any more
time of this class. Finally, when
tracking is complete, you can just go to
effects and presets and type Gaussian Blur and drop it on market removal
and increase the blurriness. And you can see it will
blur these markers. You can also press
M on keyboard, select and click here
two times to open it. And you can increase this
mask expansion if this blur, it doesn't cover your markers. And also you can
feather the edge. It will blend with your footage even better. Just like this. You can just remove all of
these markers from your hand. And if you want to introduce
more redness into your skin, you can also change
this to green color in your color grading
and drag it down if you want to have
your skin more red. This is before this, after LS press 0 numpad
to see what we've got. As you can see, our
blood is too bright, so you can just select your
blood and make it a bit more desaturated by changing these
colors and tweak it more. If you want. Feel free to
follow me here on Skillshare. I have more classes
for beginners on VFX. This class is really
great because it takes only 12 minutes and you'll
get really cool results. As also, you can check other
classes on text animation, animation itself and even
on a logo animation. Feel free to follow I post
sclerosis every week. I'm excited to see
your class projects and thank you for watching.
 M Jake, Lets Create VFX & Cool Stuff Together