Transcripts
1. Welcome: Well, hey, everyone.
Welcome on into my studio. My name's Carrie Sanders, and I'm an artist and a teacher, and I'm so glad you
stopped here today. We are going to be doing
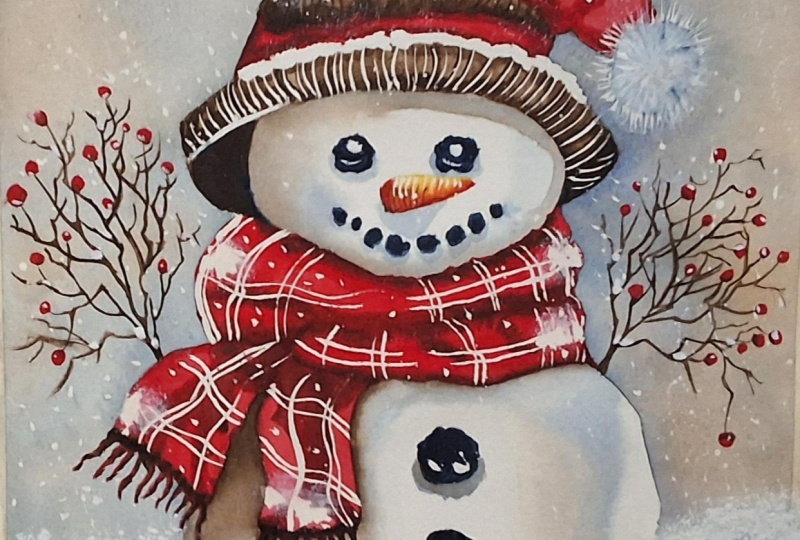
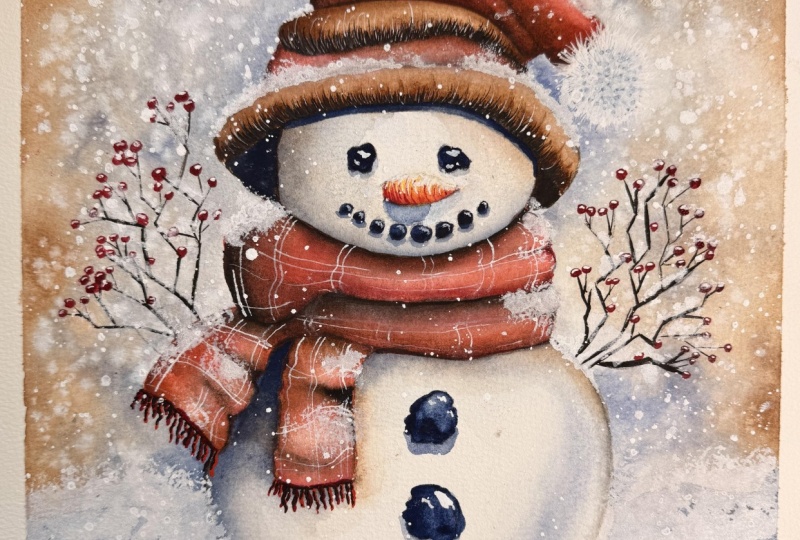
a class on this darling, magical snowman in
Winter Wonderland. This is a class that is perfect for someone who has a little
bit of painting experience. So beginners with
experience would be great on up to
experienced painters. If you've never painted before, take a look at some of my
other classes first and then come back to this one when you have a little
bit more experience. We are going to be doing
some great techniques today, such as wet-in-wet. We'll be doing some really
good snow techniques. We'll be doing washing and
glazing, highlighting, lifting highlights, shading,
we'll be doing splattering. We'll just be covering a
lot of wonderful things that will not only help
you in this project, but with all your
future projects. You know, I have been
teaching for many, many years and thousands of students around
the world by now. And the thing that
thrills me most is when I hear from students
saying, I learned so much. I learned this technique. I sharpened my skills. That is my goal as a teacher is to enhance
your experience, to enhance your talents, your abilities, and to make you feel good about
what you're doing. Also, I post my
classes in real time. So they might seem a little longer when you
look at the timer, but always remember
that you have the ability to speed them up. You can slow them down. You
can stop and start them. You are in control. You
have the ability to make this the best experience
as possible for you. If you are interested in taking any other classes with me, well, here's a few of my
holiday classes that are already available
here on Skillshare. All you need to do is go to the top of this page
and type in my name, Carrie Sanders and all
the classes that I have available. Will populate. And you can just
take a look through and see if anything's
of interest. And if you're interested
in future classes, well, here's the follow button. It's on this page of Skillshare. All you need to do is click
on that and you'll just get a little notification
whenever I pop out a new class, and it would be
really fun to spend more time together
in the future. Alright, guys, if you
are interested in taking this class right
now, then wonderful. Let's go ahead and get started together by moving to the
next video for supplies.
2. Class Project: Okay, my friends
and fellow artists, your class project
today is to complete one magical winter Snowman. And when you finish doing this, if you could take a moment
just to snap a pick and upload it into our class gallery on this page of Skillshare, it would be so fun for us to see what each
other has accomplished. You know, I'm a firm
believer that we as artists, do not get enough
recognition for our artwork. So it would be wonderful
if you would take a moment and share what you've accomplished and feel
really great about it. Give us a chance to click
on that little Heart. Celebrate with you on
your finished piece. All you need to do is look for this button on this
page of Skillshare. They make it real easy
for you to just snap it, upload it, and Walla
we can share with you. And no judgment here, nothing but love and appreciation for you
as a fellow artist.
3. Supplies & Pattern: Welcome into the studio. Let's review some of our supplies before we
get started painting. I have provided for you on
this page of Skillshare a PDF that you can print out like this and use
for the pattern. Or, of course, it's a
fairly simple sketch. So you could just sketch your pattern onto
your watercolor page. That would be fine. Just as a matter of info, I like to share the
things that I use. This is my very favorite pencil. You'll see me use it over and
over in all of my lessons. This is a black wing. This one happens to be Matt.
There's different types. But it's an excellent,
excellent artist pencil. And if you've never
treated yourself to one, I highly recommend just trying
one, see if you like it. I don't get paid to say that,
but I just really enjoy a good piece of
artist materials. So print out your snowman and then we're going to put it onto a piece of tracing paper. I usually use Strathmore
tracing paper. So just trace that on. And that's what we'll
use to go ahead and trace it onto our
watercolor paper. Now, in order to do that, I like to use either
trace down transfer paper or I'll use this
Sarl transfer paper. And the reason I
use one of these two is because they're
both wax free. This one's wax free, and
this one is, as well, which means it won't
leave any residue on your watercolor paper
as you're painting. It just dissolves with the
water, which is great. That's what you'd like
it to do so that there's no indication that you had
pattern lines on your paper. So I highly recommend that you find a wax free transfer paper. I'll be using trace down today. Then for my paper, I will
be using Blick premiere, cold press, 100% cotton. It's a 140 pound. And I highly recommend that you always use a good
watercolor paper, at least 140 pound or better. If you splurge anywhere, guys, it wouldn't be on brushes,
pencils, or paints. It would be on your watercolor
paper because that is made to enhance the hard work that you put into your piece. It's going to expand
and contract and work with the water
and the paint and do exactly what
you want it to do. It will lift when
you need to lift, paint out for highlights. And so 100% cotton 140 pound
is what I always recommend, and you will not
regret it, I promise. Alright, this is
my favorite tool, my handy i tissue. We will be using quite
a bit of this today. We'll be doing a lot of
wet-in-wet technique. And, of course, you'll
need some water and some paper towels
in a spray bottle. Let's review the
brushes really quickly. And today, I will be
using a stencil brush. If you remember the
good old fg art days, we did a lot of stenciling. It's a very stiff brush, but we'll be applying
a lot of snow. So you'll need something
that's flat tipped and stiff. And then for my rounds today, I will be using a four, a six, and then something larger for the background.
This one is a ten. You could also use a mop brush, but just something that's
gonna hold a lot of water, a lot of paint for
the background. And then we'll be doing
some fine detail work. So use what you have at home. I will be using what have I
got here? Mine are worn off. These are well loved
brushes, guys. So just a very
fine detail brush. This is probably
a number one, and this is probably a five out. And this is probably
a one or a two. So again, use what you have, but you'll want something
to do some fine lines. And that will be our
detailed work for our bushes and for the
work on his scarf. And so grab what you've got, what you're comfortable with. And let's review the paints
that we'll be using. We're going to be
using indigo, sepia. Burnt umber, cadmium red light, alizarin crimson, cadmium
orange, cadmium yellow medium. And then we'll be using bleed proof white comes
in a jar like this. You could use white gouache, but I prefer this because
it's much more opaque. So you can substitute,
of course, anything that you need to
out of your own palette. This is just what I'll be
using today in the class. So go ahead and
gather your paints, and we'll get started. Let's go ahead and
apply our pattern for those of you that need a little brush up
on how to do that. I've just placed the pattern where I would like
it on the page. I would recommend, you know,
a little space underneath a snowman if you have room
to put some snow down here. And then your graphite
paper, there's two sides. So there's kind of a
side that has a sheen that goes down on your paper. Just slide that underneath. And then I'm going to be using a stylus to apply my pattern. A stylus has a ball so that
it doesn't ruin my pattern. You could also just go ahead and use a pencil and
go over your lines. So whatever you would like to
do. But I'll use a stylus. I'll probably speed up
the camera this parts, you know, it's kind of boring to watch somebody's trace, right? Oh. So I usually just
do a couple of lines, and then I'll check
it to make sure that it's showing through.
And it's showing through. So we are good to go. And I'll finish applying this pattern and see
you in just a moment. Okay. And before I
actually pull it off, just like, look and see
if I missed any places. Alright. I'll see you
in the next video.
5. Shading: Alright, let's come
up. And again, let's kind of lumpy
bumpy that line there. But pretty dark right underneath
the edge of that scarf. We are going to come in
with sepia and darken it. We're just adding a bit of
shading here and there. Some more of this indigo
and hold your breath. Once you three go. Just see, I'm pressing on my brush, and I'm gonna bring it down. I'm gonna do it again. I want
it to look curved. Yeah. And I like that look,
that streaky look. If you want it more smooth, you can add water to it, and I'm going to add maybe some down here
that comes up a bit. That's fun. Okay,
this is dry now, so I have a water
spot right here. It's called a cauliflower
when it blooms on your paper, which is fine, but it's
not my cup of tea. So I'm gonna come in
with some indigo and just deepen this a little bit. I'm gonna sorry, I
got to make my arm funny so that you guys
can see on camera. I'm just gonna bring a little Yeah. Okay. I like that. Alright. Let's come in now and add a little sepia. I would say put sepia in your darkest areas that
you want to emphasize. And that's definitely
going to be like this is remember we have fringe that's going to come down. I'm keeping the side light. Pick up mostly water, just a hint of sepia. To add to this. Remember it's gonna
dry one value lighter. So you might be thinking, Oh, I did it too dark, but you
probably did it just right. Again, I want that
snow to stand out, so I'm putting something darker behind what's going
to come there. While we're still working
with these colors, let's go ahead and we've got this little spot we
still need to fill in. Just wash it in
wash all one value. Wait. Let's add a little more
shading over here, actually. I don't think we really shaped
much of a space over here. I'm going to soften
that with water. Okay, step back. Make
sure you're happy with your background
and your shading. I have gone in and
reapplied the face. So next, we're going to go
in and bring in some of this indigo blue and apply a
shadow underneath the nose. And it's going to follow the
shape and only about halfway across underneath that
carrot and then bring it down kind of in a triangle. And again, we're working on a bumpy, textured,
snowy surface. Look. That's the look
we want it to have. And this is a hard edge shadow, so it's not gonna be soft edge. And just kind of bring
that down like so. And yes, it looks funny like
you've given him a mustache. But trust me, when you when you get the
rest of it put in, it's gonna look great. Okay. And we're gonna do
the same thing actually with these buttons just gonna
start about halfway up. And these buttons are
a lump of coal, right? But they're gonna
stick out. So we're putting a little shadow
underneath them. Alright, if everything is dry, we can actually apply the eye. I'm using really dark indigo. If they're dry, you can go ahead and add these
buttons, as well. Have fun with this guys.
Use your imagination. They don't have to be
all matchy matchy. They can be different
sizes and shapes and whatever you want to do. So, same thing. Cute. Alright. Alright, let's pull out some burnt umber
and some more sepia. Okay, I'm using
my number for it, and I picked up burnt
umber on my palette, and I'm just going to
wash in this band. Oh I'm intentionally making it different sizes on
one end, then the other. It's kind of scrunching down
with the hat. There we go. Now, while that's still wet, let's pick up a
little bit of sepia. And let's just drop
in. When I say drop, I mean drop. While it's wet. Let's just touch in. This is going to add a touch
of texture and shading. M just kind of want to keep a little
more light in the center. Great. Okay, and
let's do the brim. Remember that we're going
to add snow here and there. So don't be picky. Don't be hard on yourself. This is sepia. Notice I'm bouncing up and down, I'm just literally touching a little bit of pigment to it. So this forms the
shape of the face. Awesome. Alright,
let's let that dry. While that umber is drying, I'm just picking up the lightest lightest amount of indigo, just a tiny bit. Just gonna add a bit. That's too much. Uh add some
more water. There we go. Just a tiny bit of
shadow underneath that eye like we
did the buttons. Because we're going
right on white, the tiniest amount
will be plenty. And I'm gonna add just
a hint underneath these larger pieces here. Yeah. You can almost just touch them
with water on your brush, and that pulls some
of the paint down. But see how that
adds just dimension. When you put a shadow
under something, it takes it from two dimension
to three dimensional from flat to just showing
a bit of shape. And let's go ahead and add
just a touch of sepia to deepen the shadow right
directly underneath that, 'cause these buttons
are pretty big. There, I like that. Okay, and I want to deepen this just a touch right between
the scarf area. It's gonna be this will be one of our darkest areas right here. Yeah. I like that. I'm gonna soften
this open area with water, water on my brush. Yep. And I'm gonna do it. This is also gonna be a
really dark area right there. Right here. Okay, I'm just gonna soften that a little
bit with water, as well. Sorry, I'm gonna have
to go shut my window. I'm getting quite a
shadow all of a sudden. Okay, let's let all of that dry and I'll go shut the window.
6. Hat & Scarf: Okay, everything
is completely dry. I've come in with
my number four and some fairly dark sepia. And I'm going to start
up here on this band. I'm going to add along
this bottom edge just a little indication of
shadow that's really deep. It will enhance.
This whole piece is a matter of contrast,
lightest lights, meaning white paper showing
through to dark darks, meaning the coal on his face
and these dark shadows. And it just makes it
pop. It's really fun. So be brave, be bold
and have fun with it. Now, see, right
now, it's like, h. But when we get
everything else going, it's gonna be great. It's
gonna look really good. Now, I'm going to add just a
little bit of curve to it. I'm keeping the
sender pretty light. I like that. Okay, let's
come down to our bottom one. And I'm not coming all
the way to the top because that the top
would be lighter. While we're over
here, we might as well go ahead and fill this in. And maybe yours is dark
enough and you don't need. So you assess what
your needs are here. I don't want it to look
like blades of grass. Well, guys, I apologize
for some reason. My video camera didn't
tape me doing the nose, so I have a cute little nose here that we're
gonna do together. Go ahead and start by washing
in the cad yellow medium. And then we're going to take
some of the cad orange. While it's still
wet, go ahead and add some on the bottom edge, which is kind of going
to be our shadow, and it should travel
up a little bit. And if not, you can help
it along with some water, but it's traveling up, but I'm
going to soften that edge. I don't need it to
be a hard edge, a hard shadow because
it's a rounded surface. So Okay, so we've got our
orange. We have our yellow. Let's pick up a touch of our cad red light that we'll
be doing the hat with. When you see me touch my paper, I'm just pulling
some of that extra water off of my brush. And I'm going to start
with just a light touch. This red a little
goes a long ways. Slow and go is what I say. Just take it gently. This is just water
on my brush now. I'm going to bring some of that red just on the
underside of the nose, and I'm going to leave some of that yellow showing on top. Cute. Alright, so go ahead
and put your nose in. So now we're back together.
That really scared me. I thought, Oh, boy,
how far did I paint? Fortunately, it
was just the nose. So let's go ahead and
move forward together. I have pulled up
Lizarn Crimson and cad red light on my palette, and we are ready to go ahead
and do a wash of the hat. This is going to be
watered down and remember, a wash is all wind value, so you don't have
to worry right now about lights and darks. We are gonna put some snow
on it and some shading. Okay, and let's go ahead and add it here. Great. Now, I'm going to lift out
just a little bit of color, so I just have
water on my brush. And just like on the top, where it would be fairly light. We may add some snow up there. Can you see how if you
just take a wet brush, press it there, and
then put it on tissue, you're lifting off a
little bit of paint. And give me a little more
right in the middle. Not too much here,
'cause that's gonna be kind of a dark.
It'll be dark there. Great. Okay, let's let that dry. And now let's pick up some
of our l Lizarin crimson. So here's where we're
gonna come in and we're gonna start developing
our shading areas. So we'll come along
the bottom edge of that brim and add some creases. Remember, it's gonna
dry one value lighter. This one's gonna be mostly dark. So I'm putting a thin
shadow above that brim. Using the tip of my brush. Let's let that dry. And now I'm going to
come into my sepia, and I'm just going to deepen
some of these shadows now. Not all of them. I want some of that lizard crimson
to show through. Let's do the bottom hedge now. Kind of like a dark
dark right there. Remember, we're kind of
going for that rustic, antique kind of fill
with all this sepia. Now, with the scarf, we're gonna start with our underneath
pieces and build outward. So we can go ahead and
start probably with this one or we could maybe do both of those
at the same time. So let's let's go ahead
and just wash those in. I was making that too smooth. We need that to be lumpy bumpy. Okay, I'm gonna bring
it up underneath there. And we're not going to
add the fringe until very last because those thin
lines can smear easily, and there's not much recovery when that happens,
so we'll do it last. Okay, let's do this one as well. Let's let that dry. Let's
come into our Elsbn crimson. This is completely dry. Gonna add some shadow
underneath you. The scarf edge here. Yes, a couple of folds. T up a little sepia. If it's still wet
enough, you can do it like I'm doing
while it's wet on wet. I'm just deepening,
letting some of that lazarin crimson still show through, just like
we did up here. I'm not doing a straight
line this is fabric, right? So we're just preparing
preparing for the fringe. Great. I'm gonna go
ahead and try mine.
7. Shade Hat & Scarf, Add Branches: Okay, this is dry, so I don't have to worry
about smearing it. I'm coming back
into cad red light. And I'm gonna go ahead
and do this next level. Great. Picking up
some lazarin crimson. Let's just come in and add
our first layer of shading. It's gonna be right
on top of this, which is actually underneath the fold of the
upper one, right? Gonna bring it down here and
there, just a little bit. Not gonna get too carried away. Just a little, so it's not even. Okay. And then I'm
gonna pick up some of the sepia. I'm
gonna deepen this. This actually gonna
be pretty dark right underneath the upper
level of the scarf. It's where it tucks underneath. It'll make sense when
we do that top piece. Well, this is wet
and wet. I'm just gonna go ahead and
let that spread. That's why I'm just
doing a tapping motion, just touching that in,
and seeing where it goes. I'm using the tip
of my brush now. I'm just touching. Just
kind of judge it down. Good. Alright, let's
go ahead and we can add in our upper
portion of the scar. Ideally, we would
wait for that to dry. So go ahead and dry
it if you're more comfortable or just
avoid touching it. And I'm just
throwing it in here, but then I'm gonna come back and I'm gonna make this edge. You got it. A little lumpy, bumpy. No straight edges. Now, mine is still wet, so I'm gonna be really careful. You know, I'm not
too worried about having a little
bit of white show, 'cause I just don't really
want to touch it right now. Don't want to touch
that lower portion. Gonna let it dry first. In fact, I'm gonna go
use my hair dryer. Okay, picking up some of
the silzarin crimson. You guys got it by now, right? Good. Okay. And I'm gonna go ahead and it
up a little bit here. I'm gonna leave a
nice highlight there. Okay. Yeah, let's
bring in some sepia. You're gonna have a nice
shadow underneath. The neck. Do Snowman have a neck? What's the anatomy of Snowman? Okay. This looks good. A
nice shadow under there. I'm using the tip of
my brush because it's wet-in-wet and I just
want it to blend, but I'm blending
it with intension. I'm going to curve
this a little bit. I'm gonna leave that
highlight right there. I'm leaving the
highlight right there and definitely in the middle. So it might act like there's
a little crease right here. Okay, remember this is gonna
dry one value lighter. So you can always come
in and make it darker. I'm just gonna darken it
up a little bit right now. I want that shadow
underneath his neck to be prominent. Good. Good. How's it going, guys? All right, let's let that
dry and see how we're doing. Okay. I have pulled out. This is a number two. It's a
liner brush, a script liner. You can see how long
and narrow the tip is. We're going to add in his arms which are actually branches, using our sepia,
which is watered down to almost an ink
like consistency. And if you haven't
done branches before, the reason we use a
long script brush is so that we can kind
of flick our brush. So let's say we're coming
up and you're just going to want to start jiggling it
and literally flick it. And then you're
going to come back and where you have
a joint like this, you can pick it up
and flick it again. And that makes your
branches look natural. Okay. So don't be nervous. If you haven't done
it before, you know, practice on a scrap paper, and there's really not a way
to go too wrong with it, so don't be too
nervous about it. It's gonna be fine. And you can add as many or as few
as you would like. You can use my reference photo, which is on screen for you. This wiggle, wiggle, flick. And then I'll pick a spot
that's kind of prominent. And now, if it skips like
that, good. That's great. We can put a little
pile of snow there, and it'll look very
natural and perfect. We're also going to come
in and put some berries, so that'd be a great
place for berries. So again, you're not
gonna mess it up. You're gonna do just
fine. I'm gonna make this one a
little bit thicker. So down towards the bottom, where we're coming
out as a tree branch is, it's thicker at the base, more narrow at the top. Connect that one. Okay, I think I'll
leave it there. Now, I only have
one branch here. So actually, maybe
I'll add the second one and just kind of blend it in so that
there's more than one. You do you and have fun with
this, do what you like. Okay. And let's do the
same thing next to it. So this one I'm gonna
have down here. You know, if you wanted
to, you could have branches coming
up from the snow. This would be the
time to add those in. But I'm going to keep them
focus on my snowman today. While we're working
with our browns, I'm switching to burnt umber, which is the lighter brown. And I'm using a very fine brush. This is a ten ought. So you can see it's just a very you can see it better here. It's a very fine tip brush. And I'll show you on the demo
that we did of the nose. We're just going to come in
and add some curved lines. We're going to give some
dimension to our carat, and I'll start some at the top, and I'm going to add some that start maybe midway through. And then I'll have some others that go all the
way to the bottom. This just adds a
little dimension to our cute little carrot nose. Now, if we had just done a
line that goes all the way, it would look like
some kind of a cone, and we want it to
be more natural, more carrot like, so to speak. So that's why we're doing short strokes of
varying lengths. The key is just to
make sure that it's curved so that you're
giving it that dimension. And to use a really fine
brush. So use what you have. Wow. I was holding my breath. Are you holding your breath? Now, I'm making
them quite curved and staying very low to
the bottom side as I get closer to that tip. Good. That's good enough.
I think. How to do. Alright, I've picked
up my five ought, and I've come into
cad red light, and I've built a little well
of paint on the side here 'cause I want it handy as
we add in our berries. Now, if you look at my pattern, I did very few berries. I didn't want them to
take over or become, you know, too prominent. But you do you if you want, I just love berries, and I want to do a
whole bunch of berries, like a bunch of grapes, do that. Do what makes you happy. Every once in a while,
stop and step back, take a look, see
how they're doing. Like Remember that
we're gonna come in, and we're going
to add some snow. Notice I'm using quite a bit of pigment so that they're strong. Please don't try to
make them perfect circles. Just go with it. Okay, I'm going to
step back six feet and see how I feel and
you do the same. If you need to add
more berries, do so. If we're done,
let's let those dry completely so we
don't smear them.
8. Finishing Details: And making sure that your berries are 100%
dry, no shine to them. They're completely safe.
Let's come back to our teeny tiny brush and
pick up some indigo, and just here and there, you don't have to do
it on all of them, but just here and there, add
a little bit of a shadow. These are so small. Don't worry about doing a hard edge or a soft edge or
just basically put a little crescent Good. Now, I didn't even
do every berry, so don't feel like you need to. It just enhances the overall impression when you look at it. Also, when I stood
back six feet, I didn't feel like I had
enough depth in my scarf. So I came in with more
sepia just right underneath the neck and right in this crease between the
upper and lower layer, and maybe a teeny
bit right here. Now, you might look at
this right now and go, Oh, my gosh, it looks terrible. But remember, couple of things. One, we wanted it to
look like it was fuzzy, so that's why we don't
have any hard edges. Two, we are going to come in with plaid markings
over the top. We're gonna do a little bit
of splattering of snow. And so it's all going to come together,
I promise it will. So if you need to
deepen yours or not, this is a great
time to take care of that before we move on. So, right, let's let
our berries dry, and then we're going
to pull out our white. Before we use our white, I highly recommend that
you change your water out, so you're working
with clean water because white tints very easily. And if you're using, you know, pink tinted water or
blue tinted water, it's going to affect your snow. I'm using a double lot liner, so it's a very thin liner, and I've thinned down the white, and we're
going to come in. Let's start with our snowball on the end of his hat
because it'll just give you a good feel working
with your white. And we're going to
start by just adding some little furs,
little fur pieces. And we will stipple the
middle of the center area, but we still want to have
this underneath it to give it some thickness
and some texture. So notice I'm having
the strokes go criss crossy every which
way. They aren't just gonna. It's not just a porcupine
that sticks straight out. Okay, so I start with the
outer edge like this. And now, aren't you glad you
put that blue underneath it? You can make it as fluffy
or not fluffy as you would like. Love that. Okay, that's about as many
as I'm gonna go on that. Okay, carrying on with the same thinness of
paint and the same brush, I'm just gonna add
some curved lines. Remember, we're gonna
put snow over this, so don't get too worried. I'm gonna add a few
stripes, so to speak. They're basically, I don't
know, threads of highlight. The important thing is the curvature that way and this way. M And I'm going to do the same thing on
the brim of the hat. I'm not going to go
underneath the hat. Okay. I like that. How'd you do? And now I'm
gonna put a few on his nose. This is where I'm
going to go a little heavier on the tip of his nose. This is so fun. This
is the fun part. Oh, I love putting
in these details. So for the eyes, I just like
to touch them a little bit. I don't I don't do lines. I just tap, tap, tap and maybe a little bit lower.
Maybe some there. Kind of like that. All right. Moving on. We're just going to keep moving
down a little bit. Let's take our white, and
we're just going to touch a little highlight on
some of the berries. Just make some
sparkle a little bit. Who doesn't love
a little sparkle? Now, with white, I have found
it doesn't matter if you're using this Doc Martin or if
you're using white gouache. I rinse out my brush frequently, so I can keep a really fine
tip on my little brush here. Let's move over to the scarf. And this take a moment to really look at the
direction you're going. These little indicators of a plaid scarf are just
that. It's an indication. We're not going to add
some serious plaid lines because it would just
overtake the snowman. But that being said,
we want to kind of be careful of, you know,
what we're doing. So I'm gonna do this in the air. So we're gonna come
down and down. It's almost like a boom, boom, because follow the contour of the shading that
you've already applied. So you've already done the work. We just want to enhance it now. There. And I'm gonna do probably
double line plaid. And I'm not even gonna put two
plaid together everywhere. I don't want it to be
all matchy matchy. Is that a technical
term? Oh, you guys. Yeah, just like that. Oh, that's fun. How'd you do? Were you holding your breath? Take a deep breath. Okay, here we go. Let's
do this bottom scarf. And now, here I don't want
to start where we ended there because the scarf
is folded over, right? So I'm gonna just
start somewhere else. All right. And then
we want to do our we still haven't done our Fran I told you we're
gonna do that last, and we will do it last.
Trust me on that one. When I paint these for a class, I paint three or four of them just to get it the
way I really like it. And so I kind of learned the hard way in order to make
it easier for you guys, so Oh, fun. Oh, you guys, he's turning out so cute. I love it. Alright, let's do just a little hint of a highlight on these buttons just because
they're so big. I'm not going to do
the ones on the mouth. I think they're
just right. I think we are okay to go ahead
and work with our snow. Let's let this dry first. We don't want to smear anything, and then we'll get a larger
brush and work with our snow.
9. Snow: And I've switched to my number six round
and I'm picking up some white for our snow. And let's start in the back, so we just kind of get
a fill for things. Jog on there, meaning
we're just gonna pat. My brush is going up and down,
this up and down motion. And let's put some on here. Now, I'm pushing hard
on the bristles. I'm letting the brush
do the work for me. And you're like, Kerrie,
I don't want stripes. No, we don't want
stripes. So I'm gonna pick up a
little bit of water. Oh Kind of bounce it. And now I just have
water on my brush. And I'm just gonna
bring it down a little bit. Soften that edge. Nice. And it's the name here. Maybe I'll bring this up there, so it looks like
it's part of that. Just kind of have fun with
it. See where it takes you. Let's just keep
going. Maybe I'll have a pile up in the corner. And now you can see how
our beautiful indigo is enhancing our snow. We are still gonna come in and stipple it with a
different brush. I'm gonna add a few streaks
over here in the open. Again, notice how
I'm pushing down on the brush. I'm not
using the tip. I am pushing down and letting
that bristle do its job. Okay, we're gonna let that dry, and then we're gonna come in
with our stippling brush. I'm using a three
eighths stippling brush. You can see it has a flat top. It's a thick bristle brush. They come in all
different sizes. We used them back in the day
for folk art quite a bit, and, you know, when we used to do it
on the walls and stuff, am I telling you my
age? I don't know. Anyway, pick up
some of that paint and work it into your brush. And then sometimes you might
need to pull some off. I don't think your
tissue will hold up, so you'll need something
a little bit thicker, a paper towel perhaps. But you can pull
some of that off. Now, you don't swipe with this like a brush, you
go straight up and down, and that's what this
brush is meant to do, but it will give it a
beautiful, snowy look. Can you see that? And that's
what we're going after. So you can do this
everywhere or a few places. I'm just going to enhance, like, the top surface here. Oh, I love that. Just makes
it look fluffy and frosty. I'm gonna do some here and there around the base of his body. Just do it just kind of here
and there for me, anyway. I'm not doing it solid. Good. Nice and snowy. Okay, now I'm going to come
into this smaller brush. And I'm gonna put
some of the snow on the branches and his scarf. And so let's start just so
we get a feel for things. Let's start on the branches. Just kind of wherever
you had a break in your branches or do you
have a break right there? Or you can create one,
I guess, with the snow. Okay, now, let's just start at the top and
work our way down. So obviously, there's gonna
be snow on top of this hat. And I'm just going to
pounce some in the center of this little snowball thing. Okay, now, I'm going to put
some on the brim of his hat. Now, when we're getting into
these dark colors, guys, be careful because if you do
it too strongly in one area, your brush will lift up the dark color underneath
and blend it with the white, and pretty soon
you've got pink snow. Rinse your brush frequently. I think I may just
take my number four. And I might just add a little. Like, snow is a little thicker right there.
And same thing here. Like this white will pick up the pink underneath it, the red. Yeah, I like that.
I like the mixture. And then I'm not gonna
do a lot on the scarf. Me a little bit in
this highlighted area that pokes out a little bit. I like to soften
that a little bit. If you have blobs like
I do here and there, you can soften
those a little bit. All right. Okay, I picked up my five at
and some cad red light, and we're going to
add the fringe. You know what that means?
We're on our final step, guys. Yay. So the fringe, we want it to look
flowy and natural, so no straight lines. Okay. And space them apart because we're gonna come in with several
different colors. Make some short,
make some longer. Okay. Now, let's pick up some Lazard crimson,
do the same thing. A Lazard and crimson can
be quite transparent, so make sure that
you're coming in thick. Okay, good. All right. Now, let's pick up some sepia. Yeah, we'll just
go ahead and now, I'm just going to kind of bounce this so that it's just
like here and there, as if it were if it's curved, it's gonna have some highs and lows, right, with the light. It's almost like a dotted line we're putting in, but
they aren't straight. But when you get it all
done, it looks great. It's like, Oh, it looks real. Good. Now I'm going to emphasize
just this bottom edge, same thing, kind of a
dotted here and there, where it attaches to the scarf. Can you see how that just adds a nice little touch of depth? Good. Okay, great. Let's let this dry and
step back six feet again and see how we're
looking. All right. The last thing that
we are going to do, and this is if you would like, is I'm picking up some white. I've thinned it
down quite a bit. I'm using my number four, and I'm just going
to add a little bit of snow, just a light dusting. And since this is dry, it's not going to spread into big snowflakes like
it did up above, but I still want
just a little bit of character down here. And if you want, you could
even lightly add some. So it's across the front of the red scarf
and the red hat. So it looks like it's snowing, which I really like that look. So I'm going to
leave it at that. Let's let this dry, and I'll
see you in just a moment. Okay, well, I stick
back six feet, and I think we are ready to finish this piece
by signing our name. I am so proud of you. I hope that you are
proud of yourself. You are talented. You are brilliant. And not everybody can
pick up a paint brush and makes the magic happen on their paper like
you have today. So I hope you pat yourself on the back and look at
the mirror and say, I got what it takes,
'cause I know that you do. So good job. Let's go ahead
and sign our name together. Congratulations, guys. Alright. I'll see you in the next
video where we'll wrap up.
10. Congratulations & Bloopers: And well, congratulations, guys. You did it. You have finished
your magical Snowman, and I hope it was a great
experience for you. I hope you had as
much fun as I did. You know, if you felt like
it was worthwhile to take this class and you know someone else that might have some
benefit from taking it, would you mind just looking for this link on this page
of Skillshare and share that with your
friend and both you and your friend will benefit
from Skillshare, which is kind of a cool
thing, but it would be fun to have them take
this class as well. Also, if you wouldn't mind taking just a moment
to snap a pick of your project and
uploading it by looking for this button
here on Skillshare. And then we can go
ahead and click our little heart
and leave a comment and nothing but love. Share congratulations with
you on a job well done. If you would be interested in taking some more of my classes, I would love to spend
more time with you. Here's a few samplings of my holiday classes that are already here loaded
on Skillshare. All you need to do is go to the top of the page
and type my name in Carrie Sanders and
everything that I have already here on
Skillshare will pop up. And maybe you would see something that you
would like to take. And if you would like to click this button, the Follow button, you'll just receive a
little notification when I pop out a new class, and that might be of
interest to you as well. And again, I do
appreciate your time. I know there's really
great teachers here on this platform, and so I'm very appreciative when you spend
some time with me. If you would like to
know more about well, the world of Carrie Sanders, you're welcome to
go to my website. It is sanders.com, and
Insta Carrie Sanders Art. Alright, guys, I think
it's time for us to see some bloopers. I mean, Merry Christmas. Take that out. That's terrible. Mm. What? We're recording?
Cut. That's a cut. Um, um, dumpy, um, um. Okay, here we go. Um breeze. Lights camera action. I'd rather be behind a paintbrush
and an easel. Okay, guys. Time
for the good times. Here we go. Umpy, dumpy,
something fgFrosty. Go. Here we go. 543d1. If you would if you wet him, I say, H if you boom. Kerrie Kerrie, think.
 Kerrie Sanders, Artist, Teacher, Creator.