Transcripts
1. Welcome: Well, hi, everyone. Welcome
on in to my art studio. My name is Kerrie Sanders, and I'm an artist and a teacher, and I have been
teaching for many, many years, thousands of students by now
across the world, and I'm so grateful that you
landed on my page today. This class is all
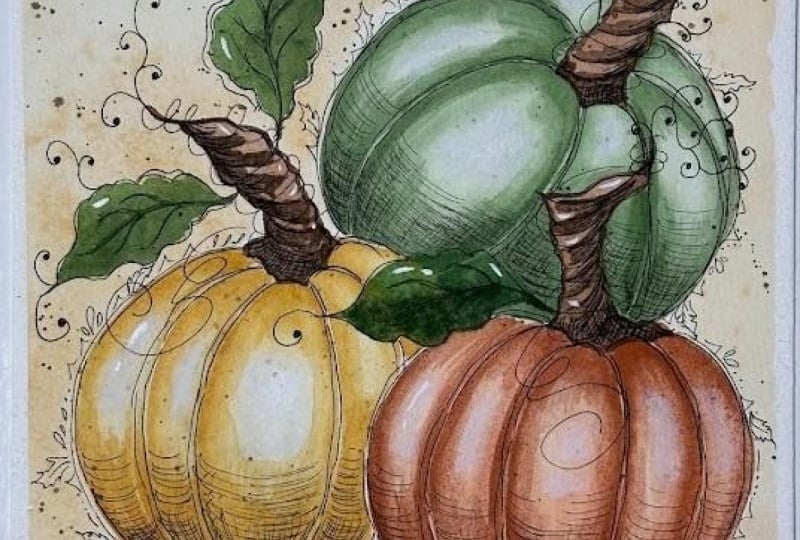
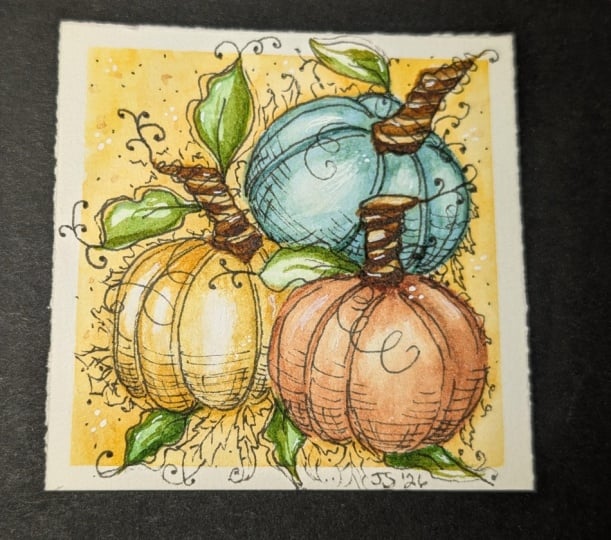
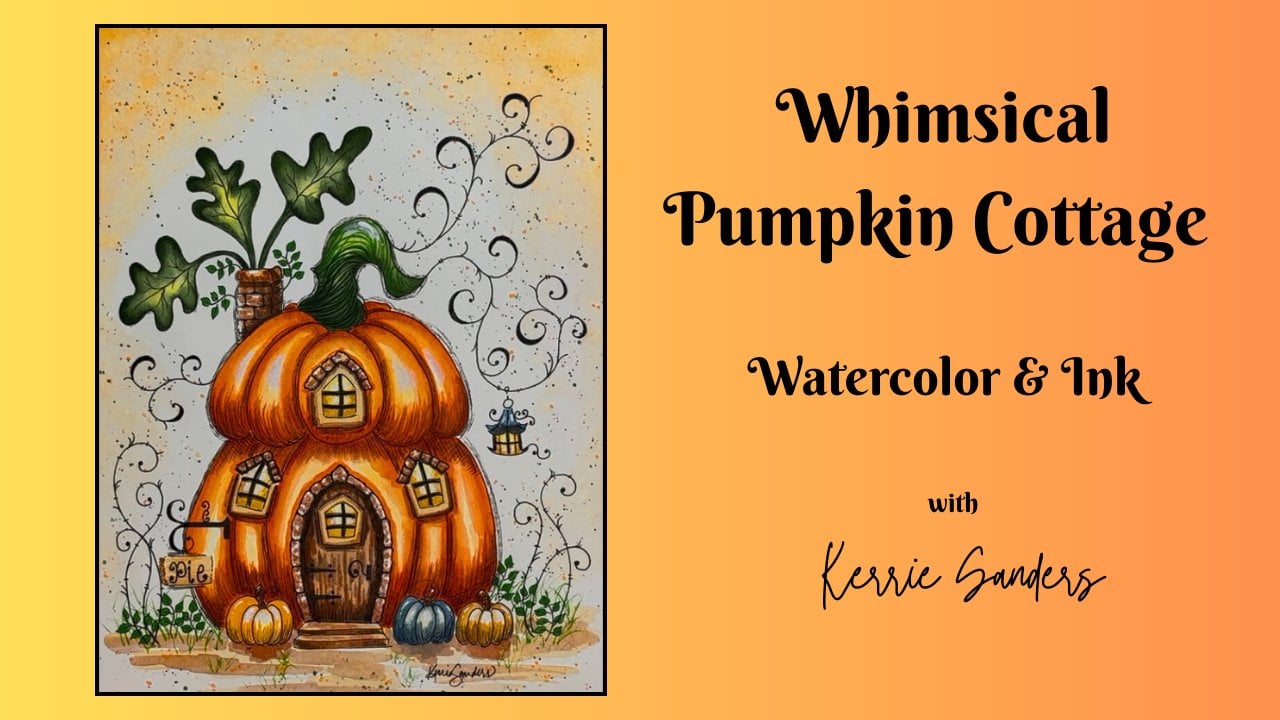
about pumpkins. We're gonna have some fun doing this little pumpkin patch. It's done in watercolor and some fun inking at the
end that ties it all together where we do lots
of doodles and learn some fun techniques that will help you with
not only this class, but with your future doodling, your sketchbooks, your projects. And it's a lot of fun
to do. It's relaxing. And my hope as a teacher always is to teach
you something new and help you sharpen
the skills that you have and have a few
laughs along the way, too, I'm just a normal person
like the rest of you. Ah. Today we're going to be doing some techniques such
as washing, glazing. We'll be doing wet on wet. We'll be doing
highlighting and shading. We'll also be doing
some splattering, my favorite thing
ever, and we'll be doing some great inking
techniques, as I mentioned. You know, I've been teaching
for many, many years. I teach online. I teach through an app that I created
and launched this year. I have taught classes in person. In other words, I
just really love connecting with people like
you that love painting. I love painting, and we're
just a happy bunch that we can help each other with and
enjoy that energy together. Something that I
do with my classes is that I upload
those in real time. And what that does, it puts
you in the driver's seat. If you like to speed
along, then great. You click the speed button. You can up the speed, and
you can make them go faster. If you're like, No, I
need to take my time. You can actually
even slow them down. You can speed them up. You can slow them down. You can stop and start the videos. You make it the best
experience possible for you, personalized to you,
which I really love that. Also, I would really love for you to take more
classes with me, and I have lots of fall ideas that are
already on Skillshare, along with upcoming
Halloween and Christmas, lots of Christmas classes. All you need to do is to go to this bar at the top of the page and type in my
name Carrie Sanders. And all the classes I have on Skillshare are almost
50 of them now. You we'll populate,
and you can take a look and see if something
else is of interest to you. And if you wouldn't
mind clicking this button and just follow me, that means you just get
a little notification whenever I put out a new class. And this is the time
of year that I love to push out some classes because
holiday is my favorite. I'm a grandmother to 12, and I love holidays. So come do some holiday
celebrations with me. I would love to
have you join me. If you would like
to take this class, then let's go ahead and get into the next video and
get started together.
2. Supplies & Pattern: Et's do a quick review of the supplies that
I'll be using today. I'm going to be using a transfer paper that
is water soluble. It's made by trace
down or Frisk, and you can get
it online easily. It's a little bit
pricey, sorry, guys, but you can reuse it over and
over and over many times. So I'm using gray for
my transfer paper. Also, I'll be using
Strathmore tracing paper. You can use any tracing paper
that you have, of course. And I've provided the
pattern for you so you can trace it onto a
piece of tracing paper. Or, of course, you can sketch it directly onto your
watercolor paper. Today, I'm using 300 pound, 100% cotton watercolor paper. At the minimum, I would
recommend using 140 pound. I'm just using a
very heavy weight today for demonstration
purposes. But don't go lower
than 140 pound. Guys, invest in some
good watercolor paper so that you have a great result. Also, I'll be using my
handy dandy tissue. If you've painted with
me before, you know, this is one of my
favorite tools to use, and I just have it broken
down into sections, so it's ready to go. Of course, you need
some clean water. You'll need your palette handy, a spray bottle to
keep your paints wet. And let's go ahead and review the paint and our brushes now. See the magic of video
all of a sudden, W. Tsappears. Alright, guys. So here are the
colors that we're going to be using today. We'll start with Traverte
and this is made by Holbein. I have in my palette three different Traverte tubes
of three different makers, and they're all
beautiful colors. But today, I'll be using
the one by Holbein. Hookers Green by Daniel Smith, Chinese orange by Sinie, Lunar Earth by Daniel Smith. Titanium Buff, Daniel Smith, quinocritan Gold, Daniel
Smith, Burnt Umber, Daniel Smith, Sepia,
Daniel Smith, Naples Yellow, Daniel Smith, and yellow ochre
by Daniel Smith. Also, I will be using this bleedproof white by doctor
Martin. It's my favorite. I prefer this over
white gouache. It does such a beautiful job. It's my favorite. And
this one jar will last an entire year.
I'm not exaggerating. If it starts to dry out,
which it usually does, I just add a few drops of water, and it regenerates beautifully. We will also be doing
lots of inking. And today, I'm going to
be using a Muji MUJI. It's just a fine point pen, and it's my favorite. It is waterproof. So use your favorite. Just make sure it's waterproof. It could be a marker, a
ballpoint pen, whatever. Just make sure it's waterproof so that you're ensuring
you don't make a boboo on your beautiful
watercolor painting. If you decide to do sketching, I just always like to
show my favorite pencil, again, just to expose
you to something new. This is a beautiful
artist pencil. It's made by black wing.
This is a matte finish. I love it because I can
replace the erasers easily, and it erases easily
when I need it to. It just goes on nice and light or as dark as you would like. When you press hard, it's
my very, very favorite. If you need to make an eraser
on your watercolor paper, make sure you're using a
soft kneaded eraser or a soft rubber eraser so that you don't damage the surface
of your watercolor paper. And for brushes today, very limited to go along
with our limited palette. I'll be using a
number six round, a number four round, my
two favorite brushes. Well, actually, this
is one of my favorite. You can see this has
been well loved. And I know I could
go buy a new one, but gosh, I really
like this one. So this is a number one. It's a very fine
script or liner brush. And again, use what
you have, guys. You don't need to go out
and buy a bunch of stuff. Use your favorites, but these
are the ones I'll be using. And for the background, I'll be using this larger round.
It's a number ten. And you could use a mop brush
or something large as well. You just want
something that holds a lot of paint, a lot of water, and also gives you the ability to see
this fine tip on it, it gives you the ability to
work around our pattern. So go ahead and gather
all your supplies, and let's get started. Alright, I have provided for you a pattern if you would like, and you can trace that onto
just some tracing paper. And then I'm going to be using some water soluble
graphite paper, and you just slide that
underneath your pattern onto your watercolor
paper. Like so. And then you can just
trace your pattern, and it's going to appear
onto your watercolor paper. And like I said, this particular graphite
paper is water soluble, so the lines totally disappear. Or, of course, you could
always use a pencil and sketch your design on if
you would like to do that. But go ahead and
apply your pattern. I'll see you in the next video. And we'll get started painting.
3. Wash In Pumpkins: We're gonna start by doing
a wash of naples yellow, and just quickly lay that in. A wash is all one color. We're gonna do a light value. I'm not going over the pumpkin. Just going around it for now. And I'm leaving it quite wet because we want to come
in with another color. I'm going to come in now
with some yellow ochre, and I'm just going to
apply that here and there, but mostly around the pumpkins. And the background, of
course, is quite wet. So this is a wet
on wet technique. It will blend itself as that yellow ochre
touches the other color. Just put it in quickly
and let it do its thing. And this is a total
personal preference, guys. Put in as much or as
little as you'd like. Now, I'm rinsing out my brush. It's just water on my brush. Just go to smooth
a little bit here. Nice. And you could
even take a little bit on I'm gonna get a little thicker coating
on the tip of my brush. And while it's wet,
I'm going to just drip in a few splatters. And because it's wet,
it's gonna spread, but it adds a nice, interesting
background. Super fun. Okay, and I'm just going to touch a little
bit here and there. This will blend right
in with our pumpkins, so it doesn't
matter a whole lot. Alright, let's keep going. Let's come back to
our Naples. Yeah. We'll apply that.
Just a nice wash of naples yellow on
the bottom portion. It's so nice sometimes
to get rid of this white canvas,
this white background. Warms things up and helps get our creative
juices going so we can decide what colors to use and how much shading to apply. Okay, so I'm just going to stop here with this bottom edge. And I'm gonna pick up some of this beautiful yellow ochre. And again, come in a little
deeper around the pumpkins. Especially since this
is the bottom edge. I may even come in
darker later on. A more of a shadow effect. Ooh, yeah. Go. Alright, I'm gonna splatter a little
bit down here, too. I think I splattered
my face. Oh, gosh. That's called getting
into your work when you splatter your face. Alright, let's pick
up a little more of our light naples yellow, and finish off this side edge. If you can't laugh at yourself, who can you laugh at, right? I learned that years ago. Makes life better. Okay,
picking up some yellow ochre, adding a few sprinkles here. Alright, I'm just gonna gently lift those
off the pumpkin. We'll actually end up doing
some on the pumpkins, but we'll keep it clean for now. How's that? All right. Let's go ahead and let that dry, and then we'll start
on our pumpkins. Okay, we're gonna start with
this big one in the back, and we're going to just do
a light wash of tera verte. And, um, we're literally
going to wash it in lightly. I'm going around the stems, I'm going around the
pumpkins in front of it. Again, I waited until
my background was dry. Otherwise, if you touch it, it's gonna bloom out
into your background. Great. Now, while it's still wet, I'm just using
water on my brush, and I'm gonna lift
off a little bit of a highlight where it would be the shiniest, you
know, on a pumpkin. Clean out your brush
if you need to. Just lift out that highlight. Just on that top portion where it would shine and the
light would catch it. Just to help emphasize. Alright. So if your paint goes and you
don't want it to be there, then just use a wood brush and touch it with your
tissue, and it lifts it out. Alright. Great.
Let's let that dry. Actually, while that's drying, let's go ahead and
do the same thing with the pumpkin in front of it. We'll just be careful
to not touch that one. And so let's come into our Chinese orange and wash
that down, adding water. Oh, I love this color. Alright, I'm gonna just not touch that green 'cause
everything's wet. Put it in there pretty quickly. We're just doing a
wash all one value. And then same thing,
clean out your brush, use some tissue,
have it handy here, and we're just going to
lift out a little highlight on each section of that pumpkin. Go with the curvature
of the pumpkin. Always follow that
same curvature of whatever you're painting. Nice. Okay, let's let that dry. Alright, let's go ahead and
wash in our third pumpkin. This is buff titanium. Same thing. Just gonna
come in nice and light. If you haven't used buff
titanium very much, I highly recommend you become good friends
with this color. It is such a great mixing color. If you're ever
looking to mix with blues or lavender or pinks, I just tones it down, makes it look kind of
Victorian, kind of antique. It just softens the
color and gives it such a beautiful, subtle look. And so I hope you enjoy
working with it today. I know it's one of my favorites. Okay. Now, you know
the drill by now. We're going to go
ahead and lift off. We're just gonna have water
on our brush and lift off that little highlight. Great. Now, we want to make
sure everything is completely dry before we
move on from this point. I may use my hair dryer.
4. Shade Pumpkins: H Okay, I've added Hooker's
green to my palette, and I'm using a number six, and we're going to just add
some shading in the crevices. Follow that line up. I'm going to add it to
the outer line as well. And then I'm just going
to pick up water soften that edge a little bit. This is where your paper
does the work for you. The paper and the water. It's
just going to blend nicely. I'm gonna put a little
shadow behind that stem. Rinse out your brush
when you need to. And I'm just gonna try and hang on to that little
bit of a highlight there. Now, remember,
it's all gonna dry one value lighter
than when it's wet. So keep that in
mind. Oh, beautiful. Okay, let's go the next. Pouring up that crevas there. And also keep in mind, guys, we are going to come
in with our ink and add some fun details to it. So be kind to yourself. Don't be too upset
if you have a streak or a line or something that's a little bit off because
ink is very forgiving. And so you should be
forgiving, as well. Just have some fun
and relax with this. Good. I'm gonna leave
that light area. I like the way it's
a strong highlight. Then let's keep going. I'm sorry if you
can hear the rain. It's decided to just
pour rain on us today. Hopefully, my mic isn't
picking it up too much. Okay, now, this one is kind of our focal point,
this round piece. So I'm just being careful to round it
off nicely at the top. I bring it down a bit. I'll come around this
pumpkin down here. I'm gonna thicken that up. Good. Now, let's
just get water on our brush and soften that edge. So when you're doing
shadows and shading, if you have a straight line like architecture or something, you'll do a lot of hard edges
like that, right there. But when we're doing
a round edge or an object that you need
a softer rounding look, then that's when you come in
with water and soften that, and it helps it look
round or curved. So that's why hard edges
and soft edges are quite different
but very important each in their own way when
you're doing watercolor. Okay, again, I'm gonna
leave a nice highlight. I just want to soften it right there. Oh,
yeah, like that. Okay. And this next section, this area is all
gonna be shaded, and this is pretty
bright up there. So let's keep that in mind
because it's on an angle. It's behind several pumpkins. So I'm not going to do a
highlight here at all. Now, up here, just the opposite. It's pretty light. Let me get my stem, go around
that stem first. Now that I see where I'm going, I applied very little paint. I have water on my brush now. Notice I'm pressing down. I'm not using the
tippy tip of my brush. I'm pressing down and letting that brush do the work for me. Don't be afraid to press
on those bristles, and you get this
beautiful smoothness. Okay, good job, guys.
Let's come down. Be pretty dark behind this stem and this
pumpkin down here. And I think there's
actually two. Just doing them both
at the same time, I guess. That's fine. That's fine. Alright, now I'm gonna bring some
water in, soften that. Beautiful. Alright, let's do
our last little piece here. Now, did you notice
how I touched and I pressed and I pulled up. So I'm trying to get
that round shape. Great. Oh, it looks so good. How'd you do, guys? Okay, if you can see over here, I've added lunar Earth,
Daniel Smith color. And it's not a bright orange. If you wanted a bright
orange pumpkin, you can switch to other colors, but I wanted this one to be kind of muted tones because
of the color palette overall. So I'm going to be using
this lunar Earth color. Substitute, something
fairly close, but a little bit darker
would be burnt sienna, if you don't have lunar earth. So we're going to follow the same techniques.
Ooh, isn't that pretty? You can see how it's
just it's almost tone on tone with what we
did with our Chinese orange. But it's just a little
bit more earthy, right? It's got a little bit
of brown in there, but just not as dark as burnt
sienna would have been, not as red, not as dark. Okay, so same technique. We're gonna just build
that up a little bit, rinse off, soften that edge. Leave a nice highlight. And this pumpkins
right in front, so it's going to have some
pretty strong highlights. Always be thinking
of your overall composition when
you're painting. This lunar earth is
a little bit grainy, a little granular,
as you can see. That's just the
way the paint is. I like it for some things
and not for others, but I think it's great for an earthy project,
like, like vegetables. I'm going to add a
little more down here. Now, this is going to be this is touching the ground and
it's down on the bottom. So I'm going a little bit darker on the
shading on the bottom here. I might want just the littlest distinction between these two. Alright, keep playing with
this other one over here, but I'm trying to gauge
how deep I want to go. So it kind of helps to get
the one next to it in. Okay, here we go. Now,
this is our center one. It's going to have
a big highlight. Great. Okay. Let's
keep on going. The secret to having
a smooth line like that when you get going on a
curve is to keep on going. Just push right through because if you stop or if you hesitate, you're gonna have
a little jiggle. Now, if you have a little
jiggle in your line, that's okay. Don't sweat it. You know, we can fix it. You can smooth it with water, and also we're gonna
come over it with ink. But, you know, you want to strive to be the
best you can be, obviously, as we practice. So just try to practice by not stopping and
not hesitating. Believe in yourself. Believe that you can
do it and you can. And you will. And then you
won't hesitate in the future. You'll be like, Oh, I
got this. No problem. Also, if you're more comfortable doing your strokes
one way or the other, see how your wrist
turns automatically. If you're more comfortable
one way or the other, turn your piece and just do it your most comfortable position. Make it the best for you. Don't do it one way, just
because I'm doing it one way. Try it the other way
and see if that's better for you. Maybe
you're left handed. I'm right handed,
so see what works. Yeah. Okay. How do you do? Okay, you
ready for our last pumpkin? We're going to be
using some raw sienna and same technique. And if it feels like it's too close to the
background, don't worry. We're not finished
yet. I'm gonna add a little extra
on the bottom, because, again,
it's on the ground. It's in the shadow area. Such a pretty color. Nice gold. Great. That looks good. Okay. Here we go. I'm gonna make this
dark on the bottom. It's hiding behind
this other pumpkin. Definitely in a shadow area. Good. One more. And water. Great. Now, I'm going to add. Mine's a little bit light. I'm gonna add a little
more down here. Step back six feet, take a look at your piece. And if you need to adjust a little bit, go
ahead and do that.
5. Deepen Shading: No. Okay, I have stepped back
six feet and taken a look, and I'm coming in with
my hooker screen. I'm just going to
emphasize a little bit of the shadows just to give it a little more
depth and interest. And you'll have to
determine where you need to add some interest
to yours as well. And you can make these kind
of streaky, if you want. Remember that we're going
to come in with some ink. But it's okay to leave
a little streaking, or you can add some
dots with your brush. I'm using my number four, which is a little bit of
smaller round than we used to actually apply it. Now, I'm following the
contour of the pumpkin, making sure that my
lines are curved. I'm just going to soften
these a little bit. Remember, again, it's gonna dry one value lighter than
what you see here, but I still want just
a hint of texture. Yeah, that just adds
another layer of interest. I like that. But it's
personal preference, so do what you would like to do. See, I like this streaky look. Just softening it
with water a bit. I'm not interfering
with my highlights. If I bring these crevices in, it makes it look more puffy. Don't you agree?
Something to stand out? Yes, you can highlight
it, but also, you need to deepen
the shadow behind it. And that makes it stand out. Great. Now, this
guy, look at this. I just trailed off and
nobody told me I missed it. Okay, there's nobody
in my studio but me. But I can always add it, can I. So here we go. I'm going to add it on both sides. I
don't know how I miss that. I'll have to look
at the pattern. Make sure, put it in
there for you guys. Okay. I'll make it a
little bit darker. I'm gonna soften this edge. Maybe you guys caught it, because I'm gonna fix the
pattern before you get it. Oh. The magic of video. Oh, it's funny. Alright, I'm just gonna deepen this
shadow down here. I just goes to show that we teachers are
just normal people. And you just can't get
upset over little things, 'cause they happen all the
time to everybody. It's okay. This gets me excited to take my grandkids to
the pumpkin Batch. It's opening up in a couple
of weeks here in Utah. Big sunflower see
sunflower field, acres and acres of
beautiful giant sunflowers and pumpkins and hay rides, you know, all the
fun stuff for fall. My little grandkids love. Alright, how did you do, guys? I'm feeling much
better about that one. Let's move down to our orange one and deep in
the shadows there. Okay, here we go. We're just gonna add some of
this lunar earth. Okay. Next one. Hey, this is just
water, socking. Great. How are you doing? And last but not least, here we go. Good. Okay. Let's move over to
our golden umpkin. Oh this is a fun color to work with because
it can go quite dark if you keep glazing
or layering it on. But it's also very transparent. So if you keep it light,
it's just so versatile. I just really love
working with Quin gold. I use it for a lot of
rocks, cliffs, beaches. And then for things
like this where we're just going to be glazing. Glazing is putting layer upon layer and it doesn't have
to be the same color. You could put a different
color on like we're doing. I go pretty dark at the bottom. Good. Okay, let's let that dry completely,
and we'll do our skims.
6. Leaves & Stems: Okay, I've added burnt
umber to the palette, and we're going to wash that in. Again, wash is all one value. Is this gonna give us a
good base to work with. And this is even though I
drew it kind of straight, I'm gonna kind of wiggle my brush and make
it not straight. I'll flip those dry. Okay, I've added
sepia to the palette, and I'm sticking with
my number four around, mostly because it's
my favorite brush. So you can use whatever brush
you want at this point. And we're just gonna
add a little bit of shading to the underside. And notice that I'm just
bringing some across. And then I'll put some
all across the bottom. Great. Okay, coming back to a verte and Hooker's green on our palette we're going to add some leaves. So I'll probably start up here. And I like to do a I
like to do a touch, press, lift, touch, press, probably wiggle a
little bit and lift. And then the other side these are going to
be larger leaves, so something along those lines. Okay? Practice them a few times. But you really can't go
wrong with these guys. Please don't be afraid of them and feel like you're gonna
ruin your peace or something, 'cause you won't,
we're gonna be inking. It's gonna be very forgiving. I'm gonna do one that's kind
of I'm going to go, like, sometimes it helps if I add just a guideline, the
vein, so to speak. So I don't want to
touch wiggle lift. I'm gonna reload a
little bit. There we go. Yeah, I like that. Then
while it's still wet, rinse out my brush a little bit, pick up some
of this darker. The hooker's green and touch. And we'll just see how
when you touch it, it spreads 'cause we're doing
the wet in wet technique. Touching with the tip of my
brush and letting it go. And that automatically
leaves a highlight on one side and the
darker on the other. And when it's dry,
we can come in and add some veins and some vines. So let's do it again
that one so fun. Alright, so coming in
with my terra verte. I'm going to add a
couple over here. I'm going to start
with that vein again. Just give me a little guideline. Touch, press, wiggle,
wiggle, wiggle, lift. Load. Touch, press,
wiggle, wiggle. Lift. Just kind of fill that in. Prince out, pick up
your hooker's green, decide which side
is your darker. Just touch. See how
that just goes. Zoom. Love it. Repeat. I won't come this way, I think. Yeah. So if I were not on camera, I would literally turn my board. So feel free to turn your board. Okay, this one I'm gonna have come over here.
Let's see, maybe. Putting on a little
thicker paint, obviously. Good. Okay, I've
turned my board upside down because I want
to add a couple of leaves down here at the
bottom, probably three or so. And I'll just have
a much better angle if I just turn it upside down. Don't fight it. I think
I'll put one there. And maybe this one
almost straight, and that one kind of that way. Okay, let's do it. Mm. Now, I know this is not an actual
pumpkin leaf we're doing. If that's important to you, you can pull up a pumpkin leaf. It's very, very large and round loopy,
which is super fun. I've done them before, but I didn't really have room for it. And this is art. Art is what we make of it, so we're doing a creative leaf. Oh there. Okay, I'm mixing my
two browns together, the burnt umber and the sepia. And I've switched
to a liner brush, a well loved liner brush. I'm attached to it. I can't
give it away just yet. I can't throw it away just
yet. I love it too much. Okay, so I'm just going to
add a little bit of design, go to add a little
curlicue on the end. So this is just like
a petal stroke. It's a touch press lift. And I'm going to create
a little bit of shape. Which we're going to
emphasize when we ink, but I want it to make sense
with our paints, so to speak. Here we go. Let's go ahead and
add some vines to our leaves so they look
like they're attached. Doesn't have to be a big deal. And you don't have to add
very many veins, either. Don't go overboard.
Just kind of let it be. Just that suggestion. Okay, we're going
to go ahead and slatter with this
brown mixture again. Mini is my number four. You decide how much you
want on your pumpkin. I like to splatter it, and then like on
the light pumpkin, I'll just come in
and just touch it. And so it leaves the splatter, but it lightens it
up quite a bit. And then I'll leave it
dark on the perimeter. But that's a personal
preference for me. So you do what you like. Alright, let's let this
dry and come back with our
7. Inking Part 1: And we are ready to add some fun personality to this piece, doing some inking. I'm going to be using
one of my favorite pens. This is a Muji MUJI. It is waterproof, so I don't
have to worry about going in afterward if I want
to add something to it. But you use what you
would like to do, and we're going to
just go for it. I will probably speed
up the camera here and there because it
gets kind of boring watching someone ink. But I like to just get in the zone and see where it flows. So I keep it nice and loose. I don't stick exactly
to the lines, as you'll see, but just kind of do what feels fun and
flowy. So here we go. A I'm a little bit careful when I
do these scrolls. We're gonna be doing some
of these fun scrolls just because I like
a nice smooth line. But you'll be
getting pretty good at these by the time
we're finished here. But I'm just going to
do one essentially and just kind of get into
the groove here, get a feel for things. And it helps spatially, helps me kind of visualize. Let me go ahead and move
on to the stems now. A couple of those poke out. We'll play with those
a little bit more. I'm going to just go ahead and notice I'm going
with the contour. It's kind of a twisted stem, so just go with the
lines that we painted in and with the movement
that you want to see. Let's go ahead and get
the basic lines in. Again, I'm not going to stick exactly to the line
that we painted, and I'm going to do
kind of a broken line just to have relaxed movement. Good. Now, I'm gonna have a double line just
because I like it. I think it makes it dance
a little bit on the page. Great. Okay, how are you doing so far?
8. Inking Part 2: Now, you absolutely could
stop at this point. You could call it done. It looks beautiful and sign
your name, be done. But I'm going to take
it to the next level with some extra fun, cutesi kind of inking. And so if you'd like
to keep going with me, then let's go. Let's go. Alright, so I'm
just going to keep adding on to some
of these scrolls. Add as many or as
few as you want. Sometimes I add a little
line here and there, like that. Or some dots. And also, you could add a double line on your
leaves, all or part. Sometimes just a little
line that stops is great, too. Just have fun with it. Okay. Alright, step back, take a look and see if you
feel comfortable with that. We may add some more
fun little things. Well, that feels good for now. I'm gonna come over
here to the stem. Alright. Now, I mean, I had just
a few contour lines just to emphasize
the little twist. They follow the contour of the stem just to make it
look twisted and shaded. And I'm gonna do
some other way, too. Great. Okay. Let's
do some over here. I hope this is relaxing for you, 'cause there's really no
wrong way to do this. Just have fun. Take a deep
breath, enjoy the process. I'm gonna take this all
the way across here. And I'm gonna bring
some up the stem. Good. Okay. And something
that I like to do on my stems is just add
a bit of a scroll, so I'm bringing it
round round round. And if you want, you can
bring it down like that. Maybe I'll bring one over here. Great. Isn't this
fun? It's starting to have a lot of personality,
a life come to it. I think I'll add some
over here as well. Maybe just a line and some dots. Yeah, let's add some over
here, too, should we? Okay. Let's step back and
look at it from a distance. Okay, I'm feeling almost there. I want to add just a little bit. I think a leaf, but not painted, just to kind of add
to the texture. Yeah, I like that. I'm
gonna add another. I'm gonna add a couple
more, I think, actually. So if you feel like it, do it. Mm hmm. Yep, I feel like that balanced
out the bottom there. Okay, let's step
back one more time. Alright, here's another
point where you could stop and be
completely finished, and it would be lovely. I am going to go ahead and
add some contour lines down here just on the bottom
third of these pumpkins. And in order to make sure that
I get that done correctly, I'm going to actually
turn my board sideways. Let me check the camera. So if you'd like to do this
portion with me, come on board. Here we go. The key to this is to
make sure that you do your lines curved
and consistent. So once you get
going, don't stop. It's kind of one of those deals where
you just keep going. So these are contour lines. You notice that they're
curve because we want each section to look
like it's rounded. So as I get up a
little bit further, I make them further apart. So closer together
at the bottom, keeps makes it more shaded. Yeah. So I'm just going to
add a little bit of that. Oh, that's pretty cute. This is a darker paint, so I'm probably not gonna
need as many lines to accomplish the same thing. Oh, I like that. I'm going to turn
this just a tad. There we go. This
one's pretty light since it's on top
and it's so big. I'm mostly gonna keep
the lines on the bottom. All right. Now, if you want, you can add a little
more contour line drawing on just
that bottom edge. And notice they're curved. You're following the
curvature of your pumpkin. So this one we're gonna kind of straighten out in the middle, and then we're going to
curve the other direction. And this goes the
other direction. And I'm just keeping that low because if you bring
it up too high, it's just gonna be way too much. In my opinion, you do you, but we have a lot of
ink going on already. I was in the middle
of filming this. I actually had to stop
for a number of hours because we had a tornado
a tornado warning, and a small tornado
actually touched ground, which is so unusual
for us in Utah. That was a little
bit frightening. And my yard's pretty torn
up, but that's okay. I'll get it taken care of
and we're back painting. Alright, that looks lovely. I think we're good. H
9. Highlights & Sign: The last thing we're
going to do before we sign our name is you can take a little bit of white
and using a flat brush. So I just picked
some of this up. I'm gonna wipe 99% of it off
so that we have a dry brush. And I'm just going to pat on a little bit of
an extra highlight. This is dry brushing. Just jih it up a little bit. Not too much, but especially
on this lighter pumpkin, it's kind of fun to have
a bright spot or two. See how that just adds a
little bit of ling ling. Um, I might do it
on this green one. Yeah, I like that. Now, this white also
dries one value lighter. So keep that in mind.
Add a little bit. Make sure you follow the
contour, so you're curving it. And just a touch up on this one little
bright spot. Love it. Yeah. And you could on this. I might try a little,
but honestly, I don't want it to be too bright because it's a muted color. So I don't want white to be I don't want white to
just, like, stand out. Okay. And if you
would like, you can add little highlights
here and there. I'm really liking these leaves that we didn't paint
in. Those are fun. I think it's time to remove
our tape and sign our name. Okay, guys, we've stepped
back six feet taking a look. I think we are finished here. I am so proud of you for
completing this piece, and I hope you enjoyed it. I hope it was a great
experience for you and you sharpened your skills and even perhaps learned
something new. We're gonna go ahead
and sign our name. As always sign your
name and claim your artwork and be happy and
proud of what you've done. And I am very proud of you. So let's go ahead and
sign our name together. Okay, I will see you in the next video where
we will wrap up.
10. Class Project: Mm. Your class project is to complete a pumpkin patch
with watercolor and ink. And when you finished,
if you could take a moment to
share that with us, all you need to do
is take your camera and snap a pick and then
look for this button on this page of Skillshare
and upload it so that we can share with one another and pat each
other on the back. And we can give
that little heart a click and say, great job. You know, one thing I've found
as artists over the years, we just don't get enough
appreciation for our artwork, and yet we all love
each other's work, and we can all appreciate
how hard it was to do that one feature or how much work went
into that technique. And so let's take a moment to
show appreciation and love. No judgment. Nothing
but love, guys. So take a moment snap a pick, upload it into our
project gallery, and let's show the
love for one another.
11. Congratulations & Bloopers: Well, congratulations, guys. You finished your art piece. I'm so happy that you
took this class with me. I hope that it was a good experience for
you, and, you know, if it was, would you mind
sharing it with someone? All you need to do is
look for this button, and that gives you the
link to this class, and you can send it to them, and then they can have a
great experience also. If you felt like you would like to take some
more of my classes, I would love to spend
more time with you. And all you need to do
is to go to the top of this page and type my name Carrie Sanders in
the search bar. And then all the classes
that I have here on Skillshare will populate, and you can just take a
quick glance through that and see if something else
looks of interest to you, and we could spend more time together, that would be awesome. Also, if you would like to see
some of my future classes, and oh, I have some
fun holiday classes coming out this year. All you need to do is click this button,
the follow button, and you'll just get
a little ping and a little notification when a new class comes out this fall. I would love to
have you follow me. I would love to spend
more time with you. If you'd like to take a look at some of my things
that I do, you know, the world of Cary Sanders when I'm not here on Skillshare, then you can find me
at Sanders art.com. Also, I'm on Instagram
and Facebook, and I developed a new
How to paint app. It's called the Joyful
Watercolor App. It shows you how to paint, whether you're a beginner or advanced from beginning to end. Lots of video projects there. And here's the link
to my watercolor app. I would love to have you
join me there as well. Okay, everybody, I guess
it's time for Bloopers? I don't know why
I share bloopers. I guess if you can't laugh at yourself, who can you laugh at? So Alright, thank
you for joining me. I'll see you next time. I hope that it was a
pleasant experience, and that the videos
I'm blabbering. I hope, I hope. I hope. I hope. Oh, boy, do I hope.
Oh, my gosh. Okay. I also have my own app. If you'd like to find
me, you can see me online to Was it? B, speed it up. Well, congratulations. You did it. I'm so
glad you joined. Oh. Oh. Let me just
throw in your face. I'm so glad you joined me. Step back six feet. It's not safe to be next to me.
 Kerrie Sanders, Artist, Teacher, Creator.